Thighs back, buttocks in (with two helpers) 2 helpers€¦ · Thighs back, buttocks in (with two...
12
27 Tadasana Variation 7 Thighs back, buttocks in (with two helpers) This variation produces a similar effect to the previous one but with a different method. Stand in Tadasana and have one helper stand behind and the other in front of you. The front helper wraps a belt around the middle of your buttocks; the rear helper wraps a belt around your frontal upper thighs. Then the rear helper pulls the front thighs backward, while the front helper pulls the mid buttocks forward. These two opposite pulls should be balanced. Props 2 ropes or belts, 2 helpers Props for Yoga / Chapter 1 / Tadasana Lift the lower ribs high above the abdomen and broaden the chest. T i p s Effects tThe pull of the two ropes clarifies the simultaneous actions of the upper legs and the pelvis. When the pelvis finds its correct vertical alignment and is held stable, the abdomen is drawn towards the spine without tension in the abdomen muscles. The pose immediately feels taller, lighter and effortless. Extend the skin of the soles from the arches toward the heels and stamp the heels down. Lift the front thigh muscles and move them back, closer to the bone. Looking from the side, the hip joint should be just above the ankle joint. Experience the effect of these actions with helpers and then try to recreate it on your own.
Transcript of Thighs back, buttocks in (with two helpers) 2 helpers€¦ · Thighs back, buttocks in (with two...

27
TadasanaVariation 7
Thighs back, buttocks in (with two helpers)
This variation produces a similar effect to the previous one but with a different method.
Stand in Tadasana and have one helper stand behind and the other in front of you.
The front helper wraps a belt around the middle of your buttocks; the rear helper wraps a belt around your frontal upper thighs.
Then the rear helper pulls the front thighs backward, while the front helper pulls the mid buttocks forward.
These two opposite pulls should be balanced.
P r o p s 2 ropes
or belts,
2 helpers
Props for Yoga / Chapter 1 / Tadasana
Lift the lower ribs high above the abdomen and broaden the chest.
T i p s E f f e c t s tThe pull of the two ropes clarifies the simultaneous actions of the upper legs and the pelvis. When the pelvis finds its correct vertical alignment and is held stable, the abdomen is drawn towards the spine without tension in the abdomen muscles. The pose immediately feels taller, lighter and effortless.
Extend the skin of the soles from the arches toward the heels and stamp the heels down.
Lift the front thigh muscles and move them back, closer to the bone.
Looking from the side, the hip joint should be just above the ankle joint.
Experience the effect of these actions with helpers and then try to recreate it on your own.

52
Adho Mukha SvanasanaVariation 5
Sit ting on “the dog”
Props for Yoga / Chapter 1 / Adho Mukha Svanasana
In this variation the student is doing the pose while the partner sits on his sacrum.
N o t e : This variation and the following one can be done only when the student is already capable of stretching the lower back sufficiently to form a triangular pelvis (not a “rounded hill”). The partner should match the student in size and flexibility and preferably be of the same gender.
After the student has entered the pose with palms against the wall:
Stand facing the wall, with spread legs, the student’s torso between your legs.
Position your buttocks on the student’s sacrum and sit on it gently. Spread your feet on the wall for stability.
Push the wall with your feet so as to move the student’s sacrum away from the wall and his/her heels down to the floor.
N o t e : In the photo the helper uses a wall rope. This is convenient but not mandatory.
E f f e c t s The partner’s push shifts the student’s weight towards the legs. The weight on the arms is diminished and the spine gets a good stretch. This variation lengthens the calf muscles and the Achilles’ tendons, thus helping to lower the heels to the floor.

59
Adho Mukha SvanasanaContinue - Variation 12
Pulling the trapezius
Props for Yoga / Chapter 1 / Adho Mukha Svanasana
E f f e c t s The trapezius pull releases the neck and creates space in the shoulder area. It also shifts load from the arms to the legs.
Earlier in this chapter (see Variation 12 of Tadasana on page xxx) we explained how to place a rope on the shoulder girdle and hook a belt in order to get trapezius traction. The same can be done in Adho Mukha Svanasana.
Arrange the rope (or the belt) as explained in Tadasana.
Enter the pose and have a partner pull the rope for you .
If no helper is available, it is possible to use a wall hook for this purpose .
P r o p s belt or rope,
par tner

75
P r o p s belt
UttanasanaVariation 4
Standing on a slanted sur face
Props for Yoga / Chapter 1 / Uttanasana
Do Uttanasana on an inverted chair such that the toe mounds are higher than the heels.
Grasp the sides of the backrest and pull the trunk down.
N o t e : You can create a slanted surface from any board, e.g. a wooden door wing, by placing one end on a higher base. For best results – the board should not be too wide, so that one can grasp its edges in order to pull the trunk down.
E f f e c t s The slope creates a sharp angle between the shins and the feet, hence increase the stretch in the calf muscles (the Gastrocnemius). This action also develops the feet arches.
P r o p s chair

77
P r o p s belt
UttanasanaVariation 6
Belt around feet and pelvis
Props for Yoga / Chapter 1 / Uttanasana
Enter the pose and loop a belt around the heels and the pelvis.
Bend your knees slightly and tighten the belt .
Now, slowly lift the buttocks and straighten the legs against the resistance of the belt .
Adjust the length of the belt until you feel its resistance when straightening the legs.
Spread the inner legs out to stretch the belt. Lift the inner ankles, the inner knees and hit the inner thighs out.
Concave the back, place your palms on blocks and look forward .
Now, maintaining the length in the front body, bend down into the pose .
To move the sacrum further in, place a rolled bandage between the belt and the sacrum .
E f f e c t s The belt presses the legs and creates compactness in the legs and the pelvis. The sacrum bone and the femur heads are drawn into the pelvis. This stimulates the organs of the pelvis, including the reproductive organs. The bones of the legs work against resistance which is beneficial for preserving bone density.
P r o p s belt (one long or t wo buckled
together to create one long),
2 blocks, bandage (optional)

78
UttanasanaVariation 7
Folding the body with a belt
Props for Yoga / Chapter 1 / Uttanasana
This is an advanced variation for flexible people who wish to bend deeper into the pose.
Place a chair about one meter (3 feet) away from the wall.
Lean with your buttocks on the wall and bend forward with bent knees.
Bring the trunk as close as possible to the legs and tighten a belt around the central back and the legs .
Now lift the buttocks along the wall to straighten the legs.
Move the trunk away from the wall, concave the back, look forward and place your palms on the chair.
Extend the chest forward and move the thoracic dorsal spine deep in .
After creating length in the front trunk bend down, bring the waist close to the inner thighs, hold the ankles and fold the body deep into the pose while the buttocks move away from the wall .
P r o p s belt,
wall,
chair or stool
E f f e c t s The first stage () teaches to move the thoracic dorsal spine into the body and to concave the back. When staying in the pose (), the belt holds the torso in place; one can thus relax the arms, legs and back muscles while still maintaining the deep forward extension.

87
P r o p s belt
Utthita TrikonasanaVariation 4
Belt pulling the lef t leg
Props for Yoga / Chapter 1 / Utthita Trikonasana
Another way of activating the back leg is by pulling it with a belt attached to it. Three optional anchoring positions are demonstrated below: the arch of the foot , above the knee and the groin .
To do the pose on the right side:
Tighten the belt around the desired location on the left leg. When anchoring the knee or the thigh, the direction of the buckle should be such that when the belt is pulled it will induce outward rotation of the leg.
Pull the belt with your left hand and enter the pose.
E f f e c t s The above three variations increase the awareness in the back leg and help to keep it stable. Anchoring the knee helps to turn and create space in the knee, while anchoring at the groin lifts and opens the inner groin. This variation is also effective for opening and turning the chest, since the pull of the belt with the left hand helps to turn the chest.
P r o p s belt
A p p l i c a b i l i t y The belt here induces outward rotation of the back leg and thus helpful for many lateral standing poses, e.g. Utthita Parsvakonasana, Virabhadrasana II, and Ardha Chandrasana. For poses like Virabhadrasana I, the belt should be placed in the other direction, so as to induce inward rotation of the back leg when pulled.

102
E f f e c t s The belt anchors the right hip in place, helping with the extension of the lower side of the trunk as well as its rotation.
P r o p s belt, par tner
Utthita Trikonasana Variation 15a
Pulling the front groin of the front leg
When bending to the right side, the front groin of the right leg should move deep in.
To do the pose to the right (instructions are given for the helper):
Stand on the left side of the practitioner and place an open belt around his/her pelvis.
Hold the two ends of the belt and gently pull it while the practitioner goes into the pose.
Pull the right side of the belt slightly stronger in order to help the practitioner turn the right thigh out and take the right hip joint in.
Props for Yoga / Chapter 1 / Utthita Trikonasana
A partner can help to induce the correct movement. Here are two ways to do that:

107
P r o p s chair
Utthita TrikonasanaVariation 19
Using a chair
Props for Yoga / Chapter 1 / Utthita Trikonasana
A chair can be used to support and align the pose as shown in the photo (see “A Chair for Yoga” for more details):
E f f e c t s The chair supports the pose enabling longer stay. Catching the backrest helps to roll the top shoulder back. The chair also provides a reference line for checking the alignment of the body.
A p p l i c a b i l i t y All lateral and twisting standing poses

109
E f f e c t s stretching the arms behind the back moves the shoulders back and thus helps to open the chest.
Utthita TrikonasanaVariation 21
Arms behind the back
Props for Yoga / Chapter 1 / Utthita Trikonasana
In classic Utthita Trikonasana the arms are stretched along the same plane as the body. Interlocking the arms or the fingers behind the back moves the shoulders back. Photos - show different ways of interlocking the arms.
P r o p s block
After staying in the pose for a few moments with arms behind the back, change to the regular arm position while retaining the openness in the shoulders and in the chest.
T i p s
A p p l i c a b i l i t y All standing poses.
113
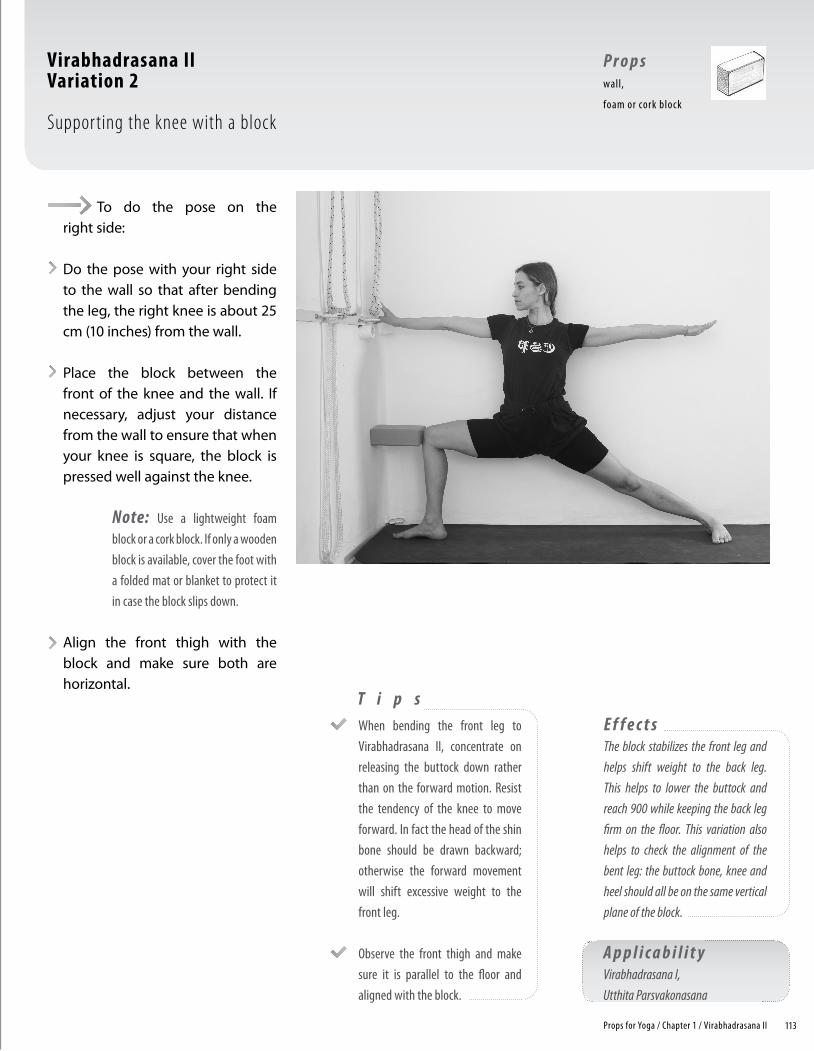
To do the pose on the right side:
Do the pose with your right side to the wall so that after bending the leg, the right knee is about 25 cm (10 inches) from the wall.
Place the block between the front of the knee and the wall. If necessary, adjust your distance from the wall to ensure that when your knee is square, the block is pressed well against the knee.
Note: Use a lightweight foam block or a cork block. If only a wooden block is available, cover the foot with a folded mat or blanket to protect it in case the block slips down.
Align the front thigh with the block and make sure both are horizontal.
A p p l i c a b i l i t y Virabhadrasana I, Utthita Parsvakonasana
E f f e c t s The block stabilizes the front leg and helps shift weight to the back leg. This helps to lower the buttock and reach 900 while keeping the back leg firm on the floor. This variation also helps to check the alignment of the bent leg: the buttock bone, knee and heel should all be on the same vertical plane of the block.
Virabhadrasana IIVariation 2
Supporting the knee with a block
Props for Yoga / Chapter 1 / Virabhadrasana II
P r o p s wall,
foam or cork block
When bending the front leg to Virabhadrasana II, concentrate on releasing the buttock down rather than on the forward motion. Resist the tendency of the knee to move forward. In fact the head of the shin bone should be drawn backward; otherwise the forward movement will shift excessive weight to the front leg.
Observe the front thigh and make sure it is parallel to the floor and aligned with the block.
T i p s

155
Spread the legs to the required distance and loop a belt around both feet (most people need a long belt for this).
Tighten the belt and work the feet against its resistance. Press down the outer feet.
Bend into the pose while keeping the same leg action .
The belt can also be looped from feet to top of the pelvis:
Enter the first stage of the pose (the concave back phase).
Loop the belt around the feet and the sacral band; slightly bend the knees and tighten the belt .
Then straighten the knees against the resistance of the belt. Bend down to place the head on the floor .
A bandage or rolled mat can be placed between the belt and the sacrum.
Props for Yoga / Chapter 1 / Prasarita Padottanasana
Prasarita PadottanasanaVariation 3
Anchoring the legs with a belt
E f f e c t s The belt makes it easier to press the outer feet to the floor. It provides compactness, activates the legs and resists the tendency of the feet to slide outward.
The variation with the belt around sacrum creates a triangular framework for the legs, so it also helps to draw the femur heads and the sacrum into the pelvis. Working against the belt helps to lift the inner thighs and groins.
P r o p s long belt
(or t wo connec ted belts)