There is no time for peace. No respite. No forgiveness ...
123
There is no time for peace. No respite. No forgiveness. There is only WAR. ™ w ww ww w. . g ga am me es s - - w wo or r k ks s h ho op p. . c co om m TM WARHAMMER 40,000 WARHAMMER 40,000 Condensed Rule book PRODUCT CODE 60010199005 www.games-workshop.com Printed in China ENGLISH
Transcript of There is no time for peace. No respite. No forgiveness ...

There is no time for peace.
No respite.
No forgiveness.
There is only WAR.
™
wwwwww..ggaammeess--wwoorrkksshhoopp..ccoomm
TM
WARH
AM
MER 40,000
WARHAMMER 40,000Condensed Rule book
PRODUCT CODE 60010199005
www.games-workshop.comPrinted in China
ENGLISH
For more than a hundred centuries the Emperor has satimmobile on the Golden Throne of Earth. He is theMaster of Mankind by the will of the gods and master
of a million worlds by the might of his inexhaustible armies.He is a rotting carcass writhing invisibly with power from theDark Age of Technology. He is the Carrion Lord of theImperium, for whom a thousand souls die every day, forwhom blood is drunk and flesh eaten. Human blood andhuman flesh – the stuff of which the Imperium is made.
To be a man in such times is to be one amongst untoldbillions. It is to live in the cruellest and most bloody regimeimaginable. This is the tale of those times.
It is a universe you can live today – if you dare – for thisis a dark and terrible era where you will find little comfortor hope. If you want to take part in the adventure then prepareyourself now. Forget the power of technology, science andcommon humanity. Forget the promise of progress andunderstanding, for there is no peace amongst the stars, only an eternity of carnage and slaughter and the laughter ofthirsting gods.
But the universe is a big place and, whatever happens, you willnot be missed…
™
There is no time for peace.
No respite.
No forgiveness.
There is only WAR.
™


INTRODUCTION . . . . . . . . . .iiiFIGHTING A BATTLE . . . . . . . . . .ivSize of game . . . . . . . . . . . . . . . . . .iv
THE RULES . . . . . . . . . . . . . . . .1DICE . . . . . . . . . . . . . . . . . . . . . . .2
MODELS & UNITS . . . . . . . . . . . . .3Measuring distances . . . . . . . . . . . . . .3
Unit types . . . . . . . . . . . . . . . . . . . . . .4
CHARACTERISTICS . . . . . . . . . . . .6
THE TURN . . . . . . . . . . . . . . . . . .9
THE MOVEMENT PHASE . . . . . .11Movement distance . . . . . . . . . . . . . .11
Unit coherency . . . . . . . . . . . . . . . . .12
Terrain . . . . . . . . . . . . . . . . . . . . . . . .13
THE SHOOTING PHASE . . . . . . .15Disallowed shooting . . . . . . . . . . . . .15
Run! . . . . . . . . . . . . . . . . . . . . . . . . .16
Check line of sight & pick a target . .16
Check range . . . . . . . . . . . . . . . . . .17
Roll to hit . . . . . . . . . . . . . . . . . . . .17
Roll to wound . . . . . . . . . . . . . . . . .19
Take saving throws . . . . . . . . . . . . .20
Cover . . . . . . . . . . . . . . . . . . . . . . .21
Going to ground . . . . . . . . . . . . . . .24
Remove casualties . . . . . . . . . . . . . .24
Complex units . . . . . . . . . . . . . . . . . .25
Multiple-wound models . . . . . . . . . .26
WEAPONS . . . . . . . . . . . . . . . . .27Weapon types . . . . . . . . . . . . . . . . . .28
Template . . . . . . . . . . . . . . . . . . . . . .29
Blast . . . . . . . . . . . . . . . . . . . . . . . . .30
Pinning . . . . . . . . . . . . . . . . . . . . . . .31
Gets hot! . . . . . . . . . . . . . . . . . . . . .31
Twin-linked . . . . . . . . . . . . . . . . . . . .31
Rending . . . . . . . . . . . . . . . . . . . . . . .31
Sniper . . . . . . . . . . . . . . . . . . . . . . . .31
Barrage . . . . . . . . . . . . . . . . . . . . . . .32
Melta . . . . . . . . . . . . . . . . . . . . . . . .32
Lance . . . . . . . . . . . . . . . . . . . . . . . .32
THE ASSAULT PHASE . . . . . . . . .33Declare assaults . . . . . . . . . . . . . . . . .33
Disallowed assaults . . . . . . . . . . . . . .33
Move assaulting units . . . . . . . . . . . .34
Defenders react . . . . . . . . . . . . . . . . .34
Fighting a close combat . . . . . . . . . .34
Assaulting through cover . . . . . . . . . .36
Grenades . . . . . . . . . . . . . . . . . . . . . .36
Determine assault results . . . . . . . . . .39
Check morale . . . . . . . . . . . . . . . . . .39
Sweeping advances . . . . . . . . . . . . .40
Pile-in! . . . . . . . . . . . . . . . . . . . . . . . .40
Consolidation . . . . . . . . . . . . . . . . . .40
Shooting into &
out of close combat . . . . . . . . . . . . .40
Multiple combats . . . . . . . . . . . . . . .41
Close combat weapons . . . . . . . . . . .42
MORALE . . . . . . . . . . . . . . . . . . .43Morale checks . . . . . . . . . . . . . . . . . .43
Fall back! . . . . . . . . . . . . . . . . . . . . .45
Regrouping . . . . . . . . . . . . . . . . . . . .46
CHARACTERS . . . . . . . . . . . . . . .47Independent characters . . . . . . . . . . .47
Independent characters
joining & leaving units . . . . . . . . . . . .48
Special characters . . . . . . . . . . . . . . .49
PSYKERS . . . . . . . . . . . . . . . . . .50Force weapons . . . . . . . . . . . . . . . . .50
UNIT TYPES . . . . . . . . . . . . . . . .51Monstrous creatures . . . . . . . . . . . . .51
Jump infantry . . . . . . . . . . . . . . . . . .52
Jetpacks . . . . . . . . . . . . . . . . . . . . . .52
Bikes . . . . . . . . . . . . . . . . . . . . . . . . .53
Jetbikes . . . . . . . . . . . . . . . . . . . . . . .53
Beasts & cavalry . . . . . . . . . . . . . . . . .54
Artillery . . . . . . . . . . . . . . . . . . . . . . .55
VEHICLES . . . . . . . . . . . . . . . . . .56Vehicle characteristics . . . . . . . . . . . .56
Vehicles & measuring distances . . . . .56
Vehicles and movement . . . . . . . . . . .57
Roads . . . . . . . . . . . . . . . . . . . . . . . .57
Vehicles Shooting . . . . . . . . . . . . . . .58
Shooting at vehicles . . . . . . . . . . . . .60
Vehicle Damage Table . . . . . . . . . . . .61
Vehicles & cover . . . . . . . . . . . . . . . .62
Smoke launchers . . . . . . . . . . . . . . . .62
Grenades . . . . . . . . . . . . . . . . . . . . . .63
Vehicles and assaults . . . . . . . . . . . . .63
Vehicles and morale . . . . . . . . . . . . .63
Units of vehicles – squadrons . . . . . .64
Vehicle types . . . . . . . . . . . . . . . . . . .65
Transport vehicles . . . . . . . . . . . . . . .66
Dedicated transports . . . . . . . . . . . . .67
Tanks . . . . . . . . . . . . . . . . . . . . . . . . .68
Open-topped vehicles . . . . . . . . . . . .70
Fast vehicles . . . . . . . . . . . . . . . . . . .70
Skimmers . . . . . . . . . . . . . . . . . . . . .71
Walkers . . . . . . . . . . . . . . . . . . . . . . .72
Dreadnought close
combat weapons . . . . . . . . . . . . . . . .73
UNIVERSAL SPECIAL RULES . . . .74Counter-attack . . . . . . . . . . . . . . . . .74
Eternal warrior . . . . . . . . . . . . . . . . .74
Fearless . . . . . . . . . . . . . . . . . . . . . . .75
Feel no pain . . . . . . . . . . . . . . . . . . .75
Fleet . . . . . . . . . . . . . . . . . . . . . . . . .75
Furious charge . . . . . . . . . . . . . . . . . .75
Hit & run . . . . . . . . . . . . . . . . . . . . . .75
Infiltrate . . . . . . . . . . . . . . . . . . . . . .75
Move through cover . . . . . . . . . . . . .75
Night vision/acute senses . . . . . . . . . .75
Preferred enemy . . . . . . . . . . . . . . . .75
Rage . . . . . . . . . . . . . . . . . . . . . . . . .76
Relentless . . . . . . . . . . . . . . . . . . . . .76
Scouts . . . . . . . . . . . . . . . . . . . . . . . .76
Slow and purposeful . . . . . . . . . . . . .76
Stealth . . . . . . . . . . . . . . . . . . . . . . . .76
Skilled rider . . . . . . . . . . . . . . . . . . . .76
Stubborn . . . . . . . . . . . . . . . . . . . . . .76
Swarms . . . . . . . . . . . . . . . . . . . . . . .76
Tank hunters . . . . . . . . . . . . . . . . . . .76
Turbo-boosters . . . . . . . . . . . . . . . . .76
Vulnerable to blasts/templates . . . . . .76
BUILDINGS & RUINS . . . . . . . . . .77Defining buildings and ruins . . . . . . .77
Buildings . . . . . . . . . . . . . . . . . . . . . .78
Ruins . . . . . . . . . . . . . . . . . . . . . . . . .82
ORGANISING A BATTLE . . . . . . .86Agree points limit & choose forces . .86
Prepare the battlefield . . . . . . . . . . . .88
Select a mission . . . . . . . . . . . . . . . . .90
Seize Ground . . . . . . . . . . . . . . . . . . .91
Capture & Control . . . . . . . . . . . . . . .91
Annihilation . . . . . . . . . . . . . . . . . . . .91
Deploy forces . . . . . . . . . . . . . . . . . .92
Pitched Battle . . . . . . . . . . . . . . . . . .92
Spearhead . . . . . . . . . . . . . . . . . . . . .93
Dawn of War . . . . . . . . . . . . . . . . . . .93
Mission special rules . . . . . . . . . . . . .94
REFERENCE . . . . . . . . . . . . . . . . .104VICTORY POINTS . . . . . . . . . . . . . .116
QUICK REFERENCE SHEET . . . . . .117
CONTENTS
WARHAMMER 40,000: Introductionii

WARHAMMER 40,000: Introduction iii
Warhammer 40,000 is far, far more than just a game. It isan engrossing and fulfiling pastime that allows you tocollect and paint armies of Citadel miniatures and then usethem to fight tabletop battles.
Warhammer 40,000 is set in a savage future age whereMankind must battle for survival in a galaxy riven bydestruction and bloodshed. It is a time when the power-armoured Space Marines and the uncountable numbers ofthe Imperial Guard must stand against the slavering hordesof alien warriors.
The Warhammer 40,000 game puts you in command of afuturistic army of infantry squads, powerful fightingvehicles, mighty heroes, and even monstrous aliencreatures. These armies of miniatures do battle over yourtabletop, floor, or any area large enough to contain thewarring forces.
You will have realised by now that Warhammer 40,000differs from normal games. There are unlimited possibilitiesand players must be prepared to expend time and effortcollecting, assembling and painting their models andsetting up their battlefields. If all this sounds like hardwork, you’re right – it is! Glory on the battlefields of thefar future is not won lightly.
Creating the magnificent spectacle of a fully painted armyis an accomplishment one can be rightfully proud of. Onceyou’ve taken part in a tightly contested battle betweenwell-painted miniatures raging across fully modelled terrainyou’ll be hooked. And you’ll be joining a community ofthousands upon thousands of gamers across the world. Ifyou are anything like us, you will soon be spendingendless hours thinking about what to collect next,deciding how to paint your latest model, and devisinggame-winning tactics for your next battle.
INTRODUCTIONWelcome to the dark future of Warhammer 40,000.

iv WARHAMMER 40,000: Fighting A Battle
FIGHTING A BATTLE
A Tau Empire force faces a Tyranid swarmon a beautifully modelled battlefield. Eacharmy totals 1,500 points – about right foran evening’s game.
SIZE OF GAMEThe size of a Warhammer 40,000 battle isdetermined by three factors – how many modelsyou have to choose from, how much time youcan dedicate to the battle, and what type ofgame or mission you plan on playing.
Generally speaking, in a small game ofWarhammer 40,000 each player has an army ofbetween 500-1,000 points. To play out a standardmission for a game of this size will take about anhour. Medium-sized matches of between 1,000-2,000 points usually take an evening to finish.Large battles of over 2,000 points can take all dayor even longer.
Very experienced (or plain ambitious) players willeven play matches of enormous size with addedunique mission rules. These massive battles maylast a weekend or longer and will almost certainlyrequire a gaming space where models can be leftstanding over night!
A massive game with 5,000 points perside, played on an extra-large table – an all-day battle!

For your first few games,using a small army willkeep things manageable.This small force iscomposed of a SpaceMarine Chaplain and aTactical squad – roughly250 points-worth.
A multi-playerbash, using 1,000points each. Thewinner gets freedrinks all night!

vi WARHAMMER 40,000: Building An Army

WARHAMMER 40,000: Building An Army vii


Reason begets doubt; doubt begets heresy.
DICEDICE (D6)In a Warhammer 40,000 battle you often need to rolldice to see how the actions of your models turn out –how effective their shooting is, what damage they’vedone to a vehicle, how far they fall back from enemyfire, and so on. Almost all of the dice rolls inWarhammer 40,000 use standard six-sided dice (usuallyreferred to as ‘D6’).
ROLLING A D3In rare circumstances you may be told to roll a D3.Since there’s no such thing as a three-sided dice, usethe following method for determining a score between1 and 3. Roll a D6 and halve the score, rounding up.Thus 1 or 2=1, 3 or 4=2 and 5 or 6=3.
MODIFYING DICE ROLLSSometimes, you may have to modify the result of thedice roll. This is noted as D6 plus or minus a number,such as D6+1 or D6-2. Roll the dice and add orsubtract the number to or from the score to get thefinal result. For example, D6+2 means roll a dice andadd 2 to the score, giving a total of between 3 and 8.
You may also be told to roll a number of dice in onego, which is written as 2D6, 3D6, and so on. Roll theindicated number of dice and add the scores together,so a 2D6 roll is two dice rolled and added together fora score of between 2-12. Another method is tomultiply the score of a dice by a certain amount, suchas D6x5 for a total between 5 and 30. Finally, acombination of methods may be used, such as 3D6-3giving a total of 0-15.
SCATTER DICESome weapons are fairly random in their accuracy andrequire you to roll a scatter dice to determine wheretheir shots land. The scatter dice is marked on foursides with an arrow, and on two sides with a special‘HIT’ symbol. Simply roll the scatter dice near the targetpoint – if an arrow is rolled this shows in whichdirection the shot has deviated. If a HIT symbol is rolledthis means the shot is bang on target. Some weaponsmay scatter automatically, with no chance of a directhit, in which case you will find a small arrow on the HITside to determine the direction.
THE MOST IMPORTANT RULE!Warhammer 40,000 is an involving game, withmany different armies, weapons and possibilities. Ina game of this size and complexity there are boundto be occasions where a particular situation liesoutside these rules, often when unusual modelsinteract. At other times you may know the rule iscovered but you just can’t seem to find the rightpage. Then again you may know the rule, but thereality of exactly where your models are on the tablemay make it a really close call – measuring assaultmoves and deciding if a key model is in cover areclassic examples.
All of these instances can lead to arguments, so it isimportant to remember that the rules are just aframework to create an enjoyable game. Winning at
any cost is less important than making sure bothplayers – not just the victor – have a good time. If adispute does crop up then work out the answer in agentlemanly manner. Many players simply like to roll-off and let the dice decide who is right, allowingthem to get straight back to blasting each other topieces. After the game you can happily continueyour discussion of the finer points of the rules, oragree how you will both interpret them should thesame situation happen again. You could even decideto change the rules to suit you better (this is knownas a ‘house rule’).
The most important rule then is that the rules aren’tall that important! So long as both players agree,you can treat them as sacrosanct or mere guidelines– the choice is entirely yours.
RE-ROLLS & ROLL-OFFSRe-rollsIn some situations the rules allow you a ‘re-roll’ ofthe dice. This is exactly as it sounds – pick up thedice you wish to re-roll and roll them again. Thesecond score counts, even if it means a worseresult than the first, and no single dice can be re-rolled more than once regardless of the sourceof the re-roll. If you re-roll a 2D6 or 3D6 roll, youmust re-roll all of the dice and not just some ofthem, unless the rule granting you the re-rollexplicitly specifies otherwise.
Roll-offsIf the rules require players to roll-off, this simplymeans that each player rolls a dice and the playerthat scores the highest result wins the roll-off. Ifthe players roll the same result, both dice must berolled again until one player is the winner.
2 THE RULES SECTION: DICE

MODELSThe Citadel miniatures used to play games ofWarhammer 40,000 are referred to as ‘models’ in therules that follow. Each model is an individual playingpiece with its own capabilities. Models represent anenormous variety of troops ranging from Gretchin, thesmall, weak slaves of the Orks, to noble Space Marines,the protectors of Mankind, to Wraithlords, mighty Eldarconstructs containing the souls of the dead. Torepresent all these differences, each model has its owncharacteristics profile as described in the next section.
BASESCitadel miniatures are normally supplied with a plasticbase. If so, they must be glued onto their bases beforethey can be used in the game.
Some players like to mount their models on impressivescenic bases. As mounting your models on different-sized bases might affect the way they interact with therules, make sure before the game that your opponentdoes not mind this.
UNITSWarriors tend to band together to fight in squads,teams, sections or similarly named groups – individualsdo not normally go wandering off on their own forobvious reasons! In Warhammer 40,000, we representthis by grouping models together into units.
Units fight in loose groups with gaps between eachmodel. This gives the troopers the freedom to moveover difficult terrain quickly, and enables them to takeadvantage of such things as minor folds in the ground,scrub, and other small features, to shelter from enemyfire. Similarly, artillery batteries consist of large gunsand the crew that fire them, vehicle squadrons aremade up of a number of vehicles and so on. Thedifferent elements of the unit have to stay together toremain an effective fighting force. This is detailed morefully in the Movement section (see page 12).
A unit will usually consist of several models that fightas a group, but it can also be a single, very large orpowerful model, such as a battle tank, a monstrousalien creature or a lone hero. In the rules that follow, allof these things are referred to as ‘units’. The differenttypes of unit are detailed overleaf.
MEASURING DISTANCESA model is considered to occupy the area of its base, sowhen measuring distances between two models, usethe closest point of their bases as your reference points.For models supplied without a base (like some largevehicles) use the model’s hull or body instead.
When measuring distances between two units, use theclosest models as your reference points, as shown inthe diagram below. So, for example, if any model in a unit is within 2" of an enemy unit/model, the unit issaid to be within 2" of that enemy unit/model.
In general, players are not allowed to measure anydistance except when the rules call for it (e.g. afterdeclaring an assault or firing at an enemy, to work outa rule’s area of effect, when deploying their forces, etc).
MODELS & UNITS
(measured base to hull)
2"(measured base to base)
5"
Space Marines
Ork Boyz
Ork Trukk
Measuring distances
THE RULES SECTION: MODELS & UNITS 3
Thought for the day:
Wisdom is the beginning of fear.
The distance between the Space Marine unit and the OrkTrukk is 5 inches. We normally say that the Trukk iswithin 5" of the Space Marine unit.
The distance between the Space Marine unit and the Orkunit (i.e. between the two closest models) is 2 inches. The two units are within 2" of each other.

THE RULES SECTION: UNIT TYPES4
UNIT TYPES
Space Marines of the Ultramarines Chapter
MONSTROUS CREATURESSome creatures are just too bigto fit into the ordinary infantryunit category. These are toweringgiants that are capable of crushing atank – like the Tyranid Carnifex, acreature bio-engineered and evolvedto become a living battering ram.While monstrous creatures use manyof the infantry rules, their size anddestructive capability make them a lotmore dangerous. Fortunately for theirfoes, a monstrous creature unit willusually consist of a single model.
In order to make it easier to learn the basic rules, the first few sections of the book, coveringMovement, Shooting, Assault and Morale are written with respect to infantry units, becausethese are by far the most common unit type in the game. The other types of unit are alsodefined here and then explained in detail later in specific sections that cover their unique rules.The unit types in Warhammer 40,000 are as follows:
INFANTRY Infantry units include all types of foot soldiers, whetherhuman or alien. A typical unit of infantry is betweenfive and ten models strong but can be much larger. In rare cases, an infantry unit may comprise only asingle model. Infantry are fairly slow moving, but cancross almost any terrain (given enough time) and makethe best use of cover to avoid enemy fire. Infantry arethe most common and dependable units inWarhammer 40,000 and the bulk of the rules areconcerned with them.
Tyranid Carnifex
Flesh Hound of Khorne
BEASTS AND CAVALRYConsisting of particularly vicious hunting animals or a rider with a livingmount, beasts and cavalry are able to swiftly carry the battle to theenemy. Beasts and cavalry have a profile like other infantry, but are ableto make use of a special faster move when they assault an enemy unit.
Beast and cavalry units are typically quite rare and small in number. Justlike bikers, cavalry riders may not dismount during the game and so havea characteristic profile that takes into account both the beast and rider.We assume that if one is killed, the other is also incapacitated or simplyflees the battlefield.

BIKES AND JETBIKESThese units are riders mounted on a variety of conventional bikes orjetbikes. They are capable of moving really quickly, and will often haveweapon systems built onto their bikes. Both types of bike manoeuvremuch faster than infantry and jetbikes are able to glide overobstructions, such as buildings, without being slowed. Their onlymajor weakness is the risk of crashing when moving through terrain.Note that, to keep things simple, riders may not dismount during thegame and therefore these models have a combined characteristicprofile that factors in both the bike and rider.
Eldar Jetbike
JUMP INFANTRYJump infantry are equipped with jump packs, jet packs,wings, teleport devices or other means of movingquickly over short distances. They commonly takeadvantage of these by dropping onto the battlefield inthe midst of the enemy – heroically or foolishlydepending on your perspective. Jump infantry canmove like normal infantry or activate their jump deviceto make a high-speed move, leaping over interveningterrain and models. Jump infantry tend to be a rare andvaluable commodity in most armies.
ARTILLERYThese units represent large weapons and theircrews, the gun models themselves being largeenough to be treated as small vehicles. Artilleryunits count as infantry in most respects, but whenthey are fired at, hits may be scored on the gunsthemselves, which have vehicle-like characteristics.
VEHICLESVehicle units include all kinds of war machines. Battletanks, grav-tanks, Monoliths and Dreadnoughts all fall intothis category. Most vehicles can move more rapidly thaninfantry but need to stick to open ground to avoid gettingbogged down. Vehicle units are represented by single modelsin the case of tanks and other large vehicles,or as a group of smaller vehicles. Vehicle crew members – the drivers,commanders and gunners – areassumed to be an integral part oftheir machine, and if their vehicle isdestroyed they areconsidered to be lostalong with it. Note thatbikes and jetbikes havetheir own unit type, andare not counted asvehicles.
Ork Zzap Gun and Gretchin crew
5THE RULES SECTION: UNIT TYPES
Imperial Guard Leman Russ
battle tank
Blood Angels
Assault Marine

WEAPON SKILL (WS)This characteristic defines how skilled and vicious awarrior is with his weapons in close combat. The higherthe score, the more likely the warrior will land blows ona close combat opponent. An average human soldierhas WS3, while a genetically-enhanced Space Marinewill have WS4 or even WS5.
BALLISTIC SKILL (BS)Ballistic Skill shows how accurate a creature is withranged attacks, such as guns, rockets or energyweapons. The higher this score is, the easier a creaturefinds it to hit when it shoots at something. Somemonsters have natural weapons that can be used atrange (they may be able to spit venom, for example)and their BS is also used to determine whether they hitor not.
STRENGTH (S)Strength shows how physically strong a creature is. Anexceptionally puny creature may have a Strength of 1, adeadly Wraithlord has S10 and most humans have S3.Strength tells us how hard a creature can hit in closecombat and therefore how easily it can hurt an enemy.
TOUGHNESS (T)Toughness measures a creature’s ability to resist physicaldamage and pain, and includes such factors as thethickness of its flesh, hide or skin. The tougher acreature, the better it can survive enemy blows orshots. A human is T3, while a resilient Ork is T4.
WOUNDS (W)Wounds show how much damage a creature can takebefore it either dies or is so badly hurt it can’t fight anymore. Most man-sized creatures have only a singleWound. Heroes and large monsters are often able towithstand several injuries that would slay a lessercreature, and so have a Wounds value of 2, 3, or more.
INITIATIVE (I) How alert a creature is and how quickly it reacts isshown by its Initiative. In close combat, faster creaturesgain a massive advantage over slower ones becausethey get to strike first. A normal human is Initiative 3,while an agile Eldar Aspect Warrior is Initiative 5.
ATTACKS (A)Warriors of exceptional skill and particularly ferociousmonsters can unleash a flurry of blows against theiropponents. This characteristic indicates the number ofdice a model rolls when fighting in close combat. Thisis normally 1 for most models, but a heroic leader or alarge monster can have 3 or even more Attacks. Thenumber of Attacks a creature makes may be increasedif it has the added impetus of assaulting into its foes oris fighting using two weapons, for example.
CHARACTERISTICS
6 THE RULES SECTION: CHARACTERISTICS
In Warhammer 40,000, there are manydifferent types of warriors, ranging from themighty Space Marines to the brutal Orks, theagile Eldar to the dreaded Tyranids. Torepresent the different abilities of thesecreatures in the game, each model has aprofile made up of nine numbers thatdescribe the various aspects of their physicaland mental make-up. These are calledcharacteristics.
The characteristics are: Weapon Skill (WS), Ballistic Skill(BS), Strength (S), Toughness (T), Wounds (W), Initiative(I), Attacks (A), Leadership (Ld) and Armour Save (Sv).
For all models except vehicles these characteristics aregiven a value on a scale of 0 to 10 – the higher, thebetter (except for a model’s Armour Save, where theopposite is true!).
Certain pieces of wargear or special rules may modify amodel’s characteristics positively or negatively, byadding to it (+1, +2, etc.) or even multiplying it (x2, x3,etc.). However no modifier may raise any characteristicabove 10 or lower it below 0. Saves can at best bemodified to 2+.
LEADERSHIP (LD)The Leadership (Ld) of most warriors is around anaverage value of 7 or 8. A creature with a higherLeadership value is courageous, steadfast, or very well-trained. A creature with a lower value istemperamental, unpredictable or cowardly. Models thatrepresent generals, heroes, sergeants and other suchcharacters often have a high Leadership that allowsthem to lead others, inspiring them on to greater featsof valour.
ARMOUR SAVE (SV)A creature’s Armour Save (Sv) gives it a chance ofavoiding harm when it is struck or shot. Most creatureshave an armour save based on what kind of armourthey are wearing, so this characteristic may beimproved if they are equipped with better armour.Other creatures may receive a natural saving throwfrom having thick bony plates or a chitinous shell.
VEHICLE CHARACTERISTICSThe Warhammer 40,000 universe is home to all sorts oftanks, war machines and other combat vehicles, bothhuman-built and alien. To reflect the many differencesbetween creatures of flesh and blood and constructs ofsteel and iron, vehicles have many different rules andtheir own set of characteristics. Vehicle characteristicsare described in the Vehicles section (see page 56).
ZERO-LEVEL CHARACTERISTICSSome creatures have been given a ‘0’ for certaincharacteristics, which means that they have no abilitywhatsoever in that field (the same is also occasionallyrepresented by a ‘–’). This usually applies to creaturesunable to use missile weapons, and so they have a BSof 0, but it might apply to other characteristics too. A defenceless model will have no Attacks whatsoever,while a model with WS0 will be hit automatically by hisenemies in close combat. A warrior with an ArmourSaving Throw of ‘–’ has no armour save at all.
CHARACTERISTIC PROFILESEach model in Warhammer 40,000 has a profile thatlists the value of its characteristics. At the back of thisbook, and in the Codex books for each army, you willfind profiles for many races and creatures.
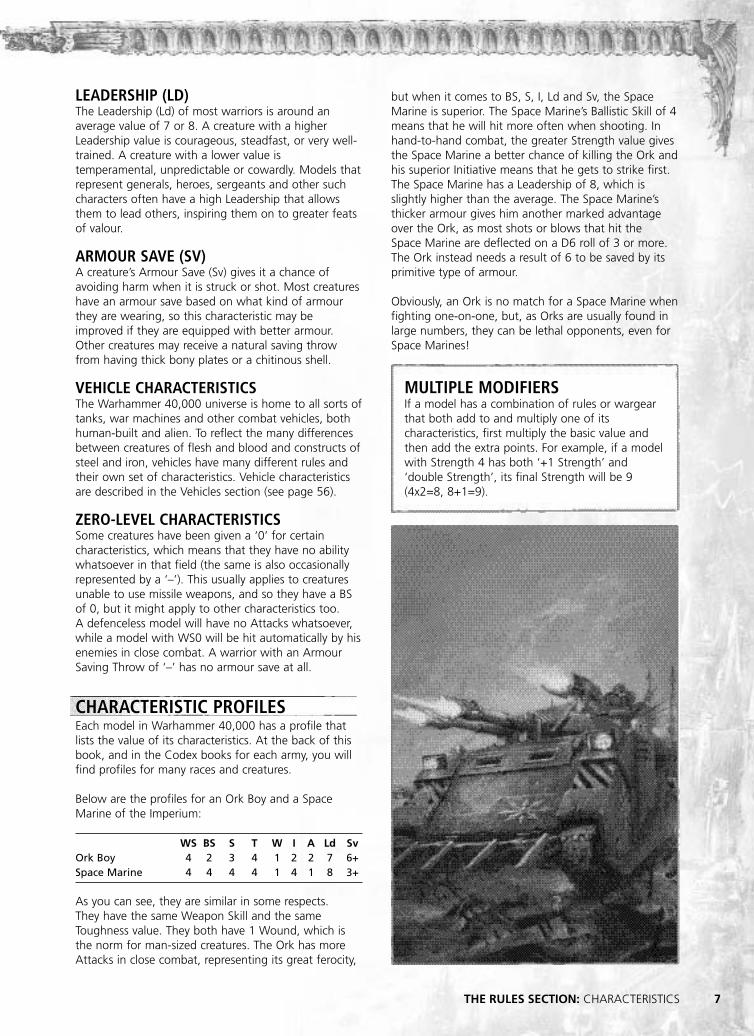
Below are the profiles for an Ork Boy and a SpaceMarine of the Imperium:
WS BS S T W I A Ld SvOrk Boy 4 2 3 4 1 2 2 7 6+Space Marine 4 4 4 4 1 4 1 8 3+
As you can see, they are similar in some respects. They have the same Weapon Skill and the sameToughness value. They both have 1 Wound, which isthe norm for man-sized creatures. The Ork has moreAttacks in close combat, representing its great ferocity,
THE RULES SECTION: CHARACTERISTICS 7
MULTIPLE MODIFIERSIf a model has a combination of rules or wargearthat both add to and multiply one of itscharacteristics, first multiply the basic value andthen add the extra points. For example, if a modelwith Strength 4 has both ‘+1 Strength’ and‘double Strength’, its final Strength will be 9(4x2=8, 8+1=9).
but when it comes to BS, S, I, Ld and Sv, the SpaceMarine is superior. The Space Marine’s Ballistic Skill of 4means that he will hit more often when shooting. Inhand-to-hand combat, the greater Strength value givesthe Space Marine a better chance of killing the Ork andhis superior Initiative means that he gets to strike first.The Space Marine has a Leadership of 8, which isslightly higher than the average. The Space Marine’sthicker armour gives him another marked advantageover the Ork, as most shots or blows that hit the Space Marine are deflected on a D6 roll of 3 or more.The Ork instead needs a result of 6 to be saved by itsprimitive type of armour.
Obviously, an Ork is no match for a Space Marine whenfighting one-on-one, but, as Orks are usually found inlarge numbers, they can be lethal opponents, even forSpace Marines!

CHARACTERISTIC TESTSDuring a battle, a model might have to take a test onone of its characteristics, commonly its Strength,Toughness or Initiative. For example it might have totest its Toughness to resist the effects of a lethal gas.
In order to take the test, roll a D6. To succeed, youmust score equal to or lower than the value of thecharacteristic involved. Note that if a 6 is rolled, thenthe model automatically fails the test regardless of thecharacteristic’s value or any other modifier that mightapply, and conversely a 1 is always a success.
Of course, if a model has to take a test for one of itscharacteristics with a value of 0, it automatically fails.
LEADERSHIP TESTSTests made against the Leadership characteristic (likeMorale checks) are different from other tests. In thecase of a Leadership test, roll 2D6 (two dice addedtogether, as explained earlier). If the result is equal to orless than the model’s Leadership, the test is passed.
If a unit includes models with different Leadershipvalues, always use the one with the highest Ld value.
Modifiers may apply to the Leadership characteristic inparticularly trying circumstances – for example, -1 if theunit suffered wounds from an Ordnance barrageweapon, as described later.
8 THE RULES SECTION: CHARACTERISTICS
POINTS VALUESGenerally, you’ll find characteristic profiles comealong with one other piece of information – themodel’s points value. This represents the relativebattlefield value of the creature in question. Pointsvalues take into account a number of differentfactors including characteristics, different races’overall strengths and weaknesses, basic weapons,unit size, rarity and so forth. Choosing forces thatare worth a specific points total allows players toorganise an evenly matched battle.
For comparison, a Space Marine is worth 15 points, and an Ork is 6 points. This means thatan Ork horde would normally outnumber a Space Marine force by more than two to one. It isjust as well that Space Marines are really hard!
A tremendous amount of action takes placein a battle: squads are constantlymanoeuvring and shooting, tanks rumbleinto action and artillery fire roars overheadin a torrential downpour of destruction. A game of Warhammer 40,000 represents theebb and flow of battle but, in order to turnthe chaos into a manageable game, playersalternate taking turns moving and fightingwith their units. So, one player will moveand fight with his forces first, then hisopponent will move and fight. Then theprocess repeats with the first player movingand fighting again, and so on until the endof the game.
During his turn, a player can usually move and fightwith all of his units. For convenience, moving, shootingand fighting in close combat are dealt with one afterthe other. This means that you move all of the modelsyou want to first, then you shoot with any who can,and finally you resolve all close combats. This processhelps to keep track of what is going on and makes iteasier to know when one player’s actions are over andhis opponent can start his turn.
GAME TURNS AND PLAYER TURNSIn a complete game turn, both players get a player turn,each one divided into Movement, Shooting and Assaultphases (see Turn Sequence, below). Exactly what is goingto happen in each phase is described in the followingsections of this book.
Hence one game turn will comprise two player turns.Whenever a rule uses the word ‘turn’, both in this rulebook and in the Codexes, it means ‘player turn’,otherwise it will clearly state ‘game turn’.
So, for example, in game turn 1 a player will take hisplayer turn 1 and go through his Movement, Shootingand Assault phases. Then the other player will take hisplayer turn 1 and go through his Movement, Shootingand Assault phases, thus ending game turn 1. Gameturn 2 will then follow.
WHO GETS THE FIRST TURN?Which player gets the first turn of the game can bedetermined in a number of different ways. Normally,both players roll a D6 and the player with the highestscore deploys his army first and then takes the firstplayer turn. The mission you are fighting will specifyexactly how this works. Fighting a variety of differentmissions is covered in more detail in the Organising aBattle section, on page 90.
THE END OF THE GAMEThe standard missions presented in this book last arandom number of game turns (five to seven turns),determined by a dice roll. However the final section ofthe book includes ideas for creating your own missions,which could end in a number of ways. A battle couldlast a specific number of game turns, so that bothplayers know when the end is nigh.
Alternatively, players might be able to win a ‘suddendeath’ victory that ends the game immediately – forexample, if they destroy the power generator they winstraight away. You could also decide to end a battle ata pre-set time if you only have a limited amount oftime to play in.
VICTORYOnce the game is finished, the players determine whohas won, as dictated by the mission they are playing(see the Organising a Battle section on page 90). For now it is enough to know that Warhammer 40,000standard missions generally revolve around capturingtactical objectives or inflicting the most damage uponthe enemy.
TURN SEQUENCE EXCEPTIONS There are times when a player is allowed to performactions during their opponent’s turn (fighting in anassault being the most common example). It may alsobe convenient to interrupt a player’s turn because ofsome event occurring, like a booby trap beingtriggered. Whatever the reason, after the interruption,the turn sequence always continues as normal.
THE TURN
THE RULES SECTION: THE TURN 9
THE TURN SEQUENCE
1 The Movement phaseThe player can move any of his units that arecapable of doing so. See the Movement rulesfor more details of how to move your forces.
2 The Shooting phaseThe player can shoot with any of his units thatcan see an enemy. See the Shooting rules formore details about how to resolve this.
3 The Assault phaseThe player can move any of his units to assaultthe enemy if they are close enough. Assaultsare bloody, desperate affairs where units arefighting in close combat. This means that bothforces can fight in an Assault phase, but onlythe player whose turn it is can move into anassault. The Assault rules will tell you moreabout them.


Although the Movement phase is the easiestto perform, it’s probably the most tacticallyimportant. Getting models into the rightposition on the battlefield is often the key tovictory. For the time being we’ll just explainhow squads of infantry move, as they are byfar the most common units in the game.Vehicles, jump infantry, bikes and certainother units move in different ways torepresent their greater mobility, and thesewill be discussed in detail later.
In his turn, a player may move any of his units – all ofthem if he wishes – up to their maximum movementdistance. Once a unit has completed all of itsmovement, the player selects another unit and movesthat one, and so on, until the player has moved all ofthe units he wishes to move. Note that a player doesn’thave to move all (or indeed any) of his units. A unitthat doesn’t move is often more effective at shooting,as we will explain later in the rules. Once you havestarted moving a unit, you must finish its move beforeyou start to move another unit. You may not go backand change the move already made by a previous unit.
MOVEMENT DISTANCEInfantry move up to six inches (6") in the Movementphase. This represents most creatures moving at areasonable pace but stopping several times to scan thesurrounding landscape for enemies, communicate withtheir commanders, etc. Even warriors who are movingin a part of the battlefield where no enemies areapparent can only move 6". This is because your unitslack your own god-like knowledge that there are noenemies around. It is perfectly fine to measure a unit’smove in one direction, and then change your mind anddecide to move it somewhere else (even the oppositeway entirely!) or decide not to move it at all.
MODELS IN THE WAY A model may not move into or through the spaceoccupied by another model (which is represented by itsbase or by its hull) or through a gap between friendlymodels that is smaller than its own base (or hull) size. A model cannot move so that it touches an enemymodel during the Movement and Shooting phases –this is only possible in an assault during the Assaultphase. To keep this distinction clear, a model may notmove within 1" of an enemy model unless assaulting.
DIFFERENT MOVEMENT DISTANCES IN A UNITAll of the models in a unit move at the speed of theslowest model.
RANDOM AND COMPULSORY MOVEMENT Sometimes, a unit may have to move a randomdistance instead of the usual 6" or be forced to movein a certain way (directly towards the closest enemy, forexample). Such situations are discussed later.
TURNING AND FACINGAs you move the models in a unit, they can turn toface in any direction, without affecting the distancethey are able to cover. Infantry models can also beturned to face their targets in the Shooting phase, sodon’t worry about which way they are pointing at theend of their Movement phase (although dramaticallyfacing off against their foes is traditional).
MOVING AND CLOSE COMBATUnits already locked in close combat with the enemymay not move during the Movement phase.
THE MOVEMENT PHASE
THE RULES SECTION: THE MOVEMENT PHASE 11
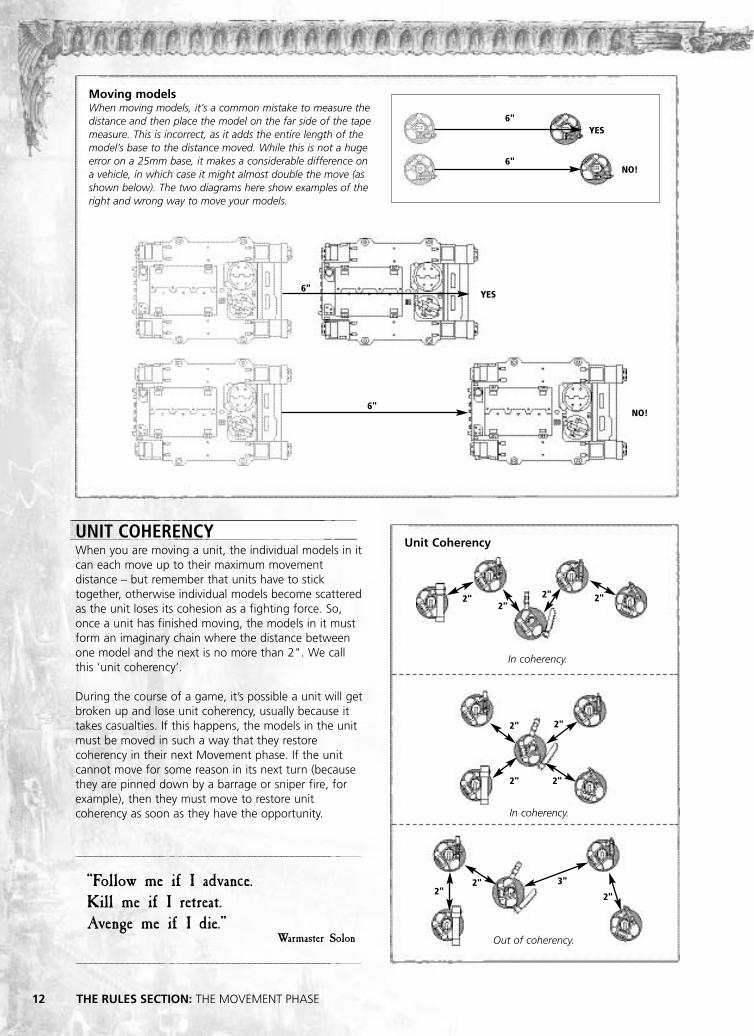
UNIT COHERENCYWhen you are moving a unit, the individual models in itcan each move up to their maximum movementdistance – but remember that units have to sticktogether, otherwise individual models become scatteredas the unit loses its cohesion as a fighting force. So,once a unit has finished moving, the models in it mustform an imaginary chain where the distance betweenone model and the next is no more than 2". We callthis ‘unit coherency’.
During the course of a game, it’s possible a unit will getbroken up and lose unit coherency, usually because ittakes casualties. If this happens, the models in the unitmust be moved in such a way that they restorecoherency in their next Movement phase. If the unitcannot move for some reason in its next turn (becausethey are pinned down by a barrage or sniper fire, forexample), then they must move to restore unitcoherency as soon as they have the opportunity.
Out of coherency.
In coherency.
Unit Coherency
In coherency.
2" 3"
2"
2"2"
2"2"
2"2"2"
2"
2"
12 THE RULES SECTION: THE MOVEMENT PHASE
Moving modelsWhen moving models, it’s a common mistake to measure thedistance and then place the model on the far side of the tapemeasure. This is incorrect, as it adds the entire length of themodel’s base to the distance moved. While this is not a hugeerror on a 25mm base, it makes a considerable difference ona vehicle, in which case it might almost double the move (asshown below). The two diagrams here show examples of theright and wrong way to move your models.
6"YES
YES
NO!
NO!
6"
6"
6"
“Follow me if I advance. Kill me if I retreat. Avenge me if I die.”
Warmaster Solon

TERRAIN The galaxy is a vast place with millions of differentwarzones: ice worlds, desert worlds, hive worlds, feralworlds and many other exotic types of battlefield – ifyou can imagine it, then it probably exists somewhere.The terrain covering these worlds can vary from broad,empty plains to sky-scraping towers of plexiglass andplasteel, from verdant jungles to barren moonscapes orbaking hot deserts. How to represent terrain on thebattlefield is discussed later (see page 88).For now, we’re going to discuss terrain only in terms ofhow infantry move through it.
TERRAIN TYPESTerrain provides useful cover from enemy fire, but canalso impede the movement of your units. Troops can beslowed by pushing through or climbing over barriersand obstructions. There are three general classes ofterrain: clear, difficult and impassable.
• Clear terrain can be moved across without anypenalty, and generally covers most of the battlefield.
• Difficult terrain slows down models wishing tomove through it, and can sometimes be dangerousto models passing through it.
• Impassable terrain cannot be moved across or into.
Guidelines on categorising terrainIt is a relatively simple matter to classify terrain withinthese four categories, and it is important that you andyour opponent agree what class of terrain each featurefalls into before starting your game.
• Clear terrain includes open areas, such as fields,moorland, grass, deserts, ash wastes and gentle hills.This could be embellished with the odd tree, shrub orcactus (or alien equivalents) for visual appeal.
• Difficult terrain includes areas of rubble, jungles,woods, ruins, brush and scrub, rocky outcrops, boggy ground, low walls, hedges, fences, razor wire,barricades, steep hills, streams and other shallowwater (as well as terrain features that combineseveral of these types, such as a ruin surrounded bywoods). If the terrain feature includes hazards, such as booby traps, carnivorous plants, toxic vents,erupting geysers and the like, then it may beadditionally categorised as both difficult anddangerous terrain.
• Impassable terrain includes deep water, lava flows,steep rocky cliffs and buildings that models cannotenter, as agreed with your opponent. Remember thatother models, friends and enemies, also count asimpassable terrain.
• Buildings that models can enter, like bunkers,bastions and other fortifications.
You will notice that buildings appear in more than onecategory. Buildings will be treated in detail in their ownsection, on page 77.
AREA TERRAINSometimes a terrain feature has clearly defined edges,such as a crater, a stream or an intact building. Othertimes, however, this might be slightly less clear, as inthe case of marshes, woods, ruins and other types ofrough ground. In reality a wood might be a tangled,overgrown mass of foliage, without a clear edge. If it isrepresented like this on your tabletop, then it will bevery difficult to stand models on it, and it would bedifficult to decide if the models are inside or outside it.
For the clarity of the game it is important to be able totell where the boundary of the terrain feature is, asthese pieces normally count as difficult terrain. This iswhere we need to introduce the concept of ‘areaterrain’. You can show the boundary of a piece of areaterrain by using a flat baseboard, an outline of lichen orsand, or by painting a slightly different colour on yourgaming board. Trees, rocks, ruins, or whatever isappropriate for the kind of area terrain you arerepresenting, are usually placed within the boundary ofthe area terrain’s base.
When moving models into this area, you maytemporarily remove the rocks, trees, etc. (if they are notglued in place!) to make moving the models easier.Remember, however, to put them back where theyoriginally were (or as close as possible!) after you finishmoving, as they may affect the line of sight of modelsshooting through that area terrain.
You should discuss all such terrain features with youropponent before the game and agree exactly whateverything counts as and where boundaries of terrainfeatures lie. When the game is underway, it will beharder to discuss it quite so impartially.
Wobbly Model SyndromeSometimes you may find that a particular piece ofterrain makes it hard to put a model exactlywhere you want. If you delicately balance it inplace, it is very likely to fall as soon as somebodynudges the table, leaving your beautifully paintedminiature chipped or even broken. In cases likethis we find it is perfectly acceptable to leave themodel in a safer position, as long as both playershave agreed and know its ‘actual’ location. If lateron your enemy is considering shooting at themodel, you will have to hold it back in the properplace so he can check line of sight.
Of course if you prefer things to be completelyclear and exact, then stick to simple, flat terrain!
13THE RULES SECTION: THE MOVEMENT PHASE

MOVING THROUGH DIFFICULT TERRAINDuring a game of Warhammer 40,000, there can betwo slightly different cases of units moving throughdifficult terrain.
If any of the models in a unit start their move insidedifficult terrain, the unit is affected by the terrain andmust take a difficult terrain test. Roll two D6 and selectthe highest – this is the maximum distance in inchesthat all of the models in the unit (not just the ones indifficult terrain!) may move.
If a unit starts its move outside difficult terrain, theplayer must declare if he wants his unit to try to enterdifficult terrain as part of their move. If he chooses notto, the unit moves as normal but may not enter difficultterrain. If he chooses that they will do so, the unit musttake a difficult terrain test as described above. Even ifthe distance rolled is too short for any of the models toreach the difficult terrain, the unit is still slowed downas described above. We assume that they are cautiouslyapproaching the terrain, using their sensors to ascertainthat no enemy is hiding in there.
If you take the difficult terrain test, you are nevercompelled to move the models, as you may not haverolled high enough to make it worth moving at all.However, if you roll the dice, the unit is still consideredto have moved for the purposes of firing, as detailedlater in the Shooting rules.
Note that as part of their move through difficult terrain,models may move through walls, closed doors andwindows, and all sort of similarly solid obstacles, unlessthe players have agreed that a certain wall or obstacleis impassable. This represents the warriors bashing theirway past locked doors and windows, using explosivesor their weapons to create breaches in light walls,climbing over low obstacles and so on.
DANGEROUS TERRAINAs mentioned previously, some terrain features will bedangerous to move through. This is represented by thedangerous terrain test. Roll a D6 for every model thathas entered, left or moved through one or more areasof dangerous terrain during its move. On the roll of a1, the model suffers a wound, with no armour or coversaves allowed (wounds and saves are explained in thenext section).
IMPASSABLE TERRAINModels may not be placed in impassable terrain unlessthe models concerned have a special rule in theirprofile granting them an exception (like being able tofly above the terrain) or both players agree to it.
Blessed is the mind too small for doubt.
Both the wood and the ruin areexamples of area terrain. As youcan see, their bases clearly definetheir extent on the table top. Boththese features are also difficultterrain, and players may agree thatthe ruin counts as dangerous too.
14 THE RULES SECTION: THE MOVEMENT PHASE

THE SHOOTING PHASE As the two armies engage each other, gunsthunder ceaselessly with plasma blasts, shellsand shrapnel raining down on both sides.
In a Warhammer 40,000 battle, we split up the firingso that each player’s force fires during the Shootingphase of his own turn. During the Shooting phase, anyand all of your units may fire. You can choose any order for your units to shoot, but you mustcomplete all the firing by one unit before you move onto the next.
Normally each model in a firing unit can fire a singleweapon. Some models, including vehicles, may be ableto fire more than one weapon, as detailed later.
The shooting process can be summarised in six steps, asdescribed below.
Once you’ve completed this shooting sequence withone of your units, select another and repeat thesequence. Once you have completed steps 1 to 6 foreach unit in your army, carry on to the Assault phase.
The rules for the Shooting phase end with details ofthe different categories of ranged weapon available towarriors in the 41st Millennium.
DISALLOWED SHOOTINGCertain situations prevent a unit from firing. The mostcommon are:
• Units that are locked in close combat with the foe.
• Units that are running (see overleaf).
• Units that have gone to ground because of enemyfire in the previous turn (see page 24).
In addition to the above, certain types of weapons canonly be fired if the unit did not move in the same turn.However, this will only prevent models with thatweapon from shooting – not the whole unit.
THE SHOOTING SEQUENCE
1 Check line of sight & pick a target.Pick one of your units, check its line of sightand choose a target for it. All models in theunit that can see at least one enemy model inthe target unit may open fire.
2 Check range. At least one target model mustbe within range of the weaponry of your firingmodels.
3 Roll to hit. Roll a D6 for each shot fired. Themodel’s BS determines what score they mustequal or beat to hit their target.
4 Roll to wound. For each shot that hits, rollagain to see if it wounds the target. The scoreneeded is determined by comparing theStrength of the firing weapons with theToughness of the target.
5 Take saving throws. Each wound sufferedmay be cancelled by making a saving throw.Saving throws usually derive from the armourworn by each model, from being in cover, orsome other piece of wargear or ability. If thetarget unit includes different types of models,you will first have to allocate the wounds ontospecific models.
6 Remove casualties. The target unit sufferscasualties for any wounds that have not been saved.
THE RULES SECTION: THE SHOOTING PHASE 15

Line of sight literally represents your warriors’ view ofthe enemy – they must be able to see their foethrough, under or over the tangle of terrain and otherfighters on the battlefield. Of course your models aremade of plastic or metal, so they can‘t tell you whatthey can see – you’ll have to work it out for them. Insome cases it will be obvious – if there is a hill or a tankblocking their view, the enemy may be blatantly out ofsight. In other cases two units will be plainly in view ofeach other, as there is nothing at all in the way. Manytimes however, it will be more difficult to tell if line ofsight is blocked or not, so players will have to stoopover the table for a ‘model’s eye view’. This meansgetting down to the level of your warriors, taking inthe view from behind the firing models to ‘see whatthey can see’. You will find that you can spot lurkingenemies through the windows of a ruined building,and that high vantage points become very useful forthe increased line of sight that they offer.
Line of sight must be traced from the eyes of the firingmodel to any part of the body of at least one of themodels in the target unit (for ‘body’ we mean its head,torso, legs and arms). Sometimes, all that may bevisible of a model is a weapon, an antenna, a banneror some other ornament he is wearing or carrying(including its wings and tail, even though they aretechnically part of its body). In these cases, the model isnot visible. These rules are intended to ensure thatmodels don’t get penalised for having impressivestandards, blades, guns, majestic wings, etc.
OWN UNITThere is one important exception to the rules for line ofsight. Firing models can always draw line of sightthrough members of their own unit (just as if they werenot there), as in reality they would take up firingpositions to maximise their own squad’s firepower.
WHICH MODELS CAN FIRE?All models in the firing unit that have line of sight to atleast one model in the target unit can fire.
A player may choose not to fire with certain models ifhe prefers (as some models may have one-shotweapons, for example). This must be declared beforechecking range, as all of the models in the unit fire atthe same time.
A firing unit can choose a single enemy unit that is notlocked in combat as its target, and may not split its fireamong different targets. In order to select an enemyunit as a target, at least one model in the firing unitmust have line of sight to at least one model in thetarget unit. If no models have line of sight then adifferent target must be chosen.
CHECK LINE OF SIGHT & PICK A TARGET
The player is checking the Space Marine’s line of sight by looking from
behind the firer’s head to the body of the target model.
RUN!At times, warriors may have to quickly redeploy,literally running from cover to cover or simplyconcentrating on movement and giving up theirchance to shoot. In their Shooting phase, units maychoose to run instead of firing, immediately movingD6" (we find that this is a popular choice for units
that have no ranged weaponry or no target!).Running movement is not affected by difficult terrain– it is always simply D6" – but models runningthrough dangerous terrain must test as normal. Unitsthat run in the Shooting phase cannot assault in thefollowing Assault phase.
Line of SightWarhammer 40,000 uses what we call ‘true lineof sight’ for shooting attacks. This means that youtake the positions of models and terrain at facevalue, and simply look to see if your warriors havea view to their targets. This is different to other,more abstract systems where terrain is assigned aheight value and you have to calculate whatwarriors can see. We have chosen true line ofsight because it makes the game feel much morecinematic and ‘real’. There’s nothing quite likegetting a ‘model’s eye view’ to bring the game tolife. Of course, this method does mean thatoccasionally there are border-line cases when it isquite hard to decide if a model can see a target ornot, but sporting players will always be generousand give their opponent the benefit of the doubt.
16 THE RULES SECTION: THE SHOOTING PHASE

ROLL TO HIT To determine if the firing models have hit their target,roll a D6 for each shot that is in range. Normallytroopers will only get to fire one shot each. However,some creatures or weapons are capable of firing morethan once, as we’ll explain in more detail later. The dicescore needed to hit will depend on how accurate thefirers are, as shown by their Ballistic Skill characteristic(or BS). The chart below shows the minimum D6 rollneeded to score a hit.
Firer’s BS 1 2 3 4 5Score needed to hit 6 5+ 4+ 3+ 2+
For example, if the shooters are a unit of five SpaceMarines with a BS of 4, you would roll five dice andeach roll of a 3 or more would score a hit.
To Hit rolls are easy to remember if you just subtractthe BS of the shooter from 7. This will give you thenumber you need; e.g. a model with a BS of 2 needs toroll a 5 or more (7–2=5).
Note that the minimum roll needed to hit is always atleast 2. When rolling to hit, there is no such thing as anautomatic hit and a roll of a 1 always misses.
MOVING & SHOOTING Whether a unit has moved or not can make a bigdifference to its firing. If the warriors hold aposition, take up firing stances and aim at theirtargets properly, some weapons can hit targetsfurther away than if they are firing on the move.Other guns are so heavy that they can only beused if their firers halt completely to bracethemselves or set up their weapons on theground. This is explained in more detail in theWeapons section later, but for the time being it’senough to know that moving can make adifference to a unit’s shooting.
The most important thing to remember is that thewhole unit counts as moving if any of its modelsmoved in the Movement phase.
Checking Range
Four Orks are found to have a target within the 12”range of their pistols (black lines). The remaining Ork isout of range of the closest visible model (grey line).
CHECK RANGE All weapons have a maximum effective range, which isthe furthest distance they can shoot. If a target isbeyond this maximum range, the shot missesautomatically. This is why you have to choose yourtarget before measuring the range. Here are someexamples of weapon ranges:
Weapon Maximum RangeLaspistol 12"Boltgun 24"Autocannon 48"
When you’re checking range, simply measure fromeach firer to the nearest visible model in the target unit.
Any model that is found to be out of range of all ofthe models he can see in the target unit missesautomatically – his shots simply do not reach.
“Victory does not always rest with thebig guns; but if we rest in front ofthem, we shall be lost.”
Commander Argentius
The reward for treachery is retribution
THE RULES SECTION: THE SHOOTING PHASE 17

FAST ROLLING WITH DIFFERENT WEAPONSWhen a unit fires, all of its weapons are firedsimultaneously, so you should ideally roll all of its To Hitdice together. Sometimes there will be differentweapons firing, or firers with different BS in the sameunit, in which case we find it easiest to use differentcoloured dice, so that those shots can be picked out.For example, a squad may include several bolters, aplasma gun and a lascannon, in which case you coulduse white dice for bolter shots, a green dice for theplasma gun and a red dice for the lascannon.Alternatively, you can simply make separate dice rollsfor different weapons or shooters, as long as it is clearwhich dice rolls represent which shots.
BALLISTIC SKILL OF 6 OR BETTER Very rarely a model may have a BS of 6 or evenmore. If a model has a BS of 6 or higher, it gains are-roll whenever it rolls a 1 to hit with rangedattacks. The second roll has normally a lowerchance of hitting, and the number needed is givenin the chart below in italics after the slash.
Firer’s BS 6 7 8 9 10Score needed to hit 2/6 2/5 2/4 2/3 2/2
For example, a model with BS 7 fires a shot withits pistol. It rolls a 1, missing, but thanks to itsexceptional BS it can re-roll the dice. This time,however it won’t hit on a 2, but rather on a 5.
If a model has a special rule that already confers ita re-roll to hit (like a master-crafted weapon, forexample), then that re-roll takes precedence andthe chart above is not used. Instead the chancesto hit on the re-roll are the same as the first shot,depending of the firer’s BS. Remember a dice canonly ever be re-rolled once!
“Let the Orks come by the thousand, or bythe tens of thousands; we shall be ready forthem. This world is the Emperor’s, not theirs,and we shall wash it clean with their blood.”
Pedro Kantor, Master of the Crimson Fists
THE RULES SECTION: THE SHOOTING PHASE18

ROLL TO WOUND Hitting your target is not always enough to put it outof action. The shot might result in nothing more than asuperficial graze or flesh wound.
To decide if a hit causes a telling wound, compare theweapon’s Strength characteristic with the target’sToughness characteristic. Each weapon has its ownStrength value, given in the description of the weapon.Here are some examples of different weapons and theirStrength characteristics.
Weapon StrengthBoltgun 4Plasma gun 7Lascannon 9
Consult the chart below, and cross-reference theweapon’s Strength (S) with the target’s Toughness (T).The number indicated is the minimum score on a D6needed to convert the hit into a wound. Just like rollingTo Hit, roll the dice together and, once again, usedifferent coloured dice to pick out weapons withdifferent Strengths or roll them separately.
Example: a Space Marine with a boltgun shoots at anOrk and hits him. A boltgun has a Strength of 4 and theOrk has a Toughness of 4. Referring to the chart, ascore of 4 or more is needed to convert the hit intodamage. If the roll is 4 or more, the Ork takes a wound.
MULTIPLE TOUGHNESS VALUESQuite rarely, a unit will contain models with differingToughness characteristics.
To keep things simple, roll to wound using theToughness characteristic that is in the majority in thetarget unit. If no majority exists, use the highest valuein the unit.
TO WOUND CHARTToughness
1 2 3 4 5 6 7 8 9 101 4+ 5+ 6+ 6+ N N N N N N2 3+ 4+ 5+ 6+ 6+ N N N N N3 2+ 3+ 4+ 5+ 6+ 6+ N N N N4 2+ 2+ 3+ 4+ 5+ 6+ 6+ N N N5 2+ 2+ 2+ 3+ 4+ 5+ 6+ 6+ N N6 2+ 2+ 2+ 2+ 3+ 4+ 5+ 6+ 6+ N7 2+ 2+ 2+ 2+ 2+ 3+ 4+ 5+ 6+ 6+8 2+ 2+ 2+ 2+ 2+ 2+ 3+ 4+ 5+ 6+9 2+ 2+ 2+ 2+ 2+ 2+ 2+ 3+ 4+ 5+
10 2+ 2+ 2+ 2+ 2+ 2+ 2+ 2+ 3+ 4+
Stre
ngth
Note that N on the chart means the hit has no effect. A target with the Toughness indicated cannot be harmed by a hit ofsuch puny Strength. Also note that a roll of 1 never scores a Wound, regardless of its Strength.
For example, in a unit containing Gretchin and an OrkRuntherd, the Gretchin’s Toughness of 3 is used for allmodels. Only if the unit is reduced to two models (theRuntherd and a single Gretchin) at the moment whenthe enemies roll to wound, must they roll against theOrk’s Toughness of 4 for both models.
Speed rollingYou’ll soon get used to the system of rolling tohit, to wound and to save. We find it is quickestto pick up the dice that rolled a successful resultat each stage and roll them again.
Cocked diceOccasionally a dice will end up in a crevice in yourterrain or in the crack between two sections ofboard and doesn’t lie flat. We call this a ‘cockeddice’. Some players use a house rule that if anydice is not completely flat on the table, it must bere-rolled. More common is for players to re-rollthe dice only if they can’t be sure of the result. Of course, if your gaming surface is very texturedand results in a lot of cocked dice (or simply if youprefer a tidy battlefield) you can make all yourrolls in a tray or box lid.
Dice on the floorIt is generally accepted that if a dice ends up onthe floor, it doesn’t count – so you don’t need toshine a torch under the sofa to find out if youmade your save or not! Most gamers agree thatsuch dice can be rolled again. However, oneplayer we know has a house rule that if your dicemisses the table, you have failed the roll – afterall, if you can’t hit a huge table with a tiny dice,then what chance have your warriors got!
THE RULES SECTION: THE SHOOTING PHASE 19

TAKE SAVING THROWS Before he removes any models as casualties, theowning player can test to see whether his troops avoidthe damage by making a saving throw. This could bebecause of the target’s armour, some other protectivedevice or ability, or intervening models or terrain.
If all the models in a unit are the same, and have asingle Wound each, such as a squad of Eldar Rangersor Necron Warriors, then this is a very simple process.You roll all the saves for the unit in one go (asdescribed below), and a model of your choice isremoved as a casualty for each failure.
On the other hand, it is common for units to includemodels with different weapons or wargear andcharacters with different profiles (and sometimes evendifferent armour). In these cases we need to knowexactly who has been wounded, and this requires anextra step in the shooting process. The wounds the unithas suffered must be allocated onto specific modelsbefore saving throws are taken. This extra step isexplained after the basic rules (see page 25).
ARMOUR SAVESMost troops wear some sort of protective clothing orarmour, even if it’s only a helmet! Some creatures mayhave a form of natural protection, such as a chitinousexo-skeleton or thick bony plates. If a model has a Sv value of 6 or better on its profile, it is allowed afurther dice roll to see if the armour stops it beingwounded. This is called an armour saving throw.
Roll a D6 for each wound the model has suffered fromincoming fire and compare the results to the model’s Svcharacteristic. If the dice result is equal to or higherthan the model’s Sv value, the wound is stopped. If theresult is lower than the Sv value, the armour fails toprotect its wearer and the model suffers a wound. Thismeans that, differently from other characteristics, a Svvalue is better if it has a lower number.
The following table shows how the minimum D6 scorerequired varies between three types of armour:
Armour Type SvOrk armour 6Imperial Guard flak armour 5Space Marine power armour 3
Example: a Space Marine wearing power armour is hitand wounded. The Space Marine is entitled to a savingthrow of 3, so a D6 is rolled resulting in a score of 5.The damage is therefore saved, and the model isunharmed – the shot bounces off his power armour.
Armour piercing weaponsSome powerful weapons are quite capable of punchingthrough even the thickest types of armour. This isshown by a weapon having an Armour Piercing value,
usually referred to as AP. Nearly all weapons have anArmour Piercing value. Some sample AP ratings fordifferent weapons are shown below:
Weapon APBoltgun 5Heavy bolter 4Lascannon 2
The AP rating indicates the armour save the weaponcan ignore – so lower means more powerful. A weaponshown as ‘AP –’ has no Armour Piercing value and willnever disallow the target’s armour save.
• If the weapon’s Armour Piercing value is equal to orlower than the model’s armour save then it issufficiently powerful to punch straight through thearmour and the target gets no armour save at all.The armour is ineffective against the shot.
• If the weapon’s Armour Piercing value is higher thanthe armour, the target can take his save as normal.
Example: a boltgun with an AP of 5 can pierce armourwhich has a Sv of 5+ or 6. A heavy bolter has anArmour Piercing rating of 4 so saves of 4+, 5+ or 6 areignored. A lascannon with its AP of 2 ignores even thebest armour it is possible to wear!
INVULNERABLE SAVESSome warriors are protected by more than merephysical armour. They may be shielded by force fields,enwrapped by mystic energies or have an alienmetabolism that can shrug off hits that would putholes in a battle tank. Models with wargear or abilitieslike these are allowed an invulnerable saving throw.Invulnerable saves are different to armour savesbecause they may always be taken whenever the modelsuffers a wound – the Armour Piercing value ofattacking weapons has no effect. Even if a woundnormally ignores all armour saves, an invulnerablesaving throw may still be taken.
20 THE RULES SECTION: THE SHOOTING PHASE
“As our bodies are armoured withadamantium, our souls are protected withloyalty. As our bolters are charged withdeath for the Emperor's enemies, ourthoughts are charged with wisdom. Asour ranks advance, so does our devotion,for are we not Marines? Are we not thechosen of the Emperor, his loyalservants unto death?”
Chaplain Fergas Nils

COVER SAVESA position in cover shields troops against flying debrisand enemy shots, enabling them to get their headsdown or crawl amongst the rocks and (hopefully) avoidharm. Because of this, units in or behind cover receivea cover saving throw. The great thing about coversaving throws is that they are not affected by theArmour Piercing value of the attacking weapon, sounits in cover will normally get a saving throwregardless of what’s firing at them.
What counts as Cover?Cover is basically anything that is hiding a target orprotecting it from incoming shots. For example, a softobstacle (like a hedge) that would hide soldiers behindit, but would not even slow down enemy shots, confersa 5+ save, purpose-built fortifications confer a 3+ save,most other things confer a 4+ save. More detail can befound in the Cover chart below. Before deploying theirarmies, it is a very good idea for players to go throughall the terrain pieces on the battlefield quickly andagree what kind of cover each will offer.
When are models in Cover?When any part of the target model’s body (as definedon page 16) is obscured from the point of view of thefirer, the target model is in cover. This is intentionallygenerous, and it represents the fact that the warrior,unlike the model, will be actively trying to take cover(as well as the smoke, explosions and flying debris thatare mercifully absent from our tabletop battlefields).
Firers may of course shoot over intervening terrain ifthey are tall enough or high up on some terrain pieceso that their line of sight is completely clear. As usual,check the firers’ line of sight by taking a good lookfrom behind their heads, and ‘see what they see’.
COVER CHART
Cover Type Savea) Razor wire, Wire mesh 6+
b) High Grass, Crops, Bushes 5+Hedges, Fences
c) Units (friends and enemies), 4+Trenches, Gun pits, Tank traps,Emplacements, Sandbags, Barricades, Logs, Pipes, Crates, Barrels, Hill crests, Woods, Jungles, Wreckage, Craters, Rubble, Rocks, Ruins, Walls, Buildings, Wrecked vehicles
d) Fortifications 3+
Intervening modelsIf a target is partially hidden from the firer’s view byother models, it receives a 4+ cover save in the sameway as if it was behind terrain.
This does not mean that intervening models literallystop the shots, but rather that they obscure the sight ofthe firers or otherwise spoil their aim. A successfulcover save in this case might mean that the firer hasnot shot at all, missing the fleeting moment when thetarget was in its sights. This is because, in the case ofintervening friends, the firer would be afraid of hittinghis comrades; while in the case of intervening enemies,the firer is distracted by the more immediate threat.
Scenic rocks and other decorative elements that playersmight have placed on the base of their models arealways ignored from the point of view of determiningcover (you cannot take your cover with you!).
THE RULES SECTION: THE SHOOTING PHASE 21
“If all else fails: duck. As a defensivestratagem it’s unreliable, but incrediblyreassuring for a moment or two.”
Lord Corvis of Petrax

ExceptionsIn order to keep the game flowing at a faster pace, wehave made a few exceptions to the cover rules given onthe previous page, namely:
• Own unit: In the same way as they can trace line ofsight through members of their own squad, modelscan always shoot, and be shot at, through membersof their own unit without conferring or receiving acover save.
• Inside area terrain: Target models whose bases areat least partially inside area terrain are in cover,regardless of the direction the shot is coming from.This represents their increased chance of diving intoor behind a piece of covering terrain.
• Firing through units or area terrain: If a modelfires through the gaps between some elements ofarea terrain (such as between two trees in a wood)or through the gaps between models in anintervening unit, the target is in cover, even if it iscompletely visible to the firer. Note that this doesnot apply if the shots go over the area terrain or unitrather than through it (see the photographicdiagram below).
• Firing out of area terrain: Models that are insidearea terrain firing out will position themselves withgood fields of vision. Therefore they may fire throughup to 2" of the area terrain they are occupyingwithout that terrain conferring a cover save to thetarget. Remember, of course, that models still needto see their target in order to be able to shoot at all.
• Firing over a barrier: Models that are in basecontact with a linear piece of terrain they can seeover, such as a low wall, barricade, tank trap or afence, can fire at enemies on the other side withoutthe barrier getting in the way of their shots.
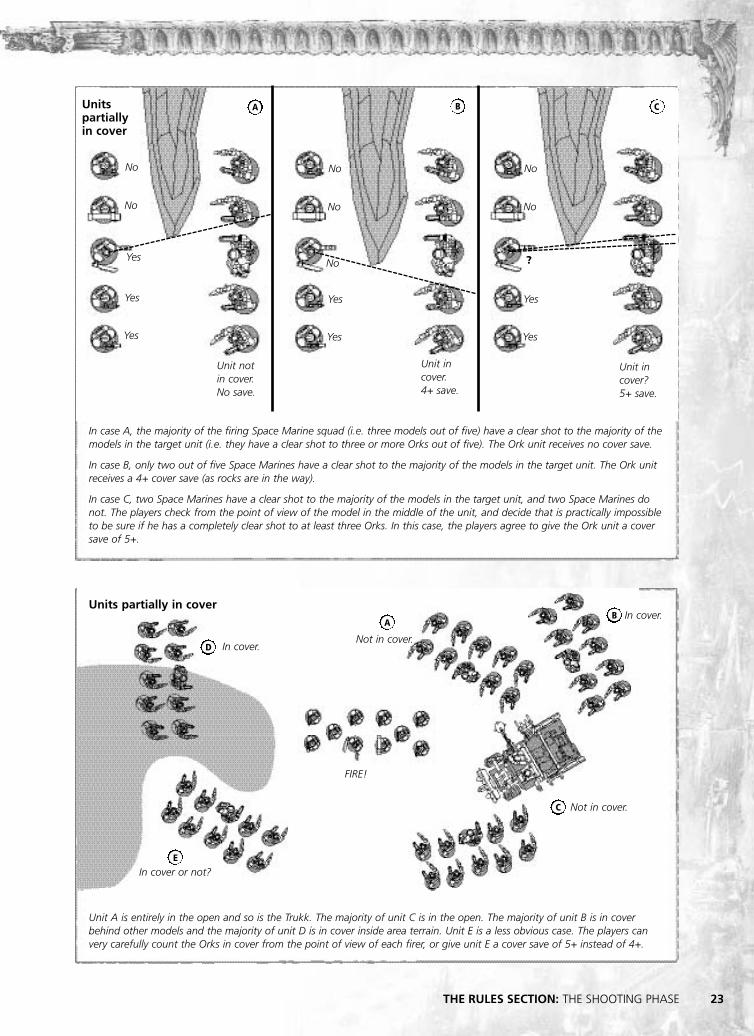
Units partially in coverSometimes, a unit will only be partially in cover, withsome of its models in cover and some not. In this caseyou must decide if the majority of the unit is in cover.Models that are completely out of sight are consideredto be in cover for this purpose.
If half or more of the models in the target unit are incover, then the entire unit is deemed to be in cover andall of its models may take cover saves.
If less than half of the models in the target unit are incover, then the entire unit counts as exposed and noneof its models may take cover saves.
Of course being in cover or not often depends on theposition of the firer as well as the target. If only onemodel is shooting, it will be easy to tell how manymodels in the target unit are in cover from the firer’spoint of view. If multiple models are shooting, you willneed to work out how many models are in cover fromthe point of view of the majority of the firing modelsthat are in range. If the majority of the firers have aclear shot to the majority of the models in the targetunit, the unit receives no save. Otherwise it does. Thismay sound complex, but you will find that in reality inmost cases it is quite obvious if a unit is in cover or not.
In situations where it’s not obvious whether a unit is incover or not, the normal solution is to strictly apply themajority rule above, and count how many models arein cover from the point of view of each of the firingmodels in range. As this process might prove to berather time-consuming, for a faster (albeit less precise)solution, the players may agree to treat these units asin cover, but with a cover save of one less than normal(for example a 5+ save if partially in cover behind abuilding or another unit, which normally would offer a4+ save). See the diagrams opposite for examples ofunits partially in cover.
22 THE RULES SECTION: THE SHOOTING PHASE
A
BC
Model A is inside the area terrain and so is in cover. Model B is not inside the area terrain, but is between two elements of that area terrain (the same
as if it was between two models of an intervening unit), so it is in cover. Model C is not in cover.
A
A B C
B
D
E
Unit A is entirely in the open and so is the Trukk. The majority of unit C is in the open. The majority of unit B is in coverbehind other models and the majority of unit D is in cover inside area terrain. Unit E is a less obvious case. The players canvery carefully count the Orks in cover from the point of view of each firer, or give unit E a cover save of 5+ instead of 4+.
Units partially in cover
Unitspartiallyin cover
In cover.
No
No
Yes
Yes
Yes
Unit notin cover.No save.
Unit incover.4+ save.
Unit incover? 5+ save.
No
No
No
Yes
Yes
No
No
?
Yes
Yes
FIRE!
In cover or not?
Not in cover.
Not in cover.
In cover.
C
In case A, the majority of the firing Space Marine squad (i.e. three models out of five) have a clear shot to the majority of themodels in the target unit (i.e. they have a clear shot to three or more Orks out of five). The Ork unit receives no cover save.
In case B, only two out of five Space Marines have a clear shot to the majority of the models in the target unit. The Ork unitreceives a 4+ cover save (as rocks are in the way).
In case C, two Space Marines have a clear shot to the majority of the models in the target unit, and two Space Marines donot. The players check from the point of view of the model in the middle of the unit, and decide that is practically impossibleto be sure if he has a completely clear shot to at least three Orks. In this case, the players agree to give the Ork unit a coversave of 5+.
THE RULES SECTION: THE SHOOTING PHASE 23

MODELS WITH MORE THAN ONE SAVESometimes, a model will have a normal armour saveand a separate invulnerable save – a good example is aSpace Marine Chaplain who is protected by bothpower armour and a Rosarius-generated force field. As if this wasn’t enough the model might be in coveras well. In these cases, the model only ever gets tomake one saving throw, but it has the advantage ofalways using the best available save.
For example, if the Chaplain described above wasstanding in a fortified building and was wounded by anAP3 weapon his power armour would be of no use, asthe shot’s AP is equal to or lower than his armour save.The force field grants a 4+ invulnerable save. However,the fortified building grants a 3+ cover save. Neither ofthese saves is affected by the AP of the weapon so theChaplain uses the cover save to give him the bestchance of surviving.
If a unit can benefit from different types of cover, forexample being behind a hedge (5+ cover save) and alow wall (4+), the unit uses the best cover saveavailable (in this case 4+).
MAXIMUM SAVESome models gain additional benefits from rules thatmay increase any of their saves by +1 or +2. However,no save (armour, cover or invulnerable) can ever beimproved beyond 2+. A roll of 1 always fails.
REMOVE CASUALTIES For every model that fails its save, the unit suffers anunsaved wound. Of course this also includes woundsagainst which no save can be attempted, such as thosefrom weapons with very high AP. Most models have asingle Wound on their profile, in which case for eachunsaved wound one model is immediately removedfrom the table as a casualty. As long as all the modelsin the unit have the same profile, special rules,weapons and wargear, the player who owns the unitcan choose which of his models is removed.
Note that any model in the target unit can be hit,wounded and taken off as a casualty, even models thatare completely out of sight or out of range of all of thefirers. This may seem slightly strange, but it representsthe fact that the real action on the battlefield is not asstatic as our models. In reality the warriors, both thefirers and the targets, would be moving around andreal bullets have a nasty habit of ricocheting or simplygoing through covering terrain!
Casualties are not necessarily dead – they may bemerely knocked unconscious, too injured to carry onfighting or incapacitated in other some way. In anycase, they are no longer fit to participate in the battle.
GOING TO GROUNDIf warriors come under heavy fire, they may decideto keep their heads down and stay alive a littlelonger while they wait for reinforcements.
After the enemy has rolled to hit and woundagainst any of your units, but before you take anysaves or remove any models, you can declare thatthe unit is going to ground. To represent this,place a suitable marker next to the unit (you mayalternatively want to lay the models down).Models in a unit that has gone to groundimmediately receive +1 to their cover savingthrows. Units that are not currently in a positionthat would give them a cover save can still go toground by diving to the floor (or some otherevasion technique) and receive a 6+ cover save.
The drawback of going to ground is that the unitcan do nothing until the end of its following turn. At the end of its following turn the unit returns tonormal, the marker is removed and the unit is freeto act as normal from then on.
Whilst it has gone to ground the unit may donothing of its own volition, but will react normallyif affected by enemy actions (for example, it willtake Morale tests as normal). If the unit has to fallback, it will return to normal immediately. Ifassaulted, the unit will fight as usual, but gains noadvantage for being in cover because they are notset to receive the enemy charge (see page 36).
24 THE RULES SECTION: THE SHOOTING PHASE
“He that may still fight, heal him.He that may fight no more, give him peace.He that is dead, take from him the Chapter’s due.”
- Master of the Apothacarion Aslon Marr

The rules for taking saving throws and removingcasualties, as presented so far, assume that all themodels in the target unit are identical in gaming terms.By this we mean they have the same profile ofcharacteristics, the same special rules and the sameweapons and wargear.
Of course many units include different models, andwhen this is the case an extra step is needed todetermine which warriors have been hit by whichweapons. This is worked out as follows:
Once the number of wounds caused by the firing unithas been determined, the player controlling the targetunit must decide which models have been wounded,allocating the wounds to the warriors of their choice.Remember that any model in the unit can be wounded,not just those in range or in view.
The player must allocate one wound to each model inthe target unit before he can allocate a second woundto the same model.
Once all models in the target unit have one woundallocated to them, the process is repeated and theplayer must allocate a second wound to all models inthe target unit before he can allocate a third wound toa model, and so on, until all wounds from the firingunit have been allocated.
This Space Marine Devastator combat squad consists of fivemodels: two Space Marines armed with bolters, two armedwith missile launchers and one Veteran Sergeant (who has adifferent profile and wargear from the rest of the squad).They are hit by a volley from a nearby enemy squad andsuffer eleven wounds – ten wounds from weapons whoseAP is not high enough to pierce their armour, and one froma weapon that can (e.g. an AP1 meltagun). This amounts totwo wounds per model and a single spare wound.
The player controlling the Space Marines picks up the dicethat scored a wound and uses them to show how he isgoing to allocate the wounds (shown above). He allocatesone normal wound, the meltagun one (the grey dice) and
the spare wound on a Space Marine with a bolter, and thentwo normal wounds on every other model. He is trying tominimise the damage by allocating both the worst wound(the meltagun’s) and the spare wound on the same model.
He goes on to roll the four saves for the Space Marines withbolters in one go, failing two. He should remove threemodels (two unsaved wounds plus one wound with noarmour save from the meltagun), but as there are only twomodels in this group of identical models, he just removesthem both. Then he rolls the four saves for the SpaceMarines with missile launchers in one go, failing one andremoving one of the models. Finally he takes the two savesfor the Veteran Sergeant, passing both.
We find that the clearest way of doing this is to literallypick up the dice that have scored wounds and placethem next to the models that they have wounded. It isstill important to know which weapon has causedwhich wound, because they may negate the target’ssave, so sticking with the same coloured dice usedwhen rolling to hit will really help.
TAKING SAVING THROWS Having allocated the wounds, all of the models in theunit that are identical in gaming terms take their savingthrows at the same time, in one batch. Casualties canthen be chosen by the owning player from amongstthese identical models. If there is another group ofidentical models in the unit, the player then takes all oftheir saves in one batch, and so on.
Finally, the player rolls separately for each model thatstands out in gaming terms. If one of these differentmodels suffers an unsaved wound, then that specificmodel must be removed. Note that if a model carryinga different weapon to the rest of the unit is killed andremoved, his squad-members are not allowed to pickup his gun. We can assume that he was the only onetrained to use the weapon, or that the weapon itselfhas been damaged and is now useless.
The diagram below shows an example of how thisprocess works. You’ll find that it is quite intuitive onceyou have tried it a few times.
THE RULES SECTION: THE SHOOTING PHASE 25
Allocating wounds on complex units
COMPLEX UNITS
MULTIPLE-WOUND MODELSEspecially tough and heroic individuals such as SpaceMarine commanders, or horrendous alien monstrositiessuch as Tyranid Hive Tyrants, can sustain more damagethan ordinary troopers and keep on fighting. To showthis, they have more than one Wound on theircharacteristic profile.
When such a multiple-wound model suffers an unsavedwound, it loses one Wound from its profile. Once themodel has lost all of its Wounds, it is removed as acasualty (so a model with 3 Wounds would only bekilled after it had been wounded three times). Keeptrack of how many wounds such models have sufferedon a piece of scrap paper, or by placing a dice ormarker next to them.
INSTANT DEATHEven though a creature might have multiple Wounds,there are plenty of weapons in the 41st Millenniumthat are powerful enough to kill it instantly. If a modelsuffers an unsaved wound from an attack that has aStrength value of double its Toughness value or greater,it is killed outright and removed as a casualty. It can beimagined that the creature is vapourised, burned to apile of ash, blasted limb from limb or otherwisemortally slain in a suitably graphic fashion.
Example: a Space Marine Captain is Toughness 4 andhas 3 Wounds. Ordinarily, he could survive beingwounded twice before being removed as a casualty onthe third wound suffered. However, if he were to havethe misfortune to be wounded by a krak missile(Strength 8 – normally used for knocking out battletanks), he would become a casualty immediatelybecause the missile’s Strength is double his Toughness.
Some models can gain improvements to theirToughness by using wargear items like bikes, ChaosMarks, etc. When it comes to instant death, suchbonuses do not count (ie, riding a bike won’t save youfrom being obliterated by a lascannon blast!). In thesecases two values will be shown for the Toughnesscharacteristic of the model, one of which is in brackets.Use the lowest value for working out instant death.
UNITS OF MULTIPLE-WOUND MODELSUnits consisting of models with multiple wounds ontheir profile, such as Tyranid Warriors and Ork Nobz,are quite rare. Working out how to allocate woundsand remove casualties from such units can be quitecomplex, so if you don’t have any in your army, feelfree not to finish reading this page!
If a unit consists entirely of models that are identical ingaming terms and have multiple wounds, then take allthe saves for the unit in one go.
If the unit includes different models, first allocate thewounds suffered. Then take saves for identical modelsat the same time as normal.
Once you have determined the number of unsavedwounds suffered by a group of identical multiple-wound models, you must remove whole models ascasualties where possible. Wounds may not be ‘spreadaround’ to avoid removing models. Track any excesswounds with a note or a marker as noted above.Multiple-wound models in the unit that are unique arerolled for individually and their unsaved wounds mustbe recorded separately.
For example, let us examine a unit of four Ork Nobz,which have 2 Wounds each. Three of the Nobz areidentical, while one has been upgraded with a betterweapon. If the unit suffers nine wounds, the playermust allocate two on each model, leaving a sparewound that he will allocate on a normal Nob. Theplayer then takes seven saves for the three normalNobz, failing three. He cannot put a single wound oneach Nob, but must remove one model as well asrecording that one normal Nob has suffered a wound.He then takes the two saves for the upgraded Nob andfails one, so he must record that the upgraded Nob hassuffered a wound as well. The unit is then fired uponby another enemy and suffers a single wound. This willautomatically kill the wounded Nob and cannot beallocated to the remaining healthy Nob.
If amongst the unsaved wounds there are some thatinflict instant death, the player must first, if possible,remove one unwounded model for each unsavedwound that causes instant death, and then proceed asnormal (this is done for each group of identicalmultiple-wound models). This rule is designed to stopplayers avoiding single wounds by putting them on amodel that has suffered instant death anyway.
In the example above, if one of the three unsavedwounds on the normal Nobz caused instant death, theplayer would remove one unwounded Nob for thatwound and then another normal Nob for the remainingtwo unsaved wounds. This would leave only onenormal Nob and the upgraded Nob, which sufferedone wound.
26 THE RULES SECTION: THE SHOOTING PHASE
BURN THE HERETIC!
KILL THE MUTANT!
PURGE THE UNCLEAN!

By the 41st Millennium, warfare hasspawned innumerable weapons, ranging incapability from the simple but efficientlaspistol to the barely controllable energiesof the plasma cannon. In this section wedescribe how characteristics and special rulesreflect the differences between differentweapons.
Every weapon has a profile that consists of severalelements, for example:
Name Maximum Strength Armour TypeRange Piercing
Boltgun 24" 4 5 Rapid Fire
MAXIMUM RANGERanges are all given in inches. If the weapon’s range isgiven as ‘Template’ then the weapon fires using theteardrop-shaped Flamer template (the exact method isexplained later).
STRENGTHAs explained in the Shooting rules, when rolling towound for shooting hits, you use the weapon’sStrength rather than the firer’s.
ARMOUR PIERCING (AP)This value shows how good the weapon is at punchingthrough armour. The lower the number, the better theweapon is at piercing armour, cancelling the target’sarmour save. See the Shooting rules for more onarmour saves and AP values.
TYPEAll weapons are classified as either Rapid Fire, Pistol,Assault, Heavy or Ordnance. These rules (foundoverleaf) are a measure of the weapon’s portability andaffect the way it can be fired in relation to the model’smovement during that turn’s Movement phase.
Some weapons such as storm bolters and multi-lasersfire multiple shots. Where this is the case the numberof shots a weapon fires is noted after its type. Forexample, a multi-laser fires three shots in each Shootingphase so its type is noted as Heavy 3.
Remember that the player can decide that any model ina firing unit is not going to fire its weapon. However, ifa model does fire, it must do so at full effect andcannot reduce its weapon’s firepower (for example, itcannot fire only two shots from its Heavy 3 weapon).
Some weapons may be able to fire in different ways,representing different power settings or different typesof ammo. Where this is the case, there will be aseparate line in the weapon’s profile for each.
ADDITIONAL CHARACTERISTICSIn addition to its type, a weapon may have someadditional characteristics that define the way theywork. These are added to the weapon type in theweapon’s profile, and include characteristics like ‘getshot!’ or ‘blast’. A weapon may have any number ofthese characteristics in addition to its type.
WEAPONS
THE RULES SECTION: WEAPONS 27
To a Space Marine, the boltgun is far more than a weapon; it is aninstrument of Mankind’s divinity, the bringer of death to his foes. Its howling blast is a prayer to thegods of battle.

An assault weapon can always shoot thenumber of times indicated and up to itsmaximum range, regardless of whether thefirer moved or not.
WEAPON TYPES
RAPID FIRE WEAPONSRapid fire weapons are very common and usually comein the form of semi-automatic rifles. Their versatilitymeans they can be fired effectively ‘from the hip’ whena squad is advancing, spraying shots into the enemywhenever they present themselves, or instead used foraimed single shots against targets at greater distances.
Models armed with a rapid fire weapon can move andfire two shots at targets up to 12" away.
If the unit has not moved, models armed with rapid fireweapons may instead fire one shot at targets over 12"away, up to the weapons’ maximum range. If such aunit is found to have firing models both within 12" ofthe target and further away, the firers within 12" willfire two shots, while those further away will fire one.
Models that shoot with rapid fire weapons in theShooting phase cannot assault into close combat in theensuing Assault phase.
Example Range S AP TypeBoltgun 24" 4 5 Rapid Fire
ASSAULT WEAPONSAssault weapons are fired by warriors as they moveforward into the attack. They either fire so rapidly orare so indiscriminate that you don’t have to do muchmore than point and shoot. For example, a flamer is aweapon that fires a fan-shaped gout of burning fuel,so it’s just as accurate whether you are moving andfiring or not. This means they are very good for movingand assaulting things… hence the name!
Assault weapons shoot the number of times indicated –whether you move or not and regardless of range.
Models carrying assault weapons can fire them in theShooting phase and still assault into close combat inthe Assault phase.
Example Range S AP TypeBig Shoota 36" 5 5 Assault 3
Moving
Up to 12" = 2 shotsMaximum range = 1 shot
StationaryandMoving
Stationary
Stationary
ASSAULT WEAPONS (firer may assault)
HEAVY WEAPONS (firer may not assault)
If a model using a rapid fire weapon remainsstationary it can fire two shots up to 12", butonly one shot up to the weapon’s maximumrange. If the model moves then it can onlyfire two shots up to a range of 12".
If a model with a heavy weapon remainsstationary it can fire the number of timesindicated and up to the maximum range ofthe weapon. If the model (or his unit) moved,however, it cannot shoot that weapon.
28 THE RULES SECTION: WEAPONS
Up to 12" = 2 shots
Maximum range of weapon
Maximum range of weapon
May not shoot
RAPID FIRE WEAPONS (firer may not assault)
Moving
Look to your wargear!

HEAVY WEAPONSThese are heavy, man-portable weapons, such asmissile launchers, or lighter weapons that requirereloading between each shot, careful set-up or bracingagainst their considerable recoil.
If a unit moves then it cannot shoot heavy weapons –they either move or shoot, but not both. Rememberthat if any models move, their whole unit counts ashaving moved for that turn, and this will preventmodels with heavy weapons from firing even if thosespecific models stayed still. When shooting, heavyweapons always fire the number of times indicatedregardless of range. They are very good for layingdown long range supporting fire or taking out tanksand monstrous creatures. Units that fire heavy weaponsin the Shooting phase may not assault into closecombat in the Assault phase.
Example Range S AP TypeLascannon 48" 9 2 Heavy 1
PISTOL WEAPONSPistol weapons are light enough to be carried and firedone-handed, but as they often have a less powerfulcharge, their range is limited. On the plus side, they arehandy enough to allow a trooper to fight in closecombat with a combination of a pistol and sword, axeor other close combat weapon.
All pistols are effectively Assault 1 weapons with arange of 12" (unless differently specified in theirprofile). In addition a pistol counts as a close combatweapon in the Assault phase.
Example Range S AP TypeBolt Pistol 12" 4 5 Pistol
ORDNANCE WEAPONSOrdnance weapons are so huge and powerful that theycannot be physically carried by infantry, but must bemounted onto a vehicle or be built into the structure ofa bunker or fortress. Their rules are covered in theVehicles section on pages 58 and 60.
Example Range S AP TypeBattle Cannon 72" 8 3 Ordnance 1,
Large Blast
ADDITIONAL WEAPONCHARACTERISTICSThese extra weapon characteristics are represented byadditional rules that are added to a weapon’s type.
TEMPLATEThese are particularly indiscriminate short-rangeddevices, such as flame throwers, which affect a broad,cone-shaped area represented by a template (seediagram). They are indicated by having the word‘template’ for their range instead of a number.
Instead of rolling to hit, simply place the template sothat its narrow end is touching the base of the modelfiring it and the rest of the template covers as manymodels as possible in the target unit without touchingany friendly models. Against vehicles, the templatemust be placed to cover as much of the vehicle aspossible without also touching a friendly model. Anymodels fully or partially under the template are hit.Against vehicles, use the direction of the firer todetermine which armour facing is attacked. Becausetemplate weapons bathe the area in burning fuel, coversaves are ignored when resolving wounds, even bymodels inside area terrain! Wounds inflicted bytemplate weapons do not have to be allocated on themodels actually covered by the template, but can beput onto any model in the unit.
Example Range S AP TypeFlamer Template 4 5 Assault 1
Multiple template weaponsIf a unit is firing more than one template weapon,resolve each shot, one at a time, as described above,determining and recording how many hits are scoredby each template. Finally, fire any other weapon in theunit, then add up all of the hits and roll to wound.
Hit
Hit
Hit
Template weapons
The Space Marine player positions thetemplate so that it scores the maximumamount of hits (in this case three).
29THE RULES SECTION: WEAPONS
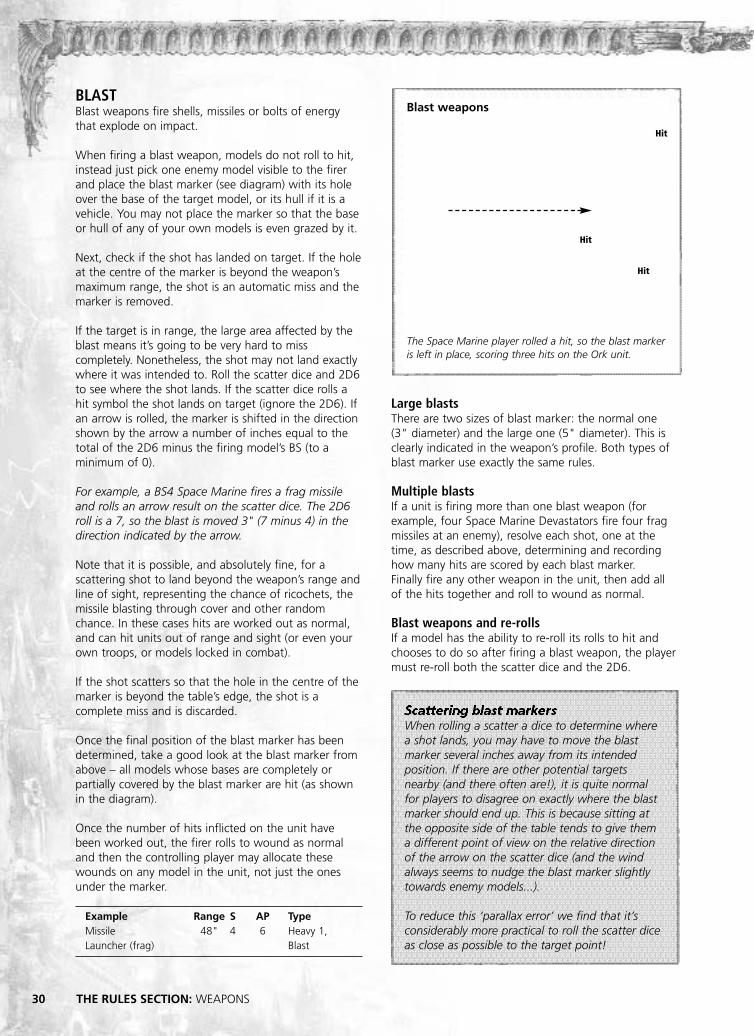
BLASTBlast weapons fire shells, missiles or bolts of energythat explode on impact.
When firing a blast weapon, models do not roll to hit,instead just pick one enemy model visible to the firerand place the blast marker (see diagram) with its holeover the base of the target model, or its hull if it is avehicle. You may not place the marker so that the baseor hull of any of your own models is even grazed by it.
Next, check if the shot has landed on target. If the holeat the centre of the marker is beyond the weapon’smaximum range, the shot is an automatic miss and themarker is removed.
If the target is in range, the large area affected by theblast means it’s going to be very hard to misscompletely. Nonetheless, the shot may not land exactlywhere it was intended to. Roll the scatter dice and 2D6to see where the shot lands. If the scatter dice rolls ahit symbol the shot lands on target (ignore the 2D6). Ifan arrow is rolled, the marker is shifted in the directionshown by the arrow a number of inches equal to thetotal of the 2D6 minus the firing model’s BS (to aminimum of 0).
For example, a BS4 Space Marine fires a frag missileand rolls an arrow result on the scatter dice. The 2D6roll is a 7, so the blast is moved 3" (7 minus 4) in thedirection indicated by the arrow.
Note that it is possible, and absolutely fine, for ascattering shot to land beyond the weapon’s range andline of sight, representing the chance of ricochets, themissile blasting through cover and other randomchance. In these cases hits are worked out as normal,and can hit units out of range and sight (or even yourown troops, or models locked in combat).
If the shot scatters so that the hole in the centre of themarker is beyond the table’s edge, the shot is acomplete miss and is discarded.
Once the final position of the blast marker has beendetermined, take a good look at the blast marker fromabove – all models whose bases are completely orpartially covered by the blast marker are hit (as shownin the diagram).
Once the number of hits inflicted on the unit havebeen worked out, the firer rolls to wound as normaland then the controlling player may allocate thesewounds on any model in the unit, not just the onesunder the marker.
Example Range S AP TypeMissile 48" 4 6 Heavy 1, Launcher (frag) Blast
Large blastsThere are two sizes of blast marker: the normal one (3" diameter) and the large one (5" diameter). This isclearly indicated in the weapon’s profile. Both types ofblast marker use exactly the same rules.
Multiple blastsIf a unit is firing more than one blast weapon (forexample, four Space Marine Devastators fire four fragmissiles at an enemy), resolve each shot, one at thetime, as described above, determining and recordinghow many hits are scored by each blast marker. Finally fire any other weapon in the unit, then add allof the hits together and roll to wound as normal.
Blast weapons and re-rolls If a model has the ability to re-roll its rolls to hit andchooses to do so after firing a blast weapon, the playermust re-roll both the scatter dice and the 2D6.
Hit
Hit
Hit
30 THE RULES SECTION: WEAPONS
Blast weapons
The Space Marine player rolled a hit, so the blast markeris left in place, scoring three hits on the Ork unit.
Scattering blast markersWhen rolling a scatter a dice to determine wherea shot lands, you may have to move the blastmarker several inches away from its intendedposition. If there are other potential targetsnearby (and there often are!), it is quite normalfor players to disagree on exactly where the blastmarker should end up. This is because sitting atthe opposite side of the table tends to give thema different point of view on the relative directionof the arrow on the scatter dice (and the windalways seems to nudge the blast marker slightlytowards enemy models...).
To reduce this ‘parallax error’ we find that it’sconsiderably more practical to roll the scatter diceas close as possible to the target point!

PINNINGComing under fire without knowing where the shotsare coming from is extremely shocking, makingtroopers throw themselves flat and hug cover as muchas possible. Sniper fire and barrages are the mostcommon causes of this.
If a unit other than a vehicle suffers any unsavedwounds from a pinning weapon, it must immediatelytake a Pinning test. This is a normal Leadership test.
If the unit fails the test, it is immediately forced to goto ground (as described on page 24). As the unit hasalready taken its saves, going to ground does notprotect it against the fire of the pinning weapon thatcaused the test (or indeed of any other weapon firedby the same unit that phase) – it’s too late!
As long as the tests are passed, a unit may be calledupon to take multiple Pinning tests in a single turn, but if a unit has already gone to ground, no furtherPinning tests are taken.
If the special rules of a unit specify that the unit cannever be pinned, the unit always automatically passesPinning tests. Such units can still choose to go toground voluntarily.
GETS HOT!‘Gets hot!’ represents the penchant of certain unstableweapons for overloading and badly burning their user.Roll to hit as normal, except that you must roll to hiteven if the target is found to be out of range. For eachresult of a 1 rolled on its to hit rolls, the firing modelsuffers a wound (normal saves apply). Because of theiradditional cooling systems, weapons on vehicles are notaffected by this rule.
Example Range S AP TypePlasma gun 24" 7 2 Rapid Fire,
Gets Hot!
Gets Hot! and blast weapons Blast weapons do not roll to hit, so you must alwaysroll a D6 before firing a Gets Hot! blast weapon tocheck if the weapon overheats. If you roll a 1, theweapon gets hot, it does not fire, and the firing modelsuffers a wound (normal saves apply). Otherwise theshot is resolved as normal.
Gets Hot! and re-rolls If a model has the ability to re-roll its rolls to hit(including because of BS 6+), it may re-roll Gets Hot!results of 1 without suffering a wound, unless theresult of the re-roll is a 1 as well.
TWIN-LINKEDWeapons are sometimes linked to fire together in orderto increase the chances of scoring a hit through thecrude expedient of blasting more shots at the target.
A set of twin-linked weapons count as a single weaponof that type, but to represent their fusillade of fire youmay re-roll the dice to hit if you miss (including twin-linked blast weapons). In other words, twin-linkedweapons don’t get more shots than normal ones, butyou get a better chance of hitting with them.
Example: A Space Marine Land Raider is firing its twin-linked heavy bolters at an enemy. It gets three shots (asheavy bolters are Heavy 3) and may re-roll any to hitdice which don’t score a 3 or higher (which is a hit fora Space Marine’s BS of 4) because the weapons aretwin-linked.
Twin-linked template weaponsTwin-linked template weapons are fired just like asingle weapon, but they can re-roll the dice to wound.When fired against a vehicle, you may re-roll thearmour penetration dice instead.
RENDINGIn the right circumstances, rending weapons have achance of piercing any armour with a hail of shots,pinpoint accuracy or diamond-hard ammunition.
Any roll to wound of 6 with a rending weaponautomatically causes a wound, regardless of the target’sToughness, and counts as AP2. Against vehicles, anarmour penetration roll of 6 allows a further D3 to berolled, with the result added to the total score.
Example Range S AP TypeAssault cannon 24" 6 4 Heavy 4,
Rending
SNIPER These deadly weapons can be used to pick out atarget’s weak or vulnerable points.
Sniper hits wound on a roll of 4+, regardless of thevictim’s Toughness. In addition, all sniper weapons arealso rending and pinning weapons (see above).
Against vehicles, sniper weapons count as Strength 3,which, combined with the rending rule, represents theirchances of successfully hitting exposed crew, visionports, fuel or ammo storage, etc.
Example Range S AP TypeSniper rifle 36" X 6 Heavy 1,
Sniper
THE RULES SECTION: WEAPONS 31

Once all of the markers are in place, work out thenumber of hits scored for each blast marker as usualfor blast weapons and then roll to wound as normal.
MELTAMelta weapons are lethal, short-ranged ‘heat rays’.They roll an extra D6 when rolling to penetrate avehicle’s Armour Value at half range or less. If theweapon is more than half its maximum range away, asingle D6 is rolled as normal. See the Vehicles ruleslater for more details on armour penetration.
Example Range S AP TypeMeltagun 12" 8 1 Assault 1,
Melta
LANCEThese weapons fire a coherent, focused beam that canbore through any armour, regardless of its thickness.Due to their unique nature, lance weapons countvehicle Armour Values higher than 12 as 12.
Example Range S AP TypeBright lance 36" 8 2 Heavy 1,
Lance
BARRAGECertain weapons launch their shells high up into the airso that they plunge down upon their target, passingover any intervening cover en route and even strikingtargets that are out of sight.
Note that in older Codex books barrage weapons wereidentified by having a G (guess) before their range (e.g.Range: G48"). This is the same as having the word‘barrage’ under their Type.
All barrage weapons use blast markers andconsequently use the rules for blast weapons, with thefollowing exceptions:
• To determine if a unit wounded by a barrage weaponis allowed a cover save, always assume the shot iscoming from the centre of the marker, instead offrom the firing model. Remember that models in areaterrain get their cover save regardless of the directionthe shot is coming from.
• Some barrage weapons have a minimum range aswell as a maximum range (e.g. Range: 12"- 48"). If the centre of the marker is placed by the firerwithin the minimum range (before rolling for scatter),the shot misses automatically and is removed.
• Death raining from the sky is a truly terrifyingexperience, therefore all barrage weapons arepinning weapons as well (see Pinning).
• Barrage weapons can fire at a target they cannot see,but if they do this, the BS of the firer makes nodifference and the blast marker scatters a full 2D6" if an arrow is rolled on the scatter dice.
Example Range S AP TypeLobba 48" 5 5 Heavy 1,
Blast, Barrage
Multiple barragesIf a unit has more than one barrage weapon, they areall fired together in a salvo, as follows:
First place the blast marker for the weapon in the firingunit that is closest to the target. If the target is inrange, roll for any scatter as described above.
Once the first marker is placed, roll a scatter dice foreach other barrage weapon fired by the unit. If anarrow is rolled, place the marker in the directionindicated so that it is adjacent and touching the edgeof the first marker placed (as shown in the diagram). If a hit is rolled, the firing player places the marker sothat it touches any part of any marker in the salvo thathas already been placed. Note that it is perfectly fine if,through this process, some markers are placedoverlapping one another.
32 THE RULES SECTION: WEAPONS
The original marker (1) scores a hit and does not scatter,
while arrows are rolled for the second (2) and third (3)
markers, which are placed accordingly. The number of hits
scored is worked out separately for each marker, and in this
case the salvo scores a total of nine hits on the unit! If, for
example, a hit had been rolled for the third marker instead,
the player could have placed it anywhere in contact with or
over markers 1 and 2, even directly on top of the first
marker (as long as it causes the most hits on the target). If
he did so, the salvo would have caused a total of ten hits
instead of the nine caused in the example above.
Multiple barrage weapons
1
3
1
3
2
2

While firepower alone may be enough todrive an enemy back from open ground orlightly held positions, shifting a determinedfoe from a fortified bunker or ruinedsettlement will need sterner measures. In anassault, troops storm forward, screamingtheir battle cries, eager to strike at their foeswith knives, claws, bayonets or gun butts ina desperate close combat.
THE ASSAULT PHASE
ASSAULT PHASE SUMMARY
1 Move assaulting units• Pick a unit.• Declare which enemy unit it is going
to assault. • Move the assaulting unit. • Pick another unit and repeat the above
until all assaulting units have moved.
2 Defenders react• The opponent picks one of his units that
have been assaulted. • The opponent moves all of the models in the
unit into base contact with the enemy, or atleast into position to be engaged.
• Pick another unit and repeat until allassaulted units have moved.
3 Resolve combats• Pick a combat. • Fight close combat. Engaged models roll to
hit and to wound in Initiative order. Theiropponents take saving throws as required.
• Determine assault results. Total up woundsinflicted. The side that inflicted the mostwounds overall in the combat is the winner.
• Loser checks morale. The loser has to pass aMorale check or fall back. If the loser passesthe test, go directly to pile-in.
• Sweeping advances, fall backs andconsolidations. Units falling back from closecombat must test to see if they successfullybreak off, if they fail they are destroyed. Thewinners may then consolidate their position.
• Pile-in! If units are still locked in closecombat, then any models not engaged aremoved towards the enemy to continue thefight next turn.
• Pick another combat and repeat until allcombats have been resolved.
THE RULES SECTION: THE ASSAULT PHASE 33
DECLARE ASSAULTSThe maximum distance most units can move during anassault is 6". As you cannot measure the distance tothe enemy before declaring the assault, if you misjudgethe distance and the unit is unable to reach its target,then the unit does not move and that assault isignored. Bear in mind that models may have to expendsome of their movement to move around impassableterrain or other models in order to reach their enemy.
DISALLOWED ASSAULTSUnits are not allowed to assault if:
• They are already locked in close combat.• They ran in the Shooting phase (see page 16).• They have gone to ground (see page 24).• They shot rapid fire weapons or heavy weapons in
the Shooting phase (see page 28).• They are falling back (see page 45).
In addition to the above, a unit that fired in theShooting phase can only assault the unit that it shot at– it cannot assault a different unit to the one itpreviously shot at. However, see the exception over thepage for multiple targets.
MOVE ASSAULTING UNITSAssaulting units must now move into close combatwith the unit they have declared an assault against. A player must move all of the models in each assaultingunit before moving on to the next unit. The assaultingplayer decides the order in which his units will move.
MOVING ASSAULTING MODELS All of the models in an assaulting unit make theirassault move following the same rules as in theMovement phase, with the exception that they may bemoved within 1" of enemy models. This means thatassaulting models may still not move through friendlyor enemy models, may not pass through gaps narrowerthan their base, and may not move into base contactwith enemy models from a unit they are not assaulting.
Assaulting units must attempt to engage as manyopposing models as possible with as many of theirmodels as possible – no holding back! Start eachassault by moving a single model from the assaultingunit. The model selected must be the one closest to theenemy (going around impassable terrain, friendlymodels and enemy models in units not beingassaulted). Move the model into contact with thenearest enemy model in the unit being assaulted, usingthe shortest possible route. Roll for difficult ordangerous terrain if necessary, and if the model is killedby a dangerous terrain test, start the assault again withthe next closest model. If the closest model is foundnot to be within move distance to the enemy, thatassault does not happen and no model is moved.
If the enemy is within range, then the assault movecontinues. After moving the first model in the unit, youcan move the others in any sequence you desire. Thereare some constraints on their movement though:
• The most important one is that each model must endits assault move in coherency with another model inits own unit that has already moved.
• If possible, the model must move into base contactwith any enemy model within reach that is notalready in base contact with an assaulting model.
• If there are no such models in reach, the model mustmove into base contact with an enemy model that isalready in base contact with an assaulting model.
• If a model cannot reach any enemy models, it musttry to move within 2" of one of its own unit’s modelsthat is already in base contact with an enemy.
• If this is impossible, it must simply stay in coherency.
If you follow this sequence you will end up with all themodels in the assaulting unit in unit coherency, havingengaged as many enemy models as possible with asmany assaulting models as possible.
ASSAULTING MULTIPLE ENEMY UNITSAs you move assaulting models, you may find it ispossible to reach other enemy units that are close tothe one you are assaulting.
As usual the closest attacking model must be moved tocontact the closest model in the enemy unit againstwhich the assault was declared. Then remaining modelscan assault models belonging to other enemy units, aslong as they keep following the rules for movingassaulting models. Remember that the assaulting unit isnot allowed to break its unit coherency, and this willobviously limit the potential for this kind of assault.
If the assaulting unit shot in the Shooting phase then itmust declare its assault against the unit it shot at, but itcan engage other enemies as described here.
DEFENDERS REACTWhen their comrades come under attack, theremaining troopers rush forward to bolster the defence.
After all assault moves have been made, the playercontrolling the units that have been assaulted this turnmust move any member of these units that is not yet inbase contact with a foe towards the enemy.
These models move up to 6" in an attempt to moveinto base contact with an enemy. This follows the samerules as moving assaulting models, except that modelsare not slowed by difficult terrain and do not takedangerous terrain tests. Also, this move may not beused to contact enemy units that are not currentlyinvolved in the assault.
FIGHTING A CLOSE COMBATHow effective creatures are in close combat dependsalmost entirely on their physical characteristics – inother words how fast, strong, tough and ferocious theyare. In close combat, armour remains as useful as everfor warding off blows and shots, but ranged weaponrybecomes a secondary consideration – the best gun inthe galaxy won’t help if your opponent is bashing yourbrains out with a rock!
In close combat, both players’ models fight. Attacks inclose combat work like shots in shooting – each attackthat hits has a chance to wound. The wounded modelgets a chance to save, and if it fails is (generally)removed as a casualty. How many blows are struck andwho strikes first is detailed later.
There may be several separate assaults being foughtsimultaneously in different parts of the battlefield. If this is the case, the player whose turn it is can choosethe order in which to resolve the combats, completingeach combat before moving on to the next one, and soon until all combats are resolved.
34 THE RULES SECTION: THE ASSAULT PHASE

THE RULES SECTION: THE ASSAULT PHASE 35
Engaged models
All of the Gretchin in base contact with a Space Marine,and the ones within 2" of an Gretchin that is in basecontact with a Space Marine are engaged and cantherefore attack. The remaining Gretchin, shown in alighter tone of grey, cannot attack.
WHO CAN FIGHT? Close combat is a swirling melee of troops leaping,spinning, hacking and slashing at one another. As wellas fighting hand-to-hand, warriors will be firing pistolsat point blank range at any target that presents itself.
Units that have one or more model in base contactwith enemies are said to be ‘locked in combat’. Withinsuch units, the following models are said to be‘engaged’ and must fight:
• Models in base contact with any enemy models.
• Models within 2" of at least one model in their unitthat is in base contact with any enemy models.
All engaged models will fight in this turn’s Assaultphase with their full number of Attacks and use anyspecial close combat attack they have. Any models leftunengaged because they are too far from an enemymodel cannot attack this turn. However, they can stillbe killed by the enemy, and the result of the combatwill still affect them.
Working out which models are engaged in combat isdone at the start of the fight, and will not change untilits end, but casualties may make it difficult toremember as the fight continues, especially in a largecombat. To make the distinction clear, you may find ituseful to turn unengaged models so that they arefacing away from their opponents. This will help you toremember once the dice start rolling.

WHO STRIKES FIRST?It’s all in the reflexes when it comes to close combat –slow, lumbering opponents can be dispatched quicklyby a faster and more agile foe. Unfortunately, manycumbersome opponents, such as Orks, are toughenough to withstand a vicious pummelling and keepcoming back for more.
In close combat, a model’s Initiative characteristicdetermines who attacks first. Work your way throughthe Initiative values of the models engaged in thecombat, starting with the highest and ending with thelowest. Models make their attacks when their Initiativevalue is reached, assuming they haven’t already beenkilled by a model with a higher Initiative! If both sideshave models with the same Initiative value, their attacksare made simultaneously. Note that certain situations,abilities and weapons can modify a model’s Initiative.
For example, a squad of Space Marines (Initiative 4)including a Veteran Sergeant with a power fist (whichreduces his Initiative to 1) assaults a mob of Orks(Initiative 2). The Space Marines strike first at Initiative4, followed by the Orks at 2, then the Sergeant strikeslast at Initiative 1.
GRENADESGrenades in Warhammer 40,000 are generally usedas part of an assault. A well-placed barrage ofgrenades can help immeasurably in the vital last fewseconds it takes to overrun an enemy and come togrips. What follows are some of the most commontypes of grenades used in assaults. Any actualdamage done by the grenade is assumed to be takeninto account in the unit’s attacks in close combat,but the unit using them gains the added benefitdescribed below.
Assault Grenades (e.g. frag grenades, plasma grenades, and so on)Assault grenades, like the ubiquitous fragmentationgrenades or the more advanced Eldar plasmagrenades, can be thrown at opponents in cover toforce them to keep their heads down during anassault. The lethal storm of shrapnel (or the delayedplasma blast) from these grenades will driveopponents further under cover for a few preciousmoments, allowing attackers more time to close in.Models equipped with assault grenades don’t sufferthe penalty to their Initiative for assaulting enemiesthrough cover, but fight as normal.
Defensive Grenades (e.g., photon grenades, etc.)An example of defensive grenades are the photongrenades of the Tau, weapons that blind anddisorientate the attacker with multi-spectral light anda sonic burst. Models assaulting against unitsequipped with defensive grenades gain no AssaultBonus attacks (see opposite). However, if thedefending unit was already locked in combat from aprevious turn, or had gone to ground, thesegrenades have no effect and the attackers gain theAssault Bonus attacks as normal.
36 THE RULES SECTION: THE ASSAULT PHASE
ASSAULTING THROUGH COVER If, following the rules for moving assaulting models (seepage 34), any model in an assaulting unit will have togo through difficult or dangerous terrain as part of itsassault move, the unit must take the relevant terraintest before moving. This has two disadvantages. Thefirst and most obvious is that such tests might causethe assault to fail altogether if the closest model cannotmake it into contact with the enemy. Note that if amodel stopped 1" away from the enemy in theMovement or Shooting phase, it can Assault even if itsunit rolls a double 1 on its difficult terrain test.
The second disadvantage is that warriors who areassaulting through cover are subject to deadly salvoesof close range fire as they slowly struggle to get togrips with their foe and may be ambushed by foes thatare ready for them. To represent this, if an assaultingunit had to take a difficult or dangerous terrain testduring their assault move, all of its models have theirInitiative value lowered to 1 when attacking, regardlessof other Initiative modifiers. Remember that assaultingmodels must try to engage as many enemies aspossible – no holding back to avoid the test!
If all of the enemy units assaulted were already lockedin combat from a previous turn or had gone to ground,this penalty does not apply as the enemy warriors arenot set to receive the charge, and the unit assaultingthough cover fights at its normal Initiative.
“Let’s stomp some ’umies!” Ghazghkull Thraka

THE RULES SECTION: THE ASSAULT PHASE
NUMBER OF ATTACKS As explained earlier, models attack in order of Initiative.When their Initiative value is reached, models with thatInitiative who are still alive must attack. It does notmatter if all the enemies that they were engaged withhave been killed – if a model was engaged at the startthe fight (and is still alive when its turn to attackcomes) it can still attack.
Each engaged model strikes with the number ofAttacks (A) on its characteristics profile, plus thefollowing bonus attacks:
• +1 Assault Bonus: Engaged models who assaultedthis turn get +1 attack.
• +1 Two Weapons: Engaged models with two single-handed weapons (typically a close combat weaponand/or pistol in each hand) get an extra +1 attack.Models with more than two weapons gain noadditional benefit – you only get one extra attack,even if you have more than two weapons.
• Other bonuses: Models may have other special rulesand wargear that confer extra attacks.
Note that bonus attacks are an exception to the rulesfor characteristics’ maximum modifiers and may bring amodel’s total attacks above 10!
Example 1: A unit of five Space Marines with boltersnormally roll five dice for their attacks in close combat.If they were assaulting they would roll ten dice (1 Attack +1 for assaulting = 2 each).
Example 2: A unit of five Orks with two close combatweapons normally roll fifteen dice (2 Attacks +1 fortwo weapons). If they were assaulting they’d rolltwenty (2 Attacks +1 for assaulting +1 for twoweapons = 4 each!).
ROLLING TO HIT To determine whether hits are scored, roll a D6 for eachattack a model gets to make. The dice roll needed toscore a hit on your enemy depends on the relativeWeapon Skills of the attacker and the target. Comparethe WS of the attacking model with the WS of thetarget unit and consult the To Hit chart below to findthe minimum score needed on a D6 to hit.
It is worth explaining the mechanic behind the chart,which is as follows: if the target’s WS is lower than thethe attacker’s, he hits on 3+; if the target’s WS is equalor up to twice as high as the attacker’s he hits on 4+,and if it is more than twice as high he hits on 5+.
Where the same roll to hit is needed, attacks should berolled together, as this speeds up the game.
In the previous example, the Ork player wouldtherefore roll all of his twenty attacks together.
Units with different WSA few units in Warhammer 40,000 contain modelswith different Weapon Skill values. Attacks against suchunits are resolved using the Weapon Skill of themajority of the engaged models. If there is no majorityWeapon Skill, use the highest Weapon Skill of themodels engaged.
For example, a mob of 20 Gretchin (WS2) led by anOrk Runtherd (WS4) are all engaged in a combat. Sincethe Gretchin are in the majority, attacks against theunit are resolved using their WS of 2 – the Runtherdcan’t prevent the Gretchin getting hit. When themodels attack, they calculate their own scores requiredto hit based on their individual Weapon Skill. So, whenthe Gretchin and Runtherd attack their enemies, theGretchin will hit based on a comparison of their WS2and the enemy’s WS, while the Runtherd will comparehis WS4 with the enemy’s.
TO HIT CHARTTarget’s Weapon Skill
1 2 3 4 5 6 7 8 9 101 4+ 4+ 5+ 5+ 5+ 5+ 5+ 5+ 5+ 5+2 3+ 4+ 4+ 4+ 5+ 5+ 5+ 5+ 5+ 5+3 3+ 3+ 4+ 4+ 4+ 4+ 5+ 5+ 5+ 5+4 3+ 3+ 3+ 4+ 4+ 4+ 4+ 4+ 5+ 5+5 3+ 3+ 3+ 3+ 4+ 4+ 4+ 4+ 4+ 4+6 3+ 3+ 3+ 3+ 3+ 4+ 4+ 4+ 4+ 4+7 3+ 3+ 3+ 3+ 3+ 3+ 4+ 4+ 4+ 4+8 3+ 3+ 3+ 3+ 3+ 3+ 3+ 4+ 4+ 4+9 3+ 3+ 3+ 3+ 3+ 3+ 3+ 3+ 4+ 4+
10 3+ 3+ 3+ 3+ 3+ 3+ 3+ 3+ 3+ 4+
37
Att
acke
r’s W
eapo
n Sk
ill
NB. If a model has WS 0, all close combat attacks directed against it will hit automatically.

ROLLING TO WOUNDNot all of the attacks that hit their mark will harm theenemy. They may be parried at the last moment or maymerely inflict a graze or flesh wound. As with shooting,once you have scored a hit with an attack you must rollagain to see if you score a wound and incapacitateyour foe. Consult the chart below, cross-referencing theattacker’s Strength characteristic (S) with the defender’sToughness (T). The chart, which is the same as the onein the Shooting section, indicates the minimum valueon a D6 roll required to inflict a wound. In most cases,when rolling to wound in close combat, you use theStrength on the attacker’s profile regardless of whatweapon they are using. Some close combat weaponsgive the attacker a Strength bonus – this is explainedlater in Special Close Combat Attacks.
In a unit containing models with different Strengthvalues, roll their attacks separately (they’ll quite oftenhave different Initiative characteristics too).
For example, in a unit containing Gretchin and an Ork Runtherd, the Gretchin’s attacks are made withtheir puny Strength of 2, but the Runtherd’s attacksuse his Strength of 3.
Multiple Toughness valuesQuite rarely, a unit will contain models that havedifferent Toughness characteristics. To keep thingssimple, roll to wound using the Toughness value of themajority of the engaged foe. If no majority exists, usethe highest value in the unit.
TO WOUND CHARTToughness
1 2 3 4 5 6 7 8 9 101 4+ 5+ 6+ 6+ N N N N N N2 3+ 4+ 5+ 6+ 6+ N N N N N3 2+ 3+ 4+ 5+ 6+ 6+ N N N N4 2+ 2+ 3+ 4+ 5+ 6+ 6+ N N N5 2+ 2+ 2+ 3+ 4+ 5+ 6+ 6+ N N6 2+ 2+ 2+ 2+ 3+ 4+ 5+ 6+ 6+ N7 2+ 2+ 2+ 2+ 2+ 3+ 4+ 5+ 6+ 6+8 2+ 2+ 2+ 2+ 2+ 2+ 3+ 4+ 5+ 6+9 2+ 2+ 2+ 2+ 2+ 2+ 2+ 3+ 4+ 5+10 2+ 2+ 2+ 2+ 2+ 2+ 2+ 2+ 3+ 4+
Stre
ngth
Note that N on the chart means the hit has no effect. A target with the Toughness indicated cannot be harmed by a hit ofsuch puny Strength. Also note that a roll of 1 never scores a Wound, regardless of its Strength.
38 THE RULES SECTION: THE ASSAULT PHASE
Know the mutant; kill the mutant.

Allocating woundsAfter determining the number of wounds inflictedagainst a unit at a particular Initiative value, the unittakes saves and casualties are removed as detailedbelow. Just like in the Shooting phase, if all the modelsin the unit are the same in gaming terms, you can carrystraight on and roll all the saves in one batch. Otherwise,wounds are allocated against the target unit by thecontrolling player, exactly like the fire of a single enemyunit during the Shooting phase (refer back to page 25).
Either way, all of the models in the target unit can behit, wounded and killed, including those that are notengaged. This represents the fact that each fighter iscontributing his shots and blows to the swirling combatwhile warriors are rushing forward to replace theircomrades that fall under the blows of the enemy.Indeed it is a good tactic to allocate wounds on modelsthat are not engaged, as it will often allow yourengaged models to survive long enough to attackback! Remember to use different coloured dice orotherwise mark out the wounds that have differentspecial rules attached to them (like those inflictinginstant death or those that ignore armour saves), asyou would do in the Shooting phase.
TAKING SAVES Models struck and wounded in close combat canattempt armour saves to avoid becoming casualties.Models usually get to save regardless of the attacker’sStrength, but some especially monstrous creatures andpowerful close combat weapons will punch straightthrough armour. Otherwise, the procedure for takingsaves is the same as the one described for Shooting.
Cover does not provide protection in close combat as itdoes against shooting. This means that models do notget cover saves against any wounds suffered in closecombat, and for obvious reasons cannot go to ground.
Remember that even if the rules for a weapon or attackstates that no armour save is allowed, an invulnerablesave may still be made.
REMOVING CASUALTIESAll of the rules for removing shooting casualties applyin close combat.
If a model becomes a casualty before it has anopportunity to attack, then it may not strike back.When striking blows simultaneously, you may find itmore convenient to resolve one side’s attacks andsimply lay wounded models on their side to remind youthat they have yet to attack back.
DETERMINE ASSAULT RESULTSAssaults are usually decisive, one side or the otherquickly gaining the upper hand and forcing back theirfoe. Good Leadership can keep a side in the fight, butthe casualties that each side inflicts are usually the mosttelling factor. To decide who has won the combat, totalup the number of unsaved wounds inflicted by eachside on their opponents. The side that caused the mostis the winner. The losing side must take a Morale checkand will fall back if they fail.
If both sides suffer the same number of wounds, thecombat is drawn and continues next turn.
Of course, if one side destroys the enemy it winsautomatically, even if it sustained more casualties!
Note that wounds that have been negated by savingthrows or other special rules that have similar effectsdo not count, nor do wounds in excess of a model’sWounds characteristic, only the wounds actuallysuffered by enemy models (including all of the Woundslost by models that have suffered instant death). In rarecases certain models can cause wounds on themselvesor their friends – obviously these wounds are added tothe other side’s total for working out who has won.
CHECK MORALEUnits that lose a close combat must take a Moralecheck to hold their ground, with a penalty dependingon how severe the defeat was (see page 44). If theypass, the unit fights on – the combat is effectivelydrawn and no further account is made of the unit’sdefeat (apart from some good-natured taunting by thewinner!). If they fail, they must abandon the fight andwill fall back. Morale checks and falling back arecovered in the Morale section on page 43.
Removing casualtiesin close combat
The Ork playerremoves casualtiesfrom unengagedmodels, so that hisengaged Gretchinlive to strike back.
THE RULES SECTION: THE ASSAULT PHASE 39
The Martyr’s grave is the foundation of the Imperium.
SWEEPING ADVANCES When a unit falls back from combat, the victors make aSweeping Advance, attempting to cut down theretreating enemies.
Both the unit falling back and the winning unit roll aD6 and add their Initiative value to the result. Alwayscount the Initiative value from the model’s profilewithout any modifiers. In a unit with mixed Initiativecharacteristics, count the majority value, or the highestif there is no majority.
They then compare their totals.
• If the winner’s total is equal or greater they catch thefleeing enemy with a sweeping advance. The fallingback unit is destroyed. We assume that the alreadydemoralised foe is comprehensively scattered, rippedapart or sent packing, its members left either dead,wounded and captured, or at best fleeing andhiding. The destroyed unit is removed immediately.Unless otherwise specified, no save or other specialrule can rescue the unit at this stage; for them thebattle is over.
• If the falling back unit’s total is higher, they break offfrom the combat successfully. Make a fall back movefor the losing unit (see page 45). The winners canthen consolidate as detailed below.
DISALLOWED SWEEPING ADVANCESIf a victorious unit is still locked in combat with otherunits that are not falling back, it does not get a chanceto execute a sweeping advance and the retreatingenemy falls back safely.
Some troops, as detailed in their entries, are notallowed to make a sweeping advance – in such casesthe enemy always manage to disengage safely.
PILE-IN!After the combat been resolved, it might happen thatsome models from units that did not fall back from thecombat are not in base contact with an enemy. Thesemodels must make a pile-in move.
Just like when defenders react to being assaulted, thesemodels move up to 6" in an attempt to move into basecontact with an enemy or, if not possible, into aposition in which they are engaged and will be able tofight. This follows the same rules as moving assaultingmodels, except that is not slowed by difficult terrainand does not trigger dangerous terrain tests. Also, apile-in move may not be used to contact enemy unitsthat are not currently involved in the assault.
When making pile-in moves, the player whose turn itcurrently is moves first. If for some reason (masscarnage, usually), his model’s pile-in moves are
insufficient to move into base contact with any enemythat was involved in that fight, the player must stillmove them as close as possible to such enemies. Theopponent will then execute his own models’ pile-inmoves, back into contact with the enemies they werefighting. If both units’ pile-in moves combined (that’smore than 12" – very unlikely!) would be insufficient tobring the combatants back together, the assault comesto an end and both sides may make consolidationmoves instead, as described below.
While a unit is locked in combat it may only make pile-in moves and may not otherwise move or shoot.
CONSOLIDATIONAt the end of a combat, if a unit’s opponents are alleither destroyed or falling back, so that the victoriousunit is no longer locked in combat with any enemy,they may consolidate. This means that they may moveup to D6" in any direction, as the sudden victory mayleave the warriors raring to storm onward or flat-footedand dumbfounded, according to the vagaries of fate.
Units making a consolidate move are not slowed bydifficult terrain and do not trigger dangerous terraintests. A consolidation move may not be used to moveinto base contact with enemy models, as this can onlybe done with an assault move. Consolidating modelsmust therefore stop 1" away from all enemy models,including any that might have just fallen back from thecombat that the consolidating unit has fought in.
SHOOTING INTO & OUT OF CLOSE COMBATModels belonging to units locked in combat may notfire weapons in the Shooting phase. Their attention iscompletely taken by the swirling melee. Likewise, whileespecially twisted and soulless commanders may wishtheir warriors to fire indiscriminately into the middle ofclose combats in the hopes of hitting the enemy, this isnot permitted. The events in a close combat move tooquickly and the warriors themselves will beunderstandably hesitant about firing on their comrades.
While blast markers and templates may not bedeliberately placed such that they cover any modelslocked in combat, they may end up there afterscattering and will then hit any models they touch(friends and foes!).
Units that are locked in close combat do not have totake Morale and Pinning tests caused by shooting; theyare considered to be much too focused on fighting tobe worried about being shot at!
40 THE RULES SECTION: THE ASSAULT PHASE
There is no substitute for zeal.

The Space Marines have charged theOrks and Gretchin. Space Marine 1 canchoose to attack either the Orks or theGretchin (or split his attacks). SpaceMarines 6 and 7 can also choose to fighteither enemy unit (or split their attacks),because they are within 2" of a memberof their own unit who is in base contactwith both enemy units.
Space Marines 2, 3, 4 and 8 can onlyattack the units they’re in base contactwith. Space Marine 5 can only attackthe Gretchin (as he is only within 2" ofmembers of his own unit that are inbase contact with the Gretchin).
Gretchin
Ork Boyz
THE RULES SECTION: THE ASSAULT PHASE 41
Multiple combat
12
34
56
7
8
After assault resolution, all units that were involved inthat multiple combat must make pile-in moves towardsenemies that fought in that combat. If a unit’s pile-incannot reach any such enemies, the unit must move asclose as possible to the enemy to allow them to pile-ininto contact. If it is impossible, both sides consolidate.
MULTIPLE COMBATSCombats that involve more than two units are called‘multiple combats’ (see the diagram below for anexample). Because of the extra complexity, they needsome additional rules, which are provided on this page.
DEFENDERS REACTIf a unit that is already locked in combat from aprevious turn is assaulted by a new enemy unit, it canreact as normal. Its models must be moved into basecontact with models from any of the units that they arefighting, not just the enemies that just assaulted them.
ATTACKINGIn multiple combats, when it is time for a model toattack, the following extra rules apply:
• Models that were engaged with just one of theenemy units at the beginning of the combat (beforeany model attacked) must attack that unit.
• Models that were engaged with more than oneenemy unit at the beginning of the combat (beforeany model attacked) may split their attacks freelybetween those units. Declare how they are splittingtheir attacks immediately before rolling to hit.
ASSAULT RESULTSWhen determining assault results in a multiple combat,total up the number of wounds inflicted by each sideto see which side is the winner. Every unit on the losingside has to check their Morale (they all use the samepenalty, as described in the Morale section). After all ofthe losing units have taken their Morale checks, anywinning unit that is now free to make a sweepingadvance rolls the dice and compares its total with thetotal of each of the falling back enemy units it wasengaged with. Any that it equals or beats aredestroyed. Remember that winning units can onlysweeping advance if all of the units they were lockedwith fall back or are wiped out in the fight.

42 THE RULES SECTION: THE ASSAULT PHASE
CLOSE COMBAT WEAPONSOn the battlefields of the 41st Millennium, closecombat remains commonplace – seasoned warriorsoften bear a deadly array of combat knives and fraggrenades, while specialised assault troops take pistols,swords and deadly power weapons into battle. In termsof rules, they are all grouped into either of thefollowing two categories:
NORMAL CLOSE COMBAT WEAPONSWeapons like chainswords, rifle butts, combat blades,bayonets, etc., do not confer any particular bonus tothe model using them. Remember that, in closecombat, pistols count as normal close combat weaponsand so the Strength and AP of the pistol are ignored.
SPECIAL CLOSE COMBAT WEAPONSThese include more complex and powerful weaponsthat enhance the wielder’s combat skills and conferbonuses, and sometimes penalties, to the models usingthem. The most widely used are listed below:
Power weaponsA power weapon is sheathed in the lethal haze of adisruptive energy field, which eats through armour,flesh and bone with ease. Models wounded in closecombat by the attacks of a model armed with a powerweapon are not allowed armour saves.
Lightning clawsLightning claws are commonly used as matched pairsand consist of a number of blades, each a mini-powerweapon, normally mounted on the back of the hand. A lightning claw is a power weapon and it also allowsthe wielder to re-roll any failed roll to wound.
Force weaponsThese psychic weapons are described on page 50.
Poisoned weaponsPoisoned weapons range from blades coated in venomto hypodermic claws. They do not rely on a comparisonof Strength and Toughness to wound – they alwayswound on a fixed number, generally shown in brackets.In most cases this is 4+. Some venoms are so lethal thatthe merest drop can kill – these may wound on a 3+,or even 2+ (as described in the appropriate Codex). In addition, if the Strength of the wielder is the same or higher than the Toughness of the victim, the wieldermust re-roll failed rolls to wound in close combat.These weapons confer no advantage against vehicles.
Power fistsA power fist (or ‘power claw’) is an armoured gauntletsurrounded by a disruptive energy field. A power fist isa power weapon, and also doubles the user’s Strength(up to a maximum of 10). Power fists, however, aredifficult and cumbersome to use, so attacks with apower fist are always delivered at Initiative 1 (ignoreInitiative bonuses from special rules, wargear, etc.).
Thunder hammersThunder hammers release a tremendous blast of energywhen they strike. A thunder hammer uses the samerules as a power fist. In addition, all models that sufferan unsaved wound from a thunder hammer and arenot killed will be knocked reeling, reducing theirInitiative to a value of 1 until the end of the nextplayer’s turn. Against vehicles with no Initiative value,whenever a thunder hammer inflicts any damage result,it also inflicts a crew shaken result (see page 61).
Rending weaponsIf a model armed with a rending close combat weaponrolls a 6 on any of his rolls to wound in close combat,the opponent automatically suffers a wound, regardlessof its Toughness. These wounds count as wounds froma power weapon. Against vehicles, an armourpenetration roll of 6 allows a further D3 to be rolled,with the result added to the total score.
WitchbladesThese psychically attuned weapons are often carried byEldar psykers. All hits scored in close combat by modelsarmed with a witchblade inflict wounds on a roll of 2+,regardless of the target’s Toughness. Armour saves aretaken as normal. Against vehicles, the wielder of awitchblade counts his Strength as 9.
FIGHTING WITH TWO SINGLE-HANDED WEAPONS Some models are equipped with two single-handedweapons they can use in close combat, with the rulesgiven below for the different possible combinations. Ofcourse, if a model is using a two-handed close combatweapon (such as a rifle’s butt or a two-handed battleaxe), it may not use it together with another weapon.
Two normal close combat weaponsThese models gain one bonus attack (see page 37).
Two of the same special weaponThese models gain one additional attack. All of theirattacks, including the bonus attack, use the specialweapon’s bonuses and penalties.
A normal and a special weaponThese models gain one additional attack. All of theirattacks, including the bonus attack, benefit from thespecial weapon’s bonuses.
Power fists, thunder hammers and lightning claws arean exception to this. Only a second power fist, thunderhammer or lightning claw can confer a bonus attack toa model equipped with one of these weapons.
Two different special weaponsWhen it is their turn to attack, these models mustchoose which weapon to use that turn, but they neverget the bonus attack for using two weapons (such isthe penalty for wielding too many complex weapons!).
It is a fortunate commander who can alwaysrely on his troops to perform fearlessly. Inthe chaos and confusion of battle, troops caneasily become demoralised, disoriented orsimply terrified by the violence unleashedagainst them. To represent this element ofthe unknown, your units of troops have tocheck to see if their morale holds undercertain circumstances. As you will havealready gathered, particular events willrequire that your troops take a Morale check,and a unit in particularly dire straits may beforced to take several Morale checks in asingle turn.
Morale checks are a specific kind of Leadership test.Note that Leadership tests are used for other functions inWarhammer 40,000, such as using Psychic powers.
MORALE CHECKSMorale represents the grit, determination, or(sometimes) plain stupidity of warriors in action. Like allother Leadership-based tests, Morale checks (also calledMorale tests) are taken by rolling 2D6 and comparingthe total to the unit’s Leadership value. If the score isequal to or under the unit’s Leadership value, the test ispassed and the unit does not suffer any ill effects –their nerve has held. However, if the score rolled ishigher, then the test is failed and the unit willimmediately fall back, as described over the page.
Some units have special rules pertaining to Moralechecks that are detailed in the appropriate Codex. Forexample, some particularly fanatical units may beimmune to the effects of morale. Some units alwayspass Morale checks, while a few others always pass allLeadership tests. This is a subtle but importantdifference. For example, units that always pass Moralechecks will still have to test for Pinning.
MORALE CHECK MODIFIERS Certain circumstances can make Morale checks harderfor a unit to pass. This is represented by applyingLeadership modifiers to Morale checks, which canreduce the unit’s Leadership value by -1, -2 orsometimes even more.
INSANE HEROISM!Occasionally, warriors will refuse to retreat even whenfaced with impossible odds or particularly harrowingexperiences. Sometimes you can push someone just toofar! A score of double 1 on the 2D6 roll alwaysindicates the unit has passed its Morale check,regardless of modifiers.
MORALE
THE RULES SECTION: MORALE 43
“Warriors of Ultramar! This iswhere we make our stand. If deathis to be our fate then we shall meetit with the Emperor’s word on ourlips and his light in our eyes. If wemust die, we will die; but we shallnever yield.”
Marneus Calgar, Lord Macragge

TAKING MORALE CHECKSUnits normally have to take a Morale check in thefollowing situations:
A) CasualtiesA unit losing 25% or more of its models during asingle phase must pass a Morale check at the endof that phase, or else it will fall back. Do not countcasualties caused by close combat attacks, as theyare covered later in C) Losing an Assault.
A unit that is locked in close combat does not haveto take Morale checks for taking 25% casualties.
Example: A unit of five troops suffers two casualtiesfrom enemy shooting, so it takes a Morale check,which it promptly passes. Next turn, the unit, nowthree strong, suffers a single casualty fromshooting, which is now enough for it to have totake another Morale check.
B) Tank ShockUnits that are overrun by an enemy tank may wiselydecide it’s time to abandon their position and fallback. If a tank reaches an enemy unit’s positionthen the unit must take a Morale check to seewhether or not it falls back. For a more completeexplanation of how tank shock works, see theVehicle rules on page 68.
C) Losing an AssaultUnits that lose a close combat (ie, they suffer morewounds than they inflict) must pass a Morale checkto hold their ground. If they fail, they must fall back.
Units taking this Morale Check suffer a -1 Ldmodifier for each wound their side has lost thecombat by.
Example: An Imperial Guard squad has lost anassault. They would normally require a 7 or less topass the Leadership test, but since they have lostthe fight by a difference of 2 Wounds (-2), theynow require a 5 or less to hold their ground.
NO RETREAT!It’s not uncommon for units to be immune to Moralechecks for losing an assault, or to automatically passthem for some reason (they may have the ‘fearless’special rule, be subject to a vow or some other specialrule). When such units lose a close combat, they are indanger of being dragged down by the victorious enemydespite their determination to hang on.
These units do not take Morale checks and will neverfall back. Instead, these units suffer a number ofwounds equal to the number their side has lost thecombat by (allocated as normal).
All types of saving throws, except for cover saves, canbe taken against these wounds.
For example, after all blows are struck, a fearless unithas lost the fight by a difference of 3. The fearless unitdoes not take a Morale test, but it immediately suffersthree wounds and will take three armour saves.
If none of the enemies involved in the combat against afearless unit can actually hurt it, the unit does notsuffer any wounds if its side is defeated in combat, andsimply continues to fight.
44 THE RULES SECTION: MORALE
“A good soldier obeys without question.A good officer commands withoutdoubt.”
Tactica Imperium

FALLING BACK FROM CLOSE COMBATModels falling back from a combat will move throughall enemy models that were involved in that combat(these enemies have already missed their chance ofcatching the falling back unit!). If any models wouldend their move less than 1" from one of theseenemies, extend the fall back move until they are clear.
TRAPPED!Sometimes a unit will find its fall back moveblocked by impassable terrain, friendly models orenemy models (remember they have to stay 1" awayfrom enemy models). The models in the falling backunit may move around these obstructions in such away as to get back to their table edge by theshortest route, maintaining unit coherency.
If the unit cannot perform a full fall back move in anydirection without doubling back, it is destroyed (seediagram below).
The player rolls a 6 on the 2D6 fall back move, so eachmodel is moved 6" directly towards their base edge. The leftmost model has to go around impassable terrain.
6"
Falling back
Trapped!
As the Gretchin cannot fall back 8" without running intoimpassable terrain or moving to within 1" of an enemy,the entire unit is destroyed!
45
FALL BACK!A fall back move is a fighting withdrawal rather thanan out-and-out rout. Sometimes a fighting retreat inthe face of overwhelming odds is the only option left.A withdrawal can give troops the chance to retire to astronger position, to regroup and mount a fresh attack,or to hold back the approaching enemy.
Units make a fall back move immediately upon failing aMorale test. In each subsequent Movement phase, theywill make further fall back moves instead of movingnormally, until the unit regroups, is destroyed or leavesthe table.
Units normally fall back 2D6". Fall back moves are notslowed by difficult terrain, but tests for dangerousterrain are taken as normal.
Each model in the unit falls back directly towards theirown table edge by the shortest possible route. Ifplaying a mission where there is no ‘own’ table edge,models fall back towards the closest table edge instead.
If any model from a unit that is falling back moves intocontact with a table edge, the entire unit is removedfrom the game and counts as destroyed, as it scattersand deserts the battle.
THE RULES SECTION: MORALE

FIRING WHILE FALLING BACKUnits that are falling back may not go to ground andautomatically pass Pinning tests.
Troops who are falling back may continue to shoot, butobviously count as moving. They may of course chooseto run instead of firing, but if they do so it must betowards their own table edge.
ASSAULTS WHILE FALLING BACKA unit that is falling back may not launch assaults.
If an enemy unit declares an assault against a unit thatis falling back and is found to be in range, the fallingback unit must immediately test to regroup (see right).If the test is successful, the unit regroups (withoutmoving), and from then on the fight continues asnormal, starting with the enemy moving in hisassaulting models. If the test is failed, the unit isdestroyed and the assaulting unit does not move at all.
Sometimes a unit that is assaulting an enemy unit thatis not falling back can, as part of a multiple assaultmove, also contact models from a nearby enemy unitthat is falling back. As soon as one assaulting model isfound to be able to move into contact with the fallingback unit, test to regroup as described above. If thetest is successful, the unit regroups (without moving)and the assault continues as normal. If the test is failed,the falling back unit is destroyed and the assaultingmodel must continue its assault move as if the fallingback unit was never there.
MORALE WHILE FALLING BACKTroops who are falling back automatically fail all Moralechecks, except those to regroup (see right).
REGROUPINGJust because a unit falls back doesn’t mean it is out ofthe fight. Courageous officers will try to inspire theirtroops to rally. Warriors might regain their will to fightout of honour, duty or sheer bloody-mindedness.
A unit falling back can attempt to regroup by taking aRegroup test in the Movement phase just before theymove. This is a special type of Leadership test, whichfalling back units cannot attempt if any of thefollowing conditions apply:
• The unit is below half strength.• There are enemies within 6".• The unit is not in coherency.
Units that are assaulted while falling back must alwaysattempt this test as soon as the enemy is found to bein assault range, and can do this regardless of any ofthe above restrictions (the alternative is just too bad!).
If the unit successfully passes its Leadership test, itstops falling back and regroups. The unit canimmediately move up to 3" (this move is unaffected bydifficult terrain, but dangerous terrain tests must betaken as normal).
Once a unit has regrouped, it cannot otherwise moveduring that Movement phase, but otherwise it behavesas normal. For example, it can shoot (though it alwayscounts as moving on the turn it regroups) or run, and itcan even launch an assault if it gets the chance.
If the unit fails its Leadership test, (or cannot regroupbecause of the restrictions given above), then it mustimmediately continue to fall back.
46 THE RULES SECTION: MORALE

Veteran warriors, brilliant officers, possessedprophets and ferocious war-leaders caninspire the troops to great feats of heroism(or fiendish bravery as the case may be) andare often quicker, stronger and more skilledin combat. In Warhammer 40,000 these kindsof powerful individuals are called ‘characters’.
CHARACTER TYPESWarhammer 40,000 armies normally include two typesof characters:
• Independent characters are represented by individualmodels, which fight as units in their own right. Oneof the most useful abilities of independent charactersis to join other units in battle, so that they can movein to bolster the battle line where the fighting isfiercest. If a model is an independent character, it willhave its own entry in the appropriate Codex, and itsrules will also clearly state that the model is anindependent character. Bear in mind that there areother models that only ever fight as units of onemodel, but are not independent characters.
• Upgrade characters are fielded as part of units fromthe start of the game, representing a squad leader orunit champion, such as a Space Marine VeteranSergeant. They do not have an entry of their ownand are effectively just another trooper in their unit,with enhanced characteristics and perhaps a widerselection of weapons and wargear choices.
CHARACTERS AS LEADERSRemember that a unit’s Leadership tests are taken usingthe Leadership of the model with the highest Ld valuein the unit (see page 8). As characters normally have abetter Ld than other warriors, this means that theymake very good leaders for other units in the army.
INDEPENDENT CHARACTERS
MOVING INDEPENDENT CHARACTERS Independent characters follow the Movement rules formodels of their type, be it infantry, jump infantry, bike,etc. In addition, independent characters can movethrough difficult terrain more quickly and safely thanordinary troops. All independent characters have the‘move through cover’ and ‘skilled rider’ special rules(see pages 75 and 76). This advantage does not extendto any vehicles they may be travelling in.
CHARACTERS
THE RULES SECTION: CHARACTERS 47
‘What You See Is What You Get’Character models in particular tend to have a lotof options as to what weapons and wargear theycan use – given in the army list of their Codex.The rule is that such equipment must be visuallyrepresented on the model so your opponents canclearly see what they are facing. This concept isoften referred to as WYSIWYG, which stands for‘what you see is what you get’.
Of course, many gamers enjoy trying out differentcombinations of wargear in different battles. So, for example, a player might decide that for hisnext game a model’s power sword will simplycount as a close combat weapon, but he will alsoequip the model with melta bombs. While sometournaments may be more strict about this kindof thing, most opponents are happy toaccommodate a small degree of one thingcounting as another, so long as you explainexactly who has what at the start of the game.

Independent characters are allowed to join otherunits. They cannot, however, join vehicle squadrons(see the Vehicles section) and units that alwaysconsist of a single model (like most vehicles andmonstrous creatures). They can join otherindependent characters though, to form a powerfulmulti-character unit!
• In order to join a unit, an independent charactersimply has to move so that he is within the 2"coherency distance of a friendly unit at the end oftheir Movement phase. If the character is within2" of more than one unit at the end of itsMovement phase, the player must declare whichunit it is joining. If a character does not intend to(or cannot) join a unit, it must remain more than2" away from it at the end of the Movementphase. This is to make clear to the opponent if thecharacter has joined a unit or not. Note that aftera character joins a unit, that unit may move nofurther that Movement phase.
• Alternatively an independent character may beginthe game already with a unit, by being deployed incoherency with them.
• While an independent character is part of a unit,he must obey the usual coherency rules. Thecombined unit moves and assaults at the speed ofthe slowest model while they stay together.
• An independent character can leave a unit duringthe Movement phase by moving out of coherencydistance with it.
• If an independent character moves and joins orleaves a unit that did not move, the charactercounts as having moved in the ensuing Shootingphase, but the unit does not.
• An independent character may not join or leave aunit during the Shooting and Assault phases –once shots are fired or assaults are launched it istoo late to join in or duck out!
• An independent character may not join or leave aunit while either he or the unit is locked in combator falling back.
• If an independent character joins a unit that hasgone to ground, he immediately goes to groundas well, and vice versa. He may not leave as longas his unit has gone to ground.
Special RulesWhen an independent character joins a unit, it mighthave different special rules from those of the unit.Unless specified in the rule itself (as in the ‘stubborn’special rule), the unit’s special rules are not conferredupon the character, and the character’s special rulesare not conferred upon the unit. In some casesthough, the independent character or the unit maylose their special rules as a result of the characterjoining the unit. For example, if an independentcharacter without the ‘infiltrate’ special rule joins aunit of infiltrators during deployment, the unitcannot infiltrate (see the Universal Special Rulessection for more details).
Retinues Some Codex books allow you to field characterstogether with a special unit that they cannot leaveduring the game (which is normally called a ‘retinue’,‘bodyguard’ or similar). Where this is the case, thecharacter counts as an upgrade character until all ofthe other members of this unit are killed, at whichpoint it starts counting as an independent characterand it will do so for the rest of the game.
48
INDEPENDENT CHARACTERS JOINING & LEAVING UNITS
THE RULES SECTION: CHARACTERS

INDEPENDENT CHARACTERS & SHOOTINGShooting at independent charactersIn the heat of battle it is often hard to distinguishindividuals, and even harder to pick them out asspecific targets. Independent characters that havejoined a unit are considered part of that unit and somay not be picked out as targets. If the unit they havejoined is hit, the controlling player can choose toallocate hits against the characters just like the othermembers of the unit. This gives you some tricky tacticalchoices as a character may be able to soak up moredamage than the normal troopers, but will be a seriousloss if he is killed.
Independent characters that have not joined a unit canbe targeted as normal, being separate units.Independent characters that are monstrous creaturescan always be picked out as separate targets, unlessthey’ve joined a unit of monstrous creatures or a unitwith special rules that offer them protection.
Independent characters shootingAll independent characters shoot just like ordinarytroopers, although in many cases they will have betterBallistic Skill or exotic weaponry that sets them apart. Ifthey have joined a unit, either roll for them separatelyor use different coloured dice to differentiate theirshooting. However, they must still fire at the sametarget as the unit they have joined.
INDEPENDENT CHARACTERS & ASSAULTSIn the Assault phase, an independent character on hisown can assault into close combat if within range ofthe enemy as normal.
If a unit that has been joined by an independentcharacter assaults into close combat, the characterassaults too, as it is part of the unit. When the attacksare resolved, however, independent characters arealways treated as a separate single-model unit (asdescribed under Multiple Combats on page 41), eventhough they have joined the unit. This is to make themstand out in the fight, as befits such heroic individuals,and it means that they have to be in base contact withthe enemy to be able to attack. Be aware, though, thatthis also means that independent characters can betargeted separately by models that are engaged withthem! Once all attacks have been resolved, thesecharacters are once again treated as normal membersof the unit they have joined (from determining assaultresults onwards).
When a unit is reacting to being assaulted, or making apile-in move, independent characters that have joinedthe unit must move before other friendly models inorder to get into base contact with an enemy if at allpossible (otherwise they will not be able to fight). Usingtheir own men as a screen in order to avoid the fight isa cowardly act, one that these great heroes wouldnever consider!
SPECIAL CHARACTERSThe 41st Millennium is filled with famous charactersrenowned as legendary heroes or infamous villains –these unique individuals, who stand out from normalcharacters because they have a personal name and notjust a title, are called ‘special characters’. Specialcharacters are highly skilled and dangerous heroes whohave incredible traits or skills that make themparticularly valuable to an army.
For example, Commissar Yarrick is without doubt themost respected Imperial Guard Commissar in theImperium, his inspiring presence securing the world ofArmageddon against two massive Ork invasions withinthe space of fifty years. An army led by him can expectgreat benefits in terms of morale and leadership. On the other hand, Khârn the Betrayer, an ExaltedChampion of the Blood God, is a mad slaughterer ofmen, with no thought for anything other than personalcombat (at which, it must be granted, he excels).
UNIQUESpecial characters can be either independent orupgrade characters, but each one of them is unique, sothe player may not include multiples of the samespecial character in an army (for example, MarneusCalgar is the Master of the Ultramarines Chapter ofSpace Marines – you cannot field three of him!).
The Ork Warboss (W) is an independent character andso counts as a separate unit. Space Marine (A) can onlyattack the Warboss. Space Marines (B) and (C) canattack either the Warboss or the Ork unit. All of theother Space Marines can only attack the Ork unit, asthey are not engaged with the Warboss.
A
2"
THE RULES SECTION: CHARACTERS 49
Independent characters in combat
C
B
w

Psykers are warriors gifted with awesomemental powers, which enable them tochannel the baleful energy of the Warp.
These powers vary from race to race and sometimesfrom one individual psyker to another. The psychicpowers available to our models are not discussedfurther here, but are described in detail in the Codexes,where you will find complete rules for individualpowers. The following general rules explain howpsychic powers are employed. Exceptions to these rulesare covered in the Codexes.
Psykers can use one psychic power per player turn. To use a psychic power successfully the psyker mustpass a Psychic test, which is a normal Leadership test.Note that this test must always be made on thepsyker’s own Leadership value. Even where Leadershiptests would normally be taken on the value of anothermodel, tests for using psychic powers are always takenusing the psyker’s own Leadership.
PERILS OF THE WARPIf the result of a Psychic test is either a double 1 ordouble 6 this indicates that something horrible hashappened to the psyker. The forces of the Daemon-haunted Warp claw at the psyker’s mind and threatento engulf and destroy him. The psyker suffers 1 woundwith no armour or cover saves allowed. Invulnerablesaves are allowed, but the power of the Warp is sogreat that successful saves must be re-rolled. Note thata psyker who rolls double 1 will still use his power,even if he is wounded or killed as a result.
PSYCHIC SHOOTING ATTACKSPsychic powers that take the form of shooting attacksare very common. Using a psychic shooting attackcounts as firing a ranged weapon (an assault weapon,unless specified otherwise). So, for example, the psykermust be able to see his target unit, cannot be locked incombat, or must not have run in the Shooting phase ifhe wishes to use a psychic shooting attack. In the sameway, if a psyker targets a unit with a psychic shootingattack, then he can only assault that unit in the ensuingAssault phase. Even if a psyker has a special ruleallowing him to use more than one psychic power perturn, he can use only one psychic shooting attack (asmodels can fire only one ranged weapon per turn).However, if he is allowed to fire more than one rangedweapon per turn, he can replace the firing of any ofthe weapons he is allowed to fire with a psychicshooting attack (but still cannot use the same powertwice in a turn).
PSYKERS
50 THE RULES SECTION: PSYKERS
FORCE WEAPONSForce weapons are potent psychic weapons usedexclusively by trained psykers. They have the sameeffects as power weapons, but also confer to thewielder one additional psychic power, used inclose combat, that can instantly extinguish the lifeforce of any opponent.
Roll to hit and wound as normal, allowing anyinvulnerable saving throws the victim might have.The psyker may then take a Psychic test to use theweapon’s power against any one opponent thatsuffered an unsaved wound by the weapon inthat player turn. The normal rules for usingpsychic powers apply (remember that a psykermay normally use only one power per turn). If thetest is passed, the enemy model suffers instantdeath, regardless of its Toughness value. Thispower has no effect against vehicles, models thatare immune to instant death and any other modelthat does not have a Wounds value.

The armies of the 41st Millennium areremarkably diverse and include manyspecialist warriors and exotic creatures.
In this section, you will find the rules for each of theseunit types, namely monstrous creatures, jump infantry,bikes & jetbikes, beasts & cavalry and artillery. Note thatvehicles are also a different unit type, but they are sovastly different that they have an entire section of therules devoted to them.
Except for the rules detailed in this section for each unittype, these units follow the same rules as infantry.
MONSTROUS CREATURESThese terrifying monsters tower over their opponents,butchering all the enemies who face them and hurlingtanks out of their path. Greater Daemons, Eldar Avatarsand Tyranid Carnifexes count amongst their number.
MOVEMENTAll monstrous creatures have the ‘move through cover’special rule (see page 75). They simply bash their waythrough trees and ruins!
SHOOTING Instead of firing a single weapon, monstrous creaturescan fire two of their weapons once per Shooting phase.They must, of course, fire both of them at the sameenemy target. In addition, monstrous creatures havethe ‘relentless’ special rule (see page 76).
Unless otherwise specified in their special rules,monstrous creatures cannot go to ground, voluntarilyor otherwise. In addition, for a monstrous creature tobe in cover, at least 50% of its body (as defined onpage 16) has to be in cover from the point of view ofthe majority of the firing models. Also, standing in areaterrain does not automatically confer a cover save tomonstrous creatures – the 50% rule takes precedence.Cover for them works exactly as for vehicles (see page62). As usual, if you cannot clearly tell if 50% of themodel’s body is covered, modify its cover save by –1.
ASSAULTAll wounds inflicted in close combat by a monstrouscreature ignore armour saves, just like those from apower weapon. In addition, monstrous creatures roll anadditional D6 for armour penetration (2D6 + Strength)when attacking a vehicle in close combat.
UNIT TYPES
THE RULES SECTION: UNIT TYPES 51

JUMP INFANTRYSome special troops use devices that allow them tomove at great speed across the battlefield, makingthem especially good at assaulting enemy troops andoutflanking their positions. The Space Marines usejump packs, which utilise high powered controlledbursts from turbines to make bounding leaps across thefield of battle, jumping over terrain with ease. Otherraces tend to have their own particular versions, suchas Orks, whose Stormboyz use rudimentary ‘rokkitpacks’ to close with the enemy, and Eldar, whoseSwooping Hawks soar elegantly on light wingssupported by gravitic motors. Sometimes thetechnology will be more exotic, such as that used byEldar Warp Spiders, who utilise short-ranged teleportdevices for a similar effect.
MOVEMENT Jump infantry can use their jump packs (or equivalent)and move up to 12" in the Movement phase. This isoptional and they can choose to move as normalinfantry if they wish. When using jump packs, they canmove over all other models and all terrain freely.However, if a moving jump infantry model begins orends its move in difficult terrain, it must take adangerous terrain test. Jump infantry models may notend their move on top of other models or impassableterrain, except that they can end their move on top ofimpassable terrain if it is actually possible to place themodels on top of it. If they do that, however, they treatthe impassable terrain as dangerous terrain. All jumpinfantry units may enter the battle by ‘deep strike’, asexplained on page 95.
Fall back movesJump infantry fall back 3D6", because they always usetheir jump packs when doing this. They move over anyterrain and models when falling back, but if they endtheir move in difficult terrain (or on top of flatimpassable terrain) they must still take a dangerous
terrain test. They cannot end their move on top ofother models, and must alter the direction of their fallback move as little as possible in order to avoid them,just as a normal unit would when falling back on foot.If they cannot do this, they are trapped and destroyed.
SHOOTING Jump infantry follow the same rules as infantry.
ASSAULT Jump infantry assault 6" like normal infantry. This moveis slowed by difficult terrain in the same way as otherinfantry, because the unit always covers the last fewyards of an assault on foot.
Different Unit TypesSo far the rules have just dealt with troops thatmove around on foot – infantry. This sectioncovers different unit types, and these not onlyadd new tactical elements to your games, butalso more complexity to the rules. These unittypes have different rules for the way they move,how terrain affects them, how far they canassault, and so on. You will find that Codexesoften add even more changes and exceptions forspecific models. In any given situation during abattle, if the Codex doesn’t say any different,follow the rules for the appropriate unit type, andif those rules don’t say anything different, followthe basic rules for infantry.
If you’re just starting out, you may find it easierto use just infantry units in your first game ortwo, while you get used to the basic rules. Onthe other hand, if you do want to jump straightin, we suggest that you just read those unit typerules that apply to models in your collection.
JET PACKSSome jump infantry are equipped with a specialtype of jump pack, referred to as a jet pack. Jetpacks are designed to provide stable firing platformsrather than a means of getting into close combat.The most frequent users of this technology are theTau. Jet packs differ from jump packs in thefollowing ways:
• In the Movement phase, they only move 6" whenusing their packs, but are always allowed to move6" in the Assault phase, even if they don’t assault.When jet packers move in the Assault phase anddo not assault, they treat difficult terrain just asother jump infantry do in the Movement phase.
• Models with jet packs have the ‘relentless’ specialrule (see page 76).
52 THE RULES SECTION: UNIT TYPES

BIKESTroops mounted on bikes excel at hit-and-run attacks.They are able to use their high speed to strike deepinto enemy territory, complete their mission and escapebefore an enemy is able to react. A skilled commanderwill recognise the benefit of having bikes at hisdisposal, and is able to use them for advancedreconnaissance, as well as to outflank a slower enemy.Indeed, in open ground, bikes are easily capable ofoutrunning all but the fastest vehicles. Riding throughheavy terrain can be somewhat dangerous however,but many riders take great pride in their superiordriving skills and daring. These warriors are oftenregarded as dangerously hot-headed risk-takers, buttheir effectiveness cannot be denied.
ADDITIONAL PROTECTIONBikes are large, solid constructions, and are often fittedwith protective armour and shields to deflect andabsorb incoming fire. Bike riders benefit from theprotection offered by their bike, which increases theirToughness characteristic by 1. Note that this increasedoes not affect the model’s Toughness for the purposesof instant death (see page 26).
MOVEMENT Bikes can move up to 12" in the Movement phase.Bikes are not slowed down by difficult terrain.However, they treat all difficult terrain as dangerousterrain instead.
Bikes also have the ‘turbo boosters’ special rule (seepage 76).
Fall back movesAs bikes are so fast moving, they fall back 3D6", ratherthan 2D6". Remember that they treat all difficultterrain as dangerous.
SHOOTINGBikes cannot run in the Shooting phase.
Bikes have the ‘relentless’ special rule (see page 76).
Each bike in a unit may fire with one weapon for eachrider on the bike. Thus a Space Marine Attack Bike witha driver and passenger in sidecar can fire two weapons.
ASSAULT Bike assault moves are not slowed down by difficultterrain. However, each model entering or movingthrough difficult terrain, or assaulting an enemy who isstanding in difficult terrain or behind an obstacle, musttake a dangerous terrain test.
Hope is the beginning of unhappiness.
JETBIKESJetbikes are powered by anti-gravitational technologythat allows them to hover a few metres above theground and make powered boosts over obstacles.They are ideal for making raids on unsuspectingenemies, hitting hard and then using their superiorspeed and handling to escape.
Jetbikes are the same as bikes, with the followingexceptions:
• In the Movement phase, jetbikes can move over allother models and all terrain freely. However, if amoving jetbike begins or ends its move in difficultterrain, it must take a dangerous terrain test. Jetbikes may not end their move over othermodels or impassable terrain, except that they canend their move on top of impassable terrain if it isactually possible to place the models on top of it.If they do that, however, they treat the impassableterrain as dangerous terrain.
• In the Assault phase, jetbikes are treated likenormal bikes when assaulting, as they must moveclose to the ground in order to fight.
• When falling back, jetbikes move over any terrainand models, but if they end their move in difficultterrain (or on top of flat impassable terrain) theymust still take a dangerous terrain test. Theycannot end their move on top of other models,and must alter the direction of their fall back moveas little as possible in order to avoid them, just as anormal unit would when falling back on foot.If they cannot do this, they are trapped andimmediately destroyed.
Eldar JetbikesThe Eldar are the undisputed masters of anti-gravtechnology, and their jetbikes form swift movingattack forces that are justifiably feared by any whohave faced them. Their favourite tactic is to suddenlyemerge from cover, open fire and then dive backinto cover before the enemy can retaliate.
All Eldar jetbikes (including Dark Eldar ones) areallowed to move 6" in the Assault phase, even ifthey don’t assault. When Eldar jetbikes move in theAssault phase and do not assault, they treat difficultterrain in the same way as other jetbikes do in theMovement phase.
THE RULES SECTION: UNIT TYPES 53

BEASTS & CAVALRYAs well as squads of warriors fighting on foot, and thearmoured bulk of vehicles, many armies of the 41st Millennium make use of fearsome predators andbeasts, such as Warp Beasts and Flesh Hounds, toaugment their forces. Other warriors ride to battle onhorses, grunting boar-like monstrosities, daemonicsteeds and countless other strange creatures. Theseunit types are referred to as ‘beasts’ if they have norider, or as ‘cavalry’ if they do. They both, however,follow the rules given in this section.
When closing on their enemies, they are able to moveat far greater speeds than warriors on foot, and as suchare able to launch deadly charges and counter charges.
MOVEMENT Beasts and cavalry move like infantry.
Fall back movesBeasts and cavalry fall back just like infantry, exceptthat they move 3D6" due to their speed.
SHOOTING Although beasts generally do not shoot, cavalryfrequently can. They follow the same rules as infantrywhen they do so.
ASSAULT Beasts and cavalry have the ‘fleet’ special rule (see page 75).
Beasts and cavalry are capable of making an especiallyfast assault to charge their enemies. When assaultingthey move up to 12".
If assaulting through cover, beasts and cavalry areslowed by difficult terrain – roll for the distance theycan move just as you would for infantry, but double theresult of the highest scoring dice.
Otherwise, they assault just like infantry.
54 THE RULES SECTION: UNIT TYPES
“I have seen war in all its forms. I have seen feral world savages brainingeach other with stones, and I have seenthe death of a whole planet at thehands of a virus bomb. I have seenSpace Marines drop to certain death,and win. I have seen Titans crush wholeplatoons underfoot. But there is nomore stirring sight in war than thecharge of massed cavalry.”
Dravin Gratz
ARTILLERYSome weapons are so large and powerful that a singleman could not hope to carry them by himself. They aremore usually mounted on vehicles, but are sometimesutilised by infantry artillery teams, particularly if thebattlefield’s terrain is not suitable for vehicles. Thesemighty artillery weapons are mounted on wheeledsupports or on anti-grav platforms, as they are simplytoo heavy to lug across a battlefield.
THE UNITArtillery units consist of a number of crewman modelsand the gun models themselves. These units are quitecomplex as they include some vehicle models and someinfantry models. The gun models are treated as vehicleswith an Armour Rating of 10 (see the Vehicles section).Any glancing or penetrating hit will destroy a gun – donot roll on the Vehicle Damage table, the gun model issimply removed. If all the crewman models are killed,the guns are immediately removed as well.
Sometimes the player has the choice of adding leadersor additional models to the crew of an artillery unit.These models are part of the crew in all respects andmay operate the guns as normal, even if they areotherwise slightly different from the rest of the crew.Independent characters that join the unit, however, donot count as crew and cannot operate the guns.
MOVEMENT Artillery units are slowed by difficult terrain like infantry,but gun models must also take dangerous terrain testswhen they pass through it. There must be at least onecrewman per gun to allow the unit to move – if thereare fewer than this, then the unit may not move.
SHOOTINGUnlike other vehicles (see next section), the gun modelscannot fire if they moved at all in that turn’s Movementphase. Any crewman that is within 2" of a gun in theShooting phase can fire it. The crewmen firing the gunsmay not fire any weapons they are carrying, while theother crew members (and any independent characterthat joined the unit) are free to fire their side arms, andcan even shoot against a different unit than the onetargeted by the unit’s guns. The guns themselvescannot split fire. When firing the guns, there must be aline of sight to the target from both the gun model andthe crewman firing it (unless they are barrage weapons,of course). Ranges are measured from the gun model.
When firing against an artillery unit, roll for each hitinflicted: on a 1-4 a gun is hit, on a 5-6 a crewman ishit. Roll to wound the crewmen and to penetrate theguns’ armour separately.
If an artillery unit goes to ground, this has no additionalprotective effect on the unit’s guns.
Artillery units cannot run in the Shooting phase.
THE RULES SECTION: UNIT TYPES 55
ASSAULT Artillery units may not launch assaults as long as theyinclude any gun models.
If they are assaulted, move the assaulting models inbase contact with the crew and guns as normal, butfrom then on the guns are ignored. All engagedenemies roll to hit and to wound against the crew (evenif they are only engaged with guns). Engaged crewmodels can of course fight back, but the guns do not.
MORALE & FALL BACK MOVESFor the purposes of Morale and other Leadership tests,and for combat resolution, always ignore the gunmodels, as if they were not there. Because they need atleast one crewman per gun in order for the unit tomove, if an artillery unit does not have one crewmanper gun when it is forced to fall back, the gun modelswithout crewmen are abandoned and immediatelyremoved. The rest of the unit then falls back as normal.If an artillery unit is forced to fall back from closecombat and the enemy is free to make a sweepingadvance, then the artillery unit automatically loses theInitiative roll and is caught and destroyed by the victor.
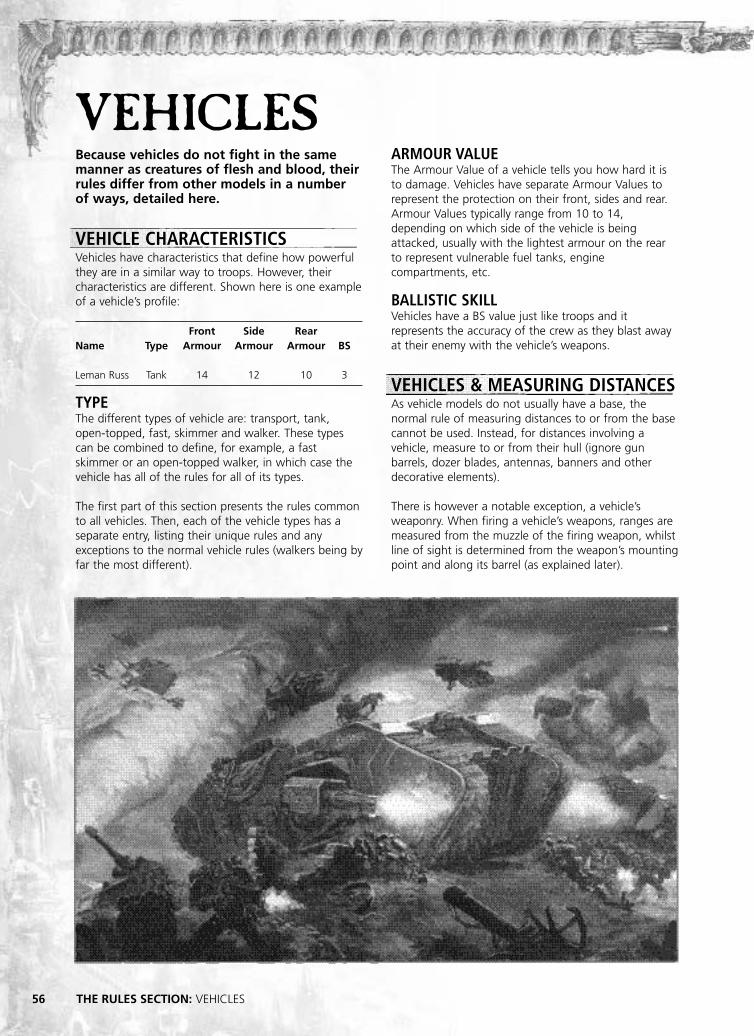
VEHICLES
56 THE RULES SECTION: VEHICLES
Because vehicles do not fight in the samemanner as creatures of flesh and blood, theirrules differ from other models in a numberof ways, detailed here.
VEHICLE CHARACTERISTICSVehicles have characteristics that define how powerfulthey are in a similar way to troops. However, theircharacteristics are different. Shown here is one exampleof a vehicle’s profile:
Front Side RearName Type Armour Armour Armour BS
Leman Russ Tank 14 12 10 3
TYPEThe different types of vehicle are: transport, tank,open-topped, fast, skimmer and walker. These typescan be combined to define, for example, a fastskimmer or an open-topped walker, in which case thevehicle has all of the rules for all of its types.
The first part of this section presents the rules commonto all vehicles. Then, each of the vehicle types has aseparate entry, listing their unique rules and anyexceptions to the normal vehicle rules (walkers being byfar the most different).
ARMOUR VALUEThe Armour Value of a vehicle tells you how hard it isto damage. Vehicles have separate Armour Values torepresent the protection on their front, sides and rear.Armour Values typically range from 10 to 14,depending on which side of the vehicle is beingattacked, usually with the lightest armour on the rearto represent vulnerable fuel tanks, enginecompartments, etc.
BALLISTIC SKILLVehicles have a BS value just like troops and itrepresents the accuracy of the crew as they blast awayat their enemy with the vehicle’s weapons.
VEHICLES & MEASURING DISTANCESAs vehicle models do not usually have a base, thenormal rule of measuring distances to or from the basecannot be used. Instead, for distances involving avehicle, measure to or from their hull (ignore gunbarrels, dozer blades, antennas, banners and otherdecorative elements).
There is however a notable exception, a vehicle’sweaponry. When firing a vehicle’s weapons, ranges aremeasured from the muzzle of the firing weapon, whilstline of sight is determined from the weapon’s mountingpoint and along its barrel (as explained later).

VEHICLES AND MOVEMENTThe distance a vehicle moves influences the amount ofweapons it may fire and how easy a target the vehiclewill be if assaulted, as described later.
• A vehicle that remains stationary will be able to bringits full firepower to bear on the enemy.
• A vehicle that travels up to 6" is moving at combatspeed. This represents the vehicle advancing slowly inorder to keep firing, albeit with reduced firepower.
• A vehicle that travels more than 6" and up to 12" ismoving at cruising speed. This represents the vehicleconcentrating on moving as fast as possible withoutfiring its guns.
Moving a maximum of 12" may seem relatively slowfor a vehicle, but it represents a cross-country speedrather than travelling on a road.
Vehicles can turn any number of times as they move,just like any other model. Vehicles turn by pivoting onthe spot about their centre-point, rather than ‘wheeling’round. Turning does not reduce the vehicle’s move. Thismeans that a vehicle may combine forward and reversemovement in the same turn providing it does notexceed its maximum move. Pivoting on the spot alonedoes not count as moving, so a vehicle that only pivotsin the Movement phase counts as stationary (however,immobilised vehicles may not even pivot). Just like otherunits, vehicles cannot move over friendly models.
TERRAIN EFFECTSVehicles attempting to move through broken terrain arenot slowed down like other units, but risk becomingstuck, bogged down or damaged.
Vehicles are not slowed down by difficult terrain, buttreat all difficult terrain as dangerous. Roll a D6 forevery vehicle that has entered, left or moved throughone or more areas of dangerous terrain during itsmove. A result of 2-6 on the dice means that thevehicle can carry on moving. A result of 1 means thatthe vehicle halts immediately and suffers anImmobilised damage result, so if it was attempting toenter difficult terrain it stops just outside.
When discussing terrain at the beginning of the game,it is perfectly fine for players to agree that some terrainhas different effects on vehicles than it does on otherunits. For example, players may agree that tank trapsare dangerous or even impassable to vehicles, but clearterrain for other units. Similarly, you could agree thatvehicles (or just certain vehicle types) treat barbed wireas clear terrain, and so on.
ROADSVehicles, with the exception of walkers andskimmers, that move at Cruising Speed following aroad for their entire Movement phase may moveup to an extra 6".
Crash, bang, wallopOne of the greatest pleasures to be had in theWarhammer 40,000 game is zooming vehiclemodels about the battlefield, unleashing thefirepower of armoured behemoths and, conversely,blowing up those vehicles that belong to the enemy.The destruction of a vehicle is usually a spectacularevent that can totally change the course of thegame, and vehicle wrecks become important piecesof terrain unto themselves. But how best torepresent such high-octane carnage?
Some like to demonstrate their vehicular misfortuneby turning a destroyed tank onto its top or side. Afew go even further and sculpt battle damageunderneath the vehicle to complement thisapproach. However, many vehicles have delicateparts on top, so players often object to treating theirbeautifully-painted tanks in such a rough and readymanner, and adopt a different solution. We knowseveral gamers who use cotton wool to representthe smoke billowing from destroyed vehicles, avisually pleasing solution and doubly handy ifsomeone spills their tea.
Battle damageAs you read on you will find that there are somedamage results that debilitate rather than destroyvehicle models. Tanks can find themselvesimmobilised by a thrown track, have their weaponsystems crippled or shot off altogether, or bestunned into inactivity for a turn. Marking theseevents is a little more difficult. Some players leavethe weapons and turrets on their models unglued sothat they can be carefully removed during battle.This helps with ease of transport and is a great wayto represent Weapon Destroyed results – just takethe relevant weapon off altogether.
A different approach is to place a dice on or next tothe vehicle, showing the number that correspondswith the appropriate damage result. You could eveninvest in a set of damage markers. These havespecific icons for each of the damage results, so youjust need to place the relevant marker on or next tothe vehicle when damage is inflicted. As with manyaspects of the wargaming hobby, there is no ‘rightanswer’ – just make sure that your opponent ishappy with whatever convention you decide upon.
THE RULES SECTION: VEHICLES 57

The Predator is firing at the Trukk. The weapon on theright sponson cannot draw a line of sight to the chosentarget, and so it cannot be fired.
Vehicle weapons& line of sight
VEHICLES SHOOTINGWhen a vehicle fires, it normally uses its own BScharacteristic and shoots like other units – all itsweapons must fire at a single target unit.
MOVING AND SHOOTING VEHICLE WEAPONRY The number of weapons a vehicle can fire in theShooting phase depends on how fast it has moved inthat turn’s Movement phase, as detailed below.
In addition, the normal penalties of movement onshooting rapid fire and heavy weapons do not apply –when fired from a vehicle, these weapon types alwaysfire as if the firing model had not moved, regardless ofwhether it actually did or not. Note that vehiclescannot run.
• Vehicles that remained stationary may fire all of theirweapons (remember that pivoting on the spot doesnot count as moving).
• Vehicles that moved at combat speed may fire asingle weapon (and its defensive weapons, asexplained below).
• Vehicles that moved at cruising speed may not fire.
There are a few exceptions to these rules: ordnance,ordnance barrage, defensive and optional weapons.
Defensive weaponsAny vehicle weapons of Strength 4 or less (or with noStrength value) are classified as ‘defensive’ weapons.
A vehicle that moved at combat speed can fire all of itsdefensive weapons in addition to the single weapon itis usually allowed to fire.
Optional weaponsSome vehicles have, among the options of their armylist entry, the possibility of buying additional weapons,such as one-shot missiles and pintle-mounted guns.Firing one of these additional weapons counts as firingone of the vehicle’s normal weapons (unless they aredefensive weapons, as described above).
Ordnance weaponsFiring a massive ordnance weapon requires theattention of all the gunners of the vehicle, so no otherweapons may be fired that turn (not even defensiveweapons!). In return, they are better at penetratingarmour (see page 60). Unless their profile specifiesotherwise, all ordnance blast weapons use the largeblast marker.
Ordnance Barrage weaponsDifferently from other unit types, vehicles carryingordnance barrage weapons can choose to fire themeither directly or as a barrage – declare before you fire.
If fired directly at the target, they are treated exactlylike normal ordnance weapons (ignoring the minimumrange in the weapon’s profile).
Alternatively, the vehicle may fire these weapons as anordnance barrage. In this case, the crew must carefullycalculate the firing trajectory, so only vehicles thatremained stationary may fire an ordnance barrageweapon (and may, of course, fire no other weaponsthat turn).
Just like normal barrages, ordnance barrages may havea minimum range (see their profile), they cause Pinningtests, and their targets work out their cover save as ifthe shot came from the centre of the blast marker.If fired at a target that is out of sight, the BS of thefirer makes no difference and the blast marker scattersa full 2D6 if an arrow is rolled on the scatter dice. In addition, ordnance barrages are even more terrifyingthan normal ones – Pinning tests caused by ordnancebarrages are taken with a -1 Ld modifier.
VEHICLE WEAPONS & LINE OF SIGHTJust like infantry, vehicles need to be able to draw aline of sight to their targets in order to shoot at them.When firing a vehicle’s weapons, point them againstthe target and then trace the line of sight from eachweapons’ mounting and along its barrel, to see if theshot is blocked by terrain or models. If the target unithappens to be in cover from only some of the vehicle’sweapons, then work out if the target gets cover savesexactly as if each firing weapon on the vehicle was aseparate firing model in a normal unit.
The Emperor asks only that you obey.
THE RULES SECTION: VEHICLES58

On some models it will be actually impossible to literallymove the gun and point it towards the target, becauseof the way the model is assembled or because the gunhas been glued in place. In this case, players shouldassume that the guns on a vehicle are free to rotate orswivel on their mountings. In order to make clear howmuch any gun is supposed to rotate, refer to thevehicle’s entry, where each weapon has been classifiedas either turret-mounted, pintle-mounted (or ‘bolt-on’),sponson-mounted or hull-mounted. Then apply thefollowing guidelines:
• Turret-mounted weapons can usually rotate 360º,together with the entire turret, unless the design ofthe model prevents this.
• Hull-mounted weapons can fire in a 45º arc fromtheir mounting point (see diagram).
• Sponson-mounted weapons vary greatly, as some cancover the full 180º of the flank they are mounted on(or even slightly more), while others are more limited.This is determined by the shape and position of thesponson’s mounting (see diagrams).
• Pintle-mounted (or bolt-on) weapons can either firein a 360º arc, if they are mounted on the vehicle’sturret; or can fire in a 45º arc from their mountingpoint, if they are mounted on the vehicle’s hull.
In the rare cases when it matters (your tank might betargeting a sniper high up in a bell tower), assume thatguns can swivel vertically roughly by 45º, even if thebarrel on the model itself cannot physically do that!
Sponson-mounted weapons arc of sight 1
Sponson-mounted weapons arc of sight 2
Imperial Guard Leman Russ
Space Marine Predator
Hull-mounted weapons arc of sight
“What I cannot crush with words I will crush with the tanks of theImperial Guard.”
Lord Solar Macharius
THE RULES SECTION: VEHICLES 59
45°
Space Marine Vindicator

ARMOUR PENETRATIONHitting a vehicle is no guarantee that you will actuallydamage it. Once a hit has been scored on a vehicle, rolla D6 and add the weapon’s Strength to it, comparingthis total with the Armour Value of the appropriatefacing of the vehicle.
• If the total is less than the vehicle’s Armour Value,the shot has no effect.
• If the total is equal to the vehicle’s Armour Value, theshot causes a glancing hit.
• If the total is greater than the vehicle’s Armour Value,the shot scores a penetrating hit.
Example: A lascannon shot hits the front of a SpaceMarine Predator (Armour Value 13). Rolling a D6, theplayer scores a 4, and adds this to the lascannon’sStrength of 9, for a total of 13. Because this equals thePredator’s Armour Value, it inflicts a glancing hit.
Ordnance weapons and Armour PenetrationOrdnance weapons (including Ordnance Barrage) hitwith such force that the target’s crew are turned tomush. When you roll to penetrate a vehicle’s armourwith an ordnance weapon, roll two dice instead of oneand pick the highest result!
Template and Blast weapons against vehiclesIf a vehicle is even partially under a template weapon, it is hit on the Armour value the firer is facing.
When firing a blast weapon against a vehicle, place themarker with the hole over any part of the vehicle’s hulland then roll for scatter as normal. In the case ofmultiple blasts, place the hole in the centre of the firstmarker on the vehicle’s hull. If the markers scatter sothat they’re not over the vehicle at all, then obviouslythe vehicle is not affected. If a marker ends over thevehicle, it makes a big difference if the hole in thecentre of the marker is over the vehicle or not:
• The centre of the blast marker ends over thevehicle’s hull. In this case the shell or missile hashit the vehicle and exploded on it. The armourpenetration roll is resolved against the Armour valuefacing the firer, regardless of the position of themarker, using the full Strength of the weapon. Hits from barrage weapons, however, always hit thevehicle’s side armour (representing its top armour).
• The centre of the blast marker ends outsidethe vehicle, but part of the marker covers itshull. In this case the shell or missile has missed thevehicle, and only some shrapnel clanks against thevehicle’s armour. The armour penetration roll isresolved against the Armour Value facing the centreof the marker, regardless of the position of the firer,and the weapon’s Strength is halved (round down).
Rear Armour
Side
Arm
our
Side
Arm
our
THE RULES SECTION: VEHICLES60
SHOOTING AT VEHICLESWhen a unit fires at a vehicle it must be able to see itshull or turret (ignoring the vehicle’s gun barrels,antennas, decorative banner poles, etc.). As the wholeunit must fire at the same target, often this means thatsome of their weapons can’t damage the targetvehicle, so we assume that the other members of thesquad are providing covering fire, bringing forwardammunition for heavy weapons or simply keeping theirheads down.
If the target vehicle is in range, roll to hit as normal. If anyhits are scored, roll for each to see if they penetrate thevehicle’s Armour Value, as explained next.
VEHICLE FACING AND ARMOUR VALUESNot all vehicles are equally armoured. Some massivetanks are protected by countless layers of reinforcedadamantium and ceramite plates, while other lightervehicles rely more on their speed to avoid incomingfire. As such, each different type of vehicle will havedifferent Armour Values, representing not just thethickness and slope of its armour, but also how difficulta target it is because of its size and speed, how toughand numerous its crew are, and so on. Armour Valuesfor individual vehicles also vary depending on whichfacing of the vehicle the shot comes from – its front,sides, or rear, as explained in the diagram.
If a unit has firing models in two different facings of atarget vehicle (some models in the front and some inthe side, for example), shots are resolved separately forthe two facings.
Vehiclearmourfacing
Front Armour

DAMAGE ROLLSA hit on a vehicle can have a variety of results. Avehicle’s armour could be completely pierced, yetmerely result in giving the crew a nasty shock.Alternatively, a lucky shot could detonate ammunitionheld within the vehicle, resulting in an explosion oftitanic proportions. If a vehicle’s armour is breached,you need to determine what damage is caused. Roll aD6 for each shot that glanced or penetrated thevehicle’s armour, apply any appropriate modifiers (theyare all cumulative) and look up the result on the VehicleDamage table below.
Glancing hits If the shot has only caused a glancing hit, the damageto the vehicle will not be so severe. Apply a -2 modifierto the dice result.
‘AP–’ weapons While some weapons are especially good at cuttingthrough heavily armoured targets, others lack thepenetrating power to destroy a vehicle easily.Penetrating and glancing hits inflicted by a weaponshown as ‘AP–’ suffer a modifier of -1 to the roll on theVehicle Damage table.
‘AP 1’ weapons Some weapons are so destructively powerful that theycan penetrate a vehicle’s heavily armoured hull withease. If an AP 1 weapon, such as a multi-melta, scoresa glancing or penetrating hit, add a modifier of +1 tothe roll on the Vehicle Damage table.
Other modifiers Specific weapons and vehicles may have special rulesthat apply further modifiers to the damage roll. For example, hits on open-topped vehicles receive a +1modifier, as explained on page 70.
DAMAGE RESULTS
1 Crew – ShakenThe vehicle is rocked by the attack, but no seriousdamage is sustained (or perhaps the crew havedecided that it is time to quickly relocate). Thevehicle may not shoot until the end of its nextplayer turn.
2 Crew – Stunned The vehicle’s crew is knocked about by the attack,or perhaps all of the vehicle’s targeting and steeringsystems are temporarily scrambled (or maybe thecrew have decided to temporarily bail out and takecover somewhere nearby). The vehicle may notmove nor shoot until the end of its next player turn.
Note: Additional stunned and shaken results are notcumulative, so if a vehicle is shaken three times it is stillonly unable to fire in its next Shooting phase, not itsnext three Shooting phases!
3 Damaged – Weapon Destroyed One of the vehicle’s weapons (chosen by theattacker) is destroyed – ripped off by the force ofthe attack. If a vehicle has no weapons left, treatthis result as an ‘immobilised’ result instead. Thiscan include vehicle upgrades that function asweapons, such as pintle-mounted storm bolters orhunter-killer missiles.
4 Damaged – Immobilised The vehicle has taken a hit that has crippled awheel, track, grav plate, jet or leg. It may not movefor the rest of the game. An immobilised vehiclemay not turn in place but its turret may continue torotate to select targets, and other weapons retaintheir normal arc of fire. Further ‘immobilised’ resultscount as ‘weapon destroyed’ instead.
Note: A vehicle that suffers either Damaged resultwhen it has no weapons left and is already immobilisedtreats the result as ‘Destroyed – Wrecked’ instead.
5 Destroyed – WreckedThe attack critically damages the hull and internalsystems – the vehicle is destroyed. The model is leftin place and becomes a wreck (see page 62).
6 Destroyed – Explodes The vehicle is destroyed, as its fuel and ammodetonate, ripping it apart in a spectacular explosion.Flaming debris is scattered D6" from the vehicle,and models in range suffer a Strength 3, AP– hit.The vehicle is then removed and is replaced with anarea of difficult ground representing scatteredwreckage or a crater (if you have one).
Note: Vehicle drivers, gunners and other crew are killedif their vehicle suffers either Destroyed results.
61THE RULES SECTION: VEHICLES
VEHICLE DAMAGE TABLE
D6 RESULT1 or less Crew – Shaken2 Crew – Stunned3 Damaged – Weapon Destroyed4 Damaged – Immobilised5 Destroyed – Wrecked. 6 or more Destroyed – Explodes!
Modifiers:Glancing hit -2Hit by ‘AP–‘ weapon -1Hit by ‘AP1’ weapon +1Target is open-topped +1

THE RULES SECTION: VEHICLES62
WRECKSWrecked vehicles are left on the table and effectivelybecome a piece of terrain, counting as both difficultand dangerous terrain, and providing cover. Playersmust clearly mark that a vehicle has been wrecked inany way they consider suitable. For example, they canturn the vehicle or just its turret upside down (and notsideways to gain extra cover!), place a marker or cottonwool on it to represent smoke and flames, and so on.
VEHICLES AND COVER – OBSCURED TARGETSVehicles do not benefit from cover in the same way asinfantry – their sheer size and bulk mean they cannottake advantage of cover as well as infantry and othersmaller, more agile troops. They can, however, positionthemselves in such a way as to make it harder for theenemy to hit them in a vulnerable location. Thedifference from the way cover works for other modelsis represented by the following exceptions to thenormal rules for cover:
• At least 50% of the facing of the vehicle that isbeing targeted (i.e. its front, side or rear) needs to behidden by intervening terrain or models from thepoint of view of the firer for the vehicle to claim tobe in cover. If this is the case, the vehicle is said to beobscured (or ‘hull down’). If a squad is firing at avehicle, the vehicle is obscured only if it is 50%hidden from the majority of the firing models (do notcount models that cannot hurt the vehicle). Just likewith units of several models, if you’re not surewhether the vehicle is 50% in cover or not, simplymodify its save by –1.
• Vehicles are not obscured simply for being inside areaterrain. The 50% rule given above takes precedence.
• Obviously, vehicles cannot go to ground, voluntarilyor otherwise.
If the target is obscured and suffers a glancing orpenetrating hit, it may take a cover save against it,exactly like a non-vehicle model would do against awound (for example, a save of 5+ for a hedge, 4+ for abuilding, 3+ for a fortification, and so on). If the save ispassed, the hit is discarded and no roll is made on theVehicle Damage table.
If a special rule or a piece of wargear confers to avehicle the ability of being obscured even if in theopen, this is a 4+ cover save, unless specified otherwisein the Codex.
It may rarely happen that the firing unit cannot see anypart of the facing they are in (front, side or rear), butthey can still see another facing of the target vehicle. In this case they may take the shot against the facingthey can see, but to represent such an extremelyangled shot, the vehicle receives a 3+ cover save.
Picture 1: more than 50% of the Rhino’s side is hiddenby the building – the Rhino is obscured. Picture 2: less than 50% of the Rhino’s side is hidden bythe building – the Rhino is not obscured.
SMOKE LAUNCHERSSome vehicles have small launchers mounted ontothem that carry smoke canisters (or a moresophisticated equivalent in the case of some alienvehicles). These are used to temporarily hide thevehicle behind concealing clouds of smoke –especially useful when moving out into the open.
Once per game, after completing its move, avehicle with smoke launchers can trigger them (itdoesn’t matter how far it moved). Place somecotton wool or other suitable marker on oraround the vehicle to show it is obscured. Thevehicle may not fire any of its weapons in thesame turn as it used its smoke launchers, but willcount as obscured in the next enemy Shootingphase, receiving a 4+ cover save.
After the enemy’s Shooting phase, the smokedisperses with no further effect. Note that avehicle may still use smoke launchers even if itscrew are shaken or stunned.
It is worth pointing out that some armies mightuse different versions of smoke launchers, whichhave slightly different rules. As normal, the rules inthe Codex take precedence.
2
1

At the conclusion of a round of close combat against avehicle there is no combat result, and so there are nosweeping advances, no pile-in and no consolidationmoves. The vehicle and the enemy remain where theyare and are free to simply move away in future turns. In a multiple fight including enemy vehicles and otherunit types, the result of the fight is worked out asnormal against the latter, ignoring the vehicles.
Successive turnsIf a vehicle that has been assaulted, and has survived,does not move in its successive Movement phase,enemy models will still be in base contact with it duringits Shooting and Assault phase. Enemy models that arein base contact with a vehicle are not locked in combatand can therefore be shot during the Shooting phase.
If the vehicle pivots on the spot (to shoot at itsattackers for example), move these models out of theway as you shift the vehicle and then place them backinto base contact with the vehicle.
Units that still have models in base contact with avehicle in its Assault phase may attack it again, just asin a normal ongoing combat (including all models thatwould count as engaged in a normal assault).
VEHICLES AND MORALEVehicles never take Morale checks for any reason. It is assumed that in all cases the vehicle’s crew hasunshakeable faith in their vehicle and their orders. Any occasional lapses that do occur are represented bycrew shaken and stunned results on the Damage table.
VEHICLES AND ASSAULTSVehicles can be both very dangerous and veryvulnerable at close quarters. On one hand, massivelyarmoured vehicles can scatter infantry before them, asno one in their right mind would wish to be caughtbeneath the tracks of an eighty-tonne tank bearingdown on them! On the other hand, a stationary vehiclecan often be very easily destroyed, as individualsclamber over it, attaching all manner of grenades andshooting into vulnerable spots.
ASSAULTING VEHICLESInfantry can pose a grave threat to vehicles if they getclose enough. They can wreck a vehicle by shootingthrough vision slits, planting explosives on fuel tanks,tearing open hatches to attack the crew or committingsome other equally imaginative act of mayhem.
Launching an assaultA unit can assault a vehicle in the Assault phase. The assault move is conducted just the same asassaulting other enemy units. As normal, all engagedmodels will attack.
Rolling to hit against vehiclesAs the vehicle has no WS, the score needed for a hitdepends on the speed of the target, as follows:
Target D6 roll neededAttacking a vehicle that is Automatic hitimmobilised or was stationary in its previous turn.
Attacking a vehicle that 4+moved at combat speed in its previous turn.
Attacking a vehicle that 6moved at cruising speed in its previous turn.
Note: when assessing how far a vehicle has moved,only take into account the actual distance covered fromits original position. Moving backwards and forwards ordriving around in circles does not help!
Armour penetration in close combatArmour Penetration is worked out in the same way asfor shooting (D6 + the Strength of the attacker). Inclose combat, however, all hits are resolved against thevehicle’s rear armour, to represent the chance ofattacking a vulnerable spot.
Combat resultsCombats against vehicles are very different from thoseamong other unit types. For a start, whilst vehicles canbe assaulted, they cannot be locked in combat.
63THE RULES SECTION: VEHICLES
GRENADESA well-placed grenade can often achieve a kill ona vehicle. Specialist tank-hunting troops arefrequently equipped with krak grenades (a specialtype of high-explosive grenade designed to stopvehicles in their tracks) or even melta bombs(fusion based charges that can reduce a battletank to a burnt-out wreck in milliseconds).
Grenades have to be clamped or placed so as toinflict enough damage, so each model using themcan only ever make one attack, regardless of thenumber of Attacks on their profile and any bonusattacks. Against vehicles, grenades have thefollowing armour penetration:
Defensive and assault grenades 4+D6
Krak grenades 6+D6
Melta bombs 8+2D6

UNITS OF VEHICLES – SQUADRONSMost vehicles fight as individual units and arerepresented by a single model. However, some smallvehicles, like Ork Warbuggies and Eldar Vypers, operatein units of more than one vehicle, known as squadrons.These follow the rules for normal units, with thefollowing exceptions:
MOVEMENT PHASEWhen a squadron moves, all of its vehicles move at thesame speed (i.e. they all move at combat speed, atcruising speed, etc.). All of its vehicles have to maintaincoherency, just like ordinary units, but vehicles in asquadron need only to remain within 4" of each otherto be in coherency, rather than within 2".
SHOOTING PHASEWhen shooting, a squadron of vehicles fires all of itsavailable weaponry at a single enemy unit. Like otherunits, vehicles in squadrons can see and shoot throughmembers of their own unit, just as if they were notthere. This represents the vehicles manoeuvring aroundeach other in a well-practiced battle formation.
When a squadron of vehicles is fired at, roll to hit andfor armour penetration against the squadron’s commonArmour Value (which is normally the same for allfacings, and in most cases is 10). If the vehicles in thesquadron have different Armour Values on differentfacings, use the Armour Value of the facing of theclosest visible vehicle.
Once all of the armour penetration rolls have beenmade, the player controlling the squadron allocates theglancing and penetrating hits to squadron members ashe would allocate wounds to members of a normalunit. Then he takes any cover saves available to thesquadron – use the rules for vehicles to determine ifeach squadron member is in cover (ignoring othermembers of the squadron, as if they were not there),and then the rules for normal units to work out if theentire squadron is in cover or not. After cover saves aretaken, make the damage rolls for any remainingglancing and penetrating hits. The effects of damageresults on vehicle squadrons are slightly different thanon normal vehicles, as described below.
DAMAGE RESULTS AGAINST SQUADRONSThe mutual support of vehicles in squadrons makesthem resilient to damage results affecting the crew. Onthe other hand, the crews are under strict orders toabandon immobilised vehicles and disable them, not toleave them as spoils of war for the enemy.
To represent this, treat all immobilised results asdestroyed (wrecked) and all stunned results as shaken.If a squadron consists of a single vehicle when anenemy unit fires at it, it reverts to the normal rules forvehicle damage results.
For example, a squad of Space Marine Devastatorsopens fire against a squadron of three Eldar Vypers,scores several hits, and rolls for armour penetrationagainst the squadron’s Armour Value of 10. This resultsin three penetrating hits and three glancing hits. The Eldar player allocates two penetrating hits on oneVyper, two glancing hits on another and onepenetrating and one glancing hit on the last Vyper. He then takes the cover saves for his Vypers (4+, forexample), saving one of the glancing hits and one ofthe penetrating hits. Finally the opponent rolls fordamage for the two glancing and two penetrating hitsthat are left, and the results are immediately applied onthe Vypers that suffered them.
ASSAULT PHASEWhen engaged in close combat against a squadron,enemy models roll to hit and for armour penetrationagainst the squadron as a whole. Damage results havethe same effect as described above, and are allocatedagainst the squadron at each Initiative value, in thesame way as a normal combat. As usual for combatsagainst vehicles, there is no defenders’ reaction,combat resolution, pile-in moves, consolidation, etc.
THE RULES SECTION: VEHICLES64

Transport vehiclesTransport vehicles are designed to carry infantrysquads around the battlefield. They offer to thewarriors either the protection of an armoured hull toshield them from anti-personnel fire or a muchhigher movement speed, or might even combineboth advantages, as in the case of Eldar transports.
Tanks Tanks are a common sight on the battlefields of the41st Millennium. Most races field some kind ofheavily armed and armoured vehicle, from the hugeand lumbering Leman Russ battle tanks of theImperial Guard, to the sleek and sophisticated grav-tanks of the Eldar. Tanks are often fitted for multi-role capability, which will commonly include trooptransportation, tank-hunting and infantry support.
Open-topped vehiclesSome vehicles are not fully enclosed, but exposetheir crews to a hostile universe. There are manyreasons for this – to give reconnaissance units a clearfield of vision, to make embarking and disembarkingpassengers easier, or it may simply be impractical toenclose the crew. While crews and embarkedpassengers on open-topped vehicles have morefreedom of movement and better arcs of vision, thelack of an enclosed crew space inevitably means thatthe vehicle is more vulnerable to incoming fire.
Fast vehiclesAs the name suggests, fast vehicles are significantlyquicker than most. Many fast vehicles are alsoskimmers, however, a few wheeled or trackedvehicles are also capable of high speeds, mostly dueto either their light weight or extremely powerfulengines. This type of vehicle has the additionaladvantage of being able to fire weapons whilemoving at higher speeds.
SkimmersWhile most vehicles travel across the ground onwheels, tracks or legs, some advanced machines arefitted with jets or anti-gravity drives that enablethem to swoop and hover a few metres above thebattlefield. This is not true flight, but rather a limitedversion of it. Often skimmers will also be categorisedas fast vehicles but this is not always the case.
WalkersOn any battlefield, there are places whereconventional vehicles cannot go – built-up areas,dense forests, narrow tunnels, and so on. For thisreason, many armies use vehicles that are propelledby two, or sometimes more, mechanical legs. Thesevehicles are usually capable of carrying as manyweapon systems as a tank on a significantly smallerand lighter chassis. They combine the resilience of atank with the manoeuvrability of an infantryman.
THE RULES SECTION: VEHICLES 65
VEHICLE TYPES
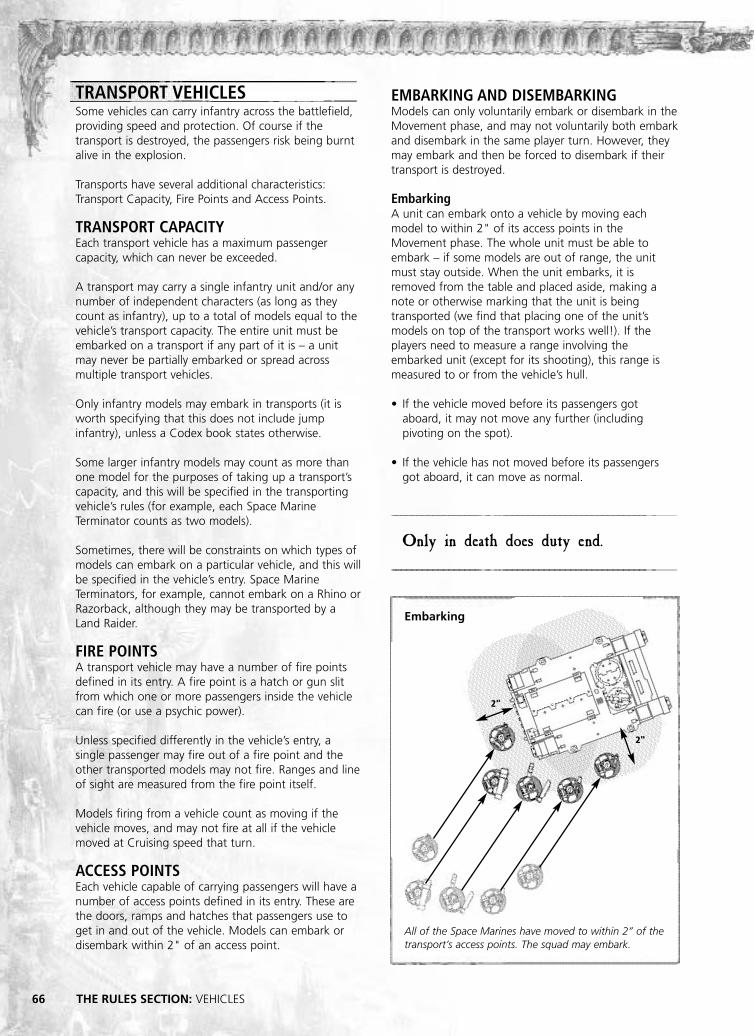
66
EMBARKING AND DISEMBARKINGModels can only voluntarily embark or disembark in theMovement phase, and may not voluntarily both embarkand disembark in the same player turn. However, theymay embark and then be forced to disembark if theirtransport is destroyed.
EmbarkingA unit can embark onto a vehicle by moving eachmodel to within 2" of its access points in theMovement phase. The whole unit must be able toembark – if some models are out of range, the unitmust stay outside. When the unit embarks, it isremoved from the table and placed aside, making anote or otherwise marking that the unit is beingtransported (we find that placing one of the unit’smodels on top of the transport works well!). If theplayers need to measure a range involving theembarked unit (except for its shooting), this range ismeasured to or from the vehicle’s hull.
• If the vehicle moved before its passengers gotaboard, it may not move any further (includingpivoting on the spot).
• If the vehicle has not moved before its passengersgot aboard, it can move as normal.
Embarking
2"
2"
THE RULES SECTION: VEHICLES
TRANSPORT VEHICLESSome vehicles can carry infantry across the battlefield,providing speed and protection. Of course if thetransport is destroyed, the passengers risk being burntalive in the explosion.
Transports have several additional characteristics:Transport Capacity, Fire Points and Access Points.
TRANSPORT CAPACITYEach transport vehicle has a maximum passengercapacity, which can never be exceeded.
A transport may carry a single infantry unit and/or anynumber of independent characters (as long as theycount as infantry), up to a total of models equal to thevehicle’s transport capacity. The entire unit must beembarked on a transport if any part of it is – a unitmay never be partially embarked or spread acrossmultiple transport vehicles.
Only infantry models may embark in transports (it isworth specifying that this does not include jumpinfantry), unless a Codex book states otherwise.
Some larger infantry models may count as more thanone model for the purposes of taking up a transport’scapacity, and this will be specified in the transportingvehicle’s rules (for example, each Space MarineTerminator counts as two models).
Sometimes, there will be constraints on which types ofmodels can embark on a particular vehicle, and this willbe specified in the vehicle’s entry. Space MarineTerminators, for example, cannot embark on a Rhino orRazorback, although they may be transported by aLand Raider.
FIRE POINTSA transport vehicle may have a number of fire pointsdefined in its entry. A fire point is a hatch or gun slitfrom which one or more passengers inside the vehiclecan fire (or use a psychic power).
Unless specified differently in the vehicle’s entry, asingle passenger may fire out of a fire point and theother transported models may not fire. Ranges and lineof sight are measured from the fire point itself.
Models firing from a vehicle count as moving if thevehicle moves, and may not fire at all if the vehiclemoved at Cruising speed that turn.
ACCESS POINTSEach vehicle capable of carrying passengers will have anumber of access points defined in its entry. These arethe doors, ramps and hatches that passengers use toget in and out of the vehicle. Models can embark ordisembark within 2" of an access point.
All of the Space Marines have moved to within 2” of thetransport’s access points. The squad may embark.
Only in death does duty end.

DisembarkingA unit that begins its Movement phase aboard a vehiclecan disembark either before or after the vehicle hasmoved. When the unit disembarks, each model isdeployed within 2" of one of the vehicle’s accesspoints, and within unit coherency. Models cannotdisembark within 1" of an enemy. If any models cannotdisembark because of enemies or because they wouldend up in impassable terrain, the unit can perform an‘emergency disembarkation’ – the models are deployedanywhere within 2" of the vehicle’s hull, but the unitcan’t do anything else for the rest of the turn. If eventhis disembarkation is impossible, they can’t disembark.
• If the vehicle has already moved (including pivotingon the spot), the passengers may disembark, butnot move any further in that Movement phase.Once the models have disembarked, the vehiclemay not move any further (including pivoting onthe spot). After disembarking, these models mayshoot (counting as moving), but may not assault.
• If the vehicle has not yet moved, then thepassengers may disembark and move normally. The vehicle can also then move normally. The disembarked models may shoot (counting asmoving), and may assault as normal.
Independent characters embarking and disembarkingIf an independent character (or even more than one)and a unit are both embarked in the same vehicle, theyare automatically joined, just as if the character waswithin 2" of the unit. If either an independentcharacter or a unit is already in a vehicle, the other mayjoin them by embarking too (assuming, of course, thatthere is enough space left).
2"
2"
Disembarking
2"
The unit and the independent characters may, in a laterMovement phase, disembark together as a single unit.They can also disembark separately by either the unit orthe characters disembarking while the others remainonboard, or even disembarking at the same time usingdifferent access points (but they must end their movemore than 2" away from each other). If the vehicle hasyet to move, both unit and characters can disembarktogether and in coherency, but then the characters canleave the unit as they move, as normal.
EFFECTS OF DAMAGE RESULTS ON PASSENGERSCrew shaken & crew stunnedPassengers may not shoot from the vehicle in their nextShooting phase, but are otherwise unaffected.
Weapon destroyed & immobilisedThese results have no effect on passengers.
Destroyed – wreckedThe passengers must immediately disembark and thentake a Pinning test. Any models that cannot disembarkare destroyed. After this, the vehicle becomes a wreck.
Destroyed – explodes!The unit suffers a number of Strength 4, AP– hits equalto the number of models embarked, treated just like hitsfrom shooting. The surviving passengers are placed wherethe vehicle used to be and then take a Pinning test.
Note: remember that all models in a single unit firesimultaneously, so a squad cannot take out a transportwith its lascannon and then mow down the occupantswith their bolters. However, if a transport is destroyed(either result) by a ranged attack, the unit that shot itmay assault the now disembarked passengers, if it isallowed to assault according to the assault rules.
All of the Space Marines have disembarked within 2" ofthe transport’s access points.
DEDICATED TRANSPORTSSometimes a unit entry in a Codex will include atransport option, allowing a vehicle to be selectedtogether with the unit. These ‘dedicatedtransports’ do not use up a slot on the forceorganisation chart. Other vehicles may also have atransport capacity, but they are chosen separatelyas normal and occupy a force organisation chartslot of their own (for example, the mighty SpaceMarine Land Raider).
The only limitation of a dedicated transport is thatwhen it is deployed it can only carry the unit itwas selected with (plus any independentcharacters). After the game begins, it can thentransport any friendly infantry unit, subject totransport capacity and other special exclusions, asexplained in the vehicle’s entry (it might not beable to transport Terminators, for example).
67THE RULES SECTION: VEHICLES

The Predator tank moves until it’s in contact with the Orks, which pass their Morale test.The Ork Nob attempts a Death or Glory! attack with his power claw, but rolls poorly,failing to stop or destroy the tank, and is removed. The Predator finishes its move,coming into contact with the Gretchin, which fail their Morale check and fall back.
Tank Shock distance travelled
Morale test passed
Moraletest
failed
‘Death or Glory!’ failed
The Gretchinfall back
towards theirown table edge
Tank Shock!
Once the vehicle has been ‘aimed’ and the speeddeclared, move the vehicle straight forward until itcomes into contact with an enemy unit or it reachesthe distance declared – no other changes of directionare allowed during a tank shock. If no enemy unit isreached, just move the vehicle straight ahead for thedistance declared and no special attack takes place.
If an enemy unit other than another vehicle is reached(including any model in an artillery unit), the unit musttake a Morale check and will immediately fall back if itfails it. If the test is passed the unit will simply let thetank move through, as if it was not there. Regardless ofthe result of the test, the vehicle keeps moving straighton, possibly tank shocking more enemy units until itreaches its final position. If the tank accidentally movesinto contact with a friendly model or comes to within1" of an enemy vehicle, it immediately stops moving.
If some enemy models in the enemy unit would end upunderneath the vehicle when it reaches its final position(it makes no difference whether the unit is falling backor not), these models must be moved out of the wayby the shortest distance, leaving at least 1" betweenthem and the vehicle and maintaining unit coherency.
If the tank moved slowly enough during the tank shockattack, it may fire as normal in the Shooting phase.
TANKSTanks are the most common vehicle type found on thebattlefields of the 41st Millennium, where their armourand firepower are an invaluable asset for any army.
Tanks follow the normal rules for vehicles, with theadditions and exceptions given below.
TANK SHOCK! Tanks may decide to use their mass as a weapon,driving right into and through densely packed enemies.This often throws the opposing battle line into disarray,as having some monstrous metal behemoth comingstraight at you is unnerving for anybody.
When moving a tank, the player can declare that thevehicle is going to attempt to make a tank shock attackinstead of moving normally. This is an exception to therule that enemy models cannot be moved through.
Remember, though, that friendly models still cannot bemoved through, so a tank shock cannot be attemptedif friendly models are in the way. Also, tank shockcannot be attempted against enemy units that arelocked in combat, as the risk of harming friends in theswirling melee is too high.
To make this kind of attack, first turn the vehicle on thespot in the direction you intend to move it and declarehow many inches the vehicle is going to move. Thevehicle must move at least at combat speed. Note thatbecause pivoting on the spot does not count asmoving, this is not enough for a tank shock.
68 THE RULES SECTION: VEHICLES
My armour is contempt.
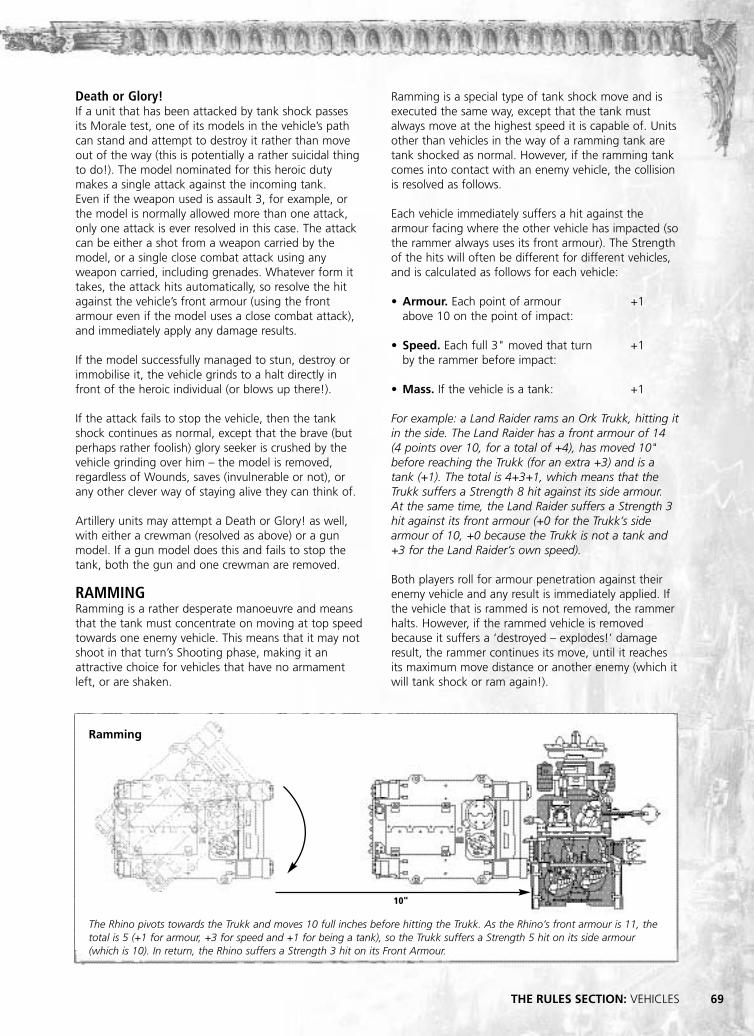
Ramming is a special type of tank shock move and isexecuted the same way, except that the tank mustalways move at the highest speed it is capable of. Unitsother than vehicles in the way of a ramming tank aretank shocked as normal. However, if the ramming tankcomes into contact with an enemy vehicle, the collisionis resolved as follows.
Each vehicle immediately suffers a hit against thearmour facing where the other vehicle has impacted (sothe rammer always uses its front armour). The Strengthof the hits will often be different for different vehicles,and is calculated as follows for each vehicle:
• Armour. Each point of armour +1above 10 on the point of impact:
• Speed. Each full 3" moved that turn +1by the rammer before impact:
• Mass. If the vehicle is a tank: +1
For example: a Land Raider rams an Ork Trukk, hitting itin the side. The Land Raider has a front armour of 14(4 points over 10, for a total of +4), has moved 10"before reaching the Trukk (for an extra +3) and is atank (+1). The total is 4+3+1, which means that theTrukk suffers a Strength 8 hit against its side armour. At the same time, the Land Raider suffers a Strength 3hit against its front armour (+0 for the Trukk’s sidearmour of 10, +0 because the Trukk is not a tank and+3 for the Land Raider’s own speed).
Both players roll for armour penetration against theirenemy vehicle and any result is immediately applied. Ifthe vehicle that is rammed is not removed, the rammerhalts. However, if the rammed vehicle is removedbecause it suffers a ‘destroyed – explodes!’ damageresult, the rammer continues its move, until it reachesits maximum move distance or another enemy (which itwill tank shock or ram again!).
10"
Death or Glory!If a unit that has been attacked by tank shock passesits Morale test, one of its models in the vehicle’s pathcan stand and attempt to destroy it rather than moveout of the way (this is potentially a rather suicidal thingto do!). The model nominated for this heroic dutymakes a single attack against the incoming tank. Even if the weapon used is assault 3, for example, orthe model is normally allowed more than one attack,only one attack is ever resolved in this case. The attackcan be either a shot from a weapon carried by themodel, or a single close combat attack using anyweapon carried, including grenades. Whatever form ittakes, the attack hits automatically, so resolve the hitagainst the vehicle’s front armour (using the frontarmour even if the model uses a close combat attack),and immediately apply any damage results.
If the model successfully managed to stun, destroy orimmobilise it, the vehicle grinds to a halt directly infront of the heroic individual (or blows up there!).
If the attack fails to stop the vehicle, then the tankshock continues as normal, except that the brave (butperhaps rather foolish) glory seeker is crushed by thevehicle grinding over him – the model is removed,regardless of Wounds, saves (invulnerable or not), orany other clever way of staying alive they can think of.
Artillery units may attempt a Death or Glory! as well,with either a crewman (resolved as above) or a gunmodel. If a gun model does this and fails to stop thetank, both the gun and one crewman are removed.
RAMMING Ramming is a rather desperate manoeuvre and meansthat the tank must concentrate on moving at top speedtowards one enemy vehicle. This means that it may notshoot in that turn’s Shooting phase, making it anattractive choice for vehicles that have no armamentleft, or are shaken.
Ramming
The Rhino pivots towards the Trukk and moves 10 full inches before hitting the Trukk. As the Rhino’s front armour is 11, thetotal is 5 (+1 for armour, +3 for speed and +1 for being a tank), so the Trukk suffers a Strength 5 hit on its side armour(which is 10). In return, the Rhino suffers a Strength 3 hit on its Front Armour.
69THE RULES SECTION: VEHICLES

THE RULES SECTION: VEHICLES
OPEN-TOPPED VEHICLESSome vehicles are much less armoured than tanks. Thismeans they are more vulnerable to damage because oftheir lightweight construction and the fact that theircrew is exposed to enemy fire. However, passengerscan fire out and disembark much more easily thannormal. Typical examples of open-topped vehicles areOrk Trukks and Dark Eldar Raiders. Open-toppedvehicles follow the normal vehicle rules, with theadditions and exceptions given below.
OPEN-TOPPED TRANSPORT VEHICLESOpen-topped vehicles do not have specific fire points.Instead, all passengers in an open-topped vehicle mayfire, measuring range and line of sight from the hull ofthe vehicle. Open-topped vehicles do not have specificaccess points. Models can embark or disembark within2" of any point of the vehicle. The passengers of open-topped vehicles may assault, even if the vehicle hasmoved before their disembarkation. As it is much easierto bail out from an open topped transport, theStrength of hits inflicted on passengers by explodingopen topped transports is one point lower than itwould be in a normal transport (i.e. Strength 3).
DAMAGING OPEN-TOPPED VEHICLESWhenever a damage roll is made against an open-topped vehicle, add +1 to the result.
“Why do we ride atop these elegantcraft? The better to hear the screams ofour prey as we ride them down, tosavour the fear etched on their faces, totaste the tantalising tang of their bloodin the air as an appetiser before thefeast. But most of all we ride them sothat the slaughter may begin as soon aspossible.”
Dhariaq Bladetongue, Kabal of the Pierced Eye
FAST VEHICLESSome vehicles are markedly faster then the moreponderous tanks, because of the combination of theirlighter construction and more powerful engines.
Fast vehicles follow the normal rules for vehicles, withthe additions and exceptions given below.
MOVING FAST VEHICLES Fast vehicles are capable of a third level of speed, called‘flat out’. A fast vehicle going flat out moves more than12" and up to 18". This represents the fast vehiclemoving at top speed, without firing its guns and istreated in all respects exactly the same as moving atcruising speed for a vehicle that is not fast (exceptwhere noted otherwise). For example, a fast vehiclemoving flat out on a road may move up to 24".
FAST VEHICLES FIRINGFast vehicles may move and fire more effectively thanother types of vehicles.
Fast vehicles that move at combat speed may fire all oftheir weapons, just like other types of vehicles thathave remained stationary (including ordnance barrageweapons, which cannot usually be fired on the move).
Fast vehicles that move at cruising speed may fire asingle weapon (plus all defensive weapons, just likeother types of vehicle moving at combat speed).
Fast vehicles moving flat out may fire no weapons.
ASSAULTING FAST VEHICLESFast vehicles that moved ‘flat out’ in the previous turnand are not immobilised are hit on a 6 in assaults(exactly as if moving at cruising speed).
FAST TRANSPORT VEHICLES Passengers may not embark onto or disembark from afast vehicle if it has moved (or is going to move) flatout in that Movement phase.
70
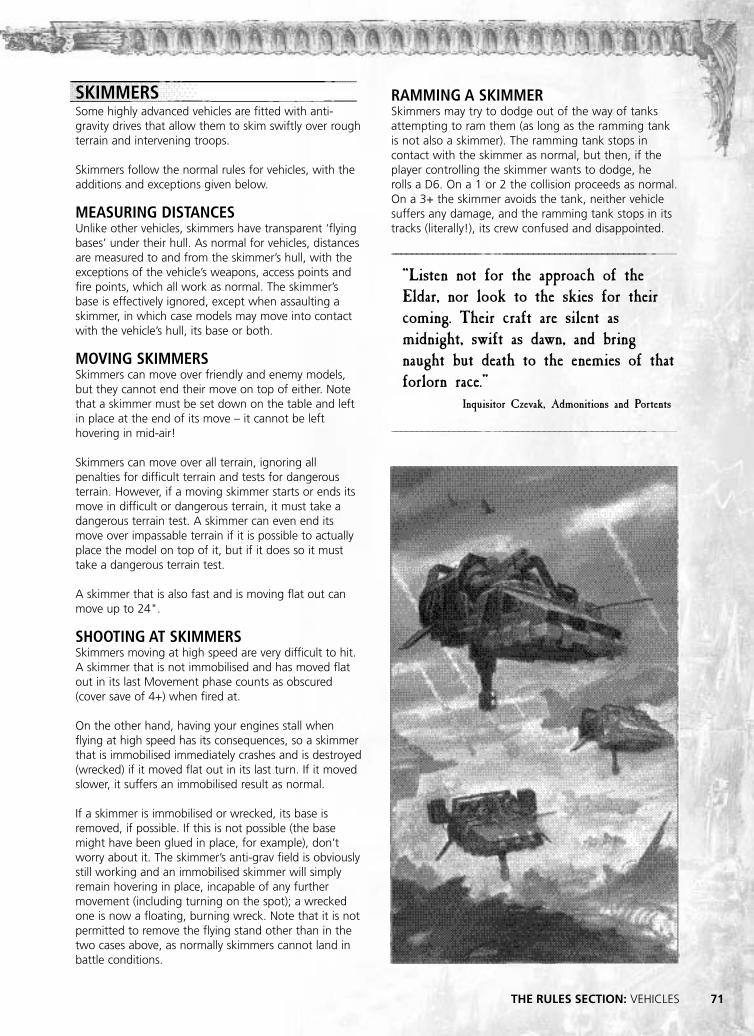
RAMMING A SKIMMERSkimmers may try to dodge out of the way of tanksattempting to ram them (as long as the ramming tankis not also a skimmer). The ramming tank stops incontact with the skimmer as normal, but then, if theplayer controlling the skimmer wants to dodge, herolls a D6. On a 1 or 2 the collision proceeds as normal.On a 3+ the skimmer avoids the tank, neither vehiclesuffers any damage, and the ramming tank stops in itstracks (literally!), its crew confused and disappointed.
“Listen not for the approach of theEldar, nor look to the skies for theircoming. Their craft are silent asmidnight, swift as dawn, and bringnaught but death to the enemies of thatforlorn race.”
Inquisitor Czevak, Admonitions and Portents
SKIMMERSSome highly advanced vehicles are fitted with anti-gravity drives that allow them to skim swiftly over roughterrain and intervening troops.
Skimmers follow the normal rules for vehicles, with theadditions and exceptions given below.
MEASURING DISTANCESUnlike other vehicles, skimmers have transparent ‘flyingbases’ under their hull. As normal for vehicles, distancesare measured to and from the skimmer’s hull, with theexceptions of the vehicle’s weapons, access points andfire points, which all work as normal. The skimmer’sbase is effectively ignored, except when assaulting askimmer, in which case models may move into contactwith the vehicle’s hull, its base or both.
MOVING SKIMMERSSkimmers can move over friendly and enemy models,but they cannot end their move on top of either. Notethat a skimmer must be set down on the table and leftin place at the end of its move – it cannot be lefthovering in mid-air!
Skimmers can move over all terrain, ignoring allpenalties for difficult terrain and tests for dangerousterrain. However, if a moving skimmer starts or ends itsmove in difficult or dangerous terrain, it must take adangerous terrain test. A skimmer can even end itsmove over impassable terrain if it is possible to actuallyplace the model on top of it, but if it does so it musttake a dangerous terrain test.
A skimmer that is also fast and is moving flat out canmove up to 24".
SHOOTING AT SKIMMERSSkimmers moving at high speed are very difficult to hit.A skimmer that is not immobilised and has moved flatout in its last Movement phase counts as obscured(cover save of 4+) when fired at.
On the other hand, having your engines stall whenflying at high speed has its consequences, so a skimmerthat is immobilised immediately crashes and is destroyed(wrecked) if it moved flat out in its last turn. If it movedslower, it suffers an immobilised result as normal.
If a skimmer is immobilised or wrecked, its base isremoved, if possible. If this is not possible (the basemight have been glued in place, for example), don’tworry about it. The skimmer’s anti-grav field is obviouslystill working and an immobilised skimmer will simplyremain hovering in place, incapable of any furthermovement (including turning on the spot); a wreckedone is now a floating, burning wreck. Note that it is notpermitted to remove the flying stand other than in thetwo cases above, as normally skimmers cannot land inbattle conditions.
71THE RULES SECTION: VEHICLES

MOVING WALKERSWhile other vehicles can only move in the Movementphase, walkers can also run in the Shooting phase andassault in the Assault phase, just as infantry can.
Walkers move in exactly the same way as infantry, sothey can move up to 6" in the Movement phase andassault up to 6" in the Assault phase.
Difficult terrain affects walkers just as it does infantry.Difficult terrain only counts as dangerous terrain forwalkers if it would do so for infantry. If walkers fail adangerous terrain test, they are immobilised.
Unlike infantry, a walker has a facing, which influenceswhere it can fire (see below) and its Armour Valuewhen fired at.
WALKERS SHOOTINGWalkers can move and fire all of their weapons, justlike a stationary vehicle.
Alternatively, they can choose to run like infantry, andthis prevents them from firing and assaulting that turn,as normal (though they can still trigger their smokelaunchers, if they have any). Obviously they cannot runif they are stunned or immobilised.
When firing a walker’s weapons, pivot the walker onthe spot so that its guns are aimed at the target(assume that all weapons mounted on a walker canswivel 45º, like hull-mounted weapons) and thenmeasure the range from the weapon itself and line ofsight from the mounting point of the weapon andalong its barrel, as normal for vehicles. This pivoting inthe Shooting phase does not count as moving andrepresents the vastly superior agility of walkers incomparison with other vehicles. Keep in mind howeverthat the walker will probably remain facing in thisdirection until its next Movement phase, so its facingwill determine where its rear armour is going to bewhen the enemy returns fire!
SHOOTING AT WALKERSWhen firing at a walker, work out which of its ArmourValues to use as you would for any other vehicle, basedon the position of its body. Walkers that are locked incombat cannot be shot at.
THE RULES SECTION: VEHICLES72
WALKERSWalkers are a very unusual type of vehicle. Instead ofwheels or tracks they have mechanical limbs that allowthem to stride forward, ploughing through denselypacked terrain with ease in order to bring theirweapons to bear. Because of this they use some of therules for normal infantry.
ADDITIONAL CHARACTERISTICSWalkers have a Weapon Skill, Strength, Initiative andAttacks value, representing their ability in close combatand reaction speed, in the same way that they do formodels that aren’t vehicles. Shown here is an example:
ArmourType WS BS S F S R I A
Dreadnought Walker 4 4 6 12 12 10 4 2
MEASURING RANGESIf a walker has a base, measure ranges and distances toand from its base, as you would for an infantry model.If a walker does not have a base (like the ChaosDefiler), measure to and from its hull (including its legsand other limbs), as normal for vehicles. Firing thewalker’s own weapons is an exception to this, asexplained later on this page.
“We pray for our brethren who pilotthe Dreadnoughts. Though they takenew form, their souls, and their weaponmounts, remain pure.”
Marneus Calgar

WALKERS AND ASSAULTSWalkers assault like infantry models, meaning that theymake assault moves and can be locked in combat withenemy units. Walkers can make an assault even if theyfired heavy or rapid fire weapons. However, like normalinfantry, they can still only assault the unit they fired at.
In close combat, walkers fight like infantry models.However, any hits scored against them must roll forarmour penetration and damage as for a vehicle.Models hitting a walker in close combat always roll forpenetration against its front armour. This is because thewalker is not a static target like other vehicles andrampages through the melee, turning to face itsenemies. Consequently a walker is quite capable oftearing apart its foe in close combat, while only thespecially armed (or monstrously powerful) will have anyhope of destroying a walker up close.
Grenades and melta bombs can be used against awalker. A model will only manage to score a hit with agrenade against a walker on the roll of 6. However, if awalker is already stunned or immobilised at the start ofthe Assault phase, the attackers roll to hit based on thenormal comparison of WS. Remember that modelsusing grenades against vehicles only make one attack.
Immobilised and/or stunned walkers fight in closecombat with one less attack than usual (to a minimumof 1), but otherwise attack normally, no matter howmany immobilised and stunned results they suffered.
Shaken damage results do not affect the way a walkerfights in close combat.
Each roll made on the Vehicle Damage table against awalker counts as a single wound for the purposes ofworking out who won the combat.
Defeated walkers do not take Morale checks and arenot affected by the No Retreat! rule.
Walkers make sweeping advances, pile-in moves andconsolidations unless they are stunned or immobilised.
RAMMING A WALKERIf a walker is rammed by a tank, it can choose to eitherbrace itself for the impact, in which case the collision isresolved as normal for a vehicle, or it can attempt a‘Death or Glory!’ attack in the same way as infantry (itcannot do this, however, if it is rammed in its rear arc).
If it chooses ‘Death or Glory!’ and its attack fails tostop the ramming tank, the walker will not be ready forthe impact and is hit on its rear armour in the collision.
SQUADRONS OF WALKERSSquadrons of walkers follow all normal rules for vehiclesquadrons, except in assaults. They assault and react tobeing assaulted in the same way as units of infantry,moving to engage their attackers before attacks arerolled. Damage results are resolved as described forvehicle squadrons, however, and they attack back,perform sweeping advances, pile-in moves andconsolidations like walkers (see Walkers and Assault).
THE RULES SECTION: VEHICLES
VEHICLE MOVING & SHOOTING SUMMARY CHART
Stationary Combat Speed Cruising Speed Flat Out
All (except Fast & Walkers) All Weapons 1 Weapon* No Weapons N/A
Fast All Weapons All Weapons 1 Weapon* No Weapons
Walker All Weapons All Weapons N/A N/A
*plus all defensive weapons.
73
DREADNOUGHT CLOSE COMBAT WEAPONSWalkers are often armed with huge close combatweapons – hammers, wrecking balls, claws, etc. A Dreadnought close combat weapon is a powerweapon and doubles the walker’s Strength inclose combat (up to a maximum of 10).
If the walker suffers a weapon destroyed resultand the player chooses the close combat weapon,the walker loses the bonuses conferred by theDreadnought close combat weapon (and anyother weapon built into the same arm).
If a walker is armed with two or more closecombat weapons, it gains one bonus attack foreach additional weapon over the first. If one of itsadditional weapons is destroyed, one bonus attack is lost.

UNIVERSAL SPECIAL RULES
THE RULES SECTION: UNIVERSAL SPECIAL RULES74
COUNTER-ATTACKTroops with this skill believe that attack is always thebest form of defence. If assaulted, they will springforward themselves and ferociously counter-attack thecharging enemy.
To represent this, when a unit with this rule is assaultedby the enemy it must take a Leadership test. If the testis successful all models in the unit get the +1 assaultbonus to their attacks, exactly as if they too hadassaulted that turn.
This rule cannot be used if, when assaulted, the unitwas already locked in combat from a previous turn.
ETERNAL WARRIORThe model is immune to the effects of the InstantDeath rule.
Many units of models in Warhammer 40,000have unique special rules. There are,however, quite a few special rules that areshared by several units, even across differentCodex books. These are called ‘universalspecial rules’ and are listed in this section forease of reference.
As this is just a summary, if any of the Codexes includeone of these special rules and the rule is different, theone in the Codex takes precedence (representing howthe general special rule applies to that specific race).
The special rules marked with an asterisk (*) areautomatically lost by an independent character joininga unit that does not have the same special rule. These rules are also lost by a unit that is joined by anindependent character that does not have the samespecial rule.

75THE RULES SECTION: UNIVERSAL SPECIAL RULES
dangerous terrain. It may not be used to move intocontact with the enemy. If there are units with this ruleon both sides, roll-off to determine who goes first andthen alternate disengaging them. If the last of theseends up no longer in combat, it consolidates instead.
INFILTRATE*In the right circumstances, stealthy troops have theability to work their way into a forward position on thebattlefield or outflank enemy lines.
Units with this special rule are deployed last, after allother units (friends and foe) have been deployed. Ifboth sides have infiltrators, the players roll-off and thewinner decides who goes first, and then alternatedeploying these units. Infiltrators may be set upanywhere on the table that is more than 12" from anyenemy unit, as long as no deployed enemy unit candraw a line of sight to them. This includes inside abuilding (see page 83), as long as the building is morethan 12" from any enemy unit. Alternatively, they maybe set up anywhere on the table that is more than 18"from any enemy unit, even in plain sight.
If a unit with this ability is deployed inside a transportvehicle, it cannot infiltrate. Infiltrate also confers aspecial outflank move to units of infiltrators that arekept in reserve (see page 94).
MOVE THROUGH COVER*Some units of infantry are especially adept at movingthrough difficult terrain. Units with this rule roll an extraD6 when rolling to move through difficult terrain. Inmost circumstances this will mean that they roll threeD6 and pick the dice with the highest score.
NIGHT VISION/ACUTE SENSESWarriors in certain parts of the galaxy have developednocturnal tendencies by fighting in perpetual night, orperhaps carry equipment that gives them such abilities.When the Night Fighting mission special rule is in use,such models may choose to re-roll the test to determinehow far they can see, but must abide by the new result.Characters with this rule confer it onto any unit theyjoin, as long as they are part of the unit. Units with thisrule confer it onto any characters joining them, as longas they are part of the unit.
PREFERRED ENEMYSome warriors are able to predict the moves of theenemies they are used to fighting. In close combat, theyhave developed special techniques that enable them tocounter such enemies more effectively. Such troops canalways re-roll their rolls to hit in close combat againsttheir preferred enemy. This ability does not work whenattacking vehicles without a Weapon Skill characteristic.
FEARLESSFearless troops automatically pass all Morale andPinning tests they are required to take, and will neverfall back. They can however go to ground voluntarily.This special rule is gained by any independent characterjoining a fearless unit. However, as long as a fearlesscharacter stays with a unit that is not fearless, he losesthis special rule. If a unit that is falling back suddenlygains this rule, it will automatically regroup at thebeginning of its next Movement phase, regardless of allnormal restrictions on regrouping.
FEEL NO PAIN Some warriors are so blood-frenzied or tough that theycan ignore injuries that would incapacitate even abattle-hardened Space Marine. If a model with thisability suffers an unsaved wound, roll a dice. On a 1, 2or 3, take the wound as normal (removing the model ifit loses its final Wound). On a 4, 5 or 6, the injury isignored and the model continues fighting. This abilitycannot be used against wounds from weapons thatinflict instant death (by having a high enough Strengthor a special rule to that effect; even if the model is aneternal warrior). Neither can it be used against woundsfrom AP1 and AP2 weapons, power weapons and anyother wound against which no armour save can ever betaken (like wounds from power fists, Dreadnought closecombat weapons, rending weapons that roll a 6, Perilsof the Warp, failed dangerous terrain tests, etc).
FLEET*There are many variants of this rule: Fleet of Foot, Fleetof Claw, even Fleet of Hoof. Title aside, all models withthese abilities are treated the same. A unit with this rulemay assault in the same turn in which it has run.
FURIOUS CHARGEModels with this skill are known for the wild ferocity oftheir assaults. In a turn in which they assaulted intocombat they add +1 to both their Initiative and Strengthcharacteristics when attacking in close combat (notethat this has no effect on the Initiative tests forsweeping advances).
HIT & RUN*Units with this ability that are locked in combat maychoose to leave close combat at the end of the Assaultphase. The unit using the hit & run ability must take anInitiative test. If the test is failed nothing happens andthe models remain locked in the fight. If the test ispassed, the unit breaks from combat and immediatelymoves up to 3D6" in a straight line in any direction,ignoring the units they are locked with. No sweepingadvance rolls are made. Enemy units that are no longerlocked in combat may consolidate. A hit & run move isnot slowed by difficult terrain, but is affected by

THE RULES SECTION: UNIVERSAL SPECIAL RULES76
RAGESome warriors are little more than mindless killingmachines, incapable of rational thought and onlyinterested in getting to grips with the enemy as soon aspossible. In the Movement phase, units subject to ragemust always move as fast as possible towards theclosest visible enemy. In the Shooting phase, they arefree to decide whether to run, but if they do they mustrun towards the closest visible enemy. In the Assaultphase they must always consolidate towards the closestvisible enemy. Whilst falling back, embarked on atransport, or if no enemy is visible, they ignore this rule.
RELENTLESSUnlike common infantry, some powerful warriors likemonstrous creatures, jet packers and bikers canadvance while firing their weapons at full capacity.Relentless models can shoot with rapid fire and heavyweapons counting as stationary, even if they moved inthe previous Movement phase, and are also allowed toassault in the same turn they fire them.
Note that a relentless independent character must stillabide by the assaulting limitations of any unit it hasjoined, if the unit is not itself relentless.
SCOUTS*Scouts are used to reconnoitre ahead and are always inthe vanguard of the army. To represent this, after bothsides have deployed (including infiltrators), but beforethe first player begins his first turn, any scouts maymake a normal move. This is done exactly as in theirMovement phase, except that during this move, scoutsmust remain more than 12" away from any enemy.
If both sides have scouts, the players roll-off and thewinner decides who goes first, and then alternatemoving these units.
If a unit with this ability is deployed inside a dedicatedtransport vehicle, it confers the scout ability to thetransport too.
This rule also confers a special outflank move to unitsof scouts that are kept in reserve (see page 94).
SKILLED RIDERThe rider is highly practiced at moving though perilouswarzones. It may re-roll the dice for failed dangerousterrain tests as long as its unit type is bike or cavalry.
SLOW AND PURPOSEFULModels with this special rule are relentless (see above).However, they always count as moving through difficultterrain (including in assaults). Remember that a slowand purposeful independent character will cause any
unit he joins to move at his speed (and vice versa) asunits have to move at the speed of the slowest model.
STEALTHThe ability to make maximum use of available cover hassaved many a warrior from discovery and death. All ofthe unit’s cover saves are improved by +1.
STUBBORNStubborn resistance against impossible odds is a featureof some races. When taking Morale tests, stubbornunits always ignore any negative Leadership modifiers.Independent characters that are stubborn confer theability onto any unit that they join.
SWARMSSwarms represent creatures that are too puny to be anindividual threat on the battlefield, but when operatingas a sea of dozens of creatures they can destroy muchlarger enemies. All swarms have the ‘stealth’ and‘vulnerable to blasts/templates’ special rules. Inaddition, intervening swarms never offer any cover saveto monstrous creatures or vehicles.
TANK HUNTERSTank hunters are especially skilled at finding andexploiting weaknesses in the armour of enemy vehicles.They add +1 to their armour penetration rolls wheneverthey hit a vehicle (both at range and in close combat).In addition, they automatically pass Morale checkscaused by tank shock.
TURBO-BOOSTERS*Units mounted on bikes and jetbikes may utilise turbo-boosters to move at extreme speed. When using theirturbo-boosters they may move up to 24" in theMovement phase. Controlling their bike at such speedstakes all their concentration and skill, however, so theycannot move through difficult terrain, shoot, launchassaults or execute any other voluntary action in thesame turn. In the following enemy Shooting phase, thebike benefits from a cover save of 3+ to represent thedifficulty of hitting such fast-moving targets. In thatenemy Shooting phase, however, bikers lose the abilityof going to ground, and automatically pass Pinningtests. A unit using turbo-boosters must end its move atleast 18" away from its starting point to claim thiscover save, as it relies on flat-out speed.
VULNERABLE TO BLASTS/TEMPLATESSome units are especially vulnerable to blast weaponsand template weapons. If the unit is a vehicle, theneach hit counts as two hits. If it is not a vehicle, eachunsaved wound is doubled to two wounds.

The buildings of the Warhammer 40,000universe range from the small, primitivestructures built by tribesmen on feralplanets, through to huge futuristicskyscrapers, crystalline spires, hardenedadamantium bunkers or glisteningbiostructures. In addition, many of thestructures on a battlefield have been reducedto ruins. Coping with this variety of differentstructures, or even the rather smaller numberof types you are likely to see on the averagewargames table, can cause problems.Generally at the most inopportune moment,when the battle is raging at its fiercest, a player will discover his opponent had anentirely different take on how the rulesapply to a particular building. To help youdeal with these problems, and hopefullyconfine the bloodshed to the tabletop, we’ve put together the following guidelines.
DEFINING BUILDINGS AND RUINSAs with any type of tabletop terrain, it is worthwhilediscussing with your opponent what effect eachdifferent structure will have before the battle begins.This need not be a time consuming process; in fact it will probably only take a few minutes, andeach structure can be as complicated or asstraightforward as you and your opponent wish it tobe. There is no right or wrong way to choose how yourbuildings and ruins work – they can even behavedifferently in different games!
BUILDINGS AND RUINS
77
This battered administratumstructure is a perfect example of a ruin.
This Tau power relay is bursting withradioactive hazards – it is bestconsidered impassable terrain.
This Space Marine command post isbuilt to withstand attack – it couldbe a treated as a building.
THE RULES SECTION: BUILDINGS
BUILDINGSThis category includes all those intact buildings inwhich players cannot physically place their models,because they are solid pieces of terrain. This includesmilitary buildings like bunkers and barracks, but otherintact structures as well, such as the hardened controlcentres at a spaceport, for example. On the battlefield,intact buildings can be used not only as cover to hidebehind, but you can imagine your models enteringthem and using them as a firing position from which torepel the enemy. Buildings use aspects of the transportvehicle rules allowing squads from both sides to occupyand fire from them, or try to destroy them.
Impassable buildingsSome buildings in your terrain collection may lookimpossible for models to enter (fortifications withbarred doors, solid metal cubes, imprisonment facilities,etc.) or that it makes no earthly sense for models toenter (gas storage silos, white-hot smelting cauldrons,thermonuclear reactors, etc.). Any of these buildingscan be deemed impassable terrain.
RUINSThese structures have taken a hammering from shells,explosions and rampaging war machines. They arenormally composed of badly damaged walls sittingamongst piles of broken rubble. Ruins can also haveone or more floors partially intact. As they are oftenlacking large chunks of walls and roof, ruins are theeasiest for gaming purposes. Players can place theirmodels inside and move them around to show theirposition. No abstractions are required – both playerswill be able to see the models for themselves.

78 THE RULES SECTION: BUILDINGS
BUILDINGSThe bloody battles of the 41st Millennium oftenenvelop cities, towns, defence lines, research outposts,hab blocks, pumping stations, army barracks, miningcolonies, space ports, tribal forts, ancient tombs, sacredshrines and countless other types of building. In themiddle of a war zone, such structures are generallydeserted, and as such they can be used as defensivepositions for troops from either side. Depending ontheir size, buildings can house anything from a smallsquad to an entire army.
Not all buildings need be designed with a militarypurpose in mind – they merely need to be intactstructures (preferably with thick walls and good arcs offire) that troops can use as a defensive position againstan oncoming foe.
Which pieces in your terrain collection count asbuildings is up to you and your opponent, but they canrange from unprepossessing wooden shacks to stonedwellings and ceramite bunkers to ancient alien hab-complexes and battle fortresses.
Buildings of all types use aspects of the transportvehicle rules. The main difference between them andactual vehicles is that they can’t move, and units fromeither side can go inside.
Some bunker or bastion models may be fitted withtheir own weapons. These weapons cannot be used toshoot unless previously agreed with your opponent, orunless there are special rules for that terrain piece orthe mission you intend to play that specifically sayotherwise. It is generally a good idea to assume thatthese weapons were abandoned long ago, and thatthey no longer work.
IMPASSABLE BUILDINGSThere are times when a player’s collection may includebuildings that makes no sense for warriors to enter –huge storage tanks, vast solid monuments and the like.In game terms we refer to these structures asimpassable buildings.
Impassable buildings and movementIf a building is agreed to be impassable at the start ofthe game, it follows the normal rules for impassableterrain, and models cannot go inside it for any reason.This is not to say that models will not interact with thebuilding – it will of course block line of sight andprovide cover for models sheltering in its lee.
Remember that if it is possible to physically placemodels on top of an impassable building, jumpinfantry, jetbikes and skimmers are allowed to end theirmove there, treating it as dangerous terrain. As usual, a brief discussion with your opponent about thebuilding before the game begins is well worthwhile.
A shrine of the Adepta Sororitas.
What sort of game?Warhammer 40,000 players like many differentthings about the game. Some see it as a purelycompetitive, tactical exercise, some prefer to focuson telling an exciting story as the battle unfolds,while others just love writing their own rules –devising new missions, creating special charactersor even changing the main rules of the game!Obviously, players that meet regularly, atsomeone’s house or a club, quickly learn whatsorts of games their friends like to play. However,when you are gaming against someone new, it’salways worth spending a few minutes before thebattle talking about the game.
For example, if you have any ruins, you shouldagree exactly how to use them. One player mayprefer to treat them simply as area terrain so thathe can concentrate on his grand plan, whileanother may like the additional story-telling that iscreated if models cannot move through solid wallsor climb up levels without stairs or ladders. Yetanother player may have written a house rulewhere an elevator is activated if you also havemodels next to the power generator on the otherside of the table! No single approach is right orwrong, as long as both players have agreedbefore the game.

OCCUPYING BUILDINGSModels can enter or exit a building through a doorwayor other opening that the players have agreed to treatas an access point. Players should decide what theaccess points are before deployment, in order to avoidany possible confusion on this matter. This aside,moving into or out of a building works the same asembarking or disembarking from a vehicle (includingemergency disembarkations).
All of the normal rules apply, so only one infantry unit(plus any independent characters that joined them) mayoccupy a building at one time. The ’transport’ capacityof a small bunker might be ten models, while a largebastion could hold any number of models from a singleunit. Again, this can vary according to what you andyour opponent agree on before the game begins.Often, a Codex specifies that a certain infantry unitmade of rather large models may use transports, butwill count as more than a single model (Space MarineTerminators, for example, count as two models each).These rules should also be used whenever such unitsenter a building (so, to continue our former example,up to five Terminators could occupy a bunker that theplayers have agreed to have a capacity of ten models).
Models entering a building are removed from the table– you can either note down where they are on a pieceof paper or use another suitable reminder. Units ofjump infantry, jetbikes and skimmers cannot land on abuilding that is occupied by enemy units.
You’ll find that some structures won’t have obviousdoors or stairs allowing access, but you wish to usethem as buildings, rather than impassable terrain.For example, we’ve got some Orky buildings thatinclude little watchtowers – unfortunately they lack anyvisible method for actually getting up to thewatchtower! In cases like this the players can simplyagree to assume that there are internal doors or ladderswhich allow access to the building.
FIRING FROM BUILDINGSJust like some transport vehicles, buildings have firepoints that allow units inside to fire out. These could bethe fire slits on bunkers and bastions or the windowson other buildings. Players should agree beforehandwhere these fire points are. Unless the players agreeotherwise, up to two models may shoot through eachfire point of a building. Note that all of the models in aunit firing from a building can only target a singleenemy unit, as normal.
ATTACKING BUILDINGSThe best way to kill enemy troops in a fortified positionis usually just to destroy the fortified position. Unitsmay shoot at or assault an occupied building just as if itwas a vehicle. Units inside a building may not beattacked directly, but will be affected in the same
manner as units inside a transport vehicle should thebuilding be damaged, and so may suffer damageand/or be forced to ‘disembark’.
Bunkers and bastions have an Armour Value of 14 allaround. The Armour Values of other buildings may varybetween 9 and 13 (see the chart below for someexamples). The players must agree at the start of thegame on the Armour Value of all buildings in use.
When shooting at a building, roll to hit and for armourpenetration normally (in close combat they are hitautomatically, just like stationary vehicles). Buildingstreat stunned, immobilised and weapon destroyedresults as shaken results instead (weapon destroyedmay work as normal if you have agreed to use theweapons mounted on the building, of course).Wrecked buildings are treated in the same way as awrecked vehicle, and therefore become difficult anddangerous terrain. If one is available, players may liketo put down a ruin in its place. Buildings that explodecan be replaced with an area of rubble or a crater.
All Space Marines in the squad have moved to within 2" ofthe building access point, so that the unit can ‘embark’ into it.
2"
BUILDINGS ARMOUR CHART
Building Armour ValueBastion or bunker 14Stone-walled palace 13Concrete city building 12Brick house 11Log cabin 10Corrugated iron or wooden shed 9
79THE RULES SECTION: BUILDINGS

THE RULES SECTION: BUILDINGS
Template weaponsTemplate weapons such as flamers are designed toattack enemies hidden behind defensive terrain, andcan attack models even if they are inside a building.
To represent this, if one or more of the fire points on a building fall under a template, the unit occupying thebuilding suffers D6 hits from the template weapon. The building itself also suffers one hit, as normal.
PARAPETS AND BATTLEMENTSMany buildings are constructed so warriors can bepositioned on the roof and fire from behind fortifiedparapets or battlements. This allows extra models fromthe unit to fire, but leaves the building more vulnerableto attack. If any models from the unit are placed on aparapet, they can fire in addition to those using firingpoints. They still count as being in the building though,so cannot be shot or assaulted directly. However, if aDamage roll is made against the building while someoccupiers are on the roof, add +1 to the result.
Example:
From appearances, this Ork hut might beconsidered a corrugated iron shed.However, we’re assuming that an OrkMekboy has “fixed it up good an’ propa”by welding scavenged armour throughoutits primitive frame. Accordingly, it has beenassigned an Armour Value of 12 – as muchas a concrete building!
We’ve assigned the structure a capacity ofthirty – enough for a big mob of Ork Boyzto take shelter.
There is a jagged doorway on every side ofthe building (we decided to treat each oneas both an access point and a fire point)while the wide roof will allow plenty ofextra Boyz to shoot.
Access/Fire point Access/Fire point
Parapet
Fire point
The Ork is hitting the unit occupying the building by firing hisburna at the fire point.
80
Use your imagination!Some players may want to use a very largebuilding, such as a fortress, which could includetowers, battlements, bunkers and so on, eachwith different capacities and Armour Values. Youmay simply want to deploy a unit inside a buildingand another on the roof. You may even want tocome up with rules for jump packers assaultingenemies on parapets. Inventing extra rules like thisis great fun, and will make for a very differentgame. Players will have to agree before the gamehow will models move between two adjoiningelements, and other details. You may even wantdifferent elements of a fortress to be treated asseveral types of structure – perhaps one section isruined, another impassable, whilst the rest istreated as one or more buildings – see oppositefor an example. As with most other things thatwe have discussed in this section, the only limitsare the buildings you own and your imagination.

81THE RULES SECTION: BUILDINGS
This glorious building is an extreme example of the fun you can have with the rules for buildings. While such astructure is complicated and likely to dominate any game it appears in, it’ll certainly give you a battle to remember!
Example:
This bastion is a hardened structure, purposebuilt for war, and so has been assigned anArmour Value of 14. It’s literally as tough asthey come.
The bastion has only a single access point, butseveral fire points – one on each facing. As itis a large structure with multiple floors, we’vedecided that the bastion can hold a unit ofany size.
There are several fixed-mount heavy bolters onthe bastion, but we’ve assumed that they aretoo ancient and decayed to do much else thanlook menacing. Of course players could agreethat the heavy bolters can be fired. Similarly,we consider the antenna array on the roof tobe purely decorative, but in some games youcould allow a bonus to reserve rolls for theside that occupies the building. Bear in mindthat if you did use the heavy bolters andantenna array, then the side occupying thebastion would gain a considerable advantage,and it would likely become the focus of fiercefighting in your battles.
Heavy bolter (non-functional)
Accesspoint
Firepoint
Antenna array
Parapet
We decided to treat the tower bunkers as
AV 14 buildings. As they are quite small,
they have been assigned a capacity of 10
models. Models in the tower bunker can
operate the heavy bolter within.
We agreed that the fortress is only
accessible from the gatehouse. This is
counted as an AV 13 building with a
capacity of 20. Models inside the
gatehouse can use a turn’s movement
to enter either of the tower bunkers.
We count the rubble slopes as difficult terrain.
We chose to treat the fortified parapet
as a separate building. Troops in the
bunker below can reach the top by
spending a turn climbing a hidden
stairway. Models on the parapet can
fire the Whirlwind missile launcher.
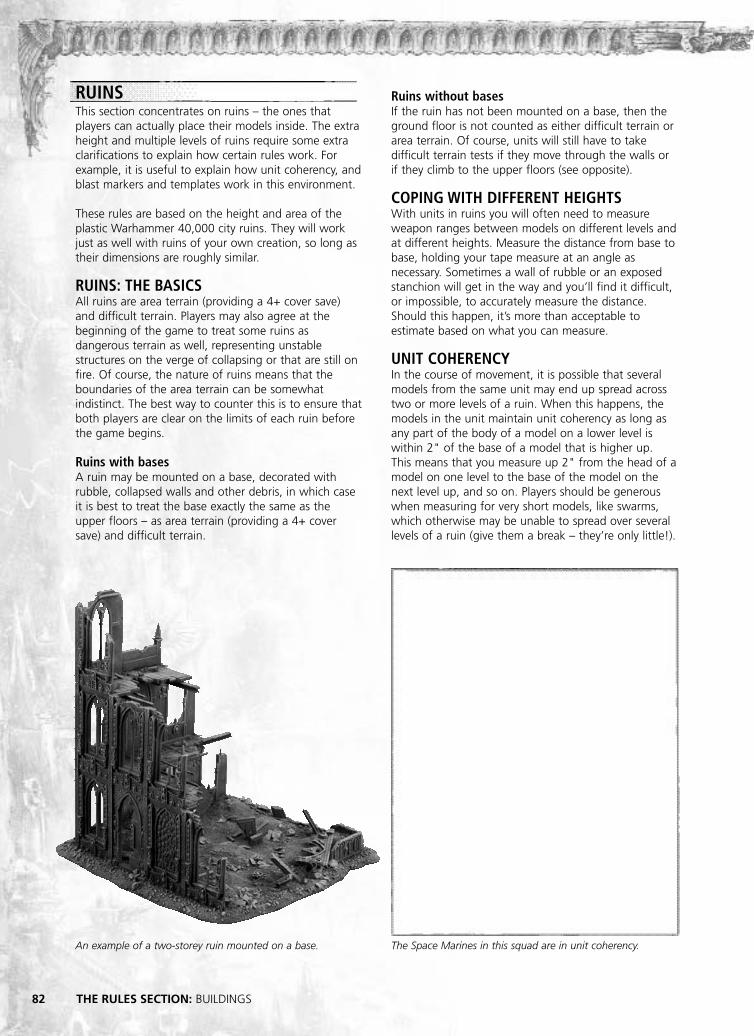
Ruins without basesIf the ruin has not been mounted on a base, then theground floor is not counted as either difficult terrain orarea terrain. Of course, units will still have to takedifficult terrain tests if they move through the walls orif they climb to the upper floors (see opposite).
COPING WITH DIFFERENT HEIGHTSWith units in ruins you will often need to measureweapon ranges between models on different levels andat different heights. Measure the distance from base tobase, holding your tape measure at an angle asnecessary. Sometimes a wall of rubble or an exposedstanchion will get in the way and you’ll find it difficult,or impossible, to accurately measure the distance.Should this happen, it’s more than acceptable toestimate based on what you can measure.
UNIT COHERENCYIn the course of movement, it is possible that severalmodels from the same unit may end up spread acrosstwo or more levels of a ruin. When this happens, themodels in the unit maintain unit coherency as long asany part of the body of a model on a lower level iswithin 2" of the base of a model that is higher up. This means that you measure up 2" from the head of amodel on one level to the base of the model on thenext level up, and so on. Players should be generouswhen measuring for very short models, like swarms,which otherwise may be unable to spread over severallevels of a ruin (give them a break – they’re only little!).
RUINSThis section concentrates on ruins – the ones thatplayers can actually place their models inside. The extraheight and multiple levels of ruins require some extraclarifications to explain how certain rules work. Forexample, it is useful to explain how unit coherency, andblast markers and templates work in this environment.
These rules are based on the height and area of theplastic Warhammer 40,000 city ruins. They will workjust as well with ruins of your own creation, so long astheir dimensions are roughly similar.
RUINS: THE BASICSAll ruins are area terrain (providing a 4+ cover save)and difficult terrain. Players may also agree at thebeginning of the game to treat some ruins asdangerous terrain as well, representing unstablestructures on the verge of collapsing or that are still onfire. Of course, the nature of ruins means that theboundaries of the area terrain can be somewhatindistinct. The best way to counter this is to ensure thatboth players are clear on the limits of each ruin beforethe game begins.
Ruins with basesA ruin may be mounted on a base, decorated withrubble, collapsed walls and other debris, in which caseit is best to treat the base exactly the same as theupper floors – as area terrain (providing a 4+ coversave) and difficult terrain.
2"
2"
The Space Marines in this squad are in unit coherency.An example of a two-storey ruin mounted on a base.
82 THE RULES SECTION: BUILDINGS

The jetbike has passed its dangerous terrain test and cantherefore move up to 12" through the ruin.
“A fortress is a living thing: thecommander its brain, the walls its bones,the sensors its eyes and ears, the troopsits blood, their weapons its fists. Thistells us two things: If one organ fails,the whole dies. And if the whole dies,no single organ can survive alone.”
Mordin Barr
The Space Marine’s difficult terrain roll of 5 allows him tomove 2" horizontally and one level up (3").
MOVING WITHIN RUINSOnly certain troops are capable of clambering to theupper levels of ruins. Accordingly, only infantry, jumpinfantry, jetbikes, monstrous creatures and walkers maymove on the upper levels of a ruin – and only if themodel can physically be placed there. Other units mayonly move on the ground level of the ruin.
Infantry, monstrous creatures and walkersEven though different building models can vary in thisrespect, we assume that every level of a ruin is 3" tall.A model moving on foot in a ruin therefore needs 3"of its movement to go up or down a level. As ruins aredifficult terrain, this means that if a 1 or 2 is rolled, amodel may not make any vertical movement (but maystill move horizontally on its level). If a 3 is rolled, themodel can either move up to 3" horizontally or simplygo up or down a level without any horizontalmovement. If a 4 or 5 is rolled, a model can eithermove horizontally up to the maximum rolled or goup/down a level as well as moving its remaining 1" or2" horizontally. On a result of 6, the model will be ableto go up/down two levels if it does not movehorizontally at all, or move one level up/down andhorizontally for the remaining 3".
Jump infantry and jetbikesRemember that jetbikes, and jump infantry that areusing their packs, are not hindered by difficult terrain,and may move over any terrain as part of their movewithout penalty.
However, if these models start or end their move indifficult terrain (such as a ruin!), they must take adangerous terrain test. All surviving models are thensimply placed within 12" of their starting point,including on a different level of a ruin (as shown in thediagram on the right).
Walls, doors, ladders and lateral thinkingShould troops be able to move through walls if there isno door? That’s really down to what you and youropponent decide. It’s perfectly acceptable to assumethe combatants on both sides have brought plenty ofcutting tools, acidic disintegrators or naked ferocity tomuscle their way through any wall so foolish as toblock their path. Indeed, the normal rules for movingthrough difficult terrain allow you to do just this.Equally you could decide that models can only passfrom one side of a wall to the other if they walkaround, or if there is a door, window, grate or similarhandy opening.
The same is true of ascending and descending levelswithin a ruin. It’s just as valid to assume that thecombatants should be able to climb the few feet fromone floor to the other as it is to disallow models fromclimbing higher in a ruin that has no ladders. Just remember that the more involved your rules forruins are, the longer the game will take.
THE RULES SECTION: BUILDINGS 83
3"
2"
9"

Blast weaponsWhen firing a weapon with a blast marker into a ruin,declare which floor you are aiming at, and continue asnormal. If a blast weapon scatters, it can still only hitmodels on the level declared as the target.
TEMPLATE AND BLAST WEAPONS Multi-level ruins require certain conventions andclarifications to ensure that template and blastweapons behave in a consistent fashion, and to keepthe game moving.
When firing template or blast weapons at models in aruin, it can be tricky to physically place the marker ortemplate over the models in question. The best way togauge which models are actually under the template isto simply hold the template above the entire ruin, andlook down through it. This is illustrated below.
The method for placing templates and markers overruins requires a degree of trust between players,especially when intervening floors obscure your view ofthe affected models.
Remember that once you have used the template orblast marker to work out how many models are hit,casualties can be removed from anywhere in the squad,including models completely out of the firer’s sight.
The Space Marine player has declared that he is targeting theGenestealers on the ground level, and so those on the higherlevels are unaffected, even though they are beneath the marker.
The Tau Empire player declares that his Hammerhead tank istargeting the Genestealers on the first level. The shot scatters, andalthough there are still models under the marker, none are on thelevel declared as the target, so no hits are scored.
It is easiest to hold blast markers and templates above the ruinand look down.
“There can be no bystanders in thebattle for survival. Anyone who will notfight by your side is an enemy youmust crush.”
Scriptorus Munificantus
84 THE RULES SECTION: BUILDINGS

Barrage weaponsBarrage weapons work by lobbing munitions high intothe air, bringing death to the enemy from above. Theadvantage of these indirect fire weapons is that theycan be used to engage targets beyond the limited linesof sight. The disadvantage is that they explode themoment they strike a structure, meaning warriors canshelter deep within the ruin.
Barrage weapons always strike the highest level that isunder the hole in the centre of the marker. Onlymodels on this level and under the template areactually hit.
Template weaponsWhen targeting a unit in a ruin, template weapons(such as a flamer) may only affect models under thetemplate on a single level. This can be on the samelevel as the firer, or one level higher or lower. The firermust declare which level is being targeted beforeplacing the template.
A skimmer, jump infantry or jetbike model that fires atemplate weapon may target models on any single levelof the ruin.
RUINS AND ASSAULTSOnce an assault begins, both friendly and enemymodels can end up scattered all over the ruin. For thesake of simplicity, the same principle described for unitcoherency is used to determine which models areengaged in an assault. That is to say, distances betweenmodels on different levels are measured between theheads of the models on the lower level to the bases of the models on the upper levels (see page 82).
In some cases the ruin might genuinely be unstable oruneven, or the space could be very limited on aparticular level, making it impossible to move assaultingmodels into base-to-base contact with the unit theywish to assault. When this happens, it is perfectlyacceptable to place models as close to their foe as issafely possible, including the level below or above,providing that you place the assaulting models as closeas possible to their opponents and you make clear toyour opponent which of your models are in base-to-base contact with his models. We find that directlybelow or above works well, representing them chargingup or down a flight of stairs.
As the hole in the marker hits the upper level first, only onemodel is hit by the barrage weapon.
The middle level is declared as the target of the flamer andtherefore only two Genestealers are hit. Note that the toplevel is not a valid target as it is too high up.
All of the models in the picture are engaged and can fightexcept for models A and B, which are not within 2" of amember of their unit that is in base contact with the enemy.
“There will be no retreat from Hades Hive. We will fight to the end.”
Commissar Yarrick
THE RULES SECTION: BUILDINGS 85
AA
AA BB
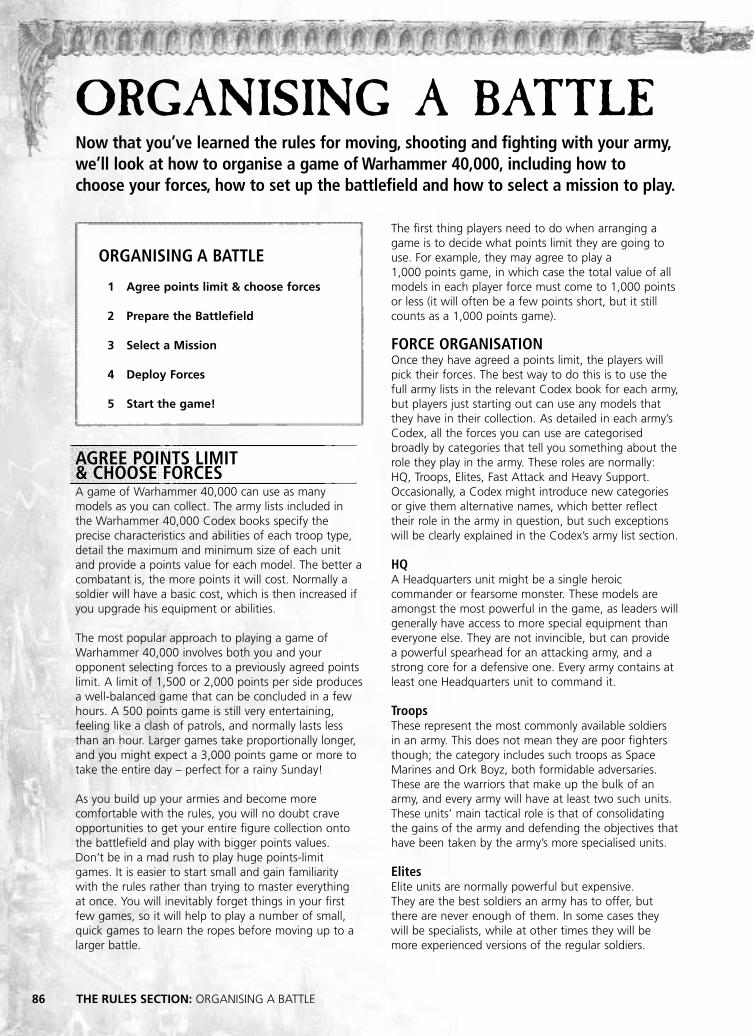
86 THE RULES SECTION: ORGANISING A BATTLE
AGREE POINTS LIMIT & CHOOSE FORCESA game of Warhammer 40,000 can use as manymodels as you can collect. The army lists included inthe Warhammer 40,000 Codex books specify theprecise characteristics and abilities of each troop type,detail the maximum and minimum size of each unitand provide a points value for each model. The better acombatant is, the more points it will cost. Normally asoldier will have a basic cost, which is then increased ifyou upgrade his equipment or abilities.
The most popular approach to playing a game ofWarhammer 40,000 involves both you and youropponent selecting forces to a previously agreed pointslimit. A limit of 1,500 or 2,000 points per side producesa well-balanced game that can be concluded in a fewhours. A 500 points game is still very entertaining,feeling like a clash of patrols, and normally lasts lessthan an hour. Larger games take proportionally longer,and you might expect a 3,000 points game or more totake the entire day – perfect for a rainy Sunday!
As you build up your armies and become morecomfortable with the rules, you will no doubt craveopportunities to get your entire figure collection ontothe battlefield and play with bigger points values. Don’t be in a mad rush to play huge points-limitgames. It is easier to start small and gain familiaritywith the rules rather than trying to master everythingat once. You will inevitably forget things in your firstfew games, so it will help to play a number of small,quick games to learn the ropes before moving up to alarger battle.
The first thing players need to do when arranging agame is to decide what points limit they are going touse. For example, they may agree to play a 1,000 points game, in which case the total value of allmodels in each player force must come to 1,000 pointsor less (it will often be a few points short, but it stillcounts as a 1,000 points game).
FORCE ORGANISATIONOnce they have agreed a points limit, the players willpick their forces. The best way to do this is to use thefull army lists in the relevant Codex book for each army,but players just starting out can use any models thatthey have in their collection. As detailed in each army’sCodex, all the forces you can use are categorisedbroadly by categories that tell you something about therole they play in the army. These roles are normally:HQ, Troops, Elites, Fast Attack and Heavy Support.Occasionally, a Codex might introduce new categoriesor give them alternative names, which better reflecttheir role in the army in question, but such exceptionswill be clearly explained in the Codex’s army list section.
HQA Headquarters unit might be a single heroiccommander or fearsome monster. These models areamongst the most powerful in the game, as leaders willgenerally have access to more special equipment thaneveryone else. They are not invincible, but can providea powerful spearhead for an attacking army, and astrong core for a defensive one. Every army contains atleast one Headquarters unit to command it.
TroopsThese represent the most commonly available soldiersin an army. This does not mean they are poor fightersthough; the category includes such troops as SpaceMarines and Ork Boyz, both formidable adversaries.These are the warriors that make up the bulk of anarmy, and every army will have at least two such units.These units’ main tactical role is that of consolidatingthe gains of the army and defending the objectives thathave been taken by the army’s more specialised units.
ElitesElite units are normally powerful but expensive. They are the best soldiers an army has to offer, butthere are never enough of them. In some cases theywill be specialists, while at other times they will bemore experienced versions of the regular soldiers.
ORGANISING A BATTLENow that you’ve learned the rules for moving, shooting and fighting with your army,we’ll look at how to organise a game of Warhammer 40,000, including how tochoose your forces, how to set up the battlefield and how to select a mission to play.
ORGANISING A BATTLE
1 Agree points limit & choose forces
2 Prepare the Battlefield
3 Select a Mission
4 Deploy Forces
5 Start the game!

THE RULES SECTION: ORGANISING A BATTLE 87
Fast Attack Fast Attack units are generally (surprise, surprise!) fasterthan their comrades and are masters at manoeuvre.Often they are responsible for reconnaissance andscouting, while at other times they are assault troopsrelying on speed to strike at the heart of the enemy.
Heavy Support Heavy Support units are literally the big guns of thearmy. In this section you will find the heaviest items ofequipment and the toughest creatures. However, theseunits are also very expensive in points, so an over-reliance on them might leave you badly outnumbered.
FORCE ORGANISATION CHARTThe minimum and maximum numbers of each of thesetypes of unit for each army are detailed on the forceorganisation chart of each army Codex book. Shownon this page is an example of one such chart, which isthe one used by most armies for standard missions (i.e. the three missions presented later in this section).
One box on the chart allows you to make one selectionfrom that part of your army list. Dark boxes arecompulsory selections. As you can see, normally youwill have to take at least one HQ selection and twoTroops selections. These compulsory choices ensure thatwhatever else you select, your force will have a corewithin it that is representative of that army. This israrely a disadvantage and many players often use themaximum number of Troops selections.
Sometimes a single choice on the force organisationchart will allow you to select more than one unit. Thiswill always be explained in the appropriate Codex, sobe sure to read it carefully.
Dedicated transportsDedicated transport vehicles sit outside the ForceOrganisation structure, as they are attached to the unitthey are bought for. When this distinction is called for(for example in some missions or deployment types),dedicated transport vehicles count as being from thesame force organisation category as the unit they werebought for. For example, a Rhino bought for a SpaceMarine Tactical Squad (Troops) counts as a unit ofTroops, but if it was bought for a unit of Veterans(Elites) it counts as Elites.
Other exceptionsQuite a few Codex books include units that, much likededicated transports, are not part of the army’s forceorganisation chart. This may be because they are toopuny, specialised support units, or simply not part ofthe main fighting forces of that race. Often labelledwith terms such as ‘supernumerary’ or ‘insignificant’,these units normally do not count towards the numberof choices the player can make from the forceorganisation chart and have rules that will clearly tellthe player how many can be included in his force.
Multiple detachment gamesAs your collection of miniatures grows, the urge to usethem all at once will become hard to resist. Above atotal of 2,500 points, the force organisation chartdeliberately becomes a very limiting factor. The chartallows you to build the minimum sized force that canreasonably be expected to complete a mission. On alarger scale, an army will consist of many suchdetachments, each performing separate missions. If youwant to play an especially large game then, as well asagreeing a points limit, you should also agree amaximum number of detachments. Each detachmentwill be a separate army, using its own forceorganisation chart.
Non-standard missionsPlayers may of course make up their own missions,varying the way units are deployed, the victoryconditions, the terrain, or even adding their ownmission special rules to represent artillery barrages,volcanic eruptions, alien teleportation devices oranything else you can think of. They may also decide tovary the force organisation chart, to represent differentforces, more suitable to their missions. They may wantto change the compulsory/optional units, or increase,decrease or remove altogether one kind of unit (noHeavy Support and two compulsory Fast Attack units,representing a rapid insertion force, for example). More examples of non-standard missions can be foundin other Warhammer 40,000 supplements.
EXAMPLE OF AFORCE ORGANISATION CHART
ELITESHQ
HEAVYSUPPORTFAST ATTACKTROOPS TROOPS
COMPULSORY1 HQ
2 Troops
OPTIONAL1 HQ
4 Troops3 Elites
OPTIONAL 3 Fast Attack
3 Heavy Support

PREPARE THE BATTLEFIELD
THE GAMING SURFACEStandard missions are designed to be played on a 6’x4’gaming surface, with each player sitting behind one ofthe long table edges (‘his own’ table edge, see diagrambelow). The concept of ‘own’ table edge is important,because when units fall back, they will always fall backtowards ‘their own table edge’. We assume this is inthe direction of their base of operations. The remainingtwo edges of the gaming surface are referred to as thetwo ‘short table edges’, which do not belong to anyplayer, as shown in the diagram below.
If you are playing a game with a very large or smallpoints limit, you may want to consider larger or smallergaming surfaces. Whatever the size and shape of yourtable, it is important to establish the different tableedges as described.
SETTING UP TERRAIN Setting up a well-modelled, interesting battlefield willenhance the enjoyment that you get from playing agame of Warhammer 40,000. Many players will collectseveral armies before considering the possibility ofinvesting in some good terrain. This is a shame, as anew set-up for your games can breathe fresh life intothe most heavily played armies and missions. Adapting your tactics from fighting in rolling woodlandto capturing buildings, ruins and other heavilydefended positions is both challenging and fun.
It is best if the players place the terrain together,ensuring that the set-up is acceptable to them both.Alternatively, you may ask a third person to set up theterrain in a fair manner. A third common way of settingup the terrain is for the player hosting the game (orarriving first at the club) to set the terrain up, and forthe other player to automatically win the roll to choosewho deploys first (see missions). In tournament play,terrain will normally be pre-set by the organisers.
HOW MUCH TERRAIN?As a general rule in Warhammer 40,000, the moreterrain, the better the gaming experience. If you usetoo little terrain, games will be short and not verysatisfactory, with too much advantage going to theplayer who gets to shoot first. For a balanced game,where close combat troops have a chance to get intocontact with the enemy without being completelyblown away in a couple of turns, we expect that abouta quarter of the total playing surface should haveterrain on it. The assumption here is that if terrainpieces are roughly 12" by 12", then six or seven piecesare needed to fulfil the 25% recommendation on astandard 6'x4' table (of course these dimensions areapproximate and terrain features like woods should notbe square, as irregular features look much better!).
In your terrain collection there should be a goodmixture of types. An equal division between terrainwhich interferes with line of sight and provides cover(such as woods or ruins), terrain which provides cover,but does not block line of sight (such as barricades,craters, scrubland and low rubble) and terrain whichblocks line of sight completely (such as hills, rockyoutcrops, buildings, etc.) makes for good tactical play. Itis best to build your terrain collection with this in mind,otherwise the game balance could be seriouslyaffected. Terrain that completely blocks line of sight isparticularly important. Too much of it and your rangedfirepower will be seriously impaired favouring assaulttroops; too little and the game will turn into a shootingmatch, with very little movement or tactical choices.
DEFINE THE TERRAIN Before continuing, you should agree with youropponent how to define each piece of terrain you areusing (see pages 13 and 77 for more details). Thisdoesn’t take more than a few minutes, but it isimportant to do before the battle starts – otherwise ithas a tendency to cause confusion and arguments inthe middle of the game. Of course if you are playingwith your usual adversary on the same terrain that youalways do, this will be as simple as saying ”Just like lasttime, okay?” However with a less familiar opponent, orif you are playing over some new terrain, remember toclarify the following:
• Which terrain pieces are area terrain, difficultterrain or dangerous terrain (or a combination)?
• Which terrain pieces are impassable terrain?
• Which terrain pieces are ruins?
• What cover saves do different terrain pieces confer?
• Which buildings are impassable?
• What are the Armour Values, fire points, accesspoints and capacity for any buildings?
88 THE RULES SECTION: ORGANISING A BATTLE
The Gaming Surface
Player A’s own table edge
Shor
t ta
ble
edge
Short table edge
Player B’s own table edge

THE RULES SECTION: ORGANISING A BATTLE 89
Wilderness outpostThe battlefield on the right has beenbased around the wargaming terrainstaples – woods and hills – with theaddition of some other elements toprovide the Warhammer 40,000 flavour.The players have taken turns to place the‘wilderness’ elements of the terrain, andbecause neither knows yet where his armywill be deploying, they have both takencare to ensure there is an even spreadover the table. This means that wherevertheir forces end up, there will be somecover nearby.
The use of a bastion makes it clear thatthe battle is set in the 41st Millennium.Because whichever side occupies thisbuilding will have a useful advantage, theplayers have agreed to place it in thecentre of the table – the armies will haveto fight to gain its protection. The roadwill allow vehicles to cross the boardquickly, in order to transport passengersor contest objectives themselves – plus itreally adds to the look of the battlefield.
War-torn settlementIn the example on the left, one player hasset up all the scenery, arranging it torepresent a small settlement, blasted andruined by years of war. His opponent willthen get to decide whether to deploy firstor second, thereby choosing the bestangle of attack.
The various ruins will block models’ viewsacross the table, forcing units tomanoeuvre and advance on the enemy.Of course models in the upper levels ofthe ruins will have a great vantage point,so these structures will be tacticallyimportant – especially if objectives areplaced within them. The piles of rubbleand barricades provide cover for warriors,as do the craters. Squads that run fromone piece of terrain to the next will beable to stay protected from enemy fire.
EXAMPLE BATTLEFIELDS
Woods allow troops toadvance in cover.
Vehicles can movefaster on a road.
Hills provide good vantagepoints for shooting.
A fortified bastion issure to be the focus offierce fighting.
Small squads canshelter from enemyfire within craters.
Large piles of rubblebreak up the line ofsight across the table.
Barricades will offerprotection while troopsclose with the foe.
Upper levels of theruins provide greatfiring positions.
Serve the Emperor today, tomorrow you may be dead.

90 THE RULES SECTION: ORGANISING A BATTLE
SELECT A MISSIONMissions define how to work out which side has won,dictating the tactics that the players will have toemploy during the battle. The three standard missionsin this section are the most common way Warhammer40,000 battles are played. They are relatively simple,and do not require an army that is designed specificallytowards a single style of play. You can either agree withyour opponent which mission to play, or roll D6 andconsult the chart below:
ENDING THE GAMEStandard missions last a random number of game turns– between five and seven. At the end of game turn 5,a player must roll a dice. On a 1-2 the game endsimmediately, on a 3+ game turn 6 is played. If this isthe case, a player will roll another dice at the end ofgame turn 6, and this time on a 4+ the gamecontinues and game turn 7 is played. At the end ofgame turn 7, the game ends automatically.
In standard missions, as soon as the game ends andbefore working out victory conditions, all units that arefalling back are removed and count as destroyed.
WIPEOUT!Regardless of the victory conditions, if at the end ofany standard mission your enemy has no units left onthe table, you win the game!
SCORING UNITSDuring a military campaign the most powerful andspecialised units assault the objectives and take them.They then forge ahead to the next objective, engagingthe enemy with lightning-fast assaults and irresistiblearmoured thrusts. It is left to the grunts, the squadsmaking up the bulk of any fighting force, to dig in andconsolidate any territorial gains, defending theobjectives from any enemy counter-attack.
The concept of scoring units is central to the first twostandard missions, which are won or lost by controllingmore objectives than the enemy (see those mission’svictory conditions), and only scoring units can do that.
An army’s scoring units are all the units that come fromits Troops allowance. The presence of other units maydeny an objective to the enemy, but only Troops cancontrol it. There are a few exceptions, however, when aunit of Troops does not count as scoring:
• If it is a vehicle.
• If it has the Swarm special rule.
• If it has a special rule specifying it never counts as ascoring unit.
Unit of Troops embarked in a transport can controlobjectives (measure the distance to their vehicle’s hull).
STANDARD MISSIONS CHART
D6 Mission
1-2 Seize Ground3-4 Capture and Control 5-6 Annihilation

SEIZE GROUNDThe battlefield is strewn with discarded equipment,wounded comrades, supplies and other detritus ofwar that, for various reasons, you wish to recover.You must fight off the enemy while scouring thefield to secure as many of these vital objectives asyou can.
Victory Conditions Before deciding deployment zones (see next section– Deploy Forces), the players must determine theposition of D3+2 objectives. The winner of a roll-offchooses a point on the table to be an objective (byplacing a counter on it, choosing a detail of a terrainfeature, or any other method that is equally clear).Then the opponent does the same, and the playersalternate choosing a point on the table until theposition of all the objectives has been determined.
These objectives may not be in impassable terrain,nor within 12" of a table edge or another objective.
After positioning the objectives, deployment of theforces begins, as described in the type ofdeployment being used.
At the end of the game you control an objective ifthere is at least one of your scoring units, and noenemy unit (any unit, whether scoring or not),within 3" of it. As different objectives vary in shapeand size, it is important to agree at the beginning ofthe game exactly where this distance will bemeasured from.
The player controlling the most objectives wins. If the players control the same number of objectives,the game is a tactical draw.
ANNIHILATIONSome battles are fought with only one goal – findyour enemy, crush him utterly and take away hismeans to mount further resistance.
Victory Conditions At the end of the game, each player receives 1 ‘kill point’ for each enemy unit that has beencompletely destroyed.
If a character has a retinue, the character and hisunit are worth 1 kill point each.
The player with the highest total of kill pointswins. If the players have the same total, the gameis a tactical draw.
THE RULES SECTION: ORGANISING A BATTLE 91
“Strike fast and suddenly. Attackwithout warning. Secure victory beforethe foe is aware of the danger.
Remember always, a war is easily won if your enemy does not know he is fighting.”
Maxims of Lord General Solar Macharius
CAPTURE AND CONTROLBoth sides are attempting to capture the enemy baseof operations or another similarly vital objective,whilst defending their own.
Victory Conditions After deciding deployment zones, but beforedeploying any unit (see next section – DeployForces), starting with the player that will deploy first,each player chooses a point in his own deploymentzone to be an objective (by placing a counter on it,choosing a detail of a terrain feature, or any othermethod that is equally clear). These objectives maynot be in impassable terrain or within 24" of theother objective.
After positioning the objectives, deployment of theforces begins, as described in the type ofdeployment being used.
At the end of the game you control an objective ifthere is at least one of your scoring units, and noenemy unit (any unit, whether scoring or not),within 3" of it. As different objectives vary in shapeand size, it is important to agree at the beginning ofthe game exactly where this distance will bemeasured from.
The player controlling the most objectives wins. If the players control the same number of objectives,the game is a tactical draw.

DEPLOY FORCESSometimes battles occur between forces that havebeen in place for weeks, carefully preparing theirpositions, while at other times a skirmish betweenpatrols escalates into a major engagement, withreserves pouring in from other sectors. You can eitheragree with your opponent which type of deployment touse for your armies, or roll a D6 and consult the chart:
A NOTE ON SECRECYTo keep things fair, you should always allow youropponent to read your force roster after a game. In thesame spirit, always make clear to your opponent whichsquads are embarked in which transport vehicle.However, before starting to deploy their armies, it is agood idea for players to agree whether or not they canread the opponent’s force roster before and during thegame. Some players prefer full disclosure (which is thenorm in tournaments, for example), as they want toconcentrate on outmanoeuvring the enemy rather thanspringing a secret trump card on them. Others prefer toleave a feel of secrecy around their lists, as bluffing canmake a game really entertaining. The choice is yours!
MISSION SPECIAL RULESAll standard missions and deployment types use thefollowing mission special rules, detailed on pages 94and 95: ‘reserves’ and ‘deep strike’.
INFILTRATORS AND SCOUTS In all three types of deployment, the sequence is thesame. First the players deploy their forces (apart fromany unit left in reserve or that chose to use their‘infiltrate’ special rule). Then they deploy theirinfiltrators (as described on page 75), and finally theymove units with the ‘scouts’ special rule (see page 76).
MULTIPLE UNIT CHOICES Note that occasionally the Codexes allow the player toinclude several units in his army at the cost of a singleforce organisation slot (like dedicated transports, etc.).Apart from being bought as a single choice, these unitsoperate and count as separate units in all respects.
SEIZE THE INITIATIVE!In war, no plan survives contact with the enemy. Inany standard mission, just before the player thatshould go first begins his first turn, the opponentcan decide to try to steal the initiative, catchingthe enemy flat-footed. If he decides to do so, herolls a dice. On a result of a 6, he will go firstinstead, immediately beginning his first turn (andno, the opponent cannot then try to seize theinitiative back again!).
PITCHED BATTLE – Long Table EdgesIn the most classic style of engagement, the twoopposing forces deploy in battle formation andadvance head-to-head, guns blazing.
The table is divided lengthways into two halves, bydrawing an imaginary line through the middle of theshort table edges. For example, a 6'x4' table wouldhave two 6'x2' halves.
The players roll-off, and the winner chooses to gofirst or second. The player that goes first thenchooses one of the long table edges to be his owntable edge. He then deploys his force in his half ofthe table, with all models more than 12" away fromthe table’s middle line (this is his ‘deployment zone’).His opponent then deploys in the opposite half.
Deploy any infiltrators and make any scout moves.
Start the game! Once deployment has finished, theplayer that chose his deployment zone first startsgame Turn 1 with his first player turn.
12" 12"
92 THE RULES SECTION: ORGANISING A BATTLE
DEPLOYMENT TYPE CHART
D6 Deployment type
1-2 Pitched Battle 3-4 Spearhead5-6 Dawn of War

SPEARHEAD – Table QuartersBoth armies are trying to outflank the enemy, whencontact is made and battle erupts.
The table is divided into four quarters, formed bydrawing two imaginary perpendicular lines throughthe centre point. So a 6'x4' table would have four3'x2' quarters.
The players roll-off, and the winner chooses to gofirst or second. The player that goes first thenchooses one of the long table edges to be his owntable edge. He then deploys his force in one of thetwo table quarters on his side the table, more than12" away from the centre of the table (this is his‘deployment zone’). His opponent then deploys inthe diagonally opposite quarter.
Deploy any infiltrators and make any scout moves.
Start the game! Once deployment has finished, theplayer that chose his deployment zone first startsgame Turn 1 with his first player turn.
DAWN OF WAR – Table HalvesA clash of patrols escalates into a major engagementas the sun rises and reinforcements begin to pour in.
The table is divided lengthways into two halves.
The players roll-off, and the winner chooses to gofirst or second. The player that goes first thenchooses one of the long table edges to be his owntable edge. He then can deploy up to two units fromhis Troops selections and up to one unit from his HQselections in his half of the table (this is his‘deployment zone’). His opponent then does thesame in the opposite half, but must position histhree units more than 18" from enemy units.
Troops and HQ units that can infiltrate, can do so, aslong as at the end of deployment the player still hasa maximum of one HQ and two Troops units on thetable. Lastly, players make any scout moves.
Start the game! Once deployment has finished, theplayer that chose his deployment zone first startsgame Turn 1 with his first player turn.
All units that were not deployed, and were notdeclared to be in reserve during deployment, mustenter the game in the Movement phase of their firstplayer turn by moving in from their own table edge,just like units moving in from reserve.
During game Turn 1 the Night Fighting missionspecial rule is in effect.
12"
THE RULES SECTION: ORGANISING A BATTLE 93
Example: player A wins the roll-off and deploys aninfantry unit from his Troops and one monstrouscreature from his HQ, in his half of the table. He alsodeclares that a second infantry unit from his Troops willuse its Infiltrate ability. In his half of the table, player Bthen deploys a unit of Troops, already embarked intotheir dedicated transport (which is his second unit ofTroops). He then deploys an independent character fromhis HQ, joining the unit embarked in the transport.Finally, player A deploys his infiltrating unit.

MISSION SPECIAL RULESThe ‘reserves’ and ‘deep strike’ special rules given hereare used in all standard missions. ‘Night fighting’ isused with the Dawn of War deployment type. Of course, players may like to add other special rulesand design their own own when creating newmissions.
RESERVESReserves are forces in the same sector as the units onthe battlefield who can be called in to reinforce themat relatively short notice.
Preparing reservesWhen deploying their army, players may choose not todeploy one or more of the units in their army andinstead leave them in reserve. Units in reserve willbecome available in later turns of the game.
During deployment, when declaring which units are leftin reserve, the player must clearly explain theorganisation of his reserves to the opponent.
First he must specify to the opponent if any of hisindependent characters left in reserve are joining a unit,in which case they will be rolled for and will arrivetogether, or not in which case they will count as aseparate unit when rolling for reserves.
Similarly, the player must specify if any transport vehiclein reserve is carrying any of the infantry units and/orindependent characters in reserve. If they do, the unitand the transport will be rolled for together and willarrive together. Remember that a dedicated transportcan only be deployed, and consequently can only bekept in reserve, either empty or transporting the unit itwas selected with (plus any independent characters).
If units in reserve have the ‘deep strike’, ‘scout’ or‘infiltrate’ special rule, the player must declare to hisopponent, during army deployment, whether they aregoing to use their special rules to deep strike/outflankor they are going to enter from his own table edgewhen they will become available (see Arriving fromReserve). This decision may not be changed later.
Rolling for reservesAt the start of each of his Movement phases except thefirst, before moving any unit, the player must roll a dicefor each of his units in reserve. Depending on the turnin question, a certain result will mean that the unit hasarrived. For example, on Turn 1 no reserves arrive, onTurn 2 the player needs a 4+ for a unit to arrive, and soon until Turn 5, when any units left will arriveautomatically (see the Reserves table on this page).
Once all of the units have been rolled for, the playerpicks any one of the units arriving and deploys it,moving it onto the table as described later. Then hepicks another unit and deploys it, and so on until all
arriving units are on the table. The player may thenproceed to move his other units as normal.
Note: you must roll for reserves as soon as possible andmust bring them onto the table as soon as they areavailable. You may not delay making the dice rolls orkeep the reserves hanging around off-table until youdecide you need them!
Arriving from reserveWhen a reserve unit arrives, it must move onto thetable from the controlling player’s own table edge(unless it’s deep striking or outflanking). Each model’smove is measured from the edge of the battlefield, as ifthey had been positioned just off the board in theprevious turn and moved as normal. This means it isincorrect to place a model on the board touching theedge and then move it – this would mean it moved toofar, especially in the case of large vehicles.
If a unit has a special rule forcing it to move in aspecific direction (such as ‘rage’, for example) or thatcould stop it from moving, the rule is ignored in thephase when it arrives from Reserve.
Certain rare units are permanently immobile. If a unitlike this cannot be deployed (for example in the Dawnof War deployment), or the player decides to keep it inreserve, it will enter the game by deep strike. Thisrepresents the immobile unit being airdropped orteleported into battle.
OutflankDuring deployment, players may declare that units withthe ‘scout’ or ‘infiltrate’ special rules are attempting tooutflank the enemy. This means they are making awide sweeping move to come at the foe from anunexpected direction. When an outflanking unit arrivesfrom reserve the controlling player rolls a dice: on a 1-2the unit will come in from the short table edge on theplayer’s left; on a 3-4 they will come from the right, ona 5-6 the player can choose left or right. Models moveonto the table as described for other reserves, above.Note that if such units are picked from their army listtogether with a dedicated transport, they may outflankwith their transport, but if they do so they must moveonto the table embarked in it.
RESERVES TABLE
Turn Unit arrives on a roll of:
1 N/A2 4+3 3+4 2+5+ Automatic
94 THE RULES SECTION: ORGANISING A BATTLE
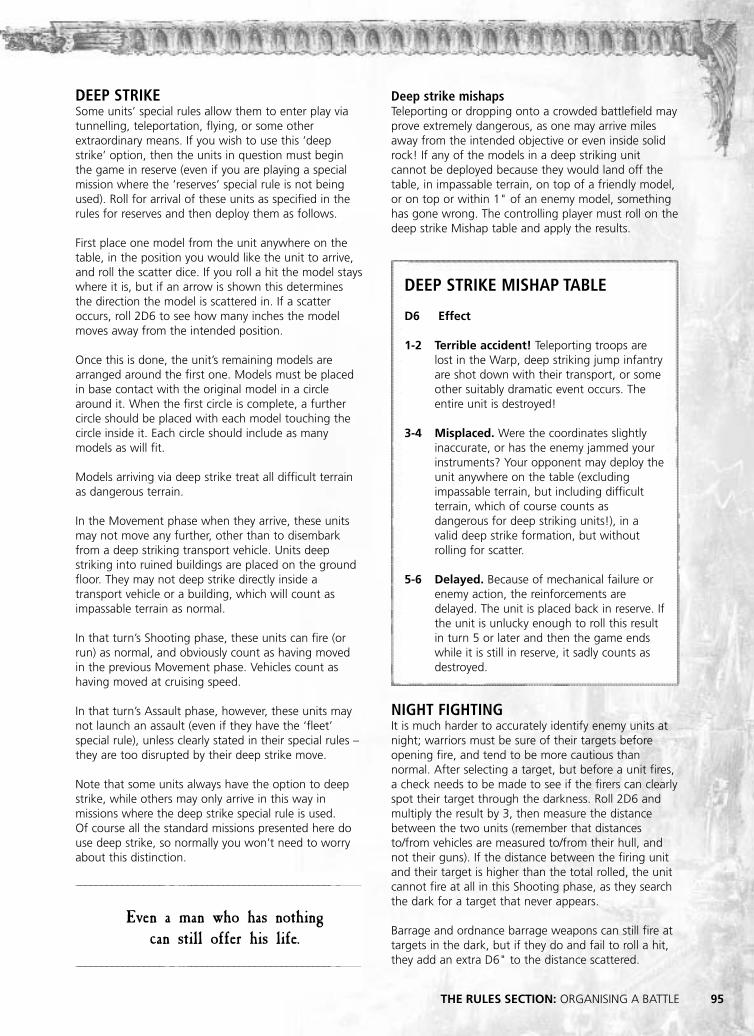
THE RULES SECTION: ORGANISING A BATTLE 95
Deep strike mishapsTeleporting or dropping onto a crowded battlefield mayprove extremely dangerous, as one may arrive milesaway from the intended objective or even inside solidrock! If any of the models in a deep striking unitcannot be deployed because they would land off thetable, in impassable terrain, on top of a friendly model,or on top or within 1" of an enemy model, somethinghas gone wrong. The controlling player must roll on thedeep strike Mishap table and apply the results.
NIGHT FIGHTINGIt is much harder to accurately identify enemy units atnight; warriors must be sure of their targets beforeopening fire, and tend to be more cautious thannormal. After selecting a target, but before a unit fires,a check needs to be made to see if the firers can clearlyspot their target through the darkness. Roll 2D6 andmultiply the result by 3, then measure the distancebetween the two units (remember that distancesto/from vehicles are measured to/from their hull, andnot their guns). If the distance between the firing unitand their target is higher than the total rolled, the unitcannot fire at all in this Shooting phase, as they searchthe dark for a target that never appears.
Barrage and ordnance barrage weapons can still fire attargets in the dark, but if they do and fail to roll a hit,they add an extra D6" to the distance scattered.
DEEP STRIKESome units’ special rules allow them to enter play viatunnelling, teleportation, flying, or some otherextraordinary means. If you wish to use this ‘deepstrike’ option, then the units in question must beginthe game in reserve (even if you are playing a specialmission where the ‘reserves’ special rule is not beingused). Roll for arrival of these units as specified in therules for reserves and then deploy them as follows.
First place one model from the unit anywhere on thetable, in the position you would like the unit to arrive,and roll the scatter dice. If you roll a hit the model stayswhere it is, but if an arrow is shown this determinesthe direction the model is scattered in. If a scatteroccurs, roll 2D6 to see how many inches the modelmoves away from the intended position.
Once this is done, the unit’s remaining models arearranged around the first one. Models must be placedin base contact with the original model in a circlearound it. When the first circle is complete, a furthercircle should be placed with each model touching thecircle inside it. Each circle should include as manymodels as will fit.
Models arriving via deep strike treat all difficult terrainas dangerous terrain.
In the Movement phase when they arrive, these unitsmay not move any further, other than to disembarkfrom a deep striking transport vehicle. Units deepstriking into ruined buildings are placed on the groundfloor. They may not deep strike directly inside atransport vehicle or a building, which will count asimpassable terrain as normal.
In that turn’s Shooting phase, these units can fire (orrun) as normal, and obviously count as having movedin the previous Movement phase. Vehicles count ashaving moved at cruising speed.
In that turn’s Assault phase, however, these units maynot launch an assault (even if they have the ‘fleet’special rule), unless clearly stated in their special rules –they are too disrupted by their deep strike move.
Note that some units always have the option to deepstrike, while others may only arrive in this way inmissions where the deep strike special rule is used. Of course all the standard missions presented here douse deep strike, so normally you won’t need to worryabout this distinction.
Even a man who has nothing can still offer his life.
DEEP STRIKE MISHAP TABLE
D6 Effect
1-2 Terrible accident! Teleporting troops arelost in the Warp, deep striking jump infantryare shot down with their transport, or someother suitably dramatic event occurs. Theentire unit is destroyed!
3-4 Misplaced. Were the coordinates slightlyinaccurate, or has the enemy jammed yourinstruments? Your opponent may deploy theunit anywhere on the table (excludingimpassable terrain, but including difficultterrain, which of course counts asdangerous for deep striking units!), in avalid deep strike formation, but withoutrolling for scatter.
5-6 Delayed. Because of mechanical failure orenemy action, the reinforcements aredelayed. The unit is placed back in reserve. Ifthe unit is unlucky enough to roll this resultin turn 5 or later and then the game endswhile it is still in reserve, it sadly counts asdestroyed.


The universe is a big place and, whateverhappens, you will not be missed…
Within these final pages you will find statistics for every troop type foreach of the armies in Warhammer 40,000. Although the entries in thissection are correct at the time of printing, the Warhammer 40,000game system is constantly growing and developing. As such, in theevent of any contradiction between this section and any of theindividual codexes, the codexes always take precedence. We have alsoincluded rules for victory points. For players that want to use them,these provide a tiebreaker in the event of a draw, or a more detailedmeasure of which side has destroyed more of the enemy. At the backare summaries of the Movement, Shooting and Assault phase and themost commonly used charts for easy reference during battle.
REFERENCE

98 REFERENCE: Space Marines
SPACE MARINES
WS BS S T W I A Ld Sv
Apothecary 4 4 4 4 1 4 2 9 3+
Attack Bike 4 4 4 4(5) 2 4 2 8 3+
Captain 5 5 4 4 3 5 3 10 3+4+
Chaplain 4 4 4 4 2 4 2 10 3+4+
Company 5 4 4 4 1 4 2 9 3+
Champion
Honour Guard 4 4 4 4 1 4 2 10 2+
Librarian 5 4 4 4 2 4 2 9 3+
Scout 4 4 4 4 1 4 1 8 4+
Scout Biker 4 4 4 4(5) 1 4 1 8 4+
Scout Sergeant 4 4 4 4 1 4 2 8 4+
Servitor 3 3 3 3 1 3 1 8 4+
Space Marine 4 4 4 4 1 4 1 8 3+
Space Marine 4 4 4 4(5) 1 4 1 8 3+
Biker
Techmarine 4 4 4 4 1 4 1 8 2+
Terminator 4 4 4 4 1 4 2 9 2+5+
Veteran Sergeant 4 4 4 4 1 4 2 9 3+
BLACK TEMPLARSWS BS S T W I A Ld Sv
Castellan 5 5 4 4 2 5 3 9 3+
Cenobyte 4 3 3 4 1 3 1 8 4+
Emperor’s 6 4 4 4 2 5 2 10 2+4+
Champion
Initiate 4 4 4 4 1 4 1 8 3+
Marshal 5 5 4 4 3 5 3 10 3+
Neophyte 3 3 4 4 1 4 1 7 4+
BLOOD ANGELSWS BS S T W I A Ld Sv
Death Company 4 4 4 4 1 4 2 9 3+
DARK ANGELSWS BS S T W I A Ld Sv
Chaplain 5 5 4 4 2 5 3 9 3+4+
Company 5 5 4 4 3 5 3 10 3+4+
Master
Interrogator- 5 5 4 4 3 5 3 10 3+4+
Chaplain
Librarian 5 5 4 4 2 5 3 9 3+
Ravenwing 4 4 4 4(5) 1 4 1 8 3+
Biker
Veteran 4 4 4 4 1 4 2 9 3+
SPACE WOLVESWS BS S T W I A Ld Sv
Wolf Guard 5 5 4 4 2 5 4 9 3+
Battle Leader
Blood Claw 3 3 4 4 1 4 1 8 3+
Blood Claw 3 3 4 4(5) 1 4 1 8 3+
Biker
Fenrisian Wolf 4 0 4 4 1 4 2 8 6+
Grey Hunter 4 4 4 4 1 4 1 8 3+
Iron Priest 5 5 4 4 2 5 3 9 2+
Long Fang 4 4 4 4 1 4 1 9 3+
Pack Leader 4 4 4 4 1 4 1 9 3+
Rune Priest 5 5 4 4 2 5 4 9 3+
Thrall 3 3 4 5 1 1 1 8 5+
Wolf Guard 4 4 4 4 1 4 2 9 3+
Wolf Lord 5 5 4 4 3 5 4 10 3+
Wolf Priest 5 5 4 4 2 5 4 10 3+4+
4+ Indicates a 4+ Invulnerable Save.5+ Indicates a 5+ Invulnerable Save.
SPACE MARINES

REFERENCE: Space Marines 99
VEHICLESArmour
Front Side Rear BS
Drop Pod 12 12 12 2
Land Raider 14 14 14 4
Land Raider Crusader 14 14 14 4
Leman Russ Exterminator 14 12 10 4
Land Speeder 10 10 10 4
Predator 13 11 10 4
Razorback 11 11 10 4
Rhino 11 11 10 4
Vindicator 13 11 10 4
Whirlwind 11 11 10 4
DREADNOUGHTSArmour
WS BS S Front Side Rear I A
Dreadnought 4 4 6(10) 12 12 10 4 2
‘Furioso’ 4 4 6(10) 12 12 10 4 2(3)
Dreadnought
Space Wolf 5 5 6(10) 12 12 10 4 3
Venerable
Dreadnought
Range S AP Type
Assault cannon 24" 6 4 Heavy 4, Rending
Autocannon 48" 7 4 Heavy 2
Bolt pistol 12" 4 5 Pistol
Boltgun 24" 4 5 Rapid Fire
Deathwind 12" 5 6 Heavy 1,
Large Blast
Demolisher 24" 10 2 Ordnance 1,
Large Blast
Flamer Template 4 5 Assault 1
Heavy bolter 36" 5 4 Heavy 3
Heavy flamer Template 5 4 Assault 1
Hunter-killer n/a 8 3 Heavy 1
missile
Lascannon 48" 9 2 Heavy 1
Meltagun 12" 8 1 Assault 1, Melta
Missile Launcher*
Frag 48" 4 6 Heavy 1, Blast
Krak 48" 8 3 Heavy 1
Range S AP Type
Multi-melta 24" 8 1 Heavy 1, Melta
Plasma pistol 12" 7 2 Pistol, Gets Hot!
Plasma gun 24" 7 2 Rapid Fire,
Gets Hot!
Plasma cannon 36" 7 2 Heavy 1, Blast,
Gets Hot!
Shotgun
Solid shot 12" 3 - Assault 2
Manstopper 12" 4 - Assault 2
Sniper rifle 36" X 6 Heavy 1, Sniper,
Pinning
Storm bolter 24" 4 5 Assault 2
Typhoon missile 48" 5 5 Heavy 1, Blast,
Twin-linked
Whirlwind**
Vengeance G12-48" 5 4 Ord. 1/Large Blast
Castellan G12-48" n/a n/a Ord. 1/Large Blast
Incendiary G12-48" 4 5 Ord. 1/Large Blast,
Castellan Ignores Cover
WEAPONS

IMPERIAL GUARDWS BS S T W I A Ld Sv
Commissar 4 4 3 3 2 4 2 10 5+
Conscript 2 2 3 3 1 3 1 5 5+
Guardsman 3 3 3 3 1 3 1 7 5+
Hardened 3 4 3 3 1 3 1 8 5+
Veteran
Hardened 3 4 3 3 1 3 2 8 5+
Veteran Sergeant
Heroic 4 4 3 3 3 4 3 9 5+
Senior Officer
Junior Officer 3 3 3 3 1 3 2 8 5+
Ogryn 4 3 5 4 3 3 2 8 5+
Ogryn Bone ’ead 4 3 5 4 3 3 3 9 5+
Priest 3 3 3 3 2 4 2 8 –
Ratling 2 4 2 2 1 4 1 6 5+
Sanctioned 2 2 3 3 1 3 1 8 5+
Psyker
Senior Officer 4 4 3 3 2 4 3 8 5+
Veteran 3 3 3 3 1 3 2 8 5+
Sergeant
Storm Trooper 3 4 3 3 1 3 1 8 4+
Storm Trooper 3 4 3 3 1 3 2 8 4+
Veteran Sergeant
Tech-Priest 3 3 3 3 1 3 1 8 3+
Enginseer
VEHICLES Armour
Front Side Rear BS
Basilisk 12 10 10 3
Chimera 12 10 10 3
Demolisher 14 13 11 3
Hellhound 12 12 10 3
Leman Russ 14 12 10 3
Armour
WS BS S Front Side Rear I A
Sentinel 3 3 5 10 10 10 3 1
Weapons Range S AP Type
Autocannon 48" 7 4 Heavy 2
Battle cannon 72" 8 3 Ord. 1, Large Blast
Boltgun 24" 4 5 Rapid fire
Bolt pistol 12" 4 5 Pistol
Demolisher 24" 10 2 Ord. 1, Large Blast
Earthshaker 120" 9 3 Ord. 1, Large Blast
Flamer Template 4 5 Assault 1
Grenade launcher*
Frag 24" 3 6 Assault 1, Blast
Krak 24" 6 4 Assault 1
Heavy bolter 36" 5 4 Heavy 3
Heavy flamer Template 5 4 Assault 1
Heavy stubber 36" 4 6 Heavy 3
Hellpistol 12" 3 5 Pistol
Hellgun 24" 3 5 Rapid fire
Hunter-killer missile n/a 8 3 Heavy 1
Inferno cannon** 24" 6 4 Heavy 1, Template
Lasgun 24" 3 – Rapid fire
Laspistol 12" 3 – Pistol
Lascannon 48" 9 2 Heavy 1
Meltagun 12" 8 1 Melta, Assault 1
Missile launcher*
Frag 48" 4 6 Heavy 1, Blast
Krak 48" 8 3 Heavy 1
Mortar G48" 4 6 Heavy 1, Blast
Multi-laser 36" 6 6 Heavy 3
Multi-melta 24" 8 1 Melta, Heavy 1
Plasma cannon 36" 7 2 Gets Hot, Heavy 1, Blast
Plasma gun 24" 7 2 Gets Hot, Rapid Fire
Plasma pistol 12" 7 2 Gets Hot, Pistol
Ripper gun 12" 4 6 Assault 2
Shotgun 12" 3 – Assault 2
Sniper rifle 36" – 6 Sniper, Pinning, Heavy 1
Storm bolter 24" 4 5 Assault 2
* May fire either frag or krak missiles/grenades.
** Place flamer template on target. Roll to hit. If you hit, all models touched by
template are hit. If you miss, they are hit on a 4+.
100 REFERENCE: Imperial Guard
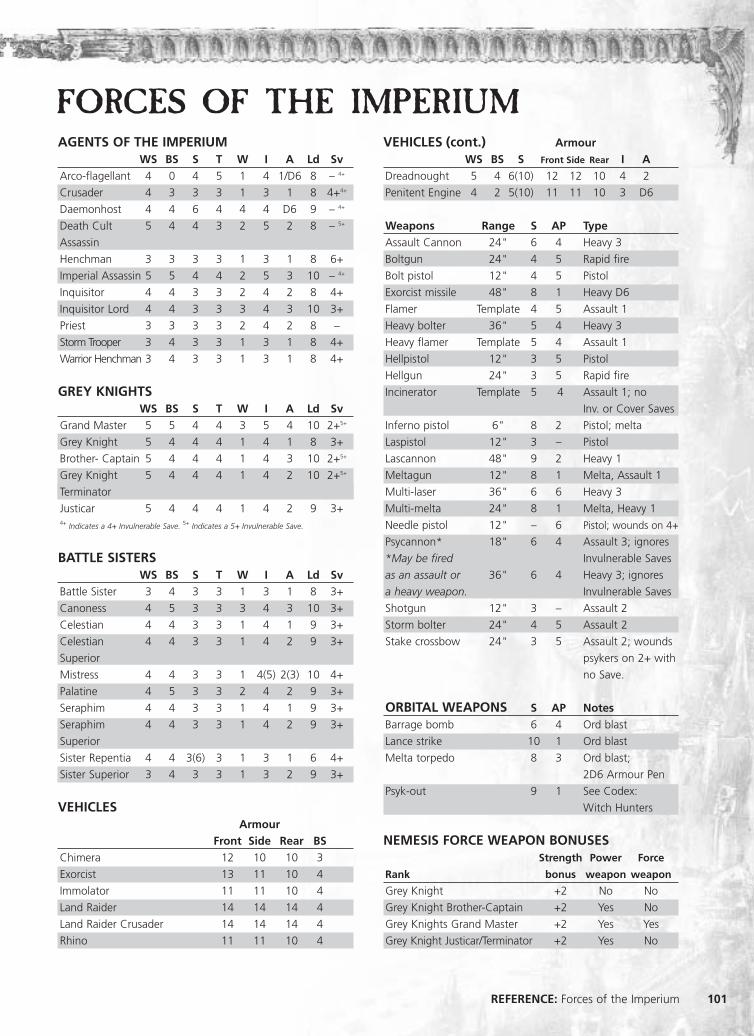
FORCES OF THE IMPERIUMAGENTS OF THE IMPERIUM
WS BS S T W I A Ld Sv
Arco-flagellant 4 0 4 5 1 4 1/D6 8 – 4+
Crusader 4 3 3 3 1 3 1 8 4+4+
Daemonhost 4 4 6 4 4 4 D6 9 – 4+
Death Cult 5 4 4 3 2 5 2 8 – 5+
Assassin
Henchman 3 3 3 3 1 3 1 8 6+
Imperial Assassin 5 5 4 4 2 5 3 10 – 4+
Inquisitor 4 4 3 3 2 4 2 8 4+
Inquisitor Lord 4 4 3 3 3 4 3 10 3+
Priest 3 3 3 3 2 4 2 8 –
Storm Trooper 3 4 3 3 1 3 1 8 4+
Warrior Henchman 3 4 3 3 1 3 1 8 4+
GREY KNIGHTSWS BS S T W I A Ld Sv
Grand Master 5 5 4 4 3 5 4 10 2+5+
Grey Knight 5 4 4 4 1 4 1 8 3+
Brother- Captain 5 4 4 4 1 4 3 10 2+5+
Grey Knight 5 4 4 4 1 4 2 10 2+5+
Terminator
Justicar 5 4 4 4 1 4 2 9 3+4+ Indicates a 4+ Invulnerable Save. 5+ Indicates a 5+ Invulnerable Save.
BATTLE SISTERSWS BS S T W I A Ld Sv
Battle Sister 3 4 3 3 1 3 1 8 3+
Canoness 4 5 3 3 3 4 3 10 3+
Celestian 4 4 3 3 1 4 1 9 3+
Celestian 4 4 3 3 1 4 2 9 3+
Superior
Mistress 4 4 3 3 1 4(5) 2(3) 10 4+
Palatine 4 5 3 3 2 4 2 9 3+
Seraphim 4 4 3 3 1 4 1 9 3+
Seraphim 4 4 3 3 1 4 2 9 3+
Superior
Sister Repentia 4 4 3(6) 3 1 3 1 6 4+
Sister Superior 3 4 3 3 1 3 2 9 3+
VEHICLESArmour
Front Side Rear BS
Chimera 12 10 10 3
Exorcist 13 11 10 4
Immolator 11 11 10 4
Land Raider 14 14 14 4
Land Raider Crusader 14 14 14 4
Rhino 11 11 10 4
VEHICLES (cont.) Armour
WS BS S Front Side Rear I A
Dreadnought 5 4 6(10) 12 12 10 4 2
Penitent Engine 4 2 5(10) 11 11 10 3 D6
Weapons Range S AP Type
Assault Cannon 24" 6 4 Heavy 3
Boltgun 24" 4 5 Rapid fire
Bolt pistol 12" 4 5 Pistol
Exorcist missile 48" 8 1 Heavy D6
Flamer Template 4 5 Assault 1
Heavy bolter 36" 5 4 Heavy 3
Heavy flamer Template 5 4 Assault 1
Hellpistol 12" 3 5 Pistol
Hellgun 24" 3 5 Rapid fire
Incinerator Template 5 4 Assault 1; no
Inv. or Cover Saves
Inferno pistol 6" 8 2 Pistol; melta
Laspistol 12" 3 – Pistol
Lascannon 48" 9 2 Heavy 1
Meltagun 12" 8 1 Melta, Assault 1
Multi-laser 36" 6 6 Heavy 3
Multi-melta 24" 8 1 Melta, Heavy 1
Needle pistol 12" – 6 Pistol; wounds on 4+
Psycannon* 18" 6 4 Assault 3; ignores
*May be fired Invulnerable Saves
as an assault or 36" 6 4 Heavy 3; ignores
a heavy weapon. Invulnerable Saves
Shotgun 12" 3 – Assault 2
Storm bolter 24" 4 5 Assault 2
Stake crossbow 24" 3 5 Assault 2; wounds
psykers on 2+ with
no Save.
ORBITAL WEAPONS S AP Notes
Barrage bomb 6 4 Ord blast
Lance strike 10 1 Ord blast
Melta torpedo 8 3 Ord blast;
2D6 Armour Pen
Psyk-out 9 1 See Codex:
Witch Hunters
NEMESIS FORCE WEAPON BONUSESStrength Power Force
Rank bonus weapon weapon
Grey Knight +2 No No
Grey Knight Brother-Captain +2 Yes No
Grey Knights Grand Master +2 Yes Yes
Grey Knight Justicar/Terminator +2 Yes No
REFERENCE: Forces of the Imperium 101

CHAOS SPACE MARINESWS BS S T W I A Ld Sv
Aspiring 4 4 4 4 1 4 2 10 3+
Champion
Aspiring Sorcerer 4 4 4 4 1 4 2 10 3+4+
Berzerker 5 4 4 4 1 4 2 9 3+
Berzerker Skull 5 4 4 4 1 4 3 10 3+
Champion
Chaos Biker 4 4 4 4(5) 1 4 1 9 3+
Chaos Biker 4 4 4 4(5) 1 4 2 10 3+
Aspiring Champion
Chaos Lord 6 5 4 4 3 5 3 10 3+5+
Chaos 4 4 4 4 1 4 1 9 3+
Space Marine
Chaos Spawn 3 0 5 5 3 3 D6 10 -
Chosen Chaos 4 4 4 4 1 4 1 10 3+
Space Marine
Noise Marine 4 4 4 4 1 5 1 9 3+
Noise Marine 4 4 4 4 1 5 2 10 3+
Champion
Obliterator 4 4 4 4 2 4 2 9 2+5+
Plague Marine 4 4 4 4(5) 1 3 1 9 3+
Plague Marine 4 4 4 4(5) 1 3 2 10 3+
Champion
Possessed 4 4 5 4 1 4 2 10 3+5+
Raptor 4 4 4 4 1 4 1 9 3+
Sorcerer 5 5 4 4 3 5 3 10 3+5+
Space Marine 7 5 6 5 4 5 4 10 3+5+
Daemon Prince
Summoned
Greater Daemon 8 0 6 6 4 4 5 10 -4+
Summoned 4 0 4 4 1 4 2 10 -5+
Lesser Daemon
Terminator 4 4 4 4 1 4 2 10 2+5+
Terminator 4 4 4 4 1 4 3 10 2+5+
Champion
Thousand Sons 4 4 4 4 1 4 1 9 3+4+
Marine4+ Indicates a 4+ Invulnerable Save.
5+ Indicates a 5+ Invulnerable Save.
VEHICLES Armour
Front Side Rear BS
Chaos Land Raider 14 14 14 4
Chaos Predator 13 11 10 4
Chaos Rhino 11 11 10 4
Chaos Vindicator 13 11 10 4
Armour
WS BS S Front Side Rear I A
Chaos 4 4 6 12 12 10 4 3
Dreadnought
Defiler 3 3 6 12 12 10 3 3
Weapon Range S AP Type
Autocannon 48" 7 4 Heavy 2
Battle cannon 72" 8 3 Ord.1, Large Blast
Blastmaster*
Varied frequency 36" 5 4 Assault 2, Pinning
Single frequency 48" 8 3 Heavy 1, Blast,
Pinning
Bolt pistol 12" 4 5 Pistol
Boltgun 24" 4 5 Rapid Fire
Demolisher 24" 10 2 Ord. 1, Large Blast
Doom siren Template 5 3 Assault 1
Flamer Template 4 5 Assault 1
Havoc Launcher 48" 5 5 Heavy 1, Blast
Twin-linked
Heavy bolter 36" 5 4 Heavy 3
Heavy flamer Template 5 4 Assault 1
Lascannon 48" 9 2 Heavy 1
Meltagun 12" 8 1 Melta, Assault 1,
Missile launcher**
Frag 48" 4 6 Heavy 1, Blast
Krak 48" 8 3 Heavy 1
Plasma Cannon 36" 7 2 Heavy 1, Blast,
Gets Hot!
Plasma Gun 24" 7 2 Rapid Fire; Gets hot
Plasma Pistol 12" 7 2 Pistol, Gets hot!
Reaper Heavy 2,
Autocannon 36" 7 4 Twin-linked
Sonic blaster 24" 4 5 Assault 2 or
Heavy 3**** May fire either at a single or varied frequency.**May fire either frag or krak missiles.***May fire either Assault 2 or Heavy 3
102102
“I murdered thousands for the Emperor and he gaveme nothing except his damning silence. Now hislapdogs yap for every life I take, while the godspromise me the galaxy.”
Svane Vulfbad
102 REFERENCE: Chaos Space Marines
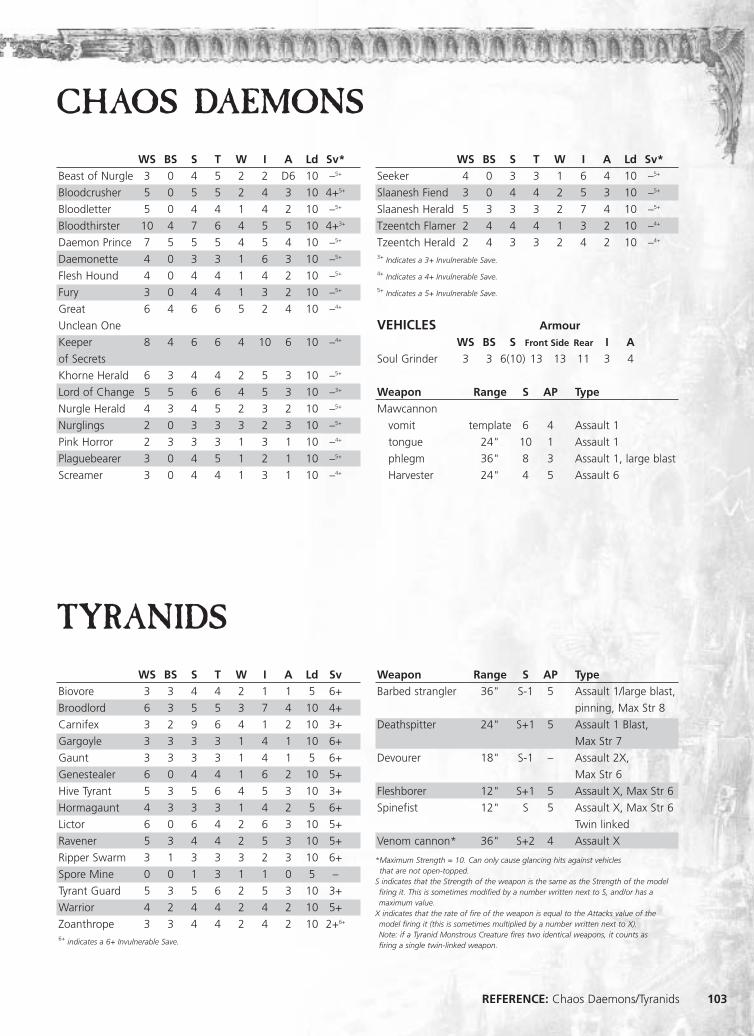
CHAOS DAEMONSWS BS S T W I A Ld Sv*
Beast of Nurgle 3 0 4 5 2 2 D6 10 –5+
Bloodcrusher 5 0 5 5 2 4 3 10 4+5+
Bloodletter 5 0 4 4 1 4 2 10 –5+
Bloodthirster 10 4 7 6 4 5 5 10 4+3+
Daemon Prince 7 5 5 5 4 5 4 10 –5+
Daemonette 4 0 3 3 1 6 3 10 –5+
Flesh Hound 4 0 4 4 1 4 2 10 –5+
Fury 3 0 4 4 1 3 2 10 –5+
Great 6 4 6 6 5 2 4 10 –4+
Unclean One
Keeper 8 4 6 6 4 10 6 10 –4+
of Secrets
Khorne Herald 6 3 4 4 2 5 3 10 –5+
Lord of Change 5 5 6 6 4 5 3 10 –3+
Nurgle Herald 4 3 4 5 2 3 2 10 –5+
Nurglings 2 0 3 3 3 2 3 10 –5+
Pink Horror 2 3 3 3 1 3 1 10 –4+
Plaguebearer 3 0 4 5 1 2 1 10 –5+
Screamer 3 0 4 4 1 3 1 10 –4+
WS BS S T W I A Ld Sv*
Seeker 4 0 3 3 1 6 4 10 –5+
Slaanesh Fiend 3 0 4 4 2 5 3 10 –5+
Slaanesh Herald 5 3 3 3 2 7 4 10 –5+
Tzeentch Flamer 2 4 4 4 1 3 2 10 –4+
Tzeentch Herald 2 4 3 3 2 4 2 10 –4+
3+ Indicates a 3+ Invulnerable Save.
4+ Indicates a 4+ Invulnerable Save.
5+ Indicates a 5+ Invulnerable Save.
VEHICLES Armour
WS BS S Front Side Rear I A
Soul Grinder 3 3 6(10) 13 13 11 3 4
Weapon Range S AP Type
Mawcannon
vomit template 6 4 Assault 1
tongue 24" 10 1 Assault 1
phlegm 36" 8 3 Assault 1, large blast
Harvester 24" 4 5 Assault 6
WS BS S T W I A Ld Sv
Biovore 3 3 4 4 2 1 1 5 6+
Broodlord 6 3 5 5 3 7 4 10 4+
Carnifex 3 2 9 6 4 1 2 10 3+
Gargoyle 3 3 3 3 1 4 1 10 6+
Gaunt 3 3 3 3 1 4 1 5 6+
Genestealer 6 0 4 4 1 6 2 10 5+
Hive Tyrant 5 3 5 6 4 5 3 10 3+
Hormagaunt 4 3 3 3 1 4 2 5 6+
Lictor 6 0 6 4 2 6 3 10 5+
Ravener 5 3 4 4 2 5 3 10 5+
Ripper Swarm 3 1 3 3 3 2 3 10 6+
Spore Mine 0 0 1 3 1 1 0 5 –
Tyrant Guard 5 3 5 6 2 5 3 10 3+
Warrior 4 2 4 4 2 4 2 10 5+
Zoanthrope 3 3 4 4 2 4 2 10 2+6+
6+ indicates a 6+ Invulnerable Save.
Weapon Range S AP Type
Barbed strangler 36" S-1 5 Assault 1/large blast,
pinning, Max Str 8
Deathspitter 24" S+1 5 Assault 1 Blast,
Max Str 7
Devourer 18" S-1 – Assault 2X,
Max Str 6
Fleshborer 12" S+1 5 Assault X, Max Str 6
Spinefist 12" S 5 Assault X, Max Str 6
Twin linked
Venom cannon* 36" S+2 4 Assault X
*Maximum Strength = 10. Can only cause glancing hits against vehiclesthat are not open-topped.
S indicates that the Strength of the weapon is the same as the Strength of the modelfiring it. This is sometimes modified by a number written next to S, and/or has amaximum value.
X indicates that the rate of fire of the weapon is equal to the Attacks value of themodel firing it (this is sometimes multiplied by a number written next to X). Note: if a Tyranid Monstrous Creature fires two identical weapons, it counts as firing a single twin-linked weapon.
TYRANIDS
REFERENCE: Chaos Daemons/Tyranids 103

ELDARWS BS S T W I A Ld Sv
Autarch 6 6 3 3 3 6 3 10 3+4+
Avatar 10 5 6 6 4 6 4 10 3+
Dark Reaper 4 4 3 3 1 5 1 9 3+
Death Jester 5 4 3 3 1 6 2 9 –
Dire Avenger 4 4 3 3 1 5 1 9 4+
Exarch 5 5 3 3 1 6 2 9 3+*
Farseer 5 5 3 3 3 5 1 10 –
Fire Dragon 4 4 3 3 1 5 1 9 4+
Guardian 3 3 3 3 1 4 1 8 5+
Guardian Jetbike 3 3 3 3(4) 1 4 1 8 3+
Harlequin 5 4 3 3 1 6 2 9 –
Howling 4 4 3 3 1 5 1 9 4+
Banshee
Phoenix Lord 7 7 4 4 3 7 4 10 2+
Ranger 3 4 3 3 1 4 1 8 5+
Shadowseer 5 4 3 3 1 6 2 9 –
Shining Spear 4 4 3 3(4) 1 5 1 9 3+
Striking 4 4 3 3 1 5 1 9 3+
Scorpion
Swooping Hawk 4 4 3 3 1 5 1 9 4+
Troupe Master 5 4 3 3 1 6 3 10 –
Warlock 4 4 3 3 1 4 1 8 –
Warp Spider 4 4 3 3 1 5 1 9 3+
Wraithguard 4 4 5 6 1 4 1 10 3+
Wraithlord 4 4 10 8 3 4 2 10 3+4+ Indicates a 4+ Invulnerable Save.
VEHICLES Armour
Front Side Rear BS
Falcon 12 12 10 3
Fire Prism 12 12 10 4
Vyper 10 10 10 3
Wave Serpent 2 12 10 3
Armour
WS BS S Front Side Rear I A
War Walker 3 3 5 10 10 10 4 2
WEAPONRange S AP Type
Avenger 18" 4 5 Assault 2
shuriken catapult
Bright lance 36" 8 2 Heavy 1,
Lance
D-cannon* G24" X 2 Heavy 1, Blast
Deathspinner 12" 6 – Assault 2
Dragon’s Template 5 4 Assault 1
breath flamer
Exarch 12" 6 – Assault 4
deathspinner
Firepike 18" 8 1 Assault 1, Melta
Flamer Template 4 5 Assault 1
Fusion gun 12" 8 1 Assault 1, Melta
Fusion pistol 6" 8 1 Pistol, Melta
Hawk’s talon 24" 5 5 Assault 3
Lasblaster 24" 3 5 Assault 2
Laser lance 6" 6 4 Assault 1, Lance
Eldar missile launcher
Krak 48" 8 3 Heavy 1
Plasma 48" 4 4 Heavy 1, Blast,
Pinning
Prism cannon* 60" 9 2 Heavy 1, Blast
(focussed)
Prism cannon* 60" 5 4 Heavy 1,
(dispersed) Large Blast
Pulse laser 48" 8 2 Heavy 2
Ranger long rifle* 36" X 6 Heavy 1, Sniper, Pinning
Reaper launcher 48" 5 3 Heavy 2
Scatter laser 36" 6 6 Heavy 4
Singing spear* 12" X 6 Assault 1
Shadow weaver G48" 6 – Heavy 1, Blast
Shrieker cannon 24" 6 5 Assault 3, Pinning
Shuriken cannon 24" 6 5 Assault 3
Shuriken catapult 12" 4 5 Assault 2
Shuriken pistol 12" 4 5 Pistol
Spinneret rifle 18" 6 1 Assault 1, Pinning
Star lance 6" 8 4 Assault 1, Lance
Starcannon 36" 6 2 Heavy 2
Sunrifle 24" 3 5 Assault 6, Pinning
Tempest launcher G36" 4 3 Heavy 2, Blast
Triskele 12" 3 2 Assault 3
Vibro cannon* 36" 4 – Heavy 1, Pinning
Wraithcannon* 12" X 2 Assault 1
* These weapons have additional rules. See the Eldar Wargear section.** May fire either plasma or krak missiles.
“Ask not the Eldar a question, for they will giveyou three terrifying answers, all of which are trueand terrifying to know.”
Inquisitor Czevak
104 REFERENCE: Eldar

DARK ELDARWS BS S T W I A Ld Sv
Archon 6 6 3 3 3 7 3 9 5+
Beastmaster 4 4 3 3 1 6 1 8 6+
Dracon 5 5 3 3 2 6 2 9 5+
Grotesque 4 0 4 3 2 3 2 5 n/a
Haemonculus 4 4 3 4 2 4 2 8 5+
Hellion 4 4 3 3 1 6 1 8 5+
Hellion 4 4 3 3 1 6 2 8 5+
Succubus
Incubi Master 5 4 3 3 1 6 2 9 3+
Incubi 5 4 3 3 1 5 1 8 3+
Mandrake 4 4 3 3 1 5 1 8 5+
Reaver 4 4 4 4 1 6 1 8 4+
Reaver 4 4 4 4 1 6 2 8 4+
Succubus
Scourge 4 4 3 3 1 5 1 8 5+
Sybarite 4 4 3 3 1 5 2 8 5+
Talos 5 3 7 7 3 4 D6 n/a 3+
Warrior 4 4 3 3 1 5 1 8 5+
Warp Beast 4 0 4 3 1 5 3 3 6+
Wych 4 4 3 3 1 6 1 8 6+
Wych Archite 6 6 3 3 3 8 3 9 6+
Wych Dracite 5 5 3 3 2 7 2 9 6+
Wych 4 4 3 3 1 6 2 8 6+
Succubus
Armour
Front Side Rear BS
Raider 10 10 10 4
Ravager 11 11 10 4
WEAPONRange S AP Type
Blaster 12" 8 2 Lance, Assault 1
Dark lance 36" 8 2 Lance, Heavy 1
Destructor Template 4 D6 Assault 1
Disintegrator*
Maximum 36" 7 2 Heavy 1, Blast
Sustained 24" 4 3 Heavy 3
Shredder 12" 6 – Assault 1, Blast
Splinter cannon 24" 4 5 Assault 4
Splinter pistol 12" 3 5 Pistol
Splinter rifle 24" 3 5 Rapid Fire
Stinger** 12" n/a 6 Assault 1,
Wounds on 2+
Terrorfex*** 12" n/a n/a Assault 1, Blast
Talos sting 24" 4 5 Assault 6
*May fire either at maximum or sustained.**If target killed, place Blast marker over it. S = target’s T.; AP = target’s Armour Save.***Only roll to hit. If 1+ models hit, their unit must make a Pinning test.
-1 modifier if unit under half strength;-1 modifier per model hit if more than one model is hit.
VEHICLES
REFERENCE: Dark Eldar 105

ORKSWS BS S T W I A Ld Sv
’Ard Boy 4 2 3 4 1 2 2 7 4+
Big Mek 4 2 4 4 2 3 3 8 6+
Burna Boy 4 2 3 4 1 2 2 7 6+
Dethkopta 4 2 3 4(5) 2 2 2 7 4+
Flash Gitz 4 2 4 4 2 3 3 7 4+
Gretchin 2 3 2 2 1 2 1 5 -
Kommando 4 2 3 4 1 3 2 7 6+
Loota 4 2 3 4 1 2 2 7 6+
Meganob 4 2 4 4 3 2 3 7 2+
Mek 4 2 3 4 1 2 2 7 6+
Nob 4 2 4 4 2 3 3 7 6+
Ork Boy 4 2 3 4 1 2 2 7 6+
Painboy 4 2 4 4 2 3 3 7 6+
Runtherd 4 2 4 4 2 3 3 7 6+
Stormboy 4 2 3 4 1 2 2 7 6+
Tankbusta 4 2 3 4 1 2 2 7 6+
Warbiker* 4 2 3 4(5) 1 2 2 7 6+
Warboss 5 2 5 5 3 4 4 9 6+
Weirdboy 4 2 4 4 2 3 3 7 6+
VEHICLESArmour
Front Side Rear BS
Battlewagon 14 12 10 2
Looted wagon 11 11 10 2
Trukk 10 10 10 2
Warbuggy/WarTrak/Skorcha 10 10 10 2
Armour
WS BS S Front Side Rear I A
Deff Dread 4 2 5(10) 12 12 10 2 3
Killa Kan 2 3 5(10) 11 11 10 2 2
WEAPONRange S AP Type
Big shoota 36" 5 5 Assault 3
Boomgun 36" 8 3 Ordnance 1,
Large Blast
Burna Template 4 5 Assault 1
Deffgun 48" 7 4 Heavy D3
Grot blasta 12" 3 – Assault 1
Grotzooka 18" 6 5 Heavy 2, Blast
Kannon*
Frag 36" 4 5 Heavy 1, Blast
Shell 36" 8 3 Heavy 1
Killkannon 24" 7 3 Ordnance 1,
Large Blast
Kustom 24" 8 2 Heavy 1
Mega-Blasta Gets Hot!
Lobba G48" 5 5 Heavy 1, Blast
Rokkit launcha 24" 8 3 Assault 1
Shokk 60" 2D6 2 Ordnance, Heavy 1
Attack Gun Large Blast
Shoota 18" 4 6 Assault 2
Skorcha Template 5 4 Assault 1
Slugga 12" 4 6 Pistol
Zzap gun** 36" 2D6 2 Heavy 1
* See Codex: Orks for more details. ** See Codex: Orks for more details. Zzap guns do not roll to hit.
“I’m da hand of Gork and Mork. Dey sent me to rouseup da boyz to crush and kill ‘cos da boyz forgot whatdere ‘ere for.
I’ da profit of the Waaagh ‘an whole worlds burn in myboot prints.”
Ghazghkull Mag Uruk Thraka
106 REFERENCE: Orks

TAU EMPIREWS BS S T W I A Ld Sv
Broadside 2 3 5 4 2 2 2 8 2+
Shas’ui
Broadside 3 3 5 4 2 3 2 8 2+
Shas’vre
Crisis Shas’el 3 4 5 4 3 3 3 9 3+
Crisis Shas’o 4 5 5 4 4 3 4 10 3+
Crisis Shas’ui 2 3 5 4 2 2 2 8 3+
Crisis Shas’vre 3 3 4 3 1 3 2 8 3+
Ethereal 4 3 3 3 2 3 3 10 –
Fire Warrior 2 3 3 3 1 2 1 7 4+
Shas’la
Fire Warrior 2 3 3 3 1 2 2 8 4+
Shas’ui
Gun Drone 2 2 3 3 1 4 1 7* 4+
Kroot 4 3 4 3 1 3 1 7 –/6
Kroot Hound 4 0 4 3 1 5 2 7 –/6
Krootox Rider 4 3 6 3 3 3 3 7 –/6
Marker Drone 2 2(3) 3 3 1 4 1 n/a 4+
Shaper 4 3 4 3 3 3 3 8 6
Shield Drone 2 2 3 ** 1 4 1 n/a **/4+
Sniper Drone 2 2(3) 3 3 1 4 1 7 4+
Spotter 2 3(4) 3 3 1 2 1 8 4+
Stealth Shas’ui 2 3 4 3 1 2 2 8 3+
Stealth Shas’vre 3 3 4 3 1 3 2 8 3+
Strain Leader 3 3 3 4 1 5 1 9 5+
Vespid 3 3 3 4 1 5 1 6 5+
Stingwing
*Gun Drones’ Leadership is only applicable when operating in independent squadrons.**Shield Drones share the Toughness and save of the model they accompany. They
also have a 4+ Invulnerable Save.
VEHICLES Armour
Front Side Rear BS
Devilfish Troop Carrier 12 11 10 3
Hammerhead Gunship 13 12 10 3(4)
Piranha Light Skimmer 11 10 10 3
Sky Ray Missile 13 12 10 3
Defence Gunship
WEAPONRange S AP Type
Burst cannon 18" 5 5 Assault 3
Flamer Template 4 5 Assault 1
Fusion blaster 12" 8 1 Assault 1, Melta
Ion cannon 60" 7 3 Heavy 3
Kroot gun 48" 7 4 Rapid Fire
Kroot rifle* 24" 4 6 Rapid Fire
Markerlight* 36" n/a n/a Heavy 1
Missile pod 36" 7 4 Assault 2
Plasma rifle 24" 6 2 Rapid Fire
Pulse rifle 30" 5 5 Rapid Fire
Pulse carbine 18" 5 5 Assault 1, Pinning
Pulse pistol 12" 5 5 Pistol
Railgun (solid shot) 72" 10 1 Heavy 1
Railgun 72" 6 4 Heavy 1, 5" Blast
(submunition) Hammerhead only
Rail rifle 36" 6 3 Heavy 1, Pinning
Seeker missile* Unlimited 8 3 Heavy 1
Smart missile system* 24" 5 5 Heavy 4
Vespid neutron 12" 5 3 Assault 1
blaster
*These weapons have additional rules.See the Tau Vehicle Upgrades and Wargear sections in Codex: Tau Empire.
REFERENCE: Tau Empire 107

NECRONS
108 REFERENCE: Necrons/Victory Points
WS BS S T W I A Ld Sv
Flayed Ones 4 4 4 4 1 4 2 10 3+
Necron 4 4 4 5 1 2 1 10 3+
Destroyer
Necron 4 4 4 5 1 2 1 10 3+
Immortal
Necron Lord 4 4 5 5 3 4 3 10 3+
Necron Warrior 4 4 4 4 1 2 1 10 3+
Necron Wraiths 4 4 6 4 1 6 3 10 – 3+
Pariahs 4 4 5 5 1 3 1 10 3+
Scarab Swarm 2 0 3 3 3 2 3 10 5+
The Nightbringer 6 4 10 8 5 4 5 10 – 4+
The Deceiver 5 3 9 8 5 5 4 10 – 4+
Tomb Spyders 2 2 6 6 2 2 3 10 3+4+ Indicates a 4+ Invulnerable Save.
3+ Indicates a 3+ Invulnerable Save.
VEHICLES ArmourFront Side Rear BS
Monolith 14 14 14 4
WEAPONRange S AP Type
Gauss blaster 24" 5 4 Assault 2, Gauss
Gauss cannon 36" 6 4 Heavy 3, Gauss
Gauss flayer 24" 4 5 Rapid Fire, Gauss
Gauss flux arc 12" 5 4 Heavy D6 per unit
within 12”, Gauss
Heavy 36" 9 2 Heavy 1
Gauss cannon
Particle whip 24" 9 3 Ordnance1,
Large Blast
Staff of Light 12" 5 3 Assault 3
Sometimes a mission ends in a draw, whether it beon objectives, kill points, or other victory conditionsin missions of your own design. While most gamerswill be happy to know that on this occasion theywere equally matched, more competitive playersmay like to have a ‘tiebreaker’ to determine whichside has done marginally better. Alternatively, youmight have inflicted so much damage on the enemyarmy that you would like to be able to claim atleast a moral victory!
This may also be useful in tournaments, where theorganisers need a better spread of results among theplayers, so some finer degrees of victory may be useful.To cover these situations, players may agree to calculatevictory points (VPs). VPs are gained by inflicting damageon enemy units, as follows.
Units destroyed At the end of the game every unit that has beendestroyed is worth an amount of VPs equal to its pointscost (including the cost of all its extra wargear, vehicleupgrades, etc). Units that end the game falling back oroff the battlefield count as destroyed.
For example, a 260 point Land Raider would be worth260 VPs to the opponent if he managed to destroy it bythe end of the game.
Units at half strength At the end of the game every enemy surviving unit thathas lost half of its initial models or more is worth anamount of VPs equal to half its points cost (including thecost of all its extra wargear, vehicle upgrades, etc),rounded down. In the case of units that start the gameas a single model (independent characters, monstrouscreatures, etc), they are worth half their points cost inVPs if they have lost half or more of the Wounds on theirprofile. In the case of vehicles, they are worth half theirpoints cost in VPs if they are suffering from the effects ofany Damaged result at the end of the game.
For example, a squad of Space Marines starts the gameat 10 models strong (costing 190 points) and ends thegame with only 5 models left. Such a squad is worth 95VPs to the opponent.
Moral victory? Each player adds together all of the VPs he has scored bydamaging enemy units, then the two totals arecompared to find the difference in VPs. A difference ofless than 10% of the game’s points limit (i.e. 150 VPs ina 1,500 point battle) means you really were evenlymatched. A bigger difference would show that one sidehas seriously maimed the enemy’s force, even though itfailed to best them on objectives, and that player has atleast earned the bragging rights.
VICTORY POINTS

REFERENCE: Quick Reference Sheet 109
Unit Slowed by Dangerous Terrain
Type difficult terrain? test required?
Infantry Yes No*
Bikes No Yes
Jetbikes No Only if move starts/ends in the terrain
Monstrous creatures Yes No*
Jump Infantry No Only if move starts/ends in the terrain
Artillery Yes No for crew*. Yes for gun models.
Beasts & Cavalry Yes No*
Vehicles – Walkers Yes No*
Vehicles – Skimmers No Only if move starts/ends in the terrain
Vehicles – Other No Yes
* unless terrain is also categorised as dangerous
COVER CHARTCover Type Save• Razor wire, Wire mesh 6+
• High Grass,Crops, 5+
Bushes, Hedges, Fences
• Units (friends and enemies) 4+
Trenches, Gun pits, Tank traps,
Emplacements, Sandbags,
Barricades, Logs, Pipes, Crates,
Barrels, Hill crests, Woods,
Jungles, Wreckage, Craters,
Rubble, Rocks, Ruins, Walls,
Buildings, Wrecked vehicles
• Fortification 3+
MORALE CHECKSAA uunniitt ttaakkeess aa MMoorraallee cchheecckk::
• If it takes 25% or more casualties
in a single phase (close combat
casualties do not count) – test at
the end of the phase.
• If an enemy tank performs a Tank
Shock attack on them – test once
the tank has moved into contact.
• If it is defeated in close combat in
the Assault phase – test once
combat results are established.
The unit’s Leadership is modified
by -1 for every point their side has
lost the combat by.
ROLL TO HIT (SHOOTING)Firer’s BS 1 2 3 4 5
Score needed to hit 6 5 4 3 2
RESOLVING COMBATS1 Pick a combat.
2 Fight Close Combat. Engaged
models roll to hit and to wound in
Initiative order. Their opponents
take Saving throws as required.
3 Determine Assault Results. Total up
wounds inflicted. The side which
inflicted the most wounds overall
in the combat is the winner.
4 Loser Checks Morale. The loser has
to pass a Morale check or fall back.
If the loser passes the test, go
directly to Pile In.
5 Sweeping Advances, Fall backs and
Consolidations. Units falling back
from close combat must test to see
if they successfully break off, if
they fail they are destroyed. The
winners may then consolidate their
position.
6 Pile In. If units are still locked in
close combat, then any models not
engaged are moved 6" towards
the enemy to continue the fight
next turn.
7 Pick another combat and repeat
until all combats have been
resolved.
QUICK REFERENCE SHEET
SHOOTING SEQUENCE1 Pick one of your units, check its
line of sight and choose a target
for it.
2 Check range.
3 Roll to hit.
4 Roll to wound.
5 Take saving throws.
6 Remove casualties.
DIFFICULT TERRAIN – EFFECTS ON MOVEMENT
ASSAULT PHASE1 Move assaulting units
2 Defenders react
3 Resolve combats
RESERVES TABLETurn Unit arrives on
1 N/A
2 4+
3 3+
4 2+
5+ Automatic
TURN SEQUENCE1 The Movement Phase
2 The Shooting Phase
3 The Assault Phase

110 REFERENCE: Quick Reference Sheet
TO WOUND CHARTToughness
1 2 3 4 5 6 7 8 9 101 4+ 5+ 6+ 6+ N N N N N N2 3+ 4+ 5+ 6+ 6+ N N N N N3 2+ 3+ 4+ 5+ 6+ 6+ N N N N4 2+ 2+ 3+ 4+ 5+ 6+ 6+ N N N5 2+ 2+ 2+ 3+ 4+ 5+ 6+ 6+ N N6 2+ 2+ 2+ 2+ 3+ 4+ 5+ 6+ 6+ N7 2+ 2+ 2+ 2+ 2+ 3+ 4+ 5+ 6+ 6+8 2+ 2+ 2+ 2+ 2+ 2+ 3+ 4+ 5+ 6+9 2+ 2+ 2+ 2+ 2+ 2+ 2+ 3+ 4+ 5+10 2+ 2+ 2+ 2+ 2+ 2+ 2+ 2+ 3+ 4+
TO HIT CHART (Assault)Opponent’s Weapon Skill
1 2 3 4 5 6 7 8 9 101 4+ 4+ 5+ 5+ 5+ 5+ 5+ 5+ 5+ 5+2 3+ 4+ 4+ 4+ 5+ 5+ 5+ 5+ 5+ 5+3 3+ 3+ 4+ 4+ 4+ 4+ 5+ 5+ 5+ 5+4 3+ 3+ 3+ 4+ 4+ 4+ 4+ 4+ 5+ 5+5 3+ 3+ 3+ 3+ 4+ 4+ 4+ 4+ 4+ 4+6 3+ 3+ 3+ 3+ 3+ 4+ 4+ 4+ 4+ 4+7 3+ 3+ 3+ 3+ 3+ 3+ 4+ 4+ 4+ 4+8 3+ 3+ 3+ 3+ 3+ 3+ 3+ 4+ 4+ 4+9 3+ 3+ 3+ 3+ 3+ 3+ 3+ 3+ 4+ 4+10 3+ 3+ 3+ 3+ 3+ 3+ 3+ 3+ 3+ 4+A
ttac
ker’
s W
eap
on
Ski
ll
Str
eng
th
VEHICLE DAMAGE TABLED6 Result
1 Crew – Shaken
2 Crew – Stunned
3 Damaged – Weapon Destroyed
4 Damaged – Immobilised
5 Destroyed – Wrecked
6 Destroyed – Explodes!
VEHICLES’ MOVING & SHOOTING SUMMARY CHARTStationary Combat Speed Cruising Speed Flat Out
All (except Fast & Walkers) All Weapons 1 Weapon* No Weapons N/A
Fast All Weapons All Weapons 1 Weapon* No Weapons
Walker All Weapons All Weapons N/A N/A*plus all defensive weapons.
DEEP STRIKE MISHAP TABLE D6 Effect
1-2 Terrible accident! The entire unit is destroyed!
3-4 Misplaced. Your opponent may deploy the unit anywhere
on the table (including inside difficult terrain, which of
course counts as dangerous for Deep Striking units!), in a
valid Deep Stike formation, but without rolling for scatter.
5-6 Delayed. The unit is placed back in reserve. If the unit is
unlucky enough that the game ends while it is still in
reserve, it counts as destroyed.
WEAPON TYPE SUMMARY(not for vehicles)
Weapon Type Moving and Firing Firing and AssaultingPistol Can move and fire once May fire once in the Shooting phase and then assault the
same enemy unit in the Assault phase. Counts as an additional weapon in close combat.
Rapid Fire Unit may not assault if the weapon was fired in the Shooting phase (unless allowed to by a special rule).
Assault Can move and fire normally. May fire in the Shooting phase and then assaultthe same enemy unit in the assault phase.
Heavy Cannot move and fire. Unit may not assault if the weapon was fired in the Shootingphase (unless allowed to by a special rule).
Fire twice at up to 12”, orremain stationary and fire onceup to maximum weapon range.
Modifiers:
Glancing Hit -2
Hit by ‘AP–’ weapon -1
Hit by ‘AP1’ weapon +1
Target is open-topped +1

Access points, 66Allocating wounds, 39Area terrain, 13Armour penetration, 60Armour Piercing (AP), 27Armour piercing weapons, 20Armour Save (Sv), 7, 20Armour Value (AV), 56Artillery, 55Assault phase, 33
Assault phase summary, 33
Assault results, 41
Assaulting multiple enemy units, 34
Assaulting through cover, 36
Assaulting vehicles, 63
Assaults while falling back, 46
Attacking, 41
Declare assaults, 33
Defenders react, 34
Determine assault results, 39
Disallowed assaults, 33
Fighting a close combat, 34
Move assaulting units, 34
Multiple combats, 41
Number of attacks, 37
Rolling To Hit, 37
Rolling To Wound, 38
Shooting into and out of close combat, 40
Assault weapons, 28Attacks (A), 6
Ballistic Skill (BS), 6Ballistic Skill of 6 or better, 18
Barrage, 32Bases, 3Battlefield, prepare the, 88Beasts, 54Bikes, 53Blast, 30, 84Buildings, 77, 78
Assaults, 85Attacking, 79Buildings armour chart, 79Defining, 77Firing from, 79Occupying, 79Parapets/battlements, 80
Casualties, 24, 39Cavalry, 54Characteristics, 6, 56
Tests, 8Characters, 47Choose forces, 86Close combat weapons, 42, 50, 73Consolidation, 40Counter-attack, 74Cover, 21, 62
Cover chart, 21Cover saves, 21Vehicles & cover, 62Wrecks as cover, 62
Damage results, 61Effects on passengers, 67
Damage rolls, 61Dangerous terrain, 14Dawn of war, 93Death or glory!, 69
Declare assaults, 33Dedicated transports, 67Deep strike, 95
Deep strike mishap table, 95
Defensive weapons, 58Deploy forces, 92Dice, 2Disembarking, 67Dreadnought close combat weapons,73
Embarking, 66Ending the game, 90Eternal warrior, 74
Fall back!, 45Assaults while falling back, 46
Firing while falling back, 46
from close combat, 45
Morale while falling back, 46
Fast vehicles, 70Fearless, 75Feel no pain, 75Fire points, 66Fleet, 75Force organisation, 86Force organisation chart, 87Force weapons, 50Furious charge, 75
Game turn, 9Gets hot!, 31Going to ground, 24Grenades, 36, 63
Heavy weapons, 29Hit and run, 75
Impassable buildings, 77, 78Impassable terrain, 14Independent characters, 47, 67
Assaults, 49
Joining and leaving units, 48
Moving independent characters, 47
Shooting, 49
Infiltrate, 75Initiative (I), 6Instant death, 26Intervening models, 21Invulnerable saves, 20
Jet packs, 52Jetbikes, 53Jump infantry, 52
Lance, 32Leadership (LD), 7
Leadership tests, 8
Lightning claws, 42Line of sight, 16
Maximum range, 27Measuring distances, 3, 56Melta, 32Mission, select a, 90Mission special rules, 94
Models, 3Monstrous creatures, 51Morale, 43, 63
Insane heroism!, 43
modifiers, 43
Morale checks, 39, 43
Morale while falling back, 46
Vehicles and morale, 63
Move through cover, 75Movement phase, 11
Different movement distances in a unit, 11
Models in the way, 11
Movement distance, 11
Moving and close combat, 11
Moving through difficult terrain, 14
Vehicle movement, 57
Multiple-wound models, 26
Night fighting, 95Night vision/acute senses, 75No retreat!, 44
Obscured targets, 62Open-topped vehicles, 70
Open-topped transport vehicles, 70
Optional weapons, 58Ordnance barrage weapons, 58Ordnance weapons, 29, 58Organising a battle, 86
Perils of the Warp, 50Pile-in!, 40Pinning, 31Pistol weapons, 29Pitched battle, 92Player turn, 9Points limit, 86Points values, 8Poisoned weapons, 42Power fists, 42Power weapons, 42Preferred enemy, 75Profiles, 7Psychic shooting attacks, 50Psykers, 50
Rage, 76Ramming, 69Rapid fire weapons, 28Re-rolls, 2Regrouping, 46Relentless, 76Rending, 31Rending weapons, 42Reserves, 94
Reserves table, 94
Retinues, 48Roads, 57Roll-offs, 2Ruins, 77, 82
Coping with different heights, 82
Moving within, 83
Template and blast weapons, 84
Run!, 16
INDEX
REFERENCE: Index 111

Saving throws, 20More than one save, 24
Taking saves, 39
Scoring units, 90Scouts, 76Seize the initiative!, 92Shooting phase, 15
Check range, 17
Disallowed shooting, 15
Firing while falling back, 46
Roll To Hit, 17
Roll To Wound, 19
Shooting at vehicles, 60
Shooting into & out of close combat, 40
Shooting sequence, 15
Skilled rider, 76
Vehicles shooting, 58
Skimmers, 71Slow and purposeful, 76Smoke launchers, 62Sniper, 31Spearhead, 93Special characters, 49Squadrons, 64Standard missions chart, 90Stealth, 76Strength, 27Strength (S), 6Stubborn, 76Swarms, 76Sweeping advances, 40
Tank hunters, 76Tanks, 68
Tank shock!, 68
Template, 29, 84Terrain, 13
Area terrain, 13
Moving through difficult terrain, 14
Types of, 13
Terrain effects, 57
Thunder hammers, 42To Hit chart, 37To Wound chart, 19, 38Toughness (T), 6
Multiple Toughness values, 19, 38
Transport vehicles, 66Transport capacity, 66
Dedicated transports, 67
Effects of damage, 67
Trapped, 45Turbo-boosters, 76Twin-linked, 31Turn, the, 9
Game turn, 9
Player turn, 9
Unique characters, 49Unit coherency, 12, 82Unit types, 4, 51Units, 3
Vehicles, 56Assaulting vehicles, 63
Measuring distances to vehicles, 56
Shooting at vehicles, 60
Types, 65
Units of vehicles – squadrons, 64
Vehicles and cover – obscured targets, 62
Vehicles and morale, 63
Vehicle characteristics, 56
Vehicle Damage table, 61
Vehicle facing and armour values, 60
Vehicles moving & shooting summary
chart, 73
Vehicles shooting, 58
Weapons & line of sight, 58
Vulnerable to blasts/templates, 76
Walkers, 72Ramming a walker, 73
Squadrons of walkers, 73
Weapon Skill (WS), 6Weapons, 27
Type, 27
Wipeout!, 90Witchblades, 42Wounds (W), 6
Multiple-wound models, 26
Zero-level Characteristics, 7
The Warhammer 40,000 game first came into existence over 20 years ago in the
Games Workshop Studio in rain-sodden Nottingham, England. The toiling Tech-Priest
who wrote its first Standard Template Construction blueprint was Rick Priestley. The
dark and gothic artistic vision came from John Blanche. Countless contributions and
admonishments were brought to bear by Alan Merrett. Throughout the writing of this
edition of the game we often had to fire up the arcane support machineries that
(mostly) keep this revered trinity stabilised. Their advice has been invaluable.
Written by: Alessio Cavatore (main rules), Mat Ward, Andy Hoare, Graham Davey,
Phil Kelly, Gav Thorpe, Adam Troke, Robin Cruddace, Jervis Johnson, Jeremy Vetock.
Cover Art: Alex Boyd, Dave Gallagher, Nuala Kinrade. Illustration: John Blanche,
Alex Boyd, Paul Dainton, Dave Gallagher, Nuala Kinrade, Robin Carey, Karl Kopinski,
Adrian Smith, Roberto Cirillo, Ian Miller. Miniature Design: Alexander Hedstrom,
Aly Morrison, Brian Nelson, Colin Grayson, David Thomas, Juan Diaz, Mark Harrison,
Martin Footitt, Michael Anderson, Seb Perbet, Tim Adcock, Neil Langdown,
Chris Catton, Dale Stringer, Jonny Ware, Tom Walton, Jes Goodwin, Trish Morrison.
’Eavy Metal: Neil Green, Keith Robertson, Kirsten Williams, Darren Latham, Fil Dunn,
Anja Wettergren, Joe Tomaszewski. Hobby Team: Dave Andrews, Mark Jones,
Chad Mierzwa. Graphic Elements: Neil Hodgson, Paul Rudge. Graphic Design,
Layout and Production: Pete Borlace, Markus Trenker, Sean Turtle, Tim Vincent,
John Michelbach, Carl Dafforn, Marc Elliot, Kris Jaggers, Rachel Ryan, Chris Eggar,
Simon Burton, Marc Elliott, Chris Ward, Sean Cutler, James Shardlow, Kris Shields,
Madeleine Tighe. Photography: Stuart White, Ian Strickland, Glenn More, Kenton
Mills. Additional Hobby Content: Matt Hutson, Dave Taylor, Paul Scott, John Shaffer,
Andrew Taylor, Matt Toone, Dave Cross. Sub-Editing: Andrew Kenrick, Mark Latham,
Talima Fox. Thanks to: Everyone who provided feedback and playtested the rules.
Several Astropaths, Servo-scribes and Tech-adepts were lost to the Dark Powers during
the making of this product (they will be remembered).
ROLL OF HONOUR
Copyright © Games Workshop Ltd 2008. Assault on Black Reach, Games Workshop, the Games Workshop logo, GW, Citadel and the Citadel device, ‘Eavy
Metal, Eldar symbol devices, Eye of Terror, Warhammer, Warhammer 40,000, the Warhammer 40,000 device, the Double-Headed/Imperial Eagle device,
40K, Battle for Macragge, the Chaos factions and associated logos, Space Marine, Space Marine Chapters and Space Marine Chapter insignia, Eldar,
Tyranid, Genestealer, Golden Demon, the Tau caste designations, Tau, Fire Warrior, Kroot, Necron, Ork, Ork devices, Chaos and all associated marks, the ‘In
the Grim Darkness of the Far Future’ tagline, names, races and race insignia, characters, vehicles, locations, units, illustrations and images from the
Warhammer 40,000 universe are either ®, TM and/or © Games Workshop Ltd 2000-2008, variably registered in the UK and other countries around the
world. All Rights Reserved. ‘Scatter’ dice are UK registered design no. 2017484.
British Cataloguing-in-Publication Data. A catalogue record for this book is available from the British Library.
112 REFERENCE: Index
UKGames WorkshopWillow Rd, Lenton
Nottingham
NG7 2WS
USGames Workshop
6721 Baymeadow Drive
Glen Burnie
Maryland, 21060-6401
AustraliaGames Workshop23 Liverpool Street
Ingleburn
NSW 2565
CanadaGames Workshop2679 Bristol Circle,
Units 2&3,Oakville
Ontario, L6H 6Z8
JapanGames WorkshopWillow Rd, Lenton
Nottingham
NG7 2WS, UK

MINIATURES INCLUDEDSpace Marines:
• Space Marine Captain• 10 Tactical Space Marines• 5 Space Marine Terminators• Space Marine Dreadnought
Orks:
• Ork Warboss• 20 Ork Boyz• 5 Ork Nobz• 3 Ork Deffkoptas
Miniatures supplied unpainted. Some assembly required. Contents may vary.Space Marine TerminatorSpace Marine Captain Ork Warboss
In the grim darkness of the far futureMankind teeters on the brink of extinction.
There is no time for peace. No respite. No forgiveness. There is only war.In the tabletop wargame of Warhammer 40,000, you and your friends
fight battles over futuristic landscapes, using a mixture of strategy and luckto defeat your opponent. This boxed set allows you to defend the
galaxy-spanning Imperium of Man with humanity’s ultimate warriors, theSpace Marines, or crush all before you with the savage and barbaric Orks,
the most warlike aliens in the 41st Millennium.
This box contains 46 highly detailed plastic Citadel miniatures allowing you toassemble two complete starting armies – Space Marines and Orks.
Assault on Black Reach:A guide to setting up your first battle of Warhammer 40,000, as well as howto paint your miniatures and expand your armies. This booklet also includes a
history of the war-torn universe of the 41st Millennium.
Warhammer 40,000 Rulebook:How to command your army on the tabletop, unleash devastating
firepower at the foe, and destroy your enemies in brutal close combat. Therules also cover models such as mighty heroes, powerful psykers, monstrous
creatures, and devastating tanks.
Dice and gaming aids:Six-sided dice, scatter dice, two range rulers and three plastic templates for
making special attacks – everything you’ll need to begin gaming.
Find out more about Warhammer 40,000 on our website:
www.games-workshop.com
TM