THE ZIBBY GARNETT TRAVELLING FELLOWSHIP Report by Nikki …
24
THE ZIBBY GARNETT TRAVELLING FELLOWSHIP Report by Nikki Chard Textile Conservation At Te Papa Tongarewa, Museum of New Zealand, Wellington, New Zealand 15 June – 22 July, 2011
Transcript of THE ZIBBY GARNETT TRAVELLING FELLOWSHIP Report by Nikki …

THE ZIBBY GARNETT TRAVELLING FELLOWSHIP
Report by Nikki Chard
Textile Conservation At Te Papa Tongarewa, Museum of New Zealand, Wellington,
New Zealand
15 June – 22 July, 2011

2
Contents Page
Introduction 3
Te Papa Tongarewa, Museum of New Zealand 5
Conservation at Te Papa 7
New Zealand in Vogue 8
Oceania 9
Titi treatment 13
Outside of work 19
Conclusion 22
Bibliography 24

3
Introduction
My name is Nikki Chard, and I am a twenty-seven year old British student
studying for an MPhil in Textile Conservation at the University of Glasgow. I
undertook my internship during the summer break between the first and
second year of study. It is my aspiration to gain employment in textile
conservation following my graduation next summer, but most importantly I
would like to have developed a wide range of skills and problem-solving
abilities to become a successful and confident textile conservator.
I intend to achieve these aims through completion of my studies in textile
conservation and I am fortunate to have been given the opportunity to study
on the new programme for textile conservation at the University of Glasgow,
having formerly been located in Winchester. The course consists of two
years of study, where conservation theory, chemistry and textile
conservation techniques are taught to provide a good grounding in the
practical skills and analytical problem-solving abilities required to work as a
textile conservator. Textiles have been provided from Glasgow Museum’s
collections enabling the students to experience working on genuine museum
objects, alongside the vast range of textiles in the Textile Conservation
Centre’s Reference Collection.
Figure 1: Wet cleaning a textile as a student at the University of Glasgow

4
It can take many years of practice to gain the judgment and decision-making
abilities to become a competent textile conservator and although I am able
to practice both my hand skills and test my problem-solving capabilities on
my course, I feel it would be beneficial for my career to gain as much
experience within a professional conservation environment before I seek
employment. My aim over my summer break was to consolidate the skills I
have learned through an internship, and I was particularly interested in
widening my knowledge of textile conservation by working at an institution
where the textiles are both compositionally and culturally different to those
that I am used to working on in the UK. I am hoping that any new techniques
and knowledge that I learn from this internship will help me in my future
career and will be viewed favourably by employers.
I chose to do my internship at Te Papa Tongarewa, Museum of New Zealand
in Wellington following a recent visit to the country and museum, where I
developed a real appreciation for Māori culture and artefacts, and it had
been my desire since that visit to try to find the opportunity to experience
working in the New Zealand heritage industry. I arranged my internship
directly with Te Papa, for a period of just under five weeks, to work in the
textile conservation studios during a busy period of preparation for a
forthcoming exhibition.
The total cost of my internship at Te Papa was £1771, and the Zibby Garnett
Travelling Fellowship awarded me £1600. Working throughout my 2010
Christmas break raised the additional funds. Nell Hoare, of the Textile
Conservation Centre Foundation, encouraged me to apply to the Zibby
Garnett Travelling Fellowship.
5
Te Papa Tongarewa, Museum of New Zealand
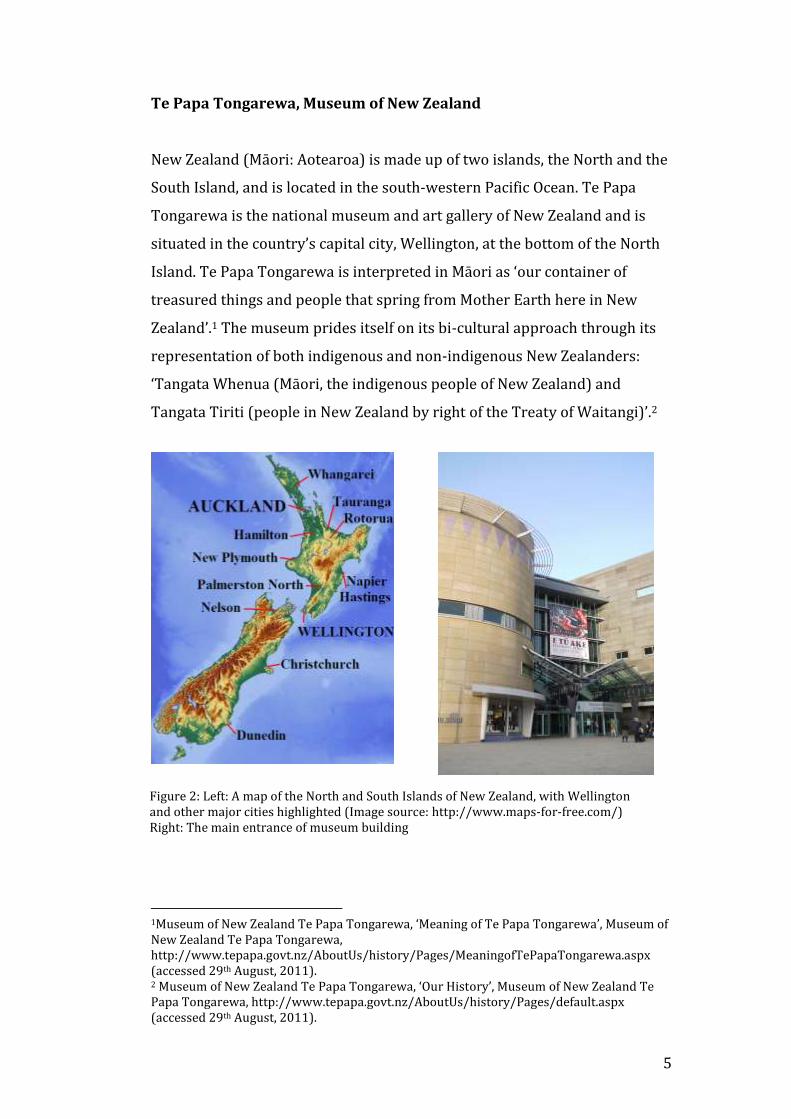
New Zealand (Māori: Aotearoa) is made up of two islands, the North and the
South Island, and is located in the south-western Pacific Ocean. Te Papa
Tongarewa is the national museum and art gallery of New Zealand and is
situated in the country’s capital city, Wellington, at the bottom of the North
Island. Te Papa Tongarewa is interpreted in Māori as ‘our container of
treasured things and people that spring from Mother Earth here in New
Zealand’.1 The museum prides itself on its bi-cultural approach through its
representation of both indigenous and non-indigenous New Zealanders:
‘Tangata Whenua (Māori, the indigenous people of New Zealand) and
Tangata Tiriti (people in New Zealand by right of the Treaty of Waitangi)’.2
1Museum of New Zealand Te Papa Tongarewa, ‘Meaning of Te Papa Tongarewa’, Museum of New Zealand Te Papa Tongarewa, http://www.tepapa.govt.nz/AboutUs/history/Pages/MeaningofTePapaTongarewa.aspx (accessed 29th August, 2011). 2 Museum of New Zealand Te Papa Tongarewa, ‘Our History’, Museum of New Zealand Te Papa Tongarewa, http://www.tepapa.govt.nz/AboutUs/history/Pages/default.aspx (accessed 29th August, 2011).
Figure 2: Left: A map of the North and South Islands of New Zealand, with Wellington and other major cities highlighted (Image source: http://www.maps-for-free.com/) Right: The main entrance of museum building

6
Figure 3: Location of Te Papa on the waterfront
When I visited Te Papa I was extremely impressed by the museum and its
bi-culturally sensitive approach, plus the way the collections communicated
to a variety of audiences. The exhibits span five floors and are not only
educational, but are also fun, interactive and engaging for all ages, covering
Art, History, Pacific, Māori, and Natural Environment.
These five themes also describe Te Papa’s five main collection areas. Many
of the textiles I saw were objects from the Pacific collections, notably those
collected by Captain Cook during his Pacific Voyages of the eighteenth-
century. The Māori taonga (treasures) are particularly significant, and Te
Papa provides the expertise and resources to care for and allow access to
these collections, whilst consulting and working closely with iwi (tribes) to
whom the taonga belongs, to ultimately acknowledge the spiritual and
cultural connections of taonga with their owners, makers and ancestors.3
3Museum of New Zealand Te Papa Tongarewa, ‘Māori Collection’ Museum of New Zealand, Te Papa Tongarewa, http://tepapa.govt.nz/ResearchAtTePapa/CollectionCareAndAccess/HistoryOfCollections/Pages/Maoricollection.aspx (accessed 29th August 2011).

7
Conservation at Te Papa
Conservation work on Te Papa’s collections was carried out in well-
equipped studios situated around a fifteen minutes walk away from the
main museum building, where the following conservation disciplines are
represented within Collection Services: textiles, objects, paintings, frames,
and paper. There is also a preventive conservator, plus a team of object
support specialists who create bespoke frames and mounts for artefacts,
and devising solutions for storage and transit. I was fortunate to meet nearly
all of these people, and found them all to be welcoming, friendly and helpful.
I worked closely with the three textile conservators in the department:
Rachael Collinge, Rangi Te Kanawa and Anne Peranteau, who was my
placement supervisor. I am extremely thankful to all three who helped to
make my internship a really valuable and useful experience, especially
during a busy period of conservation for a forthcoming exhibition.
Figure 4: The textile conservation studios at Te Papa

8
New Zealand in Vogue
One of the first tasks I was given was to ‘pad out’ mannequins to mount
dresses on that were featuring in the new Te Papa exhibition, New Zealand
in Vogue. The exhibition showcases designs and creations for garments and
accessories by New Zealand designers during the period of 1957-1968,
when New Zealand had its own Vogue magazine. I was slightly apprehensive
about this task as I had minimal costume-mounting experience, but it
proved to be a useful introduction to this common textile conservation
procedure as the dresses were comparatively modern, resulting in them
being in a good condition, plus the silhouettes of this period were less
challenging to replicate on the mannequin than an older garment could be.
Anne had already mounted all the other dresses in the exhibition prior to
my arrival at Te Papa, so her experience was useful in ensuring that we
could perform the tasks efficiently but effectively. The primary aim of
costume mounting is to provide support for the costume so that it is not
placed under any undue stress whilst on the form, as well as to ensure that
the garment is displayed to its full potential. Fortunately, the dresses
already fitted well on the standard-sized forms so using polyester wadding, I
simply padded out the hips and stomach area to create a more realistic
silhouette for the dress. I covered the wadding to hold it in place with a
nylon slipcover that was cut appropriately around the arms and neck to
reveal the areas of the mannequin that represented the flesh. It can be
difficult to manouvere the dresses onto the form without damaging it –
especially difficult with fragile costume – and Anne demonstrated a useful
approach to this problem that involved slowly easing the dress on without
pulling at it. A petticoat made by a volunteer was added to support the skirt
and enhance the look of the dress. Although brief, this task helped me to
appreciate the deadlines involved in preparing for an exhibition as well as
enhancing my understanding of costume mounting, a very useful skill to
acquire as a textile conservator.

9
Oceania
Te Papa was preparing for a temporary exhibition entitled Oceania: Early
Encounters, collaborating with Wellington’s City Art Gallery to explore the
encounters between Pacific, Māori and Europeans during the eighteenth and
nineteenth centuries. The exhibition was appropriately timed to coincide
with the Rugby World Cup that is to be staged in New Zealand throughout
September and October 2011, and to resonate with tourists who were to
‘encounter’ New Zealand and its history and culture.
The artefacts featuring in this exhibition afforded me a unique opportunity
to interact with Māori textiles, to learn about their significance, materials
and construction, and to help conserve them. Many of the textiles were
already in a good condition and did not require much conservation, but all
required surface cleaning to ensure they were free of loose particulate
soiling before going on display. Particulate soiling can be damaging to
textiles in a number of ways: particles can cause mechanical damage to
textile fibres, the textile can lose its ‘handle’ and become inflexible, plus
particles can become a food source for insects. The visually disfiguring
effects of the soiling can also be an issue.
As the weeks progressed, I had the opportunity to surface clean a large
selection of Māori and Pacific textiles, including whariki (woven mats),
many pieces of tapa (bark cloth), tivaevae (ceremonial quilts), a kete kiwi
(basket with kiwi feathers), and various Māori cloaks. Most of the textiles
were surface cleaned with a low-suction museum vacuum cleaner or dental
aspirator and a soft brush, whereas more robust or larger textiles could be
cleaned with a more powerful vacuum cleaner.

10
Figure 5: A tivaevae, a ceremonial quilt from the Cook Islands, during surface cleaning
Surface cleaning these textiles meant that I could get a closer look at their
construction, which was particularly useful in helping to understand Māori
weaving techniques. I am especially thankful to Rangi Te Kanawa, who was
extremely helpful in informing me about the construction and significance of
these various Māori textiles, and who allowed me to observe her at work
conserving these artefacts. Rangi also provided me with useful information
about the traditional black dye used on various Māori textiles, a combination
of tannins from bark and paru (mud rich in iron), which can be problematic
for conservators as the acidity of the dye can cause fibres such as muka (flax
fibre), to quickly degrade. Methods to consolidate and stabilise these dyed
fibres are being investigated, which Rangi is also involved in.
A contemporary nylon Māori flag to be displayed in Oceania featured some
disfiguring stains, so together with Rangi, I used a vacuum suction table to
clean these areas of the flag. It would have been more time-consuming to
wet clean the entire flag, so it was considered more efficient to locally treat
the stains. We used a detergent solution of Lissapol applied with a brush,
and flushed through with de-ionised water, to reduce the intensity of the

11
stain. It was challenging to both remove the stain but avoid spreading the
stain outwards which could cause rings to appear when dry, but the suction
table helped to draw the detergent solution through the textile, so it was
much easier to control the process. The flag was much cleaner as a result of
the treatment, and it was interesting for me to experience the benefits of
using the suction table.
Figure 6: Localised cleaning of a Māori flag on the vacuum suction table
Te Papa contains many examples of tapa in its collections, and I surface
cleaned a number of these. Tapa is made in many of the Pacific Islands and is
constructed from the inner bark of trees such as the paper mulberry tree,
which is beaten until the bark fibres become flat and thinner, and form a
large sheet. The tapa is often painted, and the designs on the cloth are
unique to each island group. Having previously trained as a paper
conservator, it was of particular interest to me to understand how tapa was
conserved and exhibited, and I was fortunate to observe the paper and
textile conservators in undertaking this task. Both Japanese paper, a strong,
lightweight and long-fibred paper from the paper mulberry tree, and
Cerex®, a spun bonded nylon which can be custom dyed and laminated, can

12
be used as patch supports for damaged areas of tapa, and adhered to the
cloth.
Hanging the tapa is also a challenge; unlike other textiles, Velcro cannot be
sewn to it as the resulting stitch holes can weaken the cloth, so covered
magnets are a common alternative. There were many examples of tapa to be
hung in Oceania, so I was required to cover magnets with Japanese paper,
toned with acrylic paints and adhered to the magnet, to provide a strong,
secure and visually inconspicuous solution. This was an interesting exercise
in identifying how many magnets are required to adequately support tapa,
as well as testing my colour-matching abilities to create an effectively toned
piece of Japanese paper.
Figure 7: The toned Japanese paper discs before adhesion to the magnet. A completed magnet is to the left.

13
Titi treatment
I spent the majority of my weeks at Te Papa undertaking a challenging
stitched stabilisation of a Samoan dance skirt, known as a titi. The titi was
created for Edward, Prince of Wales, later King Edward VIII and Duke of
Windsor, to commemorate his visit to Samoa in 1920.4 The titi consists of a
skirt of hibiscus bark fibre, secured to a waistband featuring an appliquéd
union jack design.
Figure 8: The titi before treatment. © Museum of New Zealand Te Papa Tongarewa, Wellington.
The titi was intended for display on a three dimensional form in the Oceania
exhibition, and required conservation to ensure it was safe to be exhibited in
this manner. The hibiscus bark fibre of the skirt was particularly brittle, and
the fibres detached from the skirt easily. As the titi could be better
appreciated as an item of clothing on a form, it was decided that the
potential loss of more fibres was worth the risk to display it vertically,
rather than flat, plus the exhibition was planned for a relatively short period
4 Museum of New Zealand Te Papa Tongarewa, ‘Collections Online’ Museum of New Zealand, Te Papa Tongarewa, http://collections.tepapa.govt.nz/objectdetails.aspx?oid=151267&term=titi (accessed 4th November 2011).

14
of time, at three months. It was understood that the waistband was created
from finely woven woollen cloth, but was now in a poor condition due to the
many holes caused by insect damage, and not only were the holes
compromising the stability of the skirt, they were also visually disfiguring.
The dyes used on the fabric of the waistband were differentially faded,
which became apparent when investigating the concealed areas within its
many creases.
My first task was to choose a support fabric to create custom dyed support
patches for the areas of loss. To complement the weave structure and
material of the waistband, nun’s veiling was selected as an appropriate
support fabric, with Dukeries nylon net for the protective overlay. The
waistband had faded differentially from a vivid blue to varying shades of
blue and green, so it was challenging to create an appropriate shade of dye
for the support fabric. Dyeing support fabrics can be a lengthy process for a
textile conservator, as the exactitude of the colour is important, and the
process itself is time-consuming. My experience of dyeing was reasonably
limited, however I had become accustomed to researching a recipe and
recreating it, but the dearth of existing green/blue recipes meant that it
would be my responsibility to devise a new recipe from scratch, and hope it
proved successful.
I formulated a recipe and dyed eight samples of the nun’s veiling, and eight
samples of the nylon net, using the same combination of colours of
Lanaset® dyes, a range of synthetic dyes with reliable fastness. It was
pleasing to discover that my nylon net samples were suitable, but only one
of the eight Nun’s Veiling samples was useful for the more bluish areas of
fading on the waistband. It can be disheartening to invest so much time in
the dyeing process, only to discover the colours are inaccurate, so I was very
glad that the second attempt was much more successful. My second attempt
involved modifying the shades to include more green tones, which matched
the damaged areas much more effectively. It is common to firstly dye small
samples of fabric, and then choose the appropriate sample shade to recreate

15
on a larger piece of fabric. However in this instance, I decided to make my
samples much larger, primarily to save time in the event of success, and also
to provide me with a range of varied samples to choose from to match the
varying shades of fading on the waistband.
Figure 9: The dyed samples of nun’s veiling and nylon net, which after one dyeing attempt are almost accurate enough to be used
I found it useful to ‘map’ the areas of damage to the waistband by tracing the
shapes onto a sheet of transparent Melinex®, which then helped me to
consider the size and location of each support patch. The patches were to be
inserted under the fabric of the waistband, then sewn in place using threads
drawn from woven polyester Stabiltex®. The Stabiltex® was a good colour
match, and strong enough to use to fix the patches in place. A commonly
used conservation stitching technique known as ‘couching’ was employed,
to ensure that the patch was adequately secured in place and the damaged
hole stabilised.
The holes ranged in size from the size of a two-pence piece to pin holes, and
it required precise planning to decide where to insert the patch, how to do
so without causing any further damage, and where to sew the patch in place.
The fabric was very damaged, so it was important to consider where the

16
stronger areas were in which to sew into, and prevent further harm to the
weakened areas. It was important to consider that whereas I was sewing the
patches in place when the titi was laid out flat, it was ultimately going to be
mounted on a three-dimensional form, so the resulting tension would
require the patches to be sufficiently secured to prevent them from either
moving around, or dislodging, thus jeopardising the stability of the titi.
It was frustrating to discover that the nun’s veiling frayed very easily when
cut, and I had difficulty attempting to insert the patch into the holes without
the patches fraying further. It was suggested that either a solution of
Paraloid B72 and acetone, or a coating of matt acrylic onto the patches
would help to stiffen them and prevent them from fraying. I experimented
with coating the entire patch in both solutions, however this resulted in the
patches becoming too stiff, which could be hard to insert and potentially
damage the waistband. I also found that the matt acrylic had an undesirable
sheen, but coating just the edges of the patches with the Paraloid B72
solution was much more effective, as it allowed me to cut the patches with
less fraying, but they still retained their flexibility. This was a really useful
exercise for me and vastly improved both the efficiency and the success of
the treatment.
Once I had secured the patches in place, I then sewed a layer of the dyed
nylon net over the top of the blue areas of the waistband, to function as a
protective overlay. Nylon net is beneficial as it is flexible and hard to
perceive when on the textile, and as the waistband was not completely flat,
it was easy to manipulate it to conform to undulating surface of the fabric.
The next task was to infill the areas of loss from the appliquéd flag design,
and provide support to these areas. Once again, I had to dye the support
patches, again creating a recipe from scratch, and was thankful that this only
took two attempts to achieve the correct colour. By dyeing the nylon net a
more golden tone, and the patches a red-brown tone, I was able to overlay
the net to blend and alter the colours to reflect the tones of the damaged

17
original fabric. These patches were inserted and then sewn with dyed red
hair silk, with then net secured over the top. The Union Jacks were even
more damaged than the blue areas of the waistband, and it was a demanding
task inserting and securing the patches in place, as I had to thoroughly
consider the options for insertion and stitching locations to ensure the
stitches would be secure, and not cause any damage to the original fabric.
Figure 10: The completed stitched supports for the Union Jacks
The final task was to machine-stitch the ‘loop’ side of the Velcro to cotton
tape, and then using a herringbone stitch, secure the tape to the back of the
waistband of the titi. The ‘hook’ side of the Velcro was attached to the
mount, which was designed to support the titi once on display, and visually
suggest a human waist wearing the titi. Although I did not have the
opportunity to actually install the titi for the exhibition, I had to consider
how easy it was for someone else to attach the titi to the mount, and then
take it off again, with minimal handling. I solved this problem by sewing the
Velcro in four sections, so that one could use to areas where there was no
Velcro to help manoeuvre it onto the form, and then detach it from the
hooks more comfortably.

18
The titi took around two and a half weeks to treat, and I was very pleased
with the final result of the treatment. This was by far the most challenging
conservation treatment I have undertaken during my training, and it was
extremely useful for me to have the opportunity to work on such an exciting
and demanding object. I certainly feel that my decision making and problem
solving abilities have improved as a result of this treatment, as I was
constantly evaluating my practice. It was heartening to devise my own
solutions to the problems I encountered, and my confidence in my abilities
increased as a consequence.
Figure 11: The titi after treatment. © Museum of New Zealand Te Papa Tongarewa, Wellington. Photograph by Kate Whitley, 2011.
Figure 12: The titi on display in Oceania. © Museum of New Zealand Te Papa Tongarewa, Wellington. Photograph by Kate Whitley, 2011.

19
Outside of Work
Having previously travelled around New Zealand in 2009, I was already
familiar with the country and culture, and had enjoyed many of its heritage
attractions and outdoor pursuits. My previous trip to Wellington had been
marred by rain, and I had not had the opportunity to visit many of the sites
in and around Wellington – except for Te Papa, so this was a fantastic chance
to experience the city. There is a saying in Wellington that you cannot beat it
on a sunny day, however its reputation as ‘Windy Wellington’ is not without
foundation, and a wet and windy day can be a frequent occurrence! That
said, although it was winter when I visited, I enjoyed many beautiful sunny
days.
Figure 13: Wellington Harbour on a sunny day
I lived with a lady who provided ‘homestay’ accommodation for females, and
who made me feel very welcome. She had a lovely single-storey villa in the
suburb of Melrose, and generally had international students to stay, with
most trying to improve their spoken English. During my stay I shared her
house with a French girl, a German girl, and a Belgian, who were all a similar

20
age to me and were very friendly. They all informed me that they enjoyed
my English accent as it helped to improve their grasp of the language, and it
was a good exercise for me to reflect on my knowledge of English grammar
to help answer their questions!
I ensured that I filled my weekends with
exploring Wellington and the surrounding
areas, and I really enjoyed learning more about
the history and culture of Wellington through
visits to the Wellington Museum of City & Sea,
the Petone Settlers Museum, the City Art
Gallery, as well as further visits to Te Papa. I
am a keen photographer in my spare time, so
visits to the City’s Botanic Gardens, its bays,
and a local wildlife sanctuary gave me an
opportunity to appreciate Wellington’s natural
side. Wellington is also known for its café
culture, and it was one of my pleasures to enjoy
coffee and homemade orange and date scones, particularly in one idyllic
location near where I lived that overlooked a bay.
Figure 15: Lyall Bay, near where I stayed
Figure 14: A delicious hot chocolate courtesy of Maranui café staff in Lyle Bay

21
I was fortunate to have the opportunity to participate in a series of Māori
pronunciation lessons, organised for Te Papa employees to understand the
Māori language. This was really useful, and gave the objects that I was
working with greater meaning through being able to appreciate and
understand the stories that the words originate from.
Figure 16: A New Zealand tree fern
Overall, I found Wellington an attractive and exciting place to stay, and it
had a strong arts and media scene. As a capital city it is comparatively small,
but has integrity and charm, and all the Wellingtonians that I encountered
were friendly.

22
Conclusion
I thoroughly enjoyed my internship at Te Papa, and felt like I learned so
much to improve my existing skills and knowledge. Having the opportunity
to conserve the titi was particularly valuable as my abilities were constantly
challenged, but I felt so much more confident about working on my own
initiative as I progressed through the treatment. My objective to gain an
appreciation of Māori textiles and the various treatment options was
fulfilled, and I feel that I have broadened my knowledge of their cultural
significance and construction alongside this. My only disappointment was
that I was not able to participate in the later installation of Oceania, as this
would have been an opportunity to expand my experience of working within
a museum setting and the types of activities this entails. Five weeks felt like
they went very fast and I regretted that my time constraints permitted me
from arranging a longer internship and experiencing more.
I was extremely impressed by all of the textile conservators that I worked
with, and was grateful to them for the trouble they took to include me in
discussions, for allowing me to observe their conservation work, and for
treating me like a colleague and a friend. It was a very busy time for the
conservators, so I was particularly thankful to Anne, who not only
impressed me with her knowledge and abilities, but also for her patience
and helping to make my internship so enjoyable.
Lastly, I am indebted to the Zibby Garnett Travelling Fellowship for making
this internship financially possible. I am proud to have been chosen to
receive a travel grant and to be associated with the Fellowship.

23
Figure 17: From left: Rachael Collinge, myself, Anne Peranteau in the textile conservation studio

24
Bibliography
Museum of New Zealand Te Papa Tongarewa,
http://tepapa.govt.nz/Pages/default.aspx (accessed 29th August, 2011).
Images
All images in this report, unless credited, are the author’s own.