The Workplace Trainer’s Tool kit - Training Tools · PDF fileThe Workplace...
24
The Workplace Trainer’s Tool kit 8 models for effective on the job training by Duane Davis
Transcript of The Workplace Trainer’s Tool kit - Training Tools · PDF fileThe Workplace...

TheWorkplaceTrainer’s Tool kit8 models for effective on the job training
by Duane Davis

IntroductionDo you know one of those really efficient people who can cram more into one day than you seem manage in a week. Not only that, they seem to do it so effortlessly and with a smile that fills you with a mixture of envy, respect and contempt.
What is it that is so different about them and us?
It’s their behaviours. They know that by doing things a certain way, tasks are completed quicker and often with better results.
Training is no different of course. Over time, most often through trial and error, trainers learn that some behaviours and actions are very effective, whilst others only waste time and effort. These effective techniques reduce training times, produce better results and increase the satisfaction of the student in the training process.
Welcome to the workplace trainers tool kit. This e-book describes exactly these behaviours that we are talking about. Simple, but powerful techniques that you can start today to see an immediate improvement in the effectiveness of your on the job training.
This e-book is just a brief guide to the templates and is taken from the book “Controlling Training”. For further information, visit www.controllingtraining.com.
Don’t forget to check out my blog at http://trainingtools.wordpress.com for more advice on effective workplace training.
Regards,
Duane Davis
2

Contents
What is a trainer
What’s in my toolkit
Section One
The pre-training brief
Educating the student
Intervention
The post-training debrief
Section Two
Reporting
Performing as a member of a training team
Actions following an unsuccessful student assessment
What Next - “Controlling Training”, the definitive guide
4
6
7
8
10
12
14
16
17
19
21
23
3

What is a trainerA trainer is often associated with a teacher or instructor, but their role is far more complex and is the culmination of a much larger collection of jobs. For example, the trainer needs to be an assessor to
identify what needs to be taught and a teacher to pass on that information. What about coach, supervisor, motivator and counsellor?
A trainer is all of these things serving to achieve one purpose. That is to help the student achieve the required level of expertise in the most effective and efficient manner.
The best descriptive word I’ve heard for this is ‘catalyst’.
All are equally important and what it really comes down to is the cost of not using one. Without a trainer to conduct OJT:
Results are achieved slower
The chance of failure is higher
Risks cannot be evaluated and controlled.
This leads us to the trainer’s mission:
Get the student competent with the least amount of resources and without harm or risk to them or
the organisation”
4

The trainer may see their role a little differently and will often only focus on the tactical aspects of the project. In other words, how they are to going to do it with what little resources they have available. Their
primary objectives are usually to:
Educate the student
Maintain quality standards
Ensure safety
Motivate the student
Mentor the student in other professional areas
Report on student progress
Provide recommendations to higher authorities.
The trainer does have many responsibilities to fulfil during OJT but these can be distilled into three main actions that the trainer will take during a training session:
Educate the student (show them what to do)
Assess performance (tell them how well they are doing it)
Control the environment (keep you, them, the rest of the team and the organisation safe).
In simple terms, this is the trinity of:
Educate, assess and intervene to control the training environment
5

What’s in the toolkitThe toolkit contains eight templates to complete your training activities.
The first section is your on-the-job training shelf and contains the step by step directions for:
Delivering a pre-training brief
Educating the student during training (proactive and reactive)
Intervening to control the training environment
Debriefing the student after the training session
The second section contains some additional tools to assist you completing your job. These are templates for:
Compiling and delivering weekly training reports
Working with the rest of the training team
Your actions following an unsuccessful student assessment
6

Section One
7

The pre-training briefA pre-brief is a meeting with the student immediately before the training to discuss the session ahead. It is used primarily to outline the goals of the training session but has some additional benefits such as being able to;
Assess the student’s own preparationOutline your expectations and ground rulesReview any special procedures for any upcoming unusual eventsExplain any contingency plans, OH&S procedures etc.Review any assignments set following the last sessionOutline expected workload, duration and breaks.
There are three critical points to making this meeting successful:
Content: The pre-brief must only contain pertinent content to the training session. Inclusion equates to importance.Consistency: A regular approach and standard format will produce familiarity with the process. Once this is achieved, the participants can focus on the content and not the process.Collaboration: Have the student provide as much input as possible. Over time, give them responsibility for preparing more of the pre-brief.
The pre-training brief model is a standard format for delivery that achieves these three components.
8

Review the previous session or last couple of sessions to identify any significant points, trends, repeated errors or unachieved goals. Discuss any assignments or remedial actions to determine the extent of the student’s efforts and what was learned from the exercises.
STEP ONE
REVIEW PREVIOUS TRAINING SESSION(S)
STEP TWO
OUTLINE THE DURATION AND WORKLOAD
STEP THREE SET GOALS
Describe the expected duration, available breaks and location. Explain any unusual events or situations that the student may not be expecting. Run through a few basic metrics to highlight the expected intensity and complexity of the working conditions.
Establish goals for the session. These can be an extensions of activities set between training sessions, a continuation of the previous sessions objectives or new ones that take advantage of today’s expected challenges. Select three to five achievable and measurable objectives as session targets.
Lay out your expectations or ground rules for the training session. What role will the student be performing, which part(s) of the job are they doing and who will they deal directly with (the supervisor, you or the customers etc.). What about personal breaks, phone calls or tea/coffee on the job.
STEP FOUR DETAIL YOUR
EXPECTATIONS
Cover emergency briefs, evacuation procedures and OH&S issues. Also explain hand-over and take-over procedures to avoid confusion should the need arise to stop the training the. Consider a formal procedure (e.g. I’M TAKING OVER / I’M HANDING OVER)
STEP FIVE
EXPLAIN CONTINGENCY PROCEDURES
THE PRE-BRIEF MODEL
9
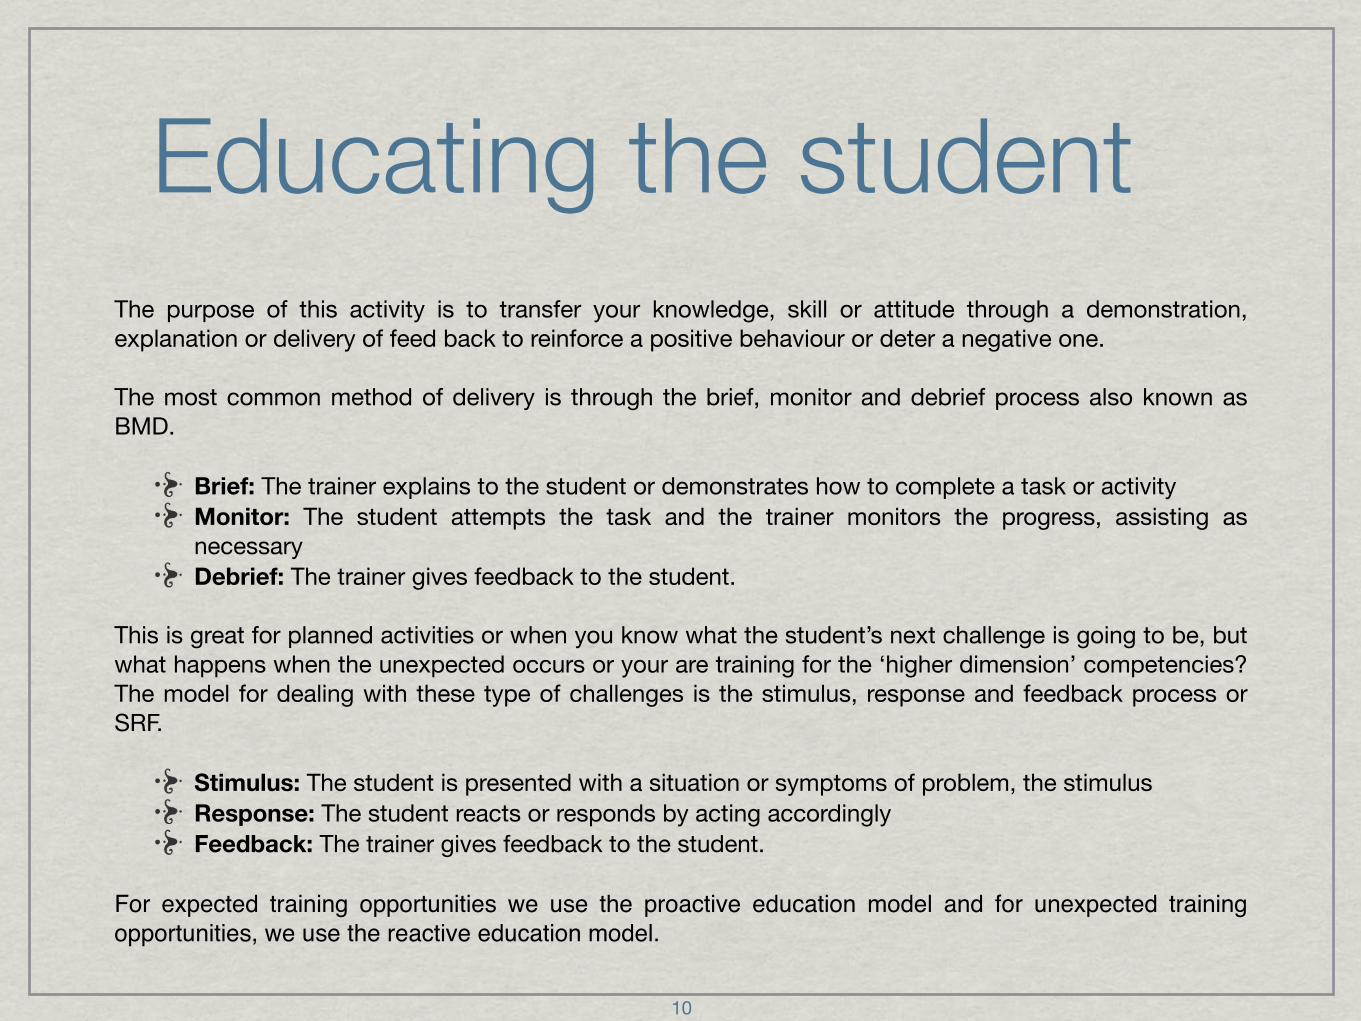
Educating the studentThe purpose of this activity is to transfer your knowledge, skill or attitude through a demonstration, explanation or delivery of feed back to reinforce a positive behaviour or deter a negative one.
The most common method of delivery is through the brief, monitor and debrief process also known as BMD.
Brief: The trainer explains to the student or demonstrates how to complete a task or activityMonitor: The student attempts the task and the trainer monitors the progress, assisting as necessaryDebrief: The trainer gives feedback to the student.
This is great for planned activities or when you know what the student’s next challenge is going to be, but what happens when the unexpected occurs or your are training for the ‘higher dimension’ competencies? The model for dealing with these type of challenges is the stimulus, response and feedback process or SRF.
Stimulus: The student is presented with a situation or symptoms of problem, the stimulusResponse: The student reacts or responds by acting accordinglyFeedback: The trainer gives feedback to the student.
For expected training opportunities we use the proactive education model and for unexpected training opportunities, we use the reactive education model.
10

• Identify the criteria for success • Explain or demonstrate the best path• Identify critical points• Highlight anticipated and challenges
STEP ONE
BRIEF
STEP TWO
MONITOR
STEP THREE DEBRIEF
• Observe and record • Use observable behaviours against agreed or known standards• Interact only if asked or necessary
• Use cause and effect• Provide remedial advice• Reinforce positive behaviours
PROACTIVE EDUCATION MODEL - BRIEF MONITOR DEBRIEF
The student is subject to a situation or the symptoms of a problem. They may or may not recognise them or their ramifications should they go unheeded.
STEP ONE
STIMULUS
STEP TWO
RESPONSE
STEP THREE FEEDBACK
The trainer gives adjusting or reinforcing feed back as appropriate. If insufficient time to debrief fully, the trainer then reviews the scenario using the facts, feelings, findings and futures model in the post-training debrief.
REACTIVE EDUCATION MODEL - STIMULUS RESPONSE FEEDBACK
The student reacts to the stimulus and then makes the appropriate response of takes what the believe to be the best course of action. Not reacting is a response.
11

InterventionBy intervening, the trainer attempts (not all are successful) to influence the training environment toward, or away from a specific course or sequence of events. There are four main reasons why a trainer would want to do this:
Safety: to ensure that to safety standards are adhered to or to prevent a course of action that would result in a unsatisfactory decrease in safety to the student, trainer or co-workers.Effective training: to ensure that the complexity or workload isn’t increased to the point that it is detrimental to the training (student is overwhelmed).Team cohesion: to ensure workload balance is not disrupted to the point that it has a significant detriment to another team member’s performance or health (stress).Operational viability: to ensure that there is no detriment to the overall operations that would result in significant damage to the organisation (e.g. loss of machinery, loss of product quality, poor customer service, insufficient production rate etc.).
In practical terms this will usually present as the trainer fixing an error, offering adjusting feedback to avoid repeating an error or influencing the students decision making process when presented with a range of options or solutions (e.g. “whatever you do, don’t” … or “have you considered…”).
Whether we like or not, just our very presence in the training environment will affect the student’s actions and decisions. You are a security blanket and some students will take greater risks or ‘have a go’ knowing that if they are unsuccessful, there is safety line within reach. What this essentially means is that when we intervene, we don’t really intervene, we escalate the level of influence that we currently have over the student. To this effectively, we use the intervention model.
12

Is the intervention necessary. Do the circumstances warrant interaction and if so, will the student be able to remedy the solution or recover on their own accord? Can it be postponed or left until the debrief to rectify?
STEP ONE
ASK “IS IT NECESSARY?”
STEP TWO
INTERVENE
STEP THREE EXPLAIN
Intervene or do not intervene. Partial intervention is still intervention. Intervene only as much as necessary and escalate actions beyond the ‘base line’ until the objectives are achieved. Use a standard procedure (e.g. I’M TAKING OVER / I’M HANDING OVER).
Explain why as soon as possible to give the student an opportunity to still learn from the demonstration or direction. If it is a critical error or student shortcoming, cease training to rectify the problem.
Hand back formally. Monitor closely, errors are more likely to occur in the moments following intervention. Be prepared to offer more direction, the student may not have considered the path you have taken them.
STEP FOUR WITHDRAW
Debrief the event as soon as possible (e.g. using facts, feelings, findings, futures). If this is delayed until the post-training debrief, tackle this first to avoid student distraction during explanation of other points. This was a big deal for them
STEP FIVE
DEBRIEF ASAP
THE INTERVENTION MODEL
13
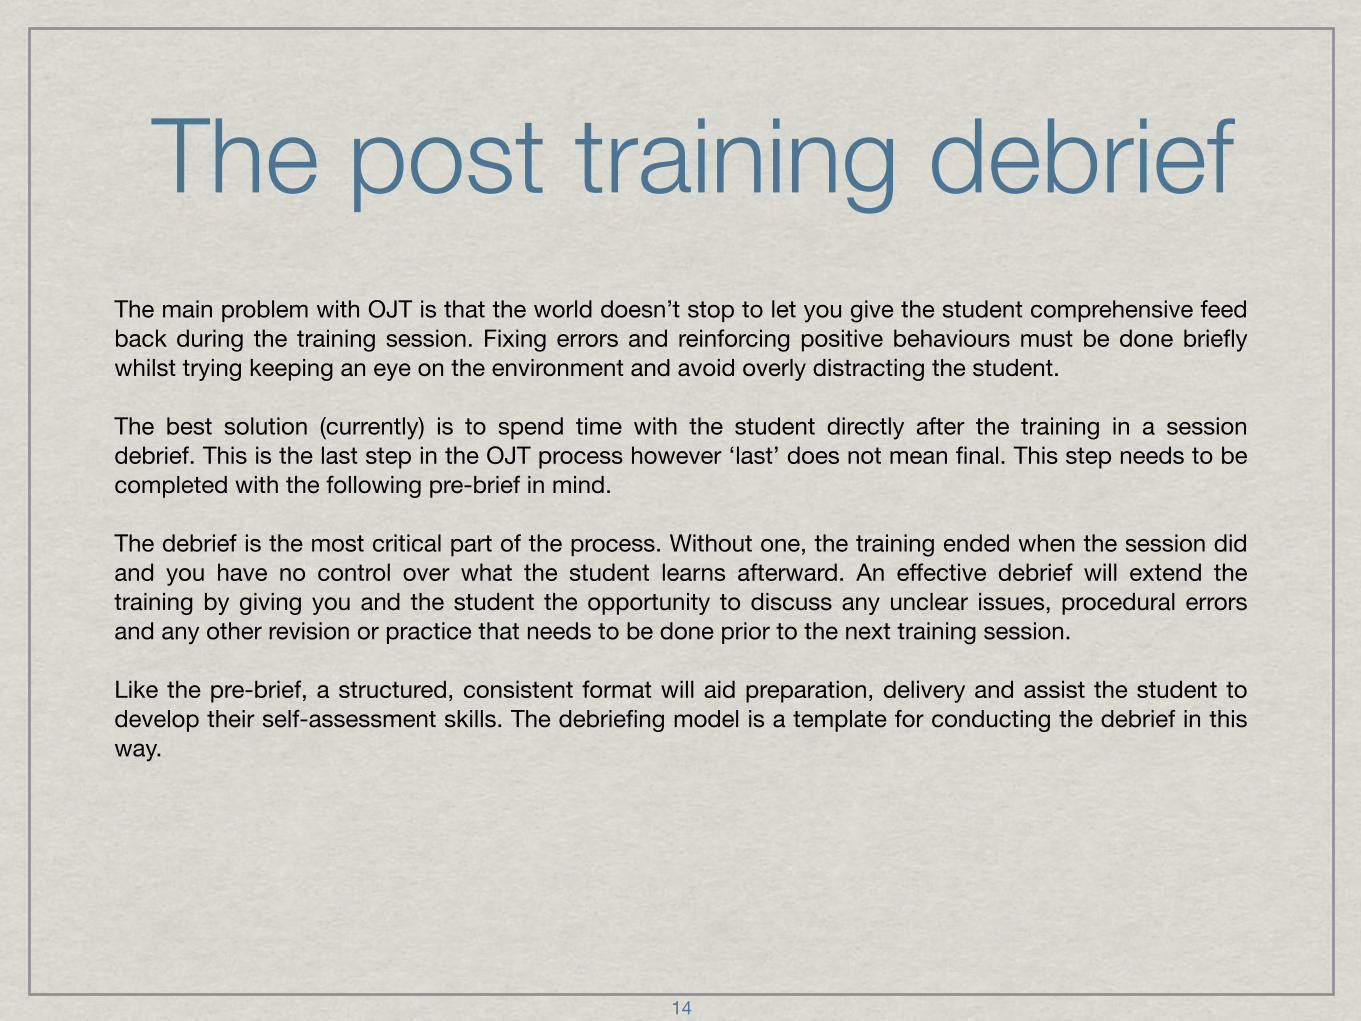
The post training debriefThe main problem with OJT is that the world doesn’t stop to let you give the student comprehensive feed back during the training session. Fixing errors and reinforcing positive behaviours must be done briefly whilst trying keeping an eye on the environment and avoid overly distracting the student.
The best solution (currently) is to spend time with the student directly after the training in a session debrief. This is the last step in the OJT process however ‘last’ does not mean final. This step needs to be completed with the following pre-brief in mind.
The debrief is the most critical part of the process. Without one, the training ended when the session did and you have no control over what the student learns afterward. An effective debrief will extend the training by giving you and the student the opportunity to discuss any unclear issues, procedural errors and any other revision or practice that needs to be done prior to the next training session.
Like the pre-brief, a structured, consistent format will aid preparation, delivery and assist the student to develop their self-assessment skills. The debriefing model is a template for conducting the debrief in this way.
14

Review each of the key points or performance indicators that occurred during the session to establish strengths, weaknesses, success and failures. Deliver reinforcing or corrective feed back as appropriate using the facts, feelings, findings, futures model.
Evaluate the goals that were identified in the pre-training debrief or introduced during the training session. Use observable behaviours and results to establish performance and compare directly with the agreed benchmarks.
Gather evidence, prepare steps 3 - 6, and review your evidence. Leave the introduction until last. Set up your location, paying attention to the environmental conditions, minimising distractions and gathering tools.
STEP ONE
PREPARE
THE DEBRIEFING MODEL
STEP TWO
INTRODUCE AND EXPLAIN
STEP THREE
EVALUATE SESSION GOALS
STEP FOUR
ASSESS PERFORMANCE
STEP FIVE
ASSESS STRATEGIC PROGRESS
STEP SIX
SET REMEDIAL ACTION
STEP SEVEN
DOCUMENT
Introduce the debrief, explaining its purpose, conduct and content. Start by putting the student at ease, then open with the format, explain the ground rules and finally check that you haven’t overlooked anything with the student.
Compare goals achieved with the training plan to identify overall progress toward completion of training. Adjust the training plan or pace to realign planned progress with current achievements and organisational objectives.
Set remedial action for each identified student weakness or shortcoming. Target critical paths first, followed by best results and finally those easiest to achieve. Identify two to five target areas to improve with remedial activities.
Gather all notes made before, during and after the training to add to the training file. Record performance, progress and remedial action in preparation for compiling a training report. Finally, document student actions, comments, suggestions and criticisms.
15

Section Two
16
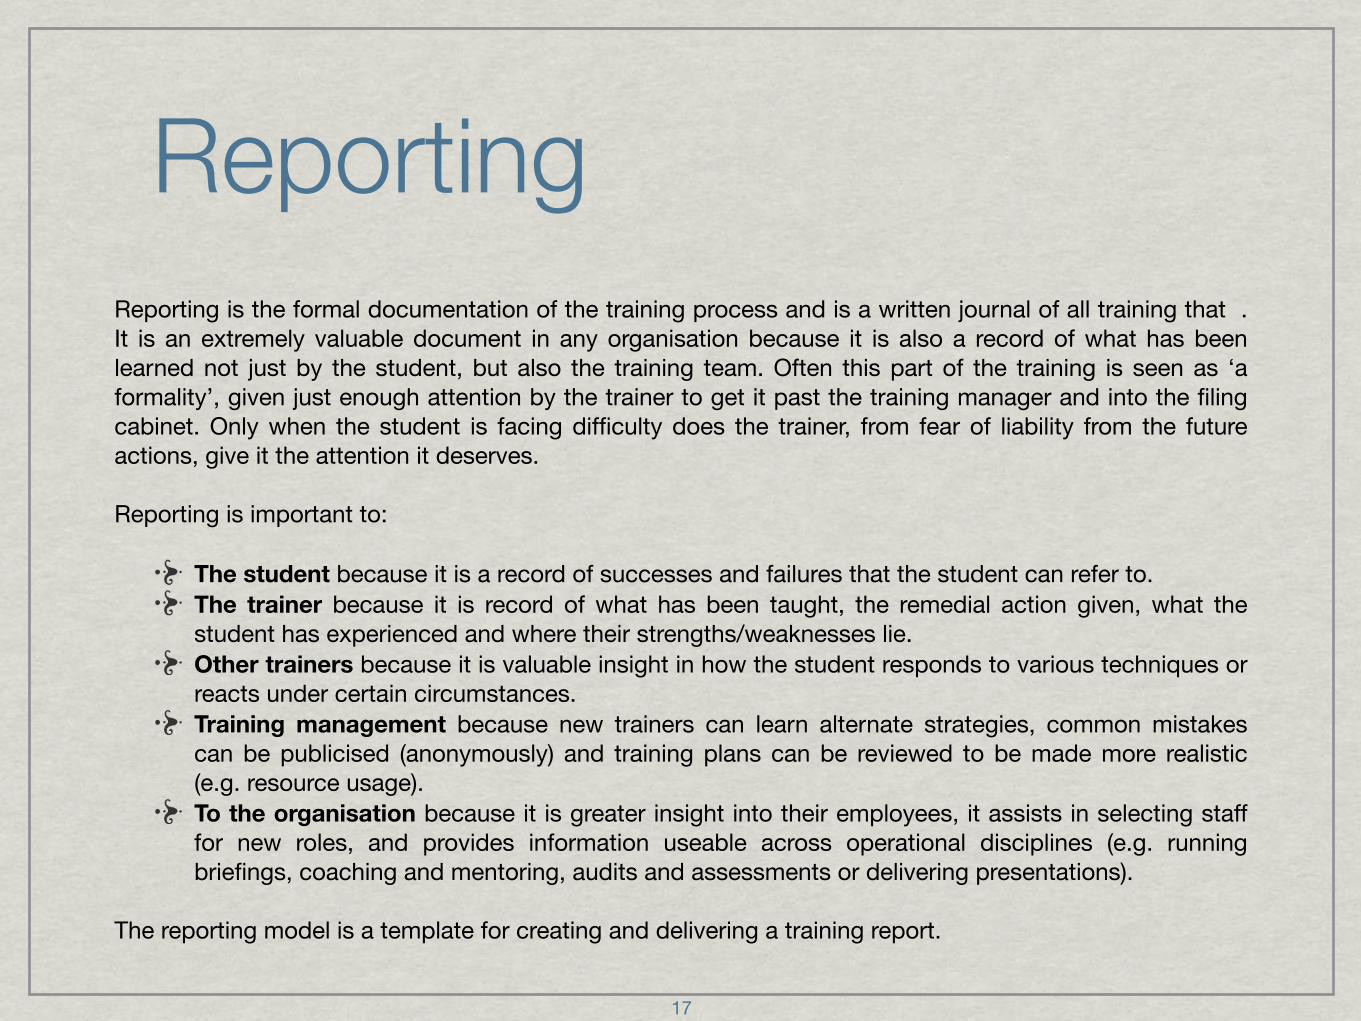
ReportingReporting is the formal documentation of the training process and is a written journal of all training that . It is an extremely valuable document in any organisation because it is also a record of what has been learned not just by the student, but also the training team. Often this part of the training is seen as ‘a formality’, given just enough attention by the trainer to get it past the training manager and into the filing cabinet. Only when the student is facing difficulty does the trainer, from fear of liability from the future actions, give it the attention it deserves.
Reporting is important to:
The student because it is a record of successes and failures that the student can refer to.The trainer because it is record of what has been taught, the remedial action given, what the student has experienced and where their strengths/weaknesses lie.Other trainers because it is valuable insight in how the student responds to various techniques or reacts under certain circumstances.Training management because new trainers can learn alternate strategies, common mistakes can be publicised (anonymously) and training plans can be reviewed to be made more realistic (e.g. resource usage).To the organisation because it is greater insight into their employees, it assists in selecting staff for new roles, and provides information useable across operational disciplines (e.g. running briefings, coaching and mentoring, audits and assessments or delivering presentations).
The reporting model is a template for creating and delivering a training report.
17
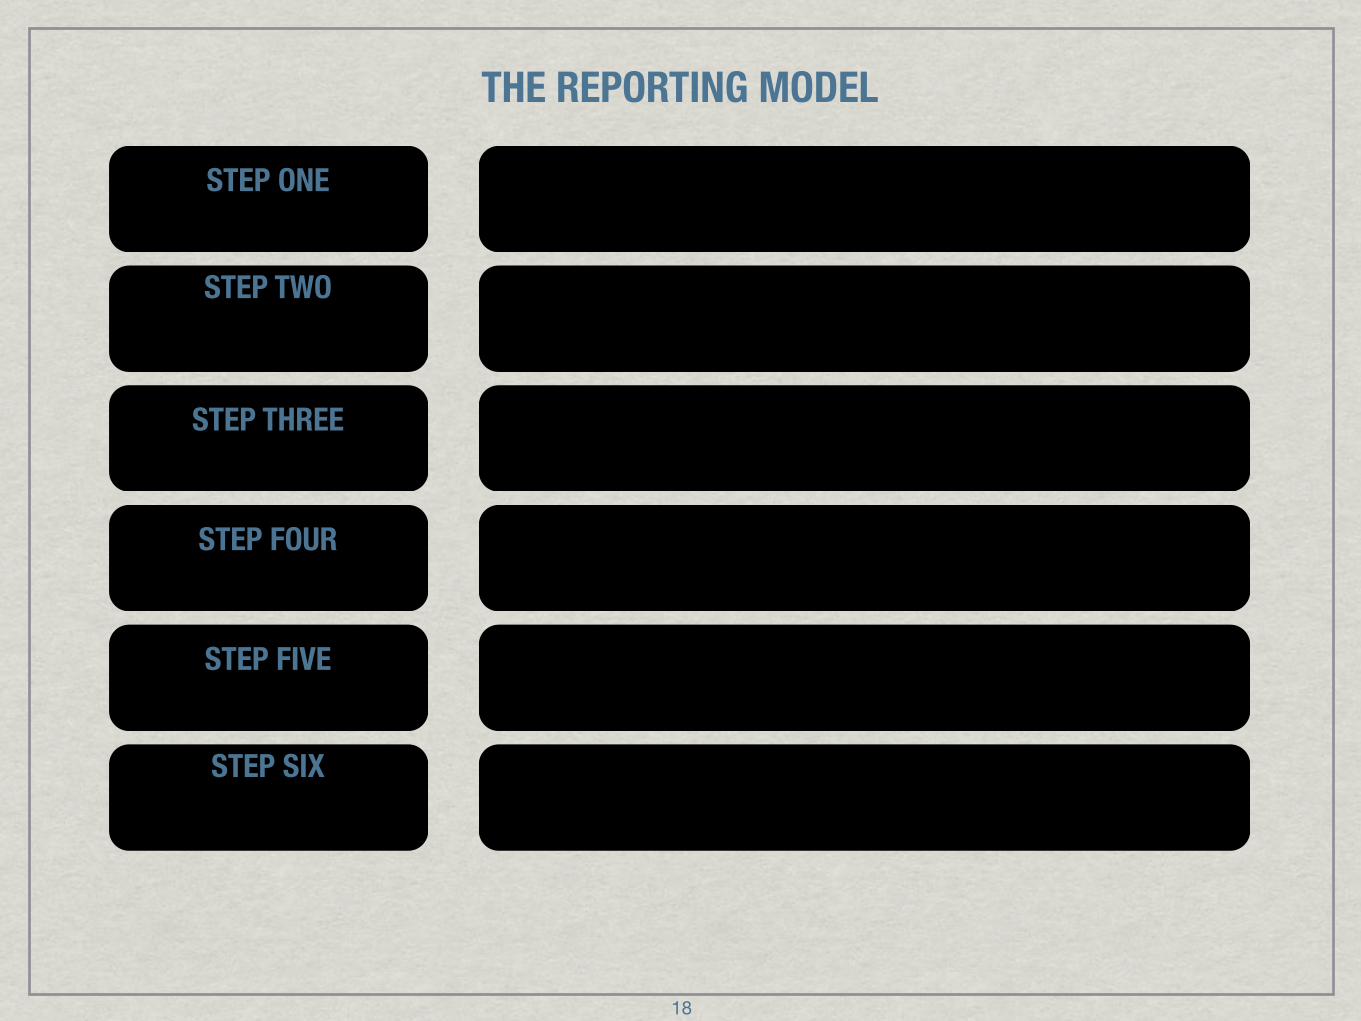
Hand deliver it to the student, make eye contact with them and verbally explain what it is. Set a time limit for them to review it and schedule the report debrief, explaining that everything will be discussed then.
Compare student results with standards to establish degree of success or failure. Look for trends to establish whether improvement is occurring. Focus specifically on performance, overall progress and remedial actions to rectify weaknesses.
Gather all evidence from the training to establish the student’s absolute performance. Use results, exemplars made or modified during training or behaviours that were observed. Refer to notes made before, during and after training.
STEP ONE
GATHER EVIDENCE
THE REPORTING MODEL
STEP TWO
GATHER STANDARDS AND OBJECTIVES
STEP THREE
COMPARE AND COMPILE
STEP FOUR
DELIVER THE REPORT
STEP FIVE
DEBRIEF THE STUDENT
STEP SIX
ACTION OUTSTANDING ADMINISTRATION
Identify performance benchmarks using competency standards, agreed goals or best practice principles. Were possible, evidence these for student comparison.
Sit down with the student and run through each strength or success (for reinforcement) and each weakness or failure (for remedial activities). Don’t read the report to them, just cover key points. Invite student collaboration and comments. Have them sign the report to indicate that it has been received.
Submit the report to training management or file as necessary. Complete any additional actives such as updating training plan, filling out log books or collaborating with other training team members.
18

Training in a teamTraining, like most events will rarely ever go completely according to plan. Circumstances will dictate that training goals be reassessed, strategies be revised and occasionally, trainers will be replaced. Like or not, trainer participation is personal (that’s we use them) and changing trainers will impact on the student’s training, even if only temporarily.
In some circumstances multiple trainers may be used to increase training opportunities (to facilitate things like shift work, temporary absences) or subject matter expertise (trainers with different strengths).
Regardless of why, it takes three things to use multiple trainers effectively; planning, communication and co-ordination.
Planning: The plan will outline goals – long, medium and short term, identify training strategies and resources required. In a team environment, it will identify the responsibilities of individual team members.Communication: Communication is essential and goes hand in hand with documentation. Documenting the training ensures that both the trainers and student have access to a record of what has been achieved, what is outstanding and most importantly, what the next step is.Co-ordination: Co-ordination between the trainers will allow the next trainer to pick up where the previous one left off. It will also reduce the replication of content or ineffective training strategies.
Introducing a hand over procedure such as the SCORE card will assist communication and co-ordination.
19

List student strengths, weakness and current training strategies. What other strategies have been tried, which were successful, which failed and what else is still to be tested. How is the student; confident, unsure, enthusiastic, uncaring etc.? Is administration and reporting up to date, when was the last meeting with training management and when is the assessment due?
STEP ONE
STATUS
STEP TWO
CURRENT PROGRESS
STEP THREE OUTSTANDING ACTIVITIES
Describe students most recently achieved goals. What are the current targets and how far along the training plan are they? Are they ahead or behind and what action is being taken to ensure that this continues or is rectified? What is the student struggling with or had limited success with and what strategies have been tried to remedy this?
List any outstanding remedial activities or assignments along with due dates. What else is about to be introduced, what has been tried, what was effective and what produced little to no results. Is the student initiating extra-curricular activities, are they enthusiastic with yours and were they completed on time. Are any reports or training meetings due?
List recent student attempts at tasks with the results. Are there any trends developing, does the student give up easily or make excuses. Will they try new things on their own or do they need prompting. Is their evidence of self initiated practice?
STEP FOUR RECENT SUCCESSES AND
FAILURES
What is next on the training agenda for the student? Is the training plan accurate, current or being used for that matter? Have any resources been organised, who was this being co-ordinated with and were there any conditions or restrictions? List the next five actions or targets just in case you are absent for the next training session or two.
STEP FIVE
EXPECTED NEXT
WORKING IN A TEAM - THE SCORE CARD
20

Student failureThis is every trainer’s nightmare. The student performed well during training but under the additional pressure of assessment conditions, they were found wanting and have been sent back for further tuition. This has a big impact on the their confidence and your plan must address this to turn the student around quickly. You need to get the student back under training as soon as possible and start your preparation for the re-assessment.
They student may consider giving up and will be looking for reasons why or why not they should admit defeat. They may also be angry, feel let down or display a lack of confidence in the training team (i.e. you). Often, a second assessment is the final chance for the student to prove their ability which adds to the pressure on the student
This is where the trainer needs to act quickly and take the lead in the recovery program. The trainer’s actions leading up to the re-assessment will be the major factor in the student’s success or failure. The ‘failure action plan’ or ‘actions after failure model’ is a seven step process for the trainer to prepare the student for re-assessment.
21

Meet with the student. Address confidence and/or emotional issues. With the student’s collaboration (and your current plan), develop the actual training plan. We need the student to take ownership; it will instil commitment and we need every available motivational tool.
Re-plan the training from the beginning. What are our new objectives? What do we have available (time, facilities, other resources) and what hurdles will we need to overcome (staff absences, operational priorities, public holidays, maintenance etc.)? Leave room for the student to come up with their own plan.
Meet with the assessor to discuss under-performing areas. Check with your assessment of those areas. Had they degraded? Was your evaluation incorrect? Had the areas of failure actually been taught? Review your documents to identify effective remedial actions.
STEP ONE
REVIEW
THE ACTIONS AFTER FAILURE MODEL
STEP TWO
RECONSIDER
STEP THREE
RE-PLAN
STEP FOUR
REASSURE
STEP FIVE
REVITALISE
STEP SIX
RESUME
STEP SEVEN
REASSESS
Consider changing trainers or employing additional ones. Enlist the aid of as many other trainers as you can for advice. Look at your own training strategies for ways to improve. Were you focused on theory over procedure or fixing rather than developing? Did you train the student to ‘teach themselves’?
Review each of the procedures, models and templates that you use as part of your training tool-box. Are they consistent, do they contain relevant content and is student collaboration encouraged? Are you pre-briefing, debriefing, reporting regularly, intervening effectively and using goal setting?
Resume training as soon as possible. Look for every opportunity to train and make extra time available for the student. Start by giving the student some remedial activities before the first training session and have them set goals, prepare the first pre-brief and look for additional training resources.
Reassess at every opportunity. Target weaknesses every session and run practice assessment sessions regularly to prepare the student. Clarify benchmarks and if informal or non-existent, create them for the purpose of the assessment (discuss this with the assessor, they must have standards).
22

What now
23
These eight templates are taken from the book “Controlling Training”, written by Duane Davis. Each of these templates are explained in great detail with step by step instructions to implement them into your current current training regime. Not only that, there are additional templates to cover other training scenarios as well as theory and practical tips to improve your overall training.
Controlling Training is the result of over a decade of experience in training military air traffic controllers, their trainers and their supervisors in 'the real world'. It bridges the gap between the classroom and training on-the-job. It is a practical guide that explains specific techniques and strategies to immediately improve the effectiveness of your workplace training. It is more than just a how to, it is a how to right now.
What's in the book?
Step by step guides to pre-briefing, OJT, debriefing and reportingThe four golden rules of learningWhy students make mistakesHow to work with other trainers in a multiple trainer teamHow to create and implement a training planHow to evaluate training using a post-training hot washProfessional development tips for trainersStrategies for continuing student development after trainingHow to prepare for assessmentWhat to do if the student fails
It is available now from Lulu.com for download (US $5.00) or purchase ($19.95).