The Top 3 Things a Real Estate Sales Professional...
56
pg. 1 The Top 3 Things a Real Estate Sales Professional Needs to Know About Signing Documents Electronically After years of discussion, the Ontario government has finally passed a bill to allow for the signing of electronic documents in real estate transactions. This is made possible by the removal of the exception which disallows land transfer documents to be signed by an electronically generated signature. This presents a huge opportunity for real estate sales professionals as those who leverage it will be able to generate and sign documents with their clients, all while on the road. Leveraging electronic forms makes you more competitive and creates a much stronger and happier relationship with your clients. Signing electronic forms on the go involves a number of different factors, not least of which is having the technical capability to do so. We have created a short list of what you can do to be prepared to sign your documents electronically. What Forms Can You Sign Electronically? First – determine which forms you want to be able to sign with your clients electronically. Here is a list of the current forms that can be signed with an electronic signature: Form 200 (Listing Agreement) Form 203 (Schedule to Listing Agreement) Form 300 (Buyer Representation Agreement) Form 303 (Schedule to Buyer Representation Agreement)
Transcript of The Top 3 Things a Real Estate Sales Professional...

pg. 1
The Top 3 Things a Real Estate Sales Professional Needs to
Know About Signing Documents Electronically
After years of discussion, the Ontario government has finally passed a bill to allow for the signing
of electronic documents in real estate transactions. This is made possible by the removal of the
exception which disallows land transfer documents to be signed by an electronically generated
signature.
This presents a huge opportunity for real estate
sales professionals as those who leverage it will be
able to generate and sign documents with their
clients, all while on the road. Leveraging electronic
forms makes you more competitive and creates a
much stronger and happier relationship with your
clients.
Signing electronic forms on the go involves a
number of different factors, not least of which is
having the technical capability to do so.
We have created a short list of what you can do to be prepared to sign your documents
electronically.
What Forms Can You Sign Electronically?
First – determine which forms you want to be able to sign with your clients electronically. Here is
a list of the current forms that can be signed with an electronic signature:
Form 200 (Listing Agreement)
Form 203 (Schedule to Listing Agreement)
Form 300 (Buyer Representation Agreement)
Form 303 (Schedule to Buyer Representation Agreement)

pg. 2
Standard Clauses
Form 261 (Mortgage Verification)
Form 240 (Amendment to Listing Agreement)
Form 305 (Amendment to Buyer Representation Agreement)
Form 201 (Seller Customer Service Agreement)
Form 310 (Buyer Customer Service Agreement)
What Type of Device Should You Use to Sign Forms Electronically?
Signing documents electronically will require access to a mobile device. Most real estate sales
professionals are using their iPad tablets for 2 reasons:
Many of the apps that allow for electronic signature are only available on
tablets.
Tablets provide a better customer experience because there is simply more
space on the screen to review the information with your client.
What Tool Can You Use to Sign Forms Electronically?
Now it is time to choose an app. While there are different products on the market we
recommend Virtual Mobile Office or ViMO. ViMO not only enables you to sign documents
electronically, it is also a complete solution that makes it easy to connect with clients, colleagues
and suppliers, research properties, post and promote listings and more.
What’s Next?
Included in your download is the ViMO “How To” Guide to signing electronic forms using ViMO.
Whether you are currently a customer looking to take advantage of this feature or are
considering becoming one, this guide is a step-by-step instruction manual that will give you a
sense of just how easy it is to take advantage of this new capability.

pg. 3
About the Author
This e-book was created by the ViMO marketing team at Teranet.
If you are interested in receiving more information about the ViMO application please contact
sales at:
Contact: Philip Share Direct telephone number: + 416-643-1028 Direct fax number: + 416 360 0494 Direct email address: [email protected]
General sales department telephone number: +1 855 999 8466 (VIMO)
General sales department email: [email protected]
If you are currently a ViMO customer and have further questions about how to use the app,
please contact support at:
ViMO Support
Telephone: +1 855 999 8466 (VIMO)
E-mail: [email protected]
ViMO Training
Telephone: +1 855 999 8466 (VIMO)
E-mail: [email protected]
Disclaimer: This e-guide is not and should not be construed as legal advice. This e-book was created July 7th, 2014
and all information therein is effective July 7th, 2014.

pg. 4
“How To” Series: ViMO Digital Forms with E-signature Capability Electronic Forms in ViMO are easy to complete, speed up the process and save you time and money. Impress your clients by incorporating this environmentally friendly, paperless solution into your workflow.
Teranet has a licensing agreement with the Ontario Real Estate Association (OREA) to provide
Standard Forms and Clauses through our mobile solution, ViMO.
ViMO’s “Forms” section only includes forms that may be signed electronically. The Agreement
of Purchase and Sales is not approved for electronic signature and it is not included in the initial
forms available.
We have initially provided the following popular forms for use in ViMO:
Amendment to Listing Agreement (Form 240)
Amendment to Buyer Representation Agreement (Form 305)
Buyer Customer Service Agreement (Form 310)
Buyer Representation Agreement (Form 300)
Listing Agreement (Form 200)
Mortgage Verification (Form 261)
Schedule to Buyer Representation Agreement (Form 303)
Schedule to Listing Agreement (Form 203)
Seller Customer Service Agreement (Form 201)
We will expand the list of forms available through ViMO over time and when regulations allow the Agreement of Purchase and Sale to be signed electronically.

pg. 5
Table of Contents
Section 1: Creating and Filling in Forms
Section 2: Sign the Form in Person with your client
Section 3: Instructions on How To Email Forms
Section 4: How To Tag a Form for Signing
Section 4(a): Client Signing Steps (access from a non-touchscreen device)
Section 4(b): Client Signing Steps (access from a touchscreen device)
Section 4(c): Real Estate Sales Professionals Signing Steps for Emailed Forms

pg. 6
Section 1: Creating and Filling in Forms
The “Forms” section is located on the top right of your dashboard. In order to activate available forms, you must follow these steps: 1. Select an “Engagement”.
Once you have selected an Engagement, by pressing on the Engagement card, you will notice that it appears on the top left corner of your ViMO header.
You will notice the ‘X’ to the right of the active Engagement which allows you to easily deselect it when done. Please note that deselecting an Engagement will reset the “Forms” screen. 2. Within a few moments, the “Forms” section will list any active forms available for the given
Engagement.
Expanding the “Forms” section will reveal your forms’ library based on Standard Forms and Clauses provided by OREA. The forms available are for buyer and listing Engagements. Forms will appear in alphabetical order within the main list.
Select Engagement

pg. 7
At the top you will notice a search bar where you can type in a keyword and the “Forms” list will reveal the available options.
3. To search forms, just start typing the name of the form in the Search Bar.
Search Bar
Engagemen
t

pg. 8
4. Selecting Forms: You can choose one or more forms by selecting the form title(s). As you
select you will see the forms appear in the “Selected Forms” box in the top left.
5. Populating Forms: To open and populate a form, select the blue “Populate” button located at the bottom of the “Selected Forms” section.
Selected Forms
Populate

pg. 9
The form will auto-populate with your profile information (taken from the “About Me” section), property listing’s information (taken from the “Engagement” section), as well as relevant fields from the Electronic Land Registry System. This will allow you to quickly complete the form to share with your clients and brokerage.
You can easily switch between your form types by choosing the desired form in “Select Forms”. To deselect any form choose the ‘X’ to the right of the form name. 6. To complete the form, simply select the input fields and enter the information.

pg. 10
To the right of the input boxes you will find a calendar where a date is required and an ‘i’ that
will open with additional tips on how to complete the field.
7. Once you reach the bottom, you can move on to “Next Form” or “Previous Form” or move
up to the top tabs and select “Preview”.
Calendar & “I”
Engagement
Calendar & “i”
Engagement

pg. 11
8. To return to the “Forms Library”, you can click on the “Create New Form” button located at
the top of the page underneath “Selected Forms” or select the “Form Library” link on the left of the “Forms” header.
9. The “Preview” tab will give you a real form view of the content & forms that you have
created.
From here you can review, edit, save and complete the form as needed.
Create New Form
Forms Library
Preview

pg. 12
10. Saving your forms: There are two options to save your form: “Save to Transaction” and
“Save Editable Form”.
“Saving to Transaction” saves your form in a completed non-editable version. This is
generally used when your form is ready to go. A copy of the PDF is available in the
“Completed” tab on the “Forms” menu.
“Save to Editable Form” allows you to save your form as a work in progress to be
opened and edited at a future time. The editable form can be accessed from the “In
Progress” tab on the “Forms” menu.
We suggest that you prepare your form before meeting with your client and select to “Save
to Editable Forms”. This way you can easily access the form and edit as needed to sign with
your client in person.
Larger Image
Engagement

pg. 13
11. Signing your form: “Sign” opens up VIMO’s access to repree™*, an electronic signing
system. Here you will see all the necessary options to complete the electronic signing of
your form.
*Forms created in ViMO are managed by a third party company, repree™ and the signing
portion is powered by DocuSign. Accounts for each provider are automatically created with your
ViMO account – no further action is required.
For more information about repree™ please visit their website at www.repree.com.
For more information about DocuSign please visit their website at www.docusign.com.

pg. 14
Section 2: Sign the Form in Person with Your Client:
Select the Engagement by pressing on the “Engagement” card.
Notice the prepared
forms available for
that Engagement

pg. 15
Expand the “Forms” section, select the “In Progress” tab and then “Editable Forms”.
The window will open in the form view, select “Preview” followed by “Sign”.
In Progress
and Editable
Forms
Sign
Preview
pg. 16
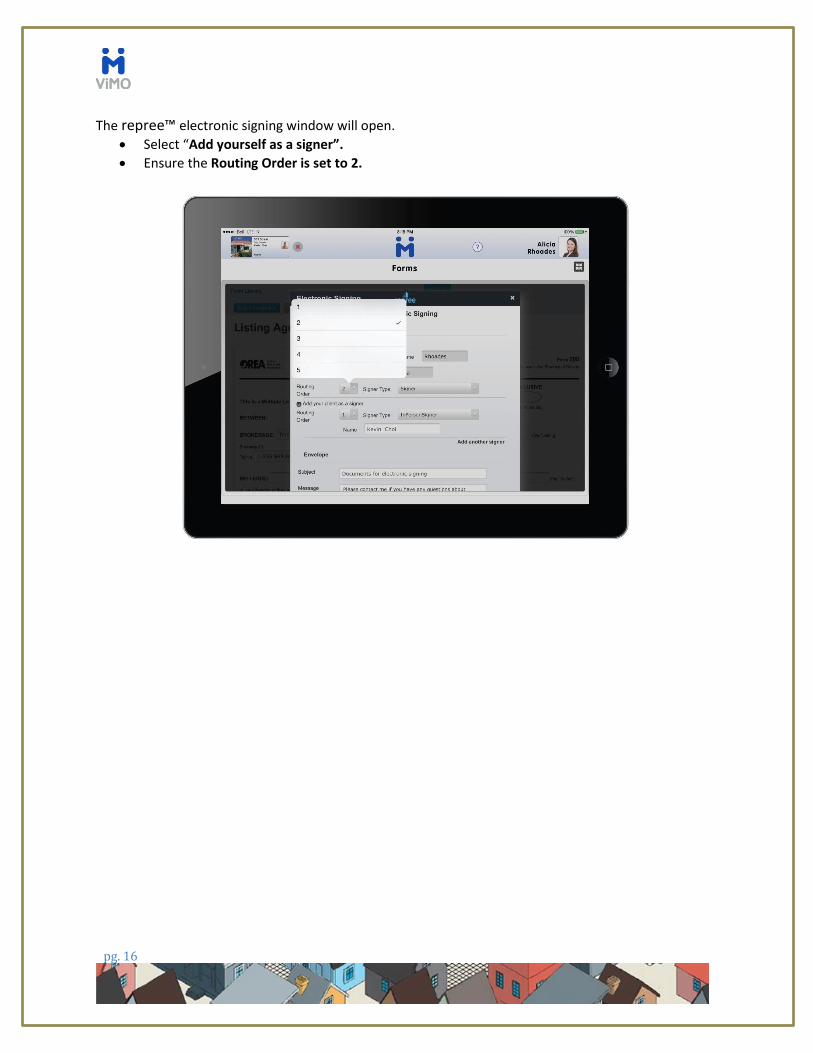
The repree™ electronic signing window will open.
Select “Add yourself as a signer”.
Ensure the Routing Order is set to 2.
pg. 17
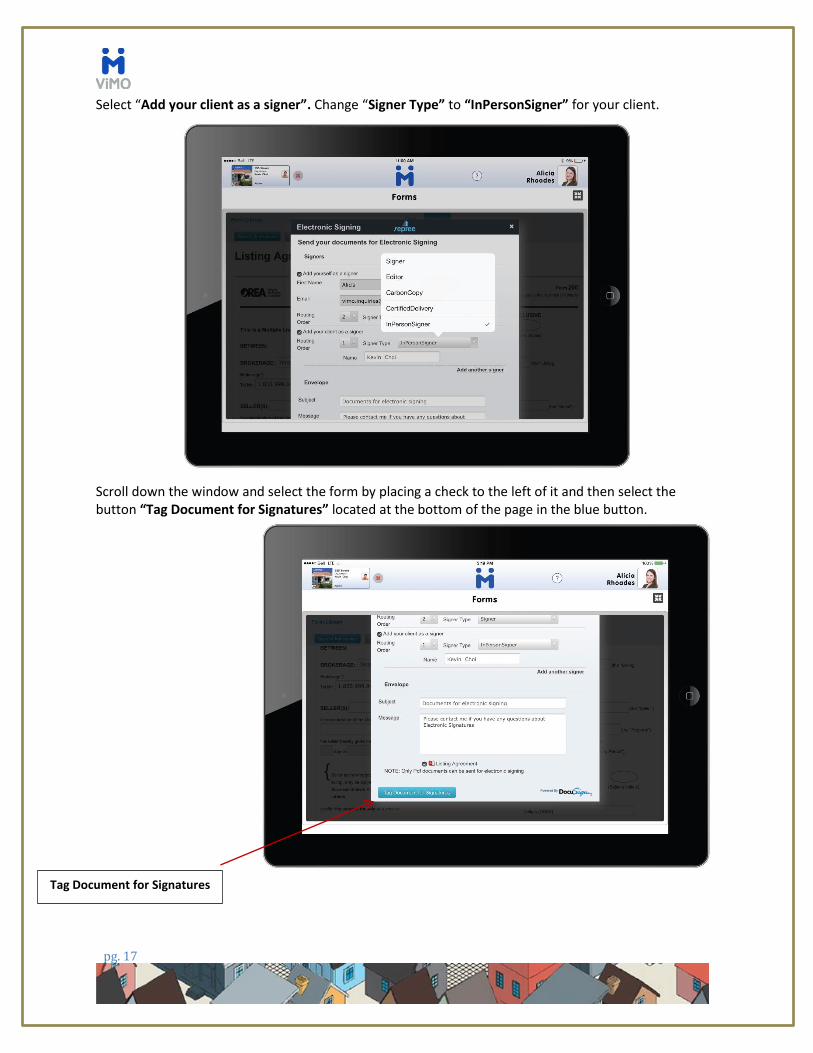
Select “Add your client as a signer”. Change “Signer Type” to “InPersonSigner” for your client.
Scroll down the window and select the form by placing a check to the left of it and then select the button “Tag Document for Signatures” located at the bottom of the page in the blue button.
Tag Document for Signatures

pg. 18
The DocuSign forms solution provides the ability to “tag” the document in advance. For the optimum mobile experience, skip the tagging phase and proceed to signature by selecting “Send” in the bottom left of the window.
Send

pg. 19
A warning message will appear, select “Send Anyways”.
A message “Your envelope has been successfully sent” will appear.
Send Anyways
pg. 20
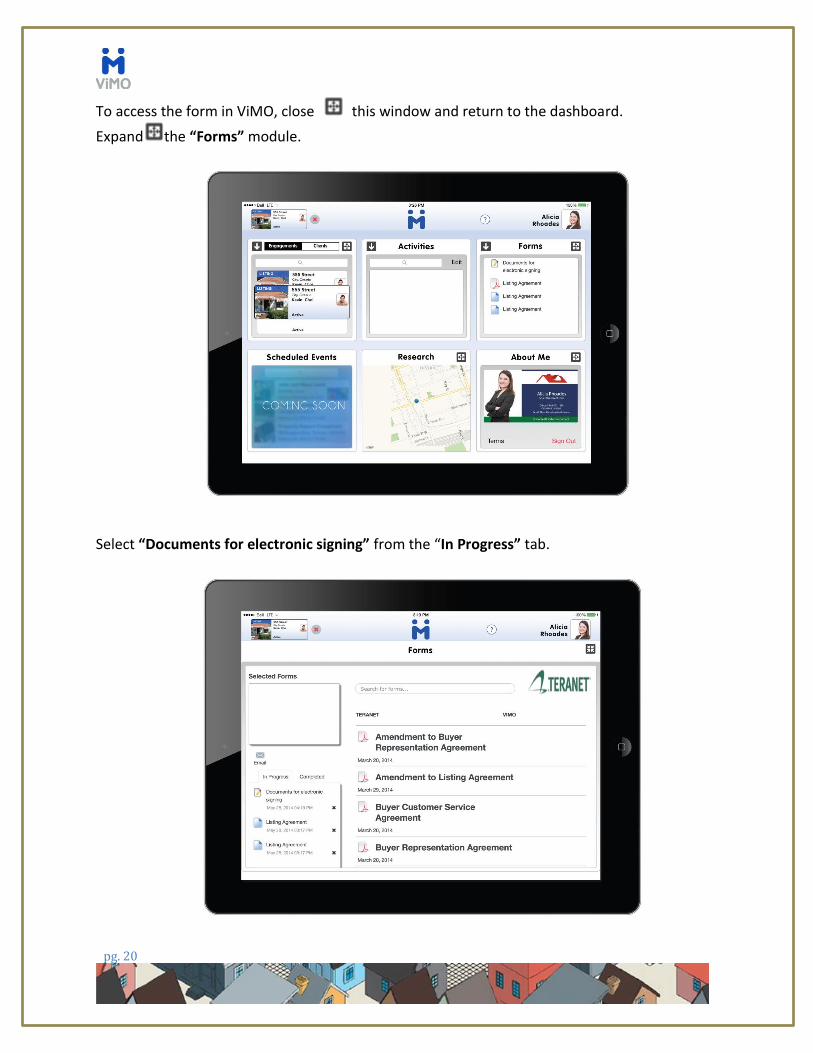
To access the form in ViMO, close this window and return to the dashboard.
Expand the “Forms” module.
Select “Documents for electronic signing” from the “In Progress” tab.

pg. 21
A window will appear with instructions on how to sign, select “Begin Signing”.
A window will appear to ask you to give control to your client, select “Continue”.

pg. 22
Ask your client to check the consent box and to select “Review Documents”. Your client’s consent to use electronic forms is stored.

pg. 23
The form will open and you can review it with your client and explain where to initial and sign. Your client can use their finger or a stylus pen to tap the screen where the initials or signature is required.
Tapping on the screen will open a tool bar where you may choose from a number of options:
Signature
Initial
My Name
Company
Title
Date Signed
Text
Checkbox

pg. 24
Example when option selected is “Initial”.
A window will open where your client can draw their initials. If your client is not satisfied with his signature, you can select “Clear”. Once your client is happy with his signature select “Adopt & Initial”.

pg. 25
Your client’s initials will appear on the form and you can direct them through the form to continue this process.
The following example shows when “Signature” is selected instead of “Initial”.

pg. 26
Below is an example of when “Date Signed” is selected.
Below is an example of when “Text” is selected. You may enter free form text, though we recommend you fill out all fields prior to signature wherever possible.
Once your client completes the form select “Finish”.
Finish

pg. 27
A window will appear to ask your client to enter their email address. Your client enters their email to validate their identity and ensure they receive a true copy of the document when completed.
The below message will appear. To close it select the expand icon and this will refresh the form.

pg. 28
Once you are back at the dashboard wait a minute to allow the form to refresh and then
expand the “Forms” section.
Select “Documents for electronic signing” from the “In Progress” tab.
Documents for electronic
signing

pg. 29
Select “Review Documents”.
The form will open and you can apply your initials, signature, and the date by tapping the screen and choosing from the menu option.

pg. 30
Notice that after you adopt initials and a signature they will be saved and applied to your forms when you select these options going forward.
Select “Finish” when electronic signing of the form is complete.

pg. 31
You will be directed to the “Current Envelopes” window in repree™.
Close this window to return to the dashboard.
A copy of the signed document will be emailed to you and your client. It will also be available in the “Activities” module in ViMO.

pg. 32
Section 3: Instructions on How to Email Forms:
Completed forms can be emailed in ViMO if you decide not to use the electronic signing feature. 1. Select the “Email” icon.
2. Enter To, place a check beside the PDF of the form and “Send Email”.

pg. 33
Section 4: How to Tag a Form for Signing
This option will allow you to “Tag” a form with electronic post-it notes to indicate where a
signature, initials, dates, etc. are required in the document. Once completed, the form will be
emailed to your client.
The main benefit of this option is that your client does not need to be with you to complete the
signing of the form.
Please note: The Tagging feature can be difficult to maneuver in a mobile environment. We will
release a mobile-friendly tagging functionality in the near future, but in the interim we
recommend you use the in-person signing process described in Section 2 for electronic
signatures.
1. Select the Engagement by pressing on the “Engagement” card.
Notice the prepared
forms

pg. 34
2. Expand the “Forms” section, select the “In Progress” tab and then “Editable Forms”.
3. The repree™ electronic signing window will open.
Select “Add yourself as a signer”.
Select “Add your client as a signer”.
In Progress and
Editable Forms

pg. 35
To add another signer, select “Add another signer” link to the bottom right of the existing signees, to locate or fill out the appropriate details.
Scroll down the window to the envelope section where you can enter a subject and message for the email to request electronic signing of the form. Place a check to the left of the form and then select the button “Tag Document for Signatures”.
Tag Document for
Signatures

pg. 36
4. The screen will open to a window where you can tag the document for signatures.
Page selection
Enlargement
Enlargement
Document Tagging
Menu

pg. 37
Under “Tag For” select the first person you would like to electronically initial and sign on the
form. You will repeat this step for all parties who need to sign.
To add a tag, select the option from the tag menu by touching it with your finger or stylus pen and drag it to the location on the form.
Tag For: Select the
person here
Tag Menu Note:
The Tag Menu is not easily
adjusted. If you enlarge it
you may have difficulty
moving through the form.

pg. 38
Continue moving down the form and place a tag in all areas that require an initial, signature, text and a date for the person selected.
5. Once done, move back up to the 1st page and select the next person to sign from the “Tag For” drop down.
Tag For: Select the
next person here

pg. 39
Drag a tag in all areas that require an initial, signature, text and a date for the person selected.
Enlargement of options available at the bottom of the window:
Go Back - will bring you to your signee options.
Save Draft - will save your document in sign mode to your “In Progress” tab in “Form Library”, and exit you from signing mode.
Discard Changes - will revert to previous save and exit you from signing mode.
Send - will email your PDF forms to your designated signees and allow you to preview your document before sending.
6. Once you have sent the form it will be emailed to all parties from repree™.
7. Your client can access the form through the email to review and sign as requested. They will be able to sign with any device (computer, mobile, iPad) that has access to their email and the internet, however the steps vary if they are using a device that does not have touch abilities. Both examples will be shown below.
Send
pg. 40
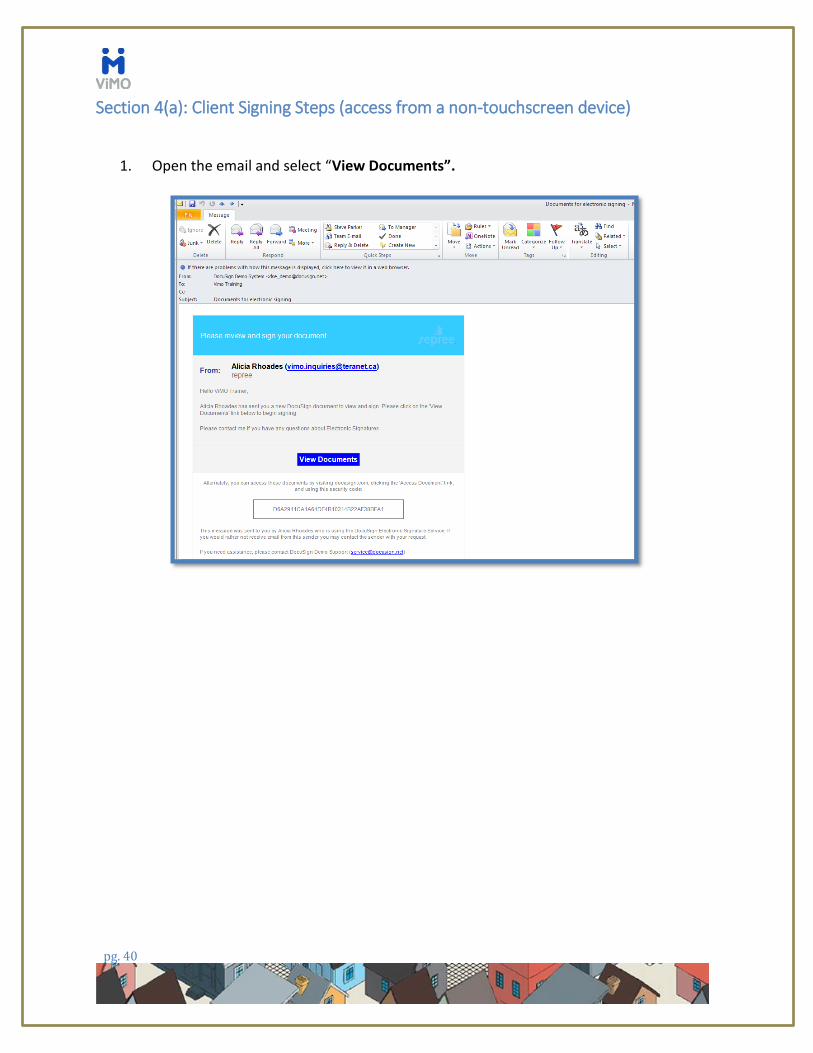
Section 4(a): Client Signing Steps (access from a non-touchscreen device)
1. Open the email and select “View Documents”.

pg. 41
2. The form will open in repree™ with a dialog box on top to confirm how you would like to proceed.
The options are to “Review Documents”, “Decline”, “Finish Later”, “Sign on Paper” and/or “Change Signer”. Select “Review Documents”.

pg. 42
3. Select “Next” to move through the tags.
Next
pg. 43
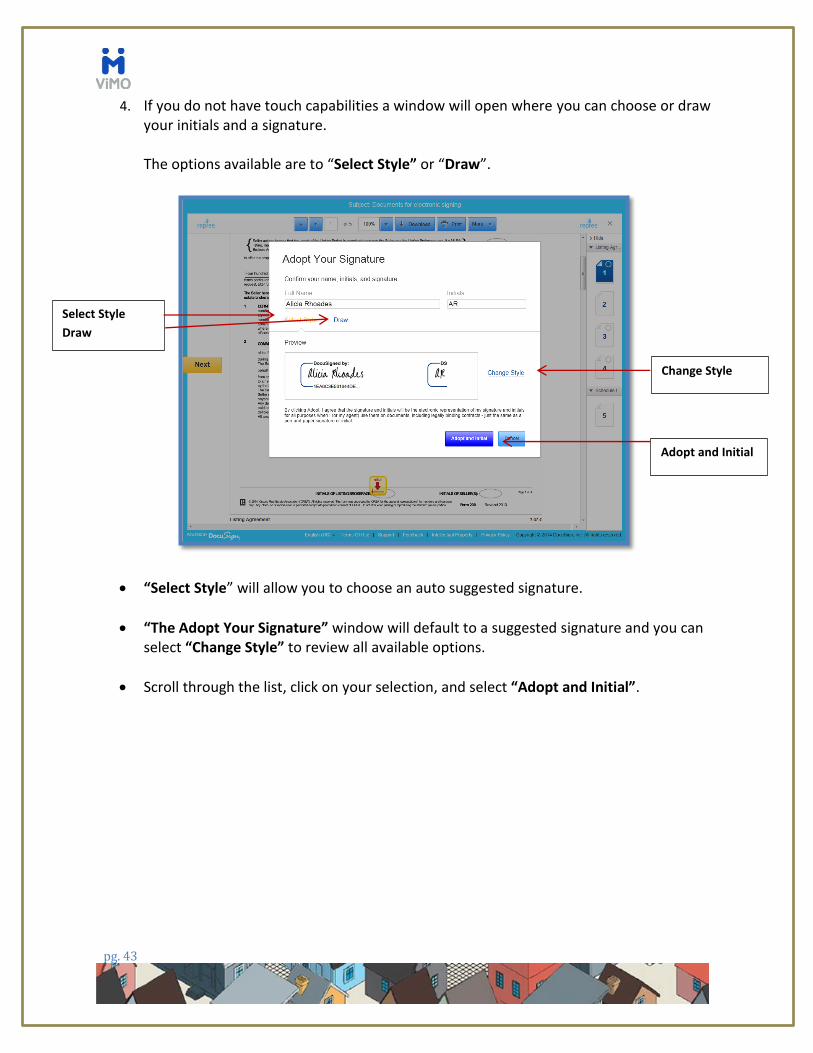
4. If you do not have touch capabilities a window will open where you can choose or draw your initials and a signature.
The options available are to “Select Style” or “Draw”.
“Select Style” will allow you to choose an auto suggested signature.
“The Adopt Your Signature” window will default to a suggested signature and you can select “Change Style” to review all available options.
Scroll through the list, click on your selection, and select “Adopt and Initial”.
Select Style
Draw
Adopt and Initial
Change Style
pg. 44
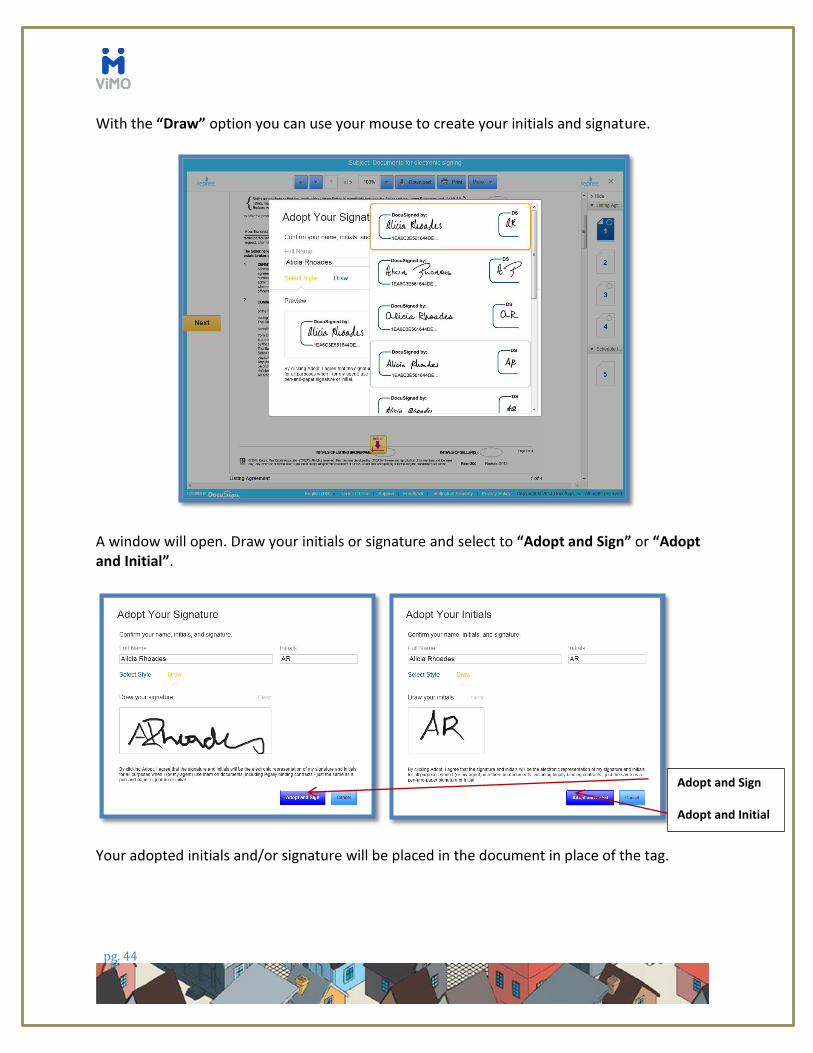
With the “Draw” option you can use your mouse to create your initials and signature.
A window will open. Draw your initials or signature and select to “Adopt and Sign” or “Adopt and Initial”.
Your adopted initials and/or signature will be placed in the document in place of the tag.
Adopt and Sign
Adopt and Initial

pg. 45
5. A message “All required fields complete” will be presented when you have completed
the review of the form.
Select “Confirm Signing”.
Confirm Signing

pg. 46
6. Once done, you will get a “You have completed your documents” message (shown below).
A copy of the completed document will be sent to your client’s email and they will not be able
to login to DocuSign to obtain a copy as the account is tied to your ViMO account.
If your client does not receive a copy of the document, please use the steps outlined in the
“Instructions on How to Email Forms” section of this guide to send them a copy.
Once the document is signed by all parties it can be accessed through the “Activities” module
in your ViMO dashboard.

pg. 47
7. Below is an example of the email sent with the completed document.

pg. 48
Section 4(b) Client Signing Steps (on a touchscreen device)
1. Your client will receive an email. They can open the email and select “View Documents”.
View Documents

pg. 49
2. They will need to check the consent statement and then “Review Document”.
3. A message will be presented from DocuSign to use your current location. This
information is captured as part of the signing process.
Check Consent
Review Document

pg. 50
4. The form will open in repree™ to review. Touch the first tag.
5. Draw your initials as prompted and select “Adopt & Initial”. The initials will replace the
tag and you can move to the next one.
Tags
Adopt & Initial

pg. 51
6. Draw your signature as prompted and select “Adopt & Sign”. The initials will replace the tag in the form.
7. Once the form is completed, select “Finish”
Adopt & Sign
Finish

pg. 52
8. You will get the following message and you can close out as a copy of the form will be sent to your client’s email.
9. If you select to cancel, the below message is presented regarding DocuSign. Close out of
the website.

pg. 53
Section 4(c): Real Estate Sales Professional Signing Steps for Emailed Forms.
You will receive an email notification once your client has signed. You can access it to sign via your email or in ViMO. We recommend signing within ViMO.
1. From the dashboard, select the “Engagement” card and then expand the “Forms” section.

pg. 54
2. Select “Documents for electronic signing” from the “In Progress” tab.
3. Select “Review Documents”.
Documents for
electronic signing
Review Documents

pg. 55
4. You will get the following message from DocuSign to use your current location. This information is captured as part of the signing process.
5. Apply your initials and signature and select “Finish” when done.
Finish

pg. 56
6. You will get the “You have completed viewing your envelope” message (shown below).
To close it select the expand icon and this will refresh the form.
7. The completed form is available in the “Activities” module.
Note - A copy will also be sent to you and your client via email.
Signed form is
available here