
The Reparation - Emperybooks
18
The Reparation by John Lovick The COMPLETE restoration of a tom, signed playing card. One. Piece. At. A. Time!
Transcript of The Reparation - Emperybooks
The Reparationby
John Lovick
The COMPLETE restorationof a tom, signed playing card.
One. Piece. At. A. Time!

The Reparation~
John Lovick
The complete restoration of a torn, signed playing card,one piece at a time. Suitable for both close-up and
cabaret performance.
lllustrated with nearly one do zen drawings of theauthor's hand s in action.
copyright © 1997 by John Lovick
All rights reserved. No part of the contents of thisbooklet may be reproduced or transmitted in any formor by any means, electronic, photocopying, recording or
otherwise without the express written consent andpermission of the author.
The Reparation
INTRODUCTION
When Guy Hollin gworth burst onto the magi c scene in Ameri cain J996, he ca used a sensation with his tom and restored cardroutine . "The Reformation." In his hands, it is a thing of beaut y,but is extremely diffi cult to do well , which is why ver y fewpeople do it. I believe the first publi shed one-piece-at-a-time fullcard restorati on is David Regal 's "Piece by Piece" from the book"Star Quality" by Harry Lorayne. (Derek Dingle 's "RestorationAssembly" lin his "Complete Works" by Richard Kaufman] predates it, but the card is restored in the course of a Matrix typeroutine , rather than in the hands.) Curiously, Regal 's Irick hasbeen largely overlooked and /or for gotten by the magiccommunity. It's much easier to do than "The Reformation" butdoesn't look as co nvincing.
What I've tried to do is combine the best ideas from bothroutines. My goal was to adapt the easier methodology of "Pieceby Piece" and make it look as good as "The Refo rmation ." Thebiggest changes I've made to Rega l's routine are: I) the handlingof the restoration phase is completely different (e.g. the card isrestored with the face toward the audience , and it 's moredeceptive because two side pieces are restored first , instead oftwo bottom pieces). 2) I eliminated a surreptitious ditch of theextra tom pieces (whi ch in turn eliminated the need for anextraneo us prop), and 3) I changed the "flash" restorati on of thelast piece, which I didn't think was consistent with the rest ofthe routine.
This handlin g is closer in method to Regal's, but uses some ofHollingworth' s ideas. I'm heavil y indebted to both of them . It'stheir extreme creativity that made my variation possibl e. Forwhat it's worth, Guy and David have both seen this manuscriptandlor rout ine have been very kind in giving it their "approval ."
NOTE: All illustrations are from the performer's point of view(POV). Use mirror work and intuition to determine how itshould look 10 the audience.
PR EPARATI O N
Gel a duplicate of the court card you are going to force . (HelpfulHint Pinochle decks have a dozen pairs of duplicate court cards ,or you can buy a one-way forcing deck .) It is necessary to usecourt cards for 3 reasons: the design makes the restoration moredeceptive, COLIrt cards are alway s symmetrical (some spot cardsaren't). and it gives you an exc use to limit where the spectatorcan sign the card. With a marker, sign your name (or Ed Marlo'sname, or mine) across the top border of the face of the card (inthe margin). Thi s signature will never be seen clearly, butshould be there for those moments when it is glimpsed by theaudience.
Hold the card with face toward yourself and the signature ontop. Fold the bottom half of the card away from yourself. up andbehind the top half. Don't fold it perfectly in half. however. Theback half of the card should project up a tiny bit u about half thewidth of the white border on a Bicycle card . Flatten the crease,and rotate the card 90° counter-cloc kwise and fold it in quartersby folding the top half toward yourself and down (so thesignature is on the inside). When you are read y to perform.finger palm the card in your left hand with the card index facingout. creases at the top and right sides. Your hand will look morenatural if you use your ring finger primari ly to hold the card(instead of your midd le finger).
PERFORMANCE
Thi s trick can be done standing or seated. I prefer to stand.Force the duplicate on some silly, unsuspecting, dim-wittedspectator. (I prefer the classic force . If you have a bank of 3 or 4duplicates. the cla ssic force is incredibly easy. In fact. that's
how I learned the classic force. and eve ntua lly reduced thenumber of force cards to one. It's a great way to learn. ) You caneither have the prepared card already finger palmed (the deckhides it nicely) or you ca n stea l if from your pocket as she issigning her selection.
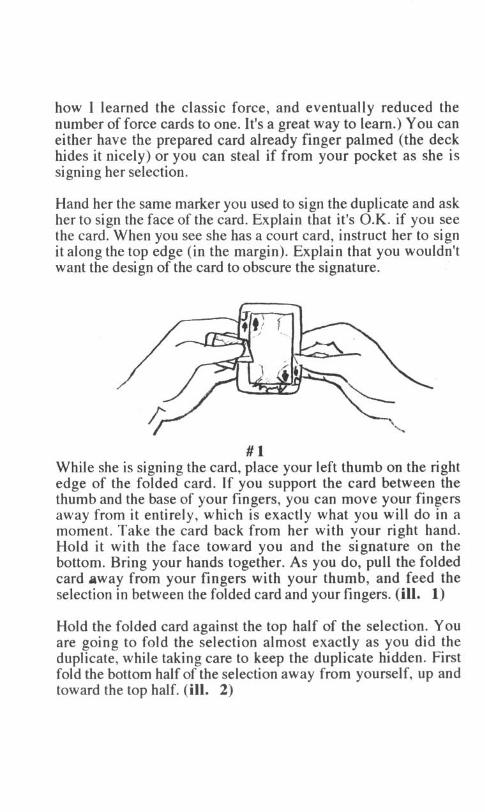
Hand her the same marker you used to sign the duplicate and askher to sign the face of the card. Explain that it's O.K. if you seethe card. When you see she has a court card, instruct her to signit along the top edge (in the margin). Explain that you wouldn'twant the design of the card to obscure the signature.
#1While she is signing the card, place your left thumb on the rightedge of the folded card. If you support the card between thethumb and the base of your fingers, you can move your fingersaway from it entirely, which is exac tly what yo u will do in amoment. Take the ca rd back from her with your right hand.Hold it with the face toward yo u and the signature on thebottom. Bring your hands together . As you do, pull the foldedca rd away from your fingers with your thumb, and feed theselection in betwee n the folded card and your fingers. (ill. 1)
Hold the folded card aga inst the top half of the selection. Youare going to fold the selection almos t exac tly as yo u did theduplicate, while taking care to keep the duplicate hidden. Firstfold the bottom half of the selection away from yourself. up andtoward the top half. (ill. 2)
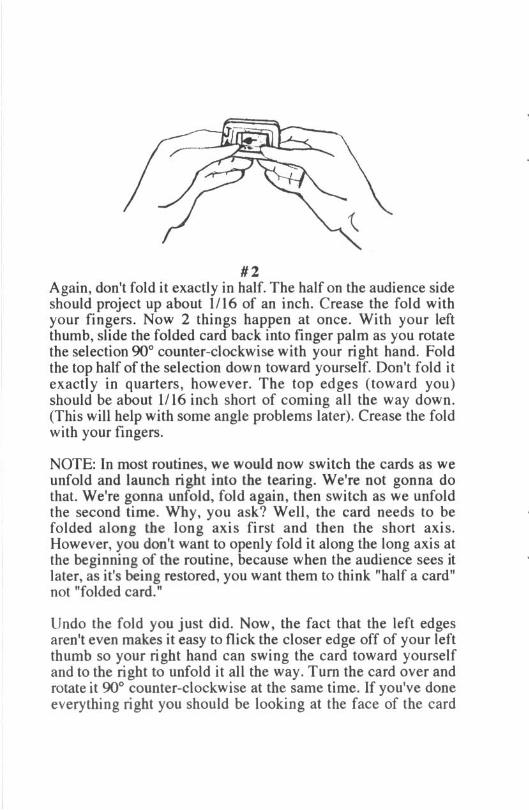
# 2Agai n, don't fold it exactly in half. T he half on the audience sideshould project up about 111 6 of an inch . Crease the fold withyo ur fin gers. No w 2 things happen at once . With yo ur leftthumb, slide the folded card back into finger palm as yo u rotatethe selection 90° counter-clockwise with your right hand . Foldthe top half of the selec tion down toward yourself. Don't fo ld itexactly in quarters, however . The top edge s (toward you)should be abo ut 1/16 inch short of coming all the way down .(This will help with some ang le problems later), Crease the foldwith your fingers.
NOTE: In most routine s, we would now switch the cards as weunfold and launch right into the tearing. We're not gonna dothat. We're gon na unfo ld. fold again, then switch as we unfoldthe second time. Why, yo u as k? Well , the card need s to befo lded along the long ax is first and then the sho rt ax is.However, you don't want to openly fold it along the long axis atthe beginning of the routine, because when the audience sees itlater, as it's being restored, you want them to think "half a ca rd"not "folded card."
Undo the fold yo u j ust did . Now, the fac t that the left edgesaren't even makes it easy to flick the closer edge off of you r leftthumb so your right hand ca n swin g the ca rd toward yourse lfand to the right to unfol d it all the way . T urn the card Over androtate it 90° counter-clockwise at the same time . If you've doneeverything right yo u sho uld be looking at the face of the card
with the signature at the bottom. In 2 quick motions, fold theright half of the card away from you and behind the left half andthen fold the top half of the card away from you and downbehind the bottom half. Done quickly. the image of a card foldedalong the long axis doesn't register. Tum the ca rd 1/4 turncounter-clockwise and press on the ca rd to tighten the creases. Iusually ju stify this unfolding and refolding by saying somethingabout needing finn creases in the card ( 10 make tearing it easier.or some other bullshit reason).
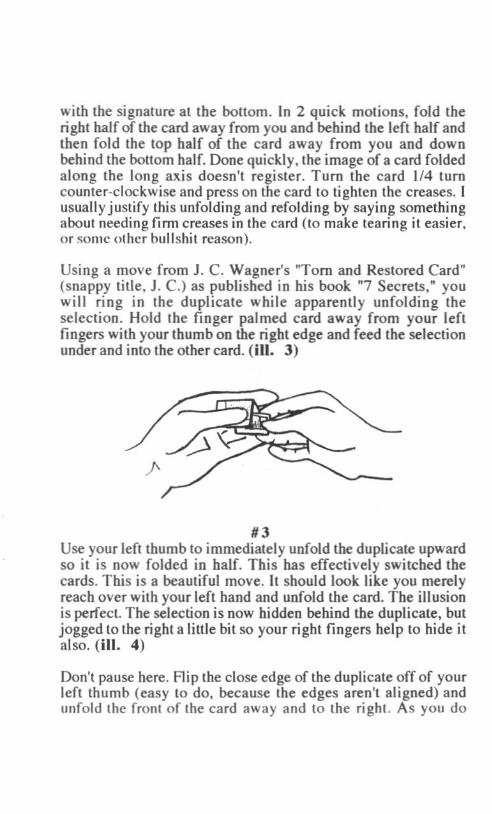
Using a move from J. C. Wagner's "Tom and Restored Card"(snappy title, J. C.) as published in his book "7 Secrets." youwill ring in the duplica te while apparent ly unfolding theselection. Hold the finge r palmed ca rd away from yo ur leftfingers with your thumb on the right edge and feed the selectionunder and into the other card. (ill. 3)
#3Use your left thumb to immediately unfold the duplicate upwardso it is now folded in half. This has effectively switched thecards. T his is a beautiful move. It should look like you merelyreach over with your left hand and unfold the card. The illusionis perfect. The selection is now hidden behind the duplicate, butjogged to the right a little bit so your right fingers help to hide italso. (ill. 4)
Don't pause here. Flip the close edge of the duplicate off of yourleft thumb (easy 10 do, because the edges aren't al igned) andunfold the front of rhc ca rd away and to the right. As you do
this, your left thumb contacts the folded selection and slides itleft as your right fingers finish unfolding the duplic ate. Use yourleft thumb to pull the folded card . 11 the way into finger palm,whil e your right hand rotates the ca rd top for bottom , thus •turning the face toward the audience. The audience should catcha glimpse of the phony signature as you do this, but your leftfingers will then hide the signature as you re-grip the card withboth hand s. Don't be parano id about covering the entiresigna ture. No one shou ld be focusing on it. However. withoutlookin g like you are trying to. you can cover the entire signaturewith your left fingers and still leave 90% of the card exposed.
i
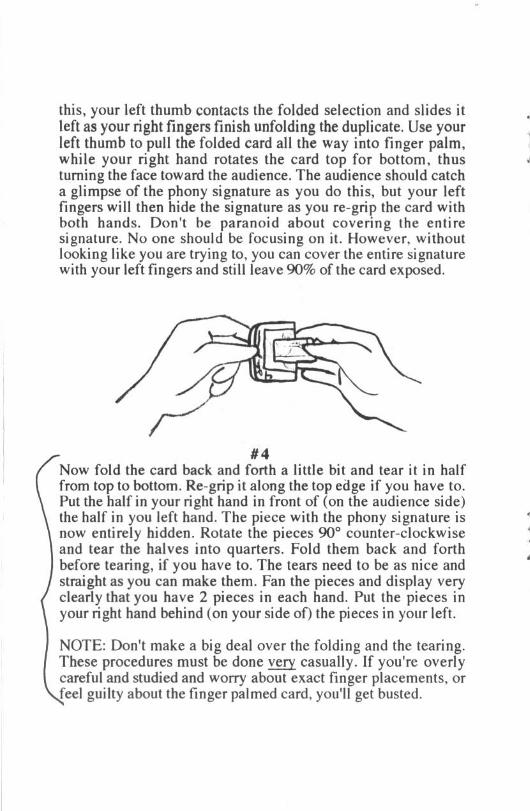
#4Now fold the card back and forth a little bit and tear it in halffrom top to bottom. Re-grip it along the top edge if you have to.Put the half in your right hand in front of (on the audience side)the half in yOll left hand. The piece with the phony signature isnow entirely hidden. Rotate the pieces 90° counte r-clockwiseand tear the halves into quarte rs. Fold them back and forthbefore tearing, if you have to. The tears need to be as nice andstraight as you can make them. Fan the pieces and display veryclearly that you have 2 pieces in each hand. Put the pieces inyour right hand behind (on your side of) the pieces in yOllT left .
NOTE: Don't make a big dea l over the folding and the tearing.These procedures must be done~ cas ually. If you're ove rlycareful and studied and worry about exact finger placements. orfeel guilty about the finger palmed card, you'll get busted.
))
)
)
With your right hand square the four pieces up into a fairl y nealpacket but downjog the 3 pieces closest to you. Rotate the packet90° counter-clockwise, and re-grip it with your left fingers.Make sure the 3 pieces stay aligned , and jogged to the right . The4th piece is next to the folded card.
Exp lain yO ll will restore the ca rd one piece at a tim e, and thatyo u are putti ng 2 pieces away while yo u sta rt with the other 2 .Grab the packet and slide it slightly to the right n just enou gh sothat piece closest to the folded card clears the right edge of it.Press the piece aga inst your fin ger tips and feed it in bet weenyour fingers and the folded card, just eno ugh so you can boldonto it. Grab the 3 closest pieces with your right hand. (Easy todo because they are in alignment). Very carefully do a blockpushoff with your right thumb. The 2 pieces closest to you willslide over together (a mini double!) and you can display the 3pieces as 2. If you keep the pieces in motion, slight misalignments will not be seen. Put them in your left front shirtpocket (see final note). As you do this, pull your left fingersback a little and push the folded card to the right with yourthumb so that a tiny bit of the folded card shows behind the tompiece. Don't expose too much of it, or extra edge s will show.It's probably better to expose the bottom edge, rather than thetop or the right side. The tom piece in your hand should be thenon-signed, non-index comer. If you have a different tom piece.you screwed up. Follow the directions better next time.
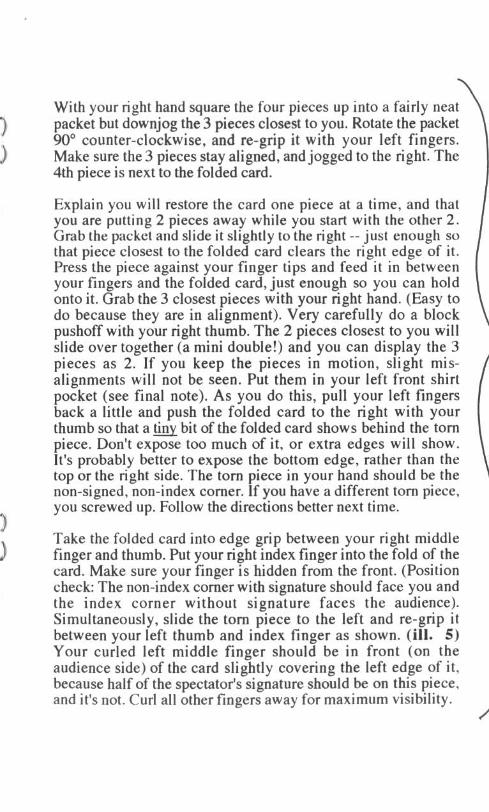
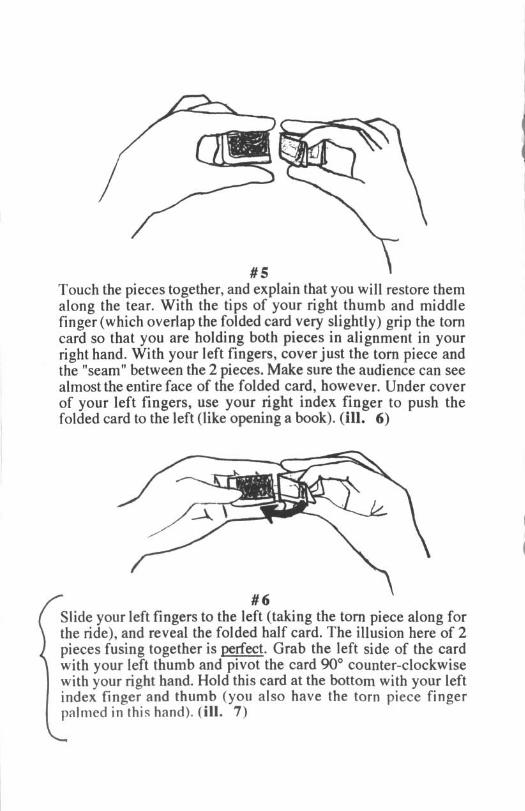
Take the folded card into edge grip between your right middlefinger and thumb. Put your right index finger into the fold of thecard. Make sure your finger is hidden from the front. (Positioncheck: The non-index comer with signature should face you andthe ind ex co rne r without signature faces the audience).Simultaneously, slide the tom piece to the left and re-grip itbetween your left thumb and index finger as shown. (i ll . 5)Your curled left middle fin ger should be in front (o n theaudience side) of the card slightly covering the left edge of it.because half of the spectator's signature should be on this piece .and it's not. Curl all other fingers away for maximum visibility.
/
l
#sTouch the pieces together. and explain that you will restore themalong the tear. With the tips of your right thumb and middlefinge r (which overlap the folded card very slightly) grip the tomcard so that yo u are holding both pieces in alignment in you rrigh t hand. With your left fingers , cover just the lorn piece andthe "seam" between the 2 pieces. Make sure the audience can seealmost the entire face of the folded card, however. Unde r coverof your left fingers , use your right index finger to push thefo lded card 10 the left (like opening a book). (ill. 6)
#6Slide your left fingers to the left (taking the tom piece along forthe ride) , and reveal the folded half card. The illusion here of 2pieces fusing together is perfect. Grab the left side of the cardwith your left thumb and pivot the card 90° counter-clockwisewith your right hand. Hold this card at the bottom with your leftindex finger and thumb (you a lso have the torn piece fingerpalme d in this hand ). (ill . 7)
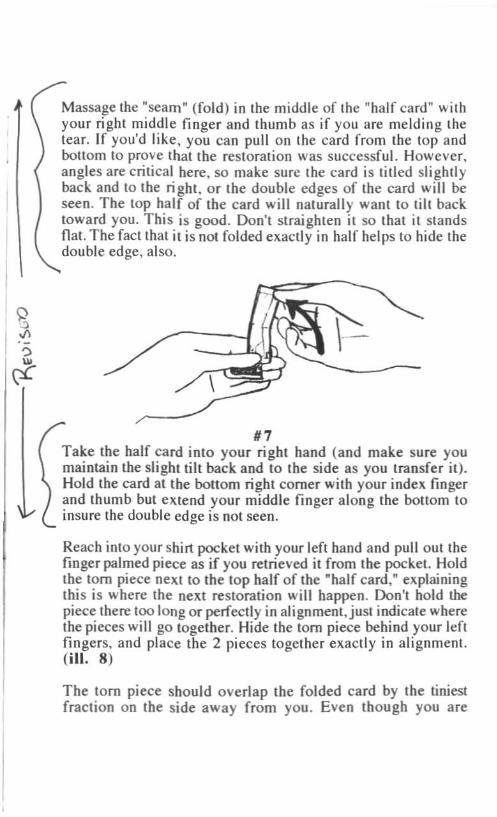
Massage the "seam " (fold) in the middle of the "half ca rd" withyour right middl e finger and thumb as if you are meldin g thetear . If you'd like, you can pull on the ca rd from the top andbottom to prove that the restoration was successful. However ,angles are critical here, so make sure the ca rd is titled slightlyback and to the right. or the do uble edge s of the ca rd will beseen . The top half of the card will naturall y want to tilt backtoward you. Thi s is good. Don't straighten it so that it standsOat. The fact that it is not folded exac tly in half helps to hide thedouble edge , also.
# 7Take the half ca rd into yo ur right hand (and make sure youmaintain the slight tilt back and to the side as you transfer it).Hold the card at the bottom right comer with your index fingerand thumb but ex tend yo ur midd le finger along the bottom toinsure the double edge is not seen.
Reach into your shirt pocket with your left hand and pull out thefinger palmed piece as if you retrieved it from the pocket. Holdthe tom piece next to the top half of the "half card, It explainingthis is where the next restoration will happen. Don't hold thepiece there too long or perfectly in alignment, just indicate wherethe pieces will go together . Hide the tom piece behind your leftfingers. and place the 2 pieces together exactly in alignment.(ill. 8)
Th e tom piece should overlap the folded ca rd by the tiniestfraction on the side aw ay from you . Even though you are
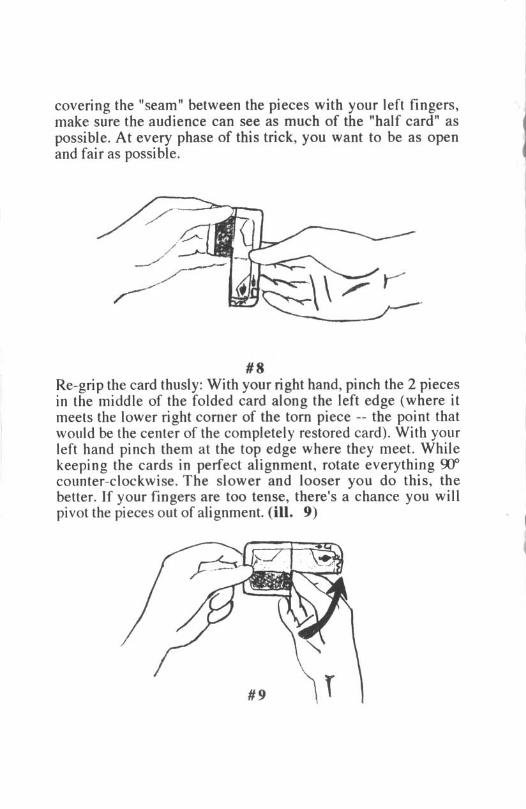
cove ring the "seam" between the pieces with your left fingers,make sure the audience can see as much of the "half card" aspossible. At every phase of this trick, you want to be as openand fair as possible.
#8Re-grip the card thusly: With your right hand, pinch the 2 piecesin the middle of the folded card along the left edge (where itmeets the lower right comer of the torn piece -- the point thatwould be the center of the completely restored card). With yourleft hand pinch them at the top edge where they meet. Whil ekeeping the cards in perfec t alignment, rotate eve rything gycounter-cloc kwise . The slower and looser you do this. thebetter. If your fingers are too tense, there's a chance you willpivot the pieces out of alignment. ( ill. 9)
#9
II
l

Keep the 2 pieces together by pinching them along the extremeleft edge with your left middle finger and thumb. Let go withyour right hand and once aga in gent ly massage the seambetween the pieces as if you are fusing them back together. Takeyour right hand away and the illusion that you are holding 3/4 ofa card is completely convincing. (ill. 10) Just make sure thecard is tilted slightly back so the double edge of the folded carddoesn't show on top.
#10Explain that you would like the audience to keep an eye on theportion of the signature visible on (their) left side as you restorethe last piece. This is to insure you're not switching ca rds , ordoing any othe r sneaky, cheati ng th ing. (Except for thi smoment, the signature is not something to either emphasize or beparanoid about. You primari ly ignore it until the end when youhand the restored card back and have the signature confirmed).With your right hand, pinch the card at what would be the centerof the complete card so you can re-grip with the left. Extendyour left index finger along the seam where the last 2 pieceswere "healed" and re-pinch with your finger and thumb. Yourfinger should cover almost the entire seam. Make sure you curlyour left fingers back so they are not covering any part of thecard. The audience must be able to see almost the entire surfaceof the card(s).
~eaCh into your shirt pocket with right hand and pretend to pull
out the last piece . Hold your hand as if the piece is hiddenbehind your fingers. Cover up the space with your right fingers
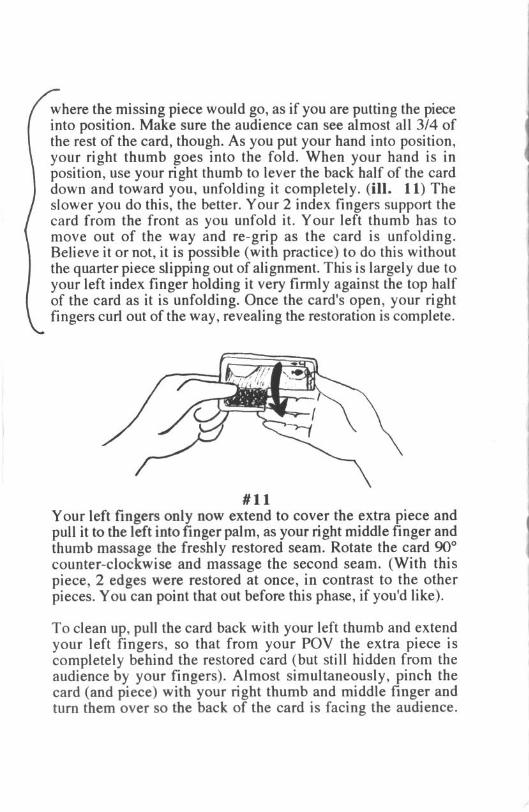
where the missing piece would go, as if you are putting the pieceinto position. Make sure the audience can see almost all 3/4 ofthe rest of the card, though. As you put your hand into position,your right thumb goes into the fold . When your hand is inposition, use your right thumb to lever the back half of the carddown and toward you. unfoldin g it completely. (ill. 11) Theslower you do this, the better. Your 2 index fingers support thecard from the front as you unfold it. Your left thumb has tomove out of the way and re-grip as the ca rd is unfolding.Believe it or not, it is possible (with practice) to do this withoutthe quarter piece slipping out of alignment. This is largely due toyour left index finger holding it very firmly against the top halfof the card as it is unfolding. Once the card's open, your rightfingers curl out of the way, revealing the restoration is complete.
#11Your left fingers only now extend to cover the extra piece andpull it to the left into finger palm, as your right middle finger andthumb massage the freshly restored seam. Rotate the card 90°counter-clockwise and massage the second sea m. (With thispiece, 2 edges were restored at once, in contrast to the otherpieces. You can point that out before this phase, if you'd like).
To clean up, pull the card back with your left thumb and extendyour left fingers, so that from your roy the ext ra piece iscompletely behind the restored card (but still hidden from theaudience by your fingers). Almost simultaneously, pinch thecard (and piece) with your right thumb and middle finge r andturn them over so the back of the card is facing the audience.
With the ca rd pinched like this, both your hands are seen to becompletely empty (other than the card. of course; and the extrapiece is hidden behind the card). With your right thumb. pull theextra piece into finger palm as you rotate the card with your lefthand and then immediate ly re-pinch it with your right thumb andindex finger. Curl you right fingers in and fold up the palmedpiece, so that your hand can look as natu ral as possible as youhand the card out for examination.
Don't be in a hurry to go south with the palmed piece . Thereshould be no heat, unless you act like you' re guilty. Returningthe marker to your pocket is a good way to ditch.
Please put in the work this trick deserve s. Finesse is the key. Itwill take a lot of mirror work ju st to understand the routine . letalone perfect it. Videotape wou ld, obviously, be an even bettertool. Learn to look natural with something in finger palm andNEVER obscure more of the ca rd than necessary. If done well,this trick can look very magical. If done poorly, your audiencewill merely wonder what the fumbling behind your fingers is allabout, and be thoroughly underwhelmed.
FINAL NOTE: If you are uncomfortable with the idea ofputt ing the torn pieces into yo ur shirt poc ket, there arealternatives. Jim Lewis has suggested putting the pieces on atable and lappi ng them as they are picked up. A handling alongthese lines would be very easy to work out. You may want tocheck out David Regal 's clever ploy for ditching to the pocket inthe original "Piece by Piece.M
REVISIONSI've lear ned some bits of fln esse and made sli&ht changes of handling to the routine sincethe ma nuscr ipt was written. Most of them are subtle changes, but they make a difference.
The following parapgraphs come immediately af'tcr illustration #4. Th ey replace the last 2paragraphs on tbat page, and tbe 3 paragraphs on the following page.
Now fold the card back and fo rth and tear it in ha]f f rom top to bottom . Re-grip it at the top if you have to. Putthe right hand half in fro nt (on theaudie nce side) of the half in you r left. T he phony signature is now hidden.Rotate the pieces 90" counte r-clockwise and tear the halves into quarters. Tear by pulling the rig ht hal f towardyou rse lf (this is important so the tom edge will look right later). Make the tears as nice and strai ght as you areable. Fold them back and fo rth before teari ng. if need be. Your atti tude about the foldi ng and the teari ngshou ld be casual. Don't be overly careful and studied. or worry about exact finger placements. or feel guiltyabou t the finger palmed card,
Fan the pieces and display 2 in each hand. Put the right hand pieces behind (on your side 00 the ones in you rleft As you do this. slide the 2 right hand pieces together. so the y are almost completel y lined up with eachother. This makes the nut step easier. Hold the 4 pieces in a fan in yo ur left fingertips . Ex plain you willrestore the card one piece a t a time. and that you will put 2 pieces away while you start with the o ther 2.
My first 3 handli ngs of this nex t part were very convol uted and unna tura l. This new handling is based on agrea t sugges tion by Ti m Trono. Hold the 4 pieces in a fan in you r left fi ngerti ps. Explain yo u will restore thecard one piece at a time. and. that you will put 2 pieces away while yo u start with the other 2. Regrab thepieces with you r right hand. Adjust the pieces just enough so that you can feed the leftmost piece in betweenyour fingers and the fo tcec caret. Move yo ur left hand to the righ t. feed ing the folded card behind the pieces.With you r index fi nger and thumb . pinch the leftmost piece and the fo lded card a nd carry them and away tothe left. All of this is done as one smooth motion. C url your other fingers out of the way, to di splay themcleanly as 2 pieces. If the tom piece is jogged to the right and angled down. covering the top of the foldedcard and the rig ht ed ges. it wi ll look just like 2 pieces. The tom piece in thi s hand should be the non-signed .non -index comer.
Simultaneously. with you r right hand . lake the other 3 torn pieces to the right and slide the rightmost piecewith yo ur thu mb to the left. to hide it behind theother 2 pieces. Curl your fi ngers out of the way and cleanlydispl ay them as 2 pieces. (ill. A) Someti mes. the pieces will slide oddly and the th ird one won't be ent ire lyhidden. If this happens. it's not a problem. Merely tilt your hand back so that the pieces are al most horizontal .and it is impossible to tell how many pieces you are holding . Pu t these 3 pieces (as 2) in your left front shi rtpocket (see final note ).
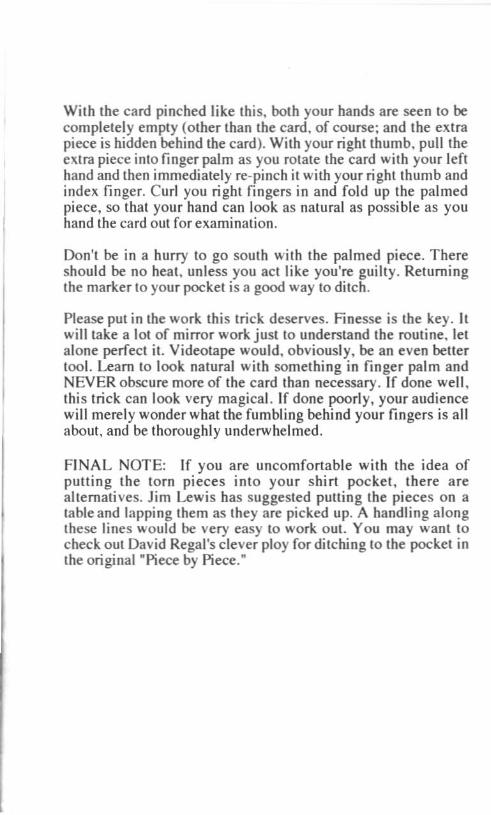
Take the folded card into edge grip between your right midd le finger and. thumb. Put you r index finger intothe fold d the card. (Check poi nt: The non-index comer of the fol ded card with signature faces you and theinde x comer WIO signature faces the audience ). Simultaneously. slide the torn piece to the left and re-gri p itbetween your left thumb and index fi nger as shown . Your curled left midd le fi nger shou ld be in fro nt (on theaudience side) of thecard. slightly coveri ng the left edge of it. because half d thespectator's signature shouldbe on this piece. and it's not. C url a ll other fingers away for maximum visibili ty. (ill. 5)
T hese next 3 paragraphs replace the 3 paragraphs immediately after ill. #6.
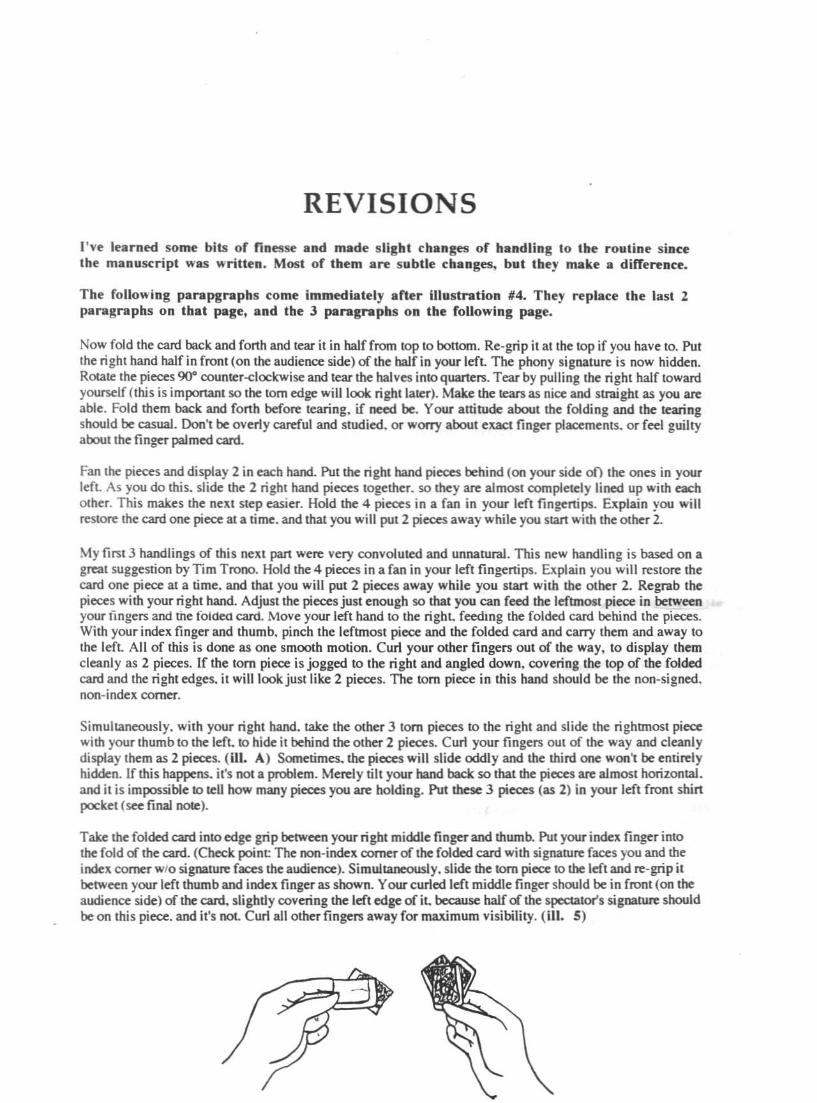
Slide your left fingers to the left (taki ng the tom piece into finger palm) and reveal the hal f card. The illusionhere of 2 pieces fusing together is perfect. Grab the left side of the card with your left hand and pivot the card9Cr cou nter-clockwise with your right hand. (ill. 7)
Make sure yo u pause before you pivot the card vertically. and let the audience see clearl y that a resto ration hastaken place. After you pivot. hold the card a! the bo ttom with yo ur left index fin ger and thumb. and massagethe "seam " with yo ur right middle finger and thumb as if yo u are meldin g the tear. If you 'd like. you canbrie fl y be nd the card back and fonh and tug o n it from the top and bottom to prove that it is in one piece .Ang les are critical here . so as yo u display the card. make sure it is titled slightly back and to the right. or thedo ub le edges will be seen . The fact that it is not folded exactly in half helps to hide the double ed ge . also.
Take the card into your right hand Hold it alon g the right ed ge in themiddl e. Don 't straighten the card so it isfla t. The card should stay slightly bent in the middle with the top and bottom slan ted back toward you. and thebe nt middle poi nting toward yo ur aud ience. This helps hide the extra ed ges. Also. remember to maintain aslight tilt to the right.
Re: the action depicted in ill 19:
T he card does not pivot in your left hand. You r left hand pinches very tightl y and rota tes with the card. so thepieces don't shift.
Th is next paragraph replaces the paragraph immediately preceding ill. #It. (2 paragraphsafter iII . ..!!!!l- _
Reach into your shirt pocket with right hand and pretend to pull o ut the last piece. Hold your hand as if thepiece is hidden behind your fingers . Move quickly but casually as if you are putting the piece into position.and with your right fingers . cover up the space where the missing piece would go . Make sure the audien cecan seealm ost a113/40f the rest of the card. As you put yo ur hand into position . yo ur right thumb goes intothe fold at the upper right comer. After you r hand is in position . usc your right thumb to lever the back half ofthe ca rd down and toward yo u. unfolding it completely. (ill. II ) Your 2 index fin gers support the card fromthe front as you unfold it. The right side comes down slightly ahead of the left side because you r left thumb isin the way. After the right s ide is unfolded about half way. the card is then primari ly gripped. by the righthan d. so your left thumb can mov e o ut of the way and then re-grip. T his all happens in o ne smoothmovement. It is themost difficult move in the routine but it is possible (with practice) to do this without thequarter piece slipping ou t of alignment. if both index fin gers press very firmly agai ns t the card during theentire unfoldi ng. Once thecard's open. you r right fin gers curl out of the way. reveal ing that the restoration iscomplete.
One final general note:
It is~ that you don 't let the finger palmedcard peek through the ' wincows" in your fin gers. Thi s is thebiggest pro blem I've had while performing the routine.

t'd lo ve to hear your ques tions, comments, ideas,'Improvements, criticism, feedback (pleasel):
John Lovick4322 1/2 Sunset Drive
L.A. CA 90027
(213) 666-5416