
The Privileged Appliance and Modules (TPAM)...
95
The Privileged Appliance and Modules (TPAM) 2.5 Client Setup Guide
Transcript of The Privileged Appliance and Modules (TPAM)...

The Privileged Appliance and Modules (TPAM) 2.5Client Setup Guide

© 2014 Dell Inc. ALL RIGHTS RESERVED.
This guide contains proprietary information protected by copyright. The software described in this guide is furnished under a software license or nondisclosure agreement. This software may be used or copied only in accordance with the terms of the applicable agreement. No part of this guide may be reproduced or transmitted in any form or by any means, electronic or mechanical, including photocopying and recording for any purpose other than the purchaser’s personal use without the written permission of Dell Inc.
The information in this document is provided in connection with Dell products. No license, express or implied, by estoppel or otherwise, to any intellectual property right is granted by this document or in connection with the sale of Dell products. EXCEPT AS SET FORTH IN THE TERMS AND CONDITIONS AS SPECIFIED IN THE LICENSE AGREEMENT FOR THIS PRODUCT, DELL ASSUMES NO LIABILITY WHATSOEVER AND DISCLAIMS ANY EXPRESS, IMPLIED OR STATUTORY WARRANTY RELATING TO ITS PRODUCTS INCLUDING, BUT NOT LIMITED TO, THE IMPLIED WARRANTY OF MERCHANTABILITY, FITNESS FOR A PARTICULAR PURPOSE, OR NON-INFRINGEMENT. IN NO EVENT SHALL DELL BE LIABLE FOR ANY DIRECT, INDIRECT, CONSEQUENTIAL, PUNITIVE, SPECIAL OR INCIDENTAL DAMAGES (INCLUDING, WITHOUT LIMITATION, DAMAGES FOR LOSS OF PROFITS, BUSINESS INTERRUPTION OR LOSS OF INFORMATION) ARISING OUT OF THE USE OR INABILITY TO USE THIS DOCUMENT, EVEN IF DELL HAS BEEN ADVISED OF THE POSSIBILITY OF SUCH DAMAGES. Dell makes no representations or warranties with respect to the accuracy or completeness of the contents of this document and reserves the right to make changes to specifications and product descriptions at any time without notice. Dell does not make any commitment to update the information contained in this document.
If you have any questions regarding your potential use of this material, contact:
Dell Inc. Attn: LEGAL Dept 5 Polaris Way Aliso Viejo, CA 92656
Refer to our web site (software.dell.com) for regional and international office information.
Trademarks
Dell and the Dell logo are trademarks of Dell Inc. and/or its affiliates. Other trademarks and trade names may be used in this document to refer to either the entities claiming the marks and names or their products. Dell disclaims any proprietary interest in the marks and names of others.
TPAM Client Setup Guide Updated - January 2014 Software Version - 2.5
Legend
CAUTION: A CAUTION icon indicates potential damage to hardware or loss of data if instructions are not followed.
WARNING: A WARNING icon indicates a potential for property damage, personal injury, or death.
IMPORTANT NOTE, NOTE, TIP, MOBILE, or VIDEO: An information icon indicates supporting information.
TPAM 2.5Client Setup Guide
2

Contents
AS/400 (iSeries) . . . . . . . . . . . . . . . . . . . . . . . . . . . . . . . . . . . . . . . . . . . . . . . . . 7
Add the Functional Account . . . . . . . . . . . . . . . . . . . . . . . . . . . . . . . . . . . . . . . . . 7
Add System to TPAM . . . . . . . . . . . . . . . . . . . . . . . . . . . . . . . . . . . . . . . . . . . . . . 7Testing System/Checking Password: . . . . . . . . . . . . . . . . . . . . . . . . . . . . . . . . . 8Changing Password: . . . . . . . . . . . . . . . . . . . . . . . . . . . . . . . . . . . . . . . . . . . . 8
Cisco Devices . . . . . . . . . . . . . . . . . . . . . . . . . . . . . . . . . . . . . . . . . . . . . . . . . . 9
Cisco Router (SSH) . . . . . . . . . . . . . . . . . . . . . . . . . . . . . . . . . . . . . . . . . . . . . . . . 9
Cisco Router (TEL) . . . . . . . . . . . . . . . . . . . . . . . . . . . . . . . . . . . . . . . . . . . . . . . .10
Cisco PIX . . . . . . . . . . . . . . . . . . . . . . . . . . . . . . . . . . . . . . . . . . . . . . . . . . . . . .11
Dell Remote Access Client (DRAC) Systems . . . . . . . . . . . . . . . . . . . . . . . . . . . . . 12
Introduction . . . . . . . . . . . . . . . . . . . . . . . . . . . . . . . . . . . . . . . . . . . . . . . . . . . .12
Configure the DRAC . . . . . . . . . . . . . . . . . . . . . . . . . . . . . . . . . . . . . . . . . . . . . . .12
Log on to the Dell Remote Access Web Interface . . . . . . . . . . . . . . . . . . . . . . . . . . . .14
Create the Functional Account . . . . . . . . . . . . . . . . . . . . . . . . . . . . . . . . . . . . . . .15
Add System to TPAM . . . . . . . . . . . . . . . . . . . . . . . . . . . . . . . . . . . . . . . . . . . . . .16
FreeBSD . . . . . . . . . . . . . . . . . . . . . . . . . . . . . . . . . . . . . . . . . . . . . . . . . . . . . 19
Introduction . . . . . . . . . . . . . . . . . . . . . . . . . . . . . . . . . . . . . . . . . . . . . . . . . . . .19
Add the Functional Account . . . . . . . . . . . . . . . . . . . . . . . . . . . . . . . . . . . . . . . . .19
Using sudo . . . . . . . . . . . . . . . . . . . . . . . . . . . . . . . . . . . . . . . . . . . . . . . . . . . . .19
SSH Daemon . . . . . . . . . . . . . . . . . . . . . . . . . . . . . . . . . . . . . . . . . . . . . . . . . . . .20
Add System to TPAM . . . . . . . . . . . . . . . . . . . . . . . . . . . . . . . . . . . . . . . . . . . . . .20
Create and Modify DSS Key . . . . . . . . . . . . . . . . . . . . . . . . . . . . . . . . . . . . . . . . . .21
HP iLO2 . . . . . . . . . . . . . . . . . . . . . . . . . . . . . . . . . . . . . . . . . . . . . . . . . . . . . 22
Introduction . . . . . . . . . . . . . . . . . . . . . . . . . . . . . . . . . . . . . . . . . . . . . . . . . . . .22
Add the Functional Account . . . . . . . . . . . . . . . . . . . . . . . . . . . . . . . . . . . . . . . . .22
Add System to TPAM . . . . . . . . . . . . . . . . . . . . . . . . . . . . . . . . . . . . . . . . . . . . . .23
Create and Modify DSS Key . . . . . . . . . . . . . . . . . . . . . . . . . . . . . . . . . . . . . . . . . .24
HP-UX Trusted and Untrusted . . . . . . . . . . . . . . . . . . . . . . . . . . . . . . . . . . . . . . 25
Add System to TPAM . . . . . . . . . . . . . . . . . . . . . . . . . . . . . . . . . . . . . . . . . . . . . .25
IBM Hardware Management Console (HMC) . . . . . . . . . . . . . . . . . . . . . . . . . . . . . 26
Introduction . . . . . . . . . . . . . . . . . . . . . . . . . . . . . . . . . . . . . . . . . . . . . . . . . . . .26
Add the Functional Account . . . . . . . . . . . . . . . . . . . . . . . . . . . . . . . . . . . . . . . . .26
Add System to TPAM . . . . . . . . . . . . . . . . . . . . . . . . . . . . . . . . . . . . . . . . . . . . . .26
Juniper Junos . . . . . . . . . . . . . . . . . . . . . . . . . . . . . . . . . . . . . . . . . . . . . . . . . 28
Introduction . . . . . . . . . . . . . . . . . . . . . . . . . . . . . . . . . . . . . . . . . . . . . . . . . . . .28
Add the Functional Account . . . . . . . . . . . . . . . . . . . . . . . . . . . . . . . . . . . . . . . . .28
Management Access Configuration . . . . . . . . . . . . . . . . . . . . . . . . . . . . . . . . . . . . .28
TPAM 2.5Client Setup Guide
3

Add System to TPAM . . . . . . . . . . . . . . . . . . . . . . . . . . . . . . . . . . . . . . . . . . . . . .28
LDAP and LDAPS . . . . . . . . . . . . . . . . . . . . . . . . . . . . . . . . . . . . . . . . . . . . . . . 30
Add System to TPAM . . . . . . . . . . . . . . . . . . . . . . . . . . . . . . . . . . . . . . . . . . . . . .30
Account Name Setup . . . . . . . . . . . . . . . . . . . . . . . . . . . . . . . . . . . . . . . . . . . . . .30
MAC OS X(10.4-10.8) . . . . . . . . . . . . . . . . . . . . . . . . . . . . . . . . . . . . . . . . . . . . 32
Introduction . . . . . . . . . . . . . . . . . . . . . . . . . . . . . . . . . . . . . . . . . . . . . . . . . . . .32
Enable SSH Daemon . . . . . . . . . . . . . . . . . . . . . . . . . . . . . . . . . . . . . . . . . . . . . . .32
Add the Functional Account . . . . . . . . . . . . . . . . . . . . . . . . . . . . . . . . . . . . . . . . .33
Add System to TPAM . . . . . . . . . . . . . . . . . . . . . . . . . . . . . . . . . . . . . . . . . . . . . .35
Create and Modify the DSS Key . . . . . . . . . . . . . . . . . . . . . . . . . . . . . . . . . . . . . . .35
Mainframe . . . . . . . . . . . . . . . . . . . . . . . . . . . . . . . . . . . . . . . . . . . . . . . . . . . . 37
Mainframe (RACF) . . . . . . . . . . . . . . . . . . . . . . . . . . . . . . . . . . . . . . . . . . . . . . . .37Create the Functional Account . . . . . . . . . . . . . . . . . . . . . . . . . . . . . . . . . . . . .37Add System to TPAM . . . . . . . . . . . . . . . . . . . . . . . . . . . . . . . . . . . . . . . . . . . .37Password Check . . . . . . . . . . . . . . . . . . . . . . . . . . . . . . . . . . . . . . . . . . . . . . .37Password Change . . . . . . . . . . . . . . . . . . . . . . . . . . . . . . . . . . . . . . . . . . . . . .37
Mainframe LDAP (RACF/TopSecret) . . . . . . . . . . . . . . . . . . . . . . . . . . . . . . . . . . . . .37Add System to TPAM . . . . . . . . . . . . . . . . . . . . . . . . . . . . . . . . . . . . . . . . . . . .37Account Name Setup . . . . . . . . . . . . . . . . . . . . . . . . . . . . . . . . . . . . . . . . . . .38
Mainframe (ACF2) . . . . . . . . . . . . . . . . . . . . . . . . . . . . . . . . . . . . . . . . . . . . . . . .39Add the Functional Account . . . . . . . . . . . . . . . . . . . . . . . . . . . . . . . . . . . . . . .39Add the System to TPAM . . . . . . . . . . . . . . . . . . . . . . . . . . . . . . . . . . . . . . . . .39Password Check . . . . . . . . . . . . . . . . . . . . . . . . . . . . . . . . . . . . . . . . . . . . . . .40Password Change . . . . . . . . . . . . . . . . . . . . . . . . . . . . . . . . . . . . . . . . . . . . . .40
MS SQL Server (2000 & 2005) . . . . . . . . . . . . . . . . . . . . . . . . . . . . . . . . . . . . . . 41
Authentication and Encryption . . . . . . . . . . . . . . . . . . . . . . . . . . . . . . . . . . . . . . .41
TPAM Commands for Managing MS SQL Server . . . . . . . . . . . . . . . . . . . . . . . . . . . . . .41
Encryption Recommendation . . . . . . . . . . . . . . . . . . . . . . . . . . . . . . . . . . . . . . . . .42
Add the Functional Account . . . . . . . . . . . . . . . . . . . . . . . . . . . . . . . . . . . . . . . . .42
Add System to TPAM . . . . . . . . . . . . . . . . . . . . . . . . . . . . . . . . . . . . . . . . . . . . . .42
SQL Server Named Instances . . . . . . . . . . . . . . . . . . . . . . . . . . . . . . . . . . . . . . . . .43
Nokia IPSO . . . . . . . . . . . . . . . . . . . . . . . . . . . . . . . . . . . . . . . . . . . . . . . . . . . 45
Introduction . . . . . . . . . . . . . . . . . . . . . . . . . . . . . . . . . . . . . . . . . . . . . . . . . . . .45
Add the Functional Account . . . . . . . . . . . . . . . . . . . . . . . . . . . . . . . . . . . . . . . . .45
Add System to TPAM . . . . . . . . . . . . . . . . . . . . . . . . . . . . . . . . . . . . . . . . . . . . . .46
Novell NDS . . . . . . . . . . . . . . . . . . . . . . . . . . . . . . . . . . . . . . . . . . . . . . . . . . . 47
Add System to TPAM . . . . . . . . . . . . . . . . . . . . . . . . . . . . . . . . . . . . . . . . . . . . . .47
Account Name Setup . . . . . . . . . . . . . . . . . . . . . . . . . . . . . . . . . . . . . . . . . . . . . .47
OpenVMS . . . . . . . . . . . . . . . . . . . . . . . . . . . . . . . . . . . . . . . . . . . . . . . . . . . . 49
Add System to TPAM . . . . . . . . . . . . . . . . . . . . . . . . . . . . . . . . . . . . . . . . . . . . . .49
Oracle (9i,10g,11g) . . . . . . . . . . . . . . . . . . . . . . . . . . . . . . . . . . . . . . . . . . . . . 50
TPAM 2.5Client Setup Guide
4

Authentication and Encryption . . . . . . . . . . . . . . . . . . . . . . . . . . . . . . . . . . . . . . .50
TPAM Commands for Oracle . . . . . . . . . . . . . . . . . . . . . . . . . . . . . . . . . . . . . . . . .50
Encryption Recommendation . . . . . . . . . . . . . . . . . . . . . . . . . . . . . . . . . . . . . . . . .50
Add the Functional Account . . . . . . . . . . . . . . . . . . . . . . . . . . . . . . . . . . . . . . . . .50
Add System to TPAM . . . . . . . . . . . . . . . . . . . . . . . . . . . . . . . . . . . . . . . . . . . . . .51
POS 4690 . . . . . . . . . . . . . . . . . . . . . . . . . . . . . . . . . . . . . . . . . . . . . . . . . . . . 52
Add Functional Account . . . . . . . . . . . . . . . . . . . . . . . . . . . . . . . . . . . . . . . . . . . .52
Add a Password Rule . . . . . . . . . . . . . . . . . . . . . . . . . . . . . . . . . . . . . . . . . . . . . .56
Add System to TPAM . . . . . . . . . . . . . . . . . . . . . . . . . . . . . . . . . . . . . . . . . . . . . .57
ProxySG . . . . . . . . . . . . . . . . . . . . . . . . . . . . . . . . . . . . . . . . . . . . . . . . . . . . . 58
Introduction . . . . . . . . . . . . . . . . . . . . . . . . . . . . . . . . . . . . . . . . . . . . . . . . . . . .58
Add Functional Account . . . . . . . . . . . . . . . . . . . . . . . . . . . . . . . . . . . . . . . . . . . .58
Add Functional Account via the CLI . . . . . . . . . . . . . . . . . . . . . . . . . . . . . . . . . . . .60
Add System to TPAM . . . . . . . . . . . . . . . . . . . . . . . . . . . . . . . . . . . . . . . . . . . . . .60
PSM Web Access . . . . . . . . . . . . . . . . . . . . . . . . . . . . . . . . . . . . . . . . . . . . . . . . 62
Introduction . . . . . . . . . . . . . . . . . . . . . . . . . . . . . . . . . . . . . . . . . . . . . . . . . . . .62
Add System to TPAM . . . . . . . . . . . . . . . . . . . . . . . . . . . . . . . . . . . . . . . . . . . . . .62
SAP . . . . . . . . . . . . . . . . . . . . . . . . . . . . . . . . . . . . . . . . . . . . . . . . . . . . . . . . 64
Add System to TPAM . . . . . . . . . . . . . . . . . . . . . . . . . . . . . . . . . . . . . . . . . . . . . .64
Add Permissions to Functional Account in SAP . . . . . . . . . . . . . . . . . . . . . . . . . . . . .65
SonicWALL . . . . . . . . . . . . . . . . . . . . . . . . . . . . . . . . . . . . . . . . . . . . . . . . . . . 67
Introduction . . . . . . . . . . . . . . . . . . . . . . . . . . . . . . . . . . . . . . . . . . . . . . . . . . . .67
Add the Functional Account . . . . . . . . . . . . . . . . . . . . . . . . . . . . . . . . . . . . . . . . .67
Add System to TPAM . . . . . . . . . . . . . . . . . . . . . . . . . . . . . . . . . . . . . . . . . . . . . .68
Sybase Adaptive Server Enterprise (ASE) . . . . . . . . . . . . . . . . . . . . . . . . . . . . . . . 70
Authentication and Encryption . . . . . . . . . . . . . . . . . . . . . . . . . . . . . . . . . . . . . . .70
TPAM Commands for Sybase . . . . . . . . . . . . . . . . . . . . . . . . . . . . . . . . . . . . . . . . .70
Encryption Recommendation . . . . . . . . . . . . . . . . . . . . . . . . . . . . . . . . . . . . . . . . .70
Add the Functional Account . . . . . . . . . . . . . . . . . . . . . . . . . . . . . . . . . . . . . . . . .71
Add System to TPAM . . . . . . . . . . . . . . . . . . . . . . . . . . . . . . . . . . . . . . . . . . . . . .71
HP NonStop Tandem . . . . . . . . . . . . . . . . . . . . . . . . . . . . . . . . . . . . . . . . . . . . . 73
Introduction . . . . . . . . . . . . . . . . . . . . . . . . . . . . . . . . . . . . . . . . . . . . . . . . . . . .73
Server Setup . . . . . . . . . . . . . . . . . . . . . . . . . . . . . . . . . . . . . . . . . . . . . . . . . . .73
Add the Functional Account . . . . . . . . . . . . . . . . . . . . . . . . . . . . . . . . . . . . . . . . .73
TPAM Client Setup . . . . . . . . . . . . . . . . . . . . . . . . . . . . . . . . . . . . . . . . . . . . . . . .74
Test Connectivity . . . . . . . . . . . . . . . . . . . . . . . . . . . . . . . . . . . . . . . . . . . . . . . .74
Teradata . . . . . . . . . . . . . . . . . . . . . . . . . . . . . . . . . . . . . . . . . . . . . . . . . . . . . 75
Introduction . . . . . . . . . . . . . . . . . . . . . . . . . . . . . . . . . . . . . . . . . . . . . . . . . . . .75
Define a Data Source . . . . . . . . . . . . . . . . . . . . . . . . . . . . . . . . . . . . . . . . . . . . . .75
Add the Functional Account . . . . . . . . . . . . . . . . . . . . . . . . . . . . . . . . . . . . . . . . .76
TPAM 2.5Client Setup Guide
5

Add System to TPAM . . . . . . . . . . . . . . . . . . . . . . . . . . . . . . . . . . . . . . . . . . . . . .76
Tru64 Enhanced Security . . . . . . . . . . . . . . . . . . . . . . . . . . . . . . . . . . . . . . . . . 78
Introduction . . . . . . . . . . . . . . . . . . . . . . . . . . . . . . . . . . . . . . . . . . . . . . . . . . . .78
Add the Functional Account . . . . . . . . . . . . . . . . . . . . . . . . . . . . . . . . . . . . . . . . .78
Using sudo . . . . . . . . . . . . . . . . . . . . . . . . . . . . . . . . . . . . . . . . . . . . . . . . . . . . .78
SSH2 Daemon . . . . . . . . . . . . . . . . . . . . . . . . . . . . . . . . . . . . . . . . . . . . . . . . . . .78
Add System to TPAM . . . . . . . . . . . . . . . . . . . . . . . . . . . . . . . . . . . . . . . . . . . . . .79
Create and Modify DSS Key . . . . . . . . . . . . . . . . . . . . . . . . . . . . . . . . . . . . . . . . . .79
Linux and UNIX Systems . . . . . . . . . . . . . . . . . . . . . . . . . . . . . . . . . . . . . . . . . . 81
Introduction . . . . . . . . . . . . . . . . . . . . . . . . . . . . . . . . . . . . . . . . . . . . . . . . . . . .81
Add the Functional Account . . . . . . . . . . . . . . . . . . . . . . . . . . . . . . . . . . . . . . . . .81
Create and Modify the Public Key . . . . . . . . . . . . . . . . . . . . . . . . . . . . . . . . . . . . . .81
Add System to TPAM . . . . . . . . . . . . . . . . . . . . . . . . . . . . . . . . . . . . . . . . . . . . . .82
VMware vSphere 4 . . . . . . . . . . . . . . . . . . . . . . . . . . . . . . . . . . . . . . . . . . . . . . 84
Introduction . . . . . . . . . . . . . . . . . . . . . . . . . . . . . . . . . . . . . . . . . . . . . . . . . . . .84
Add the Functional Account . . . . . . . . . . . . . . . . . . . . . . . . . . . . . . . . . . . . . . . . .84
Add System to TPAM . . . . . . . . . . . . . . . . . . . . . . . . . . . . . . . . . . . . . . . . . . . . . .85
Windows Active Directory . . . . . . . . . . . . . . . . . . . . . . . . . . . . . . . . . . . . . . . . . 87
Introduction . . . . . . . . . . . . . . . . . . . . . . . . . . . . . . . . . . . . . . . . . . . . . . . . . . . .87
Add System to TPAM . . . . . . . . . . . . . . . . . . . . . . . . . . . . . . . . . . . . . . . . . . . . . .87
Windows Systems . . . . . . . . . . . . . . . . . . . . . . . . . . . . . . . . . . . . . . . . . . . . . . . 89
Introduction . . . . . . . . . . . . . . . . . . . . . . . . . . . . . . . . . . . . . . . . . . . . . . . . . . . .89
Add the Functional Account . . . . . . . . . . . . . . . . . . . . . . . . . . . . . . . . . . . . . . . . .89
Add System to TPAM . . . . . . . . . . . . . . . . . . . . . . . . . . . . . . . . . . . . . . . . . . . . . .90
Test System . . . . . . . . . . . . . . . . . . . . . . . . . . . . . . . . . . . . . . . . . . . . . . . . . . . .91
Troubleshoot System Connectivity . . . . . . . . . . . . . . . . . . . . . . . . . . . . . . . . . . . . .92
Add Windows Domain Member System to TPAM . . . . . . . . . . . . . . . . . . . . . . . . . . . . .92
Test and Troubleshoot . . . . . . . . . . . . . . . . . . . . . . . . . . . . . . . . . . . . . . . . . . . 94
Test System . . . . . . . . . . . . . . . . . . . . . . . . . . . . . . . . . . . . . . . . . . . . . . . . . . . .94
Troubleshoot System Connectivity . . . . . . . . . . . . . . . . . . . . . . . . . . . . . . . . . . . . .94
About Dell . . . . . . . . . . . . . . . . . . . . . . . . . . . . . . . . . . . . . . . . . . . . . . . . . . . . 95
Contacting Dell . . . . . . . . . . . . . . . . . . . . . . . . . . . . . . . . . . . . . . . . . . . . . . . . . .95
Technical Support Resources . . . . . . . . . . . . . . . . . . . . . . . . . . . . . . . . . . . . . . . . .95
TPAM 2.5Client Setup Guide
6

1
AS/400 (iSeries)
• Add the Functional Account
• Add System to TPAM
Add the Functional AccountCreate a new functional account on the AS/400 and assign it a password. Grant the functional account the privileges required to use the chgusrprf command on other profiles.
Add System to TPAMFrom the TPAM menu, Systems, Accounts, & Collections | Systems | Add System. Provide the name for the system and Network Address (this can be either IP address or DNS name) of the AS/400. If automatic password management is desired, check the option box to do so, and configure the change settings according to your deployment plan.
Select AS400 as the platform.
Click the Connection tab to configure the details for the functional account, and other communication options.
TPAM 2.5Client Setup Guide
7

Specify the functional account used on the AS400, and enter the password for the account.
Note the option to specify an Alternate Port. If the default Telnet port of 23 is not used (check with the AS400 administrator), enter the port in this field on which the device will be listening for connections.
Testing System/Checking Password:• Telnet access to the AS/400 with a 3270 or 5250 emulator.
• No special characters needed to be pressed other than carriage return on login. Pressing enter after initial login is acceptable.
• SYSTEM: is present on the screen following a successful login. (This is usually in the upper right hand corner, see illustration below)
Changing Password:• The functional account has the required privileges to use chgusrprf from the command prompt.
• The result message for a successful change displays at the very least the following on screen:
• USER PROFILE <managed_account> CHANGE
TPAM 2.5Client Setup Guide
8

2
Cisco Devices
• Cisco Router (SSH)
• Cisco Router (TEL)
• Cisco PIX
Cisco Router (SSH)SSH v2 protocol is used to connect to the Cisco® device.
Username and password authentication is used for connections, managed locally on the Cisco Device.
Cisco Switches use the same platform type in TPAM.
From the TPAM menu, Systems, Accounts, & Collections | Systems | Add System. Provide the name for the system and network Address (this can be either IP address or DNS name) of the Cisco appliance. If automatic password management is desired, check the option box to do so, and configure the change settings according to your deployment plan.
Select Cisco Router (SSH) as the platform.
Click the Connection tab to configure the details for the functional account, and other communication options.
TPAM 2.5Client Setup Guide
9

Specify the functional account used on the Cisco appliance, and enter the password for the account. Windows® Domain functional accounts may also be used as the functional accounts for Cisco platforms. The connection will use the designated domain account to manage the platform.
Note the option to specify an Alternate Port. If the default SSH port of 22 is not used (check with the network administrator), enter the port in this field on which the device will be listening for connections.
Cisco Router (TEL)The telnet protocol is used for the connection to the Cisco device.
This method uses the line password authentication method and enable authentication method for management.
From the TPAM menu, Systems, Accounts, & Collections | Systems | Add System. Provide the name for the system and network Address (this can be either IP address or DNS name) of the Cisco appliance. If automatic password management is desired, check the option box to do so, and configure the change settings according to your deployment plan.
Select Cisco Router (TEL) as the platform.
Click the Connection tab to configure the details for the functional account, and other communication options.
Specify the functional account used on the Cisco appliance, and enter the password for the account or the line definition – whichever method is used for authentication to the appliance. Windows Domain functional accounts may also be used as the functional accounts for Cisco platforms. The connection will use the designated domain account to manage the platform.
Note the option to specify an Alternate Port. If the default Telnet port of 23 is not used (check with the network administrator), enter the port in this field on which the device will be listening for connections.
TPAM 2.5Client Setup Guide
10

Cisco PIXFrom the TPAM menu, Systems, Accounts, & Collections | Systems | Add System. Provide the name for the system and network Address (this can be either IP address or DNS name) of the Cisco appliance. If automatic password management is desired, check the option box to do so, and configure the change settings according to your deployment plan.
Select Cisco PIX as the platform.
Click the Connection tab to configure the details for the functional account, and other communication options.
Specify the functional account used on the Cisco appliance, and enter the password for the account. Windows Domain functional accounts may also be used as the functional accounts for Cisco platforms. The connection will use the designated domain account to manage the platform.
Note the option to specify an Alternate Port. If the default port of 22 is not used (check with the network administrator), enter the port in this field on which the device will be listening for connections.
TPAM 2.5Client Setup Guide
11

3
Dell Remote Access Client (DRAC) Systems
• Introduction
• Configure the DRAC
• Log on to the Dell Remote Access Web Interface
• Create the Functional Account
• Add System to TPAM
IntroductionThis chapter provides step by step instructions for configuring Dell™ Remote Access Client systems to be managed by TPAM. The steps involved are functional account creation and modification, as well as SSH key installation and configuration if necessary. Administrative knowledge of Dell Remote Access is assumed.
Configure the DRACTo set the network configuration options:
1 Connect a monitor and USB keyboard to the front of the server.
2 Connect an ethernet cable to the Dell remote access NIC on the back of the server.
TPAM 2.5Client Setup Guide
12

3 Start the server and wait for the BOOT screen to display the option for Remote Access Setup. Access the interface by pressing Ctrl+E keys within 5 seconds of the option appearing on the screen.
4 On the main screen scroll down to select Lan Parameters and press the ENTER key.
5 Scroll down the list to locate the IPv4 settings and set the required information (IP address, Subnet mask, and Gateway). Once the required information is entered press the ESC key to exit the screen.
6 Scroll down the main menu to select Lan User Configuration and press the ENTER key.
7 Enter the Account User Name and enter and confirm a password.
TPAM 2.5Client Setup Guide
13

8 Press the ESC key.
9 Select Save Changes and Exit and press the ENTER key.
10 From the main screen press the ESC key to exit and the system will continue to start.
Log on to the Dell Remote Access Web InterfaceTo log on to the Dell Remote Access Web interface:
1 Launch a DRAC supported web browser and browse to https://<DRACipaddress>.
2 Log on to the DRAC using the username and password configured during the initial set up.
3 Select Remote Access | Network Security from the menu.
4 Click on the Services tab. Make sure the Enabled check box is selected for the SSH service.
5 Click the Apply button.
TPAM 2.5Client Setup Guide
14

Create the Functional AccountIn this example the functional account will be named root.
To create the functional account:
1 Click on iDRAC Settings on the left hand menu.
2 Click on the Network/Security tab.
3 Click on Users tab.
4 Click on the User ID number for the root account.
5 Select Configure User.
6 Click the Next button.
7 Under the General section:
• Select the Enable User check box
• Enter root for the User Name
• Select the Change Password check box.
• Enter and confirm a password
TPAM 2.5Client Setup Guide
15

8 In the IPMI User Privileges section:
• Select Operator for the Maximum LAN User Privilege Granted
• Select None for Maximum Serial Port User Privilege Granted
• Leave the Enable Serial Over LAN check box clear
9 In the iDRAC User Privileges section:
• Select Operator from the Roles list
• Select the Login to iDRAC check box
• Select the Configure Users check box.
The rest of the check boxes in this section should be clear.
10 Click the Apply button.
11 Log out
Add System to TPAMFrom the TPAM menu, select Systems, Accounts, & Collections | Systems | Add System. Provide the name for the system and Network Address (this can be either IP address or DNS name). Select Dell Remote Access as the platform. If automatic password management is desired, check the option box to do so, and configure the change settings according to your deployment plan.
TPAM 2.5Client Setup Guide
16

.
Click the Connection tab to configure the functional account properties for the system. Enter root for the Account Name.
Note that the option exists to specify a TCP port other than port 22 (the default SSH port). If the system to be managed is configured to communicate on a port other than 22 for SSH, specify the port in the Alternate Port field.
For more detailed information regarding these and other options for configuring the managed systems, please consult the TPAM Administrator Guide.
Select an authentication method from one of the following:
• Select the Password option button and enter the same password used in the iDRAC functional account set up.
-- OR --
• Select the DSS option button. Select the Avail System Std. Keys or Use System Specific Key option. In this example we will choose the default system standard key id_dsa.pub. Click the Get Open SSH button to download the key to your local system.
Select the Allow Functional Account to be Requested for password release check box.
TPAM 2.5Client Setup Guide
17

Click the Save Changes button.
If authenticating using a DSS key, from the iDRAC browser, select Remote Access | Network/Security | Users. Locate the SSH Key Configurations menu, select Upload SSH Key(s) and then Next.
Upload the key that was downloaded from TPAM.
TPAM 2.5Client Setup Guide
18

4
FreeBSD
• Introduction
• Add the Functional Account
• Using sudo
• SSH Daemon
• Add System to TPAM
• Create and Modify DSS Key
IntroductionThis section provides step by step instructions for configuring OpenSSH for FreeBSD® systems to be managed by TPAM. The steps involved are verification that the ssh daemon is enabled and configured, creation and modification of the functional account, and if necessary SSH key installation and configuration. Administrative knowledge of FreeBSD and familiarity with the vi editor are assumed.
Add the Functional AccountLog on to the FreeBSD system as root (or root equivalent account) and create the functional account on the FreeBSD. In our examples, the functional account is named funcacct.
Using sudoInstead of using a root equivalent account to manage the account on the FreeBSD system the functional account can leverage sudo. Log into the FreeBSD system as root (or root equivalent account) and use visudo to edit /usr/local/etc/sudoers and add the following lines under the “User privilege specifications” section of the file:
funcacct ALL=(root) NOPASSWD: /bin/grep funcacct ALL=(root) NOPASSWD: /usr/bin/passwd
You will also need to add the following line so that sudo does not require a tty for the functional account.
Defaults:funcacct!requiretty
TPAM 2.5Client Setup Guide
19

SSH DaemonAccount management of FreeBSD systems is performed using the SSH protocol. In order for our appliance to properly communication with a FreeBSD system its’ ssh daemon must be enabled and properly configured.
Log on to the FreeBSD system as a root account and navigate to the /etc/ssh directory. Make a backup of the sshd_config file using the cp command and then open sshd_config using vi.
Verify that the following settings are not commented out and set to yes.
PermitUserEnvironment yesPasswordAuthentication yesUsePAM noX11Forwarding yesX11DisplayOffset 10X11UseLocalhost yes
If any of these settings would conflict with other ssh dependent applications you can override settings on a per user basis using “Match User”
Match User funcacctPermitUserEnvironment yesPasswordAuthentication yesUsePAM noX11Forwarding yesX11DisplayOffset 10X11UseLocalhost yesPubkeyAuthentication yesAuthorizedKeysFile .ssh /authorized_keys
Add System to TPAMFrom the TPAM menu, select Systems, Accounts, & Collections | Systems | Add System. Provide the name for the system and Network Address (this can be either IP address or DNS name). If automatic password management is desired, check the option box to do so, and configure the change settings according to your deployment plan.
In order to manage the accounts the functional account can leverage sudo. Enter sudo as the Delegation Prefix.
Click the Connection tab to configure the functional account properties for the system.
TPAM 2.5Client Setup Guide
20

Note that the option exists to specify a TCP port other than port 22 (the default SSH port). If the system to be managed is configured to communicate on a port other than 22 for SSH, specify the port in the Alternate Port field.
If password authentication will be used for the functional account, select the Password option and provide the current valid password for the account. To use the key that has been imported from the preceding steps, select the DSS option and follow the steps outlined in Create and Modify DSS Key.
Create and Modify DSS KeyUnder Account Credentials select DSS and then under DSS Key Details select either one of the Avail. System Std. Keys or Use System Specific key. In this example we will choose the default system standard key id_dsa. Click the Get Open SSH button to download the key to your local system.Using an ssh/scp client you will then upload the key to the FreeBSD using the functional account to authenticate.
Once the file has been uploaded, log into the FreeBSD system. Create the .ssh directory for the functional account & then change directory to the newly create directory:
mkdir .sshcd .ssh
Copy the id_dsa.pub file that you downloaded into the .ssh directory as the file authorized_keys:
cp /Users/funcacct/id_dsa.pub authorized_keys
Edit the sshd_config file on the managed FreeBSD system (/etc/ssh/sshd_config) to include the following in the “Authentication” section:
PubkeyAuthentication yesAuthorizedKeysFile .ssh/authorized_keys
TPAM 2.5Client Setup Guide
21

5
HP iLO2
• Introduction
• Add the Functional Account
• Add System to TPAM
• Create and Modify DSS Key
IntroductionThis section provides step by step instructions for configuring HP iLO2 systems to be managed by TPAM. The steps involved are functional account creation and modification, and SSH key installation and configuration. Administrative knowledge of HP iLO2 is assumed.
Add the Functional AccountFollowing the steps below, create the functional account on the HP iLO2 system and modify its properties (the account “funcacct” is used in this example). Log on to the web interface of the HP iLO2 with an administrator account, select the Administration tab, then User Administration and then click the New button.
Provide the user name and login name of the functional account (in this instance “funcacct”).
IMPORTANT: In order for TPAM to function properly, the User Name and Login Name fields must be identical for the functional account as well as any managed accounts.
TPAM 2.5Client Setup Guide
22

In order for the functional account to manage other accounts on the HP iLO2 it ONLY needs Allowed selected for Administer User Accounts. The option Remote Console Access is referring to access of the server the HP iLO2 is paired to, not SSH access to the HP iLO2 itself.
Add System to TPAMFrom the TPAM menu, select Systems, Accounts, & Collections | Systems | Add System. Provide the name for the system and Network Address (this can be either IP address or DNS name). If automatic password management is desired, check the option box to do so, and configure the change settings according to your deployment plan.
Click the Connection tab to configure the functional account properties for the system.
TPAM 2.5Client Setup Guide
23

Note that the option exists to specify a TCP port other than port 22 (the default SSH port). If the system to be managed is configured to communicate on a port other than 22 for SSH, specify the port in the Alternate Port field.
If password authentication will be used for the functional account, select the Password option and provide the current valid password for the account. To use the key that has been imported from the preceding steps, select the DSS option and follow the steps outlined in Create and Modify DSS Key.
Create and Modify DSS KeyUnder Account Credentials select DSS and then under DSS Key Details select either one of the Avail. System Std. Keys or Use System Specific key. In this example we will choose the default system standard key id_dsa. Click the Get Open SSH button to download the key to your local system.
In order for this file to be properly imported into the HP iLO2 the name of the functional account will need to be appended at the end of the DSS key line. Using a text editor, open id_dsa.pub and go to the end of the line the DSS key is on, add a space and then type the HP iLO2 user name of the functional account, in this case “funcacct”. Once that has been added close the file and save your changes.
Log on to the web interface of the HP iLO2 with an administrator account and go to Settings | Security.
Browse to the location of the modified id_dsa.pub file and then click the Authorize Key button.
Upon successful authorization, the key file will be listed as the functional account’s user name.
TPAM 2.5Client Setup Guide
24

TPAM 2.5Client Setup Guide
6
25
HP-UX Trusted and Untrusted
• Add System to TPAM
Add System to TPAMFrom the TPAM menu, Systems, Accounts, & Collections | Systems | Add System. Provide the name for the system and Network Address (this can be either IP address or DNS name). If automatic password management is desired, check the option box to do so, and configure the change settings according to your deployment plan.
There is a Delegation Prefix field available so that you can preface the commands that TPAM uses to manage passwords. The delegation prefix can also be used to specify an absolute path to the command that TPAM uses to manage password for the system.
Click the Connection tab to configure the details for the functional account, and other communication options.
Specify the functional account used on the HP-UX system, and enter the password for the account.
Note the option to specify an Alternate Port. If the default port of 22 is not used (check with the HP-UX administrator), enter the port in this field on which the device will be listening for connections.

7
IBM Hardware Management Console (HMC)
• Introduction
• Add the Functional Account
• Add System to TPAM
IntroductionThis document will guide you through configuring your IBM® Hardware Management Console (HMC) for TPAM password management. This guide is intended for an IBM HMC administrator or a SME (Subject-Matter Expert) who is familiar with your IBM HMC configuration and custom configurations. Your HMC administrator or SME may wish to assign permissions more granularity
Add the Functional AccountTPAM connects to the IBM HMC appliance using SSH. The functional account is used to issue commands for changing account passwords, including itself (if applicable). The functional account requires hmcsuperadmin or similar permissions to reset user’s passwords.
Add System to TPAMFrom the TPAM menu, select Systems, Accounts, & Collections | Systems | Add System. Provide the name for the system and Network Address (this can be either IP address or DNS name) of the server on which the database resides. If automatic password management is desired, check the option box to do so, and configure the change settings according to your deployment plan.
Select “IBM HMC” as the platform.
Click the Connection tab to configure the functional account properties for the system.
TPAM 2.5Client Setup Guide
26

If password authentication will be used for the functional account, select the Password option and provide the current valid password for the account.
Click the Save Changes button. Click the Accounts button to configure the managed account(s) as required for the system. Select the account on the Listing tab and click the Details tab.
NOTE: The option exists to specify a TCP port other than port 22 (the default SSH port). If the system to be managed is configured to communicate on a port other than 22 for SSH, specify the port in the Alternate Port field.
TPAM 2.5Client Setup Guide
27

8
Juniper Junos
• Introduction
• Add the Functional Account
• Management Access Configuration
• Add System to TPAM
IntroductionThis section provides instructions for configuring Junos® devices to be managed by TPAM. The steps involved are verification that the SSH service for management access is enabled and configured, verification of the functional account, and if necessary SSH key installation and configuration. Administrative knowledge of Junos and familiarity with its CLI configuration are assumed.
Add the Functional AccountFor Junos the functional account must be the device’s root account. TPAM can be configured to authenticate to the Junos device using plain-text password or DSS key authentication.
Management Access ConfigurationTPAM manages the device over SSH using the Junos CLI, please consult the Junos documentation of your device for the appropriate configuration steps to allow secure access to the SSH service.
Add System to TPAMFrom the TPAM menu, select Systems, Accounts, & Collections | Systems | Add System. Provide the name for the system and Network Address (this can be either IP address or DNS name). Select Juniper(JunOS) as the platform. Select the appropriate password rule that matches your Junos device’s configuration. Junos supports the following five character classes for plain text passwords:
• Lowercase letters
• Uppercase letters
• Numbers
• Punctuation
• Special Characters: !@#$%^&*,+<>:;
Control characters are not recommended.
If automatic password management is desired, check the option box to do so, and configure the change settings according to your deployment plan.
TPAM 2.5Client Setup Guide
28

Click the Connection tab to configure the functional account properties for the system.
Note that the option exists to specify a TCP port other than port 22 (the default SSH port). If the system to be managed is configured to communicate on a port other than 22 for SSH, specify the port in the Alternate Port field.
If password authentication will be used for the functional account, select the Password option and provide the current valid password for the account.
If DSS key authentication will be used select the DSS option and select either one of the Avail. System Std. Keys or Use System Specific Key. In this example we will choose the default system standard key id_dsa. Click the Get Open SHH button to download the key to your downloads folder. Please consult the Junos documentation of your device on how to configure DSS authentication and install the key to your device.
TPAM 2.5Client Setup Guide
29

9
LDAP and LDAPS
• Add System to TPAM
• Account Name Setup
Add System to TPAMFrom the TPAM menu, Systems, Accounts, & Collections | Systems | Add System. Provide the name for the system and Network Address (this can be either IP address or DNS name). If automatic password management is desired, check the option box to do so, and configure the change settings according to your deployment plan.
Click the Connection tab to configure the details for the functional account, and other communication options.
Note that the option exists to specify a TCP port other than port 389 (the default LDAP port) or 636 for LDAPS. If the system to be managed is configured to communicate on a port other than 389 for LDAP, specify the port in the Alternate Port field.
Enter the name of the functional account that has been created on the database and its password.
Account Name SetupWhen setting up accounts for LDAP or LDAPS managed systems the Account Name field is not where the actual account name will be listed.
TPAM 2.5Client Setup Guide
30

For example the name you enter in the Functional Account field on the Connection tab is just a place holder.
The Description field on the Account Details Information tab is where you must enter the account name for all accounts on a LDAP/LDAPS managed systems.
All communication between TPAM and the managed LDAP/LDAPS system on the back end will use the account name in the Description field.
TPAM 2.5Client Setup Guide
31

10
MAC OS X(10.4-10.8)
• Introduction
• Enable SSH Daemon
• Add the Functional Account
• Add System to TPAM
• Create and Modify the DSS Key
IntroductionThis section provides step by step instructions for configuring OpenSSH for Mac® OS X® systems to be managed by TPAM. The steps involved are verification that the ssh daemon is enabled and configured, creation and modification of the functional account, and if necessary SSH key installation and configuration. Administrative knowledge of MAC OS X and familiarity with the vi editor are assumed.
Enable SSH DaemonAccount management of Mac OS X systems is performed using the SSH protocol. In order for the TPAM appliance to properly communication with a Mac OS X system its’ ssh daemon must be enabled and configured. Log on to the Mac OS X system with an administrator account and open System Preferences.
Click on Sharing.
TPAM 2.5Client Setup Guide
32

Please verify that the Remote Login check box is selected and that Allow access will be granted for the functional account. If the functional account is not a member of the Administrators group, remote login access for that account will need to be specifically allowed here.
Once you have verified that Remote Login access via ssh has been enabled and properly configured within System Preferences you will need to verify that sshd_config file is properly configured as well.
Using terminal navigate to the /private/etc folder, make a backup of the sshd_config file using the cp command and then open sshd_config using vi.cp.
Verify that the following settings are not commented out and set to yes.
PermitUserEnvironment yesPasswordAuthentication yesUsePAM no
If any of these settings would conflict with other ssh dependent applications you can override settings on a per user basis using “Match User”
Match User funcacctPermitUserEnvironment yesPasswordAuthentication yesUsePAM noPubkeyAuthentication yesAuthorizedKeysFile .ssh/authorized_keys
Add the Functional AccountFollowing the steps below, create the functional account on a Mac OS X system and modify its properties (the account “funcacct” is used in this example). Log into the Mac OS X system with an administrator account and open System Preferences.
TPAM 2.5Client Setup Guide
33

Click on Accounts.
You may have to click the lock icon to make changes. You’ll be prompted to provide the administrator account’s password. Click the + button to add the functional account.
Select Administrator from the New Account list, then provide a full name, account name, password and retype the password to verify it. Then click the Create Account button.
TPAM 2.5Client Setup Guide
34

Add System to TPAMFrom the TPAM menu, select Systems, Accounts, & Collections | Systems | Add System. Provide the name for the system and Network Address (this can be either IP address or DNS name). If adding a MAC OS X 10.8 system select MacOSX 10.7 as the platform. If automatic password management is desired, check the option box to do so, and configure the change settings according to your deployment plan.
Click the Connection tab to configure the functional account properties for the system.
Note that the option exists to specify a TCP port other than port 22 (the default SSH port). If the system to be managed is configured to communicate on a port other than 22 for SSH, specify the port in the Alternate Port field.
If password authentication will be used for the functional account, select the Password option and provide the current valid password for the account. To use the key that has been imported from the preceding steps, select the DSS option and follow the steps outlined in Create and Modify the DSS Key.
Create and Modify the DSS KeyLog on to the Mac OS X system as functional account. From the TPAM menu, select Systems, Accounts, & Collections | Systems | Add System. From there locate and select the system you have defined for this Mac and then click the Connection tab.
TPAM 2.5Client Setup Guide
35

Under Account Credentials select DSS and then under DSS Key Details select either one of the Avail. System Std. Keys or Use System Specific Key. In this example we will choose the default system standard key id_dsa. Click the Get Open SHH button to download the key to your downloads folder.
Next you will need to open the Terminal application to perform the following steps.
Create the .ssh directory for the functional account and then change directory to the newly create directory:
mkdir .sshcd .ssh
Copy the id_dsa.pub file that you downloaded into the.ssh directory as the file authorized_keys:
cp /Users/funcacct/Downloads/id_dsa.pub authorized_keys
Edit the sshd_config file on the managed Mac system (/private/etc/ssh/sshd_config) to include the following in the “Authentication” section:
PubkeyAuthentication yesAuthorizedKeysFile .ssh/authorized_keys
TPAM 2.5Client Setup Guide
36
11
Mainframe
• Mainframe (RACF)
• Mainframe LDAP (RACF/TopSecret)
• Mainframe (ACF2)
Mainframe (RACF)
Create the Functional AccountThe functional account is the used to issue the alu command for changing account passwords, including itself. The functional account requires system special permission.
Add System to TPAMConfigure the new system in TPAM as would be done for any system, selecting Mainframe as the platform. Specify the functional account used and the password assigned.
Password CheckTPAM connects via 3270 and waits for an input prompt. TPAM enters the username and waits for the password prompt. The password is entered and TPAM waits for an input prompt. Logoff is entered and the session is evaluated to determine success.
Password ChangeThe above procedure is followed except the alu password command is entered before the Logoff command is sent.
Mainframe LDAP (RACF/TopSecret)
Add System to TPAMFrom the TPAM menu, select Systems, Accounts, & Collections | Systems | Add System. Provide the name for the system and Network Address (this can be either IP address or DNS name). If automatic password management is desired, check the option box to do so, and configure the change settings according to your deployment plan.
TPAM 2.5Client Setup Guide
37

Click the Connection tab to configure the functional account properties for the system.
Note that the option exists to specify a TCP port other than port 389 (the default LDAP port) or 636 for LDAPS. If the system to be managed is configured to communicate on a port other than 389 for LDAP, specify the port in the Alternate Port field. Select the Use SSL check box if LDAPS is to be used.
Enter the name of the functional account that has been created on the mainframe and its password. Follow the procedure for adding accounts to modify the Functional account to include the DN of this account in the description field.
The Custom Command field is where you place the LDAP attributes in a space delimited format. For RACF®, there are two attributes that need to be present. The following string represents a valid Custom Command field for RACF:
racfPassword racfattributes:noexpired
TopSecret requires 3 attributes, an example is below:
userPassword userPassword-Interval:0XX userPassword-Expire:
In all cases, the first attribute must be the password attribute.
Account Name SetupWhen setting up accounts for Mainframe LDAP managed systems the Account Name field is not where the actual account name will be listed.
For example the name you enter in the Functional Account field on the Connection tab is just a place holder.
TPAM 2.5Client Setup Guide
38

The Description field on the Account Details Information tab is where you must enter the account name for all accounts on a LDAP/LDAPS managed systems.
All communication between TPAM and the managed LDAP/LDAPS system on the back end will use the account name in the Description field.
Mainframe (ACF2)
Add the Functional AccountThe functional account is used to issue the acf command for changing account passwords, including itself. The functional account requires operator security permissions. The TPAM functional account requires the following permissions:
• Ability to connect to the Mainframe ACF2 using 3270.
• Appropriate permissions to change/modify the password for all TPAM managed accounts.
• Appropriate permissions to modify the ACF2 pswd-exp flag.
• Access to log on to TSO.
Add the System to TPAMFrom the TPAM menu, select Systems, Accounts, & Collections | Systems | Add System. Provide the name for the system and Network Address (this can be either IP address or DNS name). If automatic password management is desired, check the option box to do so, and configure the change settings according to your deployment plan.
TPAM 2.5Client Setup Guide
39

Click the Connection tab to configure the functional account properties for the system. If applicable in your custom patch, TPAM will use the configured Custom Command.
Password CheckTo check passwords TPAM connects via 3270 and waits for an input prompt. TPAM enters the username and waits for the password prompt. The password is entered and TPAM waits for an input prompt. Logoff is entered and the session is evaluated to determine success.
Password ChangeTo change a password the above procedure is followed except the acf password command is entered before the Logoff command is sent.
TPAM 2.5Client Setup Guide
40

12
MS SQL Server (2000 & 2005)
• Authentication and Encryption
• TPAM Commands for Managing MS SQL Server
• Encryption Recommendation
• Add the Functional Account
• Add System to TPAM
• SQL Server Named Instances
Authentication and EncryptionThe authentication to Microsoft® SQL Server® never sends the password in clear text. Once connected, however, all SQL commands issued and the results are sent in clear text unless either the client or the server request protocol encryption. TPAM, as the client, does not attempt to force the encryption because 1) it would fail to connect to any server that does not meet the requirements for SSL encryption, and 2) it would require that the certificate installed at the server is in the certificate trust list on TPAM. TPAM only includes the default Trusted Root Certificates supplied with the operating system and occasionally updated through OS patches. If the database server mandates encryption via the Force Protocol Encryption setting in the Server Network Configuration, TPAM can and will adhere to that mandate.
TPAM Commands for Managing MS SQL Server
• Test System - TPAM opens a connection to the database server using the username/password of the functional account. If the connection can be established, the test is successful; otherwise, it is considered a failure.
• Check Password - TPAM opens a connection to the database server using the username/password of the account being checked. If the connection can be established, the test is successful. If not, TPAM then connects to the database using the functional account and queries master..syslogins for the existence of the account. If the account exists, it is reported that there is a password mismatch, if it does not, the error indicates that the account does not exist, and if this connection cannot be established, then an “unable to connect” message is returned.
• Change Password – TPAM connects to the database using the username/password of the functional account and executes the sp_password system stored procedure for the account. The authentication is encrypted, but the text of the SQL to execute the stored procedure is sent in clear text, by default. This means that the password that is being set for the account can be sniffed from the wire. If protocol encryption is mandated from the database server, nothing is sent in clear text.
TPAM 2.5Client Setup Guide
41

Encryption RecommendationIt is recommended to use protocol encryption with Microsoft SQL Server databases. It is included with the product (free), easy to set up, and has only a slight performance impact. It is likely that passwords are not the only sensitive information being stored in or retrieved from the database. The following links provide information on setting up the protocol encryption on SQL Server 2000 database servers.
http://support.microsoft.com/kb/276553 http://support.microsoft.com/kb/316898
For SQL Server 2005, the following link provides detailed instructions. http://technet.microsoft.com/en-us/library/ms189067.aspx
There is no additional setup required at TPAM to utilize secure connections to Microsoft SQL Server. If it is specified at the DBMS, it will be used by TPAM.
Add the Functional AccountCreate a new account on the SQL Server to be the TPAM functional account (the name questtpam is used in these examples). Give the account a password. Configure this account to use SQL Server Authentication, not integrated authentication.
Example: exec sp_addlogin ‘questtpam’,’password’
Add the questtpam functional account to the System Administrators server role.
Example: sp_addsrvrolemember @loginame = ‘questtpam’ , @rolename = ‘sysadmin’
Add System to TPAMFrom the TPAM menu, select Systems, Accounts, & Collections | Systems | Add System. Provide the name for the system and Network Address (this can be either IP address or DNS name) of the server on which the database resides. If automatic password management is desired, check the option box to do so, and configure the change settings according to your deployment plan.
Select “MS SQL Server” as the platform.
Click the Connection tab to specify the details for the functional account.
Specify the functional account used on the SQL Server (i.e. ‘questtpam’), and enter the password for the account.
TPAM 2.5Client Setup Guide
42

If MS SQL server supports Windows Authentication in addition to SQL authentication, you can leverage the Domain Account or Local Computer Account as a functional account. The corresponding Windows Active
Directory® or Windows system/account should be created beforehand, so that you can choose this account on the Connection tab of the MS SQL Server system.
Notice the Tunnel DB Connection through SSH check box. Database tunneling through SSH provides the ability to securely connect to a remote database.
For DBMS accounts, SSH tunneling only uses public key and not manual passwords for establishing the SSH connections.
SQL Server Named InstancesTPAM supports dynamic ports by using the network address\namedinstance value in the network address field on the Systems Detail tab in TPAM. If TPAM detects a named instance value in this field it will not use the Port listed on the Connection tab or the default port of 1433 to connect to the MS SQL Server system. Instead TPAM will query for the dynamic port.
TIP: Make sure that the default of AllowTCP Forwarding is set to Yes in the SSH Configuration file of the managed system.
TPAM 2.5Client Setup Guide
43

If using named instances with static ports, the instance name should not be included in the network address field, and indicate the static port number on the connection tab.
TPAM 2.5Client Setup Guide
44

13
Nokia IPSO
• Introduction
• Add the Functional Account
• Add System to TPAM
IntroductionThis section provides step by step instructions for configuring Nokia® IPSO systems to be managed by TPAM. The steps involved are creation and modification of the functional account, and adding the system to TPAM.
Add the Functional AccountLog on to the Nokia IPSO system URL (Nokia Network Voyager) - http://IPADDRESS/ as admin and create the functional account. In our examples, the functional account is named “funcacct”.
From the Top Menu, click Config. From the Configuration Menu, under Security and Access Configuration, click Users. Locate Add new user:. Enter funcacct (User names must be 1-8 characters long) for Username. Enter 0 (Zero) for Uid. Enter /var/funcacct for Home Directory.
Click the Apply button. Click the Save button. Set the “funcacct” account password.
Enter New Password:
Enter New Password (verify):
Click the Apply button.
TPAM 2.5Client Setup Guide
45

Add System to TPAMFrom the TPAM menu, select Systems, Accounts, & Collections | Systems | Add System. Provide the name for the system and Network Address (this can be either IP address or DNS name). If automatic password management is desired, check the option box to do so, and configure the change settings according to your deployment plan.
Click the Connection tab to configure the functional account properties for the system.
Note that the option exists to specify a TCP port other than port 22 (the default SSH port). If the system to be managed is configured to communicate on a port other than 22 for SSH, specify the port in the Alternate Port field.
Nokia IPSO uses password authentication for the functional account, select the Password option and provide the current valid password for the account.
Enter Alternate port: (if applicable)
Enter Connection Timeout: Default [20] Seconds.
Enter Functional Account to be used: [funcacct]
Select Password. Enter password. Must match password supplied in Add the Functional Account section.
Click the Save Changes button.
Click the Test System button.
TPAM 2.5Client Setup Guide
46

14
Novell NDS
• Add System to TPAM
• Account Name Setup
Add System to TPAMFrom the TPAM menu, Systems, Accounts, & Collections | Systems | Add System. Provide the name for the system and Network Address (this can be either IP address or DNS name). If automatic password management is desired, check the option box to do so, and configure the change settings according to your deployment plan.
Click the Connection tab to configure the details for the functional account, and other communication options.
Note that the option exists to specify a port other than port 636 (the default Novell® port). If the system to be managed is configured to communicate on a port other than 636 for Novell, specify the port in the Alternate Port field.
Enter the name of the functional account that has been created on the database and its password.
Account Name SetupWhen setting up accounts for Novell NDS® managed systems the Account Name field is not where the actual account name will be listed.
TPAM 2.5Client Setup Guide
47

For example the name you enter in the Functional Account field on the Connection tab is just a place holder.
The Description field on the Account Details Information tab is where you must enter the account name for all accounts on a LDAP/LDAPS managed systems.
All communication between TPAM and the managed Novell NDS system on the back end will use the account name in the Description field.
TPAM 2.5Client Setup Guide
48

TPAM 2.5Client Setup Guide
15
49
OpenVMS
• Add System to TPAM
Add System to TPAMFrom the TPAM menu, select Systems, Accounts, & Collections | Systems | Add System. Provide the name for the system and Network Address (this can be either IP address or DNS name). If automatic password management is desired, check the option box to do so, and configure the change settings according to your deployment plan.
Select the Connection tab to configure the details for the functional account, and other communication options.
Note the option to specify an Alternate Port. If the default port of 22 is not used, enter the port in this field.
Enter the name of the functional account that has been created on the database and its password or DSS Key option. The functional account must have SECURITY as an authorized privilege, must have RW access to SYSUAF.DAT, and SYSUAF.DAT must be in the functional account's default directory (i.e., default of SYS$SYSTEM).

16
Oracle (9i,10g,11g)
• Authentication and Encryption
• TPAM Commands for Oracle
• Encryption Recommendation
• Add the Functional Account
• Add System to TPAM
Authentication and EncryptionBy default, the connection that TPAM establishes to the Oracle® database server utilizes a secure authentication protocol. Like all of the other DBMS, however, all data sent between the client and the database server after authentication is then unencrypted. This means that when changing the password for an account, the new password being set for the account is sent in clear text. Oracle has an optional feature that can be installed called Oracle Advanced Security Option. This is available for both 9i and 10g, and can be used to provide encryption of data in transit between the client and the server (in addition to many other security enhancements it provides.) This option allows the DBA to configure a listener for an instance to require a secure
channel via SSL. Like Sybase®, it is possible to set up both secure and unsecured listeners for the same instance
TPAM Commands for Oracle• Test System - TPAM opens a connection to the database server using the username/password of the
functional account. If the connection can be established, the test is successful; otherwise, it is considered a failure.
• Check Password - TPAM opens a connection to the database server using the username/password of the account being checked. If the connection can be established, the test is successful. If not, TPAM then connects to the database using the functional account. If the connection is successful, then TPAM assumes a password mismatch for the account. Otherwise, an “Unable to connect” result is returned.
• Change Password – TPAM connects to the database using the username/password of the functional account and executes “alter user xxx identified by yyy” to change the account’s password. The authentication is encrypted, but the text of the SQL is sent in clear text.
Encryption RecommendationIt is recommended to configure a secure listener on all Oracle instances for use with TPAM. Consult your Oracle documentation or DBA to set up the secure listener for the data server.
Add the Functional AccountCreate a UserID that uses password authentication.
TPAM 2.5Client Setup Guide
50

Example: create user “questtpam” identified by “password” default tablespace “USERS”;
Grant “create session” and “alter user” privileges to the account.
Example: grant “create session” to “questtpam”;
grant alter user to “questtpam”;
Add System to TPAMFrom the TPAM menu, select Systems, Accounts, & Collections | Systems | Add System. Provide the name for the system and Network Address (this can be either IP address or DNS name) of the server on which the database resides. If automatic password management is desired, check the option box to do so, and configure the change settings according to your deployment plan.
Select “Oracle” as the platform.
Click on the Connection tab.
Specify the functional account used on the Oracle database (i.e. ‘questtpam’), and enter the password for the account.
Notice the Tunnel DB Connection through SSH check box. Database tunneling through SSH provides the ability to securely connect to a remote database.
For DBMS accounts, SSH tunneling only uses public key and not manual passwords for establishing the SSH connections.
TIP: Make sure that the default of AllowTCP Forwarding is set to Yes in the SSH Configuration file of the managed system.
TPAM 2.5Client Setup Guide
51

17
POS 4690
• Add Functional Account
• Add a Password Rule
• Add System to TPAM
Add Functional AccountTo create the functional account:
1 Log on to the POS 4690 system.
2 Enter 1 and press the ENTER key.
3 Enter 5 and press the ENTER key.
TPAM 2.5Client Setup Guide
52

4 Enter 3 and press the ENTER key.
5 Enter 2 and press the ENTER key.
6 Enter your Operator ID and press the ENTER key.
TPAM 2.5Client Setup Guide
53

7 Enter the ID for the Manager model.
8 Enter a Password for the ID.
9 Enter Y and press the ENTER key.
TPAM 2.5Client Setup Guide
54

10 Enter Y and press the ENTER key.
11 Enter Y and press the ENTER key.
12 Enter N and press the ENTER key.
13 Enter Y and press the ENTER key.
TPAM 2.5Client Setup Guide
55

14 Enter Y and press the ENTER key.
Add a Password RuleThe System Administrator will need to configure a password rule for the 4690 systems in the admin interface as shown below. POS 4690 systems only allow numeric characters for the password.
TPAM 2.5Client Setup Guide
56

Add System to TPAMFrom the TPAM menu, select Systems, Accounts, & Collections | Systems | Add System. Provide the name for the system and Network Address (this can be either IP address or DNS name). If automatic password management is desired, check the option box to do so, and configure the change settings according to your deployment plan.
Select the password rule that was created for the POS 4690 systems from the Password Rule list.
Click the Connection tab to configure the functional account properties for the system.
Make sure that the Functional Account name matches the Operator ID that you configured on the POS 4690 system.
TPAM 2.5Client Setup Guide
57

18
ProxySG
• Introduction
• Add Functional Account
• Add Functional Account via the CLI
• Add System to TPAM
IntroductionTPAM has the ability to manage two accounts on Blue Coat®’s ProxySG® systems, the Enable and the Funcacct (console account).
Add Functional AccountThe functional account for the ProxySG is the console access account. This account is also used for CLI access to ProxySG. The name of the account is determined by the Administrator. This account can be altered through the Blue Coat Web Console or through the CLI console. If these are not configured please refer to ProxySg_InstallGuide document.
To create the functional account:
1 Access the Blue Coat console at https://Blue Coats’s IP or DNS:8082
2 Click on Authentication | Console Access.
3 Enter a new user name in the User Name field.
TPAM 2.5Client Setup Guide
58

4 After entering the new user name you will be prompted to re-authenticate. Enter the user name and password and click the OK button.
5 Click the Change Password button.
6 Enter and confirm the new password. Click the OK button.
7 After entering the new password you will be prompted to re-authenticate. Enter the user name and password and click the OK button.
This account information will be used to configure the Connection tab for the system in the TPAM web interface.
TPAM 2.5Client Setup Guide
59

Add Functional Account via the CLIThe functional account can also be configured via CLI. Please refer to your Blue Coat documentation to obtain the correct commands.
Example:
user create Funacctuser edit "funcacct”hashed-password $1$vCk8O4tH$N9aII2A8duj4l41NDGZmS/
Add System to TPAMFrom the TPAM menu, select Systems, Accounts, & Collections | Systems | Add System. Provide the name for the system and Network Address (this can be either IP address or DNS name). If automatic password management is desired, check the option box to do so, and configure the change settings according to your deployment plan.
Click the Connection tab to configure the functional account properties for the system.
If a port other then 22 is being used, enter the Alternate Port.Enter the Functional Account name and password. Enter the Enable Password for the ProxySG system.Click the Save Changes button.This will create the two managed accounts that can be managed by the system. The enable and funcacct accounts. To view these accounts click the Accounts button.
TPAM 2.5Client Setup Guide
60

Attempts to create any other accounts will result in an error message.
The SSH protocol used is determined by how the ProxySG system is configured. It is assumed that only v1 or v2 may be enabled at any given time on the ProxySG.
TPAM 2.5Client Setup Guide
61

19
PSM Web Access
• Introduction
• Add System to TPAM
IntroductionIf your company has a web based application and you want to manage access to this application you can set up a system with a platform of PSM Web Access.
Add System to TPAMFrom the TPAM menu, select Systems, Accounts, & Collections | Systems | Add System. Provide the name for the system.
Enter the URL that you want the sessions to be limited to in the Restricted URL field. Click the Save Changes button. If you want the ability to navigate away from the restricted URL that is entered, preface the restricted URL with “ALLOWNAV;”. This is not case-sensitive. For example to start at www.dell.com and allow navigation away from there, ALLOWNAV;www.dell.com would be typed in the restricted URL box.
Click on the Affinity tab.
Select the PSM DPA Server that you want to use to manage these sessions.
NOTE: A DPA is required to use the PSM Web Access platform.
TPAM 2.5Client Setup Guide
62

Use the Ticket System tab to set any ticket validation requirements for session requests.
Assign permissions to this system using the Collections and Permissions tabs. Click the Save Changes button. Saving the system will create a default WebAccessAccount which can then be requested by authorized users.
TPAM 2.5Client Setup Guide
63
20
SAP
• Add System to TPAM
• Add Permissions to Functional Account in SAP
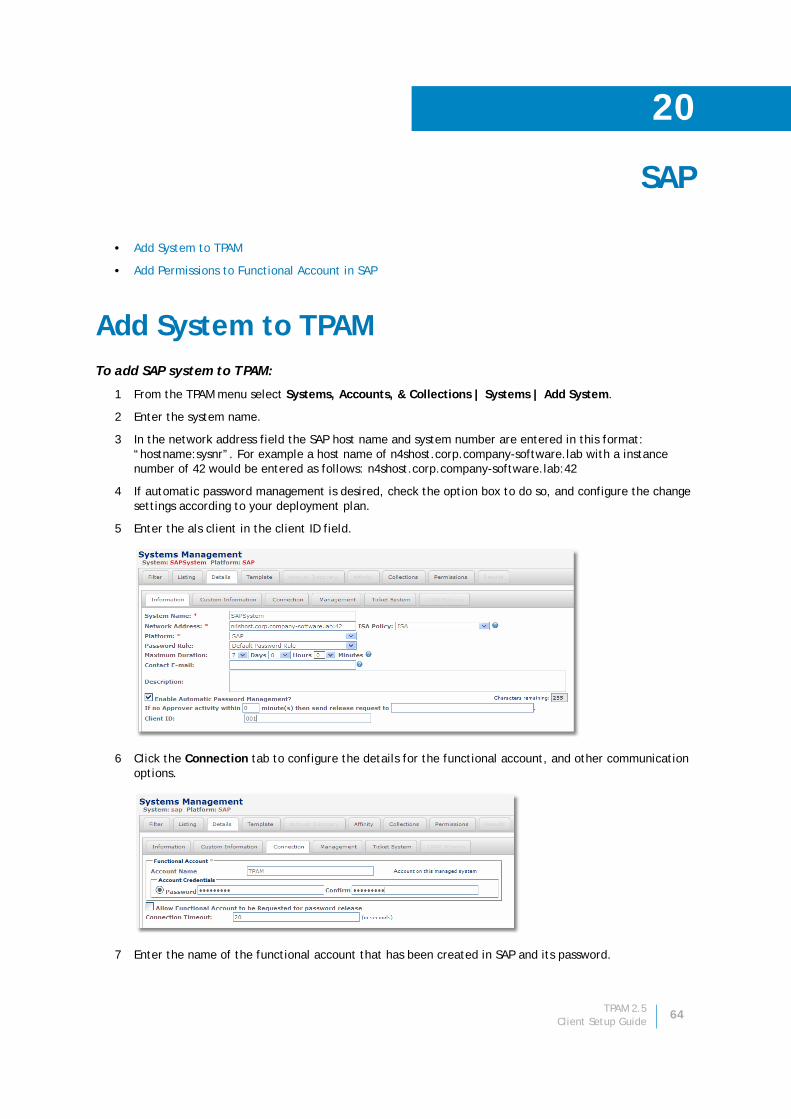
Add System to TPAMTo add SAP system to TPAM:
1 From the TPAM menu select Systems, Accounts, & Collections | Systems | Add System.
2 Enter the system name.
3 In the network address field the SAP host name and system number are entered in this format: “hostname:sysnr”. For example a host name of n4shost.corp.company-software.lab with a instance number of 42 would be entered as follows: n4shost.corp.company-software.lab:42
4 If automatic password management is desired, check the option box to do so, and configure the change settings according to your deployment plan.
5 Enter the als client in the client ID field.
6 Click the Connection tab to configure the details for the functional account, and other communication options.
7 Enter the name of the functional account that has been created in SAP and its password.
TPAM 2.5Client Setup Guide
64

8 Click on the remaining tabs to complete configuration of the system. See the TPAM Administrator Guide for more details on adding a system.
9 Click the Save Changes button.
Add Permissions to Functional Account in SAPWithin SAP the functional account used to communicate with TPAM must have an S_USER_GRP authorization granted (or any authorization set that contains this authorization, e.g. SAP_ALL) for the functional account to manage other users accounts.
To configure the functional account to work with TPAM:
1 Enter the functional account name in the User field.
2 Click the create icon.
TPAM 2.5Client Setup Guide
65

3 Enter information on the Address tab.
4 Click the Save icon.
5 Click the Roles tab.
6 Enter the administrative role name.
7 Click the Save icon.
TPAM 2.5Client Setup Guide
66

21
SonicWALL
• Introduction
• Add the Functional Account
• Add System to TPAM
IntroductionThis section provides step by step instructions for configuring Dell SonicWALL™ Network Security Appliances (NSA) to be managed by TPAM. The steps involved are creation and modification of the functional account, and adding the system to TPAM.
Also, TPAM can change passwords for both the Admin account and all Local Users, it can only check passwords for the “Admin” account and Local Users who are members of the SonicWALL Administrators group.
Add the Functional AccountLog onto the Dell SonicWALL NSA Web management interface using the admin account, or a local account with full administrative privileges.
Create a new local user, in this case we are using funcacct. Enter a password that conforms to any policy you have configured on the firewall.
From the Group tab, add the account to the SonicWALL Administrators group.
NOTE: The Dell SonicWALL NSA must be running a SonicOS firmware revision of 5.9 or later.
TPAM 2.5Client Setup Guide
67

Click the OK button to save the changes.
Add System to TPAMFrom the TPAM menu, select Systems, Accounts, & Collections | Systems | Add System. Provide the name for the system and Network Address (this can be either IP address or DNS name). If automatic password management is desired, check the option box to do so, and configure the change settings according to your deployment plan.
Click the Connection tab to configure the functional account properties for the system.
TPAM 2.5Client Setup Guide
68

Note that the option exists to specify a TCP port other than port 22 (the default SSH port). If the system to be managed is configured to communicate on a port other than 22 for SSH, specify the port in the Alternate Port field.
Dell SonicWALL Network Security Appliances use password authentication for the functional account. Select the Password option and provide the current valid password for the account.
Click the Save Changes button. Click the Test button.
TPAM 2.5Client Setup Guide
69

22
Sybase Adaptive Server Enterprise (ASE)
• Authentication and Encryption
• TPAM Commands for Sybase
• Encryption Recommendation
• Add the Functional Account
• Add System to TPAM
Authentication and EncryptionBy default, an ODBC connection to ASE does not secure the login packet, meaning the clear text password is sent across the network. TPAM specifies password encryption for the connection, so the password is never sent in clear text during authentication. After authentication, however, all information sent between the client and server is unencrypted. s a result, the change password issued from TPAM (or any other application) sends not only the password of the account being changed in clear text, but also the password of the TPAM functional account. The parameters for the sp_password system stored procedure in ASE requires the caller’s (with sso_role) password to execute. Sybase does provide a mechanism to enable SSL Encryption of the data stream, and this can be set up to listen on a selected port only, allowing some connections to be encrypted and others using the default that is not encrypted. TPAM can now be configured to communicate with this encrypted port, ensuring that no clear text passes between TPAM and the Sybase data server.
TPAM Commands for Sybase• Test System - TPAM opens a connection to the database server using the username/password of the
functional account. If the connection can be established, the test is successful; otherwise, it is considered a failure.
• Check Password -TPAM opens a connection to the database server using the username/password of the account being checked. If the connection can be established, the test is successful. If not, TPAM then connects to the database using the functional account and queries master..syslogins for the existence of the account. If the account exists, it is reported that there is a password mismatch, if it does not, the error indicates that the account does not exist, and if this connection cannot be established, then an “unable to connect” message is returned.
• Change Password – TPAM connects to the database using the username/password of the functional account and executes the sp_password system stored procedure for the account. The authentication is encrypted, but the text of the SQL to execute the stored procedure is sent in clear text, by default. This means that the password that is being set for the account and the TPAM functional account can be sniffed from the wire
Encryption RecommendationIt is recommended to configure a secure port on all Sybase instances for use with TPAM. Consult your Sybase documentation or DBA to set up the secure listening port at the data server. The instructions can be found in
TPAM 2.5Client Setup Guide
70

Secure Sockets Layer (SSL) in Adaptive Server, under Security Administration in the System Administrator’s Guide of the Sybase documentation.
Add the Functional AccountCreate a login ID on Sybase that uses database authentication (not integrated).
Assign the ID a password.
Example: exec sp_addlogin ‘questtpam’,’password’
Grant Security Officer privileges to the account.
Example: grant role sso_role to questtpam
Add System to TPAMFrom the TPAM menu, select Systems, Accounts, & Collections | Systems | Add System. Provide the name for the system and Network Address (this can be either IP address or DNS name) of the server on which the database resides. If automatic password management is desired, check the option box to do so, and configure the change settings according to your deployment plan.
Select “Sybase” as the platform.
Select the Connection tab to configure the details for the functional account, and other communication options.
Specify the functional account used on the SQL Server (i.e. ‘questtpam’), and enter the password for the account.
TPAM 2.5Client Setup Guide
71

If you plan on checking the Use SSL option, you must get your System Administrator to install the Trusted Root Certificate first through the config interface.
The Tunnel DB Connection through SSH option provides the ability to securely connect to a remote database.
Enter the Account Name that you will use to connect to the remote system. If SSH is not listening on port 22 please provide the correct port you want the connection forwarded to.
For DBMS accounts, SSH tunneling only uses public key and not manual passwords for establishing the SSH connections.
TIP: Make sure that the default of AllowTCP Forwarding is set to Yes in the SSH Configuration file of the managed system.
TPAM 2.5Client Setup Guide
72

23
HP NonStop Tandem
• Introduction
• Server Setup
• Add the Functional AccountAdd the Functional Account
• TPAM Client Setup
• Test Connectivity
IntroductionTPAM uses a functional account created on the managed host with administrative privileges to manage privileged accounts. There is no agent to be configured on the managed server.
Server SetupTo make sure the TPAM server can communicate with the HP NonStop Tandem server please do the following:
• Obtain the Telnet package from HP, install, and configure it to run on the default port of 23, or any other desired port.
• Make sure any interim firewalls will allow Telnet traffic between the TPAM appliance and the HP NonStop Tandem server.
• Set up the functional account. See Add the Functional Account.
Add the Functional AccountCreate a new account on the HP NonStop Tandem server (the name funcacct is used in this example).
The Tandem elevated account, super, which has group ID 255 and userID 255 or (255,255) or a group manager id with group id 255, can use the TACL ADDUSER command as in the example below:
ADDUSER SUPER.FUNCACCT,255,n
n is an integer from 0 - 255 that uniquely identifies the user funcacct within the group.
If using the Safeguard command interpreter Safecom, then the super ID can use the ADD USER command as in the example below:
ADD USER super.funcacct,255,n
n is an integer from 0 - 255 that uniquely identifies the user funcacct within the super user group.
TPAM 2.5Client Setup Guide
73

TPAM Client SetupTo add a HP NonStop Tandem system to TPAM:
1 Select Systems, Accounts, & Collections | Systems | Add System.
2 Enter the System Name and Network Address. (this can be either IP or DNS Name).
3 Select HP Non-Stop from the platform list.
4 Leave the Enable Automatic Password check box selected to manage password for this system.
5 Enter tacl in the initial command field. TPAM will use this to access the logon command.
6 Click the Connection tab.
7 If the default port of 23 is not used enter an alternate port number.
8 Enter the name and password of the functional account that has been created on the database. This account must have administrative privileges required to manage other database accounts.
9 Click the Save Changes button.
Test ConnectivityTelnet access may be checked from a machine with Telnet client software installed, provided any intervening firewalls allow the traffic through.
A test from a windows command prompt can check this by running the following command, replacing <NonStop IP> with the HP NonStop server IP address:
telnet < NonStop IP > 23
A test can also be run from the TPAM client /parconfig interface:
/parconfig> Net Tools> TelnetTest>
Network Address to test: <NonStop IP>
Port: 23 (default) or designated alternative port
Timeout:20s (default)
TPAM 2.5Client Setup Guide
74

24
Teradata
• Introduction
• Define a Data Source
• Add the Functional Account
• Add System to TPAM
IntroductionThis section highlights instructions for configuring Teradata® systems to be managed by TPAM. The steps involved are:
• Create/Define Datastore Connection(s)
• Create Teradata User Account(s)
• Configure functional account and testing
• Create managed system on TPAM
• Create managed account(s) and testing
Define a Data SourceTo define a data source via the Teradata Administrator Utility program:
1 From the main window, click File | Define Data Source.The ODBC Data Source Administrator dialog box appears and displays the User DSN tab by default.
2 Click the Drivers tab, and ensure the required ODBC driver is installed on your system.
3 Click the System DSN tab or User DSN tab.
4 Click the Add button.The Create New Data Source dialog box appears.
5 Select the Teradata ODBC driver, and then click Finish.
6 The ODBC Driver Setup for Teradata Database dialog box appears. Enter the following fields:
• Name - Name for the data source.
• Type a unique description such as Payroll or Accounts Payable.
• [Optional] Description - Descriptive text about this data source.
• Name(s) and IP address(es) - Name or IP address of the server of your Teradata Database to connect to.
• Do not resolve alias name to IP address - Select to not resolve alias names during set up. Clear this check box to allow aliases to be resolved whenever connecting to a database.
NOTE: For in depth information refer to the ODBS Driver for Teradata User Guide.
TPAM 2.5Client Setup Guide
75

• Use Integrated Security - Select to connect to the database through Single Sign On (SSO). The Mechanism, Parameter, Username and Password boxes are unavailable and your logon information is authenticated by network security when logging on to your computer.
• [Optional] Mechanism - If a security mechanism is in place, select the authentication mechanism.
• [Optional] Parameter - If a mechanism is selected, enter the applicable authentication string.
• [Optional] Username - User name to use to log on to the Teradata Database.
• [Optional] Password - Password for the user name.
• [Optional] Default Database - Database to work in by default. Use unqualified object names only in this database; qualify all other objects using the database name. If this field is left blank, the default database is your username.
• [Optional] Account String - Account string associated with the user name.
• Session Character Set - Specify the default character set for the session. To use a different character set, select from the pull-down menu. The default is ASCII.
7 Click OK twice.
Add the Functional AccountTo create or modify a user account:
1 Choose one of the following options:
• To create a new user with no shared specifications from an existing one, click Tools | Create | User.
• To create a new user either identical or closely related to an existing one, highlight the user to be cloned in the main window, and then click Tools | Clone User.
• To modify an existing user, first highlight the user to be modified in the main window, and then click Tools | Modify User.
2 Define the attributes and options as indicated in Create User and Modify User Dialog Box Description section of the Teradata Administrator Manual.
3 Click Create or Modify.
Add System to TPAMFrom the TPAM menu, select Systems, Accounts, & Collections | Systems | Add System. Provide the name for the system and Network Address (this can be either IP address or DNS name). If automatic password management is desired, check the option box to do so, and configure the change settings according to your deployment plan.
IMPORTANT: When connecting to Teradata Database V2R6.2.x or earlier, do not use UTF8 or UTF16 session character sets if the system contains Kanji object names. If any Kanji Database or User names exist on the system, the initial loading of the database tree fails.
IMPORTANT: When connecting to Teradata Database 12.0 or later, do not choose ASCII if any Kanji Database or User names exist on the system. Choose UTF8 or UTF16 session character sets so the information displays correctly on the page.
TPAM 2.5Client Setup Guide
76

Click the Connection tab to configure the functional account properties for the system.
Note that the option exists to specify a TCP port other than port 1025 (Default port for Teradata is 1025). If the system to be managed is configured to communicate on a port other than 1025, specify the port in the Alternate Port field.
Teradata uses password authentication for the functional account, select the Password option and provide the current valid password for the account.
Enter the following fields.
• Alternate Port: (if applicable)
• Connection Timeout: Default [20] Seconds.
• Functional Account to be used: [administrator level account required]
• Password: (Must match password supplied in Add the Functional Account section)
Click the Save Changes button.
TPAM 2.5Client Setup Guide
77

25
Tru64 Enhanced Security
• Introduction
• Add the Functional Account
• Using sudo
• SSH2 Daemon
• Add System to TPAM
• Create and Modify DSS Key
IntroductionThis section provides step by step instructions for configuring the Secure Shell Daemon (sshd2) for Tru64 systems to be managed by TPAM. The steps involved are verification that the sshd2 daemon is enabled and configured, creation and modification of the functional account, and if necessary Secure Shell key installation and configuration. Administrative knowledge of Tru64 and familiarity with the vi editor are assumed.
Add the Functional AccountLog on to the Tru64 system as root (or root equivalent account) and create the functional account. In our examples, the functional account is named funcacct.
Using sudoInstead of using a root equivalent account to manage the account on the Tru64 system, the functional account can leverage sudo. Log into the Tru64 system as root (or root equivalent account) and use visudo to edit the sudoers file and add the following lines under the “User privilege specifications” section of the file:
funcacct ALL=(root) NOPASSWD: /bin/grep funcacct ALL=(root) NOPASSWD: /bin/passwd
You will also need to add the following line so that sudo does not require a tty for the functional account.
Defaults:funcacct!requiretty
SSH2 DaemonVerify that the Tru64 system is configured to run the Secure Shell daemon (sshd2) and if necessary edit the sshd2 configuration file (/etc/ssh2/sshd2_config) to ensure that both password and public key authentication are permitted:
AllowedAuthentications publickey,password
If changes are made to the sshd2_config file, restart sshd to re-read the configuration:
TPAM 2.5Client Setup Guide
78

/etc/init.d/sshd restart
Add System to TPAMFrom the TPAM menu, select Systems, Accounts, & Collections | Systems | Add System. Provide the name for the system and network address (this can be either IP address or DNS name). Run the “rcmgr get SECURITY” command on the Tru64 system to determine the security configuration and set the Platform type accordingly -- Tru64 Untrusted for BASE security, or Tru64 Enhanced Sec. for ENHANCED security. If automatic password management is desired, check the option box to do so, and configure the change settings according to your deployment plan.
In order to manage the accounts the functional account can leverage sudo. This can be done by entering sudo as the Delegation Prefix.
Click the Connection tab to configure the functional account properties for the system.
Note that the option exists to specify a TCP port other than port 22 (the default SSH port). If the system to be managed is configured to communicate on a port other than 22 for SSH, specify the port in the Alternate Port field.
If password authentication will be used for the functional account, select the Password option and provide the current valid password for the account. To use public key authentication, select the DSS option and click the Get Sec SSH button to download the TPAM Sec SSH Key. Follow the steps outlined in the next section to complete the public key authentication configuration on the Tru64 System.
Create and Modify DSS KeyLog into the Tru64 system as the funcacct user, and create a .ssh2 directory under the user's home directory:
mkdir .ssh2
TPAM 2.5Client Setup Guide
79

Copy the TPAM Sec SSH Key (e.g. id_dsa.export) to the .ssh2 directory created above (see instructions in the previous section to download the TPAM Sec SSH key). Once the key is on the Tru64 system, convert it to from a unix compatible text file:
cd .ssh2 /usr/bin/mtools/dos2unix id_dsa.export
Authorize the TPAM SSH key, by creating a Key entry in the .ssh2/authorization file:
echo Key id_dsa.export >> authorization
TPAM 2.5Client Setup Guide
80

26
Linux and UNIX Systems
• Introduction
• Add the Functional Account
• Create and Modify the Public Key
• Add System to TPAM
IntroductionThis section provides step by step instructions for configuring OpenSSH for Linux®/Unix® systems to be managed by TPAM. The steps involved are functional account creation and modification and SSH key installation and configuration. Administrative knowledge of Linux/Unix and familiarity with the vi editor are assumed.
Add the Functional AccountCreate a new account on the Linux server and modify its properties. (the account name funcacct is used in this example).
To create the functional account:
1 useradd -c "Functional Account" -m funcacct
2 Use visudo to edit sudoers file and add the following lines:
• *Linux and most UNIX systems
funcacct ALL=(root) NOPASSWD: /bin/grepfuncacct ALL=(root) NOPASSWD: /usr/bin/passwd
• *AIX systems
funcacct ALL=(root) NOPASSWD: /bin/sedfuncacct ALL=(root) NOPASSWD: /usr/bin/passwdfuncacct ALL=(root) NOPASSWD: /usr/bin/pwdadm
3 Press the Esc key, type :wq! to save the file and exit visudo.
Create and Modify the Public KeyCreate the .ssh directory for the funcacct account:
CAUTION: Modification to the /etc/passwd file can result in irreparable damage to the system. Only experienced system administrators should perform this function, after taking proper backup precautions.
TIP: Different versions of Linux and UNIX may have these commands placed in different locations, so the paths may vary. Please consult a Linux/UNIX system administrator for assistance.
TPAM 2.5Client Setup Guide
81

cd ~funcacctmkdir .ssh
Copy the public key (id_dsa.pub) from TPAM to the .ssh directory created above, as the file authorized_keys. Log on to the admin interface via HTTPS and select Keys | Manage SSH Keys from the menu. One method of accomplishing this is to download the key to a workstation and then transfer it to the remote host via secure FTP or similar method.
Change ownership of the .ssh directory to the functional account:
chown -R funcacct~funcacct
Edit the sshd configuration file on the client system (/etc/ssh/sshd_config) to include the following in the “Authentication” section:
PasswordAuthentication yesPermitRootLogin yesPermitUserEnvironment yesPubkeyAuthentication yesAuthorizedKeysFile .ssh/authorized_keys
Restart the sshd daemon:
Linux: service sshd restart-OR-
Unix: kill –HUP [pid]
Add System to TPAMTo add system to TPAM:
1 Log onto the admin interface of TPAM.
2 Select Systems, Accounts, & Collections | Systems | Add System from the menu.
3 Enter the system name, network address (can either be IP address or DNS name).
4 Select the Enable Automatic Password Management? check box if desired.
5 On the Management tab, set the change settings according to your deployment plan.
6 There is a Delegation Prefix field available on the Information tab so that you can preface the commands that TPAM uses to manage passwords. In order to manage the accounts the functional account can leverage sudo. Enter sudo as the Delegation Prefix.
7 Click on the Connection tab.
NOTE: Different versions of Linux and Unix may require slightly different parameters for SSH configuration. Consult a Linux/Unix system administrator for assistance.
TPAM 2.5Client Setup Guide
82

8 Note that the option exists to specify a TCP port other than port 22 (the default SSH port). If the system to be managed is configured to communicate on a port other than 22 for SSH, specify the port in the Alternate Port field.
9 To use the key that has been imported from the preceding steps, select the DSS option. If password authentication will be used for the functional account, select the Password option and provide the current valid password for the account.
For more detailed information regarding these and other options for configuring the managed systems, please consult the Administrator Guide.
TPAM 2.5Client Setup Guide
83

27
VMware vSphere 4
• Introduction
• Add the Functional Account
• Add System to TPAM
IntroductionThis section provides step by step instructions for configuring a VMware® vSphere® 4 server to be managed by TPAM. The steps involved are creation and modification of the functional account. Administrative knowledge of VMware vSphere 4 is assumed.
Add the Functional AccountFollowing the steps below, create the functional account on the vSphere 4 server and modify its properties (the account “funcacct” is used in this example). Log on to the vSphere server using the vSphere Client.
Once authenticated to the server from the vSphere Client menu select View | Administration | Roles.
Click Add Role.
TPAM 2.5Client Setup Guide
84

You will then need to provide a name for the new role, in this example we’ll use “FuncRole”. The ONLY privilege the functional account will need is “Manage user groups”, which is found under Host | Local operations.
In order to create the functional account on the vSphere you will need to switch to the Inventory View. From the vSphere Client menu select View | Inventory. From there click on the Users & Groups tab.
Right-click in the area listing the users and select Add.
Provide the Login “funcacct”, the User Name “Functional Account”, type the password, retype to confirm, and make the user a member of the users group. Click the OK button.
Next click on the Permissions tab. Right-click in the area listing the users, and select Add Permission.
Under Users and Groups, add “funcacct” and under Assigned Role, select the “FuncRole” that you created earlier from the list. Click the OK button.
You’ve successfully created the functional account on the vSphere server and assigned it a role which will allow it to manage the passwords of other users on the server.
Add System to TPAMFrom the TPAM menu, select Systems, Accounts, & Collections | Systems | Add System. Provide the name for the system and Network Address (this can be either IP address or DNS name). If automatic password management is desired, check the option box to do so, and configure the change settings according to your deployment plan.
TPAM 2.5Client Setup Guide
85

Click the Connection tab to configure the functional account properties for the system.
Note that the option exists to specify a TCP port other than port 443 (the default SSH port). If the system to be managed is configured to communicate on a port other than 443 for SSH, specify the port in the Alternate Port field.
TPAM 2.5Client Setup Guide
86

28
Windows Active Directory
• Introduction
• Add System to TPAM
IntroductionThe concepts for managing domain level accounts or local system accounts with a domain account are essentially the same as for standalone systems. The difference is the scope of authority for the functional account used by TPAM, and some of the underlying mechanisms.
Add System to TPAMThe first step is to add a system in TPAM to represent the domain. The first step is to create a system in TPAM to represent the domain. This is done in the same manner as any managed system, by selecting Systems, Accounts, & Collections | Systems | Add System from the menu.
Click the Connection tab to configure the details for the domain, functional account, and other communication options:
• Enter the fully qualified domain name (i.e. saturn.planets.network.net). This cannot be a ‘substitute’ name, but must be the real DNS name for the domain. (Required) This is not the Domain Controller, but the only the Domain Name.
• Enter the NetBIOS name for the domain. (Required)
• Specify the functional account created in the domain that TPAM will use to manage system accounts. This account must belong to the Domain Administrators group. Provide the initial password for the functional account.
• If the Non-Privileged Functional Account check box is selected then any password changes for accounts on this system will use the account’s current password to log in and make the password change instead of using the functional account password.
If you do not select the Allow Functional Account to be Requested for password release check box then the password will only be accessible to an ISA.
TPAM 2.5Client Setup Guide
87

The special permissions on the functional account can be either:
• Read all properties
• Write all properties
• Read permissions
• Reset password
OR
• Reset password
• Account restrictions (read/write)
• LockoutTime (read/write)
TPAM 2.5Client Setup Guide
88

29
Windows Systems
• Introduction
• Add the Functional Account
• Add System to TPAM
• Test System
• Troubleshoot System Connectivity
• Add Windows Domain Member System to TPAM
IntroductionThis section provides step by step instructions for configuring Windows 2000/2003 or domain systems. The steps involved are functional account creation and modification and system creation on TPAM. .
Add the Functional AccountOn the Windows system, create a new user account to be the functional account for TPAM. This account must be added into the Administrators group. It is highly recommended that this account be given a strong password, and immediately placed under TPAM management. If the account being created is in an Active Directory, the same steps apply with the additional scope of Domain Administrator privilege.
TIP: The account name does not have to called “questtpam”, as long as the managed system and TPAM both use the same account name for the system being managed. Using a standard account name is simply a way to reduce management complexity.
TPAM 2.5Client Setup Guide
89

It is recommended that the Password Never Expires check box is selected. Once configured in TPAM, this account can be auto-managed to keep the password secure.
Add System to TPAMTo add system to TPAM:
1 Log onto the admin interface of TPAM.
2 Select Systems, Accounts, & Collections | Systems | Add System from the menu.
3 Enter the system name, network address (can either be IP address or DNS name).
4 Select the Enable Automatic Password Management? check box if desired.
5 On the Management tab, set the change settings according to your deployment plan.
TPAM 2.5Client Setup Guide
90

6 The Computer Name box on the Information tab is required for password management and also uses TPAM’s auto logon feature. If this field is not populated, TPAM will attempt to determine the system’s computer name when the system is tested and update the field.
7 Click on the Connection tab to set the properties of the functional account that was created on the Windows system in the steps above.
8 Enter the name of the functional account and its initial password. For Windows systems, the use of DSS authentication is not available, as it is not natively supported by the OS.
When the appliance checks a managed account’s password it connects to the managed Windows system as the managed account to verify the validity of the stored password. If an authentication error is reported the appliance views it as a password mismatch. In most cases this error is caused by the managed accounts not having the right to “access this computer from the network”.
Test SystemTo test the system connectivity to TPAM:
1 Select Systems, Accounts, & Collections | Systems | Manage Systems from the menu.
2 Enter the system name on the Filter tab.
3 Click on the Listing tab.
4 Select the system in the listing.
5 Click the Test System button.
A successful test result indicates that the remote system is now ready to be managed by TPAM.
TIP: PSM customers have the option to have TPAM log the user into the remote system using the Computer Name\USERID format. This will prevent any incorrect logon if the default domain is saved as the DOMAIN name versus the Local Workstation. If Use Windows Domain Account is selected on the Session Authentication sub-tab of the PSM Details tab, the user credentials will be passed as DOMAIN\USERID. You will notice with both options that the DOMAIN field is grayed out at login.TIP: PSM sessions to Windows machines using an RDP proxy connection type can be configured on the Windows machine to use SSL/TLS security for RDP connections. Note that the computer name set in TPAM for the system may need to be uppercase for the connections to succeed.
IMPORTANT: Managed accounts on Windows systems need to be given the user right of Access this computer from the network which can be defined via a Windows policy.
TPAM 2.5Client Setup Guide
91

Troubleshoot System ConnectivityThe most common causes of failure are connectivity with the system, or a problem with the functional account.
It is recommended that any errors at this level be fixed before proceeding to add managed accounts, etc.
Connectivity:
• Are there security rules on the network (firewalls, routers, etc.) that might be preventing this traffic?
• Is traffic from TPAM routable to the network address of the system to be managed?
• Are there any problems with cables, hubs or switches, etc.?
Functional Account:
• Is the functional account properly authorized to access the system? In a common setup, sudo is used to elevate the functional account’s privileges on the system.
• Has the functional account been locked out or disabled?
• Is the functional account configured to allow remote logon?
A good troubleshooting method to use for failed test situations is to try to access the system to be managed from another system (not TPAM) remotely, using the same functional account. Problems with the configuration of the functional account on the remote system should exhibit the same problems from alternate access points.
Add Windows Domain Member System to TPAMCreating Windows systems that are members of an Active Directory domain is only slightly different than a standalone system. The difference is in selecting the functional account used to manage the system.
• Enter the system name, address, etc. as with any new system.
• Select Windows as the platform.
• Enter the Computer Name.
Click on the Connection tab to configure the functional account and other communication options.
TPAM 2.5Client Setup Guide
92

• To use an existing domain level functional account (rather than a local functional account), select the Use Domain Account check box.
• Select the domain/account from the list of available choices. All configured domain accounts will appear in the list, so there may be several.
The Domain Account field will be populated with the selected information. No further configuration of the functional account is required.
IMPORTANT: The functional account is a member of the Administrators group, but there are some privileges that only belong to the single Administrator account. If the password policy on the Windows system has specific length and character requirements, then the password rule in TPAM must meet those requirements. If this is not done, there can be a password change failures. The reason is because accounts in the Administrators group (such as the TPAM functional account) cannot override password policy. Only the Administrator account can override this password policy when setting a password.
TPAM 2.5Client Setup Guide
93

TPAM 2.5Client Setup Guide
30
94
Test and Troubleshoot
• Test System
• Troubleshoot System Connectivity
Test SystemTo test the system connectivity to TPAM:
1 Select Systems, Accounts, & Collections | Systems | Manage Systems from the menu.
2 Enter the system name on the Filter tab.
3 Click on the Listing tab.
4 Select the system in the listing.
5 Click the Test System button.
A successful test result indicates that the remote system is now ready to be managed by TPAM.
Troubleshoot System ConnectivityThe most common causes of failure are connectivity with the system, or a problem with the functional account.
It is recommended that any errors at this level be fixed before proceeding to add managed accounts, etc.
Connectivity:
• Are there security rules on the network (firewalls, routers, etc.) that might be preventing this traffic?
• Is traffic from TPAM routable to the network address of the system to be managed?
• Are there any problems with cables, hubs or switches, etc.?
Functional Account:
• Is the functional account properly authorized to access the system? In a common setup, sudo is used to elevate the functional account’s privileges on the system.
• Has the functional account been locked out or disabled?
• Is the functional account configured to allow remote logon?
A good troubleshooting method to use for failed test situations is to try to access the system to be managed from another system (not TPAM) remotely, using the same functional account. Problems with the configuration of the functional account on the remote system should exhibit the same problems from alternate access points.

About Dell
Dell listens to customers and delivers worldwide innovative technology, business solutions and services they trust and value. For more information, visit www.software.dell.com.
Contacting DellTechnical Support: Online Support
Product Questions and Sales: (800) 306-9329
Email: [email protected]
Technical Support ResourcesTechnical support is available to customers who have purchased Dell software with a valid maintenance contract and to customers who have trial versions. To access the Support Portal, go to http://software.dell.com/support/.
The Support Portal provides self-help tools you can use to solve problems quickly and independently, 24 hours a day, 365 days a year. In addition, the portal provides direct access to product support engineers through an online Service Request system.
The site enables you to:
• Create, update, and manage Service Requests (cases)
• View Knowledge Base articles
• Engage in community discussions
• Chat with a support engineer
TPAM 2.5Client Setup Guide
95
![19th Sunday in Ordinary Time - August 12, 2018 Saint Luke ... · 12.08.2018 · 4bcd, 5-6 [1c]/Mt 19:3-12 Saturday: Ez 18:1-10, 13b, 30-32/Ps 51:12-13, 14-15, 18-19 [12a]/Mt 19:13-15](https://static.fdocuments.in/doc/165x107/608dbb41638ec95f94307681/19th-sunday-in-ordinary-time-august-12-2018-saint-luke-12082018-4bcd.jpg)


![The Baptism of the Lord January , r t s CHURCH OF SAINT ......Sunday: Is 42:1-4, 6-7/Ps 29:1-2, 3-4, 3, 9-10 [11b]/Acts 10:34-38/Mk 1:7-11 or Is 55:1-11/Is 12:2-3, 4bcd, 5-6 [3)]/1](https://static.fdocuments.in/doc/165x107/60cc6f93c051057bba2e1f0e/the-baptism-of-the-lord-january-r-t-s-church-of-saint-sunday-is-421-4.jpg)


![Bro....2021/01/03 · Is 55:1-11/Is 12:2-3, 4bcd, 5-6 [3)]/1 Jn 5:1-9/Mk 1:7-11 Newly Baptized Carmine Timothy Chiavetta](https://static.fdocuments.in/doc/165x107/61090f429a88be42f6787470/bro-20210103-is-551-11is-122-3-4bcd-5-6-31-jn-51-9mk-17-11.jpg)


