
THE ORIGINAL 4th MAY I960 VOL 130 NUMBER 3360 'DO-IT ...
20
4th MAY I960 VOL 130 NUMBER 3360 THE ORIGINAL 'DO-IT-YOURSELF' 1 MAGAZINE in j FOR ALL HOME CRAFTSMEN ic FREE Design Supplement Also in this issue CONTINUING THE 'HOBBf CRUISER' AN EXPANDING CLOTHES AIRER CHILDREN WILL BE INTRIGUED WITH THE SECRET OPENING ,\\U COLLECTORS' CLUB 1AKING YOUR N TRANSFERS V JllMW PATTERN-MAKING HARMONOGRAPH GARDENING HINTS ETC. ETC SAVINGS Up-to-the-minute ideas Practical designs Pleasing and profitable things to make
Transcript of THE ORIGINAL 4th MAY I960 VOL 130 NUMBER 3360 'DO-IT ...

4th MAY I960 VOL 130 NUMBER 3360 THE ORIGINAL
'DO-IT-YOURSELF'
1 MAGAZINE
in
j
FOR ALL
HOME CRAFTSMEN
ic FREE Design
Supplement
Also in this issue
CONTINUING THE 'HOBBf CRUISER'
AN EXPANDING CLOTHES AIRER
CHILDREN
WILL BE
INTRIGUED
WITH THE
SECRET
OPENING
,\\U COLLECTORS' CLUB
1AKING YOUR N TRANSFERS V
JllMW PATTERN-MAKING HARMONOGRAPH
GARDENING HINTS
ETC. ETC
SAVINGS
Up-to-the-minute ideas
Practical designs
Pleasing and profitable things to make

FOR many years the Ind Coope Brewery at Burton-on-Trent has been brewing excellent beer, and
expanding and developing throughout the world. The sign of the 'Red Hand' on the De Havilland Dove — the aircraft which the company uses for official business — is not merely an invitation to sample beer at its best, but also a re- minder that Ind Coope, with feet based firmly on the ground, can rise to any occasion whenever circumstances de- mand.
IND COOPE'S—2
On our way to the airfield Mr R. L. Thompson (Public Relations Office) ex- plained that when important negotia- tions are afoot, the company's directors have to travel great distances at short notice, and speed of travel is an essential feature of success. This called for a 'plane, in charge of which is Captain David Lancaster, a former fighter pilot, who had also flown on charter work.
1 spent an exciting hour looking over the Dove, observing that it had twin engines, six armchair-type seats, and was painted in Double Diamond colours. It has an average airspeed of 175 miles an hour, is fitted with de-icing equipment, and has a Decca Navigator.
Before returning to the Brewery we drove down the runway. Ind Coope are
j
( >
•wssv—r
T::1 'TV : : :
Cunning a I Burton
the only "flying brewers" in the British Isles. About 1930, a new trend in drinking
was noted — the increasing demand for bottled beer.
Ind Coope's first bottled beers were bottled by hand machinery. Today, they are bottled with the aid of the most modern machinery available, and under the most hygienic conditions possible. The brewer's skill, borne of long ex- perience, basically remains the same, but the application of that skill to produce the vast quantities of beer to satisfy the demands of an increasing population are
now developed through modern auto- matic machinery.
From the time top grade barley is taken out of freight cars by mechanical suction, and hops added in the great shiny coppers, to the moment the brewer gives his carefully tested approval to a batch of skol or Double Diamond, scientific skills as well as technical know-how play their important part in the brewing operation.
When the brew has satisfied the
brewer's rigorous tests, it passes to con- ditioning tanks to mature. During the entire production process the tempera- ture is carefully controlled to ensure a pleasant tasting and stable brew. From huge storage tanks the beer is then pumped up by air pressure to the bottling plant, where it is automatically fed into bottles, which have been thoroughly cleaned and sterilized. These are then capped, and the contents pasteurized before passing through the labelling and packaging machines.
A million bottles and cans are filled and packed in this way every day to find their way into homes all over Britain.
Now some more notes. China had its 'beer', called 'kiu', as
early as 2,300 B.C., and beer in one form or another was known to nearly all peoples in ancient times. Wherever beer was introduced it became increas- ingly popular, the old Germanic tribes making their 'bior' from mashed germi- nated barley, this being the drink, sourish in taste, described by Tacitus. Later a much stronger brew, known in High Ger- man as 'alo', was produced; it, doubtless, gave its name to our English 'ale'.
If you need a pen friend from Burton, write to: David W. Acton, 33 Somerset Road, Stapen Hill, Burton-on-Trent, Staffs. Two 90-harrel tankers
mmm If ? -1 p-
'£■ BRAN <X s a P.AWAK <x>
n mmm rMTjyE &
r.
A,„-
T,
'JUMBO' SAVINGS BANK
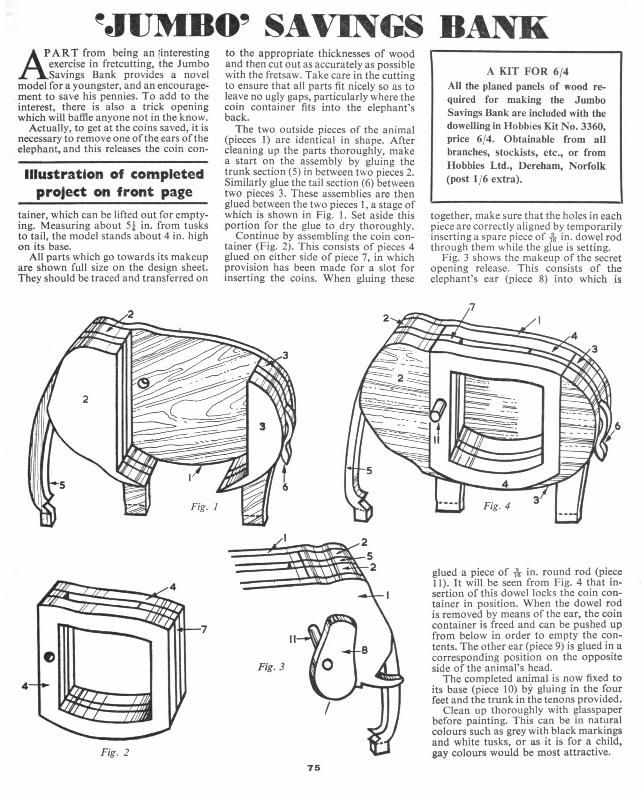
APART from being an [interesting exercise in fretcutting, the Jumbo
L.Savings Bank provides a novel model for a youngster, and an encourage- ment to save his pennies. To add to the interest, there is also a trick opening which will baffle anyone not in the know.
Actually, to get at the coins saved, it is necessary to remove one of the ears of the elephant, and this releases the coin con-
lllustration of completed project on front page
tainer, which can be lifted out for empty- ing. Measuring about 51 in. from tusks to tail, the model stands about 4 in. high on its base.
All parts which go towards its makeup are shown full size on the design sheet. They should be traced and transferred on
to the appropriate thicknesses of wood and then cut out as accurately as possible with the fretsaw. Take care in the cutting to ensure that all parts fit nicely so as to leave no ugly gaps, particularly where the coin container fits into the elephant's back.
The two outside pieces of the animal (pieces 1) are identical in shape. After cleaning up the parts thoroughly, make a start on the assembly by gluing the trunk section (5) in between two pieces 2. Similarly glue the tail section (6) between two pieces 3. These assemblies are then glued between the two pieces 1, a stage of which is shown in Fig. 1. Set aside this portion for the glue to dry thoroughly.
Continue by assembling the coin con- tainer (Fig. 2). This consists of pieces 4 glued on either side of piece 7, in which provision has been made for a slot for inserting the coins. When gluing these
A KIT FOR 6/4 All the planed panels of wood re- quired for making the Jumbo Savings Bank are included with the dowelling in Flohbies Kit No. 3360, price 6/4. Obtainable from all branches, stockists, etc., or from Hobbies Ltd., Dereham, Norfolk (post 1/6 extra).
together, make sure that the holes in each piece are correctly aligned by temporarily inserting a spare piece of pg in. dowel rod through them while the glue is setting.
Fig. 3 shows the makeup of the secret opening release. This consists of the elephant's ear (piece 8) into which is
Fig Fig
e
Fig. 2
o Fig. 3
glued a piece of in. round rod (piece 11). It will be seen from Fig. 4 that in- sertion of this dowel locks the coin con- tainer in position. When the dowel rod is removed by means of the ear, the coin container is freed and can be pushed up from below in order to empty the con- tents. The other ear (piece 9) is glued in a corresponding position on the opposite side of the animal's head.
The completed animal is now fixed to its base (piece 10) by gluing in the four feet and the trunk in the tenons provided.
Clean up thoroughly with glasspaper before painting. This can be in natural colours such as grey with black markings and white tusks, or as it is for a child, gay colours would be most attractive.
75

Flying Model Aircraft—13
Continuing the HOBBY OHJISEB
is
yfrn
Fig- 6 — The completed structure
THE nose block (see Fig. 7) can be caned either from a piece of hard balsa i in. thick or from a similar
block made up of four pieces of i in. thick balsa cemented together under pressure with their grains opposed to each other. Length and width of the rectangular piece should be a shade big- ger than the overall depth and width of the fuselage at the nose. On what is to be the front face mark with a cross the exact position of the propeller shaft.
Cut a cartridge paper template of the noseblock in side view and paste it to the edge of the balsa. Trim round it care- fully. Do exactly the same with the plan view shape of the block. Now cut a rect- angle of i in. hard balsa so that it fits neatly in the aperture at the front of the fuselage; this is the noseblock retaining spigot and is cemented to the back of the block. Before the cement has thoroughly set locate the block in the nose and make
By Gordon Allen
any necessary adjustment to align it with the fuselage; then mark the radius shapes of the fuselage nose on the back of it. Curve the block to its final shape, glass- paper it smooth and apply a thick coat of cement. Drill the block & in. diameter (using the centre already marked) and fit a 20 s.w.g. screwed brass bush.
Bend the end of a length of 20 s.w.g. piano wire to the clutch shape shown on the drawing on the front of the propeller shaft, thread the wire through the 7 in. plastic propeller and the bush on the noseblock, and bend the motor hook with a pair of round-nose pliers. Cover the hook with a piece of valve rubber tubing
to prevent it from eventually cutting into a tightly-wound rubber motor.
The one-piece wrap-round cockpit canopy is made from thin celluloid or, as in the original, thin clear plastic, with the addition of a 'fairing strip', cut from flexible cardboard or Bristol board — shown black on the detail development. Make a card or cartridge paper pattern of the canopy development, using the squares as a guide, and use this to cut the celluloid to shape. The shape of the fair- ing strip can be drawn direct on to card- board and cut out.
Using impact adhesive, fix the strip to the celluloid in the position indicated. Balsa cement can be used for this if celluloid and not plastic is beingused.but impact adhesive makes for a much cleaner job in this particular case. If the fuselage has been made accurately to the drawing you will find that the canopy
will fit neatly (Fig. 10) when bent round the rims of formers F4 and F5. However, the precise shape of the canopy in your particular model (if there have been any inconsistencies in the building of the fuselage) can be ascertained if you bend a piece of stiff tracing paper round F4 and F5 with the edge of the paper coin- ciding with the edge of F4 and then trace with a sharp pencil the required outline. Use impact adhesive to fix the canopy to F4 and F5 and to the straight portion of the balsa fuselage sides — applying it both to the rims of the formers and the fuselage edge and to the appropriate edges of the canopy.
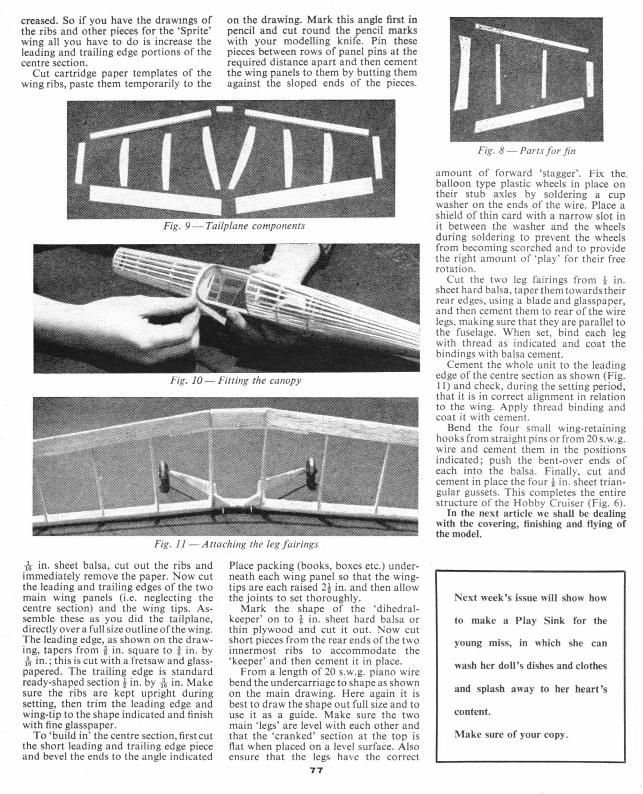
Cut all the pieces for the fin and tail- plane (Figs. 8 and 9) and assemble them with balsa cement. First it will be neces- sary to draw the components full size on paper; then the parts are fixed in place, directly over the drawing, between rows of pins. Rub a piece of candle over the drawing at all joint positions to prevent the balsa cement from sticking to the paper.
Having assembled the parts, round-off the leading edges and tips of each com- ponent and taper the trailing edge of the fin. Finish with fine glasspaper. Fill in the centre section of the tailplane with ^ in, sheet balsa. Do not fix the fin to the tailplane until both components have been covered and finished.
The wing of the 'Hobby Cruiser' is identical with that designed for the 'Sprite', the jet-model described earlier in this series, with the exception of the centre section which is wider and incor- porates the undercarriage, and the dihedral angle (the angle of the wings looking from the front) which is in-
ipw
1%^ * -
<. Pllllii illll
Fig. 7—Showing the nose block
creased. So if you have the drawings of the ribs and other pieces for the 'Sprite' wing all you have to do is increase the leading and trailing edge portions of the centre section.
Cut cartridge paper templates of the wing ribs, paste them temporarily to the
on the drawing. Mark this angle first in pencil and cut round the pencil marks with your modelling knife. Pin these pieces between rows of pane! pins at the required distance apart and then cement the wing panels to them by butting them against the sloped ends of the pieces.
m Fig. 8 — Parts for fin
amount of forward 'stagger'. Fix the balloon type plastic wheels in place on their stub axles by soldering a cup washer on the ends of the wire. Place a shield of thin card with a narrow slot in it between the washer and the wheels during soldering to prevent the wheels from becoming scorched and to provide the right amount of 'play' for their free rotation.
Cut the two leg fairings from J in. sheet hard balsa, taper them towards their rear edges, using a blade and glasspaper, and then cement them to rear of the wire legs, making sure that they are parallel to the fuselage. When set, bind each leg with thread as indicated and coat the bindings with balsa cement.
Cement the whole unit to the leading edge of the centre section as shown (Fig. 11) and check, during the setting period, that it is in correct alignment in relation to the wing. Apply thread binding and coat it with cement.
Bend the four small wing-retaining hooks from straight pins or from 20 s.w.g. wire and cement them in the positions indicated; push the bent-over ends of each into the balsa. Finally, cut and cement in place the four | in. sheet trian- gular gussets. This completes the entire structure of the Hobby Cruiser (Fig. 6).
In the next article we shall be dealing with the covering, finishing and flying of the model.
ijiI/I
Fig. 9 — Tailplane components
Fig. 10 — Fitting the canopy
Fig. II — Attaching the teg fairings
iV in. sheet balsa, cut out the ribs and immediately remove the paper. Now cut the leading and trailing edges of the two main wing panels (i.e. neglecting the centre section) and the wing tips. As- semble these as you did the tailplane, directly over a full size outline of the wing. The leading edge, as shown on the draw- ing, tapers from | in. square to f in. by & in.; this is cut with a fretsaw and glass- papered. The trailing edge is standard ready-shaped section I in. by fs in. Make sure the ribs are kept upright during setting, then trim the leading edge and wing-tip to the shape indicated and finish with fine glasspaper.
To 'build in' the centre section, first cut the short leading and trailing edge piece and bevel the ends to the angle indicated
Place packing (books, boxes etc.) under- neath each wing panel so that the wing- tips are each raised 2J in. and then allow the joints to set thoroughly.
Mark the shape of the 'dihedral- keeper' on to } in. sheet hard balsa or thin plywood and cut it out. Now cut short pieces from the rear ends of the two innermost ribs to accommodate the 'keeper' and then cement it in place.
From a length of 20 s.w.g. piano wire bend the undercarriage to shape as shown on the main drawing. Here again it is best to draw the shape out full size and to use it as a guide. Make sure the two main Tegs' are level with each other and that the 'cranked' section at the top is flat when placed on a level surface. Also ensure that the legs have the correct
Next week's issue will show how-
to make a Play Sink for the
young miss, in which she can
wash her doll's dishes and clothes
and splash away to her heart's
content.
Make sure of your copy.
77

AN EXPAI^DIXG
CLOTHES A1RER
TO commence construction of this expanding clothes airer prepare sixteen strips of wood, cut to
length as in Fig. I. A cheap hardwood, such as beech, would do for these, or even deal, if of good quality. Plane the strips to a uniform thickness of § in., and width of 1 in. Place side by side, as in Fig. 2, and at 1 in. from the ends at top and bottom, rule a straight line across.
A line should be drawn across the middle of the strips also. Set a gauge to i in. and then gauge across the lines on each piece to mark the exact spots for the screws to enter to convert these strips to two latticed sides, as in the finished article.
It is desirable for the clothes airer to fold up quite flat, as in side view, Fig. 3, and to achieve this the screw holes must be bored exactly on the marks made on the strips. For the cross rods or bars, round wood rods could be employed, | in. diameter, or as a good substitute, square strips of deal, planed to an octag- onal shape. The latter, being of softer wood, might even be considered prefer- able. Suitable strips could be cut from a piece of board j in. thick, and the corners planed off". This job can be expedited with the aid of a made-up gadget, as shown in Fig. 6, in which the unplaned square strips can be supported while their corner angles are planed off. These cross-rods can be of any length. For small family use a length of 30 in. to 36 in. will, in most cases, suffice.
Fitting together can now be under- taken. Screws of the round-headed type are employed, and a thin metal washer should be provided for each. The end holes are bored an easy fit that allows the screws to be pushed through the holes up to their heads with easy pressure of the thumb alone. Flaving bored these, the centre holes can be attended to. A differ-
ence in fitting is adopted here. In one strip a similar hole to those at the ends is bored, but in the strip to which it is sub- sequently attached, a smaller hole is made with a bradawl, just large enough to let the thread of the screw bite its way in. Detail A, in Fig. 5, explains this.
One exception to this is the screw holes in the two top sets of strips, where they cross each other, the easy-fitting holes being bored through both, and this time using a i in. drill bit. These are joined together with screw bolts and wing nuts, as at B in Fig. 5, and being capable of adjustment for tightness, help to keep the clothes airer firm, when drawn out. Now screw the lattice sides to the cross-rods, commencing from the bottom upwards, as it will be found that the top rods, or one rod, at least, will have to be a trifle longer than the rest. In all cases where the screws are employed, slip a metal washer under their heads, as shown in Fig. 4.
Holes, made with a bradawl, must
k 71/2 *\ 71/2 H Pi 1 i 1 1
-l S
Fig. I
I M I I M I I I I M
Fig. 2
w/irui/ii/A
obviously be made in the centres of the ends of all the rods beforehand, and a good plan is to punch a hole in the centre of a disc of thin, or even stiff card, cut to the diameter of the rods, and to use this as a guide by laying it on the ends of the rods in turn, and pricking through the centre hole with an awl. Adjust the tight- ness of the screws to provide a reasonable easiness of movement, when pulling out or folding up, without losing stability and firmness when in use.
Across the bottom pairs of strips, screw J in. by 3 in. bars of wood, as can be seen in side view, Fig. 3. This will help in steadying the article when extended for use, and add a little further stability and rigidity to it. Give the completed clothes airer a rub over with fine glass- paper, but otherwise it is best left un- finished and is then unlikely to mark any damp clothes placed upon it. The ends of the cross-bars should be slightly rounded off as a finish. (M.h.).
Fig. 4
A B Fig. 5
Fig. 3 78
Fig. 6
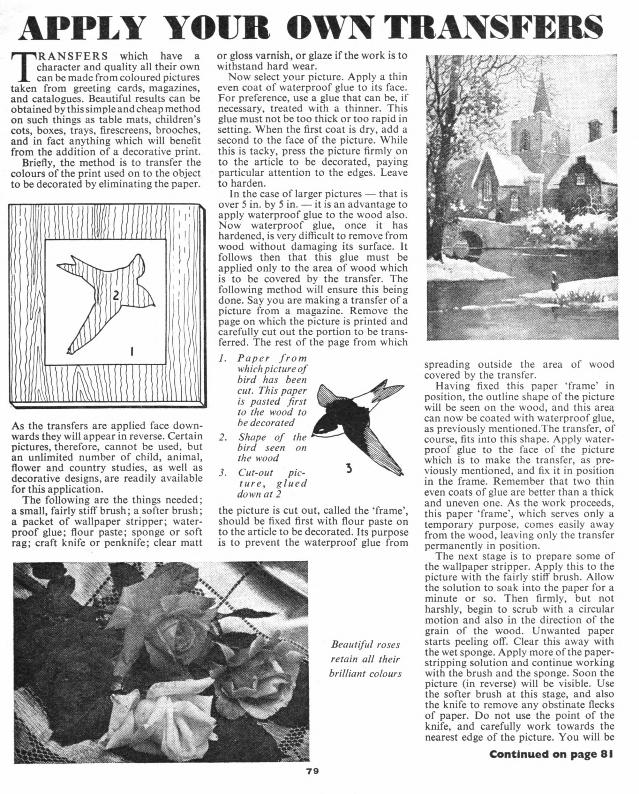
APPLY YOUR OWN TRANSFERS
Transfers which have a character and quality all their own can be made from coloured pictures
taken from greeting cards, magazines, and catalogues. Beautiful results can be obtained by this simple and cheap method on such things as table mats, children's cots, boxes, trays, firescreens, brooches, and in fact anything which will benefit from the addition of a decorative print.
Briefly, the method is to transfer the colours of the print used on to the object to be decorated by eliminating the paper.
As the transfers are applied face down- wards they will appear in reverse. Certain pictures, therefore, cannot be used, but an unlimited number of child, animal, flower and country studies, as well as decorative designs, are readily available for this application.
The following are the things needed; a small, fairly stiff brush; a softer brush; a packet of wallpaper stripper; water- proof glue; flour paste; sponge or soft rag; craft knife or penknife; clear matt
or gloss varnish, or glaze if the work is to withstand hard wear.
Now select your picture. Apply a thin even coat of waterproof glue to its face. For preference, use a glue that can be, if necessary, treated with a thinner. This glue must not be too thick or too rapid in setting. When the first coat is dry, add a second to the face of the picture. While this is tacky, press the picture firmly on to the article to be decorated, paying particular attention to the edges. Leave to harden.
In the case of larger pictures — that is over 5 in. by 5 in. — it is an advantage to apply waterproof glue to the wood also. Now waterproof glue, once it has hardened, is very difficult to remove from wood without damaging its surface. It follows then that this glue must be applied only to the area of wood which is to be covered by the transfer. The following method will ensure this being done. Say you are making a transfer of a picture from a magazine. Remove the page on which the picture is printed and carefully cut out the portion to be trans- ferred. The rest of the page from which 1. Paper from
which picture of bird has been cut. This paper is pasted first to the wood to be decorated
2. Shape of the bird seen on the wood
3. Cut-out pic- ture, glued down at 2
Beautiful roses retain all their brilliant colours
%■ %
.u» v
the picture is cut out, called the 'frame', should be fixed first with flour paste on to the article to be decorated. Its purpose is to prevent the waterproof glue from
spreading outside the area of wood covered by the transfer.
Having fixed this paper 'frame' in position, the outline shape of the picture will be seen on the wood, and this area can now be coated with waterproof glue, as previously mentioned.The transfer, of course, fits into this shape. Apply water- proof glue to the face of the picture which is to make the transfer, as pre- viously mentioned, and fix it in position in the frame. Remember that two thin even coats of glue are better than a thick and uneven one. As the work proceeds, this paper 'frame', which serves only a temporary purpose, comes easily away from the wood, leaving only the transfer permanently in position.
The next stage is to prepare some of the wallpaper stripper. Apply this to the picture with the fairly stiff brush. Allow the solution to soak into the paper for a minute or so. Then firmly, but not harshly, begin to scrub with a circular motion and also in the direction of the grain of the wood. Unwanted paper starts peeling off. Clear this away with the wet sponge. Apply more of the paper- stripping solution and continue working with the brush and the sponge. Soon the picture (in reverse) will be visible. Use the softer brush at this stage, and also the knife to remove any obstinate flecks of paper. Do not use the point of the knife, and carefully work towards the nearest edge of the picture. You will be
Continued on page 81 79

For fascinating patterns
MAKING A 11 Alt MO A OGR APH
THERE are many possible modi- fications in the designs of simple machines for the production of
patterns entirely composed of curves. Some involve both a moving pen and a moving desk, but for the sake of sim- plicity and easier manufacture the harmonograph we describe has been designed with the basis of a twin ellipso- graph. This has a moving pattern desk, the pen being held above by an arm, but a further modification is suggested by way of the compound deflector pendu- lum. FIG 1
paper placed on the desk and conse- quently the continuous movements ultimately produce all manner of inter- locking curved line patterns known as Lissajous figures. We find that a great variety of original patterns can be repro- duced by using the swinging pendulum and when it is realized that further modifications can be achieved by altering the length of the pendulum or adding a second pendulum it will be seen that the combinations are almost limitless.
As stated, the simple pendulum forms the basis of these machines, in particular Blackburn's pendulum which takes the form of a letter Y. Two upper strings are attached to a beam as in Fig. I, the lower string having a bob attached to keep the pendulum in a regular motion. If a pencil is fitted at the end it will trace a pattern on paper placed below. Alteration in the lengths of the two arms of the Y produces new effects, WEIGHT
18"
FIG 1/8"
7 1/4" ! 31/2" I
GLUE I'i TO DESK\ 3/4'
FIG 3 5 1/2
16"
It- weight
AXLE ROD-,
10" I 3/4
4"
18" he PENDULUM
FIG 5
The basis of all such machines is usually a pendulum which gives motion to the desk, which swings with the oscillations of the pendulum. A pen, or pencil, is held in a fixed position over the
80
FIG 4
so it should now be apparent that we can achieve the same object by altering the length of the pendulum in our machine.
Fig. 2 shows the harmonograph after completion and assembly. It will be seen

that the two pendulums have been fitted, each having a weight, but the lower is only attached to the upper by means of a piece of strong string, thus providing a secondary motion. The lower pendulum can be removed quite easily or added for more experiments. The suspension of the pendulum will be described in detail later.
First of all we require a piece of 1 in. shelving for a table measuring 18 in. by 1\ in.,with a portion removed at one end. This is shown in Fig. 3, and little difficulty should be encountered in removing the waste material from the end where the pendulum assembly will be fitted. See that the sides of this aperture are well smoothed with glasspaper after cutting.
Fig. 4 shows the next stage of the table construction involving the fitting of an upright made from 1 in. square material and 10 in. long. This upright is slotted at the top to accept the pen-arm, which is made from f in. square section. Cut the slot in the upright, smoothing the insides, and fix to the base by means of a dowel rod or screw from the underside. A hole should be drilled for inserting a small pin which acts as a pivot for the arm. The pen arm is drilled about 1 in. from one end with a hole large enough to accept a ball point pen and a sawcut is then made in the same end. If a screw is inserted the pen can be held quite firmly for writing on the moving desk. This fitting is shown in detail in the circle of Fig. 4. It will be seen that there is a small weight on the arm to provide constant contact between pen and paper, with another counter- weight at the end of the arm. It is sug- gested that a series of small holes are drilled along the pen arm 1J in. apart so that the weights may be adjusted as experience proves necessary.
We now arrive at the stage where the pendulum assembly is to be constructed and our design has overcome the making of difficult and precision knife edges. At the same time it is essential that the assembly moves freely, so all the holes and fittings must be accurate and free from burrs. In order to obtain freedom for a double movement it is necessary to provide for the pendulum to swing in two opposing directions. Reference to Fig. 5 will reveal how to use a small square frame made from | in. square section. Construction is quite simple if half-joints are made at the corners, these being glued and pinned. Then attach a pair of small mirror plates — or metal brackets made from sheet brass — and ultimately this small square is attached by screws between and just below the two arms of the table as shown in Fig. 2. Note that this square must be so fixed that the edge nearest the body of the table does not foul the latter when tilted up- wards. The frame should be made but not fitted at this stage.
It will be apparent that by attaching
the frame to the table we have provided one direction of swing and it now re- mains to provide for the other. Further reference to Fig. 5 will show that a rod is inserted through the opposite sides of the frame and subsequently through the dowel rod pendulum. Drill small holes in the sides of the frame for this rod, but the hole in the pendulum itself should only be determined after test. A bright steel rod — like a Meccano axle — will be ideal for this particular pivot.
We also need a desk for holding a piece of paper which takes the design when the pendulum has been set in motion. All that is required is a piece of substan- tial plywood 6in. square. This is ultimately glued to the cube fitted to the top of the dowel rod pendulum as shown in Fig. 5.
Prepare a 1 in. cube, drilling a f in. hole for the dowel rod pendulum, which should be at least 2 ft. long. Glue the rod into the prepared hole, fixing the desk on top of the cube. You will also note a further cube at the base of the rod which is for the addition of weights. A piece of lead weighing J lb. or 1 lb. may be shaped in the form of a split washer and fitted on the cube. It is suggested that the latter remains moveable — to shorten as desired — and several holes can be made in the rod for inserting pins in any de- sired position.
When the desk and pendulum have been completed the assembly may be attached to the table and arrangements made for fitting. Lower the pendulum through the frame, marking a drilling point for the axle, which will leave the desk at least 3 in. above the level of the table. Remove the pendulum, drill the hole and smooth, and the machine is
surprised how easily the unwanted paper comes away, leaving only the print transfer adhering to the wood in its full colours.
The paper 'frame' can now be taken off. Apply some of the stripping solution to it, allow this to soak in, and the frame will then come away quite easily.
After giving the picture a final sponge over with clear water, dry it by dabbing it with a cloth and holding it near to the fire for a moment or two. There is nothing in the whole process which will damage the wood or the transfer.
When dry, any slight cloudiness of the picture will disappear when the varnish is applied. Two coats are best. Work the first gently into the transfer. When the varnish has set the transfer is very tough, and may be sawn or trimmed, leaving absolutely smooth edges. By this method,
81
almost ready for use. Note that the pen- dulum must be correctly centred and balanced on the axle if this assembly is to perform its functions correctly.
It is necessary to clamp the table to a bench so that the pendulum can swing freely. Attach a piece of drawing paper to the desk by rubber bands. The pen- dulum must be started revolving in a circular motion and when the pen is lowered to the paper a pattern will be produced. Some preliminary tests will be advisable to determine the best weighting of the pen-arm and the pendulum.
Earlier we mentioned the introduction of another pendulum and the apparatus just described is the single main pen- dulum. A similarly made deflector pen- dulum, which will alter the oscillations considerably to produce a twin elliptic effect, can be suspended by means of a strong thread. Insert a screw eye in the end of the main pendulum and one in the end of the deflector pendulum, join- ing the two together by thread or a piece of wire about 2f in. long. This deflector pendulum need only be I i ft. or 2 ft. long, but both pendulums must bear their own weights. With care the two pendulums can be set in motion, when they will com- bine to produce complex patterns.
It must be remembered that much depends on the correct weighting of the pen-arm to keep it in close contact with the paper as well as the maintenance of steady oscillations of the pendulums. See that the latter have a free action or the desk cannot move smoothly and freely. First attempts at making the fascinating Lissajous figures should be with the single pendulum, experimenting with the compound pendulum later. (S.H.L.)
all the colours and highlights and even delicate tints are preserved.
Test your picture first by applying waterproof glue to a small area. If the ink does not smear (and in the majority of cases it will not), you can go ahead and produce a really fine transfer.
Practise first with small pictures on odd pieces of well-smoothed wood. You will speedily get the 'feel' of the method, and be able to do bigger things with success. Begin by making, say, a few brooches, for you can produce some really lovely ones by this method. If at the outset small pieces of the print lift, exposing the wood, you may work a matching oil colour over the spot, brush- ing it into the first coat of varnish. It will be an invisible repair. Wherever possible apply the transfer first, and do any stain- ing or enamelling afterwards. (Ed.)
• Continued from page 79
Apply pour own Transfers
JU!T TO CEMIND YOU -
Gtwniw pis
MAY
o
□ For good results sow wallflower seeds this month
Outside LATE frosts can cause damage to
tender bedding plants such as dahlias, geraniums, and begonias
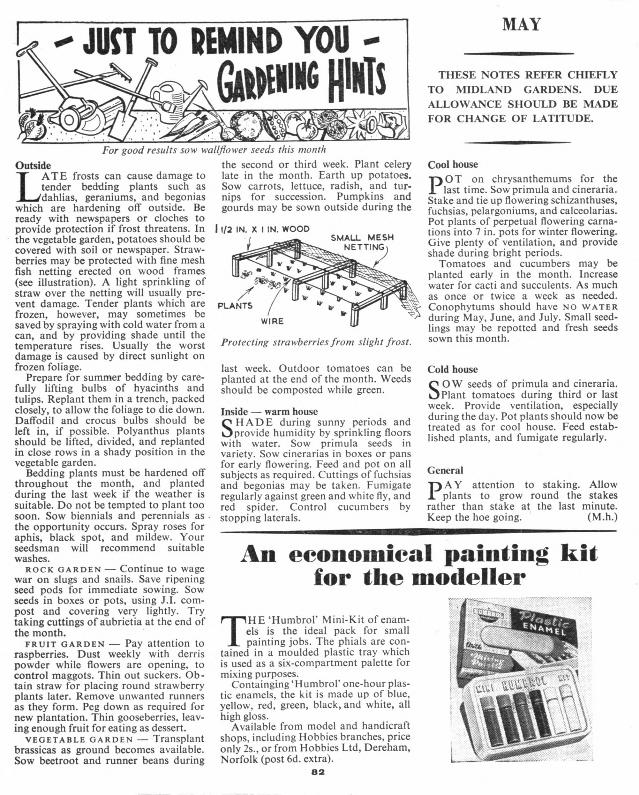
which are hardening oif outside. Be ready with newspapers or cloches to provide protection if frost threatens. In the vegetable garden, potatoes should be covered with soil or newspaper. Straw- berries may be protected with fine mesh fish netting erected on wood frames (see illustration). A light sprinkling of straw over the netting will usually pre- vent damage. Tender plants which are frozen, however, may sometimes be saved by spraying with cold water from a can, and by providing shade until the temperature rises. Usually the worst damage is caused by direct sunlight on frozen foliage.
Prepare for summer bedding by care- fully lifting bulbs of hyacinths and tulips. Replant them in a trench, packed closely, to allow the foliage to die down. Daffodil and crocus bulbs should be left in, if possible. Polyanthus plants should be lifted, divided, and replanted in close rows in a shady position in the vegetable garden.
Bedding plants must be hardened off throughout the month, and planted during the last week if the weather is suitable. Do not be tempted to plant too soon. Sow biennials and perennials as the opportunity occurs. Spray roses for aphis, black spot, and mildew. Your seedsman will recommend suitable washes.
rock garden — Continue to wage war on slugs and snails. Save ripening seed pods for immediate sowing. Sow seeds in boxes or pots, using J.I. com- post and covering very lightly. Try taking cuttings of aubrietia at the end of the month.
fruit garden — Pay attention to raspberries. Dust weekly with derris powder while flowers are opening, to control maggots. Thin out suckers. Ob- tain straw for placing round strawberry plants later. Remove unwanted runners as they form. Peg down as required for new plantation. Thin gooseberries, leav- ing enough fruit for eating as dessert.
vegetable garden — Transplant brassicas as ground becomes available. Sow beetroot and runner beans during
the second or third week. Plant celery late in the month. Earth up potatoes. Sow carrots, lettuce, radish, and tur- nips for succession. Pumpkins and gourds may be sown outside during the
11/2 IN. X l IN, WOOD i
SMALL MESH NETTING)
' PLANTS WIRE
Protecting strawberries from slight frost.
last week. Outdoor tomatoes can be planted at the end of the month. Weeds should be composted while green.
Inside — warm house SHADE during sunny periods and
provide humidity by sprinkling floors with water. Sow primula seeds in variety. Sow cinerarias in boxes or pans for early flowering. Feed and pot on all subjects as required. Cuttings of fuchsias and begonias may be taken. Fumigate regularly against green and white fly, and red spider. Control cucumbers by stopping laterals.
THESE NOTES REFER CHIEFLY TO MIDLAND GARDENS. DUE ALLOWANCE SHOULD BE MADE FOR CHANGE OF LATITUDE.
Cool house POT on chrysanthemums for the
last time. Sow primula and cineraria. Stake and tie up flowering schizanthuses, fuchsias, pelargoniums, and calceolarias. Pot plants of perpetual flowering carna- tions into 7 in. pots for winter flowering. Give plenty of ventilation, and provide shade during bright periods.
Tomatoes and cucumbers may be planted early in the month. Increase water for cacti and succulents. As much as once or twice a week as needed. Conophytums should have no water during May, June, and July. Small seed- lings may be repotted and fresh seeds sown this month.
Cold house SOW seeds of primula and cineraria.
Plant tomatoes during third or last week. Provide ventilation, especially during the day. Pot plants should now be treated as for cool house. Feed estab- lished plants, and fumigate regularly.
General PAY attention to staking. Allow
plants to grow round the stakes rather than stake at the last minute. Keep the hoe going. (M.h.)
An economteal painting; kit
lor the nio«leller
THE 'Humbrol' Mini-Kit of enam- els is the ideal pack for small painting jobs. The phials are con-
tained in a moulded plastic tray which is used as a six-compartment palette for mixing purposes.
Containging 'Humbrol' one-hour plas- tic enamels, the kit is made up of blue, yellow, red, green, black, and white, all high gloss.
Available from model and handicraft shops, including Hobbies branches, price only 2s., or from Hobbies Ltd, Dereham, Norfolk (post 6d. extra).
82
■A
r~

BRltirii WHITE A0«CS4V«
iff
BRITFIX
,
6Ci
JUST LIKE DAD'S!
You can make this ideal showpiece from Hobbies Kit No. 3300, which contains all wood, materials, etc., and 12 sets of pots and saucers. Hinged roof, window, door. 18 in. X 12 in. x 13 in. high. Only a few simple tools needed in construction.
Kits from Hobbies branches, stockists or post free (see coupon). 39/6
ALL- THE- YEAR-R O UND INTEREST
MINIATURE
GREENHOUSE A really practical model for the home
For growing cacti, succulents, miniature trees, seed- lings, etc., and can be used as a propagating frame.
To HOBBIES LTD., Dept. 99, Dereham, Norfolk Please send Kit No. 3300 for making Miniature Greenhouse
I enclose P.O. for 39/6 Name
Address
83
LURE OF THE WAYSIDE l\.\
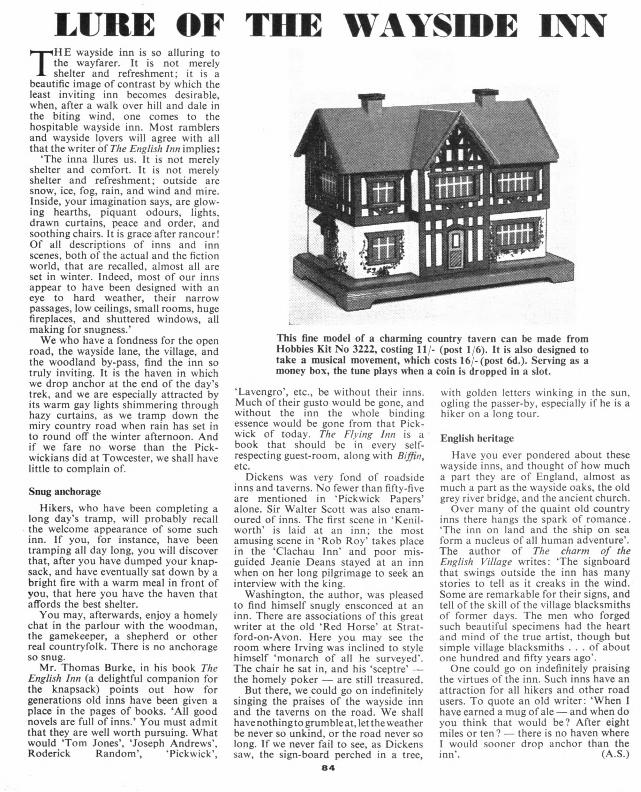
This fine model of a charming country tavern can be made from Hobbies Kit No 3222, costing 11/- (post 1/6). It is also designed to take a musical movement, which costs 16/-(post 6d.). Serving as a money box, the tune plays when a coin is dropped in a slot.
THE wayside inn is so alluring to the wayfarer. It is not merely shelter and refreshment; it is a
beautific image of contrast by which the least inviting inn becomes desirable, when, after a walk over hill and dale in the biting wind, one comes to the hospitable wayside inn. Most ramblers and wayside lovers will agree with all that the writer of The English Inn implies:
'The inna llures us. It is not merely shelter and comfort. It is not merely shelter and refreshment; outside are snow, ice, fog, rain, and wind and mire. Inside, your imagination says, are glow- ing hearths, piquant odours, lights, drawn curtains, peace and order, and soothing chairs. It is grace after rancour! Of all descriptions of inns and inn scenes, both of the actual and the fiction world, that are recalled, almost all are set in winter. Indeed, most of our inns appear to have been designed with an eye to hard weather, their narrow passages, low ceilings, small rooms, huge fireplaces, and shuttered windows, all making for snugness.'
We who have a fondness for the open road, the wayside lane, the village, and the woodland by-pass, find the inn so truly inviting. It is the haven in which we drop anchor at the end of the day's trek, and we are especially attracted by its warm gay lights shimmering through hazy curtains, as we tramp down the miry country road when rain has set in to round off the winter afternoon. And if we fare no worse than the Pick- wickians did at Towcester, we shall have little to complain of.
Snug anchorage Hikers, who have been completing a
long day's tramp, will probably recall the welcome appearance of some such inn. If you, for instance, have been tramping all day long, you will discover that, after you have dumped your knap- sack, and have eventually sat down by a bright fire with a warm meal in front of you, that here you have the haven that affords the best shelter.
You may, afterwards, enjoy a homely chat in the parlour with the woodman, the gamekeeper, a shepherd or other real countryfolk. There is no anchorage so snug.
Mr. Thomas Burke, in his book The English Inn (a delightful companion for the knapsack) points out how for generations old inns have been given a place in the pages of books. 'AH good novels are full of inns.' You must admit that they are well worth pursuing. What would 'Tom Jones', 'Joseph Andrews', Roderick Random', 'Pickwick',
'Lavengro', etc., be without their inns. Much of their gusto would be gone, and without the inn the whole binding essence would be gone from that Pick- wick of today. The Flying Inn is a book that should be in every self- respecting guest-room, along with Biffin, etc.
Dickens was very fond of roadside inns and taverns. No fewer than fifty-five are mentioned in 'Pickwick Papers' alone. Sir Walter Scott was also enam- oured of inns. The first scene in 'Kenil- worth' is laid at an inn; the most amusing scene in 'Rob Roy' takes place in the 'Clachau Inn' and poor mis- guided Jeanie Deans stayed at an inn when on her long pilgrimage to seek an interview with the king.
Washington, the author, was pleased to find himself snugly ensconced at an inn. There are associations of this great writer at the old 'Red Horse' at Strat- ford-on-Avon. Here you may see the room where Irving was inclined to style himself 'monarch of all he surveyed'. The chair he sat in, and his 'sceptre' — the homely poker — are still treasured.
But there, we could go on indefinitely singing the praises of the wayside inn and the taverns on the road. We shall have nothing to grumble at, let the weather be never so unkind, or the road never so long. If we never fail to see, as Dickens saw, the sign-board perched in a tree,
84
with golden letters winking in the sun, ogling the passer-by, especially if he is a hiker on a long tour.
English heritage Have you ever pondered about these
wayside inns, and thought of how much a part they are of England, almost as much a part as the wayside oaks, the old grey river bridge, and the ancient church.
Over many of the quaint old country inns there hangs the spark of romance. 'The inn on land and the ship on sea form a nucleus of all human adventure'. The author of The charm of the English Village writes; 'The signboard that swings outside the inn has many stories to tell as it creaks in the wind. Some are remarkable for their signs, and tell of the skill of the village blacksmiths of former days. The men who forged such beautiful specimens had the heart and mind of the true artist, though but simple village blacksmiths ... of about one hundred and fifty years ago'.
One could go on indefinitely praising the virtues of the inn. Such inns have an attraction for all hikers and other road users. To quote an old writer: 'When I have earned a mug of ale — and when do you think that would be? After eight miles or ten ? — there is no haven where I would sooner drop anchor than the inn'. (A.S.)

DONT LET SOLDERING
LEAD YOU A DANCE
'J use
FLUX1TE Soldering ceases to be a knotty problem the moment you use FLUXITE. Solder flows on easily and smoothly—and stays on. For over half a century FLUXITE has been the choice of craftsman and engineer alike and, in this age, its reliability and speed has made FLUXITE even more in demand than ever.
I T
SIMPLIFIES
ALL
SOLDERING
FLUXITE LTD., Bermondsey St., London, S.E.I CM 83
MANY
MODELS
from
ONE TIN!
Pyruma, plastic and ready to use from its tin, can be'fashioned into the widest variety of models imaginable. Buildings for your model railway set, houses, ship models, animals and figures, ashtrays and plaques — al of which when set or baked to stone-hardness, can be finished in natural colours. Get the Pyruma Model Instruction book — see Coupon, and start making things like those shown below.
SANKEY'S PYRUMA PLASTIC CEMENT
s Made by amateur modellers, this signal cabin and light- house show how with Pyruma you can get the effects of tiles, wood, brickwork, chim- ney pots, concrete — and even the rocks of the sea. The book offered below tells you how. Pyruma is obtainable from your local Ironmonger, Hardware Store or Art Material dealer.
POST THIS BOOKLET COUPON TO-DAY
To J. H. SANKEY <£ SON, LTD (Dept. HW), ILFORD, ESSEX
I enclose P.O. 6d. (not stamps) for a copy of Pyruma Modelling Instruction Booklet, post free to: NAME ADDRESS
(BLOCK LETTERS PLEASE)
85

♦ LEARN *
RADIO & T/V
SERVICING for your OWN
BUSINESS/HOBBY • by a new exciting no-maths, system, using practical equipment, recently intro-
duced to this country. FREE Brochure from :—
RADIOSTRUCTOR DEPT. G8I, 46, MARKET PLACE,
READING. BERKS. 4 5
ENJOY THE THRILL of Drawing or Paint ing. 'Make Art Pay' (free) explains remark-
able, quick, easy method of improving mind, body and income. — Clun Valley Features (H.W.), Clun, Shropshire.
KUKLOS ANNUAL. Indispensable cyclist's handbook. Tours, resthouses, money-saving
hints, 3/- post free. — Burrow, Publishers, 2 Imperial House, Cheltenham.
1 AA DIFFERENT stamps free! Request id. 1 \J\J upwards discount approvals. — Bush, 53 Newlyn Way, Parkstone, Dorset.
Further reduced Brand New
Slip into it — soft comfy—
fiLEEWI tH
9/11 'POST ETC 2'(>
— enjoy restfuI sleep throughout night. No blankets, no sheets, everything in one including special padding for a beautiful soft mattress effect. Light as a feather, it rolls up to a tiny lightweight size. 19/11, post 2/6. Even finished in heavy quality strong material. Really hardwearing. Not a blanket with outer, but genuinely quilted. Refund guaranteed. Sent (or ^ WIC£OfFEkf
ThefUGHTUEUTENANT; l ^ Genuine NEW,
i 01. TENT
l0/. bal IWCEOfFEkr 18 fort- nightly pay- ments 7/1. Plus DUCK, carr. Waterproofed I960 Tents of 8 oz. WHITE Duck. Gaieproof. Brand new surplusto export order.DON'T CONFUSE with Tents made from drab material never meant for tentage. This is real thing, with- stands anything even in our climate. Approx. 7ft. 6in. x 6ft. x 6ft., 3ft. walls. Cash £5/19/6, carr. 6/- complete ready to erect, ind. valise. 'Willesden' Green42/-ex. Ridge pole if req. 7/6 Fly-sheet 39 6 Rubberised Groundsheet 19/6. These essentials sent on appro. Refund guaranteed. LISTS, TENTS
Headquarter & General Supply Ltd. (HOBW/3) 196-200 Coldharbour Lane Loughboro June., London, S.E.5. Open Sat.
Cash Price £5-19-6
CARR. 6/-
WHEELS (Hardwood and Rubber Tyred Metal). Cot, Pram and Doll's House Fittings
and Papers. Beads, Transfers, Prints and other accessories. Stamp for new lists. (Trade supplied.) New address — JOYDEN CO., 91 Peplins Way, Brookmans Park, Herts.
MODELS You can make lasting stone-hard models with Sankey's Pyruma Plastic Cement.
Supplied in tins by Ironmongers, Hardwaremen, and Builders' Merchants. Ask for instruction leaflet.
PEN PROFIT. If you like writing send for 'Writers' Guide' (free). Thousands of words to
interest beginner or experienced. Typewriter un- necessary under our system. — Writer's Ring (H.W.), 5 Edmund Street, Birmingham 3.
FREE stamp album and 20 stamps. Request approvals, enclosing 6d. Additional gifts
given. — Beeze, 8 Langland Villas, Mumbles, Swansea.
WORKERS with sewing machines required for making cushion covers. Regular work
guaranteed. Apply enclosing s.a.e.. Dept. 28. Arnold Trading, 10 Shelley Road, Worthing, Sussex.
CRYSTAL DIODE, instructions, etc., to build matchbox diode receiver, reception
guaranteed. Send 4/- P.O. only to — BCM/ ALEXTONE, London, W.C.I.
Ef ,
CERTOFIX
FIXES CERTOFIX liquid glue can cope with all gen- eral repairs. It unites wood, glass, metal and almost all substances. It is clean in use; its joints are stronger than the materials it unites.
Sold at all Woolworth Stores
CERTOFIX
APPARATUS & CHEMICALS For your experiments. Let us help you equip a
HOME LABORATORY Beakers, Crucibles, Flasks, Funnels5
Gas Jars, Test Tubes, etc. Booklets:
(including postage) 'Experiments' 1/2 'Formulas' 1/2 'Home Chemistry' 2/10
New edition Send 3d. Stamp for latest PRICE LIST - A. N. BECK & SONS (Dept. H.W.)
60 Stoke Newington High Street, London, N.I6
Hear All Continents With H.A.C. Short-Wave Receivers
Suppliers for over 18 years of radio S-W Receivers of quality. One-Valve Kit, Price 25/- Two-Valve Kit, Price 50/- Improved designs with Denco coils. All kits complete with all components, accessories and full instructions. Before ordering, call and inspect a demon- stration receiver, or send stamped addressed envelope for descriptive catalogue. •H.A.C.' Short-Wave Products (Dept. 22), 11 Old Bond Street, London. W.I.
Price 7/6 (Post I/6)
WOOD BENCH VICE A strong hardwood vice which can be screwed to the work bench. A real ser- viceable tool, well made, and fitted with hardwood screws. 12 in. long. From branches or:
HOBBIES LTD, Dereham, Norfolk
86

A *I,K\M IV TIIEIOIOMETEII
TH E basis of this thermometer is the 'Decorette" transfer sheet No. 4003. There are two different
pictures on the sheet. Slide one of them on to a piece of j in. wood, allowing room for the thermometer. Allow 24 hours to dry and then cut round the outline with a fretsaw. Gi\e two coatsofclearvarnish. Another thermometer stand can be made with the other transfer.
Make a strut from waste wood to hold the picture upright. Pin the thermometer in position. The transfer sheet costs 2s. 3d., postage 3d., and the thermometer No. 5015 2s. 3d., postage 3d. Both are obtainable direct from Hobbies Ltd. Dereham. Norfolk, or fromyour nearest Hobbies branch or stockist. (M.p.).
sreur
■*:
I ' 5015
lilV1
i5
t *1
Printed by Balding & Mansell, Ltd., London and VTisbech, and Published for the Proprietors, Hobbies Ltd., by Horace Marshall & Son, Ltd., Temple House, Tallis Street, B.C.4. Sole Agents for Australia and New Zealand: Gordon & Gotch
(A'sia) Ltd. For South Africa: Central News Agency Ltd. Registered for transmission by Canadian Magazine Post. READER'S REPLY
MAY 1960 HW

Just like
the real thing!
Airfix kits are not just models — they're exact replicas, each series to a constant scale.
Illustration by permission of National Maritime Museum
Airfix realistic model of
^ H.M.S. ''Victory*9
There are models galore in the Airfix range! Aircraft from fighters to bombers (all to the same I/72nd scale), 00 gauge railway accessories, vintage cars, historical ships. Airfix value is unbeatable —ask your dealer for the latest list.
Nearly 100 kits from 2/- to 10 6d
r-.r
■- >
' i \ \ 1 I m m « Mk -M MtflSS
4'/- x
t
STOP PRESS!
THE WORLD'S GREATEST VALUE IN CONSTRUCTION KITS
From Model and Hobby Shops, Toy Shops and F. W. Woo/worth
Latest Airfix Production
IT-
AIRCRAFT ^ Bmto Superfreighter 7 6a. [j\
VINTAGE CARS 1930 Bent/ey 2/-
TRACKSIDE SERIES Level Crossing 2 -
MODEL FIGURES Lifeguard 21-
15159:
H.M.S. VICTORIOUS
The second kit in the new Airfix series of Famous Warships, this exciting model almost defies belief! It makes up from 94 separate parts into a magnificent model measuring ISi inches long (constant scale 50 ft. : I inch). Attractively boxed, complete with Swift, Sea Venom and Gannet aircraft, cradles, marking transfers and cement;—all for the remarkable price of only 6/-.

o 1
□
0
PIECE 10. CUT ONE 1/4 in.
PIECES I. CUT ONE OF EACH
I /4 in.
10
o iCIQ
2 PIECE 5. CUT ONE 1/4 in V
2
PIECE 6. CUT ONE
1 /4 in. \fi
i 10 10 7
PIECE 7. CUT ONE
I /4 in. O
O
c

□
1
PIECE 10 CUT ONE
□
10
PIECE 5. CUT ONE 1/4 in V
2
t
E ESIC
S3
No.
3360
'JUMBO'SAVINGS BANK
SIZE;5^in.x2iin.x4iin.HIGH
jllMBO
PANELS OF WOOD REQUIRED FOR THIS DESIGN
ONE H4 ONE G4 ONE N D8
A KIT OF MATERIALS FOR MAKING THIS DESIGN IS SUPPLIED BY HOBBIES LTD, DEREHAM, NORFOLK
PRICE ON APPLICATION.
A perfect finish every time
Humbrol Art Oil Enamel, the supreme model builder's finish. Available in tins from j oz. to 5 pint. A range of 34 colours available; glossy, matt and metallic. Humbrol Enamels dry in one hour. FROM ALL BRANCHES OF HOBBIES LTD.
Don't spoil your model with an inferior paint.. always use HUMBROL
\
o

CU I UlNb I 4 in.
PIECES I. CUT ONE OF EACH
I /4 in.
[0 10
o 10
PIECE 5. CUT ONE 1/4 in
2 ' V 2
PIECE 6. CUT ONE
1 /4 in. t/i 10 10
7
PIECE 7. CUT ONE
1/4 in. o
I o
THE ARROWS INDICATE DIRECTION OF GRAIN OF
WOOD
PIECES 2. CUT ONE OF EACH 1/2 in.
PIECE 9. CUT ONE 1/4 in.
O
PIECE 8. CUT ONE 1/4 in.
PIECE II. CUT ONE FROM 3/16 in. DIA.
ROUND ROD

PIECE 10. CUT ONE 1/4 in.
□ □,
'""•Hi,. ,MU ' «H U i, .
V
nni
10
PIECE 5. CUT ONE 1/4 in V
2
t
7
o
PIECES 4. CUT ONE OF EACH
1/2 in.
THE ARROWS INDICATE DIRECTION OF GRAIN OF
WOOD
PANELS OF WOOD REQUIRED FOR THIS DESIGN
ONE H4 ONE G4 ONE ND8
A KIT OF MATERIALS FOR MAKING THIS DESIGN IS SUPPLIED BY HOBBIES LTD, DEREHAM, NORFOLK
PRICE ON APPLICATION.
A perfect finish every time
Humbrol Art Oil Enamel, the supreme model builder's finish. Available in tins from 5 oz. to 5 pint. A range of 34 colours available; glossy, matt and metallic. Humbrol Enamels dry in one hour. FROM ALL BRANCHES OF HOBBIES LTD.
Don't spoil your model with an inferior paint.. always use HUMBROL
pfitOU
7
O
PIECE II. CUT ONE FROM 3/16 in. D1A.
ROUND ROD
i-8;
i i
PIECE 3. CUT TWO 1/2 in.
PRINTED IN ENGLAND