THE MOUNTAIN MAN - Angelfire · MOUNTAIN MAN PIONEERING ENCAMPMENT 2000 Newsletter #1 – November...
61
THE MOUNTAIN MAN PIONEER ENCAMPMENT RESOURCE GUIDE
Transcript of THE MOUNTAIN MAN - Angelfire · MOUNTAIN MAN PIONEERING ENCAMPMENT 2000 Newsletter #1 – November...

THE MOUNTAIN MAN
PIONEER ENCAMPMENT
RESOURCE GUIDE

MOUNTAIN MAN PIONEER ENCAMPMENTRESOURCE GUIDE
For use by Ward Young Men Presidencies and Scout Leaders in preparingfor the Annual Independence Stake Young Men Mountain Man PioneerEncampment held in November.
PRIMITIVE SHELTERS --------------------------------------------- 1
TIPIS ---------------------------------------------------------------- 6
INDIAN CLOTHING ----------------------------------------------- 15
PERIOD CLOTHING ----------------------------------------------- 21
PERIOD HATS & HEAD GEAR------------------------------------- 23
POUCHES & POSSIBLES POUCHES ------------------------------ 24
MOCCASINS ------------------------------------------------------- 29
PIONEER COOKING ----------------------------------------------- 31
BEADWORK-------------------------------------------------------- 35
FIREMAKING ------------------------------------------------------ 37
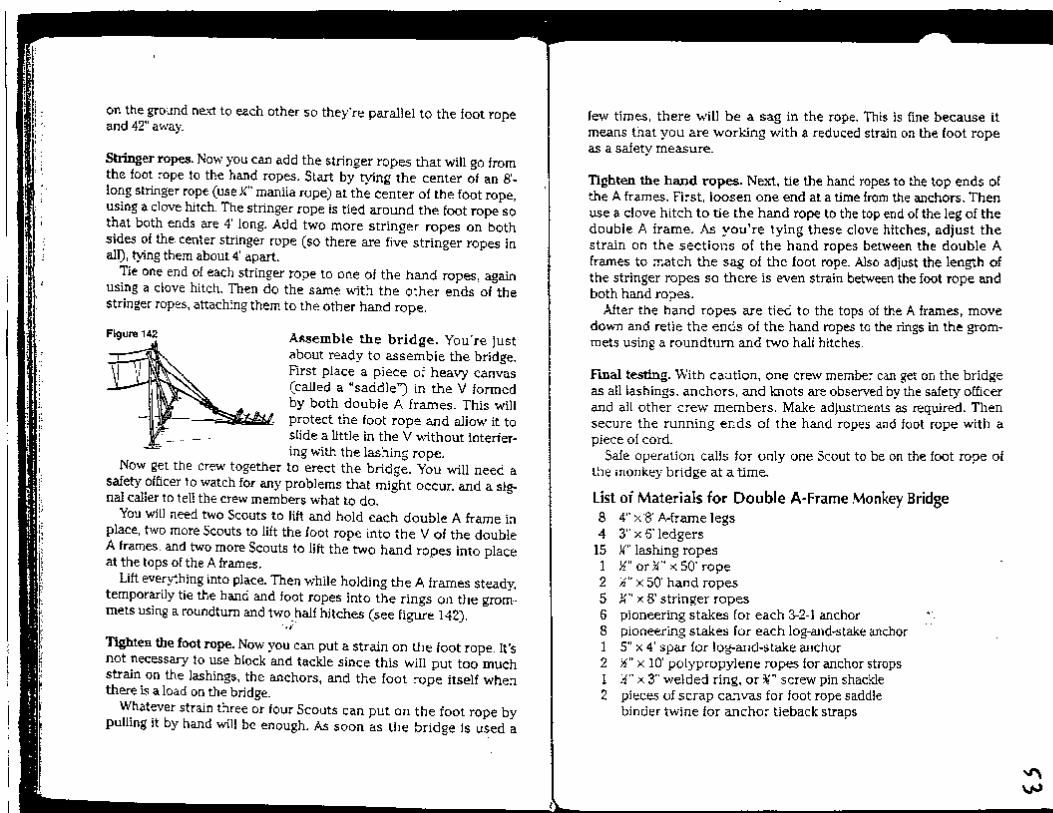
LASHING----------------------------------------------------------- 39
TOMAHAWKS & KNIVES ------------------------------------------ 54
APPENDIX (BOOK LIST)------------------------------------------ 58
NATIVE AMERICAN TECHNOLOGY & ART INTERNET LINKS ANDRESOURCE LISTING

MOU
NTAI
N M
AN P
IONE
ERIN
G EN
CAM
PMEN
T 20
00Ne
wsle
tter #
1 –
Nove
mbe
r 199
9There are many ways to provide yourself shelterwithout using a tent. This month we will discussshelters of the various primitive indian tribes.Although we’ll touch on tipis briefly this month, wewill look into them in a more in-depth discussion nextmonth.
Woodland tribes
Because most woodland tribes were wanderers,moving with the seasons to follow game, theyneeded portable houses. The wigwam was perfectfor their way of life. Its frame consisted of foursaplings bent toward the center. They covered thiswith long strips of bark sewn together and lined theinside with grass for insulation. Animal skins hung atthe entrance. Fir branches covered with moose skinslines the floor.
A wigwam made of grass mats tied to saplings andcovered with slabs of bark.
Plains tribes
The tipi was more than a shelter or home: It was asacred place. The floor symbolized the earth, and thewalls the sky. The tipi’s base was a circle, a sacredshape that symbolized how all life is interconnected.Sacred objects lines the walls, along with familypossessions and the necessities of life. The innerwalls were painted with brightly colored figures andshapes that referred to family histories, spirit beings,ancestors and battle honors. A small altar was also apart of every tipi.
Plains buffalo-hide tipi.

Southwestern tribes
The Apache lived in small encampments. Home was thewickiup, a domed hut made of a pole framework covered withbrush, grass, or reed mats. It could quickly be erected. Therewas no central tribal government. Bands had headmen orinformal leaders but warriors often launched raids on their own.Each band was made up of several extended families.
Twenty to thirty poles, about a foot apart, and bundles of grasswere used to build this wickiup.
The Navajo lived much like their kinsfolk, the Apache. Intraditional Navajo society, there were no villages, only solitaryfamily encampments. Home was a hogan, a simple cone-shaped house built of timbers and poles and covered withbark and earth. The hogan entrance faced east, to honor thesun. Daughters inherited the hogans, sheep, and otherproperty of their mothers. Husbands fathered the children,but were responsible to their sisters and their sister’soffspring. Many Navajo families today still live in hogans andlive by centuries-old traditions.
A Navajo hogan made of logs, small branches, brush, cedarbark, and earth.
Great Basin tribes California tribes
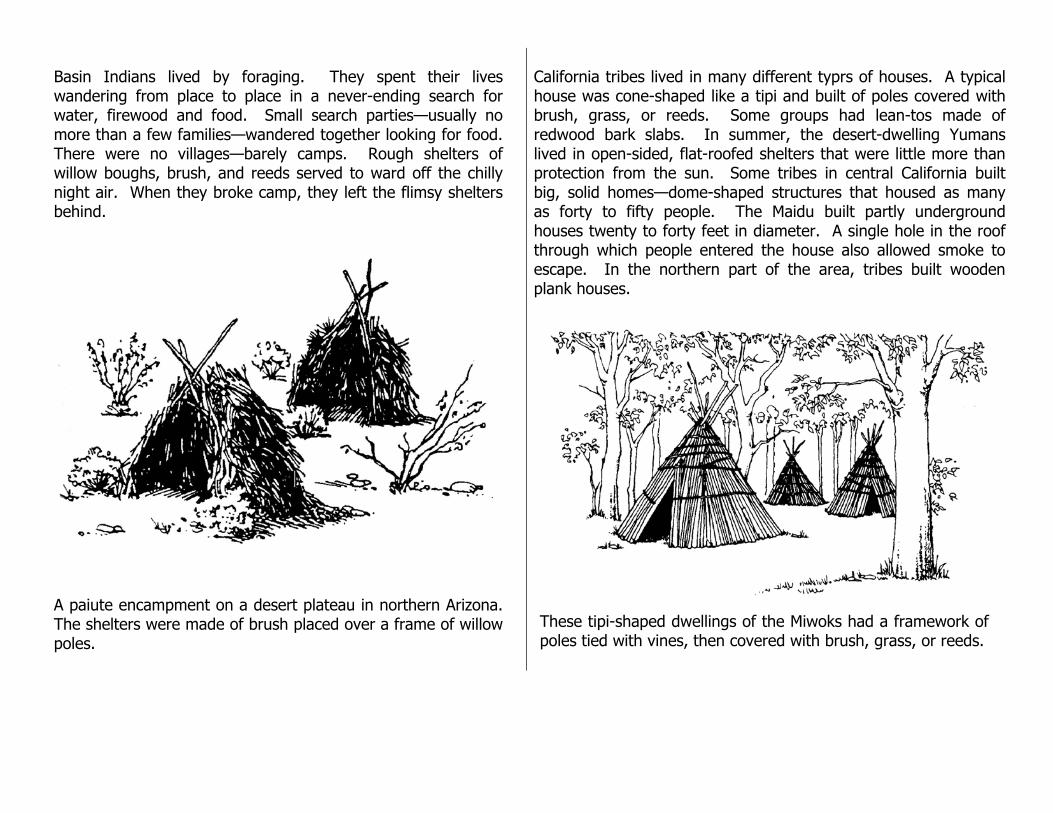
Basin Indians lived by foraging. They spent their liveswandering from place to place in a never-ending search forwater, firewood and food. Small search parties—usually nomore than a few families—wandered together looking for food.There were no villages—barely camps. Rough shelters ofwillow boughs, brush, and reeds served to ward off the chillynight air. When they broke camp, they left the flimsy sheltersbehind.
A paiute encampment on a desert plateau in northern Arizona.The shelters were made of brush placed over a frame of willowpoles.
California tribes lived in many different typrs of houses. A typicalhouse was cone-shaped like a tipi and built of poles covered withbrush, grass, or reeds. Some groups had lean-tos made ofredwood bark slabs. In summer, the desert-dwelling Yumanslived in open-sided, flat-roofed shelters that were little more thanprotection from the sun. Some tribes in central California builtbig, solid homes—dome-shaped structures that housed as manyas forty to fifty people. The Maidu built partly undergroundhouses twenty to forty feet in diameter. A single hole in the roofthrough which people entered the house also allowed smoke toescape. In the northern part of the area, tribes built woodenplank houses.
These tipi-shaped dwellings of the Miwoks had a framework ofpoles tied with vines, then covered with brush, grass, or reeds.

Northwest Coast tribes
Without nails or saws, Northwest Coast Indians built imposinghouses. The walls and roofs were made of wood planks thatwere precisely fitted and tied to a framework of thick beams,poles, and plates. All homes of this region were built formultifamily use. An average lodge was about thirty by forty-five feet. In the north, the Tlingit, Haida and Tsimshian builtrectangular gable-roofed houses, often larger than housestoday. There is evidence that some homes were as long as athousand feet, built to house an entire village. The coastalSalish, the Makah and others lived in plank houses with roofsthat sloped from front to back.
A plank house built entirely without nails. The parts weregrooved and fitted together to support one another.
This newsletter is issued on a monthly basis to provide your young menand leaders with resource information to help prepare them for theMountain Man Pioneering Encampment in November, 2000.
If you have any questions please contact me at 796-8081.
Gary StiversStake Young
Men’s Presidency
Information included in these newsletters was abstracted from the followingsources:
Minor, Marz & Nono, The American Indian Craft Book. University ofNebraska Press, 1972.
Indian Lore Merit Badge. BSA, 1996Greenwood, Dennis L., Jr, The Mountain Man Rendezvous. Date unknown.
ADDITIONAL RESOURCES
Books
Aaseng, Nathan. Navajo Code Talkers. Walker, 1993.Ancona, George. Powwow. Harcourt Brace, 1993.Bierhorst, John. In the Trail of the Wind: American Indian Poems and Ritual
Orations. Farrar Straus, 1990.Brown, Fern. Indians of North America. Henry Holt, 1995.Bruchac, Joseph. Flying with the Eagle, Racing the Great Bear: Stories from
Native America. Bridgewater Books, 1993.Children’s Atlas of Native Americans. Rand McNally, 1992.Crum, Robert. Eagle Drum. Four Winds, 1994.A Cry from the Earth: Music of the North American Indians. Ancient City Press,
1992.Culin, Stewart. Games of the North American Indians. University of Nebraska
Press, 1992.Earth Magic, Sky Magic: North American Indian Tales. Cambridge University
Press, 1991.
continued

MOU
NTAI
N M
AN P
IONE
ERIN
G EN
CAM
PMEN
T 20
00Ne
wsle
tter #
2 –
Dece
mbe
r 199
9
This newsletter is issued on a monthly basis to provide youryoung men and leaders with resource information to helpprepare them for the Mountain Man Pioneering Encampment inNovember, 2000.
If you have any questions please contact me at 796-8081.
Gary StiversStake Young
Men’s Presidency
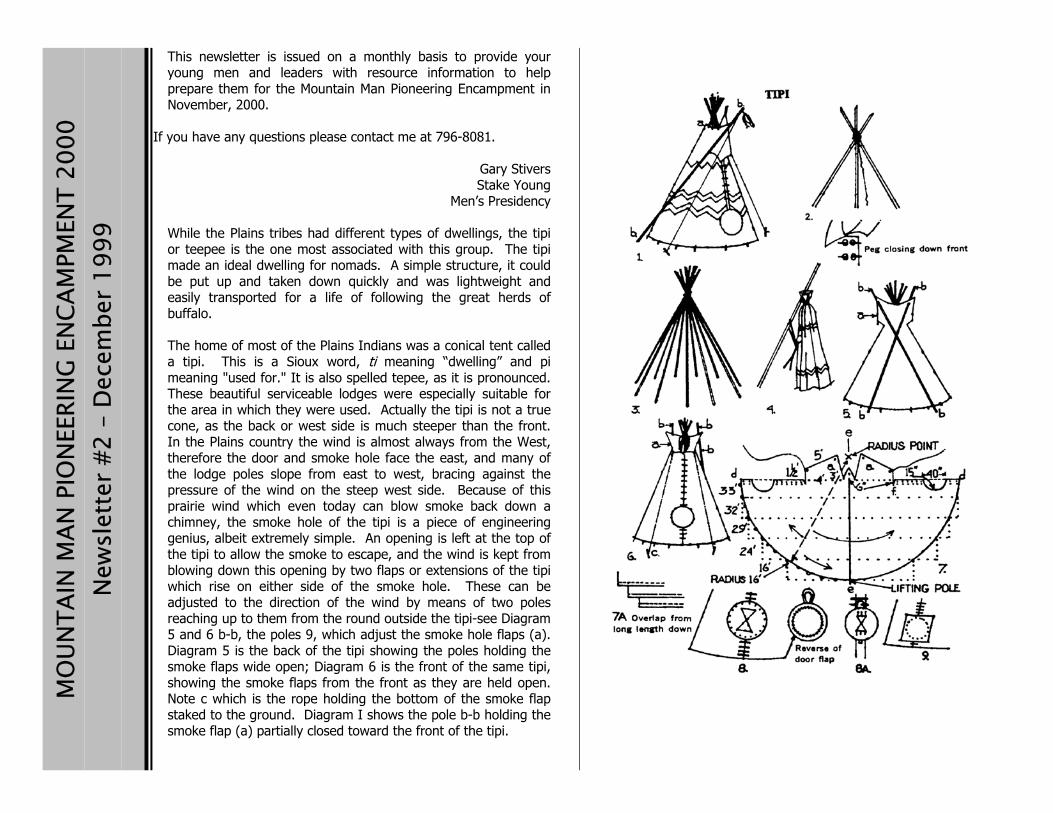
While the Plains tribes had different types of dwellings, the tipior teepee is the one most associated with this group. The tipimade an ideal dwelling for nomads. A simple structure, it couldbe put up and taken down quickly and was lightweight andeasily transported for a life of following the great herds ofbuffalo.
The home of most of the Plains Indians was a conical tent calleda tipi. This is a Sioux word, ti meaning “dwelling” and pimeaning "used for." It is also spelled tepee, as it is pronounced.These beautiful serviceable lodges were especially suitable forthe area in which they were used. Actually the tipi is not a truecone, as the back or west side is much steeper than the front.In the Plains country the wind is almost always from the West,therefore the door and smoke hole face the east, and many ofthe lodge poles slope from east to west, bracing against thepressure of the wind on the steep west side. Because of thisprairie wind which even today can blow smoke back down achimney, the smoke hole of the tipi is a piece of engineeringgenius, albeit extremely simple. An opening is left at the top ofthe tipi to allow the smoke to escape, and the wind is kept fromblowing down this opening by two flaps or extensions of the tipiwhich rise on either side of the smoke hole. These can beadjusted to the direction of the wind by means of two polesreaching up to them from the round outside the tipi-see Diagram5 and 6 b-b, the poles 9, which adjust the smoke hole flaps (a).Diagram 5 is the back of the tipi showing the poles holding thesmoke flaps wide open; Diagram 6 is the front of the same tipi,showing the smoke flaps from the front as they are held open.Note c which is the rope holding the bottom of the smoke flapstaked to the ground. Diagram I shows the pole b-b holding thesmoke flap (a) partially closed toward the front of the tipi.

The tipi is entered through an opening which is closed with a piece of hidestretched over a light round frame of wood, much in the shape of a shield.This opening was usually decorated with the symbols of the owner. Theopening could also be closed with just a hide or blanket hanging over it.
New lodges were made in the spring when the buffalo had shed their hairand their skins were thin. A tipi with a radius of 18 to 20 feet took about10 to 12 skins to make and when finished weighed about 125 pounds. Alarge council lodge of up to 40 feet might take over 50 skins to make.Later, when there were not enough buffalo left on the prairie, canvas wasused, or cowhide.
After the skins were tanned, the woman called her friends and neighbors toa feast, and after it was over they all helped in sewing and cutting the tipi.The most skilled was trusted with cutting the tipi, or the old tipi was usedas a pattern. Usually, though, the woman who cut the skins could do soentirely without a pattern. Care was taken not to waste skins in cutting orsewing, and the work was usually done in a day. The cover is a rough halfcircle (see Diagram 7) with two flaps projecting from the straight side (see7a); between these is a tongue. This is where the lifting pole is placed (7e-e).
Old poles are used, or if new ones are needed they are made of pine,cedar, spruce, or any straight slim tree. Flexible wood is not used forpoles. The trees are cut down, peeled, and dressed down. The women didmost of the work, although the men sometimes helped. The poles werefrom 10 to 40 feet long, but usually the average length was 25 feet. Theytapered from a diameter of about 2 inches at the top to 6 inches at theground end, which was sharpened. Poles were kept as long as possibleand became dark and polished from handling and smoke. New tipis werenearly white, but became darkened with smoke and were almost blackaround the smoke hole.
Pins (for holding the cover together above and below the opening) andstakes were cut from slender, strong pieces of wood. These were usually afoot or two long and half an inch thick. In winter, stones and earth werepiled against the bottom of the tipi to help anchor the stakes tightly, and tokeep out drafts and moisture. If the tipi was to be left in one place forvery long, the dirt floor inside was then excavated to a depth of two feet orso.
It is said that a tipi can be put up in a matter of minutes by Indian women,but it takes practice. Every little Indian girl had a tipi for her dolls, in themanner of a dollhouse, so she started early learning how to put them upand take them down. There were even small doghouse tipis for the familypet which were moved when the family did.
In putting up the tipi, the cover is spread flat on the ground, and thefoundation poles are laid on it in order to measure at what height they areto be tied together (see Diagram 2). The poles are marked so that thenext time they will not have to be measured. They are tied together with arawhide band or rope. The long end of the rope is left hanging so that inwindy weather it is fastened to stakes driven near the center of the lodge.The three tied foundation poles are placed on end (some tribes use fourfoundation poles, which is said to make a more beautiful tipi but not assturdy). One pole faces east and forms the south door post. The othertwo are placed behind the door pole and are closer to each other than tothe door. When the foundation is firmly fixed, the other poles are put inplace. The first pole makes the other door post and the next four to six areset up to the north of it. The next group are placed south of thefoundation door pole. The remaining poles go between the two backfoundation poles. All but the last group rest in the front, or east crotch ofthe original poles. There is usually about one pole every 30 inches aroundthe circle.
The last pole, or lifting pole, is next laid across the tipi cover on theground, along the center, from the bottom to the small tongue betweenthe smoke flaps (Diagram 7 e-e). Tie this pole at the tongue and place thispole, with the cover attached, to the west or back of the poles, in the westcrotch (Diagram 4). The two sides of the cover are pulled around the polesuntil they meet in front. The left or south side is placed over the other andthe two are pinned together with wooden pegs put in from right to left.These are placed about 6 inches apart and extend from the bottom of thesmoke hole, which goes partway down the east or front of the tipi, to thetop of the door opening. If the opening is placed a bit above ground level,pins are placed below the opening as well.
When the pins are in place, the women enter the tipi and push the polesout against the cover until there is no sagging. When the cover is tightagainst the poles, the bottom edge is staked to the ground.
The smoke flap poles are now put in place, the ties staked down either onseparate stakes, or the two flap ropes tied to one taller stake or half poleset a bit to one side and in front of the door. To keep the smoke poles
from going too far through the hole, tie a small crossbar about 18 inches ortwo feet from the top end. By moving the smoke flap poles, the smokeflaps can be moved according to the direction of the wind, and in badweather they can be completely overlapped.
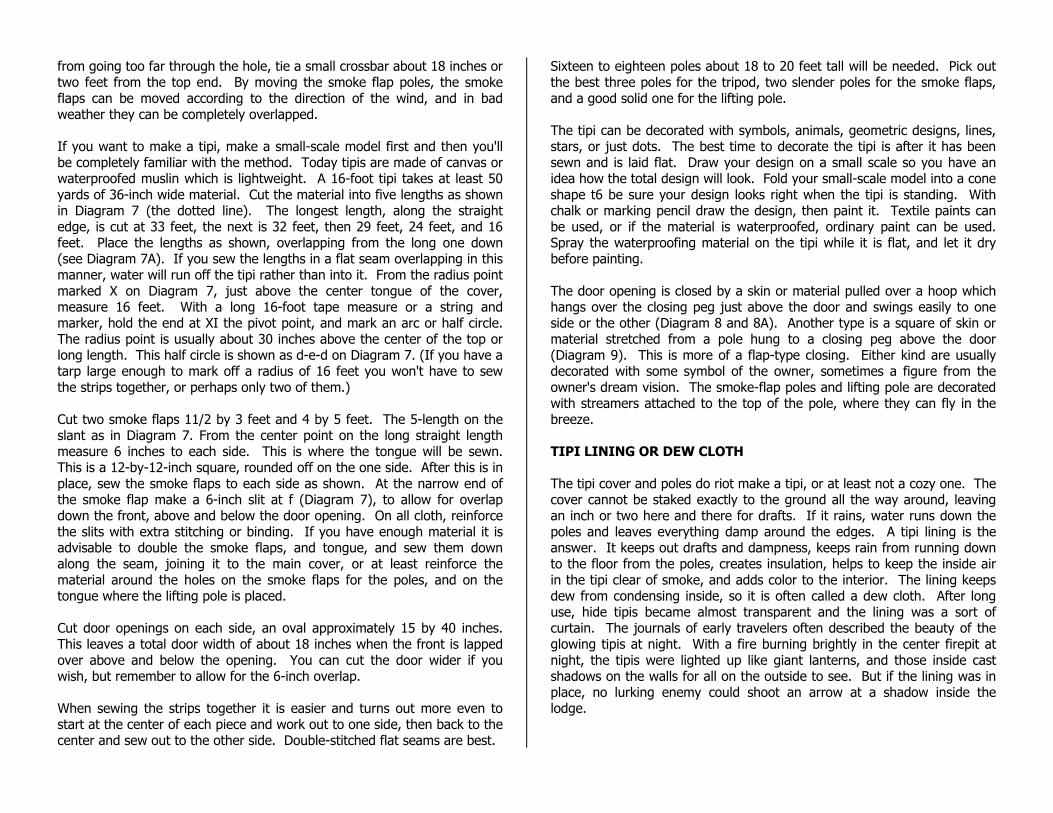
If you want to make a tipi, make a small-scale model first and then you'llbe completely familiar with the method. Today tipis are made of canvas orwaterproofed muslin which is lightweight. A 16-foot tipi takes at least 50yards of 36-inch wide material. Cut the material into five lengths as shownin Diagram 7 (the dotted line). The longest length, along the straightedge, is cut at 33 feet, the next is 32 feet, then 29 feet, 24 feet, and 16feet. Place the lengths as shown, overlapping from the long one down(see Diagram 7A). If you sew the lengths in a flat seam overlapping in thismanner, water will run off the tipi rather than into it. From the radius pointmarked X on Diagram 7, just above the center tongue of the cover,measure 16 feet. With a long 16-foot tape measure or a string andmarker, hold the end at XI the pivot point, and mark an arc or half circle.The radius point is usually about 30 inches above the center of the top orlong length. This half circle is shown as d-e-d on Diagram 7. (If you have atarp large enough to mark off a radius of 16 feet you won't have to sewthe strips together, or perhaps only two of them.)
Cut two smoke flaps 11/2 by 3 feet and 4 by 5 feet. The 5-length on theslant as in Diagram 7. From the center point on the long straight lengthmeasure 6 inches to each side. This is where the tongue will be sewn.This is a 12-by-12-inch square, rounded off on the one side. After this is inplace, sew the smoke flaps to each side as shown. At the narrow end ofthe smoke flap make a 6-inch slit at f (Diagram 7), to allow for overlapdown the front, above and below the door opening. On all cloth, reinforcethe slits with extra stitching or binding. If you have enough material it isadvisable to double the smoke flaps, and tongue, and sew them downalong the seam, joining it to the main cover, or at least reinforce thematerial around the holes on the smoke flaps for the poles, and on thetongue where the lifting pole is placed.
Cut door openings on each side, an oval approximately 15 by 40 inches.This leaves a total door width of about 18 inches when the front is lappedover above and below the opening. You can cut the door wider if youwish, but remember to allow for the 6-inch overlap.
When sewing the strips together it is easier and turns out more even tostart at the center of each piece and work out to one side, then back to thecenter and sew out to the other side. Double-stitched flat seams are best.
Sixteen to eighteen poles about 18 to 20 feet tall will be needed. Pick outthe best three poles for the tripod, two slender poles for the smoke flaps,and a good solid one for the lifting pole.
The tipi can be decorated with symbols, animals, geometric designs, lines,stars, or just dots. The best time to decorate the tipi is after it has beensewn and is laid flat. Draw your design on a small scale so you have anidea how the total design will look. Fold your small-scale model into a coneshape t6 be sure your design looks right when the tipi is standing. Withchalk or marking pencil draw the design, then paint it. Textile paints canbe used, or if the material is waterproofed, ordinary paint can be used.Spray the waterproofing material on the tipi while it is flat, and let it drybefore painting.
The door opening is closed by a skin or material pulled over a hoop whichhangs over the closing peg just above the door and swings easily to oneside or the other (Diagram 8 and 8A). Another type is a square of skin ormaterial stretched from a pole hung to a closing peg above the door(Diagram 9). This is more of a flap-type closing. Either kind are usuallydecorated with some symbol of the owner, sometimes a figure from theowner's dream vision. The smoke-flap poles and lifting pole are decoratedwith streamers attached to the top of the pole, where they can fly in thebreeze.
TIPI LINING OR DEW CLOTH
The tipi cover and poles do riot make a tipi, or at least not a cozy one. Thecover cannot be staked exactly to the ground all the way around, leavingan inch or two here and there for drafts. If it rains, water runs down thepoles and leaves everything damp around the edges. A tipi lining is theanswer. It keeps out drafts and dampness, keeps rain from running downto the floor from the poles, creates insulation, helps to keep the inside airin the tipi clear of smoke, and adds color to the interior. The lining keepsdew from condensing inside, so it is often called a dew cloth. After longuse, hide tipis became almost transparent and the lining was a sort ofcurtain. The journals of early travelers often described the beauty of theglowing tipis at night. With a fire burning brightly in the center firepit atnight, the tipis were lighted up like giant lanterns, and those inside castshadows on the walls for all on the outside to see. But if the lining was inplace, no lurking enemy could shoot an arrow at a shadow inside thelodge.
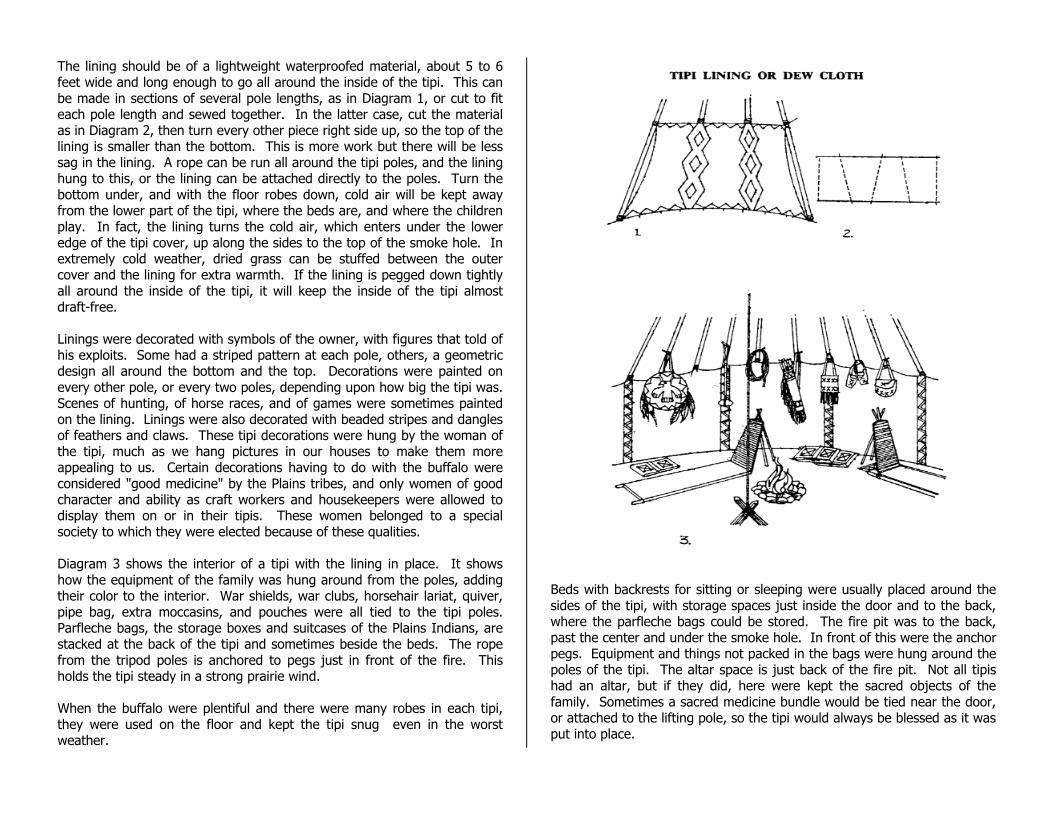
The lining should be of a lightweight waterproofed material, about 5 to 6feet wide and long enough to go all around the inside of the tipi. This canbe made in sections of several pole lengths, as in Diagram 1, or cut to fiteach pole length and sewed together. In the latter case, cut the materialas in Diagram 2, then turn every other piece right side up, so the top of thelining is smaller than the bottom. This is more work but there will be lesssag in the lining. A rope can be run all around the tipi poles, and the lininghung to this, or the lining can be attached directly to the poles. Turn thebottom under, and with the floor robes down, cold air will be kept awayfrom the lower part of the tipi, where the beds are, and where the childrenplay. In fact, the lining turns the cold air, which enters under the loweredge of the tipi cover, up along the sides to the top of the smoke hole. Inextremely cold weather, dried grass can be stuffed between the outercover and the lining for extra warmth. If the lining is pegged down tightlyall around the inside of the tipi, it will keep the inside of the tipi almostdraft-free.
Linings were decorated with symbols of the owner, with figures that told ofhis exploits. Some had a striped pattern at each pole, others, a geometricdesign all around the bottom and the top. Decorations were painted onevery other pole, or every two poles, depending upon how big the tipi was.Scenes of hunting, of horse races, and of games were sometimes paintedon the lining. Linings were also decorated with beaded stripes and danglesof feathers and claws. These tipi decorations were hung by the woman ofthe tipi, much as we hang pictures in our houses to make them moreappealing to us. Certain decorations having to do with the buffalo wereconsidered "good medicine" by the Plains tribes, and only women of goodcharacter and ability as craft workers and housekeepers were allowed todisplay them on or in their tipis. These women belonged to a specialsociety to which they were elected because of these qualities.
Diagram 3 shows the interior of a tipi with the lining in place. It showshow the equipment of the family was hung around from the poles, addingtheir color to the interior. War shields, war clubs, horsehair lariat, quiver,pipe bag, extra moccasins, and pouches were all tied to the tipi poles.Parfleche bags, the storage boxes and suitcases of the Plains Indians, arestacked at the back of the tipi and sometimes beside the beds. The ropefrom the tripod poles is anchored to pegs just in front of the fire. Thisholds the tipi steady in a strong prairie wind.
When the buffalo were plentiful and there were many robes in each tipi,they were used on the floor and kept the tipi snug even in the worstweather.
Beds with backrests for sitting or sleeping were usually placed around thesides of the tipi, with storage spaces just inside the door and to the back,where the parfleche bags could be stored. The fire pit was to the back,past the center and under the smoke hole. In front of this were the anchorpegs. Equipment and things not packed in the bags were hung around thepoles of the tipi. The altar space is just back of the fire pit. Not all tipishad an altar, but if they did, here were kept the sacred objects of thefamily. Sometimes a sacred medicine bundle would be tied near the door,or attached to the lifting pole, so the tipi would always be blessed as it wasput into place.


MO
UNTA
IN M
AN P
ION
EERI
NG
EN
CAM
PMEN
T 20
00
New
slet
ter
#3 –
Janu
ary
2000
This newsletter is issued on a monthly basis to provide your young men and leaders with resource information to help prepare them for the Mountain Man Pioneering Encampment in November 2000.
If you have any questions please contact me at 796-8081.
Gary Stivers Stake Young
Men’s Presidency
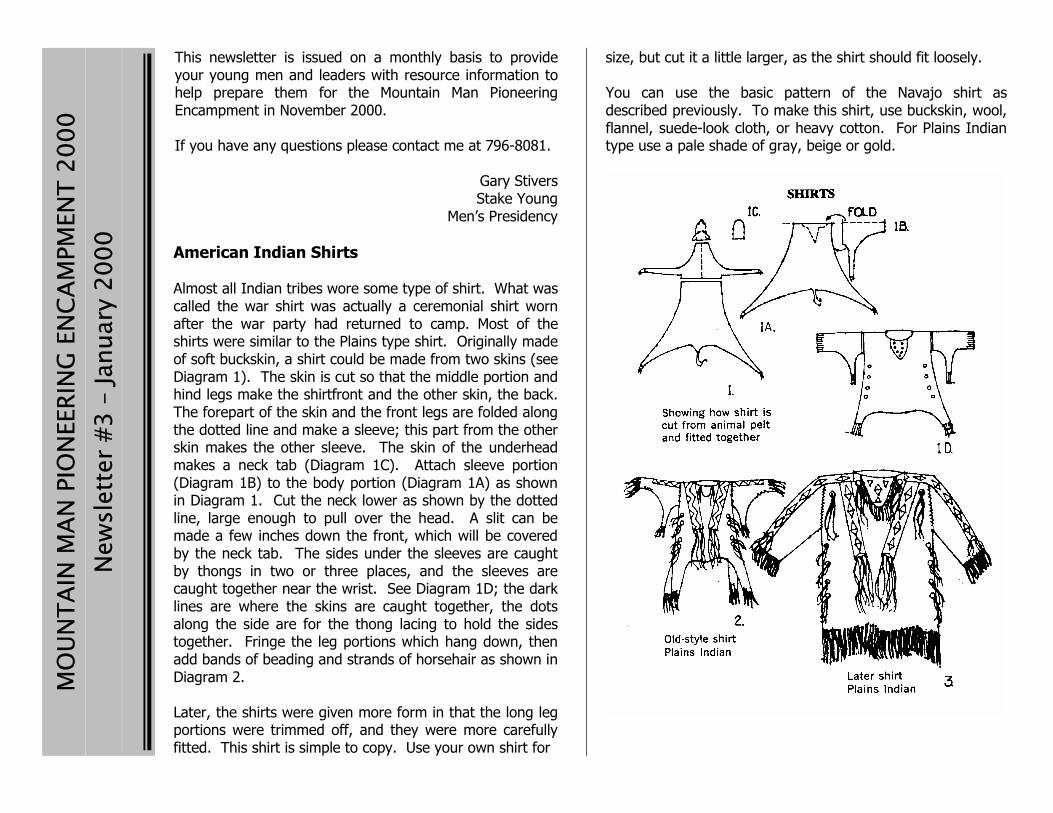
American Indian Shirts
Almost all Indian tribes wore some type of shirt. What was called the war shirt was actually a ceremonial shirt worn after the war party had returned to camp. Most of the shirts were similar to the Plains type shirt. Originally made of soft buckskin, a shirt could be made from two skins (see Diagram 1). The skin is cut so that the middle portion and hind legs make the shirtfront and the other skin, the back. The forepart of the skin and the front legs are folded along the dotted line and make a sleeve; this part from the other skin makes the other sleeve. The skin of the underhead makes a neck tab (Diagram 1C). Attach sleeve portion (Diagram 1B) to the body portion (Diagram 1A) as shown in Diagram 1. Cut the neck lower as shown by the dotted line, large enough to pull over the head. A slit can be made a few inches down the front, which will be covered by the neck tab. The sides under the sleeves are caught by thongs in two or three places, and the sleeves are caught together near the wrist. See Diagram 1D; the dark lines are where the skins are caught together, the dots along the side are for the thong lacing to hold the sides together. Fringe the leg portions which hang down, then add bands of beading and strands of horsehair as shown in Diagram 2.
Later, the shirts were given more form in that the long leg portions were trimmed off, and they were more carefully fitted. This shirt is simple to copy. Use your own shirt for
size, but cut it a little larger, as the shirt should fit loosely. You can use the basic pattern of the Navajo shirt as described previously. To make this shirt, use buckskin, wool, flannel, suede-look cloth, or heavy cotton. For Plains Indian type use a pale shade of gray, beige or gold.

Chamois fringe can be cut and added at the bottom and at the sleeves and neck tab. Sew bead bands or embroidered bands, as shown, with horsehair or yarn strands sewn at the ends of the bands (see Diagram 3). Tie under the arms with leather thongs as was done in the older type shirt. Tin cone jinglers can be tied on with the horsehair or yarn at the end of the bands and at the shoulder. (See Part V for description of how to make the tin jinglers.)
Diagram 5 is an example of a Woodland Indian shirt. This is made on the basic pattern, of black, dark blue, or wine colored velveteen or some other heavy dark material, and then embroidered in the floral designs of the Woodland tribes. Bind the neck, sleeves, and bottom with red, and a floral border, as shown.
Diagram 4 shows another type of shirt, made from the basic pattern but with less decoration. The shirts should reach somewhere between the hip and knee, so make your shirt the length that suits you. Use decorations from Part V, or make up your own.
The Northwest Coast shirts are made of dark woven material with the designs appliqued on. Diagram 6 shows the front and Diagram 6A is the back of the same shirt. This is the basic pattern without sleeves. The armholes, neck, and bottom of the shirt are bound in contrasting material. These can be made of cotton cloth with the designs painted on instead of being appliqu6d, which is time-consuming.

INDIAN LEGGINGS
Leggings were worn by both men and women. Men's leggings reached from ankle to crotch and were attached to a waist belt, or tied about the upper leg, while the women's leggings came only to the knee and were tied above the calf with thong or beaded garter bands. Those of the women usually were beaded to match their dress and were close fitting, being either wrapped, buttoned, or made so that the foot could barely slip through, and the legging was almost as close-fitting as a stocking. Some women's leggings were fastened to the moccasins and became a part of them, like boots. The leggings of the men were loose, much like the cowboy "chaps." Men's leggings were open both in front and back and were fastened by thongs to a belt, which held the breechcloth, which was always worn with leggings. The leggings of western tribes, whether made of cloth or skin, extended beyond the outer side seam and were cut into a triangle flap or fringed. The leggings of the eastern tribes usually had the seam up the front and had no flap or fringe, being more like tight-fitting trouser legs. These were decorated up the front, while the western tribes decorated their leggings up the outer side. Generally 2 yards of material, 24 to 26 inches wide, will be more than enough material to make a pair of leggings. If you are using leather or some other expensive material, it would be best to make a paper or muslin pattern; then when you have fitted it to your satisfaction, use this to cut your leggings and there will be no waste of expensive fabric or leather. Fold the material in the middle lengthwise as shown in Diagram 1. Measure from the crotch to the ankle for inside length, and from the waist to the ankle along the outside of the leg, where the belt loop is cut. Measure the belt loop about 2 or 3 inches and then angle the material toward the front or fold of the
Diagram 7 is a cape made of woven material cut in a circle and pulled on over the head. It is about 24 inches in length, and trimmed around the neck and bottom with an appliqued design.

material (see c in Diagram 1). Do the same at a. The dotted line shows the outline of the material when it is folded. To save material, you can use material in length from the ankle to d of Diagram 1. Then the belt loop can be cut from the fabric left above the crotch line, or thongs can be sewn on to loop over the belt as shown in Diagram 3.
Stitch a diagonal line from a to b (see Diagram 1), leaving just enough room at the bottom for the foot to slip through. The material at the back can then be fringed or left loose. Decorate over the diagonal sewing with beading, shells, or loops of thong, as in Diagrams 2 and 3, Plains Indian leggings. Diagram 4 is a Woodland legging, which is made straight, more like a trouser leg, with the decoration up the front and around the bottom. Belt loops or ties are placed at the side as in the Plains legging. A very modern adaptation of leggings can be made by sewing braid or beading along the outer leg seam of tight leg slacks to cover wide fringe which is cut wider at the bottom to give the look of the triangle flap of the Plains Indian legging (Diagram 5). Diagram 6 shows the old-style leggings, which were tied at the waist or around the upper leg with thongs. Women's leggings are made like those in Diagram 6 but are cut off at a-a just below the knee and tied with thong or a beaded band. The women's leggings were usually heavily beaded to match their dress.

BREECHCLOTH AND APRONS With Indian leggings, a breechcloth or apron is always worn. The breechcloth is simply a piece of cloth or soft buckskin about I foot wide and 6 feet long, depending upon how the wearer wanted the breechcloth to hang. Generally they were a little longer in the back. The ends are drawn between the legs and over the belt in front and behind. The ends, and sometimes the edges, are decorated with beading, or strips of contrasting color. The breechcloth, leggings, and moccasins were often decorated to match. In cold weather, or for ceremony, a decorated shirt was added to the outfit. For breechcloth measurements and directions, see Diagrams 1, 2, and 3. See Diagrams 4, 5, and 6 for apron patterns. These are worn instead of breechcloths, by Woodland Indians. The aprons are generally made of dark cloth, blue, black or wine velveteen, embroidered or beaded in the floral Woodland patterns. The aprons are square and about 18 or 20 inches, depending upon the size of the wearer. The back apron and the front apron are usually decorated with different patterns, and each is bound in narrow contrasting color and is tied at the hips. Aprons, leggings, and moccasins usually match.


This newsletter is issued on a m
onthly basis to provide your young men and leaders w
ith resource information to help prepare them
for the M
ountain Man Pioneering Encam
pment in N
ovember, 2000.
If you have any questions please contact m
e at 796-8081. G
ary Stivers Stake Young
Men’s Presidency
MOUNTAIN MAN PIONEERING ENCAMPMENT 2000 Newsletter #4 – February 2000


This newsletter is issued on a m
onthly basis to provide your young men and leaders w
ith resource information to help prepare them
for the M
ountain Man Pioneering Encam
pment in N
ovember, 2000.
If you have any questions please contact m
e at 796-8081. G
ary Stivers Stake Young
Men’s Presidency
MOUNTAIN MAN PIONEERING ENCAMPMENT 2000 Newsletter #5 – March 2000

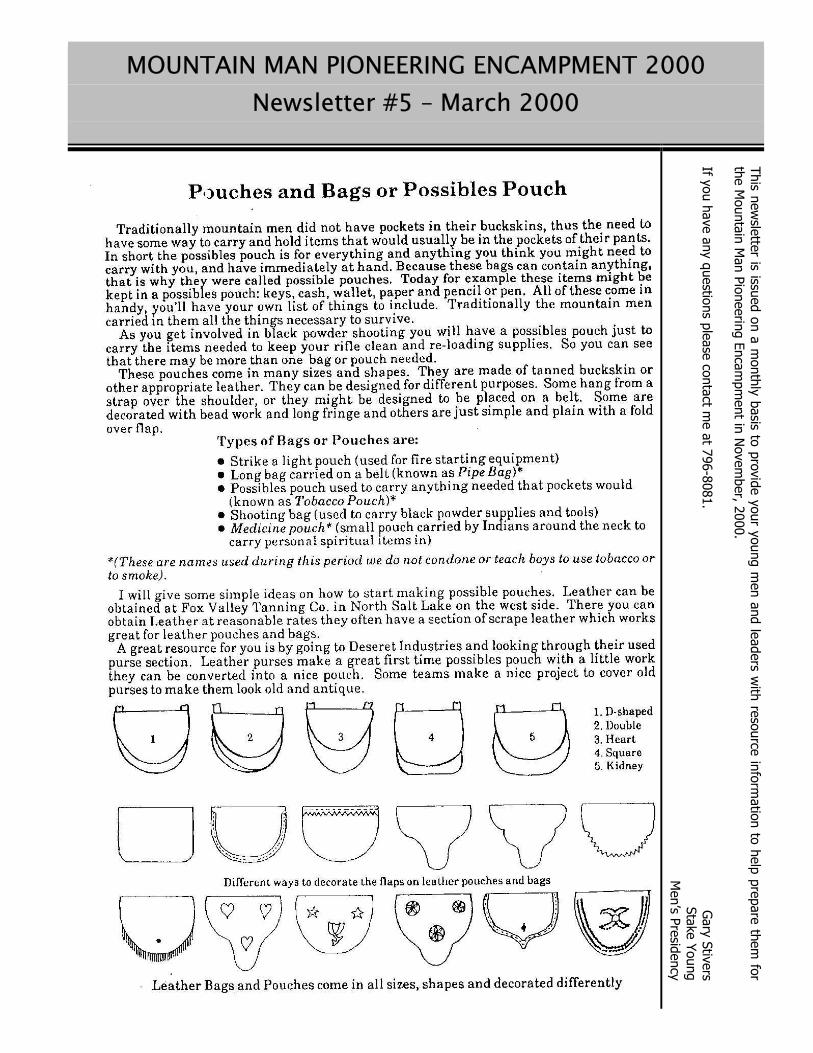
INDIAN BAGS AND POUCHES
Every Indian tribe used bags and pouches; in fact, they were necessary in almost every phase of their life. They held many items of daily life as well as ceremonial things. They were made of soft skin and decorated according to tribe, individual taste and use. The Plains tribes used geometric designs while the Woodland Indians favored floral motifs. Diagrams 1, 2 and 3 are designs of the Plains Indians. The first is a pipe bag, one of the most prized of Indian items as it held the special ceremonial pipe and tobacco. These were usually beautifully decorated and fringed. The overall length of Diagram 1 is 25 inches by 6 inches. These can be made in one length, with the fringe cut at the bottom, or the fringe can be sewn on; or they can be made in three parts, the upper portion lightly decorated so the bag can be closed with a drawstring. The middle portion is heavily beaded or decorated in some way, and the lower part is fringed. Diagram 6 shows a pipe bag decorated in the floral design of the Woodland Indians; the overall dimensions of this one are 20 inches by 5 inches. Smaller bags or pouches are used to hold personal items such as body paint, small trinkets, and sewing materials. These are usually decorated with favorite symbols and only short fringed, if fringed at all. The belt pouch is designed to wear on a belt as in Diagram 3; Diagram 3A shows how it is attached to a belt. Diagram 4 shows a small pouch with the pendant bottom decorated with a tuft of feathers. Diagram 5 shows a Woodland type pouch.

Diagram 8 shows how to make the rounded style pouch; a (see Diagram 8A) is to be sewn over b along the heavy line, d is the flap, and c will be cut as the fringe. Diagram 8B shows the decoration and Diagram 8C illustrates the slits in the back side of the pouch where it is slipped onto the belt. Diagram 9 shows a rectangular pouch: a is to be sewn over b along the heavy line. The back side with flap d is 10 by 5 inches. The front part to be sewn on is 5 by 6 inches. Diagram 9B shows the completed pouch with the lower or c portion cut as fringe. Another type of pouch, made like any of these, is called the strike-a-light pouch. It is smaller, usually 3 or 4 by 5 or 6 inches and was used for carrying flint for making fire; every household had one. These are generally made of buckskin and later of buckskin and canvas. Today you can use leather, suede, chamois, canvas, felt, leather-look material or flannel. These bags can be decorated with beads, embroidery, bits of felt glued or sewed on, and on canvas you can use wax crayon, pressed with a hot iron to set the pattern. Use a favorite motif of your own, or copy an Indian design. Commercial fringe and braid can also be used for a simple and quick decoration.


This newsletter is issued on a m
onthly basis to provide your young men and leaders w
ith resource information to help prepare them
for the M
ountain Man Pioneering Encam
pment in N
ovember, 2000.
If you have any questions please contact m
e at 796-8081. G
ary Stivers Stake Young
Men’s Presidency
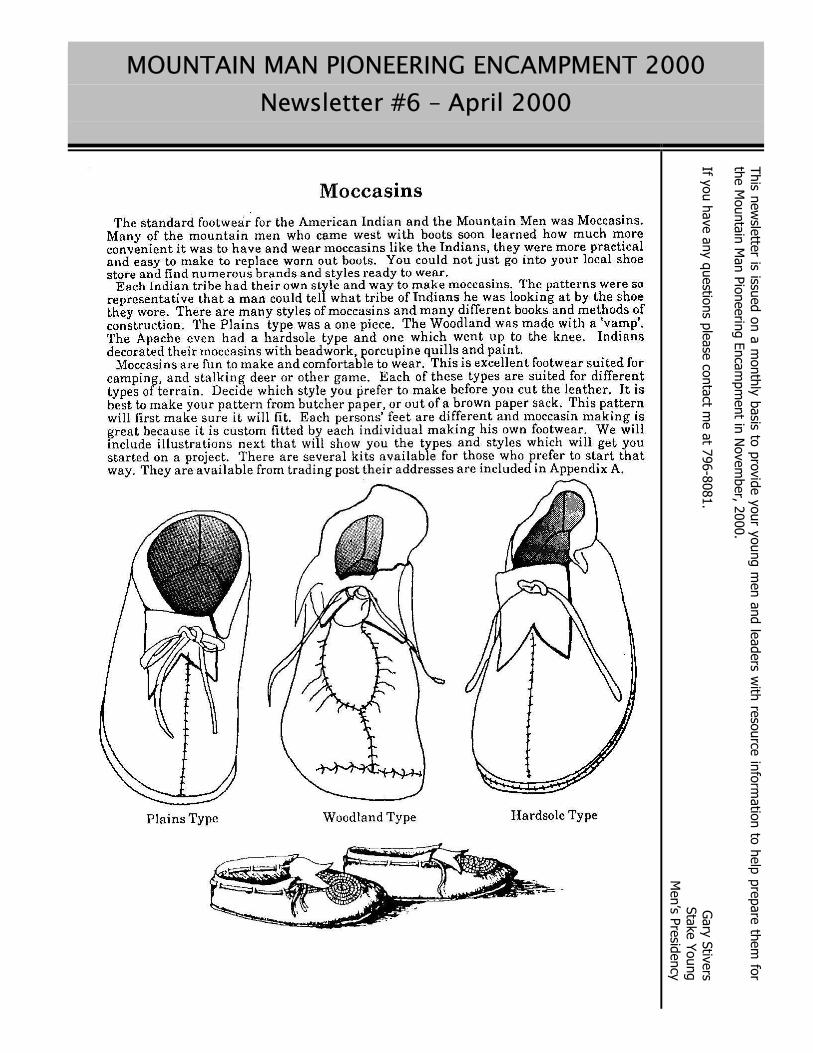
MOUNTAIN MAN PIONEERING ENCAMPMENT 2000 Newsletter #6 – April 2000


MO
UNTA
IN M
AN P
ION
EERI
NG
EN
CAM
PMEN
T 20
00
New
slet
ter
#7 –
May
200
0
This newsletter is issued on a monthly basis to provide your young men and leaders with resource information to help prepare them for the Mountain Man Pioneering Encampment in November, 2000. If you have any questions please contact me at 796-8081.
Gary Stivers Stake Young
Men’s Presidency
BASIC FOODS AND RECIPES As with all people, some tribes were famous for one type of food while others cooked something different. But one food, or a form of it, was basic among most Indians, and the Plains people depended upon it to take them through a hard winter. This food was called pemmican. In the old days this was made with dried buffalo meat and berries mixed with melted marrow fat, but today it can be made with dried beef. RECIPE FOR INDIAN PEMMICAN 1. Run dried beef through a food blender. 2. For each pound of dried beef add 1/2 cup of raisins. 3. Put the beef and raisins in a shallow pan and pour melted
suet over it. Be careful in pouring, use only enough suet to hold the beef and raisins together and no more, as it will be too fat for modern taste.
4. Mix thoroughly, then allow it to cool. 5. After cooling it can be cut into squares, strips, or however
you want it stored. This will keep for some time. You can vary this by adding other dried fruits with the raisins or in place of raisins. You might want to add more fruit per pound of dried beef. You can experiment, as every Indian woman seemed to have her own personal recipe for pemmican, which made it just a little different from her neighbors. If the recipe was a tribal one, then each tribe secretly guarded their special recipe.
BROTH AND POTATOES 2 pounds new (or small) potatoes, well washed 6 cups water Beef broth (follow directions on package for amount to use; usually
one cube or teaspoon per cup of water) Place potatoes in broth and simmer for about 45 minutes, or until
potatoes are tender. Serve as soup, with a potato. Makes about 6 servings. SWEET POTATO PANCAKES 4 large sweet potatoes 3 eggs 1 cup flour 1 1/2 teaspoons salt 1/8 teaspoon pepper 2 tablespoons cooking oil Parboil potatoes until tender; peel and mash. Mix eggs, flour, salt, and pepper. Heat oil on griddle until a drop of water sizzles. Drop potato batter from a large spoon, and brown on both sides. Flatten pancakes as you turn them. If needed, add more oil to griddle. They can be served with honey. Makes about 15 pancakes. FRIED MEAT PIES 1 1/2 pounds ground beef Dash of salt Dash of pepper 2 tablespoons green pepper 2 tablespoons onion Make meat balls about the size of a walnut.
Batter for meat balls: 2 cups flour 3 teaspoons baking powder 1 teaspoon salt Enough warm water to make a very thick batter. Roll meat balls in batter and drop in very hot oil or fat. Brown on all sides.

BAKED MEAT PIES 1 1/2 pounds ground meat Salt and pepper to taste 2 tablespoons water Make dough of: 2 cups flour 1 teaspoon salt 2 teaspoons baking powder 1 level tablespoon shortening 1 cup milk Roll mixture in small rounds and place a bit of meat in one half of round, then fold over and crimp edges together. Place in well-greased pan and bake in moderate oven until brown.
MAPLE CRANBERRY SAUCE 1 cup maple sugar 1 pound fresh washed cranberries 1 cup white sugar 1 1/4 cups water Put maple sugar, white sugar, water, and cranberries in a large saucepan. Bring to a boil, then reduce heat and simmer for 25 minutes, or until skin of cranberries pops. Cool and serve at room temperature or chilled.
SUNFLOVER CAKE 3 cups sunflower seeds, shelled 3 cups water 1/8 teaspoon salt 6 tablespoons cornmeal 1/2 cup oil or shortening
Put sunflower seed, salt, and water in a large saucepan, cover, and simmer for about an hour, stirring occasionally. Put this in a blender and puree.
Mix in the cornmeal, a tablespoon at a time, until the dough is stiff enough to be shaped by hand. Cool.
After dough is cool, shape into firm, flat cakes about 3 inches in diameter.
Heat oil in large skillet. When a drop of water sizzles, the skillet is hot enough. Brown cakes well on both sides and drain. You may need to add more oil as the cakes are cooking.
Makes about 15 cakes.
TOMATO SOUP 4 pounds tomatoes, washed and halved 2 yellow onions, peeled and sliced 2 sprigs mint 1 cooking apple, peeled and sliced 6 sprigs dill 2 bay leaves 1 teaspoon salt 2 quarts water 2 packages chicken broth or 2 cubes chicken broth (beef cubes or
packages may be used if wished)
Place all ingredients in large kettle, simmer for about 3 hours, stirring occasionally. Remove bay leaves and serve hot or cold.


MOUNTAIN MAN PIONEERING ENCAMPMENT 2000 Newsletter #8 – June 2000
This newsletter is issued on a monthly basis to provide your young men and leaders with resource information to help prepare them for the Mountain Man Pioneering Encampment in November 10 & 11, 2000.
If you have any questions please contact me at 796-8081 or email me at [email protected]
Stake Young Men’s Presidency


This newsletter is issued on a m
onthly basis to provide your young men and leaders w
ith resource information to help prepare them
for the Mountain M
an Pioneering Encam
pment on N
ovember 10 &
11, 2000.
If you have any questions please contact me at 796-8081.
Gary Stivers
Stake Young M
en’s Presidency
MOUNTAIN MAN PIONEERING ENCAMPMENT 2000 Newsletter #9 – July 2000

Ward Young Men Presidents, One of the things I find fascinating about Mountain Men and other pioneers are their colorful names. Many Mountain Men took, or were given by each other, names that expressed some particular skill or physical trait. These names described their use of firearms or other weapons, tracking or trapping ability, or physical appearances. If a man was deadly accurate with a rifle he might be named "SURE SHOT", or "DEAD-EYE" or "HAWKEYE" or "EAGLE EYE". If he was good at throwing a tomahawk he might be nicknamed "TOMAHAWK". If he was good at climbing rocky trails, he might be given the name "SURE FOOT". If he carried a particularly large rifle he might be known as "LONG RIFLE". If a man seldom bathed he might be known as "DIRTY" or "RANK". If a man had lost a finger or toe he might be called "FOUR FINGER" or "THREE-TOED". If a man never shaved or cut his hair he could be called "SHAGGY" or "BUSHY". You get the idea. What I am proposing is that your young men leaders give their young men names that fit their personality, stature, talent, inclination or past-time. I hope this will add to the adventure and mystique for the camporee. These will be the names we will use during this annual event. Names should be chosen with care and thought, unique so as to give the young men something to stand for. I also ask that the Young Men President would choose names for himself and his counselors and Scout Leaders. I hope this will provide an incentive to get to know your young men better if you have not already done so. The name I have chosen for myself is "WALKS OWN WAY". As you may have noticed I walk with a predominant limp, but also I have never been one to go with the crowd - insisting to do things I like whether others liked it or not. Thus "WALKS OWN WAY" was born. If you have any questions or need some advise or suggestions for names please call me at 796-8081 or send an email to me at [email protected]. Gary Stivers Stake Young Men President

This newsletter is issued on a monthly basis to provide your young men and leaders with resource information to help prepare them for the Mountain Man Pioneering Encampment in November, 2000.
If you have any questions please contact me at 796-8081. Gary Stivers
Stake Young Men’s Presidency
MO
UNTA
IN M
AN P
ION
EERI
NG
EN
CAM
PMEN
T 20
00
New
slet
ter
#10
– Au
gust
200
0
Lashing - Part One


This newsletter is issued on a monthly basis to provide your young men and leaders with resource information to help prepare them for the Mountain Man Pioneering Encampment in November, 2000.
If you have any questions please contact me at 796-8081. Gary Stivers
Stake Young Men’s Presidency
MO
UNTA
IN M
AN P
ION
EERI
NG
EN
CAM
PMEN
T 20
00
New
slet
ter
#11
– Se
ptem
ber
2000
Lashing - Part Two


MOUNTAIN MAN PIONEERING ENCAMPMENT 2000 Newsletter #12 – October 2000
This newsletter is issued on a monthly basis to provide your young men and leaders with resource information to help prepare them for the Mountain Man Pioneering Encampment in November, 2000.
If you have any questions please contact me at 796-8081.
Gary Stivers Stake Young
Men’s Presidency
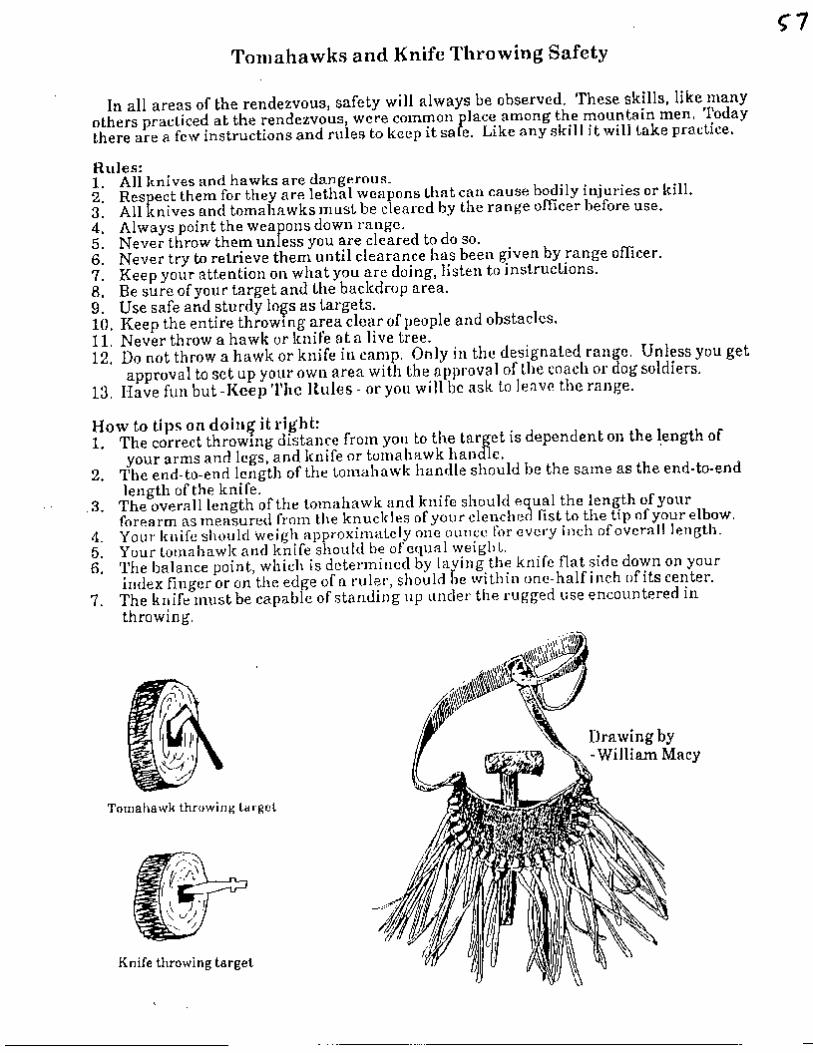
Tomakawks and Knives One of the most useful tools carried west by the mountain man was a sharp, lightweight tomahawk (hawk). It is useful in cutting wood, poles, and tent pegs, or quartering elk or moose. It is mostly found sunk into a log beside the cooking fire for cutting small pieces of wood. It was carried by the owner thrust through his belt in the middle of his back and covered with a leather blade cover to keep it from cutting the wrong hide. It was sometimes used for competitions called "hawk throwing". Learning the skill of throwing the hawk is a favorite part of Rendezvous. To sink a hawk into a log target several paces back was a necessary skill. A second useful tool was the knife and the skill of "knife throwing". It is most popular with boys. There are four major groups of knives used during the period: � The Patch Knife which is a razor sharp small knife used to cut patches for the rifle. � The Throwing Knife used for competition throwing. � The Fighting Knife like the one Jim Bowie made famous. � The Utility Knife - the real workhorse of the knives used most often.


APPENDIX – BOOK LIST
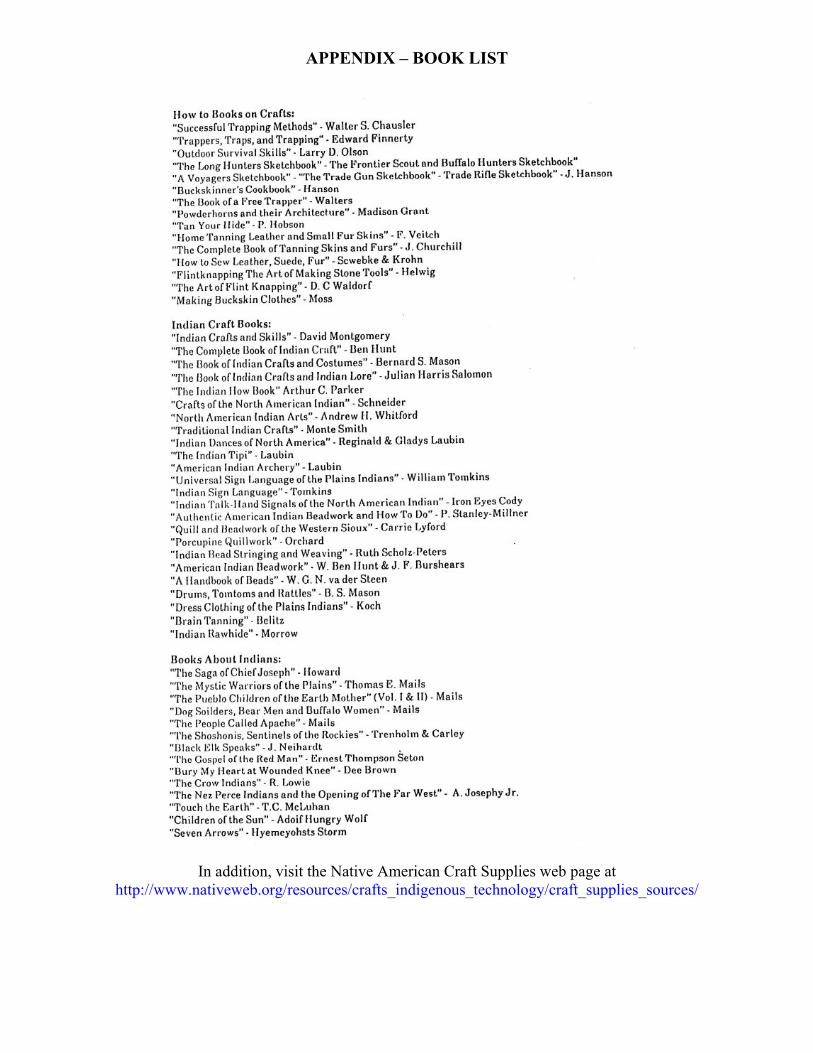
APPENDIX – BOOK LIST
In addition, visit the Native American Craft Supplies web page athttp://www.nativeweb.org/resources/crafts_indigenous_technology/craft_supplies_sources/