The Midsummer Seven - WordPress.com€¦ · · 2017-06-13The Midsummer Seven Created by ... and...
16
The Midsummer Seven Created by Sisters In Stitch The frozen winds of winter had turned into to lukewarm breezes of spring. Their hearts were full, and their hands idle. There was a longing for summer, sunshine and flowers. There was a need for friendship, creativity and community. This brought them together in arts and in expressions. To each other they became sisters. Sisters In Stitch
Transcript of The Midsummer Seven - WordPress.com€¦ · · 2017-06-13The Midsummer Seven Created by ... and...

The Midsummer Seven
Created by
Sisters In Stitch
The frozen winds of winter had turned into to lukewarm breezes of spring.
Their hearts were full, and their hands idle. There was a longing for summer, sunshine and flowers.
There was a need for friendship, creativity and community. This brought them together in arts and in expressions.
To each other they became sisters. Sisters In Stitch

You will need the following: • Yarn in different colors (We used Scheepjes Maxibonbon) • Size 1.25mm hook (or different size that works well with your yarn) • Yarn needle • Scissors Stitches and abbreviations used in this pattern US: (* will be explained) sl st – slipstitch ch – chain hdc – half double crochet dc – double crochet tr – treble crochet picot* (we do a picot with 1 ch – please see notes on the pattern) sk - skip

Notes on the Pattern
- You will be making 7 different flowers that you will be attaching to a
crocheted ribbon. This can be used in many different ways; around your hair, as a bracelet etc. The reason for the number of flowers is a legend in Sweden which claims that if you pick seven different flowers and put them under your pillow when you sleep on Midsummer’s Eve you will dream of the one you will marry.
- We used Scheepjes Maxibonbon, you can use any yarn equilliavant to that in order to make the flowers small.
- You can of course use whatever colors you want.
- We made 11 flowers in total, you can of course add or subtract to this
number. We made 5 of The Darling Little Flower and then 1 of all the others.
- In this pattern the picot stitch is used on top of dc and sc making some of
the petals and leaves pointy rather than round. We make the picot with 1ch on top of your sc/dc, then taking our hook diagonally through the two threads in the stitch below our ch. Pull yarn through all loops on your hook – for picture description please look at previous patterns on CrochetingKays homepage at www.crochetingkay.com
- If you notice any mistakes in the pattern please let us know so we can
correct and repost!
- This pattern is for personal use only. You are not allowed to publish or sell any part of this pattern.
- You are free to post pictures of your work in progress and of your
finished Midsummer Seven on social media. All we ask is that you credit us for the pattern and use the following hashtags so that we can find your beautiful results!
#sistersinstitch #midsummerseven

The Darling Little Flower
(make 5 of this one)
Round 1 (Color A) Magic circle, ch1, 5sc, cut yarn and make an invisible join in the first sc (acts like a sc) (6sc) Round 2 (Color B) In every sc do the following: (sl st in sc, ch2, 1dc, picot, ch2, sl st) (6 petals) When you have 6 petals, fasten your threads and you are done!

The Minute Blue Flower
Round 1 (Color A) Magic circle, ch1, 5sc, cut yarn and make an invisible join in the first sc (acts like a sc) (6sc) Round 2 2 sc in ever sc (12) Round 3-5 Sc in every sc Round 6 *1sc in the first 3 sc, 2 sc in the 4th sc repeat from * for the whole round (15) Round 7 * Sl st in first stitch, in the next stitch (hdc, dc, tr, picot) and in the third stitch (tr, dc, hdc) repeat from * for the whole round (5 petals) Finishing step, make a small mini tassel in another color that you pull through the flower to make the pistil.

The Little Cup of Butter
Round 1 (Color A) Magic circle, ch1, 4sc, cut yarn and make an invisible join in the first sc (acts like a sc) (5sc) Round 2 2 sc in ever sc (10) Round 3 The petals are crocheted in 2sc in the following way: Sc #1 (sl st, ch2, dc) Sc #2 (dc, ch2, sl st) Repeat in total of 5 times = 5 petals When you have 5 petals, fasten your threads and you are done!
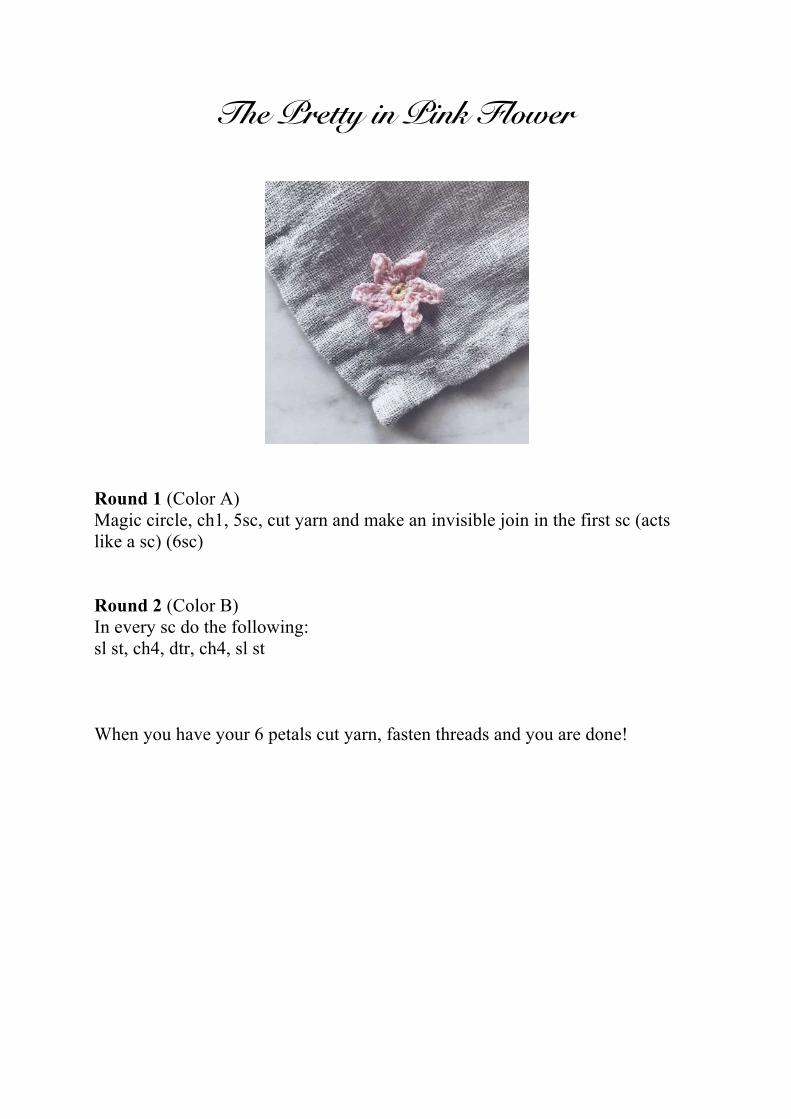
The Pretty in Pink Flower
Round 1 (Color A) Magic circle, ch1, 5sc, cut yarn and make an invisible join in the first sc (acts like a sc) (6sc) Round 2 (Color B) In every sc do the following: sl st, ch4, dtr, ch4, sl st When you have your 6 petals cut yarn, fasten threads and you are done!

The Purple Popping Flower
Round 1 (Color A) Magic circle, ch1, 5sc, cut yarn and make an invisible join in the first sc (acts like a sc) (6sc) Round 2 (Color B) In every sc do the following: Sl st, ch5, in the 2nd ch from your hook make a sl st, in the next 2 chains do hdc, sl st in the last chain and again in the sc Repeat this till you have 6 small petals Round 3 Ch 3, fasten behind petals – repeat this in total of 5 times so you get to the start of the first ch3 Round 4 In every ch3 space you do the following: Sl st, hdc, dc, tr, picot, tr, dc, hdc, sl st This should leave you with 5 larger petals behind you 6 small ones. Cut yarn, fasten and you are done!

The Folding Flower
Part 1 (Color A) Ch2, in second chain from hook you do 3 sc and finish with a sl st – this is the middle of your flower. Cut yarn, pulls through to the back of your work Part 2 (Color B) In a magic circle do the following 5 times: Sc, ch3, sl st in the 2nd chain from your hook, sk, sc in magic circle Cut yarn and fasten on the back of your work Part 3 (Color C) Magic circle with 6 sc and in every sc do the following: sl st, hdc, dc, 3tr, dc, hdc, sl st You do this until you have 5 large petals. Cut yarn and fasten Assembling the flower Now you fasten part 1 by pulling it through part 2, and then the two parts through part 3. Fasten your yarn and you are done!

The Budding Rose
This flower is unlike the others crocheted on a long chain and then “rolled” or “enfolded” with the small petals in the middle and then surrounded by the larger
petals to form a rosebud. In bold you will see the number of chains (counting from your hook) used in the different petals.
Step 1 (Color A) Ch 28 Step 2 –first small petal (chains 1-4) In the 3rd chain from your hook do a dc, and in the next ch (dc, sl st) (this forms your 1st small petal, out of 3) Step 3 – small petals (chains 5-10 = 3 chains/petal) In the next ch (sl st and ch2), dc, and to finish the petal (dc, sl st) - (do this twice and you have your other 2 small petals) Step 4 – Medium petals (chains 11-18 = 4 chains/petal) In the next ch (sl st, ch3), 2tr, 2tr, ch3 and sl st - (do this twice and you have your 2 medium petals) Step 5– large petals (chains 19-28 = 5 chains/petal) In the next ch (sl st and ch3), 2tr, 2tr, 2tr, ch3 and sl st – (do this twice and you have your 2 large petals)

Step 6 Take yarn with another color and make a knot, them make several knots on top of your knot to make a larger knot, do this twice on the same piece of yarn pretty close together – this will be the middle of your flower. Wrap your string of petals around your knots and fasten with yarn and needle. We have made this flower by folding it tightly and therefore making a bud rather than a flower in bloom – you do what you like more! Fasten your threads and you are done!
Flowers finished

The Green Leaves Ribbon
You will be crocheting a ribbon so you can fasten your flowers out of sc and leaves. You will not be fastening the flowers until you have turned and you are working your way back down the stem. You can also fasten your flowers by sewing them on if you prefer, in that case you just crochet your way back first. Next to some of the chs and leafs in the description you will find a * - this represents where we have placed the flowers. However, do feel free to place your flowers wherever you like on your ribbon.

The Leaves The leaves are either made out of 4 or 6 sc that you crochet backwards to come back to the stem. Read the description like this: Leaf explanation example Ch4 (number of chains you are making) 2 – sl st 3 – sc 4 – dc The number at the start indicates with chain starting from your hook you will crocheting in, and everything after the dash what you will be doing in that specific ch. Hopefully this is pretty clear. Leaf 1 Ch4 2 – sl st 3 – sl st 4 – sl st Leaf 2 Ch4 2 – sc, picot, sl st 3 – sc 4 – sl st
Leaf 3 Ch4 2 – sc, picot, sc 3 – sc 4 – sl st Leaf 4 Ch6 3 – dc, picot, dc 4 – dc, hdc 5 – hdc, sc 6 – sl st

The Ribbon Ch40 Leaf 1 Ch10 Leaf 2 Ch10 * Leaf 3 Ch15 Leaf 2 Ch5 Leaf 1 Ch15 * Leaf 4 Ch5 * Leaf 3 Ch10 (aprox 30cm) Leaf 1 Ch2 Leaf 1 Ch5 Leaf 3 Ch20 ** Leaf 3 Ch7 Leaf 2 Ch5 Leaf 1 Ch28 * Leaf 4 Ch5 * Leaf 1 Ch50
Leaf 3 (aprox 60 cm) Ch5 Leaf 4 * Ch28 Leaf 1 Ch5 Leaf 2 Ch7 * Leaf 3 Ch20 * Leaf 3 * same as just above Ch 5 Leaf 1 Ch2 Leaf 1 Ch10 Leaf 3 Ch5 Leaf 4 Ch15 * Leaf 1 Ch5 Leaf 2 * Ch15 Leaf 3 Ch10 Leaf 2 Ch 10 * Leaf 1 Ch 50 Turn and sc to the beginning, for details please read below
Please note: See next page for details on attaching the flowers, where to attach then and how to make your loops for securing your ribbon when in use BEFORE you start crocheting your way back.

Chain space on the top When you turn, and you want a ch20-space to be able to keep your ribbon secure around your wrist or your head, so do the following: Ch 20, sc in the 1st ch in your ch20 and then you continue back down your stem.
** When you’re crocheting your way back do the following in this ch20 space marked with ** (this is also to be able to secure you ribbon) 5 sc, ch10, sk10, 5sc
Attaching the flowers There is no one single correct way to fasten your flowers to your ribbon. We crocheted them on as we find that sewing them on is more of a hassle, but this is down to personal preference. When crocheting the flowers to the ribbon we did as follows:
1. Find a suitable place on the back of your flower when you can go through with your hook without it showing on the front. (you should now have both the previous stitch and you flower attached on your hook).
2. You go through the next stitch on you ribbon and pick up yarn and pull it through not only the stitch in question but also your flower. You could almost say that you slip stitch through your flower (you should now have only 2 loops on your hook – no flower).
3. Complete the single crochet.

Thank you for crocheting this pattern.
We hope you will enjoy The Midsummer Seven
Lots of crocheting love from Sisters In Stitch