The Master Software is a PC based application system ...
18
The Master Software is a PC based application system designed to work with 32 or 64 bit operating systems: Windows 8, 7, or Windows XP Pro with SP3 through your standard USB port interface on lap tops or desk tops.
Transcript of The Master Software is a PC based application system ...

The Master Software is a PC based application system designed to work with 32 or 64 bit operating systems: Windows 8, 7, or Windows XP Pro with SP3 through your standard USB port interface on lap tops or desk tops.
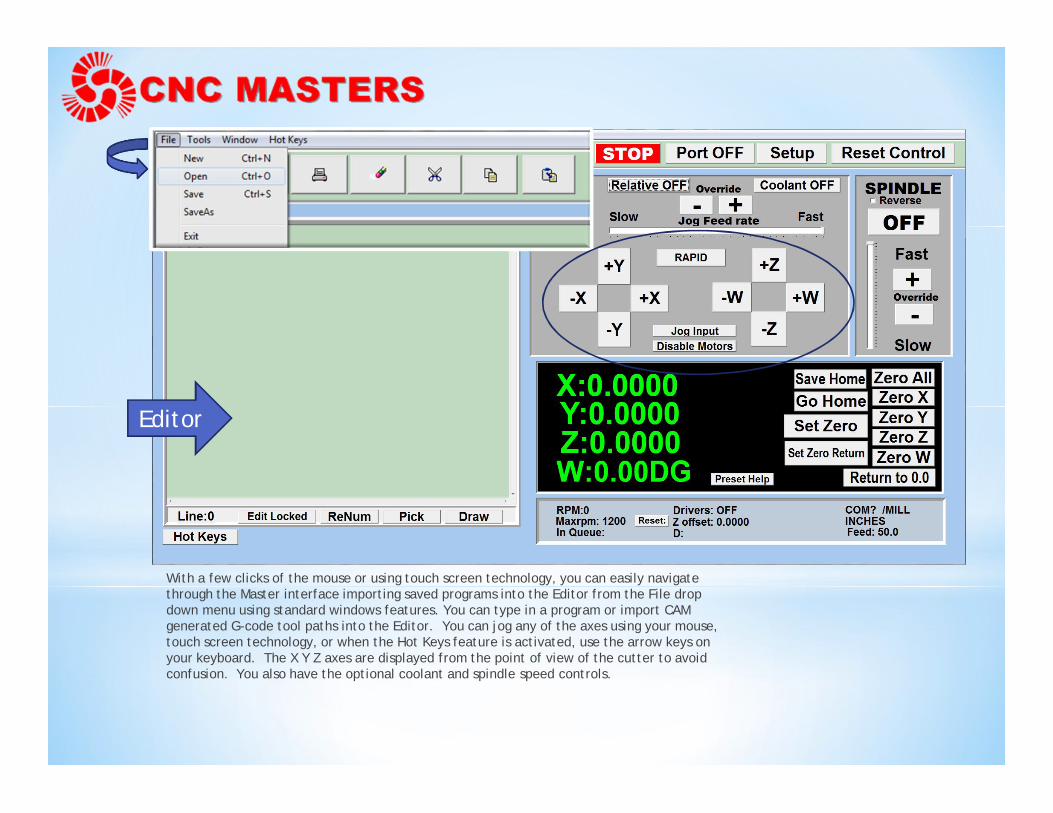
With a few clicks of the mouse or using touch screen technology, you can easily navigate through the Master interface importing saved programs into the Editor from the File drop down menu using standard windows features. You can type in a program or import CAM generated G-code tool paths into the Editor. You can jog any of the axes using your mouse, touch screen technology, or when the Hot Keys feature is activated, use the arrow keys on your keyboard. The X Y Z axes are displayed from the point of view of the cutter to avoid confusion. You also have the optional coolant and spindle speed controls.
Editor

Hot Keys is an alternative method to easily control your machine using your hard or on-screen keyboard. You can jog the axes with the arrow keys, press P to pause a program, press S to turn Spindle On, G to run a program, Space Bar to Stop, and/or J to record your individual movements one line at a time to create a program by teach mode. You also have options to zero your axes and reset your control as well.

The Master defaults to an “Edit Locked” green editor screen. To create or edit your tool path program, you will have to “Edit Unlock” first which will turn the screen to a white color. This Edit Locked feature keeps your tool path program from being accidently changed.

While in “Edit Unlock” mode, you can write FANUC style G-codes directly into the Editor, or select commands off the “Pick” menu and write your tool path program in conversational mode.

Pick Menu Features DescriptionABSOLUTE Same as G90. The Master defaults to Absolute mode.INCREMENTAL Same as G91.SPINDLE ON Same as M03 for computer variable spindle control.MOVE Same as G00, G01. Move three or four axes simulataneoulsy on the same tool path.
PRE_SETCan't start from a 0.00 position? With Pre-Set, you can enter the coordinate you want to begin the tool path program. For example, Z axis is 0.5" above the material. Pre-Set will automatically start the Z coordinate at 0.5" on the counter. You can also pre-set a coordinate directly into the DRO counters, by clicking the cursor over the counter.
RAPID Quickly retract or relocate the tool after an operation above the application. Rapid each individual axis up to 100 inches per minute of travel.FEED Slowly feed your axes with a minimum of 0.1 inches per minute of travel.
CWCIRCLE X Y I J Same as G02. Enter in the coordinates for X Y I J and let the Master machine your arcs for you. Z movement can be added for helical applications.CCWCIRCLE X Y I J Same as G03.
CALL CALL allows you to repeat as needed a sub-program with one line instead of having to re-write the sub-program several times within the larger program.
GO_HOMEGO HOME allows you to create an offset position on the machine. End your program with GO HOME on production runs to give you clearance of the axes to exchange parts on the machine.
DELAY Stop the program at a particular point and delay further execution for the time shown in milliseconds up to 40,000.
PAUSESame as M00, or type in PAUSE in the middle of a program. Hit Enter to resume the program. You can also press P on the keyboard to pause the program.
RUNFILE If the program is very long, using the RUNFILE command will read the program directly from your C drive.\ (NOTE) Using a \ in front of the notation, the Master will simply ignore this line in the program. This can be useful to place remarks within your program.SPINDLE OFF Same as M05.COOLANT ON Same as M08. Control the coolant pump directly into your program.COOLANT OFF Same as M09.END Same as M30.
With the Pick Menu, you can easily write a simple program without G-codes. You can also interchange between codes and conversational commands in the same program. Using a CAM is always best for complicated applications and the Master has no problem receiving an imported FANUC based program with the correct post processor.

1
2
3
1. Hit Draw to view your tool path program drawing. This can be helpful to quickly verify your program before running it. You also can slow down the drawing process with Draw Delay.
2. Run the machine on Trace mode. You can run each tool path independently, one line at a time to study the tool path movement to verify the position of the application and if any fixture/vise is in the way of the cutter’s path.
3. Use Trace and Draw together to run each tool path independently in the Draw Window.
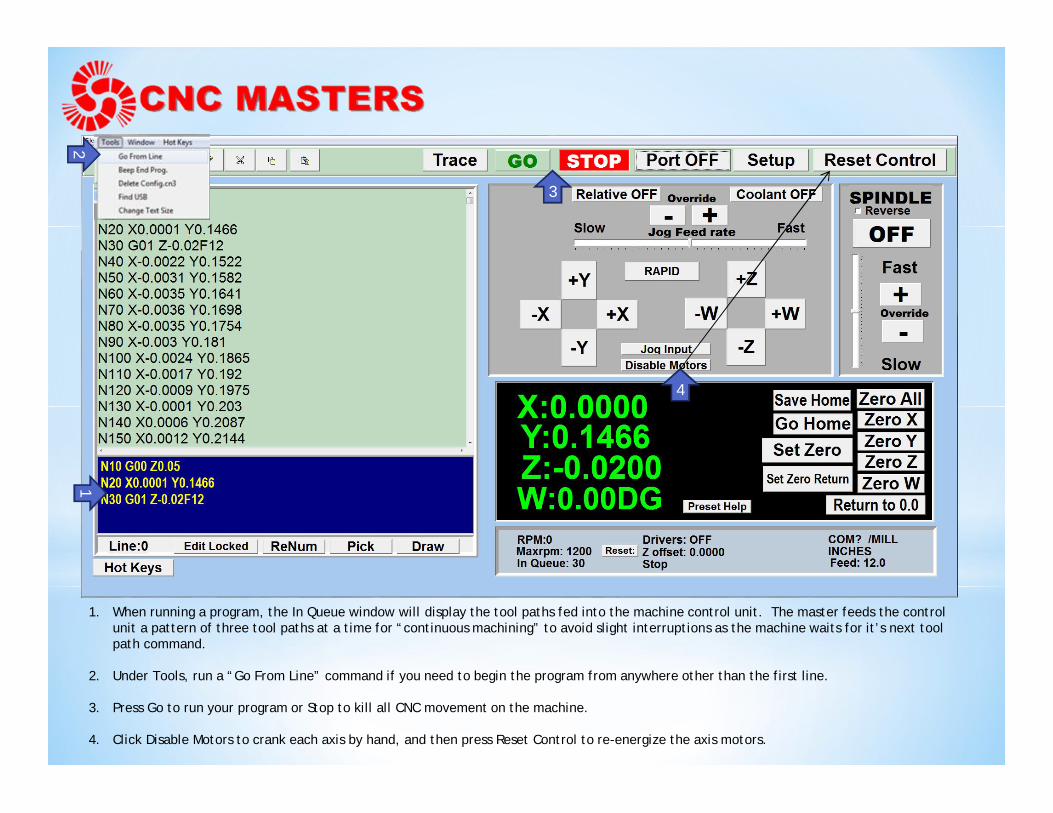
1. When running a program, the In Queue window will display the tool paths fed into the machine control unit. The master feeds the control unit a pattern of three tool paths at a time for “continuous machining” to avoid slight interruptions as the machine waits for it’s next tool path command.
2. Under Tools, run a “Go From Line” command if you need to begin the program from anywhere other than the first line.
3. Press Go to run your program or Stop to kill all CNC movement on the machine.
4. Click Disable Motors to crank each axis by hand, and then press Reset Control to re-energize the axis motors.
12
3
4

Clicking the Relative ON feature will allow you to enter a specific value to jog any of your axes to an exact location. Without having to write a program, you can jog an exact amount on any of the axes without needing to keep the key pressed down and mistakenly over-step the movement releasing your finger too slowly off the jogging button. For example, let’s say you need to drill a hole exactly 0.525” using the Z. So you enter 0.525 in the Z box. Next, adjust the JOG FEED RATE slider for the desired feed rate. Then “click once” on the +Z or –Z button to activate the travel. In this case you click the –Z button first to drill the hole, and then click the +Z button to drive the axis back up.
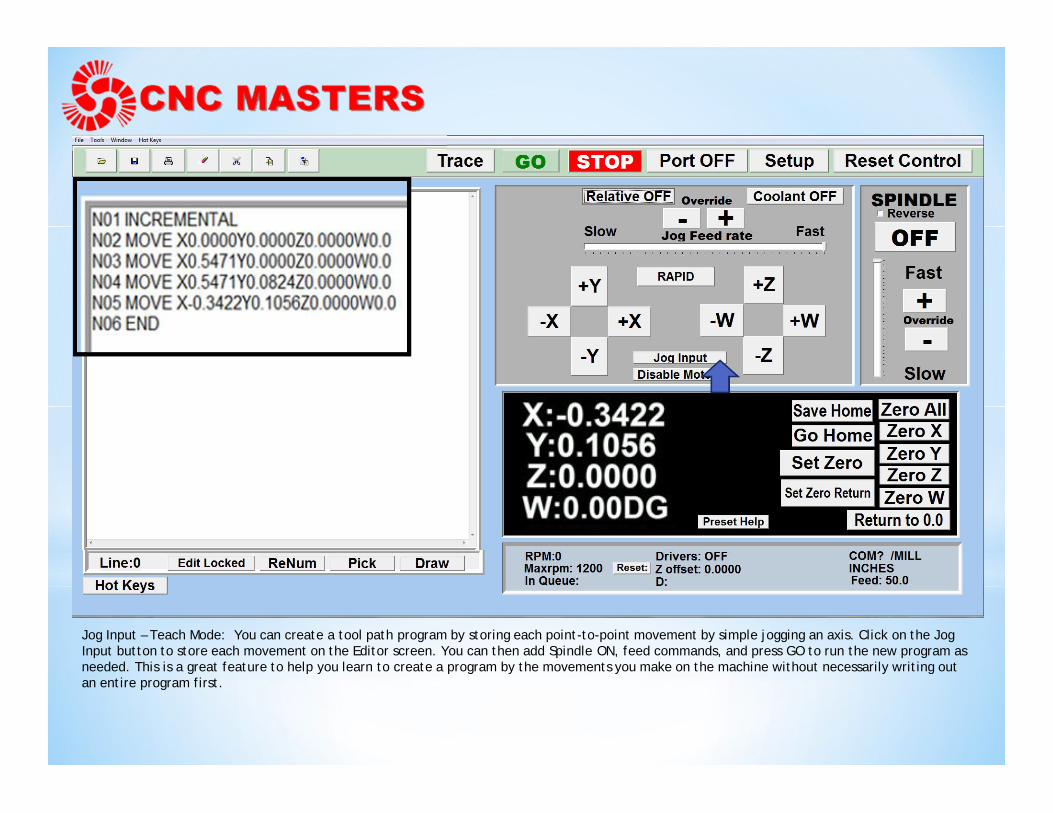
Jog Input – Teach Mode: You can create a tool path program by storing each point-to-point movement by simple jogging an axis. Click on the Jog Input button to store each movement on the Editor screen. You can then add Spindle ON, feed commands, and press GO to run the new program as needed. This is a great feature to help you learn to create a program by the movements you make on the machine without necessarily writing out an entire program first.
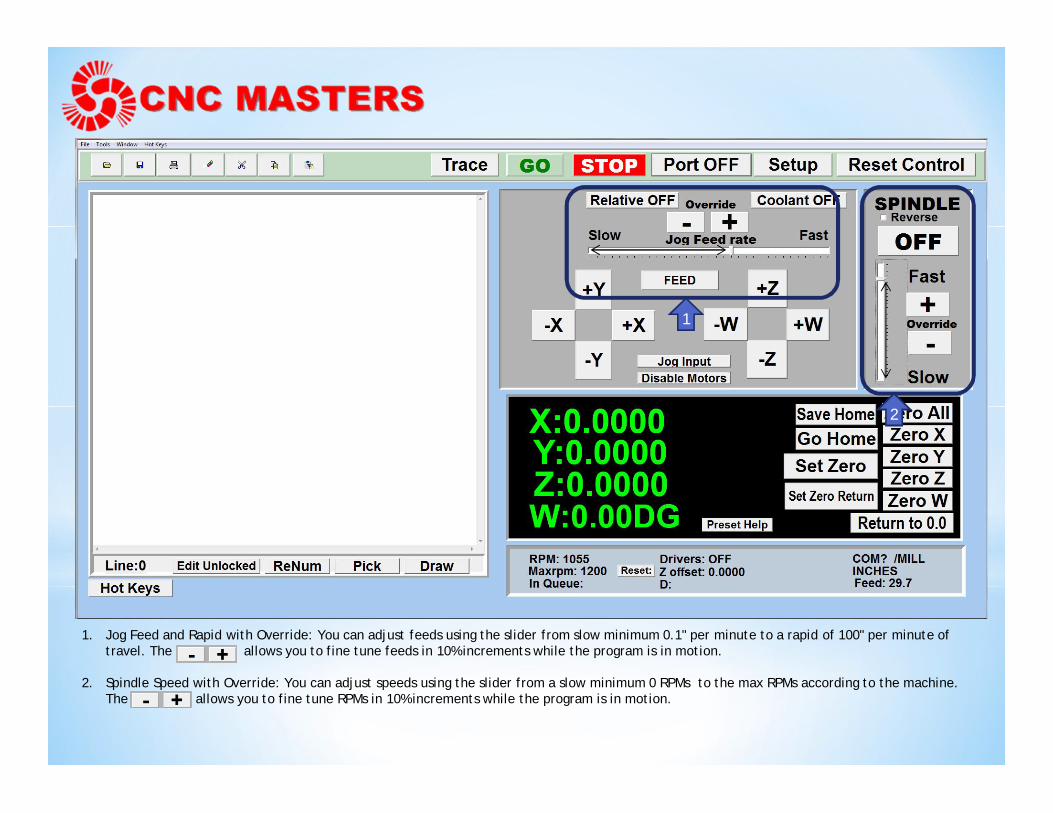
1. Jog Feed and Rapid with Override: You can adjust feeds using the slider from slow minimum 0.1" per minute to a rapid of 100" per minute of travel. The allows you to fine tune feeds in 10% increments while the program is in motion.
2. Spindle Speed with Override: You can adjust speeds using the slider from a slow minimum 0 RPMs to the max RPMs according to the machine. The allows you to fine tune RPMs in 10% increments while the program is in motion.
1
2

1. Pre-set directly into the counters by typing in your beginning coordinate if you cannot start your program with 0.00. 2. The counters X Y Z can display in inches or mm. The optional W rotary table axis displays in degrees. 3. Zero all counters or zero each counter independently. With one click of the Return to 0.0 button, all axes will travel back to 0.0 on the
machine.
1

Set and save your 0.00 position on the machine. These coordinates will be recorded as the first line of the program in the Editor screen. Should you desire to return to this program at a later date, you will only have to click on the Set Zero Return button. This will command the machine to automatically jog each axis to the saved “set” 0.00 position according to the recorded coordinates at the first line of the program.

A “Home” and a “Zero” position will help immensely when running the same program multiple times. For example: Let’s say you need to machine one application times 100 pieces. This usually requires a jig to retain that physical 0.00 position. But in this case, you want the program to end with clearance of the axes to easily switch out the next piece of stock and start again. With Save Home, you have the ability to save this home position while still retaining your Set Zero position where the machine will mill your part out. Pressing Save Home will record this new position under the Set Zero line in your program.
Pressing Go Home will jog your axes back to your “saved home” position where you originally pressed the Save Home command. You can also input GO_HOME from the Pick Menu as its own tool path in your program. So at the completion of your program it will end the axes at your Home position. Replace your piece of stock, and then press the Return to 0.0 to start your next run.
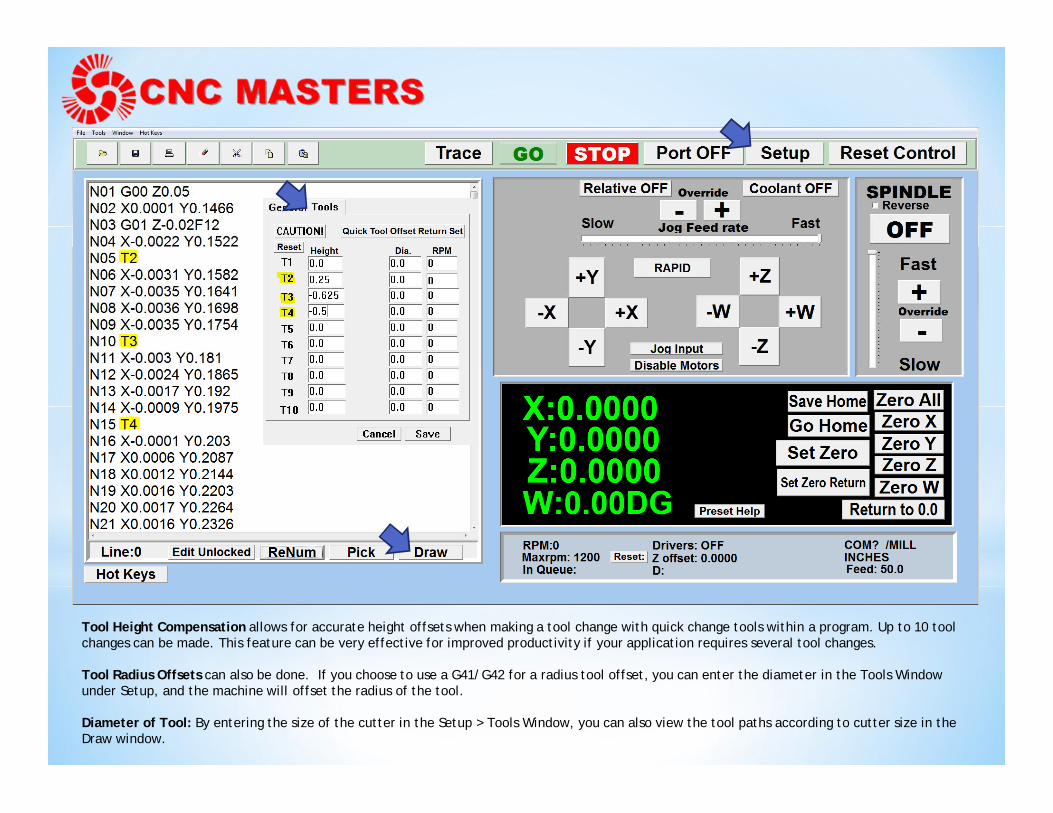
Tool Height Compensation allows for accurate height offsets when making a tool change with quick change tools within a program. Up to 10 tool changes can be made. This feature can be very effective for improved productivity if your application requires several tool changes.
Tool Radius Offsets can also be done. If you choose to use a G41/G42 for a radius tool offset, you can enter the diameter in the Tools Window under Setup, and the machine will offset the radius of the tool.
Diameter of Tool: By entering the size of the cutter in the Setup > Tools Window, you can also view the tool paths according to cutter size in the Draw window.

In the Setup window, you will find other useful features such as:
Adjust Rapid on the axes from .1" to 100"/minute of travel.Scale feature allows you to quickly double the size or miniaturize the size of the application.Calibration Factor allows you to fine tune an axis for enhanced repeatability.Inch/mm Display allows you to change from inch to mm mode.Max RPM allows you to synchronize the spindle motor belt or gear positions for computer variable spindle control.Change the Face of the Master to Lathe Mode or Mill Mode for any of our CNC machines.

The Master Software supports these standard G-Codes and M-Codes for our CNC Mills:
G00 = Position (Fast speed)G01 = Linear interpolation (Feed speed)G02 = Circular interpolation (CW)G03 = Circular Counter-clockwise interpolation (CCW)Format: X__Y__I__J__ I,J are relative distance from start to center. Z can be added for helical designs.G17 = Cancels G60 CommandG40 = Cancels G41 and/or G42G41 = Tool Radius compensation leftG42 = Tool Radius compensation rightG60 = Switch data from Y to W * radius factorG70 = Input in inchesG71 = Input in millimetersG73 = High-Speed Peck Drilling CycleG81 = Drilling CycleG82 = Counter Boring CycleG80 = Cancel CycleG83 = Deep Hole Peck Drilling CycleG90 = Absolute move (Modal)G91 = Relative/Incremental move (Modal)
M00 = PauseM03 = Spindle onM04 = Spindle on reverseM05 = Spindle offM08 = Coolant onM09 = Coolant offM30 = End program
The Master Software supports these standard G-Codes and M-Codes for our CNC Lathes:
G00 = Position (Fast speed/Rapid)
G01 = Linear interpolation (Feed speed)
G02 = Circular interpolation (CW)
G03 = Counter Clockwise Circular interpolation (CCW)Format: X__Z__I__K__ I,K are relative distance from start to center.
G04 = Dwell timeG20 = Input in inchesG21 = Input in millimetersG71 = Turning CycleG72 = Facing CycleG74 = Peck DrillingG76 = Threading cycleG90 = Absolute move (Modal)G91 = Incremental move (Modal)
M03 = Spindle onM04 = Spindle on reverseM05 = Spindle offM08 = Coolant onM09 = Coolant offM30 = End program
Our Pledge to you…
When you do business with CNC Masters, you will be doing business with a company who cares about its customers. We take our after sales tech support very seriously by phone or email for as long as your company owns a CNC Masters machine purchased directly from us. We understand that your company has invested in CNC Masters to help you along the way. It does not matter how many years have passed, we will be happy to assist you from guidance, trouble shooting on the mechanics, electronics, to explaining the functions on the Master Software. We are honored you have chosen CNC Masters over other brands in the market, so it will remain our goal to help you as needed so you can put your product out in the market as quickly as possible.
Master Software updates will also be made available to you for as long as the hardware in the control unit can sustain it. Thank you for watching, and be sure to email us with any questions you may have at [email protected].