The Landfill Orchestra but have their roots in Greek and/or Latin. ... The Landfill Orchestra 5th...
4
LOUISVILLE ORCHESTRA ©2014-16 ACTIVITY 1 – MUSIC DETECTIVE PART 1 Using the music vocabulary list, students will break down each word into syllables and underline the stress/accent. Many music terms are in Italian or French but have their roots in Greek and/or Latin. Once each word has been broken down, students should determine if there is a Greek and/or Latin root to give them a clue to its meaning. Finally, have students look up each word to determine its definition and its origin. ACTIVITY 2 – MUSIC DETECTIVE PART 2 Now that the students have learned some music terminology, it’s time to explore the instrument families of the orchestra. Using the Instruments of the Orchestra list at the back of this guide, have students divide an 8 ½ x 11” sheet of paper into four quadrants. Quadrants should be labeled; strings, woodwinds, brass, percussion. Now have students write the names of instruments that correspond with each of those designations in the correct quadrant. Then have the students identify the characteristics of those instruments within each quadrant that make them similar. For example, many of the strings are made of wood and use either a bow or can be plucked. { The Landfill Orchestra 5th Grade } Lesson 1 Explore Musical Roots MATERIALS • Glossary of Musical Terminology (back of guide and more extensive on-line at www.louisvilleorchestra.org) • Instruments of the Orchestra (back of the guide) • Paper and pencil/pen • Access to dictionary and/or computer SPONSORED BY 14 MakingMusic Guide
Transcript of The Landfill Orchestra but have their roots in Greek and/or Latin. ... The Landfill Orchestra 5th...

LouisviLLe orchestra ©2014-16
Activity 1 – Music Detective pArt 1Using the music vocabulary list, students will break down each word into syllables and underline the stress/accent. Many music terms are in Italian or French but have their roots in Greek and/or Latin. Once each word has been broken down, students should determine if there is a Greek and/or Latin root to give them a clue to its meaning. Finally, have students look up each word to determine its definition and its origin.
Activity 2 – Music Detective pArt 2Now that the students have learned some music terminology, it’s time to explore the instrument families of the orchestra. Using the Instruments of the Orchestra list at the back of this guide, have students divide an 8 ½ x 11” sheet of paper into four quadrants. Quadrants should be labeled; strings, woodwinds, brass, percussion. Now have students write the names of instruments that correspond with each of those designations in the correct quadrant. Then have the students identify the characteristics of those instruments within each quadrant that make them similar. For example, many of the strings are made of wood and use either a bow or can be plucked.
{The Landfill Orchestra 5th Grade
}Lesson 1 Explore Musical RootsMAteriALs • Glossary of Musical Terminology (back of guide and
more extensive on-line at www.louisvilleorchestra.org)
• Instruments of the Orchestra (back of the guide)
• Paper and pencil/pen
• Access to dictionary and/or computer
sponsoreD by
14 MakingMusic Guide

LouisviLLe orchestra ©2014-16
Now it’s time to listen to all the instruments in the orchestra using Benjamin Britten’s Young Person’s Guide to the Orchestra from the BBC Orchestra. You can click here so students can hear all of the different instruments. Pause after each section and have the students write down their impressions of each instrument family. How did each instrument make them feel? Did they like the high, middle or lower instruments? What types of sounds or timbres did they like the best?
Now they’re ready to start constructing their own original instruments!
Lesson 2 Create your own instrument MAteriALs• These are not limited to the below but these are examples, students should have free reign to make their own
“found” instruments out of anything recycled. Please make sure that whatever the students are using has been cleaned!
• Empty containers (for example) oatmeal containers, Pringles cans, milk jugs, soda bottles, Kleenex boxes, if available glass bottles (old fashioned Coke bottles work well), plastic cups
• Tubes: toilet paper or paper towel cores
• Vibration materials: wax paper, rubber bands of different widths, string or dental floss (if available, use different widths and materials)
• Create the shake: dried beans/peas/macaroni/rice
• Decoration: glue, paint, colored markers, glitter
Because students are using only used or recycled materials to create their own original instrument, this lesson can be tied into Earth Day as well as the Science curriculum for how humans impact the environment. By making instruments out of these “found” objects, students are lessening their impact on landfills as well as creating beautiful music!
DRUMS AND SHAKERS: Clean out emptied containers. Make sure each container has a lid of some kind. Add dried beans, peas, macaroni, rice and shake. Decorate outside of container with paint or glitter.
KAZOOS: Toilet paper/paper towel cores: cover each end of the core with the wax paper and rubber bands. Cut a slit in the wax paper at both ends of the core. Decorate core with paint. Hum/blow into one end like a kazoo.
GUITARS: Empty Kleenex boxes - decorate box as desired. Glue several strings across the opening of the box or stretch big rubber bands of different widths. Make sure to create an order from lowest to highest sounds.
HARP: Using plastic cups, wrap several widths of rubberbands across the length of the cup so that each rubberband spans the open side of the cup. Make sure to create an order from lowest (thickest rubberband) to the highest (thinnest rubberband) so you can create a tune. Now pluck the rubberbands to make a tune. You can also use a straw and blow across the top of the rubberbands so that they vibrate to create a sound. This is a rudimentary system of how our vocal chords work.
WATER XYLOPHONE: You can make this with some empty glass bottles and water. Fill each bottle with different amounts of water. You can either blow over the top to get a different sound or you can make small mallets using dowel rods and wooden beads. Line up your bottles according to their pitches (lowest to highest) and then have fun playing Mary Had a Little Lamb or Twinkle Twinkle Little Star. The more bottles, the more pitches you’ll have to play with. This can also be tied into a lesson on volume.
15Louisvilleorchestra.org
LouisviLLe orchestra ©2014-16
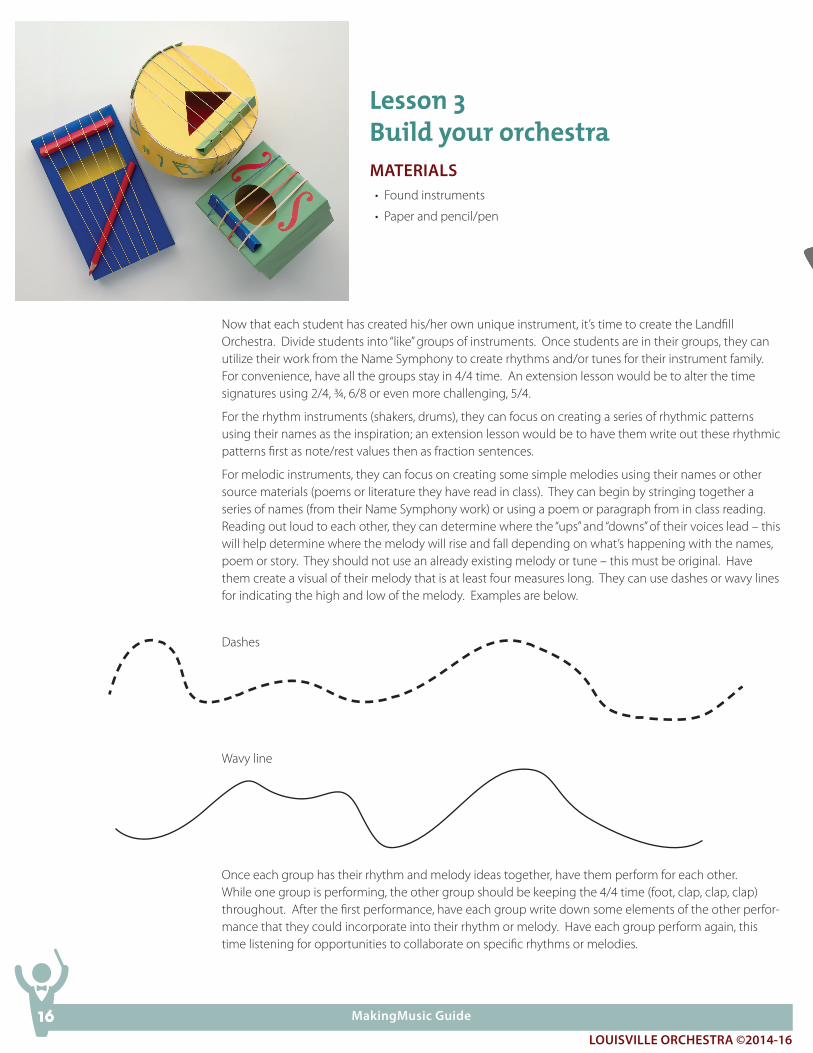
Now that each student has created his/her own unique instrument, it’s time to create the Landfill Orchestra. Divide students into “like” groups of instruments. Once students are in their groups, they can utilize their work from the Name Symphony to create rhythms and/or tunes for their instrument family. For convenience, have all the groups stay in 4/4 time. An extension lesson would be to alter the time signatures using 2/4, ¾, 6/8 or even more challenging, 5/4.
For the rhythm instruments (shakers, drums), they can focus on creating a series of rhythmic patterns using their names as the inspiration; an extension lesson would be to have them write out these rhythmic patterns first as note/rest values then as fraction sentences.
For melodic instruments, they can focus on creating some simple melodies using their names or other source materials (poems or literature they have read in class). They can begin by stringing together a series of names (from their Name Symphony work) or using a poem or paragraph from in class reading. Reading out loud to each other, they can determine where the “ups” and “downs” of their voices lead – this will help determine where the melody will rise and fall depending on what’s happening with the names, poem or story. They should not use an already existing melody or tune – this must be original. Have them create a visual of their melody that is at least four measures long. They can use dashes or wavy lines for indicating the high and low of the melody. Examples are below.
Dashes
Wavy line
Once each group has their rhythm and melody ideas together, have them perform for each other. While one group is performing, the other group should be keeping the 4/4 time (foot, clap, clap, clap) throughout. After the first performance, have each group write down some elements of the other perfor-mance that they could incorporate into their rhythm or melody. Have each group perform again, this time listening for opportunities to collaborate on specific rhythms or melodies.
Lesson 3 Build your orchestraMAteriALs• Found instruments
• Paper and pencil/pen
16 MakingMusic Guide

LouisviLLe orchestra ©2014-16
Lesson 4 Putting it all togetherNow it’s time to put the rhythm and the melody together to create the Landfill Orchestra performance of the Name Symphony.
Using some of the ideas from their individual group performances, have the students collaborate on an A section and a B section for their piece. They can reprise the A section at the end so it would look like this – AA BB AA.
Make sure to rehearse each section before putting it all together. There may be some compositional changes needed that the students can identify once they hear both parts put together. Aim for four measures of A section and four measures of B section for the first time around. Remember the final A section is a reprise of the original A section.
Now perform! Congratulations on the first performance of your Landfill Orchestra!
17Louisvilleorchestra.org