
THE JRM2 - FOREDOM
12
© 2018 Pepe Tools. www.pepetools.com 2 The Pepe tools JRM2 is the latest evolution of the famous Pepe tools Jump Ring Maker. This innovative solution enables you to produce hundreds of jump rings, accurately and quickly, but most importantly- safely. The JRM2 isn’t just a tool, it’s a collection of tools which allow you to wind coils and cut jump rings. The JRM2 comes complete with a full set of 20 mandrels ranging from 2.5mm - 12mm, A keyless winding chuck with handle, a coil holder, and the special saw attachment designed for use with a Foredom flex shaft allowing you to saw ring precisely in complete safety. You will also need a Flex shaft to power the saw. Pepe recommends the Foredom SR or TX Flex shaft with foot control and the H30 Handpiece. This provides the power and control for the sawing attachment. The JRM2 has been designed for Jewellers, hobbyists and crafters. It is intended for silver, gold, copper, aluminium and other non-ferrous metals in thin wire gauges, as used by jewellers. The fine blades are designed to give precise clean cuts when used as described. However the blades are not intended for heavy gauge steel wire or other tough materials. Top Tip… For speed and ease of use, it is highly useful to have a hand piece solely dedicated just for your jump ring maker. This way it can remain permanently attached in the handpiece holder and simply snapped on and off the flex shaft, when required. This avoids repeated setup and adjustment and means that you are always ready to go in an instant. If you wish to polish your jump rings or indeed your finished jewellery, then check out the Pepetools Polimag magnetic polisher, which is ideal for polishing large volumes of such intricate jewellery. THE JRM2 Foredom H30 Handpiece and Foredom SR Flex shaft with foot control. www.foredom.net © 2018 Blackstone Industries, LLC. All rights reserved
Transcript of THE JRM2 - FOREDOM

© 2018 Pepe Tools. www.pepetools.com
2
The Pepe tools JRM2 is the latest evolution of the famous Pepe tools Jump Ring Maker. This innovative solution enables you to produce hundreds of jump rings, accurately and quickly, but most importantly- safely. The JRM2 isn’t just a tool, it’s a collection of tools which allow you to wind coils and cut jump rings.
The JRM2 comes complete with a full set of 20 mandrels ranging from 2.5mm - 12mm, A keyless winding chuck with handle, a coil holder, and the special saw attachment designed for use with a Foredom flex shaft allowing you to saw ring precisely in complete safety.
You will also need a Flex shaft to power the saw. Pepe recommends the Foredom SR or TX Flex shaft with foot control and the H30 Handpiece. This provides the power and control for the sawing attachment.
The JRM2 has been designed for Jewellers, hobbyists and crafters. It is intended for silver, gold, copper, aluminium and other non-ferrous metals in thin wire gauges, as used by jewellers. The fine blades are designed to give precise clean cuts when used as described. However the blades are not intended for heavy gauge steel wire or other tough materials.
Top Tip…
For speed and ease of use, it is highly useful to have a hand piece solely dedicated just for your jump ring maker. This way it can remain permanently attached in the handpiece holder and simply snapped on and off the flex shaft, when required. This avoids repeated setup and adjustment and means that you are always ready to go in an instant.
If you wish to polish your jump rings or indeed your finished jewellery, then check out the Pepetools Polimag magnetic polisher, which is ideal for polishing large volumes of such intricate jewellery.
THE JRM2
Foredom H30 Handpiece and Foredom SR Flex shaft with foot control. www.foredom.net © 2018 Blackstone Industries, LLC. All rights reserved

© 2018 Pepe Tools. www.pepetools.com
3
• Coil Winder with Keyless Chuck • Coil Holder with Spring Loaded Top & Stainless Steel Knurl Knobs • Hand Piece Holder - Designed to fit a Foredom #30 Hand piece • Stainless Steel Blade Arbour • 20 Jump Ring Mandrels (2.5mm - 12mm) (#307.200) & Aluminium Machined Mandrel Base • Aluminium Organizing Base - Powder-coated Black • Pepe Lube (#307.50) • Pepetools 1 1/4” Blade (#307.20) • Allen Wrench for Hand Piece Holder set screws • Pepetools 1 1/2” Blade (#307.40) Optional
THE JRM II
Coil Winder
Mandrels
Coil Holder
Handpiece Holder
Saw / Arbour
Storage Base

© 2018 Pepe Tools. www.pepetools.com
4
Begin by securing the coil winder to you bench by using screws or bolts through the holes at the base into a sturdy bench top. Alternatively you can screw it to a wooden board which in turn can be clamped to your bench whenever needed, without any damage to your bench top. Mount the chuck horizontally with the handle to your right or left as per your own preference.
It is vital that the coil holder is also firmly secured by removing the cover and using a screw at each end, either directly to your bench or to a board and clamped as above. This should be at 90 degrees to the edge of your bench, with the small metal stop (inside the coil holder) to the front, nearest to you. Note you will cut your coils towards yourself. Ensure there is ample room all-round the coil holder to move the flex shaft and saw attachment along the length of the coil holder without any obstruction.
Fitting the blade. The precision of the JRM2 comes from the super thin saw blades used to create a perfect cut. These blades a very thin and very sharp, so extreme caution should be observed when handling the blades. Begin by selecting your chosen blade. Remember that you are only cutting through the top of the jump ring, so with small coils, beware of cutting them completely in half if using the larger blades. If in doubt, fit the smaller blade first and change the blade as necessary. Attach the blade onto the mandrel, as shown, noting the notch in the blade and small locating pin in the arbour. Screw both sides together firmly. The arbour can be mounted for right or left handed use, but in either case the blade remains the same. Ensure that the bottom of the blade cuts towards you.
Power for cutting is provided by a Foredom Flex shaft. ither an SR or TX model, with foot pedal control. These high quality flex shafts offer the power needed to cut through the coils with minimal effort. The JRM2 is designed for use with the H30 chuck Handpiece.
SET UP
Flex shaft at the right Note the bottom edge of the saw is cutting towards you
Arbour Screw
© 2018 Pepe Tools. www.pepetools.com
5
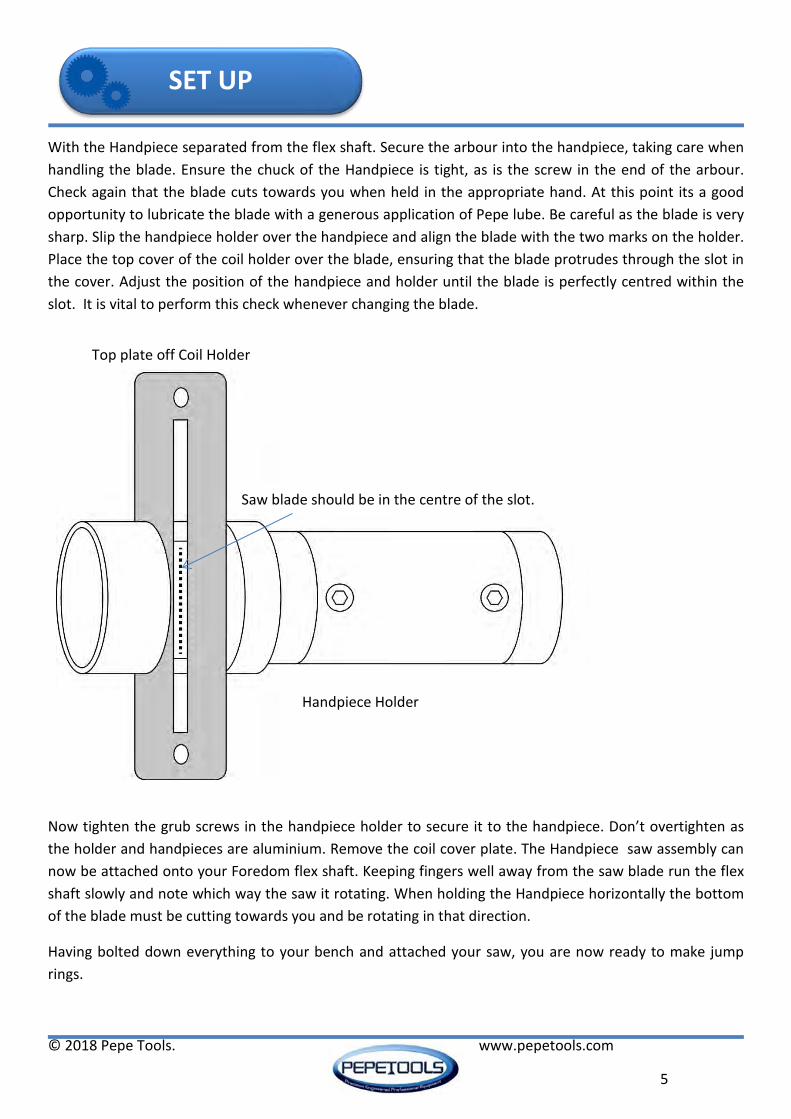
With the Handpiece separated from the flex shaft. Secure the arbour into the handpiece, taking care when handling the blade. Ensure the chuck of the Handpiece is tight, as is the screw in the end of the arbour. Check again that the blade cuts towards you when held in the appropriate hand. At this point its a good opportunity to lubricate the blade with a generous application of Pepe lube. Be careful as the blade is very sharp. Slip the handpiece holder over the handpiece and align the blade with the two marks on the holder. Place the top cover of the coil holder over the blade, ensuring that the blade protrudes through the slot in the cover. Adjust the position of the handpiece and holder until the blade is perfectly centred within the slot. It is vital to perform this check whenever changing the blade.
Now tighten the grub screws in the handpiece holder to secure it to the handpiece. Don’t overtighten as the holder and handpieces are aluminium. Remove the coil cover plate. The Handpiece saw assembly can now be attached onto your Foredom flex shaft. Keeping fingers well away from the saw blade run the flex shaft slowly and note which way the saw it rotating. When holding the Handpiece horizontally the bottom of the blade must be cutting towards you and be rotating in that direction.
Having bolted down everything to your bench and attached your saw, you are now ready to make jump rings.
Top plate off Coil Holder
Saw blade should be in the centre of the slot.
Handpiece Holder
SET UP

© 2018 Pepe Tools. www.pepetools.com
6
The first stage in making jump rings is to wind your wire into tight coils.
Begin by selecting the mandrel you want to use. Note that the mandrel corresponds to the inside diameter of your jump rings. Place the mandrel into the jaws of your winding chuck and tighten firmly by twisting the chuck with both hands in opposite directions (no key required). You will note that the larger mandrels have holes drilled though them. The holes can be used to start the coil, by inserting the end of the wire into the hole and winding a couple of turns.
For smaller mandrels, without holes a great tip is to bend a few mm at the end of the wire and insert it between the jaws of the chuck alongside the mandrel. Again wind a couple times carefully to get the coil started. It is important to ensure that in all cases the mandrel is held firmly and straight in the chuck so that it rotates properly. With the mandrel horizontal, wind the coil so that the uppermost part rotates away from you. As you rotate the handle, use your other hand to apply a light downward pull on the wire to maintain tension. Each turn of the handle is effectively one jump ring. As you wind, keep the wire pulled slightly towards the handle and try to avoid gaps in the coil. Your coil should be tight and uniform. Stop your coil a little way short of the end of the mandrel. Your coils must not exceed 3” in length. When you have the required length, snip the end of the wire as close as possible to the coil. Slip the coil off the mandrel. If using the larger mandrels with the holes you will need to cut the end of the coil where it enters the hole. Once removed, use flush cutters to clean up the ends of the coil.
Making Coils
Max coil length 3”

© 2018 Pepe Tools. www.pepetools.com
7
The coils are cut with a high speed rotating saw blade which is powered by the Foredom flex shaft. Although the blade is completely enclosed with the tool, it is still a sharp power tool and so common sense and safe working practice should be observed at all times. Safety glasses should be worn, whilst using any power tools.
Once you have wound the required number of coils, you are now ready to cut them into jump rings. Ensure that you coil holders firmly attached to you bench and is necessary remove the cover plate. Insert you coil into the holder ensuring that it butts up against the metal stop, which should be nearest to you. Ensure the coil does not extend past the mark, as space is required at the end to insert the blade .At this stage you may wire a little Pepe lube along the top edge of the coil. Replace the cover and screw down finger tight only; there is no need to overtighten. Ensure the cover is level.
Cutting Rings
Max length 3” note line
Ensure holder is firmly secures using the two screw holes. (Use countersunk screws)
Butt coil up again the stop, which should be towards you at the front

© 2018 Pepe Tools. www.pepetools.com
8
Attach the handpiece and holder assembly to you flex shaft and slot if over the coil holder such that the saw fits into the slot furthest from you. Ensure the flex shaft is free to move, and whilst firmly holding the handpiece cover, start the flex shaft (with foot pedal). Allow the saw to start rotating for a second then pull is steadily towards you, whilst keeping as firm grip on the handpiece holder and sliding the holder along the top of the coil holder. You should feel and hear the saw cutting. If at any point you feel the saw is not cutting properly, stop immediately before carefully removing the saw & handpiece from the coil. Once the saw reaches the end closest to you, stop the flex shaft and ensure the saw has fully stopped before lifting it vertically out of the slot, being careful not to twist or shear the blade. For safety, turn off your flex shaft.
Unscrew the thumb screws and remove the coil cover. You should find that all your rings have been cut. Remove the rings (tip - use a piece of scrap wire and thread it through the cut rings).
Pull forwards slowly, allowing the saw to cut.
Cutting Rings

© 2018 Pepe Tools. www.pepetools.com
9
Pepetools works closely with experts around the world, gathering feedback and ideas. Together they help us create real working tools with the quality and features you need. Dave Wilson is a jewellery designer and goldsmith, with many years’ experience specialising in Celtic knotwork and chain mail designs. Dave is also the hugely popular presenter of his Celtic Dreams YouTube channel with millions of views. His designs often require large amounts of jump rings in very specific sizes and gauges. Check out Dave’s channel for a full demo of the JRM2 and various ‘how to’ projects.
http://www.celticdreams.co.uk/
https://www.youtube.com/celticdreamscouk
Byzantine chain mail variations by Dave Wilson, in sterling silver. created using the JRM2
Pro Design

© 2018 Pepe Tools. www.pepetools.com
10
Dave’s top Tips:-
“Due to the nature of the designs I make, I need a lot of jump rings. I can’t always buy the exact size and gauge I require. However, the JRM2 allows me to make the exact rings I need in whatever volume I require. All done within a matter of minutes, quickly and safely. This ability to make my own rings on demand means more flexibility in my designs, coupled with huge cost savings over pre made rings. Plus, no waiting around for the next delivery to come.” Dave Wilson. – Celticdreas.co.uk
Stick it down. Whilst you may apply a little Pepe lube to the top of the coil before sawing, it is vital that coil is held firmly in place. Therefore, ensure the unit is always clean and avoid excessive Pepe lube, as this can cause the rings to slip once cut and fly out or jam the saw blade. So don’t use too much. Place a strip of double sided tape into the bottom of the coil holder under the coil. This helps keep your rings in place when being cut. I also place a sticky paper label (or masking tape) over the top of the coil whilst in the holder to “totally” secure it in the holder before ‘lightly’ securing the cover plate.
Not too fast. Especially when working with precious metals, there is no need to run the saw at very high speeds, this can cause excessive friction and heat. ‘Pulse’ the saw by pumping the foot pedal up and down. Cut slowly and steadily. Don’t try to force it, let the saw do the work.
Tumble. The JRM2 leaves a great flush finish on your jump rings, but there may be tiny burrs. A quick ½ hour polish, in a tumbler with some steel pins, will remove any burrs, lubricant and polish will also the rings. This will also help to toughen your rings a little. Check out Pepetools Polimag, magnetic polisher which is ideal for this job.
Anneal. If making chain mail, then you know that the dimensions of your jump rings can be highly critical. You may notice that when you release your grip after you’ve wound a coil, the wire can sometimes spring back a little. This can mean that the final rings have a fractionally larger inner diameter than the mandrel. This is normal. Hard (non annealed) wire, which you may have drawn through a plate or your mill, will spring back much more. So to reduce this spring back, ensure you always anneal your wire first, or purchase pre annealed “soft” wire.
Label your rings. You’ve found a box of left over jump rings. How big are they? What Aspect ratio? You will have to use a caliper to measure the wire and then test out different mandrels to get the one that fits. It’s much easier to just label them in the first place. Note the wire gauge, mandrel (or what you used as one), aspect ratio, outer diameter, material and the project they were made for. I also note the order code for the wire used. Simple tip, but you’ll thank me later.
Thread Lock. In order to prevent the arbour from coming loose, add a drop of thread lock adhesive (or super glue) to the arbour screw. Just a drop on the screw head, to prevent it unscrewing.
Wrap Paper around your mandrels to adjust the diameter by very precise amounts.
Top Tips
© 2018 Pepe Tools. www.pepetools.com
11
Remember that the Pepetools Jump Ring maker II is designed for use by jewellers and crafters, using precious metals and non-ferrous. The fine blades are not intended for use with steel wire or similar hard materials.
Heat and smoke coming from the coil holder when sawing.
• Heat is caused by friction. Reduce your speed and ensure the blade is lubricated. It may be that the blade is getting blunt or is not cutting in the right direction.
• It may also be that the material you are using is too hard • Smoke is caused by oil or lube burning off with friction. Avoid too much lubrication.
Not cutting
• Used blade - Check the blade. Use a loupe and check for broken teeth, or blunt ones. If so, replace the bade.
• New blade. Check that the blade is the correct way round, with the saw teeth cutting in the right direction towards the coil.
• Ensure the flex shaft is rotating in the correct direction. (forward for right handed use)
Rings flying out
• Avoid overtightening the coil holder • See the tip about using double sided tape and sticky labels over the coil to keep the rings in place.
Rings not cutting through properly
• Swap the blade for the larger dimeter blade. Remember to disconnect the saw from the Flex shaft. when changed, re align the new blade as before.
Rings cut through both sides.
• The saw is too big, when using small coils and fine gauges the blade is cutting right through both sides of the coil. Swap for a smaller diameter blade.
If you have any concerns or questions, just get in touch.
…..We are here to help.
Troubleshooting

© 2018 Pepe Tools. www.pepetools.com
12
Pepetools spend a great deal of time and money designing, researching and prototyping tools prior to releasing them to you, the user. We are constantly upgrading and refining our range in line with suggestions and feedback from professionals around the world. They say that imitation is a form of flattery. This may be true, but unfortunately there are many imitators who try to copy Pepe products with cheaply made imitations and inferior quality products.
Check out our website to find your nearest authorised stockist. If you have any doubt about the authenticity of a product, just get in touch.
Don’t gamble with your safety or your money. Always purchase your tools from a reputable dealer and insist on genuine Pepe tools products proudly made, to the highest standards right here in the USA.
Quality

© 2018 Pepe Tools. www.pepetools.com
13
Whatever social media platform you use, Pepe Tools are right there. Follow us for the latest updates, news, and information on all your favourite Pepe products. So check us out and see what’s new. Alternatively, you can call us, or simply write. However you get in touch, we look forward to hearing from you. Kind regards. Pepe tools USA.
Contacts
Pepetools - International Headquarters 7601 S.W. 34th Street Oklahoma City, OK 73179 USA
Phone: 405-745-4054 Fax: 405-745-4335
E-mail: [email protected]
Check out Pepe’s YouTube channel for projects, demos, tips, and reviews. Featuring the best jewellers from around the world, sharing their knowledge with you.
Find us on Facebook. Get in touch, chat, share ideas, and see what’s new.
https://www.facebook.com/PepeTools/
The Pepetools Website with our full product range, info on trade shows, dealer locator and much more.
http://pepetools.com/
Follow our blog with up to the minute news and info. https://pepetools.wordpress.com/
Follow us on Twitter.
https://twitter.com/Pepetools_USA