The Jin Shin Jyutsu Finger Mudras
23
The Jin Shin Jyutsu finger mudras August 27, 2014 Jan 0 comment The Jin Shin Jyutsu practice of holding the fingers is not only quite powerful, but holds a special place in the history of Jin Shin Jyutsu. As I’ve described before (What Is Jin Shin Jyutsu? ), Master Jiro Murai was a Japanese healer and philosopher who rediscovered the ancient healing practice of Jin Shin Jyutsu in the early 20th century. He was led to this practice when he suffered from health problems. As a young man, his behavior was often reckless and overindulgent. He not only entered eating and drinking contents that involved consuming immense quantities of food and drink, but he would win them! By the time he was 26, he became seriously ill. Medical doctors considered his condition incurable and terminal. Facing this serious diagnosis, Murai asked to be left alone in a mountain cabin that belonged to his family. He was carried there on a stretcher. He wanted to be left in solitude for seven days and told his family to return on the eighth day. As he meditated and passed in and out of consciousness during that week, he had visions of spiritual masters using hand mudras. He began to practice these mudras on himself. On the seventh day he underwent an intense healing experience, passing from extreme cold to extreme heat. 1
-
Upload
marianaluca -
Category
Documents
-
view
458 -
download
41
description
The Jin Shin Jyutsu Finger Mudras
Transcript of The Jin Shin Jyutsu Finger Mudras
The Jin Shin Jyutsu finger mudrasAugust 27, 2014 Jan 0 comment
The Jin Shin Jyutsu practice of holding the fingers is not only quite powerful, but holds a special place in the history of Jin Shin Jyutsu. As I’ve described before (What Is Jin Shin Jyutsu?), Master Jiro Murai was a Japanese healer and philosopher who rediscovered the ancient healing practice of Jin Shin Jyutsu in the early 20th century. He was led to this practice when he suffered from health problems. As a young man, his behavior was often reckless and overindulgent. He not only entered eating and drinking contents that involved consuming immense quantities of food and drink, but he would win them! By the time he was 26, he became seriously ill. Medical doctors considered his condition incurable and terminal.Facing this serious diagnosis, Murai asked to be left alone in a mountain cabin that belonged to his family. He was carried there on a stretcher. He wanted to be left in solitude for seven days and told his family to return on the eighth day.As he meditated and passed in and out of consciousness during that week, he had visions of spiritual masters using hand mudras. He began to practice these mudras on himself. On the seventh day he underwent an intense healing experience, passing from extreme cold to extreme heat.
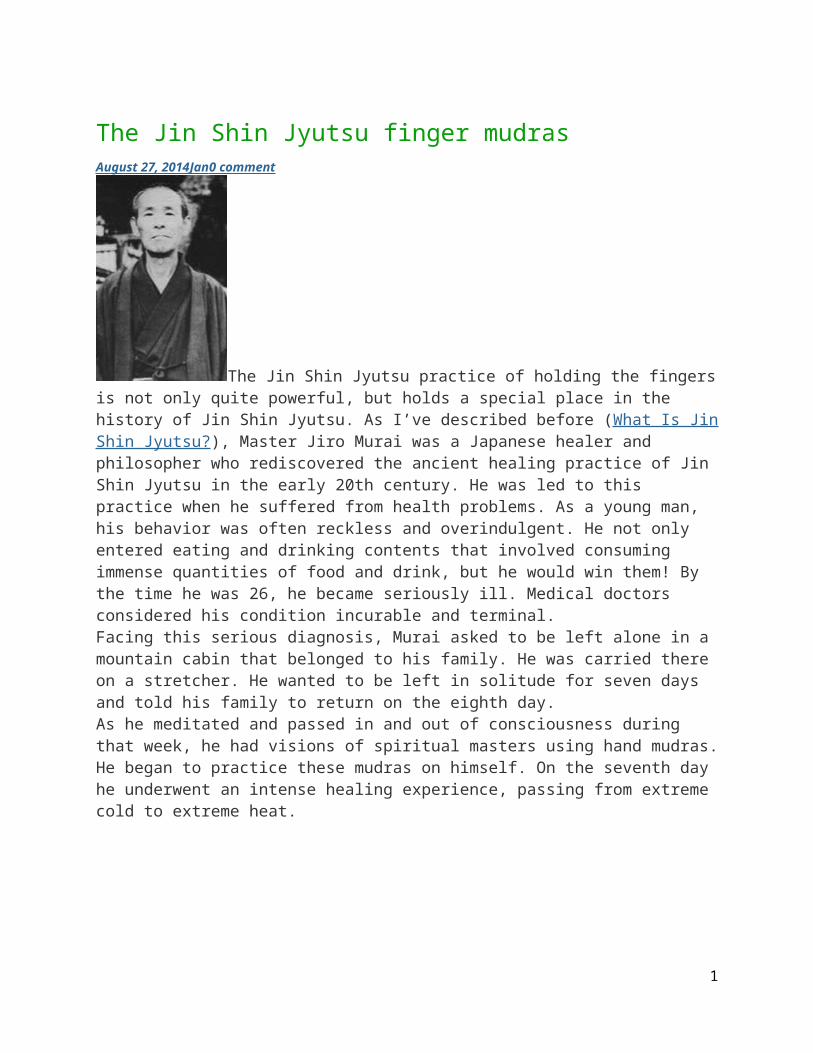
Mary Burmeister, who studied with Master Murai and brought his teachings from Japan to the rest of the world, describes this experience as follows:
1
Each day passed on to the next, becoming conscious and unconscious, with his physical body experiencing loss of heat each day. Then on the seventh day he experienced a feeling of being lifted out of the deep-freeze and thrown into a furnace of fire. When this tremendous heat subsided, he felt no more discomforts. It was like after the passing of a terrible storm. The quiet, the calm, the peace encompassed his whole being. To his amazement and disbelief, he was completely healed.
In response to his healing experience, Master Murai vowed to devote his life to discovering the connection between the hand mudras and his dramatic recovery. He did precisely that and, as a result, we have the healing art of Jin Shin Jyutsu.
How to hold the finger mudras. Their benefits and usesIn the diagrams, you can distinguish between the back of the hand and the palm side of the hand by the fingernails: if you can see fingernails, that’s the back; if you can’t, that’s the palm.
Remember to keep your hands, arms, and shoulders as relaxed as possible while holding the finger mudras.
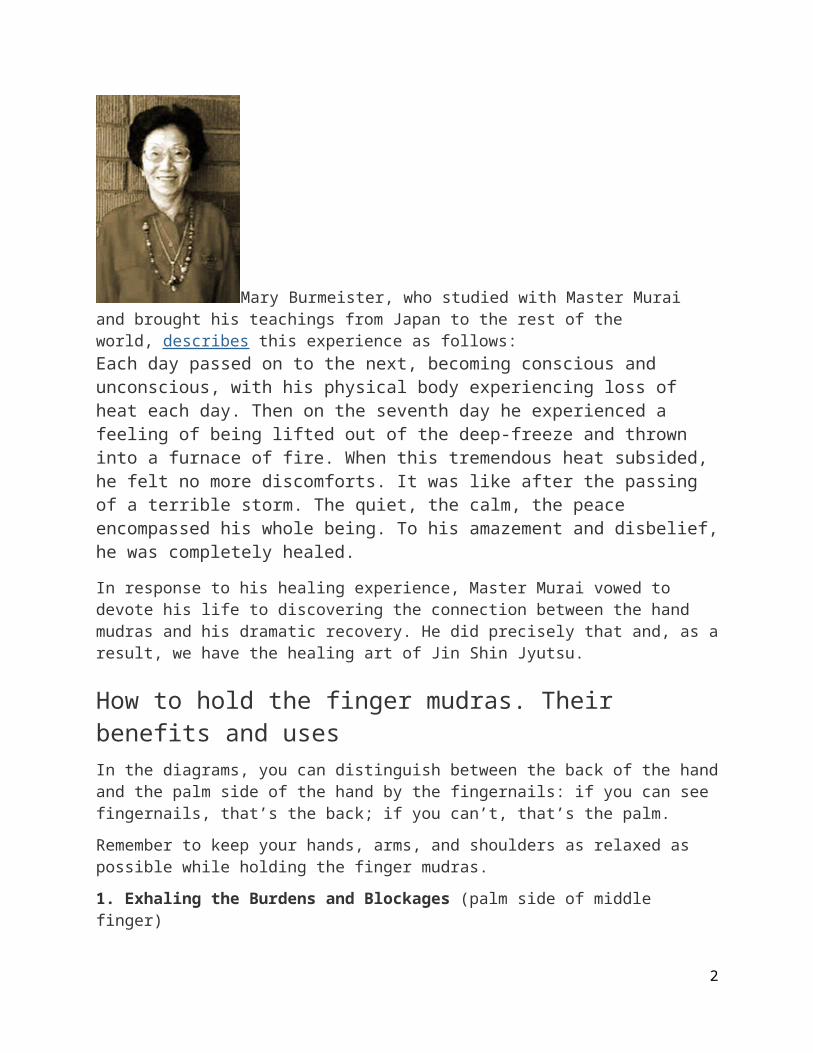
1. Exhaling the Burdens and Blockages (palm side of middle finger)
2
Lightly place the whole length of the palm side of your right thumb along the entire length of the palm side of your left middle finger. Wrap the rest of your right fingers around the left middle finger. (Reverse for right middle finger.)
Benefits: Releases generalized tension and stress from head to toe. Helps the exhale so we can empty ourselves of the causes of harmful stagnation and blockages of energy.Use for: Can’t see too well. Difficult to exhale. Frustrated. Tired all the time. Trouble making decisions. Procrastinate.2. Inhaling the Abundance (back of middle finger)
3
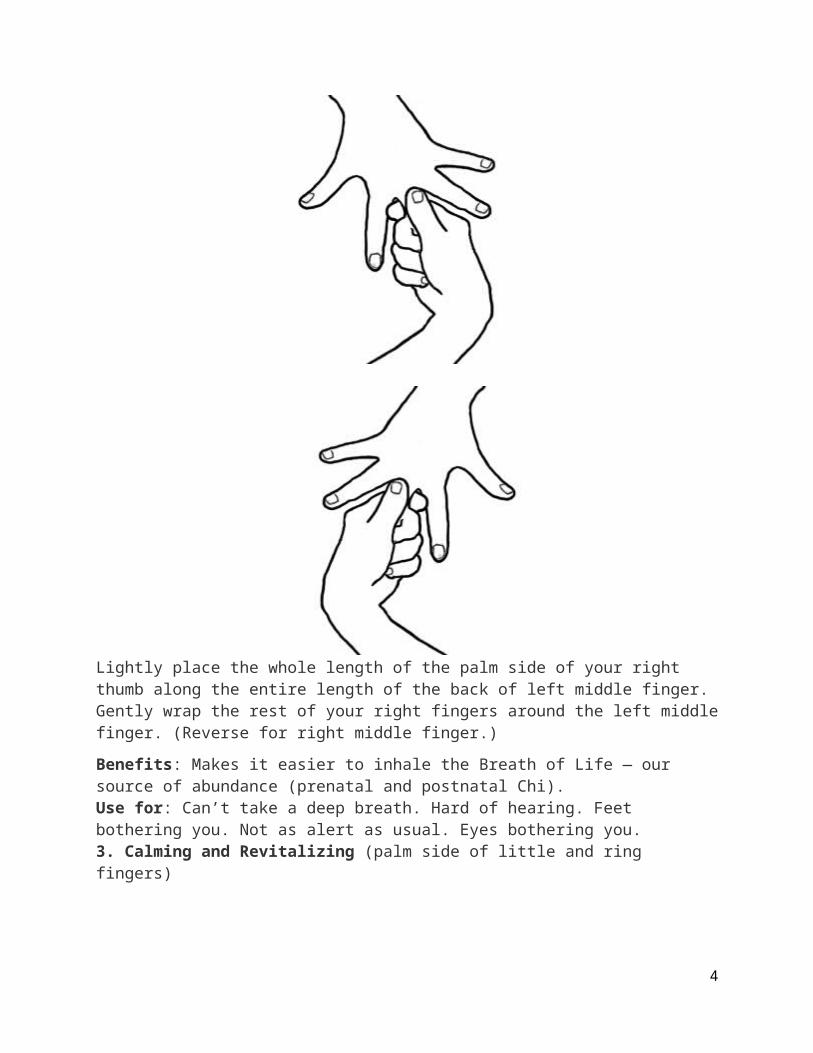
Lightly place the whole length of the palm side of your right thumb along the entire length of the back of left middle finger. Gently wrap the rest of your right fingers around the left middle finger. (Reverse for right middle finger.)
Benefits: Makes it easier to inhale the Breath of Life — our source of abundance (prenatal and postnatal Chi).Use for: Can’t take a deep breath. Hard of hearing. Feet bothering you. Not as alert as usual. Eyes bothering you.3. Calming and Revitalizing (palm side of little and ring fingers)
4
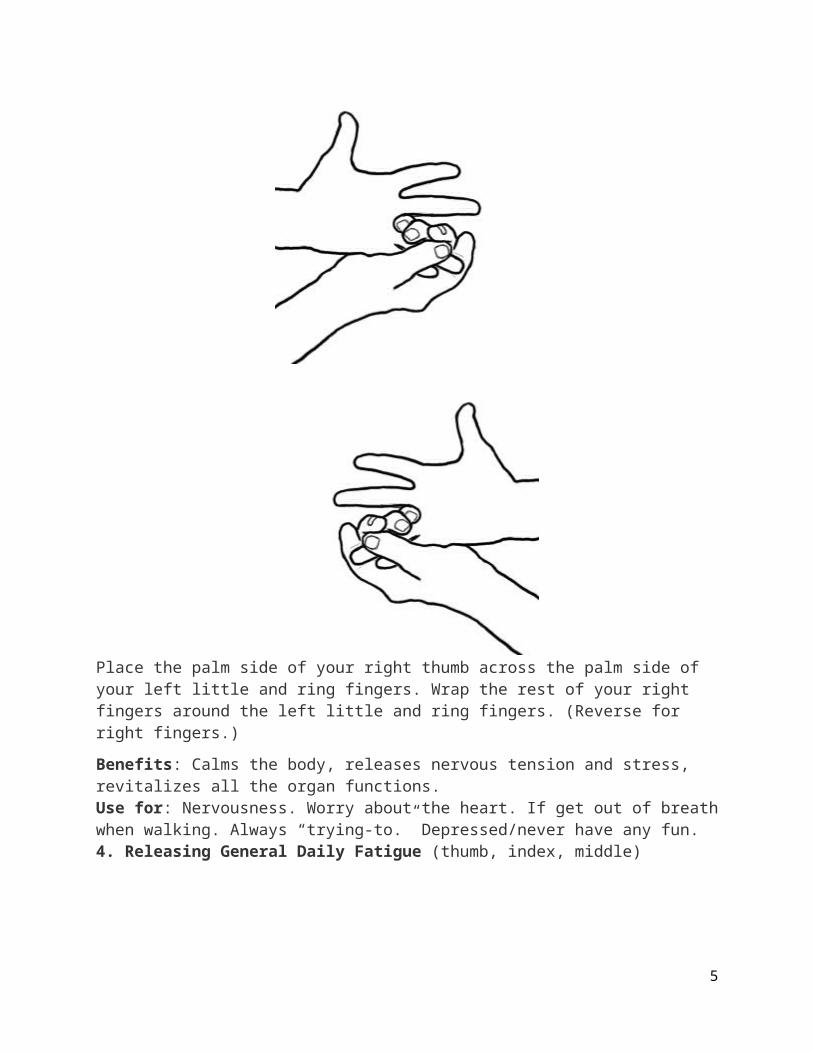
Place the palm side of your right thumb across the palm side of your left little and ring fingers. Wrap the rest of your right fingers around the left little and ring fingers. (Reverse for right fingers.)
Benefits: Calms the body, releases nervous tension and stress, revitalizes all the organ functions.Use for: Nervousness. Worry about the heart. If get out of breath when walking. Always “trying-to.” Depressed/never have any fun.4. Releasing General Daily Fatigue (thumb, index, middle)
5
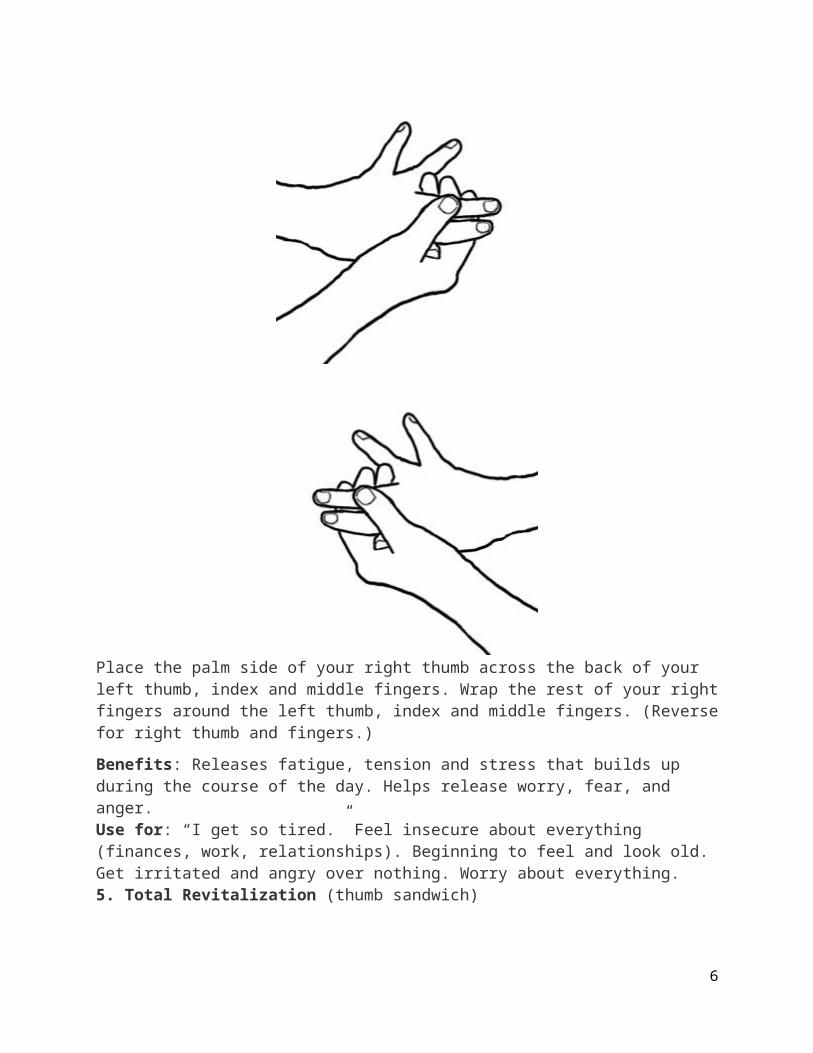
Place the palm side of your right thumb across the back of your left thumb, index and middle fingers. Wrap the rest of your right fingers around the left thumb, index and middle fingers. (Reverse for right thumb and fingers.)
Benefits: Releases fatigue, tension and stress that builds up during the course of the day. Helps release worry, fear, and anger.Use for: “I get so tired.” Feel insecure about everything (finances, work, relationships). Beginning to feel and look old. Get irritated and angry over nothing. Worry about everything.5. Total Revitalization (thumb sandwich)
6
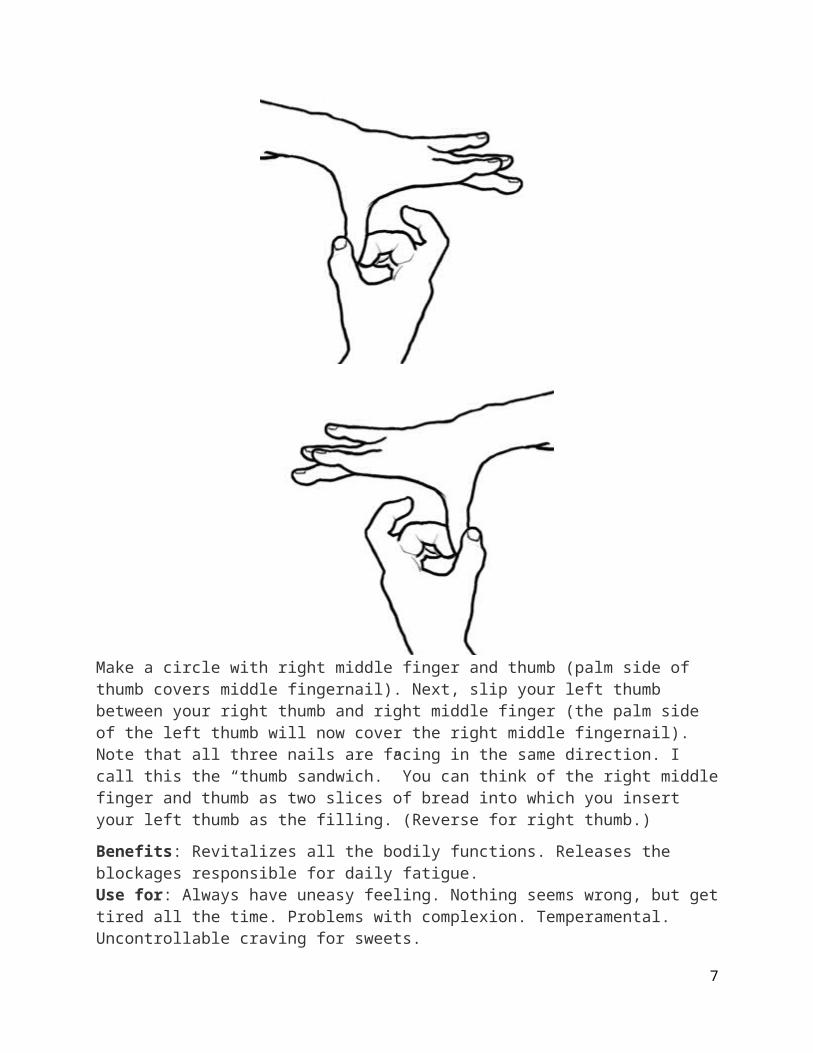
Make a circle with right middle finger and thumb (palm side of thumb covers middle fingernail). Next, slip your left thumb between your right thumb and right middle finger (the palm side of the left thumb will now cover the right middle fingernail). Note that all three nails are facing in the same direction. I call this the “thumb sandwich.” You can think of the right middle finger and thumb as two slices of bread into which you insert your left thumb as the filling. (Reverse for right thumb.)
Benefits: Revitalizes all the bodily functions. Releases the blockages responsible for daily fatigue.Use for: Always have uneasy feeling. Nothing seems wrong, but get tired all the time. Problems with complexion. Temperamental. Uncontrollable craving for sweets.6. Breathing Easily (ring fingernail to thumb)
Cover your ring fingernails with the palm side of your thumb on both the left and right hands.
7

Benefits: Strengthens the respiratory function. Helps balance ear projects. Use while walking, jogging, exercising — helps you breathe more easily. Use when flying, high altitudes (for the ears).Use for: Bad skin conditions. Feel rejected and unloved and tear up easily. Feel clumsy and all thumbs. Lost common sense. Ears bothering you.7. Exhaling Dirt, Dust, and Greasy Grime (steeple with middle fingers)
Interlock your fingers. Extend your left and right middle fingers, and adjust your hands so that the palm sides of the middle fingers are touching each other.
Benefits: Releases general daily tension and stress from head, lungs, digestive functions, abdomen, and legs. Strengthens the exhale.Use for: Harmonizing the total mind/body.8. Inhaling the Purified Breath of Life (touch middle fingernails)
Touch left and right middle fingernails together.
Benefits: Releases tension in the back, promotes overall feeling of well being. Strengthens ability to inhale and receive the purified breath of life.Use for: Harmonizing the total mind/body.
8

How to use the finger mudrasYou may find something listed under the benefits and uses that attracts you to a particular mudra. The “thumb sandwich,” for example, is popular for reducing food cravings. You may hold one of the finger mudras (on one or both hands for mudras one through five) at any time during the day for any length of time.
Mary Burmeister taught that if you find one of the finger mudras more comfortable than the others, that’s an indication that your body needs to hold that particular mudra. Continue to favor this mudra until you find that a different one is the most comfortable.
The complete practice of holding the finger mudras includes holding all eight finger positions. As you hold each mudra position, take two slow, relaxed breaths, then continue to the next position. When you finish, there is one more thing to do. The mudras are meant to be practiced for a total of 36 breaths. The eight mudra positions take 26 breaths. So when you finish the eighth mudra, remain in a relaxed, meditative state as you take ten more breaths.
Mary Burmeister recommended that you fold your two hands together as you do the final 10 breaths. But she also said: “There are no rules and regulations.” I like to touch each finger, one for each of the ten breaths. That way I don’t have to use my mind to count, but can remain in a kinesthetic (bodily) state of mind.
Remembering the finger mudras sequence and a videoIt may take you a little while to remember the sequence of finger mudras. As I mentioned in connection with the extended sequence of holding the fingers, think of learning to hold the sequence of finger mudras the way you would learn a sequence of dance steps. It’s something you learn with your body more than your mind. Once you’ve learned the mudras, you’ll find that your ability to remember the sequence is quite satisfying — for me it feels like remembering how to play a piece of piano music from memory.Everyone learns differently, however. Some of us are more oriented towards the visual or the auditory than the kinesthetic. Here’s a video that you may find helpful. It’s by Mea Hutchinson, a Jin Shin Jyutsu teacher in British Columbia. The first 2:22 minutes are an introduction to the finger mudras. Once you’re familiar with the introduction, you can watch the rest of the video repeatedly to help you remember the sequence.
Related posts & pages:What Is Jin Shin JyutsuJin Shin Jyutsu ResourcesCreating Your Own Acupressure Self-Help Practice
9
The Jin Shin Jyutsu practice of holding the fingersThe Jin Shin Jyutsu extended sequence for holding the fingers
What Is Jin Shin Jyutsu?
Officially known as Jin Shin Jyutsu® Physio-Philosophy, this practice is a disarmingly simple style of acupressure. It works with a set of 26 points (called Safety Energy Locks or SELs) along energy pathways. When a pathway becomes blocked, energy stagnates. This initially affects the local area of stagnation, but has the potential to create imbalance along the entire pathway. The 26 Energy Locks are the locations on the body where energy tends to become stuck. (Acupressurists and acupuncturists, by comparison, learn over 300 points.)
A Jin Shin Jyutsu practitioner uses both hands (referred to as “jumper cables”) to hold a combination of SELs. The very simplicity and gentleness of the process allow clients to relax and receive the work. As the SELs release and balance is restored, the client experiences physical, mental, and spiritual harmony.
Jin Shin Jyutsu is actually an ancient healing practice. Master Jiro Murai, a Japanese healer and philosopher, rediscovered it in the early 20th century. Murai was led to Jin Shin Jyutsu in response to his own health problems. In his youth he was known for his reckless, overindulgent nature, entering (and winning!) contests that involved consuming immense quantities of food and drink. At the age of 26, he became seriously ill and doctors diagnosed his condition as incurable and terminal.
Murai asked to be left alone in his family’s mountain cabin. As he passed in and out of consciousness, he had visions of spiritual masters using hand mudras, which he began to practice on himself. On the seventh day he underwent an intense healing experience. He vowed to devote his life to discovering the connection between the hand mudras and his dramatic recovery. (See The Jin Shin Jyutsu finger mudras.)
10
Murai looked for clues in the Bible and also studied extensively in ancient Chinese, Greek, and Indian texts. He practiced his healing techniques on the homeless in Tokyo, where he developed a reputation as an extraordinary healer. In the story I’ve heard, the brother of Japan’s Emperor (Hirohito) was suffering from an ailment that doctors had been unable to cure. Murai was asked to treat the Emperor’s brother and had great success. In gratitude, the Emperor asked Murai what he would like in return. Murai asked for access to ancient records (the Kojiki) in the Archives of the Imperial Palace. It was these writings that provided information on the origins, philosophy, and techniques of Jin Shin Jyutsu.
According to these records, Jin Shin Jyutsu was widely known in antiquity — before the time of Buddha, Moses, and the Kojiki (712 AD). The practice was handed down orally from generation to generation, but had virtually disappeared by the 20th century. Using all the information he had uncovered, Murai conducted extensive experiments on himself for over 50 years. He found that Jin Shin Jyutsu produced a depth of awareness that went beyond anything described in the ancient texts of Chinese medicine.
Mary Burmeister, a Japanese American, met Murai in Japan in the late 1940’s and became his student. Burmeister’s explanation for the depth and power of Jin Shin Jyutsu is that it affects the attitudes that lie beneath our symptoms, not just the symptoms themselves.
The belief that we can help ourselves through a process of knowing ourselves is integral to Jin Shin Jyutsu. At its heart, the work embodies a life of simplicity, calmness, patience, and self-containment. Practitioners of the work regard Jin Shin Jyutsu not simply as a style of bodywork, but as a philosophy of life. Ultimately it is the philosophy and spirit of the work, not the technique, that attracts clients and practitioners to Jin Shin Jyutsu.
People often learn of Jin Shin Jyutsu by word of mouth, when someone who’s had a positive and dramatic experience of the work recommends it to a friend. It’s often used as a complement to conventional healing methods. One of its great advantages is that one can easily learn simple self-help techniques that supplement sessions from a practitioner.
Mary Burmeister, who returned to the United States in the 1950’s and devoted her life to Jin Shin Jyutsu, did not believe in promoting her work as a business. Although she never advertised her courses or her private practice, she attracted students from around the world and had a waiting list of over a year for private sessions. Today Jin Shin Jyutsu is taught worldwide. An intensive series of sessions from close associates of Mary Burmeister is available in Scottsdale, AZ (see the official Jin Shin Jyutsu site for more information).The translation of Jin Shin Jyutsu is “The Art of the Creator through Compassionate Man.” The Jin Shin Jyutsu Outreach Program sponsors projects offering free Jin Shin Jyutsu sessions for children with “deep needs”
11

and their families, for hospice residents and their families, and free self-help classes for international communities that are isolated, have insufficient medical facilities, or are in financial distress.
The Body Clock Acupressure for Daylight Savings Time and Jet Lag
Jin Shin Jyutsu®: Fingers and Daily Flows
Holding the Fingers Finger Mudras Daily Flows
Resources Books and Videos
Return to Complete Table of ContentsThe Body ClockAcupressure for Daylight Savings Time and Jet LagBody clock and horary points:
3 – 5 AM Lung – LU 8 (one thumb width above inner wrist on thumb side)
5 – 7 AM Large Intestine – LI 1 (base of nail on thumb side of index finger)
7 – 9 AM Stomach – ST 36 (four fingers below knee, one thumb width out from crest of
shin bone)
9 – 11 AM Spleen – SP 3 (foot side of big toe joint, on the edge of the foot)
11 – 1 PM Heart – H 8 (on crease of palm below little finger)
1 – 3 PM Small Intestine – SI 5 (depression on edge of wrist on little finger side)
3 – 5 PM Bladder – BL 66 (toe side of little toe joint, on edge of foot)
5 – 7 PM Kidney – K 10 (tendons at the crease on the inside of knee)
12
7 – 9 PM Pericardium – P 8 (center of palm)
9 – 11 PM Triple Warmer – TW 6 (4 fingers above outer wrist at center)
11 – 1 AM Gall Bladder – GB 41 (move up the foot to where the bones of the fourth and
fifth toes meet, wiggle the toes to find tendon; jump over tendon towards little toe side)
1 – 3 AM Liver – LIV 1 (base of nail on big toe, little toe side of nail)
For daylight savings time, hold the horary point for the new time setting every two
hours.
For jet lag: When you board the plane, set your watch to the time of your destination.
Hold the horary point of the time at your destination every two hours. It’s as if you
pretend you’re already there. You can hold for five minutes every hour or for 2 to 3
minutes every two hours, depending on how serious a problem jet lag is for you.
[back to top]
Jin Shin Jyutsu: Fingers and Daily FLowsHolding the Fingers(I’ve updated this information in a recent post, The Jin Shin Jyutsu practice of holding the fingers.)
The acronym for remembering the attitudes associated with each finger is “Get rid
of Worry FAST.” W is for Worry (thumb), F for Fear (index), A for Anger (middle), S for
Sadness (ring), and T for Trying To (little).
For each attitude, there is a “quickie” hold and a longer sequence. The “quickie” hold
involves holding one finger with the fingers of the other hand. For example, to hold the
left thumb, wrap all four fingers of your right hand around your left thumb. The longer
sequence is a combination of fingers that you hold one after the other. For example, the
longer sequence for Worry is to hold the thumb, then hold the middle finger, then hold
the little finger.
How long should you hold a finger? If you have plenty of time, hold each finger until you
feel a pulse arrive in the finger. If a finger is already pulsing strongly when you first
touch it, hold the finger until the pulse calms down. Another way to hold the fingers is
simply to hold each finger for two or more breaths. You will find this very meditative and
13
relaxing. Holding individual fingers and the finger mudras before falling asleep is an
excellent practice.
The ten fingers are said to regulate 14,400 functions within the body. The different ways
of holding the fingers influence the body on a variety of levels, but they are all effective.
Choose a style that feels most comfortable and satisfying to you.
Worry: The “quickie” is to hold the thumb. The sequence is thumb, middle, little finger.
Additional benefits: for depression, hate, obsession, anxiety, self-protection,
to revitalize physical fatigue, for the back of the head, breathing, and
digestive discomforts.
Fear: The “quickie” is to hold the index finger. The sequence is thumb, index, little
finger.
Additional benefits: for timidity, mental confusion, depression, perfectionism,
criticism, frustration, digestive issues, elimination, wrist, elbow, and upper
arm discomforts.
Anger: The “quickie” is to hold the middle finger. The sequence is little, ring, middle
finger.
Additional benefits: for feeling cowardly, irritable, indecisive, unstable, not
alert, overly emotional, general fatigue, eye issues, forehead discomforts.
Sadness/Grief: The “quickie” is to hold the ring finger. The sequence is thumb,
index, middle, ring finger.
Additional benefits: for negative feelings, common sense, excess mucus,
breathing, ear discomforts.
Trying To/Pretense (cover-up): The “quickie” is to hold the little finger. The
sequence is little, ring finger.
Additional benefits: for “crying on the inside and laughing on the outside,”
feeling insecure, nervous, confused, issues of “why am I here,” calms nerves,
aids bloating.
[back to top]
Finger Mudras(I’ve updated this information in a recent post, The Jin Shin Jyutsu finger mudras.)1. Exhaling the Burdens and Blockages (palm side of middle finger)
Hold palm side of left middle finger lightly with right thumb. Place rest of right fingers on
back of left middle finger. (Reverse for right middle finger.)
14
Releases generalized tension and stress from head to toe. Helps the exhale so we can
empty ourselves of the causes of harmful stagnation and blockages of energy.
Use when: Can’t see too well. Difficult to exhale. Frustrated. Tired all the time. Trouble
making decisions. Procrastinate.
2. Inhaling the Abundance (back of middle finger)
Hold back of left middle finger lightly with right thumb. Place rest of right fingers on palm
side of left middle finger. (Reverse for right middle finger.)
Makes it easier to inhale the Breath of Life — our source of abundance (prenatal and
postnatal Chi).
Use for: Can’t take a deep breath. Hard of hearing. Feet bothering you. Not as alert as
usual. Eyes bothering you.
3. Calming and Revitalizing (palm side of little and ring fingers)
Hold palm side of left little and right fingers with right thumb. Place rest of right fingers
on back of left little and ring fingers. (Reverse for right fingers.)
Calms the body, releases nervous tension & stress, revitalizes all the organ functions.
Use for: Nervousness. Worry about the heart. If get out of breath when walk. Always
“trying-to,” Depressed/never have any fun.
4. Releasing General Daily Fatigue (thumb, index, middle)
Hold back of left thumb, index and middle fingers with right thumb. Place rest of right
fingers on palm side of left thumb, index and middle fingers. (Reverse for right thumb
and fingers.)
Releases fatigue, tension and stress that builds up during the course of the day. Helps
release worry, fear, and anger.
Use for: “I get so tired.” Feel insecure about everything (finances, work, relationships).
Beginning to feel and look old. Get irritated and angry over nothing. Worry about
everything.
5. Total Revitalization (thumb sandwich)
Make a circle with right middle finger and thumb (palm side thumb on middle fingernail).
Next slip left thumb between circle of right thumb and middle finger (left thumb palm
touching right middle fingernail). (Reverse for right thumb.)
Revitalizes all the bodily functions. Releases the blockages responsible for daily fatigue.
15
Use for: Always have uneasy feeling. Nothing seems wrong but get tired all the time.
Problems with complexion. Tempermental. Uncontrollable craving for sweets.
6. Breathing Easily (ring fingernail to thumb)
Touch ring fingernail with palm side of thumb on both the left and right hands.
Strengthens the respiratory function. Helps balance ear projects. Use while walking,
jogging, exercising — helps us breathe more easily. Use when flying, high altitudes (for
the ears).
Use for: Bad skin conditions. Feel rejected and unloved and tear up easily. Feel clumsy
& all thumbs. Lost common sense. Ears bothering you.
7. Exhaling Dirt, Dust, and Greasy Grime (steeple with middle fingers)
Touch palms of left and right middle fingers in folded hands position.
Releases general daily tension and stress from head, lungs, digestive functions,
abdomen, and legs. Strengthens exhale.
8. Inhaling the Purified Breath of Life (touch middle fingernails)
Touch left and right middle fingernails together.
Releases tension in the back, promotes overall feeling of well-being. Strengthens ability
to inhale, and receive the purified breath of life.
[back to top]
Daily FlowsUse these simple daily flows to reduce stress, boost immunity, and revitalize the body.
Main Central Flow
The Main Central flows in oval circuit, going down the face, neck, and sternum, through
the abdomen to the pubic bone. It flows up the spine, over the forehead, and then
makes the circuit again. The Main Central is the primary harmonizing energy flow in the
body and our main source of energy. It will revitalize and restore all the other flows of
the body. It’s especially useful when there is an imbalance on one side of the body.
Right hand on top of head
Left hand between eyebrows
Left hand of tip of nose
Left hand between the breasts
16

Left hand at base of breastbone
Left hand on top of pubic bone
Right hand at base of spine (coccyx)
Left and Right Supervisor Flows
The left and right Supervisor Flows are like two vertical ovals of energy, one on each
side of the body. The left Supervisor Flow “supervises” all the functions on the left side,
and the right Supervisor Flow does the same on the right side. These flows are
especially useful to clear the head, improve breathing, aid digestion, and reduce stress
in the back.
Right side:
Left hand over right shoulder (SEL #3)
Right hand on right “sitting” bone (SEL #25)
Right hand on right hip crease (groin) (SEL #15)
Left side:
Right hand over left shoulder (SEL #3)
Left hand on left “sitting” bone (SEL #25)
Left hand on left hip crease (groin) (SEL #15)
Diagonal Mediator Flows
The Diagonal Mediator Flows start at the left and right shoulders and travel through both
sides of the body, from back to front, side to side, and top to bottom. They end at the
knee on the opposite side of where they started. They harmonize the left and right
Supervisor Flows with each other and with the Main Central Flow, and thus are
extremely important for our overall supply of energy. The Mediator Flows make sure
that all the flows in the body are revitalized by the Main Central and help balance both
sides of the body.
Right side:
Right thumb on right ring fingernail
Left hand over right shoulder (SEL #3)
Bring knees together (SEL #1)
Left side:
Left thumb on left ring fingernail
17
Right hand over left shoulder (SEL #3)
Bring knees together (SEL #1)
Anterior Ascending Energy Flow
This flow is a general revitalizer for the energy that runs up the front of the body. You
can use it to pick up your energy when you’re feeling tired or run down. It’s also a good
flow to calm the nerves and strengthen digestion.
Right side:
Left hand on base of spine
Right hand on right inside ankle (SEL #5)
Right hand on left base of rib cage (SEL #14)
Left hand on right above breast area (SEL #13)
Left hand on left center of collar bone (SEL #22)
Left side:
Right hand on base of spine
Left hand on left inside ankle (SEL #5)
Left hand on right base of rib cage (SEL #14)
Right hand on left above breast area (SEL #13)
Right hand on right center of collar bone (SEL #22)
Anterior Descending Energy Flow
This flow is a general revitalizer for the energy that runs down the front of the body. Use
this flow to relieve worry, mental stress, bloating above the waist, and any weight
projects.
Right side:
Left hand on right cheekbone (SEL #21)
Right hand on right center of collar bone (SEL #22)
Right hand on left base of rib cage (SEL #14)
Right hand on left small of back (SEL #23)
18
Right hand on right base of rib cage (SEL #14)
Right hand on left inner thigh (high SEL #1)
Right hand on outside of left mid shin bone (low SEL #8)
Right hand on left middle toe
Left side:
Right hand on left cheekbone (SEL #21)
Left hand on left center of collar bone (SEL #22)
Left hand on right base of rib cage (SEL #14)
Left hand on right small of back (SEL #23)
Left hand on left base of rib cage (SEL #14)
Left hand on right inner thigh (high SEL #1)
Left hand on outside right mid shin bone (low SEL #8)
Left hand on right middle toe
Posterior Descending Energy Flow
This flow is a general revitalizer for the energy that runs down the back of the body. Use
this flow for headaches, back stress, leg discomforts, and elimination projects.
Right side:
Left hand on right side of neck (SEL #12)
Right hand on coccyx
Right hand on right center back of knee
Right hand on right outside ankle (SEL #16)
Right hand on right little toe
Left side:
Right hand on left side of neck (SEL #12)
Left hand on coccyx
Left hand on left center back of knee
Left hand on left outside ankle (SEL #16)
Left hand on left little toe
19
[back to top]
Resources
Recommended Books and Videos
Click on a title for a link to Amazon, where you’ll find a description and pricing information.
The Healer Within, Using Traditional Chinese Techniques To Release Your Body’s Own Medicine by Roger Jahnke
Qigong for Beginners, Eight Easy Movements for Vibrant Health by Stanley D. Wilson
The Touch of Healing, Energizing Body, Mind, and Spirit with the Art of Jin Shin Jyutsu by Alice Burmeister Acupressure’s Potent Points, A guide to Self-Care for Common Ailments by
Michael Reed Gach
The Trigger Point Therapy Workbook, Your Self-Treatment Guide for Pain Relief by Clair Davies
Relax with Self-Therap/Ease, A Simple Illustrated Course by Bonnie Pendleton and Betty Mehling
Medical Qigong for Treating Breast Disease by Jerry Alan Johnson Using the Thera Cane® (video) by Dan Hennessey (free rental available at Kaiser
Permanente Health Education Center)[back to top]
20