The hydraulic system of the Citroën DS explained. hydraulic system of the Citroën DS explained....
47
The hydraulic system of the Citroën DS explained. Adapted & edited by Charles Vyse from the original brief: "Citroën D Models - Hydraulic Course Notes" . ‘Snoopy’ on tour in the Scottish Highlands, May 2002.
Transcript of The hydraulic system of the Citroën DS explained. hydraulic system of the Citroën DS explained....

The hydraulic system of the Citroën DS explained.
Adapted & edited by Charles Vyse
from the original brief: "Citroën D Models - Hydraulic Course Notes" .
‘Snoopy’ on tour in the Scottish Highlands, May 2002.

The hydraulic system of the Citroën DS explained.
Adapted & edited by Charles Vyse
from the original brief: "Citroën D Models - Hydraulic Course Notes" .
CONTENTS
Page
1......................................................................... Overview
2......................................................................... Hydraulic Reservoir
3......................................................................... Repair Practice
6......................................................................... General Layouts
8......................................................................... Braking Systems
13....................................................................... Clutch & Gear Change
24....................................................................... Centrifugal Regulator
26........................................................................ Steering
29........................................................................ Suspension
31........................................................................ Height Correction
34........................................................................ High Pressure Pump
35......................................................................... Accumulator
37......................................................................... Pressure Regulator
41......................................................................... Regulation of Pressure
‘Snoopy’, the author’s 1966 DS 21, coming back together after a lengthy restoration.

The hydraulic system of a Citroën DS 21 explainedAdapted & edited by Charles Vyse
from the original brief: "Citroën D Models - Hydraulic Course Notes" .
Overview
The DS hydraulic system by 1967 had been developed and refined into an extremely
efficient and reliable system. In service, the main problems that will be encountered are likely to
be fluid leaks and low pressure spheres. The 6 spheres to be found on this model (4 suspension, 1
accumulator, 1 brake) should be removed and repressurised with Nitrogen every 3 years
irrespective of mileage covered. It is also a good idea to check the synthetic rubber diaphragms
within the spheres. At the same time as sphere repressurising, the fine filter within the hydraulic
reservoir should be removed and cleaned in petrol and the LHM fluid changed.
Fluid leaks, other than the obvious; such as a rusted or burst pipe, will almost always be
caused by a perished or split rubber gaiter on the low pressure return side. Pipe connections on
the high pressure side are designed to be self sealing as pressure builds. Whenever a high
pressure pipe connection is remade, always replace the rubber seal and tighten the gland nut with
moderate force only. The fluid used in the system is LHM, which is essentially a light green
mineral oil of SAE 20 viscosity. Throughout the whole hydraulic system, all the rams and valves
are designed to leak under pressure. This leakage is collected in rubber gaiters and plastic pipes
and returned to the main hydraulic reservoir; if you look underneath the reservoir you will see the
cluster of return pipes plumbed into the bottom of the container. This controlled leakage
continuously lubricates the whole system under pressure, in exactly the same way as the
hydraulic systems used on aircraft, tractors, earth movers etc. and it is just as inherently reliable.
Source of hydraulic pressure
The units comprising the source of pressure are as follows :
* The LHM hydraulic reservoir.
* The high pressure pump.
* The high pressure regulator.
* The main pressure accumulator.
1

To ensure the correct operation of all hydraulic units, a minimum pressure must be
maintained in the supply circuits. To avoid making the pump stop and start for each demand of
hydraulic pressure, a certain amount of LHM is stored at a higher pressure than the minimum
operating pressure. As long as pressure exists above the minimum operating pressure in the main
accumulator, then the pump draws LHM from the reservoir and returns it without generating any
pressure; the pump is operating in rest mode. The reserve of pressure is maintained in the main
accumulator. The maximum and minimum pressures are controlled by the pressure-regulator
which causes the flow of LHM from the pump, to be directed to : either the main accumulator
(pumping under pressure) - or the reservoir, (pumping without pressure).
The hydraulic reservoir
This is a drum container mounted on the front nearside of the engine bay and has an
external sight tube showing “Max” and “Min” LHM levels.
The reservoir has an internal anti-surge baffle to allow LHM returning to the tank to settle
and deaerate before being delivered back to the pump. It is vented to atmosphere by a small hole
in the filler cap, which must be kept clear. A rubber pipe is connected to the base of the reservoir
and is brought back to the top and held by a clip. This pipe is for draining the reservoir. The feed
to the hydraulic pump, is via an internal fine nylon mesh filter, accessible for cleaning by
unclipping the delivery pipe from the top of the LHM reservoir.
2
HighPressurePump
Filter
Reservoir
To hydrauliccircuits
PressureRegulator
MainAccumulator
Source of pressure circuit
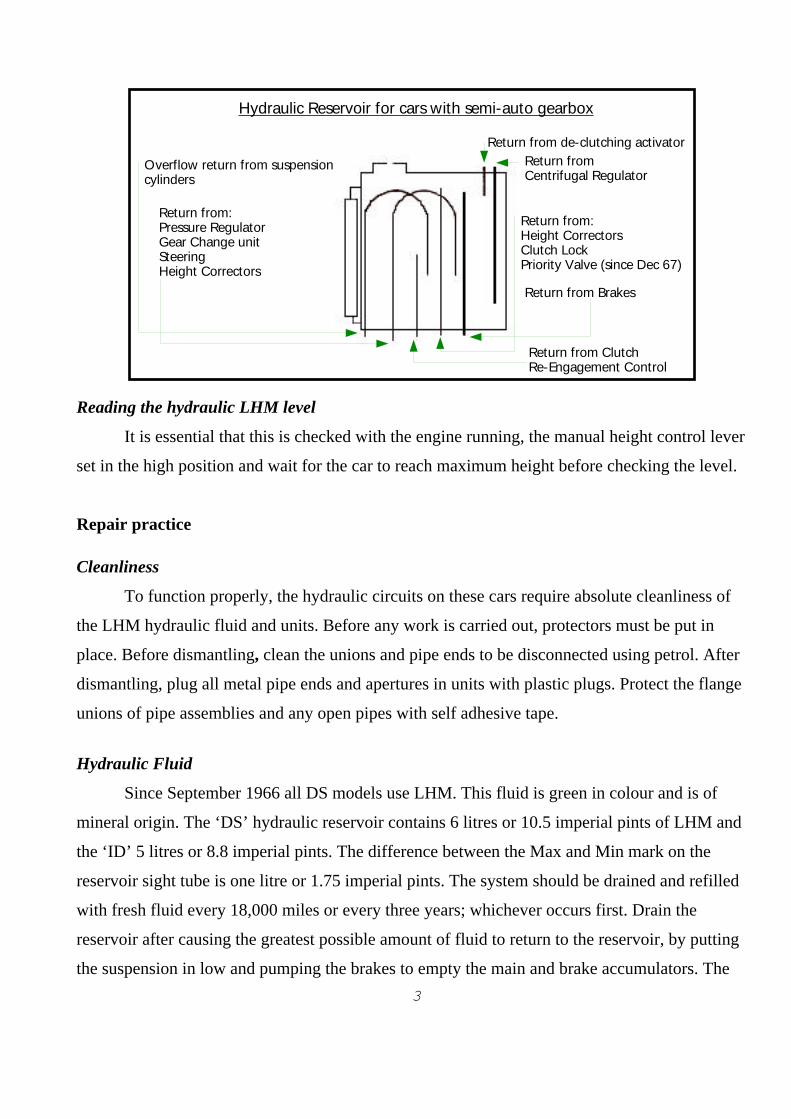
Reading the hydraulic LHM level
It is essential that this is checked with the engine running, the manual height control lever
set in the high position and wait for the car to reach maximum height before checking the level.
Repair practice
Cleanliness
To function properly, the hydraulic circuits on these cars require absolute cleanliness of
the LHM hydraulic fluid and units. Before any work is carried out, protectors must be put in
place. Before dismantling, clean the unions and pipe ends to be disconnected using petrol. After
dismantling, plug all metal pipe ends and apertures in units with plastic plugs. Protect the flange
unions of pipe assemblies and any open pipes with self adhesive tape.
Hydraulic Fluid
Since September 1966 all DS models use LHM. This fluid is green in colour and is of
mineral origin. The ‘DS’ hydraulic reservoir contains 6 litres or 10.5 imperial pints of LHM and
the ‘ID’ 5 litres or 8.8 imperial pints. The difference between the Max and Min mark on the
reservoir sight tube is one litre or 1.75 imperial pints. The system should be drained and refilled
with fresh fluid every 18,000 miles or every three years; whichever occurs first. Drain the
reservoir after causing the greatest possible amount of fluid to return to the reservoir, by putting
the suspension in low and pumping the brakes to empty the main and brake accumulators. The
3
Overflow return from suspensioncylinders
Return from:Pressure RegulatorGear Change unitSteeringHeight Correctors
Return from de-clutching activator
Return from Centrifugal Regulator
Return from:Height CorrectorsClutch LockPriority Valve (since Dec 67)
Return from Brakes
Return from ClutchRe-Engagement Control
Hydraulic Reservoir for cars with semi-auto gearbox
filter in the main reservoir must be thoroughly cleaned every 6,000 miles; a clogged filter leads to
inefficiency of the hydraulic system. The filter should be cleaned in white spirit or petrol on
LHM cars, and then blown through with compressed air. In an emergency situation, SAE 20
engine oil may be used in the hydraulic system. The system should be flushed and refilled with
LHM at the earliest opportunity.
Cleanliness of the fluid
Never re use LHM that has been in service. Clean the filter and flush and change the LHM
in the main reservoir every three years, irrespective of mileage.
Metal piping
There are two sizes of metal pipe, that carries pressurised LHM - 4.5 mm external
diameter and 6.35 mm external diameter. Factory made pipes which have been pressure tested are
marked with a coloured sleeve, Red for LHS 2 systems, and Green for LHM.
Plastic piping
Plastic Piping is used for seepage returns - suspension cylinder returns, height corrector
returns etc. It is permissible to repair these pipes by sleeving, providing that a pipe does not have
more than two sleeves which must be at least 800mm apart. The sleeve must be glued and when
the glue has hardened the joint so made, must withstand 5 kg/cm2 (72 psi) pressure from a
compressed air line.
Rubber piping
Rubber piping is used for the operational returns from hydraulic units, the supply from the
reservoir to the High Pressure Pump, and some seepage returns. All these pipes are marked Red
or Green in accordance with the fluid which they are to be used, LHS 2 or LHM respectively.
Any replacement pipe for the LHM system must be mineral oil resistant.
Storage of hydraulic units
Units should be stored full of fluid, firmly plugged and protected from dust. Rubber seals
and pipes must be stored away from dust, sunlight, and heat.
4

Sealing methods
Sealing by metal clip. This method of sealing is used to secure rubber pipes onto steel and
plastic pipes and unions. When fitting; place a rubber protective ring under the clip and take care
not to cut the end of the pipe.
Rubber Sleeve Seals
These seals ensure the sealing of steel pipes fitted to hydraulic units. Sealing is achieved
by the deformation of the sleeve under the action of tightening the gland nut. The seals must be
replaced every time a pipe is disconnected. Remove the old seal by screwing a Philips screw into
the rubber and pulling on it with pliers. Clean the bore before rebuilding. Always fit the new seal
to the pipe dry, so that about 2 mm of the pipe projects through the seal. Centralise the pipe in the
bore of the unit and ensure that the pipe goes fully home. The swelling near the end of the pipe
holds the seal in place. Start the union nut by hand and tighten moderately (1 mkg) (15 ft lbs).
Ring seals
Sealing is ensured by the deformation of the seal under the influence of the fluid under
pressure. In order that the pressure may achieve this, the diameter of the ring is less than the
width of the groove and greater than its depth. Three types of ring seals are employed:
* Marked Red for LHS 2
* Marked Green for LHM
* Marked White for either.
Seals with White markings should only be used between static components. Any marking
on a seal must always face in the direction from which the pressure is coming. Additionally, the
seals must be soaked in the appropriate fluid before fitting.
Sealing Plates
These are found at flange joints between pipes and units. When fitting, ensure that the
holes in the plate correspond with those in the flange. The seals are marked with White and are
fitted to vehicles using either type of fluid. They must be replaced at each dismantling.
5
Teflon Seals
These ensure sealing of items subject to large or frequent movements, such as the
hydraulic steering-rack piston and the suspension cylinders. Teflon seals may be used with either
type of fluid.
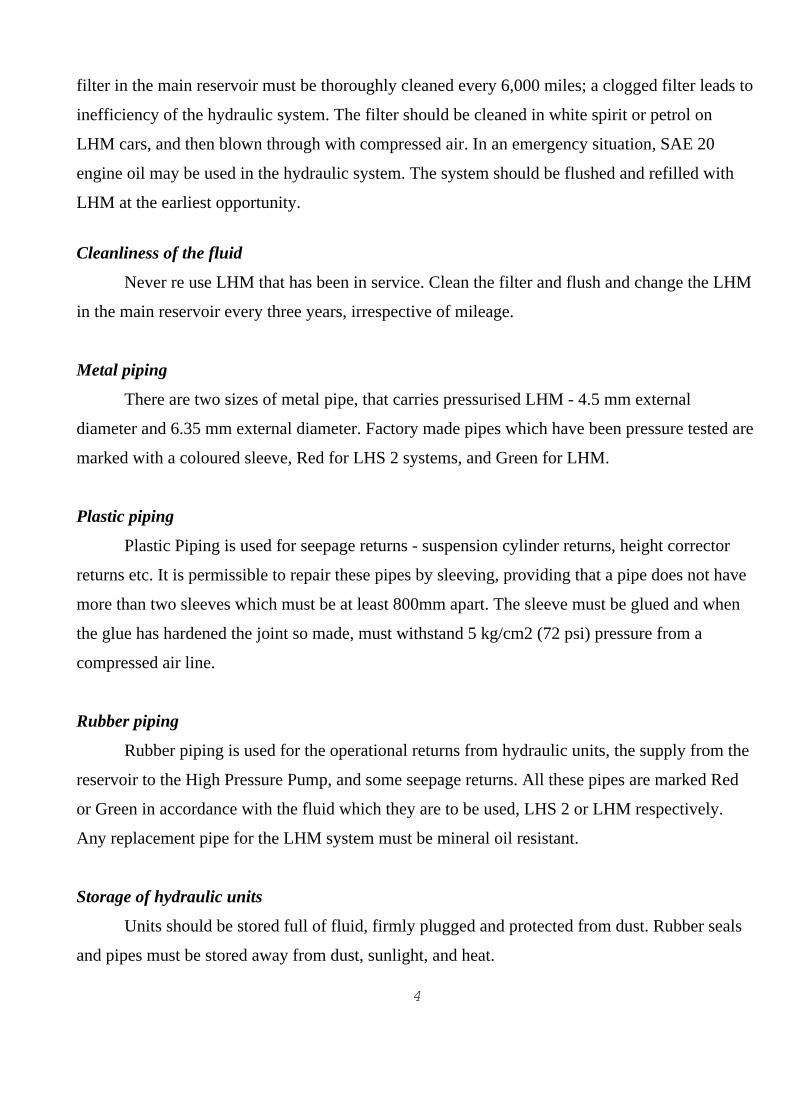
General layout of hydraulic systems
All of these vehicles have a circuit defined as ‘Source of Pressure’, comprising a high
pressure hydraulic pump, a Pressure Regulator and an hydraulic accumulator (sphere).
DS 19 A (DY) AND DS 21 (DX) Both until December 1967
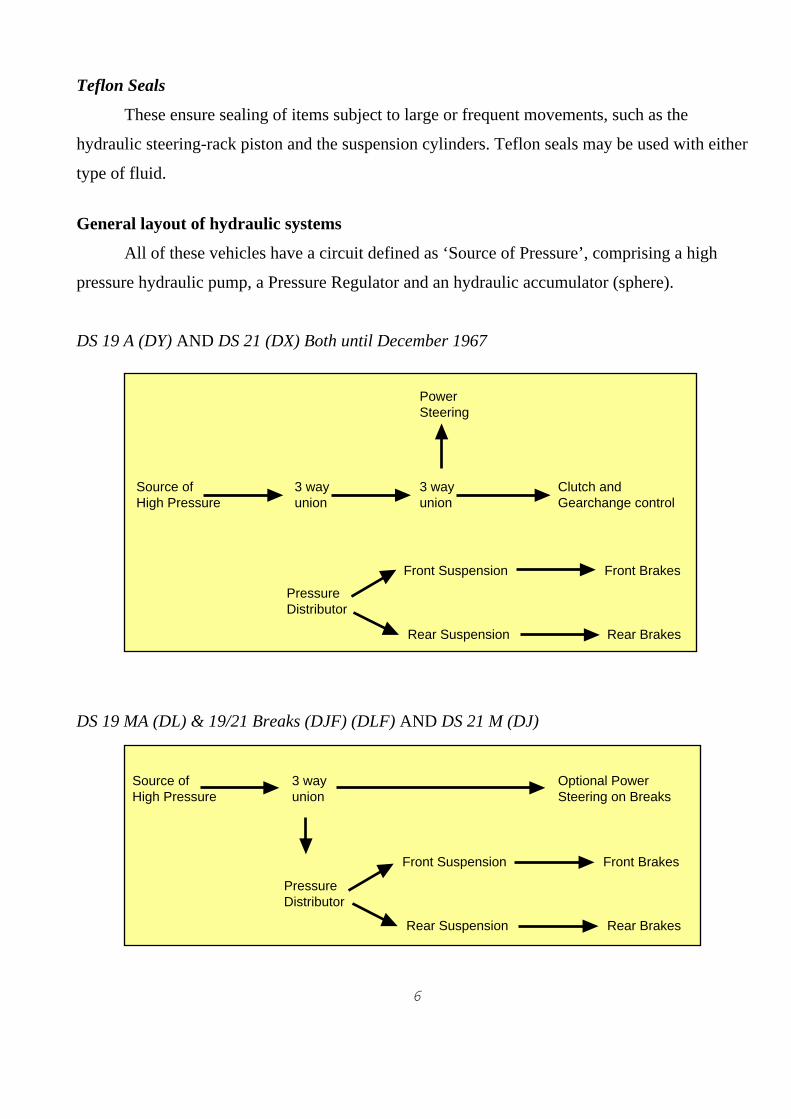
DS 19 MA (DL) & 19/21 Breaks (DJF) (DLF) AND DS 21 M (DJ)
6
3 wayunion
PowerSteering
Clutch andGearchange control
3 wayunion
Source ofHigh Pressure
PressureDistributor
Front Suspension
Rear Suspension
Front Brakes
Rear Brakes
Optional PowerSteering on Breaks
3 wayunion
Source ofHigh Pressure
PressureDistributor
Front Suspension
Rear Suspension
Front Brakes
Rear Brakes

DS 19A (DY) & DS 21 (DX) & (DY) Both since December 1967
19A/20/21 Breaks (DYF) (DYF) (DXF)
DS 19MA (DL) & DS 21M (DJ) & (DY) Both since December 1967 AND DS 20 M (DL)
19A/20/21 Breaks (DLF) (DLF) (DJF)
ID 19B (DV) & ID 20 (DT)
7
Securityvalve
Source ofHigh Pressure
Optional Power Steering
Rear Suspension Rear Brakes
Front Brakes
Front Suspension
Optional PowerSteering on Breaks
3 wayunion
Source ofHigh Pressure
PriorityValve
Front Suspension
Rear Suspension Rear Brakes
Front Brakes
PowerSteering
Clutch andGearchange control
4 wayunion
Source ofHigh Pressure
Priority Valve
Front Suspension
Rear Suspension Rear Brakes
Front Brakes

Braking SystemsAll ‘D' models are fitted with disc brakes at the front and drums at the rear, both of which
operate off of the High Pressure hydraulic system. The braking systems for the ID model and the
DS model are similar, but different. The front and rear brake circuits are separate and brake
failure in one circuit, will not affect the other. The rear brakes are fed from the rear suspension;
this design feature allows the maximum pressure in the rear brake circuit to be limited, to suit the
load the car is carrying. There is a reserve of pressure available on demand for the front brake
circuit; a separate brake pressure accumulator in the case of the DS system, the main accumulator
in the case of the ID system.
The DS braking system
Circuit Layout until December 1967
The front brake circuit and the front brake accumulator is fed from the front suspension.
The rear brake circuit and the brake pressure distributor piston is fed by the rear suspension. The
pressures in the two brake circuits will vary with the load the car is carrying. The available
pressure range is:
8
LHM High Pressure INFrontHeightCorrector
FrontHeightCorrector
BrakeAccumulator
Brake Pressure Distributor
Brake Pedal Unit
RearHeightCorrector
RearHeightCorrector
FrontBrakes Main
ReservoirRearBrakes
DS Braking System until December 1967
LHM Return
* front: 85 - 110 bars 1200-1565 psi
* rear: 50 - 90 bars 720-1280 psi
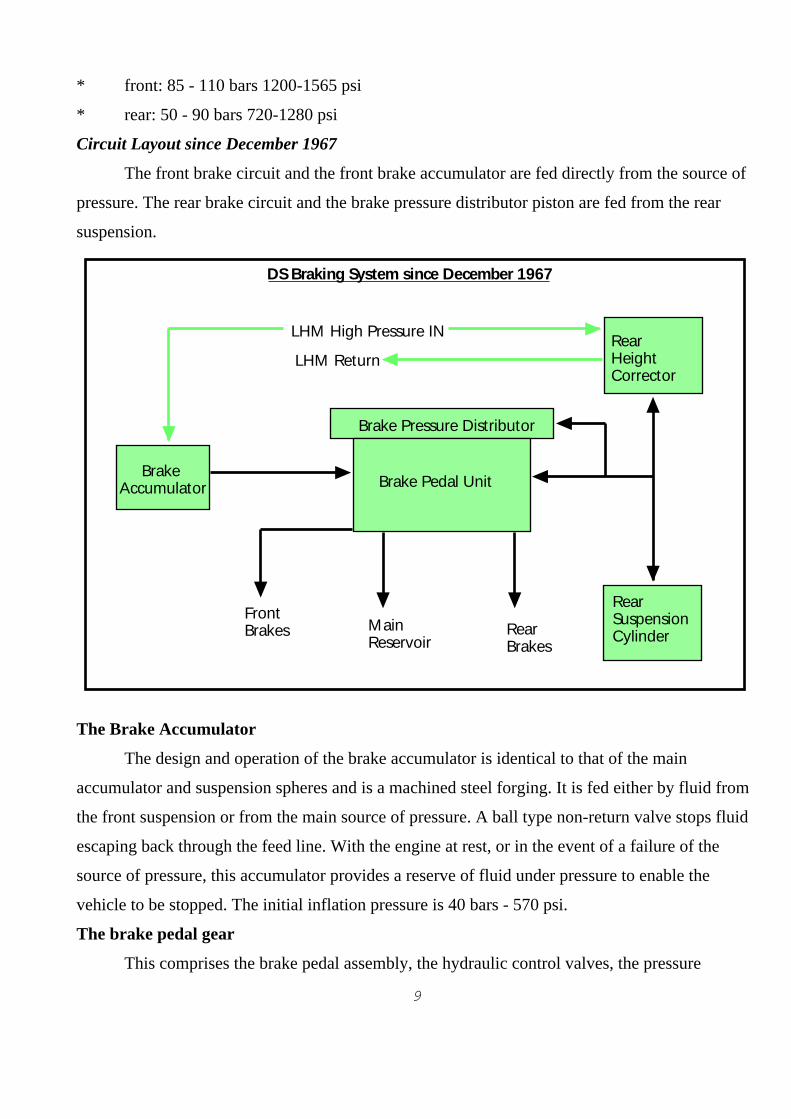
Circuit Layout since December 1967
The front brake circuit and the front brake accumulator are fed directly from the source of
pressure. The rear brake circuit and the brake pressure distributor piston are fed from the rear
suspension.
The Brake Accumulator
The design and operation of the brake accumulator is identical to that of the main
accumulator and suspension spheres and is a machined steel forging. It is fed either by fluid from
the front suspension or from the main source of pressure. A ball type non-return valve stops fluid
escaping back through the feed line. With the engine at rest, or in the event of a failure of the
source of pressure, this accumulator provides a reserve of fluid under pressure to enable the
vehicle to be stopped. The initial inflation pressure is 40 bars - 570 psi.
The brake pedal gear
This comprises the brake pedal assembly, the hydraulic control valves, the pressure
9
LHM High Pressure IN
LHM Return
BrakeAccumulator
Brake Pressure Distributor
Brake Pedal Unit
FrontBrakes Main
ReservoirRearBrakes
DS Braking System since December 1967
RearHeightCorrector
RearSuspensionCylinder

warning light switch and the brake pressure distributor. The brake pedal assembly carries the
actual pedal plate which is covered by a rubber moulding and allows a progressive braking
action. The hydraulic valve assembly comprises two identical pressure control slide-valves. The
slide-valves are connected by a pressure distributor plate. The force on the brake pedal is
transmitted to the pressure distributor plate by means of adjustable rollers (A).
The pressure control slide-valves.
When at rest with no residual pressure in the brake circuits, the supply line to the brakes is
open to the return to the reservoir. A return spring moves each slide-valve back to the ‘at rest’
position.
The pressure warning light
This switch senses the pressure in the front brake accumulator and illuminates a large red
warning light on the dash, when the pressure falls into the range of 60 to 80 bars (870 to 1160
psi.).
The brake pressure distributor
The cylinder of the brake pressure distributor is fed by fluid from the rear suspension; it is
at the rear that the variations of pressure in relation to load are at their greatest. The pressure acts
on the surface (S1) of the piston. The piston is connected to the rollers at (A). A spring returns the
piston to its rest position.
Operation of the hydraulic control valves
The driver applies the brake. The pressure distributor plate receives the effort (T). The
slide valves are moved down, closing the return ports and then opening the inlet ports. This
establishes pressure in the front and rear circuits, - p & p1. These pressures act on the undersides
of the slide valves (chamber B) providing progressive ‘feel’ at the pedal. This reaction balances
the force (T) - T = (p + p1)S
The sum of the two pressures is thus proportional to the force generated by the driver
pressing the pedal and is independent of the supply pressures. By controlling the force on the
pedal, the driver controls the power of the braking.
10

The Brake Pressure Distributor Piston
With a pressure of 60 bars (870 psi), in the Distributor Cylinder, the force (T) is applied to
the middle of the Pressure Distributor Plate. The pressures in the front and rear circuits are
therefore equal (p — p1). But because of the design of the piston, the braking effort is greater at
the front than at the rear.
11
TLoad
a
F front
F1 rearF - F1 = T
b a b + a
b
Brake Pedal Unit
Rear Suspension Return
Front Brakes
Front Suspension(before Dec ‘67)High Pressure IN(since Dec ‘67)
Return
Rear Brakes
Rear Suspension

At the front, the diameter of the two pistons in each calliper is 60 mm. At the rear, the diameter of
the pistons in the wheel cylinders are 18 mm (saloons) and 20 mm (estates).
If the pressure in the rear suspension increases, the piston in the Pressure Distributor
moves the rollers. The pressure point of the rollers and thus of the force (T), moves towards the
rear valve. The force F1 being greater than F, the pressure in the rear brake circuit rises (p1
greater than p) and the preponderance of braking effort at the front diminishes.
12
CentrifugalRegulator
De-ClutchingActivator
Rear BrakeSwivel Pipes
Pressurised LHMfrom theRear Suspension
R/H FrontBrake
L/H FrontBrake
Fast IdleActivator
Carburettor
Front BrakeAccumulator
LHM Reservoir
High PressureLHM in fromMain Accumulator
Brake Pedal Unit
L/H RearBrake
R/H Rear Brake
Brake PedalDistribution Piston
Braking Circuitall types except DV & DT
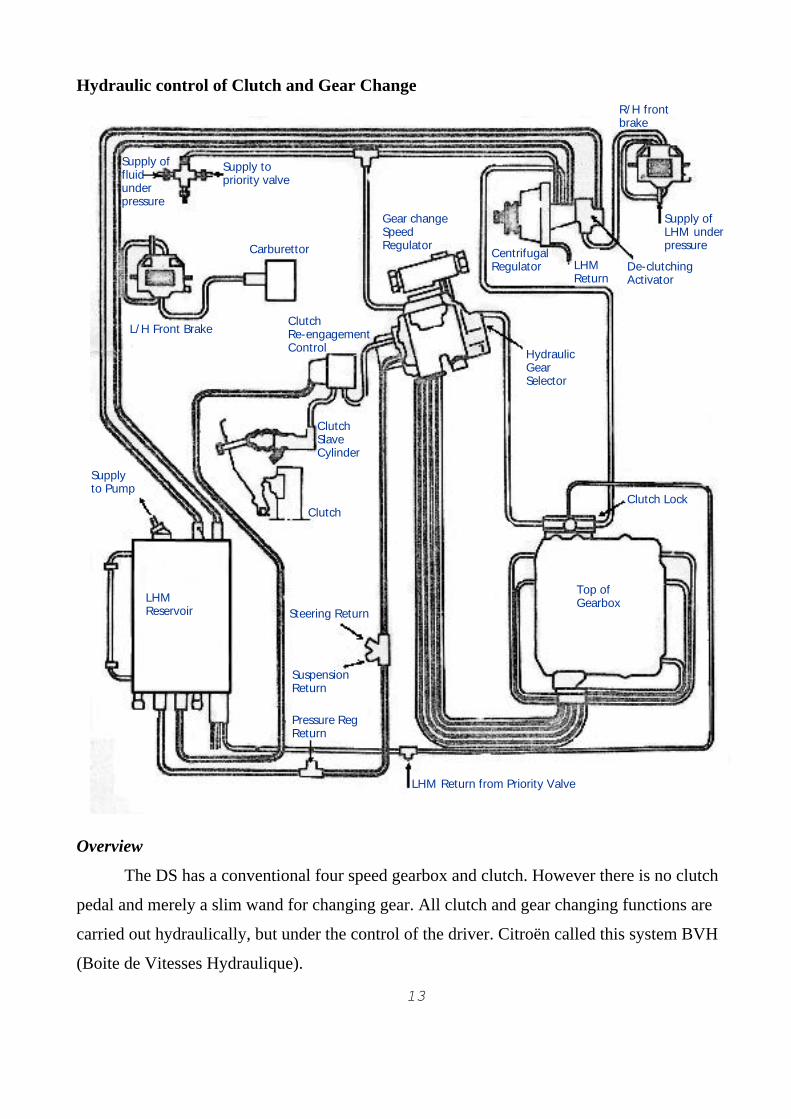
Hydraulic control of Clutch and Gear Change
Overview
The DS has a conventional four speed gearbox and clutch. However there is no clutch
pedal and merely a slim wand for changing gear. All clutch and gear changing functions are
carried out hydraulically, but under the control of the driver. Citroën called this system BVH
(Boite de Vitesses Hydraulique).
13
Supply offluidunderpressure
Supply topriority valve
Gear changeSpeedRegulator
CentrifugalRegulator
R/H frontbrake
Supply ofLHM underpressure
De-clutchingActivator
LHMReturn
HydraulicGearSelector
Carburettor
ClutchRe-engagementControl
ClutchSlaveCylinder
Clutch
LHMReservoir
Supplyto Pump
Steering Return
SuspensionReturn
Pressure RegReturn
Top ofGearbox
Clutch Lock
LHM Return from Priority Valve
L/H Front Brake
Gear selector wand
The hydraulic gear selector ensures de-clutching in neutral, and from neutral allows the
engagement of any gear. During the gear change cycle, it controls in the following order
* de-clutching
* disengagement of the gear in mesh
* engagement: of the next gear selected
* re-engagement of the clutch
The hydraulic gear selector is mounted on the bulkhead, from which a cluster of 5 pipes (4
forward gears plus reverse) lead to the gear selector rams on top of the gearbox. A further pipe
leads to the clutch re-engagement control, which is situated on the inlet manifold. There is also a
pipe to the clutch lock on the gearbox and to the centrifugal regulator.
The selector slide valve:
This is hollow and has one inlet port for high pressure LHM and five outlet ports (one for
each gear). Longitudinal and circumferential grooves are machined in the slide valve to allow the
return of LHM to the reservoir, by way of the front face of the gear selector. (From a gear, for
example). In neutral, the outlet ports in the slide valve are opposite a plain part of the sleeve in
which it operates. Sealing is maintained by the fine accuracy of the machining of the slide valve
and its sleeve; a tolerance of a few microns.
The positioning of the slide valve in its sleeve is very important, and is the object of a very
precise setting which corresponds to a given position of the gear lever.
The automatic clutch control pistons:
Five pistons (one for each gear), are able to move upwards in the gear selector when they
are pressurised. They return to their initial position by means of the return spring on the
automatic clutch control slide valve.
The automatic clutch control slide valve.
There are four synchro-delay pistons; only three of which can move, the fourth being a
plug. They are returned to their initial position by two return springs. There is no synchro-delay
piston for first gear, although it is synchronised.
14

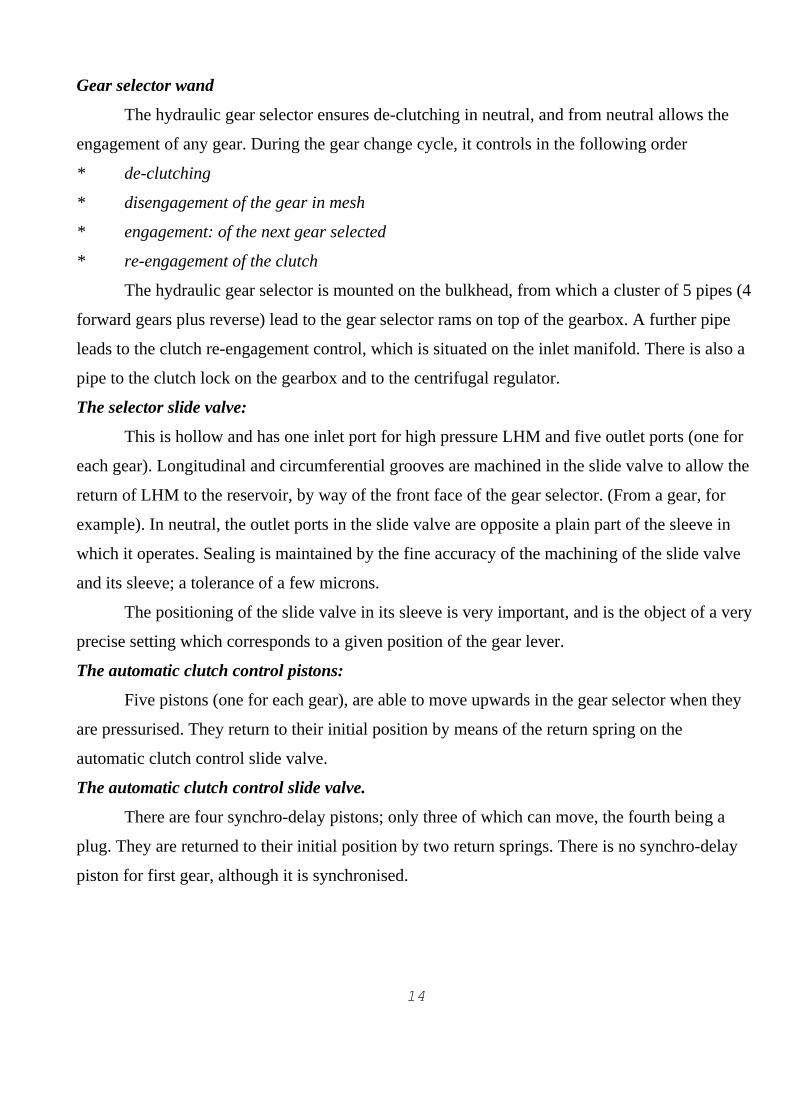
2R
41
3
GearchangeSpeedControl
Centrifugal RegulatorClutch Slave Cylinder
LHM high pressuresupply
LHM Return
Gear Selector Control Unit
The manual clutch control slide valve:
The manual clutch control is by way of a lever situated under the dash, connected to a rod,
and has only two positions; normal driving position. (slide valve in), de-clutched position. (slide
valve out). At its lower end are two drillings at right-angles to each other.
With the slide valve in its normal position, LHM under high pressure is supplied to the
hydraulic gear selector. However, when the slide valve is in its withdrawn position, it cuts off the
supply of high pressure LHM to the clutch and gear change circuit. This allows the LHM in the
clutch slave cylinder to escape to the reservoir and therefore the vehicle’s clutch is engaged. For
service purposes, this allows the engine to be started, or turned over, using the handle.
Rise of pressure - de-clutching: manual clutch control slide valve in its normal position
Before the hydraulic selector slide valve is supplied with LHM under pressure, the
position of the automatic clutch control slide valve is such that the supply to the selector slide
15
2R
41
3
GearchangeSpeedControl
Centrifugal RegulatorClutch Slave Cylinder
LHM high pressuresupply
LHM Return
valve is cut off and the port to the clutch slave cylinder is open. When high pressure arrives the
slide valve operates as a pressure control valve and de-clutching occurs at a pressure of 50-70
bars ( 725 to 1000 psi). This pressure is the result of the calibration of the spring above the slide
valve. In its regulating position the slide valve allows LHM to pass to the selector slide valve, via
the gear change speed control. Therefore, with the engine idling, in neutral,the clutch is
disengaged.
In neutral and de-clutched
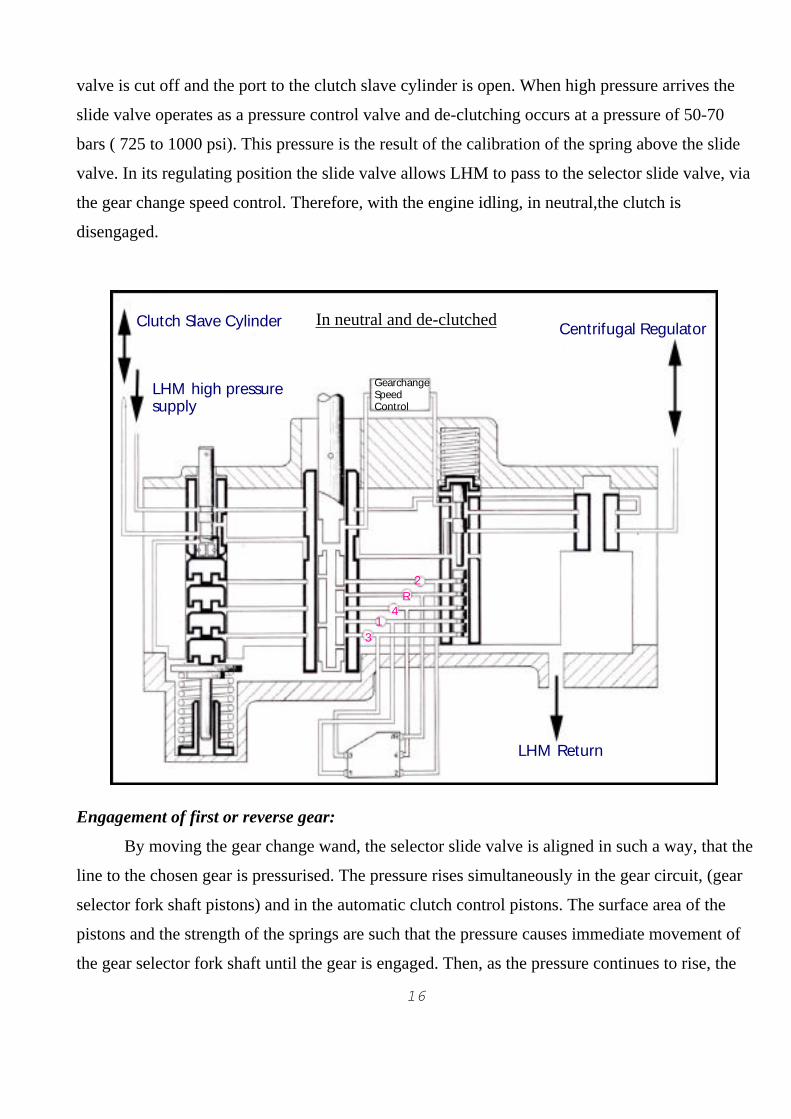
Engagement of first or reverse gear:
By moving the gear change wand, the selector slide valve is aligned in such a way, that the
line to the chosen gear is pressurised. The pressure rises simultaneously in the gear circuit, (gear
selector fork shaft pistons) and in the automatic clutch control pistons. The surface area of the
pistons and the strength of the springs are such that the pressure causes immediate movement of
the gear selector fork shaft until the gear is engaged. Then, as the pressure continues to rise, the
16

automatic clutch control piston moves. The pressure going to the gear selector pistons within the
gearbox, is in the 500 psi range, controlled by the flow control unit.
Engagement of 2nd, 3rd, or 4th gears:
When the chosen gear circuit is connected to the supply of pressure by the selector slide
valve, the pressure rises simultaneously in the gear circuit (gear selector fork shaft pistons), in the
automatic clutch control piston circuit and in the synchro-delay piston circuit. The different
phases of operation occur in the following order:
* Movement of the selector fork shaft until synchro cones begin to contact.
* Movement of the synchro delay piston: which allows the volume of LHM to increase and
the pressure to stabilise, while synchronisation continues at a constant pressure.
* Rapid movement of the selector fork shaft, allowing full engagement of the gear once the
synchro piston has bottomed.
* Movement of the appropriate automatic clutch control piston.
17
2R
41
3
Centrifugal RegulatorClutch Slave Cylinder
LHM high pressuresupply
LHM Return
GearchangeSpeedControl
In fourth gear

Re-engagement of the clutch:
Whatever gear is selected, the final operation of the gear selector is the movement of the
automatic clutch control piston. As it moves, the piston causes the automatic clutch control slide
valve to rise. The equilibrium of the pressure balance is upset, and in its new position the slide
valve allows LHM to pass to the selector slide valve (This pressure holds the gear in
engagement). It also connects the clutch slave cylinder to the centrifugal regulator; clutch
disengagement and re-engagement can take place when the centrifugal regulator allows the LHM
in the slave cylinder to escape back to the reservoir.
Return to neutral:
Between each gear the selector slide valve connects all the circuits under pressure to return
to the reservoir via the grooves it carries. All the valves return to their initial positions under the
action of their return springs.
Clutch re-engagement control (CRC)
The clutch re-engagement control is a two stage flow regulator. Its purpose is to ensure
rapid and progressive re-engagement of the clutch when changing gear. In use it mimics the
actions of a driver using a conventional clutch. It varies the speed of clutch re-engagement
according to the position of the throttle and it allows rapid disengagement of the clutch.
In the hydraulic circuit, the CRC is situated between the gear selector and the clutch slave
cylinder. Physically, the unit is bolted to the inlet manifold adjacent to the carburettor. The
pressure that goes to the CRC, and the clutch slave cylinder, is between 750 and 1000 psi, which
is set by the slide valve that operates the manual clutch re-engagement control within the gear
selector unit.
A cam (2) connected to the primary throttle butterfly spindle by a "Flector". acts via a
roller, on a lever (3) which tensions a spring (4) which in turn permanently applies pressure to a
slide valve. Another by-pass slide valve (8) is pushed towards the first by a weaker spring. In the
centre of this slide valve, the diameter is smaller than the bore in which it operates.
Declutching:
This operation needs to be as fast as possible. Therefore the CRC must not obstruct the
flow of LHM from the gear selector to the clutch slave cylinder at all. In operation, with the
clutch fully engaged, pressure from the gear selector when de-clutching, first moves the by-pass
18

slide valve back because its return spring is weaker than the hydraulic pressure. The by-pass
valve opens a port which allows free passage for the LHM going towards the clutch slave-
cylinder.
As the pressure rises, the second slide valve (7) is moved in turn, opening a second port
and stretching the spring (4) in the CRC. The movement of this slide valve stops, when its return
lever bottoms. When the pressure reaches its maximum, it becomes equal on both sides of the by-
pass valve, which returns to its original position under the influence of its spring. De-clutching is
rapid, as the flow of LHM is virtually unobstructed.
Re-engagement:
It is necessary to have a rapid first stage of engagement, to the point where the clutch
begins to bite and a slower second stage to avoid sudden engagement. To manage this, the return
of LHM must be free at first and slowed down thereafter. This is achieved by connecting the pipe
coming from the hydraulic gear selector, to return to the reservoir by the gear selector.
There is a rapid drop of pressure, until the slide valve obstructs the return port ; this occurs
when the LHM pressure on one side of the slide valve becomes less than the effect of the spring
on the return lever on the other side. This is the first phase, or rapid phase of re-engagement. In
19
Clutch Re-Engagement Control (CRC)
A
B
C
D
Clutch SlaveCylinder
Hydraulic GearSelector
1
23
4
5
6 7 8
910
7 8
7 8
7 8
7 8

the centre portion of the bypass valve is the reduced diameter already described; this is between
the outlet port and the return to gear selector. The pressure continues to drop by way of the outlet,
but is slowed, due to the restriction caused by the bypass valve.
The adjusting screw on the unit will alter the speed of clutch re-engagement when gears
are changed, from very slow with detectable clutch slip, to very fast when the car will lurch. To
achieve this wide range of adjustment, the phase-change pressure is altered. By reducing this
pressure, the rapid-drop phase is lengthened which results in the overall time of engagement
being reduced. Under hard acceleration, the pressure on the slide valve decreases, so the overall
time of re-engagement also decreases.
Throttle closing Piston:
So that the engine speed is not excessive at the point of clutch re-engagement, it is limited
automatically by the system during declutching. This permits the driver when in a hurry, to keep
his foot hard on the throttle when changing down, without affecting the smoothness of clutch
engagement.
20
Pressure
TimeT10
Clutch Slave Cylinder Pressure

While the pressure is rising in the slave cylinder, the LHM pushes on the throttle-closing
piston. The entry of LHM to the piston is slowed by making it pass a ball with 3 grooves on its
seating, the LHM passing by the grooves. The restriction of the LHM is necessary to avoid
‘hammering’ in the hydraulic circuit, but it is mainly to prevent the throttle from being closed too
quickly. The piston (1) moves out and limits the movement of the cam connected to the throttle
spindle; therefore the engine speed is limited while the clutch is out. Upon re-engagement, the
pressure drops at the same speed as in the clutch slave cylinder, and the piston returns under the
influence of its return spring, giving full throttle control back to the driver.
Regulating the speed of the gear change
The LHM fluid which operates the gear-change circuits is not always at the same
temperature or pressure when it reaches the hydraulic gear selector. For instance, in winter the
LHM circulating in the clutch circuits and warmed by engine heat is likely to be hotter and of a
thinner viscosity, than the LHM at the bulkhead in the gear selector unit, giving rise to possible
pressure variations. If not corrected, these variations, would cause errors in the timing of gear
operations. To overcome this, the LHM operating the gears passes through a gear change speed
regulator, which is mounted on top of the hydraulic gear selector.
The regulator consists of a cylinder closed at each end by a plug, and in which a hollow
piston slides. A ‘stack’ of disk washers, alternately drilled with a small central hole and a small
hole on the disk periphery and held apart by hollow spacers, form a zig-zag restricted LHM
21
Pressure Clutch Slave Cylinder Pressure
Time0
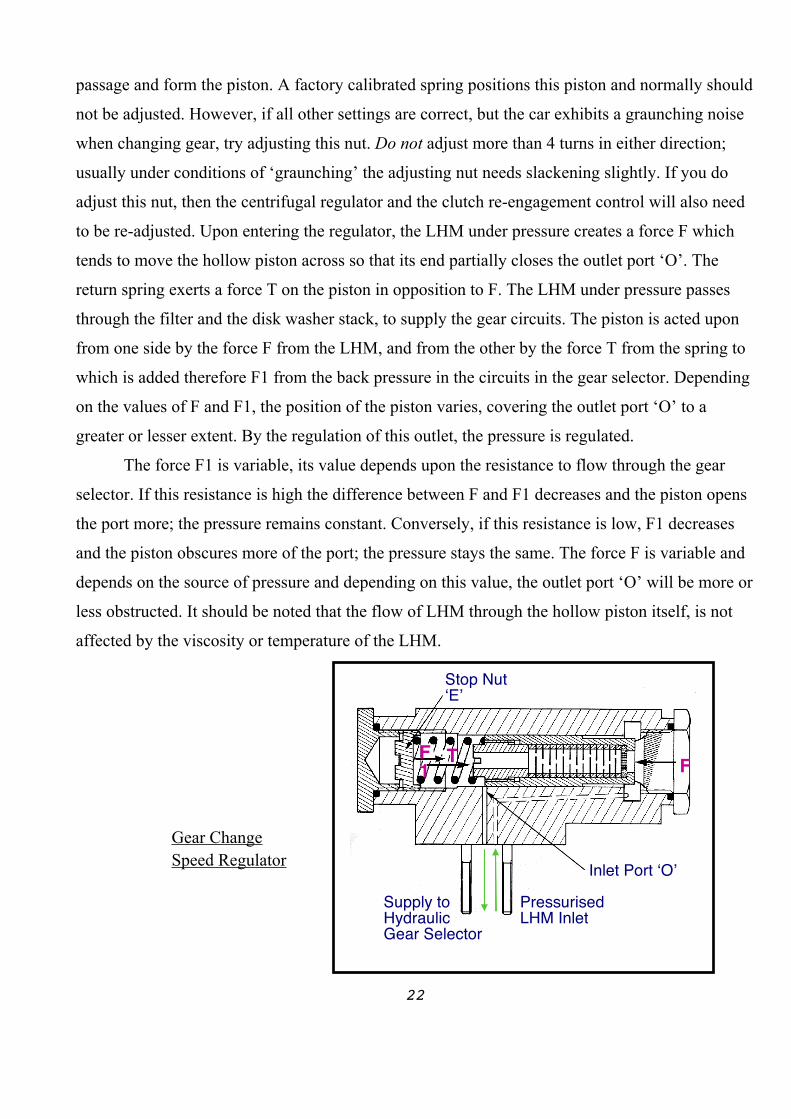
passage and form the piston. A factory calibrated spring positions this piston and normally should
not be adjusted. However, if all other settings are correct, but the car exhibits a graunching noise
when changing gear, try adjusting this nut. Do not adjust more than 4 turns in either direction;
usually under conditions of ‘graunching’ the adjusting nut needs slackening slightly. If you do
adjust this nut, then the centrifugal regulator and the clutch re-engagement control will also need
to be re-adjusted. Upon entering the regulator, the LHM under pressure creates a force F which
tends to move the hollow piston across so that its end partially closes the outlet port ‘O’. The
return spring exerts a force T on the piston in opposition to F. The LHM under pressure passes
through the filter and the disk washer stack, to supply the gear circuits. The piston is acted upon
from one side by the force F from the LHM, and from the other by the force T from the spring to
which is added therefore F1 from the back pressure in the circuits in the gear selector. Depending
on the values of F and F1, the position of the piston varies, covering the outlet port ‘O’ to a
greater or lesser extent. By the regulation of this outlet, the pressure is regulated.
The force F1 is variable, its value depends upon the resistance to flow through the gear
selector. If this resistance is high the difference between F and F1 decreases and the piston opens
the port more; the pressure remains constant. Conversely, if this resistance is low, F1 decreases
and the piston obscures more of the port; the pressure stays the same. The force F is variable and
depends on the source of pressure and depending on this value, the outlet port ‘O’ will be more or
less obstructed. It should be noted that the flow of LHM through the hollow piston itself, is not
affected by the viscosity or temperature of the LHM.
Gear ChangeSpeed Regulator
22
Stop Nut ‘E’
Inlet Port ‘O’
Supply to HydraulicGear Selector
PressurisedLHM Inlet
FF1
T

Clutch lock
The purpose of the clutch lock, is to stop the clutch re-engaging during a gear change
between first and second gear, if one or other of the gears is not fully meshed. Because of the
absence of a first gear synchro delay piston in the hydraulic selector, it is possible for the system
to allow re-engagement before the synchro and locking dogs have had time to operate.
Clutch CRC Hydraulic Clutch Centrif ReservoirCylinder Selector Lock Regulator
The clutch lock is fitted to the right hand front side of the gearbox, in the hydraulic circuit
between the gear selector and the centrifugal regulator. In this position it cannot hinder de-
clutching during other gear changes even if it is closed. The unit comprises 1 body, 1 slide valve
sleeve, 1 slide valve with a central groove, 1 return spring for the slide valve and 1 ball control
rod and ball.
This ball control rod is connected to the selector fork shaft for first and second gears by a
lever and spring. It is designed to block the pressure-release circuits if either first or second gears
are not fully engaged; or the gearbox is in neutral.
When first and second gears are being engaged, the ball is lifted by a shoulder on the ball
control rod, pushing the slide valve which blocks the LHM passage. If synchronisation and
engagement do not take place, the selector fork shaft for first and second gears and the ball
23
Clutch Lock
HydraulicGearSelector
First Gear
Second Gear
CentrifugalRegulator

control rod, remain in this intermediate position and stop the escape of LHM from the clutch
slave cylinder.
When the locking dogs are fully engaged, the selector fork shaft and the ball control rod
move and the shoulder no longer holds up the ball, which returns down with the slide valve,
under the influence of the return spring. LHM may now pass the groove in the slide valve and
clutch re-engagement takes place. When third or fourth gears are engaged, the selector fork shaft
for first and second remains in neutral and the clutch lock remains inoperative.
The Centrifugal Regulator
The centrifugal regulator controls the clutch engagement when moving off and its
disengagement when the vehicle stops with a gear still engaged. Its operation is in relation to
24
To clutch slave cylinder viaHydraulic Gear Selector
Pressurised LHM supply LHM Return
Front Brakes(R/H front calliper)
Front brakesBleed Valve
Centrifugal RegulatorBleed Valve

engine rpm. It comprises three major parts; a mechanical centrifugal governor, a pressure control
slide valve/sleeve assembly and a de-clutching activator fed by pressure from the front brakes.
As engine rpm rises, two bob weights mounted on sprung levers throw outwards under
centrifugal force. This motion is transmitted via the levers to the end of the control slide valve.
This part of the centrifugal regulator is contained within the large canister that holds the drive
pulley for the unit and is separated from the hydraulic end of the unit. The levers, springs, bob
weights etc are greased ‘for life’ as no LHM circulates here.
With the engine stopped, the springs pull the bob weights in and zero force is applied to
the slide valve. As increasing engine rpm throw the weights outwards, the springs compress until
there is a state of balance between the centrifugal force and the spring pressure.
Pressure-control slide valve assembly:
The slide valve and its sleeve act as a pressure-control device. Equilibrium of the slide
valve is achieved when the forces acting on its end (pressure and spring) are equal to the force
exerted by the bob weight pressure pad: p x s + R = F
The operating pressure (regulated pressure) is thus solely a function of the force F, namely
the engine speed: p = (F-R) / s
Thus the regulated pressure diminishes when the engine speed is increased and vice-versa.
It should be noted that when the clutch is engaged, the slide valve's position connects the
clutch circuit to the return system. Therefore during gear changes, only the automatic clutch
control slide valve controls de-clutching and engagement. A dash-pot is provided to damp sudden
pressure rises and the movement of the control slide valve.
De-clutching activator:
The purpose of the activator is to quickly de-clutch during a rapid stop with the brakes
applied and a gear engaged. Fast de-clutching is obtained by increasing the pressure in the clutch
circuit by about 10 bars (145 psi). When the car is losing speed under brakes, the pressure in the
brakes also acts on the de-clutching activator piston, compressing its return spring. As it is moved
back, the piston effectively reduces the strength of the spring R at the end of the slide valve. For a
given engine speed, the slide valve's equilibrium is obtained with a higher pressure: previously p
= (F - R) / s
R becomes less, F remains constant, so p increases (by 10 bars, approx 145 psi).
25
Adjustment of the clutch engagement speed:
Let p be the pressure corresponding to clutch drag at a given engine speed. By screwing in
the adjuster screw, both F and p increase. The pressure corresponding to the clutch drag will be
obtained at higher engine revolutions. By unscrewing the adjuster, the reverse occurs.
Power assisted steering
The steering system used on the DS, is a hydraulically powered rack and pinion system.
There are two main units; a double-acting piston connected to the rack, and the control valves
with rotating union.
Two pressure-control slide-valves (one for each side of the piston) are connected to the
steering by way of a coupling fork. As the slide-valves move due to the action of the steering
wheel, the hydraulic connections between the fixed (supply of pressure and return) and moving
(valve block) parts are maintained by the rotating union. A dash-pot is situated under each slide
valve.
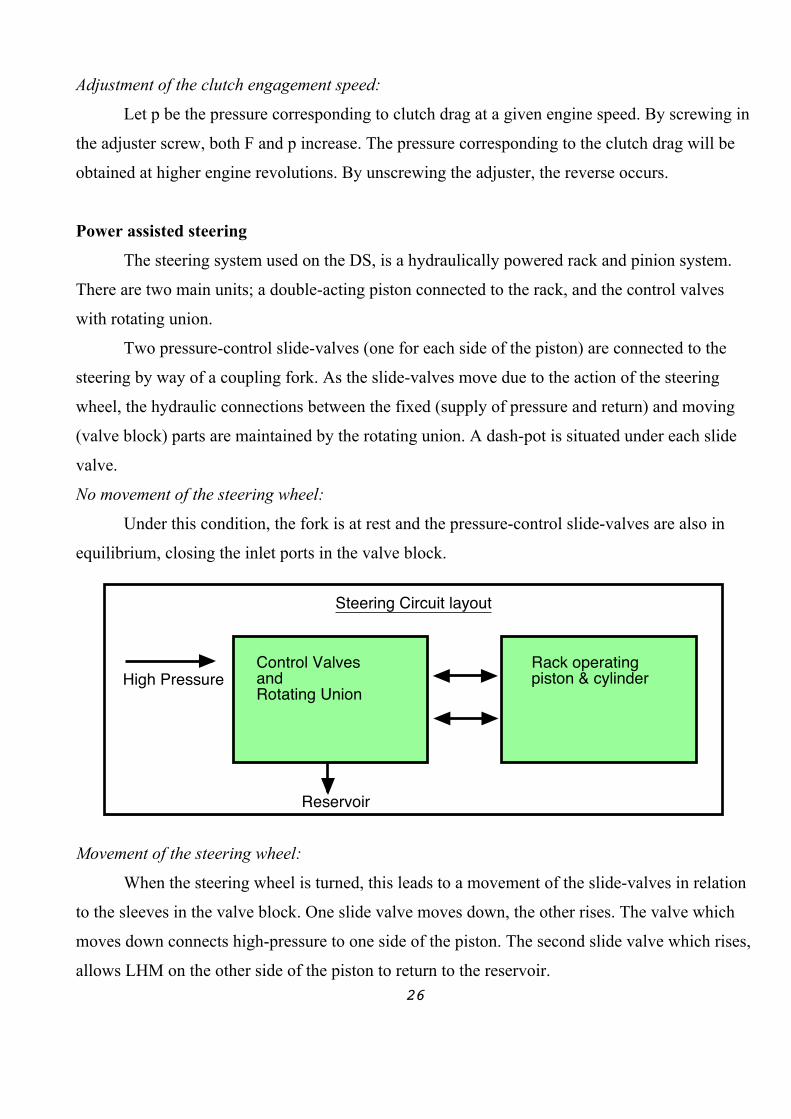
No movement of the steering wheel:
Under this condition, the fork is at rest and the pressure-control slide-valves are also in
equilibrium, closing the inlet ports in the valve block.
Movement of the steering wheel:
When the steering wheel is turned, this leads to a movement of the slide-valves in relation
to the sleeves in the valve block. One slide valve moves down, the other rises. The valve which
moves down connects high-pressure to one side of the piston. The second slide valve which rises,
allows LHM on the other side of the piston to return to the reservoir. 26
High PressureControl ValvesandRotating Union
Rack operatingpiston & cylinder
Reservoir
Steering Circuit layout

Stopping movement of the steering wheel:
When the rack moves it turns the pinion, which moves the sleeves, in which the control
slide-valves are situated, in the direction which would tend to make the valves return to the cut
off position. As long as the driver turns the steering wheel he holds the slide-valves in the open
position, but when he ceases to turn, the sleeves return to their cut off position in relation to the
slide-valves and the rack stops moving.
Residual pressure:
A residual pressure is maintained on either side of the piston when the steering is at rest.
This pressure is maintained by the pressure-distributor valve assembly and its value is a function
of the position of the pressure-control slide-valves in their sleeves. This is known as the crossover
pressures. Because of this, any movement of the steering wheel causes an immediate response by
the rack, by virtue of rising pressure on one side of the piston and falling pressure on the other
side. The movement of the rack is thus immediate.
27
Rotating pinion
Rack
A
Detail of (A)
Steering Rack &Rotating Union assembly
Steering column connection

Mechanical Linkage:
To provide a mechanical linkage between the steering wheel and the road wheels, in the
event of total hydraulic failure, the fork has two pegs which operate directly on the pinion. These
pegs have some play in their housing . This play allows under pressure, the movement of the
pinion before the slide valve. When there is no pressure, the pinion moves before the slide-valves
reach the end of their travel in the sleeves and provides manual steering; albeit heavy!.
Steering with pressure present:
The play in the pegs is not felt. The residual pressure which acts equally on both slide-
valves, takes up the slack and keeps them firmly in contact with the fork.
28
Steering CircuitSupply to HydraulicGear Selector
Supply ofLHM underpressure
Supply to Priority Valve
RotatingUnion
Return fromHydraulicGear Selector
Return fromSuspension
Return fromPressure Regulator
Supply toHydraulic Pump
LHMReservoir
Steering Rack

Suspension
Suspension is independent all round, by means of oleo-pneumatic spheres, connected to
suspension cylinders and which are in turn mechanically connected to the wheels of the car. The
design of the forged steel spheres, is similar to the spheres fitted to the pressure regulator and the
brake pressure reservoir.
Each sphere is given an initial charge of nitrogen gas. The initial pressure of the front
spheres is different from that of the rears and is a function of the unladen weight of the car. If the
initial pressure is too high, this will lead to hammering of the metal cup in the flexible diaphragm
on its seat in the sphere. This will happen if a front sphere is accidentally fitted on the rear.
Two states of a Suspension Sphere
In the absence of road wheel movements, the gas and the LHM are at identical pressures
on either side of the rubber diaphragm. This pressure is determined by the weight supported and
is the same on both sides of the same axle. This pressure is different between the front and rear
axles, due to the difference in the unladen weight of the two axles.
When the road wheel meets an obstacle and is bumped upwards, the piston is moved in
the suspension cylinder and forces the fluid in the cylinder into the sphere, compressing the gas
and thereby providing controlled suspension movement. As the bump in the road recedes, the
force on the road wheel is reduced, allowing the compressed gas in the sphere to release its
energy. The gas expands, the fluid in the sphere exerts a force on the piston in the suspension
29
Nitrogen at theinitial inflationpressure
Reserve ofLHMunder pressure
Nitrogen at thepressure of theLHM in use
cylinder and the road wheel is pushed firmly onto the road.
The compression or expansion of the nitrogen gas, prevents the force of the suspension
shock from reaching the chassis. After passing the obstacle, the pressure re-establishes its
equilibrium and the piston returns to its original position. By pumping more LHM into the
suspension cylinders, it also enables the driver to control the static height of the car, for traversing
rough terrain. By pumping the car to its maximum height and holding it there via a steel strut
placed between the chassis and the ground and then releasing all the LHM out of the suspension
cylinders, the suspension system also acts as a jacking system. Under this condition, the nitrogen
gas forces all the LHM out of the sphere, the suspension piston is fully extended and the road
wheel is lifted up off of the ground.
As suspension travel compresses the Nitrogen in the sphere at a steadily rising rate, the
suspension gets progressively stiffer with wheel travel and/or roll. Yet the DS suspension system
is approximately 20 times more compliant than a conventionally sprung suspension system and
provides a fairly constant patch pressure on the tyres over the entire range of suspension travel.
The only event that will unsettle the suspension, is when the road wheel leaves the ground
entirely, such as cresting a hump backed bridge at speed. The car will maintain a constant level in
any of the three intermediate height control positions. Within the design limits of the accumulator
it will respond to changes in load and maintain a constant height.
Shock absorbers
Fluid dampers are incorporated in the neck of the spheres and serve as double-acting shock
absorbers. The damping action is achieved by careful flow restriction of the LHM. The damper is
a precision machined metal part with a series of precisely drilled passages. The upper and lower
surfaces of the facing nuts are domed to allow the flexible discs to lift off the LHM passages.
Suspension resistance can be varied by changing the thickness of these flexible discs. There is
also a calibrated hole drilled in the damper body allowing a direct flow of LHM from the
suspension cylinder to the sphere and back again. Its purpose is to minimise damping under
conditions of small road wheel movement, when adequate damping is supplied by the tyres
themselves.
In older cars this by-pass hole does not exist. The same basic effect is achieved by using a
0.001 thou shim, placed between the damper and the flexible disc on one side. This provided a
slight gap for free movement of LHM under the conditions described above.
30

Chassis height correction
The design of the system allows for a simple yet effective automatic ride height correction
of the suspension, relative to the load carried. This is accomplished by two identical mechanical
correctors using pressure from the main hydraulic system. The correctors are controlled by a
mechanical linkage bolted to the anti-roll bars, which are themselves connected to the front and
rear suspension arms. The system also has a manual override control under the command of the
driver, which is situated on the inner offside sill. This control works simultaneously on both the
front and rear height correction units and allows changes to the ride height to be made, for
traversing water or rough terrain.
HeightCorrector
Both height correctors are a three way distributor block that depending on the position of
the main internal slide valve, can connect the suspension cylinders to the high pressure LHM
source. Or connect the suspension cylinders to the outlet which returns LHM to the main
reservoir, or isolate both the inlet and outlet ports in the central or cut-off position.
The chambers C and D are sealed by rubber diaphragms which are themselves reinforced by
metal cups. These chambers are full of LHM which arises from controlled seepage past the slide
valve. A plastic return pipe takes this LHM back to the reservoir. Both chambers are 31
Pressure IN Exhaust
Rubber Diaphragm
MetalCups Slide Valve
Discs
Springs
To Suspension Cylinders
C

interconnected by a clear passage drilled in the sleeve of the slide valve and which is closed at
each end by disc valves, controlled by the movement of the slide valve. In the central position,
each disc is held against a face on the sleeve by a weak spring. A restricted dash-pot passage
inserted in the body of the corrector, limits the flow of LHM from C to D and back. This passage
is connected to the return to the Reservoir.
As the slide-valve is moved from its central or cut-off position, the disc valve in chamber
C is held on its seating by its return spring, closing off the passage. The disc-valve in chamber D
is lifted off its seating in turn, by the shoulder on the slide-valve which now allows free LHM
movement. LHM in chamber C is now free to pass through the dash-pot, which slows down the
fluid movement. This in turn, slows down the movement of the slide-valve.
The net effect is that there must be positive effort on the slide valve for a certain period of
time, before it can move to the exhaust position. This prevents movement of the slide valve under
conditions of small rapid movements of the road wheel, which would give rise to excessive
suspension travel.
When the slide-valve is returned to the cut-off position, LHM in chamber D returns to
chamber C by way of the now clear passage, lifting the disc-valve against its return spring as it
does so. As the movement of the disc valve is not restricted, the return is rapid. As soon as the
slide valve returns to the cut-off position again, the disc valve in chamber D closes the passage,
stopping the slide-valve from over running the cut-off position. This helps to avoid secondary
corrections that would be caused by the valve overshooting the central position.
32
C D
LHM return
Valve ‘A’Valve ‘B’
Clearpassage
Dashpot
SlideValve
Slide Valve in central cut-off position

When the slide-valve moves, the disc valve in chamber D is now held againby its spring,
closing the clear passage. At the same time the disc valve in chamber C is lifted off its seating by
the shoulder on the slide-valve, thus opening the clear passage. LHM in chamber D will now pass
through the dash-pot which restricts the flow, slowing down the movement of the slide-valve. As
with the exhaust sequence, the slide valve must be held in this position for a period of time,
before the inlet passage is opened.
Going from the inlet position back to the central or cut-off position, follows the same
sequence of events as going from the exhaust to cut-off, but in the reverse direction.
It should be noted that there is a wire restrictor fitted within the return line to the reservoir,
from the exhaust port of the rear height corrector. This restrictor prevents all the LHM in the
33
Slide valve moves from the cut-off (central) position, to the exhaust position.
Slide valve moves from the exhaustposition, to the central or cut-off position.
C D C D
Slide valve moves from the cut-off (central) position, to the inlet position.
Slide valve moves back to the central or cut-off position.
C D C D

suspension cylinders returning to the reservoir at an uncontrolled rate, when the height control is
moved to maximum low and which would cause the car to drop very suddenly. If the car is new
to you and/or there is any suspicion that the hydraulic lines that run through the sills have been
replaced, it is good practice to observe the car’s suspension drop speed, before fitting the jacking
strut. It is also good practice when jacking the car, to check that the jacking strut is located
properly on the sill mounted stud and to move the height control lever to its next notch and
recheck the strut location again, before moving the lever all the way to max low.
The high pressure pump
A single cylinder pump was fitted to ID’s without power steering; the more common 7
cylinder pump is fitted to all other models. There are two outer case variants on the 7 cylinder
pump; the semi-auto car has an extra fitting lug on the pump, to take the drive belt adjusting strut
of the centrifugal regulator. The seven cylinder pump is fitted above the bell housing on the
offside and driven at half engine speed by a pair of belts off the crankshaft. This is a volumetric
pump; in other words, the swept volume remains the same, whatever the pressure.
The pump comprises seven pistons arranged in
such a way as to provide a continuous flow of LHM and
at the same time supply the necessary pressure to the
LHM. The pistons pump within cylinders and all are
arranged in a circle. An oscillating swashplate powers
the movement of the pistons via push-rods. In the
cylinder wall of each of the 7 bores are 4 inlet ports,
each with a non-return valve held on its seat by a spring.
All the ports are inter-connected and are in turn
connected to the high pressure outlet of the pump.
Seven cylinder hydraulic pump
Operation:
Each piston on its downward stroke which is powered by a return spring, produces a
depression within the bore. When the inlet ports are uncovered, this depression draws LHM into
the bore. As the piston continues to move, the inlet ports are covered and the piston starts to
34

compress the LHM. When the LHM within the bore reaches a pressure greater than that already
present in the system, the non-return valve opens and pressurised LHM is delivered to the
pressure accumulator. The non-return valve then closes by the action of its spring and the
pressure existing in the system holds the valve shut on its seating.
The pump delivery is 2.80 cc per revolution or 840 cc per minute at an engine speed of
600 rpm with a new pump. While the pump is idling, the pressure is only enough to return the
LHM to the reservoir through the pressure-regulator. The maximum pressure is controlled by the
pressure-regulator.
Seven cylinder Hydraulic Pump
Main accumulator
Their are two types of accumulator, differentiated by a number punched on the head of the
nitrogen gas filler screw:-
40 - for vehicles with the ID type brake system ID 19B (DV) & ID 20 (DT)
65 - for all other D models.
The accumulator consists of a forged steel pressure sphere which unscrews into two
halves. It is attached to the pressure regulator and both are fitted low down on the nearside of the
engine block. The purpose of the accumulator is to improve the flexibility of the hydraulic
35

Nitrogen at theinitial inflationpressure
Reserve ofLHMunder pressure
Nitrogen at thepressure of theLHM in use
De-pressurised Pressurised
system, by immediately supplying pressurised LHM in the event of heavy demand. It also allows
the pump to idle and eliminates repeated cutting-in and out. Finally, it smooths demand in the
system and acts as a damper.
Stretched across the inside of the two halves of the sphere is a flexible diaphragm made
from synthetic rubber. The top half of the sphere is filled with nitrogen under pressure, the
bottom half is connected to the pressure regulator and holds the pressurised LHM.
A basic law of physics is utilised in the innovative DS hydraulic sphere concept. This law
(Boyles Law) states that gas (nitrogen) can be compressed. Fluid (LHM) cannot be compressed.
It should be noted that the rubber diaphragm within the sphere is not load bearing. The pressure
of the nitrogen above and the pressure of the LHM below, directly act on one another through the
diaphragm, which flexes according to the differing pressures present. With the system de-
pressurised, the diaphragm balloons out under the pressure of the ever present nitrogen and is
blown hard against the wall of the bottom half of the sphere. Conversely, when the sphere is fully
pressurised by the pump, the LHM which is now at a greater pressure than the nitrogen, causes
the diaphragm to balloon upwards, compressing the nitrogen still further, until the LHM and
nitrogen pressures equalise leaving the rubber diaphragm in a state of equilibrium. When pressure
is used by the system, causing a drop in both LHM volume and pressure, the compressed nitrogen
expands to compensate for these changes and the flexible diaphragm takes up a different position
of equilibrium. The nitrogen and LHM are still at identical pressures, but of a lower value. The
36

flexible diaphragm therefore, plays a passive role in the work of the accumulator, simply that of
separating the gas and LHM.
Pressure Regulator
Pressure regulators fitted to cars with a single piston hydraulic pump and cars with the 7
piston pump, operate under different pressures.
Single-cylinder pumps up to mid-February 1969:
Marking: No groove on the lower part of the end cap.
Pressures: Cut-out 130 - 140 bars (1850 - 1990 psi)
Cut-in 100 - 110 bars (1420 - 1560 psi)
37
Hydraulic Pump
PressureRegulator
Supply to HydraulicGear Change Control
To brakepedal unit
Supply toRear Suspension
Return fromSteering
Return fromSuspension
Overflow Returnfrom Priority Valve
MainAccumulator
LHMReservoir
Supply toFront Suspension
Supply toSteering
Priority Valve
Front BrakeAccumulator
Overflow Returnfrom Clutch Lock
Source of pressure circuit

Seven cylinder pumps, and single cylinder types from mid-February 1969:
Marking: A circular groove on the lower part of the end cap.
Pressures: Cut-out 150 - 175 bars (2130 - 2490 psi)
Cut-in 125 - 140 bars (1775 - 1990 psi)
The Pressure Regulator consists of three chambers interconnected via two valves.
* Chamber A is connected to the feed from the pump.
* Chamber U is connected to the accumulator and the high pressure feed out.
* Chamber R is connected to the LHM reservoir.
The non-return valve allows LHM to pass only from A to U. The valve between chambers
A and R is controlled by the pressure in chamber U, by way of a piston in contact with the ball B
of the valve. The pressure-release screw when unscrewed, allows the LHM in the accumulator
and supply circuits to be released back to the reservoir. This act depressurises all the hydraulic
units on the car.
In operation, with the engine running the pump supplies pressurised LHM to the sphere.
Pressure then rises in chamber A, lifting the ball of the non-return valve and allowing pressurised
38
Pressure Regulator ball valve
T
f
S
S
F
Pressure Regulator
A
B
R

LHM to enter the accumulator U. There is no pressure in chamber R.
Pressure acting on the surface of the ball creates a force F = p x s which tends to force the ball
onto its seat. This same pressure acting on the piston head (in chamber U) creates a force F= P x
S which tends to lift the ball off its seating. The surface S being larger than s, the result of F and
f: (F - f) would lift the ball off its seat as soon as pressure arrives. To hold the ball on its seat until
the cut-out pressure is achieved, a spring A is situated under the ball. When the product of (F - f)
exceeds force T, the ball B is lifted off its seat. Pressure drops in chamber A and the ball of the
non-return valve seats again. Since the pressure in chamber A drops to nil, the force F also
becomes nil, thus increasing the strength of F over T which helps to maintain the cut-out
condition.
The use of pressurised LHM by the various hydraulic units, leads to a drop in pressure in
the accumulator and the force F weakens. When T becomes the stronger it forces the ball B back
onto its seat. Pressure rises in chamber A, creating again a force F which helps the spring T. The
pump then circulates LHM under pressure to the chambers A and U.
From May 1969 a Pilot-Valve type Regulator was introduced.
The Pilot-Valve Regulator consists of 4 chambers interconnected via a non-return valve
39
Accumulator To Hydraulic Circuits
V
T1
RR1
To reservoir
UC
T2LHM In
AR2
B
Pilot-Valve Regulator at cut-in phase

and two slide valves.
Chamber A is connected to the feed from the pump.
Chamber U is connected to chamber A, the accumulator and supply to units.
Chamber B is connected to chamber A or chamber R depending on the position of the pilot
valve T1.
Chamber R is connected to the LHM reservoir.
Pilot Valve T; this allows LHM to flow into chamber B or from chamber B to chamber R.
It is controlled by the pressure of the LHM in chamber U
Slide Valve T2; this allows LHM to flow from chamber A to chamber R depending upon
its position. It is controlled by the pressure of LHM in chambers U and B.
Non-return Valve C; this allows LHM to pass only from chamber A to chamber U.
Pressure-release screw V; this allows LHM in chamber U to escape back to the reservoir
via chamber R, if required.
Operation of Regulator cut-in
LHM from the HP pump (in chamber A) rises in pressure in chamber U and the supply
circuits by lifting the non-return valve C. This pressure rises simultaneously in chamber B via
pilot valve T1. Eventually the cut-out will operate, as the rising pressure in chamber U creates an
increasing force F on the upper face of the pilot valve T1, which tends to force the slide valve
downwards. As soon as this force F becomes stronger than the force of spring R1, the pilot valve
T1 moves downwards slightly, cutting off the supply of high pressure LHM to chamber B.
Meanwhile the pressure continues to rise in chamber U and the pilot valve T1 is forced further
down and connects chamber B to the reservoir via chamber R. When the pressure in chamber B
drops to zero, the slide valve T2, now subjected to the pressure in chamber U, moves down and
compresses the spring R2. This slide valve connects the feed from the HP pump (chamber A) to
the chamber R and to the return to the reservoir. Therefore the pressure existing in chamber U
closes the non-return valve C and the pump circulates LHM back to the reservoir without
pressure.
Operation of Regulator cut-out
As LHM pressure is used by the hydraulic systems, this leads to a drop in pressure in the
accumulator and chamber U. The pilot valve T1 then moves up under the influence of the spring
Rl. First it closes the port leading to chamber R, then connects the LHM feed from the pump to
40

chamber B. At this point, slide valve T2 under the influence of spring R2 moves up and closes the
return to the reservoir via chamber R. The pump circulates LHM under pressure to chamber U.
Operating Pressures
Cut-out pressure 162 - 175 bars (2305 - 2490 psi)
Cut-in pressure 140 - 147 bars (1990 - 2090 psi)
Distribution and regulation of pressure within the hydraulic system
Pressure distributors and regulators are integral parts of many of the hydraulic units on the
DS. It is therefore essential to know their principles of operation to understand the working of the
units.
A pressure distributor is a valve which will admit or exhaust LHM under pressure to or
from one or more circuits. A distributor may also isolate this unit or units from both the inlet and
exhaust lines. The Pressure Distributor generally takes the form of a slide valve operating within
a sleeve. It is the position of the slide valve which is the controlling factor in the operation of the
circuit.
Gear Selector Slide Valve
An example of this type of pressure distributor, as used on the DS, is the gear selector
slide valve, which operates within a sleeve. This slide valve is hollow and has one inlet for the
supply of pressurised LHM and five outlets; one to engage each of the four forward gears plus
reverse. Longitudinal and circumferential grooves machined in the slide valve allow the LHM to
return to the reservoir from the various circuits. The sleeve has 5 ports, one to supply each gear.
With the gearbox in neutral, the valve is at rest and the various outlets from the slide valve
41

align with a plain part of the sleeve. The various ports on the sleeve communicate with the
reservoir via the grooves in the slide valve.
Pressurisation (Diagram A): When the slide valve is moved, a port is aligned with a
corresponding port in the sleeve and the circuit is pressurised.
De-Pressurisation (Diagram B): With the slide valve in any position which allows
alignment of an outlet to a circuit, to connect with the return to the reservoir, the LHM under
pressure in that circuit will flow out and return to the reservoir. It should be noted that the
operation of this distributor is independent of the amount of effort applied to the slide valve when
it is being moved. Only the movements and positioning of the slide-valve itself, permits the
distribution of LHM.
Another type of pressure distributor, are the height correctors. This is a slide valve with
two shoulders that slide in a sleeve in which there are three ports. In the neutral position the slide
valve closes the inlet and exhaust ports. The supply port to the circuit is always open. The
slightest effort "R" on the slide valve, will introduce pressure and move it so that the inlet port is
opened. The circuit is then connected to the source of pressure. Thus the pressure in the source of
pressure circuit will enter the circuit in use and the pressure values in the two circuits will be
equal, regardless of the effort on the slide valve.
42
R
R1
Circuits in use
Exhaust
Inlet
Height Corrector Slide Valve

Conversely, a force R 1 (opposed to R) applied to the slide valve will move it so that the
exhaust port is opened and it will depressurise. The LHM under pressure in the circuit in use will
flow out and return to the reservoir. It should be noted that the forces R and R 1 are connected
with the operation of the slide valve only by the presence of a dash-pot in the height corrector.
It is the case that some hydraulic units can only be made to operate correctly by using a
pressure lower than that held in the Source of Pressure circuit. In some cases it is necessary to use
a variable but controllable pressure, such as for the steering and braking circuits. Or a constant
but relatively low pressure, such as the clutch circuit. However, a simple pressure distributor
cannot satisfy all these conditions; in these cases the DS uses a pressure control-valve.
Pressure control valve
The diagram shows the various parts which comprise the pressure control-valve. The force
R applied to the end of the slide valve may be the strength of a spring, the effect of the different
calibrations of several springs, or a physical input from the driver.
To make the control-valve operate, it is necessary to connect the source of pressure with
the circuits to be used. This connection can be made automatically; at rest the source of pressure
is connected to the circuit. Or it can be operated manually; at rest the position of the slide valve is
not important.
When pressure rises in the circuit in use, pressure P also rises in chamber A under the slide
43
R
A
F
Circuits in use(controlled pressure)
Exhaust(return to reservoir)
Inlet(high pressure)
Pressure Control Valve
S

valve. A force F = P x S opposes the force R (S = The surface area of the slide valve).
When F becomes equal to R the slide valve takes up a position of equilibrium in which
both the inlet and exhaust ports are closed. The pressure in the circuit is therefore limited to a
value P = R / S. This pressure is independent of that existing in the source of pressure circuit. If
force R is increased, the controlled pressure rises, and vice versa.
For a fixed value of R: If the pressure drops in the circuit being used, F decreases, R
prevails, the slide valve moves to the inlet position, and the regulated pressure Pr increases.
(Figure A). If the pressure rises in the circuit being used, F increases, the slide valve moves to the
exhaust position and the pressure decreases (Figure B).
These two states, resulting from seepage and friction between the slide valve and its
sleeve, result in the regulated pressure oscillating between two values very close to the theoretical
pressure.
Applications:
If R is the calibrated strength of a spring T, a regulated pressure is obtained:
Pr = T / S. An example of this, is the automatic gear change slide valve in the gear selector.
If R is a variable manual force, or the variable calibration of a spring (the calibration
44
Two states of a Pressure Control Valve
(A) (B)R R
S
Pressure OUTPressure IN
To reservoir
Pressurised LHMsupply
To reservoir
Pressurised LHMsupply
F = Pr x S F = Pr x S
S
A A

varying with the movement of the spring's abutment) a pressure is obtained which is proportional
to the force R. This is therefore an adjustable regulator. An example of this, is the hydraulic
Brake Control and Centrifugal Regulator.
Dash-Pots:
To avoid a rise of pressure which is too rapid in the circuit in use, the movement of the
slide valve may be slowed down by the use of a dash-pot. This method also avoids oscillation of
the slide valve. A piston with a calibrated amount of clearance slides within chamber A, the
diameter of which is greater than the slide valve. When the slide valve moves down, the LHM is
restricted in its movement between the piston and the walls of the chamber A, which slows down
the movement of the valve. A weak spring and a hole drilled in the head of the piston allow a
rapid return of the slide valve.
April 2003
45