The fitting and fabrication of a custom resin artificial eye
7
MAXILLOFACIAL PROSTHETICS TEMPOROMANDIBULAR JOINT DENTAL IMPLANTS I. KENNETH ADISMAN, LOUIS J. BOUCHER, Section editors The fitting and fabrication of a custom resin artificial eye Philip Benson* New York, N. Y. lh 1 e oss of a part of the face, particularly the eye, requires early replacement SO that the patient may return to a normal life. The defect is disturbing, and both psy- chologic and economic difficulties arise. In the 18th century, Ludwig Muller-Uri of Germany fabricated eyes for dolls so well that a local physician commissioned him to fabricate eyes for patients. Various materials such as vulcanite and celluloid were used during the 19th century to im- prove these artificial eyes. Early in the 20th century, the Muller-Uri family fabricated glass eyes using sand with a low iron oxide content. This type of glass eye was used almost exclusively until 1939 when combined efforts by individuals in the Armed Forces of the United States resulted in successful fabrication of the resin (methyl- methacrylate) eye. The resin eye is superior to the glass eye for both its esthetic realism and its strength. The sequence of fabrication will guide the prosthetist in the use of materials, techniques, and concepts necessary to fit and fabricate the custom-made resin eye. PAINTING THE IRIS DISK The diameters of the iris and the pupil of the patient’s natural eye are measured and recorded on a patient work card. This card serves as a permanent reference for future use. A clear ethylcellulous iris disk corresponding in size to the iridic diameter of the patient’s existing eye, is selected. Utilizing the diameter of the pupillary aper- ture, the opening is filed with a Swiss No. 2 rattail file to the proper diameter. The disk is held by a lock tweezer and prepared for painting. Windsor Newton oil colors are placed on a white palette to be mixed for selection of the pigments used in the painting procedure. The colors used include: ( 1) rose *Director, New York Prosthetic Center, New York, N. Y.; Technical Director, Facial Pros- thetic Unit, Department of Maxillofacial Prosthetics, New York University, College of Den- tistry, New York, N. Y.
-
Upload
philip-benson -
Category
Documents
-
view
221 -
download
5
Transcript of The fitting and fabrication of a custom resin artificial eye

MAXILLOFACIAL PROSTHETICS TEMPOROMANDIBULAR JOINT DENTAL IMPLANTS
I. KENNETH ADISMAN, LOUIS J. BOUCHER, Section editors
The fitting and fabrication of a custom resin
artificial eye
Philip Benson* New York, N. Y.
lh 1 e oss of a part of the face, particularly the eye, requires early replacement SO that the patient may return to a normal life. The defect is disturbing, and both psy- chologic and economic difficulties arise.
In the 18th century, Ludwig Muller-Uri of Germany fabricated eyes for dolls so well that a local physician commissioned him to fabricate eyes for patients. Various materials such as vulcanite and celluloid were used during the 19th century to im- prove these artificial eyes. Early in the 20th century, the Muller-Uri family fabricated glass eyes using sand with a low iron oxide content. This type of glass eye was used almost exclusively until 1939 when combined efforts by individuals in the Armed Forces of the United States resulted in successful fabrication of the resin (methyl- methacrylate) eye.
The resin eye is superior to the glass eye for both its esthetic realism and its strength. The sequence of fabrication will guide the prosthetist in the use of materials, techniques, and concepts necessary to fit and fabricate the custom-made resin eye.
PAINTING THE IRIS DISK
The diameters of the iris and the pupil of the patient’s natural eye are measured and recorded on a patient work card. This card serves as a permanent reference for future use. A clear ethylcellulous iris disk corresponding in size to the iridic diameter of the patient’s existing eye, is selected. Utilizing the diameter of the pupillary aper- ture, the opening is filed with a Swiss No. 2 rattail file to the proper diameter. The disk is held by a lock tweezer and prepared for painting.
Windsor Newton oil colors are placed on a white palette to be mixed for selection of the pigments used in the painting procedure. The colors used include: ( 1) rose
*Director, New York Prosthetic Center, New York, N. Y.; Technical Director, Facial Pros- thetic Unit, Department of Maxillofacial Prosthetics, New York University, College of Den- tistry, New York, N. Y.

Custom resin artificial eye 533
Fig. 1. The palette of colors used for painting the iris disk.
madder, (2) cadmium red, (3) cobalt blue, (4) veridian green, (5) yellow ochre, (6) burnt umber, (7) titanium white, and (8) ivory black (Fig. 1).
Using both daylight and artificial light, the colors in the patient’s existing eye are determined.
The sequence of the technique of painting the artificial eye is as follows: the stroma (the predominant iris color), the background (the colors shown at limbus), the collarette (the area surrounding the pupil), and the markings (the striations on the anterior surface).
After the painting is completed, the disk is removed from the lock tweezer and placed on cotton pliers. The blank spot remaining from the lock tweezer is painted. The painted disk is placed in a disk drier and dried in a forced hot-air oven at 70’ C. for 8 hours.
PACKING THE IRIS DISK
The die is wiped with methylmethacrylate monomer, and all flash is removed with a razor blade. The die is placed in proper position for packing, and cellophane sheets are placed under the template and die. The pupillary aperture is filed with a rattail file to remove excess paint. The iris disk is placed facedown on the template. It is advisable to arrange the die in the same order every time for the packing process. Clear acrylic resin is mixed in a mixing jar, adding the monomer to the polymer with a medicine dropper. The jar is closed.
When the acrylic resin reaches the proper consistency, the packing process begins. ( 1) Pack the cornea die plate, and place wet cellophane over the plate. (2) Pack the template over the disc and cover with wet cellophane. (3) Test pack in a bench press. (4) Remove the excess acrylic resin. (5) Place the black vinyl resin pupil disk over the template aperture, cover it
with dry cellophane, and assemble the die. (6) Test pack and remove the excess resin.

534 Benson J. Pro&et. Dent. November, 1977
Fig. 2. (A) The die set used for fabrication of the iris button. fB) The iris color variations.
(7) Assemble the die in sequence with no cellophane between the template and the die plate, and complete the final press.
(8) Place the assembled die in a press, and allow it to cure for 2 hours at 212’ F. starting with cold water in the unit (Fig. 2).
FITTING THE WAX SCLERAL FORM*
The border of the artificial eye fabricated for an orbital prosthesis can be de- termined by the dimensions of the palpebral fissure.
The fitting technique requires a No. 7 wax spatula, bench knife, steel ball, ivory wax, and baseplate wax.
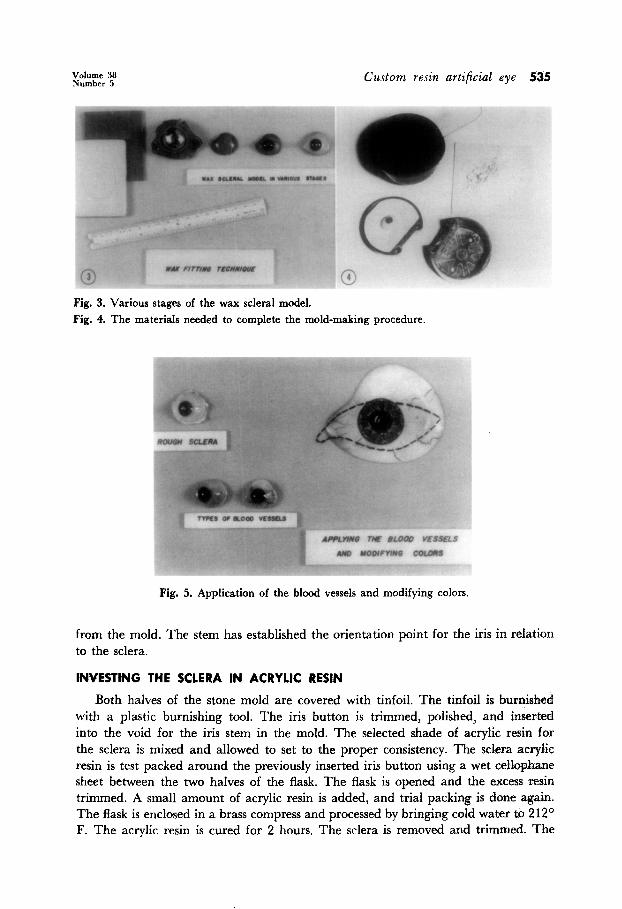
The patient’s socket is examined to determine its size and shape. A steel ball of the appropriate size and curvature of the socket is selected. Baseplate wax is heated and adapted around the steel ball. The border is outlined on the wax, and the excess wax is removed with a bench knife. The border is smoothed, flamed, and tried in the patient’s socket. The objective is to obtain complete peripheral contact and proper curvature. When this is accomplished, the wax fitting is reinserted. The location for the iris button is marked with an “X,” and the wax form is removed. The iris button is attached with a heated wax spatula. The iris button is tried in and aligned. The sclera is removed, contoured with ivory wax, and reinserted. If satis- factory, the model eye is removed and prepared for investing (Fig. 3).
INVESTING THE WAX MODEL EYE IN ARTIFICIAL STONE
Tinfoil is adapted around the iris stem, and the artificial stone is mixed to the proper consistency. Half of the brass flask is cleaned, lubricated with petroleum jelly, and filled with the prepared mixture of stone. The wax model is inserted in the stone with the iris and stem facing down. The dental stone is smoothed, and it is allowed to harden. The mold is soaked in a soapy separating medium for 10 minutes.
Artificial stone is mixed for the counter half of the mold (Fig. 4). The flask is closed and the stone allowed to harden. The mold is separated, and the wax is re- moved and cleaned. The wax and the iris button with the stem intact are removed
*Applicable only when the patient’s socket and lid exist.
Volume 38 Number 5 Custom resin artificial eye 535
Fig. 3. Various stages of the wax scleral model. Fig. 4. The materials needed to complete the mold-making procedure.
Fig. 5. Application of the blood vessels and modifying colors.
from the mold. The stem has established the orientation point for the iris in relation to the sclera.
INVRSTING THE SCLERA IN ACRYLIC RESIN
Both halves of the stone mold are covered with tinfoil. The tinfoil is burnished with a plastic burnishing tool. The iris button is trimmed, polished, and inserted into the void for the iris stem in the mold. The selected shade of acrylic resin for the sclera is mixed and allowed to set to the proper consistency. The sclera acrylic resin is test packed around the previously inserted iris button using a wet cellophane sheet between the two halves of the flask. The flask is opened and the excess resin trimmed. A small amount of acrylic resin is added, and trial packing is done again. The flask is enclosed in a brass compress and processed by bringing cold water to 212’ F. The acrylic resin is cured for 2 hours. The sclera is removed and trimmed. The

536 Benson J. Prosthet. Dent. November, 1977
Fig. 6. Anterior surfaces of the eye prosthesis.
Fig. 7. Cross section of the finished prosthesis.
iridic diameter is opened to its proper size using a dental handpiece and arbor band. The iris is in its proper relationship to the acrylic resin sclera.
MODIFICATION OF SCLERA WITH BLOOD VESSELS
Fine-grit No. 8 cuttlefish paper disks are used for roughing the surface of the sclera. The fabricated sclera and iris are inserted into the patient’s socket, visually marking the palpebral fissure. Rayon filaments of various desired lengths are cut and placed on a white card. The patient’s blood vessel pattern, including number, type, sinuous, tortuous, and straight, is observed (Fig. 5).
Rayon vessels are attached to the sclera using monomer-polymer solution. The vessels are terminated at the limbus, medial and lateral canthi. The blood vessel pat-

Volume 38 Number 5 Custom resin artificial eye 537
Fig. 8. Finished and polished artificial resin eyes.
tern is altered using a brush handle as a stylus. The monomer-polymer mix is dried under a lamp.
Modifying tints are applied to the sclera using clear monomer-polymer solution with oil pigment added. The caruncle is pink; the capillaries are pink; and various shadings of brown, blue, green, or yellow are used. The artificial plastic eye is dried under a lamp and inserted in the patient’s socket for observation.
PROCESSING THE CONJUNCTWA
Using artificial stone and the iris button stem, the iris stem void is filled in the mold. Both halves of the mold are “tinfoiled” and burnished. The fabricated eye is set on the male half of the mold. Clear acrylic resin is mixed until the proper consist- ency is obtained. The anterior portion of the eye is covered with a thin layer of the clear acrylic resin with wet cellophane between the upper and lower halves of the mold. The cellophane and excess resin are removed. A small amount of acrylic resin is added, and the final closure of the flask is completed without cellophane. The mold is closed and enclosed in the press.
The resin is processed in a curing unit starting with cold water followed by heat- ing to 212O F. in a period of 2 hours.
FlNISHING AND POLISHING
After the ocular prosthesis is removed from the mold, the flash is trimmed with a fine arbor band on a mandrel, and all coarse scratches are lightly removed. The anterior and posterior surfaces are finished with a rubber Burlew cup and polished with wet, fine Italian pumice. Using tripoli compound and high-shine white com- pound, all surfaces are finished and polished. The prosthesis is inspected for imperfec- tions (Figs. 6 and 7). The artificial resin eye is washed with warm water and soap and inserted into the patient’s socket (Fig. 8).
538 Benson J. Pro&et. Dent. November, 1977
SUMMARY
An orderly, sequential technical procedure provides the prosthetist with the capa- bility of fabricating and fitting a custom resin eye. The ocular prosthesis is estheti- cally natural to the patient and to the observer and is durable and stable for many years of use.
I want to express my sincere appreciation to Ellis Pascal Simpson and Dr. I. Kenneth Adisman for their guidance and support.
137 E. 36~~ ST.
NEW YORK, N. Y. 10016
ARTICLES TO APPEAR IN FUTURE ISSUES
Practical considerations of iontophoresis of fluoride for desensitizing dentin L. P. Gangarosa, Ph.D., D.D.S., and N. H. Park, D.D.S., M.S.D.
A safe crown removal technique Don G. Garver, D.D.S., and Robert C. Wisser, D.D.S.
The collarless metal-ceramic crown Charles J. Goodacre, D.D.S., M.S.D., Ned B. Van Roekel, D.D.S., M.S.D., Roland W. Dykema, D.D.S., M.S.D., and R. Brian Ullmann, D.D.S., M.S.D.
Vinyl chloride concentrations in maxillofacial prosthetics laboratories Oscar N. Guerra, M.S.P.H., D.D.S., and Kenneth J. Kronoveter, M.S.
An evaluation of a rubber-base impression material Genadi Gunther, C.D., D.D.S., and Stephen L. Welsh, D.D.S.
Tear strength of elastomeric impression materials Thomas W. Herfort, B.S.E., M.S., William W. Gerberich, Ph.D., M.S., C. W. Macosko, Ph.D., M.S., and Richard J. Goodkind, D.M.D., M.S.
Composite resin repair of porcelain denture teeth D. G. Jochen, D.D.S., and A. A. Caputo, Ph.D.
Accurate acrylic resin temporary restorations David A. Kaiser, D.D.S., M.S.D.
A histologic evaluation of tissue response to three currently used temporary acrylic resin crowns Michael I. MacEntee, L.D.S., Stephen 0. Bartlett, D.D.S., and C. Boyd Loadholt, Ph.D.