The EDE 2 Course
7
The EDE 2 Course The EDE 2 Course MSK EDE – Joint effusions Ankle EDE Excerpt Chapter author: Steve Socransky In the absence of trauma, there is only one true rheumatologic emergency – the septic joint. The possibility of a patient having septic joint arises from time to time and it can be quite a nuisance. Ancillary testing is limited in utility. Joint fluid analysis is the definitive test. However, except for the knee, arthrocentesis via the landmarkbased approach is infrequently performed and often yields a dry tap. In those cases, does the patient not have an effusion or was the effusion just missed by the needle? FRUSTRATING! EDE comes to the rescue. EDE helps in two ways: diagnosis and procedure guidance. Does the 10 year old with fever and hip pain have a septic hip? Does the 60 year old with diabetes and spontaneous ankle pain have a septic joint? If the EDE shows an effusion, then a septic joint is possible. But if there is no effusion, then a septic joint becomes much less likely. And with no effusion, there is little or no reason to do a tap. There are two main exceptions, both related to timing of presentation. Remember: CLINICAL SUSPICION RULES. The first would be the patient who presents quite early (i.e. < 2448 hours postonset). An effusion may not have developed yet and close followup would be wise. The second would be the patient who presents quite late in which case the pus might have become solid and not appear as black on the screen (e.g. 12 week H/O red hot ankle in a febrile intravenous drug abuser). If the patient does have an effusion on EDE and septic joint is a concern, then it’s time to do a tap. In the case of the ankle, hip, and elbow, EDE guidance is preferred as these joints are infrequently tapped by emergency physicians. On the other hand, the knee is the easiest joint to tap and it is also the joint most commonly tapped by emergency physicians. While EDE guidance is not usually required here, it is an option in the case of small knee effusions and in the morbidly obese. Although static guidance can be used, we will focus on dynamic guidance as it tends to be more reliable. Static guidance can simply be used by, one places a mark on the skin for needle entry, noting the angle at which the needle should enter the skin and the depth at which fluid should be encountered. Dynamic guidance is described in detail below. The Ankle The ankle is scanned with the probe in the longitudinal plane (indicator towards the patient’s head). A higher frequency probe is used (endocavitary or linear array). Start by placing the probe on the lower shin (Figure 1). The distal tibia’s anterior edge will be a bright white line running across the screen from left to right (Figure 2).
Transcript of The EDE 2 Course

The EDE 2 Course
The EDE 2 Course MSK EDE – Joint effusions Ankle EDE Excerpt Chapter author: Steve Socransky
In the absence of trauma, there is only one true rheumatologic emergency – the septic joint. The possibility of a patient having septic joint arises from time to time and it can be quite a nuisance. Ancillary testing is limited in utility. Joint fluid analysis is the definitive test. However, except for the knee, arthrocentesis via the landmarkbased approach is infrequently performed and often yields a dry tap. In those cases, does the patient not have an effusion or was the effusion just missed by the needle? FRUSTRATING! EDE comes to the rescue.
EDE helps in two ways: diagnosis and procedure guidance.
Does the 10 year old with fever and hip pain have a septic hip? Does the 60 year old with diabetes and spontaneous ankle pain have a septic joint? If the EDE shows an effusion, then a septic joint is possible. But if there is no effusion, then a septic joint becomes much less likely. And with no effusion, there is little or no reason to do a tap.
There are two main exceptions, both related to timing of presentation. Remember: CLINICAL SUSPICION RULES. The first would be the patient who presents quite early (i.e. < 2448 hours postonset). An effusion may not have developed yet and close followup would be wise. The second would be the patient who presents quite late in which case the pus might have become solid and not appear as black on the screen (e.g. 12 week H/O red hot ankle in a febrile intravenous drug abuser).
If the patient does have an effusion on EDE and septic joint is a concern, then it’s time to do a tap. In the case of the ankle, hip, and elbow, EDE guidance is preferred as these joints are infrequently tapped by emergency physicians. On the other hand, the knee is the easiest joint to tap and it is also the joint most commonly tapped by emergency physicians. While EDE guidance is not usually required here, it is an option in the case of small knee effusions and in the morbidly obese. Although static guidance can be used, we will focus on dynamic guidance as it tends to be more reliable. Static guidance can simply be used by, one places a mark on the skin for needle entry, noting the angle at which the needle should enter the skin and the depth at which fluid should be encountered. Dynamic guidance is described in detail below.
The Ankle
The ankle is scanned with the probe in the longitudinal plane (indicator towards the patient’s head). A higher frequency probe is used (endocavitary or linear array). Start by placing the probe on the lower shin (Figure 1). The distal tibia’s anterior edge will be a bright white line running across the screen from left to right (Figure 2).

The EDE 2 Course
Figure 1: Starting point
Figure 2: Starting point: What you see on the screen
As the probe is slid towards the foot, one reaches the end of the tibia. The bright white line will turn towards farfield and then swoops up again (Figures 3 and 4). This is the area of the talus. A Ushape or valley appearance is thus created. Placing the foot in full dorsiflexion accentuates the Ushape (Figure 5).
ANTERIOR TIBIA

The EDE 2 Course
PROBE
TIBIA
TALUS
SHADOWING
SOFT TISSUE
CEPHALAD CAUDAD
SLIDE THE PROBE
EFFUSION
Figure 3: Schematic representation of EDE screen when evaluating for an ankle effusion
Figure 4: Normal ankle: no effusion (black) at the base of the U or V shape

The EDE 2 Course
Figure 5: Dorsiflexion of the foot accentuates the Ushaped appearance of the ankle joint on the screen
At the bottom of this valley, one would look for an effusion, which would be black (Figure 6). Cartilage can sometimes be quite dark, so comparison to the other ankle is a good idea. If you do see an effusion and it is clinically indicated, it is time to do a tap.
Figure 6: An ankle effusion(black at the base of the U or V shape)
The EDE 2 Course
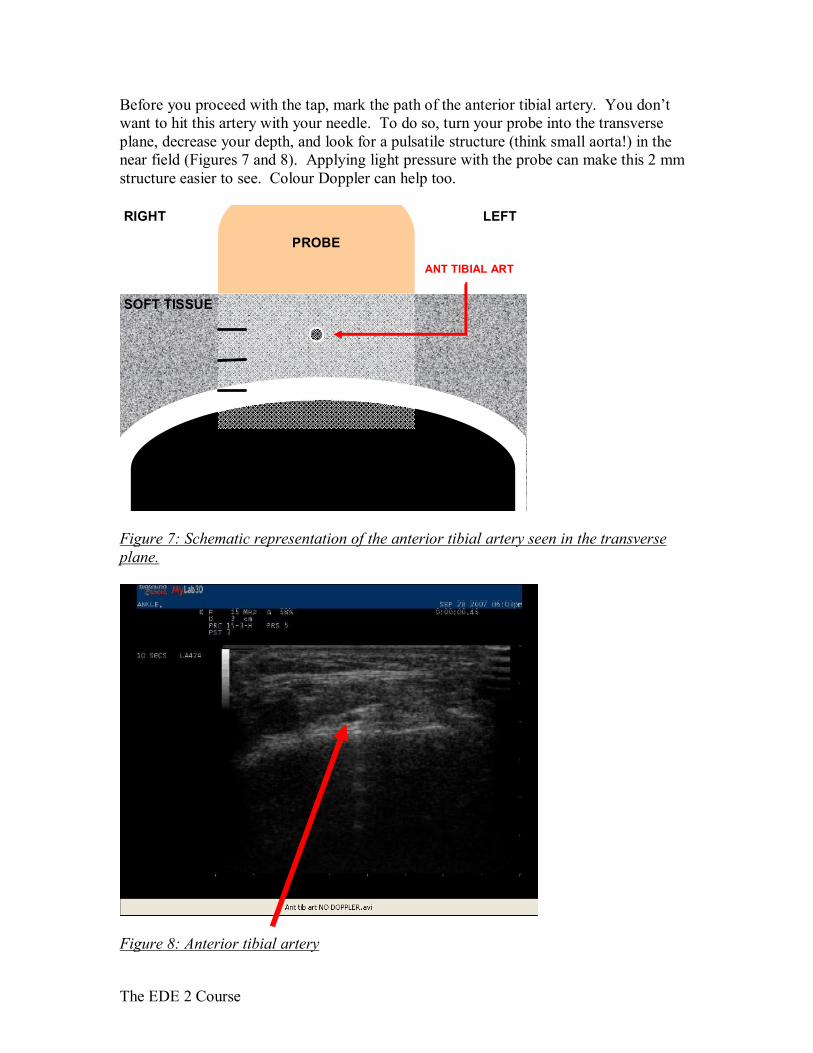
Before you proceed with the tap, mark the path of the anterior tibial artery. You don’t want to hit this artery with your needle. To do so, turn your probe into the transverse plane, decrease your depth, and look for a pulsatile structure (think small aorta!) in the near field (Figures 7 and 8). Applying light pressure with the probe can make this 2 mm structure easier to see. Colour Doppler can help too.
SOFT TISSUE
PROBE
RIGHT LEFT
ANT TIBIAL ART
Figure 7: Schematic representation of the anterior tibial artery seen in the transverse plane.
Figure 8: Anterior tibial artery

The EDE 2 Course
The probe is prepared in the same way as for central line placement. Once a sterile field is prepared, place the probe on the skin in the longitudinal plane and put the effusion in the centreleft of the screen. At this point, if you are using a standard linear array probe, you will notice a problem. The length of the probe head is too long for the small area in which you are working. Contact with the skin may be an issue (Figure 9). Using lots of gel may help. Also, the needle will never get close to the effusion if you enter the skin inferior to the probe head (Figure 10).
Figure 9: Lack of skin contact when using a linear array probe
Figure 10: Difficulty reaching the ankle joint with the needle when using a linear array probe.

The EDE 2 Course
You have 3 choices. (1) Enter the skin with the needle from the side of the probe; (2) Turn the probe into the transverse plane keeping the effusion in view (you will lose the Ushape landmark); (3) Switch to a probe with a smaller footprint such as the endocavitary probe (Figure 11).
Figure 11: The small footprint of the endocavitary probe head allows the needle point to be relatively close to the ankle joint
Once you have resolved this issue, enter the skin with the needle to one side of the anterior tibial artery. Direct the needle at the effusion while drawing back on the syringe. Withdraw and redirect as necessary until you aspirate joint fluid. Holster the probe and complete the procedure in the usual manner.
PROBE
TIBIA
SOFT TISSUE
TALUS
FOOT
SHADOWING
Figure 12: Aspirating an ankle effusion under EDE guidance