![Instructional pulication video [autosaved]](https://static.fdocuments.in/doc/165x107/58f0461a1a28ab8d468b461f/instructional-pulication-video-autosaved.jpg)
THE CREATION OF INSTRUCTIONAL VIDEO …thesis.honors.olemiss.edu/687/1/THE CREATION OF... · THE...
27
THE CREATION OF INSTRUCTIONAL VIDEO TUTORIALS FOR CHEMICAL ENGINEERING PROCESS SIMULATION SOFTWARE by Nishal Vinoo Bhikha A thesis submitted to the faculty of The University of Mississippi in partial fulfillment of the requirements of the Sally McDonnell Barksdale Honors College Oxford May 2016 Approved by __________________________________ Advisor: Dr. Adam Smith __________________________________ Reader: Dr. John O’Haver __________________________________ Reader: Dr. Paul Scovazzo
Transcript of THE CREATION OF INSTRUCTIONAL VIDEO …thesis.honors.olemiss.edu/687/1/THE CREATION OF... · THE...
THE CREATION OF INSTRUCTIONAL VIDEO TUTORIALS FOR CHEMICAL ENGINEERING PROCESS SIMULATION SOFTWARE
by
Nishal Vinoo Bhikha
A thesis submitted to the faculty of The University of Mississippi in partial fulfillment of
the requirements of the Sally McDonnell Barksdale Honors College
Oxford
May 2016
Approved by
__________________________________
Advisor: Dr. Adam Smith
__________________________________
Reader: Dr. John O’Haver
__________________________________
Reader: Dr. Paul Scovazzo

ii
© 2016
Nishal Vinoo Bhikha
ALL RIGHTS RESERVED

iii
ACKNOWLEDGEMENTS
I would like to thank Dr. Adam Smith and Dr. John O’Haver for all of their help
and counsel during my time at the University of Mississippi. I would also like to thank
my wife, Caty Bhikha, for her immeasurable love and support.

iv
ABSTRACT
NISHAL VINOO BHIKHA: The Creation of Instructional Video Tutorials for Chemical
Engineering Process Simulation Software
(Under the direction of Dr. Adam Smith)
Process simulation software is rapidly becoming a necessity in today’s world.
Often, learning how to use such a complex tool can be difficult and can take a significant
period of time. This thesis outlines efforts to aid in the instruction of this type of software
at the University of Mississippi.

v
TABLE OF CONTENTS
LIST OF FIGURES ........................................................................................................... vi
INTRODUCTION .............................................................................................................. 1
DESCRIPTION OF TUTORIAL VIDEOS ........................................................................ 6
Introduction to PRO/II Interface ..................................................................................... 6
Thermodynamic Package Selection ................................................................................ 6
Mass and Energy Balance ............................................................................................... 7
Toluene Hydrodealkylation (HDA) ................................................................................ 9
Toluene HDA Video I ............................................................................................... 11
Toluene HDA Video II ............................................................................................. 12
Toluene HDA Video III ............................................................................................ 13
Toluene HDA Video IV ............................................................................................ 16
Toluene HDA Video V ............................................................................................. 16
CONCLUSION ................................................................................................................. 20
BIBLIOGRAPHY ............................................................................................................. 21

vi
LIST OF FIGURES
Figure 1: Therodynamic Package Selection Chart2 ............................................................ 7
Figure 2: Verifying Maximum Furnace Temperature ....................................................... 9f
Figure 3: Toluene HDA PFD ............................................................................................ 10
Figure 4: Completed Toluene HDA Video I Flowsheet ................................................... 11
Figure 5: Completed Toluene HDA Video II Flowsheet .................................................. 12
Figure 6: Shortcut Column Specifications ........................................................................ 13
Figure 7: Shortcut Column with Extremely Low Temperature ........................................ 14
Figure 8: Information from Shortcut Column ................................................................... 15
Figure 9: Guess Stream Conditions .................................................................................. 17
Figure 10: Simulated Stream Conditions .......................................................................... 18
Figure 11: Finished Simultation of the Toluene HDA Process ........................................ 19

1
INTRODUCTION
Process simulation software allows the user to model and manipulate chemical
processes in order to predict behaviors or justify changes in an extremely efficient
manner. Prior to the development of process simulation software, engineers mostly
completed mass and energy balances and sized equipment by hand. When designing
process equipment such as distillation columns or reactors, engineers made ample use of
simplifying assumptions while relying heavily on past experiences. It was common for
teams of engineers to spend copious amounts of time on very meticulous calculations in
order to achieve the high degree of precision and accuracy that is needed to design, build,
and maintain a safe chemical process. In an effort to reduce the inefficiency of such
methods, many companies began to develop flowsheeting programs specific to their
needs1. These programs, however, were often crude and expensive to maintain. The rise
of commercially-available process simulation software drastically reduced the use of
these early programs because the software was much more refined and powerful in
comparison. Although this software is powerful, it requires an intimate knowledge of
engineering principles. The user must always analyze any results from the simulator and
determine if the results are reasonable or even useful. As such, simulation software can
be incredibly useful to engineers but may be rendered ineffective if engineers are not
properly trained both in engineering principles and software use.

2
There are many process simulators that are commonly used today such as
CHEMCAD, Aspen Plus, HYSYS, and PRO/II. Although they all are slightly different in
terms of interface and capability, their overwhelming number of similarities make them
easily interchangeable if an experienced user is given a small amount of time to adjust.
The six main features that all process simulators share are a component database which
houses the constants used to calculate physical properties from thermodynamic models; a
thermodynamic model solver which has options for equilibria and enthalpy calculations;
a flowsheet builder which serves as the main interface and keeps track of equipment,
streams, etc.; a unit operation block solver which performs mass, energy, and design
calculations; a data output generator which allows the user to customize the results from a
simulation; and a flowsheet solver which controls the sequence of calculations and
determines the precision for the overall convergence of the simulation1.
The three main approaches simulators employ are sequential modular,
simultaneous nonmodular, and simultaneous modular. In the sequential modular
approach, the process is solved by moving from equipment piece to equipment piece
solving the governing equations for each respectively. In the simultaneous nonmodular
approach, all the governing equations for the entire process are solved simultaneously to
achieve a solution. The simultaneous modular approach is a combination of the two
aforementioned methods. When using this method, the process is solved by moving from
equipment piece to equipment piece solving the governing equations for each
respectively.
Of the three types of methods described above, the sequential modular approach
is used most often. As previously mentioned, for any given piece of equipment, the input

3
and equipment specifications will be solved and the result will become the input into the
next piece of equipment until the entire process has solved and converged. Therefore for
a process without recycle streams, individual pieces of equipment may require multiple
iterations or algorithms to converge on a solution but the overall process is sequential and
not iterative. If there are recycles streams in the process being modeled, the software
usually splits the stream into two and solves multiple iterations in order to converge both
streams within a set tolerance.
The widespread adoption of process simulation software in industry has created in
increased demand for entry level engineers to be well versed in its use. This expectation
is magnified considering that companies the software companies have made this software
available for instructional purposes at a nominal cost compared industrial users.
Furthermore, concepts which previously required years of experience and trial and error
can now be taught with the utilization of this software which enables chemical
engineering students to encounter increasingly complex problems that mimic typical
entry level job assignments. Such high expectations demand a change and response from
the institutions that are charged with teaching students to become engineers.
Here at the University of Mississippi, the Department of Chemical Engineering
has made SimSci PRO/II an integral part of the curriculum. In the past, this software was
reserved for senior level courses. This design proved problematic in several capacities.
First, faculty were required to spend significant amounts of class time simply teaching the
very basics of the software. This was quickly viewed as problematic because students
naturally move at different paces—especially with technology. Many lectures had the
tendency to have a hectic nature because instructors had to ensure all students were on

4
the same page before continuing to subsequent steps. This can cause frustration among
the faculty and students. Additionally, students learning PRO/II in the senior year were
fully equipped with the tools needed for their design projects roughly four weeks into the
semester. This left little time to produce a quality project that adequately represented the
concepts learned throughout the curriculum. Beginning in the Fall of 2016, PRO/II will
be introduced and utilized starting in sophomore chemical engineering classes. This
change will allow our students to familiarize themselves with the software in preparation
for their senior year.
In order to overcome the hurdle of students learning the software at different
paces, it is proposed to create tutorial videos to aid students in learning PRO/II. These
videos, in theory, would drastically change the dynamic of learning the simulation
software. Instead of instructors spending weeks trying to teach students how to use this
software in a group setting, students would be able to individually walk themselves
through videos that guide them in completing a specified problem or scenario in a much
more productive setting. Ideally, students would increase the use of PRO/II as they
progress through the curriculum. With this model, students would still learn all the
necessary concepts of chemical engineering while freeing class time to cover more
complex concepts.
The nature of these videos would be appropriate to the target audience. For
example, sophomores may begin with “Introduction to PRO/II’s Interface” which simply
familiarizes the viewer with the software’s interface and very quickly explains some of
the useful capabilities of said software. Subsequently, students may simulate problems or
examples worked in class to check their answers. In contrast, a junior’s first assignment

5
may be to watch a series of videos covering all aspects of an example process and
provide a complete, working simulation of the chemical process to the instructor. By
creating numerous videos covering a variety of topics and difficulties, our department can
not only increase its efficiency in teaching undergraduates but also increase the quality of
the education they receive.

6
DESCRIPTION OF TUTORIAL VIDEOS
Introduction to PRO/II Interface
One of the earliest instructional videos the students at the University of
Mississippi will be exposed to is the “Introduction to PRO/II Interface”. Novice users can
often be overwhelmed with the many intricacies of PRO/II or any simulation software.
The purpose of this video is to gently ease students into the software. The video starts
with explaining how to open and save a new flowsheet. I then systematically move from
a blank flowsheet into some of the most commonly used functions of PRO/II. Instead of
thoroughly explain each of these categories, I give a brief overview of what each is used
for, what information can be found here, and where it is located.
Thermodynamic Package Selection
The proper selection of a thermodynamic package is of the utmost importance for
accurate simulation of a chemical process. This video aims to guide students through the
guidelines by using Figure 1. By creating situations and scenarios and discussing how to
properly utilize the aforementioned chart, students will ideally be better equipped to
discern for themselves the most appropriate thermodynamic package in future
assignments.

7
Figure 1: Therodynamic Package Selection Chart2
Mass and Energy Balance
The topic of this video is a simple combustion reaction of methanol. Students
following the simulation covered in this video should have completed the corresponding
problem, Example 9.6-2, by hand in class. To summarize the problem, liquid methanol is
fed to a furnace with air and is burned to produce carbon dioxide and water. The
objective is to find the maximum temperature the furnace should be able to withstand.
The student must first write and balance a chemical equation for this system. Once the
equation is written, the mass balance can be solved for the products. After all the masses
are known, and energy balance can be written by finding the enthalpy for the product
stream, the heat of combustion for the reaction, and the heat of vaporization for the water.

8
Solving this balance for the temperature will yield the maximum temperature the student
is searching for.
Solving problems such as this by hand can prove difficult due to the natural
mathematic complexity of the balances. In this particular problem, in order to find the
maximum temperature the furnace would be exposed to, one is required to solve a fourth
order polynomial. Modern calculators and office software can make quick work of such
equations; however, finding the information for each component and simplifying the
overall equation into form tools such as these can recognize can prove to be very tedious
which may give rise to errors by students. This video would be of use primarily to
sophomores enrolled in Ch E 307 and Ch E 308. With the earlier exposure to PRO/II, the
students learning mass and energy balances can use the software to double check the
calculations they have performed by hand. For example, students can easily and quickly
model this basic system and check if the temperature they solved for by hand, in this case
1256°C, matches the simulator’s answer. This is illustrated in the Figure 2.

9
Figure 2: Verifying Maximum Furnace Temperature
Toluene Hydrodealkylation (HDA)
The Toluene HDA process has been utilized to expose seniors to PRO/II.
Professors would simulate the entire process across multiple class sessions while having
students follow along on their computers. This constituted the majority of the training
students had in using PRO/II. As mentioned before, this method was less than ideal.
Although the students should be quite familiar with PRO/II in senior classes under the
new teaching model, this video will bring all of the prior videos and assignments together
by allowing students to interact with a full-fledged process rather than a couple of unit
ops simulated together as a homework problem . The following subsections will provide
further details on each section of the process and the corresponding instructional video:

10
Figure 3: Toluene HDA PFD
11
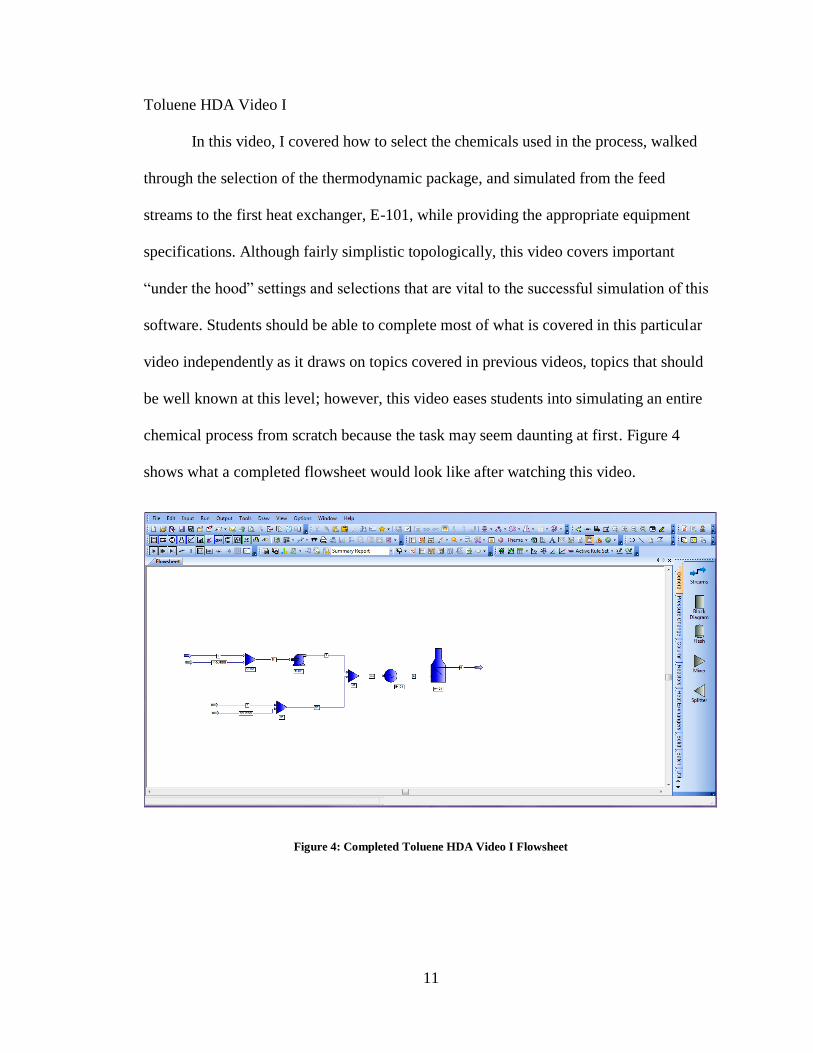
Toluene HDA Video I
In this video, I covered how to select the chemicals used in the process, walked
through the selection of the thermodynamic package, and simulated from the feed
streams to the first heat exchanger, E-101, while providing the appropriate equipment
specifications. Although fairly simplistic topologically, this video covers important
“under the hood” settings and selections that are vital to the successful simulation of this
software. Students should be able to complete most of what is covered in this particular
video independently as it draws on topics covered in previous videos, topics that should
be well known at this level; however, this video eases students into simulating an entire
chemical process from scratch because the task may seem daunting at first. Figure 4
shows what a completed flowsheet would look like after watching this video.
Figure 4: Completed Toluene HDA Video I Flowsheet

12
Toluene HDA Video II
This video spans from E-101 to the distillation column, T-101. This video covers
how to properly select and utilize a reactor for this scenario. The reactor in this example
is fairly simplistic; however, the method for properly setting it up can be applied to more
complex reactors with marginal effort. In addition to the reactor, I also cover how to
properly simulate flash drums. Care must be taking in their simulation because errors in
configurations or thermodynamic package selection may yield unreasonable results such
as extremely cold temperatures. Figure 5 shows how the flowsheet would progress as the
student finished this video.
Figure 5: Completed Toluene HDA Video II Flowsheet

13
Toluene HDA Video III
The third video in the series is entirely dedicated to creating a shortcut column
and finding the necessary information for its simulation in order to simulate a rigorous
distillation column. The subject of this video alone could very well have taken an entire
class period to show to a class. Figure 6 shows the specifications for a shortcut column
being specified.
Figure 6: Shortcut Column Specifications
There are many variables that need to be specified and the process of specifying these
variables often is very arduous, requiring students to be very meticulous. The creation of
this video allows the user to clearly see and double check all of the specifications
required to run this specific simulation thus minimizing confusion and frustration. In
addition to the many specifications on just the separation requirements, the result from a
simulated column must be closely reviewed. For example, one of the options when

14
simulating a shortcut distillation column is to either have a partial or total condenser. In
the first part of this video, the students are instructed to select the total condenser. After
running the program and letting it converge on an answer, the students are instructed to
examine the results as shown in Figure 7.
Figure 7: Shortcut Column with Extremely Low Temperature
Here they are directed to the peculiar temperature of -255°C. After discussing why the
condenser selection caused this temperature, the students are told to simulate the column
again with a partial condenser instead of total condenser. After making this change, the
students arrive at a much more reasonable temperature for their process.
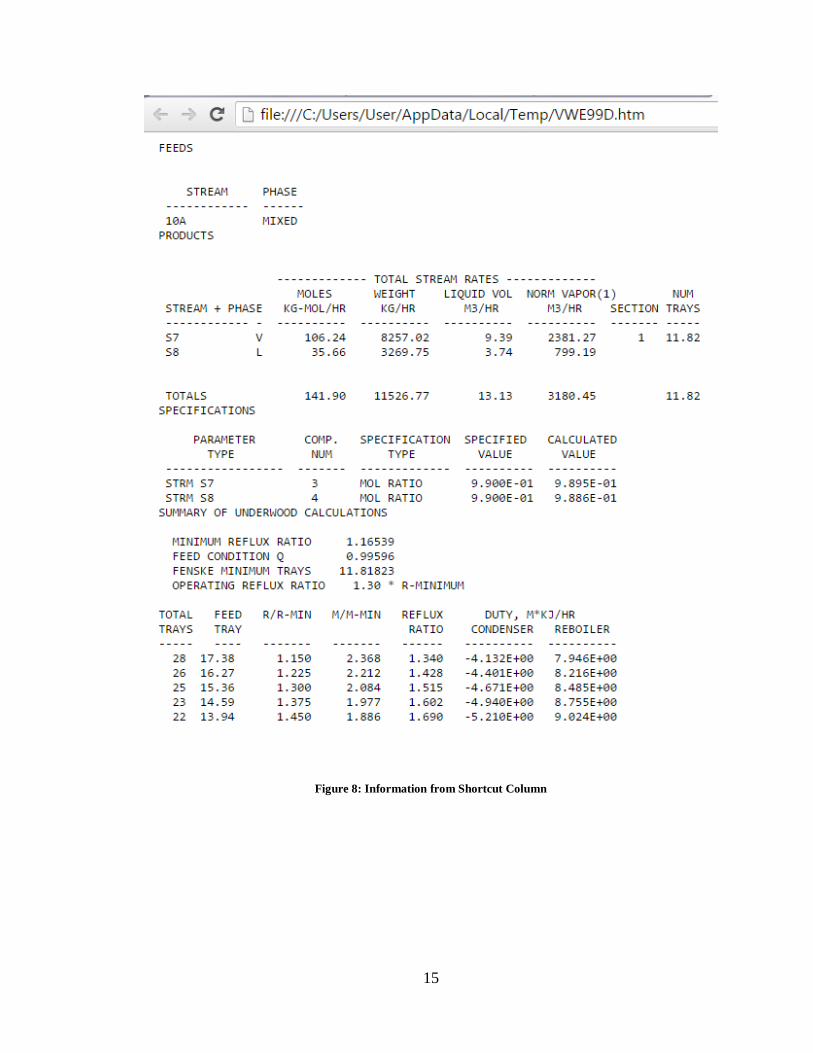
Once the specifications for the shortcut column are set, the students are to generate the
results and find the information required to simulate a rigorous distillation column. This
information is shown in Figure 8.
15
Figure 8: Information from Shortcut Column

16
Toluene HDA Video IV
This video instructs students on how to use the information from a shortcut
column to simulate a rigorous distillation column. I broke the addition of the distillation
column into two separate videos (Videos III and IV) in order to more clearly
communicate the process of simulating one. Once a chemical process is fully simulated,
engineers often begin to make changes in order to predict results. This process of
simulating a distillation column is especially important to understand because even
seemly small changes in a chemical process can have a rather large impact on column
design and function. Users who fully understand how to simulate columns and are
comfortable with the process of doing so will have a much better experience using this
type of software.
Toluene HDA Video V
This video primarily shows how to connect the recycle streams to their specified
destinations. Students are taught in Video I to provide guess conditions (i.e. composition,
temperature, and pressure) for the recycle streams in the initial simulation of this process.
After fully simulating the process, students are told to check if the simulated values for
the recycle stream match the guess values. Figure 9 shows the conditions of the initial
guess stream students specified while Figure 10 shows the simulation’s result.

17
Figure 9: Guess Stream Conditions

18
Figure 10: Simulated Stream Conditions
Because the streams are fairly similar in this particular case, students were instructed to
delete the guess stream, attached the simulated stream, and run the simulation again to
converge on a final answer. There were three recycle streams for the Toluene HDA
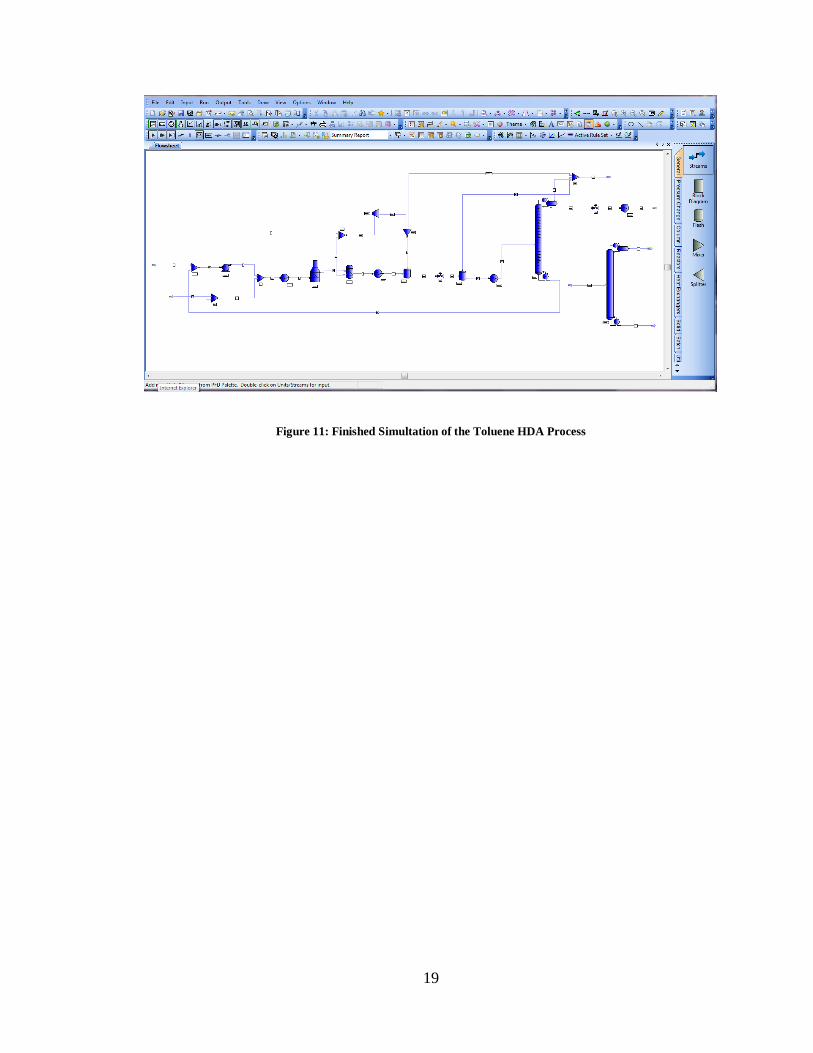
process. Students verified each of these as they progressed through this video. Figure 11
shows how a completely finished flowsheet would look for this process.
19
Figure 11: Finished Simultation of the Toluene HDA Process

20
CONCLUSION
Process simulation software definitely has a strong foothold in today’s world. As
time progresses, the need for engineers to be greatly familiar with this type of software
will only rise. The creation and implementation of these instructional tutorial videos will
greatly increase the quality of education the chemical engineering students at the
University of Mississippi receive. Not only does it free more instructional time
throughout the semester, it also aides in the effort to introduce the software earlier in the
curriculum. The videos created as a part of this thesis are a part of a larger effort to allow
students to familiarize themselves with the software outside of the classroom. There will
be more instructional videos created on many more key concepts and topics.

21
BIBLIOGRAPHY
(1) Turton, R. Analysis, Synthesis, and Design of Chemical Processes; 4th ed.;
Prentice Hall: Upper Saddle River, NJ, 2012.
(2) Towler, G. Chemical Engineering Design Principles, Practice and
Economics of Plant and Process Design; 2nd ed.; Elsevier: Great Britain