The Complete Guide on Pole Climbing
47
Transcript of The Complete Guide on Pole Climbing
© 2006 Page 2 of 47
The Complete Guide To
-Pole Climbing-

Introduction
© 2006 Page 3 of 47
Notice to the Reader.................................................................................................................4 Introduction...............................................................................................................................5 About the Author......................................................................................................................5 Acknowledgments....................................................................................................................6 Pole Climbing ...........................................................................................................................7
Climbing Tools.....................................................................................................................7 Pole-Climbing Methods.......................................................................................................9 Warm-up.............................................................................................................................11 Stretching............................................................................................................................11 Ascending ...........................................................................................................................11 Climb on the Quarters........................................................................................................14 Descending .........................................................................................................................15 The Basics...........................................................................................................................17 Belting Off..........................................................................................................................18 Positioning Strap Distance.................................................................................................21 Adjusting the Safety on the pole.......................................................................................22 Body position......................................................................................................................24 Ascending and Descending with the Safety .....................................................................27 Maneuvering Side-to-side and around the pole................................................................28 Pole Steps............................................................................................................................29 Troubleshooting .................................................................................................................30 Muscle Memory .................................................................................................................32 Climbing School.................................................................................................................34 Fall Arrest Equipment (F.A.E.).........................................................................................40
Fitness......................................................................................................................................42 Physical Training Regiment ..............................................................................................42 Diet......................................................................................................................................45
Conclusion ..............................................................................................................................46 References...............................................................................................................................47

Introduction
© 2006 Page 4 of 47
Notice to the Reader The author does not warrant or guarantee any of the methods or techniques described herein. The reader is expressly warned to follow all safety precautions that might be
necessary and to avoid all potential hazards. The author shall not be liable for any damages or injuries resulting in whole or in part from the reader’s use or reliance on any
of the material in this book.
The material in this book reflects the personal experience, education and training of the author and in now way represents any organization, company or business.
Introduction
© 2006 Page 5 of 47
Introduction The most challenging aspect of linework is learning to climb poles and work in an
elevated position. As we say in the business, “Climbing is a just a walk to work”. The purpose of this book is to provide a detailed reference guide for the following:
Climbing poles, reducing injuries, demonstrate pole climbing specific conditioning
exercises, troubleshoot poor climbing technique, demonstrate correct body position when climbing and when working aloft, and most important to provide proper climbing
technique and working body positions.
About the Author Max Fuentes has been in the power line industry since 1984. Starting as a pre-apprentice
lineman for the Sacramento Municipal Utility District, he went on to finish his apprenticeship and was promoted to Journeyman Lineman in 1988, in 1990 he was
promoted to line foreman. Max has personally trained thousands of individuals in the power line and telecommunications industry in the following:
• Pole climbing
• Live-line work-Rubber glove and
hot sticks
• Rigging
• Worker Protection Schemes
• Basic Electrical Theory
• Distribution Transformers
• Personal Protective Grounding
• High voltage Safety
• Overhead and Underground
Distribution Systems
• Line Clearances
Max Fuentes has also been the Vice-President of Northwest Lineman College, President of Trade Tech, and Director of Outside Plant for the Frontline Group. Max has also
worked as an expert witness and consultant in the transmission and distribution industry; additionally he has a Bachelors of Science Degree in Business Management from the
University of Phoenix.

Introduction
© 2006 Page 6 of 47
Acknowledgments To Scott Hylton for teaching me how to climb poles, taking me through my
apprenticeship and continuing to be one of my mentors. To Gerald Mankins, for being my pole partner in the real world and lineman rodeo competitions, and for his support in
the development of this book.

Pole-Climbing Methods
© 2006 Page 7 of 47
Pole Climbing In order to supply electricity, communications, and the Internet to the public it is necessary to locate the facilities either in the ground or aerially. This book deals with the
challenges of ascending, descending and working in an elevated position on wood poles. The utility workers who construct, install, maintain and troubleshoot the vast network of
facilities located on poles face a particularly challenging task. Unlike the normal
construction jobs the lineworker must ascend and descend poles and spend anywhere from a few minutes aloft to many hours. Poles range from 30’ on up to 130’ and are
located in cities and rural areas. Different types of wood are used for the manufacturing and supplying of poles to the utilities. Certain characteristics are inherent in the poles and
the types of treatment affect the surface of the wood and its ability to be either “climber friendly” or not.
Climbing Tools There are several manufacturers in the industry that supply climbing tools for
lineworkers. Bashlin, Buckingham and Klein are probably the largest suppliers of climbing tools in the industry. Linemen have preferences as to different styles of belts
and climbers; however all of these tools are typically standardized and vary little. The
cost to outfit an individual in climbing gear ranges from $300-500 dollars. This does not include the hand tools.
I could elaborate on the different types of belts and safety straps however this book
focuses on climbing and working aloft. Your company or the manufacturer can provide information about their products, which you can easily locate, on the Internet. The
manufacturer can provide all of the necessary information for properly fitting and
adjusting tools for every individual.
Pole-Climbing Methods
© 2006 Page 8 of 47
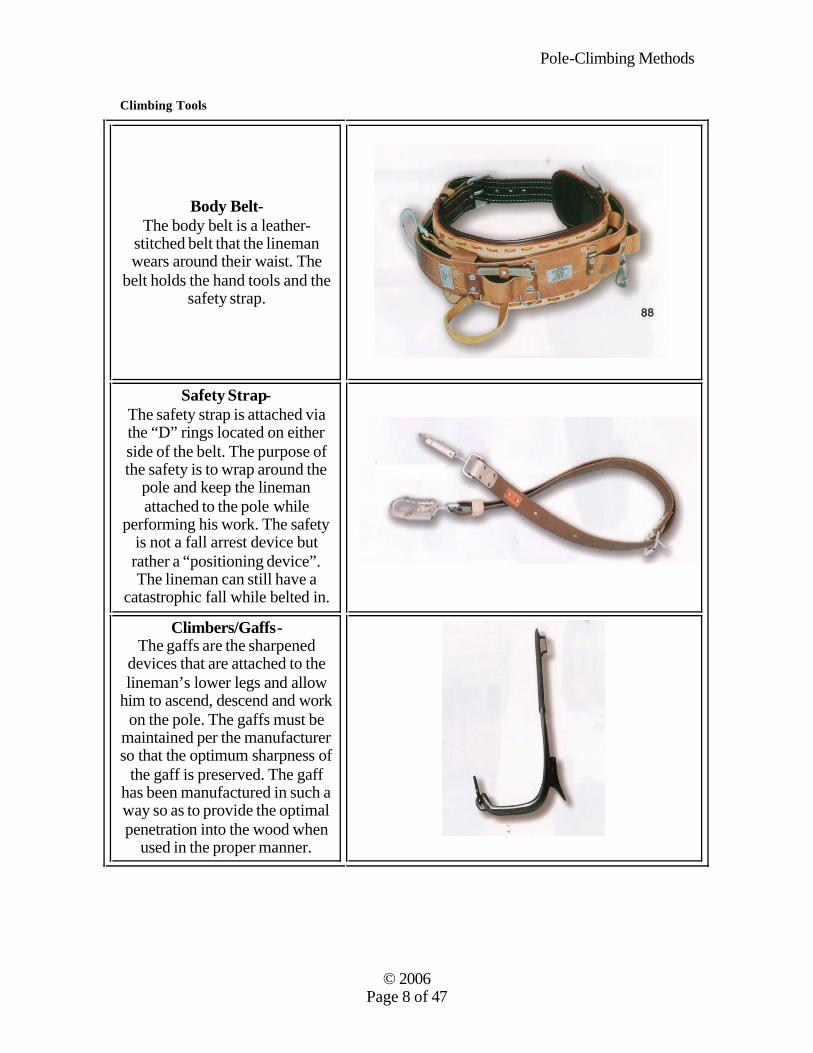
Climbing Tools
Body Belt- The body belt is a leather-
stitched belt that the lineman wears around their waist. The
belt holds the hand tools and the safety strap.
Safety Strap- The safety strap is attached via the “D” rings located on either side of the belt. The purpose of the safety is to wrap around the
pole and keep the lineman attached to the pole while
performing his work. The safety is not a fall arrest device but rather a “positioning device”. The lineman can still have a
catastrophic fall while belted in.
Climbers/Gaffs- The gaffs are the sharpened
devices that are attached to the lineman’s lower legs and allow
him to ascend, descend and work on the pole. The gaffs must be
maintained per the manufacturer so that the optimum sharpness of
the gaff is preserved. The gaff has been manufactured in such a way so as to provide the optimal penetration into the wood when
used in the proper manner.
Pole-Climbing Methods
© 2006 Page 9 of 47
Pole-Climbing Methods Power, telecommunications, fiber optic, etc are all industries that require their facilities to be placed either in the ground or aerially on a pole. In order to construct, install, maintain
and troubleshoot these network infrastructures it requires workers to be able to ascend,
descend and work aloft on wood, steel poles and steel towers. Climbing wood poles with industry approved climbing gear takes training and time in order to work efficiently in
that type of work environment. Climbing and working on wood poles is unlike any other type of job, it requires an ability to overcome heights, work in all kinds of weather, place
your body in positions to work, lift and reach that in a lot of cases is almost impossible to be ergonomically correct. Additionally, in the case of power line workers they have to do
all of those activities with energized lines.
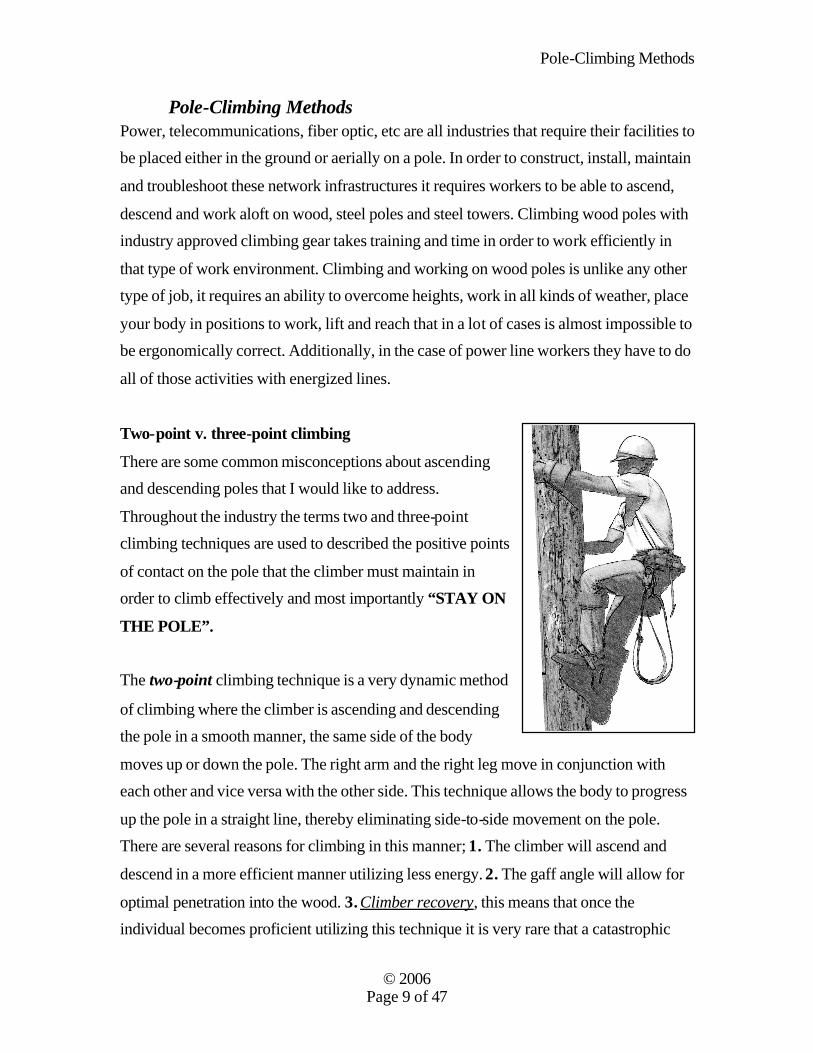
Two-point v. three-point climbing
There are some common misconceptions about ascending and descending poles that I would like to address.
Throughout the industry the terms two and three-point climbing techniques are used to described the positive points
of contact on the pole that the climber must maintain in order to climb effectively and most importantly “STAY ON
THE POLE”.
The two-point climbing technique is a very dynamic method
of climbing where the climber is ascending and descending the pole in a smooth manner, the same side of the body
moves up or down the pole. The right arm and the right leg move in conjunction with each other and vice versa with the other side. This technique allows the body to progress
up the pole in a straight line, thereby eliminating side-to-side movement on the pole. There are several reasons for climbing in this manner; 1. The climber will ascend and
descend in a more efficient manner utilizing less energy. 2. The gaff angle will allow for
optimal penetration into the wood. 3. Climber recovery, this means that once the individual becomes proficient utilizing this technique it is very rare that a catastrophic
Pole-Climbing Methods
© 2006 Page 10 of 47
fall will occur. Due to the body position even if one or both gaffs somehow become
disengaged the body position is straight up and down allowing for the gaffs to cut back into the wood. (We will explore this later as we get into the climbing mechanics itself).
The two-point climbing technique is the preferred method of climbing in the power industry. It can be argued that actually there are three-points of contact in this method of
climbing, however I believe that since the focus is on the climbing technique where the main emphasis at any one time is the simultaneous movement of one side of the body,
that it is more correct to use the term two-point. The three-point climbing technique is a very slow, deliberate and static method. This
technique is deliberately slow to emphasize each and every movement that the climber makes. There are always three “positive and continuous” points of contact when
climbing. This technique was developed by the RBC (Regional Bell Companies) in 1975 in order to insure the utmost safe technique for climbing. The phone linemen and
installers do not spend as much time climbing so in order to assure that the employees in these positions can perform safely; the three-point climbing technique was developed.
Conclusion The preferred method of climbing and working aloft in the power line industry is the two-
point method. The three-point method is fine for the infrequent climber with minimal skills and who is not required to climb over 25 feet. In the power industry typically, the
shortest poles where facilities are installed are 35’. In addition to the height of the poles the power lineman must climb over every other facility since power is always located at
the top of the pole. This requires the type of skills that enables the climber to climb poles with conduit on it, over telecommunications, cable TV and fiber optic networks,
crossarms, guy wires, energized conductors and an assortment of high voltage devices
such as transformers, capacitors, etc. The two-point climbing method provides the climber with the ability to navigate these obstacles efficiently and SAFELY.

Warm-up
© 2006 Page 11 of 47
Warm-up It is not necessary to warm-up prior to climbing a pole. Are you shocked? Climbing a
pole is not like running a 10-k. You warm-up by climbing the pole, as a competitive
runner and athlete I can tell you that prior to running a race I warm-up by running.
Stretching It is not necessary to stretch prior to climbing a pole. However, stretching would benefit
you after climbing the pole and performing your work. Professional athletes follow this
regiment. I believe that linemen have to be athletic in order to perform their jobs. Linemen should train like athletes, eat like them and have the same attitudes about
teamwork, pride and determination.
Ascending The biggest mistake I have seen beginning climbers do is to take a big first step onto the pole. The pole goes all the way to the ground; therefore you only need start with a
comfortable step onto the wood. The first two steps establish the rhythm of the climb, typically 10”-12” steps are normal however some individuals, depending on their height
will take a longer or shorter step. The right arm and right leg move in unison, as does the left side. The toes are up and the knees are approximately a fist’s distance away from the
pole. The hands and arms keep the climber on the pole; they DO NOT PULL the climber
up the pole. This is a rookie mistake and leads to tension and muscle fatigue in the shoulders, biceps and forearms. The hands slide/glide up the pole.

Ascending
© 2006 Page 12 of 47
The climber’s gaff should penetrate the wood at an angle that enables the gaff to maximize the shape and sharpness of the gaff. Gaffs should be sharpened/filed along the
length of the shaft to insure that the original shape from the factory is maintained. The optimal angle for penetration is one where the gaff penetrates at an angle of about 150 to
200 which is approximately the length of your fist between the knee and the pole (horizontally).
When ascending the pole it is imperative to look up, the beginning climber will always want to look down at their feet. However, you need to look where you are going. This
will take time to develop at first, but it must still be emphasized to the climber.
1. First step is about 10”. 2. Notice the full extension of
the leg as it propels the climber up the pole.
3. The same side moves. 4. The toes are up. 5. The legs are doing the
work, the arms do not pull.
Notice how the lineman’s body aligns in straight lines. 1. The left leg is bearing
approximately 90% of his body weight in a straight line into the pole.
2. The toes are up. 3. The safety is hanging in
such a manner so as to not interfere with the climbing motion. This is especially important when descending the pole.
TOES UP

Ascending
© 2006 Page 13 of 47
Why do I have to look up? Because there are obstacles when ascending a pole, other
facilities, conduit, freeways (Cracks in the pole that run vertically), etc, that requires the climber to navigate through this myriad amount of obstacles in order to get to the work
location safely. Additionally, in the power line industry it is imperative that the climber know how close they are getting to energized conductors and equipment.
• Knee too close to the pole. • Weight slides gaff parallel to
surface of pole. • Minimum penetration,
planing effect.
Moving the knee away from pole approximately the length of a fist between the knee and the pole, optimizes the gaff penetration.
The climber’s body weight is typically enough to supply the force necessary to allow the gaff to penetrate the pole. It is not necessary to “Stomp” the pole.

Climb on the Quarters
© 2006 Page 14 of 47
Climb on the Quarters It is imperative that the climber climbs on the quarters of the pole. If you were to look
down the top of a pole it would be circular, now imagine two lines splitting the middle of
the pole horizontally and vertically. You would have four quarters. You must ascend and descend in these areas in order to maintain a safe and correct climbing technique. If the
climber starts to climb on the halves of the of the pole they will not be able to maintain the proper knee distance away from the pole and this will affect your ability to keep your
toes up, which in turn will affect the gaff penetration. Conversely, if you climb with your feet too close together, heels close, this will also affect your ability to maintain proper
technique. Additionally, when the heels are close the potential of you gaffing yourself increases, a.k.a. “Air-conditioning you boots”.
Climbing on the sides of the pole will compromise
correct and safe technique.
Feet too close together, is also a no-no. Heels are too close, potentially gaffing
yourself.
Correct.

Descending
© 2006 Page 15 of 47
Descending Descending the pole involves the same skill sets, with a slight change in the mechanics.
When descending the pole it is necessary to take a longer step down and drop into a
“locked leg”. As I have stated earlier, you must look where you are going, if you are ascending-look up-, when descending-look down-.
Another important point is to make sure that your safety strap is hanging in such a manner so as not to impede your descent. More than one lineman has stepped into his
safety on the way down, and this can lead to some bad results, like falling off the pole. Shorten the safety so that it cannot hang so low as to provide a loop that you can step
into. Turn your belt to the side, for example a right-handed individual typically wears the safety on the left side. Take your body belt and turn it to the left slightly so that the D-
ring is located slightly more towards your rear-end. In my old body belt I could literally
turn the D-ring backwards so as to keep it in the clear when I was descending.
Descending the pole requires the climber to take a longer step down than when ascending. Ascending is a 10”-12” step, whereas descending is an 18”- 24” drop into a
Roll the knee out; do not let the gaff drift away
from the pole.
The gaff should only disengage far enough away from the pole, so that it can re-engage as the climber drops into a straight
leg.
The gaff should only engage long enough to allow the other leg to roll out and drop into a
straight leg.

Descending
© 2006 Page 16 of 47
straight leg. Of course these are general rules, depending on your size, the length of your
legs, etc, you may have a longer or shorter climbing stride. As a climber I am only 5’ 9” tall, however over the years I have found that taking a longer stride is more fluid and
efficient for me. Plus the fact is that when I take longer strides it takes fewer steps to ascend and allows me to conserve energy.
When you are descending and rolling the knee out, simultaneously you must drop the same arm, also the shoulder will roll/travel down too. The lineman will look down and
aim his gaff at the appropriate quarter of the pole and drop into a straight leg. The leg is straight momentarily, enough to insure the proper gaff angle and to penetrate the wood.
As the gaff hits the wood the lineman must continue his descent by repeating the same
technique on the other side.
The knee rolls out
Looking to set the gaff
Shoulder dropping
Travel distance of left leg
Straight leg
Toes up
Long drop, enhances your
ability to roll out the gaff

The Basics
© 2006 Page 17 of 47
The Basics A common misconception that any training instructor makes is to just” teach the basics”.
In pole climbing there’s no such thing as the basics. Sounds like blasphemy, I can hear it
now, “that guy is full of sh*t, you have to teach the basics”. Really, what are the basics? Let’s look at the basics:
• Keep your toes up
• Climb on the quarters
• Climb with your legs, not your arms
• Keep your knees away from the pole
• Look where you’re going
• Drop into a straight leg
• Roll your knee out
Okay, so now you know the basics. So if we have just identified the basics, tell me what Intermediate Climbing Skills would be, and then identify Advanced Climbing Skills. I’ve
been climbing since 1984 and I only went to one climbing school, the company never sent me to advanced climbing school.
Climbing is a skill that is taught and refined over time by doing many repetitions. However, those repetitions must be performed correctly. Therefore, when teaching pole
climbing the instructor must teach the correct techniques and be able to demonstrate
those techniques. The mechanics of climbing, proper technique and many, many repetitions are the key to success.
“Practice doesn’t make perfect. Perfect practice makes perfect”.
Belting Off
© 2006 Page 18 of 47
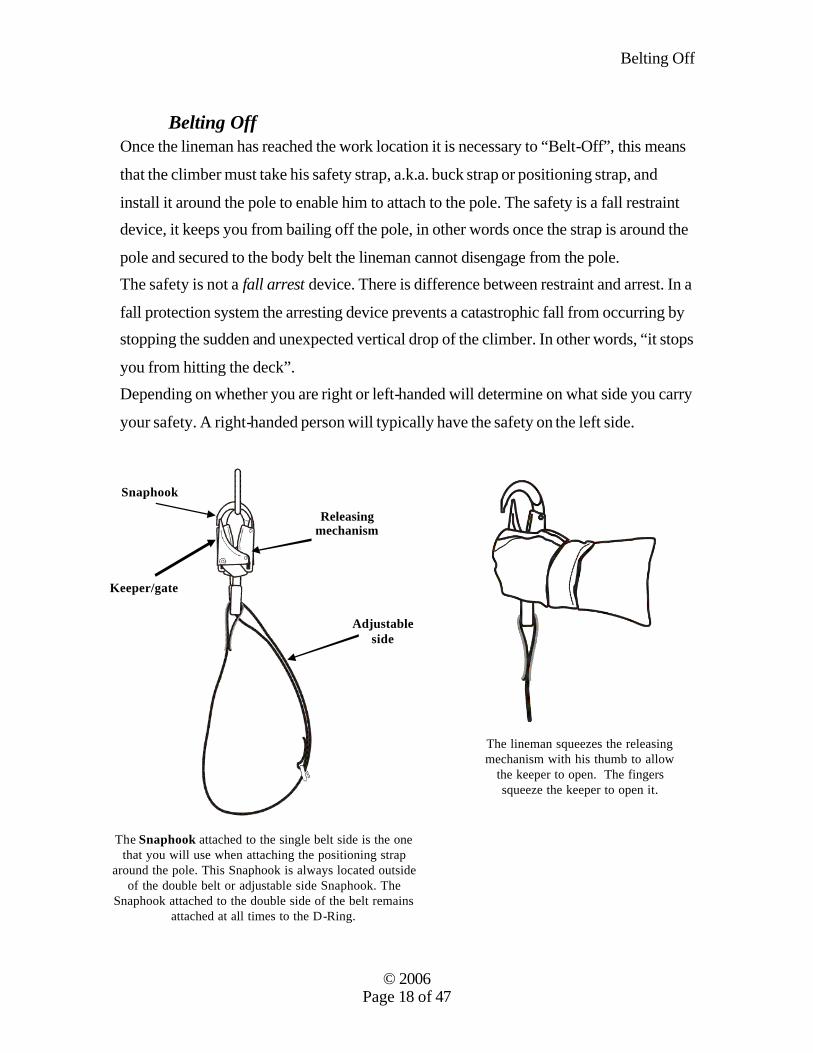
Belting Off Once the lineman has reached the work location it is necessary to “Belt-Off”, this means
that the climber must take his safety strap, a.k.a. buck strap or positioning strap, and
install it around the pole to enable him to attach to the pole. The safety is a fall restraint device, it keeps you from bailing off the pole, in other words once the strap is around the
pole and secured to the body belt the lineman cannot disengage from the pole. The safety is not a fall arrest device. There is difference between restraint and arrest. In a
fall protection system the arresting device prevents a catastrophic fall from occurring by stopping the sudden and unexpected vertical drop of the climber. In other words, “it stops
you from hitting the deck”. Depending on whether you are right or left-handed will determine on what side you carry
your safety. A right-handed person will typically have the safety on the left side.
The Snaphook attached to the single belt side is the one that you will use when attaching the positioning strap
around the pole. This Snaphook is always located outside of the double belt or adjustable side Snaphook. The
Snaphook attached to the double side of the belt remains attached at all times to the D-Ring.
Snaphook
The lineman squeezes the releasing mechanism with his thumb to allow
the keeper to open. The fingers squeeze the keeper to open it.
Keeper/gate
Releasing mechanism
Adjustable side

Belting Off
© 2006 Page 19 of 47
Before the lineman ascends the pole he should look up and
see where the work location is. The term in the trade is “Look up and live”. It is always a good habit to stop
approximately 3’- 4’ from the final work location and belt-off. The reason for this is to assess your surroundings
before going into the work location. This is especially true if you are going to be doing live-line work. You do not
want to climb right into the work location and violate the minimum approach distance (MAD).
The terms belt-off and belt-in may seem confusing and they both mean the same thing only when you are attaching the positioning belt/safety. For instance: if you are climbing up the pole and the lineman tells you to belt-off when you get there, he means attach to the pole with your safety. Conversely, if the lineman tells you to belt-off and go down, he means remove your safety and descend. Belting-in can only mean one thing; attach.

Belting Off
© 2006 Page 20 of 47
Procedure for Belting-Off
1. Look up and locate the area you will be belting-off at. 2. Make sure that your safety is properly attached in your D-Ring.
3. Test your Snaphook and insure that it properly operates. (You do not want to find out 50’ up that your safety does not operate correctly.)
4. Ascend to belting-off area. 5. Set your gaff with a straight leg on the side you will be disengaging the
Snaphook. If you are right-handed the safety will be carried on your left side, set the left leg.
6. Look at your Snaphook and then disengage it.
7. Pass the Snaphook around the pole to the other hand. 8. The receiving hand will take the Snaphook palm up with the thumb facing away
from the pole. (This is a challenging step because you have to place your receiving hand, wrist and forearm against the pole during this process).
9. The fingers on the receiving hand will now squeeze the releasing mechanism in order to open the gate/keeper on the Snaphook. The thumb will operate the
gate/keeper.
10. LOOK at the D-ring and engage the Snaphook. Do not rely on the sound of the Snaphook clicking into your D-ring; it is quite a surprise when you snap into a guy wire. “Look and Know, be a Pro”
11. When you are ready to come down reverse the process.
Belting Off
© 2006 Page 21 of 47
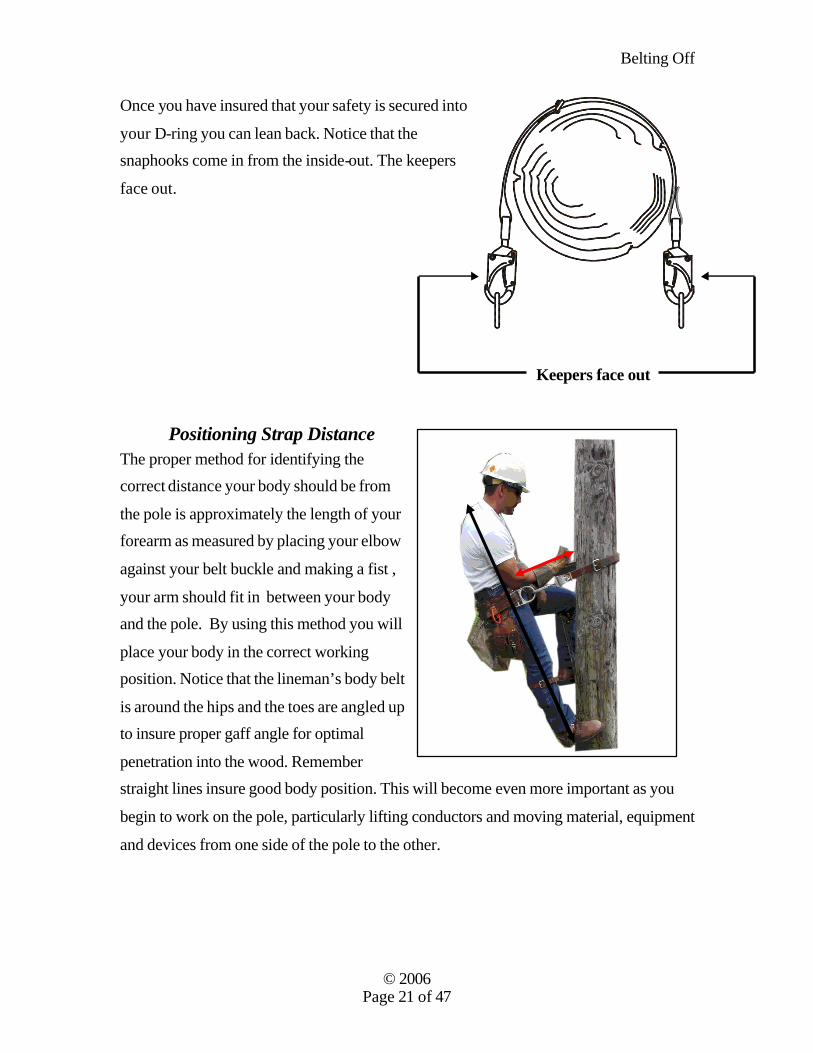
Once you have insured that your safety is secured into
your D-ring you can lean back. Notice that the snaphooks come in from the inside-out. The keepers
face out.
Positioning Strap Distance The proper method for identifying the correct distance your body should be from
the pole is approximately the length of your forearm as measured by placing your elbow
against your belt buckle and making a fist ,
your arm should fit in between your body and the pole. By using this method you will
place your body in the correct working position. Notice that the lineman’s body belt
is around the hips and the toes are angled up to insure proper gaff angle for optimal
penetration into the wood. Remember straight lines insure good body position. This will become even more important as you
begin to work on the pole, particularly lifting conductors and moving material, equipment
and devices from one side of the pole to the other.
Keepers face out
Adjusting the Safety
© 2006 Page 22 of 47
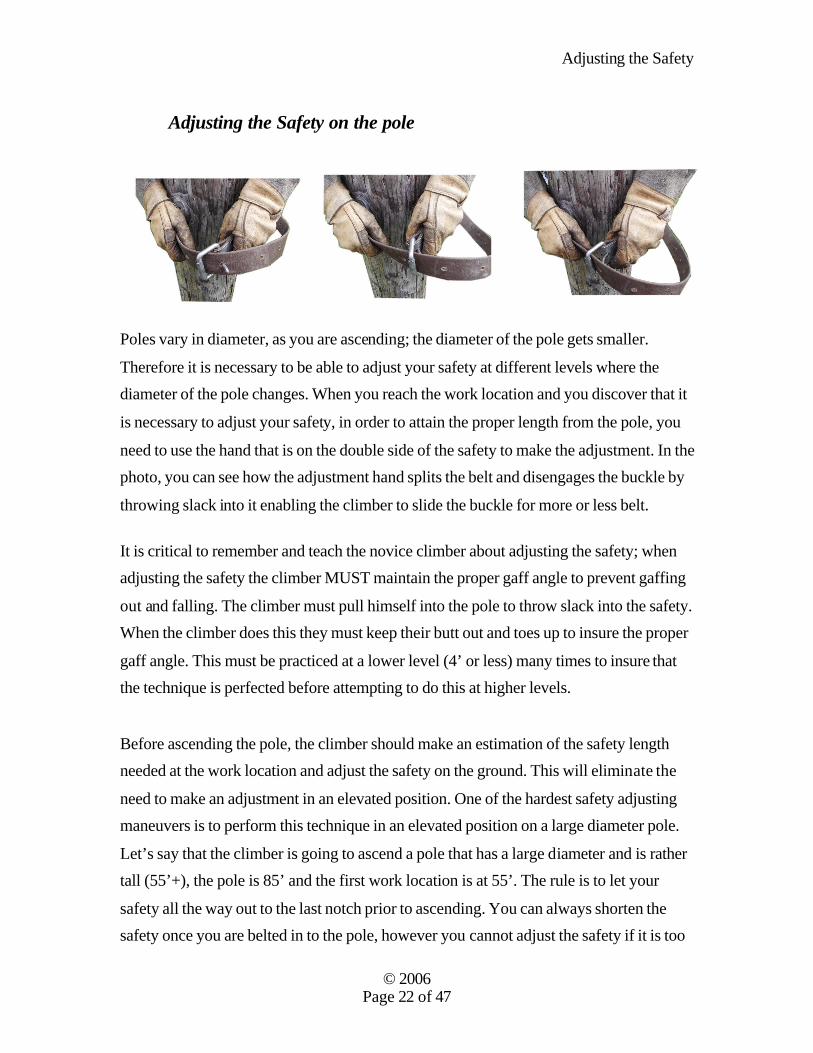
Adjusting the Safety on the pole
Poles vary in diameter, as you are ascending; the diameter of the pole gets smaller.
Therefore it is necessary to be able to adjust your safety at different levels where the diameter of the pole changes. When you reach the work location and you discover that it
is necessary to adjust your safety, in order to attain the proper length from the pole, you
need to use the hand that is on the double side of the safety to make the adjustment. In the photo, you can see how the adjustment hand splits the belt and disengages the buckle by
throwing slack into it enabling the climber to slide the buckle for more or less belt. It is critical to remember and teach the novice climber about adjusting the safety; when adjusting the safety the climber MUST maintain the proper gaff angle to prevent gaffing
out and falling. The climber must pull himself into the pole to throw slack into the safety. When the climber does this they must keep their butt out and toes up to insure the proper
gaff angle. This must be practiced at a lower level (4’ or less) many times to insure that the technique is perfected before attempting to do this at higher levels.
Before ascending the pole, the climber should make an estimation of the safety length needed at the work location and adjust the safety on the ground. This will eliminate the
need to make an adjustment in an elevated position. One of the hardest safety adjusting maneuvers is to perform this technique in an elevated position on a large diameter pole.
Let’s say that the climber is going to ascend a pole that has a large diameter and is rather tall (55’+), the pole is 85’ and the first work location is at 55’. The rule is to let your
safety all the way out to the last notch prior to ascending. You can always shorten the safety once you are belted in to the pole, however you cannot adjust the safety if it is too

Adjusting the Safety
© 2006 Page 23 of 47
short to begin with, because the safety will not wrap around the pole to allow you snap
into your D-ring. Imagine ascending to 55’ and you did not let out enough safety to snap into your D-ring, what do you do? Well one of two things, 1) keep climbing and hope
that the diameter at the higher elevation is small enough to allow you to snap in, or 2) descend to the ground and readjust to accommodate the diameter. I have done both and
neither is the smart way to ascend and descend poles because you have now increased your exposure to a fall. It is easier to adjust your safety for reducing its length than it is to
increase its length. Practice the safety adjusting maneuvers and you will find that decreasing the safety is easier because you are bringing your hands together and the
safety moves easier; increasing the length is more difficult because you are sliding the
buckle away and therefore your hands are moving away from each other, additionally the buckle is now moving against the safety and it requires that you pull on the single side to
acquire more of the safety from the double side of the strap. Now imagine doing all of these things in an elevated position where the diameter of pole
is large and your chest is literally against the pole so that your hands can work and you must keep your butt out and toes up in order to keep your gaffs in the pole. One more
thing, the pole is so big that your face is against the wood, your hard hat is about to fall
off, and you cannot see what you are doing. This is a recipe for disaster.

Body Position
© 2006 Page 24 of 47
Body position Once the climber has learned to ascend, descend and belt-off they are now ready to begin
working aloft. Let’s discuss proper body position. Proper body position is the key to
maximizing your ability to work and minimize your exposure to injuries. There have been thousands of linemen in this trade of different physical statures and abilities. It has
been my experience that the bigger linemen (Over 6’1” and 200 lbs) tend to use their natural strength and larger bodies to muscle their work. Time and time again I have seen
strong, young apprentices and journeymen blow out knees, shoulders and elbows because of poor body position and relying on their biceps rather than their heads. In this section
we will look at body position and how to maximize leverage and strength to accomplish the most work. As the climber becomes more experienced they will learn to use less
bicep and more “rigging” to accomplish
their tasks and save their bodies. When you are standing on a pole perform
this test: lean out to one side, place your hand on your quadriceps (thigh) muscle
of the leg supporting your body. Then shake your quad muscle from left-to-
right. If you cannot move the muscle freely then chances are your knee is
slightly bent and the quad muscle is
flexing to support your body weight, or your leg is hyper-extended and the result
is the same. This will cause your leg to fatigue and tire you out. The support
should rest squarely on the skeletal system, reducing muscle fatigue.
The climber is always limited by their physical stature; this means that the ability to lean
out and perform work is directly related to the height and reach of the individual. Another issue is that the ability to perform work is limited as the individual extends their reach.
“The further you lean out, the less work you can do”. You lose lifting capability and
Shake the muscle to test for tension

Body Position
© 2006 Page 25 of 47
strength the further you have to lean out.
You place yourself at a further disadvantage and increase your exposure
to injury when you are in poor body position and attempt to work. Remember,
straight lines are optimal for body position and climbing. In this photo the lineman is
leaning over backwards and reaching up. Notice the curvature of the back. Lower
back injuries can result because of this
poor body position. Additionally, in order to sustain this position the lineman has to
tighten his abdominal muscles in order to keep from completely bending backwards
and risking injury. I am positive that anyone who has ever had to work aloft and tried this maneuver, start shaking because of the stress placed on the abdominals to try and keep
the upper body rigid. Now imagine trying to lift conductor out of a roller and place it onto
the insulator. I am not just talking about #6 Cu or 4aaac; I mean 4/0, 477mcm, etc. You’ll waste your back in no time.
Having competed at the International Lineman’s Rodeo for many years, it never ceased to
amaze me at the poor body positions of both the apprentices and linemen I observed during the competition. Routinely bending over backwards to reach conductors and trying
to utilize hot sticks in this position. I can only attribute this to a lack of proper training. The situation becomes even more compounded when the individual is sporting a big
belly. Imagine starting your career in your early 20’s when you’re young and fit,
statistically speaking you can expect to gain about 2.5 to 5 lbs annually after age 35. So after 10 years you have gained anywhere from 22.5 to 50 lbs, most of it in your gut. Not
only that, but the average man starts experiencing a drop in their testosterone levels, which makes it easier to gain weight (fat) and lose the ability to sustain muscle mass. In
Abdominals forced to constrict
Back curved
Body Position
© 2006 Page 26 of 47
essence, you are getting fatter and losing strength and expecting to perform utilizing poor
body positioning. How long do you think your back will last at this rate? Workers Comp here we come.
However, the injury report will read back injury, cumulative trauma over time, work-related. Sounds like something that is inevitable. Wrong! What if the Workers Comp
report read: Individual failed to take care of himself, got fat, lost muscle mass and compounded the injury with poor body positioning. Doesn’t sound all that glamorous,
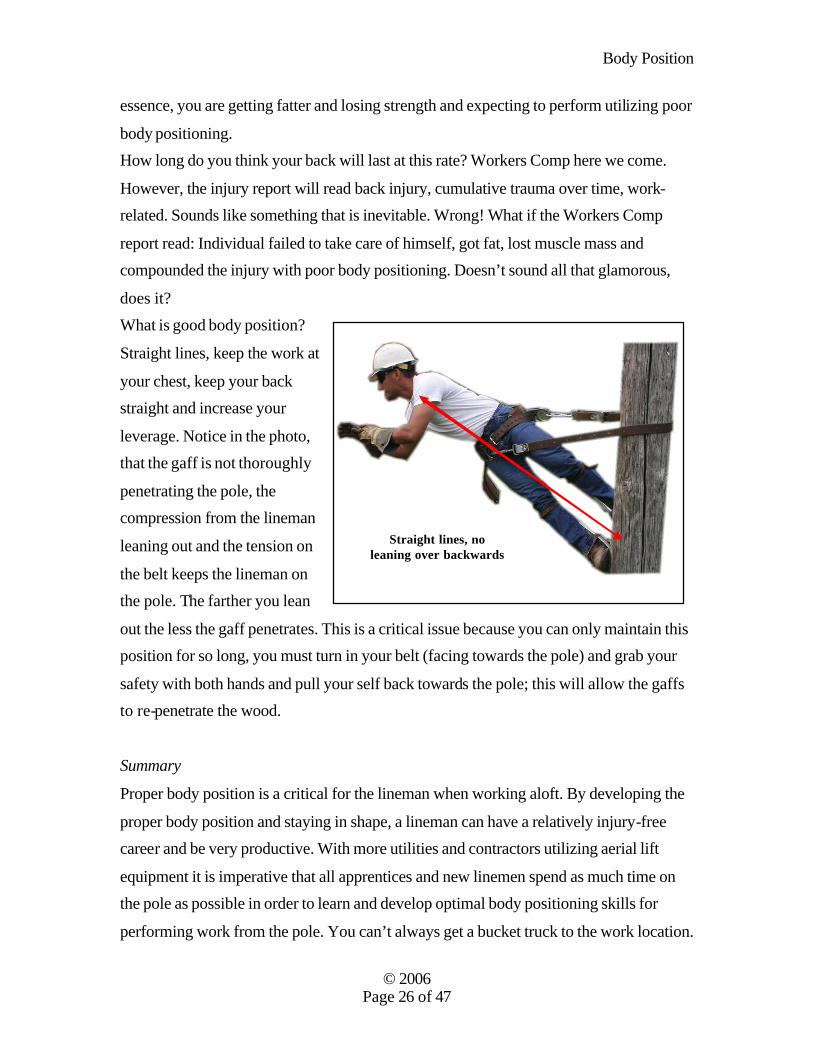
does it? What is good body position?
Straight lines, keep the work at
your chest, keep your back straight and increase your
leverage. Notice in the photo, that the gaff is not thoroughly
penetrating the pole, the compression from the lineman
leaning out and the tension on
the belt keeps the lineman on the pole. The farther you lean
out the less the gaff penetrates. This is a critical issue because you can only maintain this position for so long, you must turn in your belt (facing towards the pole) and grab your
safety with both hands and pull your self back towards the pole; this will allow the gaffs to re-penetrate the wood.
Summary
Proper body position is a critical for the lineman when working aloft. By developing the
proper body position and staying in shape, a lineman can have a relatively injury-free career and be very productive. With more utilities and contractors utilizing aerial lift
equipment it is imperative that all apprentices and new linemen spend as much time on the pole as possible in order to learn and develop optimal body positioning skills for
performing work from the pole. You can’t always get a bucket truck to the work location.
Straight lines, no leaning over backwards
Ascending/descending
© 2006 Page 27 of 47
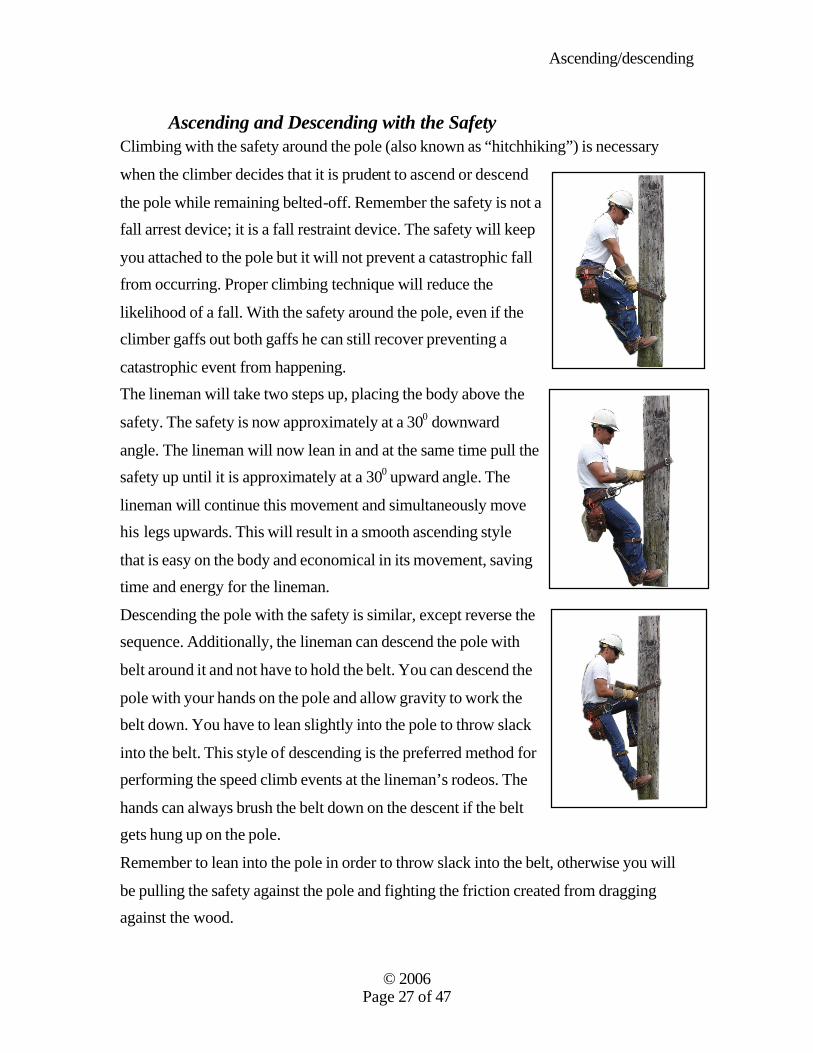
Ascending and Descending with the Safety Climbing with the safety around the pole (also known as “hitchhiking”) is necessary
when the climber decides that it is prudent to ascend or descend
the pole while remaining belted-off. Remember the safety is not a fall arrest device; it is a fall restraint device. The safety will keep
you attached to the pole but it will not prevent a catastrophic fall from occurring. Proper climbing technique will reduce the
likelihood of a fall. With the safety around the pole, even if the climber gaffs out both gaffs he can still recover preventing a
catastrophic event from happening. The lineman will take two steps up, placing the body above the
safety. The safety is now approximately at a 300 downward
angle. The lineman will now lean in and at the same time pull the safety up until it is approximately at a 300 upward angle. The
lineman will continue this movement and simultaneously move his legs upwards. This will result in a smooth ascending style
that is easy on the body and economical in its movement, saving time and energy for the lineman.
Descending the pole with the safety is similar, except reverse the sequence. Additionally, the lineman can descend the pole with
belt around it and not have to hold the belt. You can descend the
pole with your hands on the pole and allow gravity to work the belt down. You have to lean slightly into the pole to throw slack
into the belt. This style of descending is the preferred method for performing the speed climb events at the lineman’s rodeos. The
hands can always brush the belt down on the descent if the belt gets hung up on the pole.
Remember to lean into the pole in order to throw slack into the belt, otherwise you will
be pulling the safety against the pole and fighting the friction created from dragging against the wood.

Maneuvering
© 2006 Page 28 of 47
Maneuvering Side-to-side and around the pole Maneuvering on the pole requires the climber to reposition his gaffs in such a manner so
as to optimize the
movement from one side to another and to allow
the climber to circle around the pole. The
mechanics are the following: establish a
base position for the gaffs, which has already
been established when
the climber belts-off at the work location. You
already have one gaff high and the other low
in the locked position. Leaning to one side on a
straight leg performing work and then
relocating to the other
side requires a three-
step movement. Down-up-down, the gaff
opposite the side of the work will be positioned
down, the worker will then drop down into it, and at the same time the climber must begin to rotate the hips towards the side they will be going. The trailing gaff will move
up into a bent leg position (this is called the motor foot because it is going to supply the
push to allow the body to move towards the desired location). The leading gaff will now
Step #1-working to the left. Step #2-drop the right gaff down.
Step #3-Raise left gaff and plant it on the center of the
pole, pushing the body to the right.
Step #4-Drop right gaff down onto the pole and swivel hips
simultaneously to get into proper working position.

Maneuvering
© 2006 Page 29 of 47
disengage from the pole and continue towards the new location and plant into the pole in
downward movement. Notice that the lineman is using the trailing foot to anchor himself (the toe is hooked on the pole) as he moves around the pole, this maneuver is a way to
prevent the lineman from over rotating and potentially gaffing out of the pole. (See photos #1 and #4).
Pole Steps The term Pole steps is actually a “misnomer”, the correct way to utilize steps is actually as handles. Pole steps are typically installed on poles that are frequently climbed and
contain equipment and devices that are used for switching, sectionalizing and de-energizing sections of line. Pole steps are inserted into the pole 18” offset from one side
to another or 36” apart on the same side of the pole. Additionally, the steps should be in-
line with the conductor, this will minimize the pole swaying as the lineman is ascending or descending the pole and reduce the chance of wires slapping together (this is
particularly true when you have slack spans). When climbing poles with steps the climbing mechanics remain the same however avoid
stepping on the pole steps. Two reasons: 1) correct climbing mechanics requires that you climb on the quarters of the pole and since steps are 1800 apart being on opposite sides of
the pole you cannot do that. 2) You can judge whether the pole step is embedded deep enough into the pole when you
grab them, stepping on a pole step that is not securely embedded could result in the step
becoming dislodged and the climber will not be securely gaffed into the pole.
Troubleshooting
© 2006 Page 30 of 47
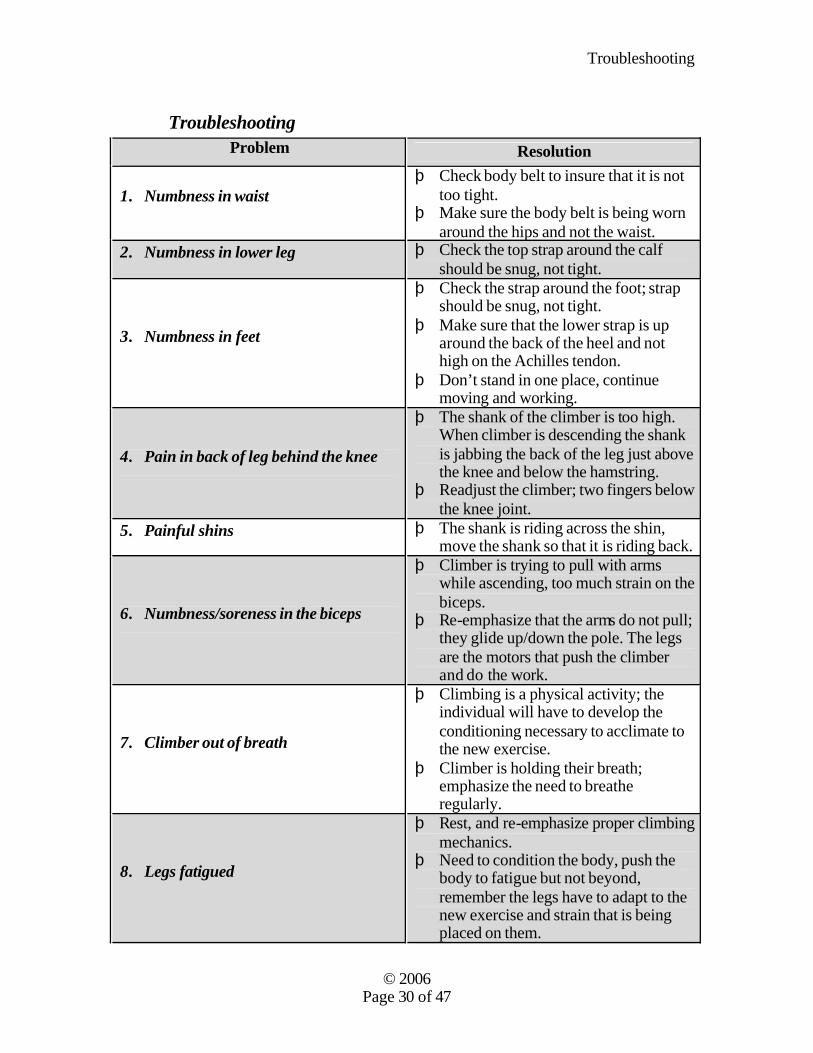
Troubleshooting Problem Resolution
1. Numbness in waist þ Check body belt to insure that it is not
too tight. þ Make sure the body belt is being worn
around the hips and not the waist. 2. Numbness in lower leg þ Check the top strap around the calf
should be snug, not tight.
3. Numbness in feet
þ Check the strap around the foot; strap should be snug, not tight.
þ Make sure that the lower strap is up around the back of the heel and not high on the Achilles tendon.
þ Don’t stand in one place, continue moving and working.
4. Pain in back of leg behind the knee
þ The shank of the climber is too high. When climber is descending the shank is jabbing the back of the leg just above the knee and below the hamstring.
þ Readjust the climber; two fingers below the knee joint.
5. Painful shins þ The shank is riding across the shin, move the shank so that it is riding back.
6. Numbness/soreness in the biceps
þ Climber is trying to pull with arms while ascending, too much strain on the biceps.
þ Re-emphasize that the arms do not pull; they glide up/down the pole. The legs are the motors that push the climber and do the work.
7. Climber out of breath
þ Climbing is a physical activity; the individual will have to develop the conditioning necessary to acclimate to the new exercise.
þ Climber is holding their breath; emphasize the need to breathe regularly.
8. Legs fatigued
þ Rest, and re-emphasize proper climbing mechanics.
þ Need to condition the body, push the body to fatigue but not beyond, remember the legs have to adapt to the new exercise and strain that is being placed on them.

Troubleshooting
© 2006 Page 31 of 47
þ Legs may be bent, too much strain on the quadriceps.
9. Back pain þ Poor body posture and positioning. þ Do not lean over backwards, chest
towards the work and lean on a straight leg.
10. Cutting out when climbing
þ Check gaffs; are they sharp? þ Are the gaffs the correct length? þ Are the gaffs shaped correctly? þ Verify gaff measurements with ruler
and gaff gauge. þ Avoid pole line hardware when
climbing i.e. washers, nuts, bolts, etc. anything that will dull the gaff.
þ Make sure that the gaff angle is proper when penetrating the pole, check the knee position (a fist’s length away from the pole).
11. Gaffs get stuck in wood
þ Don’t stand in one place too long. The gaff will work its way deeper into the wood.
þ To dislodge the gaff press the toe of the boot against the wood (point the toe down) and kick the heel out.
þ Don’t stomp the pole when ascending; only exert enough force to penetrate the wood approximately ¼ of an inch.
Muscle Memory
© 2006 Page 32 of 47
Muscle Memory1 Pole climbing is a physical activity that requires the new climber to learn how to utilize
their muscles differently than what they are used to. Learning the proper climbing
mechanics requires repetitions and perfecting the mechanics in order to develop a smooth, effortless and safe set of climbing skills. Climbing mechanics should be the
same on a 35’ pole as they would be on a 135’ pole. The proper ascending and descending skills do not change regardless of the height of the pole. What changes is the
attitude of the climber. The taller the pole the more adept the climber should be and confident in their skills. These skills are taught at the organization’s climbing school and
honed through repeated practice, which is typically done on the job. Let’s talk about developing muscle memory. What does it mean to learn a new skill and
go from "novice" to "expert"? In the world of pole climbing, part of that learning means
memorizing how to use the arms and the legs in a coordinated way to control the body as it ascends, descends and maneuvers on the pole. But how does this memorizing take
place? At first, you need to concentrate in order to make your fingers, hands; arms (and feet)
move in just the right way, based on what you see. What you're learning is precision, i.e. how to make the body perform the task (ascending and descending etc.) carefully. After a
while, the "seeing-thinking-doing" gradually becomes "seeing-doing" because your muscles seem to "know" and "remember" just what to do. What you're learning now is
speed, i.e. how to perform the task carefully and quickly. That's muscle memory.
Scientists call this "kinesthetic memory" or "neuro-muscular facilitation" and they speak of "sensory-motor" learning, since you are combining sensing input, i.e. what you see with your eyes, with motor output, i.e. what you do with your body.
Of course, during the "drill-and-practice", your muscles aren't really memorizing
anything (since all memories are stored in your brain). Instead, what you see with your
eyes is interpreted by your brain in the form of nerve signals to your muscles to make your body move.

Muscle Memory
© 2006 Page 33 of 47
Now by making the same movements in response to the same visual cues over and over
again, the associated nerve-muscle connections gradually become more effective, i.e. the transmission of the signals becomes more effective, and this is how the "thinking" in the
"seeing-thinking-doing" is gradually replaced by "seeing-doing", i.e. by muscle memory.
To learn the new skills and acquire muscle memory, you must be practicing properly. This means lots of feedback, right from the start, since novices don't know enough yet
about doing things right to be able to notice, and correct, their own mistakes! (If they
could, they'd be experts instead of novices.) Worse, if you don't practice properly, you'll learn to do things "wrong" and down the road, you'll need to "un-memorize" those bad
habits. That is why it is imperative that businesses whose employees are required to climb poles need to emphasize the proper climbing mechanics and to allow the novice to
climb on a regular basis under the direct supervision of the experienced climber (Journeyman or foreman on the crew).
Climbing School
© 2006 Page 34 of 47
Climbing School This section will outline how to successfully develop and implement a climbing school
for those organizations that require their employees to work on their facilities on wood
poles. Instructors
Your instructors are the key components for delivering a high-quality program, capable of insuring well-trained and safe workers. Individuals that will be used as instructors
should be identified through their performance evaluations, work experience and personalities. Gone are the days when yelling and screaming at new employees/recruits
were an accepted practice. Berating and brow beating are unacceptable practices in today’s corporate environment.
Today’s instructors and leaders need to have a desire to teach and mentor new
employees; they have to be professional in their delivery and ability to train individuals and teams. That doesn’t mean that you have to have “touchy, feely” people leading the
program, rather disciplined and no-nonsense individuals with focus, direction, and leadership qualities should be highly sought after. Ideally, your organization upon
identifying such candidates will provide leadership and course instruction training for these people to provide them with the tools and resources to be successful instructors.
Just because “John Doe” is a good lineman, does not mean that he will be a good instructor. Remember you are trying to transfer knowledge and skills from one individual
to another and there are methods and techniques for optimizing this transference.
Two Weeks (Ten days)
This timeline for all practical purposes is the minimum amount of time you’ll need to teach pole climbing and basic working aloft skills. Some companies go as long as a
month. It has been my experience that once a company goes beyond ten days they are basically introducing other subjects into the course. Those subjects typically are: First
Aid/CPR, safety, commercial drivers licensing, etc. Ten days will allow the instructor to
make a good evaluation about the new climbers as to whether they have the physical and mental abilities to continue on into an apprentice program.
Climbing School
© 2006 Page 35 of 47
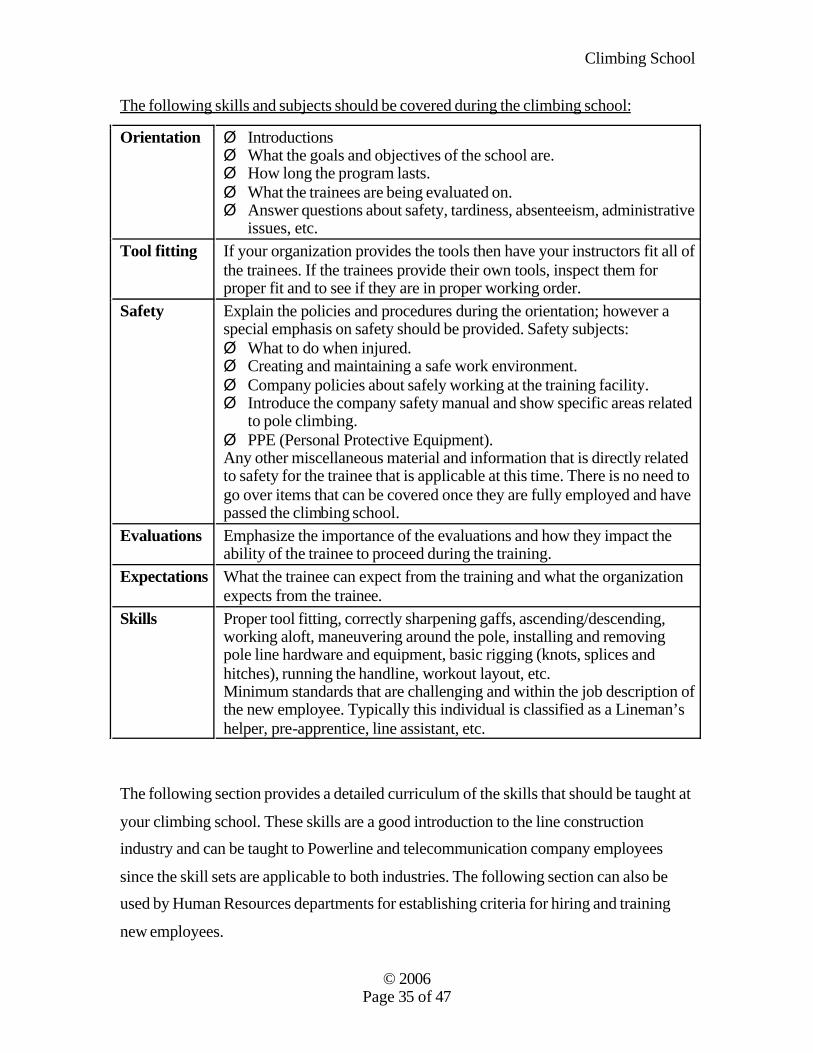
The following skills and subjects should be covered during the climbing school:
Orientation Ø Introductions Ø What the goals and objectives of the school are. Ø How long the program lasts. Ø What the trainees are being evaluated on. Ø Answer questions about safety, tardiness, absenteeism, administrative
issues, etc. Tool fitting If your organization provides the tools then have your instructors fit all of
the trainees. If the trainees provide their own tools, inspect them for proper fit and to see if they are in proper working order.
Safety Explain the policies and procedures during the orientation; however a special emphasis on safety should be provided. Safety subjects: Ø What to do when injured. Ø Creating and maintaining a safe work environment. Ø Company policies about safely working at the training facility. Ø Introduce the company safety manual and show specific areas related
to pole climbing. Ø PPE (Personal Protective Equipment). Any other miscellaneous material and information that is directly related to safety for the trainee that is applicable at this time. There is no need to go over items that can be covered once they are fully employed and have passed the climbing school.
Evaluations Emphasize the importance of the evaluations and how they impact the ability of the trainee to proceed during the training.
Expectations What the trainee can expect from the training and what the organization expects from the trainee.
Skills Proper tool fitting, correctly sharpening gaffs, ascending/descending, working aloft, maneuvering around the pole, installing and removing pole line hardware and equipment, basic rigging (knots, splices and hitches), running the handline, workout layout, etc. Minimum standards that are challenging and within the job description of the new employee. Typically this individual is classified as a Lineman’s helper, pre-apprentice, line assistant, etc.
The following section provides a detailed curriculum of the skills that should be taught at
your climbing school. These skills are a good introduction to the line construction industry and can be taught to Powerline and telecommunication company employees
since the skill sets are applicable to both industries. The following section can also be used by Human Resources departments for establishing criteria for hiring and training
new employees.

Climbing School
© 2006 Page 36 of 47
Objectives
This is an introductory skills course focusing on climbing and working in an elevated position for the purpose of installing and removing pole line hardware, equipment and
conductors to facilitate the requirements of the organization. Upon learning these skills the trainee will demonstrate proficiency while performing
these skills in order to successfully advance and be offered a permanent position with the company. Proficiency will be determined through performance evaluations and skills
testing measurements.
Pole Climbing
The trainee will learn how to ascend, descend, and maneuver around the pole. Working Aloft
The trainee will learn how to install and remove pole line hardware, equipment and conductors.
Frame poles for installation of hardware, equipment and other material, utilizing the brace-and-bit, framing saw and chisel. (No power tools, you have to learn how by using
manual tools, helps to develop proper body position when working aloft).
Install/remove the following:
♦ 8’ light and heavy crossarm
♦ 10’ light and heavy crossarm
♦ 8’ light and heavy crossarm with pin and glass
♦ 10’ light and heavy crossarm with pin and glass
♦ Dead-end light wire - # 6 copper or 4 aaac
♦ Make up, install/remove double arms (light and heavies) including pin and glass
Basic Rigging The trainee will learn how to tie the following knots, hitches and splices in order to
secure lines, tie down loads, secure and let off loads in a controlled manner:
Bowline, bowline-on-a-bight, running bowline, snubbing hitch, clove hitch, square knot, monkey’s fist or rolling bend, eye splice and crown splice. The trainee will also be
required to fabricate a handline including the “Becky” for use when installing and removing pole top components.

Climbing School
© 2006 Page 37 of 47
Safety
The trainee will learn how and when to use PPE (Personal Protective Equipment), identify hazardous areas, i.e. “being in the hole”, understand common terms-Headache,
in-the-hole, etc. The trainee will also learn how to identify what “being-in-the-bight” means and how to avoid it.
Tool identification The trainee will learn about the common tools that are applicable to their job
classification: Shovels, tamps, jackhammers, digging bars, handlines, slings (steel, rope and nylon),
blocks, chain hoists, grips, etc.
Digger/derrick The trainee will learn how the digger/derrick operates and will demonstrate proficiency in
the following: Outrigger operations, derrick operations - boom up, down, rotate, extend, grabbers
open/close and tilt up/down, winch line up/down, picking up a pole on balance and placing into a pole hole, installing and removing a pole-bolted transformer.
Additionally, the trainee should become familiar with where the tools, equipment and
devices are typically stored on the truck. Summary
This is a basic course with the following intentions: 1. To evaluate if the trainee can competently pass the physical skills demanded of
the industry. 2. To evaluate if the trainee has the right attitude and personality to work in a team
environment and can demonstrate a good attitude about safety and policies. 3. To evaluate if the trainee can follow instructions and directions and can learn new
information and apply it to the job.
Remember to keep your training simple, focused, and clear. Eliminate any grey areas in order to make the training beneficial and useful to the individual and the organization.
This curriculum can be used effectively for training individuals in a ten-day timeframe effectively, safely and cost-effectively.

Climbing School
© 2006 Page 38 of 47
Evaluations
An evaluation is an assessment that the supervisor is performing on the individual based on their performance. The evaluator should be observing and assessing two issues: (1)
Physical ability and (2) internal or attitudinal behaviors. Here is an example of an evaluation that can be used on trainees at the climbing school. Ratings 1-5, (1) failing (2) Needs improvement (3) Average (4) Above Average (5) Excellent
Ascending ¨1 ¨ 2 ¨ 3¨ 4¨ 5
Descending ¨1 ¨ 2 ¨ 3¨ 4¨ 5
Working Aloft ¨1 ¨ 2 ¨ 3¨ 4¨ 5
Body Position ¨1 ¨ 2 ¨ 3¨ 4¨ 5
Maneuvering around the pole ¨1 ¨ 2 ¨ 3¨ 4¨ 5
Mechanical ability* ¨1 ¨ 2 ¨ 3¨ 4¨ 5
Rigging ¨1 ¨ 2 ¨ 3¨ 4¨ 5
Team player ¨1 ¨ 2 ¨ 3¨ 4¨ 5
Self-motivated ¨1 ¨ 2 ¨ 3¨ 4¨ 5
Consistently seeks out new work ¨1 ¨ 2 ¨ 3¨ 4¨ 5
Understands and observes safety
procedures and policies ¨1 ¨ 2 ¨ 3¨ 4¨ 5
Quality of work ¨1 ¨ 2 ¨ 3¨ 4¨ 5
Reliability ¨1 ¨ 2 ¨ 3¨ 4¨ 5
Adaptability ¨1 ¨ 2 ¨ 3¨ 4¨ 5
*Mechanical Ability - This category assesses the trainee’s ability to work with tools. Do
they know how to use a wrench, hammer, pliers, etc, correctly?
Climbing School
© 2006 Page 39 of 47
Additionally, a line item should be included to allow the instructor to place comments
that will further explain the assessment of the trainee.
Testing Always test the trainees on each skill that is taught in order to verify that they are
learning the skill and able to demonstrate proficiency at them. For instance rigging, either you know how to tie a bowline or you don’t. This is an easy one; it is pass or fail. There
is no needs improvement for tying knots, splices or hitches.
Climbing is another thing, one trainee may be meeting the minimum standard for
climbing while another one is excelling, this is a subjective matter however the better trained the instructor is, the easier it will be to make judgments about this particular area.
Mechanical ability, some individuals either through experience or natural ability are able
to understand and utilize tools and equipment more proficiently than others. It is necessary that the instructors be able to instruct and demonstrate correct techniques and
methods for using tools and equipment.

Fall Arrest Equipment
© 2006 Page 40 of 47
Fall Arrest Equipment (F.A.E.) OSHA mandates F.A.E. for “unqualified” climbers to use during the training segment of their employment. The unqualified climber must be in the F.A.E. when they are above 4’
on the pole.
OSHA 1910.269(g) (2) (v)
Fall arrest equipment, work positioning equipment, or travel restricting equipment
shall be used by employees working at elevated locations more than 4 feet (1.2 m)
above the ground on poles, towers, or similar structures if other fall protection has
not been provided. Fall protection equipment is not required to be used by a qualified
employee climbing or changing location on poles, towers, or similar structures,
unless conditions, such as, but not limited to, ice, high winds, the design of the
structure (for example, no provision for holding on with hands), or the presence of
contaminants on the structure, could cause the employee to lose his or her grip or
footing.
Note 1: This paragraph applies to structures that support overhead electric power
generation, transmission, and distribution lines and equipment. It does not apply to
portions of buildings, such as loading docks, to electric equipment, such as
transformers and capacitors, nor to aerial lifts. Requirements for fall protection
associated with walking and working surfaces are contained in Subpart D of this Part;
requirements for fall protection associated with aerial lifts are contained in 1910.67
of this Part.
Note 2: Employees undergoing training are not considered "qualified employees" for
the purposes of this provision. Unqualified employees (including trainees) are
required to use fall protection any time they are more than 4 feet (1.2 m) above the
ground.
Here is the point, “At what point is the climber considered qualified”? This means that the organization has to identify or create a test to measure the level of proficiency of the
climber that will allow them to be “qualified” in order to remove the F.A.E. If you have a ten-day climbing school I would certify your trainees as competent climbers ASAP. The
sooner you get your trainees out of the F.A.E. the faster their skill levels will raise and the more competent they will become. Wearing F.A.E. is fine when it comes to compliance

Fall Arrest Equipment
© 2006 Page 41 of 47
with OSHA but it retards the skills training ability of the trainee to become competent
and confident on the pole. Pole climbing requires the ability to gain muscle memory and correct climbing mechanics. The F.A.E. has tendency to produce improper skills and can
in some cases contribute to different types of muscle soreness and fatigue. Climbing in the F.A.E. will definitely prevent the trainee from hitting the ground in the event that they
suffer a catastrophic gaff out (where both gaffs disengage from the pole at the same time). However, it also develops an unnatural rhythm in the climbing mechanics because
you have a lanyard constantly on your back. Here are the things I have observed and experienced when training people solely in a harness:
♦ Unnatural rhythm when ascending and descending the pole.
♦ The braking mechanism engages when the climber takes a long step down when descending.
♦ Lanyard is riding hard against the back and head because of the length of the yardarm away from the pole.
♦ When maneuvering around the pole the climber must grab the lanyard and flip it around crossarms.
F.A.E. is a good start but at some point the training wheels have to come off the bicycle to learn how to ride.
My suggestion is to develop criteria that will allow the novice climber to meet standards that will allow them to be qualified at the climbing school so that the F.A.E. can be
removed and instruction can be continued in order to truly develop the proper climbing mechanics.

Fitness
© 2006 Page 42 of 47
Fitness Climbing school presents some serious physical fitness challenges for the new climber. Unlike other forms of manual labor there are limitations to the immediate work area that
restricts the ability of the worker to optimize lifting position and maximize leverage. For example: installing insulators at the end of a 10’ crossarm means that the individual will
have to reach 5’ from centerline of the pole in order to perform this task. Installing
distribution porcelain insulators are challenging yet considered a routine operation. However, installing a sub-transmission porcelain insulator (69 kV) can be daunting
considering the fact that these insulators can weigh approximately 20+ lbs. Now imagine pulling this insulator off the handline and transporting it out to the end of the arm, if you
cannot lean out and lift this insulator and insert the steel pin into hole you cannot perform the job. Obviously if you are using epoxy type insulators they weigh less and make it
easier, however I think you get the point.
Physical Training Regiment Fitness training prior to going to climbing school will assist the new climber dealing with strength and leverage issues. The single most important thing a person can do to prepare
is to lose weight if you carrying excess lbs. Cardio/aerobic training 3-4 times a week will
start you on your way. Diet, changing poor eating habits and developing a healthy menu will enable you to see the greatest results. Eating six meals, spaced out throughout the
day will raise the metabolism and burn more calories. Resistance training, another vital component that will enable you to raise your
metabolism (helping to burn calories) and strengthen the muscles necessary to perform at a high level is an important component for pole climbing and working aloft success.
Pole climbing is anaerobic (Anaerobic literally means "without air", and refers to the
energy exchange in muscles during short high intensity workouts), meaning that since the activity is not done for a long duration there is no sense in structuring your fitness
training for an extended activity. A proficient climber should be able to ascend a 45’ pole in approximately 25-30 seconds, and descend in approximately half that time.
Therefore individuals who are going to be participating in a pole climbing school by the employer should be preparing prior to walking onto the property. This is critical because
Fitness
© 2006 Page 43 of 47
of the limited amount of time that a business can allocate for training, attrition levels in
the Powerline industry for pole climbing school are quite high, upwards of 60% and typically 50% is the baseline for attrition. Attrition can be broken down to three
components: the individual quits (approximately 50%); the individual cannot pass the minimum standards (approx. 40%), and injuries (approx. 10%). The last statistic can be
deceiving because there are very few catastrophic injuries that lead to individuals being unable to complete a pole climbing school. Injuries typically lead to the individual’s
decision that climbing poles is not the career move that they should be pursuing. The following table provides a simple exercise routine that can be implemented to prepare the
individual for pole climbing school. It is designed to be used 4-6 weeks prior to
participating in the pole climbing school and does not require actual pole climbing activities. Cardio and resistance training will be rotated so that the individual can get a
wide range of exercise options and optimize their individual health. Warm-up at least five minutes prior to the start of the workout i.e. walking, slow jog, exercise bike, elliptical,
etc. I will not include any set amount of weights or reps, just this, you must complete the set to failure (may require a spotter when lifting) because we are seeking to develop
stamina for work not a one-rep wonder. An individual who can bench press 300 lbs. is
strong but in this industry we can work upwards of 24-30 hours straight, the industry requires long term stamina and durability.
Minimum amount of sets, 4-6 for resistance training and cardio will have a set time. The optimum time to train is early in the morning, this will burn up the previous night’s
caloric intake and will jump start your metabolism. Your metabolism will rev high throughout the day (upwards of 300%) and resistance training will rev your metabolism
for the following 24-48 hours. One exercise that should be performed for lots of reps is squats; pole climbing is the
ultimate quadriceps utilization exercise. You cannot pull yourself up the pole, your lower
legs are strapped into your gaffs therefore your calf muscles are not flexed, and your hamstrings are along for the ride. Your quads are used to propel you up and around the
pole. You use your legs for lifting equipment, material and devices and for pushing conductors out onto insulators.
Squats > 4-6 sets, 15-20 reps, gradually increasing the weight, force the muscles to work.

Fitness
© 2006 Page 44 of 47
Exercise Regiment
Week Sunday Monday Tuesday Wednesday Thursday Friday Saturday
One Rest Pushups, Military press, Crunches.
Cardio 30 minutes; 80% of max heart rate.
Pull ups, barbell curls, reverse crunches.
Cardio 30 minutes; 80% of max heart rate.
Squats Rest
Two Rest Cardio 30 minutes; 80% of max heart rate.
Squats, crunches.
Cardio 30 minutes; 80% of max heart rate.
Bench Press, Shoulders - lateral raises- triceps pushdowns.
Cardio 30 minutes; 80% of max heart rate
Rest
Three Rest Pull downs (wide grip), dumbbell curls.
Cardio 30 minutes; 80% of max heart rate.
Pushups, Military press, Crunches.
Cardio 30 minutes; 80% of max heart rate.
Circuit training: pushups pull ups, squats, crunches. 20 secs. Each exercise, 4 set.
Rest
Four Rest Cardio 30 minutes; 80% of max heart rate.
Bench Press, Shoulders - lateral raises- triceps pushdowns.
Cardio 30 minutes; 80% of max heart rate.
Squats, crunches.
Cardio 30 minutes; 80% of max heart rate.
Rest
Five Rest Squats, crunches.
Cardio 30 minutes; 80% of max heart rate.
Circuit training: pushups pull ups, squats, crunches. 20 secs. Each exercise, 4 set.
Cardio 30 minutes; 80% of max heart rate.
Bench Press, Shoulders - lateral raises- triceps pushdowns.
Rest
Six Rest Cardio 30 minutes; 80% of max heart rate.
Squats, crunches.
Cardio 30 minutes; 80% of max heart rate.
Circuit training: pushups pull ups, squats, crunches. 20 secs. Each exercise, 4 set.
Cardio 30 minutes; 80% of max heart rate.
Rest

Fitness
© 2006 Page 45 of 47
Diet Here it is in a nutshell:
♦ Eat six meals a day evenly
spaced out (three main meals and three snacks i.e. fruit, vegetables,
and include a protein product; a
protein drink is an excellent snack).
♦ Always have a serving of protein with each meal.
♦ Exercise before you eat.
♦ Avoid candy and other high
sugar products after 1 p.m.
♦ Reduce alcohol intake.
♦ Your last meal should be small, preferably a protein shake.
Remember, carrying excess weight is detrimental at any point in your life however, if
you’re climbing poles and pushing your body to physical extremes you do not need to be overweight. Eat sensibly, there is no need to go on some fad diet for a short term weight
loss objective, eat foods that you find in your grocery store, you’ll save money and enjoy a better meal.

Conclusion
© 2006 Page 46 of 47
Conclusion It is the objective of this book to provide a formal methodology for organizations to teach and train their workers on how to safely and effectively climb poles and work aloft. It is
critical that power line and telecommunications companies start their lineworkers off in the right direction when training them to work aerially installing/removing and
maintaining the necessary network infrastructure.
If your trainers follow these tried and true methods they will increase their ability to effectively train new employees. Additionally, this book can be used as a train-the-trainer
manual for training instructors on how to effectively teach pole climbing.

References
© 2006 Page 47 of 47
References 1 Muscle Memory. Retrieved from http://www.simlog.com/index.html. December 7, 2005