The 5-Step Golf Swing System
31
The Simple Golf Swing System By David Nevogt INTRODUCTION This book is results oriented. That is a statement rarely encountered when reading a book related to golf instruction. Sure, there are feel-good books to which we can all relate. They take the mental approach to the game, and tell you that it’s okay to shoot 100 because the game should be fun, no matter what your results. In that regard, they build for themselves a “soft place to fall”. You may feel good after you finish the book, but the results of your game rarely have changed. Indeed, it is a mental game; however, you must focus on the mechanics of the game to lower your score. Some books already exist that focus on swing mechanics. Watch out! Note taking may be required…my personal recommendation is that you consider using a protractor as a bookmark when reading these books because you might really need to be using it. They are all about the correct balance, wrist angles, and swing planes. I’ve read tons of books on the subject and none of them have worked because they’ve all been too complex. I haven’t been able to hold on to their advice because I just couldn’t remember all of the information. I couldn’t do it all at the same time. I found that by trying something new, I was only complicating my swing. I wasn’t getting anywhere, because there was just too much information. I decided that I just couldn’t dedicate that much time to perfecting my swing. Then I realized that I didn’t have to spend so much time working on my swing, if I kept it simple. Golf should not be the most important aspect of your life. You all have many other things that are more valuable to you. Many of you believe that you just don’t have the time to become a good golfer. You can’t commit an hour each day to your golf game. I understand. It’s important to you and you would like to be better, but it’s just not worth the work. I know what you want. You want something that works. You’ve been looking for a product that you can pick up, work through in your spare time to produce results. Here it is. This product will simplify your golf swing, and our promise is that your swing will be very repeatable, so that you may anticipate consistency on the course. You will get the results you’ve been searching for. Most importantly, you will likely see positive results during your first round on the golf course, where it matters. The system you will read about is resistant to pressures that occur when competing on the course. The system will work regardless of who is in your foursome. If that sounds like a lot of promises, that is because it is a lot of promises. We have tested the techniques expressed in this book using players of all skill levels. The results are the same. Every player experiences an improved ability to hit the fairway on the tee shot as well as hit the green from the fairway. As a player sees Page 1 of 31
Transcript of The 5-Step Golf Swing System

The Simple Golf Swing System By David Nevogt
INTRODUCTION This book is results oriented. That is a statement rarely encountered when reading a book related to golf instruction. Sure, there are feel-good books to which we can all relate. They take the mental approach to the game, and tell you that it’s okay to shoot 100 because the game should be fun, no matter what your results. In that regard, they build for themselves a “soft place to fall”. You may feel good after you finish the book, but the results of your game rarely have changed. Indeed, it is a mental game; however, you must focus on the mechanics of the game to lower your score. Some books already exist that focus on swing mechanics. Watch out! Note taking may be required…my personal recommendation is that you consider using a protractor as a bookmark when reading these books because you might really need to be using it. They are all about the correct balance, wrist angles, and swing planes. I’ve read tons of books on the subject and none of them have worked because they’ve all been too complex. I haven’t been able to hold on to their advice because I just couldn’t remember all of the information. I couldn’t do it all at the same time. I found that by trying something new, I was only complicating my swing. I wasn’t getting anywhere, because there was just too much information. I decided that I just couldn’t dedicate that much time to perfecting my swing. Then I realized that I didn’t have to spend so much time working on my swing, if I kept it simple. Golf should not be the most important aspect of your life. You all have many other things that are more valuable to you. Many of you believe that you just don’t have the time to become a good golfer. You can’t commit an hour each day to your golf game. I understand. It’s important to you and you would like to be better, but it’s just not worth the work. I know what you want. You want something that works. You’ve been looking for a product that you can pick up, work through in your spare time to produce results. Here it is. This product will simplify your golf swing, and our promise is that your swing will be very repeatable, so that you may anticipate consistency on the course. You will get the results you’ve been searching for. Most importantly, you will likely see positive results during your first round on the golf course, where it matters. The system you will read about is resistant to pressures that occur when competing on the course. The system will work regardless of who is in your foursome. If that sounds like a lot of promises, that is because it is a lot of promises. We have tested the techniques expressed in this book using players of all skill levels. The results are the same. Every player experiences an improved ability to hit the fairway on the tee shot as well as hit the green from the fairway. As a player sees
Page 1 of 31

the improvement, confidence allows the player to relax and let the shot happen. Because the system delivers results, confidence increases and the desired results follow. The Simple Golf Swing system has been designed to simplify your swing. It’s very easy to turn golf into a complex system of turns and twists. Our goal is to get away from that. First, we’re going to get you into a set-up position that will enable you to make solid impact with the golf ball. You will use this set-up procedure every time you approach a shot. You will be amazed at how much this improves your game in itself. Then, we are going give you a sound grip. Next, we’re going to give you a timing drill. The goal here is to simplify how timing may be improved, while contributing to basic swing mechanics related to our Simple Golf Swing. We hope that you focus on this drill and truly understand it, so that when we take you through the swing process there is very little new that you will have to learn. Finally, we give you the component pieces of your new and simpler golf swing. You’ll have a completely new swing. It will be simple and repeatable. Most importantly, it will give you the results you have been looking for. We realize what you want, and your new swing will deliver. No more studying. No more frustrations about how to hit the ball solidly and reliably. The time to improve your golf game is now. It’s amazingly simple, and that’s why you should be so excited. Let’s get started.
Page 2 of 31

The SETUP The way you set up to hit a golf ball may be the most important factor in determining your score. We don’t take that statement lightly. This section will likely be the most important in the entire book. Do not underestimate the importance of the setup! If you forget anything in this book please don't let it be this. Luckily, the setup is the easiest part of the golf “swing” to change. It's the easiest of all the bad habits related to your golf swing to break. If you set up to the ball in the manner described, your golf swing will change for the better. You may believe that the way you currently set up to the ball assures a consistent and reliable striking of the golf ball. If you have a nagging (or worse yet, unpredictable) slice or hook, hit behind the ball, or even top the ball, the problem may originate in your current setup. If you experience one or more of these problems, there is a high probability that:
• Your setup puts you in a position to allow for these frustrating results, or
• You have, at some point, adjusted your set-up or swing to compensate for your problem, which has done nothing but facilitate a complicated golf swing. A complicated golf swing is the last thing a bogey (or higher) golfer needs
Our Simple Golf Swing revolves around simplicity. You have probably read several books that describe how to put a swing on the ball. Our clients say that most books have confused them to the point that they may never know how to improve. The whole point of swinging a golf club is to get back to the place you started. The process for “setting up” a simple golf swing puts you in a position to go through the five steps of the golf swing, and come back to the starting position with power and control. The combination of power and control is what every golfer strives for, and it all starts with a sound and repeatable set-up. In the beginning, it will take an open mind and some work to get used to this new set up. For some of you, it will be close to the set-up you are currently using. For the rest of you, it will require that you drastically change your set-up. The description will be fairly technical, and it may be difficult to get used to this new set-up routine. However, if you want to succeed, the first thing that you have to do is to be willing to accept change. As stated earlier, the set-up will be the most valuable part of the Simple Golf Swing system, so please focus on it. Position yourself so that your feet are shoulder width apart. It’s fine if you are more comfortable with a slightly more narrow or wide stance. You should be comfortable. For the longer clubs, you may need a wider stance to support yourself, and for the shorter clubs you may want a narrower stance. That's fine too. A stance that is too wide will make it difficult to turn. A stance that's too
Page 3 of 31

narrow will result in loss of balance. The width of your stance should not vary by more than the width of your foot in either direction. Feel free to get comfortable, as long as your feet are approximately shoulder-width apart. The toe of your left foot should be pointing straight out, NOT pointing to the left at all. If you angle the toe out, it will prevent you from completing a full shoulder turn. The ball should be half way between your left and right foot. For simplicity reasons, you should play the ball in the middle of your stance for every shot. Some of the equipment you use may perform better if you play the ball a bit forward or backward in your stance. That's fine, but you shouldn't position the ball more than its’ width forward or backward in either direction. With the Simple Golf Swing process you will soon be learning, positioning the ball in the middle of your stance should be best for every shot to begin with. Once you master the Simple Golf Swing, you may wish to experiment by moving the ball off-center by as much as one ball width toward your trailing foot for the shortest irons and as much as one ball width toward your leading foot for long irons. For now, however, place the ball in the middle of your stance!
Page 4 of 31

Position the golf ball in the manner previously described, then stand straight up. Your knees are not locked, but they are close to locked. Your back is perfectly straight. Your chest should be out. It won’t feel right to have your back straight and chest protruding. It will look and feel “exaggerated”, but that is alright. It is supposed to feel like that when you first adopt this new setup. Your spine has to remain straight throughout the swing. It is most important that your spine remain straight during the setup and throughout the swing. Your spine will be acting as the axis for your swing. For a moment, I want you to imagine something rotating around a bent axis. A tire, for example, turning about a bent axle…How would you describe the pattern regarding how that tire was rotating? Complex? Unpredictable? It would be really difficult to steer a car down a straight line on a bent axle wouldn't it? Bent axles are worthless, and so is your swing if your back isn’t perfectly straight. Similarly, it is difficult to “steer” a golf ball along a predictable path when the axis about which your swing rotates is not straight. You must eliminate the curvature in your spine (back) if you ever hope to strike the ball with precision and power. It is not possible to overemphasize this point. Now, focus on a straight back and spine, which allows for a very predictable, smooth, and consistent path of the club head. This will be the core of your new golf swing. Your whole swing will rotate around a straight spine. This is an extremely important and valuable new concept! Luckily, it is one of the easiest to apply and remember. My guess is that right now, even if you were to use your old swing to hit a few balls, remembering to keep your spine perfectly straight throughout the swing, you would see and feel immediate results. Next, hold the club out straight in front of you. Extend your arms as far as they can extend out in front of your body. You are holding the club, with the correct grip, straight out in front of you. Now, while keeping the club parallel to the ground, arms extended and elbows locked, move the club and your arms down so the club is even with your belly button or waist. Your wrists will have to bend slightly to do this.
Page 5 of 31

Now, you should be standing up straight, with your chest out, and your shoulders back. Your arms should be out in front of you, your elbows locked, and your wrists level with the height of your waist, while holding the club parallel to the ground. Next, bend over AT THE HIPS until the club touches the ground. Move towards or away from the ball according to where the club touches the ground. After some practice, you will be able to judge the distance well enough so that you don't have to move around to get into position. Keep your chest out and straight while bending over at the hips. It is impossible to overstate the importance of this. You should not be bending with the back at all to reach down to the ball; you should be bending AT THE HIPS. This is one of the most common mistakes made by amateur golfers. If you look at any professional golfer on television, they will ALWAYS have a straight back, and they will ALWAYS bend at the waist to get to the ball. You will feel like your “seat” is protruding backwards more than usual. That is what we want here. Also, it’s okay if the toe of your club is not flush with the ground. It’s should be that way, especially for the long irons.
Page 6 of 31

As you can see in the image to the left, the back remains straight while bending over to the ball. All of the bending is done at the hips. Bending at the waist and keeping a straight back will promote great ball flight and consistency. The relationship between the arms and chest has not changed.
This is the final setup position. The back is still straight. All you need to do is bend at the waist until the club touches the ground. As you can see, the arms are still stretched out, and the hands are hanging straight down from the shoulders. They seem lower than waist-level, but the relationship between the arms and chest has not changed. Your legs remain in a fixed position, while you move the arms and chest together to the ball. This is the key to a good, simple setup.
Now you are in a position to hit a golf ball straight and consistently down the middle. Every time you hit a golf ball, go through this set-up drill. It will become easier each time you hit a ball. It will soon become a habitual routine that you go through on the course as well as the range. More importantly, it will give you confidence, knowing that you are in the right position to make solid contact with
Page 7 of 31

the ball every time. Now hit a few balls after going through this set up routine for each ball. Get used to it for a few days and then we'll move on to the Simple Golf Swing. Congratulations, the hardest part is over. We realize that may be difficult to believe. * Just a quick word on the driver. Woods are designed differently than irons. With an iron, you should essentially be hitting "down" on the ball. That's not really the case with the woods, so we need to change just one thing when you are hitting the woods. Here's the solution. First, get in to your normal setup position, as I describe above. You've got the driver in hand, you're bent over at the waist, you're back is perfectly straight, and you're ready to take a good swing. Now, all you have to do is stand up a bit straighter. You should have already determined the correct distance between your feet and the ball. You just stand up a bit more straight by bending back up at the hips, and reach out with you arms to bring the head of the driver back to the ball. You will need to experiment with the amount that you need to adjust (it shouldn't be much). Your chest may move about 1 - 3 inches. It doesn't seem like very much, but the result will be very noticeable. Just remember that nothing else in your swing or setup changes. Your lower body doesn't move because you have already determined the correct distance between your feet and the ball. It's just a matter of standing up a bit straighter, and then reaching out a bit more with the arms to compensate. After we get through the remaining sections, you will understand that this will change your swing plane a bit. Your swing plane will become more horizontal, the straighter you stand up. Please realize that nothing else should change. You will swing each of your clubs in exactly the same fashion (found below). This repositioning at setup will have a huge effect on the outcome of your shot, so please take some time to see where you are the most comfortable.
Page 8 of 31

The GRIP First of all, it's important that you realize that your grip will affect the results that you get. However, it's not as complicated as the other systems make it out to be. First, grab the club with your right hand so the face of it is toward the target. Keep the face pointed toward the target, while placing your left hand on the bottom of the grip or handle. At this point you should be holding your left hand out flat, so that it is touching the bottom of the grip. Position the joint where your left pinky meets your palm directly underneath the handle of the club. Keep the pinky there and place the first joint in your left forefinger directly underneath the club. Now, do not lift your fingers up, bringing the grip of the club into your palm; instead, hold the handle steady with your left fingers and wrap your palm around the top of the grip. This is an important distinction. Again, don’t wrap the fingers towards the palm, but instead wrap your palm around the top of the club. Now, you should be able to easily place your left thumb directly on top of the club. This should form a V-shape where your left thumb and left forefinger meet. This V-shape should point directly to your right shoulder when it’s complete.
Hold the club steady with your right hand, and place left hand underneath the club as shown. The first joint of the left forefinger should be directly on the bottom of the handle, as well as the last joint of your left pinky
Page 9 of 31

Now, wrap the left palm around the handle of the club. Keep the club head pointed upward to assure that it will be square at setup. Once you have placed your palm on top of the club, do the same with your left thumb. Place it directly on top of the handle of the club.
Next, interlock the left forefinger, and the right pinky. Nudge your right hand all the way towards the bottom of the grip. Now again, wrap the right palm all the way around the top of the grip. Don’t hold the grip of the club in your right palm. You should be able to cover up your left thumb with your right palm if you’ve done it correctly. You’ll see another V-shape being made where your right thumb and right forefinger meet. As a check, this V should be pointing directly at your
Page 10 of 31

right shoulder. If it doesn’t point at your right shoulder, rotate your hand on the grip so that it does. Your fingers should be giving the club most of the support it needs, NOT your palms.
Now that you have the proper grip with your left hand, we can focus on the right hand. Take your right hand and place it underneath the handle of the club. Lift up your left forefinger from underneath the club so it can move freely. Interlock your right picky with your left forefinger. Wrap your right fingers lightly around the handle of the club as shown to the left. Alternative to the interlock grip (The overlap grip)
Page 11 of 31

The completed grip with both “V” shapes pointed toward the right shoulder. Note the “V” shapes are parallel with each other.
Hopefully, you already have a grip that closely resembles this one. There are some slight variations, but this grip is standard for the most part. It should produce the best results. However, if you have a different grip than this, and you are more comfortable using it, you may continue using it. A grip is hard to change, and this one may feel really uncomfortable to you; however, benefits will come if you embrace this new grip. The "Simple Golf Swing" will most likely provide to you the desired results, even if you use your current grip. However, if you are still having problems when you get through the system, please incorporate the above grip method into your swing. Just to clarify…although this discussion of grip technique may seem rather detailed, it will be clear once you put your hands on the club. Just align the club and wrap your palms around the top of the handle, aligning your V’s toward your right shoulder. Also worth noting is that throughout your setup and swing you DO NOT want to be “clutching” the golf club handle tightly. Tense muscles will result in a stiff swing and substantial loss of power.
Page 12 of 31

ALIGNMENT Good alignment will come with practice. "The Simple Golf Swing" system that you are about to learn will dramatically improve your alignment. However, there is one good and simple method for lining up with your target that you probably don't use. Stand behind the ball, looking at your target. Take your club and line up the target with your ball. Now pick a leaf, a blade of grass, or anything else that catches your eye that is perfectly in line with your target. The item should be one (1) to three (3) feet away. Now just line everything up with that item and fire away. This method won't cure all of your alignment problems, but it does give you a simple way to assure that you are on the right path. Many students have the habit of lining up way left or way right of the target. When the ball goes where they are “aiming”, they think they have a problem. If your ball consistently goes left or right of target, but flies straight, then your problem is your alignment. Try this simple method before every shot on the course and you'll definitely drop a few strokes.
Page 13 of 31

TIMING Timing cannot be taught, but it can be learned through repetition. The only way you can improve timing is to practice. If you practice, your timing will improve. If you've never picked up a club before, timing is definitely something that will require effort. Instruction regarding the timing of a golf swing is complex. Most books on golf instruction go into great detail trying to describe the aspect of timing and transition. We will not be doing that because we are writing this book to simplify your swing, not complicate it. Hold the club lightly throughout the entire swing. This will greatly assist in “getting the hands through” properly and, thereby, improving your timing, leading to more power at impact. Think about a power hitter in baseball. You certainly don’t see many power hitters that do not flip their hands through the ball. So it is in golf. To be a good golfer, it's not necessary to have perfect timing; however, you cannot allow poor timing to hurt you to the point where you are missing fairways. At this point, your focus should be on becoming a consistent golfer. It is important to have realistic goals. Right now, you should have only one goal. The goal is to make solid impact on every shot. With the proper set-up and use of the “spine as axis” approach, "The Simple Golf Swing" will help you to realize that goal very quickly. A Technique to Improve EFFECTIVE Distance
I want you to understand the purpose of this technique before providing the details. It's an easy technique that will produce fantastic results. You don't need to have a long and complicated back swing to send the ball a long way down the fairway. Try taking, what you believe to be, a half swing. The ball will go almost as far. It may not leave the clubface with the same speed, but it also will not slice 40 yards to the right. Which shot would you rather have on a golf course? The drill I'm about to teach you will help you consistently keep the ball in the fairway, and give you better accuracy with all of your clubs. Please start with the three pictures below. Understand that the point of these pictures is to get your arms and chest connected. You should understand the feeling of "being connected" before you try to incorporate this critical step into your golf swing. If you hold the club straight out in front of you, there will be a triangle formed between your arms and chest. Just focus on keeping the triangle between your arms and chest fixed. Just move your arms with your chest. When your chest stops rotating, your arms also stop. Please see the three pictures below and try it out. Turn to your right, then back around to your left, keeping the triangle between your arms and chest constant at all times.
Page 14 of 31

1 2 3 • What to focus on when taking your back-swing The chest and shoulders shouldn't be turning, unless your arms are turning with them. In other words, you want to start your swing with a shoulder turn, but your arms should start swinging at EXACTLY the same time. They are an extension. They are connected. Furthermore, your arms shouldn't be swinging unless your chest is rotating. Don't start swinging your arms without starting the shoulder turn. They are connected. Your left elbow remains locked throughout the entire swing. When you complete your shoulder turn, your arms should stop as well. The goal will be to have your left arm exactly parallel to the ground. Your elbow is still locked. When it gets there…STOP. Do not continue to swing your arms.
Start your backswing. Focus on keeping your back straight, and your chest out. To help you swing directly around your spine, try focusing on rotating your right shoulder back and around your spine. If you focus on the right shoulder, your left shoulder will be in the correct position automatically. Simple. Keep your left elbow locked.
Page 15 of 31

Keep focusing on bringing your right shoulder back and around your spine. Some of you may be able to turn about 90 degrees around your spine as shown in the picture on the left. Others may only be able to turn 45 degrees around your spine. Either is okay, but do not start moving other parts of the body to compensate for not being able to make a full shoulder turn. Stop when it gets uncomfortable. The important part is to STAY CONNECTED. When your left arm becomes parallel to the ground, stop your swing.
• What to focus on when making your down-swing Your left elbow is locked, and your left arm is parallel to the ground. Don't start rotating your shoulders through the ball, leaving your arms to catch up. This is the number one slice-producing move in golf. Your arms and hands are an extension of your chest and shoulders. Don't start the downswing with your arms either. The result of this will be an inconsistent hook. Please focus on making the arms and hands a direct extension of your chest and shoulders. This is the only timing issue that you need to understand and embrace. It's also very simple and easy to remember, and that is one of our primary goals! Keep the triangle that you have formed between your chest and arms in tact. Your arms and hands need to be an extension of your chest all the way through your swing. *Note: It is a very common habit to start the downswing with the body. Therefore, to stay connected, you may have to remind yourself consciously to start the downswing with your arms. I said above that you should not start the downswing with your arms, and you shouldn't. But you may have to remind yourself to starting swinging your arms at the top of the backswing, just so they can keep up with your body. Remember, your hands have further to travel than your body, so it's essential that they "keep up", or the result will be a slice.
Page 16 of 31
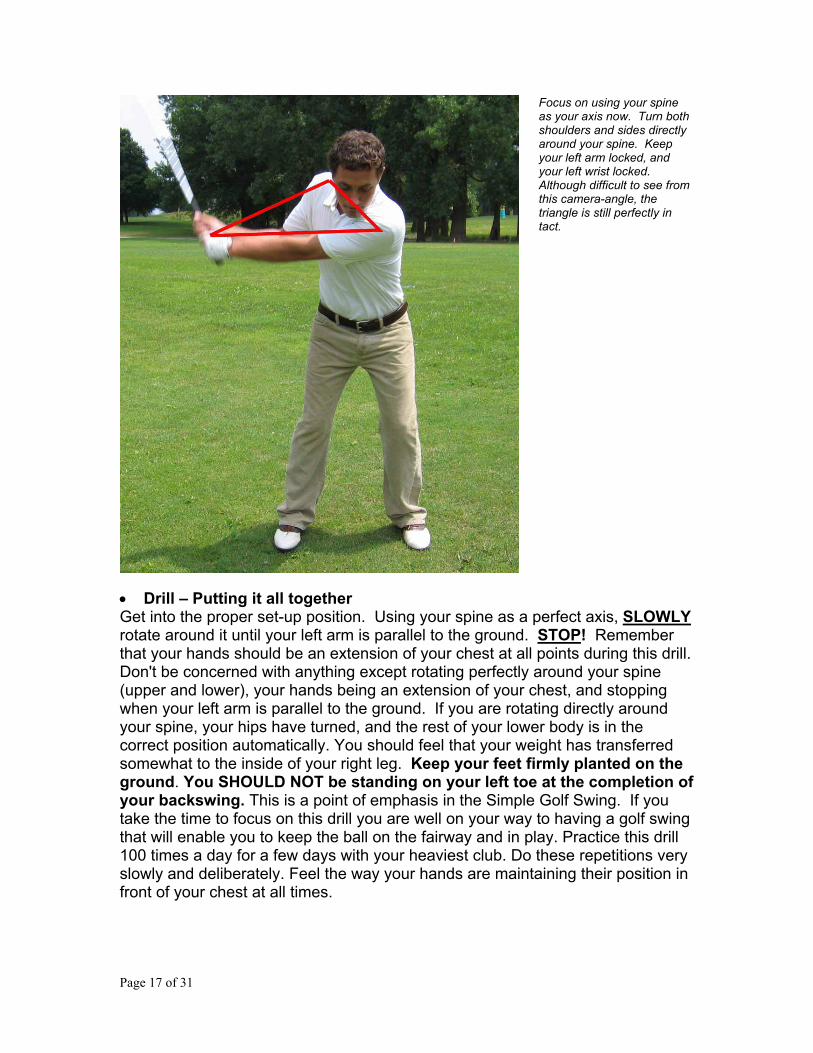
Focus on using your spine as your axis now. Turn both shoulders and sides directly around your spine. Keep your left arm locked, and your left wrist locked. Although difficult to see from this camera-angle, the triangle is still perfectly in tact.
• Drill – Putting it all together Get into the proper set-up position. Using your spine as a perfect axis, SLOWLY rotate around it until your left arm is parallel to the ground. STOP! Remember that your hands should be an extension of your chest at all points during this drill. Don't be concerned with anything except rotating perfectly around your spine (upper and lower), your hands being an extension of your chest, and stopping when your left arm is parallel to the ground. If you are rotating directly around your spine, your hips have turned, and the rest of your lower body is in the correct position automatically. You should feel that your weight has transferred somewhat to the inside of your right leg. Keep your feet firmly planted on the ground. You SHOULD NOT be standing on your left toe at the completion of your backswing. This is a point of emphasis in the Simple Golf Swing. If you take the time to focus on this drill you are well on your way to having a golf swing that will enable you to keep the ball on the fairway and in play. Practice this drill 100 times a day for a few days with your heaviest club. Do these repetitions very slowly and deliberately. Feel the way your hands are maintaining their position in front of your chest at all times.
Page 17 of 31

The Simple Golf Swing It is essential that you focus on each one of the five steps to be fully successful. Each step is crucial, and dependent on the previous step. Some of the steps are completed simultaneously. It's important that you give each step the same amount of attention. The steps are in the order that you should practice them. Once you feel that you have mastered step one, you can move on to step two. Don't move on though, until you understand and can perform the present step. You will notice that you are striking the ball better after every step. Remember to approach each step separately. Step 1: Rotate right shoulder around spine As you may have figured out already, the core of simplifying your swing is having a straight axis to turn around. This accomplishes three things. First, it gives your swing a fixed reference. In other words, it lets you come back to where you started. Second, it makes it possible to take the same swing, over and over again. Finally, it puts you in a position to hit down on the ball, giving you better ball flight. All of these benefits are essential to lowering your handicap. The sooner you learn to make a shoulder turn around your spine, the sooner you will get the benefits of the Simple Golf Swing. Of the steps I will be teaching you, this is the most important because all of the other steps revolve around it. If you have mastered the timing drill that I went through earlier, this step will be a breeze. Some people have problems swinging around their spine. When you think about getting power from your swing, most likely your first thought is to make a big movement back (horizontal) with your left shoulder and arm. This movement will force you to hit behind the ball, and it brings very inconsistent results. There should be no horizontal movement throughout the entire swing process. This is one of the hardest concepts to grasp, but once it clicks, it will revolutionize your swing. If you learn how to rotate around your spine properly, it will provide an abundance of power delivered directly to the back of the golf ball. When you make your turn, you should only focus on rotating your right shoulder back and around your spine, keeping your hands in the proper position with regard to your chest. During the back swing, most people focus only on what the left arm and shoulder are doing. However, you need to be concentrating at this point on what the right arm and shoulder are doing. It's really a fairly easy concept once you train yourself. If you can keep the ball from moving in your vision during your swing, you’re doing a good job. At first you may have to exaggerate this step. It will feel very strange for you because you haven't been using your spine as the pivot point for your swing. Most of you have only been using your upper body to generate club head speed. Usually, the lack of rotation of your hips, torso, and hands has resulted in a weak and unpredictable delivery of power to the golf ball. This lack of rotation also results in the dreaded slice that is “impossible to fix”. Remember, your hips, torso, shoulders, and arms are
Page 18 of 31

all connected. Everything rotates around your spine. Remember to stay connected (hands to chest position) as you rotate your right shoulder around your spine. This is very important and will lead us into step two.
The picture at left shows the correct setup position from above. You can see the correct shoulder turn by looking at this picture in conjunction with the picture directly below. Notice that there is no horizontal movement. There should also be no vertical movement. Everything rotates around the spine. Focus on rotating the right side of your body around your spine. The left side will move into place automatically.
Imagine the line that has been drawn is your spine (axis). When the backswing is made, just rotate everything around that axis. If you do this properly, you will be on the correct plane. This correct swing plane will help your power, accuracy, and consistency. Keep the left arm locked as shown.
Page 19 of 31

Here is a view from the front. The goal of this photo is to show that there is no lateral movement. Simply rotating your right shoulder around your spine.
*Please note that you should NOT be cocking your wrists at the end of your backswing. While this may add a bit of power, it will totally throw off your timing. The results of a wrist cock are slices, hooks, fat shots, etc. Think of the wrists as being totally stiff throughout your backswing. I know this is contradictory to everything that you have heard, but trust me it works. In step 4 you will learn how to release your wrist through the ball, so please don't be concerned with the loss of power this may cause. You will gain all of it back and more.
Page 20 of 31

Step 2: Keep right elbow “locked” to side, and stop your backswing at the proper position This step happens at the same time as step one. You need to keep your right elbow on your side as you complete the backswing. Your right elbow won't be in contact with your side when you are in the set-up position, but it will be soon after you start your backswing. You may have heard of the drill where you keep your golf towel in your right armpit throughout the entire swing. It's a good drill to practice while you are working on this step.
The right elbow should remain locked to your right side throughout the backswing. As you can see, the left arm is still locked as well.
This step is included for many reasons. First, it helps you swing around your spine and promotes a correct shoulder turn. It's really hard to move your body horizontally, while keeping your right elbow locked to your side at the same time. Secondly, it prevents the “flying elbow.” The flying elbow produces everything from a slice to a wicked hook, depending on what you do with your hands in conjunction with it. So, keeping your elbow in contact with your side will help tremendously in assuring that you swing around your body, every single time. Third, it's a power-producing move because it will put you in a position to easily flip your hands through the ball. Fourth, keeping your right elbow locked to your side will give you a great point of reference. It keeps your swing plane correct, and is a great indicator of when to stop the back swing. Finally, it helps you to "stay connected" throughout the swing. If you have your right elbow locked at your side, it will be hard to swing your arms without rotating your shoulders and visa versa. As mentioned above, staying connected and keeping your right elbow locked to your side will provide you with a good reference. During this step you will use this reference to tell you when to end your back swing. Knowing when to end it will be simple. You will end your back swing when the first of two things happens. Either, your feet will lose firm contact with the ground, or your left arm will become parallel to the ground. When one of these two things happens you will know to stop the back swing. For more flexible people, your left arm will
Page 21 of 31

reach parallel first. If you are not very flexible, your feet may start to become unplanted first. You should rotate around your spine as much as possible, while keeping your right elbow locked to your side. Most people will be able to rotate somewhere between 45 and 90 degrees around their spine. If you turn further than this, you will feel that your feet start to become lose their solid contact with the ground. You don’t want this. Your feet should remain firmly planted on the ground throughout the back swing. Your left elbow is still locked. You are taking your backswing, rotating around your spine, and staying connected. At some point during this process, your left arm will become parallel to the ground. Stop the backswing at this point. The farther you swing back, the more control you will lose. You may think that you will be sacrificing power if you take a shorter back swing. In step 4, I’ll tell you how to get it all back, so you will just have to trust the system. So as you can see, this step will provide you with countless benefits. All these benefits, and you only have to remember two things. Your goal at this point should be to simultaneously swing around your spine and keep your right elbow locked at your side. If you can complete steps one and two, you will notice more power, better accuracy, and repeatable results. You will be on the correct swing plane, and will have eliminated the source of most problems that have lead to poor results in the past.
The picture at left shows the right elbow "locked" to the side of your body. You want to keep contact between the right elbow and your right side.
Page 22 of 31

Step 3: Swing forward around your spine At the end of step two, you reached the top of your backswing. As soon, as you get there, start your downswing. As you start the downswing, make sure to remind yourself to keep your arms “connected” to your chest and shoulders. Stay connected all the way through the ball. Your hands and arms only swing as the shoulders rotate. If you start your downswing by rotating your chest, without starting to swing your arms, you will most definitely end up slicing the ball. If you swing your arms before rotating your chest, you will most likely hook the ball. Staying connected will always produce the straightest ball. During step three, focus on rotating around your spine and staying connected. You may have to consciously start the downswing with your arms. If you focus only on the rotation of your shoulders through the ball, you will most likely leave your hands behind. Keep your right elbow close to your side as you swing toward the ball (Remember the towel drill)! You don’t have to keep it locked at your side during the forward swing, as you did on the backswing… just enough to keep the “towel” in place. During this step your left elbow should still be locked. Keeping your left elbow locked during this step will really help your ball to fly straight, and it will also add power. Focus on staying connected, keeping your left elbow locked, and rotating around your spine. Then get ready for Step 4.
Notice that the triangle is still intact. This ensures that you are connected. The left elbow is still locked. The back is still straight, and you are rotating back around the spine.
Page 23 of 31

Step 4: Rotate your hands through the ball and finish This is where you will gain a significant amount of power. This step occurs simultaneously with step three. Not at precisely the same time but during the process of Step 3. The first thing you want to be thinking about is when you start the downswing is to stay connected. You want to be swinging your arms at the same time as you are rotating your shoulders. But very soon after your arms start swinging, you've got to focus on getting them through the ball. Let me explain. This is one of the best secrets in this book. Not many instructors will teach you this method right away, for if they did, perhaps you would not return for more. You wouldn't need them anymore. Step 4 will give you the power you've always wanted and eliminate that nagging slice, all in one easy step. Which one of these is worth more to you? Let’s face it…it is time to begin hitting the ball long and straight. There's got to be a catch right? There is. You won't get significant benefit from this step if you haven't mastered each of the prior steps. This step will also take some getting used to. However, it will be well worth the small amount of time you will spend practicing. At this point you are rotating around your spine on the downswing. Your swing is connected. Your left elbow is still locked, as it has been throughout this entire process. Your right elbow is still nudged in pretty close to your body, and it's sliding a little bit along your body just so your hands can keep up with your chest. (It's close enough to your body to keep the towel in your armpit) Your back is still perfectly straight. In short, you are rotating your body, swinging your arms, and your swing is connected. I have been talking about your right elbow this whole time. Now let's switch to your left. Look down at your belly button, and draw an imaginary line between your eyes and your belly button. Your left elbow should have just moved through that imaginary line that connects your eyes to your belly button. Another way to look at this is to create an imaginary line between your left foot and your eyes. If you choose to make this imaginary line, your left elbow should just be getting to your left foot. When your left elbow gets to the point of your choice, of the above two, try to stop it at that point. Your left forearm will continue to move around your spine with your right arm, but just try to focus on stopping your left elbow at one of these two imaginary points. At the same time, think about accelerating with your extended right arm. The left elbow should twist, allowing the right wrist to flip on top of the left wrist. So a few things are happening at the same time here. You may need to read this section over a few times. This step will take a little bit of practice, but it will come, and you will never look back. Do this in slow motion a few times with me. Your left arm has been locked throughout the whole swing. Your left elbow is still locked, but when it crosses that imaginary line, stop it right there. When you stop the elbow at that point notice how right elbow wants to automatically extend and flip on top of your left arm. You are still swinging with the right arm, but the left
Page 24 of 31
elbow has stopped. The force of the right arm still swinging forces your right wrist to flip on top of the left wrist. It will also force your right arm to extend. You won't literally be able to stop your left elbow at the imaginary line because your swinging right arm will force the left arm to come with it on the follow through. If you don't like this method, you can also just focus on flipping your right wrist on top of your left wrist at the point that you make impact with the ball. The same goal will be accomplished. It is better to stop your elbow on the imaginary line because it forces you to "roll" your wrists at the right time. However, if it is hard for you to imagine stopping your elbow, you can also just focus on flipping your right wrist on top of your left wrist. The same goal is accomplished either way. The ultimate goal is to keep your left elbow and shoulder from lifting up on the ball. It also prohibits you from making the "right shoulder dive." The goal is to get your hands through the ball, so you don't block it. It's your choice, but make sure you use one of the methods I described above. Really flip your right wrist through the ball. This action will give you a lot more club head speed. It also eliminates any slice that you may have had because your left elbow isn't flying on the follow through anymore. So, essentially you're keeping the left elbow close to the body now. Before it was your right, and now it's your left elbow that you are keeping tight to your body. Keep your left elbow close to your body, and flip the right wrist through the ball at the same time. You should feel the extra power this gives you.
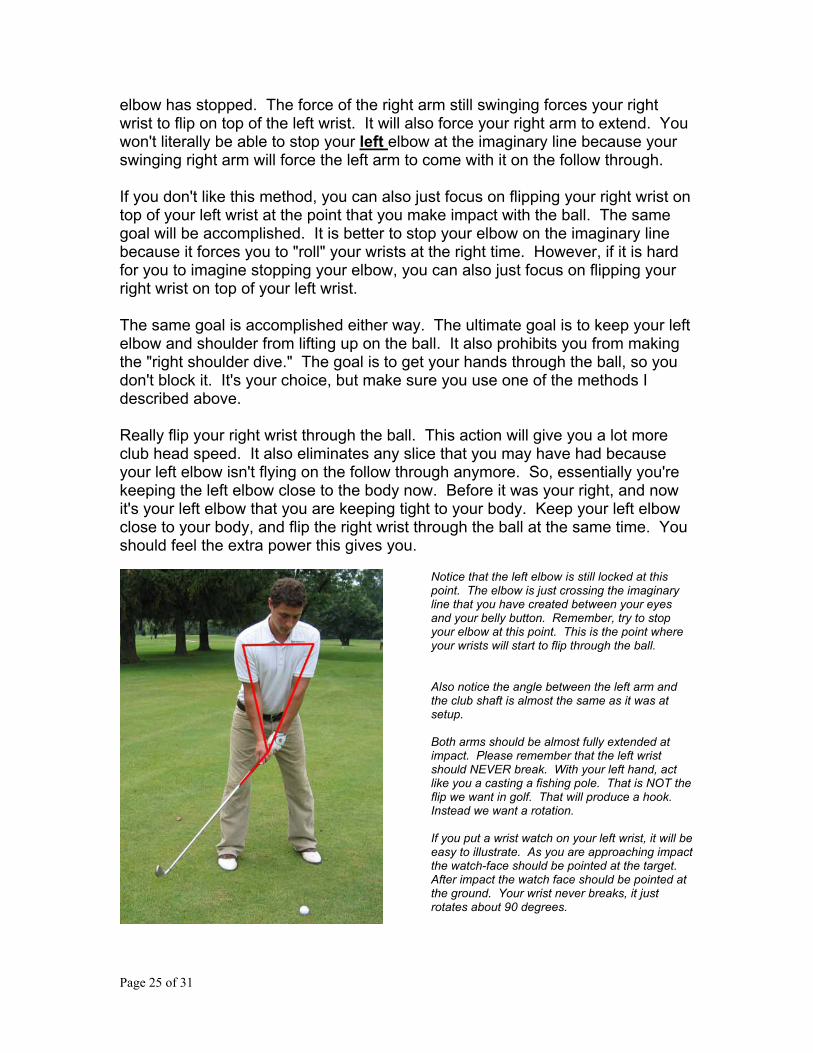
Notice that the left elbow is still locked at this point. The elbow is just crossing the imaginary line that you have created between your eyes and your belly button. Remember, try to stop your elbow at this point. This is the point where your wrists will start to flip through the ball. Also notice the angle between the left arm and the club shaft is almost the same as it was at setup. Both arms should be almost fully extended at impact. Please remember that the left wrist should NEVER break. With your left hand, act like you a casting a fishing pole. That is NOT the flip we want in golf. That will produce a hook. Instead we want a rotation. If you put a wrist watch on your left wrist, it will be easy to illustrate. As you are approaching impact the watch-face should be pointed at the target. After impact the watch face should be pointed at the ground. Your wrist never breaks, it just rotates about 90 degrees.
Page 25 of 31
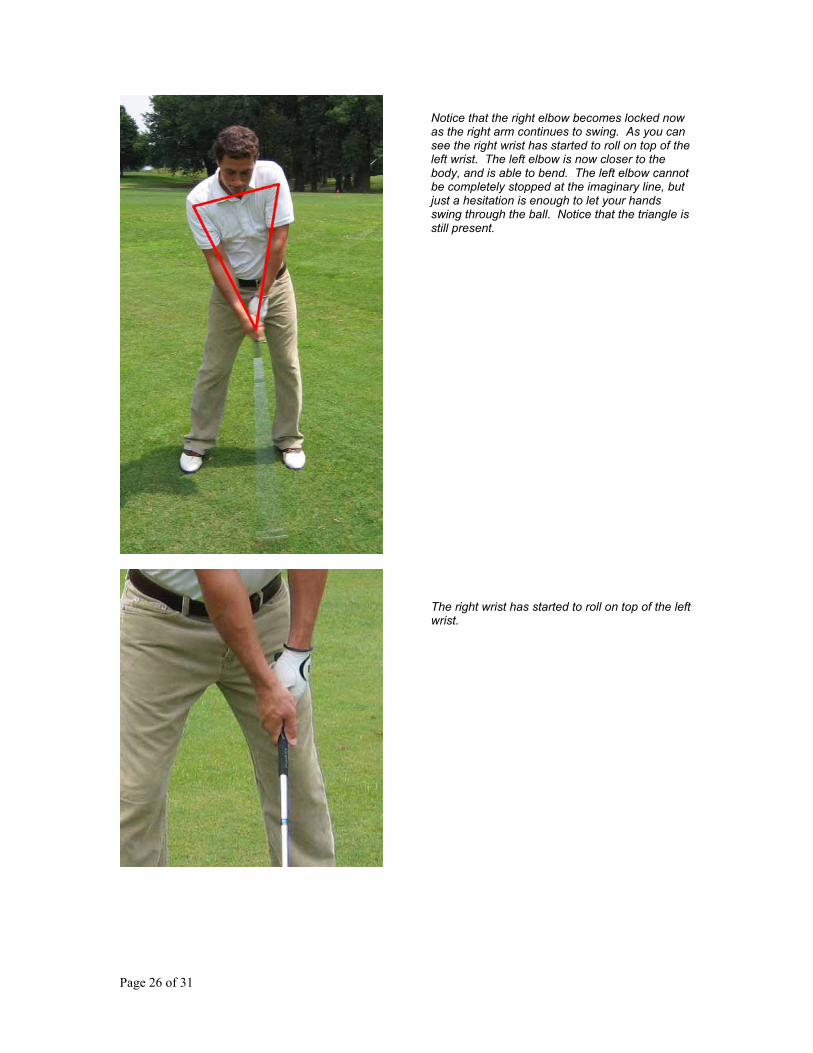
Notice that the right elbow becomes locked now as the right arm continues to swing. As you can see the right wrist has started to roll on top of the left wrist. The left elbow is now closer to the body, and is able to bend. The left elbow cannot be completely stopped at the imaginary line, but just a hesitation is enough to let your hands swing through the ball. Notice that the triangle is still present.
The right wrist has started to roll on top of the left wrist.
Page 26 of 31

At this point the right wrist is completely on top of the left wrist. Your hands are "through the ball". You have continued to rotate around your spine, and you have tried to stop the left elbow on the imaginary line. This is the primary action for amateur golfer to increase power, while reducing slice.
Here is a picture at full speed. The wrists have completed their roll through the ball. The left elbow is close to the body, and about ready to break, allowing for follow through.
Now, I'll take you into the follow-through. This will be simple. Basically just keep turning around your spine. If you have flipped your wrists correctly, you won't have to bother too much with the follow through. However, there is a basic position that you should be in when you finish the swing. You should be facing the target, and your right and left forearms should be crossed. Your right forearm should be closest to you, and the club should be out towards left field.
Page 27 of 31

The wrists have completed their roll, and the left elbow is close the body.
Swinging around the spine. The wrists have completed the roll and now the forearms are crossing. The follow through is almost complete. If you notice, the triangle is still in place, proving that you are connected throughout the entire swing.
Page 28 of 31

The follow through is now complete. The forearms are completely crossed, showing that you have gotten your hands through the ball.
This is a different view of the complete follow through. Your forearms are crossed, and that is the sign that you have completed the follow-through correctly.
Page 29 of 31

It may take a few days to get used to this new “left elbow close-to-side, forearms crossed-at-finish” concept. It will come though. It's one of the best things you can do for your golf swing. No more blocking to the right or uncontrollably slicing the ball! Step 5: Keep your head perfectly still during the entire swing This is the last crucial step that you must master. It's by far the easiest step, but ironically it will produce the most results. The biggest problem is that you don't always know when you are moving your head. You may find that swinging easier helps keep the head still, but other than that it is just something that you will have to really concentrate on. Before every shot, remind yourself to keep your head still. You shouldn't be letting your head move vertically or horizontally. Holding your head still will help you rotate around your spine correctly. It will help you come back to the place your swing started. It will help build a consistent swing. Allowing the head move around during the golf swing is no doubt the root cause for many mishits resulting in a lot of frustration. We consider it to be the last step in the Simple Golf Swing system because it will really help you tie everything together. HINT: An excellent way to tell whether your head is moving is to see if the ball looks like it is moving during your swing. The ball should NOT appear to be moving during your swing. If the ball is moving in your vision, your head is moving. Period… Just look at any of the above pictures. The one thing they all have in common is that the head is down at all times. Even after the ball is gone. IN CLOSING… If you have mastered each of the above steps, you should feel great about your new swing. You may not be in the 70's or 80's just yet, but the potential is now there. This is what you should be excited about. Now you have the tools to finish the job. Hopefully, you're not only excited about the results, but you also understand why this system works. It's important in golf to understand your swing. You have to know what you are going to do, before you do it. That's the key. You will still experience a missed shot here and there, but now you will know why they occur. More importantly, you will know how to correct the problem, so they may be absolutely minimized. It should be noted that I have not gone into any detail regarding the “lower body” throughout this book. That is because following the setup and swing routine will assure your legs and hips are doing the proper things as you swing back, forward and through the golf ball. Recall that our promise was to simplify rather than complicate the process.
Page 30 of 31

Finally, I wish to state that I have not forgotten our left-hand-golfing brothers and sisters. They merely have to substitute “left” for “right” and vice-versa throughout this book. The entire process holds true with that minor change. Just swing easy and trust the system. You have been through the material, and have been working with it. Now comes the reward on the golf course. Enjoy a great round of golf ! Disclaimer: David Nevogt is not responsible for any personal injury incurred while using "The Simple Golf Swing" method. Persons choosing to use methods taught herein assume all risks associated any with physical activities required while learning, practicing or playing golf. Copyright 2003. All rights reserved. No part of this book may be reproduced or transmitted in any form without the express written permission of David Nevogt. Contact [email protected] for reproduction fees information.
Page 31 of 31