
The 18 – 20 week obstetric scan protocol · •divides abdomen / stomach & thorax / heart...
46
The 18 – 20 week obstetric scan protocol Compiled for ASUM by: Susan Campbell Westerway AMS PhD(Medicine) MAppSc(Research) BASc DMU
Transcript of The 18 – 20 week obstetric scan protocol · •divides abdomen / stomach & thorax / heart...

The 18 – 20 week obstetric scan protocol
Compiled for ASUM by:
Susan Campbell WesterwayAMS PhD(Medicine) MAppSc(Research) BASc DMU

What Why How
The fetal morphology scan:
• routinely performed between 18 & 20 weeks gestation
• assesses fetal size, fetal anatomy & uterine environment
• aims to detect fetal abnormalities so that appropriate
pregnancy care can be offered
• must do thorough survey scan
- remember ovaries & adnexa
• must follow a scanning protocol
Ultrasound is 20% science & 80% artMartin Necas
Before You Begin
• establish correct dates - LMP / early scan
• check results of 1st trimester NT scan / bloods - ? High risk
• look at previous images – especially those with measurements
• take a thorough obstetric history/family/medications etc
• a high BMI > risks
• explain that you need to concentrate so may not initially talk much
• suggest they ask any questions they have as you are scanning
• keep smiling – even if it is a very difficult scan
• if their children / family are distracting you – ask them to leave the room
THE KEY TO SUCCESS IS PATIENCE

Rule of Opportunity
Remember the fetus is mobile & may move at any time.
When you see an opportunity – take it!
• If it is lying spine up – image the spine immediately
- sagittal, coronal, transverse
• If it is chest up – image the heart then face

Complete a Survey Scan
Ensure you scan the entire lower abdomen in transverse & sagital
This should show you viability – heartbeat - amniotic fluid
Also fetal lie – spine anterior / posterior etc.
Then commence the anatomy scan

Cervix - optimisethe Image
• Optimise prior to measuring - remember DFG
depth focus gain

The Cervix
• Normal cervical length 40mm
- long & closed (mean 32mm at 12-22wks)
• Measure from internal to external os- where anterior & posterior cervical lips meet
• If bladder overfull is it will elongate the cervix partially empty & rescan
• Measure distance from placental edge- if less than 20mm do TV scan
• ALWAYS use colour doppler between placental edge & cervix to rule out vasa previa
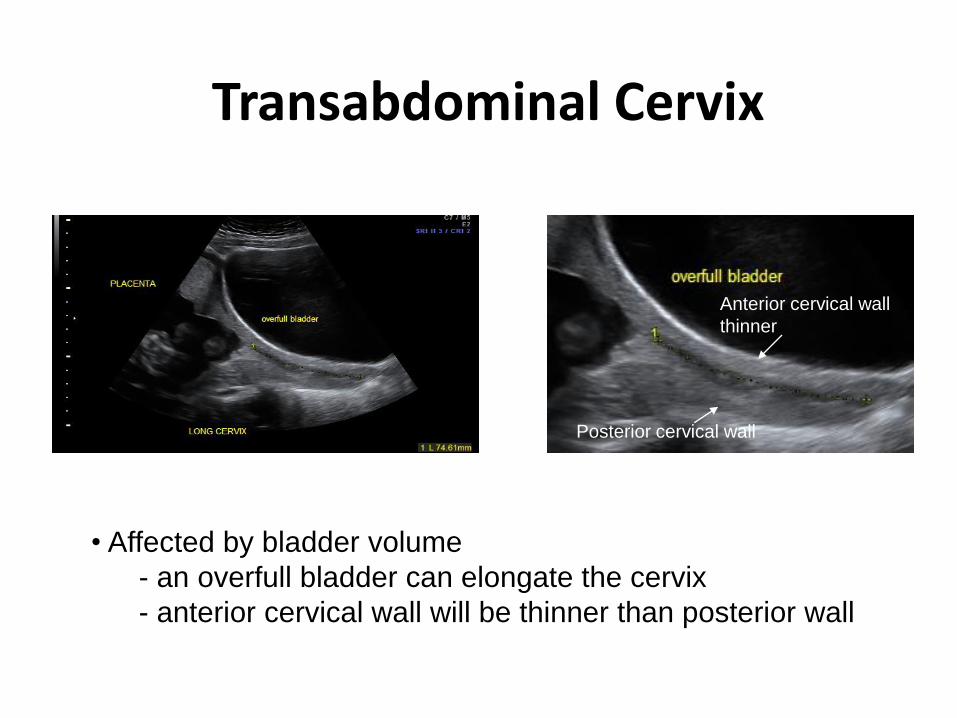
Transabdominal Cervix
• Affected by bladder volume
- an overfull bladder can elongate the cervix
- anterior cervical wall will be thinner than posterior wall
Anterior cervical wall
thinner
Posterior cervical wall

Placenta – sagittal and transverse
Ensure thorough survey scan - look for congenital uterine anomalies, succenturiate, chorioangioma etc

Cord insertion - placental
• Document insertion in sagittal view – use colour if necessary :- should insert into central third of placental disc- if peripheral insertion – measure distance from edge? Battledore? velamentous
• Trace cord from placenta to fetal insertion to look for knots, cysts etc

Bladder / Fetal Cord Insertion
Image fetal cord insertion in grey scale & colour – track entire lengthBladder should empty every 60 – 90 minutes

BPD/OFD/HC
Measurements:• Follow protocol of chart author
- eg ASUM, Chitty etc.
• Transverse axial plane at level of falx cerebri, cavum septum pellucidum & choroid plexus in antrium of each lateral ventricle.
• BPD measured at widest point –outer to inner OFD – outer to outerHC trace around outer edge of skull.
Optimise image – DFG, sector - look carefully at all structures

Posterior Head
Measure:
• Cerebellum = GA
• cisterna magna < 10mm
• nuchal fold < 6mm
• incorrect scan plane can make CM & NF appear enlarged

Lateral Ventricles
• Measure perpendicular to the falx
- inner to inner.
- antrium of lateral ventricle
– at choroid plexus glomus
• normal < 10mm

Profile / Nasal Bone
Assess shape & size
- should be able to draw
a straight line through
tip of nose, maxilla &
symphysis menti.
- measure nasal bone
- compare with charts
eg Sonek..

Face
Split screen – image maxilla & mandible nose & lips
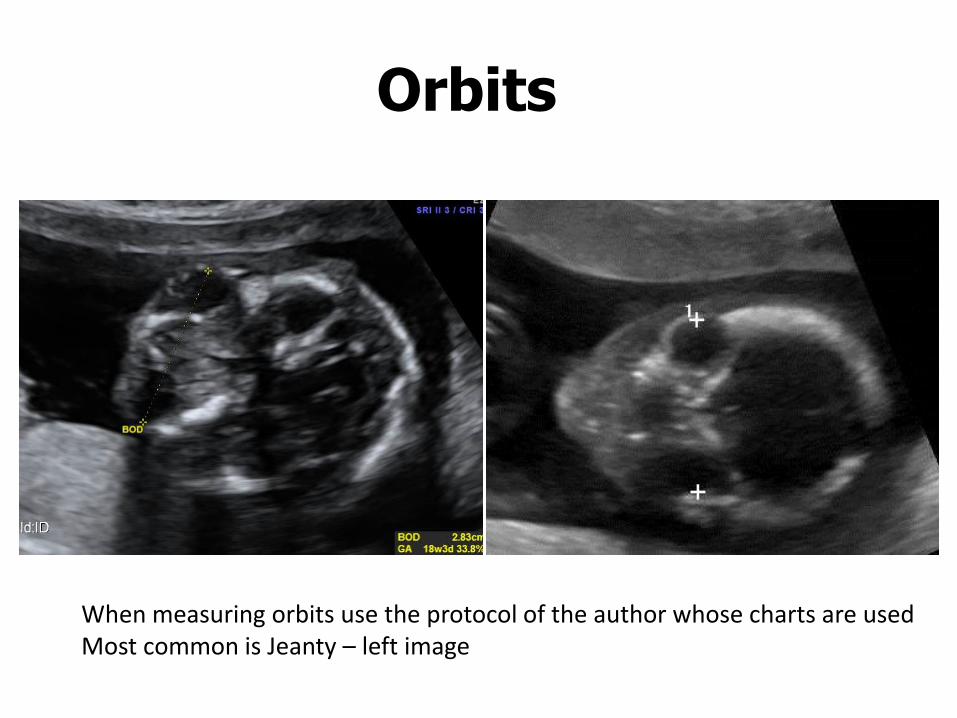
Orbits
When measuring orbits use the protocol of the author whose charts are usedMost common is Jeanty – left image

Diaphragm
• diaphragmatic interface – hypoechoic line
• divides abdomen / stomach & thorax / heart
• image right & left sides
• must image aorta passing through diaphragm
• the clue to diaphragmatic hernia is presence of
abdominal contents in the chest often leading to
shift in cardiac axis.

Situs / Heart Size
Check that heart & stomach on left side- look at size of heart & orientation
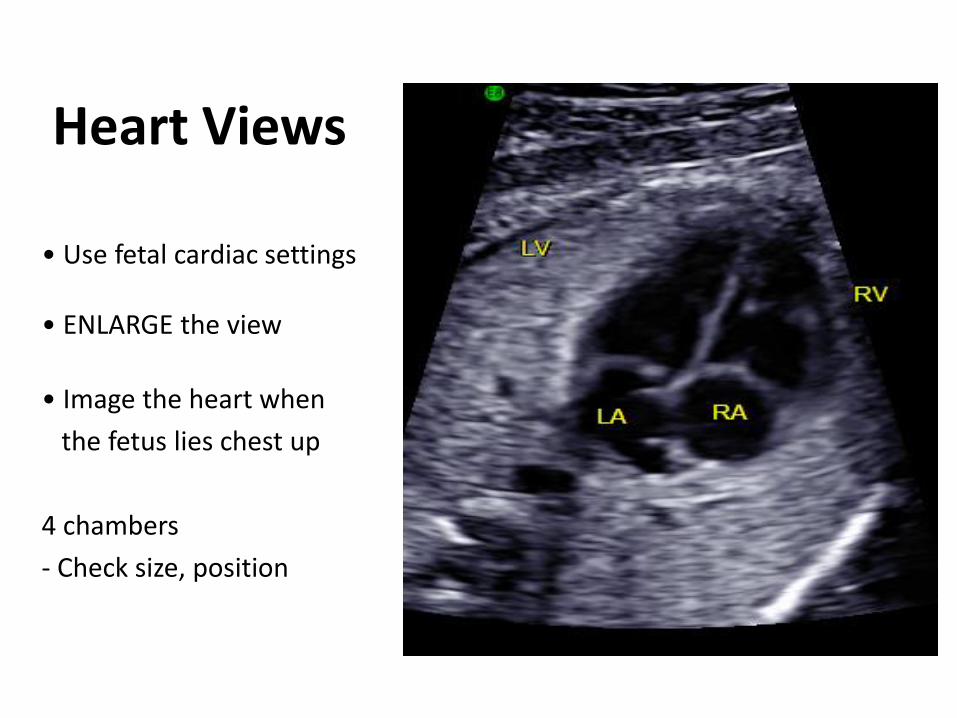
Heart Views
• Use fetal cardiac settings
• ENLARGE the view
• Image the heart when
the fetus lies chest up
4 chambers
- Check size, position
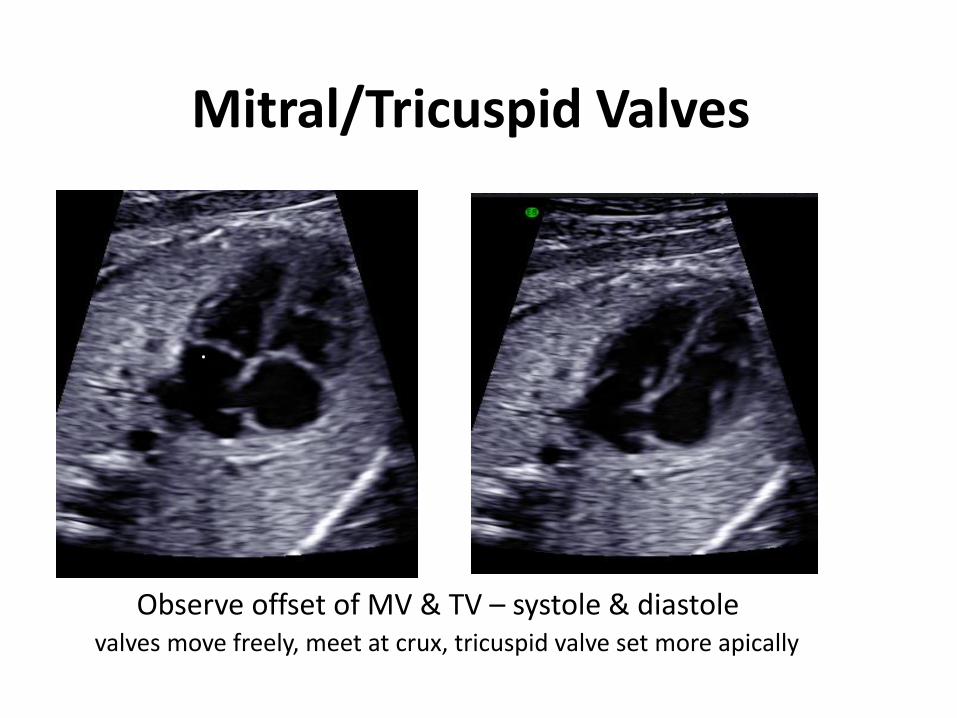
Mitral/Tricuspid Valves
Observe offset of MV & TV – systole & diastolevalves move freely, meet at crux, tricuspid valve set more apically
.
TV

Left / Right Atria
• Two atria of equal size
• Observe at least 2 pulmonary veins draining into left atrium
• Aorta posterior to LA
• Foramen ovale patent - 1/3 size of atrial septum - opens into LA
• Septum primum and secundumseen

LVOT
Arises from LV – check continuous with IVS & MV

RVOT - Main pulmonary artery• Ensure that RVOT arises from right ventricle - continuous IVS• Pulmonary trunk - branches into ductus arteriosis & right pulmonary artery

Three Vessel View
• Cephalad movement of transducer
• PA/Ao/SVC in a line
– Ratio of PA/Ao 1.1:1
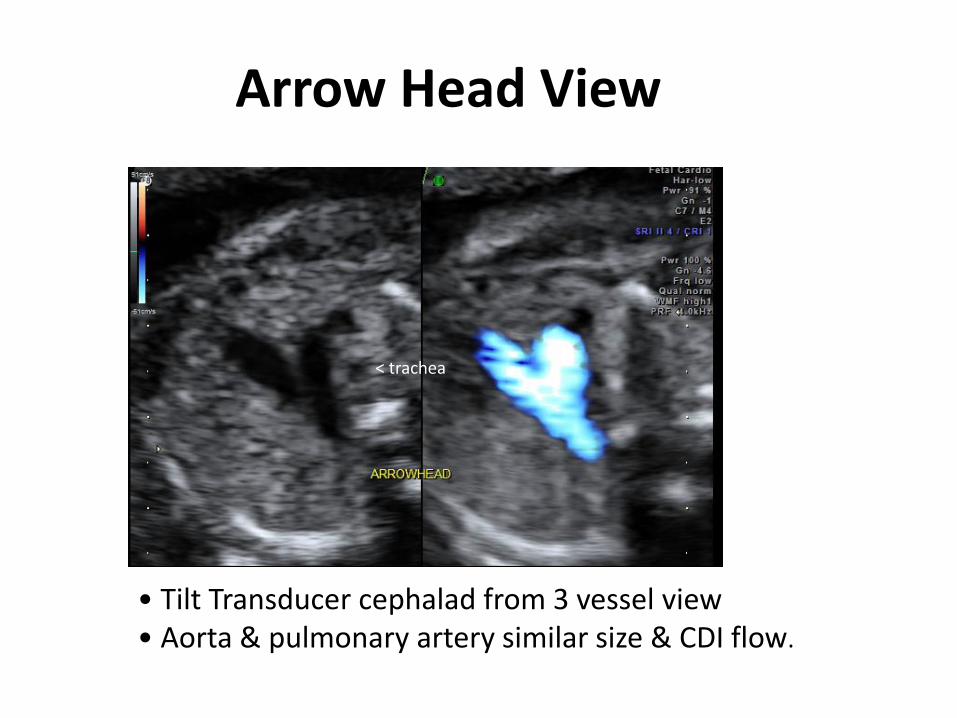
Arrow Head View
• Tilt Transducer cephalad from 3 vessel view• Aorta & pulmonary artery similar size & CDI flow.
< trachea
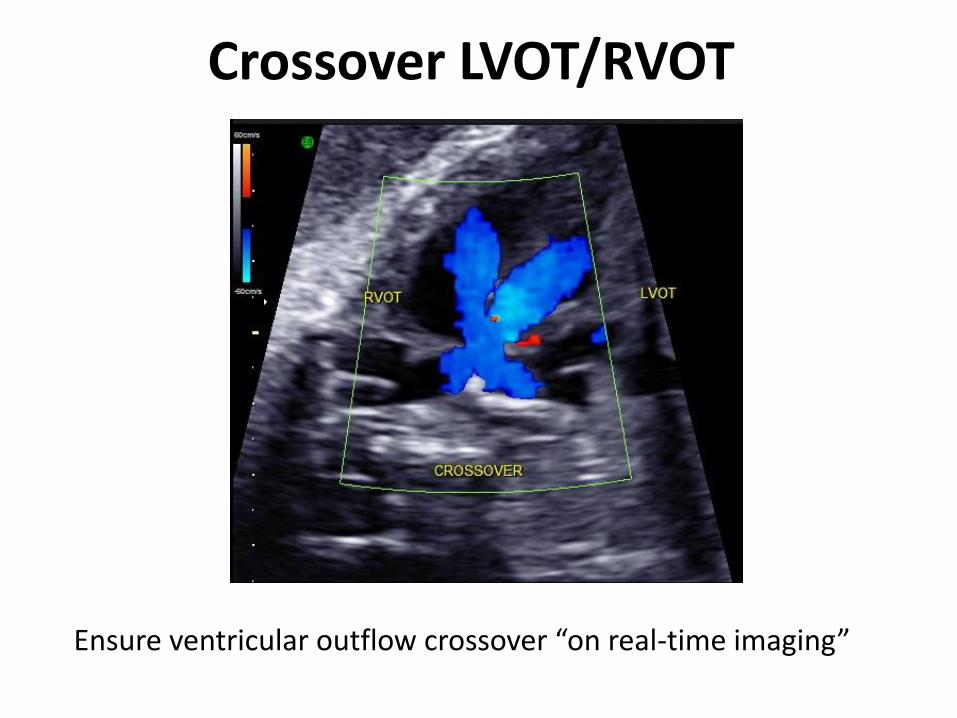
Crossover LVOT/RVOT
Ensure ventricular outflow crossover “on real-time imaging”
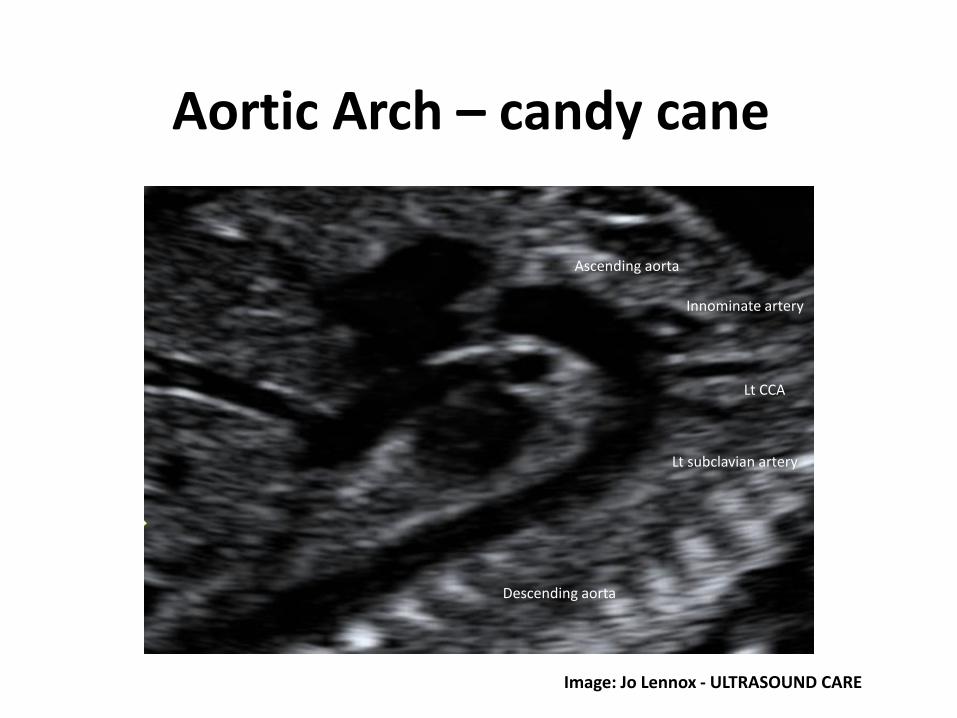
Aortic Arch – candy cane
Lt subclavian artery
Descending aorta
Ascending aorta
Lt CCA
Innominate artery
Image: Jo Lennox - ULTRASOUND CARE

Ductal Arch – hockey stick

Fetal heart rate/rhythm
• Measure over a minimumof 2 cycles

AbdomenLook closely at entire abdomen for cysts & other lesions
Measurement:• Image plane – transverse cut at levelof fetal liver & stomach, including leftportal vein at umbilical region.
• Ensure true transverse- spinal processes- round aorta
• No heart/kidneys in view• Adrenals OK
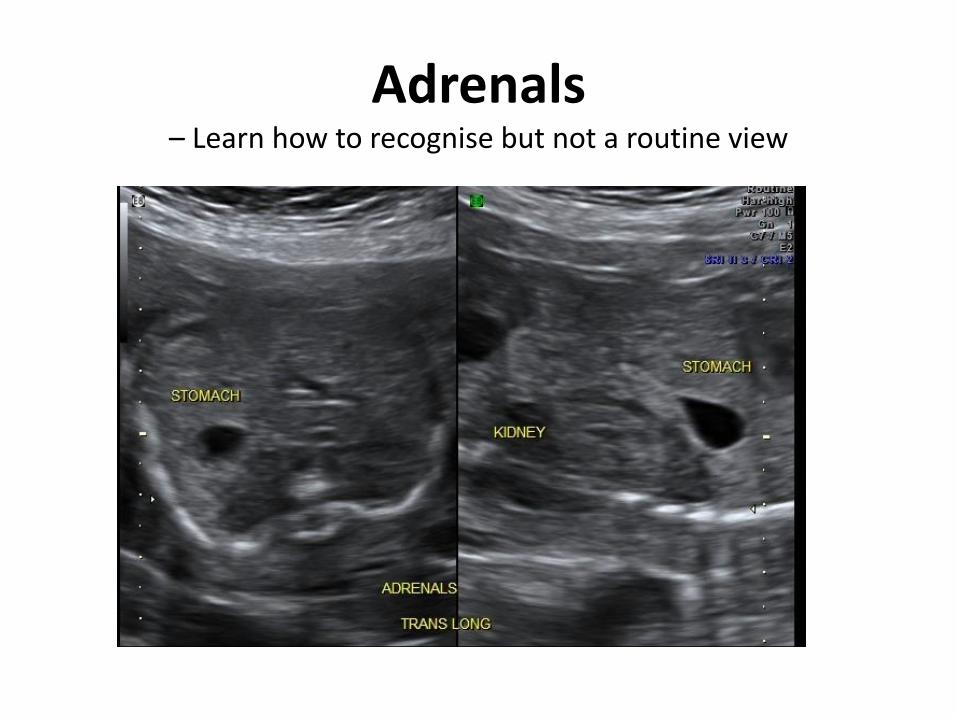
Adrenals – Learn how to recognise but not a routine view
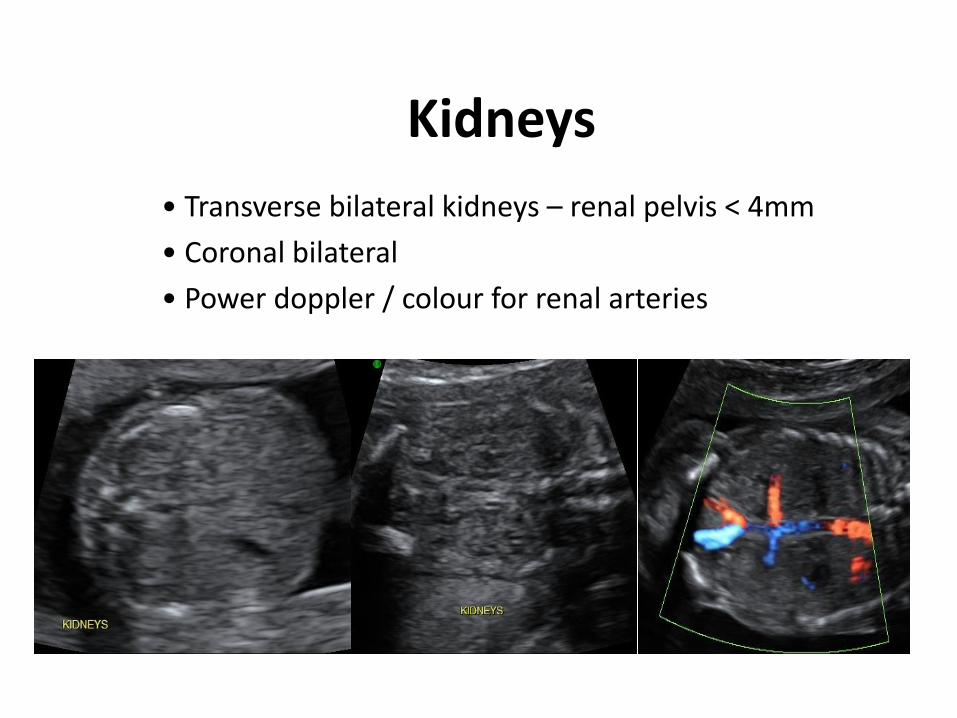
Kidneys
• Transverse bilateral kidneys – renal pelvis < 4mm
• Coronal bilateral
• Power doppler / colour for renal arteries

Bowel
• Significant if echogenicity > brightness than bone
• Turn down gain & compare with pelvic bone
• Associated with preterm delivery, IUGR – repeat scan at 30-32/40
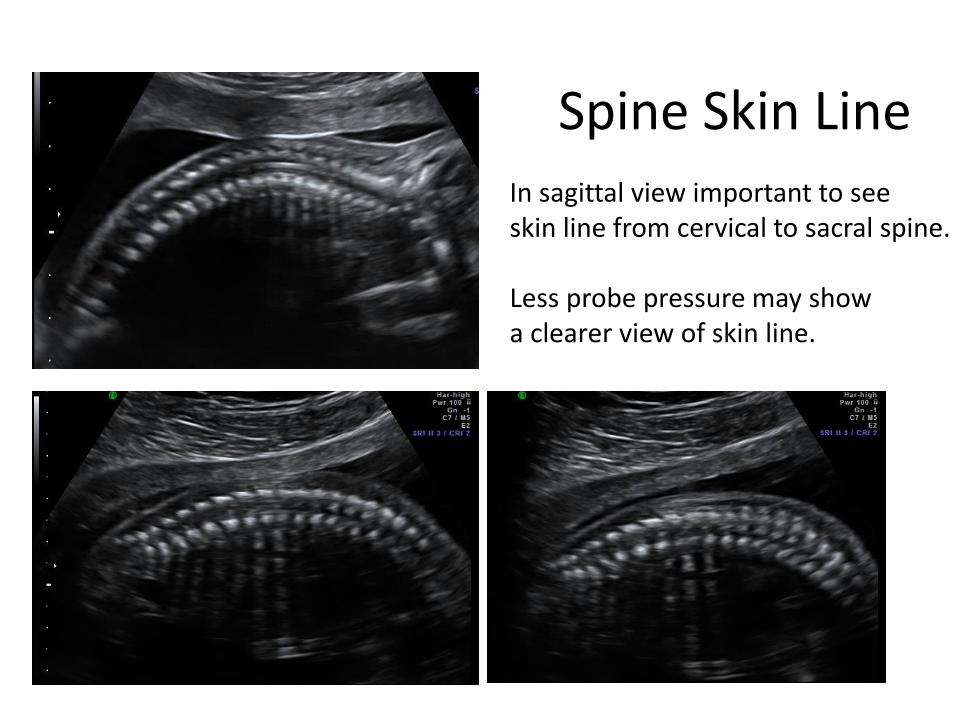
Spine Skin LineIn sagittal view important to see skin line from cervical to sacral spine.
Less probe pressure may show a clearer view of skin line.
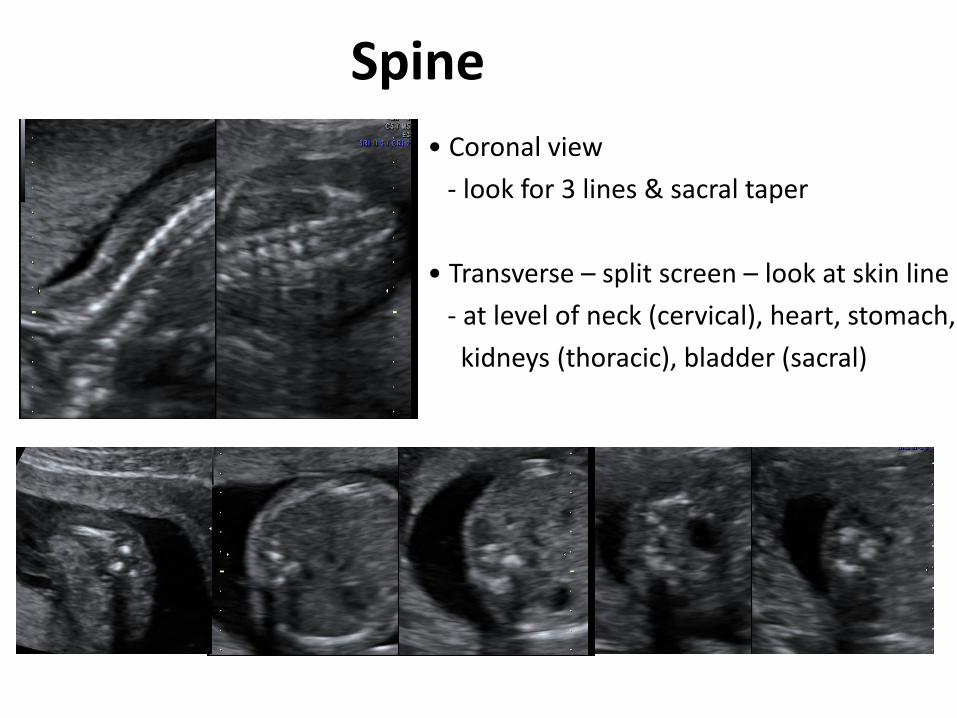
Spine
• Coronal view
- look for 3 lines & sacral taper
• Transverse – split screen – look at skin line
- at level of neck (cervical), heart, stomach,
kidneys (thoracic), bladder (sacral)
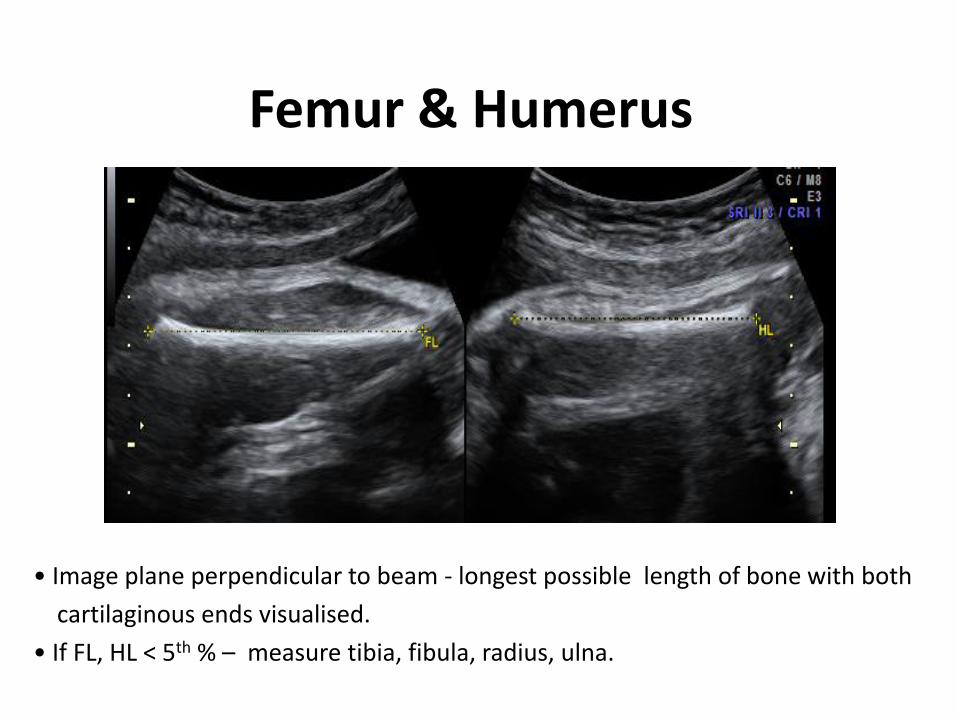
Femur & Humerus
• Image plane perpendicular to beam - longest possible length of bone with both
cartilaginous ends visualised.
• If FL, HL < 5th % – measure tibia, fibula, radius, ulna.
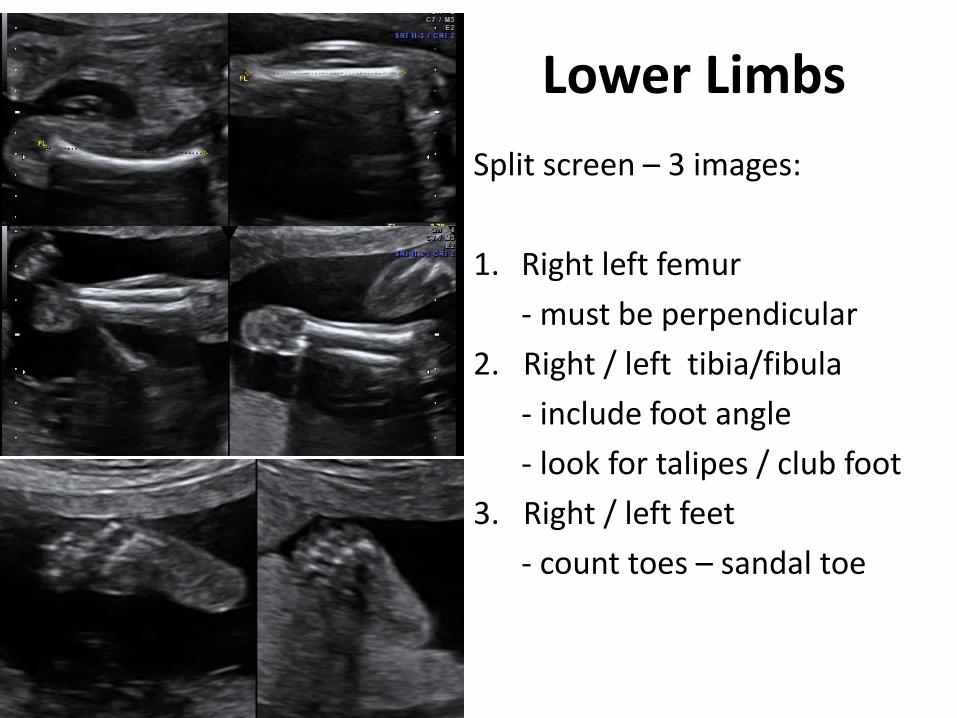
Lower Limbs
Split screen – 3 images:
1. Right left femur
- must be perpendicular
2. Right / left tibia/fibula
- include foot angle
- look for talipes / club foot
3. Right / left feet
- count toes – sandal toe
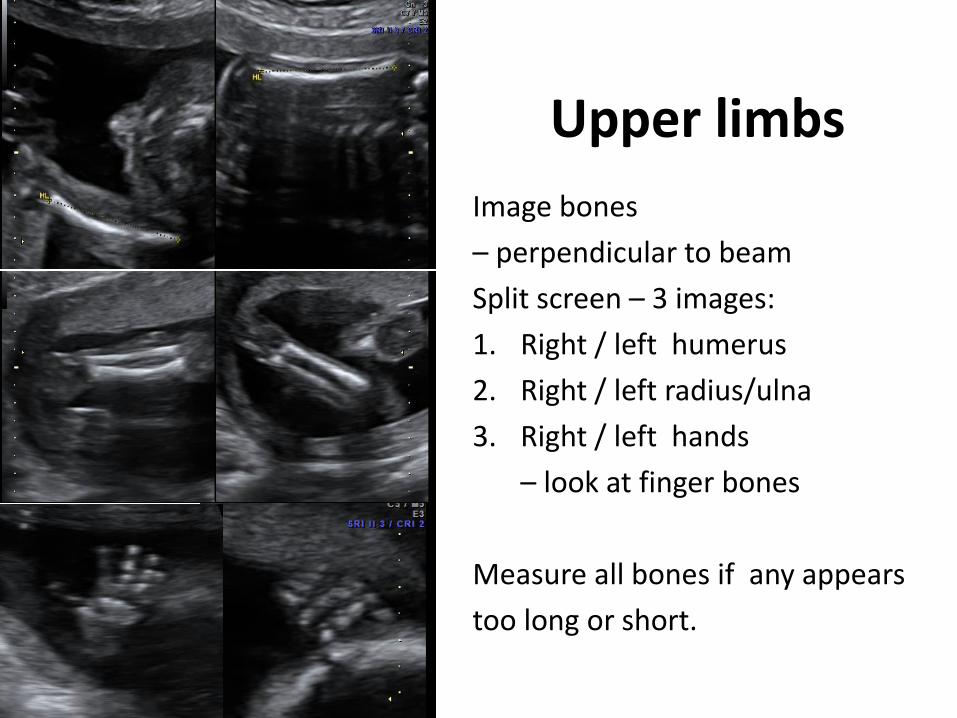
Upper limbs
Image bones
– perpendicular to beam
Split screen – 3 images:
1. Right / left humerus
2. Right / left radius/ulna
3. Right / left hands
– look at finger bones
Measure all bones if any appears
too long or short.

Clavicles – look at mineralsation
Images: Brendan Mein
Normal clavicles at 18 weeks Under mineralised clavicles(?cleido-cranial dysplasia)

Amniotic Fluid – look for a pocket > 3cms
• Important contributor to fetal well being
• Maintains intra-uterine temperature & acts as cushion
• Prevents amnion / embryo sticking
• Fetal anomalies may cause abnormal AF & visa versa
• Produced by cord, membranes, skin, lungs, kidneys
- by 20 weeks most AF due to urine output ~ 500cc/day.
• Consumption of AF by fetal swallowing ~100cc/day, absorption from
GI tract, fluid exchange in lungs ~200cc/day, fluid permeating
across cord / membranes.
(Magann 2000)

PolyhydramniosPrevalence: 1 in 200 Increased AF production Decreased consumption
Single deepest pocket (SDP) > 8cm
Causes:
reduced swallowing, increased urination,
cardiac anomalies.
Consequences:
increased risk premature labour, maternal hypertension.

Oligohydramnios
Prevalence: 1 in 500
SDP: < 2 cm use colour
Causes:
• Impaired placentation - IUGR
• Ruptured membranes
• Renal defect

Fetal Sex?
Same fetus – different angle. Be careful calling a girl < 20 weeks

Conclusion
The Morphology Scan: - is not just measurements
• Be methodical - look carefully
• Take advantage of fetal lie
• Have a check list
• Follow a protocol
• Know your limitations
• Ask for a 2nd opinion if unsure about anything

Remember …..
You only recognise what you look for …
You only look for what you know …..
You only know what you have learnt …..
Roger Gent