Text Processing Features - Weebly -...
12
Word Processing 5N1358 Monaghan Institute 3. Text Processing Features Contents Create Documents Applying a Range of Text Processing Features Including: 1. Margins and Line Spacing ................................................................................................................... 1 Change margins, set margins ............................................................................................................. 1 View Ruler .......................................................................................................................................... 1 Preset Margins ................................................................................................................................... 1 Custom margins ................................................................................................................................. 1 2. Line Spacing ........................................................................................................................................ 2 Paragraph Spacing.............................................................................................................................. 2 Line Spacing Options .......................................................................................................................... 2 3. Indenting Text and Paragraphs .......................................................................................................... 3 Indenting text – hanging paragraphs, side headings, shoulder headings.......................................... 3 4. Tabs .................................................................................................................................................... 3 Apply Tabs .......................................................................................................................................... 3 Create Tabs ........................................................................................................................................ 4 Use Leader Dots ................................................................................................................................. 5 5. Aligning text – left, right, centre, justified ......................................................................................... 5 6. Borders and Shading .......................................................................................................................... 6 Borders ............................................................................................................................................... 6 Page Border ........................................................................................................................................ 6 Shading ............................................................................................................................................... 6 Formatting Borders ............................................................................................................................ 6 7. Numbering and Bullets ....................................................................................................................... 7 Customise Numbering Options .......................................................................................................... 7 A Numbered List................................................................................................................................. 7 Define New Bullet .............................................................................................................................. 9 8. Copying and Pasting Text ................................................................................................................... 9 Copy ................................................................................................................................................... 9 Paste ................................................................................................................................................. 10 9. Enhancing Text ................................................................................................................................. 10
Transcript of Text Processing Features - Weebly -...

Word Processing 5N1358
Monaghan Institute
3. Text Processing Features
Contents Create Documents Applying a Range of Text Processing Features Including: 1. Margins and Line Spacing ................................................................................................................... 1
Change margins, set margins ............................................................................................................. 1
View Ruler .......................................................................................................................................... 1
Preset Margins ................................................................................................................................... 1
Custom margins ................................................................................................................................. 1
2. Line Spacing ........................................................................................................................................ 2 Paragraph Spacing .............................................................................................................................. 2
Line Spacing Options .......................................................................................................................... 2
3. Indenting Text and Paragraphs .......................................................................................................... 3 Indenting text – hanging paragraphs, side headings, shoulder headings .......................................... 3
4. Tabs .................................................................................................................................................... 3 Apply Tabs .......................................................................................................................................... 3
Create Tabs ........................................................................................................................................ 4
Use Leader Dots ................................................................................................................................. 5
5. Aligning text – left, right, centre, justified ......................................................................................... 5 6. Borders and Shading .......................................................................................................................... 6
Borders ............................................................................................................................................... 6
Page Border ........................................................................................................................................ 6
Shading ............................................................................................................................................... 6
Formatting Borders ............................................................................................................................ 6
7. Numbering and Bullets ....................................................................................................................... 7 Customise Numbering Options .......................................................................................................... 7
A Numbered List ................................................................................................................................. 7
Define New Bullet .............................................................................................................................. 9
8. Copying and Pasting Text ................................................................................................................... 9 Copy ................................................................................................................................................... 9
Paste ................................................................................................................................................. 10
9. Enhancing Text ................................................................................................................................. 10

LO3: Text Processing Features
Page 1
CREATE DOCUMENTS APPLYING A RANGE OF TEXT PROCESSING FEATURES INCLUDING:
1. MARGINS AND LINE SPACING
Change margins, set margins
Page margins are the blank space around the edges of the page. In general, text and graphics are inserted in
the printable area between the margins. However, some items can be positioned in the margins — for
example, headers, footers, and page numbers.
View Ruler To edit and change the margins of a word document first ensure you have the
rulers turned on. Go to View > Show Group > Ruler or turn on the ruler symbol on the top
right of the page on the button shown.
This will turn on the ruler showing the Top, Bottom, Left and Right ruler
margins. These can all be adjusted manually by dragging on the ruler
between the white and the blue margins here.
Preset Margins In addition margins can be edited by going to Page
Layout > Page Setup Group > Margins. A variety of different preset margins
are available for selection. Each shows the Top, Bottom, Left and Right
margins, in the Narrow example shown the margins are all set to 1.27 cm.
Custom margins can also be set using the option at the bottom of this
menu. Each margin can be typed to the exact correct measurement.

LO3: Text Processing Features
Page 2
2. LINE SPACING
Line spacing determines the amount of vertical space between the lines of text in a paragraph. Paragraph
spacing determines the amount of space above or below a paragraph.
To apply line spacing options highlight the paragraph which the line
spacing will be added too and go to Home > Paragraph Group >Line
Spacing.
Paragraph Spacing can also be set from this menu, this reduces and
increases the spacing between individual paragraphs and between
paragraphs and headings.
Line Spacing Options
Single This option accommodates the largest font in that line, plus a small amount of extra space.
The amount of extra space varies depending on the font that is used.
1.5 lines This option is one-and-one-half times that of single line spacing.
Double This option is twice that of single line spacing.
At Least This option sets the minimum line spacing that is needed to fit the largest font or
graphic on the line.
Exactly This option sets fixed line spacing, expressed in points. For example, if the text is in a 10-
point font, you can specify 12 points as the line spacing.
Multiple This option sets line spacing that can be expressed in numbers greater than 1. For
example, setting line spacing to 1.15 will increase the space by 15 percent, and setting line spacing
to 3 increases the space by 300 percent (triple spacing).
The following is an example of a
paragraph with single line spacing
and then a paragraph with double
line spacing.

LO3: Text Processing Features
Page 3
3. INDENTING TEXT AND PARAGRAPHS
Indenting text – hanging paragraphs, side headings, shoulder headings
Indentation determines the distance of the paragraph from either the left or the right margin. Within the
margins, you can increase or decrease the indentation of a paragraph or group of paragraphs. You can also
create a negative indent (also known as an outdent), which pulls the paragraph out toward the left margin.
You can also create a hanging indent, in which the first line of the paragraph is not indented, but subsequent
lines are.
The three indents shown here are the First Line Indent, the Hanging
Indent and the Left Indent. In addition there is also the Right Indent on
the right side of the page. To set the indent go to Page Layout >
Paragraph > Indent.
Different types of paragraph can be describe as follows:
1. An indented paragraph has a space in front of the first line
of the paragraph.
2. A block paragraph has no indent.
3. A hanging paragraph or shoulder heading is the opposite of
an indented paragraph. The first line starts at the margin
and all other lines are indented.
4. A Side Heading is a new sub-heading in a document where
the first line of the paragraph starts after the last word in the
side heading.
4. TABS
Apply Tabs
To apply tabs first you must ensure your ruler is turned on. To do this go to: View tab Ruler (as mentioned
page 1).
To add a tab to the toolbar simply click on the toolbar and the tab will appear. To move a tab click and hold
then drag it to the left or to the right.
NOTE: Tab types
LO3: Text Processing Features
Page 4
Tab a document
Note that once a tab is created it is applied from that point forward for the rest of a document.
Tab a paragraph that has already been typed
If you want to apply a tab to a paragraph that has already been created, highlight the paragraph and apply
that tab.
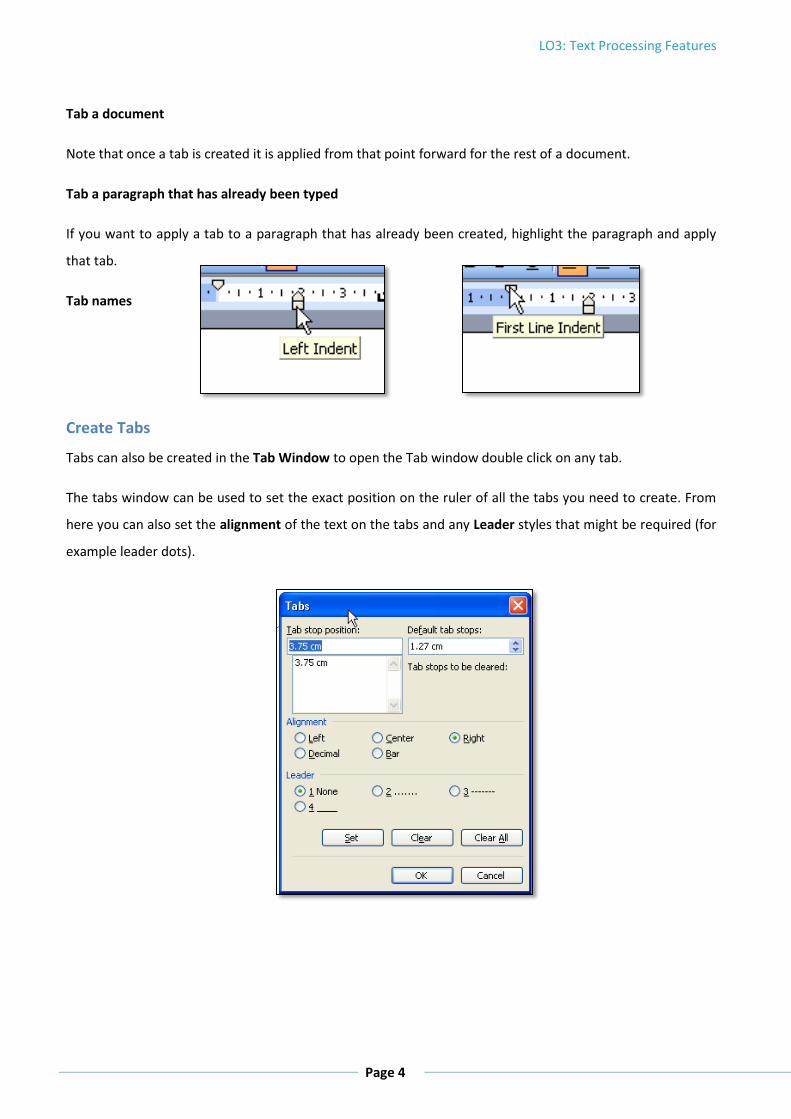
Tab names
Create Tabs
Tabs can also be created in the Tab Window to open the Tab window double click on any tab.
The tabs window can be used to set the exact position on the ruler of all the tabs you need to create. From
here you can also set the alignment of the text on the tabs and any Leader styles that might be required (for
example leader dots).

LO3: Text Processing Features
Page 5
Use Leader Dots
To turn on leader dots select the tab position and click
the leader style you want to use. Then click on Set.
5. ALIGNING TEXT – LEFT, RIGHT, CENTRE, JUSTIFIED
Horizontal alignment determines the appearance and orientation of the edges of the paragraph: left-aligned
text, right-aligned text, centered text, or justified text, which is aligned evenly along the left and right
margins. For example, in a paragraph that is left-aligned (the most common alignment), the left edge of the
paragraph is flush with the left margin. In this document this current paragraph is Justified.
To apply alignment highlight the paragraph or click on the sentence and go to Home > Paragraph Group and
choose the appropriate alignment.
Left Centre Right Justify

LO3: Text Processing Features
Page 6
6. BORDERS AND SHADING
To apply border and shading options click on the
Page Layout > Page Background Group > Page
Borders toolbar as shown.
In this window there are three tabs: Borders, Page
Border and Shading.
Borders are applied to the current
selected or highlighted area.
Page Border is applied to the
whole page.
Shading is the colour applied to
the background of the selected text.
Formatting Borders The
formatting options available allow the style of the border to be changed, the colour and the width/thickness
of the line. From these options a picture can also be added as a border.
NOTE: It is important to ensure the correct border style is selected, a common mistake is to confuse an area
or text border with a page border.
To apply borders to a paragraph highlight the paragraph and select the border required.
Shading can also be applied by highlighting text and using the ‘bucket of paint’ shading button on the Home
tab in the Paragraph group.
LO3: Text Processing Features
Page 7
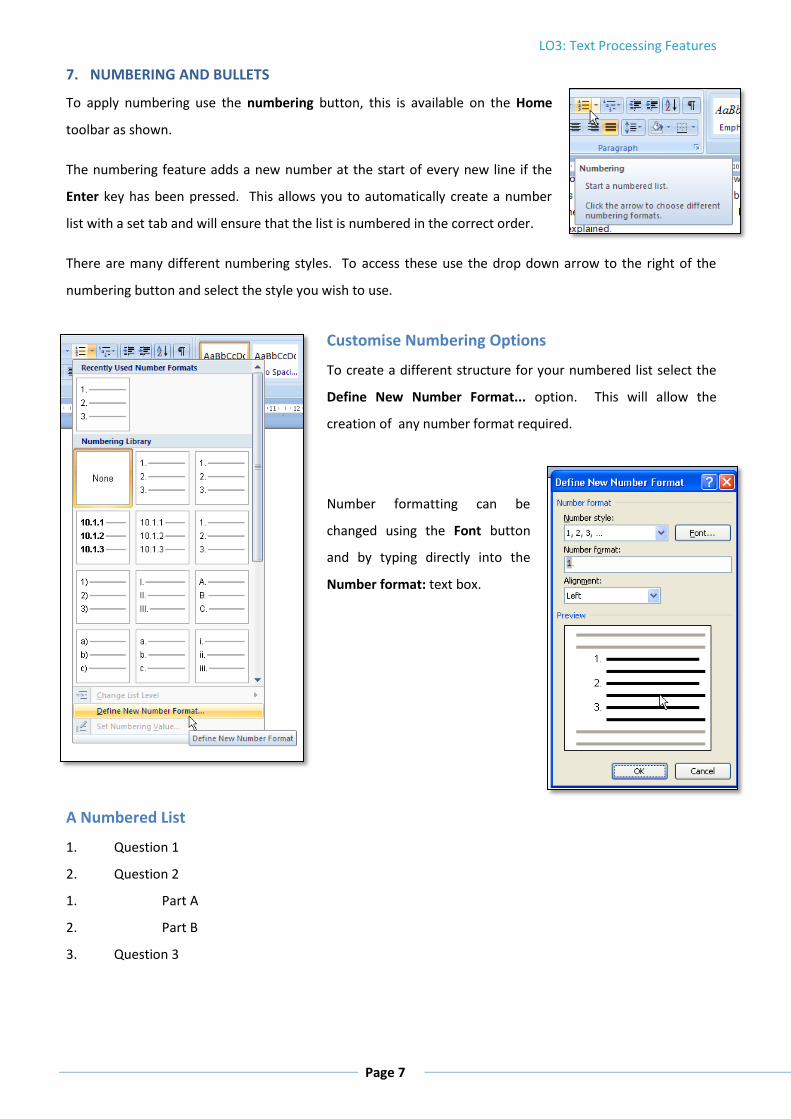
7. NUMBERING AND BULLETS
To apply numbering use the numbering button, this is available on the Home
toolbar as shown.
The numbering feature adds a new number at the start of every new line if the
Enter key has been pressed. This allows you to automatically create a number
list with a set tab and will ensure that the list is numbered in the correct order.
There are many different numbering styles. To access these use the drop down arrow to the right of the
numbering button and select the style you wish to use.
Customise Numbering Options
To create a different structure for your numbered list select the
Define New Number Format... option. This will allow the
creation of any number format required.
Number formatting can be
changed using the Font button
and by typing directly into the
Number format: text box.
A Numbered List
1. Question 1
2. Question 2
1. Part A
2. Part B
3. Question 3

LO3: Text Processing Features
Page 8
In the example of a numbered list above under Question 2 has two outlined numbers. An outline numbered
list shows list items at different levels rather than indented at one level. To move an outline numbered item
to the appropriate numbering level, use one of the following two
methods.
1. The first is on the Formatting toolbar:
To demote the item to a lower numbering level, click a list number, and
click Increase Indent .
To promote the item to a higher numbering level, click a list number, and
click Decrease Indent .
2. The second option is to simply press the tab key on the keyboard at the start of the line or sentence. This
will automatically start the second outlined list.
Bullet Points
To apply bullet options you can click on the bullet button on the
formatting toolbar, this is available on the Home toolbar as shown.
Using this option will add a bullet point to the start of the line the cursor
is on. As with the numbering button, bullets can also be indented to
hold lists within lists.
To use the indented bullet do the following:
To add a bullet second bullet pointed list use the Increase Indent
button.
o To bring the bullet back out use the Decrease Indent button
To customise your bullet options there are two methods available to
you. The first is to choose an option which has been preset in the
Bullet Library this can be accessed by selecting the drop down button
to the right of the bullet button.
LO3: Text Processing Features
Page 9
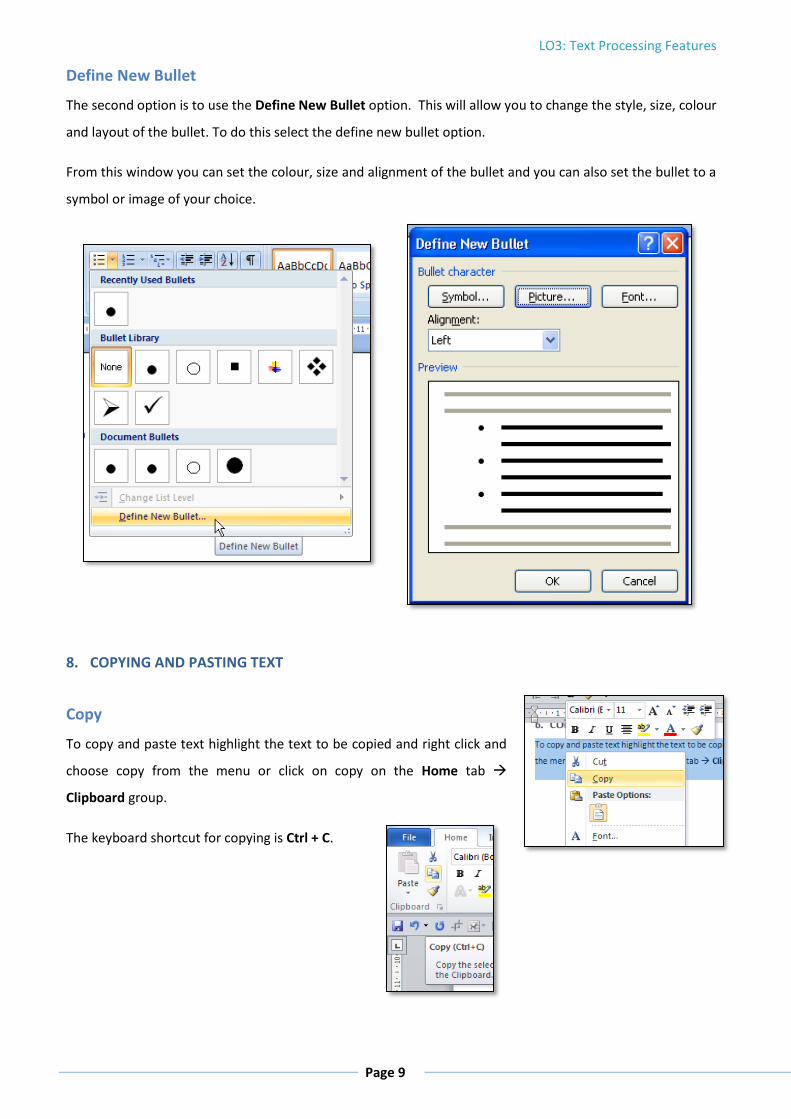
Define New Bullet
The second option is to use the Define New Bullet option. This will allow you to change the style, size, colour
and layout of the bullet. To do this select the define new bullet option.
From this window you can set the colour, size and alignment of the bullet and you can also set the bullet to a
symbol or image of your choice.
8. COPYING AND PASTING TEXT
Copy
To copy and paste text highlight the text to be copied and right click and
choose copy from the menu or click on copy on the Home tab
Clipboard group.
The keyboard shortcut for copying is Ctrl + C.
LO3: Text Processing Features
Page 10
Paste
To paste text that has been copied you can use similar methods to copying as shown. Right click
an choose paste from the drop down menu or go to the Home tab Clipboard group and
click Paste.
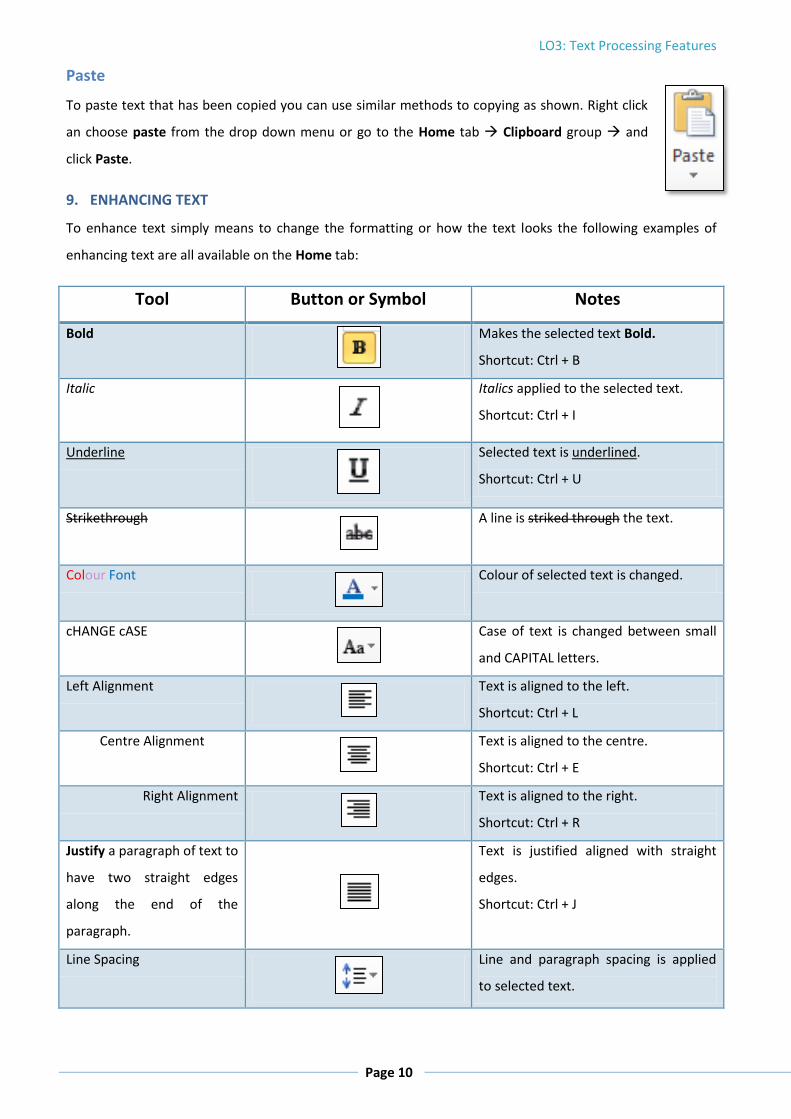
9. ENHANCING TEXT
To enhance text simply means to change the formatting or how the text looks the following examples of
enhancing text are all available on the Home tab:
Tool Button or Symbol Notes
Bold
Makes the selected text Bold.
Shortcut: Ctrl + B
Italic
Italics applied to the selected text.
Shortcut: Ctrl + I
Underline
Selected text is underlined.
Shortcut: Ctrl + U
Strikethrough
A line is striked through the text.
Colour Font
Colour of selected text is changed.
cHANGE cASE
Case of text is changed between small
and CAPITAL letters.
Left Alignment
Text is aligned to the left.
Shortcut: Ctrl + L
Centre Alignment
Text is aligned to the centre.
Shortcut: Ctrl + E
Right Alignment
Text is aligned to the right.
Shortcut: Ctrl + R
Justify a paragraph of text to
have two straight edges
along the end of the
paragraph.
Text is justified aligned with straight
edges.
Shortcut: Ctrl + J
Line Spacing
Line and paragraph spacing is applied
to selected text.

LO3: Text Processing Features
Page 11
Shading
Colour is applied to the background
behind the text.
Show/Hide
Paragraph marks and other hidden
formatting are shown.
Shortcut: Ctrl + Shift + *
Font Style
The font face is change to a new style
of writing. Calibri and Times New
Roman are popular examples.
Font Size
The size of the selected text is
changed.
Bullets
Start a bullets list. This adds bullet
points to the start of a paragraph.
1. Numbering
Start a numbered list. This adds
numbers to the start of a paragraph.
Increase Tab
Increase the indent level of the tab in
the ruler.
Decrease Tab
Decrease the indent level of the tab in
the ruler.
NOTES: