text for new - Morris Press Cookbooks · Morris Press Cookbooks 3 Wording & Font Issues • Before...
9
Morris Press Cookbooks 1 What is Press-Ready? A digital cover file that requires no typesetting or alterations and is ready to print is considered press-ready. The print quality will depend on the quality of the press-ready material provided. Hardcopy material of any kind (e.g., black/white lasers, color printouts, etc.) is not considered press-ready. If this material is furnished, the cover will be recreated as closely as possible. Important: If you cannot provide a press-ready digital file, but have specific ideas or artwork you want to use, we can help. Download the Cover Information Sheet from our web site’s Download Center at www.morriscookbooks.com. Follow the instructions and provide photos or artwork you would like to use. It’s that easy! A FREE proof will be sent for your approval. Note: If you do not provide a press-ready file, but plan to submit digital photos or artwork, please see p. 4 as these specifications will apply. Copyright © 2007 Revised May 2014 Morris Press Cookbooks All Rights Reserved. No part of this document, in whole or in part, may be copied, transferred, or reproduced. Accepted Software & Material ................................ 2 Digital File Guidelines ............................................ 3 Digital Image Specifications ................................... 4 Soft Cover Template .............................................. 5 Hardback Cover Template ....................................... 6 Hardback Liner Template ........................................ 7 3-Ring Binder (1") Template ................................... 8 3-Ring Liner (1") Template ..................................... 9 A FREE proof will be sent to you when a press- ready cover and/or liner is submitted. Production will continue when the proof has been approved. Changes may result in extra charges. For pricing, print our Change Order & Corrections Pricing from our web site’s Download Center. 3212 E. Hwy 30 • P. O. Box 2110 Kearney, NE 68847 800-445-6621 • Fax: 308-234-3969 web: www.morriscookbooks.com e-mail: [email protected] ress- R ea COVER GUIDELINES
Transcript of text for new - Morris Press Cookbooks · Morris Press Cookbooks 3 Wording & Font Issues • Before...
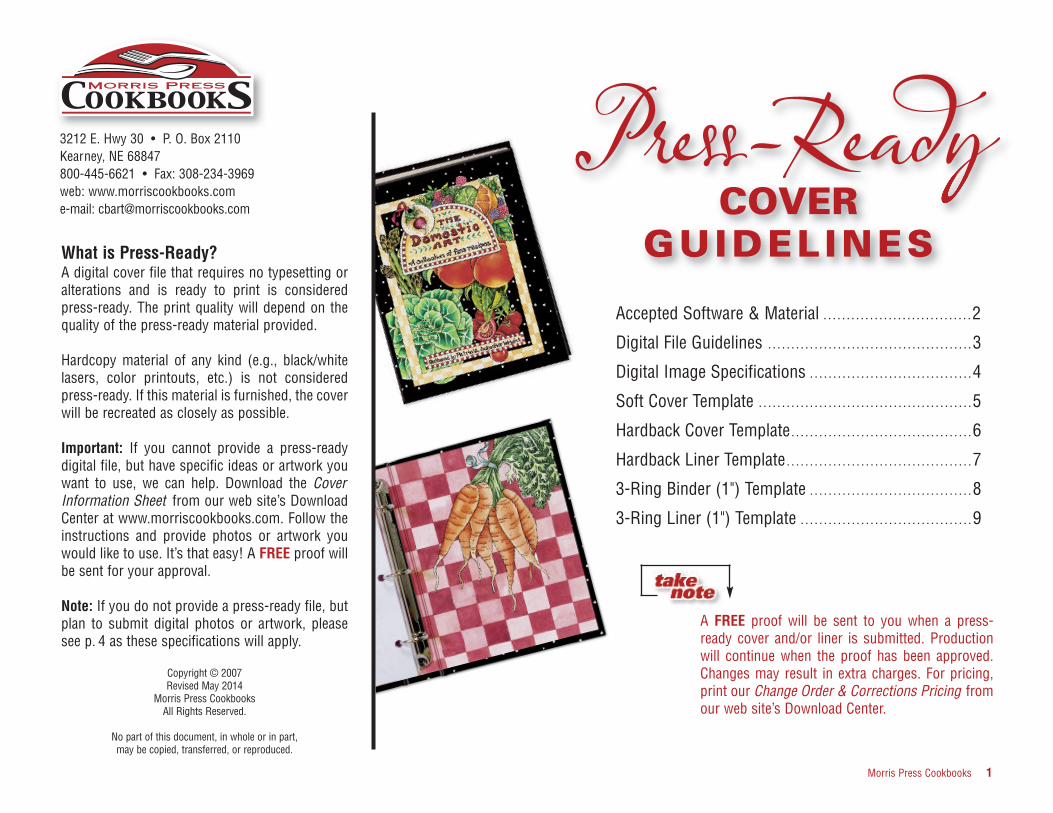
Morris Press Cookbooks 1
What is Press-Ready?A digital cover file that requires no typesetting oralterations and is ready to print is consideredpress-ready. The print quality will depend on thequality of the press-ready material provided.
Hardcopy material of any kind (e.g., black/whitelasers, color printouts, etc.) is not consideredpress-ready. If this material is furnished, the coverwill be recreated as closely as possible.
Important: If you cannot provide a press-readydigital file, but have specific ideas or artwork youwant to use, we can help. Download the CoverInformation Sheet from our web site’s DownloadCenter at www.morriscookbooks.com. Follow theinstructions and provide photos or artwork youwould like to use. It’s that easy! A FREE proof willbe sent for your approval.
Note: If you do not provide a press-ready file, butplan to submit digital photos or artwork, pleasesee p. 4 as these specifications will apply.
Copyright © 2007Revised May 2014
Morris Press CookbooksAll Rights Reserved.
No part of this document, in whole or in part,may be copied, transferred, or reproduced.
Accepted Software & Material . . . . . . . . . . . . . . . . . . . . . . . . . . . . . . . .2
Digital File Guidelines . . . . . . . . . . . . . . . . . . . . . . . . . . . . . . . . . . . . . . . . . . . .3
Digital Image Specifications . . . . . . . . . . . . . . . . . . . . . . . . . . . . . . . . . . .4
Soft Cover Template . . . . . . . . . . . . . . . . . . . . . . . . . . . . . . . . . . . . . . . . . . . . . .5
Hardback Cover Template. . . . . . . . . . . . . . . . . . . . . . . . . . . . . . . . . . . . . . .6
Hardback Liner Template. . . . . . . . . . . . . . . . . . . . . . . . . . . . . . . . . . . . . . . .7
3-Ring Binder (1") Template . . . . . . . . . . . . . . . . . . . . . . . . . . . . . . . . . . .8
3-Ring Liner (1") Template . . . . . . . . . . . . . . . . . . . . . . . . . . . . . . . . . . . . .9
A FREE proof will be sent to you when a press-ready cover and/or liner is submitted. Productionwill continue when the proof has been approved.Changes may result in extra charges. For pricing,print our Change Order & Corrections Pricing fromour web site’s Download Center.
3212 E. Hwy 30 • P. O. Box 2110Kearney, NE 68847800-445-6621 • Fax: 308-234-3969web: www.morriscookbooks.come-mail: [email protected]
Press-ReadyCOVER
GUIDELINES

Morris Press Cookbooks 2
Accepted SoftwareWe only accept a digital file, created on aMacintosh® or PC platform, with no manipulationrequired, ready to be printed. The cover and/orliner must adhere to our template specifications(soft cover, hardback, or 3-Ring). We accept filescreated with the following software:
• QuarkXPress® • Adobe InDesign®
• Adobe Photoshop® • Adobe Illustrator®
Do NOT use or send any Microsoft® files such asWord, Excel, Publisher, or PowerPoint. Theseapplications are incompatible with our softwareand are not meant to be used for professional pub-lication design.
Digital Files Required• Provide all native files and any linking and lay-ered artwork (i.e., EPS or TIFF files) that’s usedfor your cover. Do NOT use any compressionmethods on files. See p. 3 –4 for more details.
• You may send a high resolution PDF file; however,we often must make adjustments if templates arenot properly followed or files are saved incorrectly.Because of this, we also require native files.
• Provide all fonts used for your cover. If fonts areused in art files, convert them to an outline in theapplication in which they were created, or providethose fonts. Missing fonts will cause errors anddelay production.
PRESS-READYCOVER GUIDELINES
Sending Files & Material• Go to www.morriscookbook.com to upload files.Go to the Covers tab; click on File Uploader.Important: Send your order before uploading anyfiles to us. When we receive your order, you willreceive a confirmation e-mail with a BookNumber. Your Book Number is required to uploadany files.
• If you have any problems, you can also send fileson a CD or jump drive. Label it with your organi-zation name and book title.
• Provide a hardcopy of your cover (and/or liner).This will only be used to verify content, not color.Home office color printers and monitors are notreliable; they are not calibrated to our equipment.A color proof will be sent to you for approval.
Accepted Software & Material
Hardcopy material of any kind (e.g., black & white or color
printouts, etc.) is NOT press-ready. If this material is sent,
the cover will be recreated as closely as possible.
Morris Press Cookbooks 3
Wording & Font Issues• Before you begin designing your cover, thinkabout where your title and subtitle will be placed.Be sure your wording is easy to read and notplaced on top of strong patterns or busy photos.
• Fonts in art files must be converted to outlines inthe application in which they were created, or youmust furnish those fonts when you send files.
Preparing Digital Files• Full-color scans or Photoshop® files should besaved as EPS files at 300 ppi. Artwork down-loaded from a web site and some stock photographymay only be 72 ppi, which is not acceptable; itresults in poor printing quality.
• See p. 4 to review resolution which determinessize and quality of photo printing. This alsoapplies to Photoshop® files and any other imagefiles you may have.
• All files and colors used should be in CMYKmode. If we receive RGB or spot color files, wewill convert them to CMYK, but it may affect colors.
• A cover to be printed in black ink only should besaved in grayscale mode.
• Scan and save artwork at the size it will be usedin the document. Avoid enlarging artwork or pho-tos once inserted into your document – use at100%. Enlarging files too much results in lowresolution with poor printing quality. See p. 4.
• If an image bleeds, allow additional image in yourPhotoshop® files for the sides that bleed. Seetemplates for required bleed area (p. 5 – 9).
• If you purchase artwork or photos from animagery web site, download the largest size.Most will list the pixel and/or ppi size. See p. 4 todetermine the maximum achievable print size.
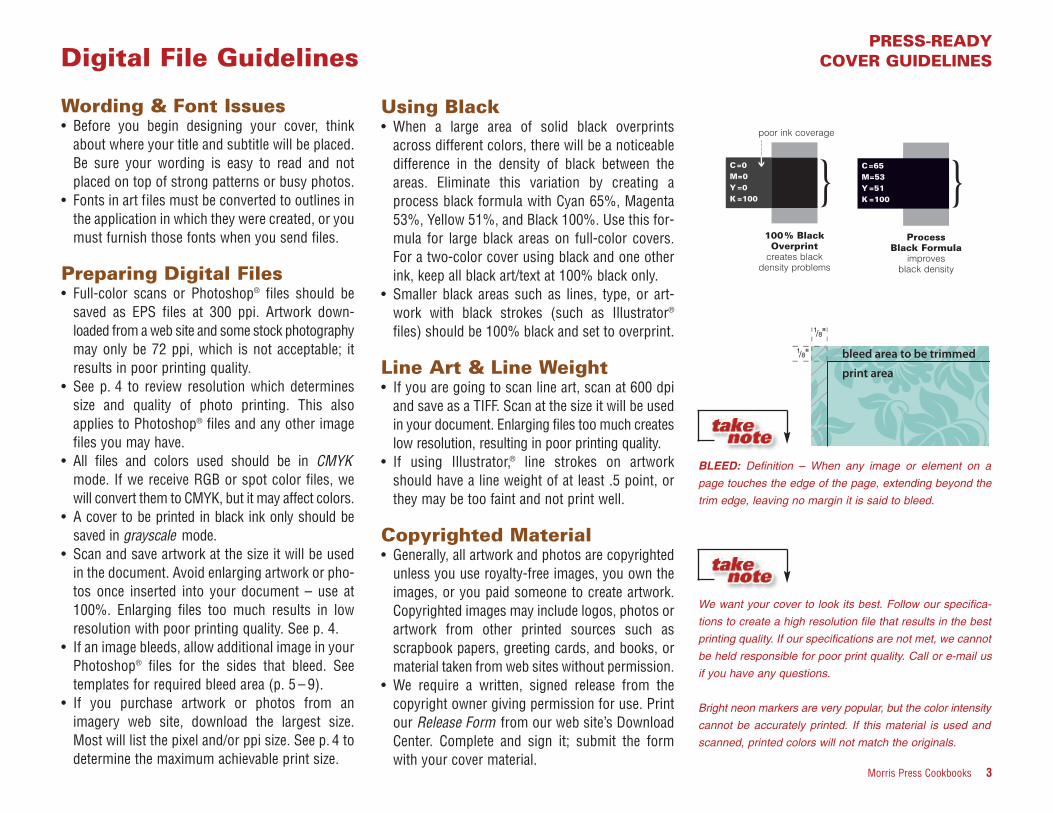
Using Black• When a large area of solid black overprintsacross different colors, there will be a noticeabledifference in the density of black between theareas. Eliminate this variation by creating aprocess black formula with Cyan 65%, Magenta53%, Yellow 51%, and Black 100%. Use this for-mula for large black areas on full-color covers.For a two-color cover using black and one otherink, keep all black art/text at 100% black only.
• Smaller black areas such as lines, type, or art-work with black strokes (such as Illustrator®
files) should be 100% black and set to overprint.
Line Art & Line Weight• If you are going to scan line art, scan at 600 dpiand save as a TIFF. Scan at the size it will be usedin your document. Enlarging files too much createslow resolution, resulting in poor printing quality.
• If using Illustrator,® line strokes on artworkshould have a line weight of at least .5 point, orthey may be too faint and not print well.
Copyrighted Material• Generally, all artwork and photos are copyrightedunless you use royalty-free images, you own theimages, or you paid someone to create artwork.Copyrighted images may include logos, photos orartwork from other printed sources such asscrapbook papers, greeting cards, and books, ormaterial taken from web sites without permission.
• We require a written, signed release from thecopyright owner giving permission for use. Printour Release Form from our web site’s DownloadCenter. Complete and sign it; submit the formwith your cover material.
PRESS-READYCOVER GUIDELINESDigital File Guidelines
}100% Black Overprint
creates black density problems
poor ink coverage
}Process
Black Formulaimproves
black density
C=65M=53Y=51K=100
C=0M=0Y=0K=100
➔
We want your cover to look its best. Follow our specifica-
tions to create a high resolution file that results in the best
printing quality. If our specifications are not met, we cannot
be held responsible for poor print quality. Call or e-mail us
if you have any questions.
Bright neon markers are very popular, but the color intensity
cannot be accurately printed. If this material is used and
scanned, printed colors will not match the originals.
BLEED: Definition – When any image or element on a
page touches the edge of the page, extending beyond the
trim edge, leaving no margin it is said to bleed.
1/8"
1/8"
print area
bleed area to be trimmed
1/8"1/8"

Morris Press Cookbooks 4
PRESS-READYCOVER GUIDELINESDigital Image Specifications
Maximum Print Size at 300 ppiwidth = 2658 pixels ÷ 300 ppi = 8.86"height = 1815 pixels ÷ 300 ppi = 6.05"
2658 pixels
1815 pixels
ResolutionAn image that looks good on your computer’s monitormay not necessarily print well. Resolution of a digitalfile, expressed in pixels per inch (ppi), determines theprinting quality.
Divide each axis by 300 – the result is the largest sizean image can be printed at maximum quality. We willaccept files as low as 150 ppi. Images won’t be assharp as 300 ppi, but it is still of acceptable quality. Inthat case, divide each axis by 150.
Example of image at 2658 pixels x 1815 pixels:300 ppi 2658 x 1815 (each axis ÷ 300)highest quality = 8.86" x 6.05" maximum print size
150 ppi 2658 x 1815 (each axis ÷ 150)medium quality = 17.72" x 12.1" maximum print size
The “Get Info” pop-up
window on a Mac will dis-
play your photo’s pixels.
If you enlarge a photo, make sure you maintain atleast 150 ppi. Images dragged from a web site areusually at 72 ppi. You cannot resave lower resolutionfiles to 300 ppi.
Note: If you scan line art (black/white artwork with NOshading), scan at 600 dpi and save as a TIFF.
How many pixels are in myphoto?Photo-editing software can show how many pixels arein an image, in length by height. Otherwise, on a Mac,open the image file in Preview, then use keys“Command-I” to “Get Info” and a pop-up window willshow the data. See example above. On a PC, rightclick on the image file, look at “Properties,” and thenthe “Summary” tab.
Camera SettingsMost digital cameras with 4 or more Megapixels, andeven some cell phones, can take photos suitable forprinting. Check your owner’s manual to use the high-est quality settings available. If possible, do not useany compression settings.
File FormatYou may want to modify the brightness, contrast, andcolor in a photo-editing program. Morris PressCookbooks cannot be responsible for photo qualitysince we do not make alterations or correct colors toimages you upload.
Save digital images in one of these formats: TIFF,EPS, or JPG. Your file should be several megabytes insize if it’s the correct resolution, although JPG files aregenerally smaller.
Morris Press Cookbooks 5
Soft Cover Specifications:• Document Width = 5 1/2" (5.5).• Document Height = 8 1/2" (8.5).• Front cover margins are 3/8" (.375) for the top,
bottom, and right side, and 11/16" (.6875) for theleft side. See Template 1.
• Back cover margins are 3/8" (.375) for the top,bottom, and left side, and 11/16" (.6875) for theright side. See Template 1B.
• The wider margin of 11/16" is needed to allow forthe plastic comb or coil binding punch.
PRESS-READYCOVER GUIDELINES
Template 1Template 1B
Key
white =image area
light gray =margin area
dark gray =bleed area
47/16"
73 /4
"
Back CoverImage Area
Type and artwork notintended to bleed must
stay in white area.
3/8"
3/8"
51/2"
81/2"47/16"
73 /4
"
Front CoverImage Area
Type and artwork notintended to bleed must
stay in white area.
3/8"
3/8"
51/2"
81/2"
11/16"
Extend bleed1/8" beyonddocumentedge on all
sides
• The white areas on Templates 1 and 1B are theimage areas. Do not extend type or artworkbeyond these areas unless it is intended to bleed.Center text and artwork within the image areas,not the document edges.
• If color or artwork bleeds, extend it into the mar-gin areas (light gray area) and 1/8" (.125) beyondthe edge of the document on all four sides (dark-er gray area). The 1/8" bleed will be trimmed off.
• The finished book size is 5 1/2" x 8 1/2".
Soft Cover Templatewith Plastic Comb or Coil Binding
A printed back cover is optional and
incurs an extra charge. Back covers will
be white unless you order a printed back
cover. See our Cookbook Publishing
Guide or web site for pricing.
For gold or silver foil stamping on your
cover, please contact us for instructions
at 800-445-6621.

Morris Press Cookbooks 6
Hardback Specifications:• Document Width = 7 1/2" (7.5).• Document Height = 10 1/4" (10.25).• Within the document, make 3/4" (.75) bleeds on
all sides of the front and back covers. Note thatthe bleed area is within the document. This areais needed even if the cover does not bleed. It willwrap around the hardback board and partiallyappear on the inside cover.
• From the 3/4" bleeds, set front cover margins thatare 3/8" (.375) for the top, bottom, and right side,and 11/16"(.6875) for the left side. See Template 2.
PRESS-READYCOVER GUIDELINESHardback Cover Template
with Plastic Comb Binding
Key
white =image area
light gray =margin area
dark gray =bleed area
Template 2Template 2B
3/4" 3/4"
3/4"
3/4"
Front CoverImage Area
Type and artwork notintended to bleed must
stay in white area.
415/16"
8"
11/16"
3/8"
3/8"
71/2"
101/4"
3/4" 3/4"
3/4"
3/4"
Back CoverImage Area
Type and artwork notintended to bleed must
stay in white area.
415/16"
8"
11/16"
3/8"
3/8"
71/2"
101/4"
If color orartwork
bleeds, itmust fill the
3/4" bleedarea on allfour sides.
• From the 3/4" bleeds, set back cover margins at3/8" (.375) for the top, bottom, and left side, and11/16" (.6875) for the right side. See Template 2B.
• The wider margin of 11/16" is needed for the plas-tic comb binding punch.
• The white areas on Templates 2 and 2B are theimage areas. Do not extend type or artworkbeyond these areas unless it is intended to bleed.Center text and artwork within the image areas,not the document edges.
• If color or artwork bleeds, it must extend into themargin areas and also fill the 3/4" bleed areas(light gray and dark gray area). If it does notbleed, leave both areas white.
• The finished book size is 6" x 8 3/4".
A printed back cover is optional and
incurs an extra charge. Back covers will
be white unless you order a printed back
cover. See our Cookbook Publishing
Guide or web site for pricing.
For gold or silver foil stamping on your
cover, please contact us for instructions
at 800-445-6621.

Morris Press Cookbooks 7
Hardback Liner Specs:Standard liners for hardback covers are white orcream (not printed). One-color, multi-color, and full-color printed liners are available for an extra charge.
Follow these guidelines:• Document Width = 5 3/8" (5.375)• Document Height = 8 3/8" (8.375).• Set margins at 3/8" (.375) for all sides. Your image
area (white area on template) will be 4 5/8" x 7 5/8"(4.625 x 7.625). See Template 3.
• Center text and artwork within the image area,not the document edges. Do not extend type orartwork beyond the image area unless it bleeds.
• If color or artwork bleeds, extend it into the mar-gin area and 1/8" (.125) beyond the document onall sides. The 1/8" bleed area will be trimmed off.
• The finished size for each liner is 5 3/8" x 8 3/8".
PRESS-READYCOVER GUIDELINES
Hardback Liner Template
A hardback cookbook has 2 liners – one for the inside front
cover and one for the inside back cover. Use Template 3
for each liner.
We do not recommend custom liners with solid color or
dense ink coverage. This can result in unwanted ink trans-
fer, rubbing onto adjacent pages.
Key
white =image area
light gray =margin area
dark gray =bleed area
Template 3If color or artwork bleeds,extend bleed 1/8" beyond document on all 4 sides.
Hardback LinerImage Area
Type and artwork notintended to bleed must
stay in white area.
45/8"
75 /8
"3/8"
3/8"
53/8"
8 3/8"
Template is the same for both inside front and inside back cover liners.
Morris Press Cookbooks 8
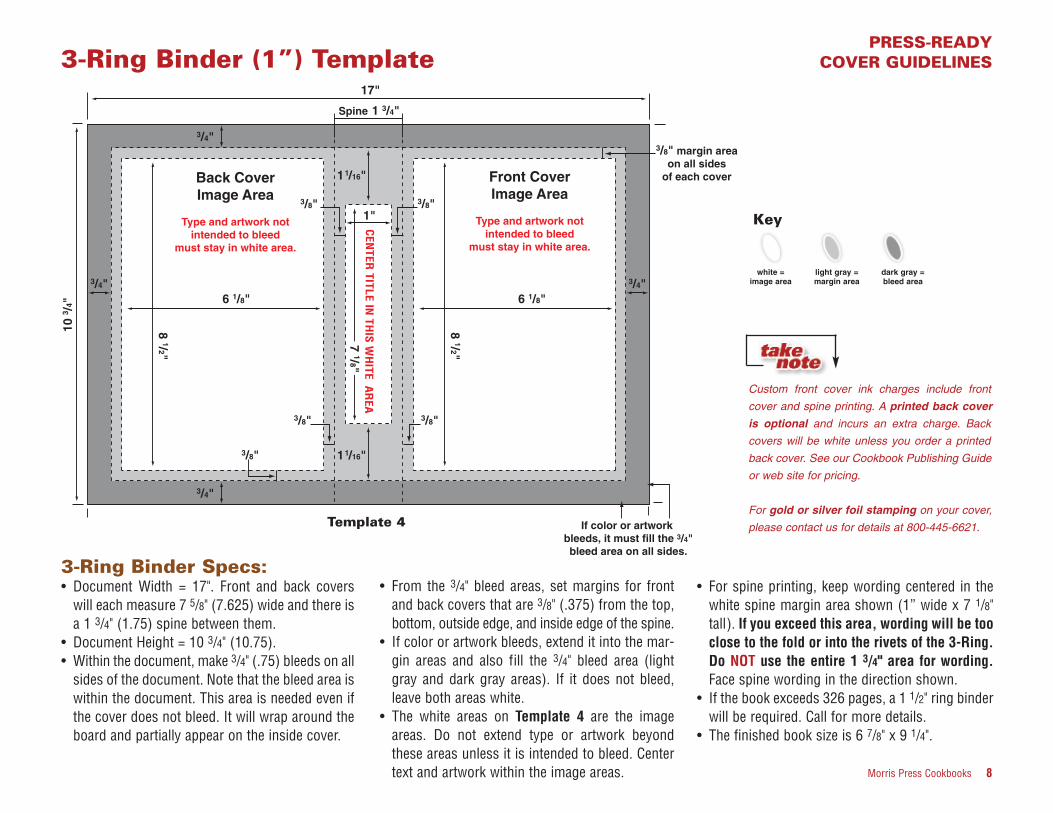
PRESS-READYCOVER GUIDELINES3-Ring Binder (1”) Template
3/4"
3/4"
3/4"3/4"6 1/8"
8 1/2"
6 1/8"
8 1/2"
17"
10 3 /
4"
Spine
3/8" 3/8"
1 1/16"
1 1/16"
1 3/4"
7 1/8"
1"
3/8" 3/8"
3/8"
If color or artwork bleeds, it must fill the 3/4"bleed area on all sides.
Back CoverImage Area
Type and artwork notintended to bleed
must stay in white area.
Front CoverImage Area
Type and artwork notintended to bleed
must stay in white area.
3/8" margin areaon all sides
of each cover
CEN
TER TITLE IN
THIS
WH
ITE AR
EA
Custom front cover ink charges include front
cover and spine printing. A printed back cover
is optional and incurs an extra charge. Back
covers will be white unless you order a printed
back cover. See our Cookbook Publishing Guide
or web site for pricing.
For gold or silver foil stamping on your cover,
please contact us for details at 800-445-6621.
• For spine printing, keep wording centered in thewhite spine margin area shown (1” wide x 7 1/8"tall). If you exceed this area, wording will be tooclose to the fold or into the rivets of the 3-Ring.Do NOT use the entire 1 3/4" area for wording.Face spine wording in the direction shown.
• If the book exceeds 326 pages, a 1 1/2" ring binderwill be required. Call for more details.
• The finished book size is 6 7/8" x 9 1/4".
Template 4
3-Ring Binder Specs:• Document Width = 17". Front and back covers
will each measure 7 5/8" (7.625) wide and there isa 1 3/4" (1.75) spine between them.
• Document Height = 10 3/4" (10.75).• Within the document, make 3/4" (.75) bleeds on all
sides of the document. Note that the bleed area iswithin the document. This area is needed even ifthe cover does not bleed. It will wrap around theboard and partially appear on the inside cover.
• From the 3/4" bleed areas, set margins for frontand back covers that are 3/8" (.375) from the top,bottom, outside edge, and inside edge of the spine.
• If color or artwork bleeds, extend it into the mar-gin areas and also fill the 3/4" bleed area (lightgray and dark gray areas). If it does not bleed,leave both areas white.
• The white areas on Template 4 are the imageareas. Do not extend type or artwork beyondthese areas unless it is intended to bleed. Centertext and artwork within the image areas.
Key
white =image area
light gray =margin area
dark gray =bleed area

Morris Press Cookbooks 9
3-Ring Liner Specs:Standard liners for 3-Ring covers are white or cream(not printed). One-color, multi-color, and full-colorprinted liners are available for an extra charge.
Follow these guidelines:• Document Width = 15". The front and back liner
areas each measure 6 9/16" (6.5625) and there isa 1 7/8" (1.875) spine area.
• Document Height = 8 3/4" (8.75).• Set image areas for the front and back liners with
margins 3/8" (.375) from the top, bottom, outsideedge, and edge of the spine.
• The white areas on Template 5 are the imageareas. Do not extend type or artwork beyondthese areas unless it is intended to bleed. Centertext and artwork within the image areas, not thedocument edges.
• If color or artwork bleeds, extend it into the mar-gin areas (including spine area) and 1/8" (.125)beyond the edge of the document on all sides(into the dark gray area). The 1/8" bleed area willbe trimmed off.
• The finished liner size is 15" x 8 3/4".
PRESS-READYCOVER GUIDELINES
3-Ring Liner (1”) Template
Key
5 13/16"
8"
5 13/16"
8"
8 3 /
4"
Spine1 7/8"
15"
Artwork or color may continue through this area.
Extend bleed 1/8" beyond document edge on all sides
3/8" margin areaon all four sides ofeach image area
Front Cover LinerImage Area
Type and artwork notintended to bleed
must stay in white area.
Back Cover LinerImage Area
Type and artwork notintended to bleed
must stay in white area.3/8"
We do not recommend custom liners with solid color or
dense ink coverage. This can result in unwanted ink trans-
fer, rubbing onto adjacent pages.
Template 5
white =image area
light gray =margin area
dark gray =bleed area