Texas Probable Maximum Precipitation (PMP)
14
Texas Probable Maximum Precipitation (PMP) GIS Service - User Guide The PMP GIS tool is a geoprocessing service hosted by the TCEQ. This tool calculates gridded PMP depths for a given drainage basin for the specified durations for general, local, and tropical storm types. PMP values are calculated (in inches) for each grid point (spaced at 90 arc-second intervals) within (or adjacent to) the drainage basin. A Basin Average table is created over the basin using the grid point PMP values. This tool will have a max processing load of 6 instances at a single time. This is to ensure efficient processing time and capacity. Table of Contents Adding Tool Connection TCEQ Gridded PMP Tool Explained Outputs Processing sub-basins
Transcript of Texas Probable Maximum Precipitation (PMP)

Texas Probable Maximum Precipitation (PMP)
GIS Service - User Guide
The PMP GIS tool is a geoprocessing service hosted by the TCEQ.
This tool calculates gridded PMP depths for a given drainage basin for the specified durations for general, local, and tropical storm types. PMP values are calculated (in
inches) for each grid point (spaced at 90 arc-second intervals) within (or adjacent to) the drainage basin. A Basin Average table is created over the basin using the grid point
PMP values.
This tool will have a max processing load of 6 instances at a single time. This is to ensure efficient processing time and capacity.
Table of Contents
Adding Tool Connection
TCEQ Gridded PMP Tool Explained
Outputs
Processing sub-basins

Adding Tool Connection
Within ArcMap, open ArcCatalog. Navigate to the GIS Servers folder and double click Add ArcGIS Server.
Accept the default of Use GIS services and click the Next > button.

Enter the following link into the Server URL, replacing the existing http://
https://gisweb.tceq.texas.gov/arcgis/rest/services/DamSafety_PMP_Tool/TCEQPMPTool/GPServer
Press Finish. There should now be a new link within the GIS Servers folder labeled gisweb.tceq.texas.gov
Navigate to the DamSafety_PMP_Tool folder and open the TCEQPMPTool toolbox. Open the TCEQ Gridded PMP Tool.


TCEQ Gridded PMP Tool Explained
Input basin
There are several different methods of input for this field.
1. Choosing an existing layer within the Map by clicking the drop-down
2. Choosing a layer within a folder by clicking the Browse button
3. Drawing a polygon directly on the Map after opening the tool
The input basin should be a projected polygon shapefile or feature class. If it is split into sub-basins, utilize the Dissolve tool (Data Management) to create a new shapefile of the full basin. If the layer contains multiple basins, use the select tool to highlight a single basin. The tool will only process one item at a time.
Storm Types and Durations
Each storm type (Local, General and Tropical) requires durations to be selected. The durations, in hours, require at least one selection per storm type. All storms have the following durations: 1, 2, 3, 4, 5, 6, 12, 24, 48, 72, 96, and 120.


Use Basin Area / PMP Area
Use Basin Area is the default and should always be checked, unless processing sub-basins. When processing sub-basins, the Use Basin Area is unchecked and a value must be entered in the PMP Area field. These steps are outlined below.
Apply Weighted Average
The Apply weighted average to border grid cells takes the percent of the Basin covering each cell and adjusts the value.
For instance, in the example to the right, instead of taking the full value of all three cells shown, this option only applies the percent of the covered areas. So the cell that only has a fraction covered will not be over-valued.

Once all the options are selected, and the tool is running, the only way to ensure processing is to open the Results window under the Geoprocessing tab.
Once the Results window is open, the tool will show under the Current Session section. There are several different symbols that could show next to the tool.
A cancelled tool
A tool that is currently processing
A tool that has been completed
A tool in queue. Depending on processing volume, this could take some time to run.
A tool that has error and did not process.

Once the tool has finished processing, the results tab will identify that the data is located in a local temp location.
Navigate to the Table of Contents to view and export data to a permanent location.
Outputs
One table and three shapefiles are the outputs of this tool.

The Basin Average Table is the main output for this tool. It contains the PMP values for each storm type and duration. Choose the duration value that makes the most sense for your study. Usually this would be the most conservative value.
There is no need to use HMR52 to obtain values. This tool provides the only values you need. Please see the PMP Study Documenation for further reference.
The shapefiles, correlating to each storm type, contain points representing the grid cells intersecting the basin. Each row in their attribute table contains the lat/long, elevation, zone, and PMP values for each duration with their corresponding storms. See the attribute table below for reference.
***If the input basin crosses into New Mexico, check the output shapefiles to verify full basin coverage. The study area does not fully extend into New Mexico. ***

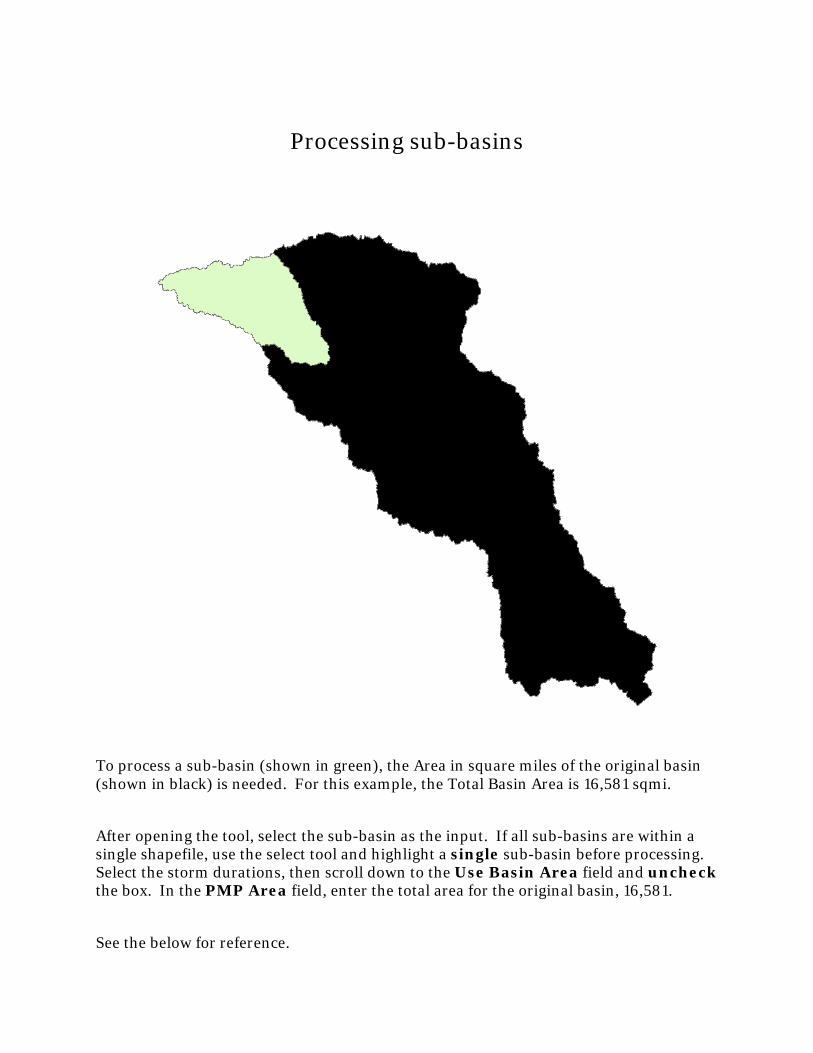
Processing sub-basins
To process a sub-basin (shown in green), the Area in square miles of the original basin (shown in black) is needed. For this example, the Total Basin Area is 16,581 sqmi.
After opening the tool, select the sub-basin as the input. If all sub-basins are within a single shapefile, use the select tool and highlight a single sub-basin before processing. Select the storm durations, then scroll down to the Use Basin Area field and uncheck the box. In the PMP Area field, enter the total area for the original basin, 16,581.
See the below for reference.

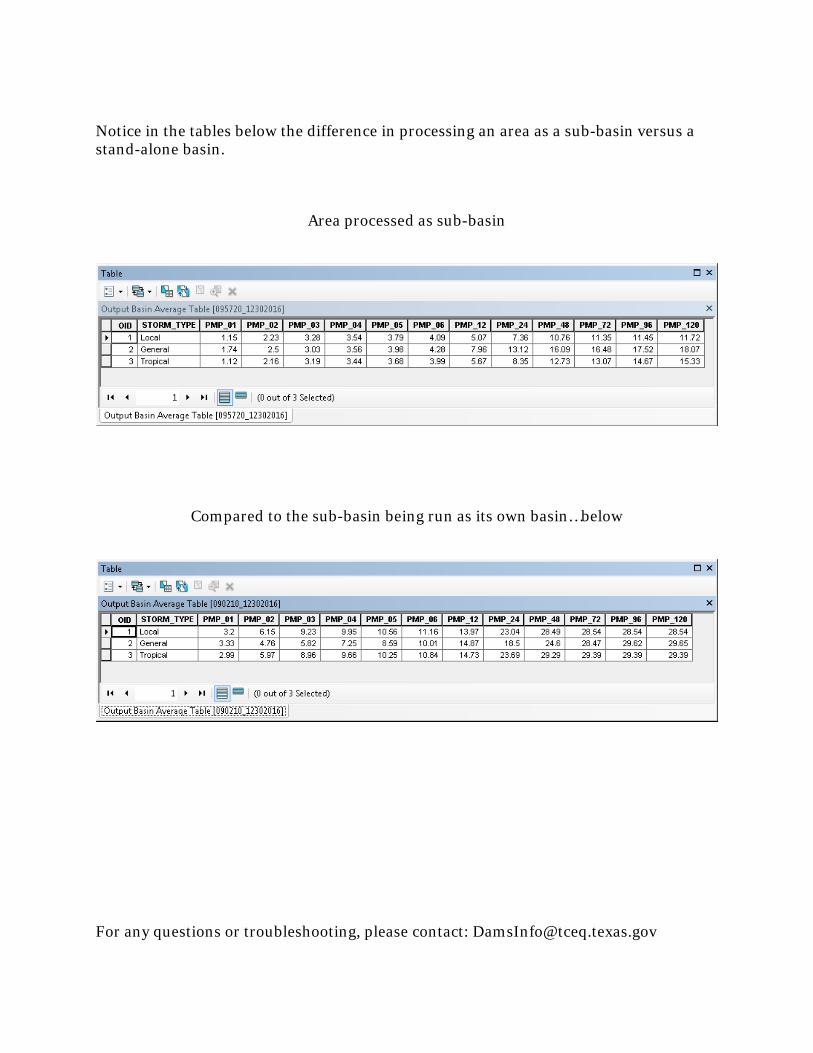
Notice in the tables below the difference in processing an area as a sub-basin versus a stand-alone basin.
Area processed as sub-basin
Compared to the sub-basin being run as its own basin…below
For any questions or troubleshooting, please contact: [email protected]