Test Scoring System 2009 - jra-assessment.com · For CPI, PAI, and STAXI reports, the printing can...
79
JR&A Test Scoring System 2009 User Guide V1.07 7/13/09
-
Upload
truongkhanh -
Category
Documents
-
view
217 -
download
0
Transcript of Test Scoring System 2009 - jra-assessment.com · For CPI, PAI, and STAXI reports, the printing can...

JR&A Test Scoring System 2009 User Guide
V1.07 7/13/09

Johnson, Roberts & Associates, Inc. 6664 Colton Blvd, Oakland, CA 94611 (510) 338-3230 Copyright © 2009 by Johnson, Roberts & Associates, Inc. All rights reserved. May not be reproduced in whole or in part in any form or by any means without written permission of Johnson, Roberts & Associates, Inc.

Contents 1 Introduction ...................................................................................... 1 Overview .................................................................................................................... 1 A typical session ........................................................................................................ 2 New features .............................................................................................................. 2 Compatibility with previous JR&A on-site scoring software ...................................... 2
2 System Requirements ..................................................................... 3 Operating System ...................................................................................................... 3 Computer requirements ............................................................................................. 3 Accessory device requirements ................................................................................. 3 Supplemental software requirements ........................................................................ 3 Network capability ..................................................................................................... 4 Internet security software compatibility ..................................................................... 4
3 Installing the JR&A test scoring system ........................................ 5
4 Starting and Ending the Program ................................................... 11 Reset Button .............................................................................................................. 12
5 Data Collection ................................................................................. 13 Overview .................................................................................................................... 13 Scanning test answer sheets .................................................................................... 13 Inputting previously collected test data files .............................................................. 18 Downloading test data collected on the Internet ....................................................... 19
6 The Data Editor ................................................................................. 21 Overview .................................................................................................................... 21 The data editor grid ................................................................................................... 21 Merging test sets ....................................................................................................... 22 The test set editor ..................................................................................................... 25 Editing test taker ID variables (Page 1) .................................................................... 26 Editing test item variables (Page 2) ........................................................................... 27 Saving edited data ..................................................................................................... 33 Saving PHQ and PsyQ data for custom PHQ reports ............................................... 35
7 The Data Viewer ............................................................................... 36 Overview .................................................................................................................... 36 Information displayed ................................................................................................ 36 Selecting records ....................................................................................................... 38 Sorting records .......................................................................................................... 38 Clearing records ........................................................................................................ 38 Retrieving records from the database ....................................................................... 39
8 Test Reports ..................................................................................... 41 Overview .................................................................................................................... 41 Previewing reports ..................................................................................................... 42 Printing reports .......................................................................................................... 43 Exporting reports to pdf files ...................................................................................... 43 Report authorizations ................................................................................................ 45 Reports with different versions .................................................................................. 45 Exporting summary report statistics .......................................................................... 46
i
ii
Regenerate reports .................................................................................................... 52
9 System Tools .................................................................................... 54 Overview .................................................................................................................... 54 Options ...................................................................................................................... 55 Authorizations ............................................................................................................ 60 Check for updates ..................................................................................................... 61 Change password ...................................................................................................... 62 Agency codes ............................................................................................................ 63
10 Data Management Tasks ................................................................. 69 Overview .................................................................................................................... 69 Deleting data records ................................................................................................ 69 Exporting data records .............................................................................................. 70
11 Data Security .................................................................................... 72
Appendices A Scantron scanner setup and configuration B TrueCrypt data encryption software C Format of summary test report containing PHQ statistics

Chapter 1 Introduction
Overview
The JR&A Test Scoring System creates specialized psychological test reports, which are intended to be used by licensed psychologists in conducting psychological evaluations of applicants for police and other public safety positions.
Reports can be created for five instruments:
• the Personal History Questionnaire (PHQ)
• the California Psychological Inventory (CPI)
• the Personality Assessment Inventory (PAI)
• the State-Trait Anger Expression Inventory (STAXI)
• the Psychological History Questionnaire (PsyQ)
The reports are produced in three formats
• Displayed on the computer screen
• Printed on paper
• Exported to pdf files
A Typical Session
A typical session with the JR&A Test Scoring System involves the following steps:
• Collect test data (either by scanning test answer sheets, downloading data obtained from online testing, or inputting data files prepared previously) from one or more applicants.
• Use the Data Editor to correct any errors or inconsistencies in the test data.
• Enter the corrected data into the system's database, and display the individual test data record(s) for each applicant, in the Data Viewer.
• View, sort, and select some or all of the test data records in the Data Viewer.
• Create test reports -- which can be previewed on screen, printed, or exported to pdf files -- for each of the test data records you have selected.
• Clear the test data records from the Data Viewer, archiving them and the associated reports in the system's database.
The following other operations are occasionally done, as required:
• Manage report authorizations (which are purchased credits allowing reports to be created).
• Set system options.
1

• Retrieve selected data from the database back into the Data Viewer, for additional processing.
• Export selected test data records to files.
• Delete selected test data records.
• Update the software.
• Manage a list of agency names and codes (for use in entering data and retrieving it from the database).
• Export summary report statistics.
• Create summary reports for multiple test takers.
New Features
The JR&A Test Scoring System contains a number of new features that were not present in the previous JR&A On-Site Scoring Software:
• Reports for all tests can be previewed on screen, printed, or exported to pdf files.
• Each report uses just one authorization, regardless of how many copies are made, what formats are used (preview, print, or pdf) or what versions are produced (e.g., pre-offer or post-offer CPI, regular or background PsyQ)
• All data and reports are saved to a database, from which they can be retrieved as needed
• Software is downloaded and upgraded from the Internet.
• Report authorizations are downloaded from the Internet, and can be moved from one computer to another.
• Data editing tools can identify and correct inconsistencies in an applicant's personal identification information (e.g., SSN, agency code, and test date) across different tests, which facilitates research and the creation of multi-test reports
• PsyQ and PHQ reports are in a new format that creates problem scores and compares them to applicant norms.
• Reports will print on any printer (not just an HP laser jet).
• The program runs under Microsoft Vista as well as XP
• The program is compatible with various data encryption options
Compatibility with Previous JR&A On-Site Scoring Software
The new Test Scoring System will run without conflicts on a computer that also has the old JR&A test scoring software installed. The old software can be kept as a backup capability until you are comfortable using the new software.
2

Chapter 2 System Requirements
Operating System
The Test Scoring System has been tested with the following operating systems:
• Windows Vista
• Windows XP Professional (SP2 or later)
• Windows 2000
Computer Requirements • At least Pentium III or higher 500 MHz processor (1 GHz minimum recommended)
• At least 192 MB of RAM (1 GB minimum recommended)
• At least 20 MB of disk space (1 GB minimum recommended)
Accessory Device Requirements • A Scantron Optical Mark Reader ("scanner") with 48 channel, double sided, pencil read
capabilities. Compatible scanners include the following Scantron models: 2250, 2260, 2500, 2800, and 8600. Appendix A contains brief instructions for installing your scanner.
• A serial port or a USB to serial conversion cable (such as the Keyspan USB to serial adaptor, model USA-19HS)
• A windows compatible printer (if you want to create printed reports). For CPI, PAI, and STAXI reports, the printing can be done somewhat faster if you have an HP laser jet printer that uses HP PCL language.
Supplemental Software Requirements
In order for the JR&A Test Scoring System to work properly, it is necessary that the following programs be installed on your computer.
• Microsoft .NET Framework 2.0
This is the set of programming tools that is used by JR&A Test Scoring System to implement its capabilities.
• Microsoft SQL Server Express SP2
This is the database program that the JR&A Test Scoring System uses to store and retrieve data.
• Internet Explorer 6 SP1 or higher
This internet browser is required for SQL Express to run properly.
3

• Swiftview
This is a utility program that is required in order to display the CPI, PAI, and STAXI reports on screen.
If these programs are not already installed on your system, they will be installed automatically, at no charge, when you install the JR&A Test Scoring System.
Network capability
In addition to running on a standalone computer, the JR&A Test Scoring System is also designed to run on a network in a client server environment.
Internet Security Software Compatibility
The JR&A Test Scoring System has been tested with the following products:
• Microsoft Windows XP Firewall
• Microsoft Vista Firewall
• Symantec Norton Internet Security Suite
In some cases it might be necessary to adjust settings in these products to ensure the best possible performance with the Test Scoring System. If you think that you are experiencing a conflict between the Test Scoring System and your Internet Security Software, please contact Johnson, Roberts and Associates.
4
Chapter 3 Installing the JR&A Test Scoring System
The JR&A Test Scoring System software can be downloaded and installed, at no charge, from the JR&A website.
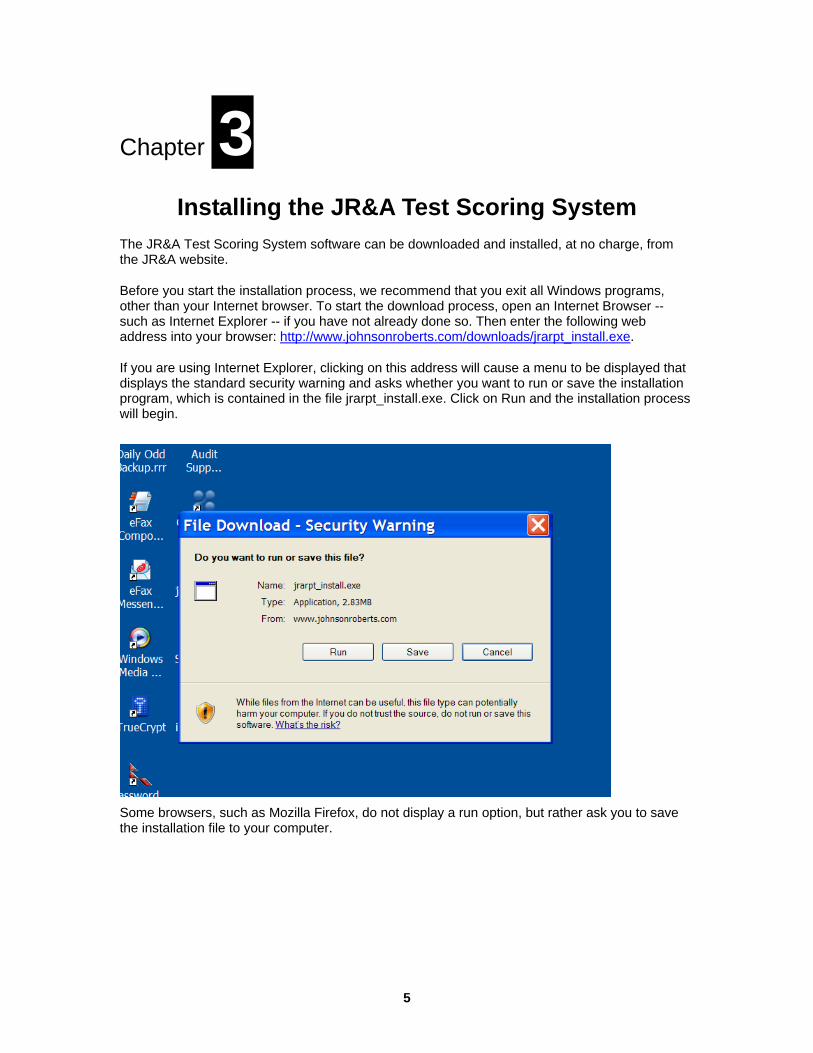
Before you start the installation process, we recommend that you exit all Windows programs, other than your Internet browser. To start the download process, open an Internet Browser -- such as Internet Explorer -- if you have not already done so. Then enter the following web address into your browser: http://www.johnsonroberts.com/downloads/jrarpt_install.exe.
If you are using Internet Explorer, clicking on this address will cause a menu to be displayed that displays the standard security warning and asks whether you want to run or save the installation program, which is contained in the file jrarpt_install.exe. Click on Run and the installation process will begin.
Some browsers, such as Mozilla Firefox, do not display a run option, but rather ask you to save the installation file to your computer.
5
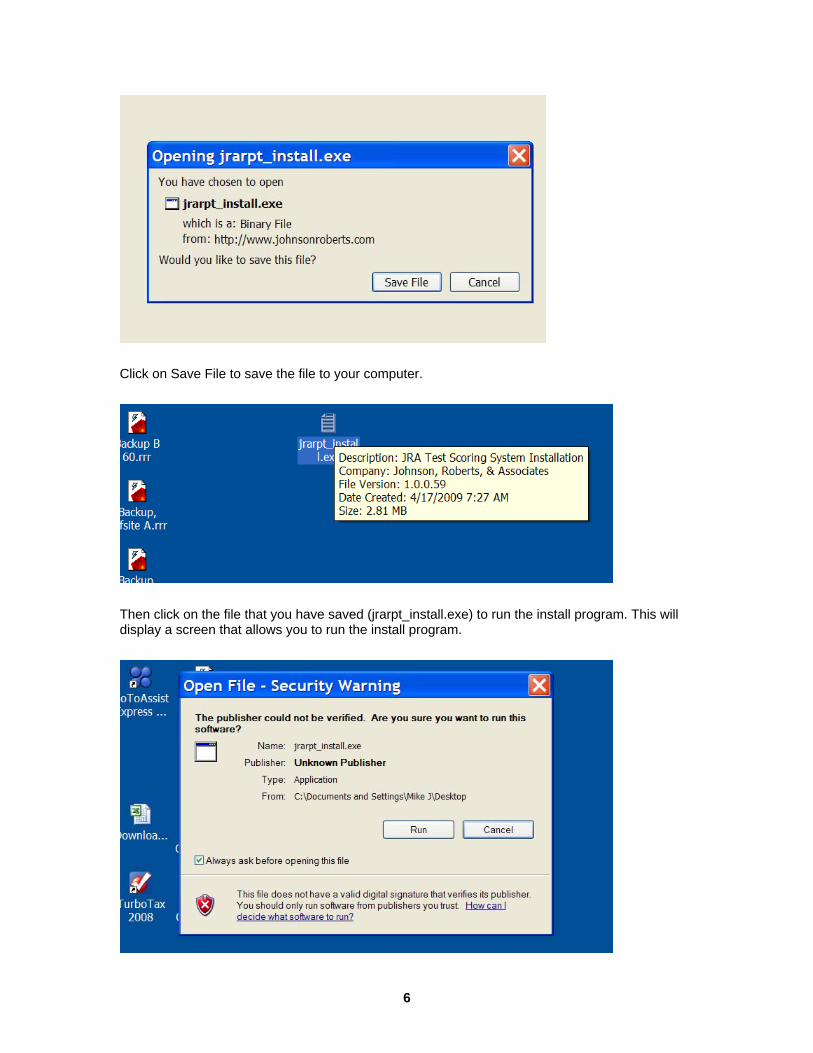
Click on Save File to save the file to your computer.
Then click on the file that you have saved (jrarpt_install.exe) to run the install program. This will display a screen that allows you to run the install program.
6

Click on Run to start the installation process.
The first step in the installation process is a welcome screen, which will remind you to exit all Windows programs. If you have not already done this, you may wish to click Cancel to cancel the installation process, exit all Windows program, and then start the installation process again. Otherwise click Continue to continue the installation process.
The first thing that the installation process will do is check your system for the presence of the supplemental software required for the JR&A Test Scoring System to work properly -- Microsoft .NET, Microsoft SQL Server Express, and Swiftview -- as described in Chapter 2. If any of these programs are missing from your system, they will be installed automatically, with no actions required of you.
Then the installation process will install the JR&A Test Scoring System software. For this, there are some options that you can choose to implement.
First, there is a screen that allows you to omit the installation of certain system components. The following system components can be omitted:
• the JR&A database
• the Swiftview software
• selected custom format files
Ordinarily, you should not omit any of these components.
7

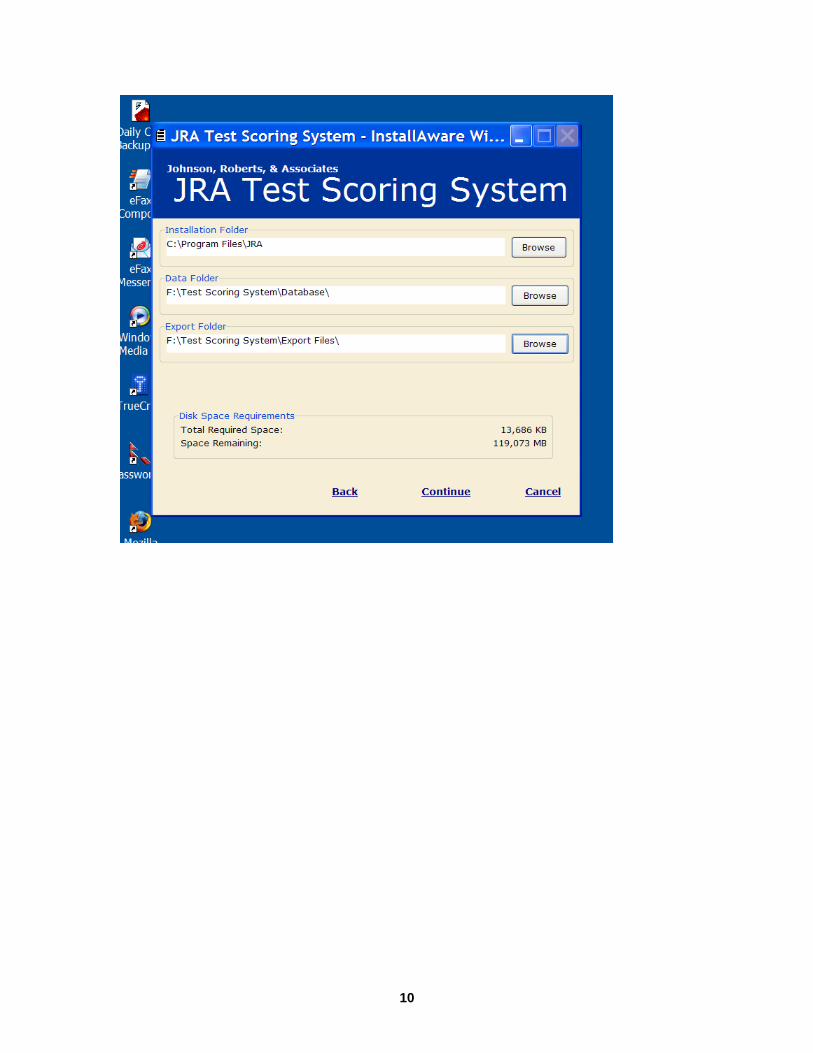
You can also select non-standard folders for various sets of files, namely (a) the Test Scoring System program files, (b) the Test Scoring System database files, and (c) files exported by the Test Scoring system, such as files containing test data or reports. (One situation in which you may want to use non-standard folder locations is if you keep the Test Scoring System database and exported files in an encrypted drive, other than the C: drive.) Selection of non-standard folders can be done using the folder options screen illustrated below.
8
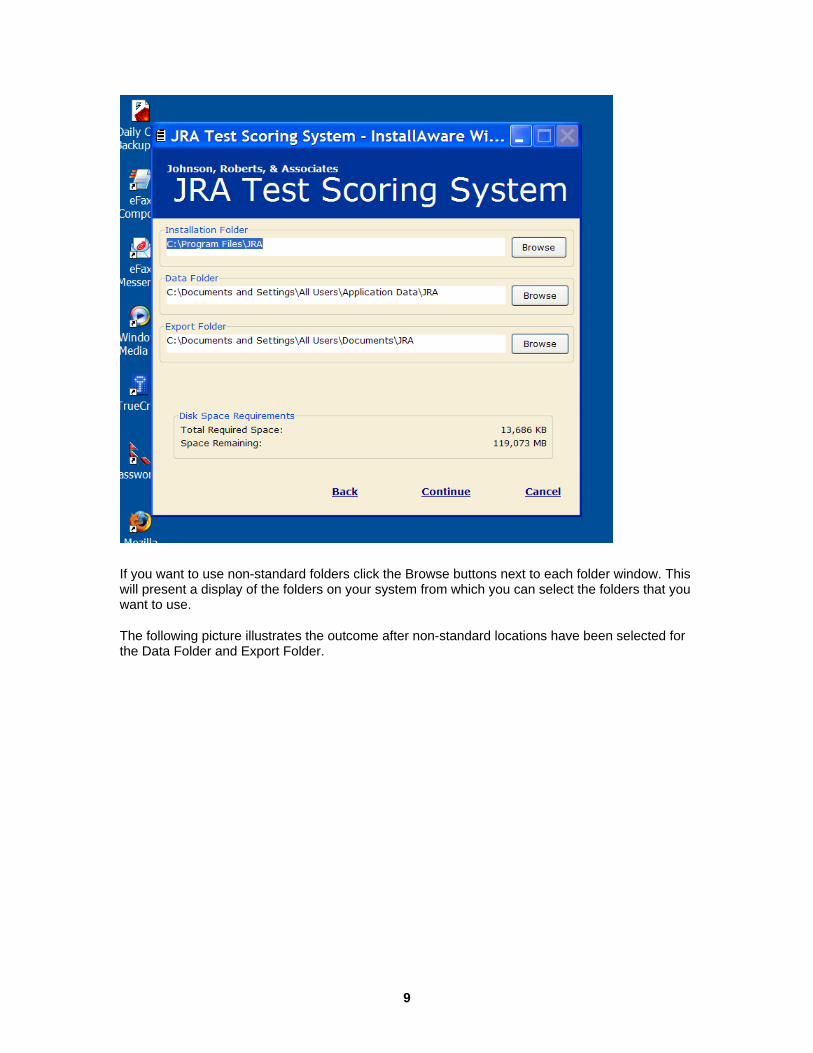
If you want to use non-standard folders click the Browse buttons next to each folder window. This will present a display of the folders on your system from which you can select the folders that you want to use.
The following picture illustrates the outcome after non-standard locations have been selected for the Data Folder and Export Folder.
9
10

Chapter 4 Starting and Ending the Program
To start the Test Scoring System from the Windows Start menu, do the following:
• Click the Start button on the Windows taskbar, in the lower left hand corner of the screen.
• Select Programs from the Start menu.
• Select JRA Test Scoring System on the continuation menu. This will display the program login window.
• Enter your User ID and Password in the JR&A Login window, then click OK. This will display the main screen of the Test Scoring System.
Note: Before you can use the software for the first time, you need to contact JR&A and establish a User ID and password. The password can be changed after the first time you use the software.
When the program begins, you will see the main screen of the Test Scoring System, which contains the Data Viewer and the primary commands and menus of the Test Scoring System
11

To end the Test Scoring System, click on the red X in the upper right hand corner of the main screen.
Reset Button
The Reset button in the Login window is used for the (relatively rare) situation in which you have installed the Test Scoring System on two or more computers and used the Test Scoring System on one of these computers to change the login password. (Changing the password is discussed in Chapter 9 of the User Guide.)
If you have changed the password on one computer and then attempt to log into the Test Scoring System on a different computer, the new password will not work, because the Test Scoring System on this different computer does not yet know about the changed password. Pressing the Reset button causes the Test Scoring System to connect to the JR&A website, which will download the new password to the different computer and allow the new password to be used for logging in. (Note that the Reset button will only work if you are logged into the Internet. Note, too, that once you have used the Reset button to update the password on a computer, you will need to know the new password in order to log in.)
If you press the Reset button when the password has not been changed, nothing will happen.
12

Chapter 5 Data Collection
In This Chapter • Overview
• Scanning test answer sheets
• Inputting previously collected test data files
• Downloading test data collected on the Internet
Overview
The first step in producing psychological test reports is to collect data containing the responses that test takers have made to one or more tests. Test data can be collected either by scanning paper and pencil answer sheets, downloading data obtained from online testing, or inputting data files that have prepared previously.
Scanning Test Answer Sheets
Scanning test answer sheets involves several steps, as described below.
Step 1 – Turn on the scanner
Turn on the scanner, using the switch on the back of the scanner.
If you scan tests several times a day, it may be convenient to leave the scanner turned on between scanning sessions.
Step 2 – Start the JR&A test scanning software
From the main menu, click File. From the continuation menu, click Scan Test Answer Sheets, as shown below
13

Step 3 – Complete the Scan Test Answer Sheets Window
Before you start scanning, you must complete the Scan Test Answer Sheets window, in order to provide information about the answer sheets that will be scanned.
First, you need to indicate whether you want to read the agency code from the scanned answer sheets, or to assign the same agency code to each answer sheet read, regardless of what is on the answer sheet. If you want to read the agency code from the scanned answer sheet, click the box next to that option.
If all of the answer sheets are from the same agency, it is best to assign the same agency code to each answer sheet so that any errors or omissions in completing the agency code on the answer sheet are ignored. To assign the agency code to use for this purpose, click on the drop down
14

menu in the Agency window, then click on the name of the agency for which the testing was done.
If the name of the agency for which the testing was done is not included in the drop down menu, you may need to add the agency name to the drop down list. This can be done using the Agency Codes tools, which are discussed in Chapter 9.
Next you should specify a name for the batch of answer sheets you are scanning. This can be anything that helps identify the batch, such as "Academy 202 Applicants". If you don't enter anything in the window, the default batch name will be the date and time on which the scanning is done. If you have already specified the agency for which the testing was done, knowing the date and time is often a useful and sufficient way to identify the batch.
Finally, you should specify the set of test answer sheets that you will be scanning, by checking the box next to the name of each test to be included in the scanning session. Later, after the data is scanned, the Data Editor tool will check to see that all tests in the set have been scanned for each test taker, and that the identification information for each test taker (name, social security number, etc.) is consistent across all of the tests in the set. The Data Editor is discussed later, in Chapter 6.
When you have finished completing the Scan Test Answer Sheets window, it will look something like the figure below.
15
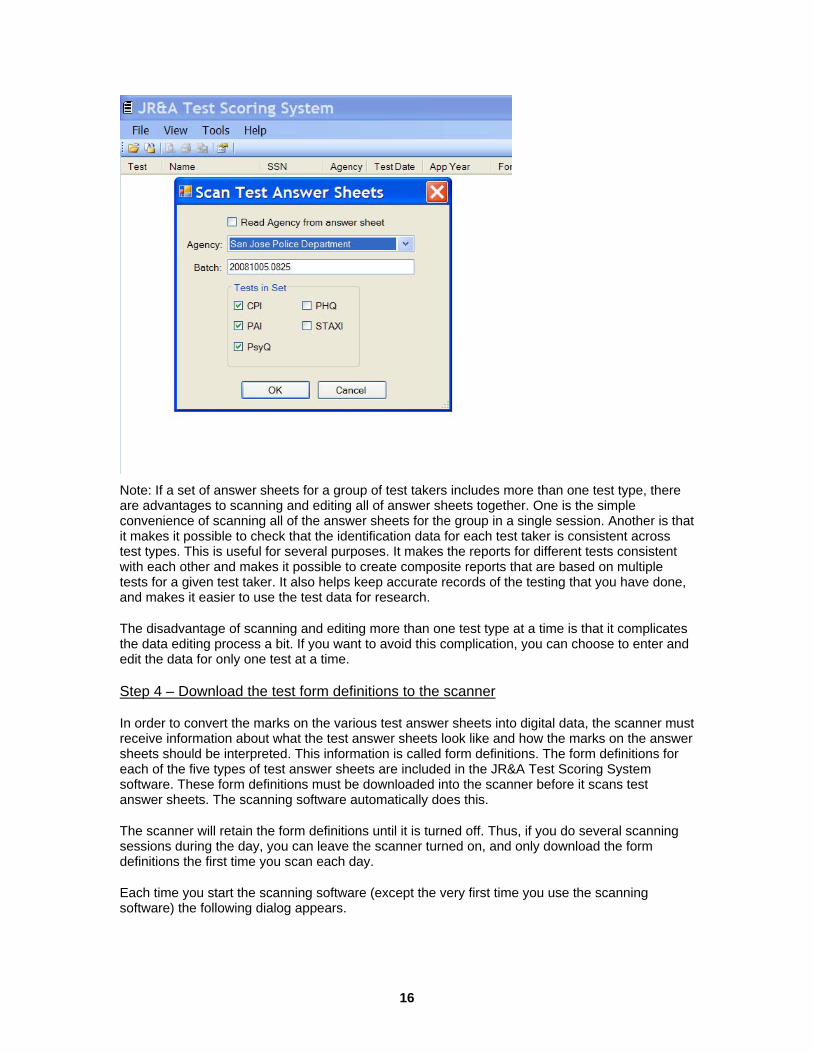
Note: If a set of answer sheets for a group of test takers includes more than one test type, there are advantages to scanning and editing all of answer sheets together. One is the simple convenience of scanning all of the answer sheets for the group in a single session. Another is that it makes it possible to check that the identification data for each test taker is consistent across test types. This is useful for several purposes. It makes the reports for different tests consistent with each other and makes it possible to create composite reports that are based on multiple tests for a given test taker. It also helps keep accurate records of the testing that you have done, and makes it easier to use the test data for research.
The disadvantage of scanning and editing more than one test type at a time is that it complicates the data editing process a bit. If you want to avoid this complication, you can choose to enter and edit the data for only one test at a time.
Step 4 – Download the test form definitions to the scanner
In order to convert the marks on the various test answer sheets into digital data, the scanner must receive information about what the test answer sheets look like and how the marks on the answer sheets should be interpreted. This information is called form definitions. The form definitions for each of the five types of test answer sheets are included in the JR&A Test Scoring System software. These form definitions must be downloaded into the scanner before it scans test answer sheets. The scanning software automatically does this.
The scanner will retain the form definitions until it is turned off. Thus, if you do several scanning sessions during the day, you can leave the scanner turned on, and only download the form definitions the first time you scan each day.
Each time you start the scanning software (except the very first time you use the scanning software) the following dialog appears.
16

You should click on Yes if you have not downloaded form definitions since last turning the scanner on. If you have downloaded form definitions since last turning the scanner on, you may click No to skip the downloading step (which takes 20-30 seconds).
If you clicked Yes in the above step, the scanning software will now load the form definitions to the scanner. While this is going on, a progress dialog appears on the screen, listing the names of the form definitions that are being downloaded. It will look something like this:
Note: The very first time you use the scanning software, the above progress screen appears immediately, and downloading commences.
Step 5 – Feed answer sheets into the scanner
When the form definitions finish loading (or if you skip the loading step), a window will appear instructing you to feed the answer sheets into the scanner.
Feed the test sheets through the scanner. As the answer sheets are fed through the scanner, the screen will display messages describing the answer sheets that are being read.
When all the sheets have been fed through the scanner, press the End button on the scanner. (On most Scantron models, the End button is labeled "End", but on some models it is an unlabeled blue button.) When you press the End button, the data will be entered into the Data Editor, which you can use to edit any errors and omissions that exist in the scanned data. (The Data Editor is discussed in Chapter 6 of this User Guide.)
17

You may cancel a scanning session by clicking on CANCEL. You may wish to do this if you discover that you are inadvertently scanning tests that have already been scanned, or if the scanner is malfunctioning in some way.
Inputting previously collected test data files
If you wish to re-process data originally collected by another user (as part of a research study, for example), or to re-process data that was originally collected using the previous version of the Test Scoring System, it is possible to do this, using the File -> Open Test Data Files command.
This command will bring up the Open Test Data File(s) window, as shown below. This window looks and operates just like the Scan Test Answer Sheets window described above, in the previous section of this chapter.
Once you have completed the information in this window, and clicked OK, you will be presented with a window that allows you to select the data files that you wish to open.
18

After you have selected the data files you wish to process, clicking on Open, will enter the data from the selected files into the Data Editor. (The Data Editor is discussed in Chapter 6 of this User Guide.)
Downloading test data collected on the Internet
As an alternative to collecting test responses using scannable paper and pencil answer sheets, tests can be administered on the Internet. Applicants view the questions and enter their answers on a computer screen, and the data is stored in the JR&A web site. (Currently, among the tests that are processed by the JR&A Test Scoring System, the only test for which online data collection is possible is the Personal History Questionnaire. Online data collection for other tests will be added in the future.)
Once test data has been collected online, it can be downloaded to the Test Scoring System. To do this, use the File -> Download Online Test Data command, as illustrated below.
19
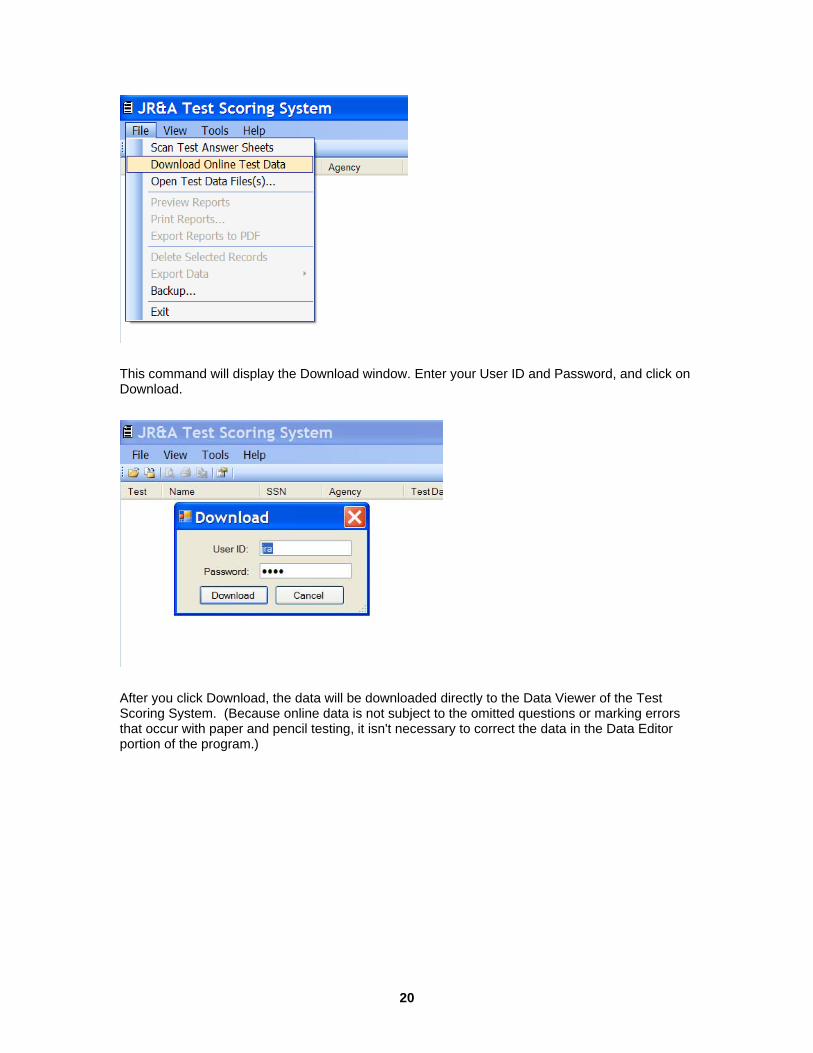
This command will display the Download window. Enter your User ID and Password, and click on Download.
After you click Download, the data will be downloaded directly to the Data Viewer of the Test Scoring System. (Because online data is not subject to the omitted questions or marking errors that occur with paper and pencil testing, it isn't necessary to correct the data in the Data Editor portion of the program.)
20
Chapter 6 The Data Editor
In This Chapter • Overview
• The Data Editor Grid
• Merging Test Sets
• The Test Set Editor
• Editing Test Taker ID Variables (Page 1)
• Editing Test Item Variables (Page 2)
• Saving Edited Data
Overview
The Data Editor allows you to examine test data that has been collected, to identify errors in the test data, and to correct those errors (to the extent that it is possible to do so) before the data is saved to the Test Scoring System database and made available for creating reports and other processing.
When a group of test takers has taken multiple tests at the same time -- such as the CPI, PAI, and PsyQ -- the Data Editor allows you to determine whether each test taker has data for each test that has been administered, and whether the identification information for each test taker (name, social security number, etc.) is consistent across all of the tests in the test set. If inconsistencies are discovered, the Data Editor allows you to correct them.
The Data Editor also allows you to identify and correct errors in the responses to the test items for each test.
The Data Editor Grid
When a batch of test data has been collected for one or more tests, the Data Editor displays information about the test data in a grid, like a spreadsheet, that indicates which tests have been taken by each test taker, and whether the test data contains errors.
The Data Editor tries to match all of the test data for each test taker and summarize it in a single row of the grid. Sometimes, however, if the test taker does not provide consistent ID information (SSN, agency code, and test date) along with each test, the matching cannot be done, and the test data for the test taker may be listed on more than one row of the grid.
The Data Editor Grid shown below contains data for several applicants who have completed the CPI, PAI, and PsyQ.
21

The variables used to describe the information in the Data Editor Grid are described below:
• Name
The test taker's name (Last Name, First Name, Middle Initial).
• SSN
The test taker's social security number.
• Agency
The 5 digit code of the agency for which the test was taken.
• Batch
The collective label given to a set of test data records that have been entered into the Test Scoring System, for a group of test takers.
You assign the batch label at the time you enter the data into the Test Scoring System (either by scanning test answer sheets, opening an existing raw data file, or preparing an online testing session).
• Save
A coded indicator of whether the test taker's data, as represented in the row of the Data Editor, is sufficiently complete and consistent that it should be saved to the Data Viewer of the Test Scoring System, and used to create reports. If the data is satisfactory, the cell in the Save column will contain "OK". If not, the cell will contain "X". An OK in this cell requires that (a) all tests that were administered in the batch are represented in the row, and (b) you have reviewed all errors and mismatches, made whatever corrections you could, and accepted any errors and mismatches that remain. (Acceptance is indicated by clicking the Accept button in the Test Set Editor, as described below).
• Match
A coded indicator of whether a specified group of user identification variables -- which are listed in the Test Set Editor, as described below -- have the same values for every test completed by the test taker. If these conditions are met, the cell in the Match column will contain "OK". If these conditions are not met, but you have accepted the mismatches that remain after you have edited the data, the cell will contain "OK*". Otherwise the cell will contain "X".
22

• CPI, PAI, STAXI, PHQ, PsyQ (The Data Editor Grid contains a separate column for each of the five tests)
A coded indicator of whether the test represented by the column has been completed by the test taker, and, if so, whether any of the test item values contain errors. If the item values for a test contained no errors, or if all errors have been corrected, the cell contains "OK". If the item values for a test contain errors that have not been corrected by editing, but you have accepted the errors that remain, the cell will contain "OK*". If the item values for a test contain errors that have not been corrected or accepted, the cell will contain "X". If a test in the test set has not been completed by the test taker, the cell will contain "--". If the test is not included in the set of tests that were administered in the batch, the cell will be blank.
In the data editor grid shown in the figure above, only one of the unedited test sets -- for applicant "George FFFFFFF" -- is ready to be saved without editing, as indicated by the OK in the Save column.
The grid shows that the data for the first applicant listed -- Matthew AAAAAAAAA -- has some identification variables that do not match for all of the tests, as indicated by the X in the Match column. The data also contains errors in the CPI and PsyQ, as indicated by the X in columns for those two tests.
Merging Test Sets
The Data Editor tries to match all of the test data for each test taker and summarize it in a single row of the grid. Data records are assigned to the same row if they have the same social security number and agency code, and if the test dates are within one year of each other. (If the test dates are not valid, they are ignored for the purpose of matching.)
If the test taker does not provide consistent matching information (SSN, agency code, and test date) along with each test, his test records cannot be matched, and the test data for the test taker will be listed on more than one row of the grid. In such cases additional steps can be taken to merge the data records.
One option is to merge the records manually. This requires that you identify records that you think should be merged. For example, the Data Editor Grid shown in the figure above contains two rows for the last test taker, Jason GGGGGG. The first row contains data for the PAI, but is missing data for the CPI and PsyQ. The second row contains data for the CPI and PsyQ, but is missing data for the PAI.
The screen shows two rows with the same test taker name each of which has a test missing. This kind of situation can be identified by sorting the rows by test taker name, which is done by clicking on the top of the name column.
Looking at the information in the two rows, it is apparent that the two rows were not combined automatically by the Data Editor because the social security number for the PAI does not agree with social security number for the CPI and PsyQ. In such a case the two records can be manually merged after which the invalid social security number can be corrected.
To merge two or more rows in the Data Editor grid, you need to highlight the rows to be merged, then click on the Manual Merge command.
23
After merging, the records will be listed in the same row of the Data Editor grid, as shown below:
Once the test records are merged, you should do whatever additional editing is required in order to eliminate any other errors or mismatches in the data records.
Note that if the social security number is valid for one test but not for the other, the Data Editor will automatically assign the valid social security number to both tests. If for some reason you do not think that the value assigned is appropriate, you are free to change it by entering a different value in the bottom row of the Test Set screen. (Editing with the Test Set screen will be discussed below.)
Another option for merging rows with missing tests is to use the Automatic Merge command. The Automatic Merge command locates rows to merge using variations of the following search methodology:
• Gather all rows that have an invalid social security number (with missing digits) and at least one missing test.
• To find a match for the first row on the list, look through all other rows for a social security number that matches a social security number in the first row. For instance 123-12-1234 would match the invalid 123-12-?234.
• If a match is found, describe the rows to be matched and ask the user whether or not to carry out the merge.
24
If you merge rows using the Automatic Merge command, the row with the valid social security number becomes the "master" row. In case the values of other variables disagree among the merged tests, the value of the "master" row is assigned to data record for all of the tests. (This assignment can be changed in the Test Set Editor.)
If the first merging procedure doesn't find matches for all of the rows with missing tests, the search is repeated, using last name, rather than social security number, as the matching variable.
If the second merging procedure doesn't find matches for all of the rows with missing tests, the search is repeated again, using first name as the matching variable.
The Test Set Editor
Any row in the Data Editor grid that does not have "OK" in the Save column needs to be edited -- in order to review and correct, if possible, the errors and mismatches that exist -- before the data is saved to the Test Scoring System database, and used for creating test reports. The editing is done in the Test Set Editor. Only one row of the Data Editor grid can be edited at a time.
To use the Test Set Editor, select the row of the grid that you want to edit, then either (a) double click on the row or (b) click Edit on the Data Editor menu.
25
Editing Test Taker ID Variables (Page 1)
The main screen of the Test Set Editor contains a set of variable values for each test that was taken by the test taker. In addition, the Test Set Editor also contains a "consensus" set of variable values that will apply to all of the tests when the data is saved.
The variables are called Page 1 variables, because the variables reflect information entered by the test taker on the front page of the answer sheet for each test. The Page 1 variables are listed below. Variables listed with an asterisk are coded values, which are edited using a drop down menu.
• Agency Code
• First Name
• Last Name
• MI
• Social Security Number
• Age
• Test Date (mm/dd/yyyy)
• Sex*
• Height
• Serial Number (from the answer sheet used to collect the test data)
• Ethnicity*
26

• Job Category*
• Education*
The Data Editor tool will identify any errors, missing values, or inconsistencies in these variables and allow you to correct them. Errors or missing values are identified with red characters. Inconsistencies in values over the different tests are identified with blue characters.
If all of the tests taken already have the same value for a variable, the Data Editor automatically inserts that value as the consensus value. If the tests do not already have the same value for a variable, you can select one of the values -- or a new value if this seems appropriate -- as the consensus value. If none of the tests have a value for a variable, you can specify a consensus value or leave the consensus value blank.
You can correct any errors or mismatches that exist, either by filling in an open window, or selecting a value from a drop down menu, depending on the variable that is being corrected. With one exception, the corrected value will be entered in the consensus cell for that variable. The exception is the test date, which is allowed to be edited with different values, because it is possible that the test taker could have taken different tests on different dates.
Once you have corrected any errors that exist in the Page 1 variables, you should correct any errors that exit in the Page 2 variables, as discussed below.
Editing Test Item Variables (Page 2)
The Data Editor also allows you to identify and correct errors in the responses to the test items. The test items are called Page 2 variables, because they are located on the second page of the answer sheet for each test.
For each test that is represented in the Test Set Editor there is a Page 2 button, which indicates the status of the Page 2 test items for that test. If the letters on the button are black, the test items do not contain errors. If the letters on the button are red, the test items do contain errors, and need to be edited.
The Test Set screen shown above, for applicant Matthew AAAAAAAA contains Page 2 errors for the CPI and PsyQ, as indicated by the red Page 2 buttons in the rows for these tests.
If you click on a red Page 2 button, you will see a list of the test items that have errors.
27
Test item errors from scanned data are of two types: multiple marks or no marks at all. Multiple marks are usually caused by incomplete erasures. Unmarked items are usually the result of the test taker not marking the item, but sometimes the item is marked too faintly to be read by the scanner, but sufficiently clearly to be read by the person doing the data editing.
For each item that is listed as having an error, you need to check the test answer sheet to determine whether the answer for the item is present and unambiguous. If the answer is present, and the test taker's intent is clear, you can correct the error by clicking on the correct response for
28

the item. Otherwise, you will need to leave the error uncorrected. The figure below indicates that the responses to questions 88 and 242 were corrected, while the responses to the other questions that contained errors were not corrected.
If you change your mind about an item correction you have made, you can either click on a different response for the item, or you can clear the response selection for the item by clicking on the item number.
If you are curious to see all of the test item responses for a test, click the Show All button in the lower right corner of the screen.
A screen like the one shown below will appear.
29
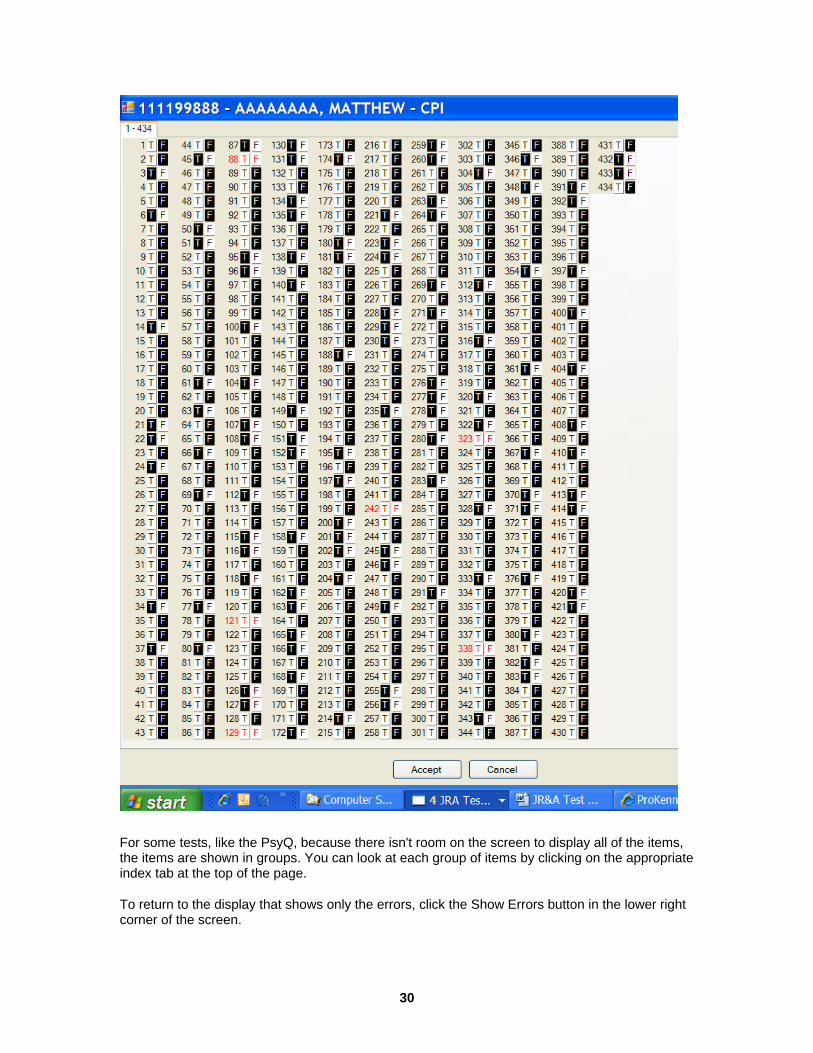
For some tests, like the PsyQ, because there isn't room on the screen to display all of the items, the items are shown in groups. You can look at each group of items by clicking on the appropriate index tab at the top of the page.
To return to the display that shows only the errors, click the Show Errors button in the lower right corner of the screen.
30

Once you have corrected all of the data errors that you are able to correct, clicking Accept on the bottom of the screen will save these corrections and return you to the Test Set page. Clicking Cancel will cancel any corrections you have made and also return you to the Test Set page.
Once you return to the Test Set page, the lettering on the Page 1 button will reflect the effects of your editing, in the following ways:
• If you have corrected all of the errors, and return to the Test Set page by clicking the Accept button, the lettering on the Page 1 button will be changed to black.
• If there were some errors that you were not able to correct, but you click the Accept button, indicating that you are satisfied that you have corrected as many errors as possible, the lettering on the Page 1 button will still be red, but the background of the button will be black, .
• If you return to the Test Set page by clicking the Cancel button, the lettering on the Page 1 button will still be red.
31
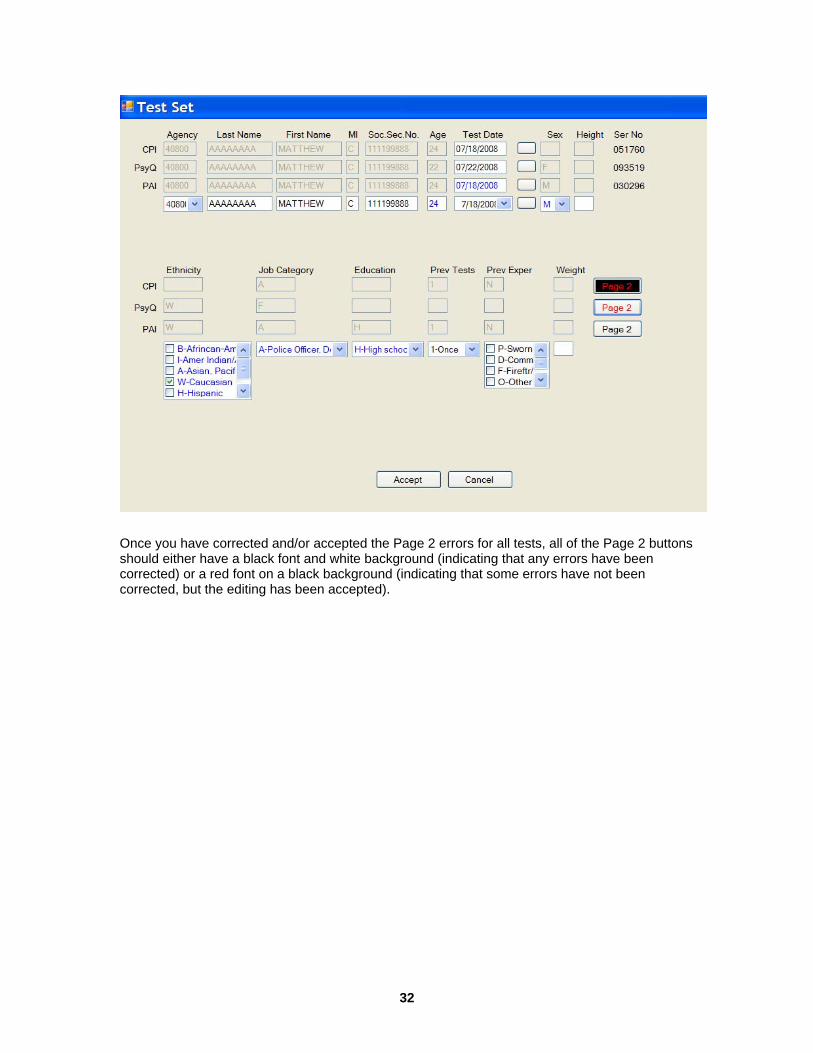
Once you have corrected and/or accepted the Page 2 errors for all tests, all of the Page 2 buttons should either have a black font and white background (indicating that any errors have been corrected) or a red font on a black background (indicating that some errors have not been corrected, but the editing has been accepted).
32

Once you have corrected all of the errors that you are able to correct, clicking the Accept button will save your changes and return you to the Test Set page. Clicking the Cancel button will return you to the Test Set page without saving your changes.
After you have corrected any errors or mismatches that you are able to correct in the Page 1 and Page 2 variables, given the information that you have available, you can press Accept to accept the edited version of the test data for the test taker. Once the data for the test is accepted, the Test Set is closed. If the Test is reopened, the word "Accepted" is listed below the Page 1 and Page 2 buttons.
Saving Edited Data
Once you have edited all of the test data records to your satisfaction, the Data Editor Grid should contain "OK" in the Save column for all test takers, as illustrated in the figure below.
33

You are now ready to save the edited data to the system database. The data will be displayed on the Data Viewer, where it can be used to create test reports.
There are two commands that can be used to save the edited data. One command, Save OK Test Sets, saves all test sets in the Data Editor Grid that have an OK in the Save column, which means that (a) all tests that were administered in the batch are represented in the row, and (b) you have reviewed all errors and mismatches, made whatever corrections you could, and have accepted any errors and mismatches that remain. The other command, Save Selected Test Sets, saves any test sets in the Data Editor that you have selected (which will be highlighted). This command is ordinarily used if you want to save test data sets for which all errors have not been corrected or accepted.
Once you have selected one of the commands, you will be asked to confirm your choice.
34

Saving PHQ and PsyQ Data For Custom reports
There are a number of custom PHQ and PsyQ reports that have been developed for particular agencies, and for other specialized purposes. Selecting a custom PHQ or PsyQ report is done using the Options tool of the Test Scoring System, which is discussed in section 9 of this manual.
If you are saving PHQ or PsyQ data, and intend to create custom reports with this data, it is important that you select the custom report with the Options tool before you save the PHQ or PsyQ data files to the Data Viewer. Once the data is saved to the data viewer, it is no longer possible to create a custom report with this set of data. (This limitation of the Test Scoring System will be changed in a later release.)
When you save PHQ or PsyQ data to the Data Viewer, there is a warning message that will remind you of this requirement. If you do not intend to create custom PHQ or PsyQ reports, you can ignore the warning message.
Note: If you plan to create a custom PHQ or PsyQ report, and -- despite the warning message -- you have saved PHQ or PsyQ data to the Data Viewer without previously selecting the desired report with the Options command, you can correct the situation with the following actions:
• Export the PHQ or PSYQ data to a file, using the File/Export Data command (which is discussed in Chapter 10 of this User Guide)
• Delete the PHQ or PSYQ data from the Test Scoring System, using the File/Delete Selected Records command (which is discussed in Chapter 10 of this User Guide)
• Select the custom report that you intend to use, using the Options tool (which is discussed in Chapter 9 of this User Guide)
• Reenter the PHQ or PSYQ data using the File/Open Test Data File(s) command (which is discussed in Chapter 5 of this User Guide). Re-editing of the data should not be necessary, because all of the corrections previously made with the Data Editor will still be present in the data.
35

Chapter 7 The Data Viewer
In This Chapter • Overview
• Information Displayed
• Sorting Records
• Selecting Records
• Clearing Records
• Retrieving Records From The Database
Overview
When test data is saved from the Data Editor, it is entered into the Test Scoring System database, and displayed in the Data Viewer.
The Data Viewer is used to view, sort, and select test data records for creating reports and doing other processing.
When you finish processing a set of test data, you can clear it from the Data Viewer and archive it in the database. If some or all of the data is needed later for processing, you can retrieve it selectively from the database and display it again in the Data Viewer.
Information Displayed
The Data Viewer displays data records in a grid, like a spreadsheet. The data records are displayed in rows, with variables that describe the data records in the columns.
36

The column variables are listed and described below:
• Test
The type of test data -- CPI, PAI, STAXI, PsyQ, or PHQ -- contained in the data record.
• Name
The test taker's name (Last Name, First Name, Middle Initial).
• SSN
The test taker's social security number
• Agency
The agency for which the test was taken.
• Test Date
The date (mm/dd/yyyy) on which the test was taken
• App Year
The year (yyyy) in which the testing began. If the test taker has taken several tests on different dates, it is the year in which the first test was taken.
• Form #
If the test was taken on an OMR answer sheet, the Form # is the sequential serial number on that answer sheet.
• Report Date
The first date (mm/dd/yyyy) on which a test report was created from the data in the data record.
• Config File
If the test is a PHQ or PsyQ, the name of the configuration file that was used to design the test report. (Among other things, the configuration file determines which test responses are considered to be grounds for disqualification and how many problem points, if any, are assigned to each test response).
• Batch
37
The collective label given to a group of data records that are entered into the Test Scoring System together. (The label is assigned by the software user who is entering the data.)
• Previewed
Whether or not a test report has been previewed, by being displayed on screen.
• Printed
Whether or not a test report has been printed.
• Exported
Whether or not a test report has been exported to a pdf file.
Selecting Records
All reports and other outputs produced by the Test Scoring System require selecting a set of test data records in the Data Viewer and then issuing commands that act on that selected set of data records. For example, to print reports for a particular set of data records, you must first select that set of data records, then issue the Print command.
There are several ways to select particular sets of data records.
One way is to use standard Windows click operations. To click a single data record, left click on that data record. To click on a sequential series of data records, click on the first record in the series, then hold down the Shift key and click on the last record in the series. To select non-sequential groups of data records, hold down the Ctrl key and click on the individual data records that you want to select.
There are also several system commands that can be used to select records. These commands are located in the View/Select Records menu. The Select All command selects all of the records in the Data Viewer. The Unselect All command causes none of the records in the Data Viewer to be selected. The Invert Selections command reverses the selections; i.e., it unselects the records that had been selected and selects the records that had not been selected.
Sorting Records
To simplify selecting the test data records that you want to process, or to organize the reports and other outputs that you produce, it is sometimes helpful to sort the test data records.
The data records in the Data Viewer may be sorted on the basis of any of the column variables, simply by clicking on the column heading. For example, to sort the records alphabetically, on the basis of the test takers' names, click on the top of the Name column.
Clearing Records
When you have finished processing a set of test data records, you will usually want to clear them from the Data Viewer so that you can focus on records that you have not yet processed.
If you want to clear all records from the Data Viewer, use the View/Clear All Records command. If you want to clear selected records from the Data Viewer, select the records that you wish to clear, then use the View/Clear Selected Records command.
38
Note that when records are cleared from the Data Viewer, they are not deleted. Rather they are retained in the Test Scoring System database, from which they can be retrieved if needed again later.
Retrieving Records From The Database
When data records are entered into the Test Scoring System, they are stored in the system database, where they remain unless they are deleted from the system. (Deleting data records is discussed in Chapter 10 of this User Guide.) Clearing records from the Data Viewer does not remove them from the database.
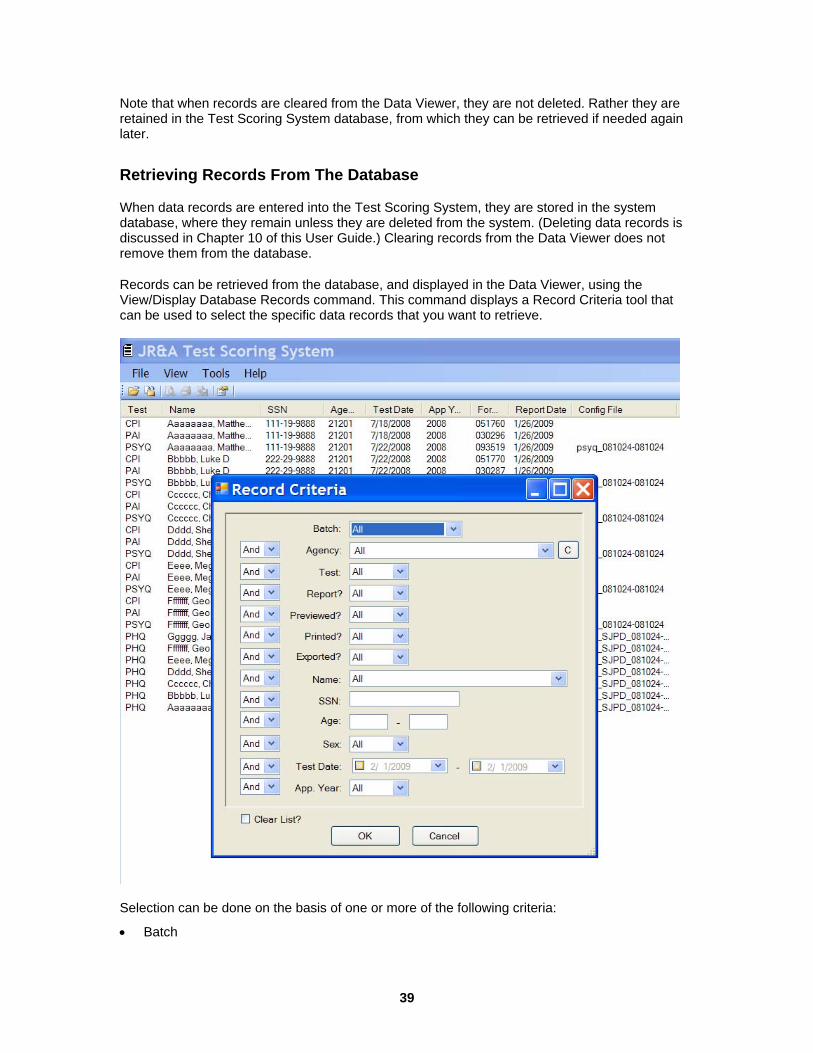
Records can be retrieved from the database, and displayed in the Data Viewer, using the View/Display Database Records command. This command displays a Record Criteria tool that can be used to select the specific data records that you want to retrieve.
Selection can be done on the basis of one or more of the following criteria:
• Batch
39
• Agency (the agency for which the test data was collected)
• Test (the type of test; CPI, PAI, etc.)
• Report? (whether a report based on the data record has been created)
• Previewed? (whether a report based on the data record has been previewed)
• Printed? (whether a report based on the data record has been printed)
• Exported? (whether a report based on the data record has been exported)
• Name
• SSN
• Age
• Sex
• Test Date (either a single date or a range of dates)
• App Year (the year in which an individual began taking tests for a particular agency)
Any selection criterion that is specified can be used on either an "And" or an "Or" basis. If several criteria are specified on an "And" basis, a data record will be selected only if it meets all of them. If several criteria are specified on an "Or" basis, a data record will be selected if it meets any one of them.
You can specify only one value for any criterion. For example, you can specify only one Test type. If you want to select records with two or more values of a criterion, you need to run the selection routine more than once. For example, if you wanted to select all PAI and CPI records, you could first select all PAI records, then run the selection routine again and select all CPI records.
When you specify the selection criteria and click OK at the bottom of the page, the records you have selected will be displayed in the Data Viewer.
When you retrieve records from the database you have a choice about what do with any records that are already in the Data Viewer. Ordinarily, the records that you select will be added to any records that are already in the Data Viewer. If you check the Clear List? option, however, the data records that are already in the Data Viewer will be cleared before the new records are added.
40
Chapter 8 Test Reports
In This Chapter • Overview
• Previewing Reports
• Printing Reports
• Exporting Reports To PDF Files
• Report Authorizations
• Reports With Different Versions
• Exporting Summary Report Statistics
• Summary Reports For Multiple Test Takers
Overview
The fundamental purpose of the Test Scoring System is to create reports based on the test data that has been collected. Once the data has been edited, saved into the system database, and displayed in the Data Viewer, creating reports is a straightforward process, consisting of the following steps:
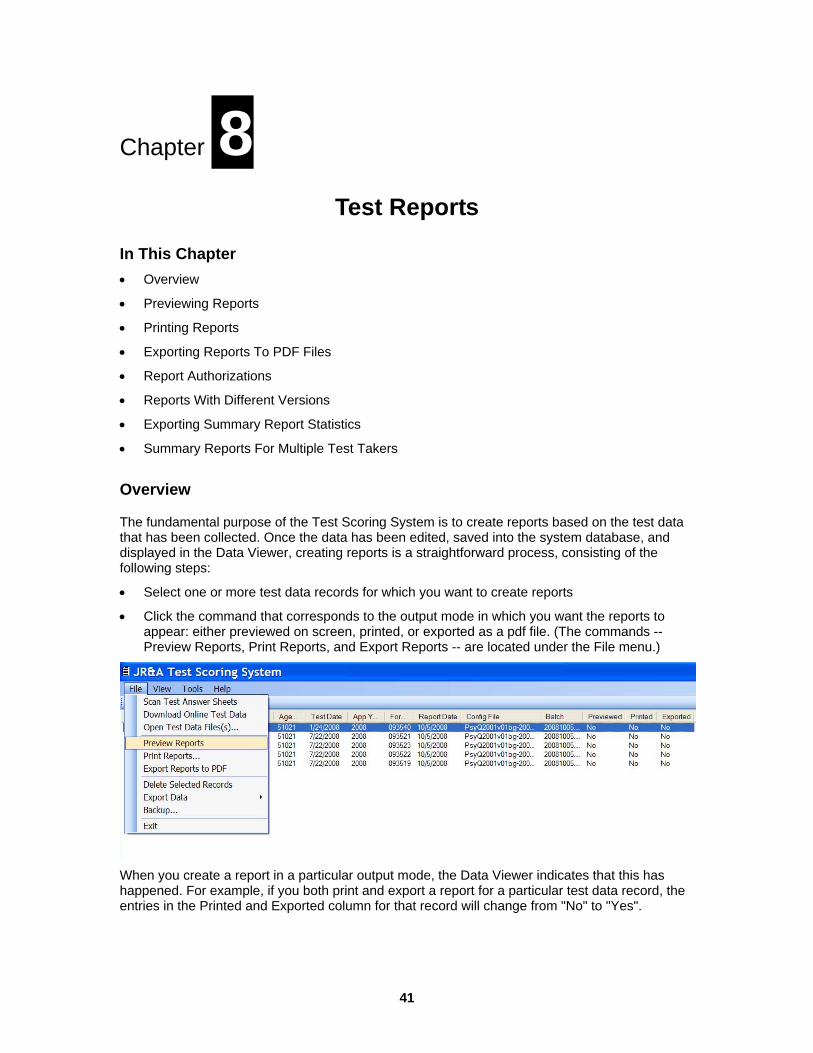
• Select one or more test data records for which you want to create reports
• Click the command that corresponds to the output mode in which you want the reports to appear: either previewed on screen, printed, or exported as a pdf file. (The commands -- Preview Reports, Print Reports, and Export Reports -- are located under the File menu.)
When you create a report in a particular output mode, the Data Viewer indicates that this has happened. For example, if you both print and export a report for a particular test data record, the entries in the Printed and Exported column for that record will change from "No" to "Yes".
41
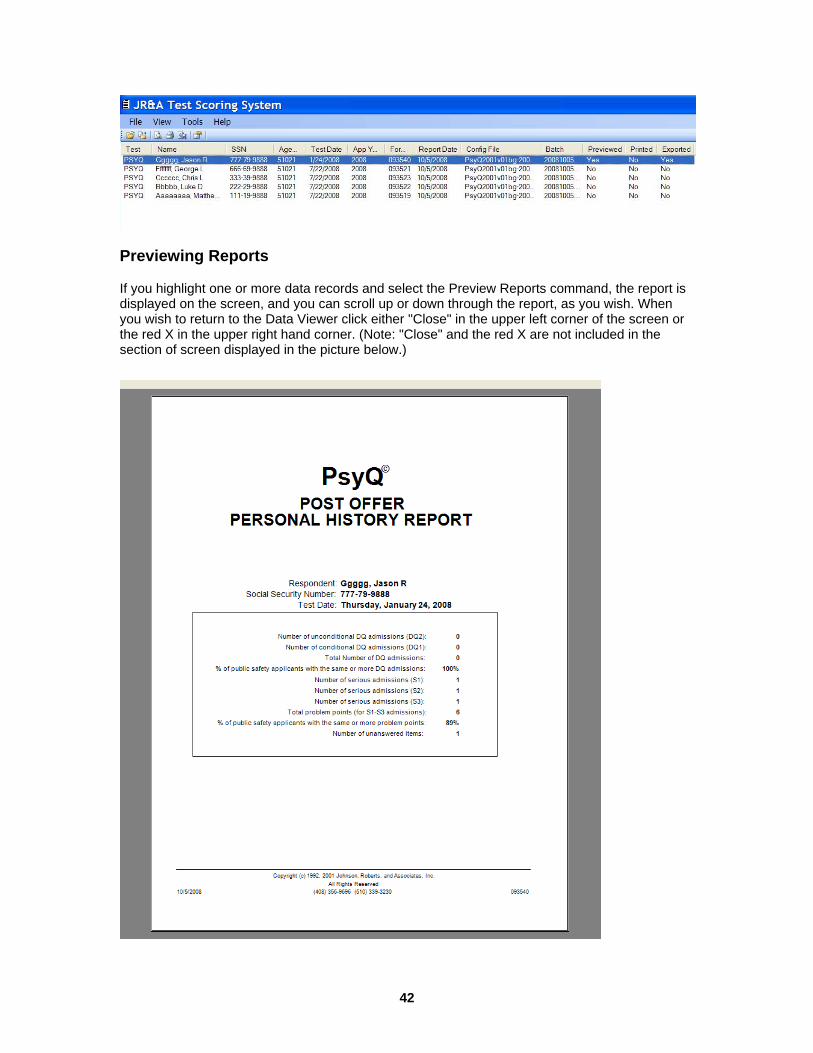
Previewing Reports
If you highlight one or more data records and select the Preview Reports command, the report is displayed on the screen, and you can scroll up or down through the report, as you wish. When you wish to return to the Data Viewer click either "Close" in the upper left corner of the screen or the red X in the upper right hand corner. (Note: "Close" and the red X are not included in the section of screen displayed in the picture below.)
42
Printing Reports
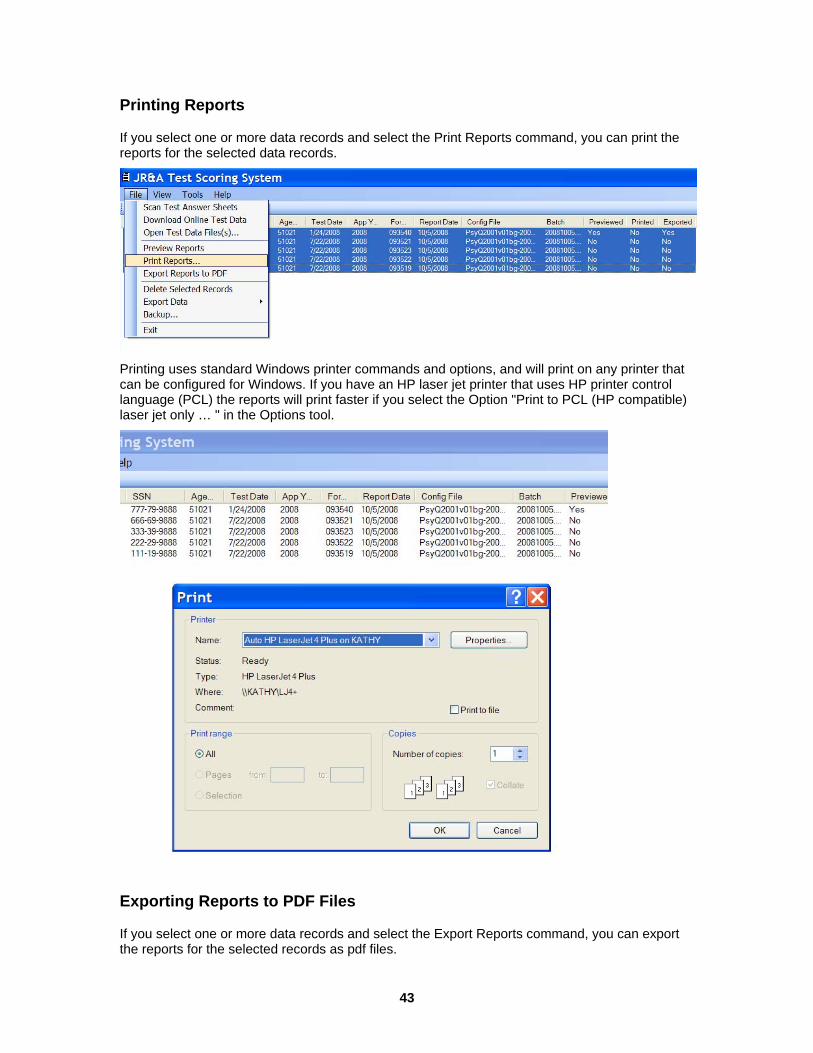
If you select one or more data records and select the Print Reports command, you can print the reports for the selected data records.
Printing uses standard Windows printer commands and options, and will print on any printer that can be configured for Windows. If you have an HP laser jet printer that uses HP printer control language (PCL) the reports will print faster if you select the Option "Print to PCL (HP compatible) laser jet only … " in the Options tool.
Exporting Reports to PDF Files
If you select one or more data records and select the Export Reports command, you can export the reports for the selected records as pdf files.
43
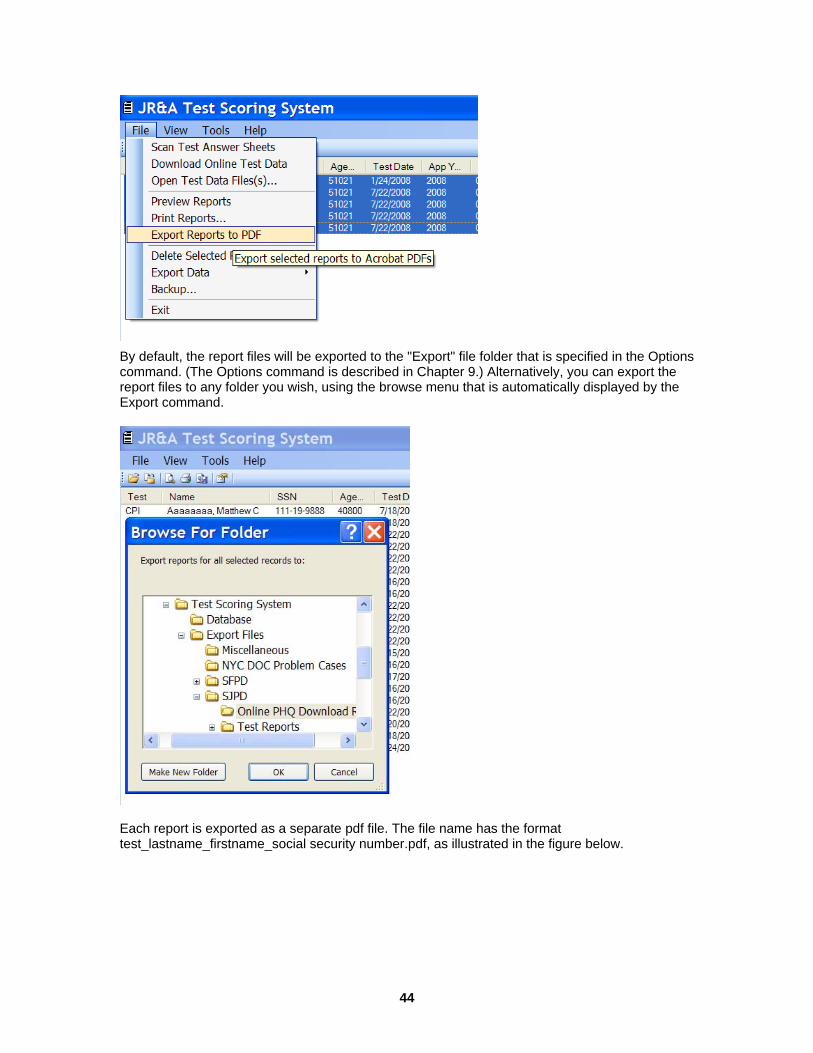
By default, the report files will be exported to the "Export" file folder that is specified in the Options command. (The Options command is described in Chapter 9.) Alternatively, you can export the report files to any folder you wish, using the browse menu that is automatically displayed by the Export command.
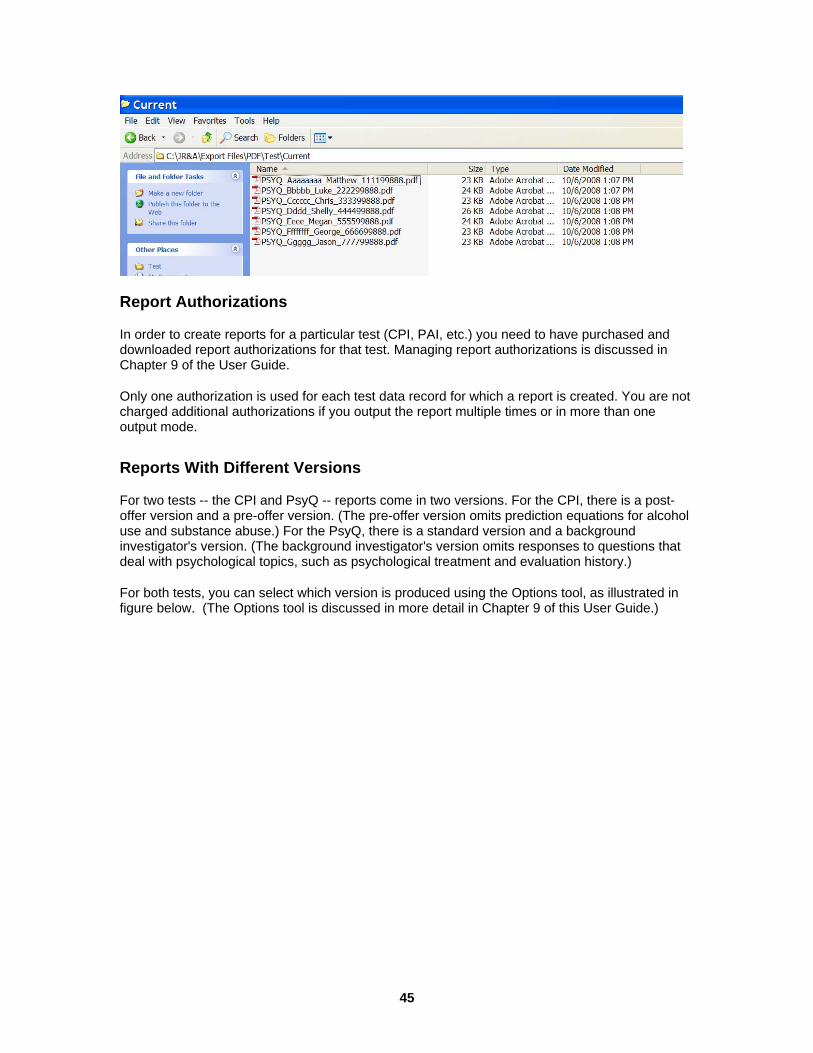
Each report is exported as a separate pdf file. The file name has the format test_lastname_firstname_social security number.pdf, as illustrated in the figure below.
44
Report Authorizations
In order to create reports for a particular test (CPI, PAI, etc.) you need to have purchased and downloaded report authorizations for that test. Managing report authorizations is discussed in Chapter 9 of the User Guide.
Only one authorization is used for each test data record for which a report is created. You are not charged additional authorizations if you output the report multiple times or in more than one output mode.
Reports With Different Versions
For two tests -- the CPI and PsyQ -- reports come in two versions. For the CPI, there is a post-offer version and a pre-offer version. (The pre-offer version omits prediction equations for alcohol use and substance abuse.) For the PsyQ, there is a standard version and a background investigator's version. (The background investigator's version omits responses to questions that deal with psychological topics, such as psychological treatment and evaluation history.)
For both tests, you can select which version is produced using the Options tool, as illustrated in figure below. (The Options tool is discussed in more detail in Chapter 9 of this User Guide.)
45

If you like, you can create both versions of a CPI or PsyQ report for a particular test data record (by creating a report, changing the version selected with the Options tool, then creating the report again). As with report output modes, only one authorization is used for each test data record for which a report is created. You are not charged additional authorizations if you create a report in more than one version.
Exporting Summary Report Statistics
In addition to complete test reports, the Test Scoring System can also create summary reports, which contain summary information excerpted from the complete test reports. (Note: Before you can create these summary reports, you must first create the complete test reports on which the summary reports are based.) Currently, only three such summary reports can be created, all of which are based on the Personal History Questionnaire.
The first of these reports is an ASCII file that excerpts the following information from each selected report:
• Name
• Social Security Number
• Test Date
• Values of various variables describing the test taker and test circumstances, such as age, ethnicity, gender, and agency for whom the test was taken
46

• Number of serious admissions
• Number of critical admissions
• Number of omitted questions
• Total serious points
• Total critical points
• Total critical and serious points
The format of this file is contained in Appendix C.
To create this report, first select the PHQ data records that you want to represent in the report. (Remember that you must have already created reports for each of these records.) Then click on the File menu, and from the continuation menu select Export Data/Compute Reported Statistics/ASCII, as shown in the figure below.
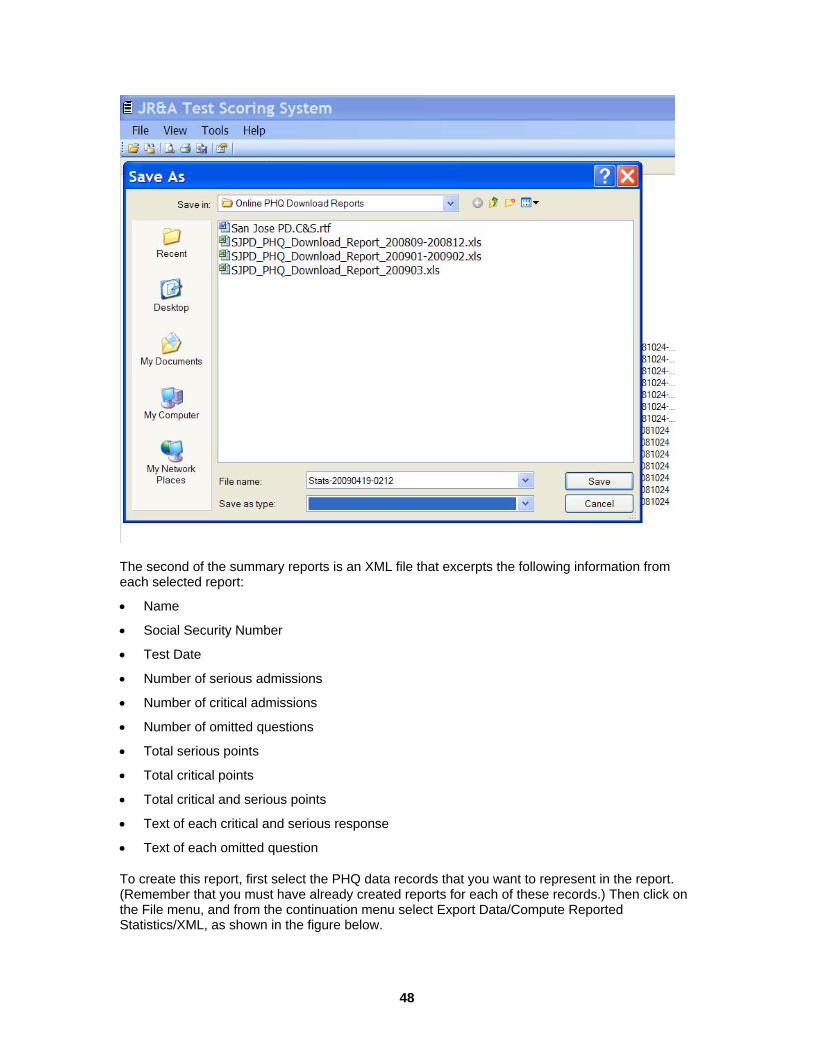
Then select the folder to which you would like the report to be exported, and (optionally) specify the name of the file containing the report. If you don't specify the filename, the file will automatically be assigned the name Stats-yyyymmdd-hhmm.txt, where yyyymmdd is the year, month, and day on which the file is created, and hhmm is the hour and minute on which the file is created.
47
The second of the summary reports is an XML file that excerpts the following information from each selected report:
• Name
• Social Security Number
• Test Date
• Number of serious admissions
• Number of critical admissions
• Number of omitted questions
• Total serious points
• Total critical points
• Total critical and serious points
• Text of each critical and serious response
• Text of each omitted question
To create this report, first select the PHQ data records that you want to represent in the report. (Remember that you must have already created reports for each of these records.) Then click on the File menu, and from the continuation menu select Export Data/Compute Reported Statistics/XML, as shown in the figure below.
48

Then select the folder to which you would like the report to be exported, and (optionally) specify the name of the file containing the report. If you don't specify the filename, the file will automatically be assigned the name JRAExport-yyyymmdd-hhmm.xml, where yyyymmdd is the year, month, and day on which the file is created, and hhmm is the hour and minute on which the file is created.
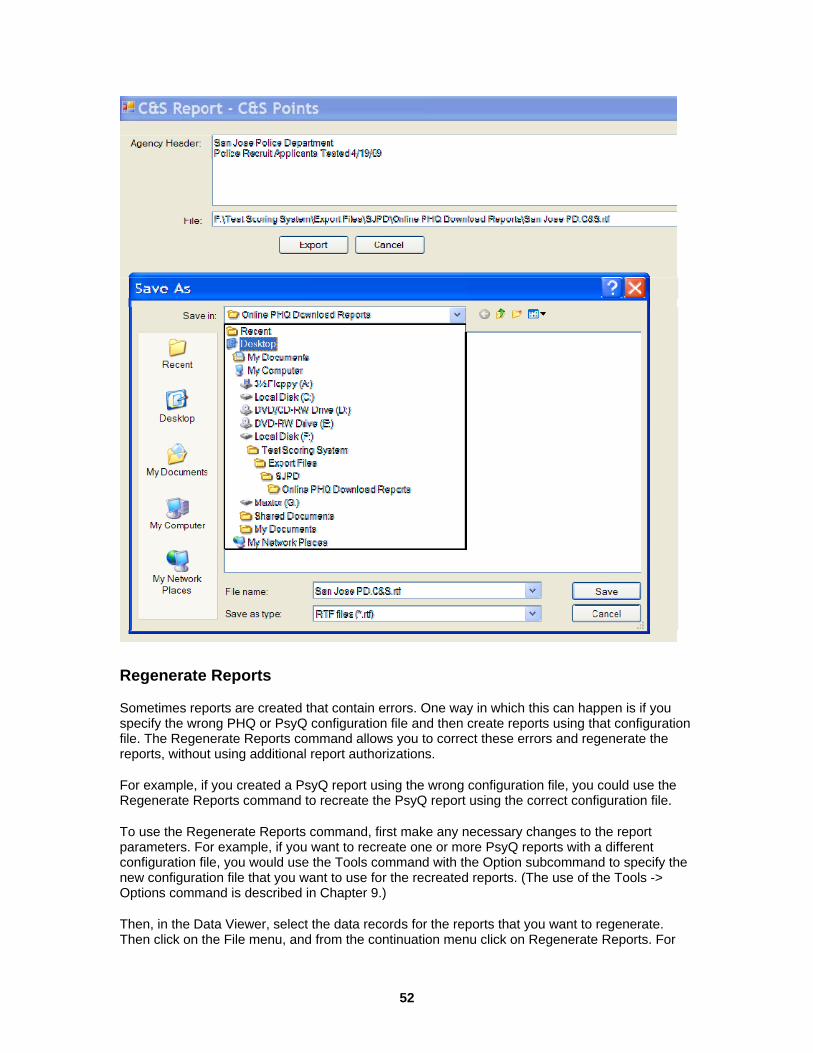
The third of these reports lists all of the applicants tested, displaying, for each applicant, the name, the number of critical and serious admissions, the number of omitted questions, and the total number of problem points. The list is presented twice, once sorted by the name of the applicant (last name, first name, middle initial) and once sorted by the total number of problem points. There are two versions of the report, one ("C&S Points") in which the computed problem points include both critical and serious admissions, and one ("Serious Points") in which the computed problem points include only serious admissions. The figure below shows an example of a page from this report.
49

In order to create this report, first select the PHQ data records that you want to represent in the report. (Remember that you must have already created reports for each of these records.) Then click on the File menu, and from the continuation menu select Export Data/Compute Reported Statistics/PHQ C&S Report, and the version of the report that you prefer (C&S Points or Serious Points), as shown in the figure below.
50

Then enter a header for the report and (optionally) select the name of the file containing the report and the folder to which you would like the file to be exported. If you do not specify a filename and folder, the program will assign the filename and folder that you used the previous time you created this report.
In order to export the report, you must first click on Save to specify the filename and folder for the exported report, then click on Export to export the report.
51
Regenerate Reports
Sometimes reports are created that contain errors. One way in which this can happen is if you specify the wrong PHQ or PsyQ configuration file and then create reports using that configuration file. The Regenerate Reports command allows you to correct these errors and regenerate the reports, without using additional report authorizations.
For example, if you created a PsyQ report using the wrong configuration file, you could use the Regenerate Reports command to recreate the PsyQ report using the correct configuration file.
To use the Regenerate Reports command, first make any necessary changes to the report parameters. For example, if you want to recreate one or more PsyQ reports with a different configuration file, you would use the Tools command with the Option subcommand to specify the new configuration file that you want to use for the recreated reports. (The use of the Tools -> Options command is described in Chapter 9.)
Then, in the Data Viewer, select the data records for the reports that you want to regenerate. Then click on the File menu, and from the continuation menu click on Regenerate Reports. For
52

the data records that you have selected, new reports will be created using the new report parameters that you have specified, without using any additional report authorizations.
53
Chapter 9 System Tools
In This Chapter • Overview
• Options
• Authorizations
• Check for Updates
• Change Password
• Agency Codes
Overview
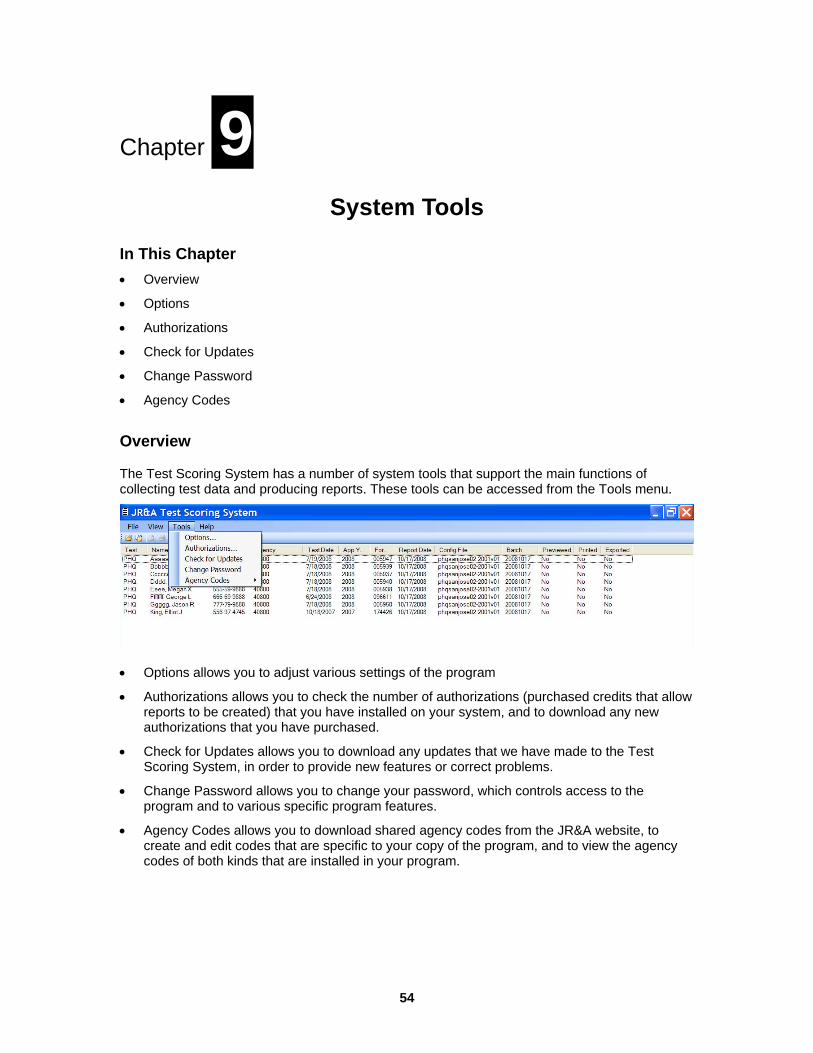
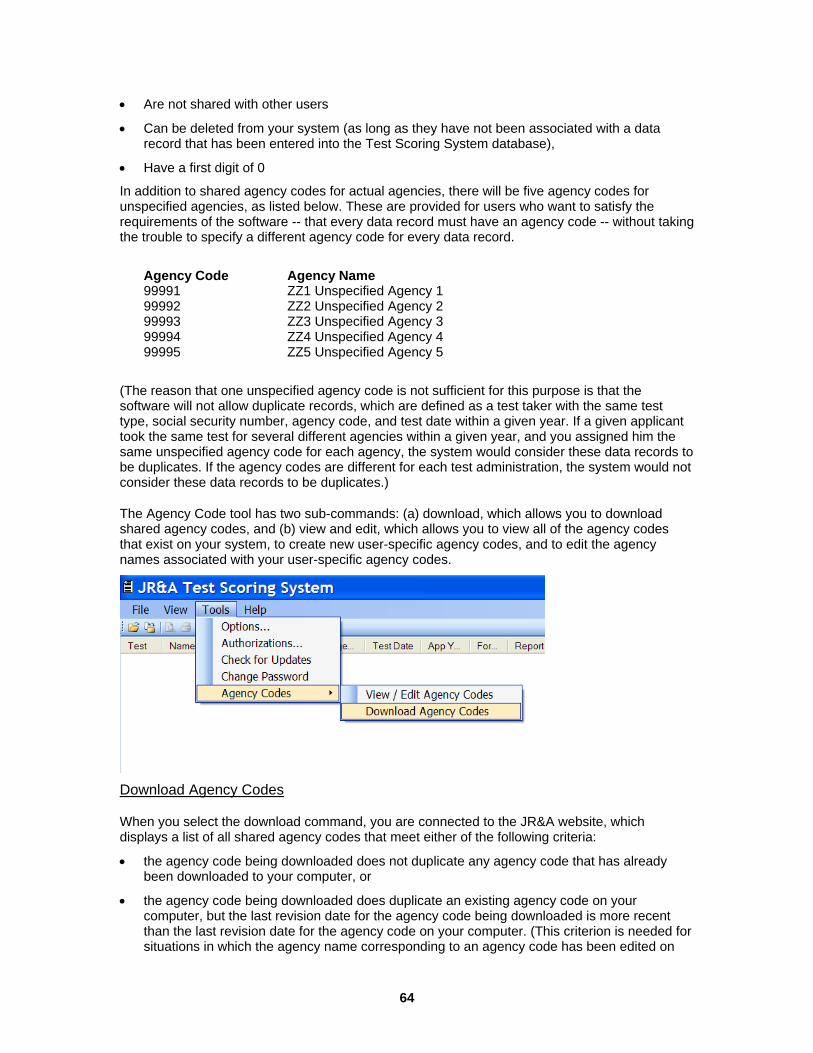
The Test Scoring System has a number of system tools that support the main functions of collecting test data and producing reports. These tools can be accessed from the Tools menu.
• Options allows you to adjust various settings of the program
• Authorizations allows you to check the number of authorizations (purchased credits that allow reports to be created) that you have installed on your system, and to download any new authorizations that you have purchased.
• Check for Updates allows you to download any updates that we have made to the Test Scoring System, in order to provide new features or correct problems.
• Change Password allows you to change your password, which controls access to the program and to various specific program features.
• Agency Codes allows you to download shared agency codes from the JR&A website, to create and edit codes that are specific to your copy of the program, and to view the agency codes of both kinds that are installed in your program.
54

Options
Options commands control various settings of the Test Scoring System. To display the Options menu, click on Tools from the main menu, then choose Options from the continuation menu. The Options menu contains five tabs, each of which controls a different set of options.
General
The General tab controls the following options:
• Delete RAW file after opened?
If this box is checked, whenever data is entered into the Data Viewer from a previously collected file, the file is deleted
• Print to PCL (HP compatible) laser jet only.
If this box is checked, the print output is formatted specifically for an HP laser jet, or compatible printer, which provides a faster print speed.
• Config file folder:
This option specifies the folder that contains configuration files, which control the formats of the PHQ and PsyQ reports. The menu lists the current folder. Clicking on the box to the right of the option, displays a menu that allows you to browse through the file directory to select a new folder.
• Export file folder
This option specifies the folder to which export files are sent. The menu lists the current folder. Clicking on the box to the right of the option, displays a menu that allows you to browse through the file directory to select a new folder.
• PsyQ report version
55
This option allows you to select whether the program will create the standard or background version of the PsyQ report. (The background version omits responses to questions that deal with psychological topics, such as psychological treatment and evaluation history.)
• CPI report version
This option allows you to select whether the program will create the pre-offer or post-offer version of the CPI report. (The pre-offer version omits prediction equations for alcohol use and substance abuse.)
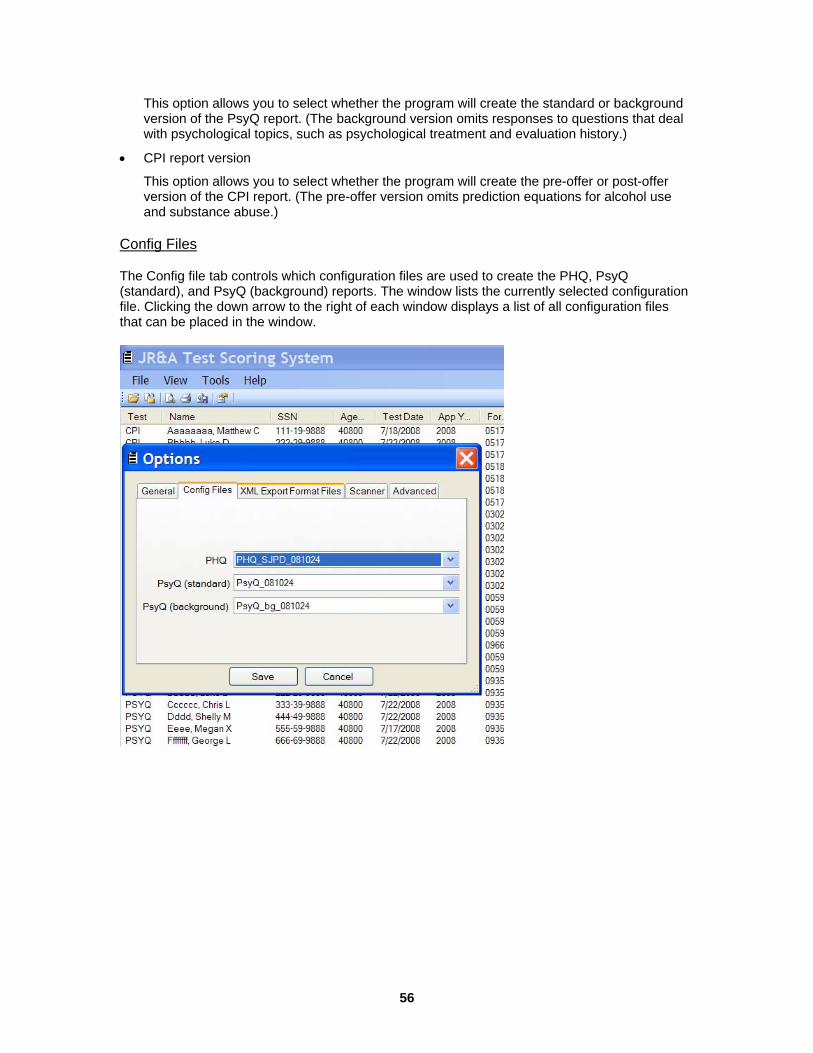
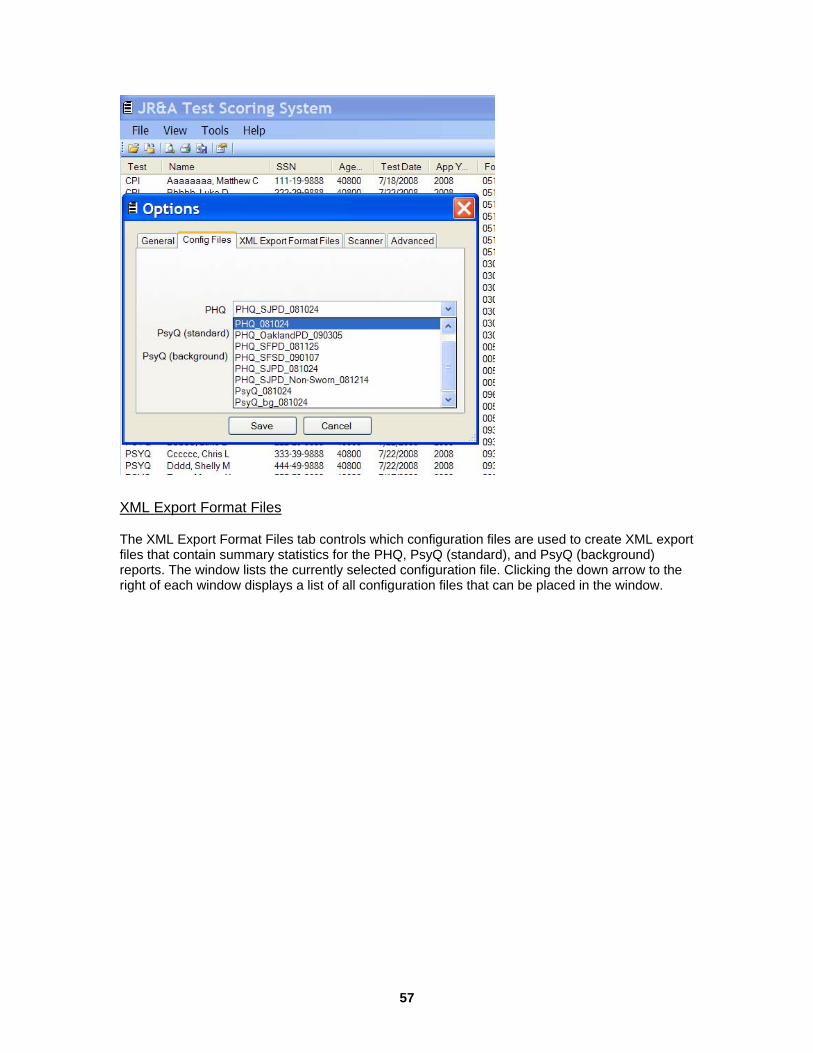
Config Files
The Config file tab controls which configuration files are used to create the PHQ, PsyQ (standard), and PsyQ (background) reports. The window lists the currently selected configuration file. Clicking the down arrow to the right of each window displays a list of all configuration files that can be placed in the window.
56
XML Export Format Files
The XML Export Format Files tab controls which configuration files are used to create XML export files that contain summary statistics for the PHQ, PsyQ (standard), and PsyQ (background) reports. The window lists the currently selected configuration file. Clicking the down arrow to the right of each window displays a list of all configuration files that can be placed in the window.
57
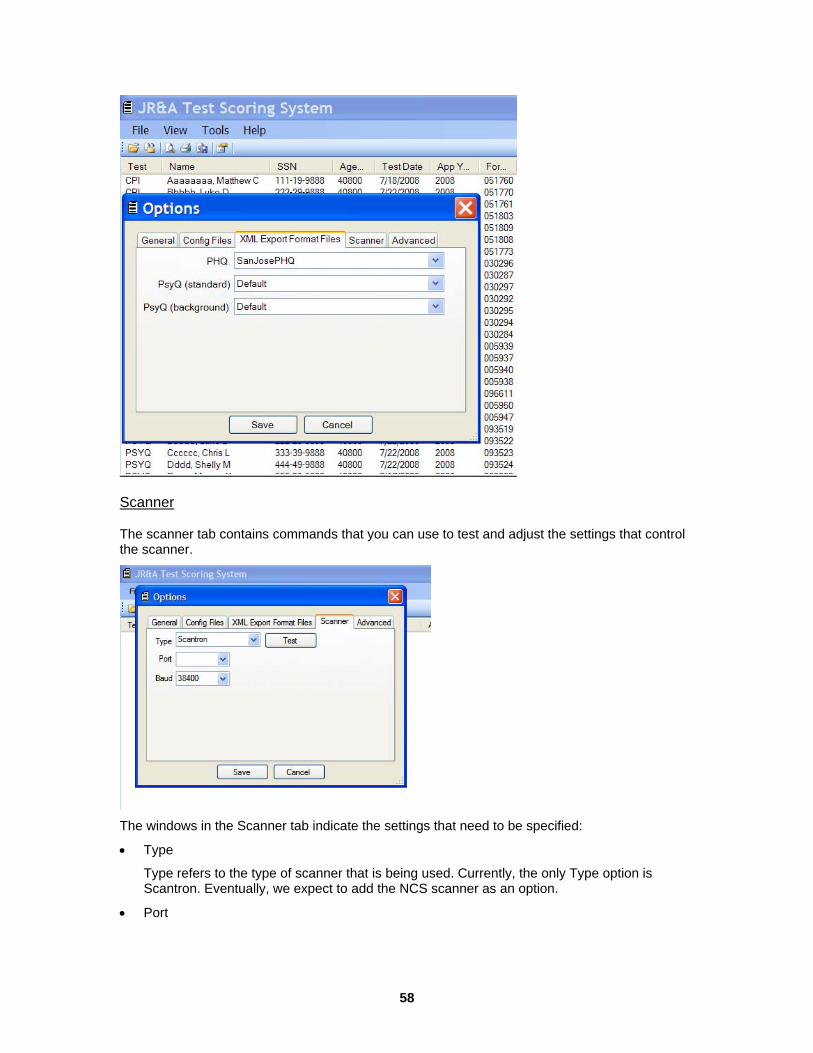
Scanner
The scanner tab contains commands that you can use to test and adjust the settings that control the scanner.
The windows in the Scanner tab indicate the settings that need to be specified:
• Type
Type refers to the type of scanner that is being used. Currently, the only Type option is Scantron. Eventually, we expect to add the NCS scanner as an option.
• Port
58
Port refers to the serial port the scanner is connected to. It will list only the ports that are actually available on your computer.
• Baud
Baud refers to the baud rate (speed) at which the scanner operates.
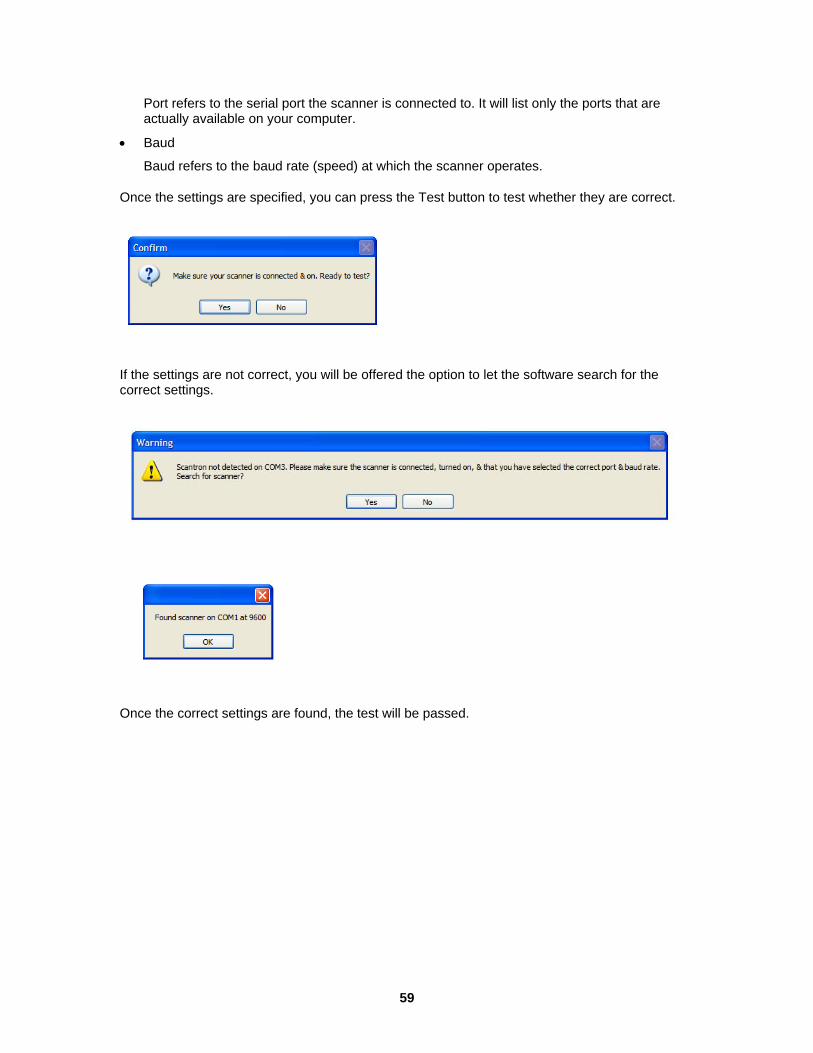
Once the settings are specified, you can press the Test button to test whether they are correct.
If the settings are not correct, you will be offered the option to let the software search for the correct settings.
Once the correct settings are found, the test will be passed.
59

Authorizations
Authorizations are purchased credits allowing reports to be created. In order to create reports for a particular test (CPI, PAI, etc.) you need to have purchased and downloaded report authorizations for that test.
You purchase authorizations by contacting JR&A and specifying the number of authorizations that you want for each test. JR&A then loads these authorizations into the JR&A web site under your user ID. In order to download the authorizations you have purchased from the JR&A website to the Test Scoring System, you need to use the Authorization Manager tool.
Selecting Authorizations, under the Tools menu, displays the Authorization Manager which displays the number of authorizations you have remaining in your account for each test, and allows you to move authorizations back and forth between the JR&A web site and your computer.
60
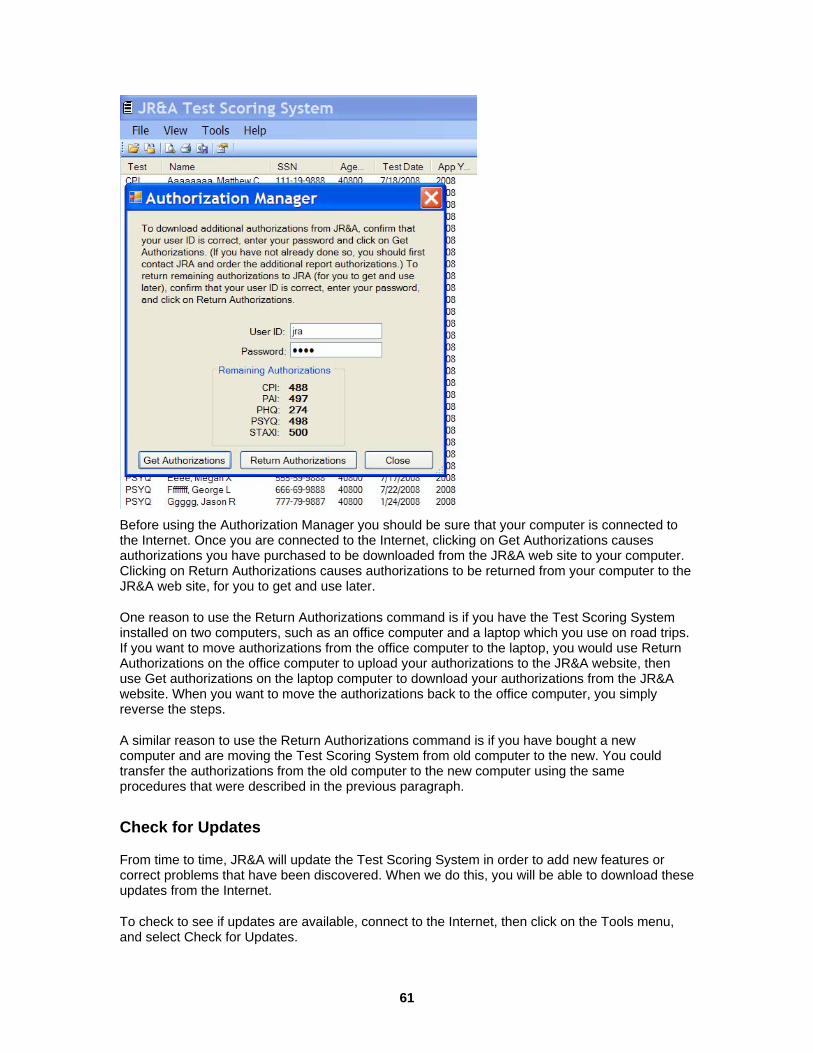
Before using the Authorization Manager you should be sure that your computer is connected to the Internet. Once you are connected to the Internet, clicking on Get Authorizations causes authorizations you have purchased to be downloaded from the JR&A web site to your computer. Clicking on Return Authorizations causes authorizations to be returned from your computer to the JR&A web site, for you to get and use later.
One reason to use the Return Authorizations command is if you have the Test Scoring System installed on two computers, such as an office computer and a laptop which you use on road trips. If you want to move authorizations from the office computer to the laptop, you would use Return Authorizations on the office computer to upload your authorizations to the JR&A website, then use Get authorizations on the laptop computer to download your authorizations from the JR&A website. When you want to move the authorizations back to the office computer, you simply reverse the steps.
A similar reason to use the Return Authorizations command is if you have bought a new computer and are moving the Test Scoring System from old computer to the new. You could transfer the authorizations from the old computer to the new computer using the same procedures that were described in the previous paragraph.
Check for Updates
From time to time, JR&A will update the Test Scoring System in order to add new features or correct problems that have been discovered. When we do this, you will be able to download these updates from the Internet.
To check to see if updates are available, connect to the Internet, then click on the Tools menu, and select Check for Updates.
61

If an update is available, a message will indicate that this is the case, and ask if you want to install it. If you click Yes, the update will be installed.
Change Password
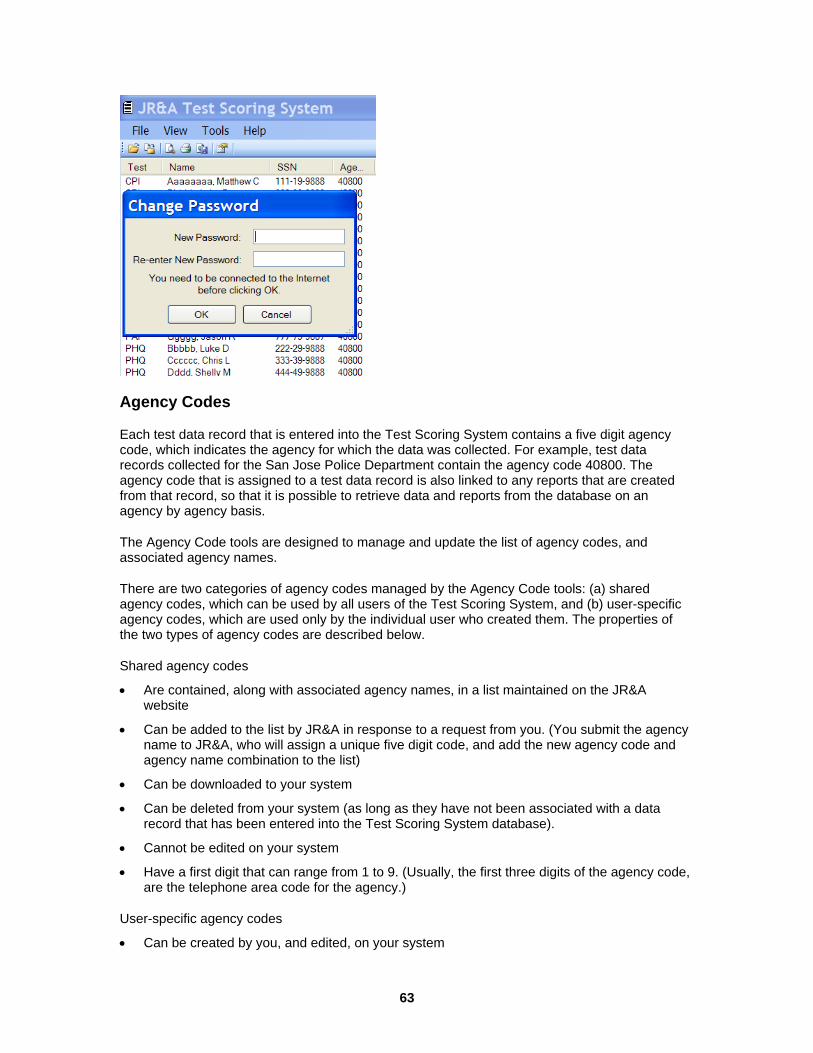
If you wish to change your password, connect to the Internet, then click on the Tools menu, and select Change Password. A menu will be displayed that allows you to change your password.
If you lose your password, please contact us. We will ask you some security questions, then e-mail you a new password.
62
Agency Codes
Each test data record that is entered into the Test Scoring System contains a five digit agency code, which indicates the agency for which the data was collected. For example, test data records collected for the San Jose Police Department contain the agency code 40800. The agency code that is assigned to a test data record is also linked to any reports that are created from that record, so that it is possible to retrieve data and reports from the database on an agency by agency basis.
The Agency Code tools are designed to manage and update the list of agency codes, and associated agency names.
There are two categories of agency codes managed by the Agency Code tools: (a) shared agency codes, which can be used by all users of the Test Scoring System, and (b) user-specific agency codes, which are used only by the individual user who created them. The properties of the two types of agency codes are described below.
Shared agency codes
• Are contained, along with associated agency names, in a list maintained on the JR&A website
• Can be added to the list by JR&A in response to a request from you. (You submit the agency name to JR&A, who will assign a unique five digit code, and add the new agency code and agency name combination to the list)
• Can be downloaded to your system
• Can be deleted from your system (as long as they have not been associated with a data record that has been entered into the Test Scoring System database).
• Cannot be edited on your system
• Have a first digit that can range from 1 to 9. (Usually, the first three digits of the agency code, are the telephone area code for the agency.)
User-specific agency codes
• Can be created by you, and edited, on your system
63
• Are not shared with other users
• Can be deleted from your system (as long as they have not been associated with a data record that has been entered into the Test Scoring System database),
• Have a first digit of 0
In addition to shared agency codes for actual agencies, there will be five agency codes for unspecified agencies, as listed below. These are provided for users who want to satisfy the requirements of the software -- that every data record must have an agency code -- without taking the trouble to specify a different agency code for every data record.
Agency Code Agency Name 99991 ZZ1 Unspecified Agency 1 99992 ZZ2 Unspecified Agency 2 99993 ZZ3 Unspecified Agency 3 99994 ZZ4 Unspecified Agency 4 99995 ZZ5 Unspecified Agency 5
(The reason that one unspecified agency code is not sufficient for this purpose is that the software will not allow duplicate records, which are defined as a test taker with the same test type, social security number, agency code, and test date within a given year. If a given applicant took the same test for several different agencies within a given year, and you assigned him the same unspecified agency code for each agency, the system would consider these data records to be duplicates. If the agency codes are different for each test administration, the system would not consider these data records to be duplicates.)
The Agency Code tool has two sub-commands: (a) download, which allows you to download shared agency codes, and (b) view and edit, which allows you to view all of the agency codes that exist on your system, to create new user-specific agency codes, and to edit the agency names associated with your user-specific agency codes.
Download Agency Codes
When you select the download command, you are connected to the JR&A website, which displays a list of all shared agency codes that meet either of the following criteria:
• the agency code being downloaded does not duplicate any agency code that has already been downloaded to your computer, or
• the agency code being downloaded does duplicate an existing agency code on your computer, but the last revision date for the agency code being downloaded is more recent than the last revision date for the agency code on your computer. (This criterion is needed for situations in which the agency name corresponding to an agency code has been edited on
64

the JR&A website since it was downloaded to your computer.) In such cases the agency name will be followed with an asterisk.
Next to each agency code, in the Download column, is a box that you can click if you want to download this agency code to the database on your installed version of the Test Scoring System. When you click on the box a checkmark will appear in the box. You can sort the agency code list by either agency code number or agency name, by clicking on the corresponding column heading.
Ordinarily, you should download to your computer only the agency codes for the agencies for which you provide evaluation services. If you download other agency codes, you will have to sift through them whenever you enter test data into the system and want to pre-specify the agency code that corresponds to the data being entered.
When you have checked all of the agency codes that you wish to add or update, click the Next button and these agency codes will be added or updated on your computer.
View/Edit Agency Codes
When you select the view and edit command, the computer will display a window that lists all of the agency codes that are on your system. The list can be sorted either numerically by agency code, or alphabetically by agency name, which you can control by clicking on the top of the column by which you want to sort the agency information.
In the following display the agencies have been sorted by Agency Name:
65
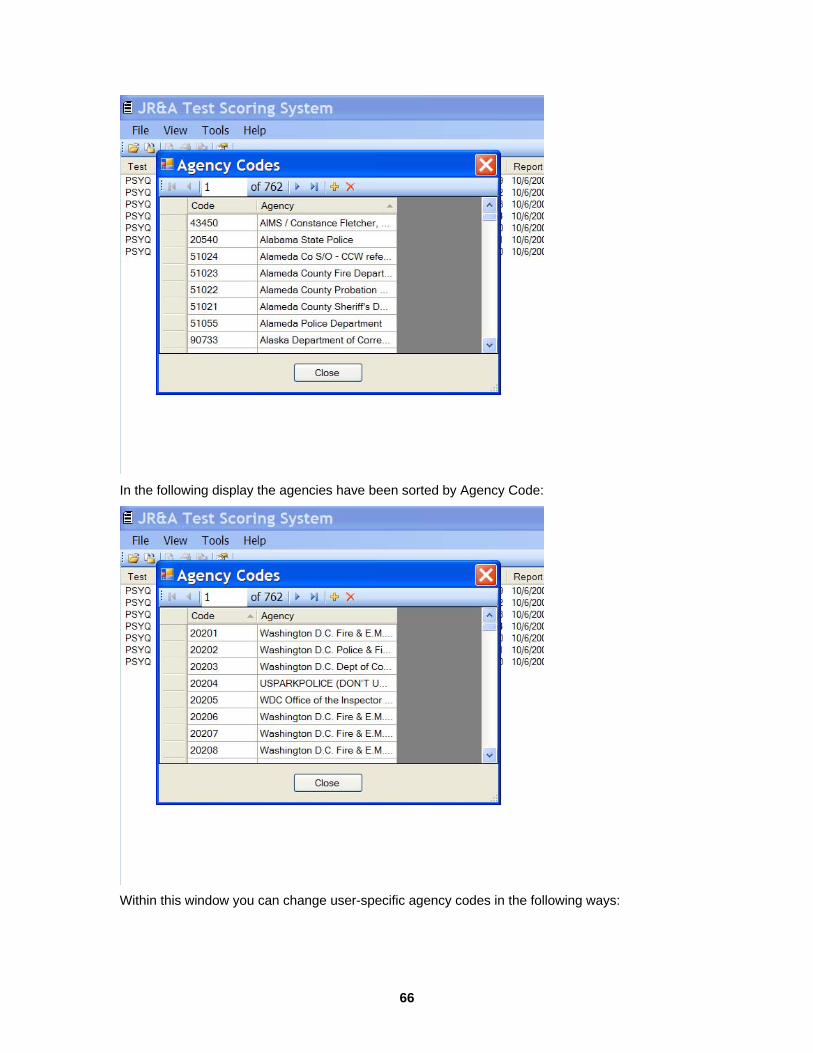
In the following display the agencies have been sorted by Agency Code:
Within this window you can change user-specific agency codes in the following ways:
66

• You can create a new user-specific agency code (which must have a first digit of 0) and corresponding agency name. To do this, you need to click on the plus sign at the top of the window, and then enter the new information in the two cells next to the asterisk.
• You can edit the agency name for any user-specific agency code. To do this, just go to the cell containing the agency name that you want to edit and start typing.
• You can delete any user-specific agency code which has not yet been entered in the database as part of a test data record. To do this, highlight the agency code you want to delete, then click the red X at the top of the list (meaning the X next to the plus sign, not the X in the upper right corner of the window).
67

68
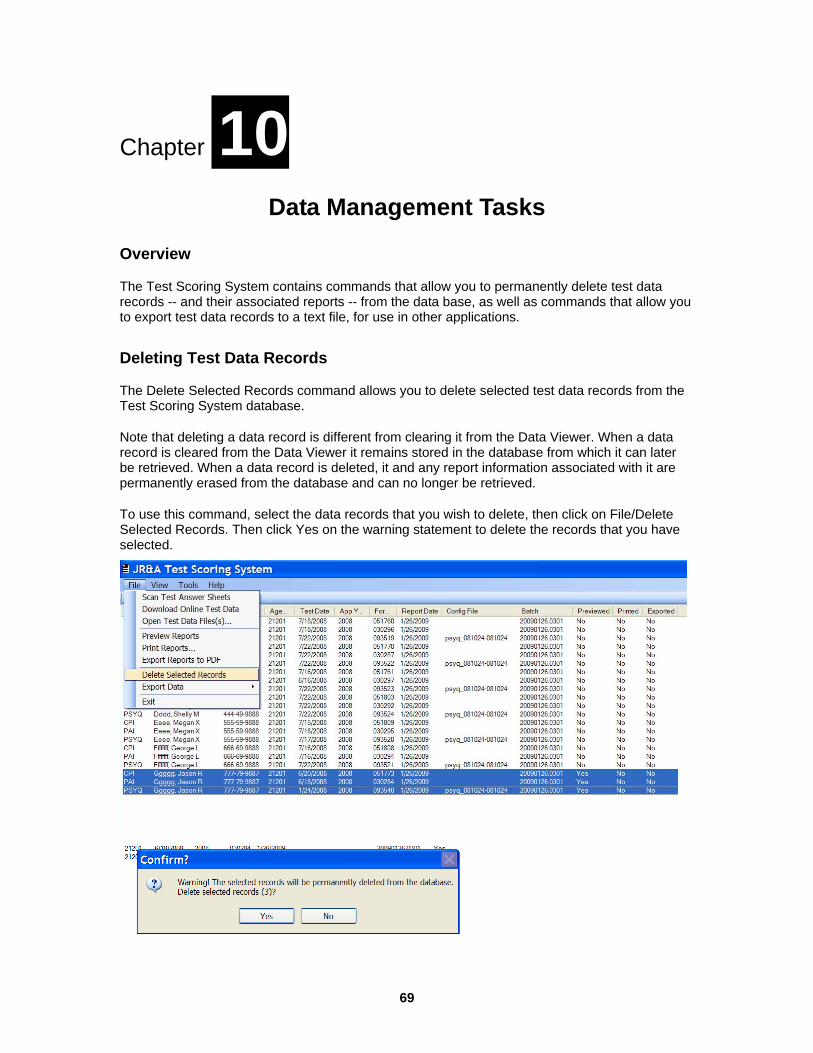
Chapter 10 Data Management Tasks
Overview
The Test Scoring System contains commands that allow you to permanently delete test data records -- and their associated reports -- from the data base, as well as commands that allow you to export test data records to a text file, for use in other applications.
Deleting Test Data Records
The Delete Selected Records command allows you to delete selected test data records from the Test Scoring System database.
Note that deleting a data record is different from clearing it from the Data Viewer. When a data record is cleared from the Data Viewer it remains stored in the database from which it can later be retrieved. When a data record is deleted, it and any report information associated with it are permanently erased from the database and can no longer be retrieved.
To use this command, select the data records that you wish to delete, then click on File/Delete Selected Records. Then click Yes on the warning statement to delete the records that you have selected.
69
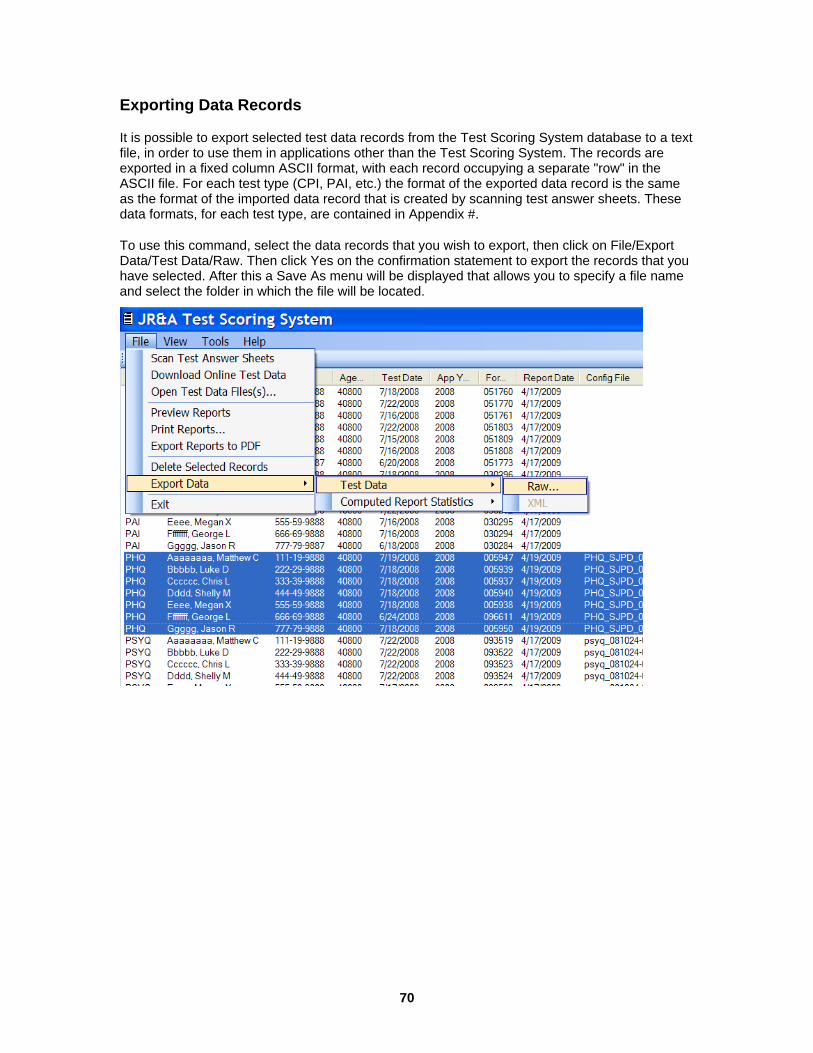
Exporting Data Records
It is possible to export selected test data records from the Test Scoring System database to a text file, in order to use them in applications other than the Test Scoring System. The records are exported in a fixed column ASCII format, with each record occupying a separate "row" in the ASCII file. For each test type (CPI, PAI, etc.) the format of the exported data record is the same as the format of the imported data record that is created by scanning test answer sheets. These data formats, for each test type, are contained in Appendix #.
To use this command, select the data records that you wish to export, then click on File/Export Data/Test Data/Raw. Then click Yes on the confirmation statement to export the records that you have selected. After this a Save As menu will be displayed that allows you to specify a file name and select the folder in which the file will be located.
70

Note that all of the test data records that you select to export will be placed into a single file. The test data records for different tests (CPI, PAI, etc.) have different formats. Therefore, if the test data records that you select to export include records for different tests, the export file will contain records with different formats. If you are exporting data for an application (such as the SPSS data analysis program) that expects all input data records in a file to be in the same format, you should export data records for only one test type at a time.
71

72
Chapter 11 Data Security
The data that is collected and processed by the JR&A Test Scoring System is extremely sensitive. It contains revealing information about the life histories and psychological characteristics of specific individuals, along with personal identification information, such as names and social security numbers.
In order to avoid jeopardizing the privacy of the individuals who are described by the data, and to comply with HIPAA and other pertinent regulations concerning the treatment of confidential information, we recommend the following data security precautions:
• Encrypt all confidential data that is stored on the computer and backup media, decrypting it only when you are using it.
• Employ standard internet security measures (a firewall, anti-spyware, anti-virus, and anti-phishing software).
• For any computer that contains confidential data, limit exposure to the internet to the downloading of necessary software updates and essential data transfers.
• If sending confidential data over the internet, use a secure connection such as the connection for the JR&A Mailbox System and/or send the information in encrypted files.
• Ideally, maintain a dedicated "secure" computer that is used only for the Test Scoring System and other applications that involve confidential data.
• Create data security rules, and train workers to follow them.
• Provide access to confidential data only to workers who need it.
• Investigate the backgrounds of workers who are given access to confidential information.
• Have workers sign agreements forbidding misuse of confidential information.
As indicated above, we believe that encrypting confidential data is crucial to data security. There are various satisfactory methods for encrypting your data. Appendix B contains a description of one particular data encryption product (TrueCrypt) that we believe offers a good combination of security, economy (it's free), and ease of use.

Appendix A Scantron Scanner Setup and Configuration
Connecting Cord
The Scantron Optical Mark Reader ("scanner") comes with a cable that is intended to connect the scanner to the serial port of your computer. If your computer does not have a serial port (most newer computers do not) you should purchase a USB-to-serial conversion cable, which plugs into any USB port on the computer. Scantron recommends the Keyspan USB to serial adaptor, model USA-19HS.
Scanner Setup
If you have just received a new scanner, perform the following steps:
• Unpack the scanner, and set it up according to the instructions packed with it.
• Connect one end of your connecting cord to the scanner.
• Plug the other end of your connecting cord to the appropriate port on your computer (either the serial port, if your computer contains a serial port, or the USB port, if you have bought a USB-to-serial conversion cable).
Scanner Configuration
In order to configure the scanner, you can use the commands in the Scanner tab of the Tools/Options menu, as described in Chapter 9 of this User Guide.
A1

Appendix B TrueCrypt Data Encryption Software
TrueCrypt is a computer program that creates one or more large files on your hard drive that can hold encrypted data.
When you open a TrueCrypt file, with a password, it acts as a virtual drive on your computer, which you can use just as if it were an actual drive (such as a USB flash drive). When you close a TrueCrypt file, all of the data that you put into the virtual drive is encrypted and inaccessible.
In its closed state, a TrueCrypt file can be moved, renamed, or copied just as if it were any other file on the computer. In particular, a TrueCrypt file can be backed up to a standard, non-encrypted drive, using your ordinary backup software. Unless the true crypt file is opened, with a password, the data within the file remains inaccessible.
TrueCrypt is a free, open-source program that you can download from the TrueCrypt web site, http://www.truecrypt.org/. This website also contains documentation, frequently asked questions, a user forum, and other types of information about installing and using the TrueCrypt program.
B1
Appendix C Format Of Summary Test Report
Containing PHQ Statistics The summary test report containing PHQ statistics -- which was described in Chapter 8 -- is a fixed column ASCII file that contains a data record for each PHQ report that is summarized.
The first 100 characters of each data record duplicate the first 100 characters of the PHQ raw data file on which the PHQ report was based. The rest of the data record contains the following computed statistics, in adjacent 3-character fields:
• Number of unconditional DQ admissions (DQ2)
• Number of conditional DQ admissions (DQ1)
• Total number of DQ admissions
• % of public safety applicants with the same or more DQ admissions
• Number of serious admissions (S1)
• Number of serious admissions (S2)
• Number of serious admissions (S3)
• Total problem points (for S1-S3 admissions)
• % of public safety applicants with the same or more problem points
• Number of unanswered items
C1