Tenable Functional Overviewstatic.tenable.com/prod_docs/functional_overview.pdf · Tenable...
28
Tenable Functional Overview October 29, 2009 (Revision 5)
-
Upload
nguyenthien -
Category
Documents
-
view
223 -
download
0
Transcript of Tenable Functional Overviewstatic.tenable.com/prod_docs/functional_overview.pdf · Tenable...

Tenable Functional Overview
October 29, 2009 (Revision 5)

Copyright 2004-2009, Tenable Network Security, Inc. Proprietary Information of Tenable Network Security, Inc.
2
Table of Contents
TABLE OF CONTENTS .............................................................................................. 2
INTRODUCTION...................................................................................................... 3
SECURITY CENTER COMPONENTS ........................................................................... 3
SUPPORTED OPERATING SYSTEMS AND ENVIRONMENTS ...................................... 3
SECURITY CENTER COMMUNICATIONS AND REPOSITORIES .................................. 5
SECURITY CENTER USER MANAGEMENT ................................................................. 6
SECURITY CENTER ADMINISTRATOR................................................................................... 7 PRIMARY SECURITY MANAGER (CUSTOMERS) ....................................................................... 8
SECURITY CENTER ACCESS CONTROL ..................................................................... 9
ACCESS INTERFACES .................................................................................................... 9 SECURITY CENTER CONSOLE ........................................................................................... 9 USER ACCOUNT MANAGEMENT ......................................................................................... 9
Customer Accounts ............................................................................................... 9 User accounts .................................................................................................... 10 Asset Lists ......................................................................................................... 11
NESSUS ACCESS CONTROL ........................................................................................... 12 Nessus User Account Generation .......................................................................... 12 Security Center Configuration .............................................................................. 13 Security Center SSL Authentication with Nessus ..................................................... 13 Host Credentials (optional) .................................................................................. 15
LOG CORRELATION ENGINE .......................................................................................... 17 Security Center Authentication ............................................................................. 17 LCE Client Types and Functions ............................................................................ 18
PASSIVE VULNERABILITY SCANNER (PVS) ......................................................................... 20 PVS User Account Generation ............................................................................... 20 Security Center Configuration .............................................................................. 21 Security Center SSL Communication with PVS ........................................................ 22
3D TOOL ................................................................................................................ 22
ABOUT TENABLE NETWORK SECURITY ................................................................. 24
APPENDIX 1: COMMON CRITERIA CORRESPONDENCE REPRESENTATION ............ 25
APPENDIX 2: TENABLE DATA FLOW DIAGRAM ..................................................... 28

Copyright 2004-2009, Tenable Network Security, Inc. Proprietary Information of Tenable Network Security, Inc.
3
Introduction
This document is intended to provide an overview of the access control mechanisms used
for the Tenable Security Center and its components.
Security Center Components
The Tenable Security Center is a web based management console that unifies the process of
vulnerability detection and management, event and log management, compliance
monitoring and provides reports on all of the above. The Security Center enables efficient
communication of security events to IT, management and audit teams. The major
components of a Security Center system are Security Center (SC), the Nessus vulnerability
scanner (Nessus), Log Correlation Engine (LCE) and its clients, Passive Vulnerability
Scanner (PVS) and the 3D Tool (3DT).
Security Center – The Tenable Security Center provides continuous, asset-based
security and compliance monitoring. It unifies the process of asset discovery,
vulnerability detection, data leakage detection, event management and configuration
auditing for small and large enterprises.
Nessus Vulnerability Scanner – Tenable‟s Nessus vulnerability scanner, is the
world-leader in active scanners, featuring high speed discovery, asset profiling and
vulnerability analysis of the organization‟s security posture. Nessus scanners can be
distributed throughout an entire enterprise, inside DMZs and across physically
separate networks.
Log Correlation Engine – Tenable‟s Log Correlation Engine is a software module
that aggregates, normalizes, correlates and analyzes event log data from the myriad
of devices within the infrastructure. Since the Log Correlation Engine is closely
integrated with the Security Center, log analysis and vulnerability management can
be centralized for a complete view of the security posture.
o Log Correlation Engine Clients -The Log Correlation Engine (LCE) Clients
are agents that are installed on systems whose logs, network traffic,
performance and other types of protocols and technologies are to be
monitored by forwarding data securely to the LCE server. Once a LCE server
is installed and configured, one or more LCE clients can be used to send
information back for normalization and correlation.
Passive Vulnerability Scanner – Tenable‟s Passive Vulnerability Scanner is a
network discovery and vulnerability analysis software solution, delivering real-time
network profiling and monitoring for continuous assessment of an organization‟s
security posture in a non-intrusive manner. The Passive Vulnerability Scanner
monitors network traffic at the packet layer to determine topology, services and
vulnerabilities. Where an active scanner takes a snapshot of the network in time, the
PVS behaves like a security motion detector on the network.
3D Tool – The 3D Tool is designed to facilitate presentations and security analysis of
different types of information acquired from the Security Center.
Supported Operating Systems and Environments
Tenable software supports a wide variety of operating system platforms and adapts well to
nearly every enterprise environment. The table below provides a list of Tenable products
and supported platforms:

Copyright 2004-2009, Tenable Network Security, Inc. Proprietary Information of Tenable Network Security, Inc.
4
Tenable Product Supported Platforms
Security Center Red Hat Linux ES3, ES4, ES5
Nessus Red Hat Linux ES3, ES4, ES5 (i386 and x86-64)
Fedora Core 7, 8, and 9
SUSE 9.3 and 10.0
Debian 4 (i386 and amd64)
FreeBSD 7.0
Solaris 9 and 10
Ubuntu 7.10 and 8.04 (i386 and amd64)
Mac OS X 10.5
Windows 2000, XP, Server 2003, Server 2008, and
Vista
Enterasys Dragon appliance running Dragon 7.2 or
later
Log Correlation Engine
Server
Red Hat Linux ES3, ES4, ES5
LCE Clients Log Agent Red Hat Linux ES3, ES4,
ES5
FreeBSD 6
Fedora Core 6
Solaris SPARC (8,9,10)
Mac OS X
Dragon Appliance
Windows 2000, XP, Server
2003, Server 2008, and
Vista
Tenable RDEP Monitor Red Hat Linux ES3, ES4,
ES5
OPSEC Client Red Hat Linux ES3, ES4,
ES5
Tenable Network
Monitor
Red Hat Linux ES3, ES4,
ES5
Tenable Netflow
Monitor
Red Hat Linux ES3, ES4,
ES5
FreeBSD 6
Passive Vulnerability
Scanner
Red Hat Linux ES3, ES4, ES5
Windows Server 2003 and Windows XP Professional
3D Tool Windows Server 2003 and Windows XP Professional

Copyright 2004-2009, Tenable Network Security, Inc. Proprietary Information of Tenable Network Security, Inc.
5
Security Center Communications and Repositories
The following table summarizes the components primary repositories and communication
methods. For a visual depiction of the data flows, please refer to the diagram in Appendix 1:
Security Center
Installation
Directory
/opt/sc3
User Data
Repository
/opt/sc3/customers/<Customer Serial Number>
Audit Log
Repository
/opt/sc3/admin/log/
Communication
Interfaces
User Access: HTTP with optional SSL.
Plugin Updates:
SSL from Tenable servers or offline. Plugin packages are secured via
4096-bit RSA digital signatures.
Inbound IDS events (optional): Captured via UDP port 514 (SYSLOG)
Nessus
Installation
Directory
/opt/nessus/
User Data
Repository
(optional if users have custom plugins): /opt/nessus/var/nessus/users/<username>/plugins/
Audit Log
Repository
Unix: /opt/nessus/var/nessus/logs/nessusd.messages
Windows:
\Program Files\Tenable\Nessus\logs\server.log
Communication
Interfaces
Communicates with SC over SSL and uses SSL Certificates for host
verification to perform security scans, get plugin updates and send
scan results to SC. Uses a separate process (nessusd) per target for
scanning.
Log Correlation Engine
Installation
Directory
/usr/thunder
User Data
Repository
/usr/thunder/db

Copyright 2004-2009, Tenable Network Security, Inc. Proprietary Information of Tenable Network Security, Inc.
6
Audit Log
Repository
/user/thunder/admin/logs
Communication
Interfaces
With Security Center:
SSH and SCP over port 22
Correlated events:
Sent to external Syslog systems on UDP port 514 (SYSLOG)
Passive Vulnerability Scanner
Installation
Directory
/opt/pvs
User Data
Repository
PRM files: /opt/pvs/var/pvs-proxy/scans
PASL scripts: /opt/pvs/var/pvs-proxy/scans
Audit Log
Repository
Unix: /opt/pvs/var/pvs/logs
Windows: \Program Files\Tenable\Nessus\logs
Communication
Interfaces
Inbound Communications:
Listens on TCP port 1243 (configurable) for inbound SC
communications. Uses SSL key authentication, configured in the pvs-
proxy.conf file. Plugin updates are over SSL.
Outbound Communications (optional):
Sends alerts via UDP port 514(SYSLOG).
3D Tool
Installation
Directory
Default:
\Program Files\Tenable\3DTool
User Data
Repository
<Installation Directory>\Reports
Audit Log
Repository
None
Communication
Interfaces
With Security Center:
SSL
Security Center User Management
The Security Center restricts the ability to manage functions based on the user role. The
roles supported by the Security Center are Security Center Administrator (admin),

Copyright 2004-2009, Tenable Network Security, Inc. Proprietary Information of Tenable Network Security, Inc.
7
Primary Security Manager (“Customer” account), Security Manager and End User.
While some roles may overlap, they may be segregated as required by the particular
organization. For some small organizations, it is entirely possible that the same person will
perform all the roles. Larger organizations may segregate roles based on their
organizational structure. For example, a large organization may have an Information
Security Group that is responsible for management of security functions throughout all the
business units and performs all Security Center administration tasks. A member of this
group would be defined as the Security Center “admin” user. This admin user can define the
business units as “Customers” within the Security Center. Each customer account would
have a Security Manager defined who would manage all End Users within this customer
account. A description of the roles supported by the Security Center follows:
Security Center Administrator
The Security Center Administrator, or “admin” user, is responsible for the configuration and
management of the Security Center application. The Security Center Administrator does not
require command line access to the operating system platform and could perform all duties
through the Security Center GUI. However, a non-privileged account may be useful to
monitor log files, make manual changes to configuration files and perform general
troubleshooting of the Security Center application. Some duties, such as generating SSH
keys on remote hosts for credential scans, may require privileged access, but these are not
routine activities and may be performed by the System Administrator. If the site requires a
separation of roles, the System Administrator could perform the functions that require
command line access to the OS. The Security Center Administrator‟s duties include the
following:
Configure the Security Center
Monitor Security Center logs
Monitor the overall Security Center system (e.g., licensing status, active scans, IDS
sources, etc.)
Add and manage the configuration of each SC customer and networks they are
allowed to scan
Manage the network of active Nessus scanners, which network “zones” they belong
to and which networks they are allowed to scan
Manage the network of Passive Vulnerability Scanners and which customers have
access to their detected real-time vulnerabilities
Manage which Log Correlation Engines each customer has access to
Manage which external data feeds (e.g., ICAT, Snort, Nessus plugins, etc.) SC is
subscribed to
Monitor IDS sources and deleting, if necessary
Manage the SC services including their configuration
Monitor all active and scheduled SC vulnerability scans (although not the scan data)
and if necessary, pausing or deleting a scan
Add and managing other SC administration accounts
Manage “Vulnerability Policies” for all customers
The access rights for the Security Center Administrator are limited to managing the Security
Center system functions and customers. SC Administrators establish the network segment
that customers are permitted to scan and establish the IDS sources for the customer. The
SC Administrators cannot perform scans themselves or view any customer vulnerability, IDS
or network log data. The SC Administrator may view customer activity logs for audit

Copyright 2004-2009, Tenable Network Security, Inc. Proprietary Information of Tenable Network Security, Inc.
8
purposes. Only the site System Administrator or the SC Administrator may view the
Security Center logs.
Primary Security Manager (Customers)
Customers are defined as a Primary Security Manager to the Security Center and are
managed by the Security Center Administrator who specifies which network ranges the
customer has access to. Each customer has a unique name and serial number.
The access rights for all customers are limited to the defined network address space and
customer data only. Customers may not view system or Security Center audit logs.
Customers are defined with IDS sources but do not have login access to these sources. Only
the admin user can define available IDS sources. Multiple customers may be defined to see
and scan the same network segment, but a scan initiated by one customer is not available
to another.
The Primary Security Manager has full rights for the entire network space of a customer
and cannot be deleted without removing the entire customer entry. The Primary Security
Manager may define additional users as either Security Managers or End Users who may
have rights to all, or only a portion of the customer network address space.
A Security Manager is typically the security representative for an organization within the
customer address space and is responsible for the overall security posture of that
organization. Security Managers can perform the following:
View vulnerabilities, IDS events and logs for the range of IP addresses as defined in
the asset lists the account has access to.
Conduct vulnerability scanning of their network address space.
Track the remediation of vulnerabilities found on systems that they are responsible
for that also permits the initiation of a rescan once the vulnerabilities are mitigated.
Add, edit and delete new users who may be either additional Security Managers or
End Users.
Add and manage asset lists – lists or ranges of IP addresses that may be statically or
dynamically created. Asset lists permit grouping of monitored systems and play an
integral part within Security Center.
Open tickets describing which vulnerabilities need to be mitigated, as well as recast
or accept the risk level of a found vulnerability.
The access rights for the Security Manager are limited to the network address space defined
by the Security Center Administrator. Security Managers have the ability to change the
access rights for End Users.
An End User is typically a system administrator or network engineer who has responsibility
for administrating security on a portion of the network. End users have the following
capabilities:
View vulnerabilities, IDS events and logs for a specific range of IP addresses which is
determined by the particular asset lists the account has access to.
Conduct vulnerability scanning of their network address space, but may also be
“locked out” from scanning either manually, or when the threshold for failed login
attempts is reached.

Copyright 2004-2009, Tenable Network Security, Inc. Proprietary Information of Tenable Network Security, Inc.
9
Track the remediation of vulnerabilities found on systems that they are responsible
for, which also permits the initiation of a rescan once the vulnerabilities are
mitigated.
The access rights for an End User are defined by the Security Manager(s) for the defined
network address space. The End User does not have the ability to change this. End Users
may be segregated to a subset of the network address space defined for the customer,
thereby restricting their ability to monitor network activity.
Security Center Access Control
This section provides technical details of how access is controlled within the Security Center.
Access Interfaces
The Security Center is designed to be managed from a web-based console interface. The
Security Center supports use of SSL, which must be set as the default console interface by
changing the URL in the configuration menu under “Misc. Options” to HTTPS instead of
HTTP.
To force use of HTTPS, edit the configuration file for the Apache server provided with the
Security Center so that the line “Listen 80” line is commented out.
Administrator and user account access is controlled either by a password set in the Security
Center (referred to as “TNS Authentication”) or via a local LDAP server. All Security Center
user functions are managed through the web interface to ensure appropriate error handling
and logging are maintained.
Access to the Red Hat Linux servers that support the Security Center, Nessus, PVS, and LCE
applications is controlled via SSH, which is provided with the Operating System. For
information on SSH, including how to support and configure it, please refer to the official
web site for the project at http://openssh.org/.
The Security Center only accepts input from devices that are specifically configured on it.
Access is controlled by a combination of authentication and IP address.
Security Center Console
The Security Center can be configured to receive nightly updates of the Nessus and PVS
plugins and push them out to the scanners it controls. These updates are received over port
443 (HTTPS) and require a valid Activation Code, obtained from Tenable. Plugin packages
are secured via 4096-bit RSA digital signatures. The Security Center “admin” user can
configure a variety of authentication options, including support for outbound web proxy
authentication, via the “Configure the Security Center” page.
User Account Management
Customer Accounts
Customer accounts are configured by the Security Center admin user via the “Add New
Customer” tab, as shown in the following screen capture:

Copyright 2004-2009, Tenable Network Security, Inc. Proprietary Information of Tenable Network Security, Inc.
10
User accounts
Once the customer account is created, the customer can log in as the Primary Security
Manager and create asset lists and additional accounts that are assigned assets within the
customer address space.
Adding Users
Typically, one or more Security Managers are created to manage End Users. To create a
new user, the Security Manager selects “Add New User” under the “Users” tab. This
presents the Security Manager with a web page similar to the following:

Copyright 2004-2009, Tenable Network Security, Inc. Proprietary Information of Tenable Network Security, Inc.
11
Asset Lists
Each customer is created by the admin user with one asset list named “Customer Ranges”
that contains the IP addresses or ranges entered when the customer was first created. The
Primary Security Manager can create additional asset lists to identify logical groupings of IP
addresses for analysis within the Security Center.
Only the Primary Security Manager may add, edit or delete asset lists within their network
range. The Primary Security Manager can assign asset lists to security managers who can
then determine which asset lists under their control users are permitted to access.
Asset credentials are stored in /opt/sc3/customers/SN/assets/ASSET_LIST_NAME.prefs
(where SN is the customer nember and “ASSET_LIST_NAME” is the name of the asset).
For example, if the PSM for customer 10 has an asset list named “Linux” and assigned SSH
credentials for this particular asset list the directory /opt/sc3/customers/10/assets/, will
have two files:
Linux.ip (the asset list)
172.20.4.0/24
Linux.prefs (the preference file associated with the asset list, which was created when the
credentials were)
The .prefs file resembles a policy .prefs file, passwords are obfuscated, however
username‟s, domains, etc. are clear text.

Copyright 2004-2009, Tenable Network Security, Inc. Proprietary Information of Tenable Network Security, Inc.
12
When the asset list is assigned to another user, the user inherits the credentials but is not
able to view/change the credentials for the asset list.
Only the PSM may created, assign, and set credentials for asset lists.
Nessus Access Control
There are two access control points related to the Nessus scanner integration with the
Security Center. They are:
The login from the Security Center to the Nessus scanner
The credentials provided for Nessus to login to a target system to perform
credentialed scans (optional)
Nessus User Account Generation
The Security Center logs in to the Nessus scanner via the lightning-proxy daemon to initiate
scans and retrieve results using a login and password combination. The login account is
created as follows:
# /opt/nessus/sbin/nessus-add-first-user
nessusd (Nessus) 3.0.5 for Linux
(C) 2005 Tenable Network Security, Inc.
Using /var/tmp as a temporary file holder
Add a new nessusd user
--------------------
Login : nessus
Authentication (pass/cert) [pass]:
Login password:
Login password (again):
User rules
----------
nessusd has a rules system which allows you to restrict the hosts
that admin has the right to test. For instance, you may want
him to be able to scan his own host only.
Please see the nessus-adduser(8) man page for the rules syntax
Enter the rules for this user, and hit ctrl-D once you are done:
(the user can have an empty rules set)
Login :paul
Password :********
DN :
Rules :

Copyright 2004-2009, Tenable Network Security, Inc. Proprietary Information of Tenable Network Security, Inc.
13
Is that ok ? (y/n) [y]
User added.
Thank you. You can now start Nessus by typing:
/opt/nessus/sbin/nessusd –D
#
Security Center Configuration
To add a Nessus scanner to the Security Center, from the “Console” table select “Add
Nessus Scanner” and fill in the information as shown in the form below:
Security Center SSL Authentication with Nessus
An alternative option to using a password for the Nessus login is to use SSL authentication
based on the OpenSSL toolkit (please see http://www.openssl.org/ for more details about
the toolkit). This provides cryptographic protection and secure authentication.
Do not confuse this SSL certificate configuration with normal Security Center to
Nessus communications. All communications between the Security Center and
Nessus are SSL encrypted over port 1241. The SSL configuration described in

Copyright 2004-2009, Tenable Network Security, Inc. Proprietary Information of Tenable Network Security, Inc.
14
“Appendix 8: Nessus SSL Configuration” of the Security Center documentation
enables password-less authentication between Security Center and Nessus.
This section provides an overview of the certificates and keys necessary for SSL
authentication between the Security Center and Nessus. There are three components
involved: the Certificate Authority, the Nessus Server and the Security Center. It is
necessary to generate the keys required for the SSL authentication and copy them to the
appropriate directories.
Certificate Authority
The Certificate Authority (CA) ensures that the certificate holder is authentic and not an
impersonator. The Certificate Authority holds a copy of the certificates for registered users
to certify that the certificate presented is genuine. When the Certificate Authority receives a
Certificate Signing Request (CSR), it validates and signs the certificate. The Certificate
Authority can reside on the Nessus server, but this is not the recommended method for a
production environment. For most PKI deployments, the Certificate Authority would be a
separate system or entity, such as Thawte or Verisign.
Nessus Server
The Nessus Server is the target of the secure communication and its keys must be
generated locally and copied to the Security Center that will need to communicate with it
using the SSL protocol.
Security Center
The Security Center communicates to the Nessus server via SSL. It uses the keys generated
and stores these keys and the certificate for the Certificate Authority in the
/opt/sc3/daemons directory. These keys must be owned by the “tns” userid.
Certificate Authority and Nessus Server Certificate
The /opt/nessus/sbin/nessus-mkcert command creates the Certificate Authority and
generates the server certificate. This command creates the following files:
File Name Created Purpose Where to Copy to
/opt/nessus/com/nes
sus/CA/cacert.pem
This is the certificate for the
Certificate Authority. If using
an existing PKI, this will be
provided to you by the PKI
and must be copied to this
location.
/opt/sc3/daemons on the
Security Center.
/opt/nessus/var/nessus/CA
on any Nessus servers that
need to authenticate using
SSL.
/opt/nessus/com/nes
sus/CA/servercert.pe
m
This is the public certificate
for the Nessus server that is
sent in response to a CSR.
/opt/nessus/com/nessus/CA
on any Nessus servers that
need to authenticate using
SSL.
/opt/nessus/var/ness This is the private key of the /opt/nessus/var/nessus/CA

Copyright 2004-2009, Tenable Network Security, Inc. Proprietary Information of Tenable Network Security, Inc.
15
us/CA/cakey.pem Certificate Authority. It may
or may not be provided by
the Certificate Authority,
depending on if they allow
the creation of sub users.
on any Nessus servers that
need to authenticate using
SSL.
/opt/nessus/var/ness
us/CA/serverkey.pem
This is the private key of the
Nessus server.
/opt/nessus/var/nessus/CA
on any Nessus servers that
need to authenticate using
SSL.
For more details on using SSL authentication with Nessus, see Appendix 8 of the Security
Center documentation.
Host Credentials (optional)
The Nessus scanner has the ability to use host credentials to login to a target system to
perform local host checks, including compliance checks. This enables Nessus to scan for
local configuration data, such as patch levels and file permissions that are not available in a
remote scan. Nessus supports use of SSH and SMB to log in to UNIX and Window systems
to perform local queries.
Windows Systems
Nessus has vulnerability checks that can use a Microsoft Windows domain account to find
local information from a remote Windows host. For example, using credentials enables
Nessus to determine if important security patches have been applied.
To use this feature, enter the Username, Password and Domain in the text boxes from the
“Options” tab in the “Add New Scan” selection:

Copyright 2004-2009, Tenable Network Security, Inc. Proprietary Information of Tenable Network Security, Inc.
16
Unix Systems
All UNIX host based checks performed by Nessus make use of the Secure Shell (SSH)
version 2 protocol that is native to the operating system platform. Nessus supports three
types of authentication methods for use with SSH: username and password, public/private
keys, and Kerberos.
Although it is supported, Tenable does not recommend using the username and password
method of authentication, since credentials are stored in clear text in the Nessus
configuration file.
The use of public and private keys is a more secure and flexible method for SSH
authentication. Nessus supports both DSA and RSA key formats. Use of SSH credentials is
the most common method of authenticating the scanner to a target host.
Nessus supports only the “blowfish-cbc” encryption algorithm for SSH. Some commercial
variants of SSH do not have support for this algorithm, possibly for export reasons. It is also
possible to configure an SSH server to only accept certain types of encryption.
The Nessus scanner can also be configured to authenticate to a Kerberos Key Distribution
Center (KDC), if the environment supports it.
The “SSH/SNMP/Kerberos Authentication” screen under the “Options” tab in the “Add
New Scan” selection enables the ability to provide SSH, SMNP or Kerberos credentials to
the Security Center for use by the Nessus scanners.
The Security Center is configured to use the SSH credentials in a defined policy as follows:

Copyright 2004-2009, Tenable Network Security, Inc. Proprietary Information of Tenable Network Security, Inc.
17
Log Correlation Engine
Tenable‟s Log Correlation Engine (LCE) has two authentication points:
Authentication from the Security Center to the LCE servers
Authentication from LCE client systems to the LCE servers
Security Center Authentication
LCE analysis is provided to the Security Center through the use of command execution
across a secure shell network session. When the Security Center needs to query LCE
servers, it invokes a Secure Shell (SSH) session to the configured LCE server. All execution
and analysis of LCE data occurs on the LCE server.
SSH public keys are configured so that the Security Center can invoke commands on the
LCE server. Non system-administrator accounts are used to perform these queries. The
trust relationship is only needed from the Security Center to the LCE server.
LCE servers are configured by the admin user from the “Log Correlation Engine
Management” selection under the “Console” tab as shown in the following screen:

Copyright 2004-2009, Tenable Network Security, Inc. Proprietary Information of Tenable Network Security, Inc.
18
The public SSH keys are for user “tns” which is the UNIX account the Security Center uses
to perform a majority of its operation.
LCE Client Types and Functions
There are a number of different LCE client types available. All LCE clients report
performance statistics (memory, disk space and CPU usage) on their host regardless of
platform.

Copyright 2004-2009, Tenable Network Security, Inc. Proprietary Information of Tenable Network Security, Inc.
19
Client Type Function
LCE Log Agent Monitors specific log files or directories for different operating
systems. These clients will “tail” any number of log files and send
the observed data to the LCE server for analysis.
The Windows Log Agent also can monitor:
Entries in the Windows event log
USB device inserts and removals
Entries in the event logs of remote Windows servers
LCE Log Agents are designed to send log data to the
LCE. Log data is in ASCII text format and will never
include binary files. The LCE Log Agents will check all
data before sending, specifically omitting binary files such as .zip, .gz, .tar, .lzh, .bz2, etc. If a binary
file is sent to the LCE, it has the potential to corrupt
the database. This functionality is automatically
performed by the LCE client software.
Tenable RDEP
Monitor
Retrieves messages from one or more Cisco IDS devices using
Cisco‟s Remote Data Exchange Protocol (RDEP) that can send events
to the LCE for processing, or it can be configured to send IDS events
directly to Security Center via SYSLOG.
LCE OPSEC Client Based on Checkpoint‟s API for Linux, it monitors OPSEC compliant
devices for new events.
Tenable Netflow
Monitor
Receives NetFlow messages for logging to the LCE. Messages can be
sent from multiple NetFlow sources to a single TNS_Netflow client.
The client supports NetFlow version 5 and 9.
Tenable Network
Monitor
Designed to monitor network traffic and send session information to
the LCE server. Sniffs network traffic to identify TCP sessions as well
as UDP, ICMP, and IGMP activity.
It also has a very useful feature of sniffing live SYSLOG traffic in
motion and sending it to the LCE as if the traffic were originally
destined for it. This makes it very easy to centralize logs and not
rely on forwarding of events from a different log server.
LCE UNIX Clients
The LCE UNIX client configuration file is edited to add the IP address of the LCE server as
well the shared secret key that will be entered in the configuration file on the LCE server.
The LCE server configuration file, /usr/thunder/daemons/thunder.conf, is also edited to add
the parameters for the LCE client (IP and shared secret key).
LCE Windows Client

Copyright 2004-2009, Tenable Network Security, Inc. Proprietary Information of Tenable Network Security, Inc.
20
The Log Correlation Engine Windows Log Agent client monitors events as well as specific log
files or directories for new logs. The LCE Windows Log Agent client installs by clicking on the
.msi distribution file that will launch the InstallShield Wizard.
To configure the LCE Windows Log Agent client launch the LCE Configuration tool located at
“C:\Program Files\Tenable\LCEClient\LCEConfig”.
This tool allows configuration of LCE server connectivity as well as configuration of the
Windows event logs, file logs and directories that should be monitored.
Passive Vulnerability Scanner (PVS)
The pvs-proxy daemon invokes a set of start scripts to allow PVS data to be sent to a
Security Center and enable it to receive new passive vulnerability plugins from the Security
Center.
To communicate with the Security Center, the PVS establishes its own unique username and
password. This credential information needs to be configured on the Security Center
through the administration interface so that the Security Center can log into the PVS and
retrieve vulnerability data.
PVS User Account Generation
The Security Center logs in to the PVS scanner via the pvs-proxy daemon to retrieve data
using a login and password combination. Unlike Nessus, which is an active scanner, the PVS
does not need to have a scan initiated since it is constantly gathering data.
UNIX Systems
The login account is created during installation as follows:
-------------------------------------------------------------------------
PVS CONFIGURATION : Security Center Uplink
-------------------------------------------------------------------------
PVS can report its data to the Security Center console for centralised
management.
If you enable Security Center support, PVS will run a daemon (pvs-proxy)
which will be polled by Security Center regularly to fetch all the new
reports. To do so, you will need to set up a username and password for pvs-
proxy and give these credentials to Security Center.
Do you want to enable Security Center support ? (y/n) [y]y
If you reply "y", you will be prompted for a username and password:
Username : admin
Password :
Password (confirm) :
Windows Systems

Copyright 2004-2009, Tenable Network Security, Inc. Proprietary Information of Tenable Network Security, Inc.
21
On the Windows version of the PVS, a service named “Tenable PVS Proxy” is installed, but is
not configured or enabled by default. To configure it, the “Options/PVS SC3 Listener”
section of the PVS user interface can be used to specify the username, password, and port
for the Security Center to log into with. Once this data is entered, the service must be
manually started and also configured to start automatically if the system reboots.
Security Center Configuration
To communicate with the Security Center, the PVS establishes its own unique username and
password. This credential information needs to be configured on the Security Center
through the administration interface so that the Security Center can log into the PVS and
retrieve vulnerability data. PVS systems many be added by the admin user via the
“Add/Remove a Passive Vulnerability Scanner” from the “Console” tab. An example
set of two PVS devices is shown below:
Example configured Passive Vulnerability Scanners
The access control points related to the Passive Vulnerability Scanner integration with the
Security Center are:
The login from the Security Center to the PVS.
The SSL certificates use to encrypt the communication

Copyright 2004-2009, Tenable Network Security, Inc. Proprietary Information of Tenable Network Security, Inc.
22
Security Center SSL Communication with PVS
PVS supports communication protocols based on the OpenSSL toolkit (please see
http://www.openssl.org/ for more details about the toolkit). This provides cryptographic
protection for communication between two systems. This section provides an overview of
the certificates and keys necessary for SSL communication between the Security Center and
PVS. There are three components involved: the Certificate Authority, the PVS Server and
the Security Center. It is not necessary to generate the keys required for the SSL
communication since they are provided with the Security Center software and downloaded
to the appropriate directory or folder, depending on the OS version of PVS. On the Red Hat
Linux version of PVS, the SSL keys and certificate are located in the /opt/pvs/var/pvs-
proxy/ssl/ directory. On the Windows version of PVS, they are located in the C:\Program
Files\Tenable\PVS\ca\ folder. The components that are stored in this folder are described
as follows:
Certificate Authority
The Certificate Authority (CA) ensures that the certificate holder is authentic and not an
impersonator. The Certificate Authority holds a copy of the certificates for registered users
to certify that the presented certificate is genuine. When the Certificate Authority receives a
Certificate Signing Request (CSR), it validates and signs the certificate. The Certificate
Authority component is named cacert.pem.
PVS Server Certificate
The PVS Server is the target of the secure communication and its certificate is named
servercert.pem. When the Security Center logs in to the pvs-proxy it sends the proxy a
„challenge‟ that was encrypted with the proxy‟s public key, which is in the servercert.pem
file.
PVS Private Key
The Security Center communicates to the PVS server via SSL using the PVS Private Key,
which is named serverkey.pem. When the Security Center sends the challenge, the proxy is
able to decrypt that challenge using its private key. The proxy‟s private key is stored in
serverkey.pem and gets loaded by the proxy when it starts up so its contents can be used
for this purpose.
3D Tool
The 3D Tool is a Windows desktop application that establishes a portal to the Security
Center. It collects technical data from the Security Center and displays it in graphical
format. It does not generate log or scan data, but can be used to log in to the Security
Center with usernames and their associated passwords defined there. The 3D Tool cannot
be used to establish user accounts and it does not store user passwords locally. The
Security Center provides all authentication and access control, not the 3D Tool.
When the 3D Tool is first launched, an empty dialog box for logging into a Security Center is
displayed as shown below:
Copyright 2004-2009, Tenable Network Security, Inc. Proprietary Information of Tenable Network Security, Inc.
23
Login dialog box for 3D Tool
To log in to a Security Center, type the IP or DNS name of the Security Center. If using the
HTTPS protocol, select the “SSL” checkbox. A valid username and password for the target
Security Center is required.
Once this is entered, click on the “Login” button. At this point, the 3D Tool will attempt to
log in to the Security Center. If it is successful, the “*Not Logged In*” message will change
to “*Logged In*” and a sound will be generated, indicating success. If the login was not
successful, an error message will be displayed and a different sound will be generated,
indicating failure.
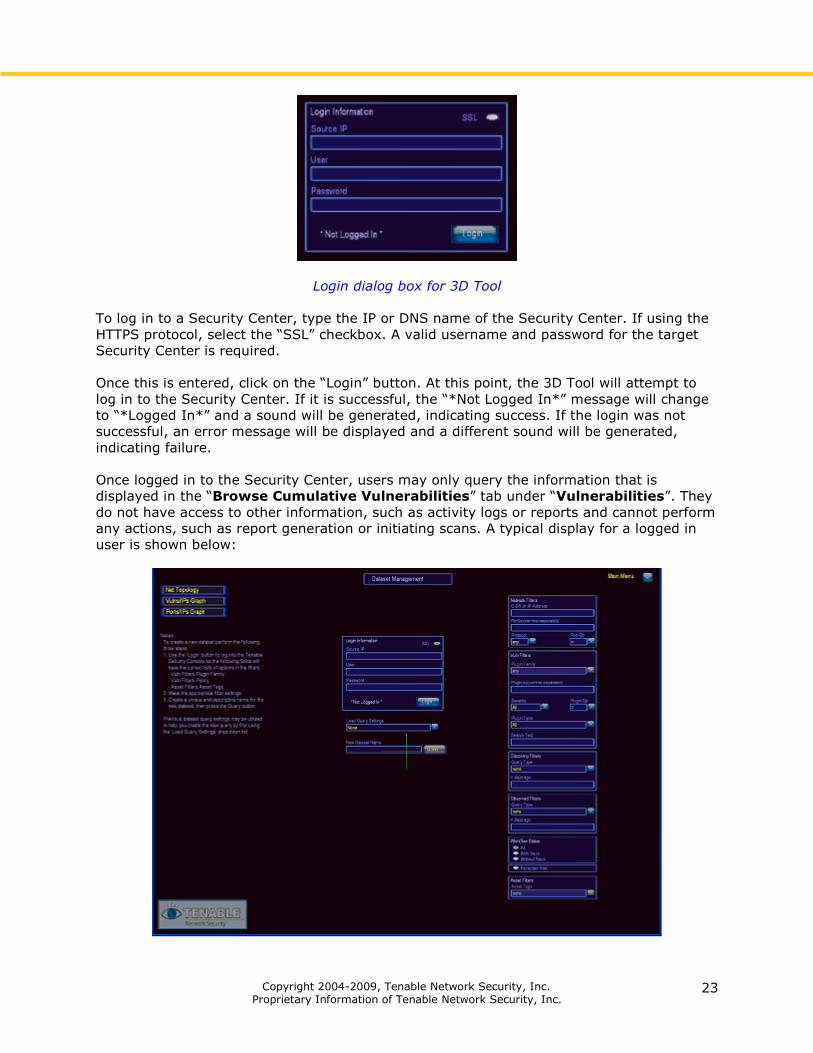
Once logged in to the Security Center, users may only query the information that is
displayed in the “Browse Cumulative Vulnerabilities” tab under “Vulnerabilities”. They
do not have access to other information, such as activity logs or reports and cannot perform
any actions, such as report generation or initiating scans. A typical display for a logged in
user is shown below:
Copyright 2004-2009, Tenable Network Security, Inc. Proprietary Information of Tenable Network Security, Inc.
24
About Tenable Network Security
Tenable, headquartered in Columbia, Md., USA, is the world leader in Unified Security
Monitoring. Tenable provides agent-less solutions for continuous monitoring of
vulnerabilities, configurations, data leakage, log analysis, and compromise detection. For
more information, please visit us at http://www.tenablesecurity.com.
TENABLE Network Security, Inc.
7063 Columbia Gateway Drive
Suite 100
Columbia, MD 21046
TEL: 1-877-448-0489
http://www.tenablesecurity.com

Copyright 2004-2009, Tenable Network Security, Inc. Proprietary Information of Tenable Network Security, Inc.
25
Appendix 1: Common Criteria Correspondence Representation
The table below displays the Common Criteria evaluation requirements with the
corresponding Tenable documentation.
Requirement Class Requirement Component Documentation
FAU: Security Audit FAU_GEN.1: Audit data
generation
Audit data generation is
described on pages 63
through 66 of the Security
Center 3.2 documentation.
FAU_SAR.1: Audit review Audit review is described on
pages 63 through 66 of the
Security Center 3.2
documentation.
FAU_SAR.2: Restricted audit
review
Restricted audit review is
described on pages 63
through 66 of the Security
Center 3.2 documentation.
FAU_SAR.3:Restricted audit
review
Restricted audit review is
described on pages 63
through 66 of the Security
Center 3.2 documentation.
FAU_SEL.1: Selective audit The selective audit
functions are describes in
the table on page 71 of the
Security Center
documentation.
FAU_STG.2: Guarantees of
audit data availability
Audit data availability is
described on pages 63
through 66 of the Security
Center 3.2 documentation.
FAU_STG.4: Prevention of audit
data loss
Prevention of audit data
loss is provided by the
environment, as described
on pages 39-40 of the
Security Center 3.2
documentation.
FIA: Identification and
Authentication
FIA_AFL.1: Authentication
failure handling
Authentication failure
handling is described
starting on page 63 of the
Security Center
documentation.
FIA_ATD.1: User attribute
definition
User attribute definition is
described in the Functional
Overview document.
FIA_UAU.2: User authentication
before any action
User authentication
functions are described in
the Functional Overview
document.

Copyright 2004-2009, Tenable Network Security, Inc. Proprietary Information of Tenable Network Security, Inc.
26
Requirement Class Requirement Component Documentation
FIA_UID.2: User identification
before any action
User identification and roles
are described in the
Functional Overview
document.
FMT: Security
Management
FMT_MOF.1: Management of
security functions behavior
The management function
behavior is described on
pages 2-5 of the Functional
Overview document under
“Security Management”.
FMT_MTD.1: Management of
TSF data
The management of TSF
data is described on pages
2-5 of the Functional
Overview document under
“Security Management”.
FMT_SMF.1: Specification of
management functions
The specification of
management functions is
described on pages 2-5 of
the Functional Overview
document under “Security
Management”.
It is also described in the
section “Customer
Management” starting on
page 57 of the Security
Center documentation.
FMT_SMR.1: Security roles The security roles are
described on pages 2-5 of
the Functional Overview
document under “Security
Management”.
FPT: Protection of the
TSF
FPT_ITT.1: Basic internal TSF
data protection
Protection of the TSF is
described on pages 39-41
of the Security Center 3.2
documentation.
IDS: Intrusion
Detection System
IDS_ANL.1 (EXP): Analyzer
analysis
The analyzer analysis is
described on page 29 of the
Security Center
documentation

Copyright 2004-2009, Tenable Network Security, Inc. Proprietary Information of Tenable Network Security, Inc.
27
Requirement Class Requirement Component Documentation
IDS_RCT.1 (EXP): Analyzer
react
The analyzer react function
using custom TASL scripts
is described on page 10 and
page 165 on the Security
Center documentation.
The TOE may also be
configured to generate
email alerts to a defined
user, as described on page
12 of the Security Center
documentation. Data may
also be forwarded to a
central SYSLOG server, as
described in the table on
page 71 of the Security
Center documentation.
IDS_RDR.1 (EXP): Restricted
data review
The restricted data review
is described in the
Functional Overview
document.
IDS_SDC.1 (EXP): System data
collection
The system data collection
is described on page 9 of
the Log Correlation Engine
documentation.
IDS_STG.1 (EXP): Guarantee of
system data availability
System data availability is
provided by the
environment, as described
on pages 39-40 of the
Security Center 3.2
documentation. It is also
provided by the storage of
data in silos, as described
on page 9 of the Log
Correlation Engine
documentation.
IDS_STG.2 (EXP): Prevention of
system data loss
Prevention of audit data
loss is described on page 4
of the Log Correlation
Engine documentation.

Copyright 2004-2009, Tenable Network Security, Inc. Proprietary Information of Tenable Network Security, Inc.
28
Appendix 2: Tenable Data Flow Diagram