Tempo Utility App For iOS and Android - Blue Maestro · 4 5 Tempo Utility App Instruction Guide Ver...
22
Tempo Utility App For iOS and Android Instruction Guide Tempo Utility App Instruction Guide Ver 1.2
Transcript of Tempo Utility App For iOS and Android - Blue Maestro · 4 5 Tempo Utility App Instruction Guide Ver...

Tempo Utility App For iOS and Android
Instruction Guide
Tempo Utility App Instruction Guide Ver 1.2

2 3
Tempo Utility App Instruction Guide Ver 1.20 Tempo Utility App Instruction Guide Ver 1.20
BLUE MAESTRO’S STANDARD LICENSE AND DISCLAIMER
Copyright ©2018 Blue Maestro Limited (“Blue Maestro”). All Rights Reserved. The copyright in the
software to which this document relates and in this document belong exclusively to Blue Maes-
tro and no permission to use, copy, modify, and distribute this software or this documentation is
permitted unless with the express prior written authorisation of Blue Maestro. The license to use
the software to which this document relates is granted so long as such software resides in hardware
provided by Blue Maestro.
No claims, representations or warranties, whether expressed or implied, including but not limited
to warranties of merchantability, fitness for a particular purpose, of title, or of non-infringement of
third party rights, are made by Blue Maestro as to the safety, reliability, durability or performance of
Blue Maestro’s products. Blue Maestro is not responsible for any liabilities resulting from negligence,
misuse, modification, or alterations to the product by the user. Furthermore, Blue Maestro accepts no
liability whatsoever for the safety, reliability, durability or performance of any of its products. IN NO
EVENT, REGARDLESS OF CAUSE, SHALL BLUE MAESTRO BE LIABLE FOR ANY INDIRECT, SPECIAL,
INCIDENTAL, PUNITIVE OR CONSEQUENTIAL DAMAGES OF ANY KIND, WHETHER ARISING UNDER
BREACH OF CONTRACT, TORT (INCLUDING NEGLIGENCE), STRICT LIABILITY OR OTHERWISE, AND
WHETHER BASED ON THIS AGREEMENT OR OTHERWISE, EVEN IF ADVISED OF THE POSSIBILITY OF
SUCH DAMAGES.
User assumes responsibility for the correct operation of the product and any software associated
with it. User assumes responsibility for determining the suitability of the product to the user’s needs,
for configuring and using the product to meet those needs, and for the proper placement/location
of the product in the environment in which it is being used. User assumes responsibility for verifying
and interpreting results obtained from product use.
BLUE MAESTRO RESERVES THE RIGHT TO REVISE ITS STANDARD LICENSE AND DISCLAIMER WITH-
OUT NOTICE AT ANY TIME.
Contents
General Principles of Operation 4
Download the App 8
Introduction Screen 9
Stored Data 10
Select Device 11
Device Details Screen 12
Download 13
Viewing Data in Graph Form 14
Viewing Data in Table Form 15
Command Screen 16
Naming the Device 17
Logging Interval 18
Sensor Interval 19
Reference Date 20
Set Alarm 1 21
Set Alarm 2 22
Clear Alarms 23
Set Transmit Power 24
Clear Data 25
Lock/Unlock the Device 26
Airplane Mode 27
Reset Device 28
Calibrate Temperature 29
Calibrate Humidity 30
Set Units of Measure 31
Disable Button 32
Set Device ID 33
Set Advertising Frequency 34
Blink Device LED 35
Command Console 36
Command Console Cont... 37
Export Data as CSV 40
Troubleshooting 41

4 5
Tempo Utility App Instruction Guide Ver 1.20 Tempo Utility App Instruction Guide Ver 1.20
General Principles of Operation
Congratulations on purchasing a Blue Maestro Bluetooth Sensor Beacon and Data Log-
ger (“Device”). A benefit of a Blue Maestro Device is the breadth and depth of available
user defined settings allowing you to set the Device as you like. Settings are made to the
Device itself meaning every user of the Device is subject to the the same settings. This is
important when more than one user interacts with a Device.
This Instruction Guide is designed principally for Blue Maestro Bluetooth Temperature
and Humidity Sensor Beacons and Data Loggers but all of Blue Maestro’s Devices share
the same principles underpinning the Android and iOS apps. So the general function-
ality and many of the commands are the same regardless of which type of Blue Maestro
Device you may have. The Instruction Guide for your particular Device may provide fur-
ther information on any special features of your Device that are not covered in this Guide.
This Guide will be kept updated but the speed of development of the apps may mean
there are new features or changes to features which are not reflected in this Guide from
time to time. We suggest you check the support pages of the Blue Maestro website
(www.bluemaestro.com) regularly for the latest app guidance.
If there are any features you are not sure of please feel free to contact support@blue-
maestro.com who will be able to assist.
Bluetooth Sensor Beacon and Data Logger
Each Device is a Bluetooth Sensor Beacon and Data Logger. That is to say it “beacons”
current sensor data and certin Device information and does not form a connection
or bond with your smartphone unless a command is being issued or a download is
occurring. As a consequence your Device may not appear as a connected device in your
Bluetooth settings, this is normal.
The Device will continuously transmit current values, certain metrics such as averages,
and key information about the Device. This is why it is described as a beacon. The apps
will scan, parse and display this data on your smartphone. This means many users can
see the same data at the same time.
The Device acts as a data logger in that at each interval (defined as the Logging Interval)
a reading will be taken and stored in the memory of the Device for future download
by the apps. Before this logged data can be on your smartphone, it needs to be down-
loaded via the app on your smartphone. There is a set number of data points that can
be logged by the Device in its memory. Once memory capacity is reached, the oldest
values are replaced with new values in a circular buffer fashion.
NOTE: A download results in a syncing of data between the Device and the apps. That is to say any data previously downloaded to your smartphone will be overridden with new data. If your Device has been reset, and a download occurred before the reset, you will need to export the data from your smartphone else it will be replaced with any new data and will be effectively erased.
Alarms and alerts
The Devices do not generate alerts that will be pushed to your smartphone while the
apps are in the background. Such push notifications for Bluetooth Sensor Beacons are
flawed for the following reasons:
1. You need to be in range
To get alerts pushed to your smartphone you would need to be in range of the Device,
with your smartphone, it would need to be switched on and the app would need to be
running in the background.
2. The app may not be functioning properly in the background
The iOS and Android operating systems may terminate the app without notice if the
smartphone is low on resources. Likewise in certain instances, Bluetooth may halt in the
background without notice. This could result in you not getting an alert even if you were
in range.
3. Reduced battery life of the Device and your smartphone
Push notifications lead to increased battery consumption in the Device and in your
smartphone.
Instead Blue Maestro Devices will generate an alarm that will be visible when you open
the apps. The apps will record each threshold breach and will display it as a number.
This will ensure you know whether or not you are in range of the Device and there is any
problems with the app or with Bluetooth on your smartphone.
Also for critical applications where push notifications are important we suggest using
another system that is not dependant on Bluetooth on your smartphone or your app
running in the background. Devices such as Blue Maestro’s Tempo Anywhere™ Internet
Gateway can push notifications to you wherever you are providing you have internet
access, since the notifications are by way of much more reliable SMS text or email.

6 7
Tempo Utility App Instruction Guide Ver 1.20 Tempo Utility App Instruction Guide Ver 1.20
Data Integrity
The Device has a number of features that prevents logged data from being manipulated,
making it ideal for use in temperature critical applications where the readings can have
consequences.
Firstly the Device uses timestamps and it is not possible to change the logging frequen-
cy or the reference date/time (both used for timestamping) without the data in the
Device from being erased. This prevents a User from manipulating logging timestamps.
Secondly a download of the Device replaces any data already stored in the smartphone,
thereby preventing the mixing of data with different timestamps and logging intervals.
NOTE: Users should become familiar with the settings that will cause data in the Device to be erased and also need to be aware that downloading data will cause any previous data in their smartphone to be overridden.
Device Security
The Device also has a number of features for security. The first is a password that can
prevent unauthorised persons from changing any of the settings of the Device or down-
loading data from the Device and secondly, a feature that disables the button prevent-
ing unauthorised persons from switching the device off/on. These security features are
ideal where third parties may come into Bluetooth range of the Device.
NOTE: If a password is set on the Device, no other person will be able to interact with the Device unless that password is entered once more. It is important that the password is not lost since it is not possible to recover it and it may render the Device useless.
Viewing Data and Report Generation
The Device allows downloaded data to be viewed in graphs or in table form. However
there are limitations to the graphing function in the apps. It is best to use one of the
Blue Maestro excel templates for viewing graphs and report generation. This provides
a paper trail ideal for enterprise applications where audit trails are required while also
providing users a great deal more flexibility in generating graphs and reports in a form
that best suits them.
Please visit bluemaestro.com for access to excel templates and instructions on how you
can generate pdf reports from your Blue Maestro Device.
How Displayed Metrics are Calculated
The apps display metrics for certain Devices such as averages, highs and lows. This can
be for the last 24 hours or since the Device was last reset.
These, just like the alarms for breaches of set thresholds, are calculated based on logged
values. That is to say that if between a logging interval a currently displayed tempera-
ture, say, falls below the recorded low temperature, it will not be recorded as a new low
temperature since that displayed value is not logged.
Bluetooth Connection Issues
From time to time users may experience Bluetooth connection issues with their smart-
phones. This is predominantly caused by different versions of iOS and Android imple-
menting Bluetooth a little differently and the choice of physical Bluetooth chips in the
smartphones themselves. Android is generally worse than iOS for Bluetooth connectivity
issues.
Thankfully most Bluetooth issues can be resolved by restarting your smartphone. Blue
Maestro has prepared a separate paper on Bluetooth connection issues which can be
found at www.bluemaestro.com/support-and-resources/
There are also some general Troubleshooting Tips found at the end of this Guide.

8 9
Tempo Utility App Instruction Guide Ver 1.20 Tempo Utility App Instruction Guide Ver 1.20
Go to Google Play Store and download the Tempo Utility App.
Ensure Bluetooth is turned on
The App should ask you to turn Bluetooth on if it is not already, but double check that
your Bluetooth is actually on.
Next ensure the device is on. All Blue Maestro Devices have an on/off function. Please
refer to the relevant instruction manual for your device to understand how this works.
NOTE: This app works on Android 5 and above and iOS 7 and above, respectively
.
Android iOS
This is the first screen of the app and will have the current version number on it. It will
enable you to select devices and to view any stored data. There will also be a link to ena-
ble you to access these instructions from your smartphone’s browser.
Android
Download the App Introduction Screen

10 11
Tempo Utility App Instruction Guide Ver 1.20 Tempo Utility App Instruction Guide Ver 1.20
If you select Stored Data then you will be presented with a list of devices where data has
been previously downloaded.
NOTE: If no download from a device has occurred, this list will be left blank and there will be no Stored Data to view.
If you select any of the devices, you will be presented with a graph of the underlying
data and the ability to view that data as a table. You will also be able to export the data
in a .csv format.
You can delete the device’s data from this screen as well.
It is important to note that you do not need to be in range of a device to view stored
data. This is data in your smartphone so you can view it any time.
NOTE: This data will be overridden on a subsequent download of data from the de-vice. If data in the device has changed and you want to keep any previous download, you will need to export the data to prevent it being overridden.
Android iOS
If from the Introduction Screen you choose select device you will be presented with a list of
devices currently on and within Bluetooth range of your smartphone. This data is scanned
from the device and a scan window is approximately 45 seconds. So for 45 seconds the
data being shown will be the data being transmitted from the devices. You can refresh
the scan by selecting Scan when it comes up at the bottom of the screen when the scan is
completed.
Each Blue Maestro Bluetooth Sensor and Data Logger contains basic information about
the device. Often if you are just looking for current readings and the state of the device,
you can simply look at this screen without having to navigate further in the app.
Also a benefit from this type of layout is that if you have multiple devices you can view all of
your devices in the one place.
Android iOS
Stored Data Select Device

12 13
Tempo Utility App Instruction Guide Ver 1.20 Tempo Utility App Instruction Guide Ver 1.20
If you select a device from the Device List screen you will be presented with further in-
formation on the device. This will include further metrics such as highs/lows, etc. as well
as more key information such as the Reference Data (for further information on this, see
below).
The screen is live for as long as Android allows the app to scan, that is to say it will keep
updating at the range of every one or two seconds (depending on how many other
Bluetooth devices are in the vicinity). From time to time, Android will not allow the app
to scan and this is predominantly due to Android discouraging continuous Bluetooth
scanning because of the higher battery consumption. If scanning has been stopped, the
best way to restart it is to navigate to the Device List and then select the device again.
Here you will be able to go to settings for the device, graph data that has been down-
loaded and cause a download to happen,
Android iOS
Before data can be shown in a graph, table or exported as a CSV, it needs to be down-
loaded from the device. If no data is downloaded, a message will appear when selecting
graph that a download needs to occur first.
When downloading, the app will connect with the device and if the connection is suc-
cessful will download the data.
NOTE: On a download the entire data stored in the smartphone for the device is replaced with the new data. If you do not want the data overridden you will need to export the data you want to save as a CSV file for future reference.
The download usually requires a good signal (>-90dB). A warning will appear if the
strength is not high enough indicating that the download may not be successful.
NOTE: It is best not to interrupt a download by selecting the Home or Back buttons on the Android. This has the potential not to fully halt a download so a connection may still be open with a device, which can affect subsequent downloads.
Android iOS
Device Details Screen Download

14 15
Tempo Utility App Instruction Guide Ver 1.20 Tempo Utility App Instruction Guide Ver 1.20
Once there is data downloaded it is possible to view this in a graph. The graph will have
the log number as the x axis and the value as the y axis for all metrics recorded by the
device. This will be represented in the units of measure that has been set for the device.
You can scroll and zoom the graph. The numerical value of the data is represented by a
value above each plot point.
Viewing a lot of data in a graph displayed on a smartphone screen is not ideal. We sug-
gest using Excel to plot data from an exported CSV if more detail and a better viewing
experience is desired.
Android iOS
From the graph screen you can choose to view the data in a table. This will be or-
deredwith the most recent log first descending to the earliest log. The metrics will be
displayed in the units of measure set for the device.
From here the data can be exported in a CSV format. More details of the export func-
tion are listed below.
Android iOS
Viewing Data in Graph Form Viewing Data in Table Form
16 17
Tempo Utility App Instruction Guide Ver 1.20 Tempo Utility App Instruction Guide Ver 1.20
From the Device Details screen you can navigate to the Command Screen where there is
a list of commands/settings that can be issued to the device.
Note: Each of these settings is made to the device itself, it is not just an app setting. This means that every user of the device will be affected by those same settings.
Android iOS
This sets a new name for the Device. The name cannot exceed 8 characters else it will be
truncated. If successful, the response should be “Name Set”.
When clicking OK to the response from the device you will be taken back to the Device
Details. The old name will may still be present until the app receives a new transmission
from the device with its new name, since this is broadcast by the device. This may take a
second or two, longer if there are many Bluetooth devices in range.
Android iOS
Command Screen Naming the Device
18 19
Tempo Utility App Instruction Guide Ver 1.20 Tempo Utility App Instruction Guide Ver 1.20
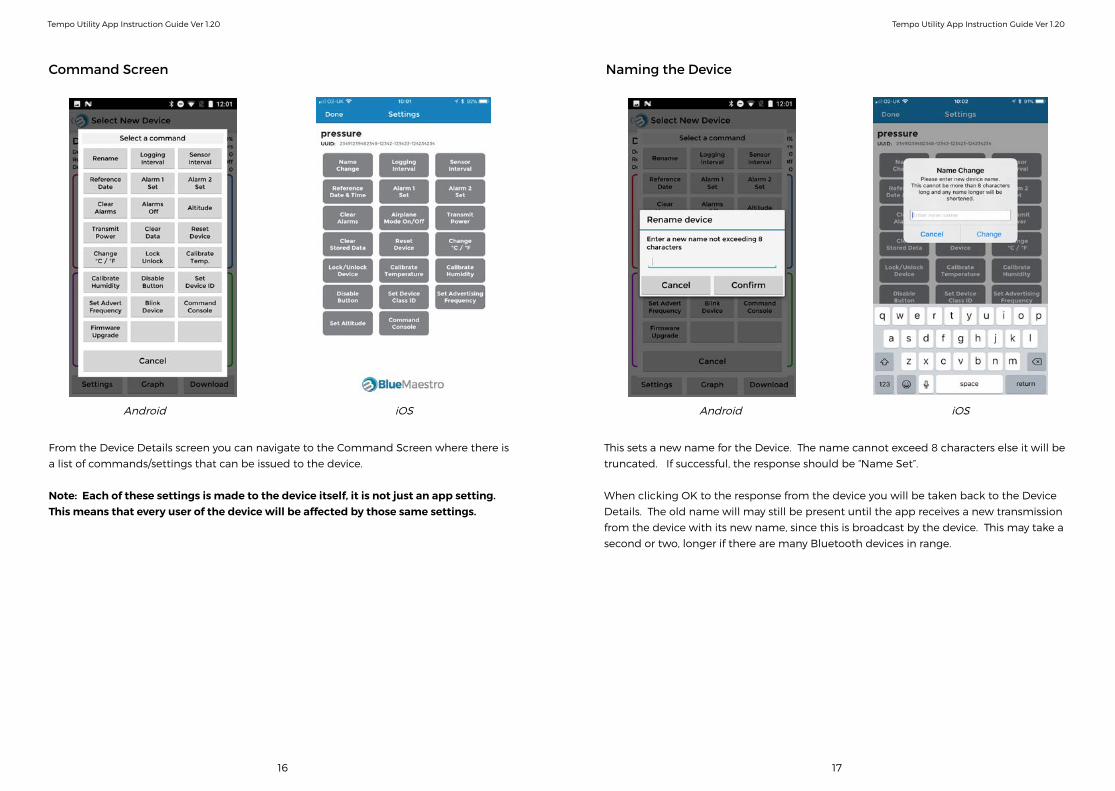
This sets the frequency with which logs are recorded in the device. If this is changed the
entire log currently stored in the device is erased and logging starts afresh.
NOTE: If you want to keep data that may be in the device before setting the logging interval, you must download data from the device and export it as a CSV. If you change the logging interval, data in the device is lost and if you then download data from the device, any data previously saved will be written over.
The logging interval should appear in the Device List screen for the particular device,
however it is also possible to get this directly from the device using the Command Con-
sole as described below.
Android iOS
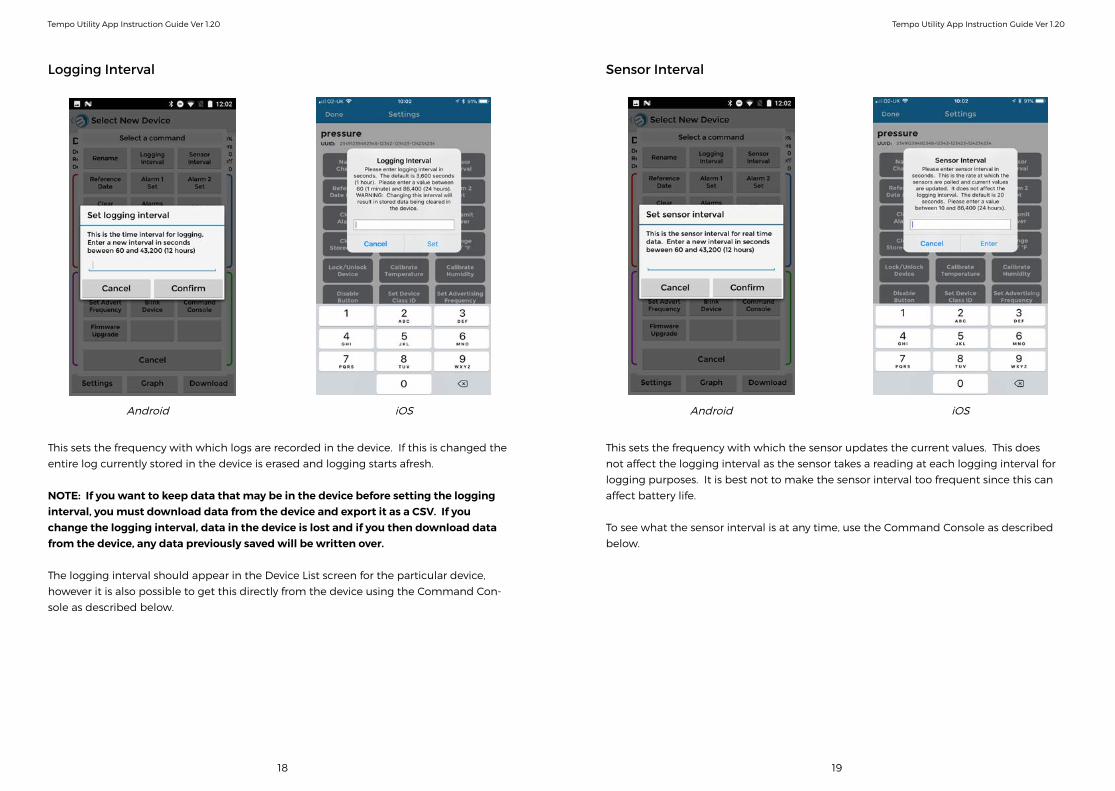
This sets the frequency with which the sensor updates the current values. This does
not affect the logging interval as the sensor takes a reading at each logging interval for
logging purposes. It is best not to make the sensor interval too frequent since this can
affect battery life.
To see what the sensor interval is at any time, use the Command Console as described
below.
Android iOS
Logging Interval Sensor Interval

20 21
Tempo Utility App Instruction Guide Ver 1.20 Tempo Utility App Instruction Guide Ver 1.20
This sets the reference date for the times-tamping of logs in the device. The reference
date is the time and date for the first time-stamp, which is taken immediately once the
reference date is set.
NOTE: Changing the reference date and time deletes the stored data in the device. If you want to keep data that may be in the device before setting the logging interval, you must download data from the device and export it as a CSV. If you change the logging interval, data in the device is lost and if you then download data from the device, any data previously saved will be written over.
Android iOS
The temperature alarms bring to your attention threshold breaches in logged data. It
will provide a visual indication in the app. The app does need to be running and the
device needs to be in range before you get the alert. The app will also display a number
indicating how many logs are below the breach, up to a maximum of 255.
You set the alarm by entering the threshold in whole numbers (points of a number are
not accepted) and then selecting whether the threshold is breached if the current met-
ric is below or above the set threshold.
The temperature alarms are only forward looking. That is to say they will only record
breaches once they have been set.
Android iOS
Reference Date Set Alarm 1
22 23
Tempo Utility App Instruction Guide Ver 1.20 Tempo Utility App Instruction Guide Ver 1.20
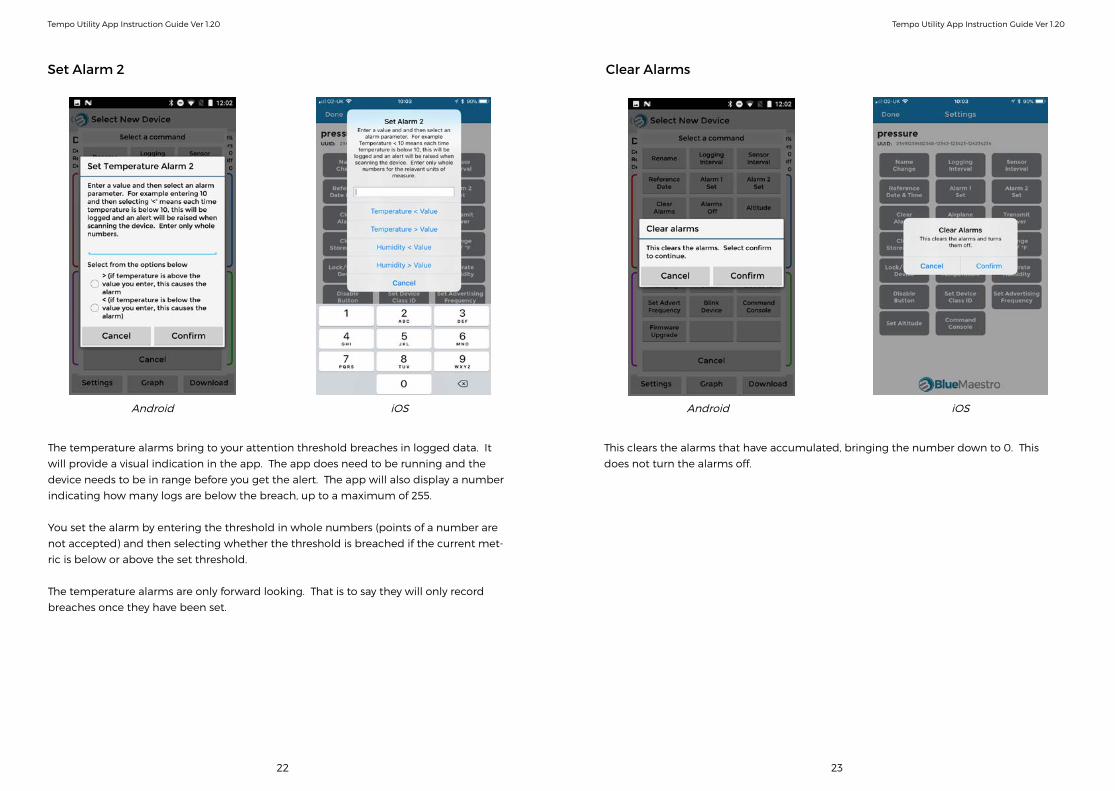
The temperature alarms bring to your attention threshold breaches in logged data. It
will provide a visual indication in the app. The app does need to be running and the
device needs to be in range before you get the alert. The app will also display a number
indicating how many logs are below the breach, up to a maximum of 255.
You set the alarm by entering the threshold in whole numbers (points of a number are
not accepted) and then selecting whether the threshold is breached if the current met-
ric is below or above the set threshold.
The temperature alarms are only forward looking. That is to say they will only record
breaches once they have been set.
Android iOS
This clears the alarms that have accumulated, bringing the number down to 0. This
does not turn the alarms off.
Android iOS
Set Alarm 2 Clear Alarms

24 25
Tempo Utility App Instruction Guide Ver 1.20 Tempo Utility App Instruction Guide Ver 1.20
This sets the transmission power of the device. It can increase battery life at the expense
of range of transmission. The default is +4dB which is the highest and can be set to -4dB
which is the lowest.
To see what the transmit power is at any time, use the Command Console described
below.
Android iOS
This clears the accumulated logs in the Device and logging recommences from the start.
Certain settings, such as the logging interval, as well as the name, are unaffected.
Android iOS
Set Transmit Power Clear Data
26 27
Tempo Utility App Instruction Guide Ver 1.20 Tempo Utility App Instruction Guide Ver 1.20
iOS iOS
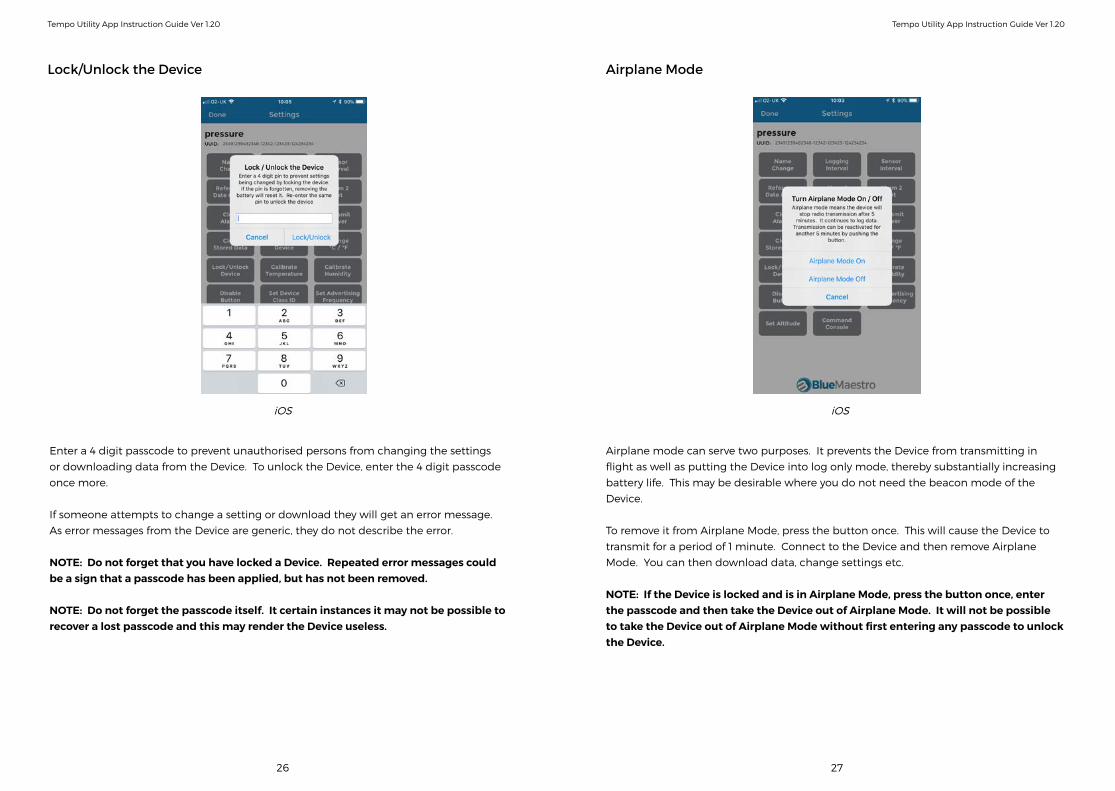
Enter a 4 digit passcode to prevent unauthorised persons from changing the settings
or downloading data from the Device. To unlock the Device, enter the 4 digit passcode
once more.
If someone attempts to change a setting or download they will get an error message.
As error messages from the Device are generic, they do not describe the error.
NOTE: Do not forget that you have locked a Device. Repeated error messages could be a sign that a passcode has been applied, but has not been removed.
NOTE: Do not forget the passcode itself. It certain instances it may not be possible to recover a lost passcode and this may render the Device useless.
Airplane mode can serve two purposes. It prevents the Device from transmitting in
flight as well as putting the Device into log only mode, thereby substantially increasing
battery life. This may be desirable where you do not need the beacon mode of the
Device.
To remove it from Airplane Mode, press the button once. This will cause the Device to
transmit for a period of 1 minute. Connect to the Device and then remove Airplane
Mode. You can then download data, change settings etc.
NOTE: If the Device is locked and is in Airplane Mode, press the button once, enter the passcode and then take the Device out of Airplane Mode. It will not be possible to take the Device out of Airplane Mode without first entering any passcode to unlock the Device.
Lock/Unlock the Device Airplane Mode

28 29
Tempo Utility App Instruction Guide Ver 1.20 Tempo Utility App Instruction Guide Ver 1.20
This resets the Device to its factory default settings. This will cause the Device to reboot.
Android iOS
This sets a calibration offset to temperature in the Device. Enter a value that may
include a decimal point. All temperature values in the Device will now have the offset
applied. For logged data this only applies going forward, so any previously logged tem-
perature values will not be affected by the offset.
To see what the calibration is at any time, use the Command Console described further
below.
Android iOS
Reset Device Calibrate Temperature
30 31
Tempo Utility App Instruction Guide Ver 1.20 Tempo Utility App Instruction Guide Ver 1.20
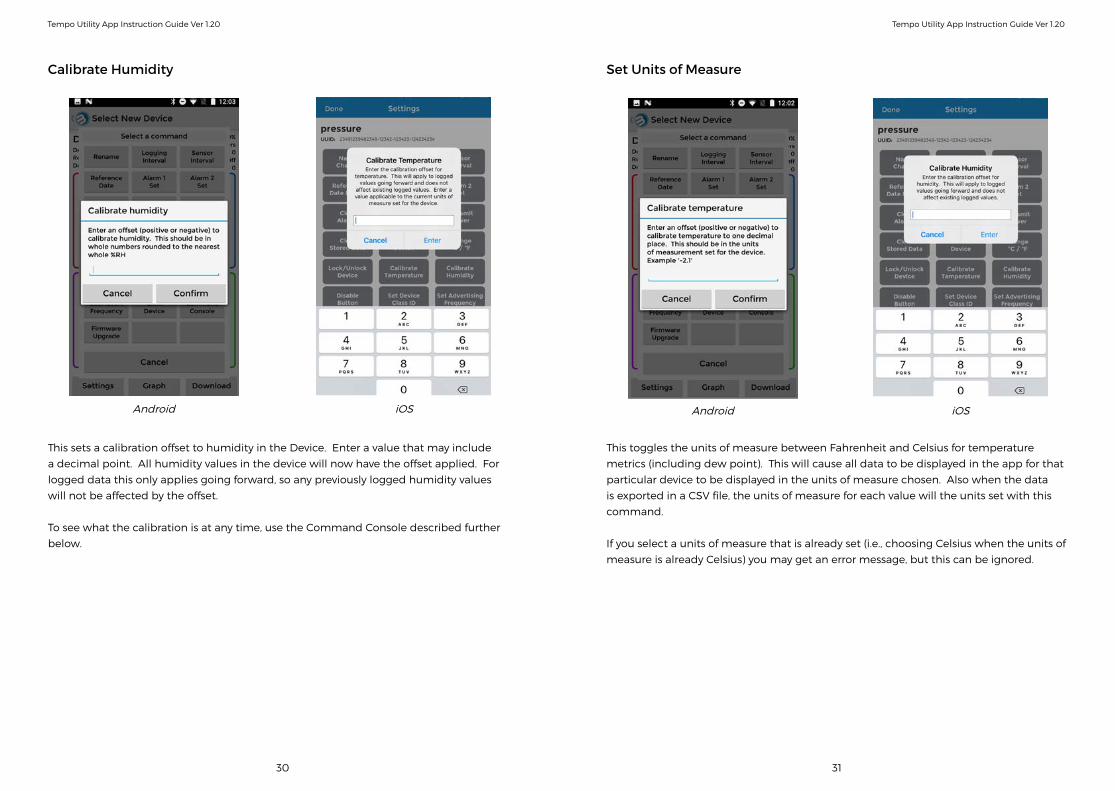
This sets a calibration offset to humidity in the Device. Enter a value that may include
a decimal point. All humidity values in the device will now have the offset applied. For
logged data this only applies going forward, so any previously logged humidity values
will not be affected by the offset.
To see what the calibration is at any time, use the Command Console described further
below.
Android iOS
This toggles the units of measure between Fahrenheit and Celsius for temperature
metrics (including dew point). This will cause all data to be displayed in the app for that
particular device to be displayed in the units of measure chosen. Also when the data
is exported in a CSV file, the units of measure for each value will the units set with this
command.
If you select a units of measure that is already set (i.e., choosing Celsius when the units of
measure is already Celsius) you may get an error message, but this can be ignored.
Android iOS
Calibrate Humidity Set Units of Measure
32 33
Tempo Utility App Instruction Guide Ver 1.20 Tempo Utility App Instruction Guide Ver 1.20
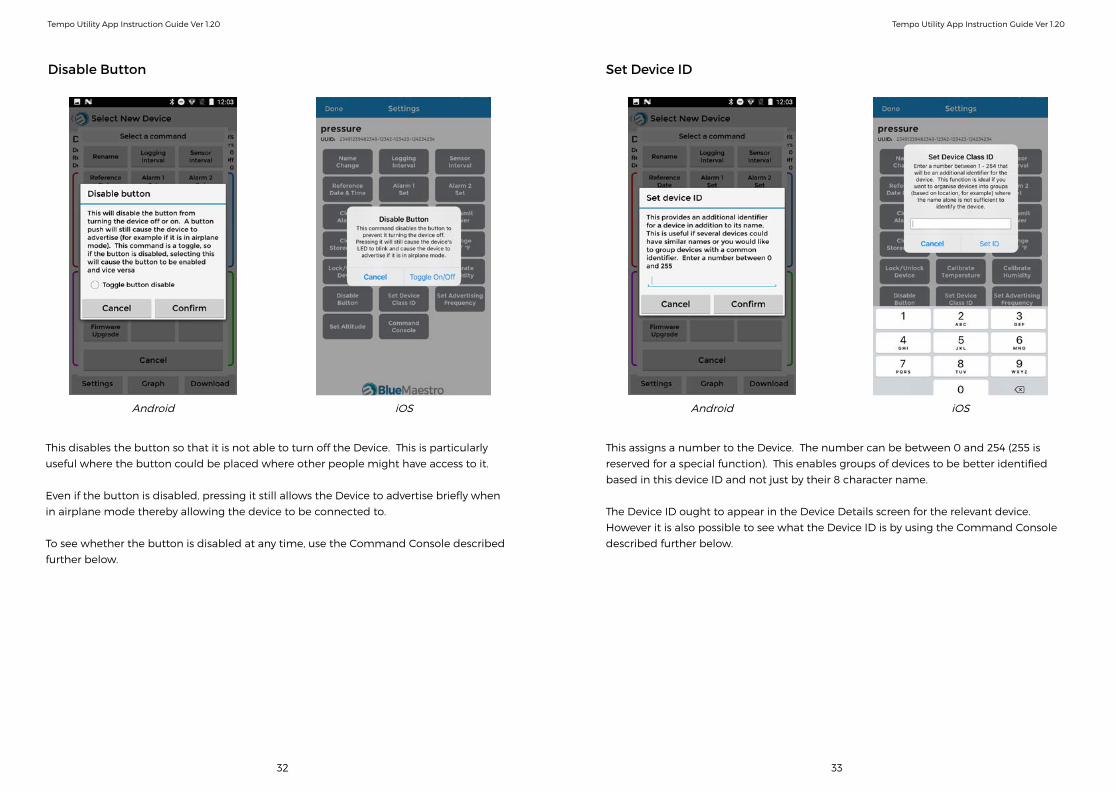
This disables the button so that it is not able to turn off the Device. This is particularly
useful where the button could be placed where other people might have access to it.
Even if the button is disabled, pressing it still allows the Device to advertise briefly when
in airplane mode thereby allowing the device to be connected to.
To see whether the button is disabled at any time, use the Command Console described
further below.
Android iOS
This assigns a number to the Device. The number can be between 0 and 254 (255 is
reserved for a special function). This enables groups of devices to be better identified
based in this device ID and not just by their 8 character name.
The Device ID ought to appear in the Device Details screen for the relevant device.
However it is also possible to see what the Device ID is by using the Command Console
described further below.
Android iOS
Disable Button Set Device ID
34 35
Tempo Utility App Instruction Guide Ver 1.20 Tempo Utility App Instruction Guide Ver 1.20
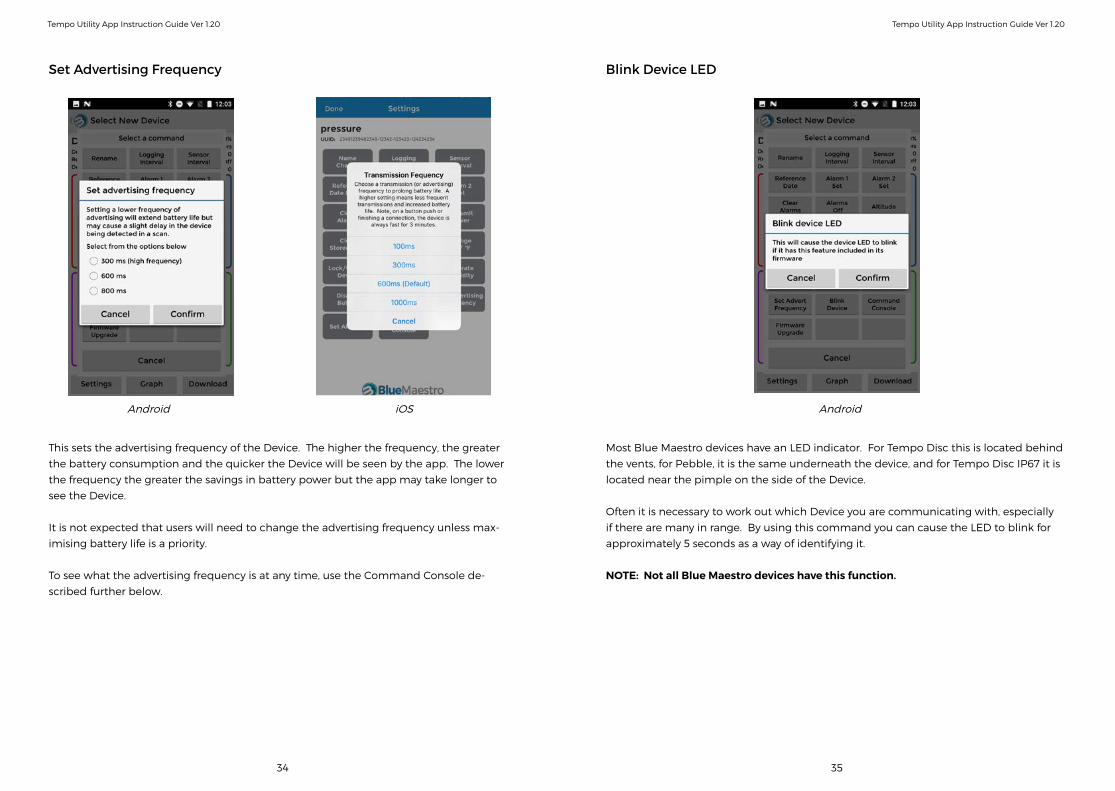
This sets the advertising frequency of the Device. The higher the frequency, the greater
the battery consumption and the quicker the Device will be seen by the app. The lower
the frequency the greater the savings in battery power but the app may take longer to
see the Device.
It is not expected that users will need to change the advertising frequency unless max-
imising battery life is a priority.
To see what the advertising frequency is at any time, use the Command Console de-
scribed further below.
Android iOS
Most Blue Maestro devices have an LED indicator. For Tempo Disc this is located behind
the vents, for Pebble, it is the same underneath the device, and for Tempo Disc IP67 it is
located near the pimple on the side of the Device.
Often it is necessary to work out which Device you are communicating with, especially
if there are many in range. By using this command you can cause the LED to blink for
approximately 5 seconds as a way of identifying it.
NOTE: Not all Blue Maestro devices have this function.
Android
Set Advertising Frequency Blink Device LED

36 37
Tempo Utility App Instruction Guide Ver 1.20 Tempo Utility App Instruction Guide Ver 1.20
This introduces the command console which is used to type specific commands to the
Device which are not contained in the settings menu. See further on for details.
Android
When pressing the Command Console button, this screen will appear. At the same time
the device will be attempted to be connected to. It is best to wait for a few seconds until
this occurs.
NOTE: Do not keep pressing Connect/Disconnect. There is often a small time delay be-tween pressing Connect and a connection occurring. Please wait 4-5 seconds between presses. It is advisable to press Connect only once you have seen the “Disconnected from....” Message in the console.
NOTE: You will notice a graph button beside the send button. This will enable certain Blue Maestro devices to display a real time graph of readings. Only certain devices have this functionality, so do not worry if this does not work for your particular device.
Android iOS
Command Console Command Console Cont...
38 39
Tempo Utility App Instruction Guide Ver 1.20 Tempo Utility App Instruction Guide Ver 1.20
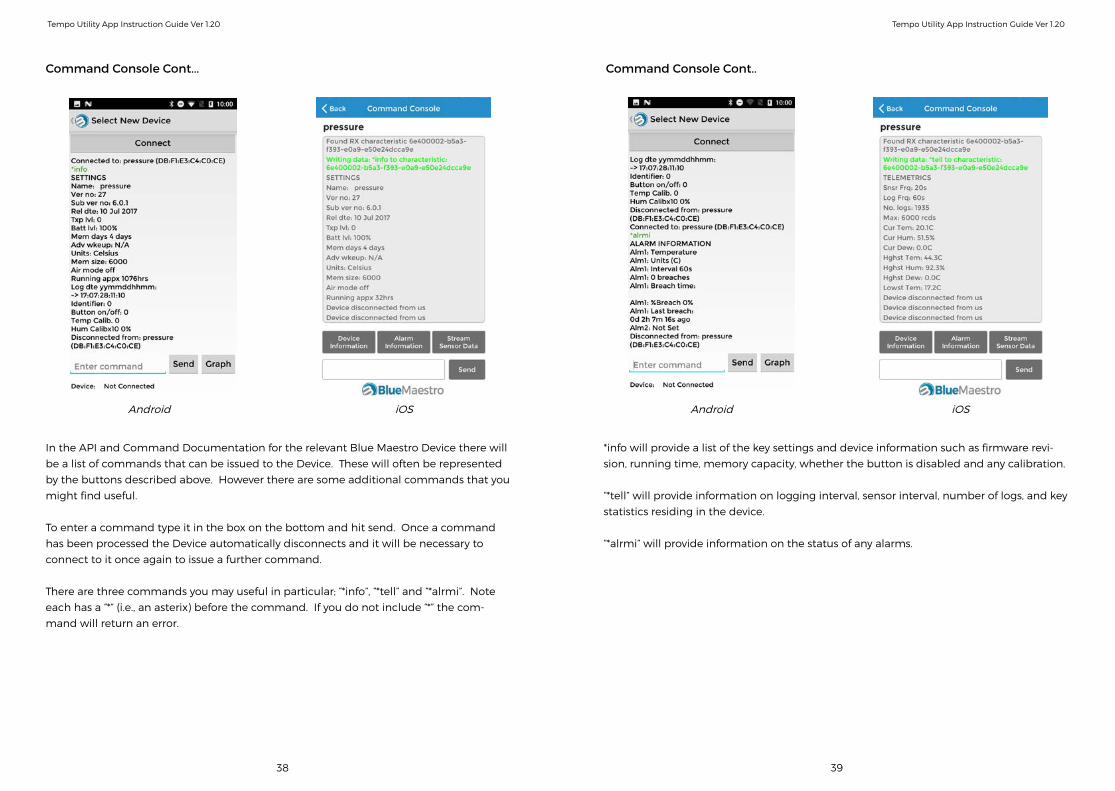
In the API and Command Documentation for the relevant Blue Maestro Device there will
be a list of commands that can be issued to the Device. These will often be represented
by the buttons described above. However there are some additional commands that you
might find useful.
To enter a command type it in the box on the bottom and hit send. Once a command
has been processed the Device automatically disconnects and it will be necessary to
connect to it once again to issue a further command.
There are three commands you may useful in particular; “*info”, “*tell” and “*alrmi”. Note
each has a “*” (i.e., an asterix) before the command. If you do not include “*” the com-
mand will return an error.
Android iOS
*info will provide a list of the key settings and device information such as firmware revi-
sion, running time, memory capacity, whether the button is disabled and any calibration.
“*tell” will provide information on logging interval, sensor interval, number of logs, and key
statistics residing in the device.
“*alrmi” will provide information on the status of any alarms.
Android iOS
Command Console Cont... Command Console Cont..

40 41
Tempo Utility App Instruction Guide Ver 1.20 Tempo Utility App Instruction Guide Ver 1.20
In the Table Data Screen there is an Export button. Pressing this will create a .CSV file
and will place it in an email with your default email address and a title of the email. You
can then email it to yourself or anyone else to enable it to be saved and custom reports
generated using excel. A copy of the CSV file will also be saved in your Android device
and can be accessed using a program on your desktop such as Android File Transfer.
NOTE: Each subsequent CSV file generated will over write an older CSV file for the same Device on your Android device.
Android iOS
Troubleshooting
This section is dedicated to common problems that a user may experience with the
app.
I cannot see the Device in the app
Firstly check your version of iOS or Android (as applicable). The apps are only compat-
ible with Android devices running Android 5.0 and above and iOS devices running iOS
7 and above.
Next, check you have Bluetooth on and have accepted Location Services if you were
asked to on starting the app. If you refused Location Services when asked, the app
may not work. If you cannot remember whether you accepted the request or not, its
best to uninstall and then reinstall the app, and any permissions required will be asked
again.
NOTE: Blue Maestro doesn’t use Location Services, but Android/iOS often considers Bluetooth Low Energy devices to be in the same category as location beacons and so will require users to confirm Location Services even if the app does not strictly use it.
Next check your Device is in range and is switched on. There will be a button (such as
the top colour surface of Tempo Disc or the bottom button on Pebble) that will active
the Device.
Next check your Device is not in airplane mode. Airplane mode will cause the Device
not to advertise and therefore will not be seen by the apps.
Finally turn your smartphone off and then on again. On certain makes and models
Bluetooth can get a little unstable, especially if you have other Bluetooth devices con-
nected. Restarting your smartphone often fixes this.
I can see the Device in the app but I cannot connect or download from it
This will either be a Bluetooth connection issue, which is best resolved by restarting
your smartphone, or could relate to the Device having a passcode set or be in airplane
mode. If the Device has a passcode set, you will get an error on connecting to it. If
there is a Bluetooth connection issue, there will be no error message, but the down-
load or setting command action will appear to stall.
Export Data as CSV

www.bluemaestro.com