Telelogic DOORS /ERS - ULisboa · Telelogic DOORS /ERS ... ClearCase is a registered trademark of...
109
INSTALLING AND SETTING UP DOORS, DOORSnet™ and DOORSrequireIT™ DOORS Integration Products �� ® Telelogic DOORS /ERS
Transcript of Telelogic DOORS /ERS - ULisboa · Telelogic DOORS /ERS ... ClearCase is a registered trademark of...

INSTALLING AND SETTING UP DOORS, DOORSnet™ and DOORSrequireIT™
DOORS Integration Products
��
®Telelogic DOORS /ERS


Installing and Setting upDOORS 7.1
DOORSnet 7.1
DOORSrequireIT 7.0
DOORS Integration Products
ERS71-001
L

ii
Manual creation date: 29 April 2004
This manual describes DOORS 7.1, DOORSnet 7.1, DOORSrequireIT 7.0, ClearCase Integration 1.2.2, ClearQuest Integration 1.1, PVCS Version Manager Integration 1.2.3, Rose Integration 2.7.6, and TestDirector Integration 1.7.1.
The information contained in this manual is subject to change without notice.
Companies, names and data used in examples herein are fictitious unless otherwise noted.
This manual, the software, and information contained in any of the databases identified in this document: (1) contain confidential and proprietary information of Telelogic AB; (2) are furnished under license agreement or a nondisclosure agreement; and (3) may be used only in accordance with the terms of such agreements.
All rights reserved. No part of this manual may be reproduced, transmitted, transcribed, stored in a retrieval system or translated into any language, human or computer, in any form, electronically or otherwise, for any purpose, without the express written permission of Telelogic AB, or its duly authorized representative.
Copyright © 2004 Telelogic AB. All rights reserved.
DOORS is a registered trademark of Telelogic AB.
DOORSnet is a trademark of Telelogic AB.
DOORSrequireIT is a trademark of Telelogic AB.
ClearCase is a registered trademark of Rational Software Corporation.
ClearQuest is a registered trademark of Rational Software Corporation.
PVCS is a registered trademark of MERANT Solutions Inc.
PVCS Version Manager is a trademark of MERANT Solutions, Inc.
Rational Rose is a registered trademark of Rational Software.
TestDirector is a registered trademark of Mercury Interactive Corporation.
UNIX is a registered trademark of the Open Group in the U.S. and other countries.
Windows, Windows 98, Windows NT, Windows 2000 and Windows XP are registered trademarks of Microsoft Corporation.
Linux is a registered trademark of Linus Torvalds.
All other trademarks used herein are the properties of their respective companies.
Installing and Setting Up

iii
Table of Contents
About this manual. . . . . . . . . . . . . . . . . . . . . . . . . . . . . . . . . . . . . . . 1Typographical conventions . . . . . . . . . . . . . . . . . . . . . . . . . . . . . . . . . . . . . . . . . . . . . . . . . . . . . . . . . . .1Related documentation. . . . . . . . . . . . . . . . . . . . . . . . . . . . . . . . . . . . . . . . . . . . . . . . . . . . . . . . . . . . . . .1
1 Introduction . . . . . . . . . . . . . . . . . . . . . . . . . . . . . . . . . . . . . . . . . . . . 3What’s in the suite? . . . . . . . . . . . . . . . . . . . . . . . . . . . . . . . . . . . . . . . . . . . . . . . . . . . . . . . . . . . . . . . . . .3What types of DOORS installation can I have? . . . . . . . . . . . . . . . . . . . . . . . . . . . . . . . . . . . . . . . . . . .5What are the licensing options? . . . . . . . . . . . . . . . . . . . . . . . . . . . . . . . . . . . . . . . . . . . . . . . . . . . . . . . .5What next? . . . . . . . . . . . . . . . . . . . . . . . . . . . . . . . . . . . . . . . . . . . . . . . . . . . . . . . . . . . . . . . . . . . . . . . .6
2 New install of DOORS on Windows . . . . . . . . . . . . . . . . . . . . . . . . . 7Installing DOORS . . . . . . . . . . . . . . . . . . . . . . . . . . . . . . . . . . . . . . . . . . . . . . . . . . . . . . . . . . . . . . . . . .7Silent installation. . . . . . . . . . . . . . . . . . . . . . . . . . . . . . . . . . . . . . . . . . . . . . . . . . . . . . . . . . . . . . . . . . .11Configure licenses. . . . . . . . . . . . . . . . . . . . . . . . . . . . . . . . . . . . . . . . . . . . . . . . . . . . . . . . . . . . . . . . . .11Check your installation . . . . . . . . . . . . . . . . . . . . . . . . . . . . . . . . . . . . . . . . . . . . . . . . . . . . . . . . . . . . . .11
For installations that point to an empty data folder. . . . . . . . . . . . . . . . . . . . . . . . . . . . . . . . . . . .11For installations that point to existing DOORS 7.1 data. . . . . . . . . . . . . . . . . . . . . . . . . . . . . . . .13
Modifying your DOORS user setup . . . . . . . . . . . . . . . . . . . . . . . . . . . . . . . . . . . . . . . . . . . . . . . . . . .14Uninstalling DOORS . . . . . . . . . . . . . . . . . . . . . . . . . . . . . . . . . . . . . . . . . . . . . . . . . . . . . . . . . . . . . . .14
3 Update to DOORS 7.1 from DOORS 7.0 or 7.0 SP1. . . . . . . . . . . . 15Information for users updating from DOORS 7.0 or 7.0 SP1 to 7.1 . . . . . . . . . . . . . . . . . . . . . . . . .15
DOORS 7.0 installations . . . . . . . . . . . . . . . . . . . . . . . . . . . . . . . . . . . . . . . . . . . . . . . . . . . . . . . . .15Data migration . . . . . . . . . . . . . . . . . . . . . . . . . . . . . . . . . . . . . . . . . . . . . . . . . . . . . . . . . . . . . . . . .15Licensing . . . . . . . . . . . . . . . . . . . . . . . . . . . . . . . . . . . . . . . . . . . . . . . . . . . . . . . . . . . . . . . . . . . . .15Default directories when updating to DOORS 7.1 . . . . . . . . . . . . . . . . . . . . . . . . . . . . . . . . . . . .15Compatibility between DOORS 7.0, DOORS 7.0 SP1 and DOORS 7.1 . . . . . . . . . . . . . . . . . .15
Install DOORS 7.1 . . . . . . . . . . . . . . . . . . . . . . . . . . . . . . . . . . . . . . . . . . . . . . . . . . . . . . . . . . . . . . . . .16Check your installation . . . . . . . . . . . . . . . . . . . . . . . . . . . . . . . . . . . . . . . . . . . . . . . . . . . . . . . . . . . . . .20
4 Update to DOORS 7.1 from DOORS 6.0 and 6.0 SR1 or DOORS 5.x21Can I migrate directly to DOORS 7.1 from DOORS 5.x?. . . . . . . . . . . . . . . . . . . . . . . . . . . . . . . . . .21Does DOORS 7.1 overwrite DOORS 6.0 SR1?. . . . . . . . . . . . . . . . . . . . . . . . . . . . . . . . . . . . . . . . . .22What do I do with my existing DOORS 6.0 SR1 data? . . . . . . . . . . . . . . . . . . . . . . . . . . . . . . . . . . . .22How does licensing change?. . . . . . . . . . . . . . . . . . . . . . . . . . . . . . . . . . . . . . . . . . . . . . . . . . . . . . . . . .23Can I install and set up DOORS 7.1 in phases? . . . . . . . . . . . . . . . . . . . . . . . . . . . . . . . . . . . . . . . . . .24What do the new installation options mean? . . . . . . . . . . . . . . . . . . . . . . . . . . . . . . . . . . . . . . . . . . . .24Install DOORS 7.1 . . . . . . . . . . . . . . . . . . . . . . . . . . . . . . . . . . . . . . . . . . . . . . . . . . . . . . . . . . . . . . . . .24Silent installation. . . . . . . . . . . . . . . . . . . . . . . . . . . . . . . . . . . . . . . . . . . . . . . . . . . . . . . . . . . . . . . . . . .28Configure licenses. . . . . . . . . . . . . . . . . . . . . . . . . . . . . . . . . . . . . . . . . . . . . . . . . . . . . . . . . . . . . . . . . .28Upgrading and migrating data to DOORS 7.1 . . . . . . . . . . . . . . . . . . . . . . . . . . . . . . . . . . . . . . . . . . .28
Installing and Setting Up

iv
Changes to startup.dxl . . . . . . . . . . . . . . . . . . . . . . . . . . . . . . . . . . . . . . . . . . . . . . . . . . . . . . . . . . . . . . 29Migrating data to DOORS 7.1 . . . . . . . . . . . . . . . . . . . . . . . . . . . . . . . . . . . . . . . . . . . . . . . . . . . . . . . 29Check your installation . . . . . . . . . . . . . . . . . . . . . . . . . . . . . . . . . . . . . . . . . . . . . . . . . . . . . . . . . . . . . 30
For users accessing a migrated DOORS 7.1 database: . . . . . . . . . . . . . . . . . . . . . . . . . . . . . . . . . 30For installations that point to an empty data folder . . . . . . . . . . . . . . . . . . . . . . . . . . . . . . . . . . . 31
Modifying your DOORS user setup . . . . . . . . . . . . . . . . . . . . . . . . . . . . . . . . . . . . . . . . . . . . . . . . . . . 32Uninstalling DOORS. . . . . . . . . . . . . . . . . . . . . . . . . . . . . . . . . . . . . . . . . . . . . . . . . . . . . . . . . . . . . . . 33
5 Installing and Using DOORS on Citrix . . . . . . . . . . . . . . . . . . . . . 35Supported platforms . . . . . . . . . . . . . . . . . . . . . . . . . . . . . . . . . . . . . . . . . . . . . . . . . . . . . . . . . . . . . . . 35Installation guidelines . . . . . . . . . . . . . . . . . . . . . . . . . . . . . . . . . . . . . . . . . . . . . . . . . . . . . . . . . . . . . . 35Environment specifications. . . . . . . . . . . . . . . . . . . . . . . . . . . . . . . . . . . . . . . . . . . . . . . . . . . . . . . . . . 35
6 Installing DOORS on UNIX . . . . . . . . . . . . . . . . . . . . . . . . . . . . . . . 37Check that you meet the system requirements. . . . . . . . . . . . . . . . . . . . . . . . . . . . . . . . . . . . . . . . . . . 37Understanding UNIX installations . . . . . . . . . . . . . . . . . . . . . . . . . . . . . . . . . . . . . . . . . . . . . . . . . . . . 37Installing DOORS . . . . . . . . . . . . . . . . . . . . . . . . . . . . . . . . . . . . . . . . . . . . . . . . . . . . . . . . . . . . . . . . . 38Installing DOORS on a UNIX client . . . . . . . . . . . . . . . . . . . . . . . . . . . . . . . . . . . . . . . . . . . . . . . . . . 43Installing the DOORS Database Server . . . . . . . . . . . . . . . . . . . . . . . . . . . . . . . . . . . . . . . . . . . . . . . . 45Installing the FLEXlm License Server . . . . . . . . . . . . . . . . . . . . . . . . . . . . . . . . . . . . . . . . . . . . . . . . . 46
7 Installing DOORS on Linux . . . . . . . . . . . . . . . . . . . . . . . . . . . . . . 49Check that you meet the system requirements. . . . . . . . . . . . . . . . . . . . . . . . . . . . . . . . . . . . . . . . . . . 49Installing the DOORS Database Server . . . . . . . . . . . . . . . . . . . . . . . . . . . . . . . . . . . . . . . . . . . . . . . . 49
8 Installing DOORSnet . . . . . . . . . . . . . . . . . . . . . . . . . . . . . . . . . . . 53Check that you meet the system requirements. . . . . . . . . . . . . . . . . . . . . . . . . . . . . . . . . . . . . . . . . . . 53Install and configure DOORSnet . . . . . . . . . . . . . . . . . . . . . . . . . . . . . . . . . . . . . . . . . . . . . . . . . . . . . 54Uninstall DOORSnet . . . . . . . . . . . . . . . . . . . . . . . . . . . . . . . . . . . . . . . . . . . . . . . . . . . . . . . . . . . . . . 61
9 Installing DOORSrequireIT . . . . . . . . . . . . . . . . . . . . . . . . . . . . . . 63Check that you meet the system requirements. . . . . . . . . . . . . . . . . . . . . . . . . . . . . . . . . . . . . . . . . . . 63Install the software. . . . . . . . . . . . . . . . . . . . . . . . . . . . . . . . . . . . . . . . . . . . . . . . . . . . . . . . . . . . . . . . . 63Set up your licenses . . . . . . . . . . . . . . . . . . . . . . . . . . . . . . . . . . . . . . . . . . . . . . . . . . . . . . . . . . . . . . . . 64Check that it works . . . . . . . . . . . . . . . . . . . . . . . . . . . . . . . . . . . . . . . . . . . . . . . . . . . . . . . . . . . . . . . . 64
What next?. . . . . . . . . . . . . . . . . . . . . . . . . . . . . . . . . . . . . . . . . . . . . . . . . . . . . . . . . . . . . . . . . . . . 65Uninstalling DOORSrequireIT. . . . . . . . . . . . . . . . . . . . . . . . . . . . . . . . . . . . . . . . . . . . . . . . . . . . . . . 65
10 Request and setup licenses . . . . . . . . . . . . . . . . . . . . . . . . . . . . . 67Concepts. . . . . . . . . . . . . . . . . . . . . . . . . . . . . . . . . . . . . . . . . . . . . . . . . . . . . . . . . . . . . . . . . . . . . . . . . 67
Server licenses . . . . . . . . . . . . . . . . . . . . . . . . . . . . . . . . . . . . . . . . . . . . . . . . . . . . . . . . . . . . . . . . . 67Standalone licenses . . . . . . . . . . . . . . . . . . . . . . . . . . . . . . . . . . . . . . . . . . . . . . . . . . . . . . . . . . . . . 67Hardware licenses . . . . . . . . . . . . . . . . . . . . . . . . . . . . . . . . . . . . . . . . . . . . . . . . . . . . . . . . . . . . . . 68
What is the LM_LICENSE_FILE variable? . . . . . . . . . . . . . . . . . . . . . . . . . . . . . . . . . . . . . . . . . . . . 68How do FLEXlm server licenses work?. . . . . . . . . . . . . . . . . . . . . . . . . . . . . . . . . . . . . . . . . . . . . . . . 69Obtaining a license. . . . . . . . . . . . . . . . . . . . . . . . . . . . . . . . . . . . . . . . . . . . . . . . . . . . . . . . . . . . . . . . . 69
Installing and Setting Up
v
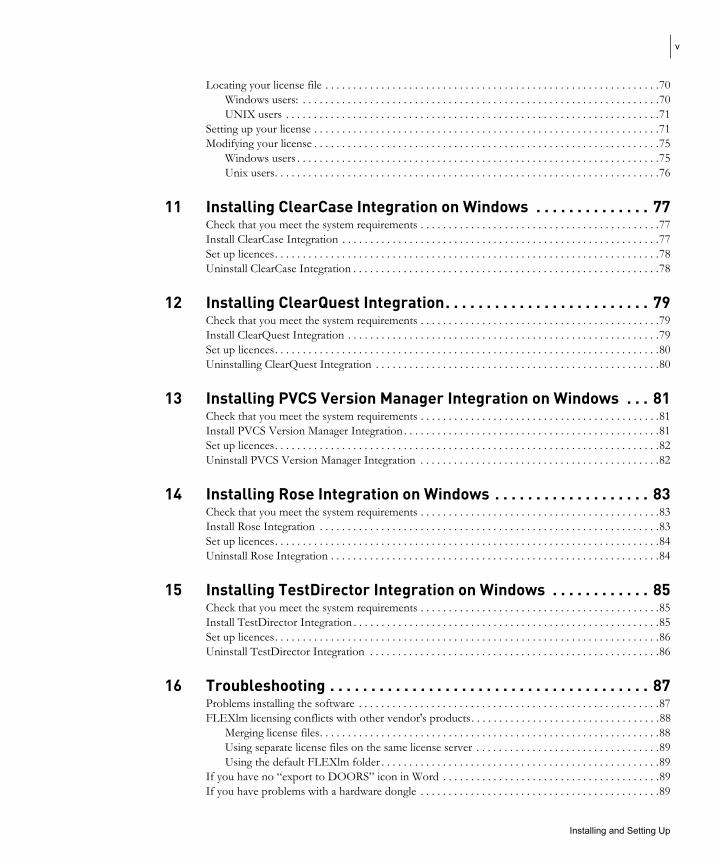
Locating your license file . . . . . . . . . . . . . . . . . . . . . . . . . . . . . . . . . . . . . . . . . . . . . . . . . . . . . . . . . . . .70Windows users: . . . . . . . . . . . . . . . . . . . . . . . . . . . . . . . . . . . . . . . . . . . . . . . . . . . . . . . . . . . . . . . .70UNIX users . . . . . . . . . . . . . . . . . . . . . . . . . . . . . . . . . . . . . . . . . . . . . . . . . . . . . . . . . . . . . . . . . . .71
Setting up your license . . . . . . . . . . . . . . . . . . . . . . . . . . . . . . . . . . . . . . . . . . . . . . . . . . . . . . . . . . . . . .71Modifying your license . . . . . . . . . . . . . . . . . . . . . . . . . . . . . . . . . . . . . . . . . . . . . . . . . . . . . . . . . . . . . .75
Windows users . . . . . . . . . . . . . . . . . . . . . . . . . . . . . . . . . . . . . . . . . . . . . . . . . . . . . . . . . . . . . . . . .75Unix users. . . . . . . . . . . . . . . . . . . . . . . . . . . . . . . . . . . . . . . . . . . . . . . . . . . . . . . . . . . . . . . . . . . . .76
11 Installing ClearCase Integration on Windows . . . . . . . . . . . . . . 77Check that you meet the system requirements . . . . . . . . . . . . . . . . . . . . . . . . . . . . . . . . . . . . . . . . . . .77Install ClearCase Integration . . . . . . . . . . . . . . . . . . . . . . . . . . . . . . . . . . . . . . . . . . . . . . . . . . . . . . . . .77Set up licences. . . . . . . . . . . . . . . . . . . . . . . . . . . . . . . . . . . . . . . . . . . . . . . . . . . . . . . . . . . . . . . . . . . . .78Uninstall ClearCase Integration . . . . . . . . . . . . . . . . . . . . . . . . . . . . . . . . . . . . . . . . . . . . . . . . . . . . . . .78
12 Installing ClearQuest Integration. . . . . . . . . . . . . . . . . . . . . . . . . 79Check that you meet the system requirements . . . . . . . . . . . . . . . . . . . . . . . . . . . . . . . . . . . . . . . . . . .79Install ClearQuest Integration . . . . . . . . . . . . . . . . . . . . . . . . . . . . . . . . . . . . . . . . . . . . . . . . . . . . . . . .79Set up licences. . . . . . . . . . . . . . . . . . . . . . . . . . . . . . . . . . . . . . . . . . . . . . . . . . . . . . . . . . . . . . . . . . . . .80Uninstalling ClearQuest Integration . . . . . . . . . . . . . . . . . . . . . . . . . . . . . . . . . . . . . . . . . . . . . . . . . . .80
13 Installing PVCS Version Manager Integration on Windows . . . 81Check that you meet the system requirements . . . . . . . . . . . . . . . . . . . . . . . . . . . . . . . . . . . . . . . . . . .81Install PVCS Version Manager Integration . . . . . . . . . . . . . . . . . . . . . . . . . . . . . . . . . . . . . . . . . . . . . .81Set up licences. . . . . . . . . . . . . . . . . . . . . . . . . . . . . . . . . . . . . . . . . . . . . . . . . . . . . . . . . . . . . . . . . . . . .82Uninstall PVCS Version Manager Integration . . . . . . . . . . . . . . . . . . . . . . . . . . . . . . . . . . . . . . . . . . .82
14 Installing Rose Integration on Windows . . . . . . . . . . . . . . . . . . . 83Check that you meet the system requirements . . . . . . . . . . . . . . . . . . . . . . . . . . . . . . . . . . . . . . . . . . .83Install Rose Integration . . . . . . . . . . . . . . . . . . . . . . . . . . . . . . . . . . . . . . . . . . . . . . . . . . . . . . . . . . . . .83Set up licences. . . . . . . . . . . . . . . . . . . . . . . . . . . . . . . . . . . . . . . . . . . . . . . . . . . . . . . . . . . . . . . . . . . . .84Uninstall Rose Integration . . . . . . . . . . . . . . . . . . . . . . . . . . . . . . . . . . . . . . . . . . . . . . . . . . . . . . . . . . .84
15 Installing TestDirector Integration on Windows . . . . . . . . . . . . 85Check that you meet the system requirements . . . . . . . . . . . . . . . . . . . . . . . . . . . . . . . . . . . . . . . . . . .85Install TestDirector Integration . . . . . . . . . . . . . . . . . . . . . . . . . . . . . . . . . . . . . . . . . . . . . . . . . . . . . . .85Set up licences. . . . . . . . . . . . . . . . . . . . . . . . . . . . . . . . . . . . . . . . . . . . . . . . . . . . . . . . . . . . . . . . . . . . .86Uninstall TestDirector Integration . . . . . . . . . . . . . . . . . . . . . . . . . . . . . . . . . . . . . . . . . . . . . . . . . . . .86
16 Troubleshooting . . . . . . . . . . . . . . . . . . . . . . . . . . . . . . . . . . . . . . . 87Problems installing the software . . . . . . . . . . . . . . . . . . . . . . . . . . . . . . . . . . . . . . . . . . . . . . . . . . . . . .87FLEXlm licensing conflicts with other vendor's products. . . . . . . . . . . . . . . . . . . . . . . . . . . . . . . . . .88
Merging license files. . . . . . . . . . . . . . . . . . . . . . . . . . . . . . . . . . . . . . . . . . . . . . . . . . . . . . . . . . . . .88Using separate license files on the same license server . . . . . . . . . . . . . . . . . . . . . . . . . . . . . . . . .89Using the default FLEXlm folder . . . . . . . . . . . . . . . . . . . . . . . . . . . . . . . . . . . . . . . . . . . . . . . . . .89
If you have no “export to DOORS” icon in Word . . . . . . . . . . . . . . . . . . . . . . . . . . . . . . . . . . . . . . .89If you have problems with a hardware dongle . . . . . . . . . . . . . . . . . . . . . . . . . . . . . . . . . . . . . . . . . . .89
Installing and Setting Up

vi
Using the DOORS API. . . . . . . . . . . . . . . . . . . . . . . . . . . . . . . . . . . . . . . . . . . . . . . . . . . . . . . . . . . . . 89Using DOORS without a database server . . . . . . . . . . . . . . . . . . . . . . . . . . . . . . . . . . . . . . . . . . . . . . 90Colors . . . . . . . . . . . . . . . . . . . . . . . . . . . . . . . . . . . . . . . . . . . . . . . . . . . . . . . . . . . . . . . . . . . . . . . . . . . 90DISPLAY variables on Solaris . . . . . . . . . . . . . . . . . . . . . . . . . . . . . . . . . . . . . . . . . . . . . . . . . . . . . . . 90DISPLAY variables—all UNIX installations . . . . . . . . . . . . . . . . . . . . . . . . . . . . . . . . . . . . . . . . . . . . 90Dual Boot Machines . . . . . . . . . . . . . . . . . . . . . . . . . . . . . . . . . . . . . . . . . . . . . . . . . . . . . . . . . . . . . . . 90Removal of license server service . . . . . . . . . . . . . . . . . . . . . . . . . . . . . . . . . . . . . . . . . . . . . . . . . . . . . 90DOORS application error on Windows 2000 . . . . . . . . . . . . . . . . . . . . . . . . . . . . . . . . . . . . . . . . . . . 91
17 Contacting customer support . . . . . . . . . . . . . . . . . . . . . . . . . . . . 93Before you contact customer support . . . . . . . . . . . . . . . . . . . . . . . . . . . . . . . . . . . . . . . . . . . . . . . . . 93How to contact customer support . . . . . . . . . . . . . . . . . . . . . . . . . . . . . . . . . . . . . . . . . . . . . . . . . . . . 93
Contact Information . . . . . . . . . . . . . . . . . . . . . . . . . . . . . . . . . . . . . . . . . . . . . . . . . . . . . . . . . . . . 94
Index . . . . . . . . . . . . . . . . . . . . . . . . . . . . . . . . . . . . . . . . . . . . . . . . 97
Installing and Setting Up

1
About this manual
Welcome to the DOORS Enterprise Requirements Suite (DOORS/ERS), a powerful set of tools that help you capture, track and manage your user requirements.
Typographical The following typographical conventions are used in this manual: conventions
Typeface or Meaning Symbol
Bold Book titles, important items, and items that you can select, including buttons and menus. For example: Click Yes to continue.
Courier Commands, files, and directories; computer output. For example: Edit your .properties file.
> A menu choice. For example: Select File > Open. This means select the File menu, then select the Open command from it.
Related The following table describes where to find information in the DOORS Enterprise Suite documentation documentation set:
For information on See
What's new in version 7.1 of DOORS
How to install DOORS and set up licenses to use it
How to use DOORS
How to use DOORSnet
How to use DOORSrequireIT
How to install and use ECPS
How to use ClearCase Integration
How to use ClearQuest Integration
The DOORS readme file
Installing and Setting up
Getting Started with DOORS Using DOORS
Using DOORSnet
Using DOORSrequireIT
Getting Started with ECPS
Using ClearCase Integration
Using ClearQuest Integration
Installing and Setting Up

2
(Continued)
For information on See
How to use PVCS Version Manager Integration
How to use Rose Integration
How to use TestDirector Integration
How to set up and manage DOORS
How to manage DOORSnet
How to write requirements
The DXL programming language
How to integrate DOORS with other applications
Using PVCS Version Manager Integration
Using Rose Integration
Using TestDirector Integration
Managing DOORS
Managing DOORSnet
Get it Right the First Time
DXL Reference Manual
DOORS API manual
You'll find PDF versions of these manuals on:
• The DOORS Enterprise Requirements Suite documentation CD
• Our web site at http://support.telelogic.com
Installing and Setting Up

3
1 Introduction
This chapter contains the following topics:
• What’s in the suite?
• What types of DOORS installation can I have?
• What are the licensing options?
• What next?
What’s in the The DOORS Enterprise Requirements Suite is a package of requirements management tools suite? designed to help enterprises take control of and effectively manage projects from the concepts phase
right through to completion.
The suite consists of ten products that allow everyone in your organization to participate in and contribute to the requirements management process.
Suite product Description
DOORS At the heart of the suite is DOORS, an application that runs on Microsoft Windows and UNIX systems. With its own built-in database, DOORS provides a rich set of features to help you capture and manage requirements.
DOORSnet DOORSnet is a web-based front end to DOORS that lets you use standard web browsers such as Netscape and Internet Explorer to access your DOORS data.
DOORSrequireIT Non-technical users who don't need the full power of DOORS may prefer to use this Microsoft Word-based editor to capture requirements. DOORSrequireIT is also useful for DOORS users who want to work remotely. For example, when you go away on a business trip, you can export the data you're currently working on from DOORS to your laptop, which is running Word and DOORSrequireIT. In your hotel room you edit your data. When you get back to your office, you transfer the data from your laptop back to the main DOORS database.
Installing and Setting Up

4
Suite product Description
DOORS/Analyst DOORS/Analyst is a modeling environment available inside Telelogic DOORS. DOORS/Analyst enables users to augment and visualize requirements using diagrams, symbols and pictures based on the standardized, visual modeling language UML 2.0, which are embedded directly within your DOORS modules. DOORS/Analyst is a natural extension to the rich capabilities already available in DOORS. With its powerful, yet easy-to-learn visual modeling features, DOORS/Analyst provides complete freedom of expression when defining requirements. With DOORS/Analyst you can easily augment your requirements descriptions with pictures, diagrams and models, to give extra life to and simplify understanding of requirements.
ECPS A scalable and flexible mechanism for managing changes to requirements. This enterprise scale Change Proposal System is based on a tighter integration of DOORS with SYNERGY/Change. The old CPS will still be part of DOORS, but users now have an alternative; using SYNERGY/Change to provide a fully flexible change process.
ClearCase Integration ClearCase Integration is one of the DOORS integration products that lets you transfer data between DOORS and ClearCase. It lets you synchronize configuration management regimes and establish traceability between information managed in DOORS and versions managed by ClearCase.
ClearQuest ClearQuest Integration is one of the DOORS integration products that Integration lets you transfer data between DOORS and ClearQuest. The
integration tracks a CR through its entire lifecycle providing status information on DOORS artefacts impacted by their implementation such as requirements and tests
PVCS Version Manager Integration
PVCS Version Manager Integration is one of the DOORS integration products that lets you transfer data between DOORS and Version Manager. It allows complete life cycle traceability from requirements through to configuration management.
Rose Integration Rose Integration is one of the DOORS integration products that lets you transfer data between DOORS and Rational Rose. It lets you add traceability to your software design process.
TestDirector Integration
TestDirector Integration is one of the DOORS integration products that lets you transfer data between DOORS and TestDirector. It enables you to add traceability to the testing process.
Installing and Setting Up

5
What types of DOORS installation can I have?
There are five types of DOORS installations:
Setup type
DOORS Standard End User
DOORS Laptop/Non-networked PC
DOORS/ERS Complete Server Installation
DOORS Training
DOORS/ERS Custom Installation
Description
Installs DOORS client application files on a local machine. This installation type relies on a user accessing networked DOORS data. Licensing may be setup for local or remote access.
Installs DOORS client application files on a local machine. Also installs DOORS Database Server files so that data may be setup and accessed locally. Licensing may be setup for local or network access. No DOORSnet files are installed.
Installs DOORS client and server binaries, DOORSnet binaries and FLEXlm license server. (N.B. If you’ve downloaded, and are running DOORSsetup.exe DOORSnet is not installed)
Restores a DOORS archived project and sets up a DOORS database server service using port 29999 to enable users to follow the DOORS EasyStart tutorial.
Choose which features you would like to install (for advanced users).
What are the licensing options?
You must have either a software or hardware license to run any of the products in the DOORS Enterprise Requirements Suite.
Licenses for DOORS 7.0 and DOORS 7.0 SP1 are compatible with DOORS 7.1.
Licenses for DOORS/ERS 6.x and 5.x are not compatible with DOORS/ERS 7.1. Customers using these versions of DOORS/ERS must request a new software license.
Existing hardware licenses do not need to be replaced.
For more information on licensing, see “Request and setup licenses” on page 67.
Installing and Setting Up
6
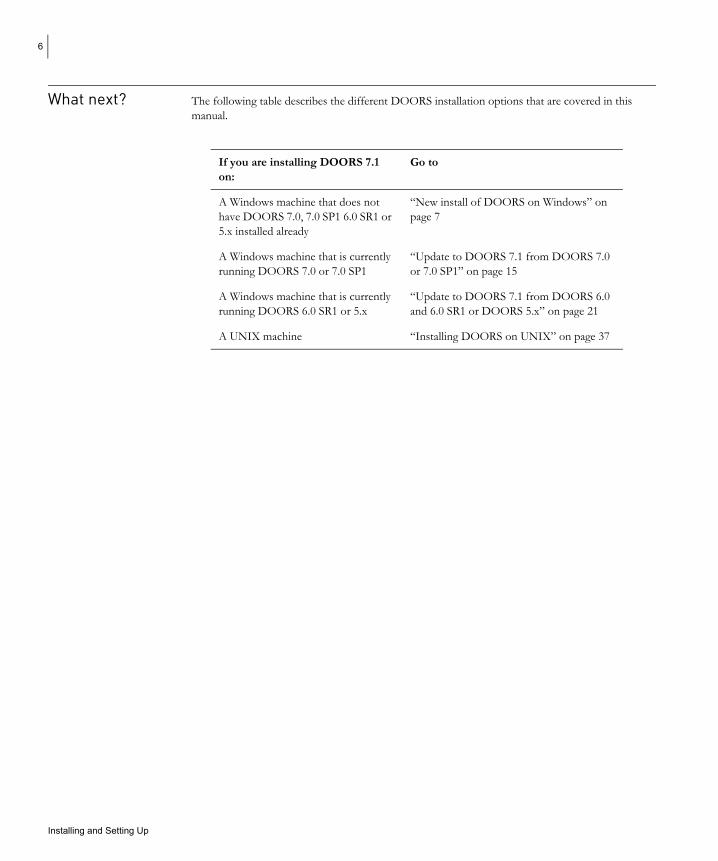
What next? The following table describes the different DOORS installation options that are covered in this manual.
If you are installing DOORS 7.1 Go to on:
A Windows machine that does not have DOORS 7.0, 7.0 SP1 6.0 SR1 or 5.x installed already
A Windows machine that is currently running DOORS 7.0 or 7.0 SP1
A Windows machine that is currently running DOORS 6.0 SR1 or 5.x
A UNIX machine
“New install of DOORS on Windows” on page 7
“Update to DOORS 7.1 from DOORS 7.0 or 7.0 SP1” on page 15
“Update to DOORS 7.1 from DOORS 6.0 and 6.0 SR1 or DOORS 5.x” on page 21
“Installing DOORS on UNIX” on page 37
Installing and Setting Up
7
2 New install of DOORS on Windows
This chapter describes how to install and set up DOORS 7.1 on a machine that does not have previous versions of DOORS installed. If you want to install DOORS and use data from previous versions of DOORS you should follow the instructions in “Update to DOORS 7.1 from DOORS 7.0 or 7.0 SP1” on page 15 or “Update to DOORS 7.1 from DOORS 6.0 and 6.0 SR1 or DOORS 5.x” on page 21.
This chapter contains the following topics:
• Installing DOORS
• Silent installation
• Configure licenses
• Check your installation
• Modifying your DOORS user setup
• Uninstalling DOORS
Installing DOORS
1. Ensure you have a DOORS 7 license. For information on DOORS licenses see “Request and setup licenses” on page 67.
2. Check that you meet the system requirements for installing and running DOORS. Details of system requirements can be found in the readme file, and on the website at http://support.telelogic.com.
3. On Windows XP, 2000 or NT, make sure you’re logged into your computer as the local Administrator, and not a user with Administrator privileges.
4. Shut down all other applications. In particular, shut down Microsoft Office applications, including the Microsoft Office toolbar.
5. If you're installing from CD:
a. Put the DOORS Enterprise Requirements Suite software CD into your CD-ROM drive.
The CD Welcome screen is displayed.
Note: If you've disabled Autorun, nothing happens when you put the CD in. In this case use the Windows Explorer to browse to the CD drive, then double-click the DOORS_ERS.EXE file in the WINDOWS folder.
b. Select the Install DOORS option.
The Welcome to the DOORS/ERS Install Wizard screen is displayed. Go to Step 7.
Installing and setting up

8
6. If you downloaded the DOORS software from the Telelogic FTP or web site:
a. Using Windows Explorer, double-click the file you downloaded.
The Location to Save Files screen is displayed.
b. Specify the folder you want the self-extracting file to use to unpack itself, then click Continue.
The Welcome to the DOORS/ERS Install Wizard screen is displayed.
7. Click Next.
The License Agreement screen is displayed.
8. If you accept the terms in the license agreement, click Yes.
The Customer Information screen is displayed.
9. Enter your user name and company name.
10. Click Next.
The Choose Destination Location screen is displayed. All of the files your computer needs to run DOORS/ERS are installed to this directory. By default, DOORS is installed to C:\Program Files\Telelogic\DOORS 7.1
If you want to change the directory;
a. Click the Browse button.
b. Browse to the directory you want to install to.
c. Click OK.
11. Click Next.
The Setup Type screen is displayed.
12. Select the setup type that best suits your requirements.
For more information on the setup types see “What types of DOORS installation can I have?” on page 5. Alternatively a description of the selected setup type is displayed in the right hand pane of the dialog.
13. Click Next.
Follow the instructions given in the table below for the setup type that you selected in Step 12.
Setup Type Steps
DOORS Standard End User a. Enter the Port Number and Hostname of the Any DOORS/ERS Custom DOORS database server you want your DOORS Installation that does not client to access. If you do not know what port include the DOORS Database number the DOORS database server is using, ask Server your DOORS administrator.
b. Click Next.
Installing and setting up
9
Setup Type Steps
DOORS a. Laptop/Non-networked PC
b.
c.
d.
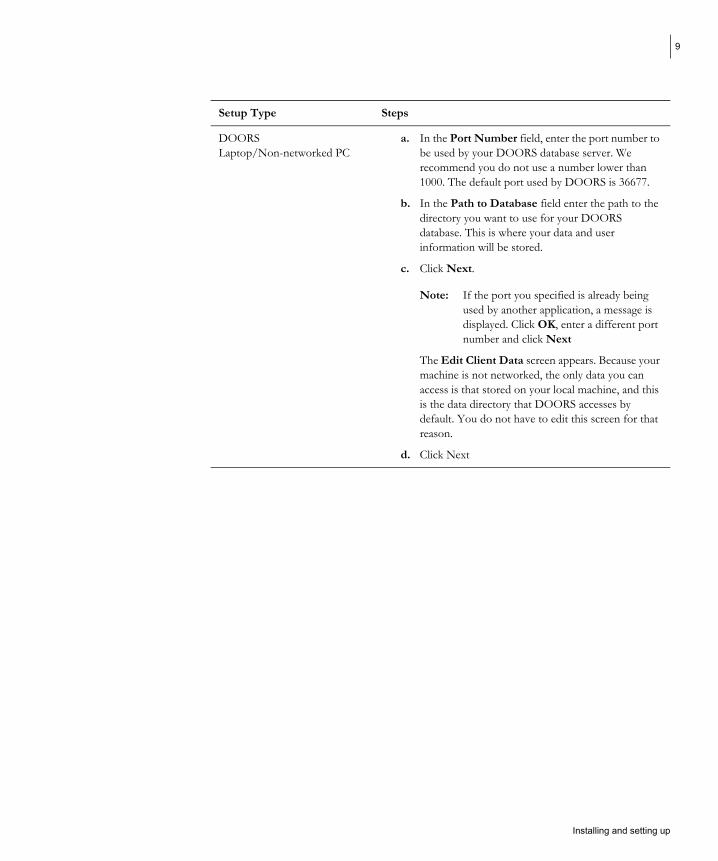
In the Port Number field, enter the port number to be used by your DOORS database server. We recommend you do not use a number lower than 1000. The default port used by DOORS is 36677.
In the Path to Database field enter the path to the directory you want to use for your DOORS database. This is where your data and user information will be stored.
Click Next.
Note: If the port you specified is already being used by another application, a message is displayed. Click OK, enter a different port number and click Next
The Edit Client Data screen appears. Because your machine is not networked, the only data you can access is that stored on your local machine, and this is the data directory that DOORS accesses by default. You do not have to edit this screen for that reason.
Click Next
Installing and setting up

10
Setup Type Steps
DOORS/ERS Complete Server Installation Any DOORS/ERS Custom installation that includes the DOORS Database Server
a.
b.
c.
d.
In the Port Number field, enter the port number to be used by your DOORS database server. We recommend you do not use a number lower than 1000. The default port used by DOORS is 36677.
In the Path to Database field enter the path to the directory you want to use for your DOORS database. This is where your data and user information will be stored.
Click Next.
Note: If the port you specified is already being used by another application, a message is displayed. Click OK, enter a different port number and click Next
The Edit Client Data screen appears.
Note: Your DOORS client can connect to the DOORS database server on this machine, or to a DOORS database server on any other machine in the network. You can change the database that your DOORS client is accessing at any time. For information on how to do this see“Modifying your DOORS user setup” on page 14.
Enter the Port Number and Hostname of the DOORS database server you want your DOORS client to access. By default, the client will access the DOORS database server you are installing on this machine.
DOORS Training If you select the DOORS Training setup type, and you do not have DOORS installed already, a DOORS Standard End User is installed. Follow the install instructions in the Standard End User section at the start of this table. The DOORS Training database is also installed.
14. Click Next.
The Start Copying Files screen is displayed. The settings you defined in the previous steps are displayed. Use the Back button if you want to change any of your settings.
15. Click Next to begin copying files.
The Setup Status screen is displayed, and the program files are copied to your machine. When all the files are copied the Enter License screen is displayed.
Installing and setting up

11
You have three options:
• If you are using a server license and you know the port@hostname that your license server is using, you can enter it in the box, click Next then click Finish.
• If you want to configure a license now, click License Setup, and see “Request and setup licenses” on page 67 for further information.
• If you do not want to configure a license at this time click Next, then Finish.
Silent installation
Installshield silent install is supported with DOORS 7.1. This means that rather than having to install DOORS from a physical CD choosing the same options time and time again, you can create an installer that will record your preferred settings once and then allow you to install in a more cost efficient and timely manner.
The only option that is supported with Installshield silent install is with the use of setup.exe. We do not support a configuration where .msi files can be used independently of setup.exe.
For more detailed information regarding support of silent installations refer to:
http://documentation.installshield.com/robo/projects/helplibdevstudio9/SetupIss.htm, or go to
http://www.installshield.com and search for “Traditional Silent Mode”.
You have to run Setup.exe with a /r switch to create a response file, then run Setup.exe with a /s switch to run a silent installation based on the contents of the response file.
Setup.exe looks for a response file called Setup.iss in the same directory as Setup.exe, but the /f1 argument can be used to specify an alternative name and location of the response file.
A silent installation program does not display any dialog boxes in the event of an error. Instead, status information for the silent installation is recorded, by default, in a file called setup.log created in the same directory as the response file being used. The end user can specify a different name and location for the log file using the /f2 argument to Setup.exe.
Configure You can run the License Setup Wizard at any time by clicking Start > Programs > Telelogic > licenses DOORS 7.1 Tools > Licence Setup. See “Request and setup licenses” on page 67 for further
information.
Check your For installations that point to an empty data folder installation Typically, these are installations using the following setup types:
• DOORS Laptop / Non-networked PC
• DOORS/ERS Complete Server Installation
Installing and setting up
12
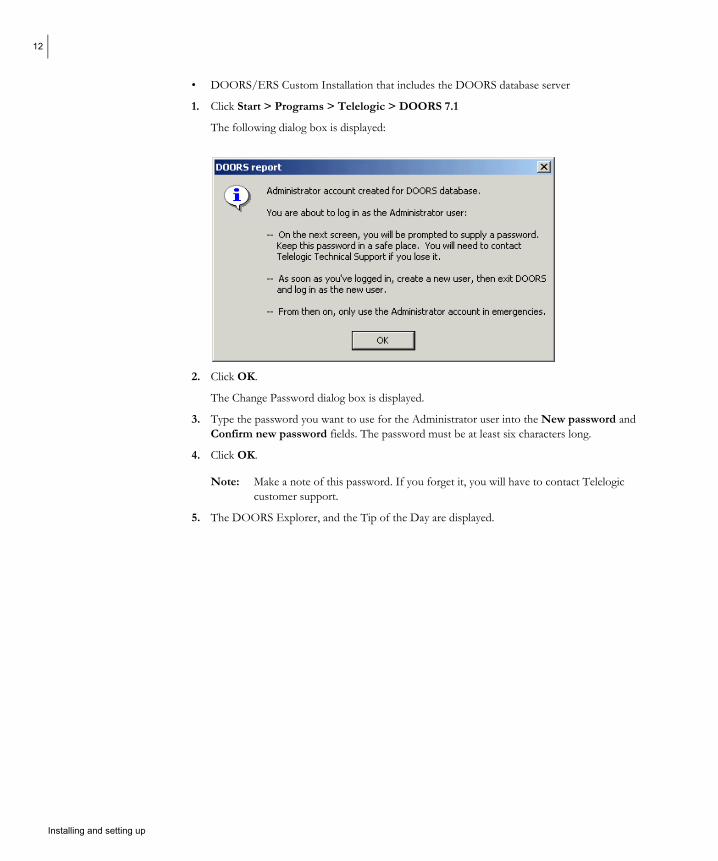
• DOORS/ERS Custom Installation that includes the DOORS database server
1. Click Start > Programs > Telelogic > DOORS 7.1
The following dialog box is displayed:
2. Click OK.
The Change Password dialog box is displayed.
3. Type the password you want to use for the Administrator user into the New password and Confirm new password fields. The password must be at least six characters long.
4. Click OK.
Note: Make a note of this password. If you forget it, you will have to contact Telelogic customer support.
5. The DOORS Explorer, and the Tip of the Day are displayed.
Installing and setting up

13
6. Click OK to dismiss the Tip of the Day screen.
7. You should only use the Administrator account in emergencies, so create a new user account, which you can use next time you log in to DOORS:
a. Click Tools > Manage Users.
b. On the Users tab, click New.
c. Type a username in the Username box.
d. Click the Database Manager user type.
e. Click OK.
8. Exit DOORS (click File > Exit).
Don't remain logged in as an Administrator user
For installations that point to existing DOORS 7.1 data Typically, these are installations using the following setup types:
• DOORS/ERS Standard End User
• DOORS/ERS Custom Installation that does not include the DOORS database server
1. Click Start > Programs > Telelogic > DOORS 7.1
DOORS is loaded and the DOORS login screen is displayed.
2. Enter your DOORS username and password and click OK. If you do not have a DOORS username, contact your DOORS administrator.
3. The DOORS explorer is displayed.
Installing and setting up
14
Modifying your DOORS/ERS 7.1 includes a tool called DOORS/ERS Configuration Tool that you can use to: DOORS user • View your DOORS/ERS 7.1 settings, without directly accessing the registry. setup • Modify your DOORS/ERS 7.1 settings if you have write access to the registry.
• Output your DOORS/ERS 7.1 settings to a text file.
To access the DOORS/ERS Configuration Tool, select Start > Program Files > Telelogic > DOORS 7.1 Tools > DOORS/ERS Configuration Tool.
Uninstalling Use Add/Remove Programs in the Windows Control Panel to remove version 7.1 of DOORS. DOORS
Installing and setting up

15
3 Update to DOORS 7.1 from DOORS 7.0 or 7.0 SP1
This chapter contains the following topics:
• Information for users updating from DOORS 7.0 or 7.0 SP1 to 7.1
• Install DOORS 7.1
• Check your installation
Information for users updating from DOORS 7.0 or 7.0 SP1 to 7.1
DOORS 7.0 installations The installation of DOORS 7.0 or 7.0 SP1 that you have (i.e. whether it is patched or unpatched) does not affect the way in which DOORS 7.1 is installed. In all cases DOORS 7.1 is installed into a new directory named DOORS 7.1 by default and after successful installation DOORS 7.0 or 7.0 SP1 is uninstalled.
You cannot install DOORS 7.1 into the same directory as your current 7.0 or 7.0 SP1 installation. If you try to do this the installation will fail.
Data migration If your data has already been migrated to DOORS 7, no further data migration is required. If you have data that you have not migrated to DOORS 7, see “Update to DOORS 7.1 from DOORS 6.0 and 6.0 SR1 or DOORS 5.x” on page 21.
Licensing You can use your DOORS 7.0 license with DOORS 7.1.
Directory names and menu options DOORS 7.1 is installed by default to a new directory named DOORS 7.1. You cannot install DOORS 7.1 to the same directory as your DOORS 7.0 installation.
The Start > Program Files > Telelogic menu displays DOORS 7.1 after the successfull installation of DOORS 7.1.
Default directories when updating to DOORS 7.1 DOORS 7.1 is installed to C:\Program Files\Telelogic\DOORS 7.1 by default. You can choose to install into this directory or modify this path to install into a new directory. However you cannot install into the directory in which DOORS 7.0 or 7.0 SP1 is currently installed.
Compatibility between DOORS 7.0, DOORS 7.0 SP1 and DOORS 7.1 • DOORS 7.0 and 7.0 SP1 clients can connect to a DOORS 7.1 database server.
Installing and setting up

16
• DOORS 7.1 clients can connect to a DOORS 7.0 or 7.0 SP1 database server.
• DOORS 7.1 clients can read DOORS 7.0 and 7.0 SP1 project or module archives, or partitions.
• DOORS 7.0 and 7.0 SP1 clients can read DOORS 7.1 project or module archives, or partitions.
Note: We recommend that you upgrade your database server to 7.1 to take advantage of defect fixes.
Install DOORS 7.1
1. Ensure you have a DOORS 7 license. For information on DOORS licenses see “Request and setup licenses” on page 67.
2. Check that you meet the system requirements for installing and running DOORS. Details of system requirements can be found in the readme file, and on the website at http://support.telelogic.com.
3. On Windows XP, 2000 or NT make sure you’re logged into your computer as the local Administrator, and not a user with Administrator privileges.
4. Shut down all other applications. In particular, shut down Microsoft Office applications, including the Microsoft Office toolbar.
5. If you're installing from CD:
a. Put the DOORS Enterprise Requirements Suite software CD into your CD-ROM drive.
The CD Welcome screen is displayed.
Note: If you've disabled Autorun, nothing happens when you put the CD in. In this case use the Windows Explorer to browse to the CD drive, then double-click the DOORS_ERS.EXE file in the WINDOWS folder.
b. Select the Install DOORS option.
The Welcome to the DOORS/ERS Install Wizard screen is displayed. Go to Step 7.
6. If you downloaded the DOORS software from the Telelogic FTP or web site:
a. Using Windows Explorer, double-click the file you downloaded.
The Location to Save Files screen is displayed.
b. Specify the folder you want the self-extracting file to use to unpack itself, then click Continue.
The Welcome to the DOORS/ERS Install Wizard screen is displayed.
7. Click Next.
The License Agreement screen is displayed.
8. If you accept the terms in the license agreement, click Yes.
The Customer Information screen is displayed.
9. Enter your user name and company name.
10. Click Next.
Installing and setting up

17
The Choose Destination Location screen is displayed. All of the files your computer needs to run DOORS/ERS are installed to this directory. By default, DOORS is installed to C:\Program Files\Telelogic\DOORS 7.1.
If you want to change the directory;
a. Click the Browse button.
b. Browse to the directory you want to install to.
c. Click OK.
Note: You cannot install DOORS 7.1 to the directory in which DOORS 7.0 or 7.0 SP1 is currently installed.
11. Click Next.
The Setup Type screen is displayed.
12. Select the setup type that best suits your requirements.
For more information on the setup types see “What types of DOORS installation can I have?” on page 5. Alternatively a description of the selected setup type is displayed in the right hand pane of the dialog.
13. Click Next.
Follow the instructions given in the table below for the setup type that you selected in Step 12.
Setup Type Steps
DOORS Standard End User a. Enter the Port Number and Hostname of the Any DOORS/ERS Custom DOORS database server you want your DOORS Installation that does not client to access. If you do not know what port include the DOORS Database number the DOORS database server is using, ask Server your DOORS administrator.
b. Got to Step 14.
Installing and setting up

18
Setup Type Steps
DOORS a. Laptop/Non-networked PC
b.
c.
d.
In the Port Number field, enter the port number to be used by your DOORS database server. We recommend you do not use a number lower than 1000. The default port used by DOORS is 36677.
In the Path to Database field enter the path to the directory you want to use for your DOORS database. This is where your data and user information will be stored.
Click Next.
Note: If the port you specified is already being used by another application, a message is displayed. Click OK, enter a different port number and click Next
The Edit Client Data screen appears. Because your machine is not networked, the only data you can access is that stored on your local machine, and this is the data directory that DOORS accesses by default. You do not have to edit this screen for that reason.
Got to Step 14.
Installing and setting up

19
Setup Type Steps
DOORS/ERS Complete Server Installation Any DOORS/ERS Custom installation that includes the DOORS Database Server
a.
b.
c.
d.
e.
In the Port Number field, enter the port number to be used by your DOORS database server. We recommend you do not use a number lower than 1000. The default port used by DOORS is 36677.
In the Path to Database field enter the path to the directory you want to use for your DOORS database. This is where your data and user information will be stored.
Click Next.
Note: If the port you specified is already being used by another application, a message is displayed. Click OK, enter a different port number and click Next
The Edit Client Data screen appears.
Note: Your DOORS client can connect to the DOORS database server on this machine, or to a DOORS database server on any other machine in the network. You can change the database that your DOORS client is accessing at any time. For information on how to do this see, “Modifying your DOORS user setup” on page 32.
Enter the Port Number and Hostname of the DOORS database server you want your DOORS client to access. By default, the client will access the DOORS database server you are installing on this machine.
Got to Step 14.
DOORS Training If you select the DOORS Training setup type, and you do not have DOORS installed already, a DOORS Standard End User is installed. Follow the install instructions in the Standard End User section at the start of this table. The DOORS Training database is also installed.
14. Click Next.
The Start Copying Files screen is displayed. The settings you defined in the previous steps are displayed. Use the Back button if you want to change any of your settings.
15. Click Next to begin copying files.
Installing and setting up
20
The Setup Status screen is displayed, and the program files are copied to your machine. When all the files are copied the Enter License screen is displayed.
You have three options:
• If you are using a server license and you know the port@hostname that your license server is using, you can enter it in the box, click Next then click Finish.
• If you want to configure a license now, click License Setup, and see “Request and setup licenses” on page 67 for further information.
• If you do not want to configure a license at this time click Next, then Finish.
Check your 1. Click Start > Programs > Telelogic > DOORS 7.1 installation DOORS is loaded and the DOORS login screen is displayed.
2. Enter your DOORS username and password and click OK. If you do not have a DOORS username, contact your DOORS administrator.
3. The DOORS explorer is displayed.
Installing and setting up
21
4 Update to DOORS 7.1 from DOORS 6.0 and 6.0 SR1 or DOORS 5.x
This chapter discusses what you should take into consideration before you update to DOORS 7.1, and then describes the installation process:
• Can I migrate directly to DOORS 7.1 from DOORS 5.x?
• Does DOORS 7.1 overwrite DOORS 6.0 SR1?
• What do I do with my existing DOORS 6.0 SR1 data?
• How does licensing change?
• Can I install and set up DOORS 7.1 in phases?
• What do the new installation options mean?
• Install DOORS 7.1
• Silent installation
• Configure licenses
• Upgrading and migrating data to DOORS 7.1
• Changes to startup.dxl
• Migrating data to DOORS 7.1
• Check your installation
• Modifying your DOORS user setup
• Uninstalling DOORS
Note: This chapter talks about updating and migrating from DOORS 6.0 SR1. You can follow the same steps as those given for DOORS 6.0 SR1 if you are updating and migrating from DOORS 6.0.
Can I migrate You cannot migrate data directly from DOORS 5.x to DOORS 7.1. Data must first be migrated to directly to DOORS 6.0 SR1 format. It can then be migrated to DOORS 7.1. You do not have to upgrade all of
DOORS 7.1 from your DOORS 5.x clients to DOORS 6.0 SR1. Only the DOORS 5.x database needs to be migrated.
DOORS 5.x? We recommend you migrate your data in the following way.
1. Install a DOORS 6.0 SR1 Complete Server Installation, accepting the default data directory.
2. Copy your DOORS 5.x database to this default location.
Installing and setting up

22
3. Run DOORS 6.0 SR1.
4. Log in as Administrator.
5. Click Confirm to migrate your data.
Note: You do not need to load and save your data as was necessary to complete the migration to DOORS 6.0 from DOORS 5.x. The migration to DOORS 7.1 from DOORS 6.0 SR1 completes the migration process.
• For more information refer to the DOORS 6.0 SR1 Installing and Setting Up Guide, which is available from the DOORS/ERS 6.0 SR1 documentation CD and from the website at http://support.telelogic.com.
Does DOORS 7.1 overwrite DOORS 6.0 SR1?
DOORS 7.1 does not overwrite DOORS 6.0 SR1. The following defaults apply when you install DOORS 7.1:
• DOORS 7.1 is installed to a new directory named DOORS 7.1.
• A new label, DOORS 7.1, is added to the Start > Programs > Telelogic menu.
• The DOORS database server service is called DOORS DB Server 7.1
Note: You can install multiple database server services on PC with DOORS 7.1. For more information see the Managing DOORS manual, which is available from the DOORS/ERS documentation CD and from the website at http://support.telelogic.com.
• The DOORS database server portnumber defaults to 36677. This was also the default for previous versions of DOORS. If you want to be able to run a DOORS 6.0 SR1 database server and a DOORS 7.1 database server from your machine, you should ensure that the 7.1 database server runs on a different port.
• By default, the DOORS 7.1 database server points to an empty data directory in the DOORS 7.1 directory. We recommend that you do not change this default path. This gives you more control over how and when you migrate your DOORS 6.0 SR1 data. For information on the options available see “What do I do with my existing DOORS 6.0 SR1 data?”, on page 22.
• The DOORS 7.1 standard end user installs to a new directory. By default, this is C:\Program Files\Telelogic\DOORS 7.1. This means that DOORS 6.0 SR1 is not overwritten, and you can run DOORS 6.0 SR1 and DOORS 7.1 in parallel on the same machine.
What do I do with Caution: We strongly recommend that you make a copy of your data directory before installing my existing DOORS 7.1, or migrating any data to DOORS 7.1. Once you have migrated your data
DOORS 6.0 SR1 to DOORS 7.1 format, you cannot reverse the migration
data? You have four options for migrating data to DOORS 7.1 from DOORS 6.0 SR1:
• Copy the DOORS 6.0 SR1 data directory to the directory that your DOORS 7.1 database server is using, then run a DOORS client and log in as the Administrator user.
Installing and setting up

23
This gives you the maximum amount of control over when you migrate your data. You can install your DOORS database server, and all the DOORS clients, pointing them all to the empty data directory. This means that none of your DOORS 7.1 clients can access your DOORS 6.0 SR1 data and migrate it until you are ready to do so. When you are ready to migrate your data, you can copy it to the empty directory and run a DOORS client against it. When you log in as the Administrator user, your data is migrated to DOORS 7.1.
• Point the DOORS 7.1 database server at the DOORS 6.0 SR1 data directory when you install DOORS 7.1, then run a DOORS client and log in as Administrator.
We do not recommend you do this unless you have:
a. Made a copy of the DOORS 6.0 SR1 data directory.
b. Ensured that the data is ready to migrate.
You should bear in mind that any DOORS client using the DOORS 7.1 database server who has access to the Administrator password could migrate the data.
• Archive the projects you want to migrate, then restore them to DOORS 7.1.
We recommend that you only use this option for initial testing of DOORS 7.1. Using archive and restore as a means of migrating data is time consuming. It also results in the loss of access controls and cross-project links.
• Make a copy of your current DOORS 6.0 SR1 data directory. Access the copied data directory from a DOORS 6.0 SR1 client, and delete the projects and folders that you do not want to migrate to DOORS 7.1.
This allows you to implement a phased migration of your DOORS 6.0 SR1 data. However, after the initial data migration the remaining DOORS 6.0 SR1 data must be migrated to DOORS 7.1 using archive restore. Using this method to migrate data is time consuming. If you archive and restore data from the same master database that was migrated, then access controls and cross-project links are preserved.
How does licensing change?
Every customer requires a new license key to use DOORS/ERS 7.0, 7.0 SP1 or 7.1. This is because we have upgraded the version of FLEXlm to v8 and also changed all DOORS/ERS licenses to use the Telelogic vendor daemon instead of the DOORS daemon. This means that you can merge all of your Telelogic licenses into one license key. The new default port number used for licensing is 19353; the previous port used for licensing was 7192.
DOORS/ERS 7.1 is also supported with FLEXlm 9.2, although we only supply FLEXlm v8 with DOORS/ERS 7.1. If you want to use DOORS/ERS 7.1 with FLEXlm 9.2 you must purchase and set it up seperately.
Note: FLEXlm v8 offers the capability to borrow licenses. This functionality has not been implemented in DOORS/ERS 7.1.
See “Request and setup licenses”, on page 67 for more information on licensing.
Installing and setting up
24
Can I install and As DOORS 7.1 does not overwrite DOORS 6.x or 5.x installations, you can install your DOORS set up DOORS database server and all your DOORS clients alongside the versions you are currently using. You can
choose when to migrate your data. If you want some users to start using the new DOORS version7.1 in phases? while others continue using the old one, they can do so as long as you have made sure that the DOORS 7.1 database server is using a different port than the DOORS 6.0 SR1 database server.
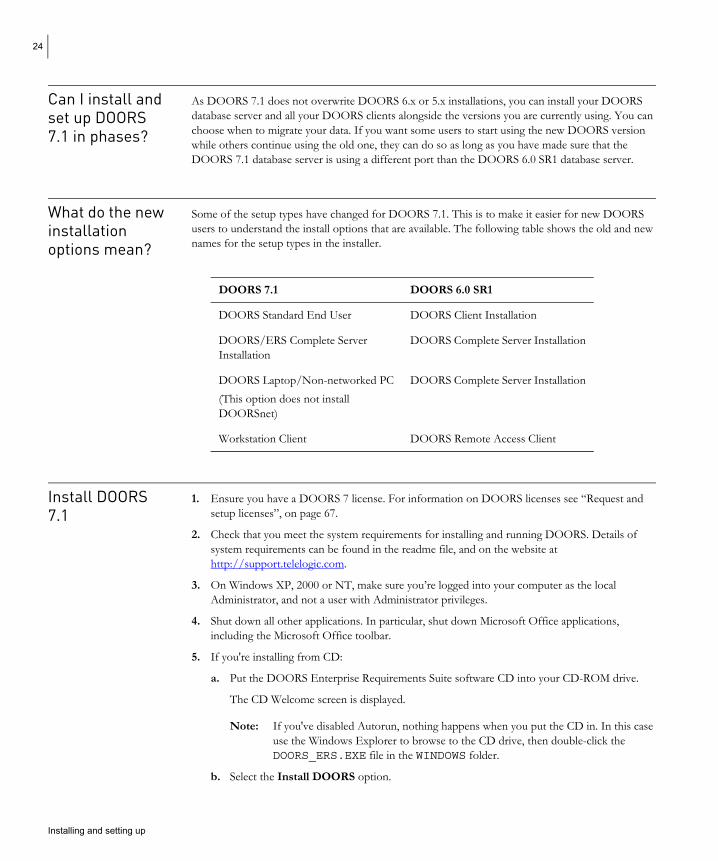
What do the new Some of the setup types have changed for DOORS 7.1. This is to make it easier for new DOORS installation users to understand the install options that are available. The following table shows the old and new
options mean? names for the setup types in the installer.
DOORS 7.1 DOORS 6.0 SR1
DOORS Standard End User
DOORS/ERS Complete Server Installation
DOORS Laptop/Non-networked PC (This option does not install DOORSnet)
Workstation Client
DOORS Client Installation
DOORS Complete Server Installation
DOORS Complete Server Installation
DOORS Remote Access Client
Install DOORS 7.1
1. Ensure you have a DOORS 7 license. For information on DOORS licenses see “Request and setup licenses”, on page 67.
2. Check that you meet the system requirements for installing and running DOORS. Details of system requirements can be found in the readme file, and on the website at http://support.telelogic.com.
3. On Windows XP, 2000 or NT, make sure you’re logged into your computer as the local Administrator, and not a user with Administrator privileges.
4. Shut down all other applications. In particular, shut down Microsoft Office applications, including the Microsoft Office toolbar.
5. If you're installing from CD:
a. Put the DOORS Enterprise Requirements Suite software CD into your CD-ROM drive.
The CD Welcome screen is displayed.
Note: If you've disabled Autorun, nothing happens when you put the CD in. In this case use the Windows Explorer to browse to the CD drive, then double-click the DOORS_ERS.EXE file in the WINDOWS folder.
b. Select the Install DOORS option.
Installing and setting up

25
The Welcome to the DOORS/ERS Install Wizard screen is displayed. Go to Step 7.
6. If you downloaded the DOORS software from the Telelogic FTP or web site:
a. Using Windows Explorer, double-click the file you downloaded.
The Location to Save Files screen is displayed.
b. Specify the folder you want the self-extracting file to use to unpack itself, then click Continue.
The Welcome to the DOORS/ERS Install Wizard screen is displayed.
7. Click Next.
The License Agreement screen is displayed.
8. If you accept the terms in the license agreement, click Yes.
The Customer Information screen is displayed.
9. Enter your user name and company name.
10. Click Next.
The Choose Destination Location screen is displayed. All of the files your computer needs to run DOORS/ERS are installed to this directory. By default, DOORS is installed to C:\Program Files\Telelogic\DOORS 7.1.
If you want to change the directory;
a. Click the Browse button.
b. Browse to the directory you want to install to.
c. Click OK.
11. Click Next.
The Setup Type screen is displayed.
12. Select the setup type that best suits your requirements.
For more information on the setup types see “What types of DOORS installation can I have?”, on page 5. Alternatively a description of the selected setup type is displayed in the right hand pane of the dialog.
13. Click Next.
Follow the instructions given in the table below for the setup type that you selected in Step 12.
Setup Type Steps
DOORS Standard End User a. Enter the Port Number and Hostname of the Any DOORS/ERS Custom DOORS database server you want your DOORS Installation that does not client to access. If you do not know what port include the DOORS Database number the DOORS database server is using, ask Server your DOORS administrator.
b. Got to Step 14.
Installing and setting up

26
Setup Type Steps
DOORS a. Laptop/Non-networked PC
b.
c.
d.
In the Port Number field, enter the port number to be used by your DOORS database server. We recommend you do not use a number lower than 1000. The default port used by DOORS is 36677.
In the Path to Database field enter the path to the directory you want to use for your DOORS database. This is where your data and user information will be stored.
Click Next.
Note: If the port you specified is already being used by another application, a message is displayed. Click OK, enter a different port number and click Next
The Edit Client Data screen appears. Because your machine is not networked, the only data you can access is that stored on your local machine, and this is the data directory that DOORS accesses by default. You do not have to edit this screen for that reason.
Got to Step 14.
Installing and setting up

27
Setup Type Steps
DOORS/ERS Complete Server Installation Any DOORS/ERS Custom installation that includes the DOORS Database Server
a.
b.
c.
d.
e.
In the Port Number field, enter the port number to be used by your DOORS database server. We recommend you do not use a number lower than 1000. The default port used by DOORS is 36677.
In the Path to Database field enter the path to the directory you want to use for your DOORS database. This is where your data and user information will be stored.
Click Next.
Note: If the port you specified is already being used by another application, a message is displayed. Click OK, enter a different port number and click Next
The Edit Client Data screen appears.
Note: Your DOORS client can connect to the DOORS database server on this machine, or to a DOORS database server on any other machine in the network. You can change the database that your DOORS client is accessing at any time. For information on how to do this see, “Modifying your DOORS user setup”, on page 32.
Enter the Port Number and Hostname of the DOORS database server you want your DOORS client to access. By default, the client will access the DOORS database server you are installing on this machine.
Got to Step 14.
DOORS Training If you select the DOORS Training setup type, and you do not have DOORS installed already, a DOORS Standard End User is installed. Follow the install instructions in the Standard End User section at the start of this table. The DOORS Training database is also installed.
14. Click Next.
The Start Copying Files screen is displayed. The settings you defined in the previous steps are displayed. Use the Back button if you want to change any of your settings.
15. Click Next to begin copying files.
Installing and setting up
28
The Setup Status screen is displayed, and the program files are copied to your machine. When all the files are copied the Enter License screen is displayed.
You have three options:
• If you are using a server license and you know the port@hostname that your license server is using, you can enter it in the box, click Next then click Finish.
• If you want to configure a license now, click License Setup, and see “Request and setup licenses”, on page 67 for further information.
• If you do not want to configure a license at this time click Next, then Finish.
Silent installation
Installshield silent install is supported with DOORS 7.1. This means that rather than having to install DOORS from a physical CD choosing the same options time and time again, you can create an installer that will record your preferred settings once and then allow you to install in a more cost efficient and timely manner.
The only option that is supported with Installshield silent install is with the use of setup.exe. We do not support a configuration where .msi files can be used independently of setup.exe.
For more detailed information regarding support of silent installations refer to:
http://documentation.installshield.com/robo/projects/helplibdevstudio9/SetupIss.htm, or go to
http://www.installshield.com and search for “Traditional Silent Mode”.
You have to run Setup.exe with a /r switch to create a response file, then run Setup.exe with a /s switch to run a silent installation based on the contents of the response file.
Setup.exe looks for a response file called Setup.iss in the same directory as Setup.exe, but the /f1 argument can be used to specify an alternative name and location of the response file.
A silent installation program does not display any dialog boxes in the event of an error. Instead, status information for the silent installation is recorded, by default, in a file called setup.log created in the same directory as the response file being used. The end user can specify a different name and location for the log file using the /f2 argument to Setup.exe.
Configure You can run the License Setup Wizard at any time by clicking Start > Programs > Telelogic > licenses DOORS 7.1 Tools > Licence Setup. See “Request and setup licenses”, on page 67 for further
information.
Upgrading and • DOORS 6.0 SR1 clients cannot connect to a DOORS 7.1 database server. migrating data • DOORS 7.1 clients cannot connect to a DOORS 6.0 SR1 database server. to DOORS 7.1 • DOORS 7.1 can read DOORS 5.x or DOORS 6.0 SR1 project or module archives.
• DOORS 6.0 SR1 clients cannot read DOORS 7.1 project or module archives, or partitions.
• DOORS 7.1 clients cannot read DOORS 6.0 SR1 partitions. Partitions must be rejoined or recovered before you migrate data to DOORS 7.1.
Installing and setting up
29
• CPS review cycles do not have to be completed before you migrate your data to DOORS 7.1.
• If a DOORS 6.0 SR1 client tries to connect to the 7.1 server, it will receive a “protocol mismatch” message and will not be allowed to connect.
Changes to startup.dxl
Previous versions of DOORS included three DXL files, which you may have modified to include additional DXL. These were called:
• startup.dxl
• batchstartup.dxl
• finish.dxl
These files were all stored in the lib\dxl directory of your DOORS installation.
In DOORS 7.1, these three files have been replaced with three new directories inside the lib\dxl directory. These directories are called:
• startupfiles
• batchstartupfiles
• finishfiles
Each of these directories contains a file named D6toD7Migration.dxl. This file contains the DXL information that was previously held in the corresponding .dxl file. For example, the file D6toD7Migration.dxl in the batchstartupfiles directory contains the DXL that was previously held in the batchstartup.dxl file, and is run on batchstartup.
If you want to add any further startup, batchstartup or finish DXL you create a new DXL file and save it to the corresponding directory. There is no limit to the number of DXL files that can be stored in these directories. All of the files in each directory are executed at the appropriate time. For example, all files in the startupfiles directory are executed when DOORS starts.
Migrating data to DOORS 7.1
For safety, it is critical that you make a backup of your DOORS data before attempting to migrate.
1. Start the DOORS 7.1 database server.
To initiate the migration, the DOORS Administrator must log in, using the DOORS 7.1 application, from either the server or a client machine and confirm that the data is to be migrated. No-one can use DOORS until migration is completed.
If the Administrator does not successfully log in, or does not confirm that migration is required, then no migration will be performed.
2. Select Start > Program Files > Telelogic > DOORS 7.1.
Installing and setting up

30
The DOORS login screen is displayed.
Note: If the DOORS login screen is not displayed, you have not copied your DOORS 6.0 SR1 data to the correct directory. If you chose to migrate your data using archive and restore, the dialog above is not displayed.
3. Type the Administrator password. No other DOORS user can log into the unmigrated database.
If you don’t know your Administrator password, contact your local Telelogic DOORS customer support department
After successful login, the following dialog is displayed:
4. Click Confirm to begin the migration.
Note: This may only take a few seconds to complete, depending on the size of your data.
When the migration is complete a dialog is displayed. You can now access the the data, and other DOORS users can log into DOORS 7.1.
Note: You do not have to open and save modules to complete the migration of data to DOORS 7.1. This step was only necessary for migration of data to DOORS 6.0 SR1 format.
Check your installation
For users accessing a migrated DOORS 7.1 database: Typically, these are installations using the following setup types:
• DOORS/ERS Standard End User
• DOORS/ERS Custom Installation that does not include the DOORS database server
1. Click Start > Programs > Telelogic > DOORS 7.1
DOORS is loaded and the DOORS login screen is displayed.
Installing and setting up

31
2. Enter your DOORS username and password and click OK. If you do not have a DOORS username, contact your DOORS administrator.
3. The DOORS explorer is displayed.
For installations that point to an empty data folder Typically, these are installations using the following setup types:
• DOORS Laptop / Non-networked PC
• DOORS/ERS Complete Server Installation
• DOORS/ERS Custom Installation that includes the DOORS database server
1. Click Start > Programs > Telelogic > DOORS 7.1
The following dialog box is displayed:
2. Click OK.
The Change Password dialog box is displayed.
3. Type the password you want to use for the Administrator user into the New password and Confirm new password fields. The password must be at least six characters long.
4. Click OK.
Note: Make a note of this password. If you forget it, you will have to contact Telelogic customer support.
5. The DOORS Explorer, and the Tip of the Day are displayed.
Installing and setting up

32
6. Click OK to dismiss the Tip of the Day screen.
7. You should only use the Administrator account in emergencies, so create a new user account, which you can use next time you log in to DOORS:
a. Click Tools > Manage Users.
b. On the Users tab, click New.
c. Type a username in the Username box.
d. Click the Database Manager user type.
e. Click OK.
8. Exit DOORS (click File > Exit).
Don't remain logged in as an Administrator user.
Modifying your DOORS/ERS 7.1 includes a tool called DOORS/ERS Configuration Tool that you can use to: DOORS user • View your DOORS/ERS 7.1 settings, without directly accessing the registry. setup • Modify your DOORS/ERS 7.1 settings if you have write access to the registry.
• Output your DOORS/ERS 7.1 settings to a text file.
To access the DOORS/ERS Configuration Tool, select Start > Program Files > Telelogic > DOORS 7.1 Tools > DOORS/ERS Configuration Tool.
Installing and setting up

33
Uninstalling Use Add/Remove Programs in the Windows Control Panel to remove version 7.1 of DOORS. DOORS
Installing and setting up

34
Installing and setting up

35
5 Installing and Using DOORS on Citrix
This chapter describes how to install DOORS on Citrix. It contains the following topics:
• Supported platforms
• Installation guidelines
• Environment specifications
Supported DOORS 7.1 is supported on Citrix MetaFrame XPe running on Windows 2000 using the Citrix ICA platforms client, also on Windows 2000. Although it may be possible for DOORS 7.1 to work with other
versions of Citrix on other supported DOORS platforms, they have not been tested and are not supported.
Installation guidelines
Terminal services must be activated on the host machine, then Citrix can be installed. These steps must take place before any applications are installed. At installation of Citrix, it is useful to rename the drives from A: C: D: etc., to M: N: & O:, for example. Doing this allows the Citrix clients to map their local drives (through redirection) to the drive letters of A: C: and D:. The swap file should also be increased, for example, to 2.5 times the amount of memory available. The registry file size should also be increased appropriately to accommodate the multiple current_user_keys required.
To install DOORS 7.1 on Citrix you must be in “install mode”.
We recommend that you configure DOORS 7.1 to display in “Seamless mode”. You may experience problems if you display in “Desktop mode”.
As a result of product performance enhancements, the DOORS 7.1 client will only display colors correctly for text highlighting when using the 16 bit color depth resolution in the Citrix ICA client.
Environment Windows 2000 must have Service Pack 2 installed. specifications It is necessary for the DOORS Database Server to be installed on a different machine to the Citrix
server. Both machines should be as geographically close together as possible to optimize performance. The DOORS licence server can be located on either of these machines, or a separate machine.
No DOORS Integrations have been tested in a Citrix environment.
Installing and Setting Up

36
Installing and Setting Up
37
6 Installing DOORS on UNIX
This chapter describes how to install and set up version 7.1 of DOORS on UNIX computers. It contains the following topics:
• Check that you meet the system requirements
• Understanding UNIX installations
• Installing DOORS
• Installing DOORS on a UNIX client
• Installing the DOORS Database Server
• Installing the FLEXlm License Server
Check that you meet the system requirements
The system requirements for running version 7.1 of DOORS on UNIX are:
• Your computer must be running one of the following operating systems:
• Hewlett-Packard HP-UX 11.0 (64-bit version)
• Sun Solaris 8
• Sun Solaris 9
For information on minimum and recommended system requirements (RAM, processor, and so on), visit the support center on our web site at http://support.telelogic.com.
• Your screen resolution must be at least 800 by 600 pixels, and support at least 256 colors.
• The computers on which you are installing DOORS must be running TCP/IP.
• If you're upgrading from an earlier version of DOORS:
•; That version must be DOORS 6.0, DOORS 6.0 SR1, DOORS 7.0 or DOORS 7.0 SP1. You cannot upgrade directly from DOORS 5.x to DOORS 7.1. Users wishing to upgrade from DOORS 5.x must first migrate data to DOORS 6.0 SR1.
Note: Overwriting previous installations is not recommended for DOORS on UNIX. You must install to a new directory.
Understanding There is one DOORS installation script that installs DOORS on all supported UNIX platforms. UNIX There are 3 types of installation that can be performed.
installations
Installing and Setting Up
38
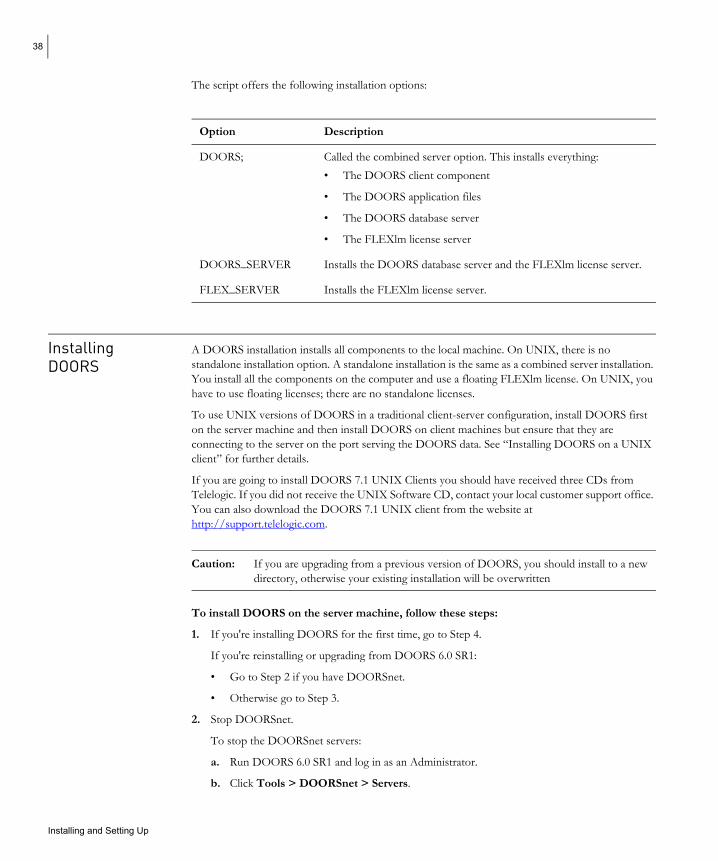
The script offers the following installation options:
Option Description
DOORS; Called the combined server option. This installs everything: • The DOORS client component
• The DOORS application files
• The DOORS database server
• The FLEXlm license server
DOORS_SERVER Installs the DOORS database server and the FLEXlm license server.
FLEX_SERVER Installs the FLEXlm license server.
Installing DOORS
A DOORS installation installs all components to the local machine. On UNIX, there is no standalone installation option. A standalone installation is the same as a combined server installation. You install all the components on the computer and use a floating FLEXlm license. On UNIX, you have to use floating licenses; there are no standalone licenses.
To use UNIX versions of DOORS in a traditional client-server configuration, install DOORS first on the server machine and then install DOORS on client machines but ensure that they are connecting to the server on the port serving the DOORS data. See “Installing DOORS on a UNIX client” for further details.
If you are going to install DOORS 7.1 UNIX Clients you should have received three CDs from Telelogic. If you did not receive the UNIX Software CD, contact your local customer support office. You can also download the DOORS 7.1 UNIX client from the website at http://support.telelogic.com.
Caution: If you are upgrading from a previous version of DOORS, you should install to a new directory, otherwise your existing installation will be overwritten
To install DOORS on the server machine, follow these steps:
1. If you're installing DOORS for the first time, go to Step 4.
If you're reinstalling or upgrading from DOORS 6.0 SR1:
• Go to Step 2 if you have DOORSnet.
• Otherwise go to Step 3.
2. Stop DOORSnet.
To stop the DOORSnet servers:
a. Run DOORS 6.0 SR1 and log in as an Administrator.
b. Click Tools > DOORSnet > Servers.
Installing and Setting Up
39
You see a list of all possible permutations of computers and port numbers that are configured for DOORSnet servers, in the format port-number@server-name.
c. Select all the entries in the list, and then click Stop servers./
d. Click Close./
To stop the DOORSnet Session Manager:/
a. Run DOORS 6.0 SR1 and log in as an Administrator./
b. Click Tools > DOORSnet > Sessions.
c. Click Stop Session Manager.
d. Click Close.
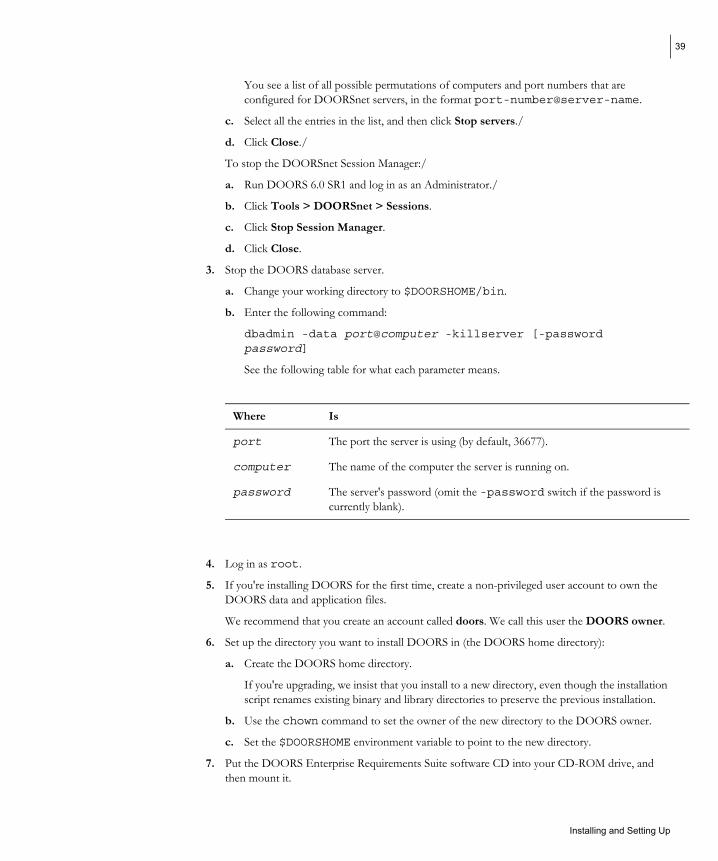
3. Stop the DOORS database server.
a. Change your working directory to $DOORSHOME/bin.
b. Enter the following command:
dbadmin -data port@computer -killserver [-password password]
See the following table for what each parameter means.
Where Is
port The port the server is using (by default, 36677).
computer The name of the computer the server is running on.
password The server's password (omit the -password switch if the password is currently blank).
4. Log in as root.
5. If you're installing DOORS for the first time, create a non-privileged user account to own the DOORS data and application files.
We recommend that you create an account called doors. We call this user the DOORS owner.
6. Set up the directory you want to install DOORS in (the DOORS home directory):
a. Create the DOORS home directory.
If you're upgrading, we insist that you install to a new directory, even though the installation script renames existing binary and library directories to preserve the previous installation.
b. Use the chown command to set the owner of the new directory to the DOORS owner.
c. Set the $DOORSHOME environment variable to point to the new directory.
7. Put the DOORS Enterprise Requirements Suite software CD into your CD-ROM drive, and then mount it.
Installing and Setting Up

40
The following table describes how to mount your CD_ROM drive:
Platform Example command
Sun Solaris mount -r -F hsfs /dev/sr0 /cdrom
HP-UX mount -r -F cdfs /dev/dsk/c0t2d0 /cdrom
Note: On Sun Solaris, if the volume manager is configured, it automatically mounts the CD-ROM on /cdrom/doors_ers_7.
8. Run the DOORS installation script, giving the full path including the CD-ROM device.
The following table describes how to run the DOORS installation script:
Platform Example command
Sun Solaris (auto mounted) /cdrom/doors_ers_7/unix/bin/instdoor.sh
Sun Solaris (manually mounted) /cdrom/unix/bin/instdoor.sh
HP-UX "/cdrom/UNIX/BIN/INSTDOOR.SH;1"
9. If you downloaded the software from the web:
a. Unzip the archive to a temporary location on your computer.
b. Run the installation script, giving the full path including the disk device. For example, if you unzipped the archive to /mydisk/temp, enter:
/mydisk/temp/doors_ers_7/unix/bin/instdoor.sh
c. Follow the instructions on your screen to install DOORS.
10. Answer the prompts on the screen:
a. Enter path to CD-ROM device or DOORS distribution:
[/cdrom]
b. Enter y at the first prompt, to install the DOORS package:
Install package DOORS [y] :
c. Enter the path to the DOORS home directory you created in Step 6.
d. Enter the name of the DOORS owner (by default, doors).
e. Enter y if you want to install the demo database, otherwise enter n
f. You see prompts like this, asking which UNIX platforms you want to install the software for and if you want to install the files that are common to all platforms, such as the lib directory, which contains the DXL files:
Install for platform [default] :
Installing and Setting Up
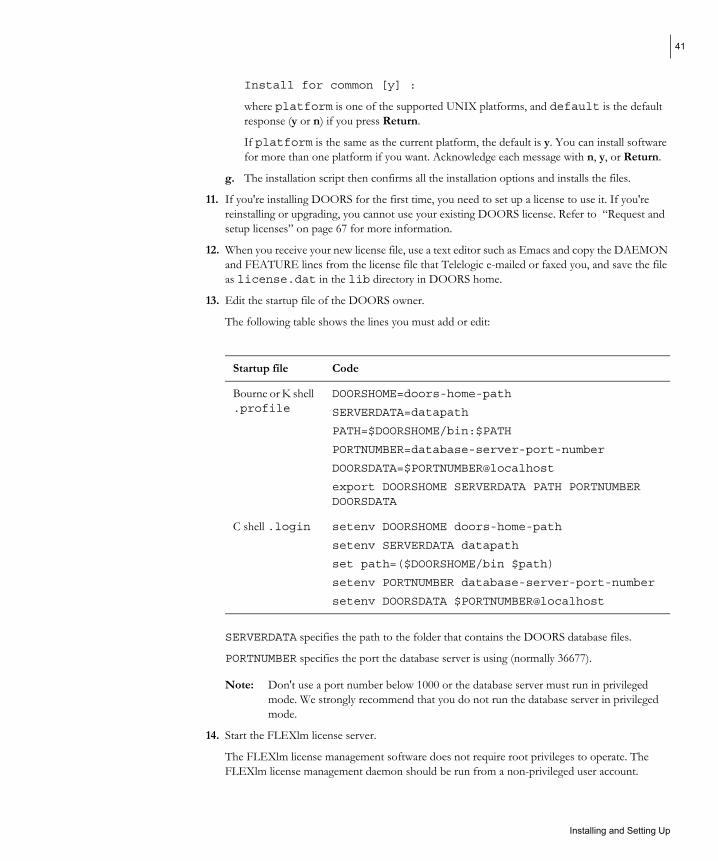
41
Install for common [y] :
where platform is one of the supported UNIX platforms, and default is the default response (y or n) if you press Return.
If platform is the same as the current platform, the default is y. You can install software for more than one platform if you want. Acknowledge each message with n, y, or Return.
g. The installation script then confirms all the installation options and installs the files.
11. If you're installing DOORS for the first time, you need to set up a license to use it. If you're reinstalling or upgrading, you cannot use your existing DOORS license. Refer to “Request and setup licenses” on page 67 for more information.
12. When you receive your new license file, use a text editor such as Emacs and copy the DAEMON and FEATURE lines from the license file that Telelogic e-mailed or faxed you, and save the file as license.dat in the lib directory in DOORS home.
13. Edit the startup file of the DOORS owner.
The following table shows the lines you must add or edit:
Startup file Code
Bourne or K shell .profile
DOORSHOME=doors-home-path
SERVERDATA=datapath
PATH=$DOORSHOME/bin:$PATH
PORTNUMBER=database-server-port-number
DOORSDATA=$PORTNUMBER@localhost
export DOORSHOME SERVERDATA PATH PORTNUMBER DOORSDATA
C shell .login setenv DOORSHOME doors-home-path
setenv SERVERDATA datapath
set path=($DOORSHOME/bin $path)
setenv PORTNUMBER database-server-port-number
setenv DOORSDATA $PORTNUMBER@localhost
SERVERDATA specifies the path to the folder that contains the DOORS database files.
PORTNUMBER specifies the port the database server is using (normally 36677).
Note: Don't use a port number below 1000 or the database server must run in privileged mode. We strongly recommend that you do not run the database server in privileged mode.
14. Start the FLEXlm license server.
The FLEXlm license management software does not require root privileges to operate. The FLEXlm license management daemon should be run from a non-privileged user account.
Installing and Setting Up

42
If the license management daemon is currently executing with root, or some other system account permission, modify it. For example, create a non-privileged user account, flexlm, for running the FLEXlm license management daemon.
The FLEXlm license server uses the port number specified on the SERVER line of the license.dat file. By default, this is 19353. If this clashes with a port already defined on your system, edit license.dat to specify the port number you want to use.
To run the FLEXlm license server automatically every time the computer is restarted, follow these steps:
On Do this
Sun Solaris; Edit the file doorslm in $DOORSHOME/etc/solaris to make the DOORSHOME variable point to your DOORS home location. Copy the file to the /etc/init.d directory and ensure that it is executable. Make two links to the file: ln -s /etc/init.d/doorslm /etc/rc3.d/S17doorslm
ln -s /etc/init.d/doorslm /etc/rc3.d/K17doorslm
HP-UX; Log in as root, and edit the file /etc/rc.local. Add the following lines to the end of the file: #start the DOORS license manager
DOORSHOME="doors_install_dir"
export $DOORSHOME
"$DOORSHOME/etc/lmgrd -c $DOORSHOME/lib/license.dat \
2>&1 > logfile" &
echo "DOORS license manager started."
Alternatively, you can initialize the license server manually by running the command interactively. For example, if DOORSHOME is defined, you can use:
$DOORSHOME/etc/lmgrd -c $DOORSHOME/lib/license.dat &
15. Start the DOORS database server:
a. Log in as the DOORS owner user.
b. Change your working directory to $DOORSHOME/bin.
c. Enter the following command:
./doorsd &
Note: If you use the Korn shell and do not use “doorsd &” in a system startup script then you should execute the following command instead:
“nohup doorsd &”
Installing and Setting Up

43
16. Give DOORS access to the screen, by adding:
xhost + >/dev/null
to the appropriate file. This is platform specific, as follows:
Platform GUI File
Sun Solaris OpenWindows .openwin-init
HP-UX HP VUE .xinitrc
Note: On Sun Solaris, the environment variable OPENWINHOME should point to the directory where the OpenWindows software is installed.
17. Your installation is now complete. You should now run DOORS on the server to check that you've configured the server software properly. To run DOORS enter the following command at the shell prompt:
doors7
18. If you're upgrading, read “Upgrading and migrating data to DOORS 7.1,” on page 28 to find out how to migrate your data.
Installing The DOORS installation will be performed in the same manner as before. You should install on each DOORS on a UNIX client machine as described in the previous section, ignoring the license section. DOORS will
UNIX client then be installed on the local machine. To connect to the machine serving the data you will have to modify the user environment of every user who wants to run DOORS, by editing each user's startup file.
Installing and Setting Up

44
The following table shows the lines you must add or edit, with optional lines shown in square brackets.
Startup file Code
Bourne or K shell: .profile
C shell: .login
DOORSHOME=doors-home-path
DOORSDATA=database-server-port-number@server
PATH=$DOORSHOME/bin:$PATH
LM_LICENSE_FILE=port-number@flexlm-server
LOCALDATA=path-to-local-directory-for-temporary-files
export DOORSHOME DOORSDATA PATH LM_LICENSE_FILE LOCALDATA
setenv DOORSHOME doors-home-path
setenv DOORSDATA database-server-port-number@server
set path=($DOORSHOME/bin $path)
setenv LM_LICENSE_FILE port-number@flexlm-server
setenv LOCALDATA path-to-local-directory-for-temporary-files
1. Give DOORS access to the screen, by adding:
xhost + >/dev/null
to the appropriate file. This is platform specific, as follows:
Platform GUI File
Sun Solaris OpenWindows .openwin-init
HP-UX HP VUE .xinitrc
Note: On Sun Solaris, the environment variable OPENWINHOME should point to the directory where the OpenWindows software is installed.
2. Now run DOORS to check that it works.
Enter the following command at the shell prompt:
doors7
Installing and Setting Up
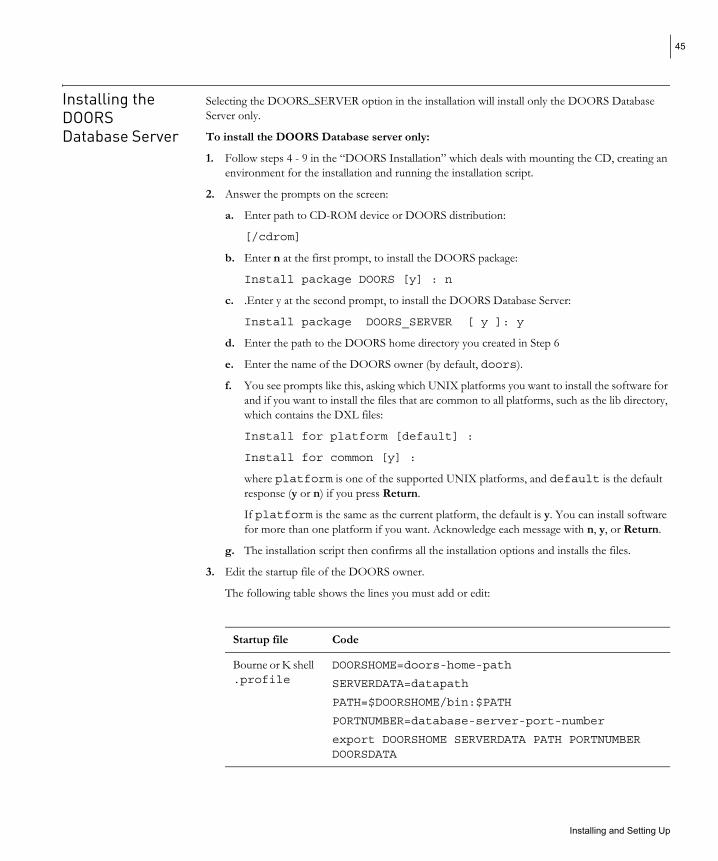
45
Installing the DOORS Database Server
Selecting the DOORS_SERVER option in the installation will install only the DOORS Database Server only.
To install the DOORS Database server only:
1. Follow steps 4 - 9 in the “DOORS Installation” which deals with mounting the CD, creating an environment for the installation and running the installation script.
2. Answer the prompts on the screen:
a. Enter path to CD-ROM device or DOORS distribution:
[/cdrom]
b. Enter n at the first prompt, to install the DOORS package:
Install package DOORS [y] : n
c. .Enter y at the second prompt, to install the DOORS Database Server:
Install package DOORS_SERVER [ y ]: y
d. Enter the path to the DOORS home directory you created in Step 6
e. Enter the name of the DOORS owner (by default, doors).
f. You see prompts like this, asking which UNIX platforms you want to install the software for and if you want to install the files that are common to all platforms, such as the lib directory, which contains the DXL files:
Install for platform [default] :
Install for common [y] :
where platform is one of the supported UNIX platforms, and default is the default response (y or n) if you press Return.
If platform is the same as the current platform, the default is y. You can install software for more than one platform if you want. Acknowledge each message with n, y, or Return.
g. The installation script then confirms all the installation options and installs the files.
3. Edit the startup file of the DOORS owner.
The following table shows the lines you must add or edit:
Startup file Code
Bourne or K shell DOORSHOME=doors-home-path .profile SERVERDATA=datapath
PATH=$DOORSHOME/bin:$PATH
PORTNUMBER=database-server-port-number
export DOORSHOME SERVERDATA PATH PORTNUMBER DOORSDATA
Installing and Setting Up

46
(Continued)
Startup file Code
C shell .login setenv DOORSHOME doors-home-path
setenv SERVERDATA datapath
set path=($DOORSHOME/bin $path)
setenv PORTNUMBER database-server-port-number
4. Start the DOORS database server:
a. Log in as the DOORS owner user.
b. Change your working directory to $DOORSHOME/bin.
c. Enter the following command:
./doorsd &
Note: If you use the Korn shell and do not use “doorsd &” in a system startup script then you should execute the following command instead:
5. “nohup doorsd &”
Installing the FLEXlm License Server
Selecting the FLEX_SERVER option in the installation will install only the DOORS Database Server only.
To install the FLEXlm License Manager only:
1. Follow steps 4 - 9 in the “DOORS Installation” which deals with mounting the CD, creating an environment for the installation and running the installation script.
2. Answer the prompts on the screen:
a. Enter path to CD-ROM device or DOORS distribution:
[/cdrom]
b. Enter n at the first prompt, to install the DOORS package:
Install package DOORS [y] : n
c. Enter n at the second prompt, to install the DOORS Database Server:
Install package DOORS_SERVER [ y ]: n
d. Enter y at the third prompt, to install the FLEXlm License Manager:
Install package FLEX_SERVER [ y ]: y
e. Enter the path to the DOORS home directory you created in Step 6
f. Enter the name of the DOORS owner (by default, doors).
g. You see prompts like this, asking which UNIX platforms you want to install the software for and if you want to install the files that are common to all platforms, such as the lib directory, which contains the DXL files:
Installing and Setting Up
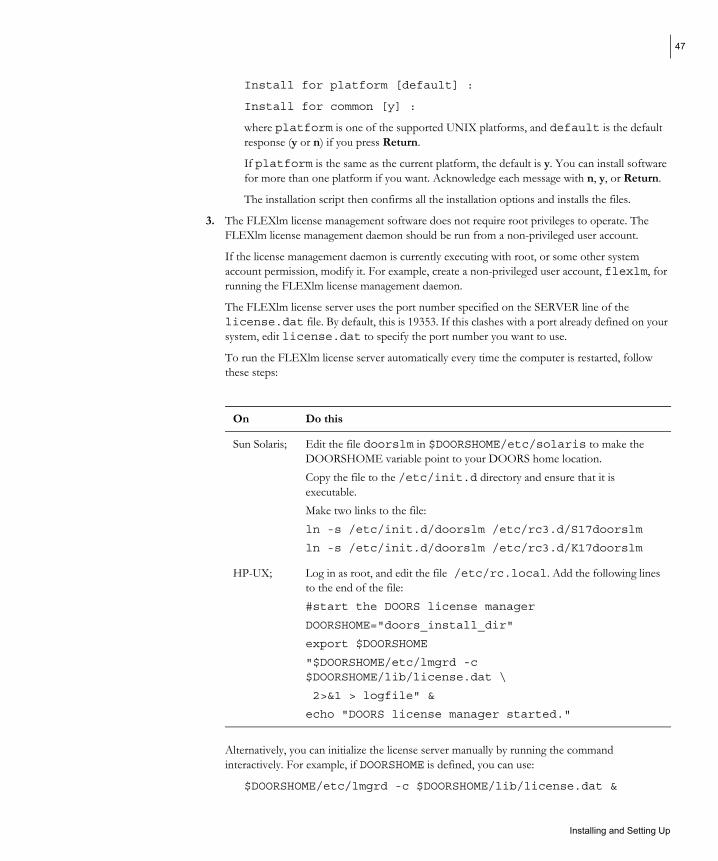
47
Install for platform [default] :
Install for common [y] :
where platform is one of the supported UNIX platforms, and default is the default response (y or n) if you press Return.
If platform is the same as the current platform, the default is y. You can install software for more than one platform if you want. Acknowledge each message with n, y, or Return.
The installation script then confirms all the installation options and installs the files.
3. The FLEXlm license management software does not require root privileges to operate. The FLEXlm license management daemon should be run from a non-privileged user account.
If the license management daemon is currently executing with root, or some other system account permission, modify it. For example, create a non-privileged user account, flexlm, for running the FLEXlm license management daemon.
The FLEXlm license server uses the port number specified on the SERVER line of the license.dat file. By default, this is 19353. If this clashes with a port already defined on your system, edit license.dat to specify the port number you want to use.
To run the FLEXlm license server automatically every time the computer is restarted, follow these steps:
On Do this
Sun Solaris; Edit the file doorslm in $DOORSHOME/etc/solaris to make the DOORSHOME variable point to your DOORS home location. Copy the file to the /etc/init.d directory and ensure that it is executable. Make two links to the file: ln -s /etc/init.d/doorslm /etc/rc3.d/S17doorslm
ln -s /etc/init.d/doorslm /etc/rc3.d/K17doorslm
HP-UX; Log in as root, and edit the file /etc/rc.local. Add the following lines to the end of the file: #start the DOORS license manager
DOORSHOME="doors_install_dir"
export $DOORSHOME
"$DOORSHOME/etc/lmgrd -c $DOORSHOME/lib/license.dat \
2>&1 > logfile" &
echo "DOORS license manager started."
Alternatively, you can initialize the license server manually by running the command interactively. For example, if DOORSHOME is defined, you can use:
$DOORSHOME/etc/lmgrd -c $DOORSHOME/lib/license.dat &
Installing and Setting Up

48
Installing and Setting Up

49
7 Installing DOORS on Linux�
This chapter describes how to install and set up version 7.1 of DOORS on Linux computers. It contains the following topics:
• Check that you meet the system requirements
• Installing the DOORS Database Server
Check that you The system requirements for running version 7.1 of DOORS on Linux are: meet the system • Your computer must be running Red Hat Linux 8.0 requirements� For information on minimum and recommended system requirements (RAM, processor, and so
on), visit the support center on our web site at http://support.telelogic.com.
• Your screen resolution must be at least 800 by 600 pixels, and support at least 256 colors.
• The computers on which you are installing DOORS must be running TCP/IP.
Installing the �DOORS �Database Server �
The DOORS Database Server only can be installed on Linux. DOORS clients are not supported on Linux and must be installed on either Windows or UNIX platforms.
To install the DOORS Database server:
1. Log in as root.
2. Create a non-privileged user account to own the DOORS data and application files.
We recommend that you create an account called doors. We call this user the DOORS owner.
3. Set up the directory you want to install DOORS in (the DOORS home directory):
a. Create the DOORS home directory.
b. Use the chown command to set the owner of the new directory to the DOORS owner.
c. Set the $DOORSHOME environment variable to point to the new directory.
4. Put the DOORS Enterprise Requirements Suite software CD into your CD-ROM drive.
On Red Hat 8.0, the CD should mount automatically to /mnt/cdrom. If it doesn’t, use the following example command to mount the CD:
mount -r -t iso 9660 /dev/cdrom /mnt/cdrom.
5. Run the DOORS installation script, giving the full path including the CD-ROM device. For example type:
/mnt/cdrom/unix/bin/instdoor.sh
6. If you downloaded the software from the web:
a. Unzip the archive to a temporary location on your computer.
Installing and Setting Up
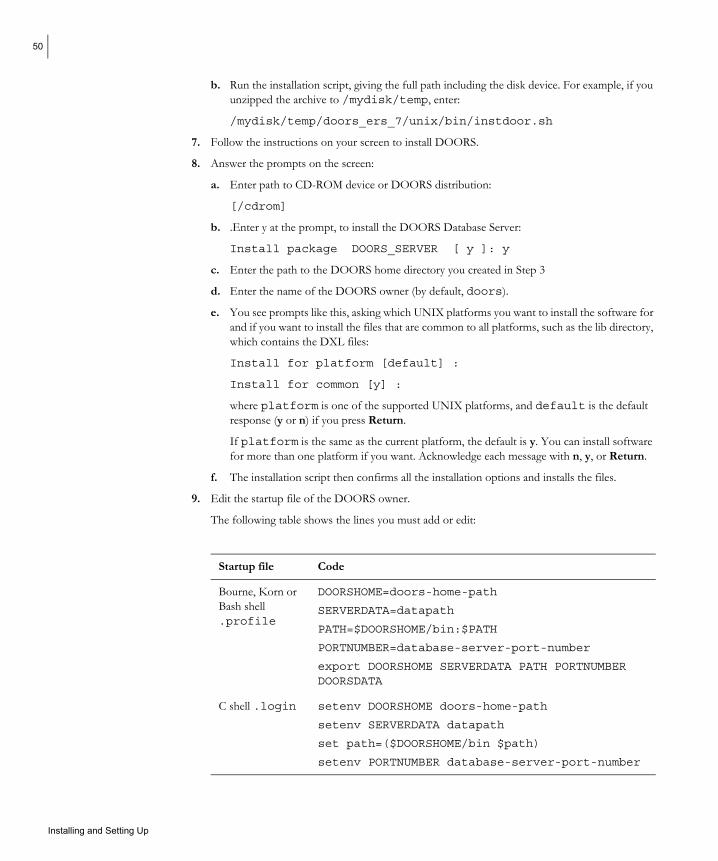
50
b. Run the installation script, giving the full path including the disk device. For example, if you unzipped the archive to /mydisk/temp, enter:
/mydisk/temp/doors_ers_7/unix/bin/instdoor.sh
7. Follow the instructions on your screen to install DOORS.
8. Answer the prompts on the screen:
a. Enter path to CD-ROM device or DOORS distribution:
[/cdrom]
b. .Enter y at the prompt, to install the DOORS Database Server:
Install package DOORS_SERVER [ y ]: y
c. Enter the path to the DOORS home directory you created in Step 3
d. Enter the name of the DOORS owner (by default, doors).
e. You see prompts like this, asking which UNIX platforms you want to install the software for and if you want to install the files that are common to all platforms, such as the lib directory, which contains the DXL files:
Install for platform [default] :
Install for common [y] :
where platform is one of the supported UNIX platforms, and default is the default response (y or n) if you press Return.
If platform is the same as the current platform, the default is y. You can install software for more than one platform if you want. Acknowledge each message with n, y, or Return.
f. The installation script then confirms all the installation options and installs the files.
9. Edit the startup file of the DOORS owner.
The following table shows the lines you must add or edit:
Startup file Code
Bourne, Korn or Bash shell .profile
DOORSHOME=doors-home-path
SERVERDATA=datapath
PATH=$DOORSHOME/bin:$PATH
PORTNUMBER=database-server-port-number
export DOORSHOME SERVERDATA PATH PORTNUMBER DOORSDATA
C shell .login setenv DOORSHOME doors-home-path
setenv SERVERDATA datapath
set path=($DOORSHOME/bin $path)
setenv PORTNUMBER database-server-port-number
Installing and Setting Up

51
10. Start the DOORS database server:
a. Log in as the DOORS owner user.
b. Change your working directory to $DOORSHOME/bin.
c. Enter the following command:
./doorsd &
Note: If you use the Korn shell and do not use “doorsd &” in a system startup script then you should execute the following command instead:
“nohup doorsd &”
Installing and Setting Up

52
Installing and Setting Up

53
8 Installing DOORSnet
This chapter describes how to install and set up version 7.1 of DOORSnet:
• Check that you meet the system requirements
• Install and configure DOORSnet
• Uninstall DOORSnet
Check that you The system requirements for running version 7.1 of DOORSnet are: meet the system • Your computer must be running one of the following operating systems: requirements
Windows Windows XP Windows 2000 Professional or Server Windows NT 4.0 Service Pack 6a
UNIX Hewlett-Packard HP-UX 11 (64-bit version) Sun Solaris 8 or 9
• Your computer must have at least 100 MB of free disk space.
• Version 7.1 of DOORS must be installed on your computer.
• DOORSnet 6.0 cannot run on the same computer as DOORSnet 7.1
• You must have an X-Windows display to run the DOORSnet Server on UNIX.
• Your computer must be configured to use a FLEXlm license with DOORS.
• You must have a web server that is configured to run CGI scripts.
When this book was written, the web servers that Telelogic had tested with DOORSnet were as follows:
Web server Version
Apache 1.3.22
Internet Information Server on Windows NT 4.0
Internet Information Server on Windows 2000 5.0
Internet Information Server on Windows XP 5.1
iPlanet Web Server (previously called the Netscape Enterprise Server) 4.1 SP7
Installing and Setting Up

54
For the latest information on the web servers that support DOORSnet, visit the support center on our web site at http://support.telelogic.com.
• Each DOORSnet user needs a web browser. When this book was written, the browsers that Telelogic had tested with DOORSnet were as follows.
Browser Version
Internet Explorer on Windows XP, NT and 2000 6.0
Netscape Navigator 4.77
For the latest information on the browsers that support DOORSnet, visit the support center on our website at http://support.telelogic.com.
Install and The second stage of setting up DOORSnet is to install and configure the software. configure DOORSnet Caution: If you are running DOORSnet 7.1, you should stop the DOORSnet server and
DOORSnet Session Manager on the DOORSnet server machine before upgrading the machine to DOORS and DOORSnet 7.1. After installation, manually start the DOORSnet server and DOORSnet Session Manager.
There are several options available when installing DOORS/ERS 7.1:
• DOORS/ERS Complete Server Installation
If this option was selected when installing DOORS, DOORSnet will already be installed. Go to Step 2 for instructions on how to configure your DOORSnet installation.
• DOORS Laptop/Non-networked PC or DOORS Standard End User
If either of these options were selected when installing DOORS, DOORSnet will not have been installed. Go to Step 1 for instructions on how to install DOORSnet.
• DOORS Custom Installation
DOORSnet will have been installed if the DOORSnet option was selected on the custom install screen. If you are not sure if DOORSnet was selected got to Step 1.
If you have DOORS installed as a Standard End User or Laptop/Non-networked Computer:
1. Install the DOORSnet software.
On Windows:
Note: Two downloads are available from the FTP and web sites. Setup.exe installs DOORS and DOORSnet. DOORSsetup.exe only installs DOORS. If you installed using DOORSsetup.exe, you must remove this installation and reinstall using Setup.exe.
a. On Windows XP, 2000 or NT, make sure you are logged into your computer as the local Administrator, and not a user with Administrator privileges.
Installing and Setting Up
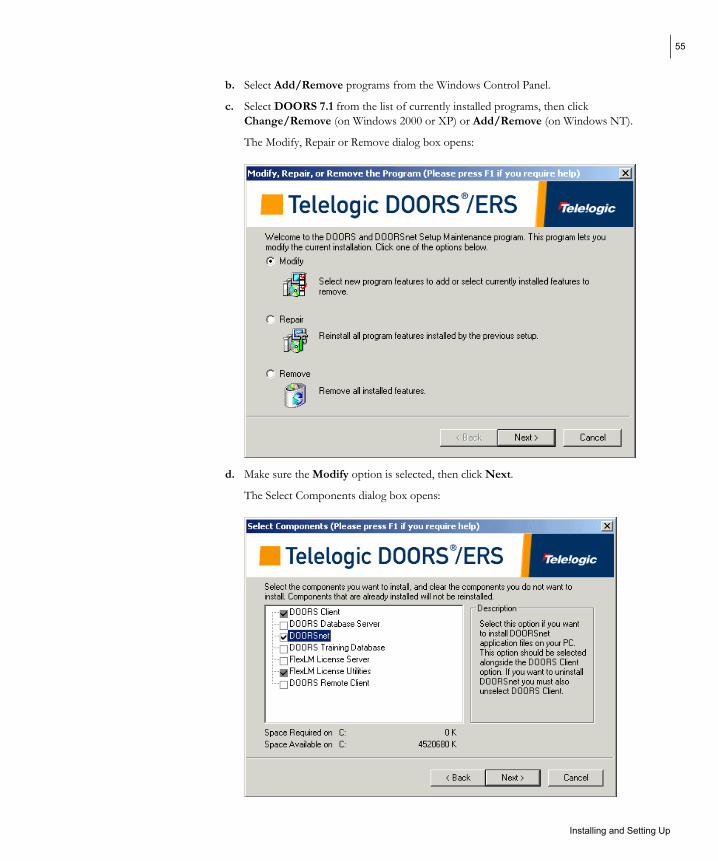
55
b. Select Add/Remove programs from the Windows Control Panel.
c. Select DOORS 7.1 from the list of currently installed programs, then click Change/Remove (on Windows 2000 or XP) or Add/Remove (on Windows NT).
The Modify, Repair or Remove dialog box opens:
d. Make sure the Modify option is selected, then click Next.
The Select Components dialog box opens:
Installing and Setting Up

56
Note: If the DOORSnet Files box is checked, DOORSnet is already installed. Click Cancel on the Select Components screen and go to Step 4 for instructions on how to configure DOORSnet.
e. Check the DOORSnet Files box and click Next.
The Edit Data screen opens.
f. By default, the Port Number and Hostname fields will display the port number and database server currently used by your DOORS client. If you want to use a different database, enter the new port number and database server.
g. Click Next.
Note: You cannot access a pre-DOORS 7 server with DOORSnet 7.1.
The necessary files are installed and the Finish screen displays.
h. Click Finish and go to Step 2 for instructions on how to configure DOORSnet.
On UNIX:
Note: DOORSnet files must be owned by the DOORS owner. We recommend a user called doors.
a. Log in as root.
b. Make sure that the $DOORSHOME environment variable is set to point to the directory in which you installed DOORS 7.1.
c. If you're installing from CD:
i. Put the DOORS Enterprise Requirements Suite software CD into your CD-ROM drive.
ii. Mount the CD-ROM.
Platform Example command
Sun Solaris mount -r -F hsfs /dev/sr0 /cdrom
HP-UX mount -r -F cdfs /dev/dsk/c0t2d0 /cdrom
Note: On Sun Solaris, if the volume manager is configured, it automatically mounts the CD-ROM on /cdrom/doors_ers_7.
iii. Run the DOORSnet installation script, giving the full path including the CD-ROM device.
Platform Example command
Sun Solaris (auto mounted) /cdrom/doors_ers_7/unix/bin/inst.sh
Sun Solaris (manually mounted) /cdrom/unix/bin/inst.sh
HP-UX "/cdrom/UNIX/BIN/INST.SH;1"
Installing and Setting Up

57
iv. Follow the instructions on your screen to install DOORSnet.
d. If you downloaded the software from the web:
i. Unzip the archive to a temporary location on your computer.
ii. Run the installation script, giving the full path including the disk device. For example, if you unzip the archive to /mydisk/temp, enter:
/mydisk/temp/doorsnet/unix/bin/inst.sh
iii. Follow the instructions on your screen to install DOORSnet.
2. The Configure Website wizard must be run on the primary DOORSnet computer. See the “Understanding DOORSnet on Multiple Computers” section in the Managing DOORSnet chapter of the Managing DOORSnet manual, which is on the DOORS Enterprise Requirements Suite documentation CD, for more information.
Run the DOORSnet website configuration wizard.
Follow these steps:
a. Log in to DOORS as a Database Manager or a Custom user who has the power to create users.
b. Click Tools > DOORSnet > Configure Website.
The wizard asks various questions that your website administrator should be able to answer.
Note: If your website administrator has problems answering the questions, see the chapter on configuring web servers in Managing DOORSnet, which is on the DOORS Enterprise Requirements Suite documentation CD.
If you copied the DOORSnet web directory to a UNIX directory, you may need to change the access permissions on the directory.
The user account that Needs this access
Runs the website and DOORSnet configuration wizards
Read and write access to the DOORSnet web directory and all the files and folders in it
Runs the DOORSnet CGI scripts Read and execute access to the DOORSnet cgi directory, and read and write access to the DOORSnet docs directory.
Note: If you do not have a DOORS UNIX license, you will need to do the following instead:
i. Install DOORSnet on a PC client
ii. Configure your web site, then configure DOORSnet.
iii. Choose the configuration options applicable to your UNIX server.
iv. Copy the DOORSweb directory from the PC client to the UNIX server.
v. Change the owner of this directory to doors.
Installing and Setting Up

58
vi. Optionally, change the access permissions.
vii. Follow the rest of the steps on the next page.
3. Ask your website administrator to publish the DOORSnet cgi and docs directories on your web server.
Note: If your website administrator isn't sure how to publish directories, see the chapter on configuring web servers in Managing DOORSnet, which is on the DOORS Enterprise Requirements Suite documentation CD. It contains detailed instructions for various web server products.
4. Run the DOORSnet configuration wizard.
Follow these steps:
a. Log in to DOORS as a Database Manager or a Custom user who has the power to create users.
b. Click Tools > DOORSnet > Configure DOORSnet.
c. Follow the instructions in the wizard.
Note: If this is your first DOORSnet installation, we recommend that you accept all the default settings offered by the wizard.
The wizard stores the configuration information in your DOORS database.
If you accept the default settings, the wizard automatically starts DOORSnet.
On Windows, both the DOORSnet server and Session Manager run as services. By default, the wizard installs and starts the services. The services are automatically started whenever you restart your computer.
5. If necessary, start DOORSnet. Skip this step if you accepted the wizard's default settings in the previous step.
Start the DOORSnet Session Manager first, then the DOORSnet server. For information on how to do this, see Managing DOORSnet, which is on the DOORS Enterprise Requirements Suite documentation CD.
6. Check that you can access DOORSnet using a web browser.
Try to access DOORSnet using a web browser from any computer on your intranet. Go to this URL:
http://your-webserver-name/doorsnet
where your-webserver-name is whatever you normally type to access your webserver. For example, go to http://yourwebserver.yourdomain/doorsnet.
Note: If you have a secure webserver, type https instead of http. You must use either the http or https protocol. None of the DOORSnet links or buttons work if you just double-click the HTML files in Windows Explorer or if you open the files directly using your browser's File menu.
Installing and Setting Up

59
You should see the DOORSnet Registration Page.
7. Register with DOORSnet.
Type in your name and e-mail address, and then click OK.
You should see the DOORSnet Access Page.
Installing and Setting Up

60
8. Access your DOORS database.
Type any valid username and password for your DOORS database, and then click OK.
You should see this window:
Notice that you can't see any data because you haven't published any yet.
9. Log out of DOORSnet.
On the DOORSnet tab, click Log out to end your DOORSnet session.
Note: Always log out when you've finished using DOORSnet, to free up a session for another user. If you forget to do this, DOORSnet automatically ends your session after an hour, but meanwhile you're using up a session, which may stop someone else being able to use DOORSnet.
You have finished installing and setting up DOORSnet.
Read Managing DOORSnet to find out how to publish your data so that web users can access it using their browsers. This manual is on the DOORS Enterprise Requirements Suite documentation CD.
Note: If you are upgrading from DOORSnet 6.0 to DOORSnet 7.1, you should not have to re-publish data or re-configure users unless your configuration has changed.
Installing and Setting Up

61
Uninstall DOORSnet
Follow these steps to remove DOORSnet 7.1:
1. On Windows XP, NT and Windows 2000, make sure you're logged in to your computer as the local Administrator, and not just a user with Administrator privileges.
2. Click Start > Settings > Control Panel.
The Control Panel appears.
3. Double-click Add/Remove Programs.
The Add/Remove Programs window appears.
4. Select DOORS from the list of currently installed programs, then click Change/Remove (on Windows 2000 or XP) or Add/Remove (on Windows NT).
The DOORS/ERS Installation Wizard appears.
5. Select the Modify option, then click Next.
A Select Components dialog box similar to the screenshot below is displayed,
6. Uncheck the DOORSnet Files component by clicking in the tick-box, then click Next.
7. Complete the remaining steps in the wizard to remove DOORSnet.
Installing and Setting Up

62
Installing and Setting Up
63
9 Installing DOORSrequireIT
This chapter describes how to install and set up version 7.0 of DOORSrequireIT. There are four stages:
• Check that you meet the system requirements
• Install the software
• Set up your licenses
• Check that it works
• Uninstalling DOORSrequireIT
Check that you The system requirements for version 7.0 of DOORSrequireIT are: meet the system • Your computer must be running one of the following combinations of Windows and Word: requirements
Windows Word
Windows 2000 Word 2000
Windows NT 4.0 Word 2000
Windows XP Word 2002
• Your computer must have at least 20 MB of free disk space.
• You cannot install and run DOORSrequireIT 7.0 alongside DOORSrequireIT 6.0 or 2.1. Version 6.0 and 2.1 must be removed before version 7.0 can be installed.
Install the software
To install DOORSrequireIT version 7.0:
1. If you don't want to exchange data between DOORSrequireIT and DOORS, go to Step 2.
Otherwise, install DOORS 7.1. Follow the instructions in “New install of DOORS on Windows”, on page 7.
If DOORS 7.1 is installed, the DOORSrequireIT installer automatically installs the component that exchanges data between DOORSrequireIT and DOORS.
On Windows XP, 2000 or NT, make sure you're logged in to your computer as the local Administrator, and not a user with Administrator privileges.
2. Make sure that no Microsoft applications are running. In particular, make sure that Microsoft Word is not running.
3. Install DOORSrequireIT.
Installing and Setting Up

64
If you're installing from CD:
a. Put the DOORS Enterprise Requirements Suite software CD into your CD-ROM drive.
You see the CD welcome screen.
Note: If you've disabled Autorun, nothing happens when you put the CD in. In this case, using Windows Explorer, double-click the file DOORS_ERS.EXE in the WINDOWS folder on the CD.
b. Select the DOORSrequireIT option, and then follow the instructions on your screen to install DOORSrequireIT.
If you downloaded the DOORSrequireIT software from the Telelogic FTP or web site:
a. Using Windows Explorer, double-click the file you downloaded.
b. Follow the instructions on your screen to install DOORSrequireIT.
Set up your licenses
There are two different DOORSrequireIT licenses:
• The standard license lets you use DOORSrequireIT.
• The DOORSrequireIT Data Exchange license lets you exchange data between DOORS and DOORSrequireIT.
The standard DOORSrequireIT license is a standalone FLEXlm license. The Data Exchange license can be either a standalone or floating FLEXlm license.
Users who are upgrading from DOORS 6.x need a new license to use DOORSrequireIT 7.0 or DOORSrequireIT Data Exchange 7.0.
For information on how to set up licenses for DOORSrequireIT, see “Request and setup licenses”, on page 67.
Check that it works
Once you have set up a license to use DOORSrequireIT, follow these steps to check that it works:
1. Start Microsoft Word.
2. Open the document system requirements.doc in the DOORSrequireIT examples folder. For example, open:
c:\program files\telelogic\doorsrequireit\examples\system requirements.doc
Installing and Setting Up

65
3. The file system requirements.doc is opened in Word.
Follow these steps to remove DOORSrequireIT:
1. On Windows NT and Windows 2000, make sure you're logged in to your computer as the local Administrator, and not just a user with Administrator privileges.
2. Click Start > Settings > Control Panel.
The Control Panel appears.
3. Double-click Add/Remove Programs.
The Add/Remove Programs window appears.
4. Select DOORSrequireIT 7.0 from the list of currently installed programs, then click Change/Remove (on Windows 2000 or XP) or Add/Remove (on Windows NT).
A Confirm Uninstall dialog box appears.
5. Click OK to remove DOORSrequireIT and all of its features.
You should see the DOORSrequireIT Requirements option on the Word menu bar and the DOORSrequireIT toolbar below the Word toolbar.
What next? You are now ready to use DOORSrequireIT.
Use the help or read Using DOORSrequireIT for more information on DOORSrequireIT. This manual is on the DOORS Enterprise Requirements Suite documentation CD.
Uninstalling DOORSrequireIT
Installing and Setting Up

66
Installing and Setting Up

67
10 Request and setup licenses
• Concepts
• What is the LM_LICENSE_FILE variable?
• How do FLEXlm server licenses work?
• Obtaining a license
• Locating your license file
• Setting up your license
• Modifying your license
Concepts You must have either a software or hardware license to run any of the products in the DOORS Enterprise Requirements Suite.
Server licenses If you are using a server license you must install a FlexLM license server. A server license provides a fixed number of licenses for DOORS/ERS clients. Any DOORS/ERS client on the network can obtain a license from the license server, until all of the licenses are in use.
The license file contains a list of FEATURE lines that describe the products or features for which the FLEXlm license server can provide licenses. A server license can contain feature lines for all of the DOORS/ERS products, or for a selection of them.
A server license also contains the following details:
• The name or TCP/IP address of the computer on which the FLEXlm license server is running.
• An encryption of the ethernet address of its network interface card or the disk serial number of the local disk on which the operating system is installed (by default, the C: drive).
This is to make sure that you can't use the license file on any other computer.
Note: If you change the computer's network card, the license file won't work, because the new network card has a different ethernet address. If you reformat that disk, your existing license file won't work, because formatting a disk changes its serial number. Contact Telelogic to request a new license file.
• The port number that it's using to communicate with client computers. The default port number is 19353.
Standalone licenses A standalone license can only be used by the computer on which it is stored.
Installing and Setting Up

68
A standalone license file contains a list of FEATURE lines that describe the products or features for which the local computer is licensed. A standalone license can contain feature lines for all of the DOORS/ERS products, or for a selection of them.
To make sure that you can't use the license file on any other computer, the FEATURE line includes a HOSTID value that uniquely identifies the computer. It contains an encryption of the ethernet address of its network interface card or the disk serial number of the local disk on which the operating system is installed (by default, the C: drive).
Note: If you change the computer's network card, the license file won't work, because the new network card has a different ethernet address. If you reformat that disk, your existing license file won't work, because formatting a disk changes its serial number. Contact Telelogic to request a new license file.
Hardware licenses A hardware license is attached to the parallel port of your local computer. A hardware license can only be used for DOORS PC; other products in the DOORS Enterprise Requirements Suite require a software license. To configure a hardware license, see “If you are using hardware license:” on page 72.
FLEXlm is manufactured by Macrovision Corporation. For information on FLEXlm, visit the Macrovision web site at http://www.macrovision.com.
NetSentinel hardware dongles are manufactured by Rainbow Technology. For more information, visit their web site at http://www.rainbow.com/.
What is the The DOORS suite products store the location of the license file in the LM_LICENSE_FILE LM_LICENSE_FILE system variable. On UNIX, LM_LICENSE_FILE is an environment variable.
variable? The value of LM_LICENSE_FILE depends on whether your computer is using standalone or server licenses.
License Value Description
Standalone license-file-name The full path to the license file on your computer.
Server port@license-server-name The FLEXlm license server your computer is requesting server licenses from and the port number the server is using.
If your computer is using both standalone and server licenses, LM_LICENSE_FILE has two values separated by semicolons (;).
The license file is called license.dat. By default it's in the lib folder of your DOORS home directory. For example, it's:
Installing and Setting Up

69
c:\program files\telelogic\doors 7\lib\license.dat
How do FLEXlm server licenses work?
Server licenses are managed by the FLEXlm license server.
Two components run on the FLEXlm license server:
• The license manager (lmgrd.exe)
• One or more vendor daemons
There is normally one vendor daemon for each vendor whose products use FLEXlm server licenses.
The license manager daemon starts, stops and restarts the vendor daemons. The vendor daemons keep track of how many licenses are being used and by whom.
The DAEMON line in the license file on the FLEXlm license server specifies the path to the Telelogic vendor daemon, telelogic.exe.
When you start up a DOORS suite product that is configured to use a server license, this is what happens:
1. Your DOORS suite program uses the LM_LICENSE_FILE system variable to find out the name of the computer that's running the FLEXlm license server and the port that it's using.
2. The DOORS suite program contacts the license manager on the FLEXlm license server, using the specified port.
It requests a server license and makes the request for the Telelogic vendor daemon.
3. On the FLEXlm license server, the license manager sends the request to the Telelogic vendor daemon.
4. The Telelogic vendor daemon checks to see if any licenses are available.
5. If there are free licenses, the Telelogic vendor daemon grants a license and the DOORS suite program runs.
If there aren't any licenses available, the Telelogic vendor daemon refuses the request, and the DOORS suite program fails to start and displays a message saying that it couldn't obtain a license.
Obtaining a license
Customers who are upgrading from DOORS 6.x require a new license key to use DOORS/ERS 7.1. This is because we have upgraded the version of FLEXlm to v8 and also changed all DOORS/ERS licenses to use the Telelogic vendor daemon instead of the DOORS daemon. This means that you can merge all of your Telelogic licenses into one license key. The new default port number used for licensing is 19353; the previous port used for licensing was 7192.
Existing DOORS 7 users do not need a new license to upgrade to DOORS 7.1.
DOORS/ERS 7.1 is also supported with FLEXlm 9.2, although we only supply FLEXlm v8 with DOORS/ERS 7.1. If you want to use DOORS/ERS 7.1 with FLEXlm 9.2 you must purchase and set it up seperately.
Note: FLEXlm v8 offers the capability to borrow licenses. This functionality has not been implemented in DOORS/ERS 7.1.
Installing and Setting Up

70
The following table describes how to obtain a license key if you are a new user of DOORS/ERS.
Region Instructions
USA When you purchased your DOORS/ERS software, you should have received an email with instructions on how to request a license. Follow these instructions. If you did not receive an email then mail [email protected]
Rest Of World Please contact your local sales office. If you are not sure how to do this, please find the nearest sales office on www.telelogic.com
The following table describes how to obtain a license key if you are an existing user of DOORS/ERS
Region Instructions
USA New license requests for DOORS 7.1 can be sent to [email protected]. Please provide your Site ID/Acct.# and a copy of your current license.dat file so we have all of the host information present.
Rest Of World Please contact your local sales office. If you are not sure how to do this, please find the nearest sales office on www.telelogic.com. Please have a copy of your current license.dat file available.
Locating your license file
Windows users: 1. Select Start > Programs > Telelogic > DOORS 7.1 Tools > License Utility.
2. Select Configuration Using License File.
• If a valid path to a license.dat file is displayed in the box below the option buttons, you are using a standalone license.
Note the path to your license file. If there are multiple values you should look at the latest entry first since DOORS appends any license file variables that it sets.
• If port@hostname, for example 7192@ourserver is displayed in the box below the option buttons, you are using a remote connection to a server license.
Contact your local DOORS Administrator. If you are the local DOORS Administrator then contact your local DOORS customer support.
3. Select Configuration using Services option if the box below the option buttons remains empty. If a FLEXlm License Server Service is setup on your computer then FLEXlm License Manager is displayed in the box below the option buttons.
Select the Configure Services tab. The path to the license.dat is displayed.
Installing and Setting Up

71
UNIX users Locate your license file using LM_LICENSE_FILE variable.
Setting up your license
You must obtain a new license from Telelogic to run DOORS/ERS 7.1. If you have a license for DOORS 7.0 or 7.0 SP1, this will work with DOORS 7.1.
If you have a standalone license:
Telelogic will e-mail or fax you a license file called license.dat, which contains the FEATURE that you need to use DOORS/ERS. Copy this file to a directory of your choice.
The default directory in which DOORS searches for the license is C:\program files\telelogic\doors 7\lib\.
1. On Windows NT, Windows 2000 and XP, make sure you're logged in to your computer as the local Administrator, and not just a user with Administrator privileges.
2. Select Start > Programs > Telelogic > DOORS 7.1 Tools > License Setup.
The Welcome to the License Setup Wizard screen is displayed.
3. Click Next.
The Select Option screen is displayed.
4. Select Configure an existing license, then click Next.
5. Select FLEXlm license, then click Next.
6. Select Standalone computer, then click Next.
7. Select the products you want to configure licenses for, then click Next..
8. Enter the full path to your license file, or select the license file you're using from the drop-down list, and then click Next.
9. The setup complete screen is displayed. Click Finish.
On Windows 2000, XP and NT, the wizard sets the LM_LICENSE_FILE system variable to point to your license file. If this variable already exists, it adds the information to the end of the current value.
The wizard updates your registry by adding SECURITY=SOFT.
If you have a server license:
Telelogic will e-mail or fax you a license file called license.dat, which contains the FEATURE that you need to use DOORS/ERS. Copy this file to a directory of your choice.
The default directory in which DOORS searches for the license is C:\program files\telelogic\doors 7\lib\.
1. On Windows NT, Windows 2000 and XP, make sure you're logged in to your computer as the local Administrator, and not just a user with Administrator privileges.
2. Select Start > Programs > Telelogic > DOORS 7.1 Tools > License Setup.
The Welcome to the License Setup Wizard screen is displayed.
Installing and Setting Up

72
3. Click Next.
The Select Option screen is displayed.
4. Select Configure an existing license, then click Next.
5. Select FLEXlm license, then click Next.
6. Select FLEXlm license server, then click Next.
7. Select the products you want to configure licenses for.
8. Enter the full path to your license file, or select the license file you're using from the drop-down list, and then click Next.
A message appears saying that your computer is configured.
9. Click OK.
On Windows 2000, XP and NT, the wizard sets the LM_LICENSE_FILE system variable to point to your license file. If this variable already exists, it adds the information to the end of the current value.
The wizard updates your registry by adding SECURITY=SOFT.
If you are a client accessing a server license:
1. On Windows NT, Windows 2000 and XP, make sure you're logged in to your computer as the local Administrator, and not just a user with Administrator privileges.
2. Select Start > Programs > Telelogic > DOORS 7.1 Tools > License Setup.
The Welcome to the License Setup Wizard screen is displayed.
3. Click Next.
The Select Option screen is displayed.
4. Select Configure an existing license, then click Next.
5. Select FLEXlm license, then click Next.
6. Select Client computer, then click Next.
7. Type in the path to your license server in the form port@hostname, or select the license file you're using from the drop-down list, and then click Next.
A message is displayed stating that your computer is configured.
8. Click OK.
On Windows 2000, XP and NT, the wizard sets the LM_LICENSE_FILE system variable to point to your license file. If this variable already exists, it adds the information to the end of the current value.
The wizard updates your registry by adding SECURITY=SOFT.
If you are using hardware license:
Three types of hardware license are supported with DOORS 7.1:
• Pre 7.1 Parallel Dongle
Installing and Setting Up

73
If you are using a hardware dongle that you purchased with a previous version of DOORS, select this option when you run the license setup.
• 7.1 Parallel Dongle
If you are using a parallel dongle that you bought with DOORS 7.1, select this option when you run the license setup.
• 7.1 USB Dongle
If you are using a USB dongle that you bought with DOORS 7.1, select this option when you run the license setup.
If you have a pre 7.1 Parallel Dongle:
1. On Windows NT, Windows 2000 and XP, make sure you're logged in to your computer as the local Administrator, and not just a user with Administrator privileges.
2. Select Start > Programs > Telelogic > DOORS 7.1 Tools > License Setup.
The Welcome to the License Setup Wizard screen is displayed.
3. Click Next.
The Select Option screen is displayed.
4. Select Configure an existing license, then click Next.
5. Select Hardware dongle, and click Next.
6. Select Pre 7.1 Parallel Dongle, and click Next.
A message appears saying that your computer is configured.
7. Click OK.
The wizard updates the registry file by adding SECURITY=HARD.
8. Run the NetSentinel setup program by running the file setupx86.exe in the doors 7.1\nentinel\win_nt folder.
9. Click Functions > Install Sentinel Driver.
10. Remove the extra I386 entry from the end of the path and select OK. You don't need to restart your computer at this stage, so ignore the message from the installation program.
11. Run the NetSentinel setup program again, and this time click Functions > Configure Sentinel Driver to make sure that your computer has detected the dongle.
12. Restart your computer.
If you have a 7.1 Parallel Dongle:
1. On Windows NT, Windows 2000 and XP, make sure you're logged in to your computer as the local Administrator, and not just a user with Administrator privileges.
2. Select Start > Programs > Telelogic > DOORS 7.1 Tools > License Setup.
The Welcome to the License Setup Wizard screen is displayed.
3. Click Next.
The Select Option screen is displayed.
Installing and Setting Up
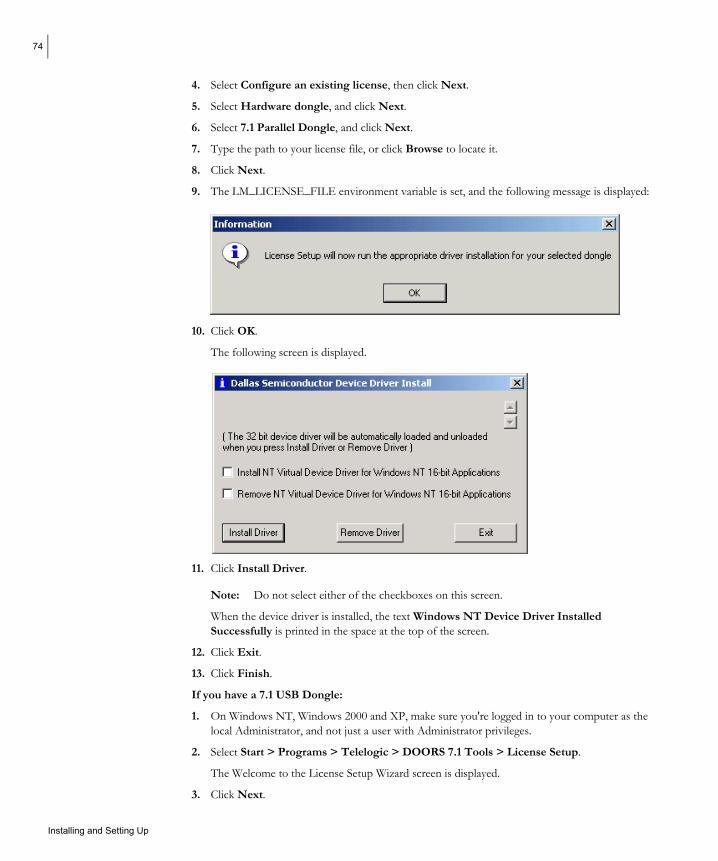
74
Installing and Setting Up
4. Select Configure an existing license, then click Next.
5. Select Hardware dongle, and click Next.
6. Select 7.1 Parallel Dongle, and click Next.
7. Type the path to your license file, or click Browse to locate it.
8. Click Next.
9. The LM_LICENSE_FILE environment variable is set, and the following message is displayed:
10. Click OK.
The following screen is displayed.
11. Click Install Driver.
Note: Do not select either of the checkboxes on this screen.
When the device driver is installed, the text Windows NT Device Driver Installed Successfully is printed in the space at the top of the screen.
12. Click Exit.
13. Click Finish.
If you have a 7.1 USB Dongle:
1. On Windows NT, Windows 2000 and XP, make sure you're logged in to your computer as the local Administrator, and not just a user with Administrator privileges.
2. Select Start > Programs > Telelogic > DOORS 7.1 Tools > License Setup.
The Welcome to the License Setup Wizard screen is displayed.
3. Click Next.
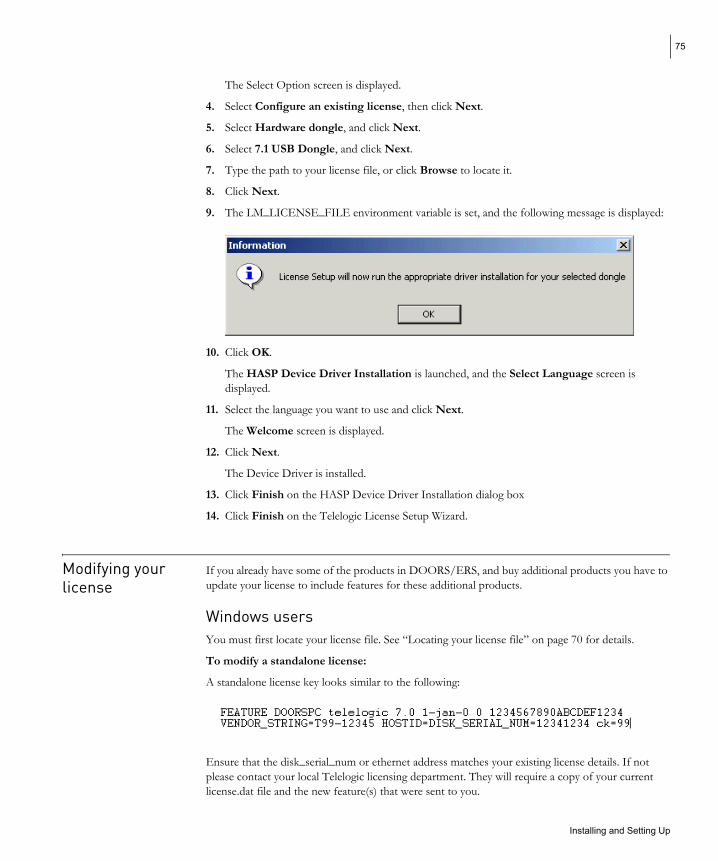
75
The Select Option screen is displayed.
4. Select Configure an existing license, then click Next.
5. Select Hardware dongle, and click Next.
6. Select 7.1 USB Dongle, and click Next.
7. Type the path to your license file, or click Browse to locate it.
8. Click Next.
9. The LM_LICENSE_FILE environment variable is set, and the following message is displayed:
10. Click OK.
The HASP Device Driver Installation is launched, and the Select Language screen is displayed.
11. Select the language you want to use and click Next.
The Welcome screen is displayed.
12. Click Next.
The Device Driver is installed.
13. Click Finish on the HASP Device Driver Installation dialog box
14. Click Finish on the Telelogic License Setup Wizard.
Modifying your If you already have some of the products in DOORS/ERS, and buy additional products you have to license update your license to include features for these additional products.
Windows users You must first locate your license file. See “Locating your license file” on page 70 for details.
To modify a standalone license:
A standalone license key looks similar to the following:
Ensure that the disk_serial_num or ethernet address matches your existing license details. If not please contact your local Telelogic licensing department. They will require a copy of your current license.dat file and the new feature(s) that were sent to you.
Installing and Setting Up

76
If the details match then copy the additional feature line(s) you have received and paste them into your license file, then save your license file.
To modify a server license:
A server license key looks similar to the following:
Ensure that the disk_serial_num or ethernet address matches your existing license details. If not please contact your local Telelogic licensing department. They will require a copy of your current license.dat file and the new feature that was sent to you.
If the details match then copy the additional feature line(s) you have received and paste them into your license file, then save your license file.
To enable the new license feature you have to reread your license file:
1. Select Start > Program Files > Telelogic > DOORS 7.1 Tools > License Utility.
2. Select the Start/Stop/Reread tab.
3. Click ReRead License File.
Unix users You must first locate your license file. See “Locating your license file” on page 70 for details.
To reread a server license key use lmutil lmreread <path to license file>. See“Installing the FLEXlm License Server” on page 46 for more information.
Installing and Setting Up

77
11 Installing ClearCase Integration on Windows
This chapter describes how to install and set up version 1.2.2 of ClearCase Integration on Windows 2000, NT and XP. It contains the following topics:
• Check that you meet the system requirements
• Install ClearCase Integration
• Set up licences
• Uninstall ClearCase Integration
Check that you meet the system requirements
The system requirements for running version 1.2.2 of ClearCase Integration on Windows are:
• Your computer must be running one of the following Windows operating systems:
• Windows XP
• Windows 2000 SP2
• Windows NT 4.0 Service Pack 6a
For information on minimum and recommended system requirements (RAM, processor power and so on), visit the support center on our web site at http://support.telelogic.com
• DOORS 7.0, 7.0 SP1 or 7.1
Note: Do not choose Remote Client Installation when you install DOORS 7.
• ClearCase 2002.05.00
Install ClearCase Integration
Follow these steps to install ClearCase Integration:
1. On Windows 2000, NT or XP, make sure you’re logged into your computer as the local Administrator, and not a user with Administrator privileges.
2. Shut down all other applications. In particular, shut down DOORS and ClearCase.
3. If you downloaded the ClearCase Integration software from the Telelogic FTP or web site, go to Step 5.
4. If you're installing from CD:
a. Put the DOORS ERS software CD into your CD-ROM drive.
You see the CD welcome screen.
Installing and Setting Up

78
Note: If you've disabled Autorun, nothing happens when you put the CD in. In this case, using Windows Explorer, double-click the file DOORS_ERS.EXE in the WINDOWS folder on the CD.
b. Select the option to install ClearCase Integration.
c. Go to Step 6.
5. If you downloaded the ClearCase Integration software from the Telelogic FTP or web site:
• Using Windows Explorer, double-click DOORSClearCase_1_2_2.exe, the file you downloaded.
6. You see the ClearCase Integration welcome screen.
Run the installation, following the instructions on screen.
7. When the installation is complete, the setup complete screen is displayed.
8. Click Finish to complete setup.
For information on how the integration works see the Using ClearCase Integration manual. This is available from the DOORS Enterprise Requirements Suite documentation CD, and from our website at http://support.telelogic.com.
Set up licences If you are installing ClearCase Integration for the first time you have to request and setup a new license before you can use it. See “Request and setup licenses,” on page 67 for more information.
If you are reinstalling or upgrading from an earlier version of the integration you have to request a new license. Your old license will not work with this version of ClearCase Integration. See “Request and setup licenses,” on page 67 for more information.
Uninstall Use Add/Remove Programs in the Windows Control Panel to remove version 1.2.2 of ClearCase ClearCase Integration.
Integration
Installing and Setting Up

79
12 Installing ClearQuest Integration
This chapter describes how to install and set up version 1.1 of ClearQuest Integration on Windows 2000 and NT. It contains the following topics:
• Check that you meet the system requirements
• Install ClearQuest Integration
• Set up licences
• Uninstalling ClearQuest Integration
Check that you meet the system requirements
The system requirements for running version 1.1 of ClearQuest Integration on Windows are:
• Your computer must be running one of the following Windows operating systems:
• Windows 2000
• Windows NT 4.0 Service Pack 6a
For information on minimum and recommended system requirements (RAM, processor power, and so on), visit the support center on our website at http://www.support.telelogic.com.
• DOORS 7.0, 7.0 SP1 or 7.1
• ClearQuest 2002.05.20
Install ClearQuest Integration
Follow these steps to install ClearQuest Integration:
1. On Windows XP, 2000 or NT, make sure you are logged into your computer as the local Administrator, and not a user with Administrator privileges.
2. Shut down all other applications. In particular, shut down DOORS and ClearQuest.
3. If you downloaded the ClearQuest Integration software from the Telelogic ftp or website, go to Step 5.
4. If you're installing from CD:
a. Put the DOORS ERS software CD into your CD-ROM drive.
You see the CD welcome screen.
Note: If you've disabled Autorun, nothing happens when you put the CD in. In this case, using Windows Explorer, double-click the file DOORS_ERS.EXE in the WINDOWS folder on the CD.
b. Select the option to install ClearQuest Integration.
c. Go to Step 6.
Installing and Setting Up

80
5. If you downloaded the ClearQuest Integration software from the Telelogic ftp or website:
• Using Windows Explorer, double-click DOORSClearQuest_1_1.exe, the file you downloaded.
6. You see the ClearQuest Integration welcome screen.
Run the installation, following the instructions on screen.
7. When the installation is complete, the setup complete screen is displayed.
8. Click Finish to complete setup.
For information on how the integration works see the Using ClearQuest Integration manual. This is available from the DOORS Enterprise Requirements Suite documentation CD, and from our website at http://support.telelogic.com.
Set up licences If you are installing ClearQuest Integration for the first time you have to request and setup a new license before you can use it. See “Request and setup licenses,” on page 67 for more information.
If you are reinstalling or upgrading from an earlier version of the integration you have to request a new license. Your old license will not work with this version of ClearQuest Integration. See “Request and setup licenses,” on page 67 for more information.
Uninstalling Use Add/Remove Programs in the Windows Control Panel to uninstall version 1.1 of ClearQuest ClearQuest Integration.
Integration
Installing and Setting Up

81
13 Installing PVCS Version Manager Integration on Windows
This chapter describes how to install and set up version 1.2.3 of PVCS Version Manager Integration on Windows 2000, NT and XP. It contains the following topics:
• Check that you meet the system requirements
• Install PVCS Version Manager Integration
• Set up licences
• Uninstall PVCS Version Manager Integration
Check that you meet the system requirements
The system requirements for running version 1.2.3 of PVCS Version Manager Integration on Windows are:
• Your computer must be running one of the following Windows operating systems:
• Windows XP
• Windows 2000 SP2
• Windows NT 4.0 Service Pack 6a
For information on minimum and recommended system requirements (RAM, processor power, and so on), visit the support center on our web site at http://support.telelogic.com
• DOORS 7.0, 7.0 SP1 or 7.1
Note: Do not choose Remote Client Installation when you install DOORS 7.
• Version Manager 6.8 or 7.5.1.0
Install PVCS Version Manager Integration
Follow these steps to install PVCS Version Manager Integration:
1. On Windows XP, 2000 or NT, make sure you are logged into your computer as the local Administrator, and not a user with Administrator privileges.
2. Shut down all other applications. In particular, shut down DOORS and PVCS Version Manager.
3. If you downloaded the PVCS Version Manager Integration software from the Telelogic FTP or web site, go to Step 5.
4. If you're installing from CD:
a. Put the DOORS ERS software CD into your CD-ROM drive.
You see the CD welcome screen.
Installing and Setting Up
82
Note: If you've disabled Autorun, nothing happens when you put the CD in. In this case, using Windows Explorer, double-click the file DOORS_ERS.EXE in the WINDOWS folder on the CD.
b. Select the option to install PVCS Version Manager Integration.
c. Go to Step 6.
5. If you downloaded the PVCS Version Manager Integration software from the Telelogic FTP or web site:
• Using Windows Explorer, double-click DOORSPVCSVersionManager_1_2_3.exe, the file you downloaded.
6. You see the PVCS Version Manager Integration welcome screen.
Run the installation, following the instructions on screen.
7. When the installation is complete, the setup complete screen is displayed.
8. Click Finish to complete setup.
For information on how the integration works see the Using PVCS Version Manager Integration manual. This is available from the DOORS Enterprise Requirements Suite documentation CD, and from our website at http://support.telelogic.com.
Set up licences If you are installing PVCS Version Manager Integration for the first time you have to request and setup a new license before you can use it. See “Request and setup licenses,” on page 67 for more information.
If you are reinstalling or upgrading from an earlier version of the integration you have to request a new license. Your old license will not work with this version of PVCS Version Manager Integration. See “Request and setup licenses,” on page 67 for more information.
Uninstall PVCS Use Add/Remove Programs in the Windows Control Panel to remove version 1.2.3 of PVCS Version Manager Version Manager.
Integration
Installing and Setting Up

83
14 Installing Rose Integration on Windows
This chapter describes how to install and set up version 2.8 of Rose Integration on Windows 2000, NT and XP. It contains the following topics:
• Check that you meet the system requirements
• Install Rose Integration
• Set up licences
• Uninstall Rose Integration
Check that you meet the system requirements
The system requirements for running version 2.8 of Rose Integration on Windows are:
• Your computer must be running one of the following Windows operating systems:
• Windows XP
• Windows 2000
• Windows NT 4.0 Service Pack 6a
For information on minimum and recommended system requirements (RAM, processor power, and so on), visit the support center on our web site at http://support.telelogic.com.
• Your computer must be running one of the following DOORS versions:
• DOORS 7.1
• DOORS 7.0 SP1
• DOORS 6.0 SR1
• DOORS 6.0a
Note: Do not choose Remote Client Installation when you install DOORS.
• Rational Rose 2002.05.00 with DOORS 7.0 SP1, DOORS 6.0 SR1 and DOORS 6.0a
• Rational Rose 2003.06.00 with DOORS 7.1 and 7.0 SP1.
Install Rose Follow these steps to install Rose Integration:Integration 1. Download the Rose Integration software from the Telelogic FTP or web site.
2. On Windows XP, 2000 or NT, make sure you are logged into your computer as the local Administrator, and not a user with Administrator privileges.
3. Shut down all other applications. In particular, shut down DOORS and Rational Rose.
Using Rose Integration
84
4. Using Windows Explorer, double-click DOORSRoseLink_2_8.exe, the file you downloaded.
5. You see the Rose Integration welcome screen.
Run the installation, following the instructions on screen.
6. When the installation is complete, the setup complete screen is displayed.
7. Click Finish to complete setup.
Set up licences If you are installing Rose Integration for the first time you have to request and setup a new license before you can use it. See “Request and setup licenses,” in the Installing and Setting Up manual, supplied with DOORS/ERS for information on how to request a new license.
If you want to use this integration with DOORS 7.1 and have not upgraded your license to DOORS 7, then you must request a new license. Your old license will not work with this version of Rose Integration. See “Request and setup licenses,” in the Installing and Setting Up manual, supplied with DOORS/ERS for information on how to request a new license.
If you are upgrading from DOORS Roselink 2.7.6 (compatible with DOORS 7), you do not need to request a new license.
If you are using DOORS 6 or 6.0a you do not need to request a new license.
Uninstall Rose Use Add/Remove Programs in the Windows Control Panel to remove version 2.8 of Rose Integration Integration.
Using Rose Integration

85
15 Installing TestDirector Integration on Windows
This chapter describes how to install and set up version 1.7.1 of TestDirector Integration on Windows 2000, NT and XP. It contains the following topics:
• Check that you meet the system requirements
• Install TestDirector Integration
• Set up licences
• Uninstall TestDirector Integration
Check that you meet the system requirements
The system requirements for running version 1.7.1 of TestDirector Integration on Windows are:
• Your computer must be running one of the following Windows operating systems:
• Windows XP
• Windows 2000 SP2
• Windows NT 4.0 Service Pack 6a
For information on minimum and recommended system requirements (RAM, processor power, and so on), visit the support center on our website at http://support.telelogic.com
• DOORS 7.0, 7.0 SP1 or 7.1
Note: Do not choose Remote Client Installation when you install DOORS 7.
• TestDirector 7.6
Install TestDirector Integration
Follow these steps to install TestDirector Integration:
1. On Windows XP, 2000 or NT, make sure you are logged into your computer as the local Administrator, and not a user with Administrator privileges.
2. Shut down all other applications. In particular, shut down DOORS and TestDirector.
3. If you downloaded the TestDirector Integration software from the Telelogic FTP or web site, go to Step 5.
4. If you're installing from CD:
a. Put the DOORS ERS software CD into your CD-ROM drive.
You see the CD welcome screen.
Installing and Setting Up
86
Note: If you've disabled Autorun, nothing happens when you put the CD in. In this case, using Windows Explorer, double-click the file DOORS_ERS.EXE in the WINDOWS folder on the CD.
b. Select the option to install TestDirector Integration.
c. Go to Step 6.
5. If you downloaded the TestDirector Integration software from the Telelogic FTP or web site:
• Using Windows Explorer, double-click DOORSTestDirector_1_7_1.exe
6. You see the TestDirector Integration welcome screen.
Run the installation, following the instructions on screen.
7. When the installation is complete, the setup complete screen is displayed.
8. Click Finish to complete setup.
For information on how the integration works see the Using TestDirector Integration manual. This is available from the DOORS Enterprise Requirements Suite documentation CD, and from our website at http://support.telelogic.com.
Set up licences If you are installing TestDirector Integration for the first time you have to request and setup a new license before you can use it. See “Request and setup licenses,” on page 67 for more information.
If you are reinstalling or upgrading from an earlier version of the integration you have to request a new license. Your old license will not work with this version of TestDirector Integration. See “Request and setup licenses,” on page 67 for more information.
Uninstall Use Add/Remove Programs in the Control Panel to remove version 1.7.1 of TestDirector TestDirector Integration.
Integration
Installing and Setting Up

87
16 Troubleshooting
This chapter contains the following topics:
• Problems installing the software
• FLEXlm licensing conflicts with other vendor's products
• If you have no “export to DOORS” icon in Word
• If you have problems with a hardware dongle
• Using the DOORS API
• Using DOORS without a database server
• Colors
• DISPLAY variables on Solaris
• DISPLAY variables—all UNIX installations
• Dual Boot Machines
• Removal of license server service
• DOORS application error on Windows 2000
Note: Go to the support center on our website at http://www.support.telelogic.com for the latest information on problems you may encounter when you install and set up the products in the DOORS Enterprise Requirements Suite, and how to work around the problems.
Problems installing the software
If you have problems installing any of the products in the DOORS Enterprise Requirements Suite, try the following before you contact our customer support team for help:
• Stop all applications before you install the software.
Shut down all the applications running on your computer.
• Turn off virus protection software.
When virus protection software is running in the background, it can interfere with the installation of any software product because of the way installers decompress files when they install them on your computer.
• Make sure you meet the prerequisites for the product you're trying to install.
For each product, the chapter in this book that describes how to install the product starts by listing the prerequisites for the product. Make sure you meet the prerequisites before you try to install the product.
• Restart your computer, and then try installing the DOORS suite product again.
Installing and Setting Up

88
FLEXlm licensing conflicts with other vendor's products
This section describes different strategies for resolving licensing conflicts between DOORS suite products and other products that use FLEXlm licenses:
• Merging license files
• Using separate license files on the same license server
• Using the default FLEXlm folder
Merging license files If you have two or more products whose FLEXlm license servers run on the same computer, you may be able to merge their licenses into a single license file.
Different vendors use different algorithms to generate the HostID, which uniquely identifies the computer. They can use a custom algorithm, or they can generate the HostID from either:
• The ethernet address of the network interface card
• The disk serial number of the boot drive
• The computer's Internet address
You can't merge two license files if they use different algorithms, for example if one uses the Internet address and the other uses the disk serial number.
If the license files use different algorithms, you can ask Telelogic to create a new license file that uses the other vendor's algorithm.
To merge two license files:
1. Contact the other vendor's customer support team to check if there are any known issues with merging their licenses.
2. Using a text editor such as Notepad, copy the SERVER, DAEMON and FEATURE lines from the Telelogic license file and paste them into the other vendor's license file. Save the merged file as license.dat.
If it's a server license, make sure that the new file only has one SERVER line, and that it's the first line in the file.
3. If it's a server license, reinitialize your FLEXlm license server.
On Windows:
a. Click Start > Programs > Telelogic > DOORS Tools 7.1 > License Utility.
b. Select the Stop/Reread tab.
c. Highlight the license path and choose Reread License File.
On UNIX:
a. Enter the following command at the shell prompt:
$DOORSHOME/etc/lmreread
Installing and Setting Up

89
Using separate license files on the same license server On Windows the FLEXlm license server runs as a service. The default name of the service is FLEXlm License Manager.
To avoid conflicts with software from other vendors, you can install a service with a different name, and use this for your DOORS suite products. Each FLEXlm service can use its own license file. For information on how to do this, contact Telelogic customer support.
If the two products use different versions of FLEXlm license server, make sure you use the newest version. New versions of the FLEXlm license server are backward compatible with earlier versions.
On UNIX, you must run a separate copy of lmgrd for each license file. When you run multiple copies of lmgrd, remember:
• The port number on the SERVER line of each license file must be unique. If necessary, you can use a standard text editor to change the port number in a license file.
• You must be using a compatible version of lmgrd when you start it up for a particular license file. To do this, use an explicit path to lmgrd.
Using the default FLEXlm folder This method can be used for Windows systems only.
Place a copy of your license file in the c:\flexlm folder. By default, FLEXlm reads any license file in that folder.
To reread the licenses, see Step 2 above.
If you have no If you have no Export to DOORS button , it may be because you've modified the location of “export to your Word startup folder. DOORS” icon in You can change or check this folder by clicking Tools > Options. On the File Locations tab, the Word Startup entry shows the location of your Word startup folder.
In this case, copy doors.dot from the \lib\word folder in the DOORS home folder (for example, c:\program files\doors 7.1\lib\word) to your Word startup folder.
If you have If you experience problems running DOORS with a hardware dongle:problems with a 1. Check that your parallel port is set to bidirectional.hardware dongle 2. Check that you do not have any other device connected to your parallel port.
Using the The DOORS API will only work with TCP/IP communication. Socket-based communication in DOORS API UNIX is not supported.
Installing and Setting Up

90
Using DOORS DOORS 7.1 must be used with a database server. It cannot be used directly on mapped data because without a file information in the database may become corrupt.
database server For details on how to configure multiple databases on one computer, see the Managing DOORS manual, which is available from the DOORS/ERS documentation CD and from the website at http://support.telelogic.com.
Colors If your display card supports only 256 colors, you may experience unusual color effects. This will not affect underlying data, but we recommend you use a display that supports more than 256 colors.
DISPLAY A Solaris DOORS client can now run in batch mode without a DISPLAY environment variable variables on being set.
Solaris If the batch-mode DXL attempts to use the GUI and DISPLAY has not been defined, DOORS will exit.
If DISPLAY has been defined, DOORS will attempt to connect to the specified X display, even if the batch-mode DXL doesn't use a GUI. As a result, DISPLAY must refer to a valid X display that you are authorized to connect to.
DISPLAY The X display must be specified with the DISPLAY environment variable; using the standard variables—all -display or -d options does not work.
UNIX installations
Dual Boot If you have a dual boot machine and DOORS 7.1 is installed on one of the operating systems you Machines cannot install it on the other operating system as well.
Removal of license server service
Removing DOORS does not remove the FLEXlm license server service. This is because it is impossible to ascertain whether the server was installed by Telelogic or another software vendor.
To remove the FLEXlm license server service manually, follow these steps:
1. Get a DOS command prompt:
a. Click Start > Run.
b. In the Open box, type cmd.
c. Click OK.
2. Change to the flex folder of your DOORS 7 home directory. By default this is C:\program files\telelogic\doors 7.1\flex.
Installing and Setting Up

91
3. Type the following command:
installs - r
DOORS Attempting to start DOORS after adding a Standard user and logging in as that user may produce the application error following error:
on Windows Application error “The application failed to initialize
2000 properly (0xc0000022)”. Click OK to terminate the application.
To work around this problem:
Manually set the access permissions for Everyone to full control on the following file: $DOORSHOME\bin\dutb32.dll.
Installing and Setting Up

92
Installing and Setting Up

93
17 Contacting customer support
This chapter contains the following topics:
• Before you contact customer support
• How to contact customer support
• Contact Information
Before you contact customer support
If your site has a designated on-site support person, please contact that person before you contact our customer support team.
To help our customer support team solve your problem, please have the following information available:
• Your name, title, company name, e-mail address, fax number and telephone number.
• Your Telelogic DOORS site ID.
• The version and build number of DOORS that you're running.
To get this information, run DOORS, and click Help > About DOORS.
• The operating system you're running DOORS on, for example, Windows NT 4.0 Service Pack 6.
• What operating system your DOORS database is running on, if different.
• If you are reporting a new problem, please have a clear statement of the problem, including the exact text of any error messages produced by DOORS, your operating system, or any other tools that were running when the problem occurred.
• If you are calling about a problem you reported earlier, you need the original tracking number the customer support team assigned to your problem.
How to contact Visit the support center on our web site at http://support.telelogic.com. customer Alternatively, you can e-mail or telephone us. support Contact information for users in the Americas, Europe, Scandinavia, Asia and Pacific is shown
below.
Installing and Setting Up

94
Installing and Setting Up
Contact Information Americas
e-mail [email protected]
telephone +1 800 577 8449
service hours 9 am – 8 pm EST
Europe/Scandinavia
e-mail [email protected]
telephone +44 (131) 622 3636 (Europe) +44 (131) 622 3640 (Germany)
service hours 8:30 am – 5 pm GMT
Australia and New Zealand
e-mail [email protected]
telephone +61 (2) 9904 6315 (International) 1300 659 671 (Australia)
service hours 9 am – 5 pm AEST
China
e-mail [email protected]
telephone +86 (10) 8518 5130
service hours 9 am – 5:30 pm GMT+8
India
e-mail [email protected]
telephone +91 (80) 5112 4443
service hours 9 am – 5:30 pm GMT+5.5
Japan
e-mail [email protected]
telephone +81 (3) 6402 1650
service hours 9:30 am – 6 pm GMT+9

95
Korea
e-mail [email protected]
telephone +82 (2) 561 8512
service hours 9 am – 6 pm GMT+9
Taiwan
e-mail [email protected]
telephone +886 (2) 2213 5279
service hours 9 am – 6 pm GMT+8
Other Asian countries
e-mail [email protected]
telephone +91 (80) 5112 4443
service hours 9 am – 5:30 pm GMT+5.5
For up-to-date contact information, visit the following URL: http://www.telelogic.com/support/contact/
Installing and Setting Up

96
Installing and Setting Up
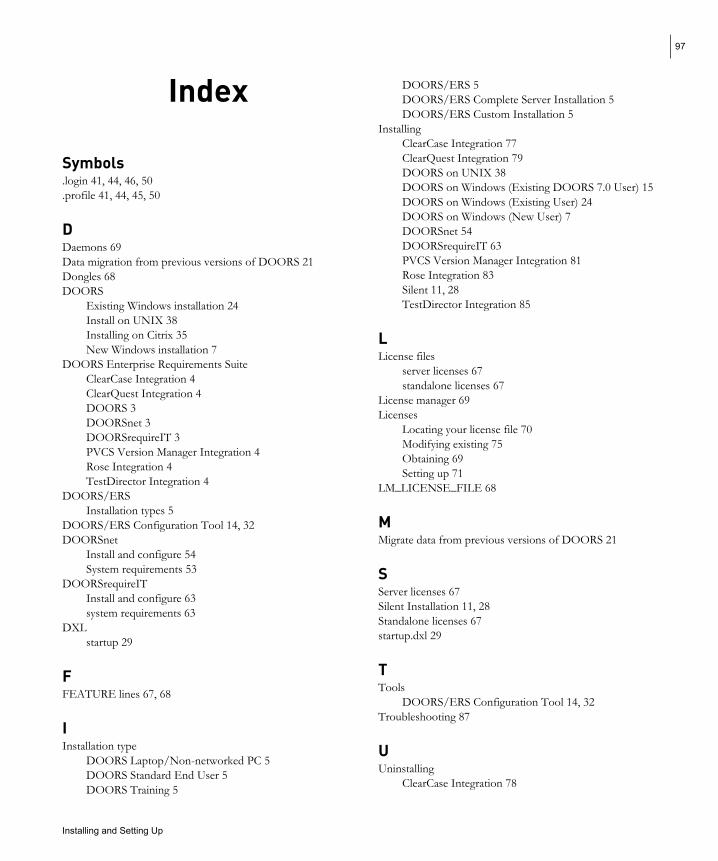
97
Index
Symbols .login 41, 44, 46, 50.profile 41, 44, 45, 50
D Daemons 69Data migration from previous versions of DOORS 21Dongles 68DOORS
Existing Windows installation 24Install on UNIX 38Installing on Citrix 35New Windows installation 7
DOORS Enterprise Requirements SuiteClearCase Integration 4ClearQuest Integration 4DOORS 3DOORSnet 3DOORSrequireIT 3PVCS Version Manager Integration 4Rose Integration 4TestDirector Integration 4
DOORS/ERS Installation types 5
DOORS/ERS Configuration Tool 14, 32DOORSnet
Install and configure 54System requirements 53
DOORSrequireITInstall and configure 63system requirements 63
DXLstartup 29
F FEATURE lines 67, 68
IInstallation type
DOORS Laptop/Non-networked PC 5DOORS Standard End User 5DOORS Training 5
DOORS/ERS 5DOORS/ERS Complete Server Installation 5DOORS/ERS Custom Installation 5
InstallingClearCase Integration 77ClearQuest Integration 79DOORS on UNIX 38DOORS on Windows (Existing DOORS 7.0 User) 15DOORS on Windows (Existing User) 24DOORS on Windows (New User) 7DOORSnet 54DOORSrequireIT 63PVCS Version Manager Integration 81Rose Integration 83Silent 11, 28TestDirector Integration 85
L License files
server licenses 67standalone licenses 67
License manager 69Licenses
Locating your license file 70Modifying existing 75Obtaining 69Setting up 71
LM_LICENSE_FILE 68
M Migrate data from previous versions of DOORS 21
S Server licenses 67Silent Installation 11, 28Standalone licenses 67startup.dxl 29
T Tools
DOORS/ERS Configuration Tool 14, 32Troubleshooting 87
U Uninstalling
ClearCase Integration 78
Installing and Setting Up

98
ClearQuest Integration 80DOORS 14, 33DOORSnet 61DOORSrequireIT 65PVCS Version Manager Integration 82Rose Integration 84TestDirector Integration 86
UNIXDatabase Server Installation 45, 49DOORS Client Installation 43FLEXlm License Server Installation 46Understanding UNIX installations 37
Update 15
VVendor daemons 69
Installing and Setting Up


Visit www.telelogic.com/support for more information on our support centers across the world.
World Headquarters P.O. Box 4128, SE-203 12 Malmö, Sweden Phone: +46 40 650 00 00 · Fax: +46 40 650 65 55
American Headquarters 9401 Jeronimo Road, Irvine, CA 92618, USA Phone: +1 949 830 8022 · Fax: +1 949 830 8023
Offices in Europe, America, Asia and Australia
[email protected] · www.telelogic.com
��