TEL : (82-55) 239-7000 FAX : (82-55) 239-7524 #58, … PRINCIPLE OF BRAKE(FRICTION FORCE)..... 58...
66
OWNER'S MANUAL
Transcript of TEL : (82-55) 239-7000 FAX : (82-55) 239-7524 #58, … PRINCIPLE OF BRAKE(FRICTION FORCE)..... 58...

OM42-0201-02E
HEAD OFFICE (FACTORY)#58, SUNG SAN-DONG, CHANG WON, KYUNGNAM, KOREATEL : (82-55) 239-7000 FAX : (82-55) 239-7524
OWNER'S MANUAL

SSPPEECCIIFFIICCAATTIIOONN ................................................................... 3OOPPEERRAATTIIOONN IINNSSTTRRUUCCTTIIOONN ............................................ 4
SAFETY PRECAUTIONS ................................................... 4PRIOR TO STARTING VEHICLE.......................................... 5CORRECT ATTIRE ............................................................ 5OPERATION...................................................................... 6CARGO............................................................................. 6MODIFICATION ................................................................. 7MUFFLER ......................................................................... 7
PARTS LOCATION ............................................................. 8METER READING AND USAGE .......................................10
METER .............................................................................10INDICATOR LAMP .............................................................10HOW TO SET CLOCK ........................................................11
SWITCH OPERATION ........................................................12MAIN SWITCH...................................................................12STARTER BUTTON............................................................12HEADLIGHT ......................................................................13WINKER SWITCH ..............................................................13HORN BUTTON.................................................................14HAZARD SWITCH..............................................................14
EQUIPMENT USAGE .......................................................... 14STEERING LOCK ............................................................... 14SEAT LOCK....................................................................... 15INNER BOX ....................................................................... 15TRUNK.............................................................................. 16DOCUMENT STORAGE AREA............................................. 16BAG HOLDER.................................................................... 17HANDPHONE CHARGER.................................................... 17
CORRECT DRIVING OPERATION .................................... 18STARTING THE ENGINE..................................................... 18IF ENGINE CANNOT BE STARTED ...................................... 20AFTER STARTING ENGINE................................................. 21PROPER DRIVING METHODS............................................. 22STOPPING ........................................................................ 23
SELF INSPECTIONS BEFORE OPERATION .................. 25INSPECTION OF CONCERNED AREA ................................. 26BRAKE INSPECTION.......................................................... 26FUEL CHECK..................................................................... 27TIRE INSPECTION ............................................................. 28ENGINE OIL LEVEL CHECK ................................................ 29LIGHTS AND WINKER INSPECTION .................................... 29BACK MIRROR INSPECTION .............................................. 30
1
CONTENTS
*NS-125DLXO/M 02.11.5 3:40 PM 페이지1

2
FUEL LEAK INSPECTION................................................ 30LICENSE PLATE INSPECTION......................................... 30
MAINTENANCE ............................................................... 30MAINTENANCE SCHEDULE............................................ 31MAINTENANCE PRECAUTIONS ...................................... 33BRAKES ........................................................................ 33BRAKE HOSE, PIPE LEAKAGE, DAMAGE, ASSEMBLY STATE .... 35BRAKE PAD WEAR......................................................... 35CHANGING ENGINE OIL ................................................. 36WHEEL REMOVAL ......................................................... 37SPARK PLUG................................................................. 39BATTERY INSPECTION .................................................. 40FUSE REPLACEMENT.................................................... 41BULB REPLACEMENT .................................................... 42AIR CLEANER ELEMENT INSPECTION ........................... 44SIDE STAND INSPECTION.............................................. 45CABLE RUBBER PART INSPECTION ............................... 45NOTABLES FOR CAR WASHING..................................... 45STORAGE GUIDE........................................................... 46
FRAME AND ENGINE NUMBER ................................... 47
SAFE DRIVING ........................................................................ 48PREPARATION BEFORE DRIVING............................... 48DRIVING METHOD ............................................................ 49
DRIVING POSITION.......................................................... 49PRECAUTION WHEN DRIVING......................................... 51STARTING........................................................................ 52
TURNING METHOD .......................................................... 54PRINCIPLE OF TURN ........................................................ 54EFFECT OF SPEED.......................................................... 543 POSITIONS OF TURNING .............................................. 55TURNING METHOD.......................................................... 56PRECAUTION WHEN TURNING ....................................... 57
BRAKING METHOD.......................................................... 58BASIC PRINCIPLE OF BRAKE(FRICTION FORCE)............. 58RESTRAINT OF BRAKE EFFECT (INERTIA) ..................... 58BRAKING METHOD .......................................................... 59COMPARISION OF BRAKING DISTANCE.......................... 59IMPACT WHEN COLLISION .............................................. 59
WIRING DIAGRAM ................................................................ 60
*NS-125DLXO/M 02.11.5 3:40 PM 페이지2

3
SPECIFICATION
LENGTH×WIDTH×HEIGHT(mm)
WHEEL BASE(mm)
GROUND CLEARANCE(mm)
SEAT HEIGHT(mm)
WEIGHT(kgf)
PASSENGER
ENGINE TYPE
PISTON DISPLACEMENT(cc)
BORE AND STROKE(mm)
STARTING SYSTEM
TRANSMISSION TYPE
1,970×700×1,110
1,350
130
765
110
2
OIL COOLED/AIR COOLED
4 STROKE 4VALVE
124.9
56×50.7
START MOTOR / KICK
V - MATIC
IGNITION SYSTEM
BATTERY CAPACITY
FUEL CAPACITY(ℓ)
C.D.I
12V6AH(MF TYPE)
7.5
120 / 70 - 12 53K
130 / 70 - 12 62K
TELESCOPIC
UNIT SWING OIL DAMPER
HYDRAULIC DISK
HYDRAULIC DISK
CR8EH-9
15
ITEM DATA ITEM DATA
FR.
RR.
FR.
RR.
FR.
RR.
SPARK PLUG
FUSE(A)
TIRE SIZE
SUSPENSION
BRAKE
*NS-125DLXO/M 02.11.5 3:40 PM 페이지3

This manual describes matters pertaining to correct operation,safe operation and simple maintenance of the vehicle youpurchased.To ensure more comfortable and safer operation, make sure to read this manual carefully prior to operation.●The photographs and drawings shown in this manual may
differ from those of actual vehicles due to changes in vehiclespecifications and modifications made.
●This vehicle is designed for 2 riders including the operator.
CAUTION
●Do not use polluted gasoline.Using polluted gasoline will cause rust inside the fueltank, and will close the supply of fuel to the carburetor,leading to an improper engine starting or may causeserious damage to an engine.
●Do not use polluted or low-grade oil.Always use genuine oil to protect and extend vehicleperformance and its life span.
●If any failure occurs due to the use of polluted gasolineor oil, such failure will be excluded from being eligiblefor repairs under the warranty.
●Careful driving and the wearing of proper attire and safetyequipment are the most important factors in the safeoperation of the scooter. Please obey traffic regulations anddo not be hurried and careless.
●Many new vehicle owners operate their newly purchasedvehicles with great care and attention to safety factors.However, after becoming accustomed to the operations areoften discarded, which can lead to accidents. Please don't letthis happen to you and always approach the operation of yourvehicle with the safety considerations needed.When operating the vehicle, always keep in mind and obeythe notes of precaution printed on the “Safety PrecautionLabel”attached to the vehicle.
4
OPERATION INSTRUCTIONSAFETY PRECAUTIONS
●Always wear helmet.●Observe posted speed limits.●Park vehicle away from people(especially children) as
the muffler can get very hot.●For safety, do not illegally modify the vehicle.●If exposed to direct sunlight for a long period of time,
the visual display panel may temporailly be fogged.●Regularly conduct specified maintenance inspections.
<Maintenance Inspection Points>Brakes, Tires, Oil, Lights, Horn, Instruments
*NS-125DLXO/M 02.11.5 3:40 PM 페이지4
●Read user's manual carefully.●Conduct maintenance checks prior to operation.●Always maintain vehicle in clean status and carry out
specified maintenance checks.●Make sure to stop engine and stay away from fire when
fueling.●Exhaust gas contains harmful substance such as carbon
monoxide, Start engine in well-ventilated places.
●Always make sure to wear helmet for safety. Wear glovesand safety goggles.
●Do not wear uniforms which might hinder operation. It isdangerous if the uniform is caught by brake lever.
A helmet should always beworn and the helmet chinstrap should be securelyfastened.
Correct shirts or jackets withtight-fitting sleeves should beworn,
Shoes should fit properly, and shoes having little orno heel should be worn.
5
PRIOR TO STARTING VEHICLE
CORRECT ATTIRE
*NS-125DLXO/M 02.11.5 3:40 PM 페이지5

6
When carrying cargo, you must keep in mind that operating thevehicle, especially when turning, will be different.Make sure not to overload the vehicle with goods as this canmake the vehicle unstable during operation.
REAR CARRIER MAXIMUM LOAD : 3kg
TRUNK MAXIMUM LOAD : 10kg
INNER BOX MAXIMUM LOAD : 1.5kg
●Operators should naturally fix bodies to keep smooth driving.●Please check whether or not you are unnaturally strained and
strung up.●Driving pose has a great influence on safe operation.
Please always maintain the center of your body in the middleof seat, Especially do not sit at the rear seat because it maylessen the weight of front wheel and cause trembling steeringwheel.
●Passengers should accurately fix bodies using both hands andput both feet on floor panel.
OPERATION CARGO
*NS-125DLXO/M 02.11.5 3:40 PM 페이지6

7
CAUTION
●Only load cargo in or on designated areas as placing orfastening cargo to other areas can cause damage to thevehicle.
●Do not place articles between the frame body cover andengine as this can burn the goods.
Modification of vehicle structure or function deterioratesmanipulability or causes exhaust noise to become loudershortening the vehicle life. These modifications are not onlyprohibited by law but also are the acts harmful to other people.Modifications are not covered by warranty.
●Pay particular attention to fellow passenger so that he/shecan prevent getting burnt by the hot muffler during travel.
MODIFICATION
MUFFLER
*NS-125DLXO/M 02.11.5 3:40 PM 페이지7

8
PARTS LOCATION
FUEL TANK
PARKING LOCK
BAG HOLDER
PILLION STEP BATTERY
MAIN SWITCH
FR. BRAKE LEVER
*NS-125DLXO/M 02.11.5 3:40 PM 페이지8

9
RR.BRAKE LEVERLUGGAGE BOXINNER BOX
PILLION STEP
MAIN STAND
KICK START PEDAL
SEAT LOCK
*NS-125DLXO/M 02.11.5 3:40 PM 페이지9

<SPEEDOMETER>Indicates driving speed. Maintain legalspeed limits to ensure safe operation.
<ODOMETER>Indicates total distance in kilometerstravelled by the vehicle.
<FUEL GAUGE>The fuel gauge indicates the gasolinelevel inside the fuel tank.(The needle willindicate the amount of gasoline in the fueltank whether the main switch is turned toOFF or On position.)Gasoline should be put in the fuel tank assoon as possible if the needle is resting inthe red area. When the needle is in the redarea, roughly 1, 2 liters of gasoline can beput in the vehicle to fill tank.
<WINKER INDICATOR>If the winker switch is operated, the winker indicator flashes in union withthe flashing of the turn signals.
<CLOCK>●Current time shows below meter.●You can use other clock battery.
<CHANGING CLOCK BATTERY>●Separate the front handle cover.●Open the cover of clock battery
below meter and change battery.●If you feel difficult, please contact
authorized maintenance shops forinspection.
10
ODOMETER WINKER INDICATOR
FUEL GAUGE
HEADLIGHTINDICATOR
SPEEDOMETER
CLOCK
METER READING AND USAGE METER INDICATOR LAMP
CAUTION
●Long exposure to sunray can makeclock digit invisible.
*NS-125DLXO/M 02.11.5 3:41 PM 페이지10

TIME EX)
TIME SETTING●Push button B 4 times.●Push button A and set time you want.●If completed, push button B for setting.
MINUTE SETTING●Push button B 5 times.●Push button A and set time you want●If completed, push button B for setting.
DATE EX)
MONTH SETTING●Push button B 2 times.●Push button A and set time you want.●If completed, push button B for setting.
DAY SETTING ●Push button B 3 times.●Push button A and set time you want●If completed, push button B for setting.
DATE/TIME CHECKING
EXAMPLE 1If you push button A one time,time will be changed into date.
After checking it,push button B to keep it back.
EXAMPLE 2If you push button B one time,time will be changed into date andautomatically restored into time.
After checking, it, push button B 5 timesto keep it back.
11
HOW TO SET CLOCK
12 : 30A
B1 21
A
B
12 : P
12 : 30 1 21
12 : 30 1 21 12 : 30: 30
1
21
*NS-125DLXO/M 02.11.5 3:41 PM 페이지11

12
1. On.... Starts engine. Key can not bepulled out.
2. OFF....Stops engine. Key can beplaced in or taken out of themain switch.
3. LOCK....Locks handle bars. Key can beplaced in or taken out of themain switch.
The engine is started pressing this buttonwhen pressed in a state where the mainswitch key is placed to an ON position andthe brake lever is pulled.
SWITCH OPERATION
MAIN SWITCH STARTER BUTTON
CAUTION
●The engine will not start if thebrake lever is not pulled.
CAUTION
●Do not manipulate main switch keyduring operation. If the main switchkey is placed on “Off” or “Lock”position, all electrical system willnot function. Never operate themain switch key during travel as itmight cause unexpected accidents,If it is necessary to remove themain switch key, stop the vehiclefirst prior to removing.
●When you park the vehicle andleave it, please lock handle bars andtake out the key.
●If the key is left in “ON”positionwithout starting engine, battery isdischarged.
●Do not use a number of keystogether with a metal key holder.The keys and the key holder maycause scratches or other damage tothe cover while operating thevehicle.(Recommend cloth or leather keyholders)
STARTER BUTTON
KEY
MAIN SWITCH
*NS-125DLXO/M 02.11.5 3:41 PM 페이지12

<TURNING ON HEADLIGHT>
Put main switch key in “ON” position andturn on headlight switch.
<HEADLIGHT HIGH/LOW BEAM SWITCH>
High beam or low beam can be operatedby the use of high/low beam switch.
HIGH BEAM...... used when needing extra
light.
LOW BEAM...... used when other vehicles are
present, in the city, etc.
If this switch is turned on when the mainswitch is in an ON position, the winker willoperate.
(R)....used when making a right turn.(L)....used when making a left turn.
13
HEADLIGHT WINKER SWITCH
CAUTION
●The winker switch does not auto-matically turn back to its originalposition after completing the turn.Please set the switch back to itscenter position after turning.
HEADLIGHT HIGH/LOW BEAM SWITCH
WINKER SWITCH
(HI)D
(LO)D
HEADLIGHT SWITCH
SWITCH POSITION FUNCTION
Headlight, taillight,position lamp andmeter lights on.
Position lamp, taillight,and meter lights on.
Light turned off.(OFF)
(P)
(H)CAUTION
●Use the high beam only in thesuburban road or when the usage ofthe high beam not hinder the safedriving of the car ahead.
*NS-125DLXO/M 02.11.5 3:41 PM 페이지13

The horn is sounded if the horn button ispressed when the main switch is in an ONposition.
When the emergency light button ispressed with the main switch in “ON”position, the winker lamp will startblinking.
<LOCKING>To lock the steering, turn the handlebarsall the way to the left, turn the key toLOCK while pushing in. Remove the key.
<UNLOCKING>To unlock the steering, turn the key to theOFF position.
14
HORN BUTTON HAZARD SWITCH
STEERING LOCK
HORN BUTTON HAZARD SWITCH
EQUIPMENT USAGE
STEERINGLOCK
KEY
WARNING●Do not turn the key to LOCK while
riding the motorcycle; loss ofvehicle control will result.
*NS-125DLXO/M 02.11.5 3:41 PM 페이지14

<LOCKING>●The seat automatically locks when the
seat is pushed in its downward position,●Lightly pull upward on the seat to make
sure the seat has been properly locked.<UNLOCKING>●Turn the seat lock switch to the right
using the main switch key.
<LOCKING>Turn the inner box switch to the rightusing the main switch key. In this state,close the cover, turn the key to the left andthen remove the key.
<UNLOCKING>Turn the inner box switch to the right withthe main switch key and the inner box willeasily open.
INNER BOX MAXIMUM LOAD: 1.5kg
15
SEAT LOCK
CAUTION
●As the seat automatically locks,take special care not to accidentlyleave the key in the trunk.
●Driving with unlocked seat lockmay cause danger.
SEAT LOCK
MAIN SWITCH
INNER BOX
INNER BOX
MAIN SWITCH
CAUTION
●Do not place valuable of fragilegoods in the inner box.
●Make sure to remove importantitems out of the inner box whenwashing the vehicle as water canenter the inner box.
*NS-125DLXO/M 02.11.5 3:41 PM 페이지15

●There is a trunk under the seat.●The seat is opened to gain access to the
trunk by using the main switch key onthe seat lock.
●The lamp inside the trunk will be turnedon if the seat is opened.
TRUNK MAXIMUM LOAD:10kg
● There is a document storage area onthe bottom of the seat.
● Store the owner’s manual and themaintenance notebook in this area.
16
TRUNK DOCUMENT STORAGE AREA
CAUTION
●Make sure that the seat is securelylocked after closing the seat.
●An unlocked seat can hinder theoperation of the vehicle.
●The temperature inside the trunkrises due to heat from the engine.Do not place foodstuffs and otherarticles that can be damaged easilyby heat. Also do not place flamm-able materials in the trunk.
●Do not place valuable or fragilegoods in trunk.
●As water can enter the trunk whenwashing, make sure to removearticles that can be damaged bywater.
●Do not load uncloseable size ofhelmet and thing in the trunk,otherwise, the battery can bedischarged with the trunk lamp on.
TRUNK
SEAT LOCK
DOCUMENT STORAGE AREA
*NS-125DLXO/M 02.11.5 3:41 PM 페이지16

●For ease in carrying bags and similaritems, they should be hung from the bagholder which is fitted for this purpose.
●When using the bag holder, place it inthe open position and return it to thenormal position when not in use.
●The main switch key is used to open theinner box.
●Open the charge socket cap, insert thehandphone plug into the socket.
●Close the inner box.●Turn the main switch to an ON position.●When the charging is completed, open
the inner box and remove the handphoneplug.
17
BAG HOLDER
CAUTION●Do not attempt to carry very heavy
or bulky loads since this wouldaffect the stability and steeringcharacteristics of the scooter.
BAG HOLDER
HANDPHONE CHARGER
HANDPHONE CHARGER
CAUTION●The charging of the handphone
must be done with the main switchplaced in ON.
●Usage of if the handphone plug for other purpose (for example, lanternor ciga jack) may cause the battery discharging.
●Driving the vehicle during chargingthe handphone may cause damage and failure of the handphone.
*NS-125DLXO/M 02.11.5 3:41 PM 페이지17

●Make sure to check the oil, gasoline, etc.,before starting the engine.
●Please ensure that the main stand is in adown position when starting the engine.
●Drive with care for both safety reasonsand longer vehicle life.
●For 1 month (or 1,000km) after pur-chasing the vehicle, drive moderatlyavoiding fast starts and fast acceleration.
Always follow the proper startingprocedure described below.
●This motorcycle is equipped with a side stand ignition cut-off system.
●The engine cannot be started if the sidestand is down.
●Always be ensure that you operate theengine starting controls with the scooteron its stand.
Lock the rear wheel.
Turn the main switch to an ON position.
Start engine with cell or kick.
18
CAUTION
●Make sure that the rear brake isholded when starting the engine toprevent an unexpected quick startof the vehicle.
CORRECT DRIVING OPERATION STARTING THE ENGINE
WARNING●Never run the engine in an
enclosed area. The exhaustcontains poisonous carbonmonoxide gas that can cause lossof consciousness and lead todeath.
●While the scooter is on its standyou should NEVER apply fullthrottle:if the rear wheel touchesthe ground the scooter would setoff at full speed. (Remember thatthe scooter has a centrifugalautomatic speed control)
*NS-125DLXO/M 02.11.5 3:41 PM 페이지18

19
<USING THE ELECTRIC START(CELL)>
●Press the starter button without rotatingthe starter grip (opening the throttle).
●If the engine is hot and does not startafter pressing the starter button for 3~4seconds, rotate the throttle grip to1/8~1/4 of a rotation and try again. Thiswill allow easy starting
●It is possible that starting will be moredifficult if the vehicle has not been usedfor a long period of time or if the fuelhole is plugged up(starting problemseven when there is sufficient fuel in thefuel tank may be an indication of aplugged fuel hole).When this happens, do not rotate thethrottle grip and try the starter button afew times.
1/41/8
CAUTION
●Immediately release the starterbutton as soon as the vehicle hasstarted.
●Do not press the starter button whenthe engine is running.This can damage the starting motor.
CAUTION
●Do not keep the starter buttonpressed for more than 5 seconds ata time. Release the starter buttonfor approximately 10 secondsbefore pressing it again.
*NS-125DLXO/M 02.11.5 3:41 PM 페이지19

<WITHOUT ELECTRIC START(KICK)>
●Erect main stand and hold rear brakelever and then step kick starter pedalstrongly.
When the engine is cold (morning orwinter or the vehicle has not been usedfor a long period of time) let the engineidle for a short period allow the engineto warm up.
If engine cannot be started or vehicle doesnot move, check the followings.●Is there fuel in fuel tank?●Are you operating in accordance with the
instructions given in owner’s manual?●Is fuse not cut?●Is starter motor running?●If starter motor is not running due to
battery consumption, try starting motorby using kick start technique.
20
CAUTION
●Keep holding rear brake until start.●Exhaust has contains harmful subs-
tance such as carbon monoxide.Start engine in well-ventilated places.
IF ENGINE CANNOT BE STARTED
CAUTION
●Make sure to place kick starter inits original position after the enginehas been started.
●Be sure to erect main stand and sidestand when starting.
●Do not use the starter button and thekick-starter pedal simultaneously.
*NS-125DLXO/M 02.11.5 3:41 PM 페이지20

Fold the main stand.●Push the vehicle forward to fold the
main stand and make sure that the brakelever does not become released duringthis operation.
Get on the vehicle.●Mounting should be done from the left
side, and you should sit squarely on theseat. Leave either one foot or both feetplanted on the ground.
Release the squeezing tension on therear brake lever and slowly begin torotate the throttle grip to allow for aslow and easy start.
21
CAUTION
●Keep holding rear brake leverbefore starting.
CAUTION●A quick rotating of the throttle grip
will cause the vehicle to movesuddenly forward.
●If the engine RPM isn’t decreasedafter the throttle grip return to itsoriginal position, stop operatingand inspect it in the closestauthorized repair center.
CAUTION●Do not excessively open the throttle
until you actually start the drivingoperation of the vehicle.
AFTER STARTING ENGINE
*NS-125DLXO/M 02.11.5 3:41 PM 페이지21

●Before entering traffic, use the correctturn signal to foreward other drivers ofyour intentions.
Speed is controlled by the operation ofthe throttle grip.
●If the throttle grip is rotated........
The speed of the vehicle increases.Please rotate the throttle grip slowly.When climbing a hill, the throttle gripneed to be rotated further to give thevehicle more power.
●If the throttle grip is allowed torotate back........
Speed decreases. This can be doneslowly or quickly, depending on howquickly you need to decelerate.
Work the front and rear brakes together.
●Allow the throttle grip to rotate back toits beginning position and then squeezethe brake levers.
●If is best to operate the brakes by firstlightly squeezing the brake levers andthen changing to a more firm squeeze.
22
CAUTION
●If only one of the brakes is used, itis possible for the vehicle toexperience sliding.
ROTATEBACK ROTATE
RR. BRAKE FR. BRAKE
PROPER DRIVING METHODS
*NS-125DLXO/M 02.11.5 3:41 PM 페이지22

23
The brakes should never be suddenlyapplied and the handle bars shouldnever be suddenly turned.
●Sudden braking or turning can cause thevehicle to slide and tip over.
●It is especially dangerous to performsudden braking on wet roads or in rainyweather as the tires can lose traction andslip easily.
Special care in driving should betaken during rainy weather.
●More braking distance is needed whendriving on wet roads or in the rain.Reduce speed and be sure to initiate thebraking operation sooner than whendriving in normal conditions.
●On downgrades, allow the throttle gripto rotate back to its initial position toreduce speed, and apply the brakes anddrive slowly down the hill.
●It is possible for the brakes totemporarily lose operative ability afterdriving through a puddle or whendriving in the rain. To ensure that thebrakes are operating properly, slowdown(after checking for other vehicles)and while driving slowly, lightly applythe brakes to rid the brakes of anyexcess water and to dry them.
●Be extremely careful when driving inthe snow or on icy roads.When driving in these conditions, boththe tires lose much of their traction andthe rear tire can slip when opening thethrottle.
When approaching the desiredstopping area.
●Activate the proper turn signal, and afterchecking for other vehicles, slowly turninto the area in which you want to stop.
●Allow the throttle grip to rotate compl-etely back and apply the front and rearbrakes. The brake light will shine toalert vehicles in back of you that you arestopping.
STOPPING
RR. BRAKE FR. BRAKE
*NS-125DLXO/M 02.11.5 3:41 PM 페이지23

24
After the vehicle has come to acomplete stop.
●Return the turn signal switch to thecenter position and turn the main switchto OFF. This will turn the engine off.
Dismount on the left side and lower themain stand on a flat surface.
●Be sure to park in an area that is free oftraffic. Also, the vehicle can tip over ifthe main stand is not placed on a stableand flat surface.
●The main stand is lowered by graspingthe handle bars with the left hand,holding the rear carrier with the righthand, and stepping firmly on the standwith the right foot. In this position, liftthe rear carrier upward, which willsecure the main stand.
To prevent theft, be sure to lock handlebars when parking.
CAUTION
●Park in a safe area that will notblock traffic. When you parked thevehicle after driving, make surefoot the vehicle beyond man’sreach because engine and mufflerare still hot.
●Park the motorcycle on firm, levelground to prevent it from failingover.
●If you must park on a slight incline,aim the front of the motorcycleuphill to reduce the possibility ofrolling off the side stand oroverturning.
4 STROKE 4 VALVE
CAUTION
●Do not rotate the main switch keywhile driving. If the main switch isturned to an OFF or LOCKposition, the electrical system willnot operate. Operating the mainswitch key while driving can bevery hazardous. Only turn the mainswitch key to OFF or LOCKpositions after completing stoppingthe vehicle.
*NS-125DLXO/M 02.11.5 3:41 PM 페이지24

25
Self inspect the vehicle and have regularmaintenance inspections for increasedsafety and the prevention of accidents.Regular maintenance inspections shouldbe performed even if the vehicle has notbeen used for a long period of time.
Self inspections before operation should beperformed on a daily basis prior tooperating the vehicle.
●Inspections of concerned Area●Brake inspection●Fuel check●Tire inspection●Engine oil level check●Lights and turn signal inspection●Back mirror inspection●Fuel leak inspection●License plate inspection●Throttle grip inspection
CAUTION
Observe safety rules when conductinginspections.●Exhaust gas contains harmful
substance such as carbon mono-xide. Do not carry out inspectionson vehicle in closed places, or inpoorly ventilated places, withengine running.
●Conduct inspections on flat, solidground with the stand erected.
●Be careful of burns when conductinginspections immediately after engineis stopped because the engine andmuffler are hot.
●Stop engine and remove the keyprior to the vehicle maintenanceservice.
●Use appropriate types of tools.
●If you are unable to correct troubleeven after you make adjustment orcorrection, contact authorizedmaintenance shops, dealers ordesignated repair shops fornecessary inspection and repairs.
SELF INSPECTIONS BEFORE OPERATION
*NS-125DLXO/M 02.11.5 3:41 PM 페이지25

● Check areas which caused for concernwhen last operating the vehicle.
● If happened, contact authorizedmaintenance shops for necessaryinspection and repairs.
<BRAKE LEVER FREE PLAY>Lightly squeeze the brake levers untiltension is felt to check for an appropriateamount of free play. No free play in thebrake levers or overly loose brake leversare indication of a problem in the brakesystem.
BRAKE LEVER FREE PLAY: 10-20mm
<CHECK OF BRAKE FLUID>This is checked by placing the vehicle onits main stand on a flat surface. Make surethat the handle bars are at a horizontallevel. Check to see if the fluid are belowthe LOWER level.If brake fluid are significantly low, thismay indicate that there are leakage in thebrake system. Inspect the brake hoses tocheck for leaks.
26
BRAKE INSPECTION
LOWER LEVEL
FREE PLAYFREE PLAY
CAUTION●Specified brake lever free play
must be maintained. Excessive freeplay may cause long stoppingdistance, brake operational faultand slow reacting time resulting inthe dangerous situation andinsufficient free play may causeshort stopping distance and damagebrake system(pad, lining, etc.)
CAUTION●If the brake fluid is significantly
lower than the specified level,inspect not only brake fluid but alsocheck the front brake pad for wear.
INSPECTION OF CONCERNED AREA
*NS-125DLXO/M 02.11.5 3:41 PM 페이지26
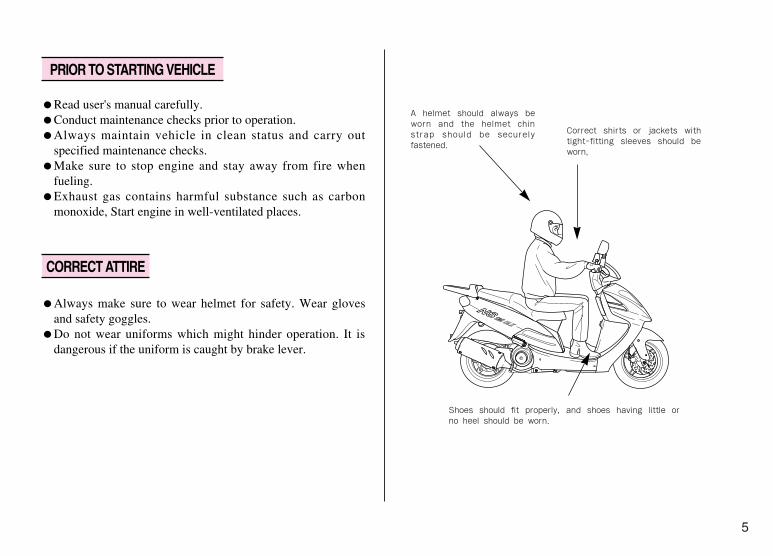
<CHECK>●Check gasoline to see if there is a
sufficient amount of gasoline to reachyour destination.
●If the fuel gauge needle indicates Emark (red portion), fill fuel tank withgasoline as soon as possible.
RESERVE FUEL CAPACITY : 1.2ℓ
<REFUELING>●Use the main switch key to open the
SEAT.●Turn the fuel tank cap counterclockwise,
and remove it.●Fill the tank with gasoline until it
reaches the bottom of the level plate.●Be sure to set the fuel tank cap to the
right position.
27
CAUTION●Gasoline is extremely flammable
and is explosive under certainconditions. Refuel in a well-ventilated area.
●Make sure to stop engine and stayaway from fire when refueling.
●Do not fill gasoline past the levelplate. Gasoline may leak out of thefuel tank when replacing the fueltank cap if too much gasoline is putin the fuel tank.
●Don’t fill low grade gasoline.Using it can cause damage (bending,getting worn, etc.) to combustionchamber and parts of fuel.
●Do not close the fuel cap withexcessive strength. It may cause thedamage of the cap and the rubberpacking resulting in the leak of fueland may cause fire in case ofelectrical short or the overturn ofthe vehicle.
●Avoid repeated or prolongedcontact with skin or breathing ofvapor.KEEP OUT OF REACH OF CHILDREN.
FUEL CHECK
FUEL GAUGEFUEL TANK CAP
LEVEL PLATE
*NS-125DLXO/M 02.11.5 3:41 PM 페이지27

28
<AIR PRESSURE CHECK>Check for an appropriate level of airpressure by examining how the tire sits onthe ground. If you notice any abnormalitiesin the shape of the tire with regard to thearea contacting the ground, use a tiregauge to check tire pressure and adjust thetire pressure to the appropriate level.
<TIRE PRESSURE>
<CRACKS/DAMAGE>Check tire tread and sides for cracks anddamage.
<ABNORMAL WEAR>Check tire tread for signs of abnormalwear.
<FOREIGN MATTER>Check tire tread and sides for nails, rocks,etc. That might have become wedged inthe tire.
<TREAD DEPTH>●Check the wear indicator (wear limit
marking) to see if there is an insufficientamount of tread remaining.
●If the indicators are visible, replace tirewith a new one.
CRACKS
DAMAGE
ABNORMALWEAR
WEAR INDICATOR(WEAR LIMIT MARKING)
WEAR INDICATORLOCATION MARKING
SIZE
AIR PRESSURE(kg/㎠)
1 PERSONRIDING
FRONT 1.75
120/70-12 53K
130/70-12 62K
2.00
1.75
2.25
REAR
REAR
FRONT
FRONT
REAR
2 PERSONRIDING
TIRE INSPECTION
× ×
*NS-125DLXO/M 02.11.5 3:41 PM 페이지28

Check the engine oil level each day beforeriding the motorcycle.The oil level must be maintained betweenthe upper and lower level marks on thesight-glass●Stand the motorcycle on the main stand
on level ground.●Start the engine and let it idle for
approximately 2~3 minutes.●Check the engine oil level.●If required, add the specified oil. Do not
overfill.
<HEADLIGHT, TAILLIGHT>Start the engine and make sure the lightsturn on. Also check to see if the lights aredamaged or if there is dirt on them.
<BRAKE LIGHT CHECK>Turn the main switch to ON.While separately operating the front andrear brakes, check to see if the brake lightturns on. Also check to see if there is anydamage to the lens or if there is dirt on thebrake light.
<WINKER CHECK>Turn the main switch to ON.Check to see if all the winker in the frontand rear of the vehicle(including left andright sides) are flashing properly, At thesame time, check to make sure that theautomatic sound signal of the winker isworking. Check also to see if any of thelens are damaged or dirty.
29
CAUTION●If air pressure is inadequate or if there
are cracks, damage or abnormal wearon tires, it may cause tremblingsteering wheel and flat tire.
●Insufficient air pressure may causethe heavy steering wheel makinghandling difficult, fuel overconsumption and the excessivewear of tire outer area and excessiveair pressure may cause easier wheel handling and lower fuelconsumption. But it may also causethe excessive wear of tire centerarea.
●This vehicle is equipped withtubeless tires. If you have flat tires,please contact authorised maint-enance shops for inspection.
CAUTION●Running the engine with insufficient
oil may cause serious engine damage.
ENGINE OIL LEVEL CHECK
SIGHT GLASS
LIGHTS AND WINKER INSPECTION
*NS-125DLXO/M 02.11.5 3:41 PM 페이지29

BACK MIRROR INSPECTION
FUEL LEAK INSPECTION
Sit squarely on the seat and check to see ifyou have a good view behind the vehicleby looking at the back mirrors. Also checkfor dirt and damage on the back mirrors.
Check to see if there is any leaking fuel bythoroughly checking the fuel tank, hose,carburetor, etc.
Check to see if there is any dirt or damageto the license plate. Also check to see if the license plate isfirmly secured to the vehicle.
●The Required Maintenance Schedulespecifies how often you should haveyour motorcycle served, and what thingsneed attention.
●It is essential that your motorcycle beserved as scheduled to retain its highlevel of safety, dependability, andemission control performance.
●These instructions are based on theassumption that the motorcycle will beused exclusively for its designedpurpose. Sustained high speedoperation, or operation in unusually wetor dusty conditions, will require morefrequent service than specified in theMAINTENANCE SCHEDULE. Consult your authorized Daelim dealerfor recommendations applicable to yourindividual needs and use.
30
MAINTENANCELICENSE PLATE INSPECTION
CAUTION●If any fuel is spilled, make sure the
area is dry before starting theengine.
*NS-125DLXO/M 02.11.5 3:41 PM 페이지30

31
Perform the Self Inspections Before Operation at each scheduled maintenance period.I: INSPECT AND, CLEAN, ADJUST, LUBRICATE OR REPLACE IF NECESSARYR: REPLACE L: LUBRICATE C: CLEAN
FUEL LINE I I I I
FUEL FILTER R R R R
THROTTLE OPERATION I I I I
AIR CLEANER NOTE( 2)
SPARK PLUG I R I
VALVE CLEARANCE I I I I
CARBURETOR IDLE I I I I
ENGINE OIL R R R R
ENGINE OIL FILTER R R R R
OIL FILTER SCREEN C C C
TRANSMISSION OIL R NOTE( 3)
BRAKE FLUID I I I NOTE( 3)
ITEM
★
★
★
★
★
★
★★
★
FREQUENCY ODOMETER READING(CAUTION 1)
REMARK
MAINTENANCE SCHEDULE
Every 1,000Km : C
×1,000Km 1 4 8 12
MONTH 6 12 18
*NS-125DLXO/M 02.11.5 3:41 PM 페이지31

32
BRAKE SHOE / PAD WEAR I I I I
BRAKE SYSTEM I I I I
BRAKE STOP SWITCH I I I
HEADLIGHT ADJUSTMENT I I I I
SUSPENSION I I I
BOLTS, NUTS, FASTENERS I I
WHEELS / TIRES I I I
STEERING HANDLE BEARING I I I I
DRIVE BELT I I I
WEIGHT ROLLER I I I
SLIDE PIECE I I I
ITEM
★
★
★
★
★
★★
★★
★★
★★
★★
FREQUENCY ODOMETER READING(CAUTION 1)REMARK
NOTES : (1) At higher odometer readings, repeat at the frequency interval established here.(2) Service more frequently when riding in unusually wet or dusty areas.(3) Replace every 2 years, or at indicated odometer interval, whichever comes first. Replacement requires mechanical skill.
★ If you do not have the appropriate tools or information to conduct maintenance, or if you feel you are not capable to performmaintenance on this vehicle, contact authorized dealers or repair shops for maintenance and repairs.
★★To ensure safety, inspections and maintenance of these parts must be carried out by dealers, or repair centers.
×1,000Km 1 4 8 12
MONTH 6 12 18
*NS-125DLXO/M 02.11.5 3:41 PM 페이지32

33
The following is an explanation of correctinspection methods, cleaning and partsreplacing. Please always refer to thissection when wanting to inspect or repairyour vehicle.
Both the front and rear brakes are thehydraulic disk type.As the brake pads wear, the brake fluidlevel drops.There are no adjustments to perform, butfluid level and pad wear must be inspectedperiodically.The system must be inspected frequentlyto ensure there are no fluid leaks.If the lever free play becomes excessiveand the brake pads are not worn beyondthe recommended limit, there is probablyair in the brake system and it must be bled.See your authorized Daelim dealer for thisservice.
MAINTENANCE PRECAUTIONS BRAKES
WARNING●If your motorcycle is overturned or
involved in a collision, inspectcontrol levers, cables, brake hoses,calipers, accessories, and other vitalparts for damage. Do not ride themotorcycle if damage impairs safeoperation. Have your authorizedDaelim dealer inspect the majorcomponents, including frame,suspension and steering parts, formisalignment and damage that youmay not be able to detect.
●Use new, genuine Daelim parts ortheir equivalent for maintenanceand repair. Parts which are not ofequivalent quality may impair thesafety of your motorcycle and theeffective operation of the emissioncontrol systems.
CAUTION
●Always observe safety rules whenperforming maintenance on thevehicle.
●Choose a flat surface and makesure the main stand is in a securedown position.
●Use correct tools.●Conduct engine maintenance with
the engine key out of the ignition.●Be careful around the engine and
muffler when performing mainte-nance as these areas can becomeextremely hot.
●After self maintenance, the wastematerial must be packed in thespecified container and entrusteddisposal to the authorized disposalcompany.
CAUTION
●Brake fluid may cause irritation.Avoid contact with skin or eyes. In case of contact, flush throughly with water and can a doctor if your eyes were exposed.
●Keep out of reach of children.
*NS-125DLXO/M 02.11.5 3:41 PM 페이지33

<REPLENISHING FRONT BRAKE FLUID>
●Check that the fluid level is above the LOWER level mark with the motorcycle in an upright position.
●Brake fluid must be added to the reservoir whenever the fluid level begins to reach the LOWER level mark.
1.Remove the screw rivet and take the front brake fluid maintenance lid off.
2.Clean dust and other foreign materials around reserve tank to prevent foreign materials from falling inside tank.
3.Remove the screws and take oil cup cap, diaphragm plate, diaphragm off.
4.Replenish recommended brake oil to the upper level inside reserve tank.
RECOMMENDED BRAKE OIL ISDOT 3 or DOT 4
5.Reinstall the diaphragm plate, and oil cup cap.
6.Tighten the screws securely.7.Install the front brake fluid maintenance
lid.
<REPLENISHING RERE BRAKE FLUID>
●Replenish in the same method as that of front brake fluid replenishment.
34
CAUTION
●When adding brake fluid, be verycareful not to allow foreign matterto enter the reserve tank.
●Do not fill past upper level.This can cause brake fluid to leakout of the reserve tank.
●Do not let brake fluid contactvehicle parts as this damagespainted areas. If oil contacts parts,quickly clean the fluid off using adry cloth.
●Use recommended brake fluid asother types can undergo chemicalchanges.
●If brake fluid is exceedingly low,this can be indication of damage tothe brake system.
●A leak in the brake system can leadto reduced braking efficiency andpossible loss of braking ability.
OIL CUP CAP
DIAPHRAGM PLATE
DIAPHRAGM
SCREW RIVET
BRAKE FLUIDMAINTENANCE LIDSCREW
*NS-125DLXO/M 02.11.5 3:41 PM 페이지34

Visually check for fluid leaks or damageand, using a spanner, check joints andclamps for clearance.Also, check hose and pipe protective partsto see if they contact other parts whenturning the handle bars or due to vibrationwhen driving.
Brake pad wear depends upon the severityof usage, the type of riding, and roadconditions. (Generally, the pads will wearfaster on wet and dirty roads.)Inspect the pads at each regularmaintenance interval (page 32).
[FRONT / REAR BRAKE]
●Check the cutout in each pad.●If either pad is worn to the cutout,
replace both pads as a set●See your authorized Daelim dealer for
this service.
<FRONT BRAKE>
<REAR BRAKE>
35
BRAKE HOSE, PIPE LEAKAGE,DAMAGE, ASSEMBLY STATE
BRAKE PAD WEAR
CUTOUTS
CUTOUTS
*NS-125DLXO/M 02.11.5 3:41 PM 페이지35

If engine oil is polluted, it seriously affectsthe engine life span. Maintain appropriatelevel of oil, use correct type of oil andobserve oil exchange period.●Stand vehicle on the main stand on level
ground and run engine idle(warm-up)for approximately 2-3 minutes.
●Stop engine and place a container underthe engine. Remove the drain plug bolt,and drain engine oil.
●Tighten the drain plug bolt.●Remove the plug maintenance cover and
fill the engine oil after opening oil filtercap of cylinder head cover.
OIL CAPACITY : 0.8ℓℓ(After oil filter change)0.75ℓℓ(After oil change)
●Start the engine and keep it idle for afew minutes.
●Stop the engine and check the oil level.If the oil level is low, add therecommended engine oil.
●Check on oil leaks.
<RECOMMENDED OIL>
If oil sold on markets or privately ma-nufactured oil (oil-grade) is used, enginelife is adversely affected, and the privilegeof warranty repairs cannot be guaranteed.
36
CHANGING ENGINE OIL
DRAIN PLUG BOLTSIGHT GLASS
GRADE(SE, SF, SH)
CAUTION
●If you change engine oil immed-iately after engine is stopped, becareful of burns because the engine,muffler and engine oil are still hot.
●Exercise caution not to allow dustor other foreign matter to flow inwhen refilling engine oil.
●If oil overflows, wipe off oil clean.If oil level is lower or higher thanprescribed level, engine is adver-sely affected.
●Do not mix oil with those ofdifferent manufacturers or grade, ordo not use low-quality oil as it maycause deterioration of oil, leadingto accidents.
●Clean the oil filter screen with freshcleaning oil every 4,000km.
●Be careful not to lose the oil filterscreen spring when assembling theoil drain bolt.
*NS-125DLXO/M 02.11.5 3:41 PM 페이지36

[FRONT WHEEL REMOVAL]
① Raise the front wheel off the ground byplacing a support block under theengine.
② Loosen the oval screw and remove thespeedometer cable.
③ Remove the front caliper assemblyfrom the front fork by removing thefixing bolts.
④ Loosen the axle nut.⑤ Withdraw the front wheel axle and
remove the front wheel.
⑥ Install in the reverse order of removal.
Prior to assembling, match the depressedpart( ) of the speedometer gear box withthe projected part of the left front fork.
Fit the caliper over the disc, taking carenot to damage the brake pads. Install thecaliper fixing bolts, and tighten to atorque of : 2.7kgf··m
Tighten the front axle nut to the specifiedtorque.FRONT AXLE NUT TORQUE: 5.0~7.0kgf··m
⑦ After assembling, operate brake for anumber of times and see if wheel isturning smoothly without gettinginterruption.
37
SPEEDOMETER CABLE
OVAL SCREW
AXLE NUT
FRONT CALIPER
FIXING BOLTS
DEPRESSED PART
FRONT WHEEL AXLE
WHEEL REMOVAL
CAUTION
●Do not operate brake lever after thefront wheel is removed. It willmake wheel assembling difficult.
CAUTION
●When installing the wheel, care-fully fit the left brake disk betweenthe brake pads to avoid damagingthe pads.
*NS-125DLXO/M 02.11.5 3:41 PM 페이지37

<REAR WHEEL REMOVAL>
① Set vehicle on main stand in uprightposition on level ground.
② Loosen the rear brake hose setting bolt. ③ Loosen the 3muffler setting bolts, and
remove the muffler.
④ Loosen the rear brake hose setting bolt.⑤ Remove the rear caliper assembly from
the rear swing arm by removing the 2fixing bolts.
⑥ Loosen the axle nut, remove the rearswing arm.
⑦ Remove the collar and the rear wheel.
⑧ Install in the reverse order of removal.
REAR AXLE NUT TORQUE : 6.0~8.0kgf··m
38
CAUTION
●If a torque wrench was not used forinstallation, see your authorizeddealer as soon as possible to verifyproper assembly.Improper assembly may lead to lossof braking capacity.
CAUTION
●If a torque wrench was not used forinstallation, see your authorizeddealer as soon as possible to verifyproper assembly.Improper assembly may lead to lossof braking capacity.
AXLE NUT REAR SWING ARM
FIXING BOLTSREAR CALIPER
REAR BRAKE HOSE SETTING BOLT
REAR BRAKE HOSE SETTING BOLT
FIXING BOLTS
MUFFLER SETTING BOLTSMUFFLER
*NS-125DLXO/M 02.11.5 3:41 PM 페이지38

39
If electrode is stained or clearance is notright, satisfactory spark is not produced.Clean and make adjustment.
●Remove spark plug cap.●Clean around the plug.●Using a plug wrench, remove plug.●Clean plug with plug cleaner.●Check electrode for wear and corro-
sion.●Measure clearance using a feeler gauge.
PLUG GAP: 0.8-0.9mm
●Tighten with hands until the plug
washer touches cylinder head.
STANDARD PLUG: CR8EH-9
●If new plug is installed, turn 1/2 andtighten using a plug wrench.
If plug is reused, turn 1/3~1/4 and tighten.
<DEALING WITH POOR STARTING>
When the starter doesn’t work duringdriving in winter times or in a repeatedshort distance, use the suitable spark plugfor this driving condition.Poor starting may happen when nonstopdriving in low speed, even though weproduce standard plug.In case starter isn’t working well in drivingrepeatedly in a short distance or in an areawith many traffic signals, use the CR7EH-9 pulg instead of standard plug CR8EH-9
SPARK PLUG
CAUTION
●If plug of different maker or differentheat value is used, it causesunsatisfactory engine starting,inadequate engine revolution andoutput deterioration.
●The spark plug must be securelytightened. An improperly tightenedplug can become very hot andpossibly damage the engine.
PLUG GAP
*NS-125DLXO/M 02.11.5 3:41 PM 페이지39

40
<CLEANING BATTERY TERMINALS>
●If you remove two screws from batterybox cover after putting floor panel metforward, you will find battery assembled.
●If the battery terminal is polluted, or inrust, separate battery and clean it.
●Battery terminal in rust with whitepowder should be cleaned with warmwater.
●In case of serious rust of battery ter-minal, disassemble the battery cord andgrind it with wirebrush or sandpaper.
<REPLENISHING BATTERY WATER>
●This vehicle doesn’t need eitherreplenishing or checking battery waterbecause of the equipment of enclosedMF battery.
●In case battery needs a checking, itshould be cared of by service center.
BATTERY COVER
BATTERY INSPECTION
CAUTION●Turn the ignition switch OFF
before disconnecting the terminalfrom the battery. Remove thenegative pole side cord first andthe positive pole side cord next.Make sure, at this time, that side cord is connected first,followed by side cord.
●When handling the battery stayaway from flammable materials.
●Make sure that terminals do notcontact with other adjacent partswhen handling / terminal.Contact with other parts may causespark resulting in electrical equip-ment malfunction, fire and electricshock.
●Frequent cell starting can shortenthe battery lifetime. Please use akick to start the engine after thelong period storage and in case ofthe initial starting and the coldstarting to improve startingperformance and extend the batterylifetime.
CAUTION
●Be careful not to disassemble in-jection part of enclosed battery.
●When not using vehicle during along time, take off the battery fromthe vehicle to keep from self-discharge and electric discharge.Put the battery in a well ventilatedplace after charging fully. In case itisn’t available to take battery offfrom the vehicle, disconnect “-”terminal.
*NS-125DLXO/M 02.11.5 3:41 PM 페이지40

41
Turn off the main switch to see if the fuseis severed. If the fuse is severed, exchangethe fuse into 7A fuse.
●To change a fuse, first take off batterycover. Then, disconnect a “fuseconnector” after opening a “fuseholder.”
●If the fuse immediately becomessevered after being changed with thenew one, check another problem of theelectric system.
FUSE REPLACEMENT
<DISASSEMBLY> <ASSEMBLY>
FUSE CONNECTOR
CORD
CAUTION
●Disassembly.When disassemble fuse, make surethat fuse holder isn’t separated.
●Assembly.After assembling fuse in the part ofconnector, check if fuse moveseasily to a line. If fuse moves eas-ily, it may cause an accident atheating.
●Do not use a fuse having a largervoltage as the wire can becomeoverheated and damaged.When replacing any of the electri-cal parts (lights and gauges), besure to replace them with the reco-mmended parts. Using differentparts can lead to the fuses burningout or damage to the battery.
●When washing the vehicle, takespecial care not to allow to besplashed in the area of the fuses.
BATTERY COVER
*NS-125DLXO/M 02.11.5 3:41 PM 페이지41
42
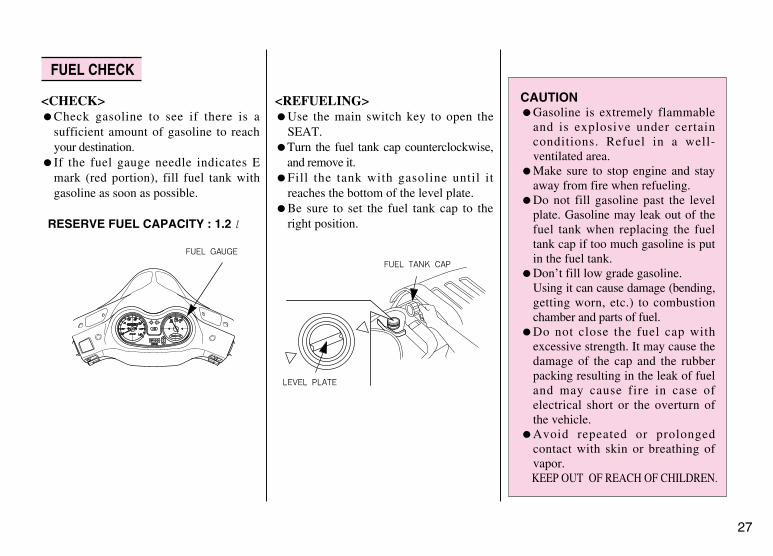
●Be sure to turn the ignition switchOFF when replacing the bulb.
●Do not use bulbs other than thatspecified.
●After installing a new bulb, check thatthe light operates properly.
[HEADLIGHT BULB]●Before replacing the bulb, be sure to
check the switches for looseconnection of the connector.
① Loosen the special screw and removethe front cover.
② Loosen the 4 headlight setting boltsand pull off the socket without turning.
③ Remove the rubber cover.④ Remove the pin.⑤ Slightly press down on the bulb and
turn it counterclockwise.⑥ Install a new bulb in the reverse order
of removal.
HEADLIGHT BULB : 12V35/35WCAUTION
●The light bulb becomes very hotwhile the light is ON, and remainhot for a while after it is turnedOFF. Be sure to let it cool downbefore servicing.
●Do not put finger prints on theheadlight bulb, as they may createhot spots on the bulb and cause it tobreak. Wear clean gloves whilereplacing the bulb.If you touch the bulb with yourbare hands, clean it with a clothmoistened with alcohol to preventits early failure.
FRONT COVERHEADLIGHT
BULBHEAD LIGHT
RUBBER COVER
BULB REPLACEMENT
*NS-125DLXO/M 02.11.5 3:41 PM 페이지42

43
[TAIL/STOPLIGHT BULB]
① Remove the rear undercover.② Loosen the 2 screws and remove the
rear combination light lens.③ Slightly press down on the bulb and
turn it counterclockwise.④ Install a new bulb in the reverse order
of removal.
TAIL/STOP LIGHT BULB : 12V 21W/5W
[WINKER BULB]
<FRONT WINKER BULB>
① Remove the RH./LH. back mirrior.② Loosen the 1 RH./LH. handle side
cover lower screw, and 1 each of thespecial upper side screws.
③ Loosen the 4 rear handle cover screws.④ Loosen the front handle cover setting
screw.⑤ Pull the front handle cover foward, and
remove the wiring.⑥ Remove the front handle cover.
⑦ Loosen the screw and remove thesocket.
⑧ Slightly press down on the bulb andturn it counterclockwise.
⑨ Install a new bulb in the reverse orderof removal.
FRONT WINKER BULB : 12V 10W
BULB REAR UNDERCOVER
RH. BACK MIRRIOR
LH. BACK MIRRIOR
BULBSOCKET
SCREW
FRONT HANDLE COVER
LH. HANDLESIDE COVER
FRONT HANDLECOVER
RH. HANDIESIDE COVER
REAR COMBINATIONLIGHT LENS
*NS-125DLXO/M 02.11.5 3:41 PM 페이지43

44
<REMOVAL>① Turn the seat lock switch to the right
using the main switch key.② Loosen the 6 washer screw and remove
the air cleaner case cover.③ Loosen the 2 washer screw and remove
the air cleaner element holder.④ Remove the air cleaner element.
<CLEANING>●Clean the air cleaner element in clean
oil, squeeze excess oil, and then, wra-pping it in a dry cloth, squeeze it again.
●Make sure all excess oil removed andreassemble the air cleaner element.
OIL : SAE 10W-30
⑤ Install in the reverse order of removal.
AIR CLEANER ELEMENTINSPECTION
CAUTION
●Do not use gasoline or ther ma-terials having a low ignition pointas this can be a fire hazard.
●If the air cleaner element is inadequately assembled, dust andother waste materials can directlyenter the engine. This results inincreased cylinder wear and redu-ced power, and reduced durabilityof the engine.
●When washing the vehicle, becareful not to allow water to getinto the air cleaner.Difficulties in starting the enginemay result if this happens.
●If the engine start is failed duringrain or after driving across waterpool, check to see if the water isinfiltrated in the air cleaner andclean it.
BULB REAR UNDERCOVER
REAR COMBINATIONLIGHT LENS
REAR WINKER LENS
<REAR WINKER BULB>
① Remove the rear undercover.② Loosen the 2 screws and remove the
rear combination light lens.③ Remove the rear winker lens.④ Slightly press down on the bulb and
turn it counterclockwise.⑤ Install a new bulb in the reverse order
of removal.
REAR WINKER BULB : 12V 10W
*NS-125DLXO/M 02.11.5 3:41 PM 페이지44

45
SIDE STAND INSPECTION
SIDE STANDSPRING
●Erect main stand and place vehicle in upright position on level ground.
●Check the spring for damage or loss of tension and the side stand assembly for freedom of movement.
●Check the side stand ignition cut-off system;Put the side stand up.Start the engine.Lower the side stand. The engine should stop as you put the side stand down.
●If the side stand system does not operate as described, inspect it in the closest authorized repair center.
A rubber part is assembled on the cable toprotect the inner cable.Make sure that this part is placed firmlyaround the correct part of the cable. Whenwashing the car, do not directly spraywater on to the rubber part is dirty, use adry cloth to clean this area.
●Make sure to stop the engine prior to carwashing.
●Be careful not to allow water to enterthe muffler during the washing.Water inside the muffler may cause animproper engine starting or rust occurr-ence.
●Do not let water get inside the brakingsystem during the washing, as waterinside the brake system may weaken thebraking power. Upon completion ofwashing, select a safe place where thereis no traffic obstruction, and start thevehicle.Lightly apply the brake while driving ata slow speed and check the brakingpower.If the braking power has been weak-ened, apply brake lightly while drivingat a slow speed to dry up the brakesystem.
●Take precautions when waxing thevehicle.Excessive polish of the painted sectionand/or the resin part with compoundwax might damage the painted sectioncausing discoloration of the affectedarea.
CAUTION●Infiltration of the foreign materials
or water caused by damage oflever(disengagement, tearing, etc.)may cause freezing in winterseason resulting in faulty operation,sudden accelation and brakingforce decrease. If any damage isfound, replace with the new oneimmediately.
CABLE RUBBER PART INSPECTION
INSPECTIONPART
RUBBER INSPECTIONPART
NOTABLES FOR CAR WASHING
*NS-125DLXO/M 02.11.5 3:41 PM 페이지45

Extended storage, such as for winter,requires that you take certain steps toreduce the effects of deterioration fromnon-use of the motorcycle.In addition, necessary repairs should bemade BEFORE storing the motorcycle;otherwise, these repairs may be forgottenby the time the motorcycle is removedfrom storage.
<STORAGE>●Empty the fuel tank into an approved
gasoline container using a commerciallyavailable hand siphon or an equivalentmethod.
●If storage will last more than one month,carburetor draining is very important, toassure proper performance after storage.
●Remove the battery. Store in an areaprotected from freezing temperaturesand direct sunlight. Slow charge the battery once a month.
●Wash and dry the motorcycle. Wax allpainted surfaces.
●Inflate the tires to their recommendedpressures. Place the motorcycle onblocks to raise both tires off the ground.
●Cover the motorcycle (don’t use plasticor other coated materials) and store inan unheated area, free of dampness witha minimum of daily temperaturevariation. Do not store the motorcycle indirect sunlight.
<REMOVAL FROM STORAGE>
●Uncover and clean the motorcycle.●Charge the battery as required. Install
the battery.●Perform all Self Inspections Before
Operation checks (page 25).Test ride the motorcycle at low speeds in a safe riding area away from traffic.
46
STORAGE GUIDE
CAUTION●Gasoline is extremely flammable and
is explosive under certain conditions. Perform this operation in a well-ventilated area with the engine stopped. Do not smoke or allow flames or sparks in the area where gasoline is drained or stored and where the fuel tank is refueled.
*NS-125DLXO/M 02.11.5 3:41 PM 페이지46

●The frame number is stamped on thefront central part of the frame.
●The engine number is stamped on thecentral part of the left crankcase.
●The frame and engine numbers will beused as the basis of recovering thevehicle when is stolen.
●Record the frame and engine numbersalong with the vehicle license platenumbers and keep them separately fromthe vehicle.
47
FRAME AND ENGINE NUMBER
FRAMENUMBER
INNER BOX
ENGINENUMBER
LEFT CRANKCASE
NUMBERING CAP
SG125E5000001
<FRAME NUMBER>
<ENGINE NUMBER>
*NS-125DLXO/M 02.11.5 3:41 PM 페이지47

48
● Performing daily inspection
● Putting on the protective gears (Helmet, glove, goggles, etc.)
● Bringing the driver's licence
● Determinating the path to the desired destinationFUEL,
PROTECTIVEGEARS
SAFE DRIVING
DRIVER'S
LICENCE
PERFORMING
DAILY
INSPECTION
PREPARATION BEFORE DRIVING
*NS 125 DLX(48~64) 02.11.5 3:47 PM 페이지48

< SCOOTER >The appropriate driving position is most important thing to driving safely.① Eyes : Look at the front direction widely.② Shoulders : Relieve the tension. ③ Arms : Relieve the tension and bend arms to inside and let
them act as the spring.④ Hands : Grip the handle the position away from the inside
end of the handle with distance of one finger to facilitate the operation of the switch and lever.
⑤ Wrist : Keep the state to act freely without applying excessive force to the shoulder and arms.
⑥ Knees : Relieve the tension and keep the distance of both knee same as shoulders.
⑦ Feet : Place the feet to face the front parallel and keep the distance of both feet same as shoulders
49
DRIVING POSITION
DRIVING METHOD
*NS 125 DLX(48~64) 02.11.5 3:47 PM 페이지49

50
< VEHICLE EXCEPT SCOOTER >① Eyes : Look at the front direction widely.② Shoulders : Relieve the tension. ③ Arms : Relieve the tension and bend arms to inside and let
them act as the spring.④ Hands : Grip the handle the position away from the inside
end of the handle with distance of one finger to facilitate the operation of the switch and lever.
⑤Wrist : Keep the state to act freely without applying excessive force to the shoulder and arms.
⑥ Knees : Press the fuel tank slightly.⑦ Feet : Place the feet to face the front parallel and make the
step bar be placed in the center of feet.
*NS 125 DLX(48~64) 02.11.5 3:47 PM 페이지50

51
● Secure the safe distance.● Drive protectively.● Do not obstruct the traffic.● Do not drive on the pedestrian way or walkway. ● Drive on the left driveway when passing away.● Make sure that you can apply the brake anytime.● Always apply the brake when stopping temporarily.● Do not drive excessively long distance and take enough
break.
PRECAUTION WHEN DRIVING
● If any abnormality is found, stop driving and contact service center to inspect the vehicle.
● Restart the vehicle after 2~3 min when it is turned over.● Always turn on the headlight at night.
*NS 125 DLX(48~64) 02.11.5 3:47 PM 페이지51

52
Prior to starting always look around to avoid accident.
< SCOOTER >① Lock the rear brake with the main stand erected. ② Start the engine using the cell or kick.③ Pull back the main stand. ④ Get on the vehicle.⑤ Release the brake lock lever by pull the rear brake lever
strongly.⑥ Start driving slowly after turning on the winker and
releasing the brake while ensuring the safety around the vehicle.
STARTING
*NS 125 DLX(48~64) 02.11.5 3:47 PM 페이지52

53
< VEHICLE EXCEPT SCOOTER >① Get on the vehicle after pulling back the stand. ② Start driving slowly after turning on the winker and
releasing the brake while ensuring the safety around the vehicle.
CAUTION●Return the side stand to its original position.●Keep driving without doing this may cause turnover
accident.
*NS 125 DLX(48~64) 02.11.5 3:48 PM 페이지53

54
The basic principle of turn is balancing using the centrifugal force which makes vehicle go outside and the gravity which makes vehicle fall inside.
The centrifugal force increases in inverse portion to the radius of a curve and in portion to the square speed. Decelerate prior to entering the curved way to reduce the centrifugal force.
EFFECT OF SPEEDPRINCIPLE OF TURN
CENTRIFUGALFORCE
GRAVITY
TURNING METHOD
*NS 125 DLX(48~64) 02.11.5 3:48 PM 페이지54

55
The basic principle of turn is balancing using combined force of the centrifugal force and the gravity. All 3 positions require straightening the head and keeping the eyes horizontally.
< LEAN-WITH >This is a turning position with motor cycle and driver in a line.This position is the most natural and exact, so driver must learn it thoroughly.
< LEAN-IN >This is a turning position with driver leaned inside more than motor cycle. This position is adequate to drive on the rained or slippy road because it has best road holding.However, special attention is required because front visual field is poor when driver leans inside more than motor cycle.
3 POSITIONS OF TURNING
*NS 125 DLX(48~64) 02.11.5 3:48 PM 페이지55

56
< LEAN-OUT >This is a turning position with motor cycle leaned inside more than driver, which is opposite to the lean-in position. With this position, quick turn is well performed and driver can obtain wide front visual field adequate to drive on the rained or slippy road because it has best road holding. However, special attention is required because there is danger of slipping on the bad holding road.
① Turn the throttle grip to its original position and decelerate using both front and rear brakes.
② Lean the vehicle toward inside of turn circle while driving slowly at constant speed.
③ Accelerate gradually.
TURNING METHOD
*NS 125 DLX(48~64) 02.11.5 3:48 PM 페이지56

57
Do not drive inside of large truck's turn circle.
< DEAD ANGLE ZONE >Dead angle zone is the sight range which cannot be identified by driver and increases in proportion to the width of the vehicle
< DISTANCE BETWEEN THE FRONT AND REAR WHEEL TURN >It is distance between path of the front and rear wheel and increases in proportion to the length of the vehicle
PRECAUTION WHEN TURNING
*NS 125 DLX(48~64) 02.11.5 3:48 PM 페이지57

58
● Vehicle is braked using friction between road surface and tires.
● Braking distance increases 1.5 times on wet road and 3 times on icy road because friction force of road surface is decreased.
Due to the inertia, vehicle does not stop immediately after applying the brake.
BASIC PRINCIPLE OF BRAKE (FRICTION FORCE) RESTRAINT OF BRAKE EFFECT (INERTIA)
BRAKING METHOD
*NS 125 DLX(48~64) 02.11.5 3:48 PM 페이지58

59
● Turn the throttle grip to its original position and decelerate using the engine brake.
● Erect the vehicle straight.● Brake using both front and rear brakes.
·Vehicle speed : 50 km/h
Learn the proper braking method to prevent accident.
Impact increases in proportion to the speed and weight. The impact when collision to concrete wall at 50 km/h is same as one when falling from the height of 10m.
IMPACT WHEN COLLISION
COMPARISION OF BRAKING DISTANCE
BRAKING METHOD
*NS 125 DLX(48~64) 02.11.5 3:48 PM 페이지59

60
2PMINI
4P
6PMINI
LIGHTING
BAT TL
P
START
ST E
FREE
PUSHPUSH
FREE
HO BAT
HORN
(N)
DIMMER
HI HL LO
LO
HI
TURN
R WR L
R
N
L
W WHITE Gr GRAY
B BLACK
Y YELLOW
L BLUE
G GREEN
R RED
Br BROWN
O ORANGE
SB SKY BLUE
LG LIGHT GREEN
P PINK
4P
HL
L Br/W WCORDCOLOR
CORDCOLOR
GRSB O
COLORCORD
LG BCORDCOLOR
Y/R B
CORDCOLOR
4P
(N)
M
B BR Br/W
6PMINI
6P
ENGINE
MINI2P
WR
COLORCORD
SB GR
R
O
L
HAZARD
FREE
PUSH
MINI2P
P
RE
COLORCORD
PUSH
FREE
BR
BAT. TR/L
TRUNK LAMP
ON
COLORCORD
OFF
LOCK
GB/W R B
BAT HOIG E
COMBINATION
FREE
PUSH
CORDCOLOR
B/W
SIDE STAND S/W
IG E
G
+ _
Y L/YB/ R
REG.RECTI
Y G B R
BR/
L/YW
B/ G /BY
SB
G/YG
OO
GY/
G
SB
G
G
SB
O
YB/
G
CDI UNIT IGN. COILHORN
LO HI BATR L WR HO
W L BSB O Gr
G
HO BATE IG
G B/WRB
BATTL
B
FR.STOP SW.
COMBINATION SW.
LIGHTING SW.
HORN S/W.
G
SB
Br
G
G
Br
SB
G
O
G
Br Br
L/W
B
SB
G
B
LG
LG
B B
G/Y G/Y
G
O
R/B L/YY
12V MF6AH
BATTERY
ST-MOTOR
A.C.G
R.H RR. WINKER LIGHT
12V 10W
STOP AND TAIL LIGHT
12V 21W/5W
L.H RR. WINKER LIGHT
12V 10W
R.H FR. WINKER LIGHT
12V 10W
L.H FR. WINKER LIGHT 12V 10W
FUEL METER
METER ILLUMINATION12V 1.7W x 2
R.H WINKER PILOT
12V 3.4W
L.H WINKER PILOT 12V 3.4W
HIGH BEAM PILOT 12V 1.7W
RH. HEAD LIGHT
12V 35/35W
PULSE GEN.
6P
G/W
HL
Br/W
G/Y
BR B
L
G
W
BR BR
G
L
W
L
G
L
W
G
G
W
L
Y/W
Y
Y Y
Y G/W
G/W
Y/RG/Y
G/Y Y/R
Y Y
ST-MAG S/W
POSITION LIGHT
12V 5W
LH. HEAD LIGHT
12V 35/35W
/G
L
SB
O
Y/W
L/W
Y/R
B
RR.STOP SW.
BR
Y/W
SB
O
Y/R
L/W
BR
G/Y
G
LG
B
G Gr
WINKER RELAY
B
ST
/ RYG
EHL
/BrW
G/YG/Y
B B
/W
LG
Y/W
MINI
L/W G/Y
3P
W
FUEL UNIT
G B R WB /
G /B WRB
B/SY
AUTO
YY
G/Y G/Y
O
G
LICENCE LIGHT
12V 5W
START SW.
DIMMER S/W. WINKER S/W.
G
G
BR
G
12V 5W
POSITION LIGHTG
BR
R
R
FUSE 15A
R
R
O
G
Y
O
LR
SB
WR
Gr
HAZARD S/W
BG
GR
GR
14V 1.4W
TRUNK LAMP
TRUNK LAMP S/WG
30W 5.9
PP
P
RE
P P
R B
BAT. TR/L
G B
CHARGE SOCKET
G
G
B/WG
B/WG
SIDE STAND S/W
B/WG
B
B
WIRING DIAGRAM
*NS 125 DLX(48~64) 02.11.5 3:48 PM 페이지60

61
MEMO
*NS 125 DLX(48~64) 02.11.5 3:48 PM 페이지61

62
MEMO
*NS 125 DLX(48~64) 02.11.5 3:48 PM 페이지62

63
MEMO
*NS 125 DLX(48~64) 02.11.5 3:48 PM 페이지63

64
MEMO
*NS 125 DLX(48~64) 02.11.5 3:48 PM 페이지64

OOWWNNEERR’’SS MMAANNUUAALL
2002. 1. PRINTED2001. 1. PUBLICATION NO COPY
*NS-125DLXO/M 02.11.5 3:42 PM 페이지48