
Technics SLDZ1200
28
Operating Instructions Model No. SL-DZ1200 RQT7114-Y Direct Drive Digital Turntable PP Before connecting, operating or adjusting this product, please read these instructions completely. Please keep this manual for future reference.
-
Upload
christopher-quinn -
Category
Documents
-
view
62 -
download
0
Transcript of Technics SLDZ1200

Operating Instructions
Model No. SL-DZ1200
RQT7114-Y
Direct Drive Digital Turntable
PP
Before connecting, operating or adjusting this product, please read theseinstructions completely.Please keep this manual for future reference.

RQT7114
2
Bef
ore
use
Parts and supplied accessories
Please check and identify the parts and sup-plied accessories.Use numbers indicated in parentheses whenasking for replacements parts.In U.S.A. to order accessories, refer to “Acces-sory Purchases” on back cover.
AC power supply cord (REZ1619) ................................. 1
NoteThe included AC power supply cord is for use with this unit only.Do not use it with other equipment.Do not use an AC power supply cord from any other type ofequipment with this unit.
Stereo connection cable (SFDHBD2N01) ..................... 1
Slip surface (RGK1704-S2) ............................................ 1
Dear customer
Thank you for purchasing this product.For optimum performance and safety, please read these instructionscarefully.
Table of contents
Before useParts and supplied accessories ................................................. 2Product service ............................................................................. 2Listening caution .......................................................................... 3IMPORTANT SAFETY INSTRUCTIONS ....................................... 4Main features ................................................................................ 5Component part names ............................................................... 6Platter setup .................................................................................. 7Setup .............................................................................................. 7Connections .................................................................................. 8
Connecting with the DJ mixer .................................................... 8Connecting the control terminals for relay play ......................... 9Connecting with the stereo amplifier (Not using the DJ mixer) ........... 9Connecting to equipment with digital input terminals ................ 9
Basic operationsInserting-removing a disc or SD Memory Card ...................... 10Display indicator ......................................................................... 11Playing a CD or SD Memory Card (basic play) ....................... 12Basic function settings .............................................................. 14
Selecting TURNTABLE mode or CD PLAYER mode .............. 14Instant play (INSTANT CHANGE) ........................................... 14Using the FREE WHEEL mode ............................................... 14Adjusting the platter brake ....................................................... 14Adjusting the auto cue level ..................................................... 14
Advanced operationsPlatter operations ....................................................................... 15
Changing play with your hand ................................................. 15Basic play for DJs .................................................................... 15
Changing tempo and direction of play .................................... 16Changing tempo ....................................................................... 16Locking the pitch ...................................................................... 16Reverse play (Reversing the platter) ....................................... 16
Playing from memory ................................................................. 17Setting the auto cue point ........................................................ 17Setting the cue point at any point ............................................ 17Play from the stored point ........................................................ 17Storing to the CUE PADS and playing .................................... 18Store desired points to memory and play (loop play) ............. 18Recording to the SAMPLE PADS and playing ........................ 19Erasing cue pad, sample pad, loop play data ......................... 19
Changing the sound ................................................................... 20Changing sound to simulate analog ........................................ 20Change sound with combined performance ............................ 20Editing the SAMPLE PADS ...................................................... 20
Other functionsSaving to a SD Memory Card, Recalling .................................. 21
Saving to a SD Memory Card .................................................. 21Formatting the SD Memory Card ............................................. 22Recalling (loading) data saved on a SD Memory Card ........... 22Regarding MP3 albums and SD audio .................................... 22
Using with other equipment ...................................................... 23Start play using the mixer’s fader ............................................ 23Using two units for relay play ................................................... 23Using the amplifier and other equipment ................................ 23Linking different tracks ............................................................. 24
Unit’s initialize memory function .............................................. 24Initializing this unit’s memory ................................................... 24
ReferenceGlossary ...................................................................................... 24Handling SD Memory Cards ...................................................... 25Concerning CDs ......................................................................... 25Q&A (Frequently asked questions) .......................................... 26Troubleshooting guide ............................................................... 26Error messages .......................................................................... 27Maintenance ................................................................................ 27Specifications ............................................................................. 27Warranty (U.S.A.) ......................................................... Back cover
The model number and serial number of this product can be foundon either the back or the bottom of the unit.Please note them in the space provided below and keep for futurereference.
MODEL NUMBER SL-DZ1200
SERIAL NUMBER
User memo:
DATE OF PURCHASE
DEALER NAME
DEALER ADDRESS
TELEPHONE NUMBER
Product service
1. Damage requiring service—The unit should be serviced byqualified service personnel if:(a) The AC power supply cord or AC adaptor has been
damaged; or(b) Objects or liquids have gotten into the unit; or(c) The unit has been exposed to rain; or(d) The unit does not operate normally or exhibits a marked
change in performance; or(e) The unit has been dropped or the cabinet damaged.
2. Servicing—Do not attempt to service the unit beyond thatdescribed in these operating instructions. Refer all other servic-ing to authorized servicing personnel.
3. Replacement parts—When parts need replacing ensure theservicer uses parts specified by the manufacturer or parts thathave the same characteristics as the original parts. Unauthorizedsubstitutes may result in fire, electric shock, or other hazards.
4. Safety check—After repairs or service, ask the servicer toperform safety checks to confirm that the unit is in properworking condition.
Product information
For product information or assistance with product operation:In the U.S.A., refer to “Customer Services Directory” on back cover.In Canada, contact the Panasonic Canada Inc. Customer Care Cen-tre at 905-624-5505, or visit the website (www.panasonic.ca), or anauthorized Servicentre closest to you.
RQT7114
3
Bef
ore
use
CLASS 1LASER PRODUCT
(Back of product)
CAUTION!DO NOT INSTALL OR PLACE THIS UNIT IN ABOOKCASE, BUILT-IN CABINET OR INANOTHER CONFINED SPACE. ENSURE THEUNIT IS WELL VENTILATED. TO PREVENTRISK OF ELECTRIC SHOCK OR FIRE HAZARDDUE TO OVERHEATING, ENSURE THATCURTAINS AND ANY OTHER MATERIALS DONOT OBSTRUCT THE VENTILATION VENTS.
Marking sign is located on bottom of the unit.
WARNING:TO REDUCE THE RISK OF FIRE, ELECTRICSHOCK OR PRODUCT DAMAGE, DO NOTEXPOSE THIS APPARATUS TO RAIN,MOISTURE, DRIPPING OR SPLASHING ANDTHAT NO OBJECTS FILLED WITH LIQUIDS,SUCH AS VASES, SHALL BE PLACED ON THEAPPARATUS.
CAUTION!THIS PRODUCT UTILIZES A LASER.USE OF CONTROLS OR ADJUSTMENTS ORPERFORMANCE OF PROCEDURES OTHERTHAN THOSE SPECIFIED HEREIN MAYRESULT IN HAZARDOUS RADIATIONEXPOSURE.DO NOT OPEN COVERS AND DO NOT REPAIRYOURSELF. REFER SERVICING TO QUALIFIEDPERSONNEL.
Listening caution
Selecting fine audio equipment such as the unit you’ve just pur-chased is only the start of your musical enjoyment. Now it’s timeto consider how you can maximize the fun and excitement yourequipment offers. This manufacturer and the Electronic IndustriesAssociation’s Consumer Electronics Group want you to get themost out of your equipment by playing it at a safe level. One thatlets the sound come through loud and clear without annoyingblaring or distortion—and, most importantly, without affecting yoursensitive hearing.
We recommend you to avoid prolonged exposure to excessivenoise.
Sound can be deceiving. Over time your hearing “comfort level”adapts to higher volumes of sound. So what sounds “normal” canactually be loud and harmful to your hearing.Guard against this by setting your equipment at a safe levelBEFORE your hearing adapts.To establish a safe level:¡Start your volume control at a low setting.¡Slowly increase the sound until you can hear it comfortably and
clearly, and without distortion.
Once you have established a comfortable sound level:¡Set the dial and leave it there.
Taking a minute to do this now will help to prevent hearingdamage or loss in the future. After all, we want you listening for alifetime.
EL
EC
TR
O N I C I N D UST
RIE
S
•A
SS O C I A T I O
N•
EST. 1924
The lightning flash with arrowhead symbol, within an equilateral triangle, is intended to alert the user to the presence of uninsulated “dangerous voltage” within the product’s enclosure that may be of suffi-cient magnitude to constitute a risk of electric shock to persons.
CAUTION
CAUTION: TO REDUCE THE RISK OF ELECTRICSHOCK, DO NOT REMOVE SCREWS.NO USER-SERVICEABLE PARTSINSIDE.REFER SERVICING TO QUALIFIEDSERVICE PERSONNEL.
The exclamation point within an equilateral triangle is intended to alert the user to the presence of important operating and maintenance (servicing) instructions in the literature accompanying the appliance.
RISK OF ELECTRIC SHOCKDO NOT OPEN
The following mark and symbols are located on bottom of the unit.
(Inside of product)
RQT7114
4
Bef
ore
use
IMPORTANT SAFETY INSTRUCTIONSRead these operating instructions carefully before using the unit. Follow the safety instructions on the unit and the applicable safety instructionslisted below. Keep these operating instructions handy for future reference.
1) Read these instructions.
2) Keep these instructions.
3) Heed all warnings.
4) Follow all instructions.
5) Do not use this apparatus near water.
6) Clean only with dry cloth.
7) Do not block any ventilation openings. Install in accordance withthe manufacturer’s instructions.
8) Do not install near any heat sources such as radiators, heat reg-isters, stoves, or other apparatus (including amplifiers) that pro-duce heat.
9) Do not defeat the safety purpose of the polarized or grounding-type plug. A polarized plug has two blades with one wider thanthe other. A grounding-type plug has two blades and a thirdgrounding prong. The wide blade or the third prong are providedfor your safety. If the provided plug does not fit into your outlet,consult an electrician for replacement of the obsolete outlet.
10) Protect the power cord from being walked on or pinched particu-larly at plugs, convenience receptacles, and the point wherethey exit from the apparatus.
11) Only use attachments/accessories specified by the manufac-turer.
12) Use only with the cart, stand, tripod, bracket, ortable specified by the manufacturer, or sold withthe apparatus. When a cart is used, use cautionwhen moving the cart/apparatus combination toavoid injury from tip-over.
13) Unplug this apparatus during lightning storms or when unusedfor long periods of time.
14) Refer all servicing to qualified service personnel. Servicing isrequired when the apparatus has been damaged in any way,such as power-supply cord or plug is damaged, liquid has beenspilled or objects have fallen into the apparatus, the apparatushas been exposed to rain or moisture, does not operate normal-ly, or has been dropped.
CAUTION:This equipment has been tested and found to comply withthe limits for a Class B digital device, pursuant to Part 15 ofthe FCC Rules.These limits are designed to provide reasonable protectionagainst harmful interference in a residential installation.This equipment generates, uses and can radiate radiofrequency energy and, if not installed and used inaccordance with the instructions, may cause harmfulinterference to radio communications. However, there is noguarantee that interference will not occur in a particularinstallation. If this equipment does cause harmfulinterference to radio or television reception, which can bedetermined by turning the equipment off and on, the user isencouraged to try to correct the interference by one or moreof the following measures:¡Reorient or relocate the receiving antenna.¡Increase the separation between the equipment and re-
ceiver.¡Connect the equipment into an outlet on a circuit different
from that to which the receiver is connected.¡Consult the dealer or an experienced radio/TV technician
for help.
Any unauthorized changes or modifications to thisequipment would void the user’s authority to operate thisdevice.
This device complies with Part 15 of the FCC Rules.Operation is subject to the following two conditions: (1) Thisdevice may not cause harmful interference, and (2) thisdevice must accept any interference received, includinginterference that may cause undesired operation.
THE FOLLOWING APPLIES ONLY IN THE U.S.A.
RQT7114
5
Bef
ore
use
Main features
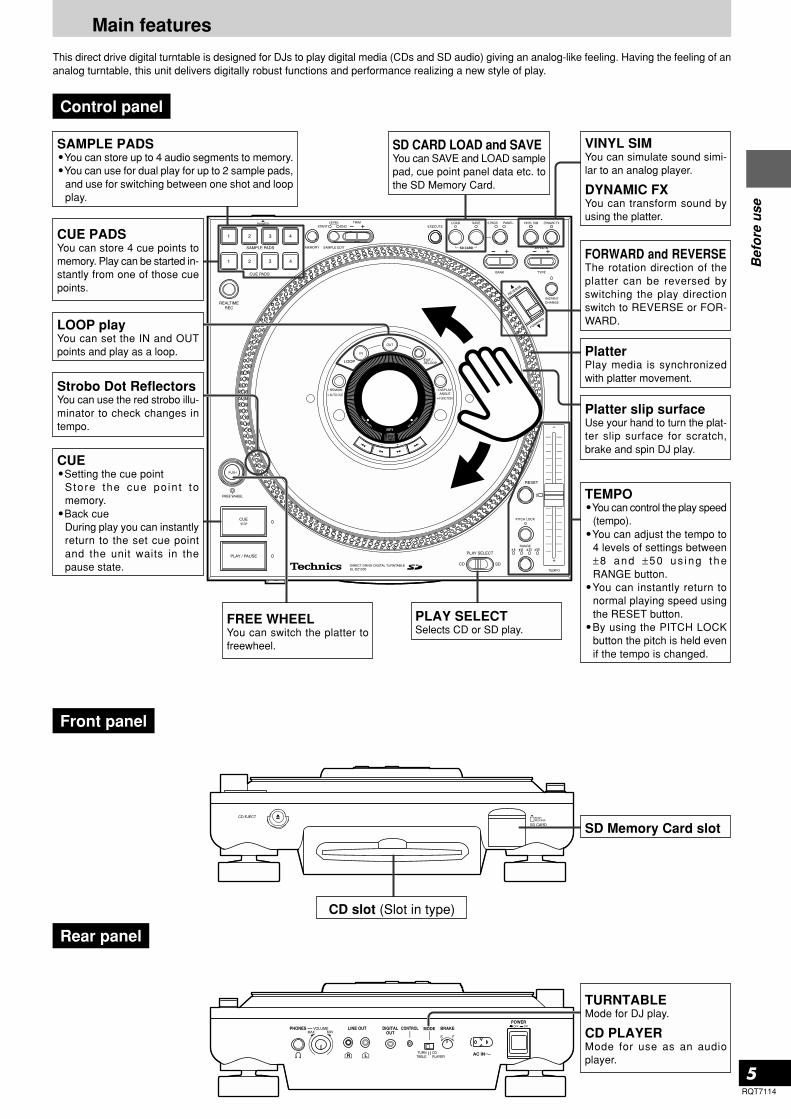
This direct drive digital turntable is designed for DJs to play digital media (CDs and SD audio) giving an analog-like feeling. Having the feeling of ananalog turntable, this unit delivers digitally robust functions and performance realizing a new style of play.
SAMPLE PADS•You can store up to 4 audio segments to memory.•You can use for dual play for up to 2 sample pads,
and use for switching between one shot and loopplay.
CUE PADSYou can store 4 cue points tomemory. Play can be started in-stantly from one of those cuepoints.
LOOP playYou can set the IN and OUTpoints and play as a loop.
Strobo Dot ReflectorsYou can use the red strobo illu-minator to check changes intempo.
CUE•Setting the cue point
Store the cue po in t tomemory.
•Back cueDuring play you can instantlyreturn to the set cue pointand the unit waits in thepause state.
SD CARD LOAD and SAVEYou can SAVE and LOAD samplepad, cue point panel data etc. tothe SD Memory Card.
VINYL SIMYou can simulate sound simi-lar to an analog player.
DYNAMIC FXYou can transform sound byusing the platter.
FORWARD and REVERSEThe rotation direction of theplatter can be reversed byswitching the play directionswitch to REVERSE or FOR-WARD.
PlatterPlay media is synchronizedwith platter movement.
TEMPO•You can control the play speed
(tempo).•You can adjust the tempo to
4 levels of settings between±8 and ±50 us ing theRANGE button.
•You can instantly return tonormal playing speed usingthe RESET button.
•By using the PITCH LOCKbutton the pitch is held evenif the tempo is changed.
PLAY SELECTSelects CD or SD play.
Control panel
FREE WHEELYou can switch the platter tofreewheel.
Platter slip surfaceUse your hand to turn the plat-ter slip surface for scratch,brake and spin DJ play.
CD slot (Slot in type)
SD Memory Card slot
Front panel
Rear panel
TURNTABLEMode for DJ play.
CD PLAYERMode for use as an audioplayer.
RQT7114
6
Bef
ore
use
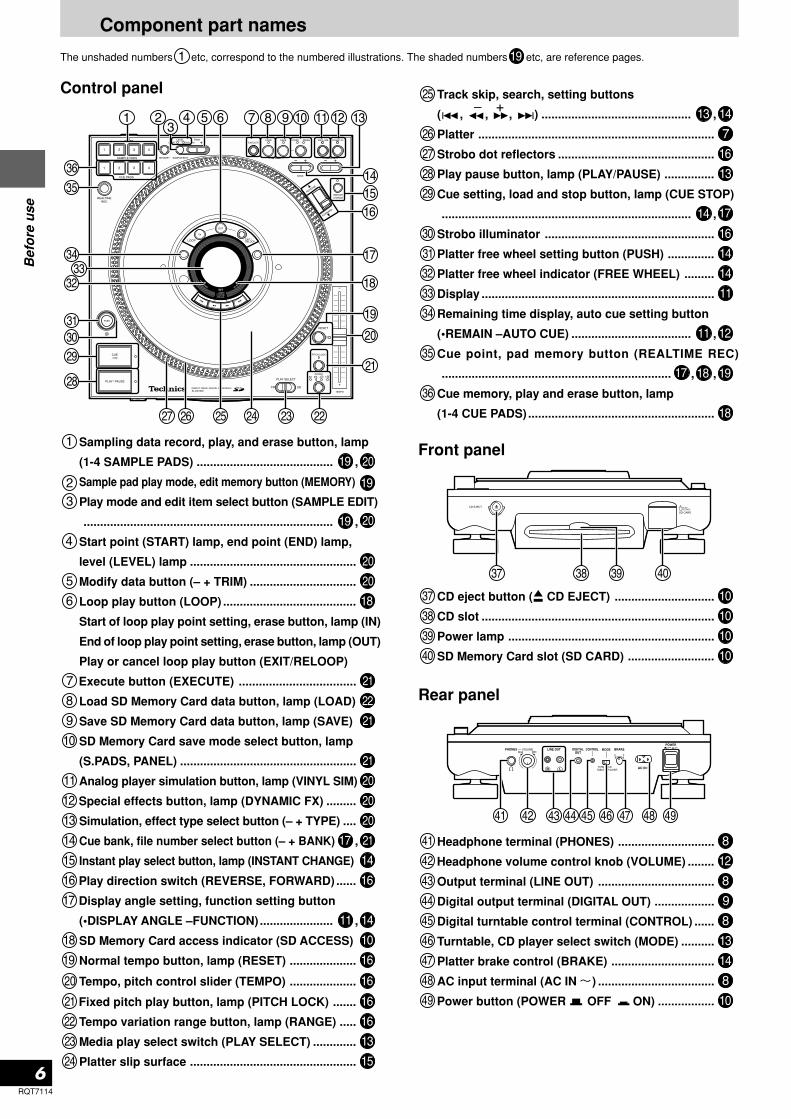
Component part names
The unshaded numbers etc, correspond to the numbered illustrations. The shaded numbers etc, are reference pages.
Control panel
Sampling data record, play, and erase button, lamp
(1-4 SAMPLE PADS) ......................................... ,
Sample pad play mode, edit memory button (MEMORY)
Play mode and edit item select button (SAMPLE EDIT)
........................................................................... ,
Start point (START) lamp, end point (END) lamp,
level (LEVEL) lamp ..................................................
Modify data button (– + TRIM) ................................
Loop play button (LOOP) ........................................
Start of loop play point setting, erase button, lamp (IN)
End of loop play point setting, erase button, lamp (OUT)
Play or cancel loop play button (EXIT/RELOOP)
Execute button (EXECUTE) ...................................
Load SD Memory Card data button, lamp (LOAD)
Save SD Memory Card data button, lamp (SAVE)
SD Memory Card save mode select button, lamp
(S.PADS, PANEL) .....................................................
Analog player simulation button, lamp (VINYL SIM)
Special effects button, lamp (DYNAMIC FX) .........
Simulation, effect type select button (– + TYPE) ....
Cue bank, file number select button (– + BANK) ,
Instant play select button, lamp (INSTANT CHANGE)
Play direction switch (REVERSE, FORWARD) ......
Display angle setting, function setting button
(•DISPLAY ANGLE –FUNCTION)...................... ,
SD Memory Card access indicator (SD ACCESS)
Normal tempo button, lamp (RESET) ....................
Tempo, pitch control slider (TEMPO) ....................
Fixed pitch play button, lamp (PITCH LOCK) .......
Tempo variation range button, lamp (RANGE) .....
Media play select switch (PLAY SELECT) .............
Platter slip surface ..................................................
Track skip, search, setting buttons
( , , , ) ............................................. ,
Platter .......................................................................
Strobo dot reflectors ...............................................
Play pause button, lamp (PLAY/PAUSE) ...............
Cue setting, load and stop button, lamp (CUE STOP)
........................................................................... ,
Strobo illuminator ...................................................
Platter free wheel setting button (PUSH) ..............
Platter free wheel indicator (FREE WHEEL) .........
Display ......................................................................
Remaining time display, auto cue setting button
(•REMAIN –AUTO CUE) .................................... ,
Cue point, pad memory button (REALTIME REC)
..................................................................... , ,
Cue memory, play and erase button, lamp
(1-4 CUE PADS)........................................................
Front panel
CD eject button ( CD EJECT) ..............................
CD slot ......................................................................
Power lamp ..............................................................
SD Memory Card slot (SD CARD) ..........................
Rear panel
Headphone terminal (PHONES) .............................
Headphone volume control knob (VOLUME) ........
Output terminal (LINE OUT) ...................................
Digital output terminal (DIGITAL OUT) ..................
Digital turntable control terminal (CONTROL) ......
Turntable, CD player select switch (MODE) ..........
Platter brake control (BRAKE) ...............................
AC input terminal (AC IN ) ...................................
Power button (POWER OFF ON) .................

RQT7114
7
Bef
ore
use
Platter setup
The stoppers are used to lock the platter, protecting the unit fromshock during shipping.
1. Remove the 3 platter lock stoppers from the platter
Turn the platter lock stop-
pers approximately 90°Pull the platter lock stop-
pers out•Pull out the platter lock stoppers
once they are aligned with therelease hole.
Platter lock stoppers
Slip surface
Marker
Mounting pin
2. Attach the slip surface (included)
•With the marker on the slip surface facing up, attach onto the 2mounting pins.
Store the 3 platter lock stoppers in a safe place after removal.
Adjusting the platter brakeYou can adjust the platter brake speed using the BRAKE control onthe rear of the unit. After connecting, adjust to the desired brake speed.( page 14)
When transporting the unitMake sure to re-attach the 3 platter lock stoppers.
1. Remove the slip surface•Pack in a way to avoid bending the slip surface.
2. Insert the 3 platter lock stoppers1. Align the platter holes with the chassis holes inside at the same
position used to remove the stoppers above in step 1.2. Insert the platter lock stoppers into the holes
•Move the platter to fully insert the stoppers.3. Turn the platter lock stoppers approximately 90° to lock
Place the unit on a flat and stable surface that is not subject tovibrations or movement.
Note•Do not place this unit on top of amplifiers emitting hot air or place
near spot lights and use for any long duration. This may affect theunit or disc causing problems.
•Create space around this unit in order to assist heat release.•Place the unit away from televisions and tuners to avoid interfer-
ence. Interference will affect picture and sound quality.•Placing the unit near speakers may result in undesired sound in an
environment that requires elevated volume. In this case move theunit further away from the speaker(s) or turn the volume down.
•Place stereo connection cables, AC power supply cord and panelin a location that will not be affected by movement or vibrationduring play.Undesirable sounds may result if there are movements or vibra-tions affecting the unit with exception of the legs.
Adjusting the height of the main unitAfter placing the unit in the desired location for use, adjust the insula-tor so the main unit is flat and secure.
Setup
Changing the display angleChange display angle corresponding to position of the main unit.( page 11)
RQT7114
8
Bef
ore
use
Connections
Connecting with the DJ mixer
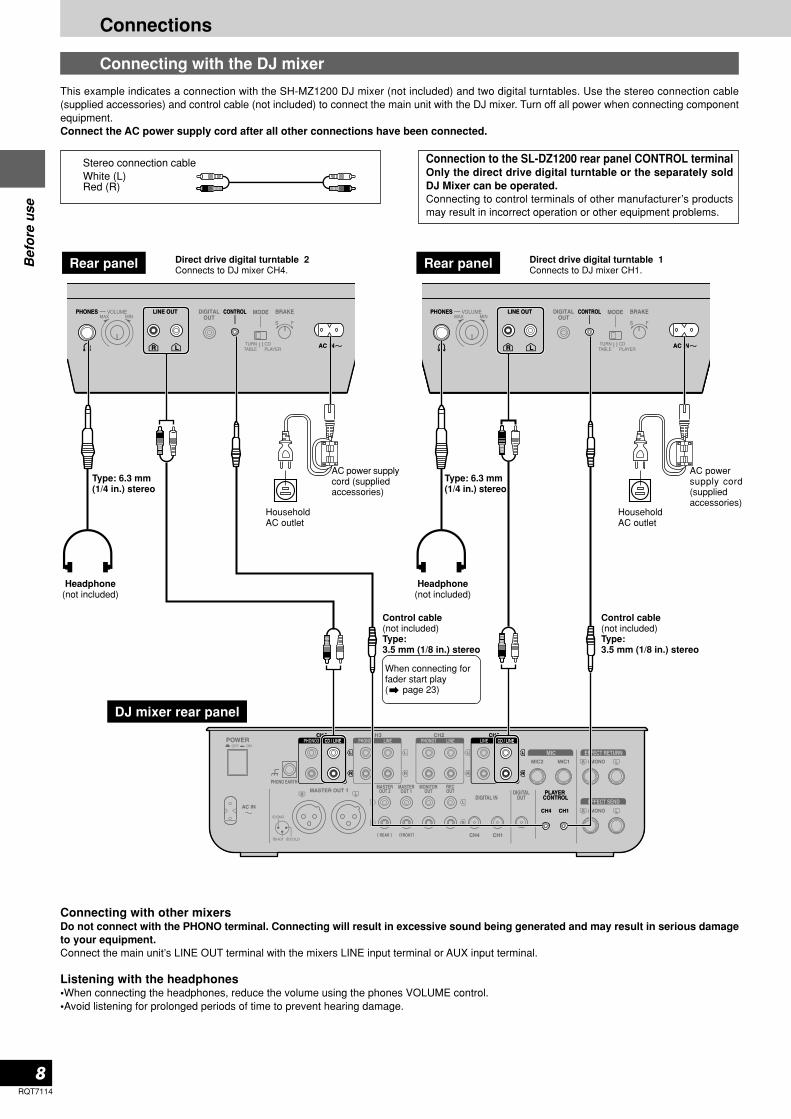
This example indicates a connection with the SH-MZ1200 DJ mixer (not included) and two digital turntables. Use the stereo connection cable(supplied accessories) and control cable (not included) to connect the main unit with the DJ mixer. Turn off all power when connecting componentequipment.Connect the AC power supply cord after all other connections have been connected.
Stereo connection cableWhite (L)Red (R)
Connection to the SL-DZ1200 rear panel CONTROL terminalOnly the direct drive digital turntable or the separately soldDJ Mixer can be operated.Connecting to control terminals of other manufacturer’s productsmay result in incorrect operation or other equipment problems.
Rear panel Direct drive digital turntable 2Connects to DJ mixer CH4.
Rear panel Direct drive digital turntable 1Connects to DJ mixer CH1.
Type: 6.3 mm(1/4 in.) stereo
Headphone(not included)
AC power supplycord (suppliedaccessories)
HouseholdAC outlet
Type: 6.3 mm(1/4 in.) stereo
Headphone(not included)
AC powersupply cord(suppliedaccessories)
HouseholdAC outlet
Control cable(not included)Type:3.5 mm (1/8 in.) stereo
When connecting forfader start play( page 23)
DJ mixer rear panel
Control cable(not included)Type:3.5 mm (1/8 in.) stereo
Connecting with other mixersDo not connect with the PHONO terminal. Connecting will result in excessive sound being generated and may result in serious damageto your equipment.Connect the main unit’s LINE OUT terminal with the mixers LINE input terminal or AUX input terminal.
Listening with the headphones•When connecting the headphones, reduce the volume using the phones VOLUME control.•Avoid listening for prolonged periods of time to prevent hearing damage.

RQT7114
9
Bef
ore
use
Connecting the control terminals for relay play
Use the control terminals of the two units to connect for relay play. ( page 23)
Rear panelDirect drive digital turntable 2
Rear panelDirect drive digital turntable 1
Control cable (not included)Type: 3.5 mm (1/8 in.) stereo
Do not connect with the PHONO terminal. Connecting will result in excessive sound being generated and may result in serious damageto your equipment.Connect with the amplifier's CD or AUX input terminal.
Connecting with the stereo amplifier (Not using the DJ mixer)
Rear panel
Amplifier(not included)
Speaker (not included)
Stereo connection cable (Supplied accessories)
Connect to the digital input terminal on the DJ mixer or amplifier with digital input terminals using the connection cables (not included).•SD Audio cannot be output from this unit's digital out terminals.
Connecting to equipment with digital input terminals
DJ mixer etc. (not included)
Connection cable (not included)Type: RCA coaxial
Rear panel

RQT7114
10
Bas
ic o
per
atio
ns
Inserting-removing a disc or SD Memory Card
Rear panel
Front panel
With the labelface up
Power lamp
Front panel
With the labelface up
SD ACCESSindicator
SD Memory Card
Inserting a disc
1. Press [POWER OFF ON] on the rear of unitThe unit power is on. The display comes on and the power lamplights.
2. Insert a disc•Insert the disc flat and parallel into the CD slot, with the label up.
The unit will automatically load the disc.•You cannot use an 8 cm disc.
Note•Do not insert a disc when the power is off.•Do not insert 2 or more discs.•Do not try to insert the disc using unnecessary force that may bend
the disc. When the unit is loading or ejecting a disc, do not applyopposing force to the disc. Not following the above steps may re-sult in damage to the disc or unit.
Removing a disc
While stopped or while paused1. Press [ CD EJECT]•Press the button and the disc will come out.•If you press while playing in TURNTABLE mode, a message ap-
pears in the display and play continues. Make sure to press af-ter pausing play.
•If you do not remove the disc within approximately 10 secondsthe unit will automatically re-load the disc.
To remove2. Press again•Remove as indicated in the illustration
without touching the playing surface.
Forced disc ejectYou can forcefully eject a disc when the disc does not eject even afterpressing [ CD EJECT].
1. Press [POWER OFF ON] to turn the power off
2. Press [POWER OFF ON] again holding down[ CD EJECT] to turn the power on, and then release[ CD EJECT] after “DZ1200” appears in the display
Inserting a SD Memory Card
1. Open the SD Memory Card slot lid
2. With the label on the card facing up and the notchededge facing the unit, insert the card
3. Insert until the card locks into place
4. Close the lid
Removing a SD Memory Card
After confirming the SD ACCESS indicator is not flash-ing, open the lid and press on the center of the SDMemory Card to release the lock and pull the ejectedcard out carefully, then close the lid.•The SD ACCESS indicator flashes when the SD Memory Card
is being accessed. Do not turn off the power or try to open the lidand remove the card while the indicator is flashing. (Doing somay result in a loss of saved data.)
Note•Make sure to always close the SD card slot lid.
If you try using when the lid is open, “NO SD CARD” or “SD LIDOPEN” will appear in the display and operation will not be pos-sible.
Playable media
CD
SD Memory Card
(SD audio)
CD-DA audio that is finalized on aCD-R or CD-RW
MP3 files(WMA is not supported)
Secure AAC
Secure MP3(WMA is not supported)
25
12, 22
22
ReferencePage

RQT7114
11
Bas
ic o
per
atio
ns
Display indicator
Displaying the remaining time
While playing a CD, SD Memory CardPress [•REMAIN –AUTO CUE]•“REMAIN” appears and the remaining play time of the track is
displayed.•Pressing again will return the time display to its original state.•When you are playing a MP3 file from a CD-R or CD-RW the
remaining play time will not be displayed if you press [•REMAIN–AUTO CUE].
•When there is less than 30 seconds of time remaining, you arenotified by the flashing time display. With a MP3 file from a CD-R or CD-RW, the time display flashes if there is less than 7 sec-onds of time remaining. However, depending on the operation,the flashing indicator in the display may not appear.
Changing the display angle
You can rotate the display angle corresponding to the way the unit issetup.
Press [•DISPLAY ANGLE –FUNCTION] to select the dis-play angle•The angle of the display rotates 90 degrees clockwise each time
the button is pressed.•The setting remains in memory even when the power is turned
off.
Adjusting the display contrast
1. Press and hold [•DISPLAY ANGLE –FUNCTION] forabout 2 or more seconds until the display changes
•“CONTRAST” is selected in the display.
2. Press [– ], [+ ] to adjust the display contrast•Press [– ], [+ ] to change the display to the desired con-
trast (adjustable range: 1-100).•If no buttons are pressed for more than 5 seconds, the time dis-
play returns to its original state.•The setting remains in memory even when the power is turned
off.
Selected play media indicator
: Indicates CD is selected
: Indicates SD is selected
Track number indicatorWhen using CD, SD Audio: Total number of tracks and the track
being played is displayedWhen using CD-R, CD-RW MP3 files:
Total number of tracks and the trackbeing played within the album is dis-played
Current track position indicator
Change in tempo rate indicator
Auto Cue indicator : Indicates Auto Cue is on
Cue bank indicator
REALTIME REC indicator : Indicates the sample pad is in REALTIME REC operation
Beats per minute (BPM) indicatorNumber of beats per minute, indicating track speedDepending on the music, the BPM may not be detectable, ormay take time to be displayed.
Play time (Minutes, seconds, frames), remaining time
(CD, SD audio) indicator
Remaining time (REMAIN) indicatorDisplayed only for CD, SD audio
MP3 album number indicatorIndicated when using MP3 files
CD-MP3 (CD-R, CD-RW MP3 file) indicator
Displayed when using CD, SD audio
Displayed when using MP3 files on CD-R and CD-RW

RQT7114
12
Bas
ic o
per
atio
ns
1
354
2
Playing a CD or SD Memory Card (basic play)
Playing CD-R and CD-RW discsThis unit can play CD-DA formatted CD-R and CD-RW discs.CD-DA formatted discs must be finalized at the final point of record-ing using a CD designed for music recording. CD-R and CD-RW discscontaining MP3 files can also be played. However, play may not bepossible on some discs depending on the state of recording.
Finalizing makes audio recordings compatible for play on equip-ment that supports play of CD-R and CD-RW discs that are de-signed for music recording.
Adjusting volume whenusing the headphones
Turn [VOLUME]
Auto Cue function (TURNTABLE mode only)When one of the media has been set, or when a track has beenskipped, or when advancing to the next song while playing, the autocue point automatically sets and pauses at the point just before audiobegins, skipping the null sound area at the beginning of the track.Auto Cue is set to off as default.
Rear panel
Front panel
With the labelface up
With the labelface up SD Memory Card
Front panel
SD ACCESSindicator
Auto Cue indicatorAuto cue point setting indicator
Turning on Auto Cue
Press [•REMAIN –AUTO CUE] for more than 2 seconds•The display indicator changes from “ ” to “ ”•Each time you press and hold the button:
(Auto Cue is on) (Auto Cue is off).•The segment without sound that is skipped is a maximum of 15
seconds from the beginning of the track.•The on or off setting remains in memory even when the power is
turned off. Additionally, the setting stored to memory for eachCD or SD Memory Card is restored once the set media is re-inserted.

RQT7114
13
Bas
ic o
per
atio
ns
1 Press [POWER OFF ON]•The unit display will come on once the power is turned on.
3 Switch [PLAY SELECT] to select the me-dia to be used•When there is no media inserted, "NO DISC" or "NO SD
CARD" appears in the display.•You can control platter movement and adjust tempo once
the media is inserted.
4 Insert a disc or SD Memory Card( page 10)•Make sure to close the SD card slot lid as it will not work if
left open.•It takes several seconds for the disc to be loaded.•When Auto Cue is on, the unit switches to standby at the
first track's auto cue point. The CUE lamp flashes when thesettings are being read and after reading is finished itchanges to a stationary light.When Auto Cue is off, the unit switches to standby at thebeginning of the first track.
•The PLAY/PAUSE lamp begins flashing.
5 Press [PLAY/PAUSE]When Auto Cue is on•The platter begins rotating and synchronized with the plat-
ter, the first track begins playing.•The PLAY/PAUSE lamp and the CUE lamp light.•Once play of the first track has ended, play is paused at the
second track’s auto cue point. The platter stops at this point.
When Auto Cue is off•The platter begins rotating, synchronized with the platter,
the first track begins playing and the PLAY/PAUSE lamplights.
•Play continues again from the first track once the last trackis reached. (All track repeat)
Pausing
Press [PLAY/PAUSE] (to restart, press once more)•PLAY/PAUSE lamp flashes and the platter stops.
Skipping forward or backward
Press [ ], [ ]•Skips each time the button is pressed or while being pressed.•When Auto cue is on, the unit skips to the auto cue point just
before where the selected track's audio begins.
Searching forward or backwardDuring play or while paused
Press and hold [– ], [+ ]•Hold the button to search.•You cannot search beyond a track with MP3 files on CD-R, CD-
RW.•Sounds heard when searching become cut with MP3 files and
SD Audio.
Regarding display indicators when the insertedmedia is not recognized
Re-insert correctly.NO CD AUDIO TRACK: The CD type is not supported. ( page
25), or was inserted upside down.NO SD AUDIO TRACK: The SD Memory Card is unrecognizable
because of damage or an error, or there isno track data.
Selecting MP3 albums, selecting SD audio tracksSelect the SD audio track stored on the SD Memory Card or theMP3 album on the CD-R, CD-RW. ( page 22, Regarding MP3albums and SD audio)
1. Switch [PLAY SELECT] to select the media to be used
2. Press [ ], [ ] to select the track•The album number of the CD-R, CD-RW MP3 album appears in
the display.•The memorized track name etc. that is selected appears in the
display when played. (Up to 32 alphanumeric characters.)•When using SD audio on a SD Memory Card, a track only from
the default playlist can be selected or played.
Removing the CD
While pausedPress [ CD EJECT]•The eject indicator appears in the display and the disc is ejected.•When you press during play, the CD does not eject, a message
appears in the display and play continues.
Removing the SD Memory Card ( page 10)•Remove after play has ended.•The SD ACCESS indicator flashes when the SD Memory Card
is being accessed. Do not turn off the power or try to open the lidand remove the card from the SD Memory Card slot while theindicator is flashing. (Doing so may result in a loss of saveddata.)
During CD play
Track number
Play time
Play position
2 Switch [MODE] to TURNTABLE•Functions are limited when using the CD PLAYER mode.
( page 14)
When no disc is inserted
When no SD Memory Card is inserted

RQT7114
14
Bas
ic o
per
atio
ns
On the rear panel, switch [MODE] to either TURNTABLEor CD PLAYERTURNTABLE : A mode for DJ play, all functions are useable.•Panel data ( page 19) set on this unit is memorized on this
unit.•When using CD-R, CD-RW MP3 files, the total number of tracks
and total album number are not displayed. Confirm by switch-ing to the CD PLAYER mode.
CD PLAYER:The mode best suited for play as an audio player.You can use DJ play functions excluding the following limited func-tions.Limited functions•Panel data cannot be automatically stored or read.•The platter does not rotate. The platter slip surface cannot be
operated.•The auto cue and cue bank functions do not work.•The instant change function does not work.Automatic settings immediately after switching modes•The RESET lamp comes on and returns to normal play speed.•DJ play functions like dynamic effect and so on are automati-
cally switched off.Basic play operation ( page 12-13) changes•In step 2, switch to the CD PLAYER side.•In step 5, press [PLAY/PAUSE]
and play of the first track begins,and once the end of track isreached the PLAY/PAUSE lampgoes out and play stops.Display indicator when stoppedWhen using CD, SD Audio:Total play time is displayed.When using CD-R, CD-RW MP3 files:The total number of tracks andtotal number of albums are dis-played.
•To start playPress [PLAY/PAUSE].
•To stop playPress [CUE STOP].
•To eject the CDDuring play, you can also press the CD eject button to eject thedisc.
Basic function settings
You can select to use the unit as a turntable, or as a CD player.
Selecting TURNTABLE mode orCD PLAYER mode
Total play time(Hours, Minutes, Seconds)
Total numberof tracks
Total numberof albums
When in the TURNTABLE mode and Instant Change is off, the soundwhen starting and pausing is synchronized with the starting and stop-ping of the platter. When Instant Change is on, just like pressing [PLAY/PAUSE] on a normal CD player, play is paused or starts instantly.This is a feature specific to digital turntables.
Press [INSTANT CHANGE]
•The INSTANT CHANGE lamp lights.
•Pressing [INSTANT CHANGE] again will cancel the setting.•The Instant Change on or off setting for each CD or SD Memory
Card is stored to memory, and the setting is restored once the setmedia is re-inserted.
Instant play (INSTANT CHANGE)
While in TURNTABLE modePress [PUSH]•The platter drive motor stops. When play-
ing, the platter comes to a gradual stop,and the sound playing is synchronized tothe platters movement.
•The strobo illuminator light goes out, andthe FREE WHEEL indicator flashes in thedisplay.
•You can press [PUSH] again to release.•Turning the power off will erase the settings.
Using the FREE WHEEL mode
FREE WHEEL indicator
While in TURNTABLE mode, you can adjust the brake speed for theplatter to come to a stop by pressing [PLAY/PAUSE] during play.
Adjusting the platter brake
On the rear panel, turn [BRAKE]S (Slow) direction : Slow stopF (Fast) direction : Fast stop
When the Auto Cue function is on ( page 12), depending on thetrack, the auto cue point may not be set at the point just before wherethe audio begins. In this situation you can adjust the auto cue level.
1. Press and hold [•DISPLAY ANGLE –FUNCTION] formore than 2 seconds until the display changes
2. Press [ ] and from the display select “AUTO CUELEVEL”
•“LEVEL –60 dB” appears in the display (initial settings example).
3. Press [– ], [+ ] and select the level:•Select from –36 dB, –42dB, –48 dB, –54 dB, –60 dB, –66 dB,
–72 dB, –78 dB•Sound that is lower than the set level is skipped as null sound.
4. Press [•DISPLAY ANGLE –FUNCTION]•The selection is automatically set if you do not press [•DISPLAY
ANGLE –FUNCTION] within 5 seconds.•The set auto cue level for each CD or SD Memory Card is stored
to memory, and the setting is restored once the set media is re-inserted.
Adjusting the auto cue level

RQT7114
15
Ad
van
ced
op
erat
ion
s
Platter operations
Before use•Switch [PLAY SELECT] to select the media to be used•Turn [MODE] on the rear panel to TURNTABLE•Insert the SD Memory Card or CD to be used
Platter slipsurface
Play on this unit is synchronized with the platter when Instant Changeis off. You can change the tempo using the platter slip surface.
Instant playWhen Instant Change is off
1. While the platter slip surface is stopped, press [PLAY/PAUSE]
2. Spin the platter slip surface when you want to start play
When Instant Change is on
Press [PLAY/PAUSE]•For several seconds after the start of play the INSTANT CHANGE
lamp flashes and the tempo or audio play cannot be changedeven by operating the platter slip surface.
•You can also use the cue pad for instant play ( page 18)
Instant stopWhen Instant Change is off
During play, hold and stop the platter slip surface, thenpress [PLAY/PAUSE]
When Instant Change is on
During play, press [PLAY/PAUSE]
Use your hand to vary the platter slip surfacerotation speed
During play use your hand on the platter slip surface toincrease or decrease tempo.•Increasing or decreasing the rotation speed of the platter slip
surface changes the tempo.•The time display flashes and play sound does not change if the
platter slip surface is operated immediately after the disc isloaded, or immediately after auto cueing.
•Sound may not be output if you turn the platter slip surface im-mediately after pressing [ ], [ ] to skip a track.
•You cannot use the platter slip surface to move from the 1st trackback to the last track.
•When using CD-R, CD-RW MP3 files you cannot use the platter slipsurface to move backward to the previous track.
•You can also use [TEMPO] to change the tempo. ( page 16)
Changing play with your hand
Using the platter slip surface, you can improvise play with the platterslip surface speed and direction of play using your hand.
Braking
Stop the platter slip surface with your hand during play•The audio being played will stop corresponding to the speed of
the platter slip surface.•Once you release the platter slip surface after you have stopped
play, the audio will begin to play corresponding to the speed ofthe platter slip surface.
Spinning
Forcefully spin the platter slip surface faster than theplatter slip surface speed during play•Play is controlled by the platter slip surface rotation speed.
•If you spin the platter slip surface too fast, the sound and the timedisplay will not keep pace.
Scratch playing
1. Press and stop the platter slip surface during play•Play stops.
2. Turn the platter slip surface in the direction and speedyou want to play
•Play corresponds to the direction and speed of the platter slipsurface.
3. Release your hand from the platter slip surface•Play returns to its original state.
•When pitch lock ( page 16) is on, the pitch does not changeeven if you move the platter slip surface with your hand.
Basic play for DJs
Note•In order to begin play from any state on this unit right away, the CD
is always rotating. Because of this there may be some noise thatoccurs due to rotation, however this is not a malfunction.
•Switching [PLAY SELECT] during play or while paused, instantlystops play, a “PLEASE WAIT !” message appears in the display,and the unit returns to the beginning of the CD or SD MemoryCard.
•The time display flashes and [PLAY/PAUSE] does not function im-mediately after the media is loaded, or immediately after skipping,searching or auto cueing.

RQT7114
16
Ad
van
ced
op
erat
ion
s
Locking the pitch
You can change the tempo without affecting the pitch.
Press [PITCH LOCK]•The PITCH LOCK lamp lights.•Sound quality will change due to digital processing.•Making a big adjustment to the rate of change in tempo may
cause the occurrence of digital noise.•By rotating the platter slip surface with the pitch lock set to on,
you can play using the platter slip surface without changing theoriginal pitch.
•Pitch lock automatically turns off when the power is turned off.
Reverse play (Reversing the platter)
You can reverse play a track.
Set the play direction switch to REVERSE side•The platter spins in reverse, and reverse play starts.•Reverse play is synchronized with the platter, therefore it may
take time for it to come up to the normal rated speed. Use In-stant Change to make quicker changes.
•The direction you increase or decrease tempo with your handon the platter slip surface is also reversed.
•You cannot reverse play from the 1st track back to the last track.•You cannot perform reverse play beyond a track with MP3 files on
CD-R and CD-RW.•When using reverse play, the start of play for cue pad play or loop
play that is longer than 15 seconds may be delayed ( page 18).
Changing tempo and direction of play
Before use•Switch [PLAY SELECT] to select the media to be used•Turn [MODE] on the rear panel to TURNTABLE•Insert the SD Memory Card or CD to be used
Changing tempo
1 When the RESET lamp is litPress [RESET] and the RESET lampgoes out
2 Press [RANGE] to select the tempovariation range•Each time the button is pressed:
±8% ±16% ±33% ±50%
•When playing CD-R, CD-RW MP3 files or SD audio, onlythe ±8%, ±16% range can be selected.
•The larger the range number, the larger the change in tempowhen using [TEMPO].
•The selected tempo variation range lamp lights.
3 During play, use [TEMPO] to make ad-justments•Use the scale on the panel for making approximate adjust-
ments.•The pitch will change with the tempo.•When the power is turned off the range returns to ±8%.
You can change the tempo and pitch of the media being played.
RESET lamp
Tempo reset
Press [RESET]•The RESET lamp lights and play instantly returns to normal play
when playing.•Tempo reset automatically turns off when the power is turned
off.
Checking tempo•The change in tempo
rate appears in the dis-play.
•You can check the relative change in tempo when the strobolight reflects on the three rows of strobo dots on the peripheraledge of the platter when rotating.
Strobo dots
When the dots appear to be stationary, the tempo settinghas changed about +3.5%.
When the dots appear to be stationary, the tempo is atnormal setting.
When the dots appear to be stationary, the tempo settinghas changed about –3.5%.
NoteThe strobo dot illuminator is a synchronized and precise frequencyquartz illuminator (Red LED). Be sure to use this red LED as the basiswhen checking tempo.
Change intempo rate
Strobo illuminator
a
cb

RQT7114
17
Ad
van
ced
op
erat
ion
s
Playing from memory
Before use•Switch [PLAY SELECT] to select the media to be used•Turn [MODE] on the rear panel to TURNTABLE•Insert the SD Memory Card or CD to be used
Setting the auto cue point
1 When Auto Cue is off
Press [•REMAIN -AUTO CUE] for morethan 2 seconds until “ ” appearsin the display
2 Perform track skip or play to move tothe beginning of the track you want toset•The unit pauses just before the
beginning of the track’s audio,the CUE lamp lights and the autocue point is set.
•“ ” is displayed in the cue bankdisplay.
You can automatically set the auto cue point and pause just beforethe beginning of the audio you want to play.
•After returning to the set point, the play point is moved in synchro-nization with the platter slip surface. When you reverse the platterslip surface with your hand and when the platter slip surface hasmoved back to the previous track because of the brake setting,pressing [PLAY/PAUSE] to begin play stops play again at the autocue point.
•The CUE lamp flashes several seconds immediately after settingand platter slip surface operation may not be possible.
•Setting again erases previous auto cue points.
Storing the auto cue point to cue bank memory
1. Set the auto cue point ( indicated above)•“ ” appears in the cue bank indicator display.
2. Perform step 1, 2, 4 in the Setting the cue point atany point section ( right side of page)
•The selected cue bank number reverses display and is stored inmemory.
•If you do not select the cue bank, a “CUE BANK ERROR” mes-sage appears in the display. Select the cue bank and re-set.
Setting the cue point at any pointYou can set a cue point at any point of a track and easily recall anydesired cue point.You can save up to 10 cue points from one CD or one SD MemoryCard to cue bank memory.
1. Press [– + BANK] to select thecue bank
•Once a point has been stored to a cuebank (1-10), the cue bank number in-dicator in the display reverses display.
2. During play or while paused, press [REALTIME REC]•All the SAMPLE PADS, CUE PADS 1-4 pad lamps and the CUE
lamp flash.•Press [REALTIME REC] again to cancel.
3. Turn the platter slip surface to position play to startjust before the beginning of audio
•If the cue point is set at an audible point, the point immediatelyfollowing becomes the cue point.
•Make certain the platter slip surface is completely stopped.
4. Press [CUE STOP]•The CUE lamp lights, the selected cue bank number reverses
display and is stored in memory.•When the reverse displayed cue bank number is selected, it is
overwritten.
5. Repeat the above steps to store additional cue points
•The cue bank for each CD or SD Memory Card is stored to memory,and the setting is restored once the set media is re-inserted.
Play from the stored point
Before use:•When using the auto cue point
When “ ” does not appear in the cue bank number displaySet the auto cue point ( left side of page)
•When using the cue pointPress [– + BANK] and select the desired cue bank•Select the cue bank of the number indicator that has reversed in
the display.•You cannot select “ ” by pressing [– + BANK].
Returning to the auto cue point, cue point(Back cue)
When Instant Change is off
During play or while paused, stop the platter slip sur-face and press [CUE STOP]•The unit returns to the set point, the PLAY/PAUSE lamp flashes
and play pauses.•You cannot operate the platter slip surface for several seconds
immediately after back cueing.•During play, pressing [CUE STOP] without stopping the platter
slip surface, will move the play point in synchronization with theplatter slip surface after having returned to the set point.
When Instant Change is on
During play or while paused, press [CUE STOP]•During play, without stopping the platter slip surface the unit re-
turns to the set point.•Immediately following platter slip surface operation the INSTANT
CHANGE lamp flashes and after several seconds sound is output.
(e.g.) cue point is storedin memory

RQT7114
18
Ad
van
ced
op
erat
ion
sPlaying from memory
Storing to the CUE PADS and playing
Before use•Switch [PLAY SELECT] to select the media to be used•Turn [MODE] on the rear panel to TURNTABLE•Insert the SD Memory Card or CD to be used
You can store cue points to CUE PADS and immediately replay oneof those points by inserting the media and simply pressing the appro-priate pad.
Storing to the CUE PADS in real-time
1. During play or while paused, press [REALTIME REC]•All SAMPLE PADS, CUE PADS 1-4 pad lamps and CUE lamp
flash.•Press [REALTIME REC] again to cancel.
2. At the desired point, press one of the [CUE PADS 1-4]•The play point selected is stored in memory. The previously stored
data is erased if it exists.•The selected pad lamp lights.
•The CUE PADS data for each CD or SD Memory Card is stored tomemory, and the setting is restored once the set media is re-in-serted.
Store desired points to memory andplay (loop play)
During media play you can set any 2 desired points to loop play.
Creating a loop
1. During play, press LOOP [IN] at the desired point•LOOP IN lamp lights.•Press LOOP [IN] again to set again.•After pressing LOOP [IN] you can cancel settings by pressing
[EXIT/RELOOP].
To set in real timePress LOOP [IN] to set the desired point
To set manually1. Stop the platter slip surface at the desired point2. Press LOOP [IN]
To set using the cue point transferred from memory1. Select the cue bank and back cue2. Press LOOP [IN]
2. During play press LOOP [OUT]Repeat step 1 above to set.•The LOOP OUT and IN lamp flashes, and play begins looping
between the loop in point and the loop out point.
•Turn off Auto Cue before setting or playing a loop beyond a track.•When setting the loop setting again, perform the above steps after
canceling loop play by pressing [EXIT/RELOOP].•You can also control the platter slip surface and make tempo ad-
justments etc. during loop play.•During loop play, looping is released when you have exceeded the
loop range using the skip or search button.•The loop points for each CD or SD Memory Card are stored to
memory, and the settings are restored once the set media is re-inserted.
Loop release (Cancel)
During loop play, press [EXIT/RELOOP]•Play continues without returning to loop play even when the loop
out point is reached.•The LOOP IN, OUT lamps change to stationary lights.
Re-loop (Returns to a loop)
After releasing a loop, press [EXIT/RELOOP] during play•Returns to the loop in point previously set and begins loop play
again.
When using CD-R, CD-RW MP3 files•When you reverse play while using cue point, cue pad or re-loop,
reverse play is not effective beyond the set starting point.
Play from the stored point
Play after back cueing
After performing back cue, press [PLAY/PAUSE]•Play begins from the set point.
Correcting the cue point
1. Perform back cue
2. Perform steps 2-4 in the Setting the cue point at anypoint section again. ( page 17)
•A new cue point is stored to memory.
Playing from the CUE PADS
Press one of the lit [CUE PADS 1-4]•Even if you are playing, play immediately begins from the point
stored to the CUE PADS .When paused in the TURNTABLE mode, the platter begins toturn and play.
•During play of the CUE PADS, if you press the same pad again,play will repeat from the beginning of the memorized point.
•During play of the CUE PADS, if you press a different pad, playwill switch to the selected pad.
Stopping cue pad play
Press [PLAY/PAUSE]•The PLAY/PAUSE lamp flashes and play pauses.

RQT7114
19
Ad
van
ced
op
erat
ion
s
Recording to the SAMPLE PADS andplaying
You can record audio to the sample pads for replay.You can record up to a maximum total of 32 seconds using SAMPLEPADS 1-4.
Recording to the SAMPLE PADS in real-time
1. Press [REALTIME REC] while media is being played•All SAMPLE PADS, CUE PADS 1-4 pad lamps and CUE lamp
flash.•Press [REALTIME REC] again to cancel.
2. Press one of the [SAMPLE PADS 1-4] and recordingstarts
•The selected SAMPLE PADS lamp flashes.• indicator changes to in the display.•Previous pad data is erased at the start of recording if it exists.•Recording automatically ends when the pads total recording time
reaches 32 seconds.
3. At the end point press the same sample pad again•The SAMPLE PADS lamp changes to a stationary light and re-
cording ends.• indicator reverts back to in the display.
•You can also control the platter slip surface and adjust the tempoduring recording.
•You can also edit sample pad data. ( page 20)•Recorded sample pad data is erased when the power is turned off.
To avoid losing data you can save to the SD Memory Card. (page 21, Saving to a SD Memory Card)
Playing from the SAMPLE PADS
Press one of the lit [SAMPLE PADS 1-4]•The lamp of the pad you pressed begins to flash and play begins.•During play, if you press one of the lit sample pads, dual play
begins and mixed sound is output. You can perform dual playusing up to 2 sample pads.
•Once the end of the play is reached the SAMPLE PADS lampchanges to a stationary light. Play ends if you press the padagain during play.
•When playing only the sample pad, the platter slip surface doesnot rotate even in the TURNTABLE mode.
•When playing media, you can mix sound by also playing the samplepad. Sound may become distorted depending on the audio level.You can adjust the sample pad level. ( page 20, Editing theSAMPLE PADS)
Select play mode and play
1. Press [SAMPLE EDIT] and select “PLAY MODE SE-LECT”
•Play mode selection is not possible when nothing has been re-corded to the sample pad.Each time you press the button:
START ENDEDIT WRITINGOK?
LEVELPLAY MODE SELECT
START : (Edit the data starting point)END : (Edit the data ending point)LEVEL : (Edit the volume level)PLAY MODE SELECT : Selects the play modeEDIT WRITING OK? : (Select to store to memory or not)
2. Press one of the recorded sample pads•The selected sample pad flashes and play begins.
3. Press [– ], [+ ] to select the play mode•The play mode indicated in the display changes each time you
press the button.
ONE SHOT & REPLAY ONE SHOT & STOP LOOPONE SHOT & REPLAY :
Plays from the start and ends once the end of play is reached.During play, press again and play begins from the start.
ONE SHOT & STOP :Plays from the start and ends once the end of play is reached.During play, press again and play stops.
LOOP :Plays from the start, and after reaching the end of play, playcontinues from the beginning again. Press again and playstops.
•Repeat steps 2-3 above to set other pads.
4. Press [MEMORY]•“COMPLETED” appears in the display and the play mode is saved
on the main unit.•The sample pad lamp light comes back on.
5. Press the same sample pad to play•Play starts with the selected play mode.
•If you don’t want to store to the main unit’s memory, press[SAMPLE EDIT] and select “EDIT WRITING OK?” and press [+ ]to select “NO” from the display.
NoteStoring panel data to this unit (TURNTABLE mode only)•The unit stores following panel data for each CD or SD Memory
Card. It can store data for up to 50 CDs or SD Memory Cards.•Auto Cue on, off and auto cue level•Cue bank •Instant change•Loop in, Loop out •Cue pad 1-4•Dynamic effect •Vinyl simulator
•If the unit’s memory exceeds 50 CDs or SD Memory Cards worthof data items, a message indicating replacement appears in thedisplay and data items will be overwritten and replaced in the or-der of the oldest used first.
•You can save this panel data for each CD or SD Memory Card toa SD Memory Card. ( page 21, Saving to a SD Memory Card)
•In CD player mode, panel data cannot be automatically stored orread.
Automatic read when media inserted (TURNTABLE mode only)•When media with recorded data is inserted into the unit, the set-
tings are automatically read.While the unit is reading the media, each of the lamps for the cuepad 1 to 4, CUE, LOOP IN, and OUT flash rapidly, and are set inorder. Pushing the cue pad, or the CUE or loop play buttons whilethe lamp is flashing rapidly will give that pad or button priority to beset, and then played. The start of play may be delayed.When reading has completed, the lamps stop flashing, and remainslit.MP3 files on CD-R and CD-RW, or SD audio take more time toread than CD audio. Use only once the lamp has stopped flashingand remains lit after pressing the cue pad, or the CUE or loop playbuttons.
•The lamps may flash rapidly while the media is being read evenwhen carrying out other operations.
•Removing the media, or switching [PLAY SELECT] erases the set-tings, however re-inserting the media restores the settings.
1. Until “DATA ERASE OK?” appears, press one of thelit pads or buttons (longer than 2 sec.) cue pads 1-4,sample pads 1-4, LOOP [IN] or [OUT].
2. Press [– ] and select “YES” from the display•During play, audio play stops.•“COMPLETED” appears in the display and the data of the but-
ton you selected is erased.•The selected button lamp goes out.•Pressing [+ ] to select “NO” cancels the operation and re-
turns to the original display.
Erasing cue pad, sample pad, loopplay data
RQT7114
20
Ad
van
ced
op
erat
ion
s
Before use•Switch [PLAY SELECT] to select the media to be used•Turn [MODE] on the rear panel to TURNTABLE•Insert the SD Memory Card or CD to be used
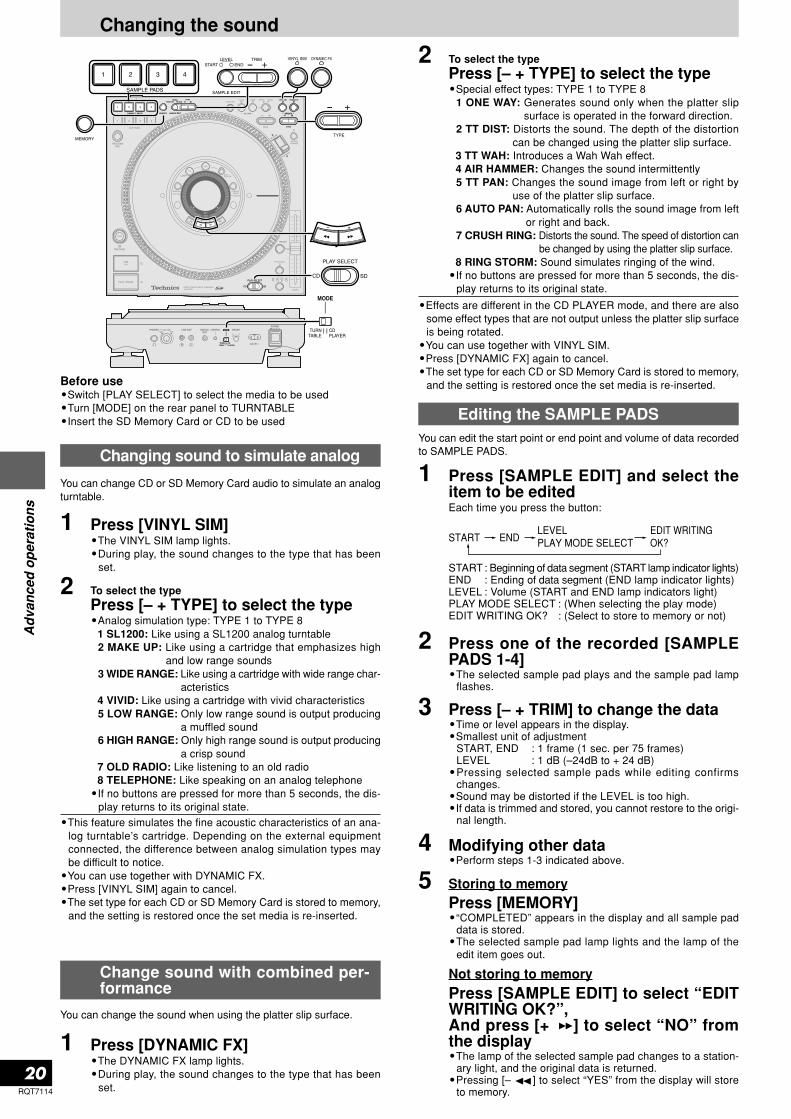
1 Press [VINYL SIM]•The VINYL SIM lamp lights.•During play, the sound changes to the type that has been
set.
You can change CD or SD Memory Card audio to simulate an analogturntable.
2 To select the type
Press [– + TYPE] to select the type•Analog simulation type: TYPE 1 to TYPE 8
1 SL1200: Like using a SL1200 analog turntable2 MAKE UP: Like using a cartridge that emphasizes high
and low range sounds3 WIDE RANGE: Like using a cartridge with wide range char-
acteristics4 VIVID: Like using a cartridge with vivid characteristics5 LOW RANGE: Only low range sound is output producing
a muffled sound6 HIGH RANGE: Only high range sound is output producing
a crisp sound7 OLD RADIO: Like listening to an old radio8 TELEPHONE: Like speaking on an analog telephone
•If no buttons are pressed for more than 5 seconds, the dis-play returns to its original state.
Changing sound to simulate analog
•This feature simulates the fine acoustic characteristics of an ana-log turntable’s cartridge. Depending on the external equipmentconnected, the difference between analog simulation types maybe difficult to notice.
•You can use together with DYNAMIC FX.•Press [VINYL SIM] again to cancel.•The set type for each CD or SD Memory Card is stored to memory,
and the setting is restored once the set media is re-inserted.
1 Press [DYNAMIC FX]•The DYNAMIC FX lamp lights.•During play, the sound changes to the type that has been
set.
You can change the sound when using the platter slip surface.
2 To select the type
Press [– + TYPE] to select the type•Special effect types: TYPE 1 to TYPE 8
1 ONE WAY: Generates sound only when the platter slipsurface is operated in the forward direction.
2 TT DIST: Distorts the sound. The depth of the distortioncan be changed using the platter slip surface.
3 TT WAH: Introduces a Wah Wah effect.4 AIR HAMMER: Changes the sound intermittently5 TT PAN: Changes the sound image from left or right by
use of the platter slip surface.6 AUTO PAN: Automatically rolls the sound image from left
or right and back.7 CRUSH RING: Distorts the sound. The speed of distortion can
be changed by using the platter slip surface.8 RING STORM: Sound simulates ringing of the wind.
•If no buttons are pressed for more than 5 seconds, the dis-play returns to its original state.
Change sound with combined per-formance
•Effects are different in the CD PLAYER mode, and there are alsosome effect types that are not output unless the platter slip surfaceis being rotated.
•You can use together with VINYL SIM.•Press [DYNAMIC FX] again to cancel.•The set type for each CD or SD Memory Card is stored to memory,
and the setting is restored once the set media is re-inserted.
2 Press one of the recorded [SAMPLEPADS 1-4]•The selected sample pad plays and the sample pad lamp
flashes.
You can edit the start point or end point and volume of data recordedto SAMPLE PADS.
Editing the SAMPLE PADS
1 Press [SAMPLE EDIT] and select theitem to be editedEach time you press the button:
START ENDEDIT WRITINGOK?
LEVELPLAY MODE SELECT
START: Beginning of data segment (START lamp indicator lights)END : Ending of data segment (END lamp indicator lights)LEVEL : Volume (START and END lamp indicators light)PLAY MODE SELECT : (When selecting the play mode)EDIT WRITING OK? : (Select to store to memory or not)
3 Press [– + TRIM] to change the data•Time or level appears in the display.•Smallest unit of adjustment
START, END : 1 frame (1 sec. per 75 frames)LEVEL : 1 dB (–24dB to + 24 dB)
•Pressing selected sample pads while editing confirmschanges.
•Sound may be distorted if the LEVEL is too high.•If data is trimmed and stored, you cannot restore to the origi-
nal length.
5 Storing to memory
Press [MEMORY]•“COMPLETED” appears in the display and all sample pad
data is stored.•The selected sample pad lamp lights and the lamp of the
edit item goes out.
Not storing to memory
Press [SAMPLE EDIT] to select “EDITWRITING OK?”,And press [+ ] to select “NO” fromthe display•The lamp of the selected sample pad changes to a station-
ary light, and the original data is returned.•Pressing [– ] to select “YES” from the display will store
to memory.
4 Modifying other data•Perform steps 1-3 indicated above.
Changing the sound
RQT7114
21
Oth
er f
un
ctio
ns
Saving to a SD Memory Card, Recalling
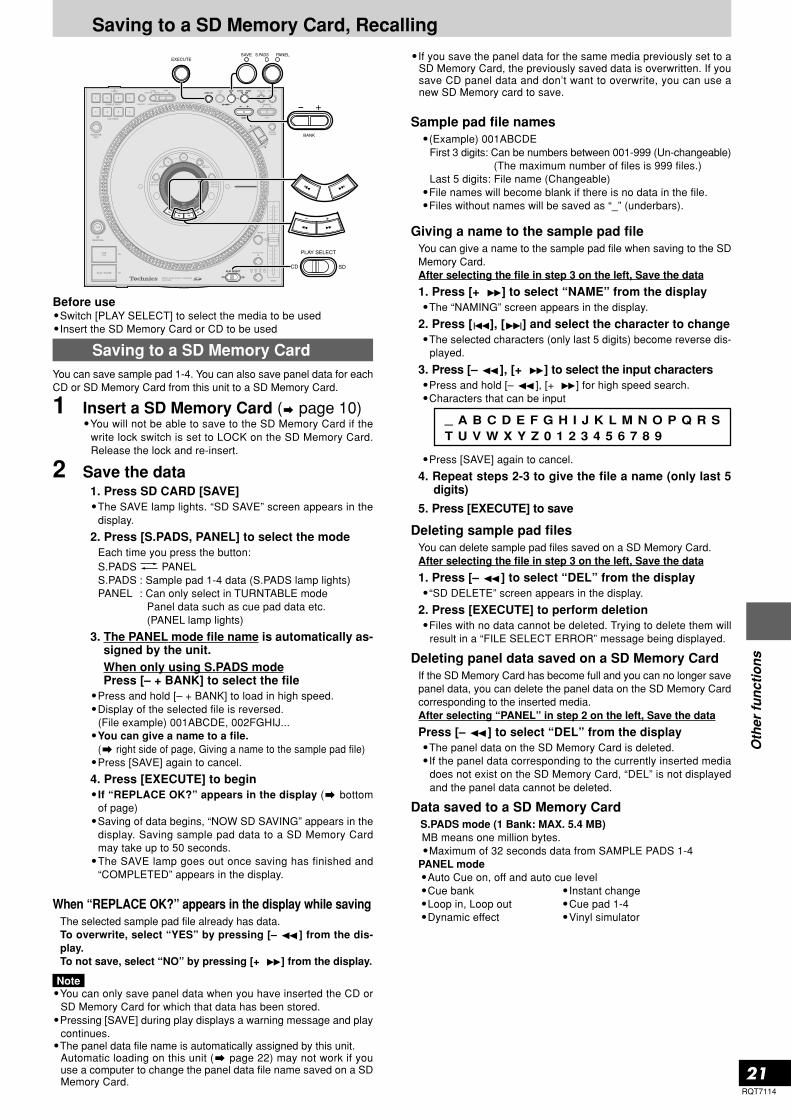
1 Insert a SD Memory Card ( page 10)•You will not be able to save to the SD Memory Card if the
write lock switch is set to LOCK on the SD Memory Card.Release the lock and re-insert.
You can save sample pad 1-4. You can also save panel data for eachCD or SD Memory Card from this unit to a SD Memory Card.
2 Save the data1. Press SD CARD [SAVE]•The SAVE lamp lights. “SD SAVE” screen appears in the
display.
2. Press [S.PADS, PANEL] to select the modeEach time you press the button:S.PADS PANELS.PADS : Sample pad 1-4 data (S.PADS lamp lights)PANEL : Can only select in TURNTABLE mode
Panel data such as cue pad data etc.(PANEL lamp lights)
3. The PANEL mode file name is automatically as-signed by the unit.When only using S.PADS modePress [– + BANK] to select the file
•Press and hold [– + BANK] to load in high speed.•Display of the selected file is reversed.
(File example) 001ABCDE, 002FGHIJ...•You can give a name to a file.
( right side of page, Giving a name to the sample pad file)•Press [SAVE] again to cancel.
4. Press [EXECUTE] to begin•If “REPLACE OK?” appears in the display ( bottom
of page)•Saving of data begins, “NOW SD SAVING” appears in the
display. Saving sample pad data to a SD Memory Cardmay take up to 50 seconds.
•The SAVE lamp goes out once saving has finished and“COMPLETED” appears in the display.
Saving to a SD Memory Card
Giving a name to the sample pad fileYou can give a name to the sample pad file when saving to the SDMemory Card.After selecting the file in step 3 on the left, Save the data
1. Press [+ ] to select “NAME” from the display•The “NAMING” screen appears in the display.
2. Press [ ], [ ] and select the character to change•The selected characters (only last 5 digits) become reverse dis-
played.
3. Press [– ], [+ ] to select the input characters•Press and hold [– ], [+ ] for high speed search.•Characters that can be input
•Press [SAVE] again to cancel.
4. Repeat steps 2-3 to give the file a name (only last 5digits)
5. Press [EXECUTE] to save
Deleting sample pad filesYou can delete sample pad files saved on a SD Memory Card.After selecting the file in step 3 on the left, Save the data
1. Press [– ] to select “DEL” from the display•“SD DELETE” screen appears in the display.
2. Press [EXECUTE] to perform deletion•Files with no data cannot be deleted. Trying to delete them will
result in a “FILE SELECT ERROR” message being displayed.
Deleting panel data saved on a SD Memory CardIf the SD Memory Card has become full and you can no longer savepanel data, you can delete the panel data on the SD Memory Cardcorresponding to the inserted media.After selecting “PANEL” in step 2 on the left, Save the data
Press [– ] to select “DEL” from the display•The panel data on the SD Memory Card is deleted.•If the panel data corresponding to the currently inserted media
does not exist on the SD Memory Card, “DEL” is not displayedand the panel data cannot be deleted.
Data saved to a SD Memory CardS.PADS mode (1 Bank: MAX. 5.4 MB)MB means one million bytes.•Maximum of 32 seconds data from SAMPLE PADS 1-4
PANEL mode•Auto Cue on, off and auto cue level•Cue bank •Instant change•Loop in, Loop out •Cue pad 1-4•Dynamic effect •Vinyl simulator
Sample pad file names•(Example) 001ABCDE
First 3 digits: Can be numbers between 001-999 (Un-changeable)(The maximum number of files is 999 files.)
Last 5 digits: File name (Changeable)•File names will become blank if there is no data in the file.•Files without names will be saved as “_” (underbars).
Before use•Switch [PLAY SELECT] to select the media to be used•Insert the SD Memory Card or CD to be used
When “REPLACE OK?” appears in the display while savingThe selected sample pad file already has data.To overwrite, select “YES” by pressing [– ] from the dis-play.To not save, select “NO” by pressing [+ ] from the display.
Note•You can only save panel data when you have inserted the CD or
SD Memory Card for which that data has been stored.•Pressing [SAVE] during play displays a warning message and play
continues.•The panel data file name is automatically assigned by this unit.
Automatic loading on this unit ( page 22) may not work if youuse a computer to change the panel data file name saved on a SDMemory Card.
_ A B C D E F G H I J K L M N O P Q R ST U V W X Y Z 0 1 2 3 4 5 6 7 8 9
•If you save the panel data for the same media previously set to aSD Memory Card, the previously saved data is overwritten. If yousave CD panel data and don’t want to overwrite, you can use anew SD Memory card to save.

RQT7114
22
Oth
er f
un
ctio
ns
001
001ABCDE.mp3002FGHIJ.mp3003KLMNO.mp3004PQRST.mp3
002
001A_123.mp3002FG_12.mp3003KLM_1.mp3
003
001VWXYZ.mp3
1 Insert the SD Memory Card containingsaved data ( page 10)
Loading sample pad dataYou can recall sample pad 1-4 data saved on a SD Memory Card.
2 Load the file1. Press SD CARD [LOAD]•The LOAD lamp lights. “SD LOAD” screen appears in the
display.•The S.PADS lamp lights.
2. Press [– + BANK] to select the file•Press and hold [– + BANK] to load in high speed.•Display of the selected file is reversed.
(File example) 001ABCDE, 002FGHIJ...•Press [LOAD] again to cancel.
3. Press [EXECUTE]•The media begins to load, “NOW SD LOADING” appears
in the display. Loading may take up to 25 seconds.•The LOAD lamp goes out once loading has finished and
“COMPLETED” appears in the display.
•Pressing [LOAD] during play, displays a warning message and playcontinues.
•Previous sample pad data is erased from memory on this unit onceloaded.
Recalling (loading) data saved on aSD Memory Card
Regarding MP3 albums and SD audio
Saving to a SD Memory Card, Recalling
Selection and play order of tracks within an MP3album
•For MP3 tracks on CD-R and CD-RW, play proceeds folder byfolder in the sequence of folder number order.
•Only MP3 files are playable when there are files other than MP3fi les on the CD-R, CD-RW containing the MP3 f i les.However, when there is normal audio data (CD-DA) and MP3files mixed on the same disc, only audio data can be played.Folders that do not contain MP3 files are skipped.
Creating MP3 files for play on this unit•The format used for CD-R, CD-RW is ISO9660 level 1, or level 2.•When creating on a computer etc, give folders and files names
using numeric and alphabetic characters.•Read the operating instruction manual if using MP3 file creation
software on your computer. Depending on the type of recording,some MP3 files may not be playable.
•Only ID3 tag track titles are displayable on this unit.V1, V1.1 (Up to 32 alphanumeric characters.)
•This unit is compatible with multi-sessions. When there are manysessions, it may take some time for play to begin, therefore werecommend reducing the number of sessions to a minimum.
•You cannot play a file that was recorded with packet write.•This unit is not compatible with HighMATTM.
Creating SD audio for play on this unitRecord tracks to a SD Memory Card using only the “SD JUKE-BOX” application for recording SD audio for your PC, and a USBreader-writer (all sold separately).•This unit is not compatible with the WMA format.
Play order
Folders can be created within folders, howeverthe play may not proceed in the correct order.
Root
1st track2nd track3rd track4th track
1 Insert the SD Memory Card ( page 10)
All data is erased and the SD Memory Card is formatted. Useablecapacity will be less. Useable capacity may differ from that indicatedon the media.Use only when you want to erase all files or when there is dataon the card that cannot be read.
Formatting the SD Memory Card
2 Hold down SD CARD [SAVE] for morethan 5 seconds until “FORMAT OK?”appears in the display•Press [SAVE] again to cancel.
3 Press [EXECUTE] to proceed•“COMPLETED” will appear on the display. All data is erased
and the card is formatted.•If “FORMAT ERROR” appears in the display, this SD Memory
Card cannot be formatted.
Panel data automatic loading (TURNTABLE mode only)The unit automatically loads panel data for each CD or SD MemoryCard to its memory from the SD Memory Card.
1. Switch [PLAY SELECT] to select the media to be usedand turn the MODE switch on the rear panel to TURN-TABLE side
2. Insert the SD Memory Card containing saved paneldata
3. If the media corresponding to the saved panel data isa CD, insert the CD
•If the same media data exists on the SD Memory Card and inthe unit’s memory, the SD Memory Card takes precedence andthe unit’s memory is overwritten.If you do not want to replace data in the unit’s memory, save to aSD Memory Card in advance.
5th track6th track7th track
8th track
Naming folders and filesAt the time of recording, give foldersand file names with 3-digit prefixesin the order you want to play them.

RQT7114
23
Oth
er f
un
ctio
ns
Using with other equipment
Before use•Switch [PLAY SELECT] to select the media to be used•Turn [MODE] on the rear panel to TURNTABLE•Insert the SD Memory Card or CD to be used
Start play using the mixer’s fader
You can instantly start play from the auto cue point or cue point on thisunit using the mixer’s fader by connecting this unit to the control ter-minal of a DJ mixer using a control cable connection. ( page 8)
Before use :•Adjust buttons and control knobs of CH1 and CH4 on the DJ mixer
so mixed sound is output from the master output.•Turn the DJ mixer’s FADER START CH1 and CH4 to on.•On unit 1 or 2, set the auto cue point or set the cue point and select
the cue bank.
Starting with the channel fader(e.g.) When the fader operation switch on the DJ mixer is set to NORMAL
1. On the DJ Mixer, change the C.FADER ASSIGN Aswitch to other than 1 and change the C.FADER AS-SIGN B switch to other than 4
2. Push the CH1, CH4 channel fader all the way to the bottom
3. During play or while paused on unit 1 or 2, press[CUE STOP] (Back cue)
•Returns to the set point and pauses.
4. When you want to start play, push the CH1 or CH4channel fader up
•At the same time, play begins from the set point on unit 1 or 2.
•After you return the channel fader to its original position, unit back cues,and pauses after returning to the set point.
Starting with the cross fader(e.g.) When the cross fader operation switch on the DJ mixer is set to
NORMAL and to start play on CH1
1. On the DJ Mixer, change the C.FADER ASSIGN Aswitch to 1 and change the C.FADER ASSIGN Bswitch to 4
2. Push the cross fader all the way toward CH4 ( )
3. During play or while paused on unit 1, press [CUESTOP] (Back cue)
4. When you want to start play, push the cross fader inthe opposite direction indicated in step 2, towardsCH1 ( )
•At the same time, play begins from the set point on unit 1.
You can relay play by connecting the control terminals of the two units.( page 9)
Before use:•Turn Auto Cue on for both units, set the auto cue point for the track
to be played and back cue.
Using two units for relay play
Press [PLAY/PAUSE] on the unit to beplayed first•Once track play finishes on the unit being played, play auto-
matically begins from the unit on standby.•The unit that was played first pauses and cues at the next track’s
auto cue point.
•You can automatically alternate play between both units by repeat-ing this method.
•You can listen to many different tracks by changing the media andselecting the track of the unit in the standby position.
•Set the cue point, select the cue bank and back cue on the standbyunit to begin relay play from the desired point of the desired track.
Note•During play, if power on one of the units is cut or turned off, play
may begin on the other standby unit.•You cannot use fader start and relay play at the same time.
Using the amplifier and other equipment
Connect with the matching input terminals on the equipment (not in-cluded). ( page 9)•When using this unit’s DIGITAL OUT terminal, SD Audio is not out-
put.
1 Put the equipment on standby
2 Press [PLAY/PAUSE] to play•Audio played from the connected equipment is output.
•You can alternate play by back cueing unit 2 connected toCH4.Push the cross fader all the way toward CH4 Play CH4
CH1 Back cue
Push the cross fader all the way toward CH1 Play CH1CH4 Back cue
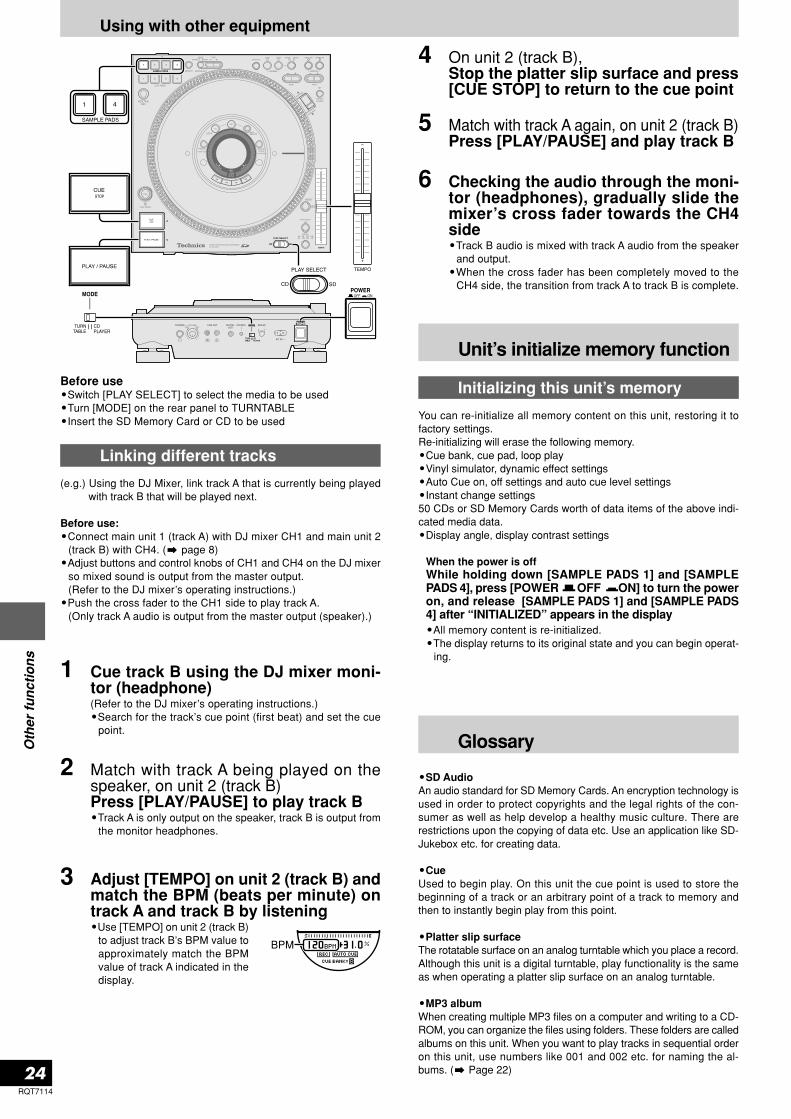
RQT7114
24
Oth
er f
un
ctio
ns
Before use•Switch [PLAY SELECT] to select the media to be used•Turn [MODE] on the rear panel to TURNTABLE•Insert the SD Memory Card or CD to be used
Linking different tracks
(e.g.) Using the DJ Mixer, link track A that is currently being playedwith track B that will be played next.
Before use:•Connect main unit 1 (track A) with DJ mixer CH1 and main unit 2
(track B) with CH4. ( page 8)•Adjust buttons and control knobs of CH1 and CH4 on the DJ mixer
so mixed sound is output from the master output.(Refer to the DJ mixer’s operating instructions.)
•Push the cross fader to the CH1 side to play track A.(Only track A audio is output from the master output (speaker).)
1 Cue track B using the DJ mixer moni-tor (headphone)(Refer to the DJ mixer’s operating instructions.)•Search for the track’s cue point (first beat) and set the cue
point.
2 Match with track A being played on thespeaker, on unit 2 (track B)Press [PLAY/PAUSE] to play track B•Track A is only output on the speaker, track B is output from
the monitor headphones.
3 Adjust [TEMPO] on unit 2 (track B) andmatch the BPM (beats per minute) ontrack A and track B by listening•Use [TEMPO] on unit 2 (track B)
to adjust track B’s BPM value toapproximately match the BPMvalue of track A indicated in thedisplay.
4 On unit 2 (track B),Stop the platter slip surface and press[CUE STOP] to return to the cue point
5 Match with track A again, on unit 2 (track B)Press [PLAY/PAUSE] and play track B
6 Checking the audio through the moni-tor (headphones), gradually slide themixer’s cross fader towards the CH4side•Track B audio is mixed with track A audio from the speaker
and output.•When the cross fader has been completely moved to the
CH4 side, the transition from track A to track B is complete.
BPM
Using with other equipment
Initializing this unit’s memory
Unit’s initialize memory function
You can re-initialize all memory content on this unit, restoring it tofactory settings.Re-initializing will erase the following memory.•Cue bank, cue pad, loop play•Vinyl simulator, dynamic effect settings•Auto Cue on, off settings and auto cue level settings•Instant change settings50 CDs or SD Memory Cards worth of data items of the above indi-cated media data.•Display angle, display contrast settings
When the power is offWhile holding down [SAMPLE PADS 1] and [SAMPLEPADS 4], press [POWER OFF ON] to turn the poweron, and release [SAMPLE PADS 1] and [SAMPLE PADS4] after “INITIALIZED” appears in the display•All memory content is re-initialized.•The display returns to its original state and you can begin operat-
ing.
Glossary
•SD AudioAn audio standard for SD Memory Cards. An encryption technology isused in order to protect copyrights and the legal rights of the con-sumer as well as help develop a healthy music culture. There arerestrictions upon the copying of data etc. Use an application like SD-Jukebox etc. for creating data.
•CueUsed to begin play. On this unit the cue point is used to store thebeginning of a track or an arbitrary point of a track to memory andthen to instantly begin play from this point.
•Platter slip surfaceThe rotatable surface on an analog turntable which you place a record.Although this unit is a digital turntable, play functionality is the sameas when operating a platter slip surface on an analog turntable.
•MP3 albumWhen creating multiple MP3 files on a computer and writing to a CD-ROM, you can organize the files using folders. These folders are calledalbums on this unit. When you want to play tracks in sequential orderon this unit, use numbers like 001 and 002 etc. for naming the al-bums. ( Page 22)

RQT7114
25
Ref
eren
ce
With this system, you can only play CDs having thismark.
•Do not use irregularly shaped CDs. (Mayresult in damage to your equipment.)
•Use discs that display the logo mark indi-cated above, or conform to the Compactdisc digital audio standard. The disc maynot play properly if you are using a non-standard conforming disc.
•For CDs with greater than 80 minutes total play time, the portionbeyond 80 minutes cannot be played on this unit.
•Depending on the CD, there may be apparent noise or the totalnumber of tracks may not be read properly. In either case, try re-inserting the CD.
•Recorded music CDs that are partially or fully translucent may notbe usable with this unit.
•Do not use CDs that are dirty.
•SD logo is a trademark.
•MPEG Layer-3 audio decoding technology licensed fromFraunhofer IIS and Thomson multimedia.
Concerning CDs
•If you are taking the CD from a cold to a warm environment, mois-ture may form on the CD. Wipe this off with a soft, dry, lint-freecloth before using the CD.
•Do not write on the label side with a ball-point pen or other writinginstrument.
•Do not use record cleaning sprays, benzine, thinner, static elec-tricity prevention liquids or any other solvent.
•Do not attach labels or stickers to CDs. (Do not use CDs with ex-posed adhesive from tape or left over peeled off stickers.)
Handling precautions
How to hold CDs
How to clean CDs
Be sure to store CDs in their cases to protect them from dust, scratches,and warping.
Do not place or store CDs in the following places•Locations exposed to direct sunlight•Humid or dusty locations•Locations directly exposed to a heat vent or heating appliance•In the glove compartment or on the rear deck of an automobile
Storage precautions
•Do not use scratch-proof protectors etc.•Do not use CDs printed with label printers available on the market.
Do not touch therecorded surface.
Wipe from inside outward.
The recorded surface
Handling SD Memory Cards
When handling SD Memory CardsAvoid the following:•Altering or disassembling the SD Memory Card•Striking, bending, dropping, or getting water on the SD Memory
Card•Touching the metal connectors with your fingers or with metal objects•Peeling off attached labels•Attaching new labels or stickers
Storage•Always put the SD Memory Card back in its case.•Do not store in potentially high temperature locations such as within
cars, or in areas open to direct sunlight.•Do not place in locations subject to high humidity or dust.•Do not place in areas subject to caustic gases.
Protecting important data•Set the write protect switch to the
LOCK position. Release the lock whenstoring new data.
•If there is a space for writing a note onthe SD Memory Card, use a felt pen(oil based) for writing. Do not use a pencil or ball point pen. Loss ofdata may result if the SD Memory Card is damaged.
•Do not remove the AC power supply cord while the unit power ison (When the units display is on) or loss of data may result.
•Do not remove the SD Memory Card from the unit during play.Loss of data may result.
Write ProtectSwitchRear
side
•AACA compression standard that makes recording and play of high qual-ity audio possible including MPEG2 (an international standard). Usedin SD Audio and broadcast satellite digital signals.
•MP3MP3 is the abbreviated form of the international standard MPEG1/Audio Layer3. MP3 allows you to achieve approximately ten to onecompression rates with bit rates of 128 kbps. MP3 is used widely withSD Audio, CDs, and computers.
•Sampling frequencyThe number of samples taken approximately each second when anaudio signal is digitally converted and stored in memory. The higherthe value the wider the frequency range can be used for digital con-version thus providing near original audio quality reproduction, how-ever the resulting size of the audio data does become quite large.
•Bit rateA value that indicates the audio signal compression rate. Indicatesthe number of bits sampled approximately each second, the largerthe bit value the more information is contained resulting in better au-dio quality, however the size of the audio data does become quitelarge.

RQT7114
26
Ref
eren
ceQ&A (Frequently asked questions)
Question
ConnectingOtherDevices
CD
How do I connect an analog player?
How do I connect speakers?
How do I record through an optical digital con-nection?
Can I use a multimedia card (MMC) or a memorystick?Can I play DVD-Video or a CD video?Can I play CD-R and CD-RW which contains MP3data?
An analog player cannot be connected directly. It must be con-nected through a DJ mixer.Speakers cannot be connected directly. Speakers must beconnected through DJ Mixer or amplifier.There is no optical digital output terminal on the unit. A con-nection cable can be used to connect to the DIGITAL OUTterminal on the unit.No. Use a SD Memory Card only.
No.Yes. However, play may not be possible on some discs de-pending on the state of recording.Some functions are not operational.
AnswerReference
page
8
9
9
10, 12-13
25
12
Troubleshooting guide
Before requesting service, make the below checks. If you are in doubt about some of the check points, or if the remedies indicatedin the chart do not solve the problem,refer to the “Customer Services Directory” on back cover if you reside in the U.S.A., or refer to the “Product information” on page 2 ifyou reside in Canada.
Reference Page
8 - 9
—
8 - 9
8 - 9
—
10
25
—
25
10
22
14
14
17
18
22
SolutionConnect the stereo cables properly, left toleft, right to right.Move the unit away from the other electricalequipment.Connect the stereo connection cable prop-erly.Connect with the DJ mixer’s LINE input ter-minals. Do not connect to the PHONO ter-minal.Turn the unit power off or distance the unitfrom the TV or FM tuner.Insert the CD with the label-side facing up.Replace with a standard conforming CD.Wipe the CD clean with a soft cloth.Moisture may form on the lens.Wait about an hour and try playing again.
Wipe the CD clean with a soft cloth.
Eject the disc after stopping or pausing.If forced disc ejection does not work, con-tact your nearest dealer.Record tracks using the SD audio recordingapplication for the PC (sold separately).
Press the PUSH button to release.Switch the MODE switch on the rear panelto the TURNTABLE side.Set the cue point.
Set the loop in point and loop out point tocreate the loop.
When updating the unit’s memory etc., andwhen panel data is necessary, save to theSD Memory Card in advance.
CauseAre the left and right stereo cables re-versed?Are connection cables too close to the ACpower supply cord or a fluorescent light?Is the stereo connection cable not con-nected?Are the output cables properly con-nected?
Is the unit is causing the TV or FM inter-ference?Is the CD is inserted upside down?Are you using a non-standard CD?Is the CD dirty?Has the unit been suddenly moved froma cold to a warm or hot location, resultingin an abrupt change in temperature?Is the CD dirty?
When in the TURNTABLE mode you can-not eject the disc during play.
Is the music file you inserted not SD au-dio?
Are you using the FREE WHEEL mode?Is the CD PLAYER mode selected?
Is the cue point set?
Is the loop in point (start point) set?
Have you inserted a SD Memory Cardthat already has the panel data for thecorresponding media? In this case the SDMemory Card takes precedence and thepanel data stored to the unit’s memory isreplaced with the setting on the SDMemory Card.
ProblemLeft and right audio is re-versed.A “Humming” sound isheard during play.No sound comes out ofone speaker.Sound is distorted and ornoise is being emitted.
There is interference toTV or FM reception.“NO CD AUDIO TRACK”appears on the displaywhen a CD is inserted.The unit does not playwhen the Play button ispushed.There is noise or certainpoints on the disc cannotbe played properly.CD does not eject afterpressing the CD EJECTbutton.“NO SD AUDIO TRACK”appears on the displaywhen a SD Memory Cardis inserted.The platter does not ro-tate.
Back cue does not workwhen the CUE button ispressed during play.Loop play does not workwhen the LOOP OUT but-ton is pressed.The last panel data set onthis unit is replaced whenyou insert the corre-sponding media.
General
CD
SD audio
Operation
•Sometimes the BPM value and the CD memory value differ. This is because the method for measuring the BPM value is different, andit is not due to a defective or malfunctioning unit.

RQT7114
27
Ref
eren
ce
Error messages
MessageCAN NOT EJECTCUE BANK ERROR
DATA ERROR
FAILED
FILE SELECT ERRORFORMAT ERRORNO CD AUDIO TRACK
NO DATA
NO DISCNO PANEL MODE
NO REMAIN
NO SD AUDIO TRACK
NO SD CARDREPLACED OLD PANEL DATA
SD CARD FULL
SD CARD PROTECTED
SD LID OPENTRACK ERROR
DescriptionCannot eject the CD.After setting the auto cue point, you tried to setthe cue setting without selecting the cue bank.There is a problem with the data.
A save, load or format error occurred and the op-eration did not complete.The wrong file was selected.You cannot format this SD Memory Card.The inserted disc is unrecognizable.The disc has been inserted upside down.You tried to save to a SD Memory Card, but thereis no sample pad data.CD is not inserted.You cannot save panel data when using the CDPLAYER mode.You cannot display the current remaining time withMP3 files.There are no audio tracks on this SD Memory Card.The inserted SD Memory Card is unrecognizablebecause of damage or an error.SD Memory Card is not inserted.The oldest used media panel data was replaced.You cannot store more than 50 CDs or SD MemoryCards worth of data items.You cannot save any more data to the SD MemoryCard.The SD Memory Card is write protected.
The lid of the SD Memory Card slot is open.You cannot play this track.This track data cannot be read.
ActionPause the unit and eject the CD.Select the cue bank first.
Use a SD Memory Card that was recordedproperly.Try saving or loading again. Or try saving to anew SD Memory Card.Select the correct file.Use a new SD Memory Card.Re-insert the CD properly.
Re-insert the CD properly.Save using the TURNTABLE mode.
Use a SD Memory Card that was recordedproperly.
Re-insert the SD Memory Card properly.Save it to a SD Memory Card or initialize theunit’s memory.
Use a new SD Memory Card.
Release the SD Memory Card write-protectswitch.Make sure to close the lid.Select another track or replace with properlyrecorded media.
Specifications
To clean this unit, wipe with a soft, dry cloth.
•Never use alcohol, paint thinner, or benzine to clean this unit.•Before using chemically treated cloth, read the instructions that came with the cloth carefully.
Maintenance
•Digital audio outputCoaxial digital output Pin jack
•HeadphoneOutput level 20 mW max. 32 Ω (adjustable)
•PickupWave length 790 nmLaser Power No hazardous radiation is emitted
•GeneralPower supply AC 120 V, 60 HzPower consumption 20 WDimensions (W X H X D) 320 x 111 x 330 mm
(1239/64˝ x 43/8˝ x 13˝)Mass 5.8 kg
(12.8 lb.)
NoteSpecifications are subject to change without notice.Mass and dimensions are approximate.
Specifications are the values when playing CD audio in the CDPLAYER mode with tempo reset.
•Playable mediaCD (12 cm) (5˝) CD-Audio (CD-DA)
CD-R/CD-RW (CD-DA, MP3)SD Memory Card
•CD-MP3 play formatCompatible compression rate between 32 kbps and 192 kbps
(Recommended: 128 kbps)Compatible sampling rate 48 kHz/44.1 kHz/32 kHz
•SD Audio play formatAudio extension format MPEG2-AAC/MP3Compatible sampling rate 48 kHz/44.1 kHz/32 kHz
•AudioNo. of channels 2 (stereo)Frequency response 4 Hz-20 kHzOutput voltage 2 Vrms (0 dB) (JEITA)Output terminal Pin jack

Limited warranty (ONLY FOR U.S.A.)
Panasonic/Technics DJ ProductsLimited Warranty
Panasonic Consumer Electronics Company,Division of Matsushita Electric Corporation of AmericaOne Panasonic Way Secaucus, New Jersey 07094
Panasonic Sales Company, Division of Matsushita Electricof Puerto Rico, Inc.,Ave. 65 de Infantería, Km. 9.5San Gabriel Industrial Park, Carolina, Puerto Rico 00985
Limited Warranty CoverageIf your product does not work properly because of a defect in materials or workmanship,Panasonic Consumer Electronics Company or Panasonic Sales Company (collectivelyreferred to as “the warrantor”) will, for the length of the period indicated on the chart below,which starts with the date of original purchase (“warranty period”), at its option either (a)repair your product with new or refurbished parts, or (b) replace it with a new or arefurbished product. The decision to repair or replace will be made by the warrantor.
During the “Labor” warranty period there will be no charge for labor. During the “Parts”warranty period, there will be no charge for parts. You must carry-in or mail-in yourproduct or arrange for in-home service, as applicable, during the warranty period. If non-rechargeable batteries are included, they are not warranted. This warranty only applies toproducts purchased and serviced in the United States or Puerto Rico. This warranty isextended only to the original purchaser of a new product which was not sold “as is”. Apurchase receipt or other proof of the original purchase date is required for warranty service.
Carry-In, Mail-in or In-Home ServiceFor Carry-In, Mail-in or In-Home Service (as applicable) in the United States call 1-800-211-PANA(7262) or visit Panasonic Web Site: http://www.panasonic.comFor assistance in Puerto Rico call Panasonic Sales Company (787)-750-4300 or fax(787)-768-2910.
In-Home service, if applicable, requires clear, complete and easy access to the product bythe authorized servicer and does not include removal or re-installation of an installedproduct. It is possible that certain in-home repairs will not be completed in-home, but willrequire that the product, or parts of the product, be removed for shop diagnosis and/orrepair and then returned.
Limited Warranty Limits And ExclusionsThis warranty ONLY COVERS failures due to defects in materials or workmanship, andDOES NOT COVER normal wear and tear or cosmetic damage. The warranty ALSODOES NOT COVER damages which occurred in shipment, or failures which are causedby products not supplied by the warrantor, or failures which result from accidents, misuse,abuse, neglect, mishandling, misapplication, alteration, faulty installation, set-upadjustments, misadjustment of consumer controls, improper maintenance, power linesurge, lightning damage, modification, rental use of the product, service by anyone otherthan a Factory ServiCenter or other Authorized Servicer, or damage that is attributable toacts of God.
THERE ARE NO EXPRESS WARRANTIES EXCEPT AS LISTED UNDER “LIMITEDWARRANTY COVERAGE”. THE WARRANTOR IS NOT LIABLE FOR INCIDENTALOR CONSEQUENTIAL DAMAGES RESULTING FROM THE USE OF THIS PRODUCT,OR ARISING OUT OF ANY BREACH OF THIS WARRANTY, INCLUDING WITHOUTLIMITATION, LOSS OF GOODWILL, PROFITS OR REVENUE, LOSS OF USE OF THISPRODUCT OR ANY ASSOCIATED EQUIPMENT, COST OF SUBSTITUTEEQUIPMENT, DOWNTIME COSTS, OR CLAIMS OF ANY PARTY DEALING WITHBUYER FOR SUCH DAMAGES. (As examples, this excludes damages for lost time, costof having someone remove or re-install an installed unit if applicable, travel to and fromthe servicer, loss of media, data or other memory content. The items listed are notexclusive, but are for illustration only.) ALL EXPRESS AND IMPLIED WARRANTIES,INCLUDING THE WARRANTY OF MERCHANTABILITY, ARE LIMITED TO THEPERIOD OF THE LIMITED WARRANTY.
Some states do not allow the exclusion or limitation of incidental or consequentialdamages, or limitations on how long an implied warranty lasts, so the exclusions may notapply to you.
This warranty gives you specific legal rights and you may also have others rights whichvary from state to state. If a problem with this product develops during or after thewarranty period, you may contact your dealer or ServiCenter. If the problem is not handledto your satisfaction, then write to the warrantor's Consumer Affairs Department at theaddresses listed for the warrantor.
PARTS AND SERVICE (INCLUDING COST OF AN IN-HOME SERVICE CALL IFAPPLICABLE) WHICH ARE NOT COVERED BY THIS LIMITED WARRANTY AREYOUR RESPONSIBILITY.
Labor
One (1) Year
Ninety (90) Days(when applicable)
Not Applicable(in exchange fordefective item)
Product
DJ Turntables (analog), DJ Mixers,DJ Direct Drive Digital Turntables
Accessories:(Repaired or exchanged)DJ Headphones, Cartridges,Microphones
Accessories:(Exchanged)SD Memory Cards, PlatterMats, Adaptors, Cables
Service
Carry-In or Mail-In
Carry In or Mail In
Carry In or Mail In
Parts
One (1) Year
Ninety (90) Days
Ninety (90) Days
Customer Services Directory
Accessory Purchases
Obtain Product Information and Operating Assistance; locate your nearest Dealer or Servicenter; purchase Parts andAccessories; or make Customer Service and Literature requests by visiting our Web Site at:
http://www.panasonic.com/supportor, contact us via the web at:
http://www.panasonic.com/contactinfoYou may also contact us directly at:1-800-211-PANA (7262),Monday-Friday 9 am-9 pm; Saturday-Sunday 10 am-7 pm, EST.
For hearing or speech impaired TTY users, TTY: 1-877-833-8855
Purchase Parts, Accessories and Instruction Books online for all Panasonic Products by visiting our Web Site at:http://www.pasc.panasonic.commor, send your request by E-mail to:[email protected] may also contact us directly at:1-800-332-5368 (Phone) 1-800-237-9080 (Fax Only) (Monday – Friday 9 am to 8 pm, EST.)Panasonic Services Company20421 84th Avenue South, Kent, WA 98032(We Accept Visa, MasterCard, Discover Card, American Express, and Personal Checks)
For hearing or speech impaired TTY users, TTY: 1-866-605-1277
Matsushita Electric of Puerto Rico, Inc. Panasonic Sales CompanyFactory Servicenter:Ave. 65 de Infantería, Km. 9.5, San Gabriel Industrial Park, Carolina, Puerto Rico 00985Phone (787)750-4300, Fax (787)768-2910
Service in Puerto Rico
(ONLY FOR U.S.A.)
RQT7114-YM0304TK0
EnPanasonic Sales Company,Division of Matsushita Electric ofPuerto Rico, Inc. (“PSC”)Ave. 65 de Infantería, Km. 9.5San Gabriel Industrial Park, Carolina,Puerto Rico 00985
Panasonic Canada Inc.5770 Ambler DriveMississauga, Ontario L4W 2T3www.panasonic.ca
Panasonic Consumer ElectronicsCompany, Division of MatsushitaElectric Corporation of AmericaOne Panasonic Way Secaucus,New Jersey 07094http://www.panasonic.com
2004 Matsushita Electric Industrial Co., Ltd.Printed in Japan