TECHNICAL PAPER Installing & Configuring UNICOM System ... · Basic Troubleshooting ... Installing...
32
TECHNICAL PAPER Installing & Configuring UNICOM ® System Architect ® Part 1: Stand-Alone Installation with Microsoft ® SQL Server Express ® by Sami Joueidi Senior Cloud Architect IBM
Transcript of TECHNICAL PAPER Installing & Configuring UNICOM System ... · Basic Troubleshooting ... Installing...

TECHNICAL PAPER
Installing & Configuring
UNICOM® System Architect®
Part 1: Stand-Alone Installation with
Microsoft® SQL Server Express®
by Sami Joueidi
Senior Cloud Architect
IBM

UNICOM® Systems
2
This technical paper was originally published by IBM®, and has been rebranded by UNICOM® Systems in
April, 2018 after it acquired System Architect® and collateral material from IBM®. It has also been updated to include material on the UNICOM® license server and make any other necessary adjustments to the rebranded software, with consent from the author.
© Copyright UNICOM® Systems 15535 San Fernando Mission Blvd, Mission Hills, CA 91345; Produced in the
United States of America. All rights reserved.
UNICOM® Systems and the UNICOM® Systems logo are trademarks of UNICOM® Global. All other brands, product names, trade names, trademarks and service marks used herein are the property of their respective owners.

UNICOM® Systems
3
Contents Executive Summary .....................................................................................................................................5
Overview of System Architect .................................................................................................................5
What You Need to Know Before You Start ........................................................................................ 7
Terms and Utilities ............................................................................................................................... 7
System Architect Encyclopedias ...................................................................................................... 7
Encyclopedias with Microsoft SQL Server or Microsoft SQL Server Express ................... 8
System Architect Encyclopedia Manager (SAEM) ............................................................................ 8
The Startup Wizard ........................................................................................................................... 9
I. Install UNICOM® License Server & Apply License ....................................................................................10
Node-locked licenses ........................................................................................................................10
Floating Licenses ............................................................................................................................... 11
II. Install System Architect ................................................................................................................... 12
Uninstall Previous Version of SA (If It Exists) .......................................................................... 12
Install SA................................................................................................................................................ 12
III. Install Microsoft® SQL Server Express & Examples ....................................................................................... 14
Launch Startup Wizard & Install Microsoft SQL Server Express ..................................................... 14
Create a Local SQL Server Express Connection .............................................................................. 16
Create a New Encyclopedia ............................................................................................................. 17
Installation Complete ............................................................................................................................ 17
IV. Create a Shared Folder for Encyclopedia Backups ....................................................................................... 18
Create a Shared Folder...................................................................................................................... 18
Modify Security Settings for the New Folder ............................................................................... 19
Share the folder and modify the permissions .............................................................................. 20
V. Grant the BUILTIN\Users Group SQL Server Roles ....................................................................................... 23
Grant dbcreator and sysadmin roles ............................................................................................. 24
VI. Connect to SQL Server Express as Local or Domain User .............................................................................. 26
Configure Subsequent Workstations ................................................................................................... 27

UNICOM® Systems
4
VII. Basic Troubleshooting ................................................................................................................ 28
SQL Server login failure ................................................................................................................... 28
SQL Server does not exist or access denied .......................................................................... 28
SQL Server Services will not start ............................................................................................... 28
SQL Server Express failed to install on Windows XP .............................................................. 28
Windows Installer Cleanup Utility Failed to Install ................................................................ 29
NT AUTHORITY\NETWORK SERVICE (Network Service) issues ........................................... 29
Appendix.................................................................................................................................................... 30
Enable Microsoft SQL Server Network Protocols........................................................................... 30
Resources................................................................................................................................................... 32
Learn .................................................................................................................................................. 32
Discuss ............................................................................................................................................... 32

UNICOM® Systems
5
Executive Summary
This i s Part 1 of a 2-part series. This article provides an overview of UNICOM® System
Architect® ( S A ) terminology and explains the steps for installing and configuring the
software to connect to Microsoft® SQL S e r v e r Express. The example is targeted for
professional encyclopedias, which are one of the two types of repositories in System
Architect.
Installing and configuring UNICOM® System Architect® is typically straight forward with a one-
click install that provides installation of the product and an underlying Microsoft® SQL Server
Express database. However, Windows security can provide some challenges for installation of
Microsoft SQL Server to a Windows environment. Further complexities may be encountered if you
are installing System Architect to a network environment and using a separately installed version of
full-blown Microsoft® SQL Server.
This 2-part series of articles covers System Architect Version 11.4.4 or later. It describes
installation in a secured environment and configuration to connect to Microsoft SQL Server
(SQL Server) and Microsoft SQL Server Express in a non-shared and shared environment,
targeting professional and enterprise encyclopedias. Each part also includes a Basic
Troubleshooting section.
This article, Part 1 of a two-part series, provides an overview of System Architect
terminology and utilities. It then walks you through the steps of installing and configuring the
software to connect to SQL S e r v e r Express on a workstation targeted to professional
encyclopedias.
Part 2, Connect System Architect to Microsoft SQL Server, describes the steps to
connect a server environment targeted to professional encyclopedias.
Overview of System Architect
System Architect is a comprehensive enterprise architecture solution that provides fully
integrated support across four keys domains: business, information, systems, and
technology. It is used to capture complex knowledge about organizations and related
technology.
Empowered with this knowledge, executives, decision makers, and managers can analyze
and optimize current capabilities, because they will have a more thorough understanding of
the organizational structures, portfolio of business strategies, business processes,
information flow, applications, and technology infrastructure. The result is an enhanced
collaboration between stakeholders and improvement in the organization’s effectiveness to
proactively respond to business changes and an enhanced ability to consider new
capabilities.
In addition, System Architect is the most widely used enterprise architecture solution in
support of the U.S. Department of Defense Architecture Framework (DoDAF). It provides the

UNICOM® Systems
6
capabilities for building models representing U.S. Department of Defense (DoD)
architectures and automatically generates DoDAF work products and reports.
System Architect includes the Federal Enterprise Architecture Framework (FEAF) that
assists the U.S. Government departments and agencies in incorporating and using the U.S.
Office of Management and Budget (OMB) Reference Models, as well as the subsequent
creation and publishing of OMB Exhibit 300 and Exhibit 53 reports.

UNICOM® Systems
7
What You Need to Know Before You Start
Terms and Utilities
Installing and configuring System Architect is a three-part process:
1. Installing the UNICOM License Server.
2. Installing the System Architect software on the workstation
(laptop/workstation/network server).
3. Installing Microsoft® SQL Server® Express to your laptop/workstation or connecting System Architect to a Microsoft® SQL Server® on the network.
System Architect depends on Microsoft® Windows® features provided in the latest service packs and operating system upgrades. It has a native reporting engine to produce various reports. It also has the capability to produce Microsoft® Excel and Microsoft® Word reports. This capability requires these products to be installed on the workstation.
Consult the System Requirements tab https://teamblue.unicomsi.com/products/system-architect/ for software and hardware requirements for System Architect and Microsoft®
SQL Server.
System Architect also requires a license to unlock its various features. The licenses are available as either node-locked (user) licenses, which are tied to a specific workstation, or as floating (server) licenses. You must run UNICOM® License Server on the network or your local machine (or laptop) to serve up a System Architect license for SA to run.
System Architect Encyclopedias
System Architect uses a Microsoft® SQL Server® database as its underlying storage mechanism to store all diagrams and definitions, amongst other information. Each database is called an encyclopedia. Another term for this is the enterprise architecture (EA) repository. You can use one database (or encyclopedia) on the network for your EA repository, which multiple people work on at the same time. You may also create and use encyclopedias on your local machine or laptop. There are numerous ways to move information from a local encyclopedia to another (network) encyclopedia.
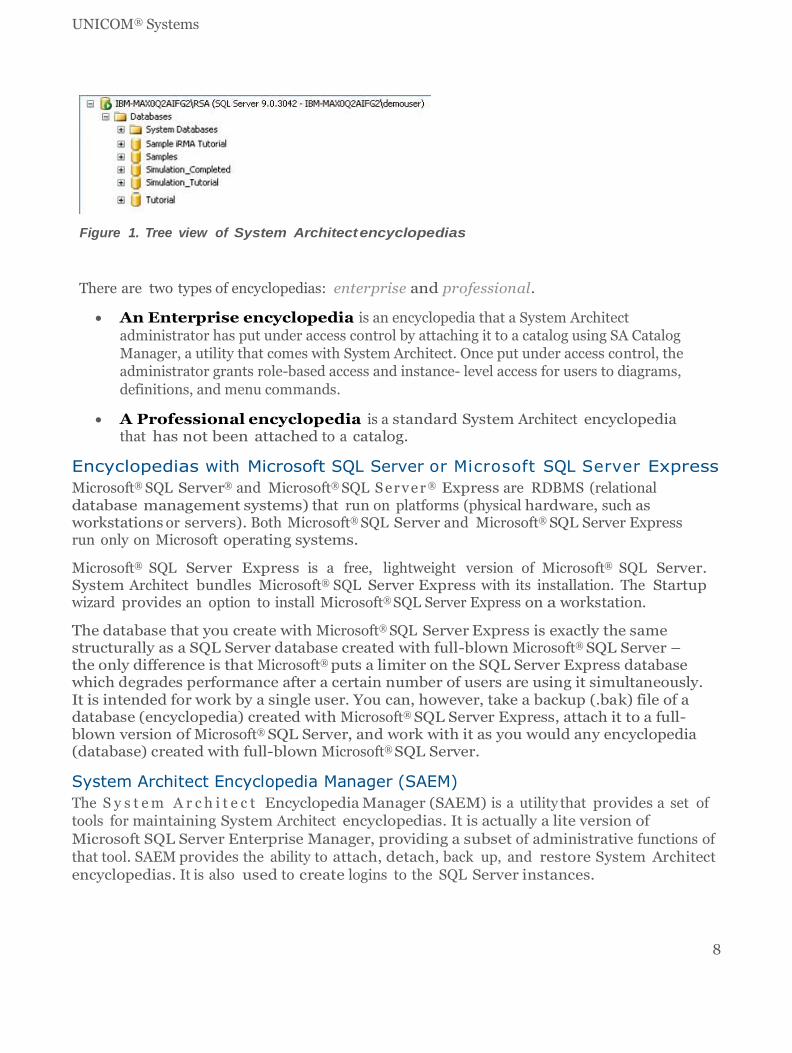
An encyclopedia (which is a Microsoft SQL Server database) can created only by using System Architect. The database and its objects (tables and views) is created within a Microsoft® SQL Server instance. System Architect identifies the instance name by the hostname and the instance name in this format:
<hostname>\<instance name>.
In Figure 1, the tree view, shows a SQL Server instance called "RSA" running on a physical server with the hostname of IBM-MAX0Q2AIFG2. Within the IBM-MAX0Q2AIFG2\RSA instance are several System Architect encyclopedias, such as Tutorial and Samples.
UNICOM® Systems
8
Figure 1. Tree view of System Architect encyclopedias
There are two types of encyclopedias: enterprise and professional.
An Enterprise encyclopedia is an encyclopedia that a System Architect
administrator has put under access control by attaching it to a catalog using SA Catalog
Manager, a utility that comes with System Architect. Once put under access control, the
administrator grants role-based access and instance- level access for users to diagrams,
definitions, and menu commands.
A Professional encyclopedia is a standard System Architect encyclopedia that has not been attached to a catalog.
Encyclopedias with Microsoft SQL Server or Microsoft SQL Server Express
Microsoft® SQL Server® and Microsoft® SQL S er v e r ® Express are RDBMS (relational database management systems) that run on platforms (physical hardware, such as workstations or servers). Both Microsoft® SQL Server and Microsoft® SQL Server Express run only on Microsoft operating systems.
Microsoft® SQL Server Express is a free, lightweight version of Microsoft® SQL Server. System Architect bundles Microsoft® SQL Server Express with its installation. The Startup wizard provides an option to install Microsoft® SQL Server Express on a workstation.
The database that you create with Microsoft® SQL Server Express is exactly the same structurally as a SQL Server database created with full-blown Microsoft® SQL Server – the only difference is that Microsoft® puts a limiter on the SQL Server Express database which degrades performance after a certain number of users are using it simultaneously. It is intended for work by a single user. You can, however, take a backup (.bak) file of a database (encyclopedia) created with Microsoft® SQL Server Express, attach it to a full-blown version of Microsoft® SQL Server, and work with it as you would any encyclopedia (database) created with full-blown Microsoft® SQL Server.
System Architect Encyclopedia Manager (SAEM)
The S y s t e m A r c h i t e c t Encyclopedia Manager (SAEM) is a utility that provides a set of
tools for maintaining System Architect encyclopedias. It is actually a lite version of
Microsoft SQL Server Enterprise Manager, providing a subset of administrative functions of
that tool. SAEM provides the ability to attach, detach, back up, and restore System Architect
encyclopedias. It is also used to create logins to the SQL Server instances.

UNICOM® Systems
9
The Startup Wizard
The Startup Wizard is a tool used to configure the settings for System Architect installation. You start it by selecting Help > Startup Wizard.
You can use the wizard for these tasks:
• Install Microsoft® SQL Server Express to the local workstation
• Connect to an existing Microsoft® SQL Server (or SQL Server Express) located on the
workstation
• Connect to an existing Microsoft® SQL Server (or SQL Server Express) located on the
network
The wizard also provides options for selecting a default framework and a t t a c h i n g example encyclopedias.

UNICOM® Systems
10
I. Install UNICOM® License Server & Apply License
System Architect requires a valid license to enable you to run it and unlock its features. System Architect uses a UNICOM® License Server to serve up a System Architect license.
Node-locked licenses
For a node-locked (user) license, the license is tied to a specific workstation. In such a
configuration, every workstation running System Architect requires having its own specific
license.sa file. You must also run UNICOM® License Server to serve up the license before
starting System Architect on your workstation/laptop.
The steps to set up license management of System Architect are as follows:
1. Install UNICOM® license server to the network or your workstation/laptop, depending on
where you will be installing/running System Architect, as follows:
a. Create a new folder, and extract the contents of the ult_license.zip file into it.
b. Navigate to ult_licesrv/bin/windows_intel/64bit
c. Run the setup.exe for the UNICOM license server, and follow the onscreen instructions.
2. When the installation program for UNICOM License Server has finished, copy your license.sa file to this folder: C:\Program Files\UNICOM Global\License Server\licenses
3. Create a Named User file named License.SA.NamedUsers, using instructions below:
a. Edit the newly created License.SA.NamedUsers file with any text editor to specify
the named user for the machine. The named user, in its entirety, should be placed
underneath each licensed feature in the License.SA.NamedUsers file. An example
is below.
b. The domain is your Computer Name that you can find by right-mouse clicking on
your Computer properties; the username is the name you log into your computer
with.
[SA-SystemArchitect-Authorized] domain\user1 [SA-DODAF-ABM-Authorized] domain\user1 [SA-DODAF-Authorized] domain\user1 domain\user2
Complete list of Authorized Modules for System Architect: [SA-SystemArchitect-Authorized] [SA-ARCHIMATE3-Authorized]

UNICOM® Systems
11
[SA-DODAF-ABM-Authorized] [SA-DODAF-Authorized] [SA-FEA-Authorized]
[SA-Simulator-Authorized]
Here is an example of what would be in a License.SA.NamedUsers file:
[SA-SystemArchitect-Authorized]
ComputerName\JoeT
[SA-ARCHIMATE3-Authorized]
ComputerName\JoeT
[SA-DODAF-ABM-Authorized]
ComputerName\JoeT
[SA-DODAF-Authorized]
ComputerName\JoeT
[SA-Simulator-Authorized]
ComputerName\JoeT
4. Place the License.SA.NamedUsers file you created in the same directory as the license.sa file: C:\Program Files\UNICOM Global\License Server\licenses.
5. Select All Programs> UNICOM® Global> License Server> Manage Licenses.
6. Type i and hit Enter to import the license.sa file provided by UNICOM® Systems. Type in the path and file name of the license file and hit Enter, then close the License Manager.
7. Run the UNICOM® License Manager by selecting All Programs> UNICOM® Global> License Server> Start License Server.
8. Run System Architect.
Floating Licenses
Floating (server) licenses are accessible on a network and are not tied to one particular workstation. Instead, the license is tied to the workstation or server where the UNICOM® License Server is installed. In such a configuration, not every workstation running System Architect requires its own license.sa file. Instead, floating licenses provide a pool of licenses that can be shared among all System Architect users – you can have an unlimited number of people use System Architect but only X at a time, where X is the number of Floating licenses you have. All floating licenses are placed in one license.sa file.
The floating configuration requires the UNICOM® License Server to be network accessible by all System Architect workstations. Each workstation running System Architect uses or "consumes" a license from the UNICOM® License Server.

UNICOM® Systems
12
II. Install System Architect
The System Architect installation described in this article focuses on Microsoft® SQL S e r v e r
Express for professional encyclopedias.
Uninstall Previous Version of SA (If It Exists)
You must remove previous versions of System Architect from the workstation before installing a new version.
1. Log on to the workstation as a workstation administrator.
2. Access the control panel to uninstall any previous versions of System Architect from the workstation.
Install SA
1. Log on to the workstation as the workstation administrator.
2. Run the System Architect installation (.exe) file, and follow the prompts.
3. Accept the license agreement.
4. Enter the Customer Information: User Name and Organization.
5. Click the option under "Install this application for:" Anyone who uses this
computer (all users).
6. Choose a destination location. Accept the default unless you want to specify a
different location.
7. Supply license information – choose A UNICOM License server – and enter the
location of the license server – for example, localhost:7498

UNICOM® Systems
13
Figure 2. License information screen on System Architect install.
8. Under "Please select a setup type," click Complete to install all of the System
Architect options.
9. Click Next.
10. Click Install to install the software.
11. Click Finish after it is installed.
Once the install is complete, you have installed System Architect the software – but you will still
need to install the Microsoft® SQL Server Express provided so that you will be able to create
encyclopedias (databases) on it. Steps to do that are provided next.
III. Install Microsoft® SQL Server Express & Examples
System Architect requires Microsoft® SQL Server RDBMS (relational database
management system) for its repository to store the diagrams and definitions. The next
step is to install Microsoft® SQL S e rv e r Express on the workstation, attach the tutorial
and sample encyclopedias (which are databases), and select other start-up options. The
Startup Wizard automates this process.
Launch Startup Wizard & Install Microsoft SQL Server Express
1. Log on to the workstation as the workstation administrator
2. Start System Architect either by selecting Start > Program Files > UNICOM
Systems> UNICOM Systems Lifecycle Solutions> System Architect or by double-
clicking the System Architect icon on your desktop.
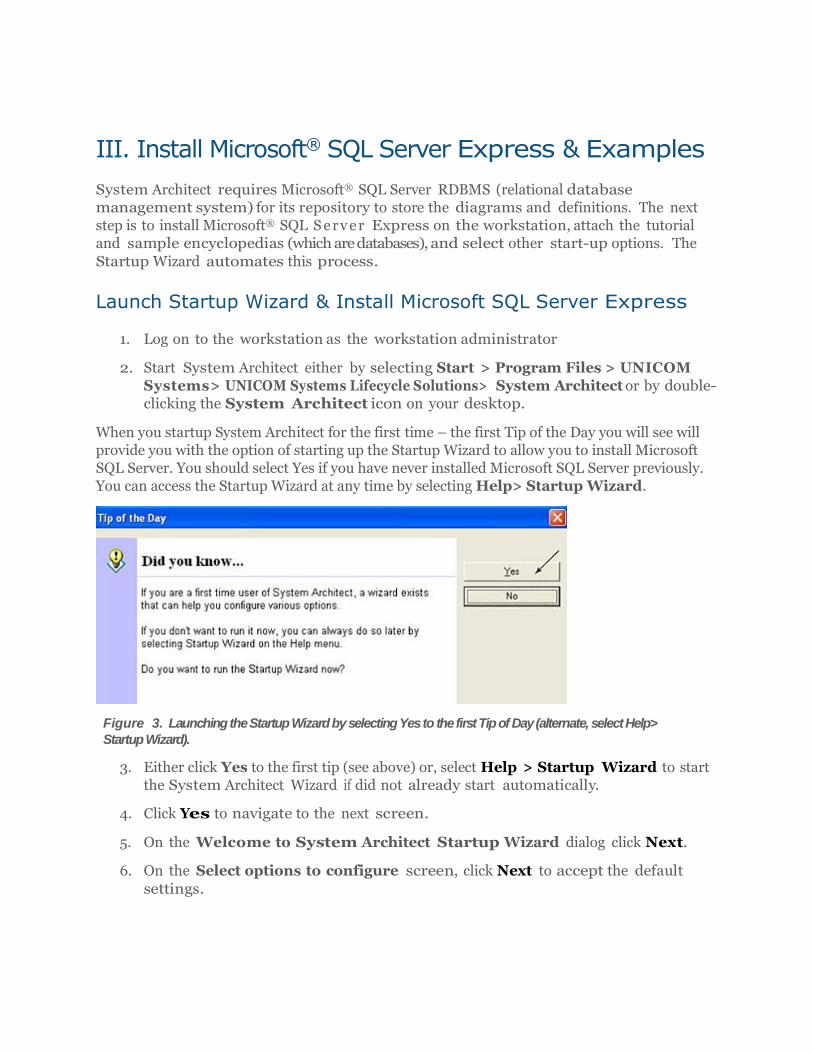
When you startup System Architect for the first time – the first Tip of the Day you will see will
provide you with the option of starting up the Startup Wizard to allow you to install Microsoft
SQL Server. You should select Yes if you have never installed Microsoft SQL Server previously.
You can access the Startup Wizard at any time by selecting Help> Startup Wizard.
Figure 3. Launching the Startup Wizard by selecting Yes to the first Tip of Day (alternate, select Help>
Startup Wizard).
3. Either click Yes to the first tip (see above) or, select Help > Startup Wizard to start
the System Architect Wizard if did not already start automatically.
4. Click Yes to navigate to the next screen.
5. On the Welcome to System Architect Startup Wizard dialog click Next.
6. On the Select options to configure screen, click Next to accept the default
settings.

UNICOM® Systems
15
Figure 4. Startup Wizard default options
7. Under Configure where encyclopedia data will be stored, select the option to
install SQL Server Express locally on the workstation.
Figure 5. Option to Install Microsoft SQL Server Express Locally
8. Click Next to get to the Configure Startup View screen.
9. Click Welcome guide, and leave the Default Welcome Guide Generic
option selected.
10. Click Next to move to the Configure Sample Encyclopedia Projects screen.
11. Make selections on which example encyclopedias to attach to the server – you can
leave the default which is that they are all selected.
Figure 6. Configure Sample Encyclopedia Projects View
12. Click Next.
13. Click Finish to complete the installation steps.

UNICOM® Systems
16
When the installation is finished, you will be prompted to enter an Audit ID. The Audit ID
is used to track the changes made by a user to diagrams and definitions in the
encyclopedia for audit purposes. Everything that you do in System Architect –
create/edit/delete/open a definition, diagram, or symbol – is time stamped with
your Audit ID. Later you can run reports on who did what to the architecture at
what time, through the Audit ID.
14. Enter an Audit ID (for example, your log in name), and then click OK.
Figure 7. The “Enter Audi ID” window
Create a Local SQL Server Express Connection
1. From the Open Encyclopedia window, click the Existing tab on the left.
2. Click the button under Connection to create a connection to the SQL instance.
3. In the next dialog window, click New to create the connection.
4. Under Connection Name in the Connection Manager dialog, type a name for
the connection (example, Local Connection).
5. From the combination box in the form of <workstation name>\<instance name>,
select the local SQL Server Express instance name. For this example, select this
one:
IBM-MAX0Q2AIFG2\RSA
6. Click OK.
Figure 19. Create a New Connection to the Local Instance

UNICOM® Systems
17
When the list of the sample encyclopedias is displayed, you can select one from the list
to open it.
7. Click Cancel to dismiss the Open Encyclopedia dialog.
8. Click Close to dismiss the Tip of the Day dialog.
Create a New Encyclopedia
To create a new Encyclopedia perform the following steps.
1. From the System Architect main page click File > Open Encyclopedia.
2. In the Open Encyclopedia window, click New to create a new System Architect
encyclopedia.
3. Browse to select Local Connection to connect to the SQL instance.
4. Enter a name for the new encyclopedia (for example, Test).
5. Click OK.
Figure 20. Create a New System Architect Encyclopedia
6. When the Property Configuration dialog opens, click OK to accept the default
selections.
The newly created encyclopedia opens, and the installation and configuration of System
Architect is now finished.
Installation Complete
At this point, both System Architect and SQL S e r v e r Express are installed on the
workstation. A SQL S e r v e r Express instance is created. And you have created a
connection to that SQL Server Express instance that has the example encyclopedias
(databases) installed to it. You can create new encyclopedias as well.
So far, the workstation administrator is the only person with the rights to use System
Architect and create System Architect encyclopedias. If you have installed System Architect

UNICOM® Systems
18
to your laptop, where you are naturally the administrator – then you are finished with the System
Architect installation. You can now create a connection to the Microsoft SQL Server instance and
open the example encyclopedias (databases) or create a new encyclopedia.
If you wish to open encyclopedias that someone provides you, or you wish to backup your
encyclopedia in the future – you should do the next step – IV. Creating a Shared Folder for
Encyclopedia Backups.
If you are not the only one that will be using System Architect on the workstation you have
installed it to, you should perform steps V and VI of this article to complete the software
configuration for non administrators.
IV. Create a Shared Folder for Encyclopedia Backups
On Windows, Microsoft SQL Server Express services run under a special account called NT
AUTHORITY\NetworkService. This account is also known as NETWORK SERVICE or
SERVICE. It has minimum amount of security privileges, which minimizes network attacks
on the workstation or server.
The System Architect Encyclopedia Manager (SAEM) provides System Architect
administrators the ability to backup and restore System Architect encyclopedias. The
backup file of an encyclopedia (or SQL Server database) has a .bak extension. When you
specify to backup an encyclopedia to a backup (.bak) file, the file must be written to a shared
directory that NT AUTHORITY\NetworkService has both read and write access to. To
allow Network Service read and write access to the folder, the security for the folder must
be modified. Follow these steps to create a shared folder and modify the security:
Create a Shared Folder
Note that on older versions of Windows such as Windows XT and Windows Server 2003, you
may need to uncheck “Use Simple file sharing option” on the My Documents folder to proceed
with this step.
1. From Windows Explorer, navigate to the drive or folder where you want to create
the shared folder – a r e c o m m e n d a t io n i s t h a t y o u us e y o ur M y
Do c um e n t s f o l d e r (example: c:\Document and Settings\All
Users\Documents).
2. Create a new folder in My Documents (example, right-mouse click on My
Documents and select New> Folder or select File > New > Folder) and give it a
name to represent the fact it will hold System Architect backup databases to share –
example saDBShare.

UNICOM® Systems
19
Modify Security Settings for the New Folder
1. Right-click o n the new folder (in this example, saDBShare), and select the
Security tab.
2. In the Security tab, click the Advanced button.
3. With System selected, click the Change Permissions button.
4. Click to clear the toggle choice Replace all child object permissions with
inheritable permissions from this object.
5. Select Add.
6. In the Select User or Group dialog, for the object name, type NETWORK.
7. Click Check Names.
8. Select NETWORK SERVICE, and then click OK.
9. In the Select User or Group dialog box, click OK.
10. In the Permission Entry dialog box, click Allow for the Full Control
permission – all other permissions below it will automatically toggle themselves
on as well.
Figure 8. Specifying Network Service Access for SA Backup folder
11. Click OK.
12. Repeat the steps to add SERVICE.
13. In the Advanced Security Setting window, o p t i o n a l l y click Apply, and click
OK (if it is available to be clicked; Windows should automatically apply the changes).
You can now use this folder to place .bak files which represent backup encyclopedias (databases)
and use the Restore from File option in SAEM to restore them to your Microsoft SQL Server
instance as encyclopedias. You can also use the SAEM option to Backup to File to store a backup
of an encyclopedia (.bak file) to this folder.

UNICOM® Systems
20
Share the folder and modify the permissions
In the previous section you learned how to create a folder with sufficient permissions to use to
backup encyclopedias as .bak files, and restore .bak files to an encyclopedia on a Microsoft SQL
Server instance using SAEM. But you are the only one with access to that folder. In this section,
we cover how to allow other Windows accounts to be able to use this folder.
1. Select the Sharing tab in the Properties dialog of the saDBShare (our example
name) folder, and click the Share button.
2. From the drop-down, select Everyone.
3. Click the Share button.
4. Click the Advanced Sharing button.
5. In the Advanced Sharing dialog, toggle the choice Share this Folder.
Figure 9. Specifying Folder Sharing Options
6. Click the Permissions button.
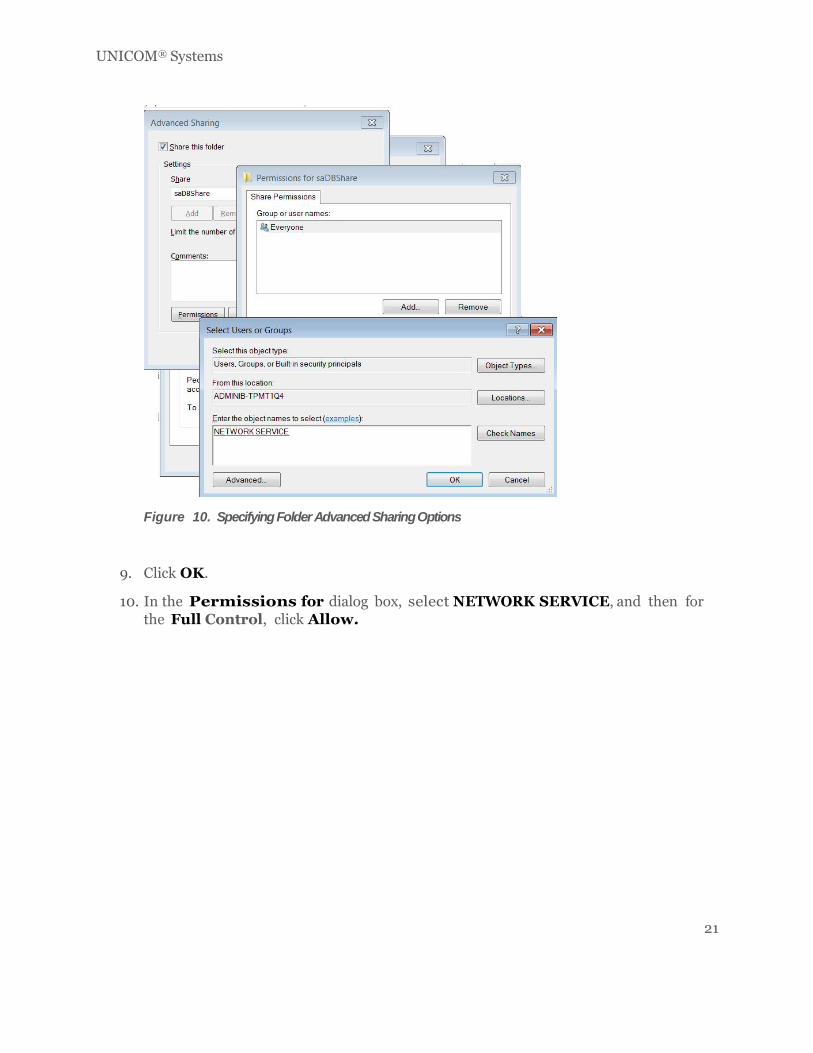
7. In the Permissions for saDBShare dialog, click Add.
8. In the Select Users or Groups dialog, type NETWORK SERVICE, and then
click Check Names. If NETWORK SERVICE is not found, type NETWORK
instead.
UNICOM® Systems
21
Figure 10. Specifying Folder Advanced Sharing Options
9. Click OK.
10. In the Permissions for dialog box, select NETWORK SERVICE, and then for
the Full Control, click Allow.

UNICOM® Systems
22
Figure 11. Adding Network Service Sharing Option
1. Click Apply.
2. Repeat the steps for SERVICE.
3. In the Permissions for dialog box, select Everyone, and click Remove.
NETWORK SERVICE (or NETWORK) and SERVICE now show under Group or user
names.

UNICOM® Systems
23
Figure 12. Completing Service & Network Service Sharing Options
4. Click Apply, and then click OK.
5. In the Advanced Sharing dialog, click Apply and then OK.
6. In the Properties dialog box, click Apply, and then OK to close the window.
Tip:
To back up and restore System Architect encyclopedias by using the Encyclopedia
Manager, you can connect to this shared folder by using its Universal Naming
Convention (UNC) format (\\computername\saDBShare) or by using the
mapped drive.
V. Grant the BUILTIN\Users Group SQL Server Roles
To allow System Architect users access to Microsoft SQL Server or SQL Server Express
instances and encyclopedias, SQL Server security uses either Windows authentication
(for local or domain users) or SQL Server authentication (for users defined within SQL
Server by the database administrator). For this example, you will use Windows
authentication.
So far, the workstation administrator is the only person with the rights to use System
Architect and create System Architect encyclopedias. If you have installed System Architect
to your laptop, where you are naturally the administrator – then you are finished with the System

UNICOM® Systems
24
Architect installation. You can run System Architect, and create new encyclopedias or open
existing ones (by selecting File, Open Encyclopedia).
However, if you have installed System Architect to a machine that will be used by others, users
who belong to the BUILTIN \Users group are not automatically granted rights to
connect to SQL Server nor can they create or use System Architect encyclopedias.
Grant dbcreator and sysadmin roles
The next step is to grant the Windows BUILTIN\Users group dbcreator and sysadmin
roles. System Architect users who belong to this group will be able to create and modify
System Architect encyclopedias within the SQL Server Express instance. This task is
accomplished by using the System Architect Encyclopedia Manager (SAEM) utility.
1. Log on to the workstation as a workstation Administrator.
2. Click Start > All Programs > UNICOM Systems > UNICOM Systems
Lifecycle Solutions > System Architect > SAEM for SQL Server.
3. Click Server > Connect to create a connection to the SQL S e r v e r instance.
4. From the drop-down menu, select the local SQL Server Express instance. The SQL
instance is in the form of <local hostname>\<instance name>.
5. Select Windows for authentication.
6. Press OK.
Figure 1 3 . Use Windows Authentication to connect to a SQL Server
Now, grant BUILTIN\Users group dbcreator and sysadmin roles:

UNICOM® Systems
25
7. Click Server > Logins to see a list of existing Windows users and groups.
8. Select the BUILTIN\Users group.
Figure 14. Edit BUILTIN\Users Group properties
10. Click the Edit the selected login icon to edit the properties for the Windows
BUILTIN\Users group.
11. From the Properties window, click the Server Roles tab.
12. Check both sysadmin and dbcreator options to give the group administrator
rights to the SQL Server Express instance and the ability to create encyclopedias
within the instance.
13. Click OK, and close the Login Properties window.
14. Click Server > Disconnect to disconnect from the SQL Server instance.
15. Close the SAEM (SQL Server) utility.
Figure 15. Use the check boxes to grant server roles
Users who belong to the BUILTIN\Users group now have the security rights that are
necessary to use System Architect to connect to the local SQL Server Express instance
and create encyclopedias. They are also considered the database owners of these
encyclopedias.

UNICOM® Systems
26
VI. Connect to SQL Server Express as Local or Domain User
You have finished the workstation administrator's tasks for System Architect installation
and configuration. Non-administrative users of the workstation can now log in to the
workstation and start the software. You can proceed with these steps:
1. Log off of the workstation as a workstation administrator.
2. Log on to the workstation as a local or domain user.
3. Start System Architect (which automatically activates the Startup Wizard).
4. Either click Yes to the first tip in the Tip of the Day dialog (see Figure 3) or, select Help
> Startup Wizard to start the System Architect Wizard if did not already start
automatically.
5. On the Welcome to System Architect Startup Wizard screen, click Next.
6. From the Configure Where Encyclopedia Data Will Be Stored dialog, click
Next to accept the defaults.
7. Select the Existing SQL Server Located on this machine option to connect
to the local SQL Server Express instance.
8. Click Next.
Figure 16. Select a server to host System Architect encyclopedias
9. From the Available Local SQL Servers window, select the local SQL Server Express
instance name.
(For this example: IBM-MAX0Q2AIFG2\RSA)

UNICOM® Systems
27
Figure 17. Select the local SQL Server Instance
10. Click Next.
11. For the Connection Information option, select Use Windows authentication.
Figure 18. Specify Windows Authentication for the Local SQL Server
12. Click Next to navigate through the rest of the screens.
13. Click Finish to dismiss the Summary of User Selections window.
14. When prompted, enter an Audit ID. The Audit ID is a name that you create that will
be tracked as you create/edit/delete architecture information in System Architect. Every
diagram, symbol, and definition that you create/edit/delete/open will be tracked by a
date/time stamp and your Audit ID, so that reports can be run to see what users did
what to the architecture at what time and date.
15. Click OK.
You will then see the Open Encyclopedia dialog. The next steps are to create a SQL
Server Express connection, browse the sample encyclopedias, and create a new one. To
do this, follow the same steps provided above in section III, Install Microsoft® SQL
Server Express & Examples -- for creating a Local SQL Server Express connection,
opening the example encyclopedias, and creating new encyclopedias.
Configure Subsequent Workstations
You can install and configure System Architect on additional workstations by repeating the
process described in this article.

UNICOM® Systems
28
VII. Basic Troubleshooting
Instructions follow for how to handle the following problems or tasks:
SQL Server login failure Use either the domain\username or username@fully_qualified_domain format to log
in.
SQL Server does not exist or access denied
Figure 21. Error Message: SQL Server does not exist
1. Ensure that SQL Server Express is installed properly.
2. Ensure that the SQL Server protocols are enabled and that SQL services are
running.
SQL Server Services will not start 1. Disable anti-virus software.
2. Restart the SQL services.
SQL Server Express failed to install on Windows XP
The Startup Wizard displays an error during the installation and configuration of SQL
Server Express on Windows XP. This error is related to a conflict with the MSXML 6
Parser. The work around is to use the Windows Installer CleanUp utility to remove
references to MSXML
To do this, follow these steps:
1. Download the Windows Installer Cleanup utility from Microsoft Support. .
2. Run the utility.
3. Select MSXML 6 from the list, and then click Remove.
4. Reboot the workstation.
5. Start System Architect and re-run the System Architect Startup Wizard.

UNICOM® Systems
29
Windows Installer Cleanup Utility Failed to Install
1. Download and install the Microsoft® Visual Basic Script (VBScript).
2. Reboot the workstation.
3. Re-run the Windows Installer Cleanup Utility.
NT AUTHORITY\NETWORK SERVICE (Network Service) issues
Follow the instructions in Section IV, Create a Shared Folder to Store Encyclopedia
Backups, to resolve the issue.

UNICOM® Systems
30
Appendix
Enable Microsoft SQL Server Network Protocols
SQL S e r v e r Express is usually installed as a named instance. The named instance is
identified by the network name of the computer and the instance name that you specify
during installation. The TCP and Named Pipes network protocols are installed by SQL
Server Express setup. However, the services are sometimes disabled by default, so you
must explicitly enable them.
1. Log on to the workstation as the workstation administrator
2. Right-click the My Computer icon on your desktop and select Manage from the
drop-down menu to open the Computer Management window.
3. Expand Services and Applications.
4. Expand SQL Server 2012 Network Configuration (name will vary depending
on version of SQL Server installed).
5. Select Protocols for RSA, where RSA is the instance name.
6. Ensure that the Shared Memory, TCP/IP, and Named Pipes protocols are
enabled.
Figure 22. Enable SQL Server Protocols
The next step is to restart the SQL server service for the instance for the changes to take
effect.
1. Under Computer Management, expand SQL Server Configuration Manager if
it is not already expanded from

UNICOM® Systems
31
2. Click SQL Server 2005 Services.
3. Right-click SQL Server (RSA), where RSA is the instance name.
4. Ensure that NT AUTHORITY\NetworkService is the services owner (the next
section explains more about that service).
5. Click Restart to stop and then restart the SQL server service
Figure 23. Restart Microsoft SQL Server service

UNICOM® Systems
32
Resources
Learn
Learn more about UNICOM® System Architect®:
o Browse the product page UNICOM® System Architect® at
http://unicomsi.com/products/system-architect/
o Watch videos of UNICOM® System Architect® on its YouTube channel,
SystemArchitectTrain.
o Explore the UNICOM Customer Support Portal for System Architect technical
resources and best practices.
Discuss
Participate in the System Architect LinkedIn forum, where you can share information
about methods, frameworks, and tool implementations. Discussions include tool-specific
technical discussions about System Architect.
Follow UNICOM® System Architect® on:
o Facebook.com\SystemArchitect,
o Twitter (@SystemArchitect), and
o YouTube (SystemArchitectTrain),
and add your comments and requests.


![[1]Oracle® Fusion Middleware Installing and Configuring ... · Installing and Configuring Oracle Enterprise Data Quality 12c ... Oracle Fusion Middleware Installing and Configuring](https://static.fdocuments.in/doc/165x107/5b8396637f8b9a47588d872b/1oracle-fusion-middleware-installing-and-configuring-installing-and.jpg)