Technical Manual - media.haworth.com manual 3-2-16.pdf · • Plug and play access for cabled users...
22
Technical Manual March 2, 2016 2.2.0 Release for Wireless Product
Transcript of Technical Manual - media.haworth.com manual 3-2-16.pdf · • Plug and play access for cabled users...

Technical ManualMarch 2, 2016
2.2.0 Release for Wireless Product

2
Workware – Technical Manual | table of contents
IntroductionGetting to Know workware 3
I. Product DetailsWorkware Configurations 3System Overview 5Interface Module Options 5Processor 6Processor – Video Inputs and Outputs 6Wireless 6
II. System IntegrationAV integration with the Processor 8Security 10Network Connectivity 11
III. SupportFirmware Updates 11Beyond Installation 12IT FAQ 12Troubleshooting 14Need Additional Help 14Warranty 15
For directions for previous generations of releases of Workware Wireless, contact [email protected].

3
Introduction
Getting to Know WorkwareWorkware is a group of products that provides technology-enhanced collaborative spaces in a variety of ways and helps users think, see, do and connect in many different work settings. Comprised of connect and view, workware provides solutions for monitor placement, power and data connectivity, and user control of monitor access. Workware is the tool that gives users freedom to connect, share, and create securely and simply.
• Easy Digital Sharing• Integrates Anywhere• Secure and Supported
An uninterrupted exchange of information is essential for communication and creative problemsolving in groups. That’s just what workware connect was designed to bring to the workplace.
With options for wireless or wired connectivity, workware removes technological barriers that often hinder collaboration at work. Users simply plug in or launch software on their laptop to connect wirelessly to external video displays. It’s that easy for groups to connect, share content, and keep ideas flowing.
Wireless security is important to everyone. With workware, wireless connectivity is built upon your existing network infrastructure, taking advantage of your existing firewalls and other security features. Additionally, each session can be protected using a fixed password, setup for moderator controlled sessions, or a unique 4-digit login screen key. Wired cable back-up provides additional security by enabling visitors to participate in a meeting without accessing a wireless system.
Workware Configurations Workware connect provides scalable options for connecting and sharing. These include four different options based on the needs of an individual organization and are scalable for wired or wireless environments.
Cable SharingPresenters pass a cable from one user to the next.
Cable Sharing with touch controlUp to four users pass control by touching a button. No cable passing needed.
Wireless Sharing* Unlimited users can share content wirelessly using device specific application software controls.
Wireless sharing with cable backupCombines wireless sharing and cable sharing with touch control.

4
Cable Sharing Cable Sharing with Touch Control
Wireless Sharing with Cable Backup
Wireless Sharing
Sharing MethodHow users share their presentation on the monitor.
Switching MethodHow users switch the monitor presentation to other users.
Maximum Number ofConnections to theMonitor
Monitor Power Control
Simultaneous SharingAllows more than one user to share content at the same time.
Other Advantages
Available for wireless users.
Cable Sharing• Presenters use a single audio/ video cable connected directly to a monitor. This provides audio/ video access to the monitor to share presentations.
Physical Cable Switching• Users switch betweenpresenters by disconnectingthe audio/video cable from the first user’s device andconnecting it to the second user’s device.
Cabled Connections(1 Connection – Maximum)• Since the audio/video cable is directly wired to the moni- tor this application can onlyprovide one connection to the monitor for presentations
Monitor Remote Control•Monitor power is controlled using the monitor remotecontrol (field supplied) or the power button on the monitor.
Not available for cabled users
• Simple configuration.• Plug and play access for cabled presenters (no software needed).
Not available for cabled users
• Plug and play access for cabled users (no software needed).• Touch Pad allows easy switching between cabled presenters and presentation modes.• Touch Pad/Processor supports Video Conferencing Mode.
Available for wireless users.
• Simple configuration.• Mobility for wireless users.• Wireless module firmware and app software provide unique content control features as well as sharing individual application windows and media files.
• Mobility for wireless users.• Plug and play access for cabled users - no software needed.• Touch Pad allows easy switching between cabled presenters and presentation modes.• Touch Pad/Processor supports Video Conferencing Mode.
Wireless Sharing• Presenters connect to the wireless module, which is connected via LAN to the building network, wirelessly and share presentation material from their laptop or mobile device.
Wireless Switching• Users can simultaneously present content with other users.
Wireless Connections(Unlimited Users)• Unlimited users can simultaneously share content depending on the building’s wireless network capacity.
Monitor Remote Control• Monitor power is controlled using the monitor remote control (field supplied) or the power button on the monitor.
Wireless Sharing with Touch Control• Using the Touch Control, users may switch the system to the wireless mode and connect to the wireless module, which is connected via LAN to the building network, wirelessly and share presentation material from their laptop or mobile device.
Cabled Sharing With Touch Control• Presenters may access themonitor to share a presentation by connecting audio/ video cables to their device and activating the cables corresponding button on the Touch Control.
Touch Control Switching• Users may switch the monitor presentation to other users by activating the corresponding button on the Touch Control.
Wireless Switching• When the Wireless Mode is active, users can simultaneously present content with other users.
Cabled Connections(4 Connections - Maximumper processor)• The Interface Module canaccommodate a maximum of four audio/video cables.
Wireless Connections(Unlimited Users)• Unlimited users can simultaneously share content depending on the building’s wireless network capacity.
Touch Control Power Button• Monitor power is controlledusing the power button on theTouch Control.
Cabled Sharing with Touch Control• Presenters may access the monitor to share a presentation by connecting audio/ video cables to their device and activating the cables corresponding button on the Touch Control.
Touch Control Switching• Users may switch the monitor presentation to other users by activating the corresponding button on the Touch Control.
Cabled Connections(4 Connections - Maximumper processor)• The Interface Module can accommodate a maximum of four audio/video cables.
Touch Control Power Button• Monitor power is controlled using the power button on the Touch Control.
I. Product Details
Workware ConfigurationsWe understand that different users need different solutions. Workware was designed to be flexible tothose changing needs. The workware interface module allows for 4 levels of connectivity to monitordisplays. The solutions are scalable for wired or wireless environments.
Choosing the Right Workware Solution

5
I. Product Details
System OverviewThe illustration below shows the complete workware system with all available options (monitor not included). The workware interface module with wired switching can be used with or without the wireless module.
• Wired switching supports up to four users at a time, each with their own cable.• Power and wired switching is controlled by the Touch Control panel.• Wireless switching supports up to unlimited users, on or off site.• Wireless switching controlled by on screen interface.• Wireless with cable back up supports visitors without access to the client wireless network.
I. Product Details
Interface Module OptionsWorkware is available with switching and non- switching interface module options. The diagrambelow is intended to help determine what is right for your organization based on features and benefits of both options.
See Table
Non Switching Interface Module
single monitor –wireless sharingwith cable backupcabling diagram
User 4User 3User 2User 1
User 4User 3User 2User 1
User 4User 3User 2User 1
User 4User 3User 2User 1
dual monitor –wireless sharingwith cable backupcabling diagram
Corded option
Corded option
Hardwired option
Hardwired option
Switching – Interface Module

6
I. Product Details
Processor• The Processor controls switching between presentation modes and between cabled presenters.• The Processor is only included with switching version of the Interface Module.• The processor is typically mounted beneath a table surface inside a Cable Base (14” x 14” or larger Cable Base is required).• The wireless ports enable the wireless icon on the touch pad to be activated.
I. Product Details
Processor – Video Inputs and Outputs
See Chart
I. Product Details
Workware Wireles 2.0•Workware connect is available as an independent wireless system as well. This option offers increased functionality by allowing a large number of users to display their content without the need for plugging in a cable. Workware wireless further enables collaboration by allowing up to four computers to display on one screen at the same time. This feature is called “Quad-View”. The wireless system is controlled by a small piece of software which runs on your laptop to enable connection with the workware module.
Wireless Features
Web Based Administrative Settings:To access the administration options with workware connect follow these steps:
Access the web interface for the wireless module through a standard web browser (Address isdisplayed on the screen).
1. Click the “Admin” link.2. Enter the password (Default: admin).
.
ProcessorPower Cable• Included with Processor• 6’ Long Black cable.
13 ” H
2 ” W
Front View
4 ” D
11 ” H
Side View
AUX – Balanced Audio• 3.5mm Mini Plugs
Video Conference• HDMI Input• Optional
ProcessorPower• Power Port
Serial Number
5V DC Power
Touch Pad• RJ12 Port
Power Relay• RJ12 Port
TV 1 (Left)• HDMI Output
TV 2 (Right)• HDMI Output• Optional
AUX• HDMI Output• Duplicates TV2• Optional
Audio Input• 3.5mm Mini Plug
HDMI Input
VGA Input
Audio/Video
OU
TPUT
Audio/Video
INPU
T
Input 4• VGA/Audio or HDMI Input
Input 3• VGA/Audio or HDMI Input• OptionalInput 2• VGA/Audio or HDMI Input• Optional
Input 1• VGA/Audio or HDMI Input
Wireless M
odule PortsControl
Firmware Update• USB Port
Splash Screen• HDMI Input• Optional
VideoConference• HDMI Output• Duplicates TV1• Optional

7
Display Tab
Naming & Discovery• Display Name – Allows each unit on the network to have a unique name such as the room number or the room name the module where the module is located.• Publish the following names on the workware display – The unit can be configure to show the display name or the modules IP address on the lower right corner of the room monitor. Additionally, both can be displayed in which case each detail is shared for 5 seconds.• Display Name and Publishing Method – In order to take advantage of the display naming feature, it is recommended that the Haworth Directory Service tool is installed on a network connected computer. Once installed, selecting both items will ensure that users have 1-click access to any wireless module connected to the building’s network. The IP address of the computer running the HDS software must be typed in the Primary HDS Host text field.
Access Control• Open – Allows unrestricted access to any particular module.• Screen Key – Provides an on display 4-character code for room participants to connect to a particular module. This key changes each time all users are disconnected from a module.• Global Password – Provides a fixed password for accessing the module. This setting is best used when only 1 user is wanting to be connected to a module.• Moderated – Provides a single user a controlled session where they have the ability to restrict who connects to the session and who can share content during the session.• Password field – Used in conjunction with the Global Password and Moderated settings.• Remote View – Allows the display content to be accessed remotely. Settings are Enabled, Displayed, and Determine a Runtime which allows users in a session to decide whether to have it enabled or disabled during their session. On this setting, the feature defaults to disabled with each new session.
Resource Restriction• Maximum Connections – For the base 2.0 system this is restricted to 10 users maximum but is unlimited for the Pro 2.0 system. However, due to network restrictions, the number of connections may need to be reduced from these default settings.• Maximum Posts – For the base 2.0 system this is restricted to 4 posts maximum posts but is unlimited for the Pro 2.0 system. However, due to network restrictions, the number of posts may need to be reduced from these default settings. It should be noted that desktop sharing on Windows/Mac OS devices consumes the most bandwidth on the network. Users should be encouraged to use app and media file sharing to reduce wireless network loads when possible.• Automatic Image Resizing – automatically resizes shared image files to minimize the amount of resources being used on the wireless module during any sharing session.
System• Automatic adjustment – Allows the system time and date to be manually configured or to use the available time on the network.• Timezone – required for automatic and manual time setting.• Date and Time – required for manual time setting.• Splash Screen Background – The splash screen on the in-room display can be configured to any image but it should be noted that doing so may remove the workware instructions from the splash screen. This feature will be improved at a later date to allow easier changing.• Admin Password – Default is admin. This password can be changed but should be kept in a secure location as the system currently does not have a way to recover this password if lost or forgotten.• Language – Changes the default language of the Admin screens.
8
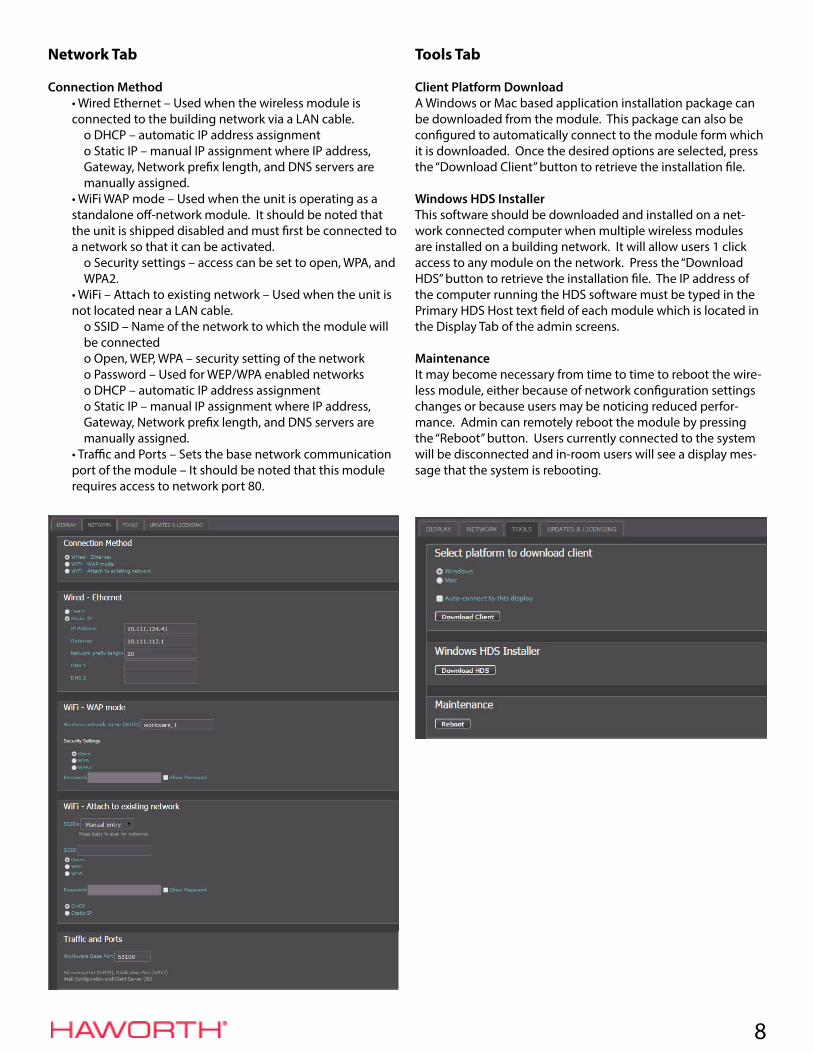
Network Tab
Connection Method• Wired Ethernet – Used when the wireless module is connected to the building network via a LAN cable.
o DHCP – automatic IP address assignmento Static IP – manual IP assignment where IP address, Gateway, Network prefix length, and DNS servers are manually assigned.
• WiFi WAP mode – Used when the unit is operating as a standalone off-network module. It should be noted that the unit is shipped disabled and must first be connected to a network so that it can be activated.
o Security settings – access can be set to open, WPA, and WPA2.
• WiFi – Attach to existing network – Used when the unit is not located near a LAN cable.
o SSID – Name of the network to which the module will be connectedo Open, WEP, WPA – security setting of the networko Password – Used for WEP/WPA enabled networkso DHCP – automatic IP address assignmento Static IP – manual IP assignment where IP address, Gateway, Network prefix length, and DNS servers are manually assigned.
• Traffic and Ports – Sets the base network communication port of the module – It should be noted that this module requires access to network port 80.
Tools Tab
Client Platform DownloadA Windows or Mac based application installation package can be downloaded from the module. This package can also be configured to automatically connect to the module form which it is downloaded. Once the desired options are selected, press the “Download Client” button to retrieve the installation file.
Windows HDS InstallerThis software should be downloaded and installed on a net-work connected computer when multiple wireless modules are installed on a building network. It will allow users 1 click access to any module on the network. Press the “Download HDS” button to retrieve the installation file. The IP address of the computer running the HDS software must be typed in the Primary HDS Host text field of each module which is located in the Display Tab of the admin screens.
MaintenanceIt may become necessary from time to time to reboot the wire-less module, either because of network configuration settings changes or because users may be noticing reduced perfor-mance. Admin can remotely reboot the module by pressing the “Reboot” button. Users currently connected to the system will be disconnected and in-room users will see a display mes-sage that the system is rebooting.

9
Updates and Licensing
This tab provides admin with system information that will be useful to Haworth in the event any questions arise regarding the system. Please refer to this tab when contact Haworth for assistance. Information on this page includes:
•Software version and release date•Software license type, install date, and maintenance expiration information•Device related information such as the device serial number and the MAC addresses of the primary Ethernet and wireless ports.
Additionally, this tab is where admin will need to initially be directed in order to activate the module. As previously mentioned, modules are initially shipped deactivated and require network access in order to be activated. Once activated, this tab will also be used for checking for software updates.

10
II. System Integration
AV integration with the ProcessorThe workware connect processor is able to integrate with a number of 3rd party audio/visual components including:
• Tablets and Smartphones• Video conference/Telepresence systems• External speakers• Alternate wireless video display systems• Media players (Bluray, DVD, flash-based)• Multiple display devices (Monitors, projectors, interactive white boards)
Tablets and SmartphonesTablets and smartphones can be used with the workware wired processor. You will need the appropriate adapters for the device to connect via VGA or HDMI. Tablets and smartphones are alsosupported on workware wireless.
Web Based Video Conferencing Systems (Skype)Laptop Skype content will be projected to the display. To use an external webcam, connect camera to the host laptop. Position camera as desired.
Video Conference SystemsWorkware uses HDMI-port mirroring to integrate with video conference/ telepresence solutions. The inputs and outputs from the video codec connect into the workware processor ports labeled “Video Conferencing”.
External SpeakersWorkware connect has two 3.5mm external audio ports for connecting audio to external speakers through an amplifier (field supplied).
Alternate Wireless Video Display Systems*Workware connect can accept inputs from multiple wireless display systems. There are two input ports, one VGA and one HDMI. If either of these ports are connected, the wireless icon on the touchpad will display. If both ports are connected, the system will toggle between the two with each button press, starting with VGA first, then HDMI.* Units below 2100 serial number will not support audio on this port.
Media PlayersWorkware connect is a HDCP compliant device that accepts inputs from a multitude of media players, such as Bluray, DVD, and flash-based digital players. The Splash Screen and Video Conferencing input ports may be used as auxiliary inputs to the system.
Multiple MonitorsWorkware connect is capable of broadcasting using two monitors. Included are two additional output ports that mirror the TV 1 and TV 2 monitor ports. For additional information refer to the monitor guidelines section of this document.
ProjectorsWorkware connect can be used to display through a projector(s). However, workware connect uses a power relay to control power to the display devices. This may cause overheating of the projector bulb and potential damage. When using workware with projectors do not connect the power relay cable and instead power the projector on manually.
VideoConferenceOne Monitor
VideoConferenceTwo Monitor

11
II. System Integration
AV integration with the Processor (continued)Interactive Whiteboards/Touch Displays Interactive whiteboards and displays generally have two required connections, a video connection (VGA or HDMI) and a data connection for the interactive control (usually USB). Workware can connect to the video for the display, however there is no connection for a USB to pass through to the device. In this case, users of the interactive display would need to plug the USB cable into their laptop to enable the interactive features of the device.
Video signal extenders over CAT5/6 cableHDMI to Cat5 video extenders may be used to extend the output signal to a display device; however, they must be able to pass EDID and CEC signals between the processor and display. Please be aware that some extender devices have manual sync adjustments and may require adjusting to achieve the optimalvideo display.
Supported Equipment List for use with the Haworth workware cabled systemWorkware is compatible with most display devices, however there are some guidelines that should be followed for proper functioning:
Monitors/Televisions:• 1080p resolution @ 60Hz• Must have speakers• Must be able to remember last power state• At least one available HDMI input• Recommended LCD / LED technology• Speakers recommended• Capable of displaying a resolution of 1024 X 768• Plasma monitors should not be used• List of monitor brands:* Sony, NEC, Samsung, Toshiba, Panasonic, Sharp
workware view• Monitor must measure between 32 and 70 inches when measured diagonally.• Must not weigh over 70 lbs for a table mount or 100 lbs for a wall mount.
Input Devices:Input devices must have a video output port and match standard computer resolutions ranging from 640 x 480 to 1920 x 1080.
• Operating Systems:
Video Conference Systems:To use a video conference system with workware, the system must have a HDMI input and a HDMI output. If your system does not use HDMI, a converter device will be necessary. Active converter devices are always recommended. Workware will only output 1080p, therefore, the video conferencesystem must accept 1080p input.
• List of brands:*PolyCom, LifeSize, Cisco* System is intended to be a suggestion only. Haworth takes no responsibility and assumes no liability for any use of any of the suggested System. Although we strive to test all equipment with workware, manufacturers change the model numbers on a regular basis. This recommendation is based onstandard models available at time of testing.
** When using a VGA cable, Windows XP may have some scaling issues based on what display driver is being used. Options may need to be set in the driver for best performance. As of April 8, 2014 no more security updates or technical support for Windows XP operating system will be released from Microsoft.
PC PlatformsWindows 7Windows 8Windows 10OSX 10.8OSX 10.9OSX10.10OSX 10.11
Mobile PlatformsIos 6iOS 7iOS 8iOS 9Android 4.3Android 4.4Android 5Android 6

12
II. System Integration
AV integration with the Processor (continued)workware view – Monitor Size Requirements
See Size Requirements
II. System Integration
SecurityWhen using the wireless feature of workware, a number of measures have been utilized to provide a secure environment for data sharing. The cabled option of workware is completely secure as there are no network connections available. To protect your presented content from being intercepted as it is transmitted across the network, and to prevent unauthorized users from presenting content to your display, the workware connect wireless module offers the following security features:
Note: Although we strive to provide multiple security features, Haworth takes no responsibility and assumes no liability the many ways enterprise network security can be compromised.
Session Login Code• The default configuration of workware generates a random, 4-digit login code every time a session is started. Users must either be in the room so they are able to see the current code or have someone who is in the room relay the current code in order to connect to the wireless module and display content on the attached display.• This prevents users from connecting remotely to the device and taking over the display in the middle of a meeting or presentation. This feature can be disabled or assigned a static code that does not change between sessions. Users will still need to provide the code before they are able to connect to the device and present content.
Wireless encryption• The workware connect wireless module supports 64 and 128 bit WEP, WPA, and WPA2-PSK encryption when connecting via the internal wireless radio. When using the customer’s existing wired or wireless infrastructure to connect to the system, any security mechanisms in place users will apply.
Monitor Size RequirementsMinimum Maximum
Width 34” 40”
Height20.5”(1 ” Thick Table Top)19.6”(2” Thick Table Top)
27.5”(1 ” Thick Table Top)26.6”(2” Thick Table Top)
Load N/A 70 lbs.
Monitor Size RequirementsMinimum Maximum
Width 39” 45”
Height22.4”(1 ” Thick Table Top)21.5(2” Thick Table Top)
30.1”(1 ” Thick Table Top)29.2(2” Thick Table Top)
Load N/A 70 lbs. (
Monitor Size RequirementsMinimum Maximum
Width 46” 52”
Height26.1”(1 ” Thick Table Top)25.2”(2” Thick Table Top)
34.3”(1 ” Thick Table Top)33.4”(2” Thick Table Top)
Load N/A 70 lbs.
Table Mount – 46”-47“ Single Monitor
Table Mount – 40”-42“ Single Monitor Table Mount – 52”-55” Single Monitor
Table Mount – Dual 32” MonitorsMonitor Size Requirements
Minimum MaximumWidth 26.7” 31.5”
Height17.7”(1 ” Thick Table Top)16.8”(2” Thick Table Top)
23”(1 ” Thick Table Top)22.1”(2” Thick Table Top)
Load N/A 70 lbs.
EWVT-DCND-P Without Shroud
EWVT-DCSD-P With Shroud
Wall Mount – 46”-47” Single Monitor
Wall Mount – 52”-55” Single Monitor
Wall Mount – 65”-70” Single Monitor
Monitor Size RequirementsMinimum Maximum
Width 39.2” 45”Height 23” 34.5”Load N/A 100 lbs.
Monitor Size RequirementsMinimum Maximum
Width 42.5” 53”Height 27” 39”Load N/A 100 lbs.
Monitor Size RequirementsMinimum Maximum
Width 52.1” 65”Height 30” 46.5”Load N/A 100 lbs. (per side)
Wall Mount 46”-47” Dual MonitorsMonitor Size Requirements
Minimum MaximumWidth 40.6” 45.5”Height 23” 34.5”Load N/A 100 lbs. (per side)
Wall Mount 52”-55” Dual MonitorMonitor Size Requirements
Minimum MaximumWidth 43.9” 53.5”Height 27” 39”Load N/A 100 lbs. (per side)
Wall Mount 65”-70” Dual MonitorsMonitor Size Requirements
Minimum MaximumWidth 53.5” 65.5” Height 30” 46.5”Load N/A 100 lbs. (per side)
EWVD-SASS-PP
Structural Walls
EWVD-DASS-PP
Mobile Monitor Easel65” Monitor – Seated Height
Monitor Size RequirementsMinimum Maximum
Width 43” 50.5”Height 28” 30.5”Depth – 2”Load – 70 lbs.
Monitor Size RequirementsMinimum Maximum
Width 51” 61”Height 35” 37.9”Depth – 2”Load – 100 lbs.
Mobile Monitor Easel 52”-55” Monitor – Standing Height52”-55” Monitor Seated Height
workware viewTable Mount Single Monitor
workware viewWall Mount Single Monitor
workware viewTable Mount Dual 32” Monitors
workware viewWall Mount Dual Monitors
workware viewMobile Monitor Easel

13
II. System Integration
Network Connectivity1. Basic Infrastructure – In this configuration, the workware connect wireless unit is connected to a switch or the organization’s internal network. Clients connect to existing access points on the same network, and traffic is routed to the unit. No “guest” access is provided by default. To connect, the user must first access their organizations network. If it is wireless, they would use the security protocol provided by their organization’s IT department to access their network. Once connected, the WPS application on the user’s device can then present wirelessly over their network.
2. Stand Alone – The radio antennas (802.11 b/g/n) may be activated and the workware connect wireless unit will act as a wireless access point. A client can connect directly to the wireless access point without the need to be connected to the network infrastructure. Internet connectivity is only available from an external source or an organizations internal network, as the workware unit is not connecting to another network, internet is not available in stand alone mode.
3. Bridging/AP Mode – The radio antennas may be activated, and the unit can be bridged wirelessly to an existing wireless network.
III. Support
Firmware Updates
workware firmware updates should be installed by a member of the IT staff.
IntroductionThis procedure outlines the method to upgrade a workware processor to the newest firmware level as provided by Haworth. Please see release notes for information regarding the firmware release.
1. Download firmware package from : http://www.haworth.com/workware/support
2. Unzip the four files (as shown below) and place them onto a Fat32 formated USB flash drive.
3. Unplug power to the workware processor and also unplug any active inputs (alternate wireless port, video conference, splash screen override, and table top inputs.
4. Connect the following components to the workware module in the following order:
Step 1. USB Flash DriveStep 2. Workware touchpad and cableStep 3. Workware power cable
WirelessAccess Point
UsingSSID
MonitorMonitor
Existing Wired Network
WirelessModule
WirelessModule
HD
MI
HD
MI
CAT5Cable
PC
PC
Name Da Type Size
WORKWARE.BIN 4/22/2014 11:57 AM BIN File 64 KB
WORKWARE.FLO 2/13/2014 6:57 PM FL0 File 4 KB
WORKWARE.FL1 2/13/2014 6:67 PM FL1 File 256 KB
4/3/2014 9:44 AM FLH File 1,140 KB
USBpower audio HDMIwireless module
VGA
outputAUX TV2 (right) TV1 (left) balanced audio
left right
video conference
controltouchpad power relay
Step 1. USB Flash Drive Step 2. Workware touchpad and cableStep 3. Workware power cable
Processor Ports – Component Connection Order123

14
III. Support
Firmware Updates (continued)5. Touchpad will begin to illuminate one icon at a time.
6. The touchpad will illuminate as normal and start flashing icons, one at a time, in the following sequence:
7. When all the icons begin flashing together, the update has successfully completed. If any icon stops flashing at any time, the process has stopped and needs to be restarted by removing the workware power cable and reinserting it.
8. Unplug the power from the processor and remove USB Flash Drive from Processor. Reconnect Monitor and power to confirm update was successful. See version number on lower right corner of monitor screen.
9. Reconnect all input cables and the power.
10. Your system is now updated.
III. Support
Beyond InstallationWorkware is fully supported from the time you place your order, through installation and introduction into a facility. From software and hardware upgrades to a fully staffed call-line, workware is supported to ensure complete satisfaction.
Software upgradesIf your module is under an active maintenance agreement, software upgrades can be downloaded and automatically installed by going into the admin screens of each module.
Hardware upgradesThe workware connect processor has been designed with modular components. The video input/output cards can be replaced, as well as the controller board that houses the processor chip. Upgrades to hardware components will be available as they are developed. workware internal components must be installed and serviced by authorized Haworth.
IT FAQ1. How will software and firmware updates be distributed?workware software and firmware updates will be available via a link on the workware web page on Haworth.com.
2. What should I expect in terms of support?Phone support available: 8:00 am EST to 8:00pm EST Monday–Friday 855-815-5111
3. How often will the software be updated with new features, bug fixes, security updates, or updates to support new operating systems?Updates to firmware and software would occur when:
• A “bug” is identified.• A new operating system is released by Microsoft or Apple. Within 3 months of the release we will have updated software available for download from our tech support website.• Microsoft or Apple release patches or updates that would require the wireless system to be updated.• Driver updates (from operating system providers) that change the operation of the wireless module.• New security features released from IEEE.
4. How long will support be provided for an existing operating system?
• An operating system will continue to be supported as long as the vendor actively supports it.
5. What are the network requirements for workware?• Networks with a 10/100/1000 infrastructure will operate well with the wireless system. For optimal performance, it is recommended that a gigabit connection be used.
6. How do you prevent Macintosh Computers (running MacOS 10.9 or newer) from disconnecting during a wireless presentation using Wireless Module model EWCW-V000?
• MacOS 10.9 (Mavericks) includes a new power saving feature called App Nap. This feature saves power byswitching applications running in the background into a standby mode. During wireless presentations the App Nap feature may need to be disabled to prevent workware’s Wireless Presentation Software (WPS) from being switched into a standby mode causing the presentation to disconnect.• Does not apply to Wireless Module model EWCW-H000.
1
8
7
2
3
4
5
6

15
III. Support
7. Which wireless network security protocols are supported and which wireless standards and frequency bands are supported? Security Protocols 64/128 bit WEP/WPA/WPA2-PSK Standards and Frequency Channels IEEE 802.11b/g/n 2.4GHz, IEEE 802.3 (10BASE-T) IEEE 802.3u (100BASE-TX) Channels: 11 (U.S., Canada), 13 (Europe), 14 (Japan)
8. What are the bandwidth requirements for workware connect wireless?
• A 1024x768 display running a presentation with a high refresh rate will transfer data at approximately 2Mbps. Increasing the resolution to 1920x1080 raises the bandwidth consumption to approximately 3.5Mbps.• In streaming mode, the client connects to the wireless module over TCP port 1038, and bandwidth utilization varies based on the bitrate of the source video file. For example, a 1080p MOV file with a bitrate of 6674kbps will consume approximately 6.5Mbps (6674kbps/1024 = 6.517Mbps). Quality of image is dependent on capacity of bandwidth.
9. How many users can connect to the wireless system at one time?
• The wireless system is an IP addressable device; it is only limited by the number of available client IP addresses.
10. Is audio supported when presenting quadview?• Audio sharing is available only to Windows/Mac based devices. A separate button appears when sharing a desktop that allows the user to share or unshare audio.
11. What video formats are supported?• Any format supported by the device of the end user is compatible.
12. Are iPads and iPhones supported?• workware cable sharing applications can support connections to iPads and iPhones if they have adapter cables for connections to workware’s HDMI or VGA user cables.• Yes. The iOS app for phones and tablets may not be initially available at launch.
13. Does the wireless module support HDMI output?• Yes. 1080p resolution.
14. I don’t want my screen resolution to change, can I disable this?• If you do not wish to change your resolution at presentation startup, when the software asks you if you would like to change resolutions, choose “Cancel.” The video will still be extended, however, your aspect ratio may not look correct on the projector (video may appear to be squashed), depending on your native resolution and wireless resolution output.
15. Once I install the wireless software, do I still need to download the software from the web interface / workware usb flashdrive?
• Once the workware software is installed, you will never need to use the workware usb flashdrive or the web interface to download the client software.
16. Can I stream full frame video to the wireless system?• In presentation mode, you cannot stream full frame video, as this mode does not offer buffering. If you wishto show a small video on the screen (320x280) in presentation mode, this will be acceptable. However, videos larger than this will not play smoothly. If there is low bandwidth availability, lag can occur depending on video size.
17. What is the resolution of the wireless module?• By default, the wireless module outputs HDMI at a resolution of 1280x720. However, it can be changed to support VGA at various resolutions from 800x600 up to 1440x900. The wireless module will accept most input resolutions and scale them to the selected output.

16
III. Support
TroubleshootingSometimes there are simple fixes when things don’t seem to be working the way we describe. Below are some common issues and quick fixes to get users up and running with workware.
The audio is not functional on Windows XP.When using Windows XP and requiring audio to be sent during normal presentation mode, the user must change the video quality to “Normal,” set send audio to projector to “Yes” and install the “VAC_Setup1.0.8.5 (for XP).exe” driver on the client machine. Once installed, the user will need to reboot the client machine, navigate to the “Control Panel,” and open the “Sounds and Audio Devices” window. In this window, click on the “Audio” tab under “Default Sound Playback,” select “Virtual Cable 1,” and press APPLY and then OK. You will have audio support.
Why can’t I show a PowerPoint Presentation on my extended screen?Screen Capture is not supported by DirectX technology. Office 2003 to 2007 should display correctly, but using Office 2010 may produce errors.
I don’t want my screen resolution to change. Can I disable this?If you do not wish to change your resolution at presentation startup, choose “Cancel” when the software asks you if you would like to change resolutions. The video will still be extended, but your aspect ratio may not display correctly on the projector (video may appear to be stretched or squashed) depending on your native resolution and wireless resolution output.
I cannot find wireless SSID when scanning for networks.Check to make sure you do not have multiple devices using the same SSID name in the Network Setup menu. Also check to make sure “SSID Broadcast” is set to “Enable”. You will need to connect through the Ethernet port on the back of the wireless unit since WiFi access is unavailable. The internet or Local Area Network connectivity is not functional. Check to make sure the “Gatekeeper” option in the Network Setup menu is set to “Internet Only” or “All Pass”. If “All Pass” is enabled and you are still encountering network issues, you will need to involveyour local area network administrator to verify network settings are correct and that no conflicts exist on your current network.
I can connect to SSID but cannot present.If you can connect to the WPS SSID wireless network, but you cannot see the option to log into the wireless unitto present, check your firewall settings. This can be done through in your control panel under “Windows Firewall”.The root name of the application is called “WePresent-Plus”; make sure all Inbound and Outbound exceptions are set to “Enabled” and not “Block.” In certain cases, once you connect to the wireless SSID and execute the software, you can manually enter the IP address, username, and login code, and the client device will connect.
I have noticed the unit gets hot. Is this ok?-The unit top cover has a dual purpose, to protect the internal electronics and to disperse internal heat. As a result of this second purpose, the top cover can become hot when the unit is powered. While the heat does not provide any risk to fires or injury, it can startle a person who comes in contact with the module. The module has been thoroughly tested to UL safety standards and has met all of the required standards.
On Windows systems I’ve noticed the system is asking me to turn on Aero Themes. Why?The unit has been designed to take advantage of Windows 7 active desktop functionality which allows for enhanced content sharing capability with the wireless module. However, when enabling this feature, windows may change some desktop settings on the user’s device such as notification sounds and desktop backgrounds. The system will still function in a less than optimal manner without enabling this feature.
I’ve noticed sometimes that when I share content I can see a black and white box pattern. Why does this happen?If the connected user is not using the active desktop functionality, the standard content sharing method may produce this mentioned box pattern. This pattern is a result of another device application window laying either in the foreground or background of the shared application window. Simply move or minimize this window to remove the box pattern.
I am in a room with the module but I do not have the application on my device. What do I do?If you are running a Windows/Mac based device and you are on the same network as the module, simply open a browser window and type the IP address shown on the display in blue font. Click the “Download” icon that appears on the page and install the instructions.
When I download the software I get a warning that says the software cannot be verified or is dangerous. What do I do?Microsoft and Apple have application certification programs for software that is created for their operating systems. We are in the process of certifying our software them but rest assured this warning provides no threat to you or your company.
I want to use the other Ethernet and HDMI ports but there are plugs in them. Why?The system currently does not have the second ethernet port active so the plug is there to assist with installation. The second HDMI connector is also plugged because this is actually a DVI output. It is the same as HDMI but it does not pass audio. It can be used in conjunction with the audio connector also found on this same side of the module, however audio will not be active out of this port if a monitor is connected to the primary HDMI port. For this reason, it has also been plugged.

17
What can I used all of the other ports on the device for like the SD Card and USB ports.These ports were used during the development of the product. It is not recommended to use the USB ports for device charging as some devices will try to communicate with the operating system and cause the module problems.
Need Additional Help?
There are a number of ways to reach us for help.• Web site support page haworth.com/workware• Call us at 855-815-5111• Email us at [email protected]
Pre-Sale Checklist• The pre-sale checklist provides an easy way to ensure that all technical requirements have been addressed for smooth installation of workware.• Use the pre-sale checklist prior to installation to assist with the planning of a workware installation.• It can also be used during installation to verify all variables have been addressed.• Contact your Haworth dealer for the Pre-Sale Checklist document.

18
III. Support
WarrantyThis North American Haworth Product Non-Obsolescence and Warranty Policy (the ‘‘policy’’) applies to products manufactured after October 1, 2012. For products manufactured before this date please refer to the policy published in the NA Price List when purchased or contact your local Authorized Haworth Dealer*. All Haworth products are warranted for 24 hour/7 day use over the length of the Applicable Warranty Period as set forth below.
Haworth, Inc. or Haworth, Ltd., (each called ‘‘Haworth’’) will make a good faith effort to maintain product compatibility within our various generations of integrated product platforms to provide our customers with spaces that adapt to change. Under our non-obsolescence policy, we commit to provide our customers with products of comparable function or operational characteristics for a term equal to the Applicable Warranty Period. Haworth fabrics and finishes must be updated periodically to maintain the market appeal of our products and respond to the demands and changing preferences of our customers. As a result, we or the manufacturer may discontinue some fabrics and finishes before expiration of the Applicable Warranty Period.
If a new product purchased or leased from Haworth or from an Authorized Haworth Dealer proves to be defective (as defined below) while the product is still in the possession of the initial purchaser or lessee and if they, within the Applicable Warranty Period, send notice of the defect to Haworth by electronic mail ([email protected]), then, except as provided below, Haworth will, at Haworth’s option, either repair or replace the product, at Haworth’s expense, or refund the purchase price of the product. Except as provided below, a product shall be considered ‘‘defective’’ if Haworth finds that it is defective in material or workmanship and if the defectmaterially impairs the value of the product to the purchaser or lessee. The applicable warranty period begins on the day the product is manufactured. If a product that the purchaser or lessee references in a notice of defect was not installed by a Haworth Certified installer and/or reconfigured by a Haworth-trained installer, then the product may not be considered defective and Haworth will not be obligated to repair or replace it or to refund its price.
PRODUCTS / APPLICABLE WARRANTY PERIOD
LIFETIMEAll Haworth products are warranted for lifetime except products, components and materials described below:
TWELVE YEARSAll Haworth NA manufactured seating is warranted for 24/7 multiple shift use by persons up to 325 lbs and includes the framework, mechanisms, seating foam, seat & back mesh and seating glides & casters. All wood or wood framed products.
TEN YEARSAll wall products, electrical components (excluding Power Base™ AI and workware™ products), electrical accessories, fixed task lighting, LED lighting, adjustable keyboard pads, monitor arms and products that are at any time used in a classroom or educational environment (other than administrative areas) except as limited or described below:
FIVE YEARSFabric scrims and fabrics rated (A) Heavy Duty under the Association of Contract Textiles Guidelines, leather, user adjustable worksurface mechanisms, gel arm caps, thermofused laminates, slow close mechanisms, electronic ballasts used in task lighting, horizontal glass or thermoplastic table assemblies and Systems Accessories.
THREE YEARSworkware™ products, plastic ultraviolet light color fastness and fabrics rated (a) under the Association of Contract Textiles Guidelines.
ONE TO FIVE YEARS**Products that are manufactured outside North America and sold into the North American market.
ONE YEARSoft palm rest, mouse pad insert, and translucent edging. Each Haworth ‘‘specials’’ product will be warranted for the same applicable warranty period of the comparable catalogue product unless otherwise stated on the specials solutions department inquiry response. Service parts used for warranty carry the remaining balance of the assembly’s original warranty period.*An Authorized Haworth Dealer is any dealer or retailer that sells and installs within their primary contracted area and/or under the DealerLink Program Agreement.**The Applicable Warranty Period for each such product is specified in Haworth’s price list for the product.
A product will not be considered to be defective, and Haworth will not repair, or replace it or refund its price if the product (1) is a consumable product, such as a lamp; (2) is ‘‘Customer’s Own Material’’ (i.e. material specified by the purchaser or lessee that is not a standard Haworth product offering, such as Haworth Alliance fabrics); (3) is not installed and used as recommended in Haworth’s written specification, installation and user guides; (4) has been otherwise misused or suffered abusive damage or (5) is a product that is manufactured by a third-party supplier from whom Haworth purchases it for resale without incorporating it into Haworth product (in which case Haworth will assign to the purchaser or lessee any warranty that the manufacturer provides).

19
A defect in material or workmanship does not include damage to a product, or failure of a product to operate or perform properly or to maintain appearance, caused by (a) normal wear and tear; (b) an Act of God or transportation; (c) a product alteration made without Haworth’s express written authorization; (d) the natural variation of color, grain or texture found in wood and leather; (e) the natural aging found in materials such as wood, fabric and leather which results in colors shifting during use; (f ) dye lot variations in fabric, leatheror wall covering (g) the natural patina and “puddling” of leather during use or (e) reverse crocking of dyes from clothing onto our seating materials.
EXCEPT AS STATED ABOVE, HAWORTH DOES NOT MAKE A WARRANTY AS TO ANY PRODUCT AND, IN PARTICULAR, DOES NOT MAKE A WARRANTY OF MERCHANTABILITY OR OF FITNESS FOR A PARTICULAR PURPOSE. Product repair or replacement or refund of the price, at Haworth’s option, in accordance with this Policy, is the purchaser’s or lessee’s exclusive remedy for a product defect. Haworth shall not have tort liability with respect to a product, and Haworth shall not be liable for any consequential, economic, indirect, special,punitive or incidental damages arising from a product defect. Haworth shall not be liable for repair or product placement due to improper installation or any defect in materials used for installation which are not manufactured, sold or supplied by Haworth.
End User License Agreement

20
Power Options - Data Options -
120 v USB Charging
Data Ports Cable Bay- No Cable
Cable Bay with HDMI or
VGA+Audio Cables
Processor Power Relay Touch Control
Non-Switching Interface Module
√ Yes √ Yes √ Yes √ Yes No No No No
Switching Interface Module
√ Yes √ Yes No No √ Yes √ Yes √ Yes √ Yes
Interface Module Options

21
Input Type Quantity Touch PadSymbol Purpose
VGA or HDMI 2 or 4 Inputs for presentation devices (computers, tablets, smart phones, document projectors, DVD players, Blu-ray players, etc.)
HDMI 1 Input for video conference codec connection or ancillary equipment
HDMI 1 Input for splash screen override (The power button has to be on with no other icons activated for the splash screen to be visible)
HDMI or VGA 1 Input for alternate wireless or ancillary equipment* Units below 2100 serial number will require a hardware update to support audio on this port.
USB 1 NA Input for �rmware updates and future expansion.
Input Type Quantity Purpose
HDMI 2 Output for TV 1 (Left) and TV 2 (Right).
HDMI 1 Output for video conference codec connection or clone monitor of TV 1.
HDMI 1 Auxiliary output port for future expansion or clone monitor of TV2.
3.5mm Audio 2 Output for left and right channel analog audio out.
Input Type Screen Resolution
VGA 640 x 480
SVGA 800 x 600
XGA 1024 x 768
SXGA 1280 x 1024, 1400 x 1050 (SXGA+)
WXGA 1440 x 900 (VGA Only)
WUXGA 1600 x 900
720p 1280 x 720
1080p 1920 x 1080
Component Screen Resolution
Processor 1080p/60 – The workware connect processor is fully digital and will upscale or downscale all inputs to 1080p @ 60 Frames Per Second
Wireless Module Auto detects output cable when attached.HDMI - 1080p
System Input Timer Action
System doesn’t detect any video inputs System will shut itself o� after 15 minutes.
System detects no input to Splash Screen Port System will shut itself o� after 15 minutes.
System detects no signal from the Video Conference Port System will stay on.
Inputs:
Outputs:
Supported Screen Input Resolution @ 60hz:
Supported Screen Output Resolution:
Power Management:
Product Details
Processor- Video Inputs and Outputs

22
Monitor Size RequirementsMinimum Maximum
Width 34” 40”
Height20.5”(1 ” Thick Table Top)19.6”(2” Thick Table Top)
27.5”(1 ” Thick Table Top)26.6”(2” Thick Table Top)
Load N/A 70 lbs.
Monitor Size RequirementsMinimum Maximum
Width 39” 45”
Height22.4”(1 ” Thick Table Top)21.5(2” Thick Table Top)
30.1”(1 ” Thick Table Top)29.2(2” Thick Table Top)
Load N/A 70 lbs. (
Monitor Size RequirementsMinimum Maximum
Width 46” 52”
Height26.1”(1 ” Thick Table Top)25.2”(2” Thick Table Top)
34.3”(1 ” Thick Table Top)33.4”(2” Thick Table Top)
Load N/A 70 lbs.
Table Mount – 46”-47“ Single Monitor
Table Mount – 40”-42“ Single Monitor Table Mount – 52”-55” Single Monitor
Table Mount – Dual 32” MonitorsMonitor Size Requirements
Minimum MaximumWidth 26.7” 31.5”
Height17.7”(1 ” Thick Table Top)16.8”(2” Thick Table Top)
23”(1 ” Thick Table Top)22.1”(2” Thick Table Top)
Load N/A 70 lbs.
EWVT-DCND-P Without Shroud
EWVT-DCSD-P With Shroud
Wall Mount – 46”-47” Single Monitor
Wall Mount – 52”-55” Single Monitor
Wall Mount – 65”-70” Single Monitor
Monitor Size RequirementsMinimum Maximum
Width 39.2” 45”Height 23” 34.5”Load N/A 100 lbs.
Monitor Size RequirementsMinimum Maximum
Width 42.5” 53”Height 27” 39”Load N/A 100 lbs.
Monitor Size RequirementsMinimum Maximum
Width 52.1” 65”Height 30” 46.5”Load N/A 100 lbs. (per side)
Wall Mount 46”-47” Dual MonitorsMonitor Size Requirements
Minimum MaximumWidth 40.6” 45.5”Height 23” 34.5”Load N/A 100 lbs. (per side)
Wall Mount 52”-55” Dual MonitorMonitor Size Requirements
Minimum MaximumWidth 43.9” 53.5”Height 27” 39”Load N/A 100 lbs. (per side)
Wall Mount 65”-70” Dual MonitorsMonitor Size Requirements
Minimum MaximumWidth 53.5” 65.5” Height 30” 46.5”Load N/A 100 lbs. (per side)
EWVD-SASS-PP
Structural Walls
EWVD-DASS-PP
Mobile Monitor Easel65” Monitor – Seated Height
Monitor Size RequirementsMinimum Maximum
Width 43” 50.5”Height 28” 30.5”Depth – 2”Load – 70 lbs.
Monitor Size RequirementsMinimum Maximum
Width 51” 61”Height 35” 37.9”Depth – 2”Load – 100 lbs.
Mobile Monitor Easel 52”-55” Monitor – Standing Height52”-55” Monitor Seated Height
workware viewTable Mount Single Monitor
workware viewWall Mount Single Monitor
workware viewTable Mount Dual 32” Monitors
workware viewWall Mount Dual Monitors
workware viewMobile Monitor Easel
System Integration
AV integration with the Processor (continued)workware view – Monitor Size Requirements