TechBook - Bahama Spas
33
in.touch 2 TechBook Simplest of setups Strong and long range communication signal State-of-the-art apps with push notifications ultimate Wi-Fi remote control for your spa
Transcript of TechBook - Bahama Spas
in.touch 2
TechBook
Gecko Alliance450 des Canetons, Québec (Qc), G2E 5W6 Canada, 1.800.78.GECKO
www.geckoalliance.com Printed in Canada
9919-101517-FRev. 10-2018
© Groupe Gecko Alliance inc., 2018All trademarks or registered trademarks are the property of their respective owners.
Simplest of setups
Strong and long range communication signal
State-of-the-art apps with push notifications
ultimate Wi-Fi remote control for your spa
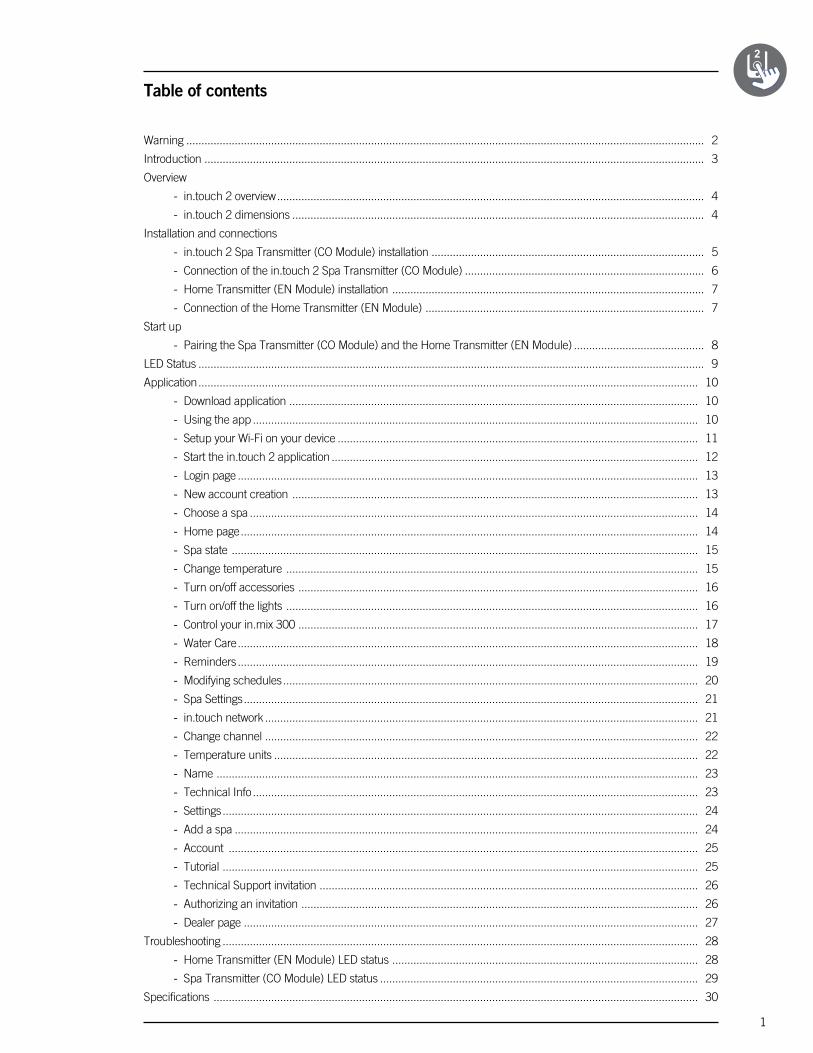
1
Warning ��������������������������������������������������������������������������������������������������������������������������������������������������������������������������� 2
Introduction ��������������������������������������������������������������������������������������������������������������������������������������������������������������������� 3
Overview
- in�touch 2 overview ��������������������������������������������������������������������������������������������������������������������������������������������� 4
- in�touch 2 dimensions ���������������������������������������������������������������������������������������������������������������������������������������� 4
Installation and connections
- in�touch 2 Spa Transmitter (CO Module) installation ������������������������������������������������������������������������������������������ 5
- Connection of the in�touch 2 Spa Transmitter (CO Module) ������������������������������������������������������������������������������� 6
- Home Transmitter (EN Module) installation ������������������������������������������������������������������������������������������������������� 7
- Connection of the Home Transmitter (EN Module) �������������������������������������������������������������������������������������������� 7
Start up
- Pairing the Spa Transmitter (CO Module) and the Home Transmitter (EN Module) ������������������������������������������� 8
LED Status ����������������������������������������������������������������������������������������������������������������������������������������������������������������������� 9
Application ��������������������������������������������������������������������������������������������������������������������������������������������������������������������� 10
- Download application ��������������������������������������������������������������������������������������������������������������������������������������� 10
- Using the app ��������������������������������������������������������������������������������������������������������������������������������������������������� 10
- Setup your Wi-Fi on your device ����������������������������������������������������������������������������������������������������������������������� 11
- Start the in�touch 2 application ������������������������������������������������������������������������������������������������������������������������� 12
- Login page �������������������������������������������������������������������������������������������������������������������������������������������������������� 13
- New account creation �������������������������������������������������������������������������������������������������������������������������������������� 13
- Choose a spa ���������������������������������������������������������������������������������������������������������������������������������������������������� 14
- Home page ������������������������������������������������������������������������������������������������������������������������������������������������������� 14
- Spa state ���������������������������������������������������������������������������������������������������������������������������������������������������������� 15
- Change temperature ���������������������������������������������������������������������������������������������������������������������������������������� 15
- Turn on/off accessories ������������������������������������������������������������������������������������������������������������������������������������ 16
- Turn on/off the lights ���������������������������������������������������������������������������������������������������������������������������������������� 16
- Control your in�mix 300 ������������������������������������������������������������������������������������������������������������������������������������ 17
- Water Care �������������������������������������������������������������������������������������������������������������������������������������������������������� 18
- Reminders �������������������������������������������������������������������������������������������������������������������������������������������������������� 19
- Modifying schedules ����������������������������������������������������������������������������������������������������������������������������������������� 20
- Spa Settings ������������������������������������������������������������������������������������������������������������������������������������������������������ 21
- in�touch network ����������������������������������������������������������������������������������������������������������������������������������������������� 21
- Change channel ����������������������������������������������������������������������������������������������������������������������������������������������� 22
- Temperature units �������������������������������������������������������������������������������������������������������������������������������������������� 22
- Name ��������������������������������������������������������������������������������������������������������������������������������������������������������������� 23
- Technical Info ��������������������������������������������������������������������������������������������������������������������������������������������������� 23
- Settings ������������������������������������������������������������������������������������������������������������������������������������������������������������� 24
- Add a spa ��������������������������������������������������������������������������������������������������������������������������������������������������������� 24
- Account ����������������������������������������������������������������������������������������������������������������������������������������������������������� 25
- Tutorial ������������������������������������������������������������������������������������������������������������������������������������������������������������� 25
- Technical Support invitation ����������������������������������������������������������������������������������������������������������������������������� 26
- Authorizing an invitation ����������������������������������������������������������������������������������������������������������������������������������� 26
- Dealer page ������������������������������������������������������������������������������������������������������������������������������������������������������ 27
Troubleshooting ������������������������������������������������������������������������������������������������������������������������������������������������������������� 28
- Home Transmitter (EN Module) LED status ����������������������������������������������������������������������������������������������������� 28
- Spa Transmitter (CO Module) LED status ��������������������������������������������������������������������������������������������������������� 29
Specifications ���������������������������������������������������������������������������������������������������������������������������������������������������������������� 30
Table of contents
2
WARNING : Before installing or connecting the unit, please read the following�
* FOR OPTIMUM PERFORMANCE PLEASE CAREFULLY READ THE MANUAL BEFORE INSTALLATION�
* INSTALL THE IN�TOUCH 2-CO MODULE AT LEAST 12" (30 CM) AWAY FROM ANY METAL PART OR ANY METAL FOIL�
* THE IN�TOUCH 2-CO MODULE SHOULD BE INSTALLED SUCH AS IT CAN BE RELOCATED UNDER THE SPA IN ORDER TO OBTAIN OPTIMAL RECEPTION AFTER FINAL INSTALLATION OF THE SPA IN THE YARD�
* TO SATISFY FCC RF EXPOSURE REQUIREMENTS FOR MOBILE AND BASE STATION TRANSMISSION DEVICES, A SEPARATION DISTANCE OF 8" (20 CM) OR MORE SHOULD BE MAINTAINED BETWEEN THE IN�TOUCH 2 MODULES AND PERSONS DURING OPERATION; TO ENSURE COMPLIANCE, OPERATION AT CLOSER THAN THIS DISTANCE IS NOT RECOMMENDED�
* THE ANTENNAS USED FOR THESE MODULES MUST NOT BE CO-LOCATED OR OPERATING IN CONJUNCTION WITH ANY OTHER ANTENNA OR TRANSMITTER�
* TO POWER THE IN�TOUCH 2-EN, ONLY USE THE POWER SUPPLY UNIT PROVIDED WITH THE IN�TOUCH 2-EN�
* THIS APPLIANCE IS NOT INTENDED FOR USE BY PERSONS (INCLUDING CHILDREN) WITH REDUCED PHYSICAL, SENSORY OR MENTAL CAPABILITIES, OR LACK OF EXPERIENCE AND KNOWLEDGE, UNLESS THEY HAVE BEEN GIVEN SUPERVISION OR INSTRUCTION CONCERNING USE OF THE APPLIANCE BY A PERSON RESPONSIBLE FOR THEIR SAFETY�
* CHILDREN SHOULD BE SUPERVISED TO ENSURE THAT THEY DO NOT PLAY WITH THE APPLIANCE�
DISPOSAL OF THE PRODUCTTHE APPLIANCE (OR THE PRODUCT) MUST BE DISPOSED OF SEPARATELY IN ACCORDANCE WITH THE LOCAL WASTE DISPOSAL LEGISLATION IN FORCE�
COMPATIBILITY REQUIREMENTS in.touch 2 modules for FCC (North America) models (915 MHz): Home and spa transmitter kit: 0608-521020, 0608-521023
in.touch 2 modules for ETSI (Europe) models (868 MHz): Home and spa transmitter kit: 0608-521021, 0608-521024
Compatible spa packs:in�xm2, in�xe, in�ye, in�yj and in�yt spa systems manufactured in or after 2012�
in.touch 2 application: Compatible with devices running: iOS 8�0 or higher Android 2�3 or higher
ROUTER AND INSTALLATION REQUIREMENTSAny standard router with an available 100 Mbps (wired LAN) RJ45 port can be used� The router must also have its Port 10022 open, which is normally a default setting� A 3-foot (0�9 m) Ethernet cable is included�
The home transmitter will need a main supply (120V in North America, 220V in Europe) nearby to allow connection of the transformer�
Aeware®, Gecko®, and their respective logos are Registered Trademarks of Gecko Alliance Group� in�touch 2™, in�xm2™, in�xe™, in�yt™, in�ye™, in�therm™ and their respective logos are Trademarks of Gecko Alliance Group� All other product or company names that may be mentioned in this publication are tradenames, trademarks or Registered Trademarks of their respective owners�
Warning
3
Introduction
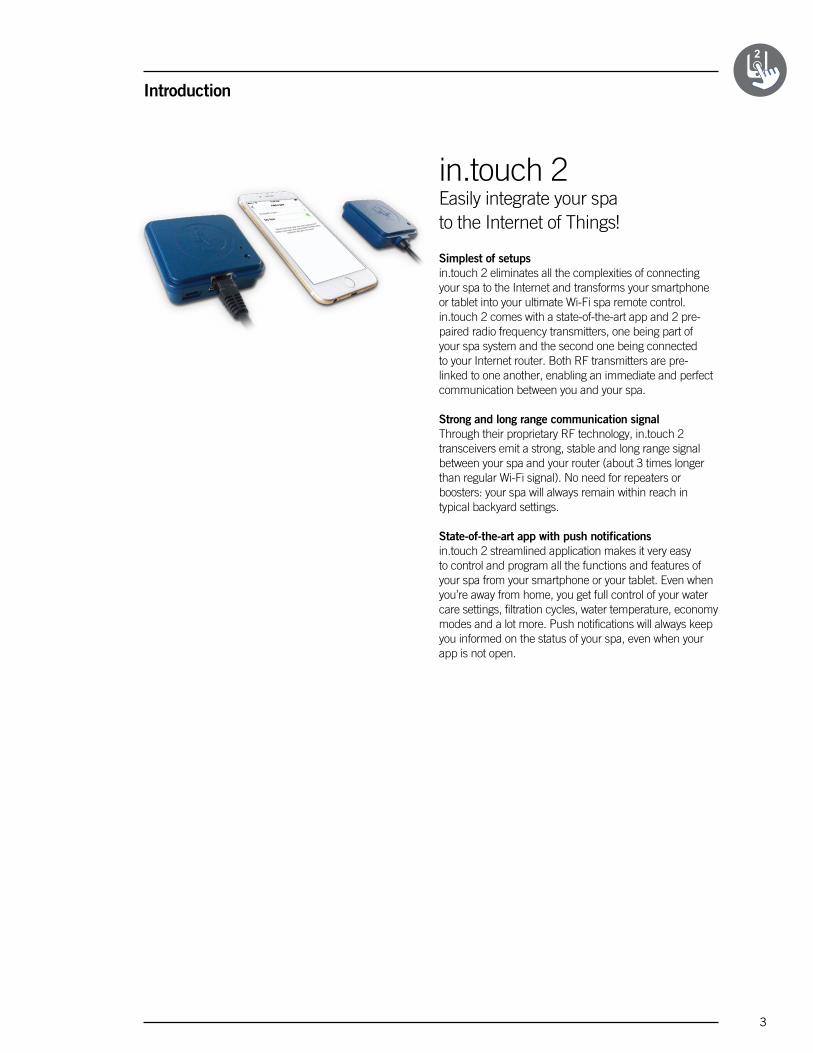
in�touch 2 Easily integrate your spa to the Internet of Things!
Simplest of setups in�touch 2 eliminates all the complexities of connecting your spa to the Internet and transforms your smartphone or tablet into your ultimate Wi-Fi spa remote control� in�touch 2 comes with a state-of-the-art app and 2 pre-paired radio frequency transmitters, one being part of your spa system and the second one being connected to your Internet router� Both RF transmitters are pre-linked to one another, enabling an immediate and perfect communication between you and your spa�
Strong and long range communication signalThrough their proprietary RF technology, in�touch 2 transceivers emit a strong, stable and long range signal between your spa and your router (about 3 times longer than regular Wi-Fi signal)� No need for repeaters or boosters: your spa will always remain within reach in typical backyard settings�
State-of-the-art app with push notificationsin�touch 2 streamlined application makes it very easy to control and program all the functions and features of your spa from your smartphone or your tablet� Even when you’re away from home, you get full control of your water care settings, filtration cycles, water temperature, economy modes and a lot more� Push notifications will always keep you informed on the status of your spa, even when your app is not open�

4
Overview
in.touch 2 overview
in.touch 2 dimensions
3.24 in.(82 mm)
2.94 in.(75 mm)
.96 in.(24 mm)
2.76 in.(70 mm)
2.76 in.(70 mm)
3.39 in.(86 mm)
3.1 in.(76 mm)
.91 in.(23 mm)
Spa Transmitter (CO Module)Home Transmitter (EN Module)
Status LED
Pairing activation
Fastening bracket
RJ45 Ethernet connection CO pack connectionMicro USB power
Home Transmitter (EN Module) Spa Transmitter (CO Module)
Status LED
5
Installation and connections
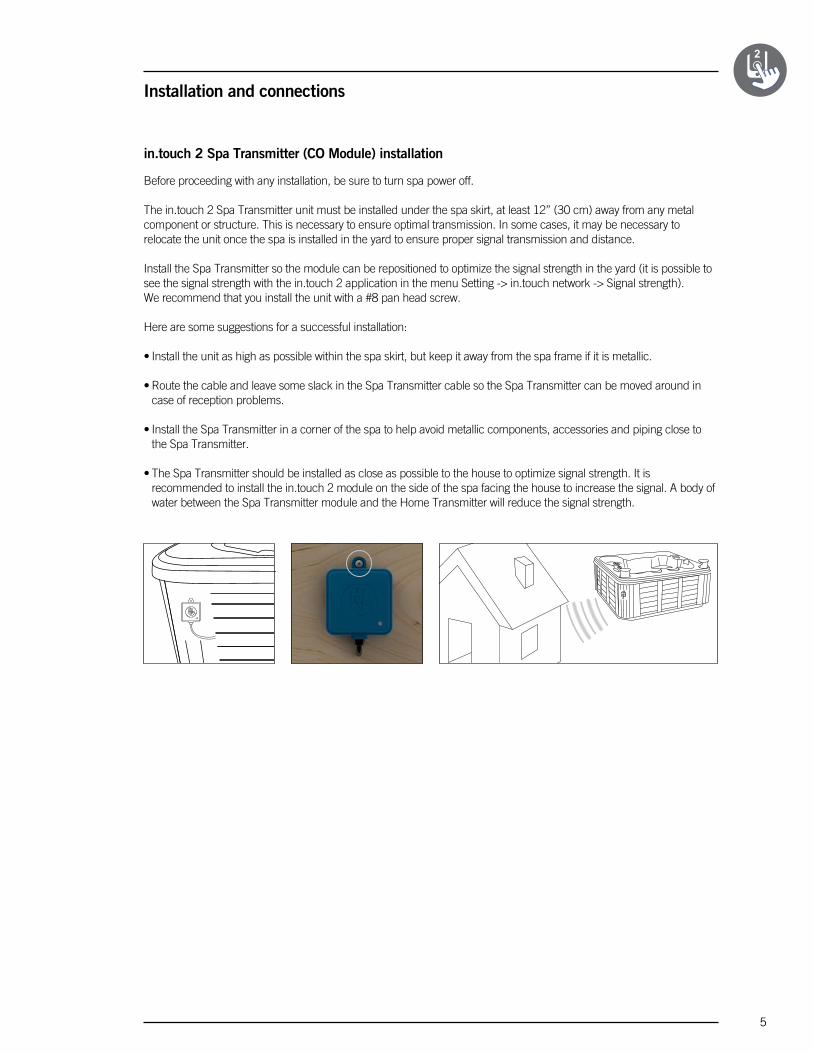
in.touch 2 Spa Transmitter (CO Module) installation
Before proceeding with any installation, be sure to turn spa power off�
The in�touch 2 Spa Transmitter unit must be installed under the spa skirt, at least 12” (30 cm) away from any metal component or structure� This is necessary to ensure optimal transmission� In some cases, it may be necessary to relocate the unit once the spa is installed in the yard to ensure proper signal transmission and distance�
Install the Spa Transmitter so the module can be repositioned to optimize the signal strength in the yard (it is possible to see the signal strength with the in�touch 2 application in the menu Setting -> in�touch network -> Signal strength)� We recommend that you install the unit with a #8 pan head screw�
Here are some suggestions for a successful installation:
• Install the unit as high as possible within the spa skirt, but keep it away from the spa frame if it is metallic�
• Route the cable and leave some slack in the Spa Transmitter cable so the Spa Transmitter can be moved around in case of reception problems�
• Install the Spa Transmitter in a corner of the spa to help avoid metallic components, accessories and piping close to the Spa Transmitter�
• The Spa Transmitter should be installed as close as possible to the house to optimize signal strength� It is recommended to install the in�touch 2 module on the side of the spa facing the house to increase the signal� A body of water between the Spa Transmitter module and the Home Transmitter will reduce the signal strength�
LD
6
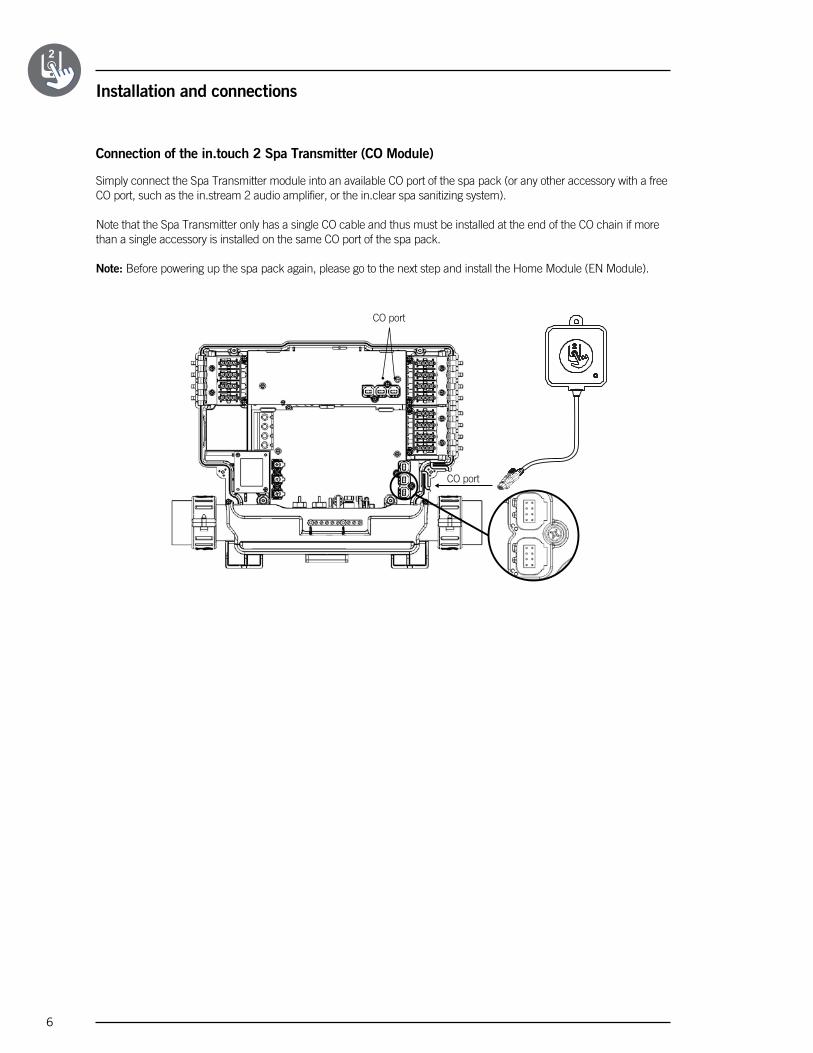
Connection of the in.touch 2 Spa Transmitter (CO Module)
Simply connect the Spa Transmitter module into an available CO port of the spa pack (or any other accessory with a free CO port, such as the in�stream 2 audio amplifier, or the in�clear spa sanitizing system)� Note that the Spa Transmitter only has a single CO cable and thus must be installed at the end of the CO chain if more than a single accessory is installed on the same CO port of the spa pack�
Note: Before powering up the spa pack again, please go to the next step and install the Home Module (EN Module)�
Installation and connections
CO port
CO port
7
Installation and connections
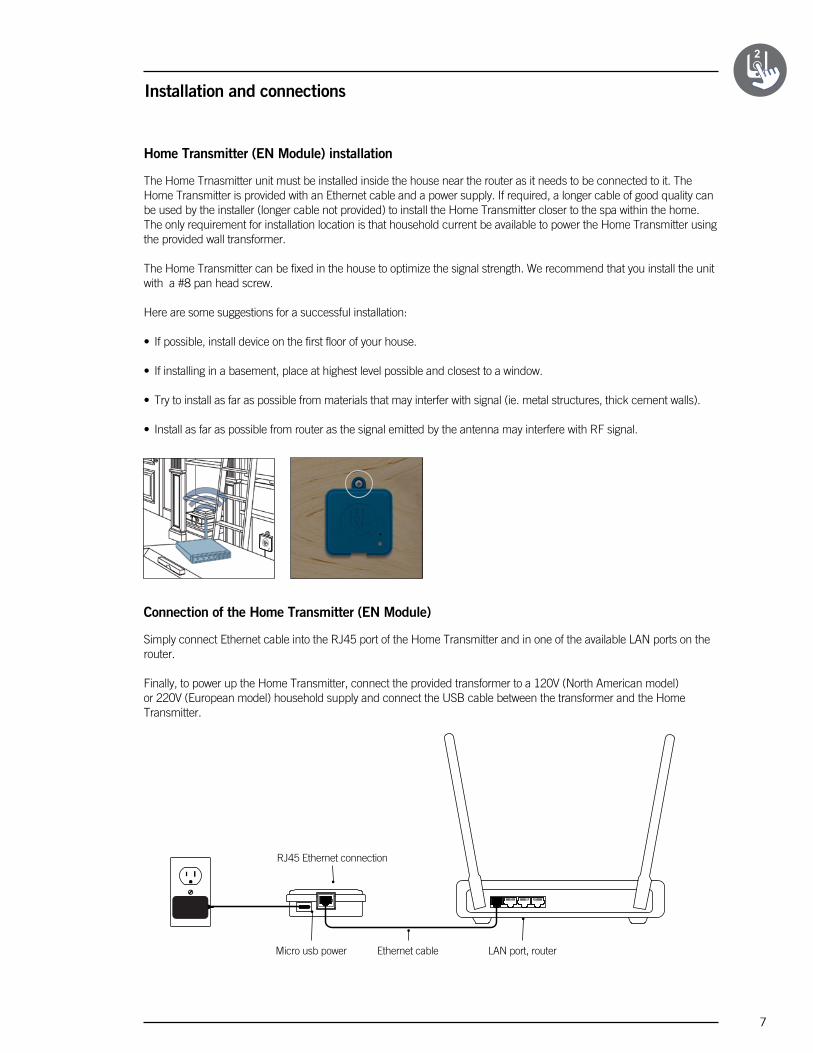
Connection of the Home Transmitter (EN Module)
Simply connect Ethernet cable into the RJ45 port of the Home Transmitter and in one of the available LAN ports on the router�
Finally, to power up the Home Transmitter, connect the provided transformer to a 120V (North American model) or 220V (European model) household supply and connect the USB cable between the transformer and the Home Transmitter�
RJ45 Ethernet connection
LAN port, routerEthernet cableMicro usb power
Home Transmitter (EN Module) installation
The Home Trnasmitter unit must be installed inside the house near the router as it needs to be connected to it� The Home Transmitter is provided with an Ethernet cable and a power supply� If required, a longer cable of good quality can be used by the installer (longer cable not provided) to install the Home Transmitter closer to the spa within the home� The only requirement for installation location is that household current be available to power the Home Transmitter using the provided wall transformer�
The Home Transmitter can be fixed in the house to optimize the signal strength� We recommend that you install the unit with a #8 pan head screw�
Here are some suggestions for a successful installation:
• If possible, install device on the first floor of your house�
• If installing in a basement, place at highest level possible and closest to a window�
• Try to install as far as possible from materials that may interfer with signal (ie� metal structures, thick cement walls)�
• Install as far as possible from router as the signal emitted by the antenna may interfere with RF signal�
8
Start up
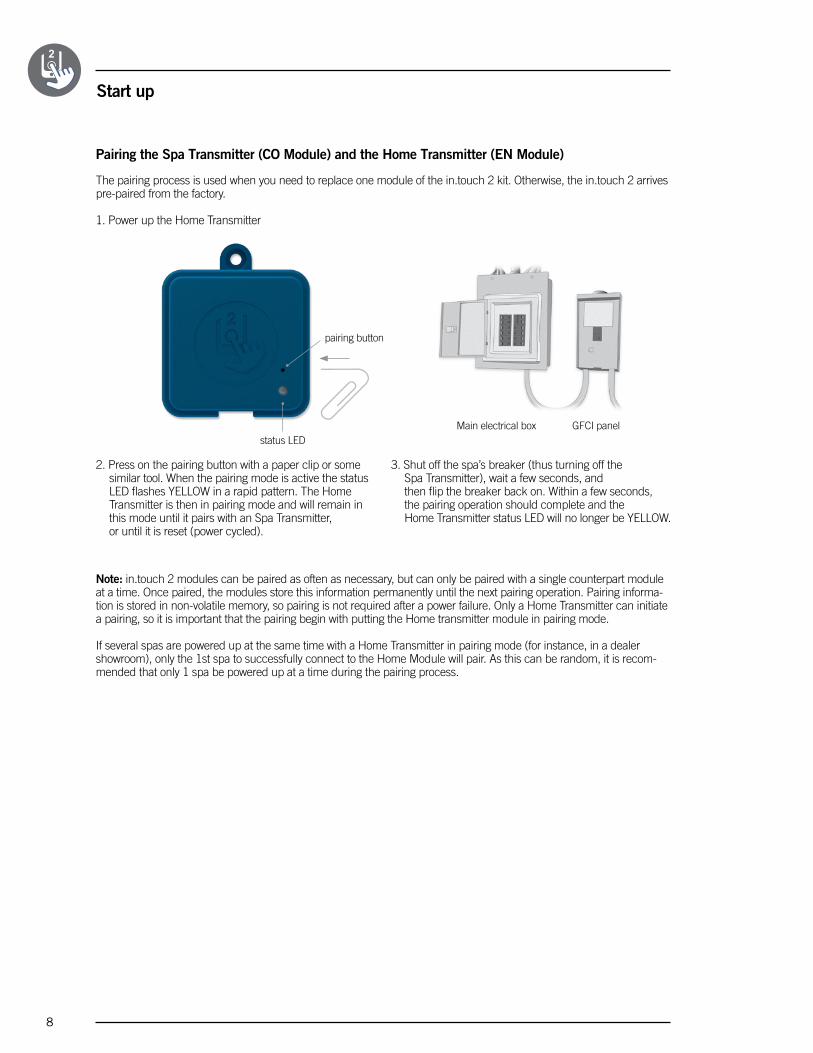
Pairing the Spa Transmitter (CO Module) and the Home Transmitter (EN Module)
The pairing process is used when you need to replace one module of the in�touch 2 kit� Otherwise, the in�touch 2 arrives pre-paired from the factory�
1� Power up the Home Transmitter
pairing button
status LED
3� Shut off the spa’s breaker (thus turning off the Spa Transmitter), wait a few seconds, and then flip the breaker back on� Within a few seconds, the pairing operation should complete and the Home Transmitter status LED will no longer be YELLOW�
Main electrical box GFCI panel
Note: in�touch 2 modules can be paired as often as necessary, but can only be paired with a single counterpart module at a time� Once paired, the modules store this information permanently until the next pairing operation� Pairing informa-tion is stored in non-volatile memory, so pairing is not required after a power failure� Only a Home Transmitter can initiate a pairing, so it is important that the pairing begin with putting the Home transmitter module in pairing mode�
If several spas are powered up at the same time with a Home Transmitter in pairing mode (for instance, in a dealer showroom), only the 1st spa to successfully connect to the Home Module will pair� As this can be random, it is recom-mended that only 1 spa be powered up at a time during the pairing process�
2� Press on the pairing button with a paper clip or some similar tool� When the pairing mode is active the status LED flashes YELLOW in a rapid pattern� The Home Transmitter is then in pairing mode and will remain in this mode until it pairs with an Spa Transmitter, or until it is reset (power cycled)�
9
LED Status
LED
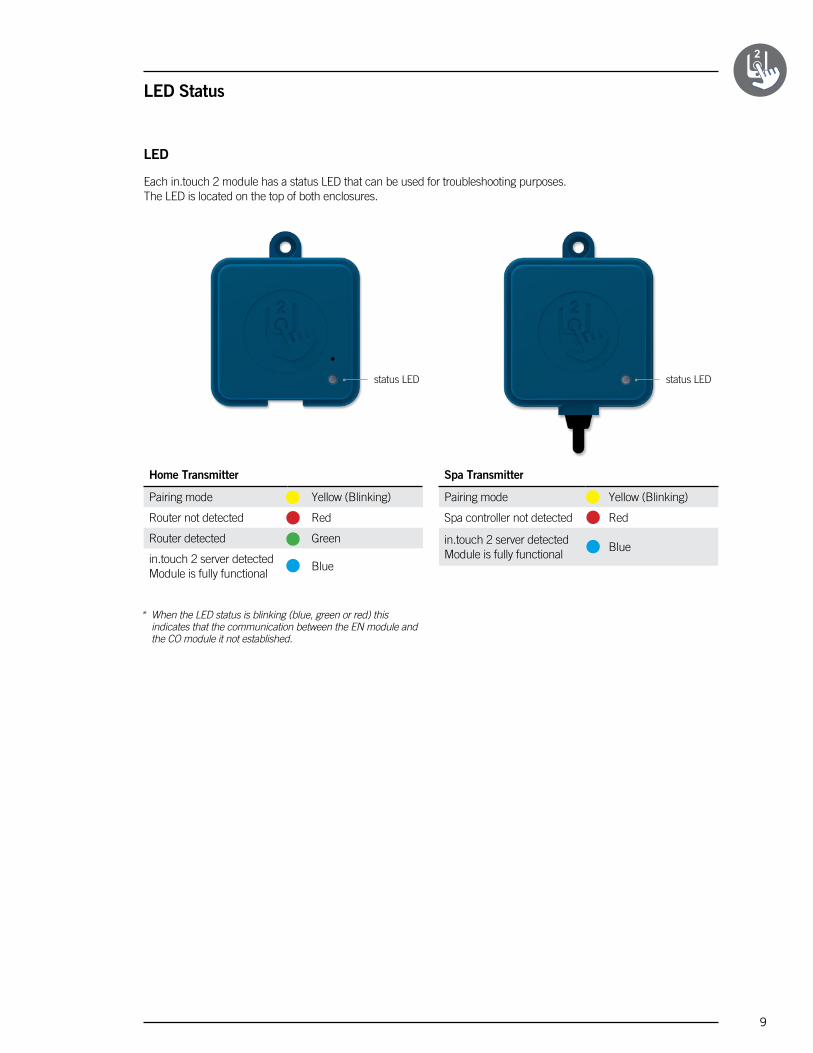
Each in�touch 2 module has a status LED that can be used for troubleshooting purposes� The LED is located on the top of both enclosures�
status LED status LED
* When the LED status is blinking (blue, green or red) this indicates that the communication between the EN module and the CO module it not established.
Home Transmitter
Pairing mode Yellow (Blinking)
Router not detected Red
Router detected Green
in�touch 2 server detected Module is fully functional
Blue
Spa Transmitter
Pairing mode Yellow (Blinking)
Spa controller not detected Red
in�touch 2 server detectedModule is fully functional
Blue
10
Application
Download application
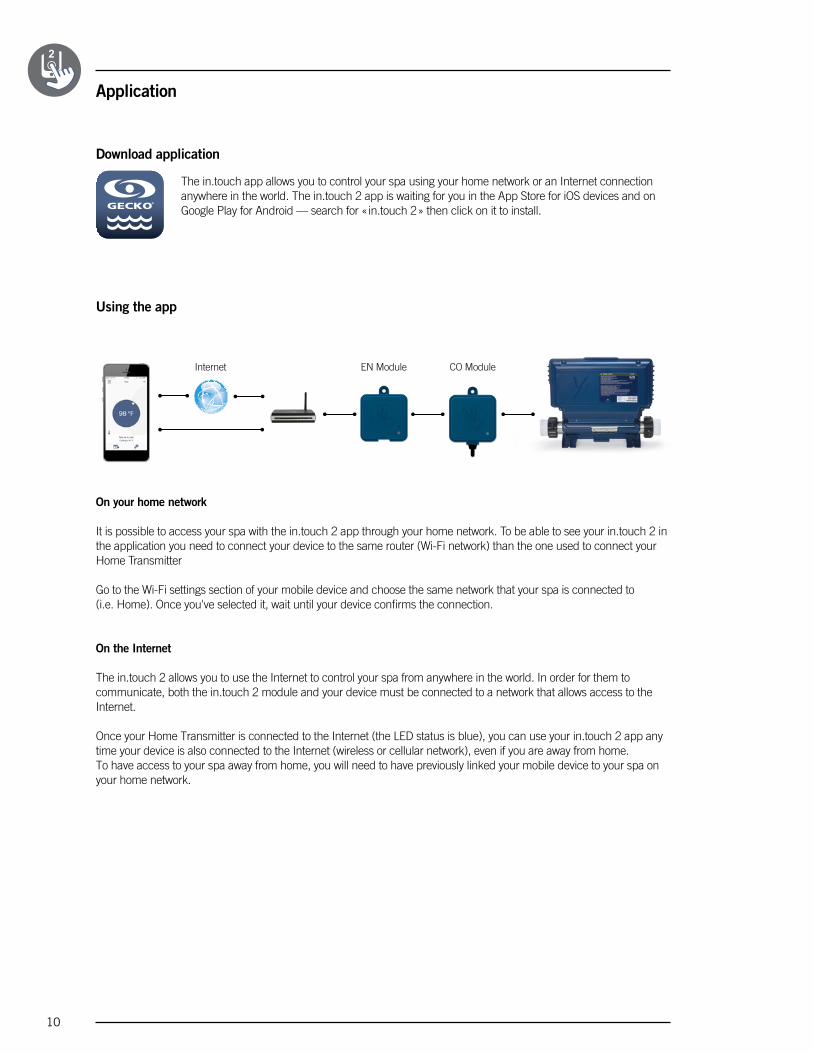
The in�touch app allows you to control your spa using your home network or an Internet connection anywhere in the world� The in�touch 2 app is waiting for you in the App Store for iOS devices and on Google Play for Android — search for « in�touch 2 » then click on it to install�
On your home network
It is possible to access your spa with the in�touch 2 app through your home network� To be able to see your in�touch 2 in the application you need to connect your device to the same router (Wi-Fi network) than the one used to connect your Home Transmitter
Go to the Wi-Fi settings section of your mobile device and choose the same network that your spa is connected to (i�e� Home)� Once you've selected it, wait until your device confirms the connection�
On the Internet
The in�touch 2 allows you to use the Internet to control your spa from anywhere in the world� In order for them to communicate, both the in�touch 2 module and your device must be connected to a network that allows access to the Internet�
Once your Home Transmitter is connected to the Internet (the LED status is blue), you can use your in�touch 2 app any time your device is also connected to the Internet (wireless or cellular network), even if you are away from home� To have access to your spa away from home, you will need to have previously linked your mobile device to your spa on your home network�
Using the app
Internet CO Module EN Module
11
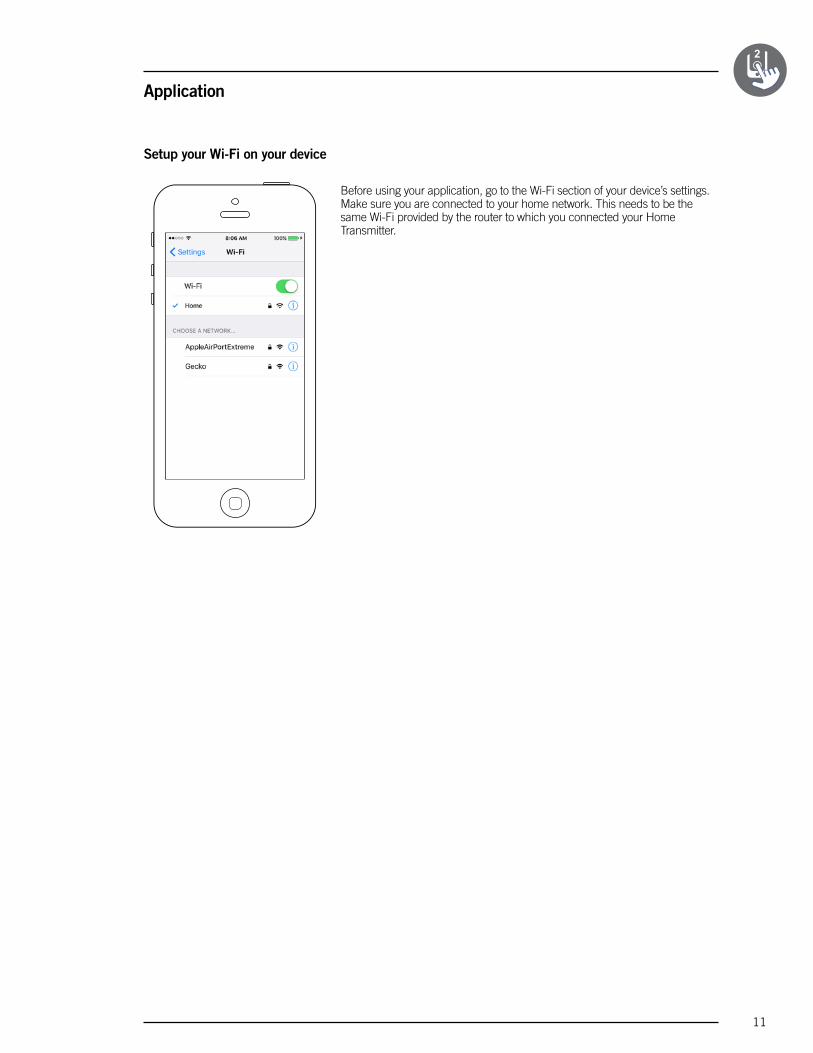
Before using your application, go to the Wi-Fi section of your device’s settings� Make sure you are connected to your home network� This needs to be the same Wi-Fi provided by the router to which you connected your Home Transmitter�
Setup your Wi-Fi on your device
Application
12
Application
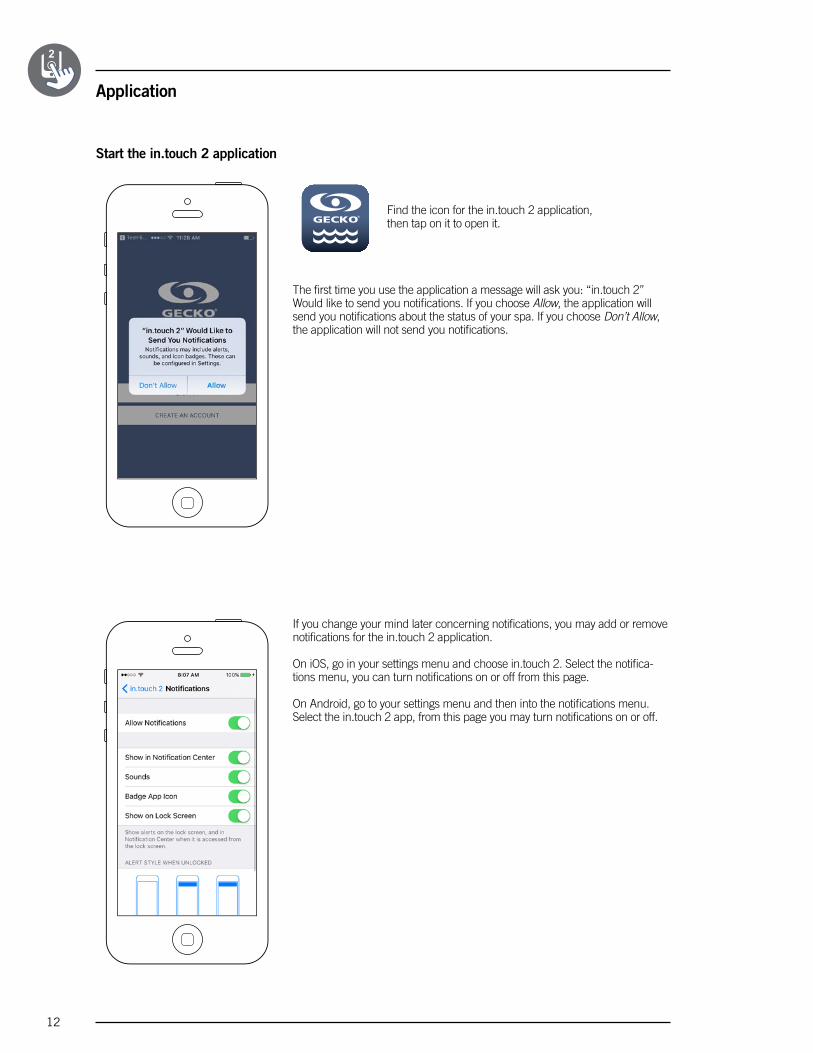
Find the icon for the in�touch 2 application, then tap on it to open it�
The first time you use the application a message will ask you: “in�touch 2” Would like to send you notifications� If you choose Allow, the application will send you notifications about the status of your spa� If you choose Don’t Allow, the application will not send you notifications�
If you change your mind later concerning notifications, you may add or remove notifications for the in�touch 2 application�
On iOS, go in your settings menu and choose in�touch 2� Select the notifica-tions menu, you can turn notifications on or off from this page�
On Android, go to your settings menu and then into the notifications menu� Select the in�touch 2 app, from this page you may turn notifications on or off�
Start the in.touch 2 application

13
Before using your application, you must create an account first and then, you’ll be able to sign in� Your account will give you the opportunity to have access to your spa from any in�touch 2 application�
Login page
When you choose to create a new account, you agree at the same time our Terms of Service and our Privacy Policy� You can read them at any time through this link: https://geckointouch�com/legal
New account creation
14
Application
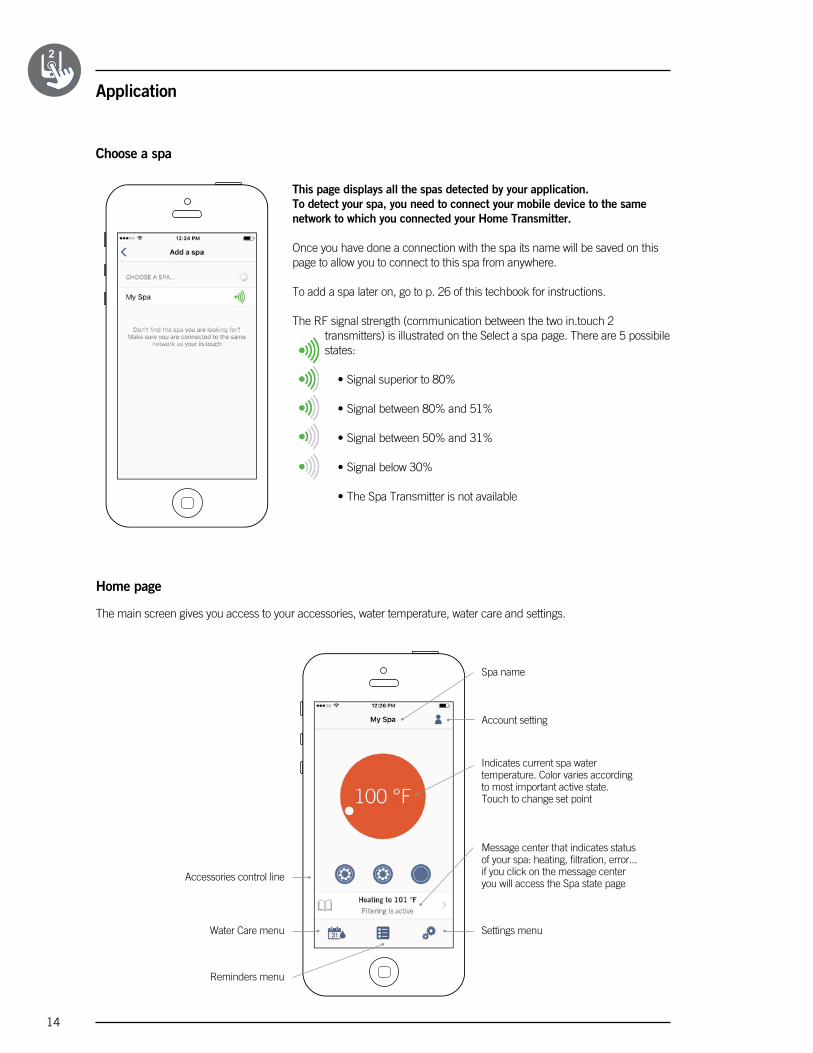
Choose a spa
Home page
The main screen gives you access to your accessories, water temperature, water care and settings�
This page displays all the spas detected by your application. To detect your spa, you need to connect your mobile device to the same network to which you connected your Home Transmitter.
Once you have done a connection with the spa its name will be saved on this page to allow you to connect to this spa from anywhere�
To add a spa later on, go to p� 26 of this techbook for instructions�
The RF signal strength (communication between the two in�touch 2 transmitters) is illustrated on the Select a spa page� There are 5 possibile states:
• Signal superior to 80%
• Signal between 80% and 51%
• Signal between 50% and 31%
• Signal below 30%
• The Spa Transmitter is not available
Account setting
Settings menu
Reminders menu
Spa name
Message center that indicates status of your spa: heating, filtration, error���if you click on the message center you will access the Spa state page
Water Care menu
Accessories control line
Indicates current spa water temperature� Color varies according to most important active state� Touch to change set point
15
Application
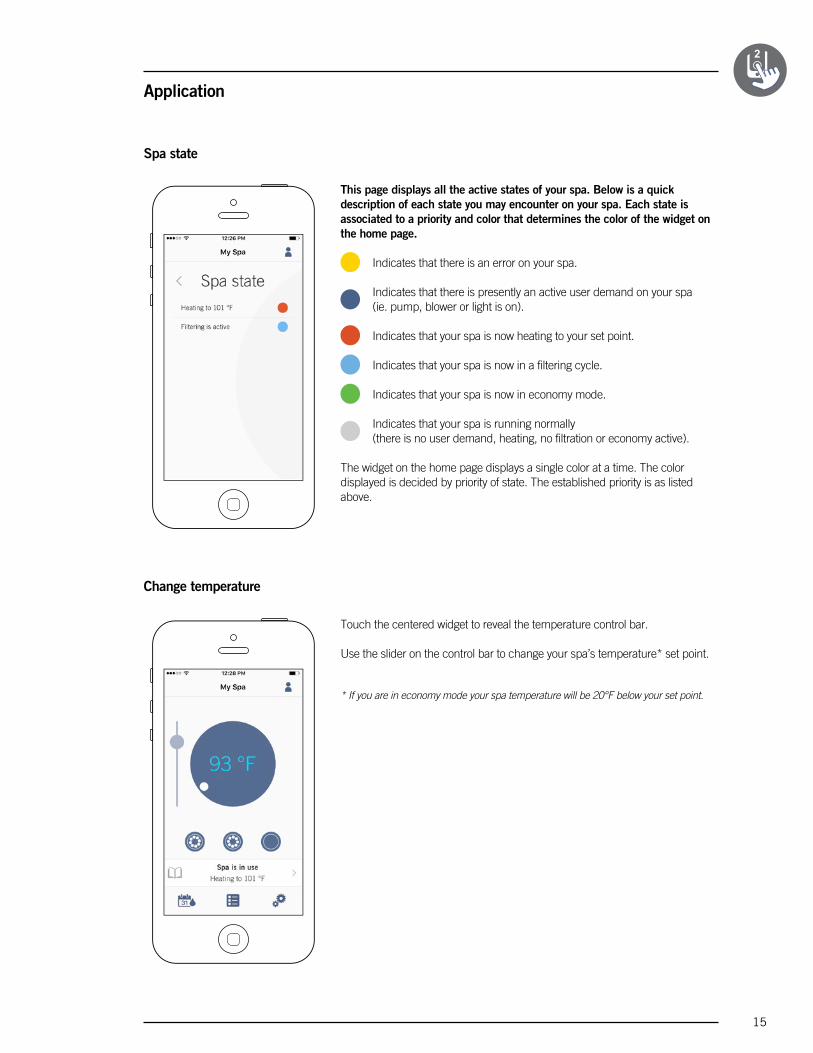
Spa state
Change temperature
This page displays all the active states of your spa. Below is a quick description of each state you may encounter on your spa. Each state is associated to a priority and color that determines the color of the widget on the home page.
Indicates that there is an error on your spa�
Indicates that there is presently an active user demand on your spa (ie� pump, blower or light is on)�
Indicates that your spa is now heating to your set point�
Indicates that your spa is now in a filtering cycle�
Indicates that your spa is now in economy mode�
Indicates that your spa is running normally (there is no user demand, heating, no filtration or economy active)�
The widget on the home page displays a single color at a time� The color displayed is decided by priority of state� The established priority is as listed above�
Touch the centered widget to reveal the temperature control bar�
Use the slider on the control bar to change your spa’s temperature* set point�
* If you are in economy mode your spa temperature will be 20°F below your set point.
16
Application
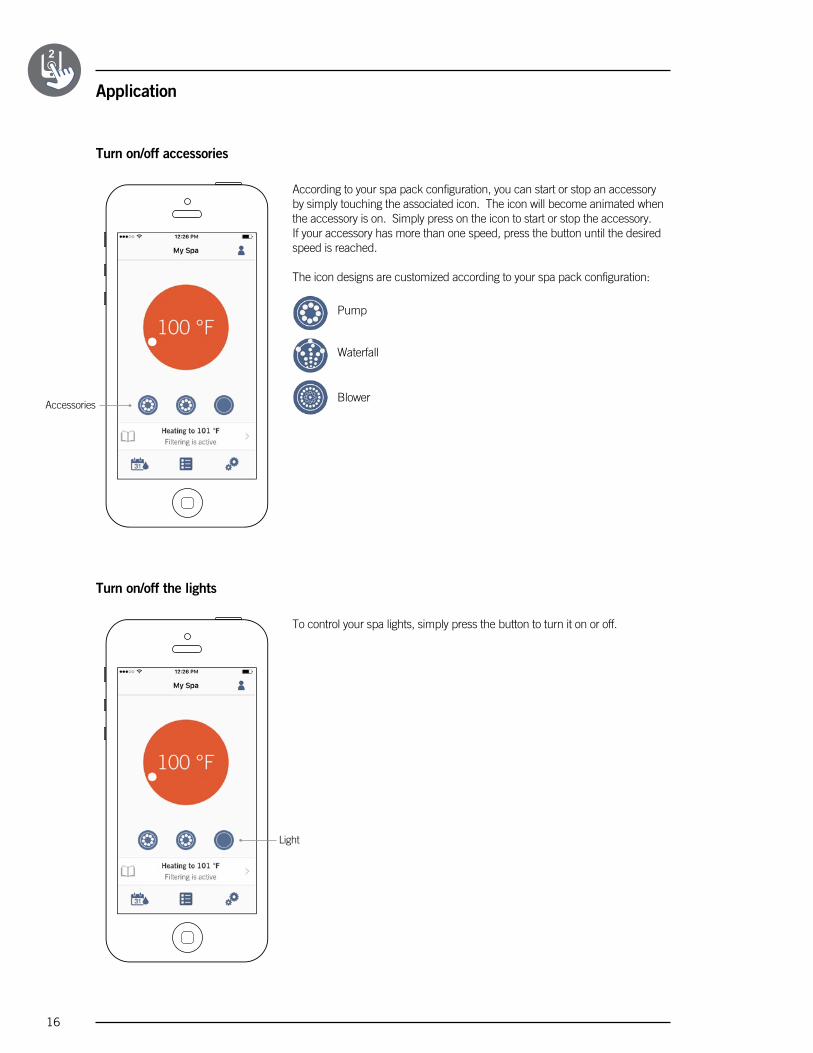
Turn on/off accessories
According to your spa pack configuration, you can start or stop an accessory by simply touching the associated icon� The icon will become animated when the accessory is on� Simply press on the icon to start or stop the accessory� If your accessory has more than one speed, press the button until the desired speed is reached�
The icon designs are customized according to your spa pack configuration:
Accessories
To control your spa lights, simply press the button to turn it on or off�
Light
Pump
Waterfall
Blower
Turn on/off the lights
17
Application
Swap to in�mix 300
Turn on/off in�mix 300
On
Intensity
OffZone
selection
Color wheel
Rainbow icon
Synchronization/ desynchronization icon
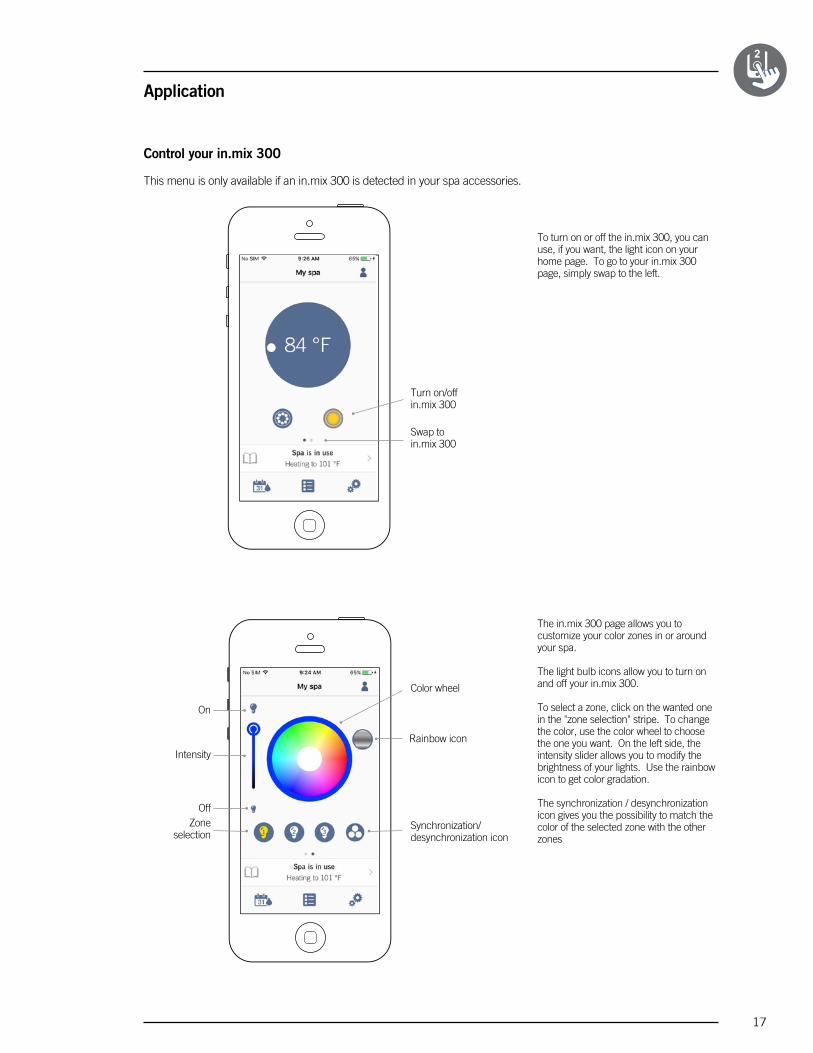
Control your in.mix 300
This menu is only available if an in�mix 300 is detected in your spa accessories�
To turn on or off the in�mix 300, you can use, if you want, the light icon on your home page� To go to your in�mix 300 page, simply swap to the left�
The in�mix 300 page allows you to customize your color zones in or around your spa�
The light bulb icons allow you to turn on and off your in�mix 300�
To select a zone, click on the wanted one in the "zone selection" stripe� To change the color, use the color wheel to choose the one you want� On the left side, the intensity slider allows you to modify the brightness of your lights� Use the rainbow icon to get color gradation�
The synchronization / desynchronization icon gives you the possibility to match the color of the selected zone with the other zones

18
Water Care
The Water Care page will help you set up your ideal filtration and heating settings� Choose between Away from Home, Beginner, Energy Savings, Super Energy and Weekender, depending on your need� Touch the Water Care name you would like to activate, a green checkmark will appear on the icon, indicating you have selected it�
By default, each Water Care mode has pre-configured schedules of economy and filtration�To modify Water Care options, touch the pencil icon at the right end of the desired Water Care to open its menu�
Below you have a short description of each Water Care at default state:
Away From Home:In this mode the spa will always be in economy; the set point will be reduced by 20° F�
Beginner / Standard:The spa will never be in economy mode and will be filtering according to the pack's low level configuration�
Energy Savings:The spa will be in economy mode during the peak hours of the day and resume normal mode on the weekend�
Super Energy Savings:The spa will always be in economy mode during peak hours, every day of the week�
Weekender:The spa will be in economy mode from Monday to Friday, and will run normally on the weekend�
Application
19
Application
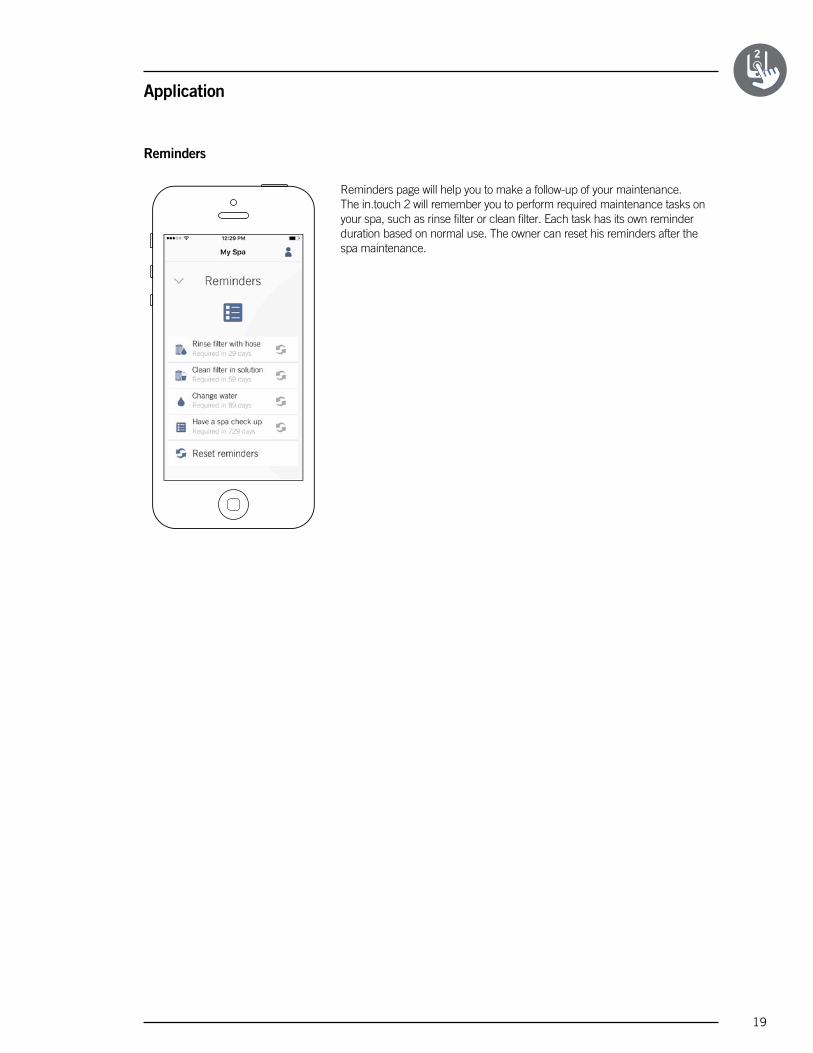
Reminders
Reminders page will help you to make a follow-up of your maintenance� The in�touch 2 will remember you to perform required maintenance tasks on your spa, such as rinse filter or clean filter� Each task has its own reminder duration based on normal use� The owner can reset his reminders after the spa maintenance�
20
Modifying schedules
Application
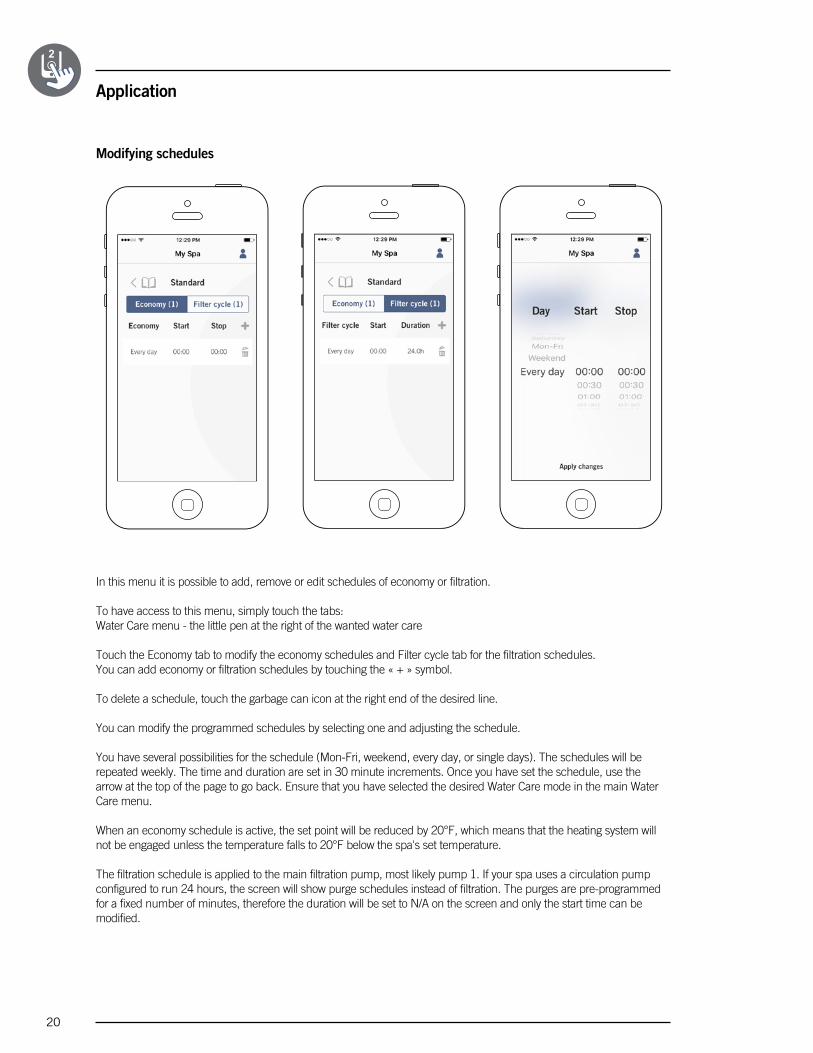
In this menu it is possible to add, remove or edit schedules of economy or filtration�
To have access to this menu, simply touch the tabs:Water Care menu - the little pen at the right of the wanted water care
Touch the Economy tab to modify the economy schedules and Filter cycle tab for the filtration schedules�You can add economy or filtration schedules by touching the « + » symbol�
To delete a schedule, touch the garbage can icon at the right end of the desired line�
You can modify the programmed schedules by selecting one and adjusting the schedule�
You have several possibilities for the schedule (Mon-Fri, weekend, every day, or single days)� The schedules will be repeated weekly� The time and duration are set in 30 minute increments� Once you have set the schedule, use the arrow at the top of the page to go back� Ensure that you have selected the desired Water Care mode in the main Water Care menu�
When an economy schedule is active, the set point will be reduced by 20°F, which means that the heating system will not be engaged unless the temperature falls to 20°F below the spa's set temperature�
The filtration schedule is applied to the main filtration pump, most likely pump 1� If your spa uses a circulation pump configured to run 24 hours, the screen will show purge schedules instead of filtration� The purges are pre-programmed for a fixed number of minutes, therefore the duration will be set to N/A on the screen and only the start time can be modified�

21
Application
In the Settings page you can access the following: • in.touch network• Temperature units• Change spa name • Technical info
To select an item, tap on the arrow next to it� It will open the selected menu�
Spa Settings
in.touch network
The in�touch network menu allows you to have access to information concerning the RF connection parameters between the Home Transmitter and the Spa Transmitter�This menu gives you acces to:
• Channel• Signal strength• Reset channel (resets channel to ... default)
To change channels, press on the Channel line�
22
Application
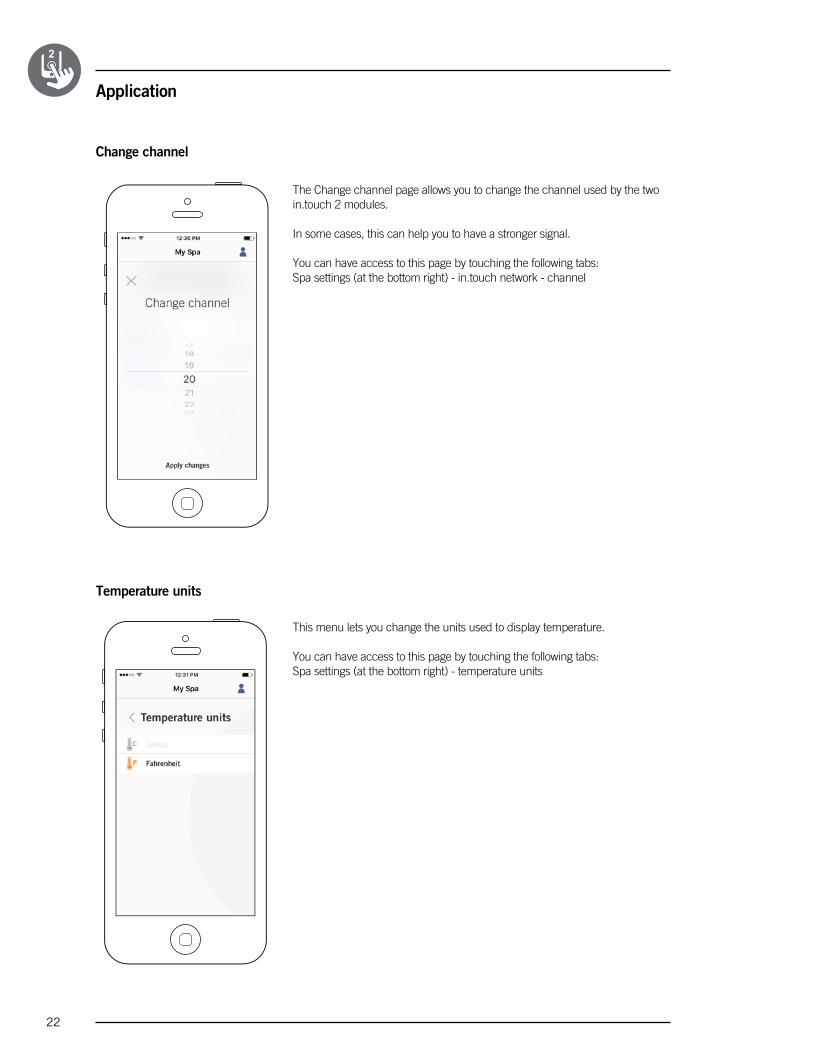
The Change channel page allows you to change the channel used by the two in�touch 2 modules�
In some cases, this can help you to have a stronger signal�
You can have access to this page by touching the following tabs:Spa settings (at the bottom right) - in�touch network - channel
Change channel
Temperature units
This menu lets you change the units used to display temperature�
You can have access to this page by touching the following tabs:Spa settings (at the bottom right) - temperature units

23
Application
This section allows you to edit the name of the spa�
You can have access to this page by touching the following tabs:Spa settings (at the bottom right) - Change spa name
Name
Technical Info
This section shows information about the in�touch 2 software number and the revision numbers of the different components of your system� You can have access to this page by touching the following tabs:Spa settings (at the bottom right) - Technical info

24
Application
In the Settings page you can access the following: • Add a spa from local network• Account • Tutorial • *Legal• **Patents
To select an item, tap on the arrow next to it� It will open the selected menu�
*The button Legal will bring you to this web site :https://geckointouch�com/legal
**The button Patents will bring you to this web site: http://geckoportal�com/corpo/#patents
Settings
Add a spa
This page displays all the spas detected by your application. To detect your spa, you need to connect your mobile device to the same network to which you connected your Home Transmitter.
Once you have done a connection with the spa its name will be saved on this page to allow you to connect to this spa from anywhere�
You can have access to this page by touching the following tabs:Settings (up right corner) - Add a spa
The RF signal strength (communication between the two in�touch 2 transmitters) is illustrated on the Select a spa page� There are 5 possibile states:
• Signal superior to 80%
• Signal between 80% and 51%
• Signal between 50% and 31%
• Signal below 30%
• The Spa Transmitter is not available
25
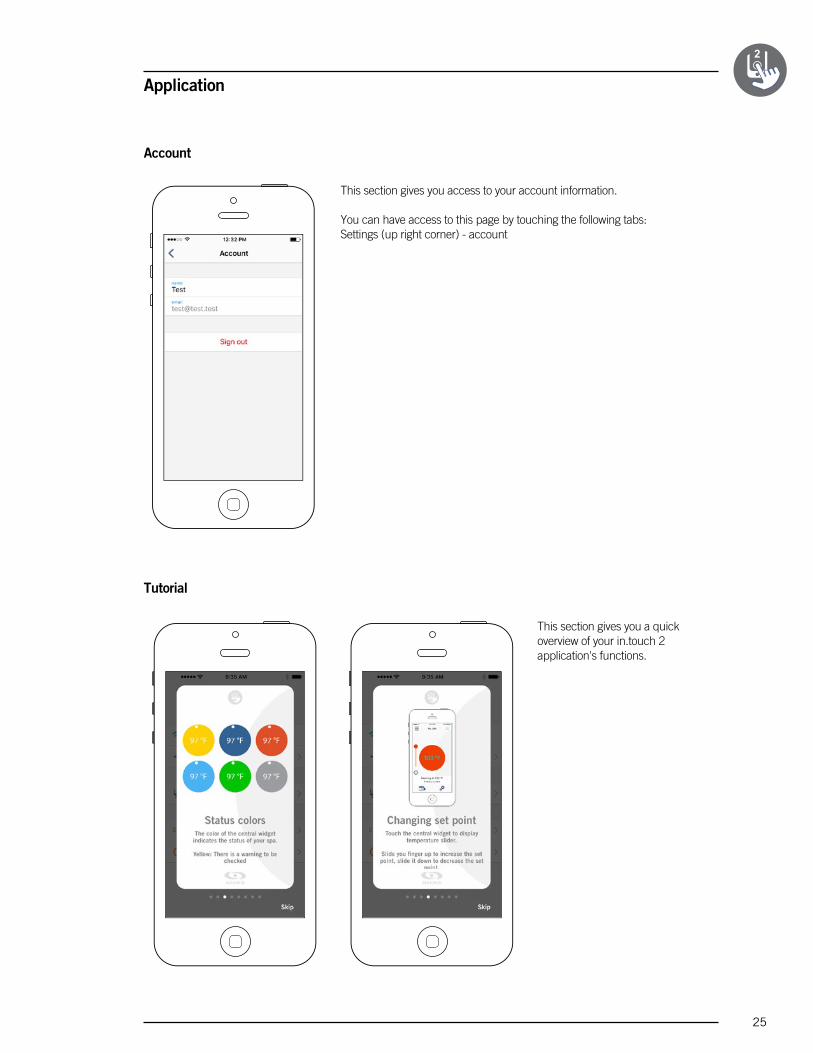
This section gives you a quick overview of your in�touch 2 application's functions�
Tutorial
Application
This section gives you access to your account information�
You can have access to this page by touching the following tabs:Settings (up right corner) - account
Account
26
Application
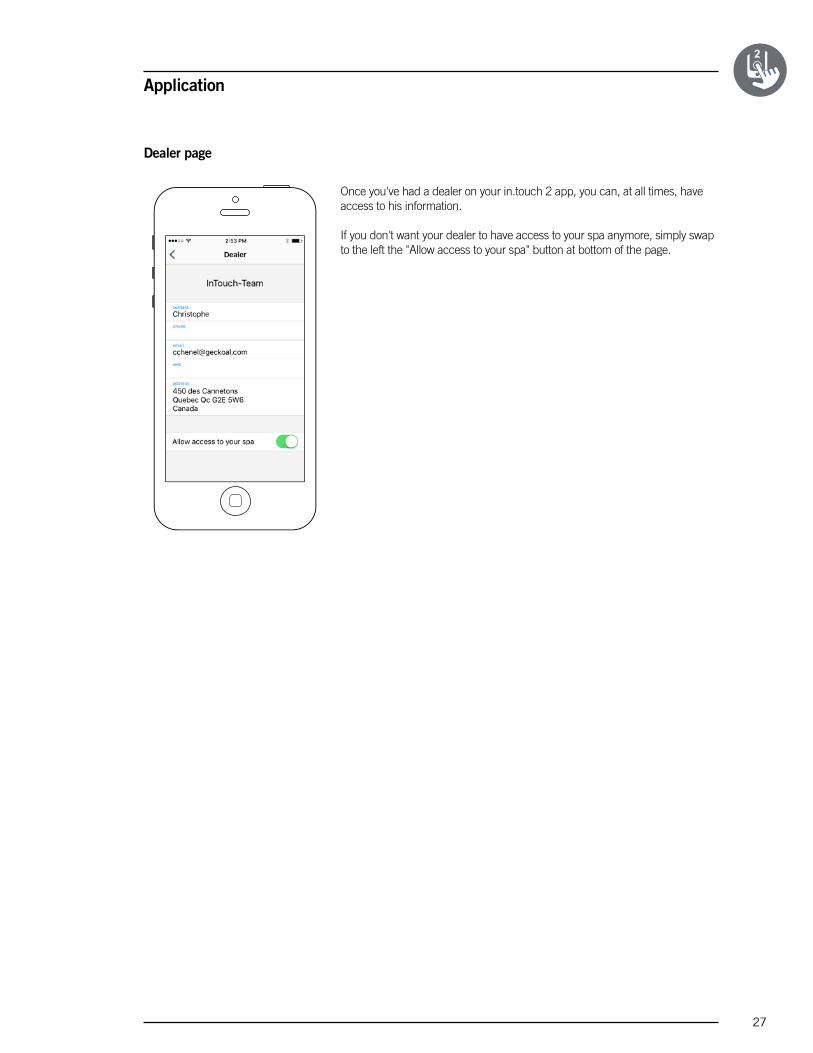
All the invitations you may receive are under the dealers tab in the "settings" menu�
To choose an invitation, simply click on it� You will then see a window authorization to confirm with the dealer's information�
You can also decline the invitation at any time if you want to�
Authorizing an invitation
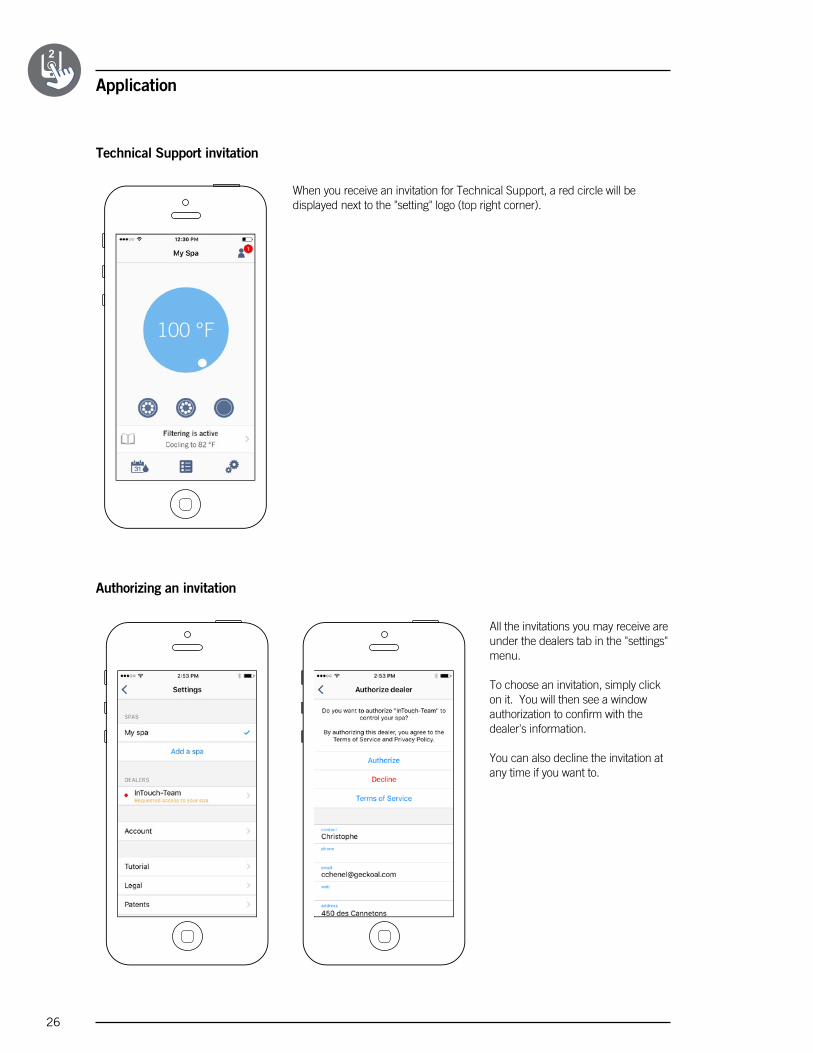
When you receive an invitation for Technical Support, a red circle will be displayed next to the "setting" logo (top right corner)�
Technical Support invitation
27
Application
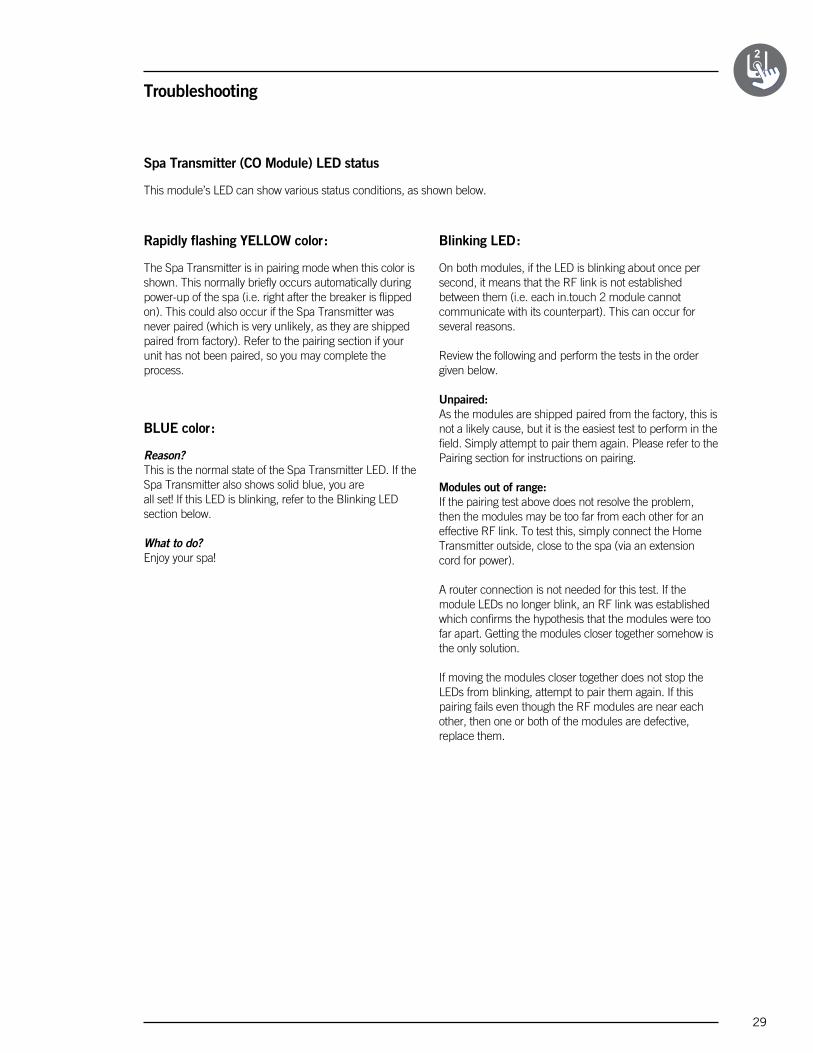
Once you've had a dealer on your in�touch 2 app, you can, at all times, have access to his information�
If you don't want your dealer to have access to your spa anymore, simply swap to the left the "Allow access to your spa" button at bottom of the page�
Dealer page

28
Troubleshooting
There are 2 different modules in the in�touch 2 kit: The Home Transmitter (EN Module) and the Spa Transmitter (CO Module)� They communicate together via an RF link� The Home Transmitter is responsible for the Ethernet communications and the Spa Transmitter is responsible for the spa communications�
Home Transmitter (EN Module) LED status
This module’s LED can show various status conditions, as indicated below�
Troubleshooting
Both in�touch 2 modules have a status LED to help diagnose problems, if any occur�
Rapidly flashing YELLOW color :
The Home Transmitter is in pairing mode when this color is shown (the pairing switch was pressed)� Until a pairing successfully completes, the application cannot connect to the spa� To complete the pairing, you must turn off the spa (using its breaker), wait a few seconds and then flip back the breaker to on� The pairing will then occur within a few seconds� If not, then the Spa Transmitter is either incorrectly connected, out of range, or defective�
If the in�touch 2 modules were previously paired and the pairing switch is accidently pressed, simply unplug the Home Transmitter USB power cord and re-plug it (thereby resetting the Home Transmitter)� The modules should then normally reconnect together�
Once out of pairing mode, the Home Transmitter will display another color�
For each of the following colors, the information applies whether the LED is blinking or not� If the LED is blinking, please also refer to the Blinking LED section below�
RED color :
Reason?The Home Transmitter is not detecting a router� Until this is resolved, the application cannot connect to the spa�
What to do?Make sure the router is powered and working correctly (i�e� test it using another computer or device connected to the same LAN port you intend to use)�
Make sure the Ethernet cable is correctly connected at each end (LAN port on router end, and the Home Transmitter�) If the problem still occurs, try connecting with another cable� If a computer (or other device) works fine on the LAN port, and the cable is fine, then the Home transmitter is likely defective�
GREEN color :
Reason?The Home Transmitter is connected to a router (an IP address was assigned), but the in�touch 2 server is not reachable�
What to do?This is very likely a router configuration issue, so refer to your router’s User Manual�
It may be due to Port 10022 being closed� Normally, this port is open by default in commercial routers, but different routers may have different behaviors�
If Port 10022 is confirmed as open, then some other internal configuration is preventing the router from accessing Internet� In this case, the application will still have access to the spa if connected to the same network�
The server may also simply be temporarily “offline” for servicing/maintenance, so try again later� The application can still connect with the spa, but only from within the same network�
If the application can connect to a local spa, the problem is likely the Internet connection (WAN), a router mis-configuration, or your Internet Service Provider (ISP) has issues with its network connection�
BLUE color :
Reason?This is the normal state of the Home Transmitter LED� It has a full Internet connection, with access to the in�touch 2 server� As long as your device and application have access to the Internet (either via Wi-Fi or cellular data such as 3G, 4G, or LTE), then you’re good to go!
What to do?Enjoy your spa!
29
Spa Transmitter (CO Module) LED status
This module’s LED can show various status conditions, as shown below�
Troubleshooting
Rapidly flashing YELLOW color :
The Spa Transmitter is in pairing mode when this color is shown� This normally briefly occurs automatically during power-up of the spa (i�e� right after the breaker is flipped on)� This could also occur if the Spa Transmitter was never paired (which is very unlikely, as they are shipped paired from factory)� Refer to the pairing section if your unit has not been paired, so you may complete the process�
BLUE color :
Reason?This is the normal state of the Spa Transmitter LED� If the Spa Transmitter also shows solid blue, you are all set! If this LED is blinking, refer to the Blinking LED section below� What to do?Enjoy your spa!
Blinking LED :
On both modules, if the LED is blinking about once per second, it means that the RF link is not established between them (i�e� each in�touch 2 module cannot communicate with its counterpart)� This can occur for several reasons�
Review the following and perform the tests in the order given below�
Unpaired:As the modules are shipped paired from the factory, this is not a likely cause, but it is the easiest test to perform in the field� Simply attempt to pair them again� Please refer to the Pairing section for instructions on pairing�
Modules out of range:If the pairing test above does not resolve the problem, then the modules may be too far from each other for an effective RF link� To test this, simply connect the Home Transmitter outside, close to the spa (via an extension cord for power)� A router connection is not needed for this test� If the module LEDs no longer blink, an RF link was established which confirms the hypothesis that the modules were too far apart� Getting the modules closer together somehow is the only solution�
If moving the modules closer together does not stop the LEDs from blinking, attempt to pair them again� If this pairing fails even though the RF modules are near each other, then one or both of the modules are defective, replace them�
30
Specifications
EnvironmentalHumidity: Up to 85% non condensingOperating temperature: -4°F (-20°C) to 140°F (60°C)Storage temperature: -22°F (-30°C) to 185°F (85°C)Water ingress protection: IPX5 for CO module
Compatibilityin�yt, in�ye, in�yj, in�xe, or in�xm2 spa systems manufactured in or after 2012�
Regulatory Compliance Information for Internal Transceiver Module
United StatesContains FCC ID: OA3MRF89XAM9A
This equipment has been tested and found to comply with the limits for a Class B digital device, pursuant to part 15 of the FCC Rules� These limits are designed to provide reasonable protection against harmful interference in a residential installation� This equipment generates, uses and can radiate radio frequency energy, and if not installed and used in accordance with the instructions, may cause harmful interference to radio communications� However, there is no guarantee that interference will not occur in a particular installation� If this equipment does cause harmful interference to radio or television reception, which can be determined by turning the equipment off and on, the user is encouraged to try to correct the interference by one or more of the following measures:• Reorient or relocate the receiving antenna�• Increase the separation between the equipment and receiver�• Connect the equipment into an outlet on a circuit different from that to which the receiver is connected�• Consult the dealer or an experienced radio/TV technician for help�
CanadaContains IC: 7693A-89XAM9A
This device complies with Industry Canada license exempt RSS standard(s)� Operation is subject to the following two conditions: (1) this device may not cause interference, and (2) this device must accept any interference, including interference that may cause undesired operation of the device�
Europe
The internal transceiver module has been certified for use in European countries�The following tests have been completed, and passed:
Test standard ETSI EN 300 220-2 V2�4�1:• Frequency error & drift• Effective radiated power• Transient power• Modulation bandwidth• Unwanted emissions in the spurious domain• Receiver spurious radiation
Test standard ETSI EN 301 489-3 V1�6�1:• Conducted emissions• Radiated emissions• Radiated immunity
31
North American complianceUL 1563 Sixth Ed�UL file: E182156CAN/CSA C22�2 No� 218�1-13 (2013) FCC part 15 (2015) subpart BICES-003 (2016)
European and international compliance IEC 60335-1, A2 : 2008IEC 60335-2-60, A1 : 2013EN 55014-1 : 2006, A1 : 2009, A2 : 2011EN 55014-2 : 2015EN 61000-3-2 : 2014EN 61000-3-3 : 2013
Specifications

in.touch 2
TechBook
Gecko Alliance450 des Canetons, Québec (Qc), G2E 5W6 Canada, 1.800.78.GECKO
www.geckoalliance.com Printed in Canada
9919-101517-FRev. 10-2018
© Groupe Gecko Alliance inc., 2018All trademarks or registered trademarks are the property of their respective owners.
Simplest of setups
Strong and long range communication signal
State-of-the-art apps with push notifications
ultimate Wi-Fi remote control for your spa