TEAMWORK SYSTEM - No Magic · Teamwork System Layout Figure 1 -- Teamwork system layout The diagram...
108
TEAMWORK SYSTEM version 17.0.1 user guide No Magic, Inc. 2011
Transcript of TEAMWORK SYSTEM - No Magic · Teamwork System Layout Figure 1 -- Teamwork system layout The diagram...
TEAMWORK SYSTEMversion 17.0.1
user guide
No Magic, Inc.
2011

All material contained herein is considered proprietary information owned by No Magic, Inc. and is not to be shared, copied, or reproduced by any means. All information copyright 2000-2011 by No Magic, Inc. All Rights Reserved.
C O N T E N T S 0
Teamwork Concepts 5Teamwork System Layout 7Installing and Running Teamwork Server 10System Requirements 10Installing 10Upgrading Teamwork Server 11Importing projects and users from earlier versions of Teamwork Server 14Starting Teamwork Server 15Stopping Teamwork Server 19
Working with Teamwork Projects 19Logging to the Teamwork Server 20Creating and Managing Categories 22Creating a Teamwork Project 23Adding a Non-Teamwork Project to Teamwork Server 23Creating Teamwork Project in IDE integration 26Locking Model Elements and Diagrams for Editing 26Unlocking Model Elements and Diagrams 32Committing to Teamwork Server 37Saving a Teamwork Project 38Updating 39Versioning 39Visibility of version tags 39Sending Messages 40Customizing Teamwork Server Properties 42
Managing Teamwork Server 43Users Management 43Starting the Administrator’s Console 47Administrator’s Console Dialog 48Data Migration between Different Repositories 62Changing Teamwork Server Debugging Mode 63
Collaborate Menu and Collaboration Toolbar 64Teamwork Dialogs 65
Edit Projects Dialog 65Edit Users Dialog 68Add/Edit User Dialog 70Login Dialog 71Open Server Project Dialog 72Commit Settings Dialog 75Project Versions Dialog 75Version Information Dialog 77Modules Dialog 78
Data Partitioning on Teamwork Server 79Creating Teamwork Modules 79Working with Teamwork Modules 80
Project Branching in Teamwork 82Introduction 82
Copyright © 2000-2011 No Magic, Inc.3
C O N T E N T S
Managing Branches 85LDAP Support 92
Enabling LDAP Integration 92Connection Settings 93Authentication Settings 94User Data Retrieval Settings 99Connection Testing 101Subversion and LDAP Integration Working at the Same Time 101Converting Certificates to JKS Format 101Integrating Teamwork Server with SSL-Enabled Active Directory 102
Code Engineering in Teamwork Project 104Connecting Teamwork server via SSH encrypted tunnel 105
Configure the Teamwork Server side 105Client Side Configuration 108
4 Copyright © 2000-2011 No Magic, Inc..
TEAMWORK SYSTEM
With MagicDraw Teamwork Server you can assign as many developers as needed to work simultaneously on the same project using multiple workstations. The resulting Teamwork project is saved on the server for sharing with other MagicDrawTM applications. Users with administrator rights can create new users by creating a name and assigning various permissions to work on projects. The permissions assigned will determine whether the new user can update, commit, edit, create, and delete model elements, diagrams, and projects.
To enable Teamwork support, you should install and run the MagicDraw Teamwork Server software. Each MagicDraw application acts as a client in the Teamwork system.
At www.magicdraw.com/viewlets in the Project management an collaboration section, you will find the Teamwork viewlets to help you understand how to work with the Teamwork Server.
Teamwork ConceptsGet acquainted with basic Teamwork concepts before getting started with Teamwork projects in MagicDrawTM.
Create Teamwork projectCreate a new project that is stored in the Teamwork Server and is available for other users with the appropriate permissions. For more information, see “Creating a Teamwork Project” on page 23.
Update project Load the latest version of a project from the server into MagicDrawTM. For more information, see “Updating” on page 39.
Lock elements for editLock elements for edit model elements of the project to edit them. When an element is locked for edit, other users in the same project cannot edit it until the element is unlocked. For more information, see “Locking Model Elements and Diagrams for Editing” on page 26.
Unlock elementsUnlock model elements/diagrams, so that other users can lock them for editing. For more information, see “Locking Model Elements and Diagrams for Editing” on page 26.
Commit projectUse commit to save changes in the project. Committing saves a new project version to the server. Before committing, the user can select elements to unlock add comments and/or tags. If a new project version is available on the server, the project is automatically updated before committing. For more information, see “Committing to Teamwork Server” on page 37.
Update lock informationRefresh the list of elements that are locked by other users.
AuthorA user who has committed a new project version.
NOTE The Teamwork Server functionality is available with MagicDraw client Standard, Professional, Architect, and Enterprise editions only.
Copyright © 2000-2011 No Magic, Inc.5
TEAMWORK SYSTEMTeamwork Concepts
VersionA unique number assigned to the committed project. Project version numbers begin at zero (for the initial version) and increase with every new project version.
CommentOptional description of changes in the committed version.
TagInformation about the status of a project (approved, initially tested, etc.), or other important information.
Administrator LoginThe default Administrator's account in Teamwork System is: Login name: AdministratorPassword: AdministratorTo prevent illegal access, it is advisable to change the Administrator's password. For more information, see Section “Managing Teamwork Server” on page 43.
Teamwork Server Administrator's ConsoleA remote connection for Teamwork Server status observation and administrative control. The server holds information about active users and loaded projects. The Administrator can shutdown or restart the server, change its properties, and view log files (including debug information) for the server and separate projects.
RepositoryA storage place for projects and their versions managed by the Teamwork Server.
Project categoryA concept which enables visual grouping of projects in Teamwork Server repository.
Native userA user whose account data is stored locally, i.e. in the native Teamwork Server repository.
External userA user whose account data (all except the login name) is stored in an external database, e.g., Subversion, ClearCase, or LDAP.
Teamwork ModuleA Teamwork project containing one or more shared packages. Modules are created with a purpose to reuse them or to decompose projects into parts.
Dependency between two elements
A situation where one element (dependent element) refers to the data of the other element (independent element).
6 Copyright © 2000-2011 No Magic, Inc..
TEAMWORK SYSTEMTeamwork System Layout
Teamwork System Layout
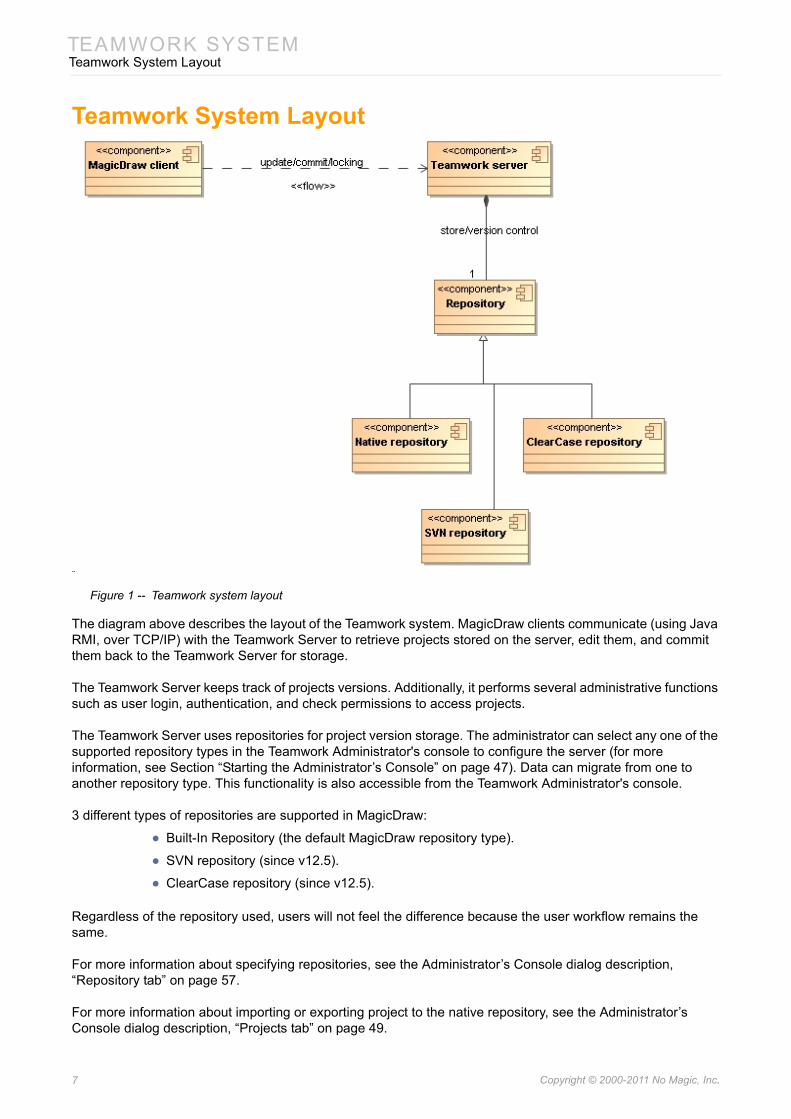
Figure 1 -- Teamwork system layout
The diagram above describes the layout of the Teamwork system. MagicDraw clients communicate (using Java RMI, over TCP/IP) with the Teamwork Server to retrieve projects stored on the server, edit them, and commit them back to the Teamwork Server for storage.
The Teamwork Server keeps track of projects versions. Additionally, it performs several administrative functions such as user login, authentication, and check permissions to access projects.
The Teamwork Server uses repositories for project version storage. The administrator can select any one of the supported repository types in the Teamwork Administrator's console to configure the server (for more information, see Section “Starting the Administrator’s Console” on page 47). Data can migrate from one to another repository type. This functionality is also accessible from the Teamwork Administrator's console.
3 different types of repositories are supported in MagicDraw:
• Built-In Repository (the default MagicDraw repository type).
• SVN repository (since v12.5).
• ClearCase repository (since v12.5).
Regardless of the repository used, users will not feel the difference because the user workflow remains the same.
For more information about specifying repositories, see the Administrator’s Console dialog description, “Repository tab” on page 57.
For more information about importing or exporting project to the native repository, see the Administrator’s Console dialog description, “Projects tab” on page 49.
7 Copyright © 2000-2011 No Magic, Inc..
TEAMWORK SYSTEMTeamwork System Layout
Built-In Repository
This is a default repository type. When the Teamwork Server is first installed and started, it is configured to use this type of repository. The Built-In repository is the only type of repository available in the version prior to 12.5 of Teamwork Server.
When the Teamwork Server is configured to use the Built-In repository, a directory is designated for project storage. The Server then uses its internal proprietary code to implement a versioned repository for a collection of projects.
Additionally, a simple user authentication/authorization scheme is implemented in the repository to store a simple list of users and their passwords (securely encrypted using one-way encryption) in a user file. When MagicDraw users log into the server, it uses this user file to verify these users and their passwords. Users' rights to access different projects are also described using this file.
SVN Repository
The Teamwork Server can be configured to use SVN repository as a back-end. In this mode, the Teamwork Server retrieves and commits project versions into the SVN repository.
To use this repository type, SVN client must be correctly installed on the computer where the Server runs. The Teamwork Server must be able to launch svn executable - svn executable must be in PATH and have appropriate permissions. The supported SVN client versions are 1.4, 1.5, and 1.6 (since Teamwork Server version 17.0).
All SVN repository access methods are supported:
• local access through file:// type URLs
• remote repository access through svn://, svn+ssh:// type URLs
• remote repository access through HTTP and WebDAV - http://, https:// type URLs
The Teamwork Server with SVN repository supports pass-through authentication into the SVN. A pass-through authentication is used for all access methods except file:// method. In this case, the Teamwork Server only maintains a list of users, but not their passwords; their passwords are not stored. When a user tries to log into the Teamwork Server, server does not verify the password itself, but it logs into the SVN with the typed user name/password. All the project update/commit actions on the repository are performed by the server on the user’s request. Hence, if you explore the repository with the SVN tools, you will see that all the changes are attributed to the correct user.
For file:// type URLs, pass-through authentication is not possible. The Teamwork Server uses the same built-in authentication method as the Built-In repository type, the users list with their crypted passwords is maintained in a repository file. The server authenticates users using this file. Actions in a repository are performed by the server on the user’s request. If the server is started as NT service, all actions in the repository will be attributed
Advantage DisadvantageSimple to configure (the only configuration parameter is a directory where project ver-sions will be stored) and does not depen-dent on external tools.
Consume a lot of storage capacity, which increases complexity and maintenance costs. The teamwork administrator has to set up the appropriate backup policy and monitor the growth of disk space used when project versions accumulate. Usually, organization have their own control systems to store code, documents etc. and these system determine the appropriate backup and space allocation.
NOTE Only password based logins are supported (public/private key logins for svn+ssh:// and https:// access methods are currently not available).
8 Copyright © 2000-2011 No Magic, Inc..
TEAMWORK SYSTEMTeamwork System Layout
to the Local System user (unless a different user is specified in the service settings). If the server is started manually, all actions in the repository will be attributed to the user who started the server. This difference can only be seen when examining the SVN repository with the SVN native tools. When looking at the project versions with MagicDraw client, all commit actions will be attributed to the uses who performed them.
For best performance, the Teamwork Server and SVN repository should have a good link between them. Optimally Teamwork Server could run on the machine where the repository is installed.
ClearCase Repository
The teamwork Server can be configured to use ClearCase repository as a back-end. In this mode, the Teamwork Server retrieves and commits project versions into the ClearCase repository.
To use this repository type, the ClearCase client must be correctly installed on the computer where the Server runs. It must be able to launch cleartool executable - cleartool executable must be in PATH and have appropriate permissions. The supported ClearCase client versions are v7.0 or later (earlier versions might work, but were not tested).
All actions (update/commit) are performed in the ClearCase repository by the server on user request. If the server is started as NT service, actions in the repository will be attributed to the Local System user (unless a different user is specified in the service settings). If the server is started manually, all actions in the repository will be attributed to the user who started the server. This difference can only be seen when examining the ClearCase repository with the ClearCase native tools. When looking at the project versions with MagicDraw client, all commit actions will be attributed to the users who performed them.
For best performance the Teamwork Server should run on the machine where the repository is installed.
NOTE When a project file is committed into the SVN repository, the server stores addi-tional auxiliary information about the project in an additional directory. If you commit the MyProject.mdzip project into the server, the auxiliary information will be stored in the MyProject_files directory nearby. Do not delete this direc-tory from the repository.
Advantage Disadvantage Projects with their versioning information can be stored in the same repository along-side the other artifacts, produced by the team: code, documentation, etc. There is no need to maintain a separate repository for MagicDraw projects, schedule backups, and monitor for storage used.
Dependent on external tool, the SVN client.
NOTE When a project file is committed into the ClearCase repository, the server stores additional auxiliary information about the project in an additional directory. If you commit the MyProject.mdzip project into the server, the auxiliary information will be stored in the MyProject_files directory nearby. Do not delete this directory from the repository.
Advantage DisadvantageProjects with their version information can be stored in the same repository alongside the other artifacts, produced by the team: code, documentation, etc. There is no need to maintain a separate repository for MagicDraw projects, schedule backups, and monitor storage used.
Dependent on ClearCase client.
9 Copyright © 2000-2011 No Magic, Inc..
TEAMWORK SYSTEMInstalling and Running Teamwork Server
Installing and Running Teamwork Server
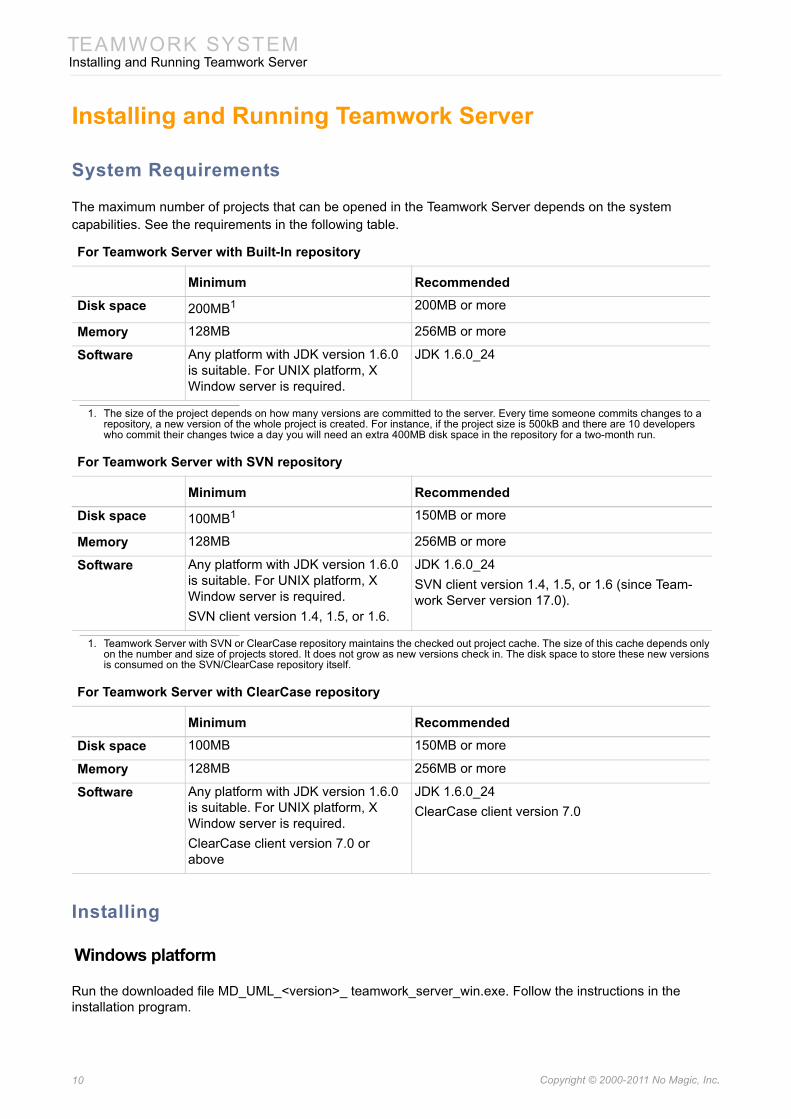
System Requirements
The maximum number of projects that can be opened in the Teamwork Server depends on the system capabilities. See the requirements in the following table.
Installing
Windows platform
Run the downloaded file MD_UML_<version>_ teamwork_server_win.exe. Follow the instructions in the installation program.
For Teamwork Server with Built-In repository
Minimum Recommended
Disk space 200MB1
1. The size of the project depends on how many versions are committed to the server. Every time someone commits changes to a repository, a new version of the whole project is created. For instance, if the project size is 500kB and there are 10 developers who commit their changes twice a day you will need an extra 400MB disk space in the repository for a two-month run.
200MB or more
Memory 128MB 256MB or more
Software Any platform with JDK version 1.6.0 is suitable. For UNIX platform, X Window server is required.
JDK 1.6.0_24
For Teamwork Server with SVN repository
Minimum Recommended
Disk space 100MB1
1. Teamwork Server with SVN or ClearCase repository maintains the checked out project cache. The size of this cache depends only on the number and size of projects stored. It does not grow as new versions check in. The disk space to store these new versions is consumed on the SVN/ClearCase repository itself.
150MB or more
Memory 128MB 256MB or more
Software Any platform with JDK version 1.6.0 is suitable. For UNIX platform, X Window server is required.SVN client version 1.4, 1.5, or 1.6.
JDK 1.6.0_24SVN client version 1.4, 1.5, or 1.6 (since Team-work Server version 17.0).
For Teamwork Server with ClearCase repository
Minimum Recommended
Disk space 100MB 150MB or more
Memory 128MB 256MB or more
Software Any platform with JDK version 1.6.0 is suitable. For UNIX platform, X Window server is required.ClearCase client version 7.0 or above
JDK 1.6.0_24ClearCase client version 7.0
10 Copyright © 2000-2011 No Magic, Inc..

TEAMWORK SYSTEMInstalling and Running Teamwork Server
UNIX platform
Confirm that X Window server is running. Run the downloaded file MD_UML_<version>_ teamwork_server_unix.sh. Follow the instructions in the installation program.
MAC OS X platform
Confirm that X Window server is running. Run the downloaded file MD_UML_<version>_ teamwork_server_mac.dmg and install the application by dropping the launcher to the Applications folder (or another preferred location).
Other Platforms
Extract the downloaded file MD_UML_<version>_teamwork_server_no_install.zip. You can launch the Teamwork Server by opening either teamwork_server.exe or ./teamwork_server in the bin directory.
These files require some modifications prior to launching them.Confirm you have JVM installed.
Upgrading Teamwork Server
You can use automatic or manual upgrade of Teamwork Server.
In automatic upgrade, a new Teamwork Server version will be installed instead of current one. If you need to keep the current server version without any changes, please upgrade the server manually. The manual upgrade allows for installing a new server version on a new location. You will be able to import your old projects and users, to test a functionality of a new server version, and only after that to remove a previous server version.
Since the version of 16.9 commercial licenses are locked to the particular machine. You will be requested to activate the license and receive the commercial license dedicated for the particular machine after the upgrade. If you have already activated the license before upgrading with a new version, the license will be activated automatically.
Automatic upgrade of Teamwork Server
The easiest way to renew MagicDraw Teamwork Server is to upgrade it automatically. Using this feature the upgrade with newest versions and service packs is done automatically.
To upgrade Teamwork Server automatically
1. Stop Teamwork Server (see "Stopping Teamwork Server" on page 19) and close the Adminis-trator’s Console.
2. Remove Teamwork Server from Windows services if it was added. See the procedure "To remove Teamwork Server from the Windows services" on page 19.
3. Start Teamwork Server using GUI (see "Starting the server using GUI" on page 15).4. In the Teamwork Server startup dialog, click the Check for Updates button.
NOTE You should have valid Software Assurance to upgrade Teamwork Server. For more about Software Assurance, see at https://www.magicdraw.com/software_assurance.
IMPORTANT! Make sure server and the client versions are the same. Also it is rec-ommended to use the same JVM version for the server and client.
11 Copyright © 2000-2011 No Magic, Inc..
TEAMWORK SYSTEMInstalling and Running Teamwork Server
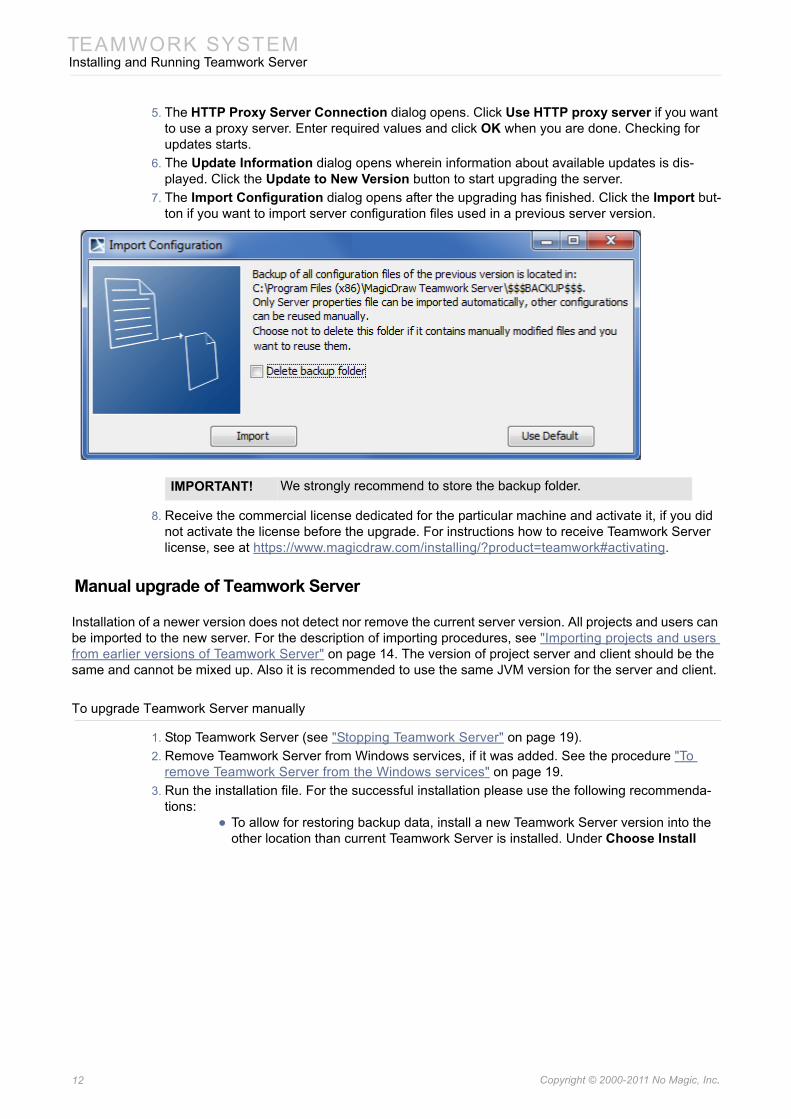
5. The HTTP Proxy Server Connection dialog opens. Click Use HTTP proxy server if you want to use a proxy server. Enter required values and click OK when you are done. Checking for updates starts.
6. The Update Information dialog opens wherein information about available updates is dis-played. Click the Update to New Version button to start upgrading the server.
7. The Import Configuration dialog opens after the upgrading has finished. Click the Import but-ton if you want to import server configuration files used in a previous server version.
8. Receive the commercial license dedicated for the particular machine and activate it, if you did not activate the license before the upgrade. For instructions how to receive Teamwork Server license, see at https://www.magicdraw.com/installing/?product=teamwork#activating.
Manual upgrade of Teamwork Server
Installation of a newer version does not detect nor remove the current server version. All projects and users can be imported to the new server. For the description of importing procedures, see "Importing projects and users from earlier versions of Teamwork Server" on page 14. The version of project server and client should be the same and cannot be mixed up. Also it is recommended to use the same JVM version for the server and client.
To upgrade Teamwork Server manually
1. Stop Teamwork Server (see "Stopping Teamwork Server" on page 19).2. Remove Teamwork Server from Windows services, if it was added. See the procedure "To
remove Teamwork Server from the Windows services" on page 19.3. Run the installation file. For the successful installation please use the following recommenda-
tions:• To allow for restoring backup data, install a new Teamwork Server version into the
other location than current Teamwork Server is installed. Under Choose Install
IMPORTANT! We strongly recommend to store the backup folder.
12 Copyright © 2000-2011 No Magic, Inc..
TEAMWORK SYSTEMInstalling and Running Teamwork Server
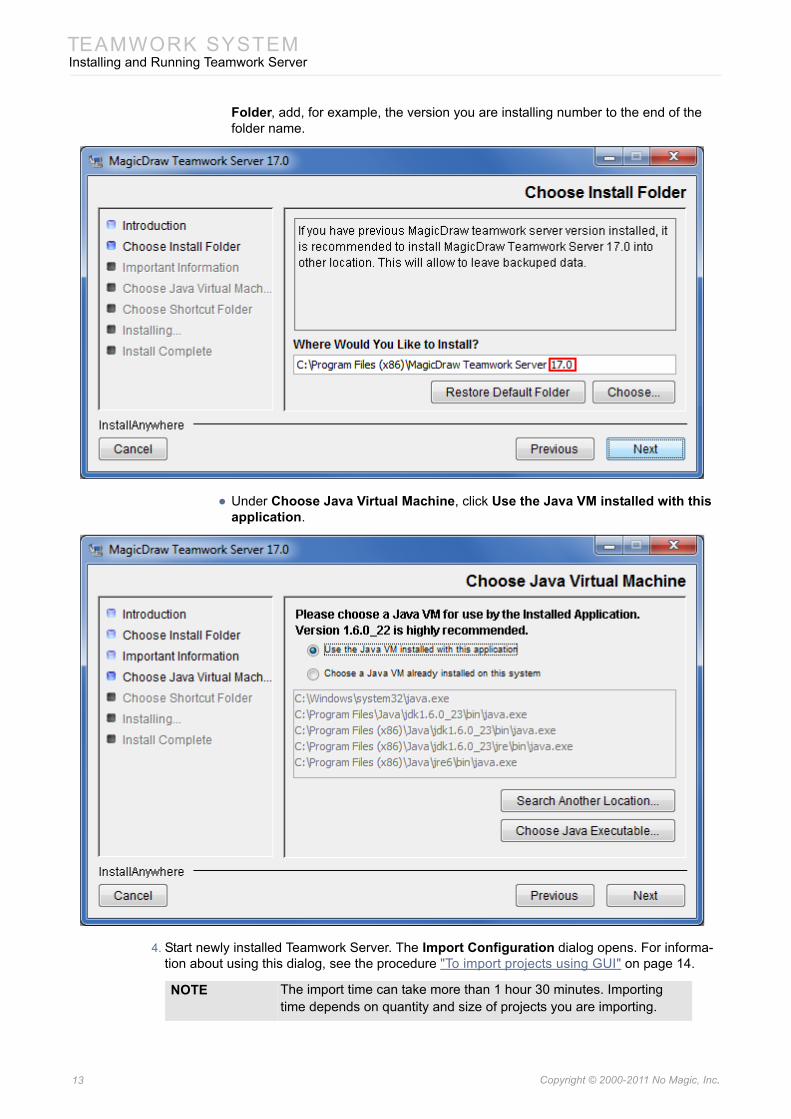
Folder, add, for example, the version you are installing number to the end of the folder name.
• Under Choose Java Virtual Machine, click Use the Java VM installed with this application.
4. Start newly installed Teamwork Server. The Import Configuration dialog opens. For informa-tion about using this dialog, see the procedure "To import projects using GUI" on page 14.
NOTE The import time can take more than 1 hour 30 minutes. Importing time depends on quantity and size of projects you are importing.
13 Copyright © 2000-2011 No Magic, Inc..
TEAMWORK SYSTEMInstalling and Running Teamwork Server
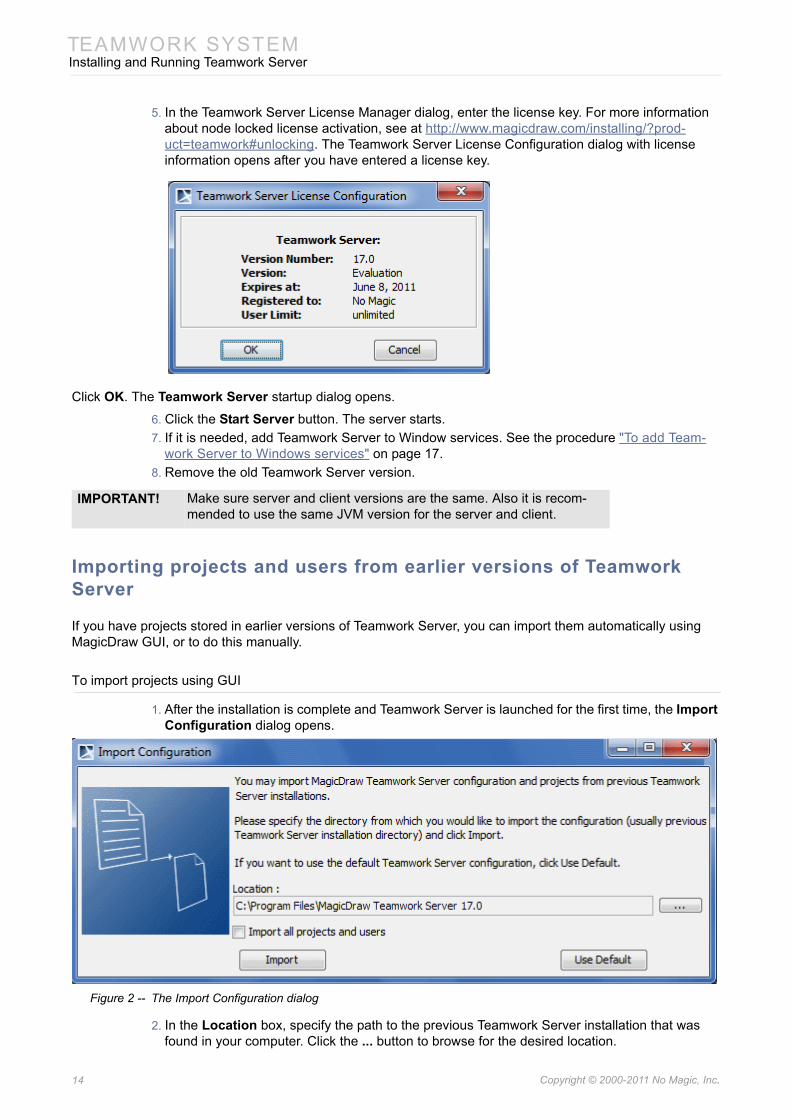
5. In the Teamwork Server License Manager dialog, enter the license key. For more information about node locked license activation, see at http://www.magicdraw.com/installing/?prod-uct=teamwork#unlocking. The Teamwork Server License Configuration dialog with license information opens after you have entered a license key.
Click OK. The Teamwork Server startup dialog opens.
6. Click the Start Server button. The server starts.7. If it is needed, add Teamwork Server to Window services. See the procedure "To add Team-
work Server to Windows services" on page 17.8. Remove the old Teamwork Server version.
Importing projects and users from earlier versions of Teamwork Server
If you have projects stored in earlier versions of Teamwork Server, you can import them automatically using MagicDraw GUI, or to do this manually.
To import projects using GUI
1. After the installation is complete and Teamwork Server is launched for the first time, the Import Configuration dialog opens.
Figure 2 -- The Import Configuration dialog
2. In the Location box, specify the path to the previous Teamwork Server installation that was found in your computer. Click the ... button to browse for the desired location.
IMPORTANT! Make sure server and client versions are the same. Also it is recom-mended to use the same JVM version for the server and client.
14 Copyright © 2000-2011 No Magic, Inc..
TEAMWORK SYSTEMInstalling and Running Teamwork Server
3. Select the Import all projects and users check box to transfer projects and users to the latest version of Teamwork Server.
4. Click Import.
To import projects manually
• Copy the Projects folder with all its files from the previous Teamwork Server installation folder to the new <Teamwork Server home>/Projects folder.
Migrating from the SVN/ClearCase repository to the Built-In repository type
1. Start the server on the SVN/ClearCase repository.2. Open the Administrator's Console, trigger project export. Select a directory to dump the per-
manently store the projects. This will be the directory in which the server will subsequently operate.
3. In the Administrator's Console, reconfigure the server for the Built-In repository. Specify the directory where you stored the projects as a directory to work with.
4. Restart server in order to use this new repository.5. Projects are now in a new Built-In repository.
Starting Teamwork Server
To start the server for the first time, run the file teamwork_server.exe from the bin folder and browse the license key when prompted. The key is no longer required the next time the server is run.
For more information about node locked license activation, see at http://www.magicdraw.com/installing/?product=teamwork#unlocking.
Starting the server using GUI
To start Teamwork Server
1. Do one of the following:• Start Teamwork Server the same way you would start any application on your
operating system.
• Run teamwork_server.exe in the server bin folder. The Teamwork Server startup dialog opens.
NOTE Follow the instructions in dialogs to update profiles during project import.
15 Copyright © 2000-2011 No Magic, Inc..
TEAMWORK SYSTEMInstalling and Running Teamwork Server
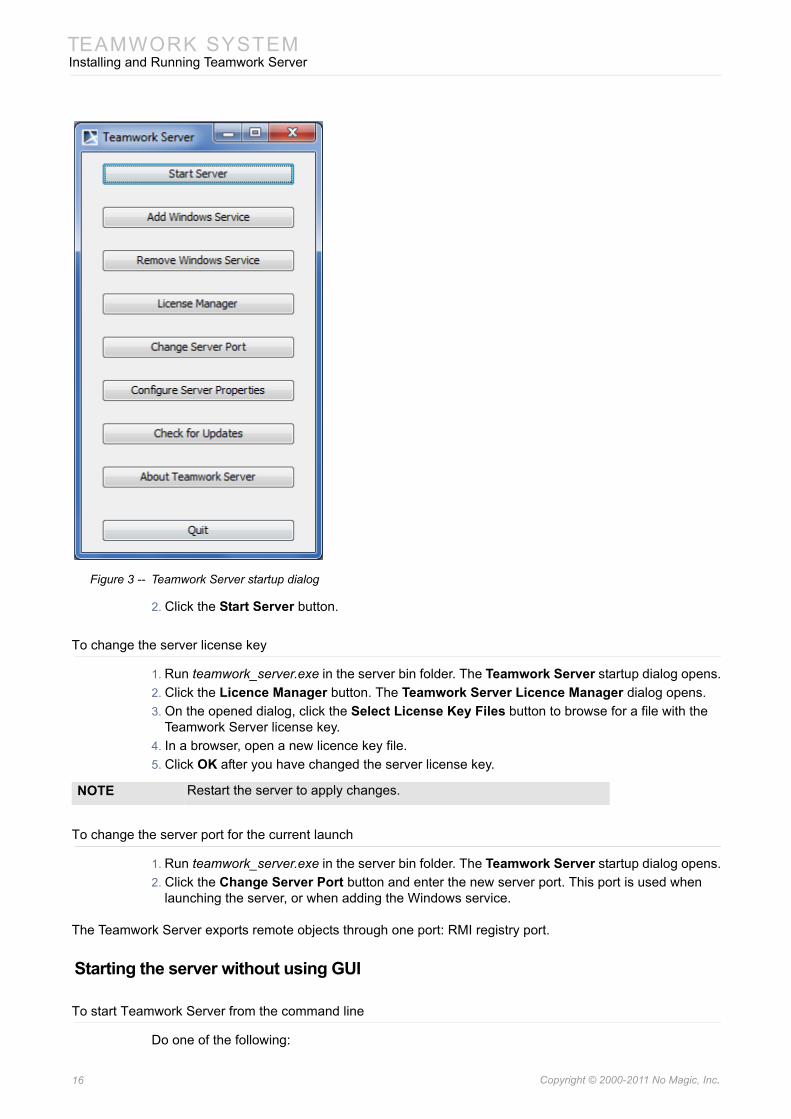
Figure 3 -- Teamwork Server startup dialog
2. Click the Start Server button.
To change the server license key
1. Run teamwork_server.exe in the server bin folder. The Teamwork Server startup dialog opens.2. Click the Licence Manager button. The Teamwork Server Licence Manager dialog opens.3. On the opened dialog, click the Select License Key Files button to browse for a file with the
Teamwork Server license key.4. In a browser, open a new licence key file.5. Click OK after you have changed the server license key.
To change the server port for the current launch
1. Run teamwork_server.exe in the server bin folder. The Teamwork Server startup dialog opens.2. Click the Change Server Port button and enter the new server port. This port is used when
launching the server, or when adding the Windows service.
The Teamwork Server exports remote objects through one port: RMI registry port.
Starting the server without using GUI
To start Teamwork Server from the command line
Do one of the following:
NOTE Restart the server to apply changes.
16 Copyright © 2000-2011 No Magic, Inc..

TEAMWORK SYSTEMInstalling and Running Teamwork Server
• Add the parameter NOGUI when starting the server from the command line.
• Run teamwork_server_nogui.exe in the server bin folder.
To add Teamwork Server to Windows services
1. Run teamwork_server.exe in the server bin folder. The Teamwork Server startup dialog appears.
2. Click the Add Windows Service button. After the service is added, select one of the following:• Start this service from the Windows Services list.
• Reboot the computer and the Service will start automatically.
• To run the server, click the Start Server button.
To start Teamwork Server as a service on Red Hat Linux
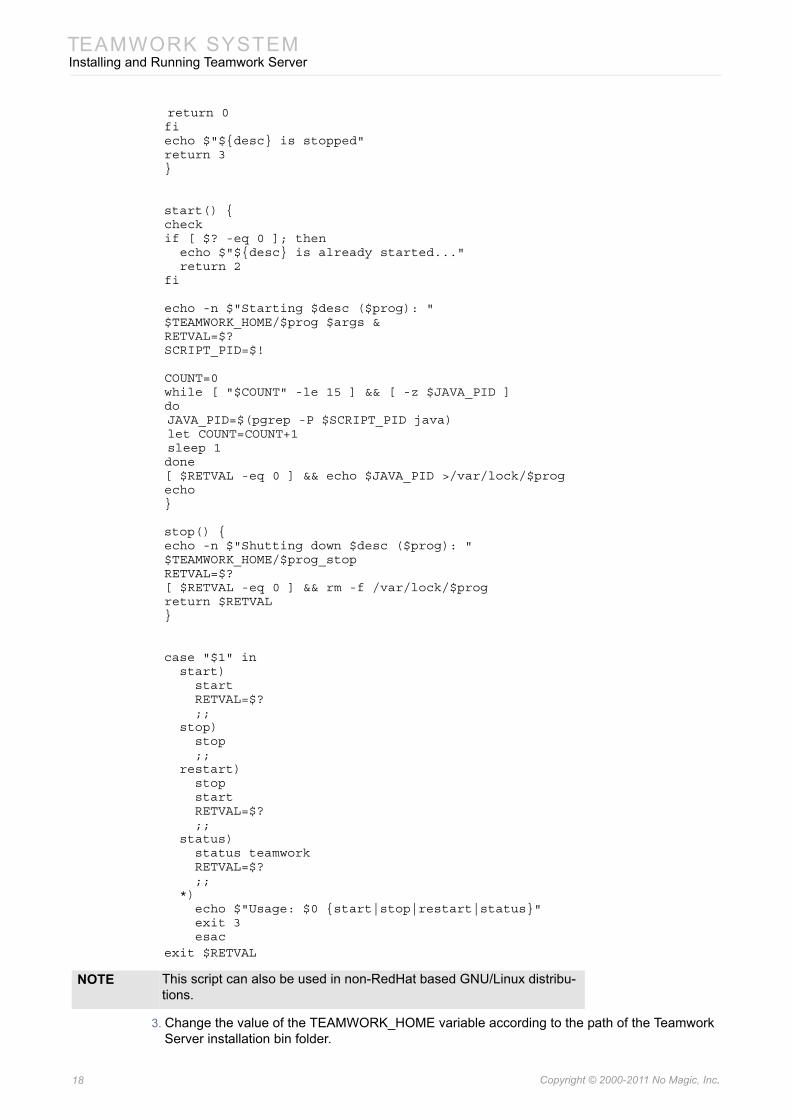
1. Create a new service script file named “teamwork”.2. Copy the following script code and paste it into the file.
#!/bin/bash## chkconfig: - 91 60# description: MagicDraw TeamWork Server
### BEGIN INIT INFO# Provides: teamwork# Required-Start: $local_fs $network $named $remote_fs $syslog# Required-Stop: $local_fs $network $named $remote_fs $syslog# Short-Description: MagicDraw TeamWork Server# Description: This script is used to start MagicDraw TeamWork Server### END INIT INFO
RETVAL=0TEAMWORK_HOME="/var/MagicDraw_Teamwork_Server/bin"prog="teamwork_server_nogui"prog_stop="stop_teamwork_server"desc="MagicDraw Teamwork Server"args="SERVICE"
check() {if [ -f /var/lock/$prog ]; thenif ps -p $(cat /var/lock/$prog 2>/dev/null) >/dev/null; then
return 0fifireturn 3}
status() {checkif [ $? -eq 0 ]; thenecho $"${desc} is running..."
NOTE This feature is available only on Windows operating systems.
IMPORTANT! Windows 7 OS and Windows Vista OS Firewall do not allow remote con-nections. Hence after adding Teamwork Server to Windows 7 or Windows Vista services, you have to add the Teamwork Server port number 1100 in Windows Firewall Exceptions list. Only then all remote connections to Teamwork Server will be allowed.
17 Copyright © 2000-2011 No Magic, Inc..
TEAMWORK SYSTEMInstalling and Running Teamwork Server
return 0fiecho $"${desc} is stopped"return 3}
start() {checkif [ $? -eq 0 ]; then echo $"${desc} is already started..." return 2fi
echo -n $"Starting $desc ($prog): "$TEAMWORK_HOME/$prog $args &RETVAL=$?SCRIPT_PID=$!
COUNT=0while [ "$COUNT" -le 15 ] && [ -z $JAVA_PID ]doJAVA_PID=$(pgrep -P $SCRIPT_PID java)let COUNT=COUNT+1sleep 1done[ $RETVAL -eq 0 ] && echo $JAVA_PID >/var/lock/$progecho}
stop() {echo -n $"Shutting down $desc ($prog): "$TEAMWORK_HOME/$prog_stopRETVAL=$?[ $RETVAL -eq 0 ] && rm -f /var/lock/$progreturn $RETVAL}
case "$1" in start) start RETVAL=$? ;; stop) stop ;; restart) stop start RETVAL=$? ;; status) status teamwork RETVAL=$? ;; *) echo $"Usage: $0 {start|stop|restart|status}" exit 3 esacexit $RETVAL
3. Change the value of the TEAMWORK_HOME variable according to the path of the Teamwork Server installation bin folder.
NOTE This script can also be used in non-RedHat based GNU/Linux distribu-tions.
18 Copyright © 2000-2011 No Magic, Inc..
TEAMWORK SYSTEMWorking with Teamwork Projects
4. Save the file and move it into the system directory “/etc/init.d”.5. In the command line, type the following commands:
cd /etc/rc3.dln -s ../init.d/teamwork S99teamwork
6. In the command line, type the following command:
service teamwork start
To change the server license key from the command line
1. Stop the Teamwork Server (see "Stopping Teamwork Server" on page 19).2. Start the Teamwork Server from the command line. Add the following argument:
"-changeKey -key:<path to the key file location>".
This is the sample for the Windows OS:
teamwork_server_nogui.exe -changeKey -key:C:\MagicDraw_16_0_TeamworkServer_key.xml
Stopping Teamwork Server
To stop Teamwork Server
• In the <Teamwork Server home>\bin directory, run the stop_teamwork_server.exe.
To stop Teamwork Server on Red Hat Linux
• In the command line, type the following command:
service teamwork stop
To remove Teamwork Server from the Windows services
1. Run teamwork_server.exe in the server bin folder. The Teamwork Server startup dialog opens.2. Click the Remove Windows Service button.
Working with Teamwork Projects
You must have certain permissions to work with Teamwork projects. The following are the most important steps when working with Teamwork projects:
TIP You can also configure the service for runlevel using the following com-mand:chkconfig --level 3 teamwork on
NOTE The path to the key file should be fully qualified and without spaces.
NOTE This feature is available only on Windows operating systems.
View Online Demo
Working in Teamwork
19 Copyright © 2000-2011 No Magic, Inc..
TEAMWORK SYSTEMWorking with Teamwork Projects
1. Create a Teamwork project or add a non-Teamwork project to the Teamwork Server.Open the Teamwork project.
2. Lock the elements you want to edit and edit them in the open project.3. Select the model elements to unlock and commit the project.4. Create categories for visual grouping of Teamwork projects.
If you want to lock an element for editing, the application will check for the permissions you have and the availability of the element.
Before committing elements, you can unlock the elements you have previously locked. Committing to Teamwork Server will create a new project version.
Logging to the Teamwork Server
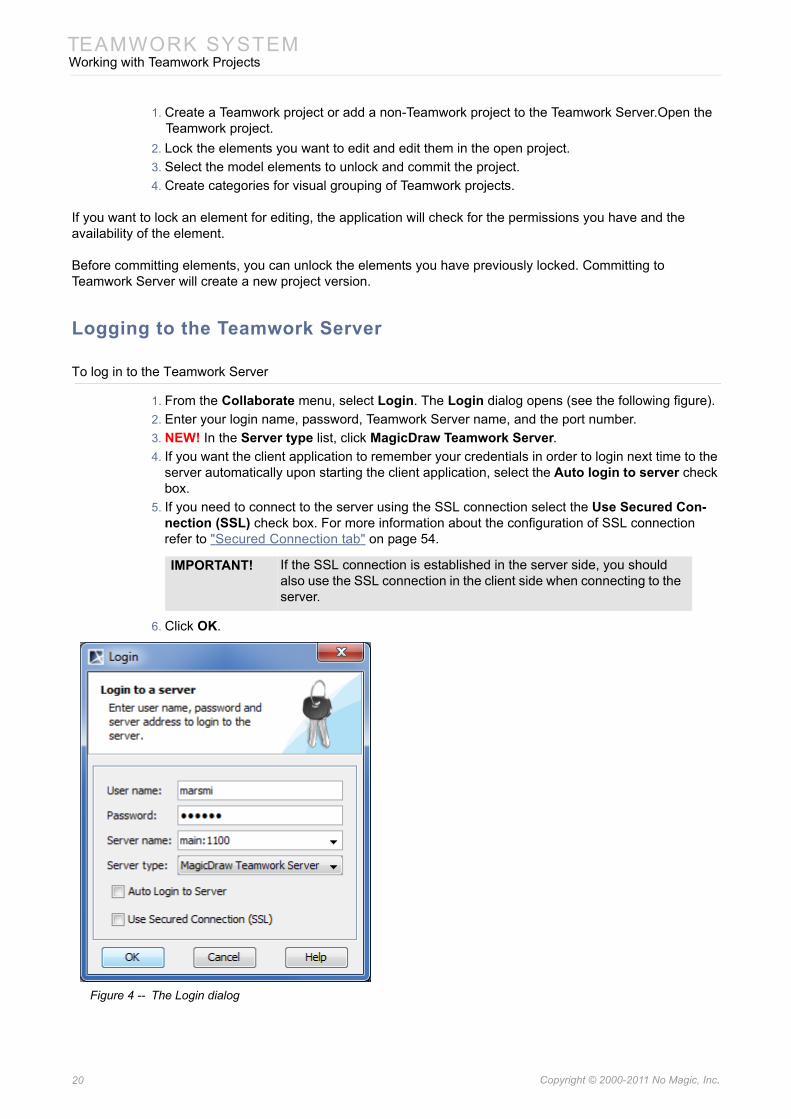
To log in to the Teamwork Server
1. From the Collaborate menu, select Login. The Login dialog opens (see the following figure).2. Enter your login name, password, Teamwork Server name, and the port number.3. NEW! In the Server type list, click MagicDraw Teamwork Server.4. If you want the client application to remember your credentials in order to login next time to the
server automatically upon starting the client application, select the Auto login to server check box.
5. If you need to connect to the server using the SSL connection select the Use Secured Con-nection (SSL) check box. For more information about the configuration of SSL connection refer to "Secured Connection tab" on page 54.
6. Click OK.
Figure 4 -- The Login dialog
IMPORTANT! If the SSL connection is established in the server side, you should also use the SSL connection in the client side when connecting to the server.
20 Copyright © 2000-2011 No Magic, Inc..
TEAMWORK SYSTEMWorking with Teamwork Projects
To enter the Teamwork address and port
• Type server address (you can use domain name or IP address), colon, and then port number in the Server name text box, in the Login dialog (Figure 4 on page 20). For example, localhost:1100.
For more information on how to change server port, see “To change the server port for the current launch” on page 16.
The default Administrator's account in Teamwork System is:
Login name: Administrator
Password: Administrator
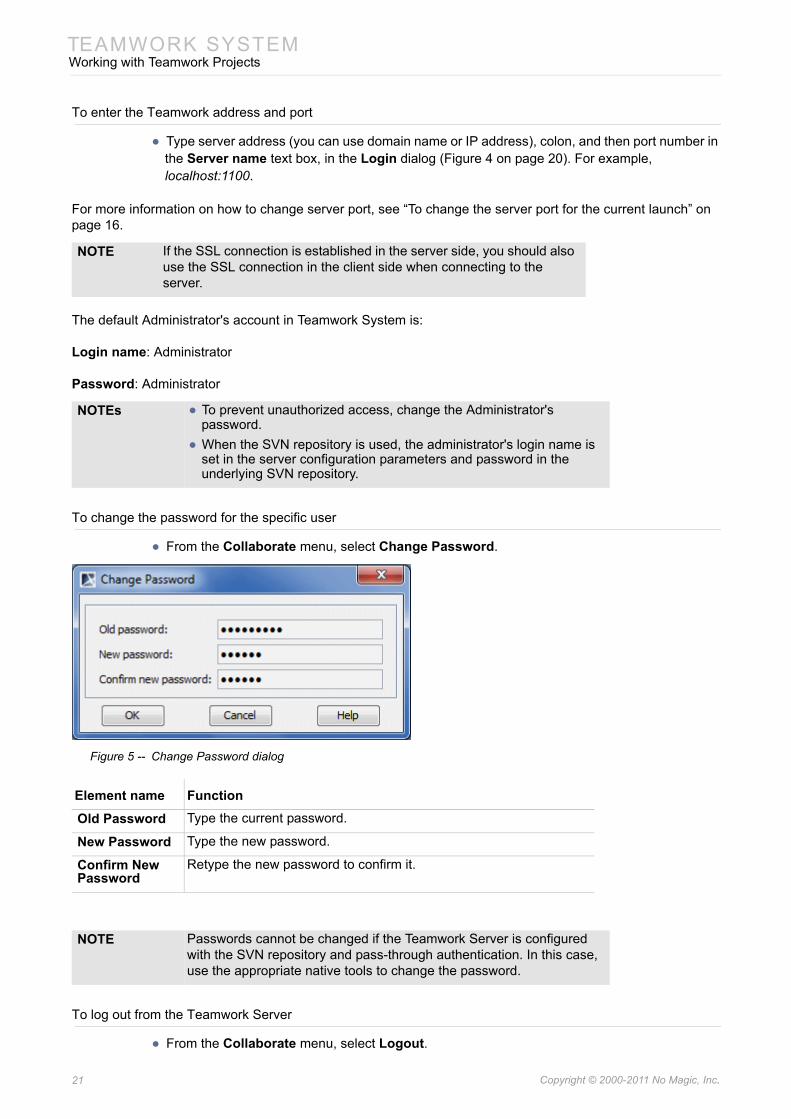
To change the password for the specific user
• From the Collaborate menu, select Change Password.
Figure 5 -- Change Password dialog
To log out from the Teamwork Server
• From the Collaborate menu, select Logout.
NOTE If the SSL connection is established in the server side, you should also use the SSL connection in the client side when connecting to the server.
NOTEs • To prevent unauthorized access, change the Administrator's password.
• When the SVN repository is used, the administrator's login name is set in the server configuration parameters and password in the underlying SVN repository.
Element name Function
Old Password Type the current password.
New Password Type the new password.
Confirm New Password
Retype the new password to confirm it.
NOTE Passwords cannot be changed if the Teamwork Server is configured with the SVN repository and pass-through authentication. In this case, use the appropriate native tools to change the password.
21 Copyright © 2000-2011 No Magic, Inc..
TEAMWORK SYSTEMWorking with Teamwork Projects
Creating and Managing Categories
Teamwork Server supports visual grouping of projects. You can build a structure of the whole project repository by creating categories and grouping Teamwork projects into these categories.
You can create an unlimited number of your own categories, rename or remove them, or move projects to them.
Teamwork projects that do not belong to any created category will be automatically moved to the system category named “Uncategorized”.
To create a new category
1. From the Collaborate menu, choose either Open Server Project or Projects.
2. On the opened dialog’s toolbar, click the Create Category button. The Create Category dialog opens.
3. Enter the category name.4. Click OK.
To rename a category
1. From the Collaborate menu, choose either Open Server Project or Projects.2. On the opened dialog, select a category or a project that belongs to the category you want to
rename and then click the Rename Category button. The Rename Category dialog opens.
3. Enter a new category name.4. Click OK.
To move a project to a category
1. From the Collaborate menu, choose either Open Server Project or Projects.2. On the opened dialog, select the project you want to move, and then click the Move to Cate-
gory button. The Move to Category dialog opens.
3. Select the category.4. Click OK.
TIP! You can also this dialog by selecting the Create Cate-gory command from the shortcut menu.
NOTE You cannot rename the “Uncategorized” category.
TIP You can also open this dialog by selecting the Rename Category command from the shortcut menu.
NOTE A project can belong to only one category at the same time.
TIP You can also open this dialog by selecting the Move to Category command from the shortcut menu.
22 Copyright © 2000-2011 No Magic, Inc..
TEAMWORK SYSTEMWorking with Teamwork Projects
To remove the category
1. From the Collaborate menu, choose either Open Server Project or Projects.2. On the opened dialog, select the category or the project that belongs to the category you want
to remove, then click the Remove Category button and confirm your decision.
Creating a Teamwork Project
This section provides the step-by-step instructions on how to create a new Teamwork project.
To create a new Teamwork project
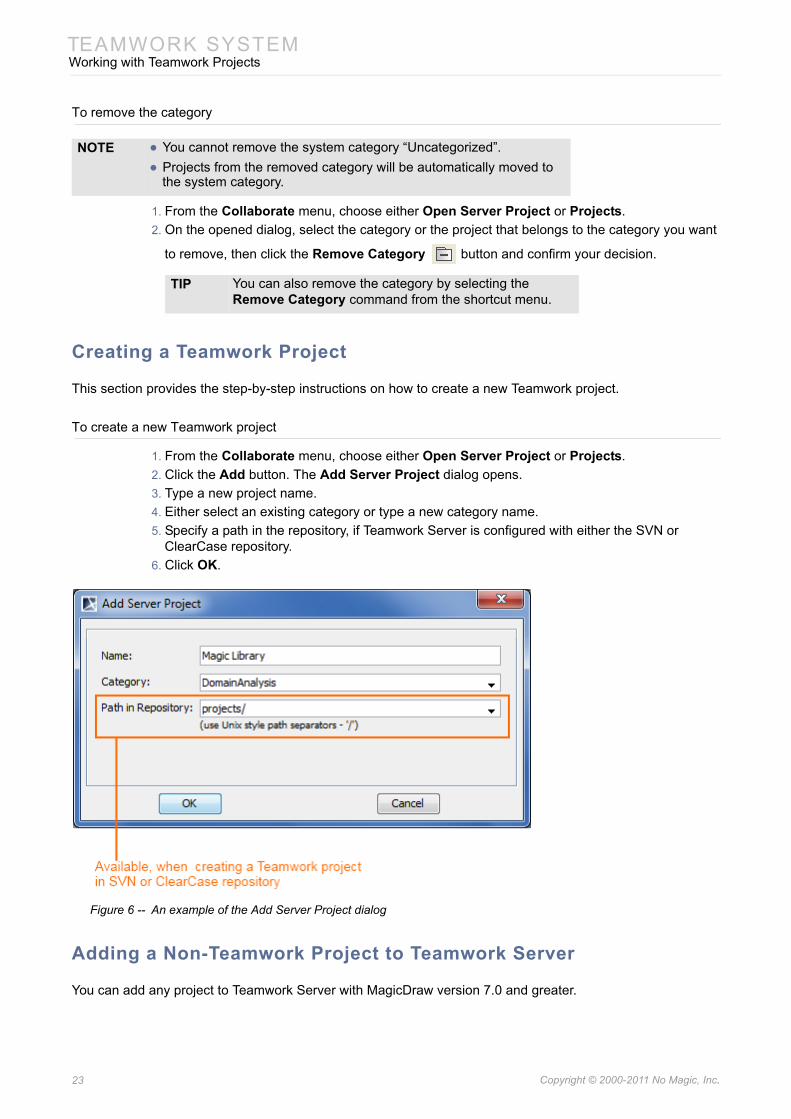
1. From the Collaborate menu, choose either Open Server Project or Projects. 2. Click the Add button. The Add Server Project dialog opens.3. Type a new project name.4. Either select an existing category or type a new category name.5. Specify a path in the repository, if Teamwork Server is configured with either the SVN or
ClearCase repository.6. Click OK.
Figure 6 -- An example of the Add Server Project dialog
Adding a Non-Teamwork Project to Teamwork Server
You can add any project to Teamwork Server with MagicDraw version 7.0 and greater.
NOTE • You cannot remove the system category “Uncategorized”.• Projects from the removed category will be automatically moved to
the system category.
TIP You can also remove the category by selecting the Remove Category command from the shortcut menu.
23 Copyright © 2000-2011 No Magic, Inc..
TEAMWORK SYSTEMWorking with Teamwork Projects
This section provides step-by-step instructions on how to add a non-Teamwork project to Teamwork Server.
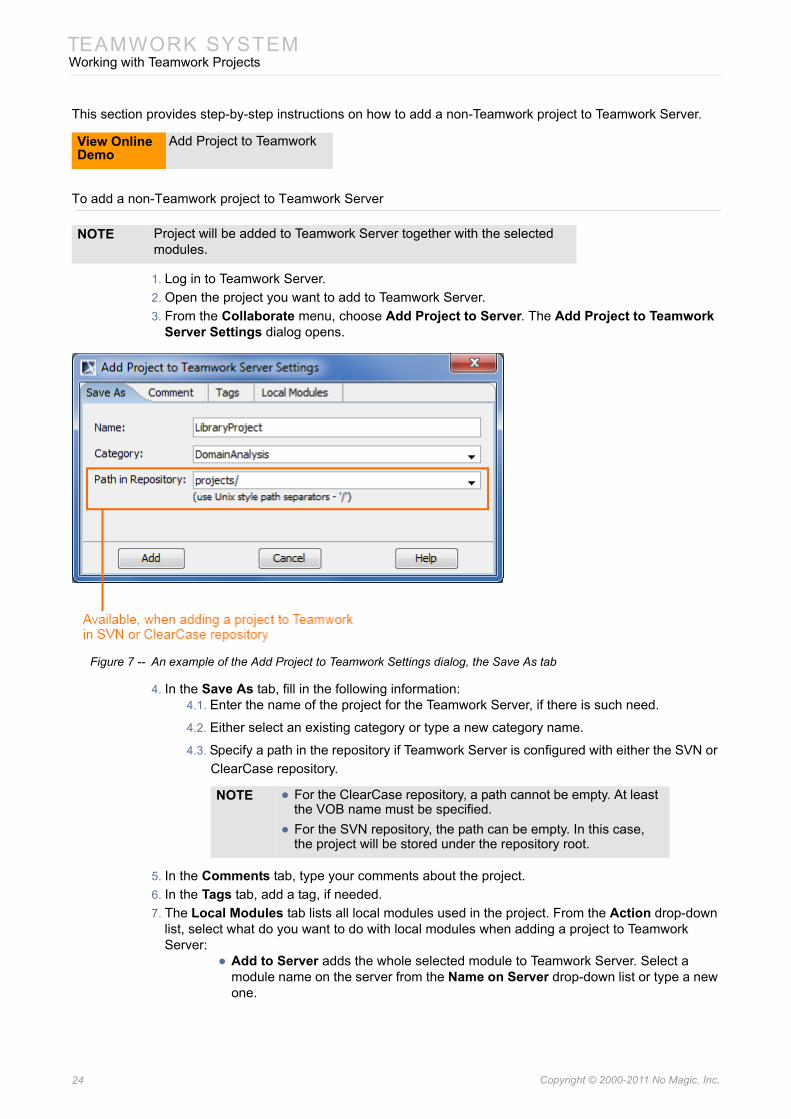
To add a non-Teamwork project to Teamwork Server
1. Log in to Teamwork Server.2. Open the project you want to add to Teamwork Server.3. From the Collaborate menu, choose Add Project to Server. The Add Project to Teamwork
Server Settings dialog opens.
Figure 7 -- An example of the Add Project to Teamwork Settings dialog, the Save As tab
4. In the Save As tab, fill in the following information:4.1. Enter the name of the project for the Teamwork Server, if there is such need.
4.2. Either select an existing category or type a new category name.
4.3. Specify a path in the repository if Teamwork Server is configured with either the SVN or ClearCase repository.
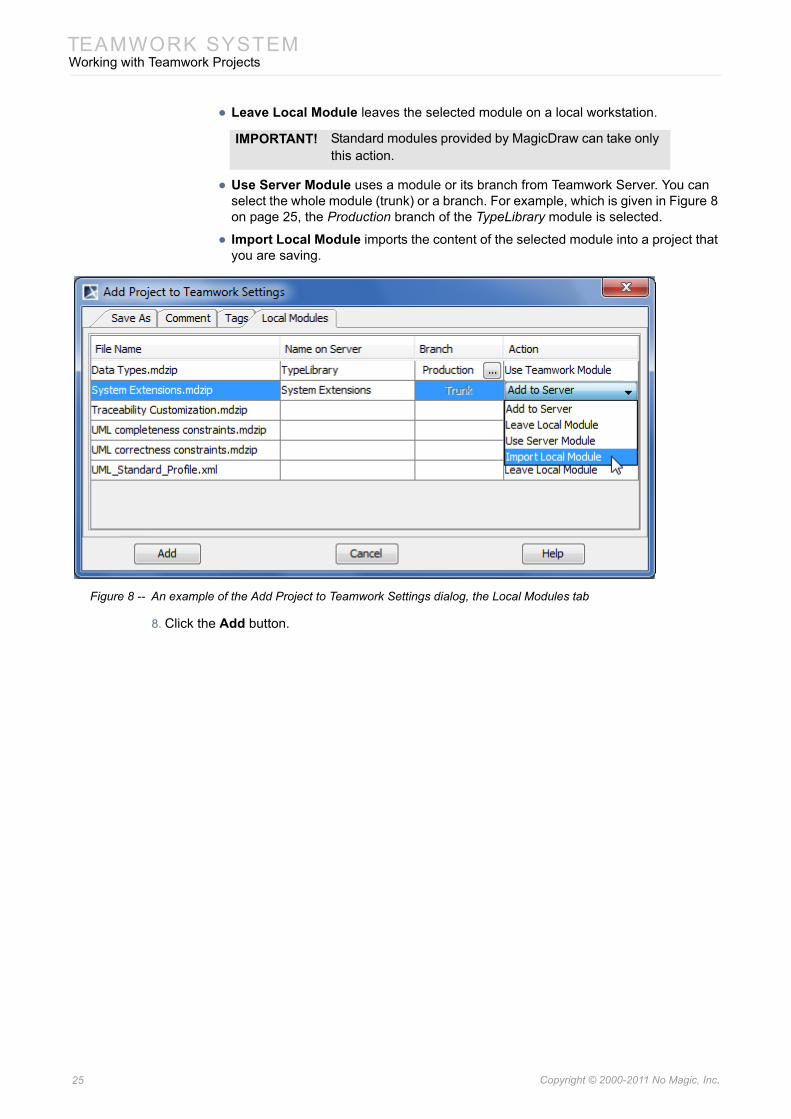
5. In the Comments tab, type your comments about the project.6. In the Tags tab, add a tag, if needed.7. The Local Modules tab lists all local modules used in the project. From the Action drop-down
list, select what do you want to do with local modules when adding a project to Teamwork Server:
• Add to Server adds the whole selected module to Teamwork Server. Select a module name on the server from the Name on Server drop-down list or type a new one.
View Online Demo
Add Project to Teamwork
NOTE Project will be added to Teamwork Server together with the selected modules.
NOTE • For the ClearCase repository, a path cannot be empty. At least the VOB name must be specified.
• For the SVN repository, the path can be empty. In this case, the project will be stored under the repository root.
24 Copyright © 2000-2011 No Magic, Inc..
TEAMWORK SYSTEMWorking with Teamwork Projects
• Leave Local Module leaves the selected module on a local workstation.
• Use Server Module uses a module or its branch from Teamwork Server. You can select the whole module (trunk) or a branch. For example, which is given in Figure 8 on page 25, the Production branch of the TypeLibrary module is selected.
• Import Local Module imports the content of the selected module into a project that you are saving.
Figure 8 -- An example of the Add Project to Teamwork Settings dialog, the Local Modules tab
8. Click the Add button.
IMPORTANT! Standard modules provided by MagicDraw can take only this action.
25 Copyright © 2000-2011 No Magic, Inc..
TEAMWORK SYSTEMWorking with Teamwork Projects
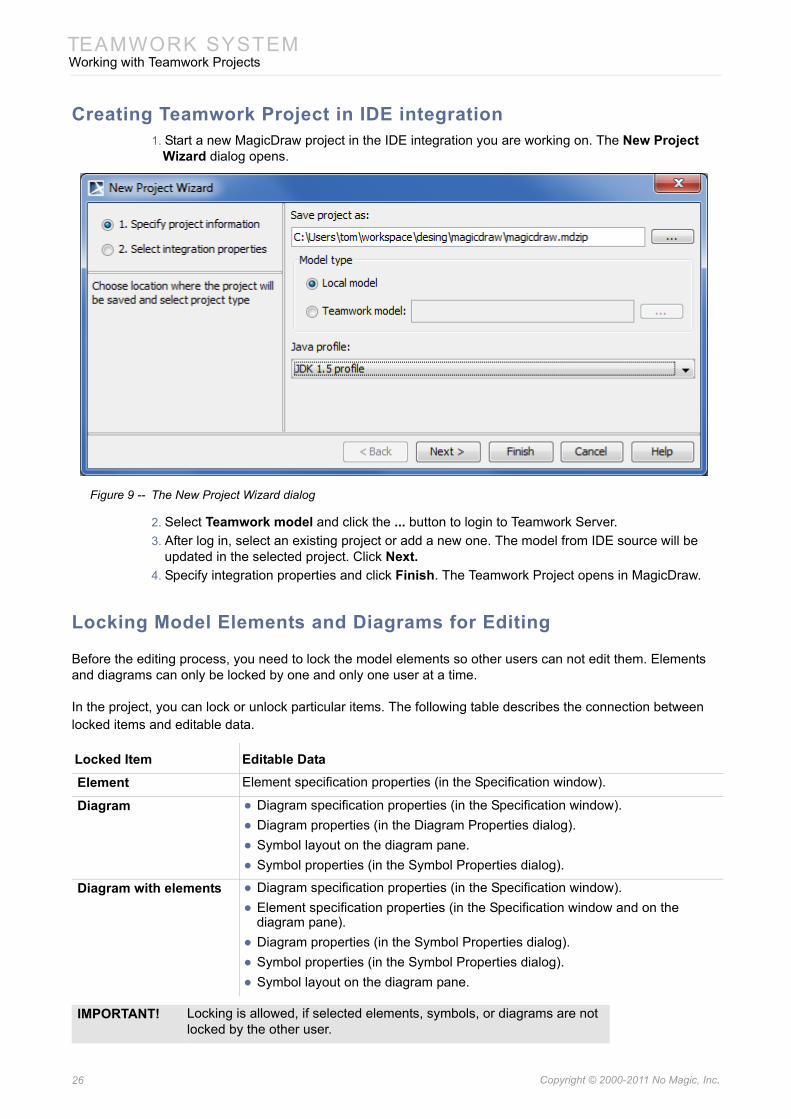
Creating Teamwork Project in IDE integration1. Start a new MagicDraw project in the IDE integration you are working on. The New Project
Wizard dialog opens.
Figure 9 -- The New Project Wizard dialog
2. Select Teamwork model and click the ... button to login to Teamwork Server.3. After log in, select an existing project or add a new one. The model from IDE source will be
updated in the selected project. Click Next.4. Specify integration properties and click Finish. The Teamwork Project opens in MagicDraw.
Locking Model Elements and Diagrams for Editing
Before the editing process, you need to lock the model elements so other users can not edit them. Elements and diagrams can only be locked by one and only one user at a time.
In the project, you can lock or unlock particular items. The following table describes the connection between locked items and editable data.
Locked Item Editable Data
Element Element specification properties (in the Specification window).
Diagram • Diagram specification properties (in the Specification window).• Diagram properties (in the Diagram Properties dialog).• Symbol layout on the diagram pane.• Symbol properties (in the Symbol Properties dialog).
Diagram with elements • Diagram specification properties (in the Specification window).• Element specification properties (in the Specification window and on the
diagram pane).• Diagram properties (in the Symbol Properties dialog).• Symbol properties (in the Symbol Properties dialog).• Symbol layout on the diagram pane.
IMPORTANT! Locking is allowed, if selected elements, symbols, or diagrams are not locked by the other user.
26 Copyright © 2000-2011 No Magic, Inc..
TEAMWORK SYSTEMWorking with Teamwork Projects
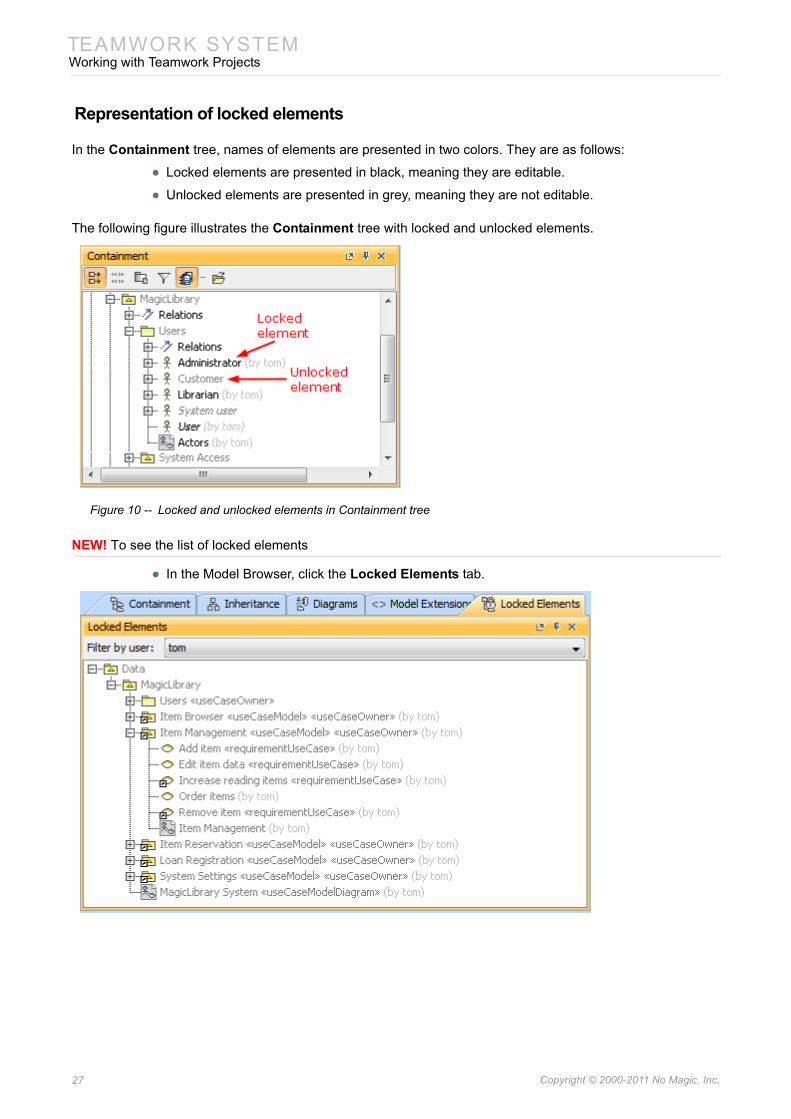
Representation of locked elements
In the Containment tree, names of elements are presented in two colors. They are as follows:
• Locked elements are presented in black, meaning they are editable.
• Unlocked elements are presented in grey, meaning they are not editable.
The following figure illustrates the Containment tree with locked and unlocked elements.
Figure 10 -- Locked and unlocked elements in Containment tree
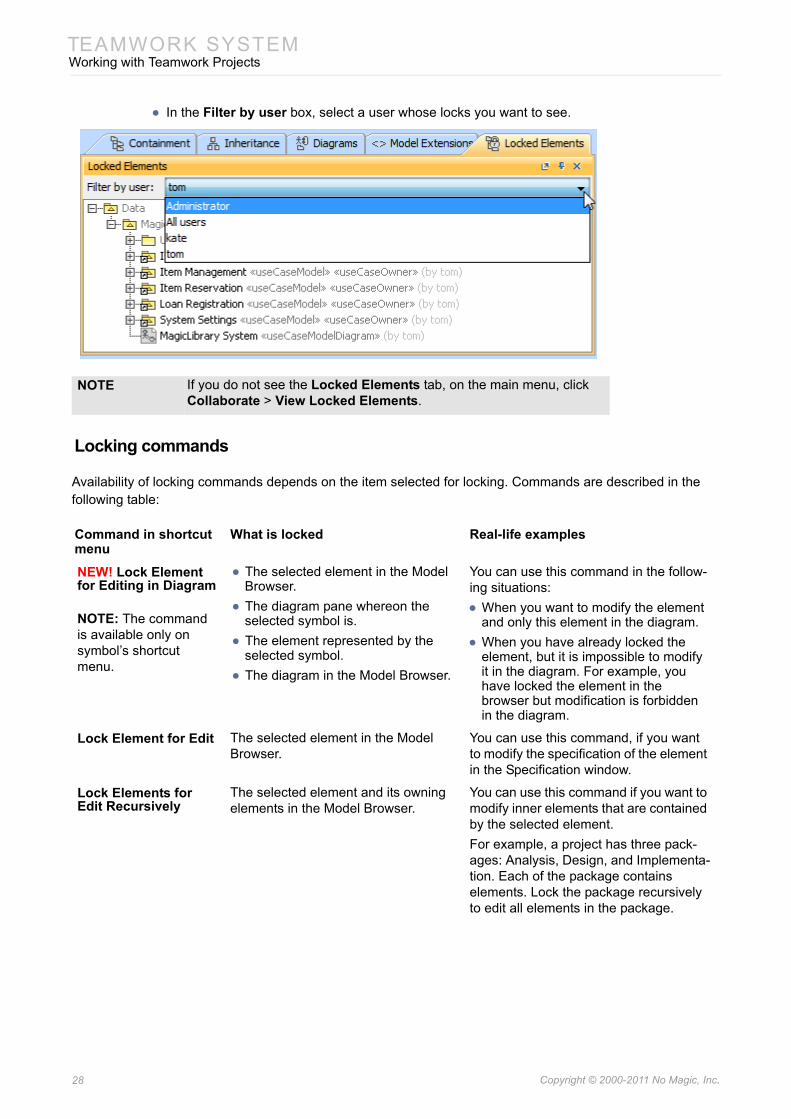
NEW! To see the list of locked elements
• In the Model Browser, click the Locked Elements tab.
27 Copyright © 2000-2011 No Magic, Inc..
TEAMWORK SYSTEMWorking with Teamwork Projects
• In the Filter by user box, select a user whose locks you want to see.
Locking commands
Availability of locking commands depends on the item selected for locking. Commands are described in the following table:
NOTE If you do not see the Locked Elements tab, on the main menu, click Collaborate > View Locked Elements.
Command in shortcut menu
What is locked Real-life examples
NEW! Lock Element for Editing in Diagram
NOTE: The command is available only on symbol’s shortcut menu.
• The selected element in the Model Browser.
• The diagram pane whereon the selected symbol is.
• The element represented by the selected symbol.
• The diagram in the Model Browser.
You can use this command in the follow-ing situations:• When you want to modify the element
and only this element in the diagram.• When you have already locked the
element, but it is impossible to modify it in the diagram. For example, you have locked the element in the browser but modification is forbidden in the diagram.
Lock Element for Edit The selected element in the Model Browser.
You can use this command, if you want to modify the specification of the element in the Specification window.
Lock Elements for Edit Recursively
The selected element and its owning elements in the Model Browser.
You can use this command if you want to modify inner elements that are contained by the selected element.For example, a project has three pack-ages: Analysis, Design, and Implementa-tion. Each of the package contains elements. Lock the package recursively to edit all elements in the package.
28 Copyright © 2000-2011 No Magic, Inc..
TEAMWORK SYSTEMWorking with Teamwork Projects
Locking procedures
To lock elements and / or diagrams
1. Do one of the following:• Select an element in the Model Browser.
• Select a diagram in the Model Browser.
• Select a symbol on a diagram pane.
• Right-click the diagram pane.
2. On the selected item’s shortcut menu, point to Lock or Lock Diagram, and then click a desired locking command. For more information about locking commands, see "Locking commands" on page 28.
To lock several elements
1. Do one of the following:• Select several elements in the Model Browser.
• Select several symbols on the diagram pane.
2. On the selected elements shortcut menu, click Lock for Edit. This allows for editing locked ele-ment specification properties in the Specification window.
To lock an element in the Specification window
1. Open the Specification window of the selected element or symbol.
NEW! Lock Diagram Content for Edit
NOTE: The command is available only on symbol’s or diagram’s shortcut menu.
• Symbols on a diagram pane of a selected diagram.
• The diagram pane of the selected diagram.
• Elements of the selected diagram in the Model Browser.
• The selected diagram in the Model Browser.
You can use this command when you are working with the diagram and elements that are represented on this diagram.You will be able to modify each element specification on the diagram and the dia-gram itself.
Lock Diagram for Edit
NOTE: The command is available only on symbol’s or diagram’s shortcut menu.
• Symbols on the diagram pane of the selected diagram.
• The diagram pane of the selected diagram.
• The selected diagram in the Model Browser.
You can use this command if you want to change only the representation of the diagram. You will be able to modify every symbol representation on the diagram and change the symbols layout.
NOTE The list of commands may vary depending on the item you have selected.
Command in shortcut menu
What is locked Real-life examples
29 Copyright © 2000-2011 No Magic, Inc..
TEAMWORK SYSTEMWorking with Teamwork Projects
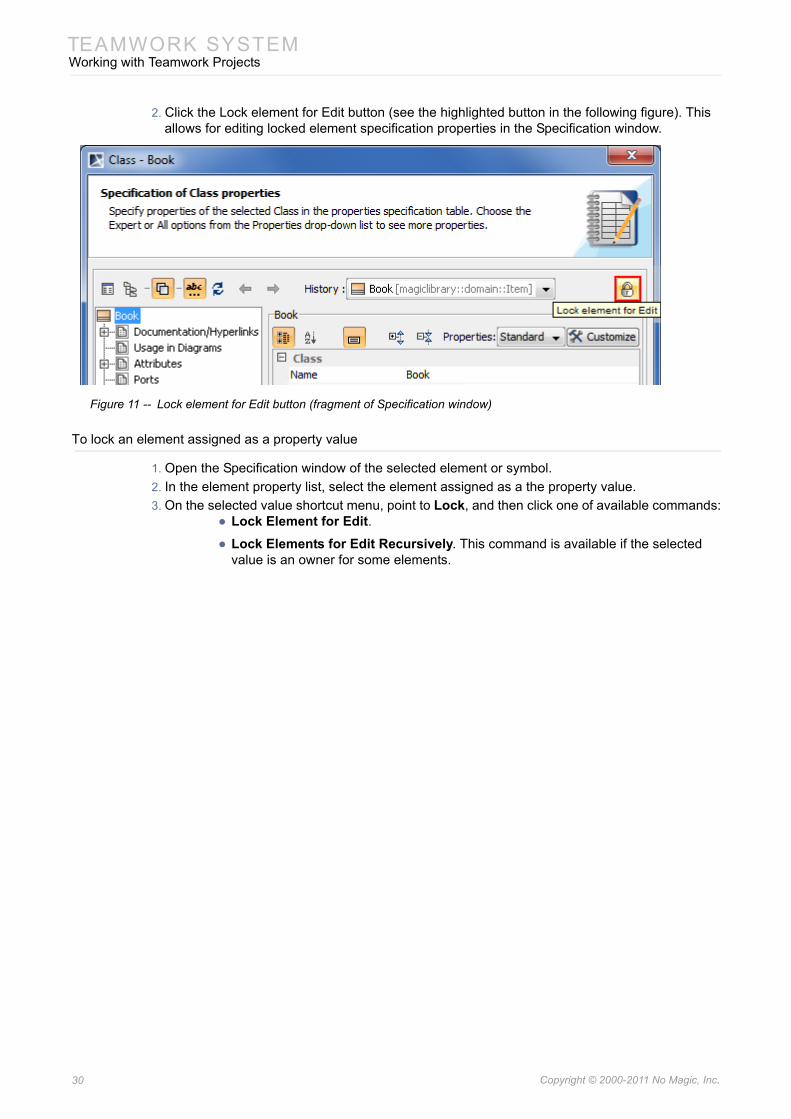
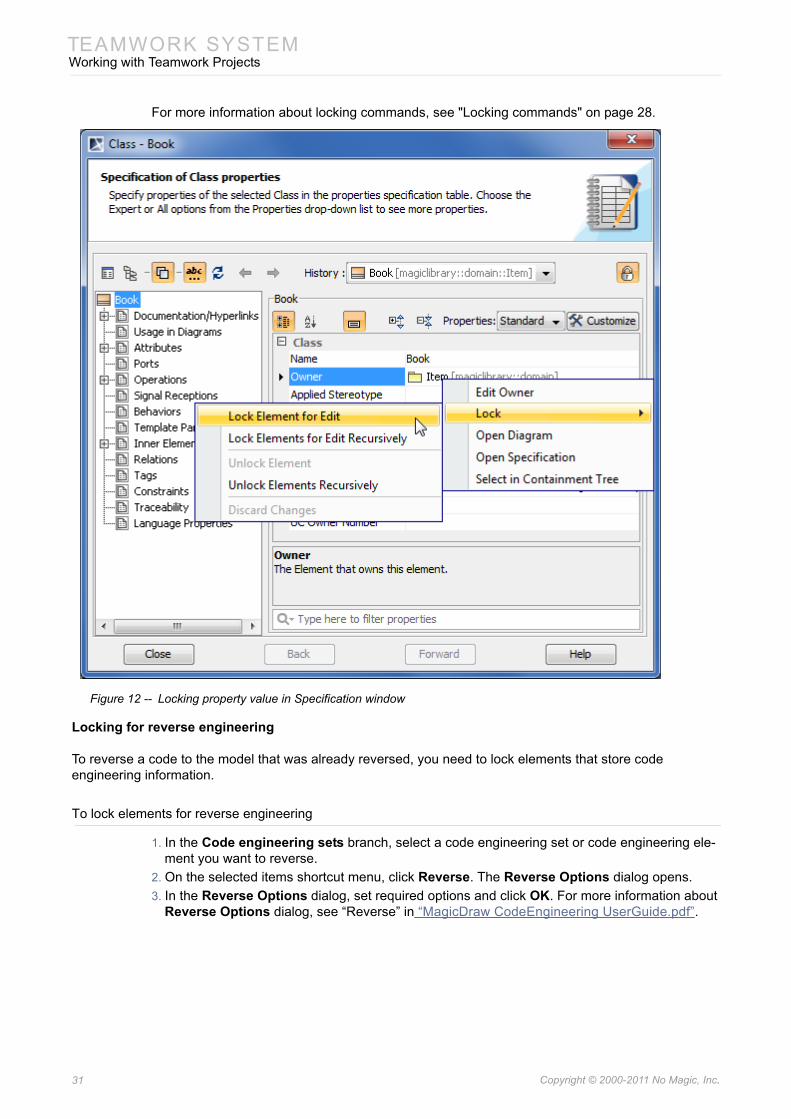
2. Click the Lock element for Edit button (see the highlighted button in the following figure). This allows for editing locked element specification properties in the Specification window.
Figure 11 -- Lock element for Edit button (fragment of Specification window)
To lock an element assigned as a property value
1. Open the Specification window of the selected element or symbol.2. In the element property list, select the element assigned as a the property value.3. On the selected value shortcut menu, point to Lock, and then click one of available commands:
• Lock Element for Edit.• Lock Elements for Edit Recursively. This command is available if the selected
value is an owner for some elements.
30 Copyright © 2000-2011 No Magic, Inc..
TEAMWORK SYSTEMWorking with Teamwork Projects
For more information about locking commands, see "Locking commands" on page 28.
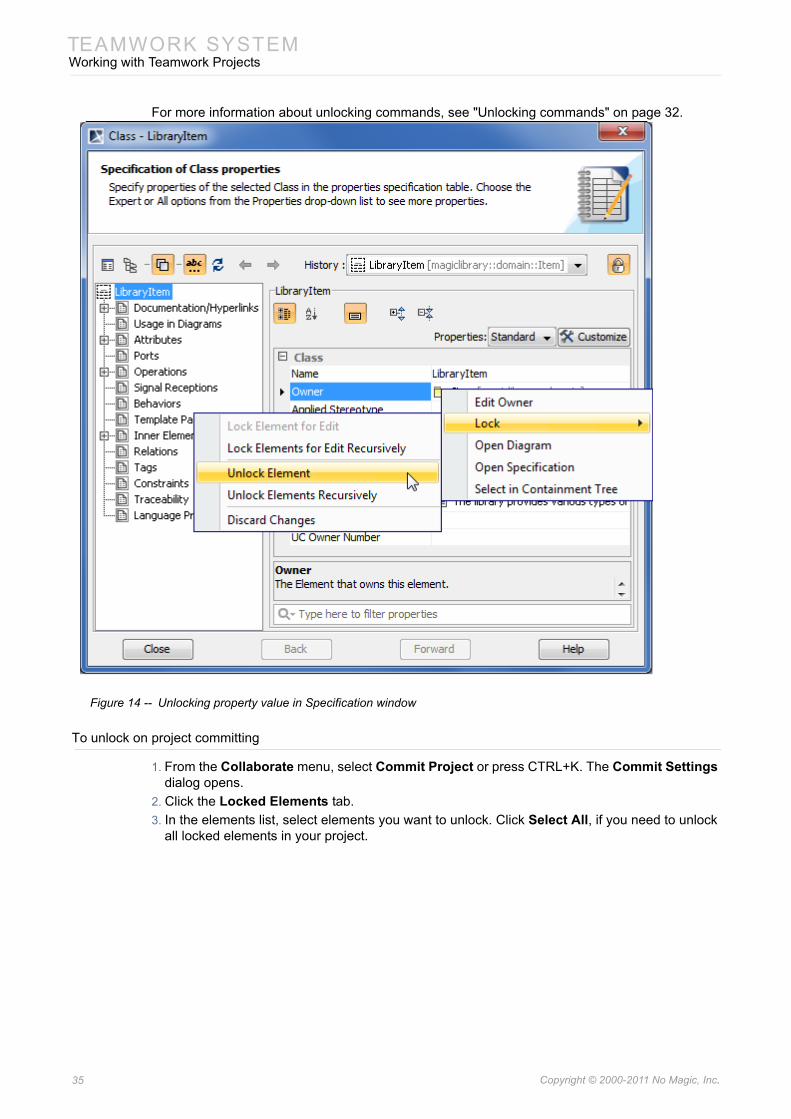
Figure 12 -- Locking property value in Specification window
Locking for reverse engineering
To reverse a code to the model that was already reversed, you need to lock elements that store code engineering information.
To lock elements for reverse engineering
1. In the Code engineering sets branch, select a code engineering set or code engineering ele-ment you want to reverse.
2. On the selected items shortcut menu, click Reverse. The Reverse Options dialog opens.3. In the Reverse Options dialog, set required options and click OK. For more information about
Reverse Options dialog, see “Reverse” in “MagicDraw CodeEngineering UserGuide.pdf”.
31 Copyright © 2000-2011 No Magic, Inc..
TEAMWORK SYSTEMWorking with Teamwork Projects
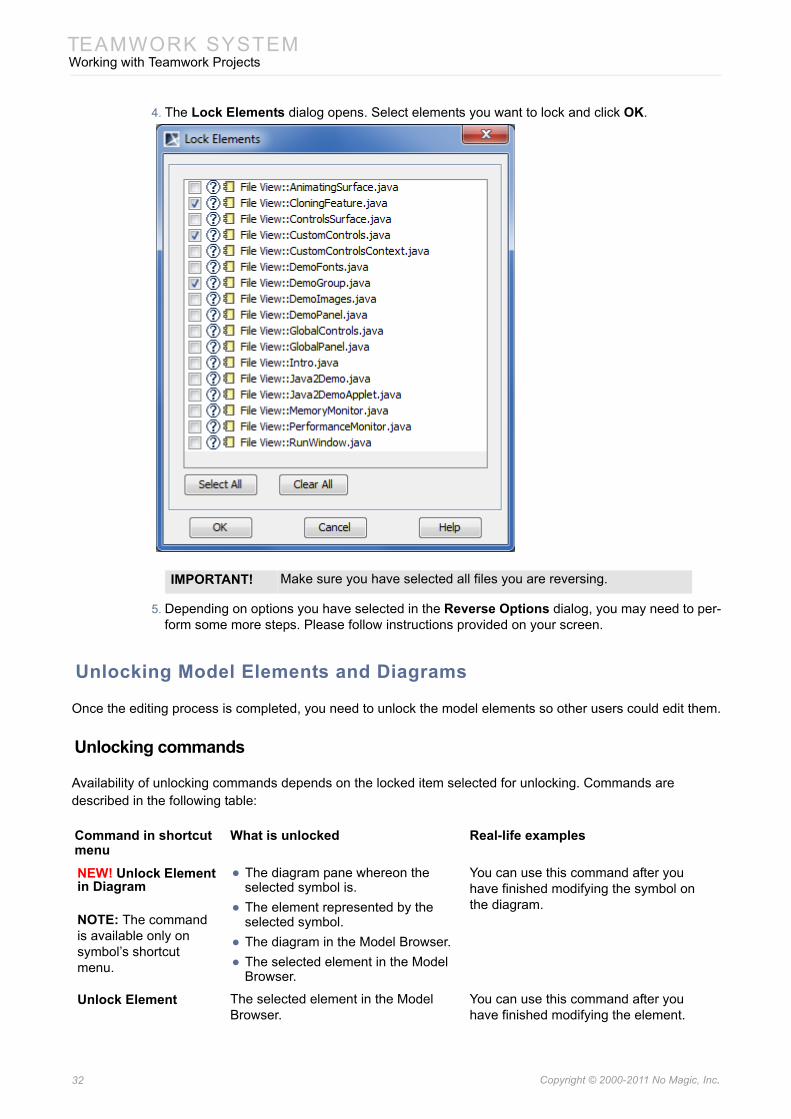
4. The Lock Elements dialog opens. Select elements you want to lock and click OK.
5. Depending on options you have selected in the Reverse Options dialog, you may need to per-form some more steps. Please follow instructions provided on your screen.
Unlocking Model Elements and Diagrams
Once the editing process is completed, you need to unlock the model elements so other users could edit them.
Unlocking commands
Availability of unlocking commands depends on the locked item selected for unlocking. Commands are described in the following table:
IMPORTANT! Make sure you have selected all files you are reversing.
Command in shortcut menu
What is unlocked Real-life examples
NEW! Unlock Element in Diagram
NOTE: The command is available only on symbol’s shortcut menu.
• The diagram pane whereon the selected symbol is.
• The element represented by the selected symbol.
• The diagram in the Model Browser.• The selected element in the Model
Browser.
You can use this command after you have finished modifying the symbol on the diagram.
Unlock Element The selected element in the Model Browser.
You can use this command after you have finished modifying the element.
32 Copyright © 2000-2011 No Magic, Inc..
TEAMWORK SYSTEMWorking with Teamwork Projects
Unlocking procedures
To unlock elements or / and diagrams
1. Do one of the following:• Select a locked element in the Model Browser.
• Select a locked diagram in the Model Browser.
• Select a locked symbol on a diagram pane.
• Right-click the diagram pane.
2. On the selected item’s shortcut menu, point to Lock or Lock Diagram, and then click a desired unlocking command. For more information about locking commands, see "Unlocking com-mands" on page 32.
To unlock several elements
1. Do one of the following:• Select several locked elements in the Model Browser.
• Select several locked symbols on the diagram pane.
2. On the selected elements shortcut menu, click Unlock. This forbids editing element specifica-tion properties in the Specification window.
To unlock all element
1. From the Collaborate menu, select Unlock All. The Commit Settings dialog opens.2. In the Locked Elements tab, you may select elements to unlock. By default, all locked ele-
ments in the project are selected.3. Click Commit when you are done.
Unlock Elements Recursively
The selected element and its owning elements in the Model Browser.
You can use this command after you have finished modifying all elements owned by the selected elements.
NEW! Unlock Diagram Content
NOTE: The command is available only on symbol’s or diagram’s shortcut menu.
• Symbols on a diagram pane of a selected diagram.
• The diagram pane of the selected diagram.
• Elements of the selected diagram in the Model Browser.
• The selected diagram in the Model Browser.
You can use this command after you have finished modifying the diagram and its symbols.
Unlock Diagram
NOTE: The command is available only on symbol’s or diagram’s shortcut menu.
• Symbols on the diagram pane of the selected diagram.
• The diagram pane of the selected diagram.
• The selected diagram in the Model Browser.
You can use this command after you have finished modifying diagram repre-sentation, but still need to continue work-ing with elements used on the diagram.
NOTE The list of commands may vary depending on the item you have selected.
Command in shortcut menu
What is unlocked Real-life examples
33 Copyright © 2000-2011 No Magic, Inc..
TEAMWORK SYSTEMWorking with Teamwork Projects
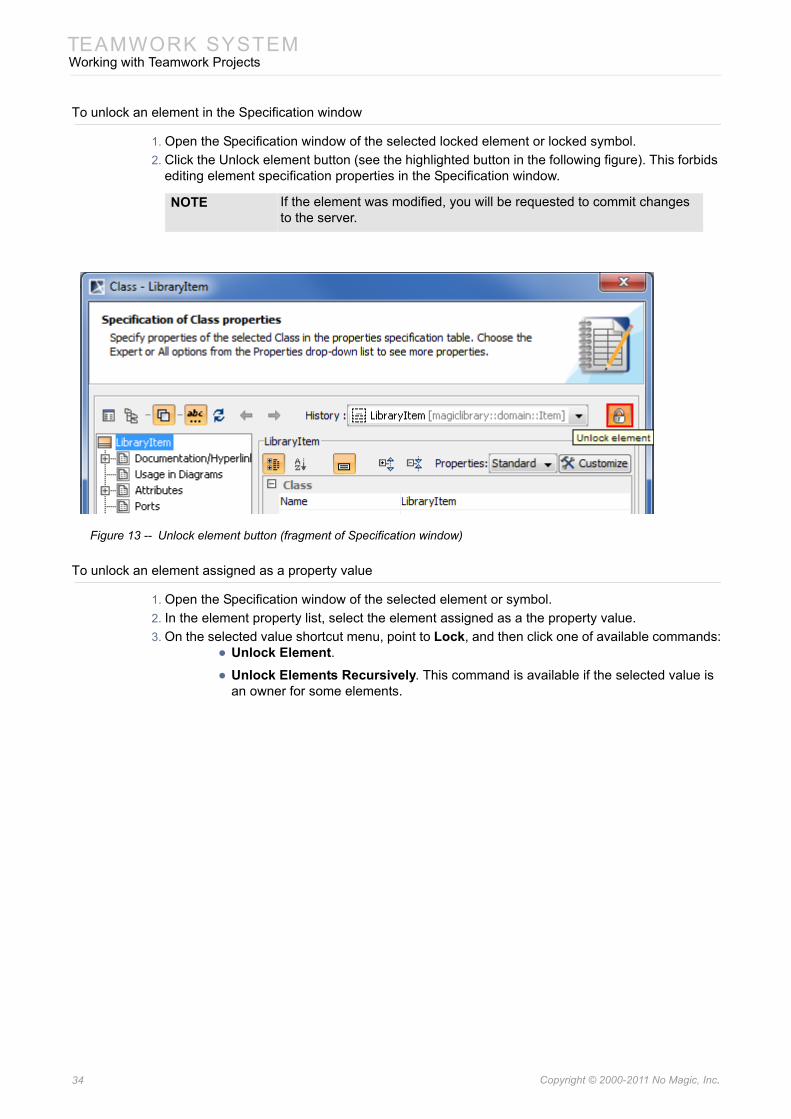
To unlock an element in the Specification window
1. Open the Specification window of the selected locked element or locked symbol.2. Click the Unlock element button (see the highlighted button in the following figure). This forbids
editing element specification properties in the Specification window.
Figure 13 -- Unlock element button (fragment of Specification window)
To unlock an element assigned as a property value
1. Open the Specification window of the selected element or symbol.2. In the element property list, select the element assigned as a the property value.3. On the selected value shortcut menu, point to Lock, and then click one of available commands:
• Unlock Element.• Unlock Elements Recursively. This command is available if the selected value is
an owner for some elements.
NOTE If the element was modified, you will be requested to commit changes to the server.
34 Copyright © 2000-2011 No Magic, Inc..
TEAMWORK SYSTEMWorking with Teamwork Projects
For more information about unlocking commands, see "Unlocking commands" on page 32.
Figure 14 -- Unlocking property value in Specification window
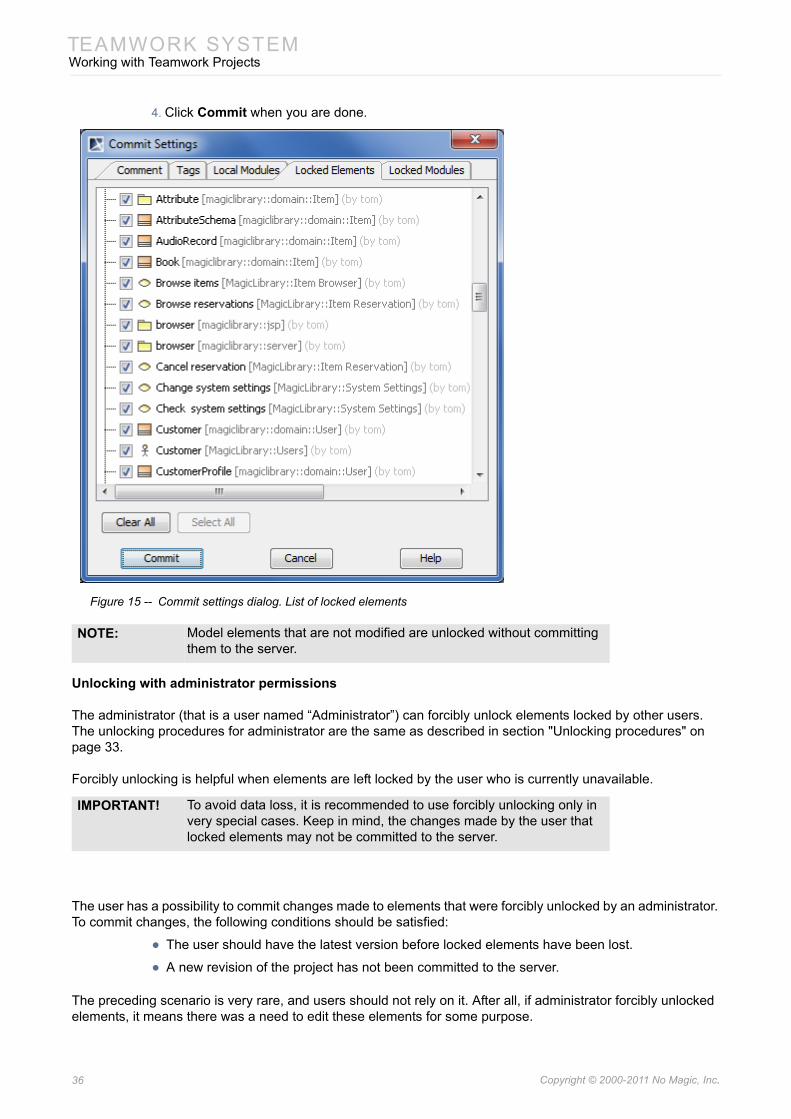
To unlock on project committing
1. From the Collaborate menu, select Commit Project or press CTRL+K. The Commit Settings dialog opens.
2. Click the Locked Elements tab.3. In the elements list, select elements you want to unlock. Click Select All, if you need to unlock
all locked elements in your project.
35 Copyright © 2000-2011 No Magic, Inc..
TEAMWORK SYSTEMWorking with Teamwork Projects
4. Click Commit when you are done.
Figure 15 -- Commit settings dialog. List of locked elements
Unlocking with administrator permissions
The administrator (that is a user named “Administrator”) can forcibly unlock elements locked by other users. The unlocking procedures for administrator are the same as described in section "Unlocking procedures" on page 33.
Forcibly unlocking is helpful when elements are left locked by the user who is currently unavailable.
The user has a possibility to commit changes made to elements that were forcibly unlocked by an administrator. To commit changes, the following conditions should be satisfied:
• The user should have the latest version before locked elements have been lost.
• A new revision of the project has not been committed to the server.
The preceding scenario is very rare, and users should not rely on it. After all, if administrator forcibly unlocked elements, it means there was a need to edit these elements for some purpose.
NOTE: Model elements that are not modified are unlocked without committing them to the server.
IMPORTANT! To avoid data loss, it is recommended to use forcibly unlocking only in very special cases. Keep in mind, the changes made by the user that locked elements may not be committed to the server.
36 Copyright © 2000-2011 No Magic, Inc..
TEAMWORK SYSTEMWorking with Teamwork Projects
Changes to elements that were locked and not forcibly unlocked by an administrator, can be committed to teamwork normally.
To delete an element from the Teamwork project
1. Lock the element or elements you want to delete (see "Locking Model Elements and Diagrams for Editing" on page 26).
2. Delete the element.3. Commit the project to the Teamwork Server.
Committing to Teamwork Server
When committing a project, new data (data from the MagicDraw application) is merged with the existing one (the current project data on the server). If the current merged element does not yet reside on the server, it should be added to the project without merging.
Any new elements added to the parent scope are given a unique name when placed among elements of the same type.
Each new project version is created and saved to the server.
To commit a new project or changes in a project
1. From the Collaborate menu, select Commit Project, or press CTRL+K.2. In the Commit Settings dialog, type the comment in the Commit Comment tab (optional).3. Enter the tag in the Tag tab (optional).4. If locked elements are present, select the elements you want to unlock from the Locked Ele-
ments list box. To select all the locked elements, Select All.5. Click OK.
IMPORTANT! If the element contains inner elements which can be locked separately, these inner elements should not be locked by the other users to com-plete element removal.For this reason, we suggest to use command Lock Element for Edit Recursively to lock all inner elements so nobody could prevent you from removing selected elements.
IMPORTANT! Only modifier model elements are committed to the server before the new project version is created.
NOTE After committing a project, a new project version that contains changes will be saved in the Teamwork Server. If you want to save the project locally to your computer, on the File menu, click Save Project and choose one of the two first options in the Save Options dialog:• Save the project locally. This option allows you to commit changes
made to a locally-saved project to Teamwork Server later.• Save the local copy of the project and remove locking and
version information. The project will be saved on a disk and will not include any locking or version information. A local copy of the project cannot be committed to the Teamwork Server.
37 Copyright © 2000-2011 No Magic, Inc..

TEAMWORK SYSTEMWorking with Teamwork Projects
Saving a Teamwork Project
You can select any of the following options save when saving a Teamwork project for the first time:
• Save the project locally. This option allows you to commit changes made to a locally-saved project to Teamwork Server later.
• Save a local copy of the project and remove locking and version information. The project will be saved on a disk and will not include any locking or version information. A local copy of the project cannot be committed to the Teamwork Server.
• Commit the project changes to the MagicDraw Teamwork Server. Once selected, this option will automatically be chosen whenever MagicDraw saves the Teamwork project.
To choose the save option
1. From the File menu, choose Save Project As. The Save Options dialog will open.2. Select one of the three save options.3. Click OK.
Figure 16 -- The Save Options dialog
If the first or third save option is selected in the Save Options dialog, it will be used every time Teamwork Server saves the project (the second option won’t be saved for the next time). You may notice that the name of the appropriate command on the File menu is dynamic. Depending on the project's last save option, the command name can either be Save Locally with Server Information or Commit to Server. The ToolTip of the appropriate button on the File toolbar will change as well.
To save a Teamwork project
Do one of the following:• On the File menu, choose .
• On the File toolbar, click .
• Press CTRL+S.
NOTE The command name depends on the save option selected in the Save Options dialog. It can be one of the following:• Save Locally With Server Information.• Commit to Server.
NOTE The ToolTip text of this button depends on the save option selected in the Save Options dialog. It can be one of the following:• Save Locally With Server Information.• Commit to Server.
38 Copyright © 2000-2011 No Magic, Inc..
TEAMWORK SYSTEMWorking with Teamwork Projects
Updating
When updating a project, the latest project version from the server is loaded. A new version of a project is created every time a user commits new data to the server.
When updating lock information, the list of elements that are locked by other users is refreshed.
You should update a project when you know that a new project version is available on the server.
To update the whole project
• From the Collaborate menu, select Update Project, or press CTRL+U.
To update elements that are locked by other users
• From the Collaboratemenu, select Update Lock Information, or press CTRL+SHIFT+U.
Versioning
Every time a project is committed, a new project version is created. You can undo committed changes by setting a previous project version as latest.
To view project versions
1. From the Collaborate menu, select Projects or Open Server Project commands.2. Click the Versions button. The Project Versions dialog opens.
The Versions dialog lists all versions of the selected project. You can set the selected project version as latest, edit comments, and review other project versions.
Visibility of version tags
Project version tags are visible in the following places:
• Version browser
• Branches browser
NOTE Model elements that are locked for will not be updated.
39 Copyright © 2000-2011 No Magic, Inc..
TEAMWORK SYSTEMWorking with Teamwork Projects
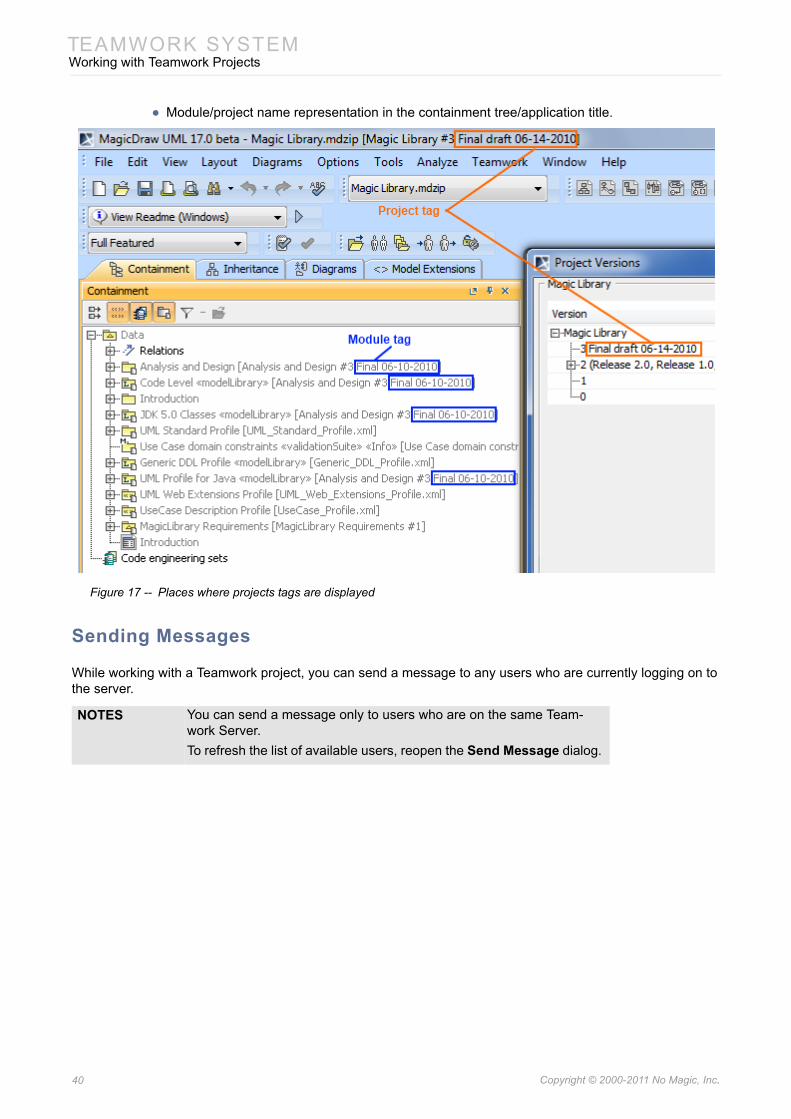
• Module/project name representation in the containment tree/application title.
Figure 17 -- Places where projects tags are displayed
Sending Messages
While working with a Teamwork project, you can send a message to any users who are currently logging on to the server.
NOTES You can send a message only to users who are on the same Team-work Server.To refresh the list of available users, reopen the Send Message dialog.
40 Copyright © 2000-2011 No Magic, Inc..
TEAMWORK SYSTEMWorking with Teamwork Projects
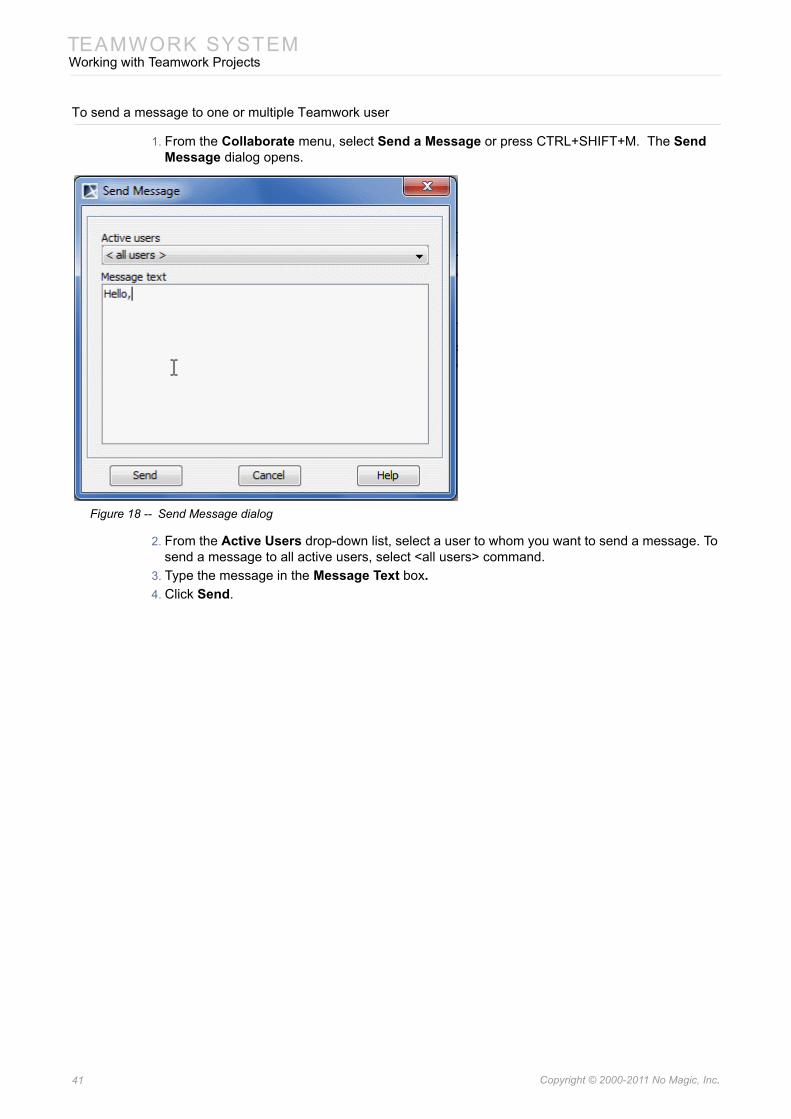
To send a message to one or multiple Teamwork user
1. From the Collaborate menu, select Send a Message or press CTRL+SHIFT+M. The Send Message dialog opens.
Figure 18 -- Send Message dialog
2. From the Active Users drop-down list, select a user to whom you want to send a message. To send a message to all active users, select <all users> command.
3. Type the message in the Message Text box.4. Click Send.
41 Copyright © 2000-2011 No Magic, Inc..
TEAMWORK SYSTEMWorking with Teamwork Projects
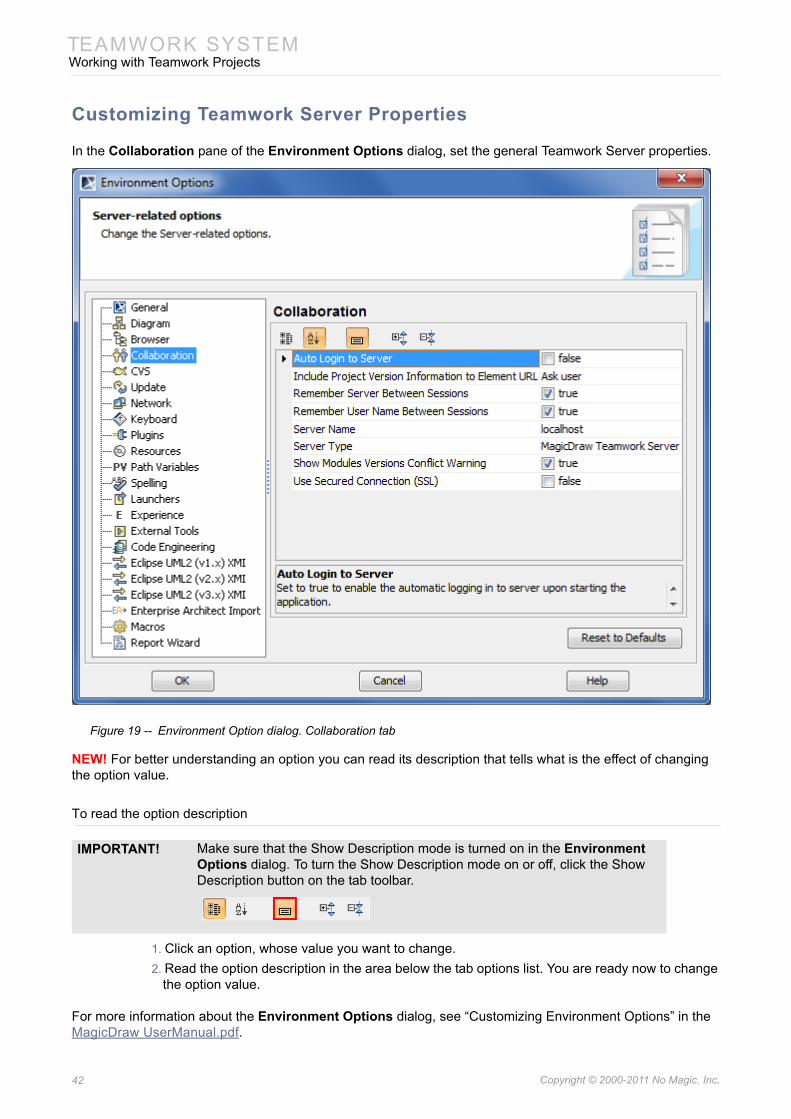
Customizing Teamwork Server Properties
In the Collaboration pane of the Environment Options dialog, set the general Teamwork Server properties.
Figure 19 -- Environment Option dialog. Collaboration tab
NEW! For better understanding an option you can read its description that tells what is the effect of changing the option value.
To read the option description
1. Click an option, whose value you want to change.2. Read the option description in the area below the tab options list. You are ready now to change
the option value.
For more information about the Environment Options dialog, see “Customizing Environment Options” in the MagicDraw UserManual.pdf.
IMPORTANT! Make sure that the Show Description mode is turned on in the Environment Options dialog. To turn the Show Description mode on or off, click the Show Description button on the tab toolbar.
42 Copyright © 2000-2011 No Magic, Inc..
TEAMWORK SYSTEMManaging Teamwork Server
Managing Teamwork Server
Users Management
You can create two types of users in Teamwork Server: normal users that may have different permissions and users with administrator rights. Users with administrator rights can do the following actions in Teamwork Server:
• Manage users.
• Create projects and assign users to them.
• Manage project versions and branches.
• Set user permissions for the system and projects (the read and edit modes are set by default).
• Remove users and projects from Teamwork.
The Teamwork Server users have their own user accounts (including login names and passwords given by the administrator) and various types of permissions. According to the storage place of the user accounts, users can be either:
• Native - the user’s account data is stored locally.
• External - the user’s account data is stored in the external database (Subversion/ClearCase and/or LDAP). Only the login name of an external user is stored locally.
You can create, edit, or remove both types of Teamwork users regardless of whether the integration with any external database (Subversion, ClearCase, LDAP) is enabled or disabled. The names of native and external users are unique per single server.
You can convert an external user to a native one and vice versa. Users with administrator rights can change a specific user's type by editing the user's account information, or convert a whole list of active Teamwork users by using the Teamwork Administrator's console.
You will be connected to Teamwork Server once the authorization process, which will prompt for your user ID (login name and password), has been completed. Upon verification, you can work with the system.
To add a new native user
1. From the Collaborate menu, select Users. The Edit Users dialog opens (see "Edit Users Dia-log" on page 68).
2. Click the Add button. The Add User dialog opens (see "Add/Edit User Dialog" on page 70).3. Enter the user’s login name, full name for better identification, and password.4. Click OK.5. Select the types of system permissions for the user in the Permissions list (see "User permis-
sions" on page 46).
To add a new external user
1. From the Collaborate menu, select Users. The Edit Users dialog opens (see "Edit Users Dia-log" on page 68).
2. Click the Add button. The Add User dialog opens (see "Add/Edit User Dialog" on page 70).3. Enter the user’s login name and full name for better identification.
NOTE If there are two MagicDraw clients with the same login name, only one client is allowed to log into Teamwork Server at a time.
View Online Demo
Create a New User in Teamwork
43 Copyright © 2000-2011 No Magic, Inc..
TEAMWORK SYSTEMManaging Teamwork Server
4. Select the External User check box.5. Click OK.6. Select the types of system permissions for the user in the Permissions list (see "User permis-
sions" on page 46).
To convert a native user to an external one by editing the user's account information
1. From the Collaborate menu, select Users. The Edit Users dialog opens (see "Edit Users Dia-log" on page 68).
2. Click the Edit button. The Edit User dialog opens (see "Add/Edit User Dialog" on page 70).3. Enter the user’s full name.4. Select the External User check box.5. Click OK.
To convert all native users to external
1. Start Teamwork Administrator’s Console (see "Starting Teamwork Administrator’s Console" on page 48).
2. In the Active Users tab, click the Convert Native Users to External button (see "Active Users tab" on page 48).
3. Click Yes to confirm your decision.
You will be informed once the conversion has been completed. A Teamwork Server's user conversion can be:
• Successful - when all the users are converted from native to external. In this case the informational message is displayed, and you can check the list of all converted users in the server log.
• Unsuccessful - when the conversion failed. In this case an error message is displayed, and you can see the server log for more details.
• Non-applicable - when there are no users to convert from native to external. In this case an informational message is displayed.
For the information about the server log file, see “Log File tab” on page 53.
To convert an external user to native by editing the user's account information
1. From the Collaborate menu, select Users. The Edit Users dialog opens (see "Edit Users Dia-log" on page 68).
2. Click the Edit button. The Edit User dialog opens (see "Add/Edit User Dialog" on page 70).3. Enter the user’s full name.4. Clear the External User check box.
NOTE As you cannot set a password for an external user in MagicDraw's Teamwork Server, use an appropriate tool for managing the external database (Subversion, ClearCase, or LDAP) wherein the user's account is stored.
NOTE • The password of a native user, who has been converted to an external user, will be retained. However, it will not be used in the user authentication.
• The user's native password will be enabled again only if the user is converted back to a native user.
NOTE All converted users will be able to log into Teamwork Server only if they are avail-able in the external user sources (LDAP, Subversion, or ClearCase server to which your server is integrated).
44 Copyright © 2000-2011 No Magic, Inc..

TEAMWORK SYSTEMManaging Teamwork Server
5. Type and retype the password.
6. Click OK.
To convert all external users to native
1. Start Teamwork Administrator’s Console (see "Starting Teamwork Administrator’s Console" on page 48).
2. On the Active Users tab, click the Convert External Users to Native button (see "Active Users tab" on page 48).
3. Click Yes to confirm your decision.
You will be informed once the conversion has been completed. A Teamwork Server's user conversion can be:
• Successful - when all the users are converted from external to native. In this case an informational message is displayed, and you can check the list of all converted users in the server log.
• Unsuccessful - when the conversion failed. In this case an error message is displayed, and you can see the server log for more details.
• Non-applicable - when there are no users to convert from external to native. In this case an informational message is displayed.
For the information about the server log file, see "Log File tab" on page 53.
To remove a user from Teamwork
1. From the Collaborate menu, select Users. The Edit Users dialog opens (see "Edit Users Dia-log" on page 68).
2. In the Users area, select the user and click Remove.
To assign a project to a user
1. From the Collaborate menu, select Users. The Edit Users dialog opens (see "Edit Users Dia-log" on page 68).
2. Click More, if you do not see the Teamwork projects list. The list of available Teamwork proj-ects is dispayed in the Available Projects area.
3. Select a project you want to assign to the selected user.4. Click the << button to move the selected project to the Assigned Projects list.5. Click OK when you are done.
NOTE If the converted user used to be a native user, the password will be the same one used when he or she was a native.
NOTE • All converted users will not be able to log into Teamwork Server as they do not have passwords; therefore, the administrator has to set up a password for each user after the conversion.
• If the converted user used to be a native user, the password will be reset to the same one used when he or she was a native.
NOTES • Once a user has been added to a project, the default user rights will be created allowing the user to access the project only according to the rights given.
• The system permissions have a higher priority over the project permissions. For example, a user whose system permissions allow model editing can edit all projects, even if the user does not have rights to edit the projects.
45 Copyright © 2000-2011 No Magic, Inc..
TEAMWORK SYSTEMManaging Teamwork Server
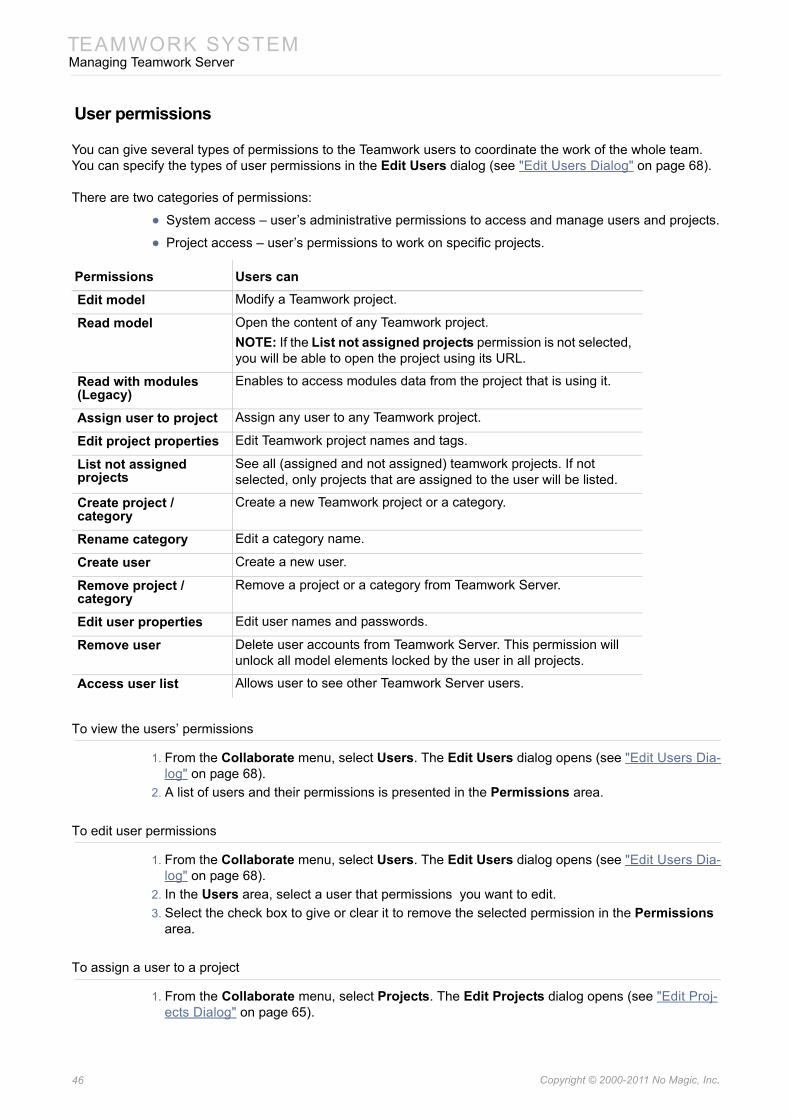
User permissions
You can give several types of permissions to the Teamwork users to coordinate the work of the whole team. You can specify the types of user permissions in the Edit Users dialog (see "Edit Users Dialog" on page 68).
There are two categories of permissions:
• System access – user’s administrative permissions to access and manage users and projects.
• Project access – user’s permissions to work on specific projects.
To view the users’ permissions
1. From the Collaborate menu, select Users. The Edit Users dialog opens (see "Edit Users Dia-log" on page 68).
2. A list of users and their permissions is presented in the Permissions area.
To edit user permissions
1. From the Collaborate menu, select Users. The Edit Users dialog opens (see "Edit Users Dia-log" on page 68).
2. In the Users area, select a user that permissions you want to edit.3. Select the check box to give or clear it to remove the selected permission in the Permissions
area.
To assign a user to a project
1. From the Collaborate menu, select Projects. The Edit Projects dialog opens (see "Edit Proj-ects Dialog" on page 65).
Permissions Users can
Edit model Modify a Teamwork project.
Read model Open the content of any Teamwork project.NOTE: If the List not assigned projects permission is not selected, you will be able to open the project using its URL.
Read with modules (Legacy)
Enables to access modules data from the project that is using it.
Assign user to project Assign any user to any Teamwork project.
Edit project properties Edit Teamwork project names and tags.
List not assigned projects
See all (assigned and not assigned) teamwork projects. If not selected, only projects that are assigned to the user will be listed.
Create project / category
Create a new Teamwork project or a category.
Rename category Edit a category name.
Create user Create a new user.
Remove project / category
Remove a project or a category from Teamwork Server.
Edit user properties Edit user names and passwords.
Remove user Delete user accounts from Teamwork Server. This permission will unlock all model elements locked by the user in all projects.
Access user list Allows user to see other Teamwork Server users.
46 Copyright © 2000-2011 No Magic, Inc..
TEAMWORK SYSTEMManaging Teamwork Server
2. Click More, if you do not see the unassigned users list. The list of available users is displayed in the Available Users area.
3. Select the user you want to assign to the selected project.4. Click the << button to move the selected user to the Assigned Users list.5. Click OK when you are done.
Starting the Administrator’s Console
The MagicDraw UML Teamwork Server Administrator's Console is used for Teamwork Server status observation and Administrative control. The server holds information about active users connecting to the server and loaded projects. The Administrator can shutdown or restart the server, change its properties, and view log files (including debug information) for the server and separate projects.
Requirements
Installing Administrator’s Console
Windows platform1. Run the downloaded file MD_UML_<version number>_teamwork_admin_win.exe. 2. Follow the instructions in the installation program.
Unix platform1. Ensure that X Windows server is running. 2. After downloading, open a shell and go to the directory where you downloaded the installer. At
the prompt type: sh ./MD_UML_<version number>_teamwork_admin_unix.sh. 3. Follow the instructions in the installation program.
MAC OS X platform
After downloading, double-click MD_UML_<version number>_teamwork_admin_mac.dmg and install the application by dropping the launcher into the Applications folder (or another preferred location).
Requires Mac OS X Leopard or Mac OS X Snow Leopard and Java 1.5.0_19 for 32-bit Mac OS X, and Java 1.6.0_10 for 62-bit Mac OS X.
Other platforms1. Extract the downloaded file MD_UML_<version number>_teamwork_admin_no_install.zip.2. Launch teamwork_administrator.exe or ./teamwork_administrator from the bin folder.
NOTE When a user is added to a project, default user rights are created, allowing the user to access the project according to the rights given.
Minimum Recommended
Disk space 8MB1
1. Without JVM. Additional 22 MB are needed for JVM.
30MB* or more
RAM 64MB 128MB or more
NOTE The Administrator's Console is automatically installed when the MagicDraw client or Teamwork Server is installed. So, if one of these is installed, there is no need to install the console separately.
47 Copyright © 2000-2011 No Magic, Inc..
TEAMWORK SYSTEMManaging Teamwork Server
Starting Teamwork Administrator’s Console
To start Teamwork Administrator’s Console
1. Double-click teamwork_administrator.exe in <MagicDraw Teamwork Server installation direc-tory>\bin. The Login to Teamwork Administrator’s Console dialog opens.
2. Type administrator’s login name and password, server name, and click OK. Teamwork Admin-istrator’s Console starts.
Administrator’s Console Dialog
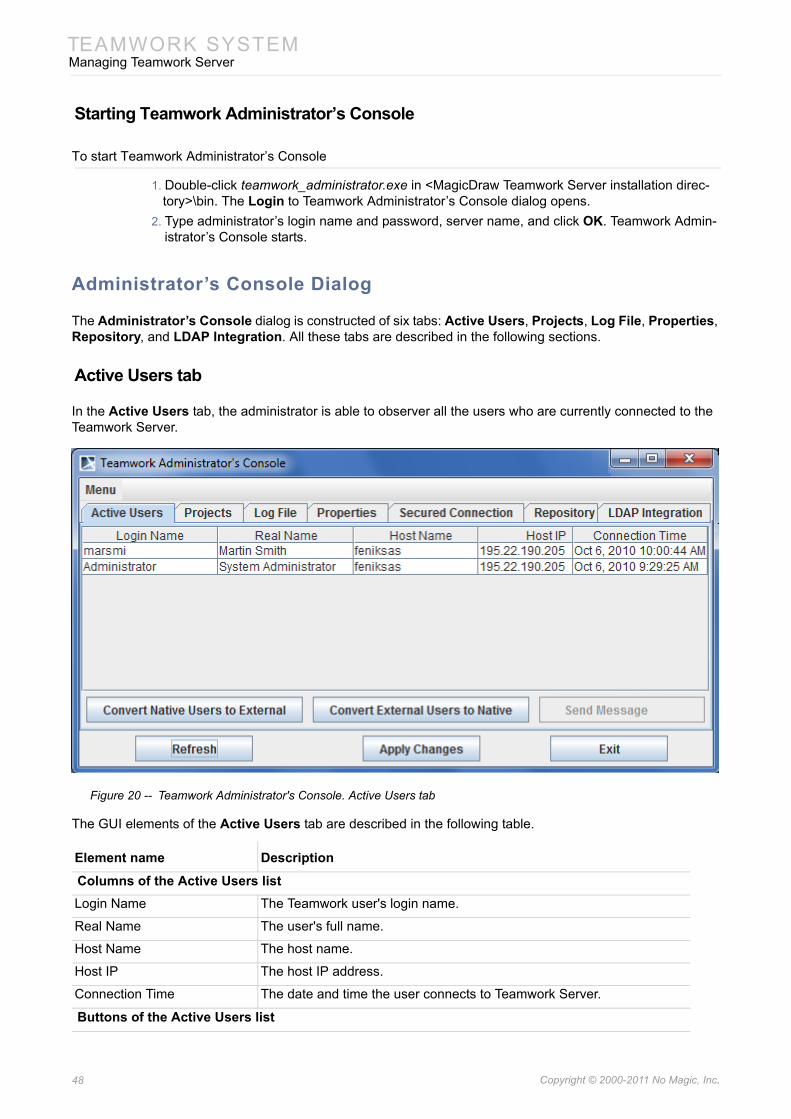
The Administrator’s Console dialog is constructed of six tabs: Active Users, Projects, Log File, Properties, Repository, and LDAP Integration. All these tabs are described in the following sections.
Active Users tab
In the Active Users tab, the administrator is able to observer all the users who are currently connected to the Teamwork Server.
Figure 20 -- Teamwork Administrator's Console. Active Users tab
The GUI elements of the Active Users tab are described in the following table.
Element name Description
Columns of the Active Users listLogin Name The Teamwork user's login name.
Real Name The user's full name.
Host Name The host name.
Host IP The host IP address.
Connection Time The date and time the user connects to Teamwork Server.
Buttons of the Active Users list
48 Copyright © 2000-2011 No Magic, Inc..

TEAMWORK SYSTEMManaging Teamwork Server
Projects tab
The Projects tab displays, names, authors, and the status of all projects that are stored on the Teamwork Server.
Figure 21 -- Teamwork Administrator's Console. Projects tab
Import and Export from and to repository can also be triggered from this Projects tab. Import and export are conceptually described in the Section “Starting the Administrator’s Console” on page 47. Here only the GUI workflow is presented.
To import projects into the current server
1. In the Teamwork Administrator’s Console Projects tab, click the Import from Native Reposi-tory button. The Projects Import Wizard opens.
2. Select the directory where the projects to import are located. This must be a directory where project versions are stored in a Teamwork Server's Built-In repository format, for example a directory on which the Teamwork Server has previously been configured to operate, or a directory
Convert Native Users to External
Starts the conversion of all connected native users to external users.
For more information about this conversion, see section “To convert all native users to external” on page 44.
Convert External Users to Native
Starts the conversion of all connected external users to native users.
For more information about this conversion, see section “To convert all external users to native” on page 45.
Send Message Opens the Send Message to Remote User dialog for sending mes-sage to a specific user. The button is available, when a user is selected.
Element name Description
49 Copyright © 2000-2011 No Magic, Inc..
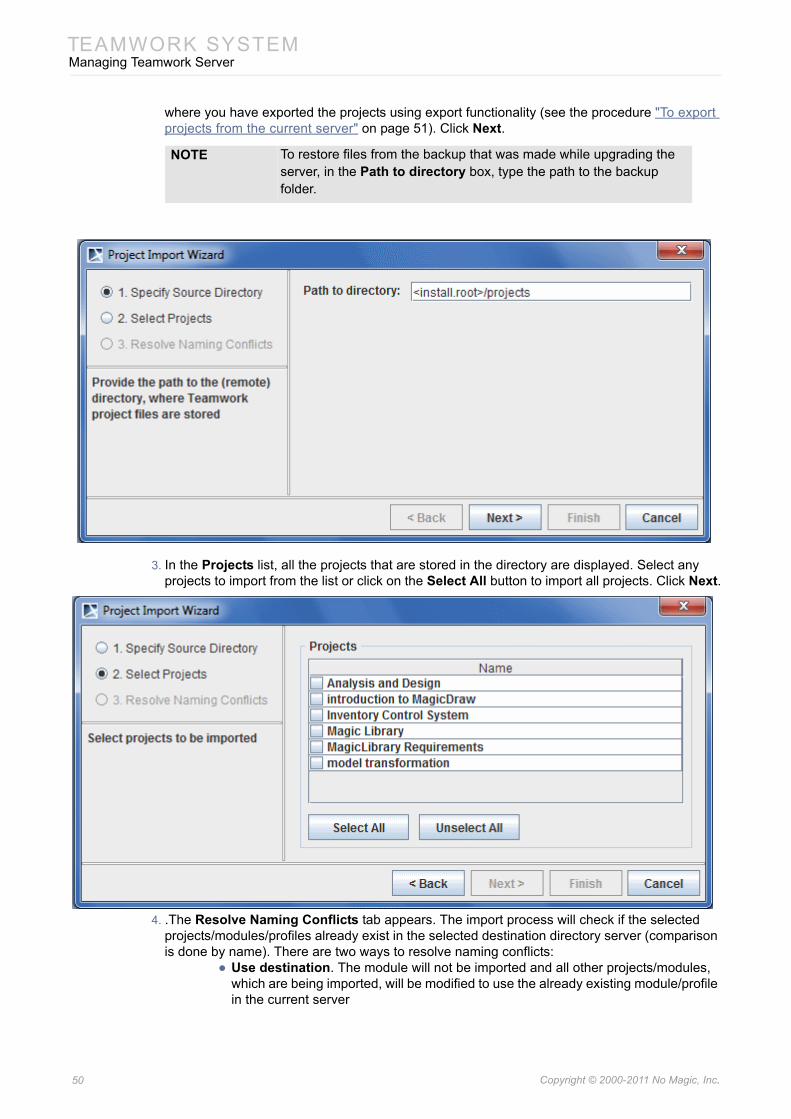
TEAMWORK SYSTEMManaging Teamwork Server
where you have exported the projects using export functionality (see the procedure "To export projects from the current server" on page 51). Click Next.
3. In the Projects list, all the projects that are stored in the directory are displayed. Select any projects to import from the list or click on the Select All button to import all projects. Click Next.
4. .The Resolve Naming Conflicts tab appears. The import process will check if the selected projects/modules/profiles already exist in the selected destination directory server (comparison is done by name). There are two ways to resolve naming conflicts:
• Use destination. The module will not be imported and all other projects/modules, which are being imported, will be modified to use the already existing module/profile in the current server
NOTE To restore files from the backup that was made while upgrading the server, in the Path to directory box, type the path to the backup folder.
50 Copyright © 2000-2011 No Magic, Inc..
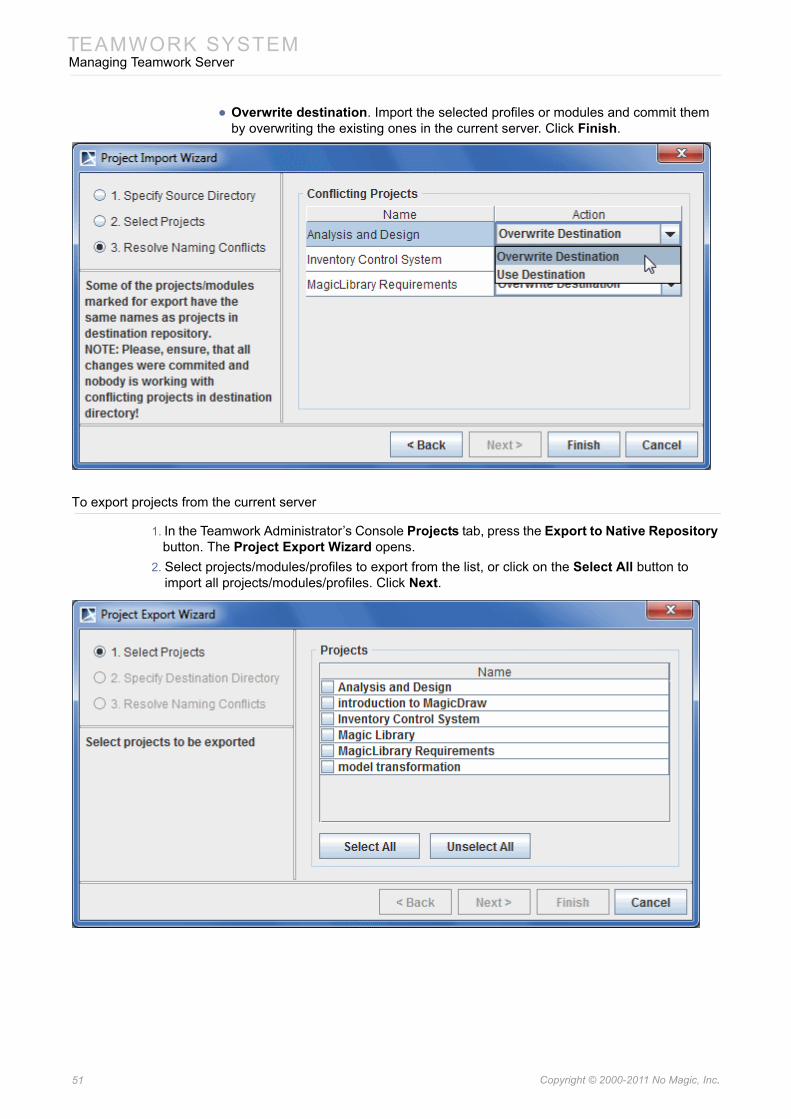
TEAMWORK SYSTEMManaging Teamwork Server
• Overwrite destination. Import the selected profiles or modules and commit them by overwriting the existing ones in the current server. Click Finish.
To export projects from the current server
1. In the Teamwork Administrator’s Console Projects tab, press the Export to Native Repository button. The Project Export Wizard opens.
2. Select projects/modules/profiles to export from the list, or click on the Select All button to import all projects/modules/profiles. Click Next.
51 Copyright © 2000-2011 No Magic, Inc..
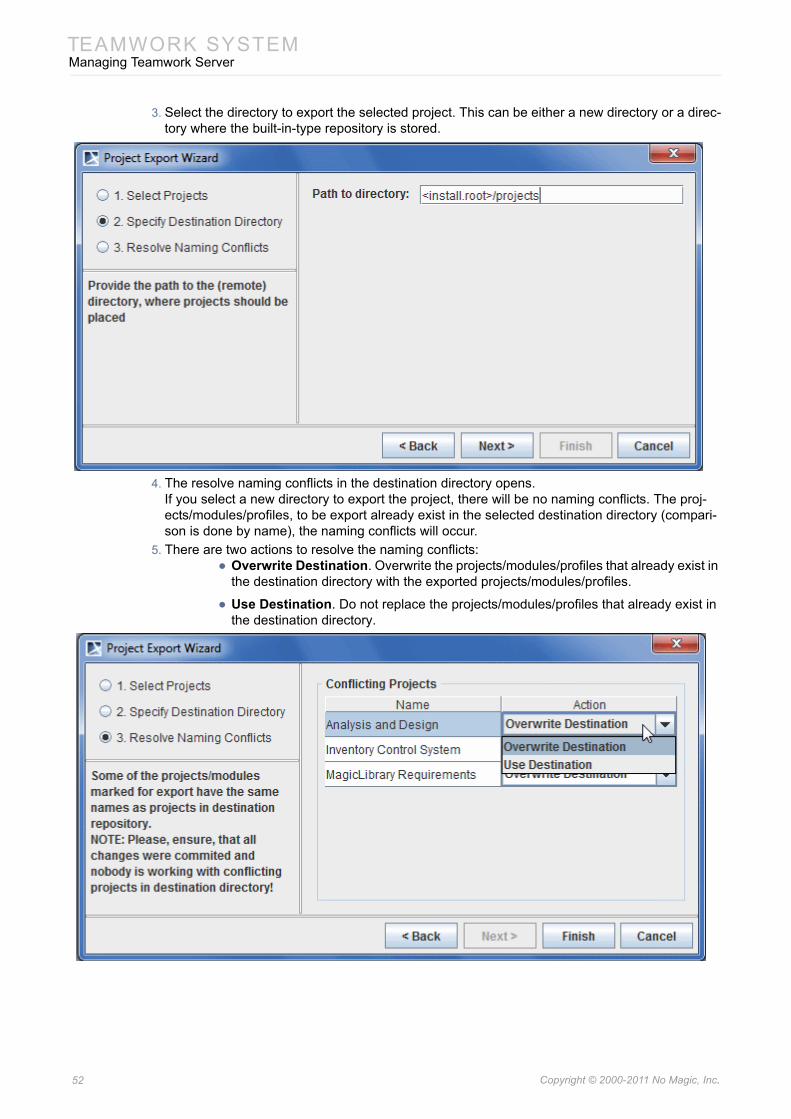
TEAMWORK SYSTEMManaging Teamwork Server
3. Select the directory to export the selected project. This can be either a new directory or a direc-tory where the built-in-type repository is stored.
4. The resolve naming conflicts in the destination directory opens. If you select a new directory to export the project, there will be no naming conflicts. The proj-ects/modules/profiles, to be export already exist in the selected destination directory (compari-son is done by name), the naming conflicts will occur.
5. There are two actions to resolve the naming conflicts:• Overwrite Destination. Overwrite the projects/modules/profiles that already exist in
the destination directory with the exported projects/modules/profiles.
• Use Destination. Do not replace the projects/modules/profiles that already exist in the destination directory.
52 Copyright © 2000-2011 No Magic, Inc..
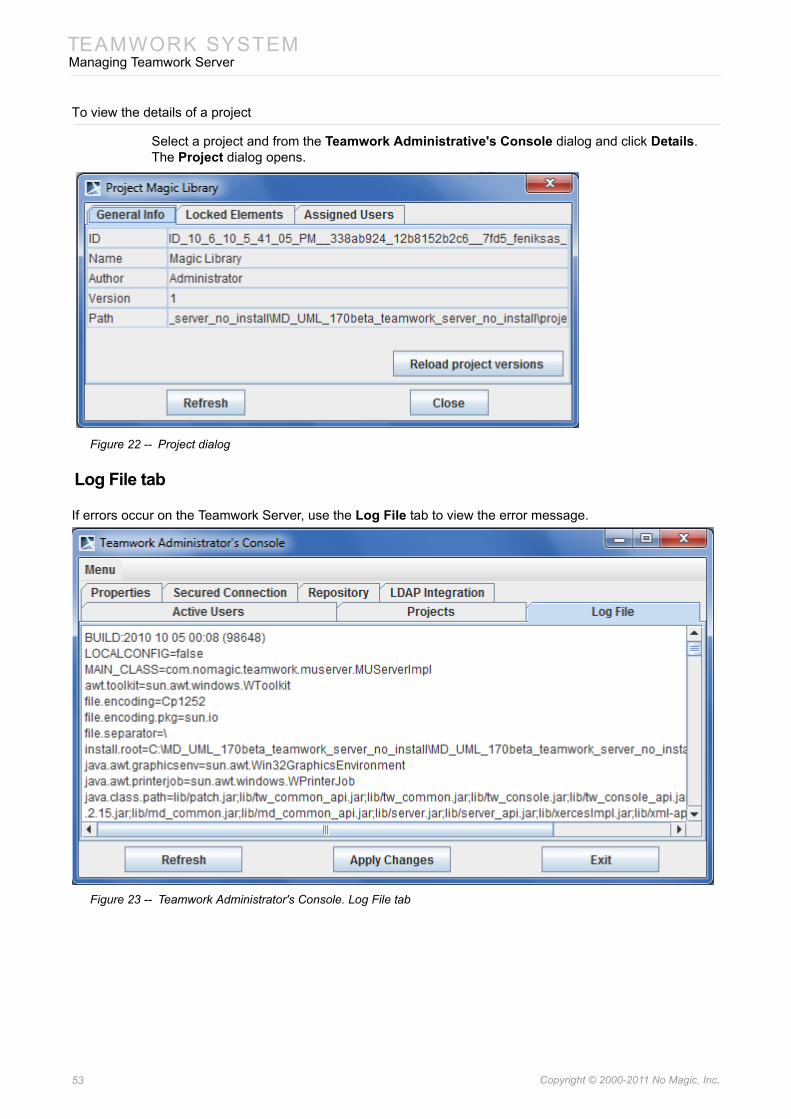
TEAMWORK SYSTEMManaging Teamwork Server
To view the details of a project
Select a project and from the Teamwork Administrative's Console dialog and click Details. The Project dialog opens.
Figure 22 -- Project dialog
Log File tab
If errors occur on the Teamwork Server, use the Log File tab to view the error message.
Figure 23 -- Teamwork Administrator's Console. Log File tab
53 Copyright © 2000-2011 No Magic, Inc..
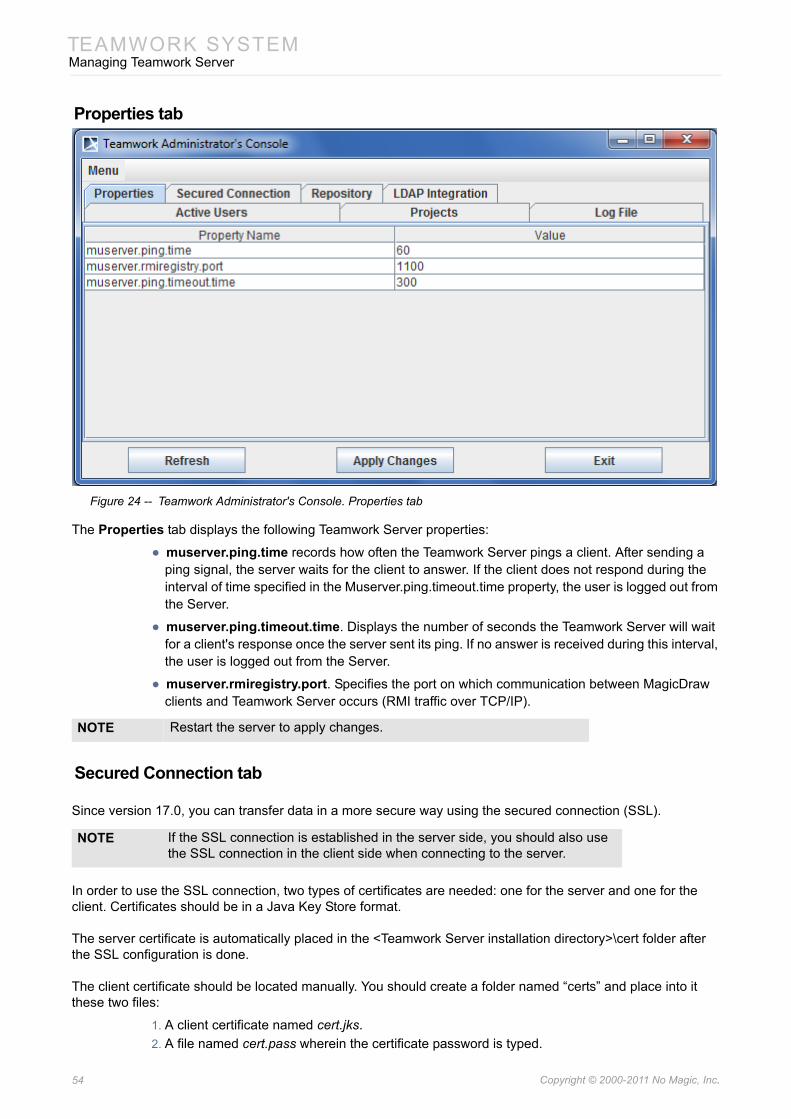
TEAMWORK SYSTEMManaging Teamwork Server
Properties tab
Figure 24 -- Teamwork Administrator's Console. Properties tab
The Properties tab displays the following Teamwork Server properties:
• muserver.ping.time records how often the Teamwork Server pings a client. After sending a ping signal, the server waits for the client to answer. If the client does not respond during the interval of time specified in the Muserver.ping.timeout.time property, the user is logged out from the Server.
• muserver.ping.timeout.time. Displays the number of seconds the Teamwork Server will wait for a client's response once the server sent its ping. If no answer is received during this interval, the user is logged out from the Server.
• muserver.rmiregistry.port. Specifies the port on which communication between MagicDraw clients and Teamwork Server occurs (RMI traffic over TCP/IP).
Secured Connection tab
Since version 17.0, you can transfer data in a more secure way using the secured connection (SSL).
In order to use the SSL connection, two types of certificates are needed: one for the server and one for the client. Certificates should be in a Java Key Store format.
The server certificate is automatically placed in the <Teamwork Server installation directory>\cert folder after the SSL configuration is done.
The client certificate should be located manually. You should create a folder named “certs” and place into it these two files:
1. A client certificate named cert.jks.2. A file named cert.pass wherein the certificate password is typed.
NOTE Restart the server to apply changes.
NOTE If the SSL connection is established in the server side, you should also use the SSL connection in the client side when connecting to the server.
54 Copyright © 2000-2011 No Magic, Inc..
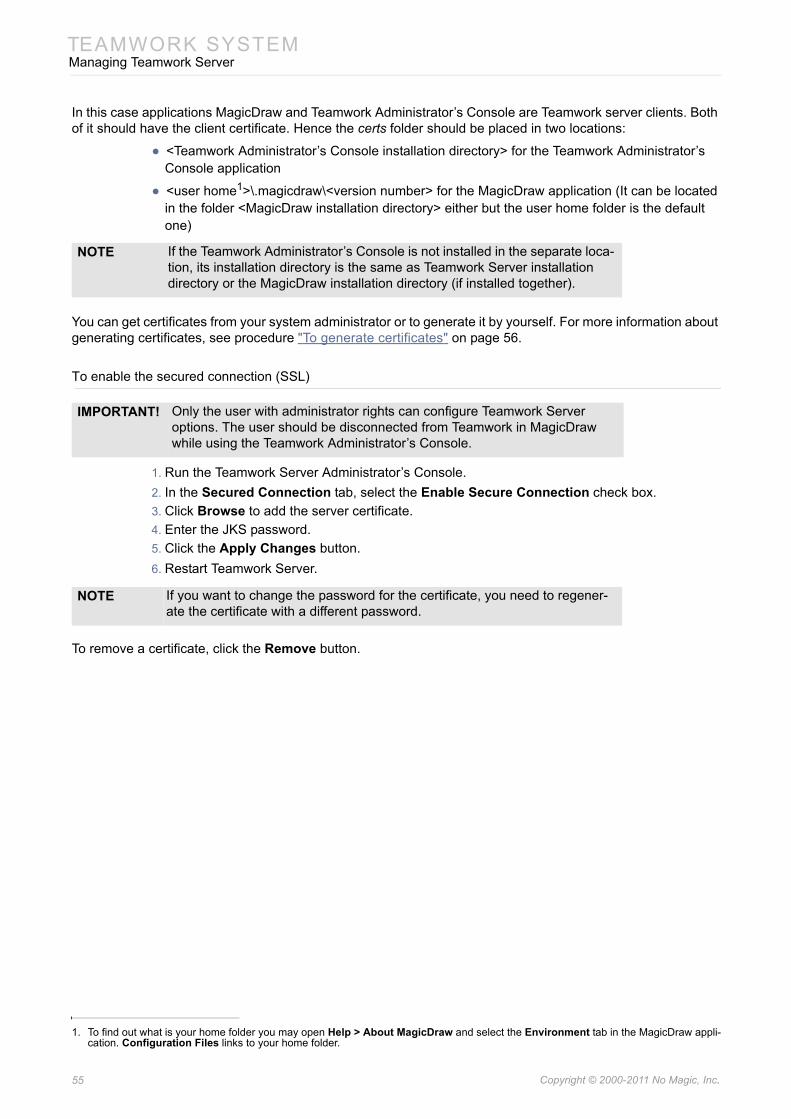
TEAMWORK SYSTEMManaging Teamwork Server
In this case applications MagicDraw and Teamwork Administrator’s Console are Teamwork server clients. Both of it should have the client certificate. Hence the certs folder should be placed in two locations:
• <Teamwork Administrator’s Console installation directory> for the Teamwork Administrator’s Console application
• <user home1>\.magicdraw\<version number> for the MagicDraw application (It can be located in the folder <MagicDraw installation directory> either but the user home folder is the default one)
You can get certificates from your system administrator or to generate it by yourself. For more information about generating certificates, see procedure "To generate certificates" on page 56.
To enable the secured connection (SSL)
1. Run the Teamwork Server Administrator’s Console.2. In the Secured Connection tab, select the Enable Secure Connection check box.3. Click Browse to add the server certificate.4. Enter the JKS password.5. Click the Apply Changes button.6. Restart Teamwork Server.
To remove a certificate, click the Remove button.
1. To find out what is your home folder you may open Help > About MagicDraw and select the Environment tab in the MagicDraw appli-cation. Configuration Files links to your home folder.
NOTE If the Teamwork Administrator’s Console is not installed in the separate loca-tion, its installation directory is the same as Teamwork Server installation directory or the MagicDraw installation directory (if installed together).
IMPORTANT! Only the user with administrator rights can configure Teamwork Server options. The user should be disconnected from Teamwork in MagicDraw while using the Teamwork Administrator’s Console.
NOTE If you want to change the password for the certificate, you need to regener-ate the certificate with a different password.
55 Copyright © 2000-2011 No Magic, Inc..
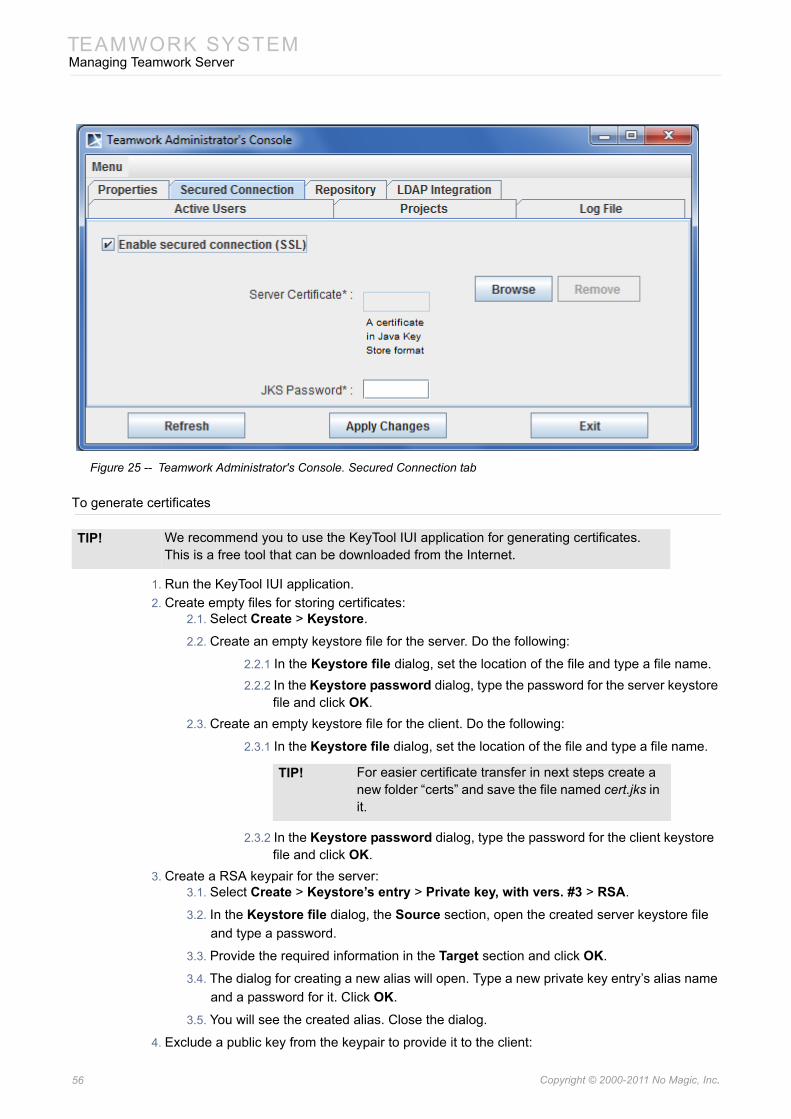
TEAMWORK SYSTEMManaging Teamwork Server
Figure 25 -- Teamwork Administrator's Console. Secured Connection tab
To generate certificates
1. Run the KeyTool IUI application.2. Create empty files for storing certificates:
2.1. Select Create > Keystore.
2.2. Create an empty keystore file for the server. Do the following:
2.2.1 In the Keystore file dialog, set the location of the file and type a file name.2.2.2 In the Keystore password dialog, type the password for the server keystore
file and click OK.2.3. Create an empty keystore file for the client. Do the following:
2.3.1 In the Keystore file dialog, set the location of the file and type a file name.
2.3.2 In the Keystore password dialog, type the password for the client keystore file and click OK.
3. Create a RSA keypair for the server:3.1. Select Create > Keystore’s entry > Private key, with vers. #3 > RSA.
3.2. In the Keystore file dialog, the Source section, open the created server keystore file and type a password.
3.3. Provide the required information in the Target section and click OK.
3.4. The dialog for creating a new alias will open. Type a new private key entry’s alias name and a password for it. Click OK.
3.5. You will see the created alias. Close the dialog.
4. Exclude a public key from the keypair to provide it to the client:
TIP! We recommend you to use the KeyTool IUI application for generating certificates. This is a free tool that can be downloaded from the Internet.
TIP! For easier certificate transfer in next steps create a new folder “certs” and save the file named cert.jks in it.
56 Copyright © 2000-2011 No Magic, Inc..

TEAMWORK SYSTEMManaging Teamwork Server
4.1. Select Export > Private’s key first certificate in chain > As simple certificate file.
4.2. In the Keystore file dialog, the Source section, open the server keystore file and type its password.
4.3. Create a file, whereto the key will be exported. In the Certificate file dialog, the Target section, set a location and type a file name for the client certificate. Click OK.
4.4. The dialog for selecting an alias will open. Select from the list the alias that has been created in step 3.4 and type its password. You will be able to see the created certificate.
5. Import a public key into the client certificate:5.1. Select Import > Keystore’s entry > Trusted certificate > Regular certificate.
5.2. In the Source section set the certificate file, which has been created in step 4, as a regular certificate file.
5.3. In the Target section set the client keystore file client.jks as a keystore file and click OK.
5.4. The dialog will open asking to enter a new alias name.Enter the alias name created in step 3.4 and click OK.
5.5. Some pop-up windows will open informing about the generation process. Close all of them after reviewing.
Generated certificates are ready to use now. Paste them into the right location. For the information on how to configure SSL in a server side please refer to procedure “To enable the secured connection (SSL)” on page 55.
Repository tab
Repository tab is a very important tab. It contains information about the repository of the server. This tab determines where and how the Teamwork Server stores projects and their version information, user lists, etc.
For more information about repositories, see “Teamwork System Layout” on page 7.
There are 3 different types of repository to choose in the Repository type combo box. General information about the types is described in the Section “Teamwork System Layout” on page 7. This section, presents the configuration fields in detail.
The Repository tab layout changes with the type of repository selected.
NOTE Restart the Server to apply changes.
57 Copyright © 2000-2011 No Magic, Inc..
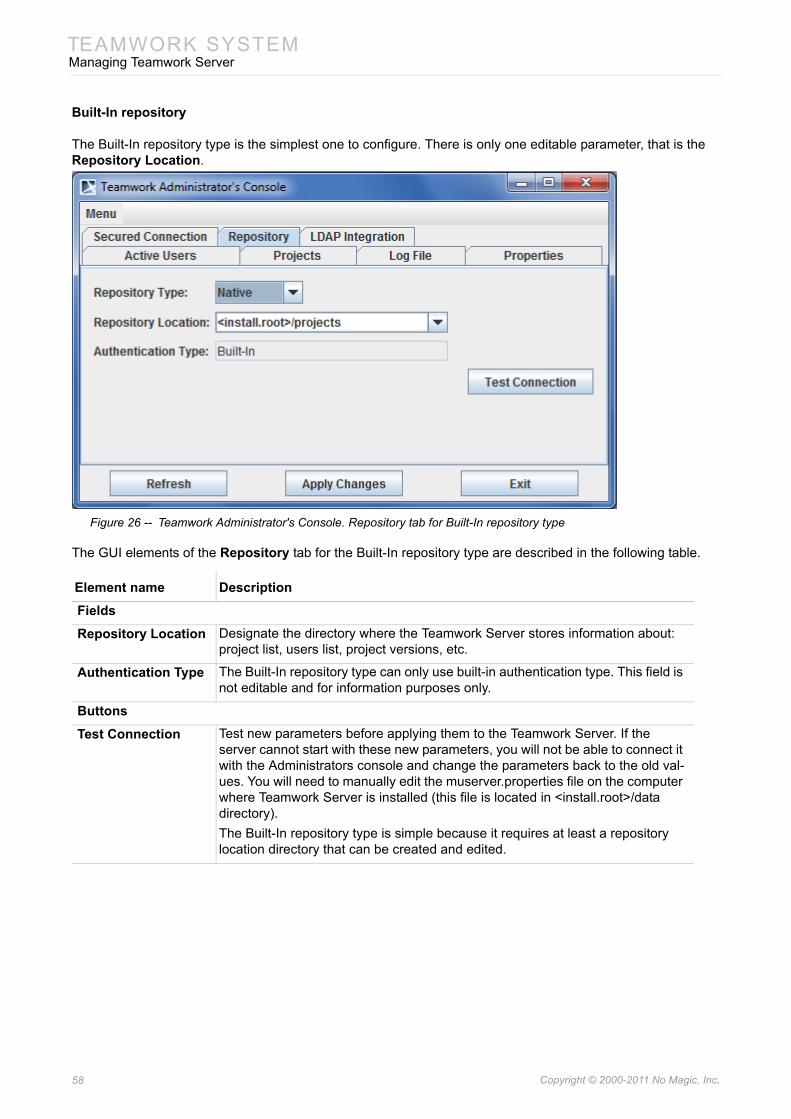
TEAMWORK SYSTEMManaging Teamwork Server
Built-In repository
The Built-In repository type is the simplest one to configure. There is only one editable parameter, that is the Repository Location.
Figure 26 -- Teamwork Administrator's Console. Repository tab for Built-In repository type
The GUI elements of the Repository tab for the Built-In repository type are described in the following table.
Element name Description
Fields
Repository Location Designate the directory where the Teamwork Server stores information about: project list, users list, project versions, etc.
Authentication Type The Built-In repository type can only use built-in authentication type. This field is not editable and for information purposes only.
Buttons
Test Connection Test new parameters before applying them to the Teamwork Server. If the server cannot start with these new parameters, you will not be able to connect it with the Administrators console and change the parameters back to the old val-ues. You will need to manually edit the muserver.properties file on the computer where Teamwork Server is installed (this file is located in <install.root>/data directory).The Built-In repository type is simple because it requires at least a repository location directory that can be created and edited.
58 Copyright © 2000-2011 No Magic, Inc..

TEAMWORK SYSTEMManaging Teamwork Server
SVN repository
Figure 27 -- Teamwork Administrator's Console. Repository tab for SVN repository type
When configuring the SVN repository, SVN must be installed on the computer where Teamwork Server runs. svn executable must be accessible on the system's PATH and have appropriate permissions to execute.
Element name Function
Fields
Repository URL An URL field, which points to the SVN repository that will be used. The path can direct to a repository root or any other inner repository folders. All other paths (configurations location, profile location, also project paths, when adding project to the repository) will relate to this location.All repository access types, which are supported by standard SVN installation, are supported here. In particular, file:// (local repositories), svn:// and svn+ssh:// (remote repositories accessible through remote login and svnserve), http:// and https:// (remote repositories, accessible through HTTP and WebDAV) URLs can be used here.
Project Cache Directory The directory where the Teamwork Server checksout files to work with the
repository. The Teamwork Server uses this directory to launch all necessary SVN operations to implement project storage and create project version. This is a “scratchpad” for the Teamwork server to work.
59 Copyright © 2000-2011 No Magic, Inc..
TEAMWORK SYSTEMManaging Teamwork Server
Server Configuration Location
The directory in SVN repository where the Teamwork Server keeps its configu-ration files (project and user lists).
System Profile Location
The directory in SVN repository where the MagicDraw's system profiles are stored.
Authentication Type Currently not editable. This is an informational-only field, which indicates what authentication type will be used depends on the repository access method (repository URL). If the repository URL is:• svn://, svn+ssh://. The Authentication Type will be Remote Login. This means
that when performing SVN actions, the Teamwork Server will log in remotely, as the user, who performs the action. A pass-through authentication of MagicDraw clients will be used.
• http://, https://. The Authentication Type will be Basic/Digest HTTP. This means that when performing SVN actions, the Teamwork Server will authenticate with the web server using HTTP Basic Auth or HTTP Digest Auth (see RFC2617), as the user who performs the action. A pass-through authentication of MagicDraw clients will be used.
• file://. The Authentication Type will be Built-In. A pass-through authentication is impossible for this type of repository access, hence the Teamwork Server refers back to the same authentication type as that of built-in repositories. The Server will keep its own users list with their passwords, and authenticate users itself.
The pass through authentication means that the Teamwork Server will only keep users list, but not their passwords. When a MagicDraw client logs into the Team-work Server, the server will not verify the password, but will log into SVN instead. It stores the user's password in memory and use it for all subsequent communications with the SVN prompted by the user's actions. This feature decreases the burden on both the administrator and users because all pass-words are kept in one place.Certificate based authentication method for svn+ssh:// and https:// is not yet supported.
For pass-through authentication methods (all types of repository URLs except file://) the following fields are available:
Administrator login name
Specify the administrator of the Teamwork Server. This user will have full per-missions to the projects and various administrative tasks, such as updating user list file, project list file, etc. in the SVN repository.
Administrator password
The Administrator’s password. The Teamwork Server needs this password to perform various administrative tasks in the SVN repository. NOTE: this password will be stored and encrypted in a form that is difficult decrypt. This encrypted password is stored in the muserver.properties file (located in <install.root>/data directory of the Teamwork Server). You can set restricted permissions on this file for example, accessible only to user in the Teamwork Server.
Auto-add unknown users to Teamwork if they log in successfully
Decreases the administrator's burden to manage users list. If this check box is cleared, all MagicDraw users who try to log in, but are not in the users list of the Teamwork Server will be refused an access if they supply correct usernames/passwords to login the SVN repository. If the check box is checked, MagicDraw users who are not in the users list of the Teamwork Server, but supply correct usernames/passwords to login to the SVN repository will be automatically added to the list and access the server.
The default Built-In authentication method (file:// type URLs) login name is “Administrator” without a password field (not necessary). The “Auto-add unknown users to the Teamwork if they log in success-fully” check box is also unavailable (meaningless) in this case.
Element name Function
60 Copyright © 2000-2011 No Magic, Inc..
TEAMWORK SYSTEMManaging Teamwork Server
ClearCase repository
Figure 28 -- Teamwork Administrator's Console. Repository tab for Clear Case repository type
The ClearCase type of repository has a few parameters. When configuring this repository, the ClearCase client part must be installed on the computer where the Teamwork Server runs. The Teamwork Server will use cleartool executable to access and manage files in the ClearCase repository, so cleartool must be accessible - the PATH and have appropriate permissions to run. Also, the ClearCase repository must have the right permissions for the user, the Teamwork Server.
Buttons
Test Connection Test new parameters before applying them to the Teamwork Server. If the server cannot start with these new parameters, you will not be able to connect it with the Administrator’s Console and change the parameters back to the old val-ues. You will need to manually edit the muserver.properties file on the computer where the Teamwork Server is installed (this file is located in <install.root>/data directory).
This test ensures that the Teamwork Server is able to access and write the cache directory, access (and log in with the specified administrator user and password) the SVN repository in the specified location. It also checks the configuration and system profile locations on the SVN repository (the administrator must be able to write there).
Property name Function
Fields
Project Cache Directory
The directory where the Teamwork Server checksout files to work with the repository. The Teamwork Server will create a snapshot view (in ClearCase par-lance) in this directory and place any necessary VOBs there project and perform all operations necessary to implement project storage and project versions. This is a “scratchpad” for the Teamwork Server to work.
Element name Function
61 Copyright © 2000-2011 No Magic, Inc..
TEAMWORK SYSTEMManaging Teamwork Server
LDAP Integration tab
For more information about LDAP Integration, see "LDAP Support" on page 92.
Data Migration between Different Repositories
3 different types of repositories are supported in MagicDraw v12.5 and above. By default (when first installed) the server uses Built-In repository type. When switching to a different repository type, the task of project migration is inevitably increased.
There are many different but similar use cases, such as migrating the data from the previous built-in-type repository into a new SVN/ClearCase based repository.
Server Configuration Location The directory in the ClearCase repository, where the Teamwork server keeps its
configuration files (project and user lists).NOTE: Must begin with some VOB name and cannot be left empty.
System Profile Location A directory in the ClearCase repository where the MagicDraw's system profiles
are stored.NOTE: Must begin with some VOB name and it cannot be left empty.
Authentication Type The ClearCase repository type can only use built-in authentication type. This field is not editable and for information purposes only.The Built-In authentication means that the Teamwork Server manages its own users list and their passwords. When MagicDraw clients connect to the server, it will authenticate them using this list. When the Teamwork Server works with the ClearCase repository, it uses the standard system authority to identify itself to the repository. This means that the Server run as authorized by the user. All actions in the ClearCase repository will be attributed to that user (irrelevant to users in the connecting MagicDraw cli-ent). If a user starts the server, it will run as authorized by that user. If the server is started as NT service the service will run under a local system account. This can be a source of cryptic errors, for example if the local system account has no rights to access the ClearCase repository, the Teamwork Server will fail when started as a service, while everything works all right when started from the com-mand line.
Administrator Login Name
When the Built-In authentication type is used, the administrators name is “Administrator”. This field is not editable and for informational purpose only. The default Administrator’s password is (for a new set-up repository) “Administrator”. For security reason it is highly recommended to change the default password after the server starts.
Buttons
Test Test new parameters before applying them to the Server. If the server cannot start with these new parameters, you will not be able to connect it with the Administrators console and change the parameters back to the old values. You will need to manually edit the muserver.properties file on the computer where Teamwork Server is installed (this file is located in <install.root>/data directory).This test ensures that Teamwork Server is able to create the ClearCase view in the specified directory and to access the two configured VOBs (for configuration storage and profile storage).
Property name Function
62 Copyright © 2000-2011 No Magic, Inc..
TEAMWORK SYSTEMManaging Teamwork Server
It is possible for the Teamwork Server to import and export projects. This function is triggered from the Administrators console (see section “Administrator’s Console Dialog” on page 48). Import & Export is only possible in the Built-In repository type format. The Built-in repository type is a kind of intermediate form for information interchange.
Note that words "import" and "export" here are used relatively to the currently running server (the one to which administrator's console is attached):
• “import” means importing data into the current server from the designated directory;
• “export” means exporting data from the current server into the designated directory.
Migrating the server from the Built-In repository to the SVN/ClearCase repository
1. The Server is started on the Built-In repository (projects/versions stored in a directory).2. Open the Administrator's Console. Reconfigure the server to work with the SVN/ClearCase
repository.3. In the Administrator’s Console, reconfigure the server to work with the ClearCase/SVN
repository.4. Restart server to use the new repository. The Server starts. There is nothing in the repository
but the profiles needed to work with MagicDraw.5. Login again to the Administrator’s Console and trigger project import. Select the directory to
import from, the same directory from where the export was performed.6. Projects are now in a new SVN/ClearCase repository.
Migrating from SVN repository to ClearCase repository
1. Server is started on SVN/ClearCase repository.2. Open Administrator's Console, trigger project export. Choose some temporary directory to
dump the data to.3. In Administrator's Console, reconfigure server for work with some ClearCase/SVN repository.4. Restart the server, to use new repository. Server will be started, repository will be empty - no
projects - only the profiles, needed for work with MagicDraw will be added to repository.5. Login again in the Administrator’s Console, and trigger project import. Choose the directory
to import from - the same directory where you previously did export.6. Projects are now in a new, ClearCase/SVN repository.
Changing Teamwork Server Debugging Mode
You can change Teamwork Server debugging mode without restart.
To enable Teamwork Server debugging:
1. Start Teamwork Server Administrator’s Console.2. Select Enable Debugging from the Menu (Figure 29 on page 64).
NOTE Enable Debugging action is disabled in the Offline Administrator’s Console mode.
63 Copyright © 2000-2011 No Magic, Inc..
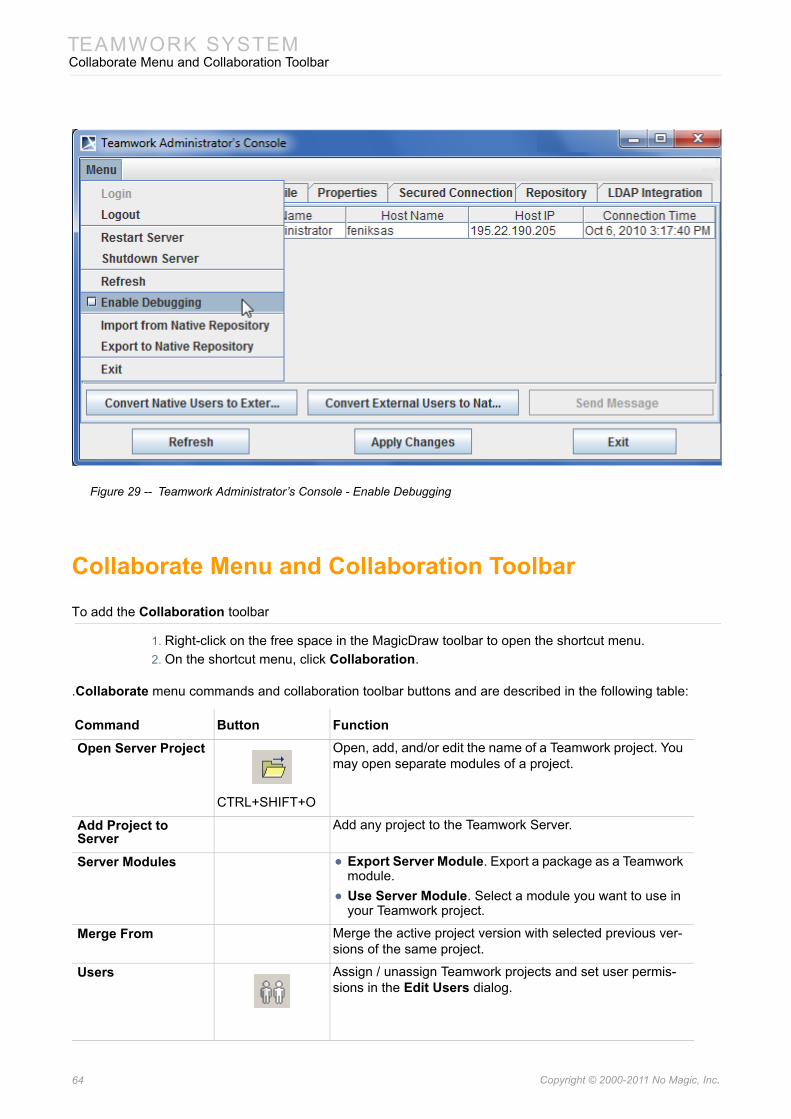
TEAMWORK SYSTEMCollaborate Menu and Collaboration Toolbar
Figure 29 -- Teamwork Administrator’s Console - Enable Debugging
Collaborate Menu and Collaboration Toolbar
To add the Collaboration toolbar
1. Right-click on the free space in the MagicDraw toolbar to open the shortcut menu.2. On the shortcut menu, click Collaboration.
.Collaborate menu commands and collaboration toolbar buttons and are described in the following table:
Command Button Function
Open Server Project
CTRL+SHIFT+O
Open, add, and/or edit the name of a Teamwork project. You may open separate modules of a project.
Add Project to Server
Add any project to the Teamwork Server.
Server Modules • Export Server Module. Export a package as a Teamwork module.
• Use Server Module. Select a module you want to use in your Teamwork project.
Merge From Merge the active project version with selected previous ver-sions of the same project.
Users Assign / unassign Teamwork projects and set user permis-sions in the Edit Users dialog.
64 Copyright © 2000-2011 No Magic, Inc..
TEAMWORK SYSTEMTeamwork Dialogs
Teamwork DialogsTo activate the Teamwork interface, connect to Teamwork Server.
Edit Projects Dialog
You can use the Edit Projects dialog to manage projects, assign them to other Teamwork users, and set user permissions for the system and specific projects.
To open the Edit Projects dialog
• From the Collaborate menu, select Projects.
Projects Add or delete a Teamwork project, edit a project name, and / or assign users to the project.
Update Project
CTRL+U
Load the latest project version from the server. Model ele-ments that are locked will not be updated.
Commit Project
CTRL+K
Commit active projects. Select elements to unlock before committing.
Unlock All Open the list of locked elements in the Commit Settings dialog.Click the Commit button to unlock selected elements.
NEW! View Locked Elements
Open the Locked Element tree in the Model Browser.
Update Lock Information
CTRL+SHIFT+U
Update the list of locked model elements.
Login CTRL+SHIFT+L Display the user login dialog.
Logout CTRL+SHIFT+T Logout from the Teamwork Server.
Change Password Allow users to change their passwords to login to the Team-work Server.
Send Message CTRL+SHIFT+M Send messages to any user in the Teamwork Server.
NOTE MagicDraw Reader edition allows users to open and review teamwork projects.
Command Button Function
65 Copyright © 2000-2011 No Magic, Inc..
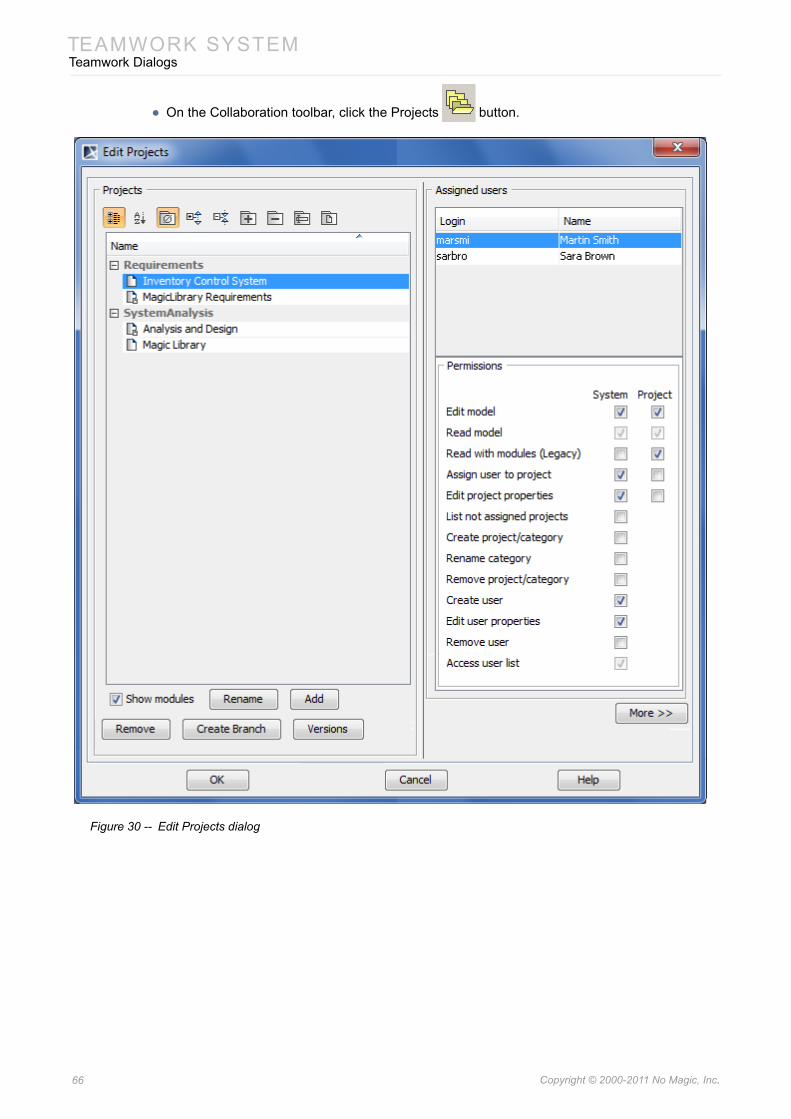
TEAMWORK SYSTEMTeamwork Dialogs
• On the Collaboration toolbar, click the Projects button.
Figure 30 -- Edit Projects dialog
66 Copyright © 2000-2011 No Magic, Inc..
TEAMWORK SYSTEMTeamwork Dialogs
Element name Description
Buttons of the Category toolbar
Categorized view The buttons are the same as those in the Open Server Project dialog. For more details about these buttons, see section “Open Server Project Dialog” on page 72.
Alphabetical view
Show Empty Categories
Expand
Collapse
Create Category
Remove Category
Rename Category
Move to Category
Columns of the Project list
Name • The name of the project.• The name of the category.
Buttons of the Project list
Show modules The buttons are the same as those in the Open Server Project dialog. For more details about these buttons, see section “Open Server Project Dialog” on page 72.Rename
Add
Remove
Create Branch
Versions
Columns of the Assigned users list
Login The login name of the user assigned to the selected project.
Name The full name of the user assigned to the selected project.
Permissions list A list of permissions given to the selected user for a specific project. For more details about user permissions, see the section “User permissions” on page 46.
Columns of the Available users list
Login The Teamwork user's login name.
67 Copyright © 2000-2011 No Magic, Inc..
TEAMWORK SYSTEMTeamwork Dialogs
Edit Users Dialog
To open the Edit Users dialog
• From the Collaborate menu, select Users.
• On the Collaboration toolbar,click the Users button.
Name The Teamwork user's full name.
Buttons between the user lists
<< Moves the selected users from the Available Users list to the Assigned Users list.
>> Move the selected users from the Assigned Users list to the Available Users list.
Element name Description
68 Copyright © 2000-2011 No Magic, Inc..
TEAMWORK SYSTEMTeamwork Dialogs
Figure 31 -- Edit Users dialog
Group box/Button Element name
Function
Users Login The user login name.
Name The user’s full name.
Edit Edit the user’s name and password.
Add Add a new user to the Teamwork Server.
Remove Remove a user from the Teamwork Server.
Assigned Projects Name List projects assigned to specific users.
69 Copyright © 2000-2011 No Magic, Inc..
TEAMWORK SYSTEMTeamwork Dialogs
Add/Edit User Dialog
The Add User dialog is used for creating a new Teamwork user, and the Edit User dialog is used for editing the Teamwork user appropriately. Both dialogs have the same structure, only the Login field in the Edit User dialog is not editable.
To open the Add User dialog
1. From theCollaborate menu, select Users.2. Click the Add button.
To open the Edit User dialog
1. From the Collaborate menu, select Users.2. In the Users list, select the user and click the Edit button.
Figure 32 -- Edit User dialog
Permissions - The detailed description of permissions. See Section “User per-missions” on page 46.
<< - Move the selected project from the Available Projects list to the Assigned Projects list.
>> - Move the selected project from the Assigned Projects list to the Available Projects list.
Available Projects Name List all available Teamwork projects.
Element name Description
Login The login name of the Teamwork user.NOTE: Changing the user’s login name is not allowed.
Name The full name of the Teamwork user.
Group box/Button Element name
Function
70 Copyright © 2000-2011 No Magic, Inc..
TEAMWORK SYSTEMTeamwork Dialogs
Login Dialog
To open the Login dialog
• From the Collaborate menu, select Login.
Figure 33 -- Login dialog
External User The check box which indicates whether the user is a native user or an external user. Do one of the following:• Leave the check box deselected for the native user.• Select the check box for the external user.For detailed information about adding native and external users, see section “To add a new native user” on page 43 and section “To add a new external user” on page 43.
New password A new password.The field will be visible if you add or edit a native user (the External user check box is clear).NOTE: To create or change a password for an external user, use an appropriate tool for managing the external database (Subversion, ClearCase or LDAP) wherein the user’s account is stored.
Confirm new password
The new password retyped.The field will be visible if you add or edit a native user (the External user check box is clear).
Element name Function
User name The user’s login name.
Password The user’s password.
Server name The name of the Teamwork Server (and port).
Element name Description
71 Copyright © 2000-2011 No Magic, Inc..
TEAMWORK SYSTEMTeamwork Dialogs
Open Server Project Dialog
The Open Server Project dialog is used for opening projects and managing them as well.
To open the Open Server Project dialog
• From the Collaborate menu, select Open Server Project.• On the Collaboration toolbar, click the Open Server Project button.
• Press CTRL+SHIFT+O.
NEW! Server type Select the server type from the predefined list.
Auto Login to Server
Automatically connect to the specified Teamwork Server upon starting MagicDraw.
Use Secured Connection (SSL)
Use the secured connection (SSL) for data transfer automatically when connect-ing to the server.IMPORTANT! To select this option be sure that SSL is configured on Teamwork Server.
Element name Function
72 Copyright © 2000-2011 No Magic, Inc..
TEAMWORK SYSTEMTeamwork Dialogs
Figure 34 -- The Open Teamwork Project dialog
Element name Description
Buttons of the Category toolbar
Categorized view Displays the categorized structure of the project list.
Alphabetical view Displays the plain project list without any category.
Show Empty Categories
Shows the categories that have no projects.
Expand Expands all categories. The button is available only in the categorized view.
Collapse Collapses all categories. The button is available only in the categorized view.
73 Copyright © 2000-2011 No Magic, Inc..
TEAMWORK SYSTEMTeamwork Dialogs
Create Category Opens the Create Category dialog for creating a new category. The button is available only in the categorized view.For more information about creating categories, see section “To create a new category” on page 22.
Remove Category Opens the dialog asking to confirm or cancel the removal of the selected cate-gory. The button is available only in the categorized view, when the category or the project is selected.For more information about removing categories, see section “To remove the category” on page 23.
Rename Category Opens the Rename Category dialog for renaming the selected category. The button is available only in the categorized view, when the category or the project is selected.For more information about renaming categories, see section “To rename a cat-egory” on page 22.
Move to Category Opens the Move to Category dialog for choosing the category to move the selected project into. The button is available only in the categorized view, when the project is selected.For more information about project moving to category, see section “To move a project to a category” on page 22.
Columns of the Project list
Name • The name of the project.• The name of the category.
Branch The name of the project branch, last selected using the “...” button, or the value “Trunk”, if the project isn’t branched or if the project itself was last selected.
Buttons of the Project list
Show modules Shows those projects that contain one or more shared packages.
Show only assigned Shows only those projects to which the user is assigned.
Rename Opens the Rename dialog for reaming the project. The button is available only when the project is selected.
Add Opens the Add Server Project dialog for creating a new Teamwork project.For more information about creating new Teamwork projects, see section “To create a new Teamwork project” on page 23.
Remove Opens the dialog asking to confirm or cancel the removal of the project from the Teamwork Server. The button is available only when the project is selected.
Create Branch Opens the Create Branch dialog for creating a new branch for the selected project or its branch. The button is available only when the project is selected.For more information about creating project branches, see section “To create a project branch” on page 85.
Versions Opens the Project Versions dialog. The button is available only when the proj-ect is selected.For more information about project versions, see the following sections:• “Versioning” on page 39.• “To open the Project Versions dialog” on page 75.
Common buttons
Open Opens the selected project.
Element name Description
74 Copyright © 2000-2011 No Magic, Inc..
TEAMWORK SYSTEMTeamwork Dialogs
Commit Settings Dialog
To open the Commit Settings dialog
• From the Collaborate menu, select Commit Project.• Press CTRL+K.
Figure 35 -- Commit Settings dialog
Project Versions Dialog
In this dialog, project versions are listed from the latest one (which is on the top) to the oldest one.
To open the Project Versions dialog
1. From the Collaborate menu, select Open Server Project.
Element name Function
Local Modules List local modules in the project.
Locked Elements List model elements that are locked. Before committing, select the elements you want to unlock.
Locked Modules List locked modules in the teamwork project. To lock modules, from the Options main menu, select Modules and then click Lock in the open Modules dialog.
Select All Select all locked model elements.
Clear All Clear all selected model elements.
75 Copyright © 2000-2011 No Magic, Inc..
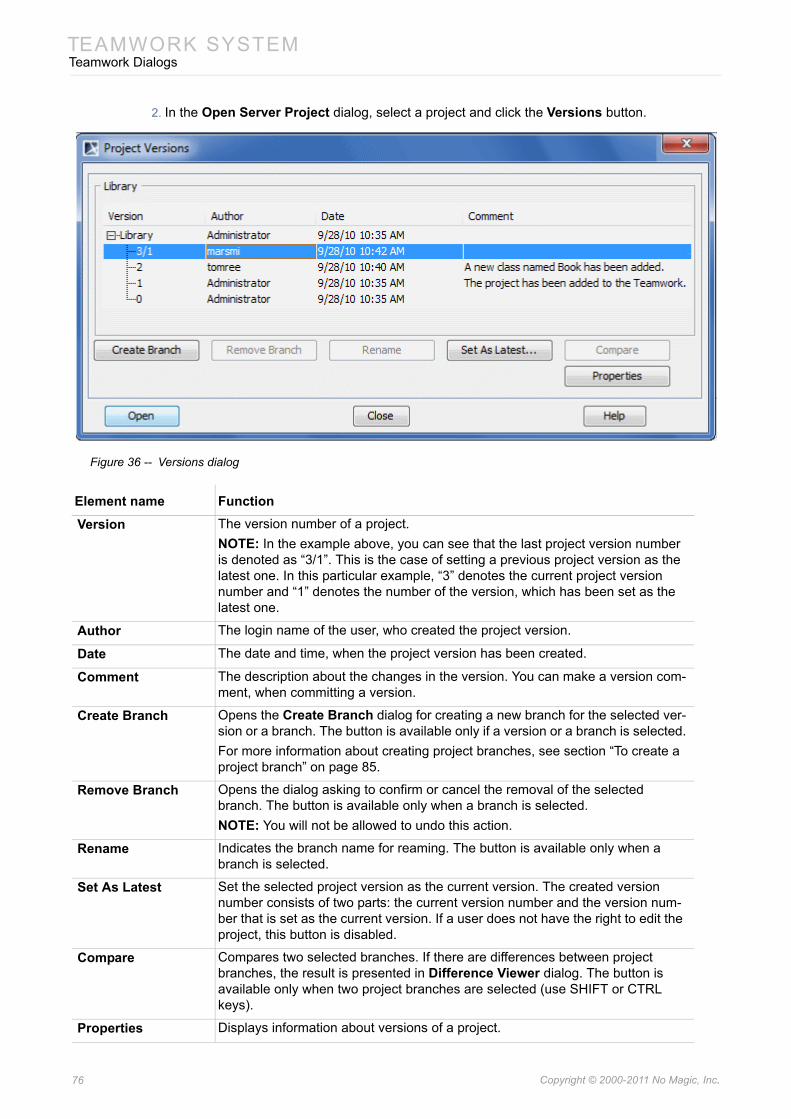
TEAMWORK SYSTEMTeamwork Dialogs
2. In the Open Server Project dialog, select a project and click the Versions button.
Figure 36 -- Versions dialog
Element name Function
Version The version number of a project. NOTE: In the example above, you can see that the last project version number is denoted as “3/1”. This is the case of setting a previous project version as the latest one. In this particular example, “3” denotes the current project version number and “1” denotes the number of the version, which has been set as the latest one.
Author The login name of the user, who created the project version.
Date The date and time, when the project version has been created.
Comment The description about the changes in the version. You can make a version com-ment, when committing a version.
Create Branch Opens the Create Branch dialog for creating a new branch for the selected ver-sion or a branch. The button is available only if a version or a branch is selected.For more information about creating project branches, see section “To create a project branch” on page 85.
Remove Branch Opens the dialog asking to confirm or cancel the removal of the selected branch. The button is available only when a branch is selected.NOTE: You will not be allowed to undo this action.
Rename Indicates the branch name for reaming. The button is available only when a branch is selected.
Set As Latest Set the selected project version as the current version. The created version number consists of two parts: the current version number and the version num-ber that is set as the current version. If a user does not have the right to edit the project, this button is disabled.
Compare Compares two selected branches. If there are differences between project branches, the result is presented in Difference Viewer dialog. The button is available only when two project branches are selected (use SHIFT or CTRL keys).
Properties Displays information about versions of a project.
76 Copyright © 2000-2011 No Magic, Inc..
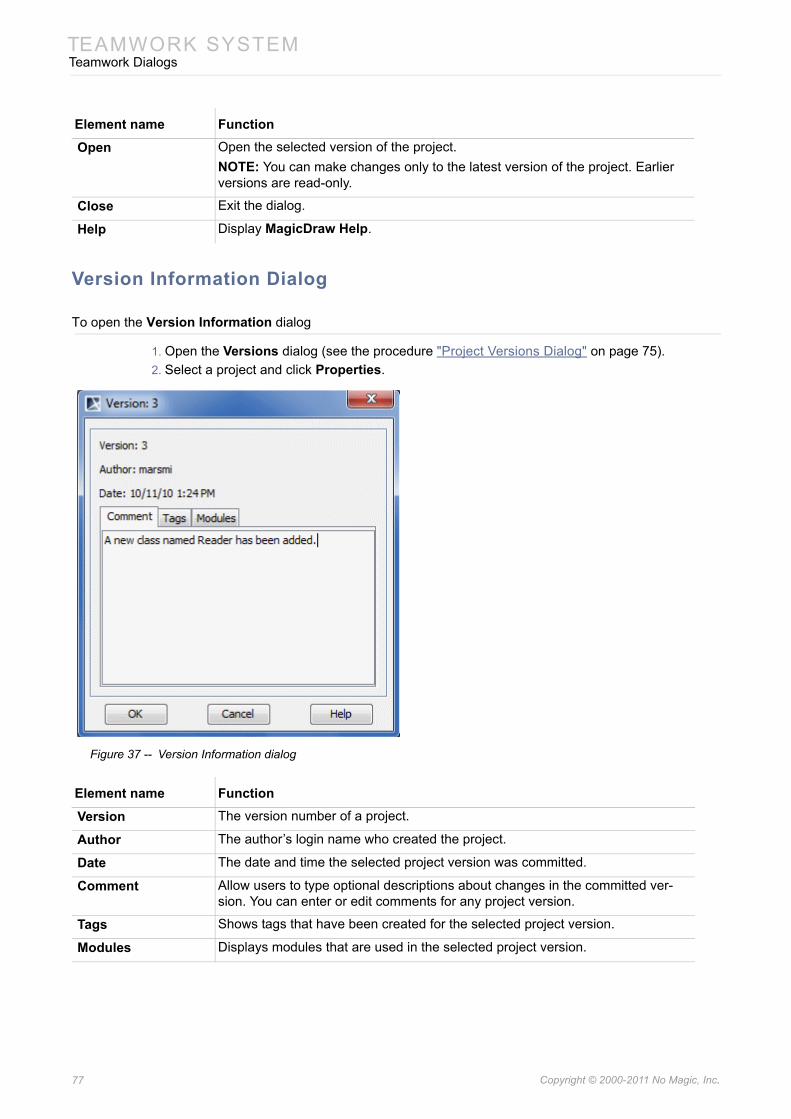
TEAMWORK SYSTEMTeamwork Dialogs
Version Information Dialog
To open the Version Information dialog
1. Open the Versions dialog (see the procedure "Project Versions Dialog" on page 75).2. Select a project and click Properties.
Figure 37 -- Version Information dialog
Open Open the selected version of the project. NOTE: You can make changes only to the latest version of the project. Earlier versions are read-only.
Close Exit the dialog.
Help Display MagicDraw Help.
Element name Function
Version The version number of a project.
Author The author’s login name who created the project.
Date The date and time the selected project version was committed.
Comment Allow users to type optional descriptions about changes in the committed ver-sion. You can enter or edit comments for any project version.
Tags Shows tags that have been created for the selected project version.
Modules Displays modules that are used in the selected project version.
Element name Function
77 Copyright © 2000-2011 No Magic, Inc..
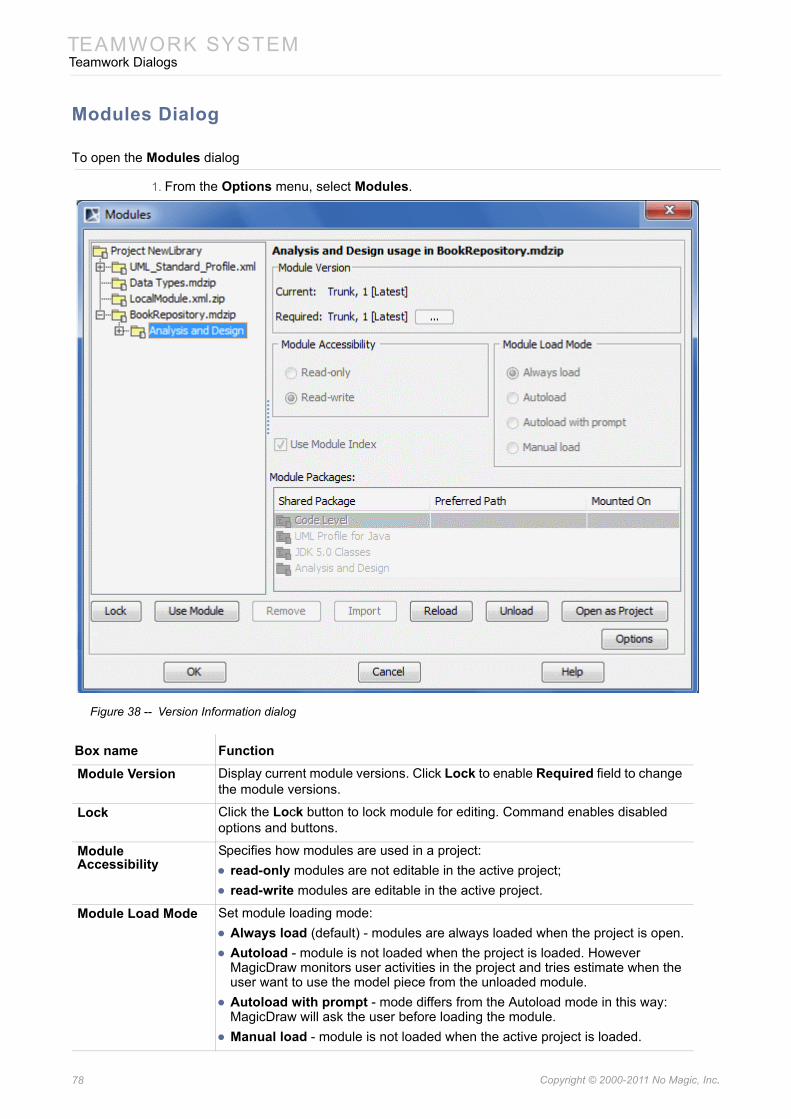
TEAMWORK SYSTEMTeamwork Dialogs
Modules Dialog
To open the Modules dialog
1. From the Options menu, select Modules.
Figure 38 -- Version Information dialog
Box name Function
Module Version Display current module versions. Click Lock to enable Required field to change the module versions.
Lock Click the Lock button to lock module for editing. Command enables disabled options and buttons.
Module Accessibility
Specifies how modules are used in a project:• read-only modules are not editable in the active project;• read-write modules are editable in the active project.
Module Load Mode Set module loading mode:• Always load (default) - modules are always loaded when the project is open.• Autoload - module is not loaded when the project is loaded. However
MagicDraw monitors user activities in the project and tries estimate when the user want to use the model piece from the unloaded module.
• Autoload with prompt - mode differs from the Autoload mode in this way: MagicDraw will ask the user before loading the module.
• Manual load - module is not loaded when the active project is loaded.
78 Copyright © 2000-2011 No Magic, Inc..
TEAMWORK SYSTEMData Partitioning on Teamwork Server
Data Partitioning on Teamwork ServerData partitioning is the segmentation of a MagicDraw project into multiple independent parts, or modules. Since these modules are saved using the same file format as regular MagicDraw projects, they can be opened and edited in any MagicDraw client application. This approach allows easy reuse of the same basic model libraries in multiple projects.
For more information about data partition, see “Project Partitioning” in “MagicDraw UserManual.pdf”.
Creating Teamwork Modules
To create a Teamwork module using the Collaborate menu
1. Open a Teamwork project.2. From the Collaborate menu, select Server Modules and then click Export Server Module.
The Export Module dialog opens.3. In the All data list, select one or more packages from which you want to create a Teamwork
module and click the Add button. The packages will be added to the Selected packages list.4. Click OK.
5. Enter the name of the module for Teamwork Server, if there is such need.6. Either select an existing category or type a new category name.7. Click OK. The module will be created in Teamwork Server as a separate file.
To create a Teamwork module using the package shortcut menu
1. Open the Teamwork project.
Use Module Index If selected, uses indexing scope, specified in the Project Options dialog.
Shared Package Name of the shared package.
Preferred Path Carry the information about the path, where the shared package should be placed in the active project.
Mounted On Hold the packages of the project on which the corresponding module share is placed. Click the “...” button to change the package or create a new one.
Use Module Enabled, when a module is selected as read-write. It allows users to use mod-ule in the selected module.
Remove Remove a module from the project.
Import Import a module to the project.
Reload Reload a module in the project.
Unload Unload the module from the project.
Open as Project Open the selected module as a project.
Options The Project Options dialog opens.
NOTE In this step you may be asked to confirm or cancel the depen-dency checking between the exported packages and the rest of the project (including shared packages that belong to the project and used modules). The dependency analysis step is described in “Dependencies Between Elements” of “MagicDraw UserMan-ual.pdf”.
79 Copyright © 2000-2011 No Magic, Inc..
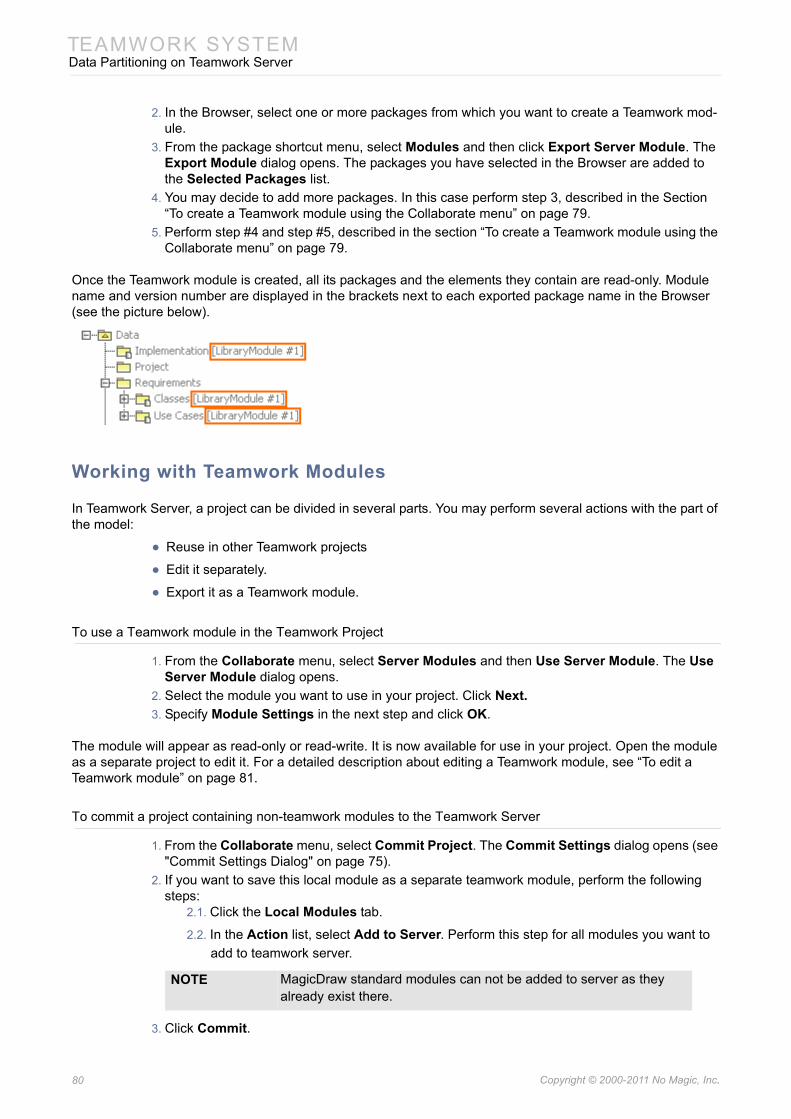
TEAMWORK SYSTEMData Partitioning on Teamwork Server
2. In the Browser, select one or more packages from which you want to create a Teamwork mod-ule.
3. From the package shortcut menu, select Modules and then click Export Server Module. The Export Module dialog opens. The packages you have selected in the Browser are added to the Selected Packages list.
4. You may decide to add more packages. In this case perform step 3, described in the Section “To create a Teamwork module using the Collaborate menu” on page 79.
5. Perform step #4 and step #5, described in the section “To create a Teamwork module using the Collaborate menu” on page 79.
Once the Teamwork module is created, all its packages and the elements they contain are read-only. Module name and version number are displayed in the brackets next to each exported package name in the Browser (see the picture below).
Working with Teamwork Modules
In Teamwork Server, a project can be divided in several parts. You may perform several actions with the part of the model:
• Reuse in other Teamwork projects
• Edit it separately.
• Export it as a Teamwork module.
To use a Teamwork module in the Teamwork Project
1. From the Collaborate menu, select Server Modules and then Use Server Module. The Use Server Module dialog opens.
2. Select the module you want to use in your project. Click Next.3. Specify Module Settings in the next step and click OK.
The module will appear as read-only or read-write. It is now available for use in your project. Open the module as a separate project to edit it. For a detailed description about editing a Teamwork module, see “To edit a Teamwork module” on page 81.
To commit a project containing non-teamwork modules to the Teamwork Server
1. From the Collaborate menu, select Commit Project. The Commit Settings dialog opens (see "Commit Settings Dialog" on page 75).
2. If you want to save this local module as a separate teamwork module, perform the following steps:
2.1. Click the Local Modules tab.
2.2. In the Action list, select Add to Server. Perform this step for all modules you want to add to teamwork server.
3. Click Commit.
NOTE MagicDraw standard modules can not be added to server as they already exist there.
80 Copyright © 2000-2011 No Magic, Inc..
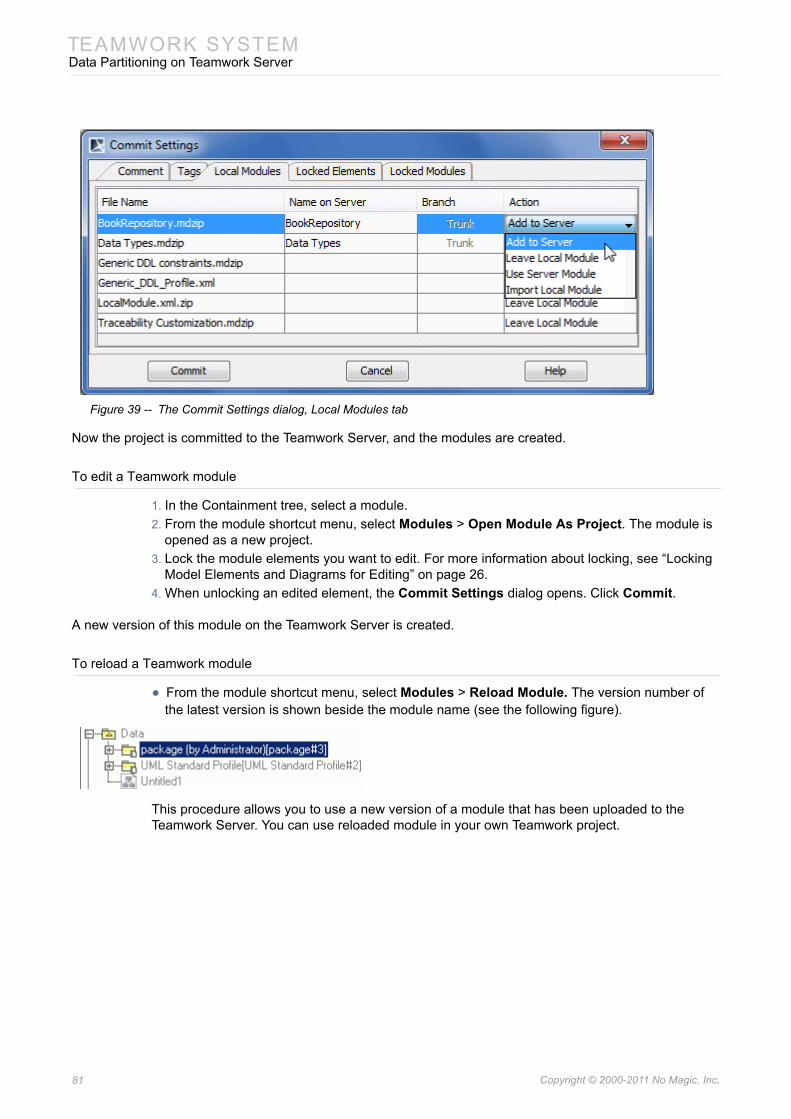
TEAMWORK SYSTEMData Partitioning on Teamwork Server
Figure 39 -- The Commit Settings dialog, Local Modules tab
Now the project is committed to the Teamwork Server, and the modules are created.
To edit a Teamwork module
1. In the Containment tree, select a module.2. From the module shortcut menu, select Modules > Open Module As Project. The module is
opened as a new project. 3. Lock the module elements you want to edit. For more information about locking, see “Locking
Model Elements and Diagrams for Editing” on page 26.4. When unlocking an edited element, the Commit Settings dialog opens. Click Commit.
A new version of this module on the Teamwork Server is created.
To reload a Teamwork module
• From the module shortcut menu, select Modules > Reload Module. The version number of the latest version is shown beside the module name (see the following figure).
This procedure allows you to use a new version of a module that has been uploaded to the Teamwork Server. You can use reloaded module in your own Teamwork project.
81 Copyright © 2000-2011 No Magic, Inc..
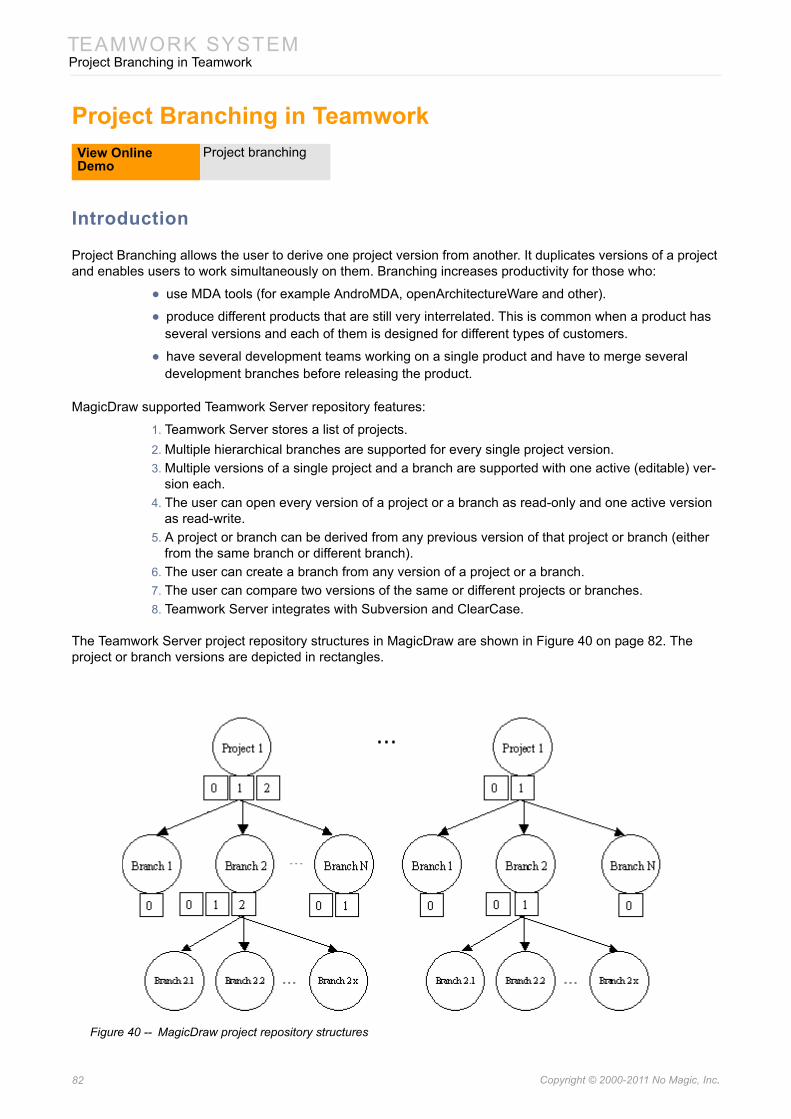
TEAMWORK SYSTEMProject Branching in Teamwork
Project Branching in Teamwork
Introduction
Project Branching allows the user to derive one project version from another. It duplicates versions of a project and enables users to work simultaneously on them. Branching increases productivity for those who:
• use MDA tools (for example AndroMDA, openArchitectureWare and other).
• produce different products that are still very interrelated. This is common when a product has several versions and each of them is designed for different types of customers.
• have several development teams working on a single product and have to merge several development branches before releasing the product.
MagicDraw supported Teamwork Server repository features:
1. Teamwork Server stores a list of projects.2. Multiple hierarchical branches are supported for every single project version.3. Multiple versions of a single project and a branch are supported with one active (editable) ver-
sion each. 4. The user can open every version of a project or a branch as read-only and one active version
as read-write. 5. A project or branch can be derived from any previous version of that project or branch (either
from the same branch or different branch).6. The user can create a branch from any version of a project or a branch.7. The user can compare two versions of the same or different projects or branches.8. Teamwork Server integrates with Subversion and ClearCase.
The Teamwork Server project repository structures in MagicDraw are shown in Figure 40 on page 82. The project or branch versions are depicted in rectangles.
Figure 40 -- MagicDraw project repository structures
View Online Demo
Project branching
82 Copyright © 2000-2011 No Magic, Inc..
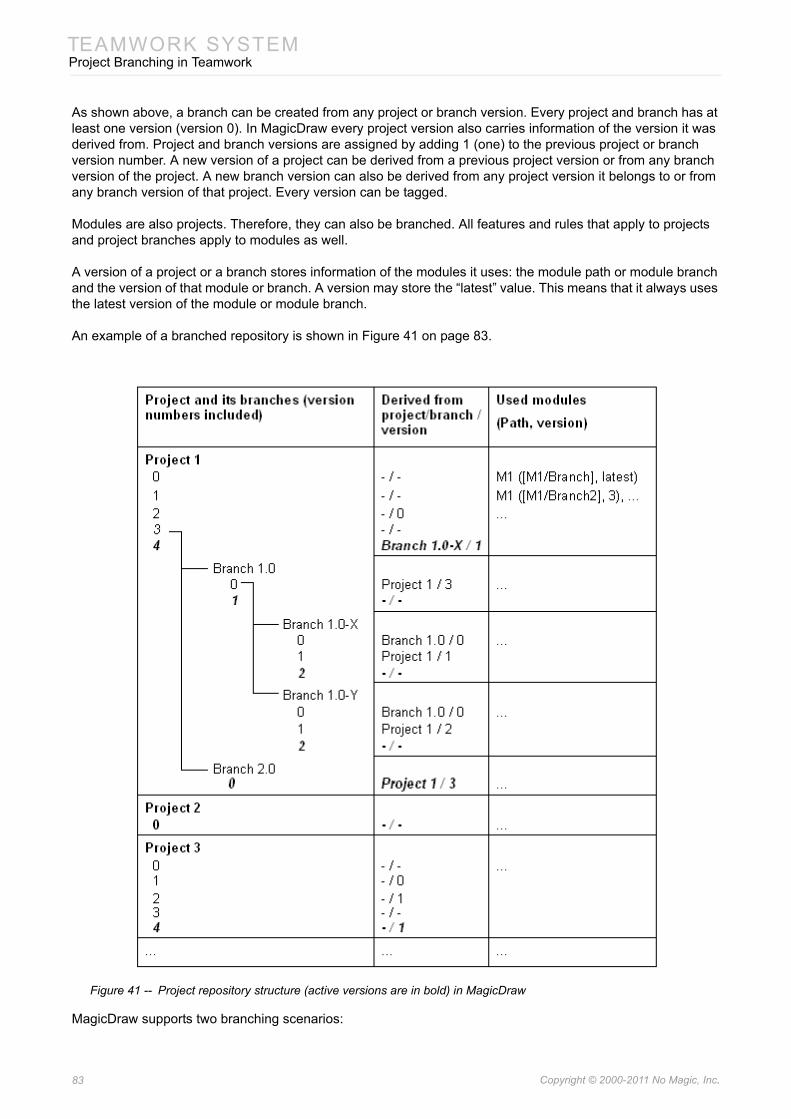
TEAMWORK SYSTEMProject Branching in Teamwork
As shown above, a branch can be created from any project or branch version. Every project and branch has at least one version (version 0). In MagicDraw every project version also carries information of the version it was derived from. Project and branch versions are assigned by adding 1 (one) to the previous project or branch version number. A new version of a project can be derived from a previous project version or from any branch version of the project. A new branch version can also be derived from any project version it belongs to or from any branch version of that project. Every version can be tagged.
Modules are also projects. Therefore, they can also be branched. All features and rules that apply to projects and project branches apply to modules as well.
A version of a project or a branch stores information of the modules it uses: the module path or module branch and the version of that module or branch. A version may store the “latest” value. This means that it always uses the latest version of the module or module branch.
An example of a branched repository is shown in Figure 41 on page 83.
Figure 41 -- Project repository structure (active versions are in bold) in MagicDraw
MagicDraw supports two branching scenarios:
83 Copyright © 2000-2011 No Magic, Inc..
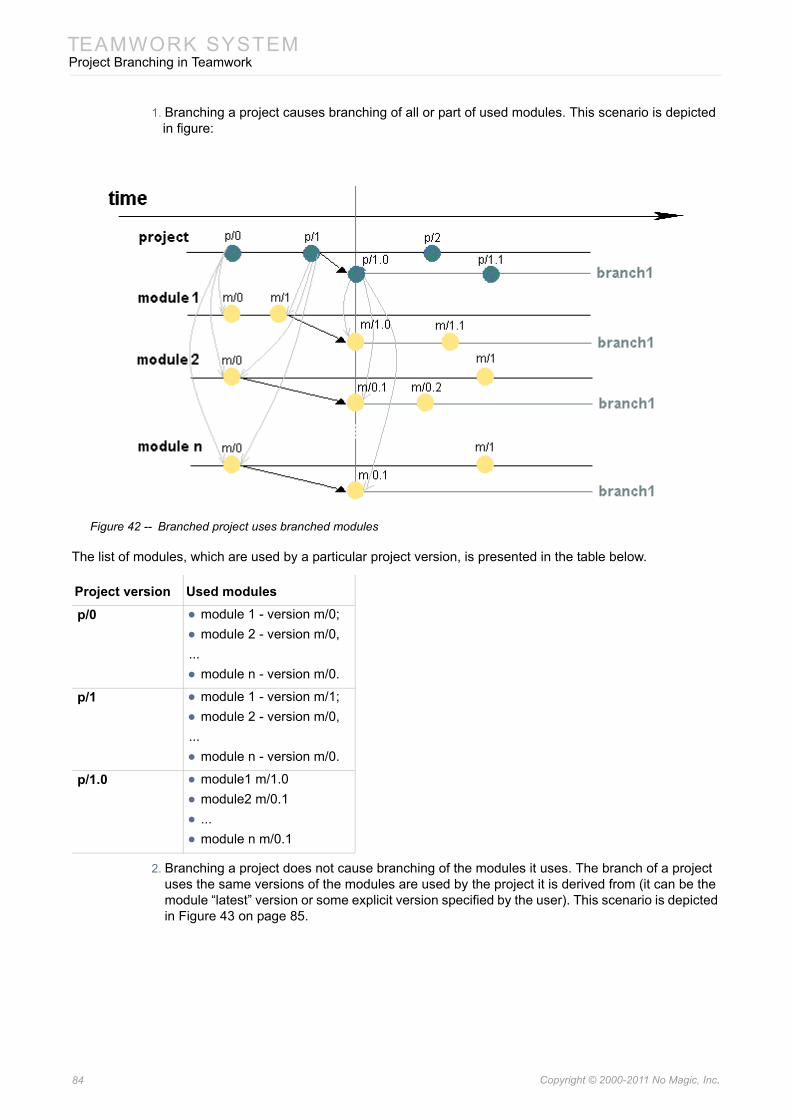
TEAMWORK SYSTEMProject Branching in Teamwork
1. Branching a project causes branching of all or part of used modules. This scenario is depicted in figure:
Figure 42 -- Branched project uses branched modules
The list of modules, which are used by a particular project version, is presented in the table below.
2. Branching a project does not cause branching of the modules it uses. The branch of a project uses the same versions of the modules are used by the project it is derived from (it can be the module “latest” version or some explicit version specified by the user). This scenario is depicted in Figure 43 on page 85.
Project version Used modules
p/0 • module 1 - version m/0;• module 2 - version m/0,...• module n - version m/0.
p/1 • module 1 - version m/1;• module 2 - version m/0,...• module n - version m/0.
p/1.0 • module1 m/1.0• module2 m/0.1• ...• module n m/0.1
84 Copyright © 2000-2011 No Magic, Inc..
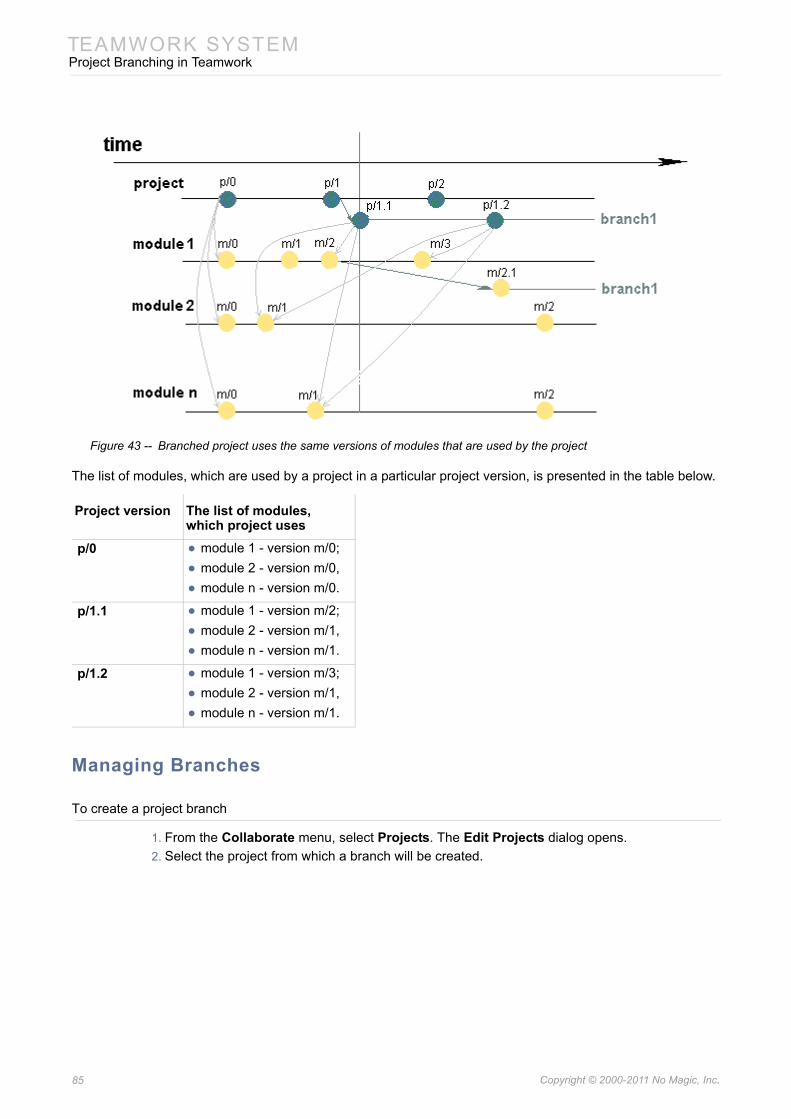
TEAMWORK SYSTEMProject Branching in Teamwork
Figure 43 -- Branched project uses the same versions of modules that are used by the project
The list of modules, which are used by a project in a particular project version, is presented in the table below.
Managing Branches
To create a project branch
1. From the Collaborate menu, select Projects. The Edit Projects dialog opens.2. Select the project from which a branch will be created.
Project version The list of modules, which project uses
p/0 • module 1 - version m/0;• module 2 - version m/0,• module n - version m/0.
p/1.1 • module 1 - version m/2;• module 2 - version m/1,• module n - version m/1.
p/1.2 • module 1 - version m/3;• module 2 - version m/1,• module n - version m/1.
85 Copyright © 2000-2011 No Magic, Inc..
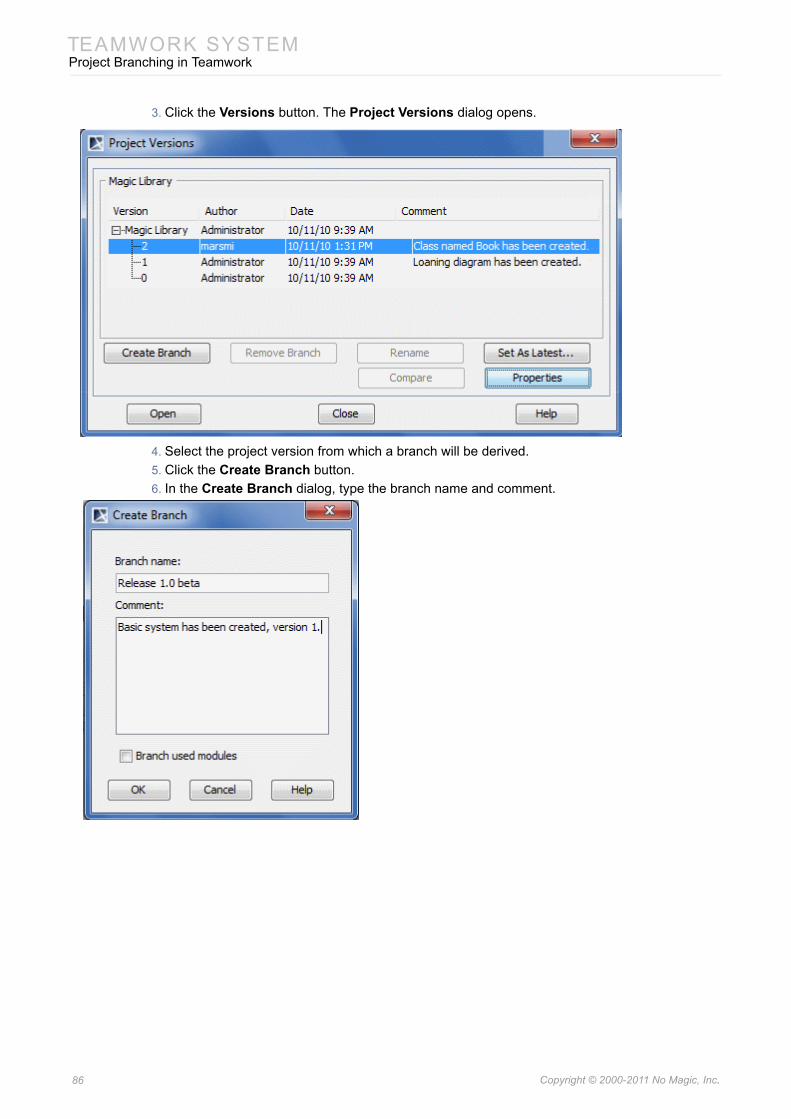
TEAMWORK SYSTEMProject Branching in Teamwork
3. Click the Versions button. The Project Versions dialog opens.
4. Select the project version from which a branch will be derived.5. Click the Create Branch button.6. In the Create Branch dialog, type the branch name and comment.
86 Copyright © 2000-2011 No Magic, Inc..
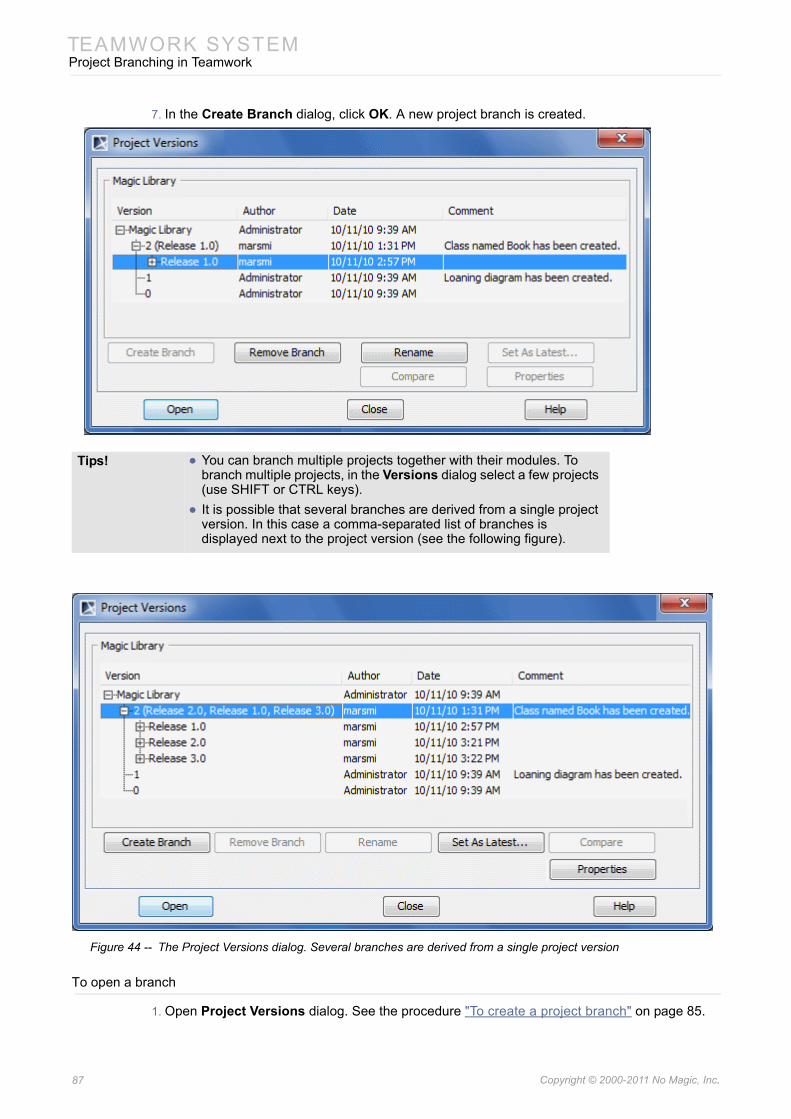
TEAMWORK SYSTEMProject Branching in Teamwork
7. In the Create Branch dialog, click OK. A new project branch is created.
Figure 44 -- The Project Versions dialog. Several branches are derived from a single project version
To open a branch
1. Open Project Versions dialog. See the procedure "To create a project branch" on page 85.
Tips! • You can branch multiple projects together with their modules. To branch multiple projects, in the Versions dialog select a few projects (use SHIFT or CTRL keys).
• It is possible that several branches are derived from a single project version. In this case a comma-separated list of branches is displayed next to the project version (see the following figure).
87 Copyright © 2000-2011 No Magic, Inc..
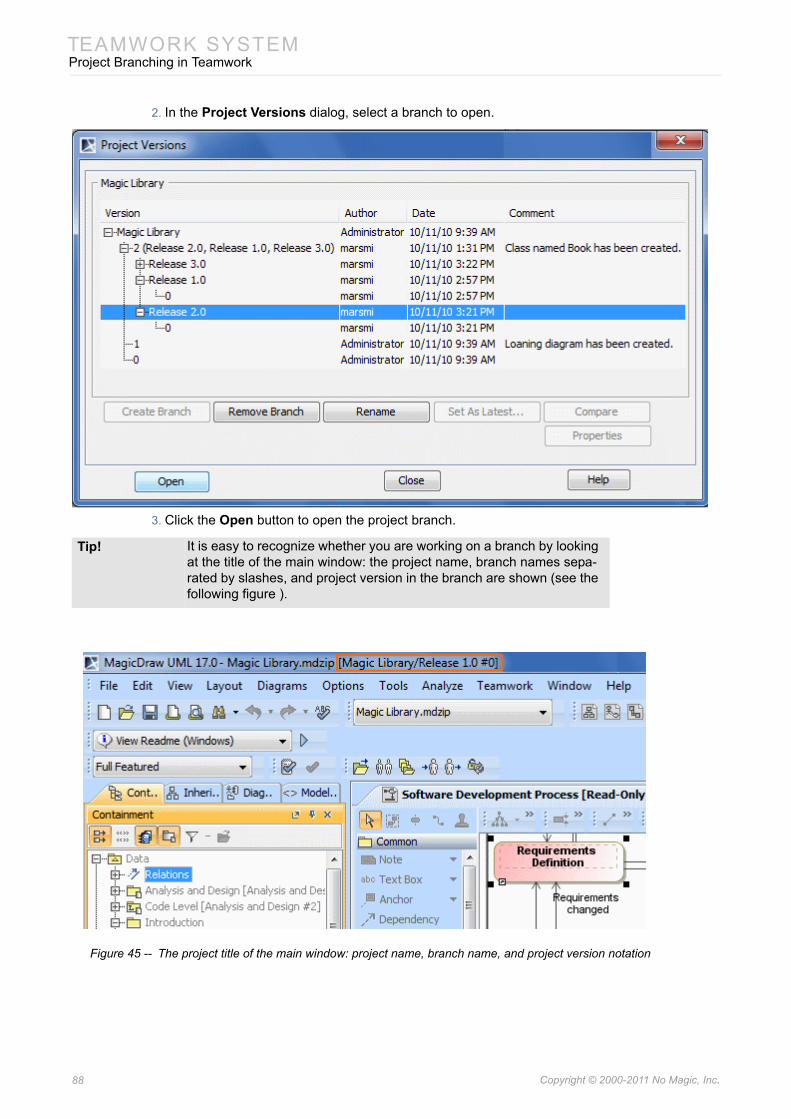
TEAMWORK SYSTEMProject Branching in Teamwork
2. In the Project Versions dialog, select a branch to open.
3. Click the Open button to open the project branch.
Figure 45 -- The project title of the main window: project name, branch name, and project version notation
Tip! It is easy to recognize whether you are working on a branch by looking at the title of the main window: the project name, branch names sepa-rated by slashes, and project version in the branch are shown (see the following figure ).
88 Copyright © 2000-2011 No Magic, Inc..

TEAMWORK SYSTEMProject Branching in Teamwork
To quickly open the latest version of a branch using the Open Server Project dialog
1. From the Collaborate menu, select Open Server Project. The Open Server Project dialog opens.
2. Select a project.
89 Copyright © 2000-2011 No Magic, Inc..
TEAMWORK SYSTEMProject Branching in Teamwork
3. Press the ... button. The Select Branch dialog opens.
4. Select a project branch and click OK.5. In the Open Server Project dialog, click Open. The project of the selected branch opens.
90 Copyright © 2000-2011 No Magic, Inc..
TEAMWORK SYSTEMProject Branching in Teamwork
The branch opened at the latest is recorded in the Open Server Project dialog. You can see the branch name in the Branch column. The default branch value is Trunk.
Figure 46 -- The project and its branch selected to open
To branch modules together with project
1. Open Project Versions dialog. See the procedure "To create a project branch" on page 85.2. In the Project Versions dialog, select the project version and click the Create Branch button.
The Create Branch dialog opens.
91 Copyright © 2000-2011 No Magic, Inc..
TEAMWORK SYSTEMLDAP Support
3. Select the Branch Used Modules check box. The Select modules to branch area appears in the dialog.
4. In the Select modules to branch list, select the module to be branched together with the proj-ect.
5. Click OK when you are done.
The workflow of project branching when modules are branched together with the project is depicted in Figure 42 on page 84.
LDAP SupportLDAP Integration allows Teamwork Server to authenticate its users against LDAP servers. LDAP Integration enables pass-through MagicDraw authentication against LDAP servers, by passing client's authentication information to LDAP servers.
LDAP Integration supports Simple User+Password and SASL authentication, SSL/TLS protocols, and several LDAP servers configured for a single integration.
Enabling LDAP Integration
To enable LDAP Integration
1. Start Teamwork Administrator's Console (see "Starting Teamwork Administrator’s Console" on page 48).
2. Click the LDAP Integration tab.3. Click Enable LDAP Integration. LDAP integration settings become active (see the following
figure).
92 Copyright © 2000-2011 No Magic, Inc..
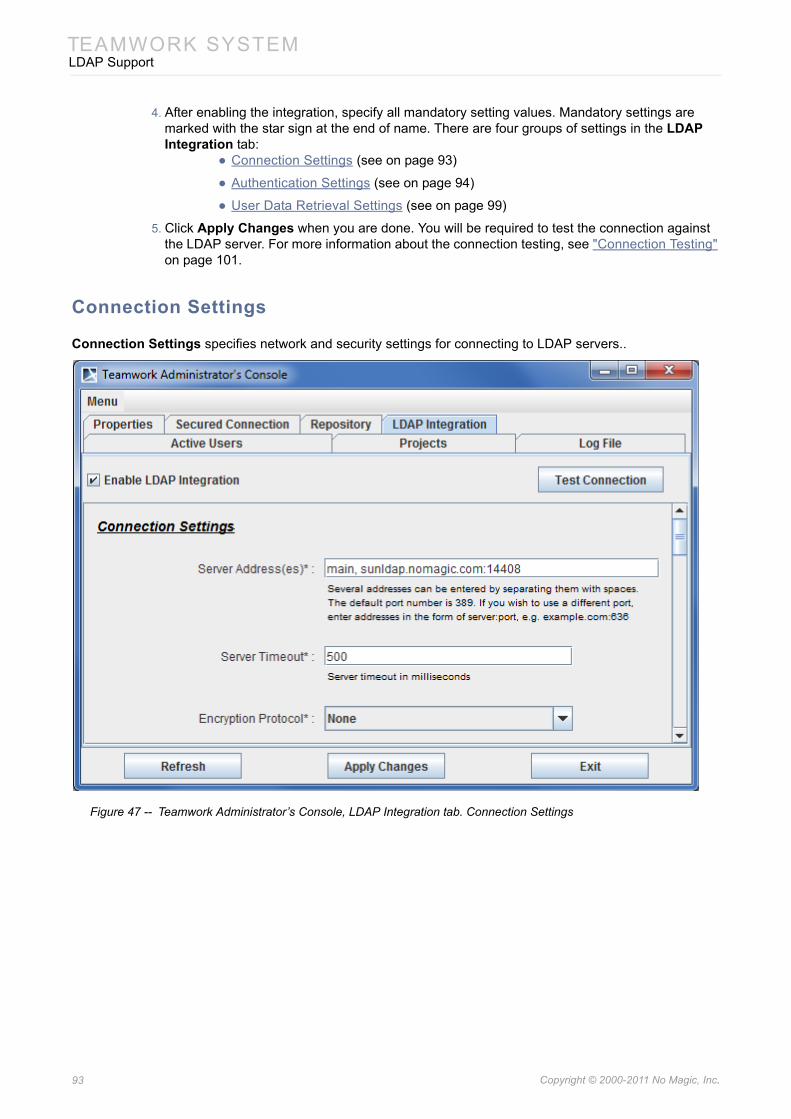
TEAMWORK SYSTEMLDAP Support
4. After enabling the integration, specify all mandatory setting values. Mandatory settings are marked with the star sign at the end of name. There are four groups of settings in the LDAP Integration tab:
• Connection Settings (see on page 93)
• Authentication Settings (see on page 94)
• User Data Retrieval Settings (see on page 99)
5. Click Apply Changes when you are done. You will be required to test the connection against the LDAP server. For more information about the connection testing, see "Connection Testing" on page 101.
Connection Settings
Connection Settings specifies network and security settings for connecting to LDAP servers..
Figure 47 -- Teamwork Administrator’s Console, LDAP Integration tab. Connection Settings
93 Copyright © 2000-2011 No Magic, Inc..
TEAMWORK SYSTEMLDAP Support
Connection Settings are described in the following table.
Authentication Settings
LDAP Integration supports two most popular LDAP authentication methods. They are as follows:
• Simple User+Password (see "Authentication settings for the Simple User+Password authentication type" on page 95).
• SASL (see "Authentication settings for the SASL authentication type" on page 98)
Teamwork Server transforms user credentials entered in MagicDraw to LDAP authentication credentials by using the templates in authentication settings. After successful authentication to LDAP, a special user for each authenticated LDAP user is created in Teamwork Server. They differ from ordinary users as they have no passwords (in order to complete authentication, authentication to LDAP server(s) is used). You can perform various actions for these users, otherwise. It is possible to setup permissions, remove users, and do other common actions with users.
NEW! You can automatically create a proxy user account for Teamwork Server. Select Auto-add unknown users if they login successfully checkbox and authenticated user credentials without password will be stored in Teamwork Server on successful login.
Setting Name Description
Server Address(es)
A list of servers separated by spaces where each entry holds server address and server port. If unspecified, the 389 port is used. At least one server address must be specified. Usually a master server and its slaves (replicas) are specified for round-robin authentication.Teamwork Server authenticats against servers in the order they are listed in the Server Adress(es). If authentication does not succeed to the first server in the list, the second server is used, and so on until authentication is successful. Authentication failure for the whole integration is considered as an inability to authenticate against any of the specified servers.A single server in the specified list is queried within the period of time specified in the Server Timeout setting.
Server Timeout A time duration that specifies maximum period of time in milliseconds to suc-cessfully authenticate to a single server. If authentication is unsuccessful within this period of time, the next server in the server list is queried. The default value for this option is 500 milliseconds.
Encryption protocol
A list of protocols. You can use SSL or TLS protocols for the encription. Select None, if you do not need to use an encryption protocol. The selected protocol applies to every server specified in the LDAP server list. For example, if the SSL encryption is specified, communications to all the servers specified in the Server Address(es) list will be encrypted using the SSL protocol.If the encrypted connection is used, Server Root CA certificate and password may be required. Server Root CA certificate should be stored in Java Key Store (JKS) format. For more information about converting certificates to JKS format, see "Converting Certificates to JKS Format" on page 101.
94 Copyright © 2000-2011 No Magic, Inc..
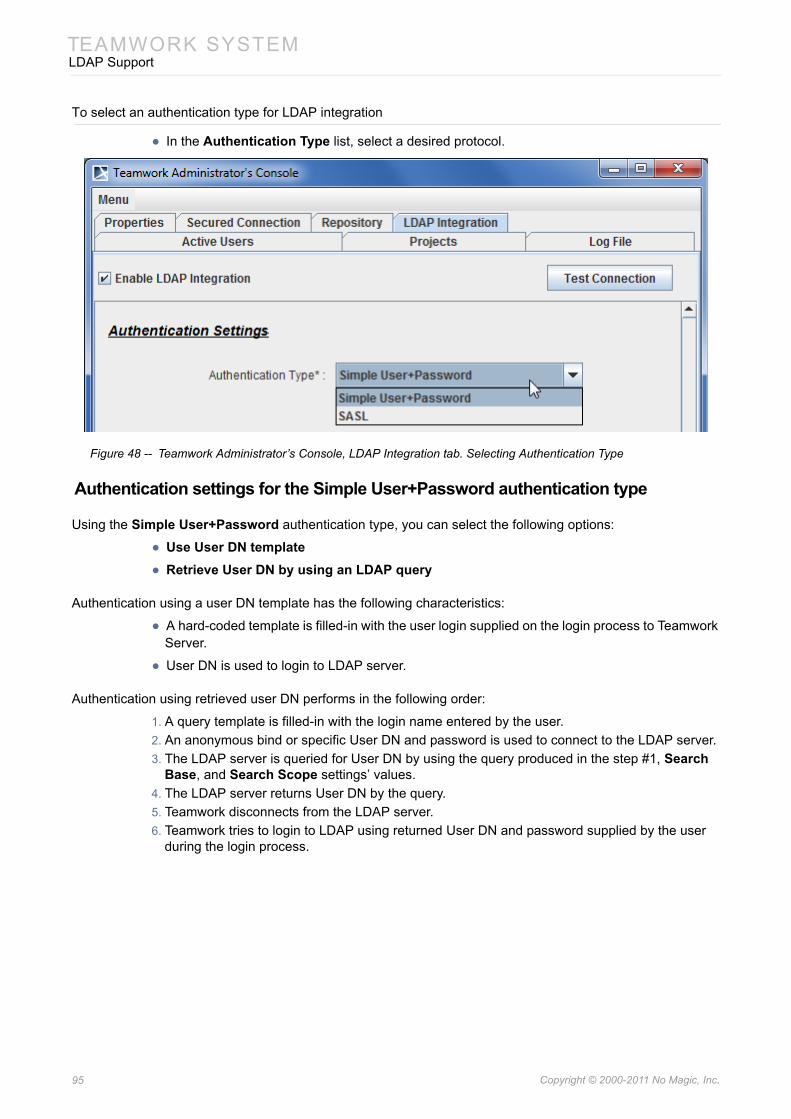
TEAMWORK SYSTEMLDAP Support
To select an authentication type for LDAP integration
• In the Authentication Type list, select a desired protocol.
Figure 48 -- Teamwork Administrator’s Console, LDAP Integration tab. Selecting Authentication Type
Authentication settings for the Simple User+Password authentication type
Using the Simple User+Password authentication type, you can select the following options:
• Use User DN template• Retrieve User DN by using an LDAP query
Authentication using a user DN template has the following characteristics:
• A hard-coded template is filled-in with the user login supplied on the login process to Teamwork Server.
• User DN is used to login to LDAP server.
Authentication using retrieved user DN performs in the following order:
1. A query template is filled-in with the login name entered by the user.2. An anonymous bind or specific User DN and password is used to connect to the LDAP server.3. The LDAP server is queried for User DN by using the query produced in the step #1, Search
Base, and Search Scope settings’ values.4. The LDAP server returns User DN by the query.5. Teamwork disconnects from the LDAP server.6. Teamwork tries to login to LDAP using returned User DN and password supplied by the user
during the login process.
95 Copyright © 2000-2011 No Magic, Inc..

TEAMWORK SYSTEMLDAP Support
.
Figure 49 -- Teamwork Administrator’s Console, LDAP Integration tab. Authentication Settings (Simple User+Password)
Authentication Settings are described in the following table.
Setting Name DescriptionSettings that are active when the Use User DN template is selected
96 Copyright © 2000-2011 No Magic, Inc..
TEAMWORK SYSTEMLDAP Support
User DN User DN stores a template, which is used for mapping the user’s authenticat-ing against Teamwork Server to LDAP distinguished names when authenticat-ing. The template recognizes a single keyword $(login). An example of the template:cn=$(login), dc=example, dc=com
Settings that are active when the Retrieve User DN by using an LDAP query is selected
Query The LDAP query for retrieving User DN, for example:uid=$(login)
Search Base DN, from which a search should begin, for example:dc=example,dc=com
Search Scope Search scope specifies whether the search must be restricted to the directly owned DNs only or it must be performed in the whole subtree.Choose one of the following:• One level• Subtree
Anonymous Bind
A mode of bind, specifying, whether the user connects to LDAP server with a specific user or anonymously for being able to find the User DN which corre-sponds to the user who is trying to login to Teamwork.IMPORTANT! You must have such a user if you do not have anonymous access.
Bind DN Specific User DN for connecting to the LDAP server and perform queries.NOTE: This element is active, when Anonymous Bind is not selected.
Bind Password A specific password to connect to the LDAP server and perform queries (you must to have such a user if you do not have anonymous access!)NOTE: This element is active, when the Anonymous Bind is not selected.
Setting Name Description
97 Copyright © 2000-2011 No Magic, Inc..
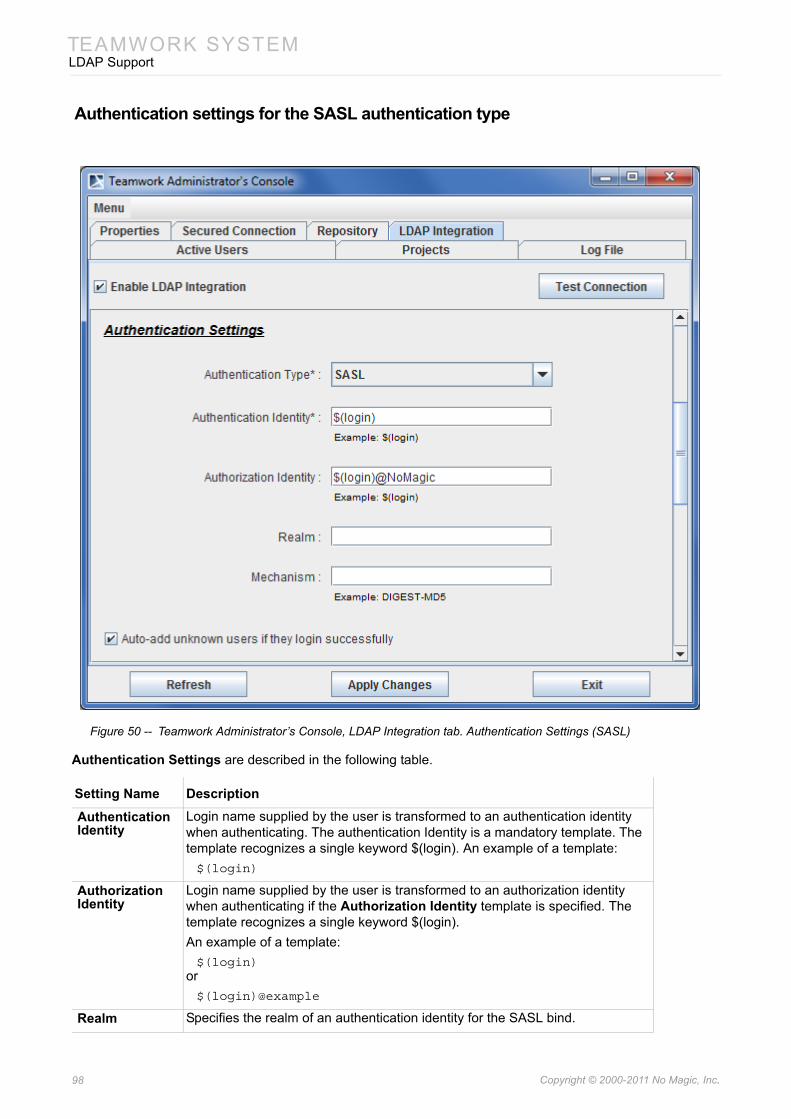
TEAMWORK SYSTEMLDAP Support
Authentication settings for the SASL authentication type
Figure 50 -- Teamwork Administrator’s Console, LDAP Integration tab. Authentication Settings (SASL)
Authentication Settings are described in the following table.
Setting Name Description
Authentication Identity
Login name supplied by the user is transformed to an authentication identity when authenticating. The authentication Identity is a mandatory template. The template recognizes a single keyword $(login). An example of a template:$(login)
Authorization Identity
Login name supplied by the user is transformed to an authorization identity when authenticating if the Authorization Identity template is specified. The template recognizes a single keyword $(login). An example of a template:$(login)
or$(login)@example
Realm Specifies the realm of an authentication identity for the SASL bind.
98 Copyright © 2000-2011 No Magic, Inc..
TEAMWORK SYSTEMLDAP Support
User Data Retrieval Settings
Authenticated users usually have an access to User DN attributes in the LDAP database. If the user information retrieval is enabled, and User DN attributes are accessible to the authenticated user, Teamwork Server retrieves their values and sets them for the corresponding external users.
User DN is retrieved in the same way as it is done if the Simple User+Password authentication type is enabled (either by using a static User DN template or by querying the LDAP server(s) for User DN). When the user logs in to the LDAP server, this connection is further reused for retrieving user information.
If the user information retrieval is disabled or User DN attributes are not accessible to the authenticated user, Teamwork Server creates an external user with the login name that was specified by the user on the authentication.
Mechanism Specifies the SASL mechanism to be used for authentication. An example:DIGEST-MD5
Setting Name Description
99 Copyright © 2000-2011 No Magic, Inc..
TEAMWORK SYSTEMLDAP Support
Figure 51 -- Teamwork Administrator’s Console, LDAP Integration tab. User Data Retrieval Settings
User Data Retrieval Settings are described in the following table:
Setting Name Description
User DN Attribute-to-Full Name Mapping
After a specific User DN is found, the name of a local user which is created on the authentication is created by using the Full Name Mapping template for this User DN. The Full Name Mapping template supports placeholders in the form of $(attribute), where attribute is an attribute of DN. An example:$(cn) $(sn)
This will form the Name of the created user out of two LDAP attributes - cn and sn.
100 Copyright © 2000-2011 No Magic, Inc..
TEAMWORK SYSTEMLDAP Support
Connection Testing
After you have specified the LDAP Integration setting values, you can test the connection to LDAP server.
To test a LDAP Integration configuration
1. In the LDAP Integration tab of Teamwork Administrator’s Console, click Test Connection. The Test Connection dialog opens.
2. Type user’s login name, password, and click OK.3. The message with connection results appears.
Subversion and LDAP Integration Working at the Same Time
If Teamwork Server uses Subversion for storing projects and LDAP Integration for authentication, Subversion must recognize (or authenticate) the same users and passwords that are used to authenticate against the LDAP server. Administrator is the user specified in he LDAP Integration configuration.
When Teamwork is integrated with Subversion only, client's authentication information is passed to the Subversion server. When Teamwork Server is integrated with Subversion and LDAP, client's authentication information is passed for both Subversion server(s) and LDAP server(s), but only successful authentication to LDAP server(s) successfully logs the user into Teamwork Server.
Converting Certificates to JKS Format
Teamwork Server recognizes certificates stored in Java KeyStore (JKS) format. If certificates are in PEM format, they have to be converted to JKS format. OpenSSL (http://www.openssl.org/) and Sun Java KeyTool (included into every Java distribution) can be used for this purpose. For example, if we a certificate in a file called cert.pem, then the following commands will covert it to JKS format:
openssl x509 -in cert.pem -out cert.der -outform der keytool -importcert -alias mycert -file cert.der -keystore truststore.jks
Settings that are active when the Use User DN templaten is selected:
User DN User DN specifies a template used to search for specific DN by the supplied login name. An example:cn=$(login), dc=example, dc=com
Settings that are active when the Retrieve User DN by using an LDAP query is selected:
Query An LDAP query for retrieving User DN, for example:uid=$(login)
Search Base DN from which the searching should begin, for example:dc=example,dc=com
Search Scope Specifies, whether the search must be restricted to the directly owned DNs only or it must be performed in the whole subtree.Choose one of the following options:• One level• Subtree
Setting Name Description
101 Copyright © 2000-2011 No Magic, Inc..
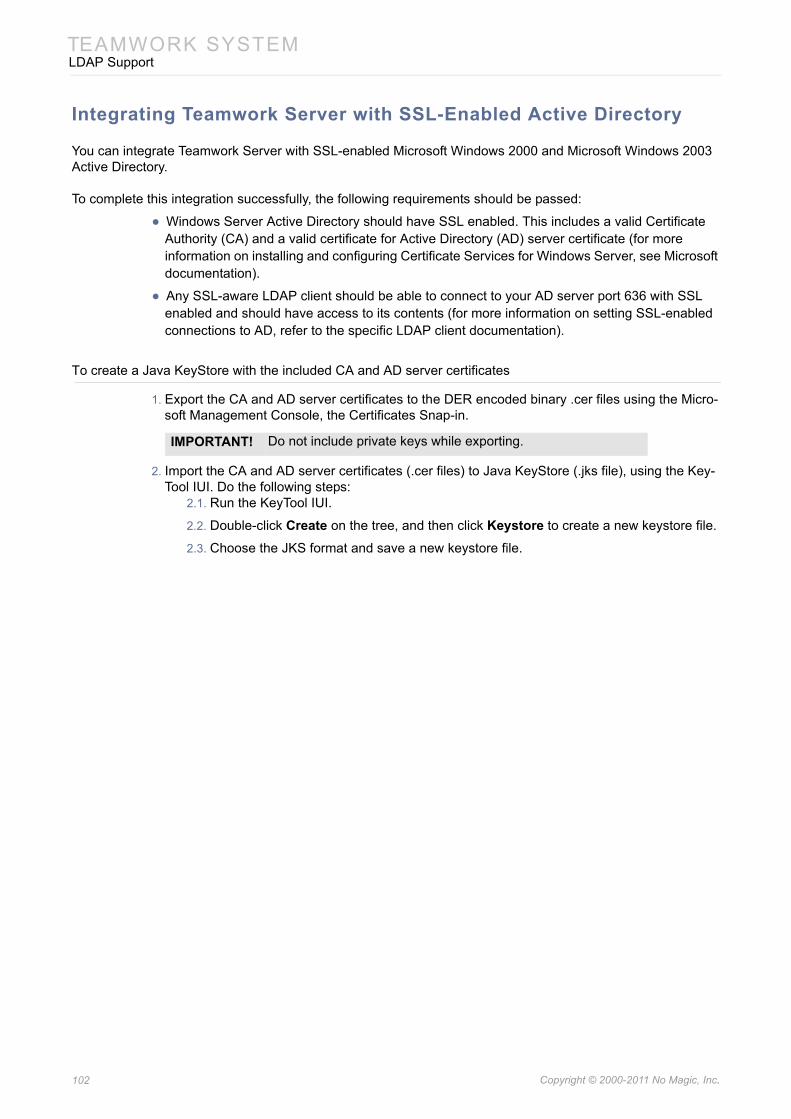
TEAMWORK SYSTEMLDAP Support
Integrating Teamwork Server with SSL-Enabled Active Directory
You can integrate Teamwork Server with SSL-enabled Microsoft Windows 2000 and Microsoft Windows 2003 Active Directory.
To complete this integration successfully, the following requirements should be passed:
• Windows Server Active Directory should have SSL enabled. This includes a valid Certificate Authority (CA) and a valid certificate for Active Directory (AD) server certificate (for more information on installing and configuring Certificate Services for Windows Server, see Microsoft documentation).
• Any SSL-aware LDAP client should be able to connect to your AD server port 636 with SSL enabled and should have access to its contents (for more information on setting SSL-enabled connections to AD, refer to the specific LDAP client documentation).
To create a Java KeyStore with the included CA and AD server certificates
1. Export the CA and AD server certificates to the DER encoded binary .cer files using the Micro-soft Management Console, the Certificates Snap-in.
2. Import the CA and AD server certificates (.cer files) to Java KeyStore (.jks file), using the Key-Tool IUI. Do the following steps:
2.1. Run the KeyTool IUI.
2.2. Double-click Create on the tree, and then click Keystore to create a new keystore file.
2.3. Choose the JKS format and save a new keystore file.
IMPORTANT! Do not include private keys while exporting.
102 Copyright © 2000-2011 No Magic, Inc..
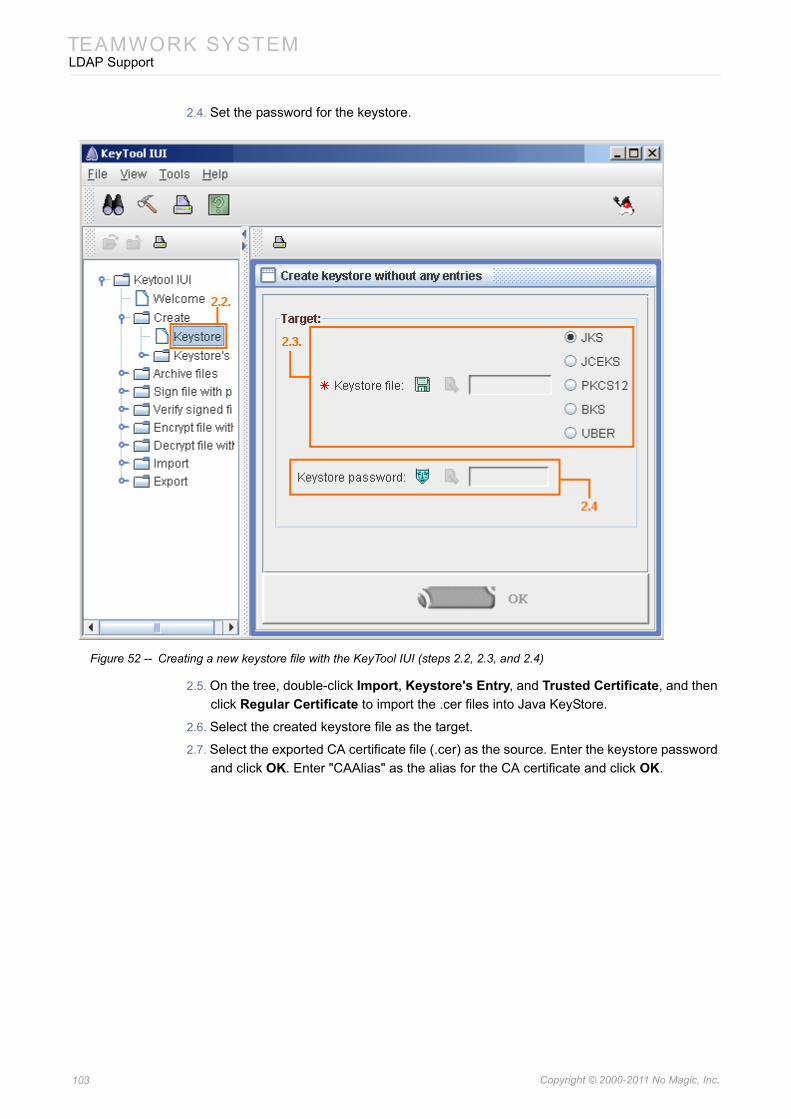
TEAMWORK SYSTEMLDAP Support
2.4. Set the password for the keystore.
Figure 52 -- Creating a new keystore file with the KeyTool IUI (steps 2.2, 2.3, and 2.4)
2.5. On the tree, double-click Import, Keystore's Entry, and Trusted Certificate, and then click Regular Certificate to import the .cer files into Java KeyStore.
2.6. Select the created keystore file as the target.
2.7. Select the exported CA certificate file (.cer) as the source. Enter the keystore password and click OK. Enter "CAAlias" as the alias for the CA certificate and click OK.
103 Copyright © 2000-2011 No Magic, Inc..
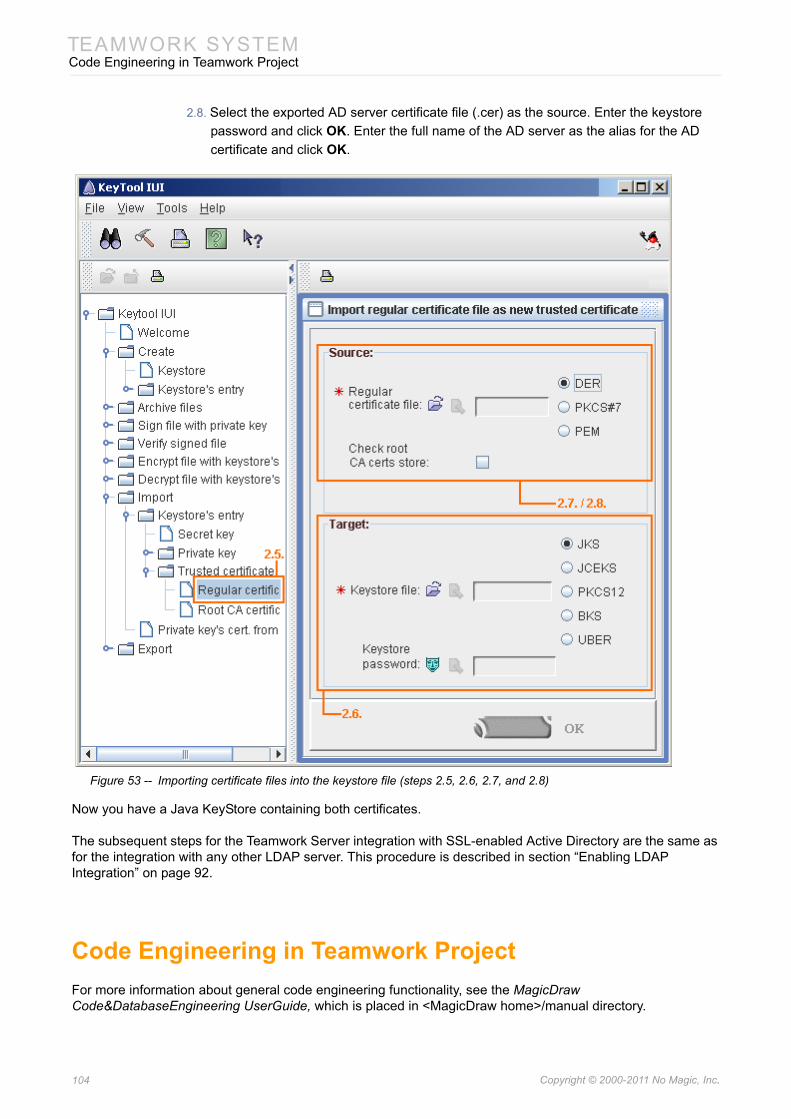
TEAMWORK SYSTEMCode Engineering in Teamwork Project
2.8. Select the exported AD server certificate file (.cer) as the source. Enter the keystore password and click OK. Enter the full name of the AD server as the alias for the AD certificate and click OK.
Figure 53 -- Importing certificate files into the keystore file (steps 2.5, 2.6, 2.7, and 2.8)
Now you have a Java KeyStore containing both certificates.
The subsequent steps for the Teamwork Server integration with SSL-enabled Active Directory are the same as for the integration with any other LDAP server. This procedure is described in section “Enabling LDAP Integration” on page 92.
Code Engineering in Teamwork ProjectFor more information about general code engineering functionality, see the MagicDraw Code&DatabaseEngineering UserGuide, which is placed in <MagicDraw home>/manual directory.
104 Copyright © 2000-2011 No Magic, Inc..
TEAMWORK SYSTEMConnecting Teamwork server via SSH encrypted tunnel
To generate code in the teamwork project
1. From the Code engineering sets shortcut menu in the Browser, select New and then select a code engineering language. Type a name for new set.
2. Add elements from the Data branch to the newly created set. All elements (locked and unlocked) can be added to set for code generation. Drag & drop them from the Browser tree.
3. Select the code engineering set, containing elements in the Browser and from the shortcut menu, select Generate. The code is generated for all elements.
To reverse code in the teamwork project
1. From the created code engineering set shortcut menu, select Edit. 2. Specify the Working Directory and Working Package, to where reversed elements will be
placed in the model.
3. In the Add File tab from the Round Trip Set dialog, add code files from the All Files list to the Set list. Click OK.
4. From the modified code engineering set shortcut menu, select Reverse. Define options in the Reverse Options dialog. Click OK.
When performing a round-trip code engineering, code cannot be reversed for unlocked elements - the Reverse command will be disabled in shortcut menu.
Connecting Teamwork server via SSH encrypted tunnelIn this section you will find the description for SSH-encrypted MagicDraw UML and Teamwork Server connectivity.
Requirements on both server and client are as following:
1. Windows 2000/XP/Vista or Windows Server family OS.2. Local administrative rights to create local user for tunnelling and to run SSH service.3. OpenSSH server and client binary installation files. You may obtain it from http://source-
forge.net/project/showfiles.php?group_id=103886&package_id=111688#.The OpenSSH software is free of charge.
Configure the Teamwork Server side1. Login to the Teamwork Server with administrator privileges.2. Install OpenSSH with default settings. This will install OpenSSH server and client on your
Teamwork Server machine. The warning about editing password and group file appears while installing. Click OK.
3. Create a local user for SSH tunnel. To do this right click on My Computer, then select Manage. In the Local Users and Groups section right-click on Users and choose New User. The New User dialog opens (see Figure 54 on page 106).
3.1. Enter a new username which you will use to login into SSH service to establish tunnelling. For example, tunnel.
3.2. Enter the user password according to your local system policy.
3.3. Clear the User must change password at next logon check box.
NOTE Reversing the whole set to a defined package is allowed only if the package is locked.
105 Copyright © 2000-2011 No Magic, Inc..
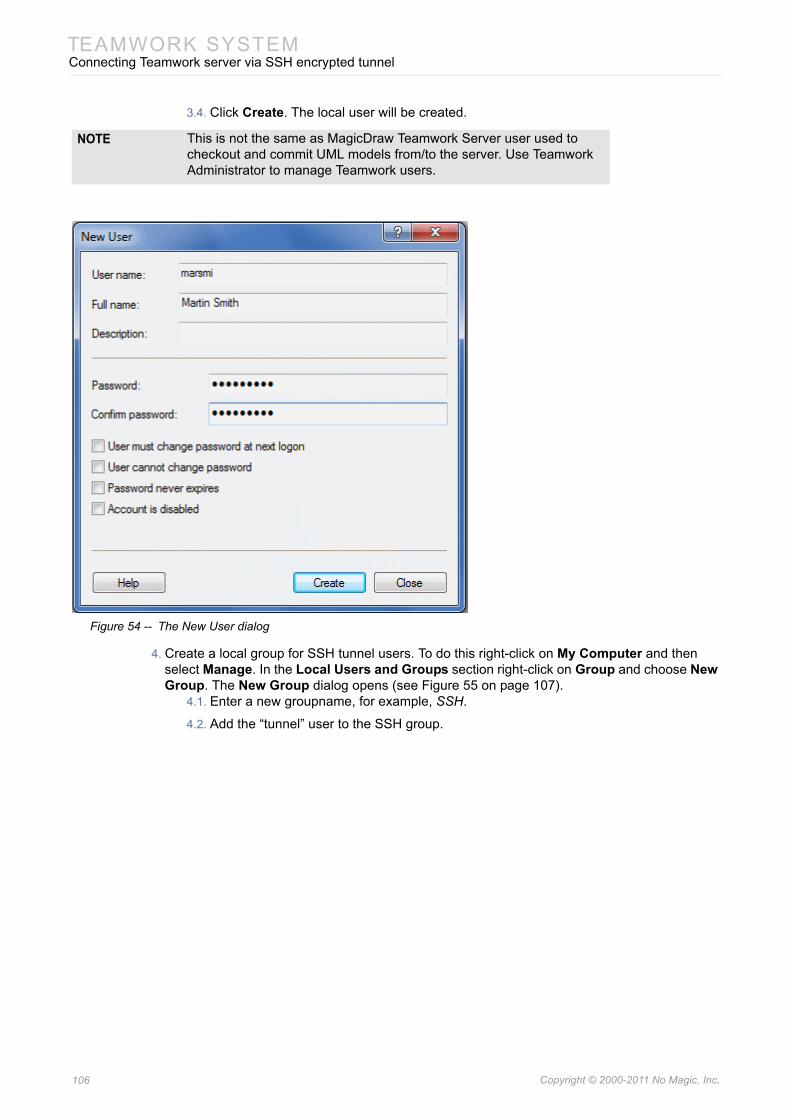
TEAMWORK SYSTEMConnecting Teamwork server via SSH encrypted tunnel
3.4. Click Create. The local user will be created.
Figure 54 -- The New User dialog
4. Create a local group for SSH tunnel users. To do this right-click on My Computer and then select Manage. In the Local Users and Groups section right-click on Group and choose New Group. The New Group dialog opens (see Figure 55 on page 107).
4.1. Enter a new groupname, for example, SSH.
4.2. Add the “tunnel” user to the SSH group.
NOTE This is not the same as MagicDraw Teamwork Server user used to checkout and commit UML models from/to the server. Use Teamwork Administrator to manage Teamwork users.
106 Copyright © 2000-2011 No Magic, Inc..
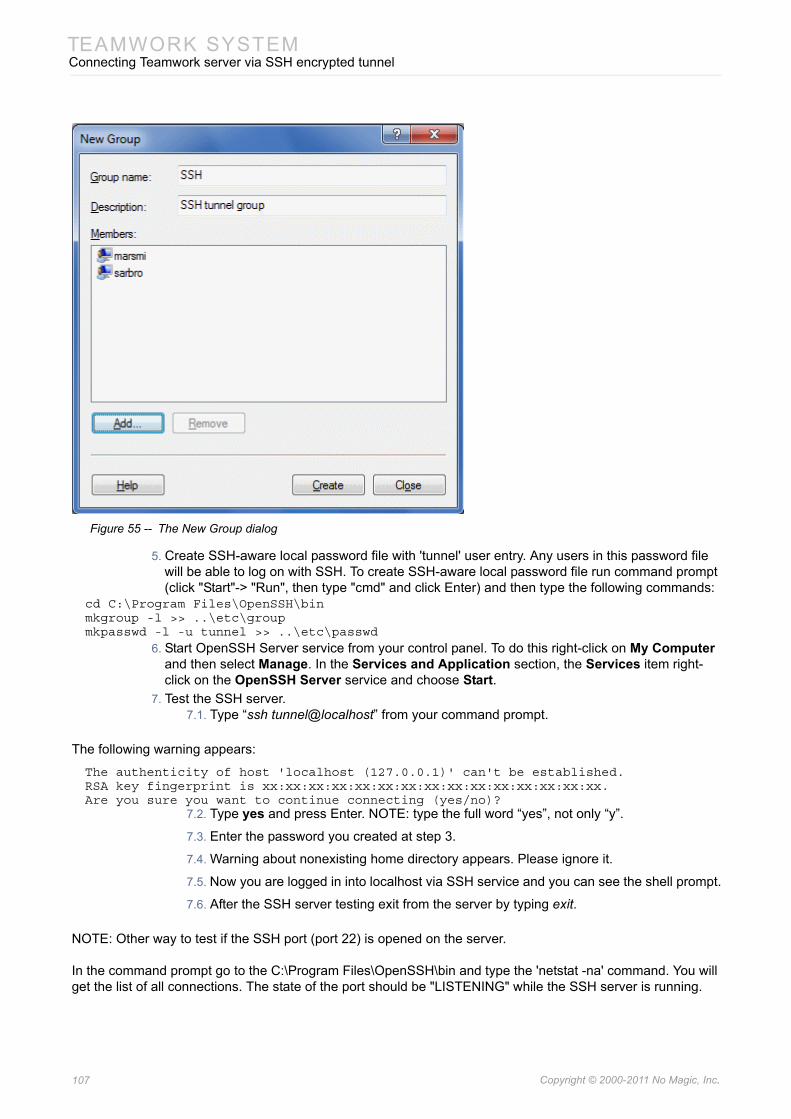
TEAMWORK SYSTEMConnecting Teamwork server via SSH encrypted tunnel
Figure 55 -- The New Group dialog
5. Create SSH-aware local password file with 'tunnel' user entry. Any users in this password file will be able to log on with SSH. To create SSH-aware local password file run command prompt (click "Start"-> "Run", then type "cmd" and click Enter) and then type the following commands:
cd C:\Program Files\OpenSSH\binmkgroup -l >> ..\etc\groupmkpasswd -l -u tunnel >> ..\etc\passwd
6. Start OpenSSH Server service from your control panel. To do this right-click on My Computer and then select Manage. In the Services and Application section, the Services item right-click on the OpenSSH Server service and choose Start.
7. Test the SSH server.7.1. Type “ssh tunnel@localhost” from your command prompt.
The following warning appears:
The authenticity of host 'localhost (127.0.0.1)' can't be established.RSA key fingerprint is xx:xx:xx:xx:xx:xx:xx:xx:xx:xx:xx:xx:xx:xx:xx.Are you sure you want to continue connecting (yes/no)?
7.2. Type yes and press Enter. NOTE: type the full word “yes”, not only “y”.
7.3. Enter the password you created at step 3.
7.4. Warning about nonexisting home directory appears. Please ignore it.
7.5. Now you are logged in into localhost via SSH service and you can see the shell prompt.
7.6. After the SSH server testing exit from the server by typing exit.
NOTE: Other way to test if the SSH port (port 22) is opened on the server.
In the command prompt go to the C:\Program Files\OpenSSH\bin and type the 'netstat -na' command. You will get the list of all connections. The state of the port should be "LISTENING" while the SSH server is running.
107 Copyright © 2000-2011 No Magic, Inc..
TEAMWORK SYSTEMConnecting Teamwork server via SSH encrypted tunnel
Client Side Configuration1. Install OpenSSH client from the same installation file you downloaded. Uncheck "Server" option
when asked
The SSH client package is installed to "C:\Program Files\OpenSSH" by default and added into your PATH variable.
2. Establish an SSH tunnel by logging into Teamwork server SSH service from the command prompt:
ssh - L localport:teamworkserver:teamworkserverport username@teamworkserver
For example, the following command will establish an SSH encrypted tunnel from client port 1100 to server port 1100. When connecting to localhost:1100, the packets get encrypted and sent to twserver:1100, where actual Teamwork server resides:
ssh -L 1100:twserver:1100 tunnel@twserver
localport may be any unused port on your workstation.
Teamwork server port is the port the Teamwork server is running (usually 1100)
You are logged as user "tunnel" to the SSH service on Teamwork server machine. Leave the session opened, as killing it also kills the SSH tunnel used for the MagicDraw Client.
3. Open MagicDraw Client. Use localhost:localport when connecting to the Teamwork server. Localport is 1100 in this case as we used it when created the tunnel.
NOTE Using any other value than "localhost" or "127.0.0.1" will fail, even if connected to the actual machine name, resolved by DNS. This is because tunnel starts on loopback interface of your workstation only for security reason.
108 Copyright © 2000-2011 No Magic, Inc..