TeammateTime Store Manager Training
38
© 2008 General Parts International, Inc. Written permission is required to copy or forward to anyone other than the intended recipient. TeammateTime Store Manager Training Module 4: 1-Time Setup Steps
-
Upload
fleur-gordon -
Category
Documents
-
view
36 -
download
0
description
TeammateTime Store Manager Training. Module 4: 1-Time Setup Steps. Agenda. Enter Schedule Requirements for each teammate (Availability and Fixed Shifts) Set up borrowing relationships Assign keyholder attribute to keyholders Exclude non-keyholders from keyholder labor role Get Clock-in PINs. - PowerPoint PPT Presentation
Transcript of TeammateTime Store Manager Training

© 2008 General Parts International, Inc.Written permission is required to copy or forward to anyone other than the intended recipient.
TeammateTime Store Manager Training
Module 4: 1-Time Setup Steps

© 2008 General Parts International, Inc.Written permission is required to copy or forward to anyone other than the intended recipient.
Slide 2
Agenda
• Enter Schedule Requirements for each teammate (Availability and Fixed Shifts)
• Set up borrowing relationships• Assign keyholder attribute to keyholders• Exclude non-keyholders from keyholder labor role• Get Clock-in PINs

© 2008 General Parts International, Inc.Written permission is required to copy or forward to anyone other than the intended recipient.
Slide 3
Set Up Tasks in Site Manager
Your first week in TeammateTime, you need to do the following set-up tasks in Site Manager:1. Enter each teammate’s Schedule Requirements:
• General availability for each teammate that should be scheduled based on labor demand
• Fixed shifts for teammates with regular schedules
2. Establish borrowing relationships to allow other managers to borrow your teammates.
3. Assign the keyholder attribute to keyholders.

© 2008 General Parts International, Inc.Written permission is required to copy or forward to anyone other than the intended recipient.
Slide 4
Set Up Tasks in Site Manager
Your first week in TeammateTime, you need to do the following set-up tasks in Site Manager:1. Enter each teammate’s Schedule Requirements:
• General availability for each teammate that should be scheduled based on labor demand
• Fixed shifts for teammates with regular schedules
2. Establish borrowing relationships to allow other managers to borrow your teammates.
3. Assign the keyholder attribute to keyholders.

© 2008 General Parts International, Inc.Written permission is required to copy or forward to anyone other than the intended recipient.
Slide 5
Enter Schedule Requirements
Before the system can generate schedules, you need to enter each teammate’s Schedule Requirements in Site Manager.
Click the Employee button.
© 2008 General Parts International, Inc.Written permission is required to copy or forward to anyone other than the intended recipient.
Slide 6
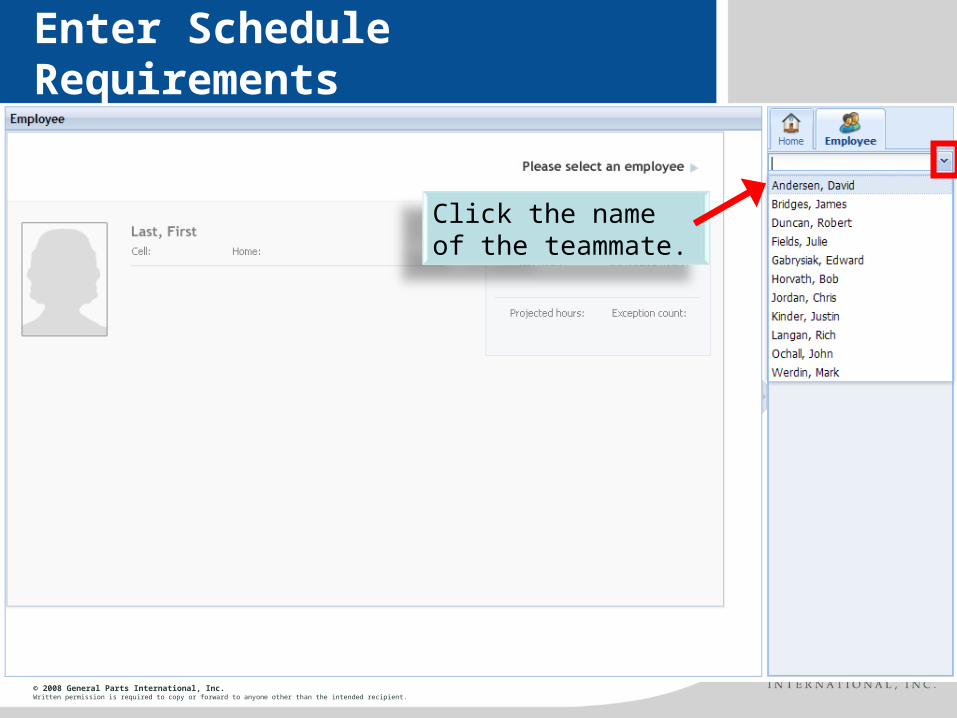
Enter Schedule Requirements
Click the name of the teammate.

© 2008 General Parts International, Inc.Written permission is required to copy or forward to anyone other than the intended recipient.
Slide 7
Enter Schedule Requirements
Click the Schedule Requirements button.

© 2008 General Parts International, Inc.Written permission is required to copy or forward to anyone other than the intended recipient.
Slide 8
Enter Schedule Requirements
Click the Add Schedule Requirements button.
Important: Enter all Schedule Requirements for a teammate before saving them. Schedule Requirements cannot be edited – to change them, you will have to enter the teammate’s Schedule Requirements again from scratch.

© 2008 General Parts International, Inc.Written permission is required to copy or forward to anyone other than the intended recipient.
Slide 9
Enter Schedule Requirements
Enter the Start Date when the Schedule Requirements will take effect.
The End Date is not required.
If creating rotations, the Start Date must align with Week 1.
Click the Calendar button to change the start date.

© 2008 General Parts International, Inc.Written permission is required to copy or forward to anyone other than the intended recipient.
Slide 10
General Availability
If the teammate should be scheduled based on labor demand, you must edit the times under General Availability to match the teammate’s availability to be scheduled. If the teammate is available any time on a given day, keep the “All Day” box checked.
For Canada: Leave the General Availability at the “All Day” default for all teammates.

© 2008 General Parts International, Inc.Written permission is required to copy or forward to anyone other than the intended recipient.
Slide 11
Enter General Availability
Under General Availability, remove the checkmark from the All Day check box for each day the teammate is not available to work all day. If you do not want the teammate auto-scheduled for a particular day, uncheck the All Day box and leave the From and To fields blank.
Click the All Day check box beside a day to remove the checkmark.
In the From field, type the earliest time the teammate can work. In the To field, type the latest time the teammate can work. Make sure “am” and “pm” are correct.
© 2008 General Parts International, Inc.Written permission is required to copy or forward to anyone other than the intended recipient.
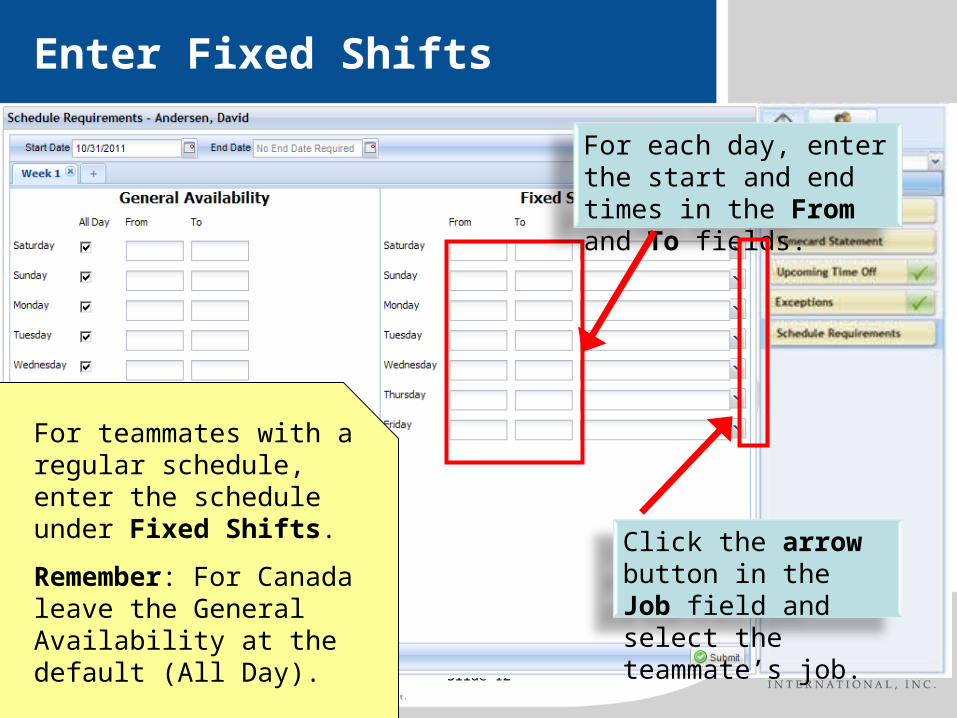
Slide 12
Enter Fixed Shifts
For teammates with a regular schedule, enter the schedule under Fixed Shifts.
Remember: For Canada leave the General Availability at the default (All Day).
For each day, enter the start and end times in the From and To fields.
Click the arrow button in the Job field and select the teammate’s job.

© 2008 General Parts International, Inc.Written permission is required to copy or forward to anyone other than the intended recipient.
Slide 13
Add Rotation Weeks
If a teammate has a schedule rotation, you can enter fixed shifts for additional weeks. You can add as many weeks as you need.
Be sure that the Start Date field for each week correctly lines up with the rotation.
Click the Plus button to add another week.

© 2008 General Parts International, Inc.Written permission is required to copy or forward to anyone other than the intended recipient.
Slide 14
Add Rotation Weeks
Enter the Fixed Shifts for Week 2. Add more rotation weeks if needed.
When you are done entering all Schedule Requirements, click the Submit button.

© 2008 General Parts International, Inc.Written permission is required to copy or forward to anyone other than the intended recipient.
Slide 15
Meals
Notes about meals:
•The system will automatically schedule meals based after the 3rd hour and no later than the 5th hour. Meals are auto-scheduled for one hour; managers can edit the schedule to adjust the hours and breaks.
•Meals cannot be less than 30 minutes; the Web Clock will not allow a teammate to punch in from a meal after less than 30 minutes without a Manager Override.
•An exception will be created if a meal is not started before 5 hours.
•Meals do not apply to shifts less than 5 hours.
•The system will not require teammates to punch out at the scheduled meal time.

© 2008 General Parts International, Inc.Written permission is required to copy or forward to anyone other than the intended recipient.
Slide 16
Set Up Tasks in Site Manager
Your first week in TeammateTime, you need to do the following set-up tasks in Site Manager:1. Enter each teammate’s Schedule Requirements:
• General availability for each teammate that should be scheduled based on labor demand
• Fixed shifts for teammates with regular schedules
2. Establish borrowing relationships to allow other managers to borrow your teammates.
3. Assign the keyholder attribute to keyholders.

© 2008 General Parts International, Inc.Written permission is required to copy or forward to anyone other than the intended recipient.
Slide 17
Establish a Borrowing Relationship
For each teammate, you can establish borrowing relationships with other stores. This allows the other store managers to see your teammates and put them on their schedules; the other store will automatically be charged for the time the teammate works there.
You can set up borrowing relationships only with stores that are currently using TeammateTime.
Click the Add Borrowed Site button.

© 2008 General Parts International, Inc.Written permission is required to copy or forward to anyone other than the intended recipient.
Slide 18
Establish a Borrowing Relationship
The home store manager assigns the borrowed designation to the teammate.
The borrowing store manager confirms the selected teammate and accesses the Schedules to add a shift for the borrowed teammate.
Click the Site arrow.
Click the Site number.

© 2008 General Parts International, Inc.Written permission is required to copy or forward to anyone other than the intended recipient.
Slide 19
Establish a Borrowing Relationship
Note: A teammate can have a borrowing relationship with multiple locations.
The home store manager must establish each borrowing relationship.
Click the Submit button.
Click the Calendar button to change the start date.

© 2008 General Parts International, Inc.Written permission is required to copy or forward to anyone other than the intended recipient.
Slide 20
Establish a Borrowing Relationship
You need to add an End date to stop a borrowing relationship.
Note: Borrowing relationships are effective immediately. This means if a teammate shows up for work and needs to be scheduled at another site, you can do the following: •Unfill the shift in the Schedule Editor.•Establish the borrowing relationship with the borrowing store.

© 2008 General Parts International, Inc.Written permission is required to copy or forward to anyone other than the intended recipient.
Slide 21
Set Up Tasks in Site Manager
Your first week in TeammateTime, you need to do the following set-up tasks in Site Manager:1. Enter each teammate’s Schedule Requirements:
• General availability for each teammate that should be scheduled based on labor demand
• Fixed shifts for teammates with regular schedules
2. Establish borrowing relationships to allow other managers to borrow your teammates.
3. Assign the keyholder attribute to keyholders.
© 2008 General Parts International, Inc.Written permission is required to copy or forward to anyone other than the intended recipient.
Slide 22
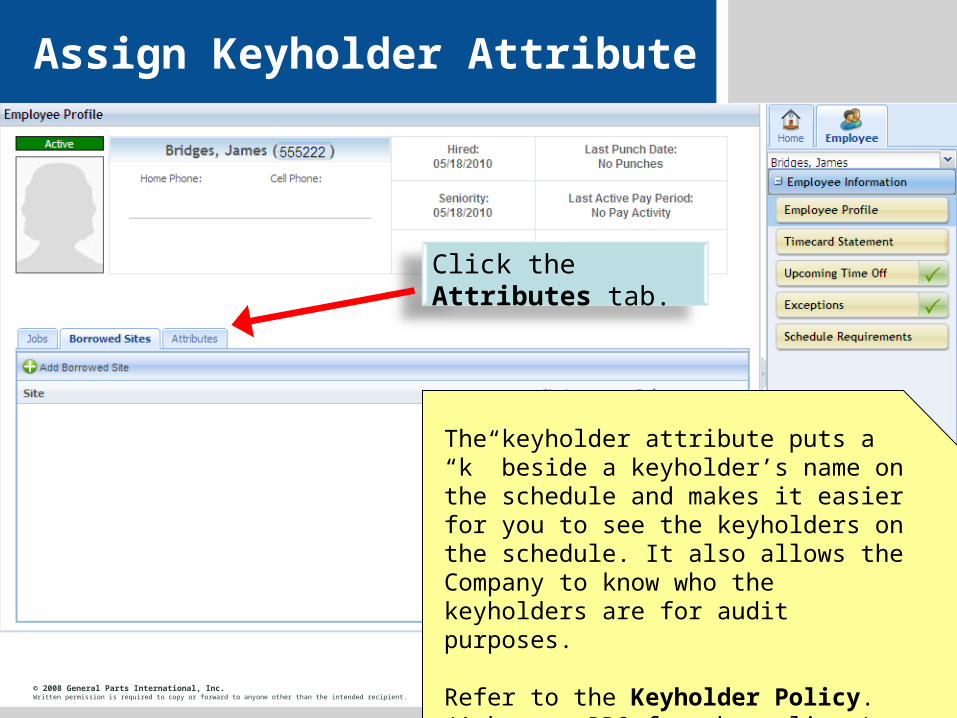
Assign Keyholder Attribute
Click the Attributes tab.
The keyholder attribute puts a “k” beside a keyholder’s name on the schedule and makes it easier for you to see the keyholders on the schedule. It also allows the Company to know who the keyholders are for audit purposes.
Refer to the Keyholder Policy. (Ask your RDO for the policy.)

© 2008 General Parts International, Inc.Written permission is required to copy or forward to anyone other than the intended recipient.
Slide 23
Assign Keyholder Attribute
Click the Assign Attribute button.

© 2008 General Parts International, Inc.Written permission is required to copy or forward to anyone other than the intended recipient.
Slide 24
Assign Keyholder Attribute
Click the Attribute arrow.
Click Keyholder.

© 2008 General Parts International, Inc.Written permission is required to copy or forward to anyone other than the intended recipient.
Slide 25
Assign Keyholder Attribute
Click the Submit button.

© 2008 General Parts International, Inc.Written permission is required to copy or forward to anyone other than the intended recipient.
Slide 26
Set Up Tasks in Core
Your first week in TeammateTime, you need to do the following set-up tasks in Core:1. Exclude non-keyholders from the keyholder labor role (for all
US and Canada Customer Service Teammates, including ISO).
2. Get your teammates’ Clock-in PINs (needed for them to punch in and out). Also get your own Clock-in PIN (needed for Manager Override of the Web Clock).

© 2008 General Parts International, Inc.Written permission is required to copy or forward to anyone other than the intended recipient.
Slide 27
Exclude TMs from Keyholder Labor Role
Type workforce in the Quick Find box and click Workforce Employees in the drop-down list.
By default, the system assigns all teammates the keyholder labor role. You will have to tell the system which teammates to exclude from this labor role.
This is a one-time setup task.

© 2008 General Parts International, Inc.Written permission is required to copy or forward to anyone other than the intended recipient.
Slide 28
Exclude TMs from Keyholder Labor Role
Click the name of the first teammate.

© 2008 General Parts International, Inc.Written permission is required to copy or forward to anyone other than the intended recipient.
Slide 29
Exclude TMs from Keyholder Labor Role
Click the Jobs tab.
© 2008 General Parts International, Inc.Written permission is required to copy or forward to anyone other than the intended recipient.
Slide 30
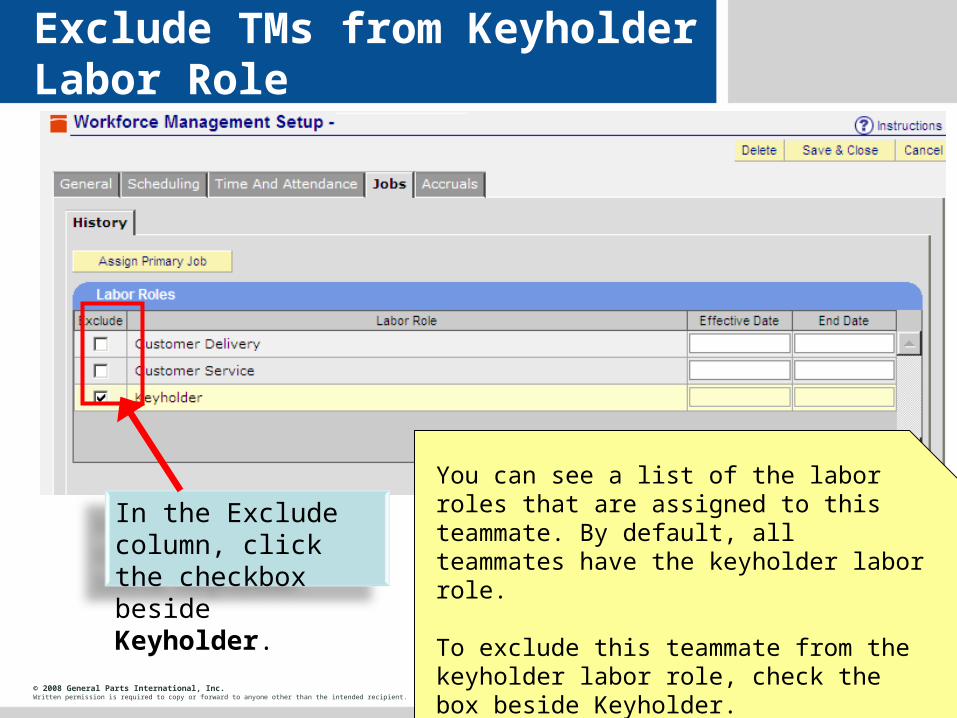
Exclude TMs from Keyholder Labor Role
You can see a list of the labor roles that are assigned to this teammate. By default, all teammates have the keyholder labor role.
To exclude this teammate from the keyholder labor role, check the box beside Keyholder.
In the Exclude column, click the checkbox beside Keyholder.

© 2008 General Parts International, Inc.Written permission is required to copy or forward to anyone other than the intended recipient.
Slide 31
Exclude TMs from Keyholder Labor Role
Important: Customer Service Teammates are expected to deliver parts when necessary. Do not exclude Customer Service Teammates from the Customer Delivery labor role unless they are unable to drive.

© 2008 General Parts International, Inc.Written permission is required to copy or forward to anyone other than the intended recipient.
Slide 32
Set Up Tasks in Core
Your first week in TeammateTime, you need to do the following set-up tasks in Core:1. Exclude non-keyholders from the keyholder labor role (for all
US and Canada Customer Service Teammates, including ISO).
2. Get your teammates’ Clock-in PINs (needed for them to punch in and out). Also get your own Clock-in PIN (needed for Manager Override of the Web Clock).

© 2008 General Parts International, Inc.Written permission is required to copy or forward to anyone other than the intended recipient.
Slide 33
Access Clock-In PINs
Teammates need their Clock-in PINs to punch in and out of the Web Clock. Managers need their Clock–in PIN to perform a Manager Override of the clock.
Type employee list in the Quick Find box and click Employee List in the drop-down list.

© 2008 General Parts International, Inc.Written permission is required to copy or forward to anyone other than the intended recipient.
Slide 34
Access Clock-In PINs
Check the box beside Include Badge Number.
Click Run Report.
Note: The Clock-in PIN is sometimes called the Badge Number in TeammateTime.

© 2008 General Parts International, Inc.Written permission is required to copy or forward to anyone other than the intended recipient.
Slide 35
Access Clock-In PINs
To print the list, click the Print button.
Give each teammate his or her Clock-in PIN (Badge Number). Teammates must not share this information.

© 2008 General Parts International, Inc.Written permission is required to copy or forward to anyone other than the intended recipient.
Slide 36
Manager’s Next Steps
1. Log in to Site Manager. If you have access/login issues, contact Voice of the Teammate (VOTT) at 877-443-5747.
2. When prompted, change your password to match your My Time password; this password will be synched to be the same for the Core.
3. Enter Schedule Requirements for each teammate (Availability and Fixed Shifts).
4. Set up borrowing relationships.
5. Assign keyholder attribute to keyholders.
6. Exclude non-keyholders from keyholder labor role.
7. Get Clock-in PINs.
8. Update store hours in Notebook and update rosters during first week.
9. If you have questions about using TmT, call your RDO.

© 2008 General Parts International, Inc.Written permission is required to copy or forward to anyone other than the intended recipient.
Slide 37
Prepare Teammates
1. Go to the TeammateTime Information Center on CARQUEST Link. Print and post the Web Clock job aid by each computer. (Teammates are not assigned any TmT training in the Learning Center.)
2. Inform teammates about the TeammateTime and give them their Clock-in PINs.
3. Launch the Web Clock. Explain how to use it and when to request a manager override of the clock.
4. Provide login information (user teammate ID as ID and password). Show them how to log in to MyTmT to see their schedule and timecard and request time off.
Note: If teammates forget their Clock-in PINs, they can ask their manager or RDO or call Voice of the Teammate.

© 2008 General Parts International, Inc.Written permission is required to copy or forward to anyone other than the intended recipient.
Slide 38
Questions?