Teaching Handwriting - جامعة بابل | University of Babylon T. Gourdie’s The Puffin Book of...
31
Teaching Handwriting
Transcript of Teaching Handwriting - جامعة بابل | University of Babylon T. Gourdie’s The Puffin Book of...
Teaching Handwriting
2
Contents Page Foreword 3 Introduction 4 1 Basic Considerations 5 The Aim of Teaching Handwriting Basic Script The Cursive Style Capitals Numerals Consistency of Movement and Shape 2 Sequence of Instruction 9
The First Two Years Years 3 and 4 Years 5 and 6 Years 7 and 8
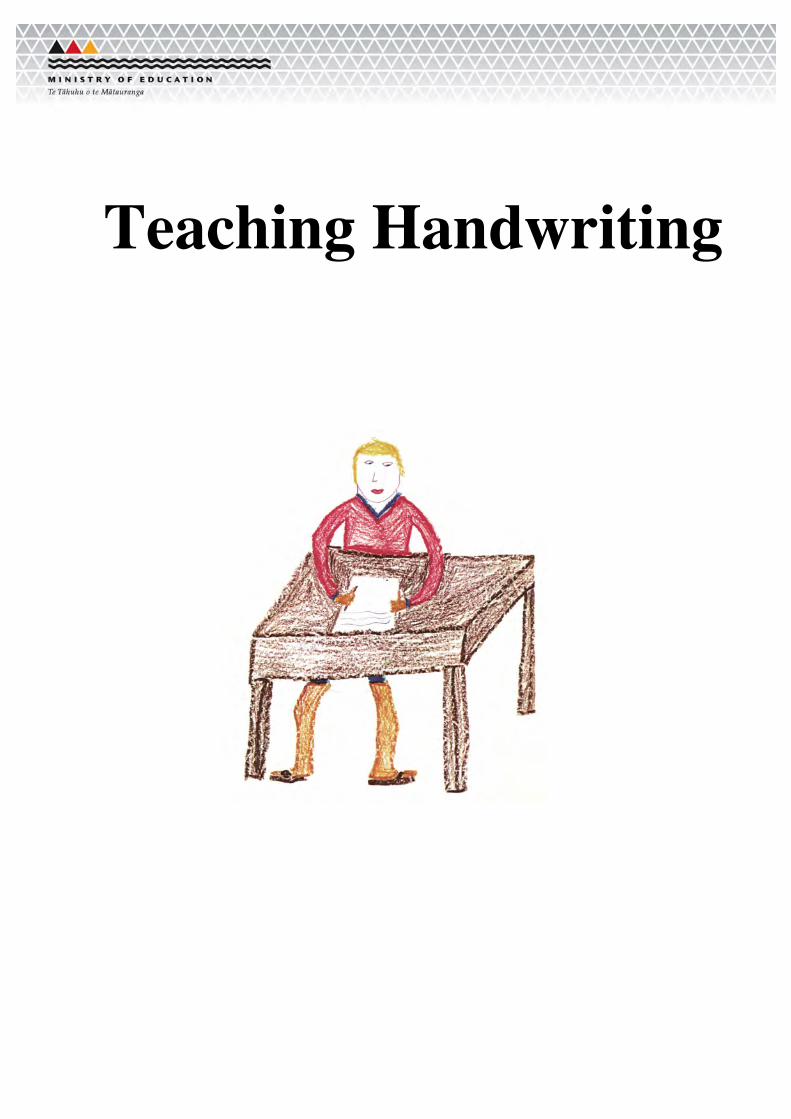
3 General Considerations and Teaching Practices 16 References 23 Appendices 24 1 Samples of Developing Handwriting 2 Beginning Points and Direction of Movements Index 31 Acknowledgments The handwritten samples in appendix 1 were done by students from Upper Hutt Primary School. The illustration on the front cover is by Kevin Prince. The lettering samples throughout the text and in appendix 2 were done by Howard Farr. Copyright © Crown 1985 Published in PDF format 2008 for the Ministry of Education by Learning Media Limited, Box 3293, Wellington, New Zealand www.learningmedia.co.nz Learning Media has made every reasonable attempt to contact all the holders of copyright for material quoted or reproduced in this book. We would be pleased to hear from any copyright holders whom we have been unable to contact. Copyright © Crown 2008 All rights reserved. Enquiries should be made to the publisher. PDF ISBN 978 0 7903 3260 4 Item Number 33260
3
Ministry of Education (2007). The New Zealand Curriculum. Wellington: Learning Media. Ministry of Education (2007). Literacy Learning Progressions: Meeting the Reading and Writing Demands of the Curriculum (Draft for Consultation). Wellington: Learning Media.
Foreword Teaching Handwriting has been produced in response to requests from teachers for guidance on the style of handwriting to be taught in New Zealand primary schools. The teaching of handwriting is not an end in itself. It is a skill which, along with spelling and punctuation, is an essential tool in effective written communication. The style of the handwriting presented in this supplement to the syllabus has been designed to provide children with a basic script which, developed to the cursive form, will satisfy the requirements of an adult hand. The basic script enables children to write legibly, fluently, without strain, and with sufficient speed for practical purposes. It is also flexible enough to allow children to develop their own personal style. Earlier drafts of this supplement have been tried out in groups of schools and discussed with teachers, inspectors, advisers, and teachers’ college lecturers. In 1980, a draft of the supplement and a questionnaire were issued to all schools, and teachers were invited to respond. Their responses were considered and modifications made to the booklet. Work on Teaching Handwriting began in 1976 at a Lopdell House course chaired by D. J. Merrington, Senior Inspector of Schools, Auckland. Since then, the work has been co-ordinated by J. K. Millar, Senior Education Officer Curriculum Development. Although many people have assisted in the preparation of this booklet, I wish to acknowledge the work of E. M. Eggers, psychologist, Palmerston North, who took a major part in writing the final draft; of N. A. Bracefield, principal, Dunedin, and J. S. Sharp, senior teacher, Napier, who provided information on research; and of H. J. Farr, principal of Upper Hutt Primary School, and his staff and pupils, who provided continuing and enthusiastic support for the project, and whose work is represented in the handwritten samples. W. L. Renwick Director-General of Education
In response to requests from teachers, Teaching Handwriting has been reproduced in PDF format. Some minor changes have been incorporated to reflect current terminology and practice. Refer to The New Zealand Curriculum: English learning area: Speaking, Writing, and Presenting strand for specific indicators at each level to plan for students’ handwriting needs. The draft Literacy Learning Progressions: Meeting the Reading and Writing Demands of the Curriculum provides clear expectations as to the handwriting skills students need to have mastered by certain year levels.
4
Introduction In spite of rapid technological change, the ability to write legibly and quickly continues to be a basic skill in New Zealand society. This supplement to the curriculum aims to help teachers to provide consistent instruction in a complex task involving both the physical skill and the attitudes of the learners. It is recognised that handwriting is not an end in itself but is one of the necessary skills of written expression. There has been considerable debate about the teaching of handwriting, and – for at least fifty years – continuing criticism of the standard of handwriting of pupils and school leavers. Handwriting involves physical skill and is required of everyone in our society. As in all physical skills, there is a wide range of achievement. Nevertheless, it continues to be the task of teachers in primary and intermediate schools to teach all pupils, within the limits of their individual differences, to write efficiently and legibly. In 1982, the Department of Education made a study of the handwriting of a sample of form one pupils in intermediate schools.1 Results indicated that, on average, children who used the style detailed in this supplement to the curriculum wrote with greater speed and legibility than those who used other common styles.
5
1 Basic Considerations The Aim of Teaching Handwriting In primary schools, the aim of teaching handwriting is to teach each child to write legibly, fluently, without strain, and with sufficient speed for all practical purposes. To realise this aim, the basic script, with its development to the cursive form described in this booklet, should be taught in all primary and intermediate schools. The purpose of using the same system in all schools is to produce continuity and consistency in the teaching and learning of handwriting. Such a statement does not deny freedom for individual differences and growth, nor does it ignore the fact that handwriting is highly individualistic. Throughout this booklet, there is frequent reference to the individual differences between children and the need for teachers to accept the resulting modifications of letter forms provided that the essential form is not distorted. Teachers should not rigidly insist on the precise, standardised reproduction of model letter shapes, but should emphasise rather the way the pencil or pen is moved to form the letters. The central theme of this booklet is that, to achieve the aim, a child’s task is to learn efficient movements rather than to copy model shapes. A teacher can teach movement – a sample alphabet cannot. Instruction needs to be informed and consistent, providing a base on which individual handwriting may progressively develop. Handwriting is still a necessary skill in our society, and the development of an efficient, individual style depends on the mastery of basic skills, which can be achieved only by competent teaching and regular practice. To achieve a consistent approach in all classes, every teacher should understand and use the style described in this book. Where implementation of this handwriting style requires major changes to school schemes, it is suggested that the changes should be introduced at the junior class level and be allowed to grow up through the school.
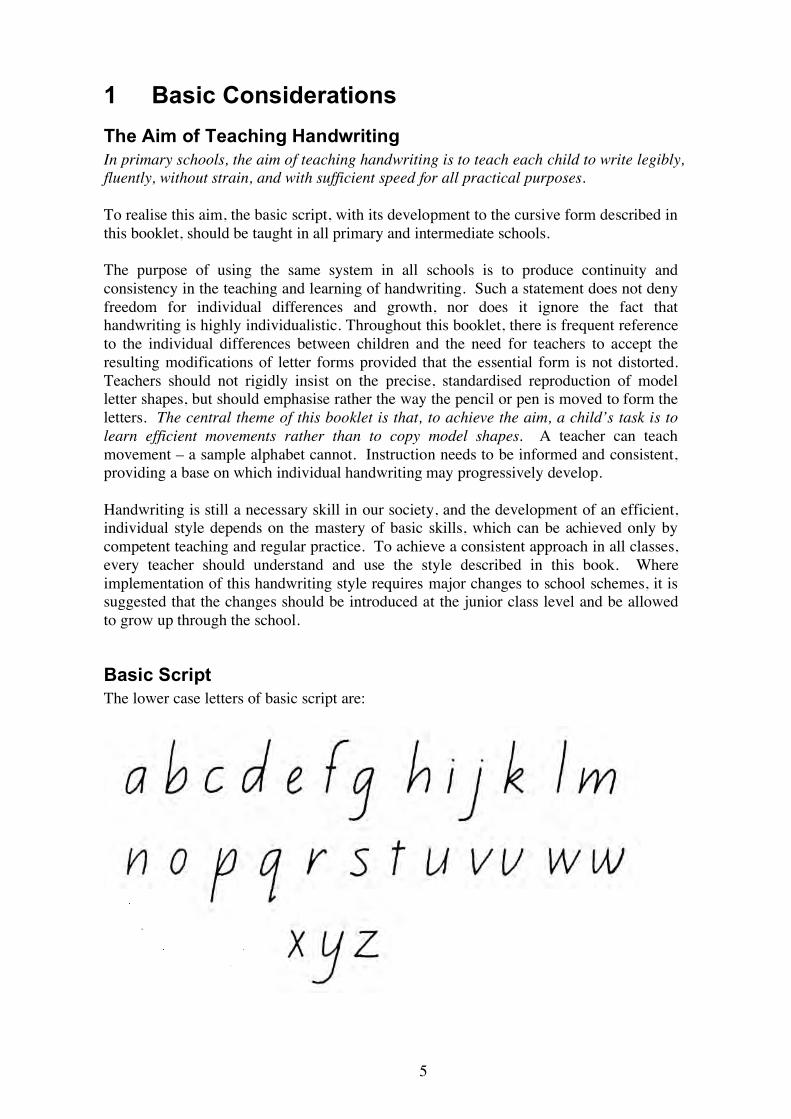
Basic Script The lower case letters of basic script are:
6
The term “basic script” used in this booklet refers to an alphabet that is simple and practical. It can be written at speed and with an ease which allows some variation without loss of a consistent appearance. Basic script also provides a sound foundation for later progression to a cursive form and to the expression of individual preferences.
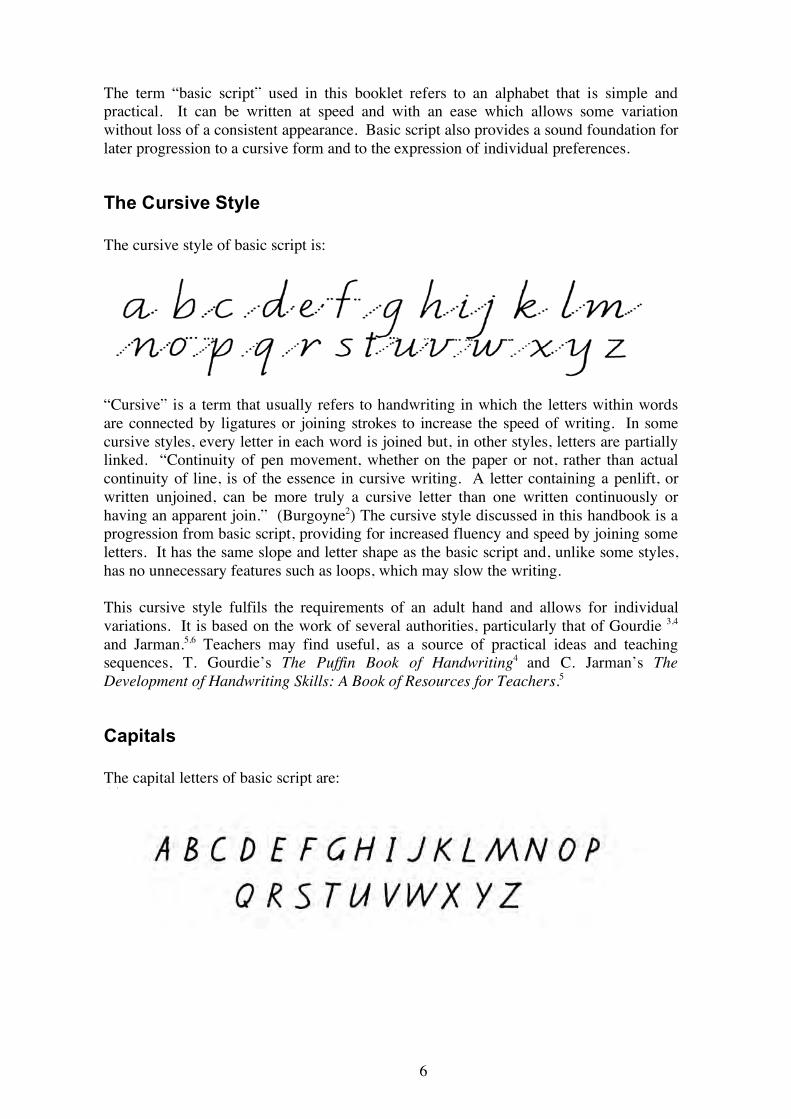
The Cursive Style The cursive style of basic script is:
“Cursive” is a term that usually refers to handwriting in which the letters within words are connected by ligatures or joining strokes to increase the speed of writing. In some cursive styles, every letter in each word is joined but, in other styles, letters are partially linked. “Continuity of pen movement, whether on the paper or not, rather than actual continuity of line, is of the essence in cursive writing. A letter containing a penlift, or written unjoined, can be more truly a cursive letter than one written continuously or having an apparent join.” (Burgoyne2) The cursive style discussed in this handbook is a progression from basic script, providing for increased fluency and speed by joining some letters. It has the same slope and letter shape as the basic script and, unlike some styles, has no unnecessary features such as loops, which may slow the writing. This cursive style fulfils the requirements of an adult hand and allows for individual variations. It is based on the work of several authorities, particularly that of Gourdie 3,4 and Jarman.5,6 Teachers may find useful, as a source of practical ideas and teaching sequences, T. Gourdie’s The Puffin Book of Handwriting4 and C. Jarman’s The Development of Handwriting Skills: A Book of Resources for Teachers.5
Capitals The capital letters of basic script are:
7
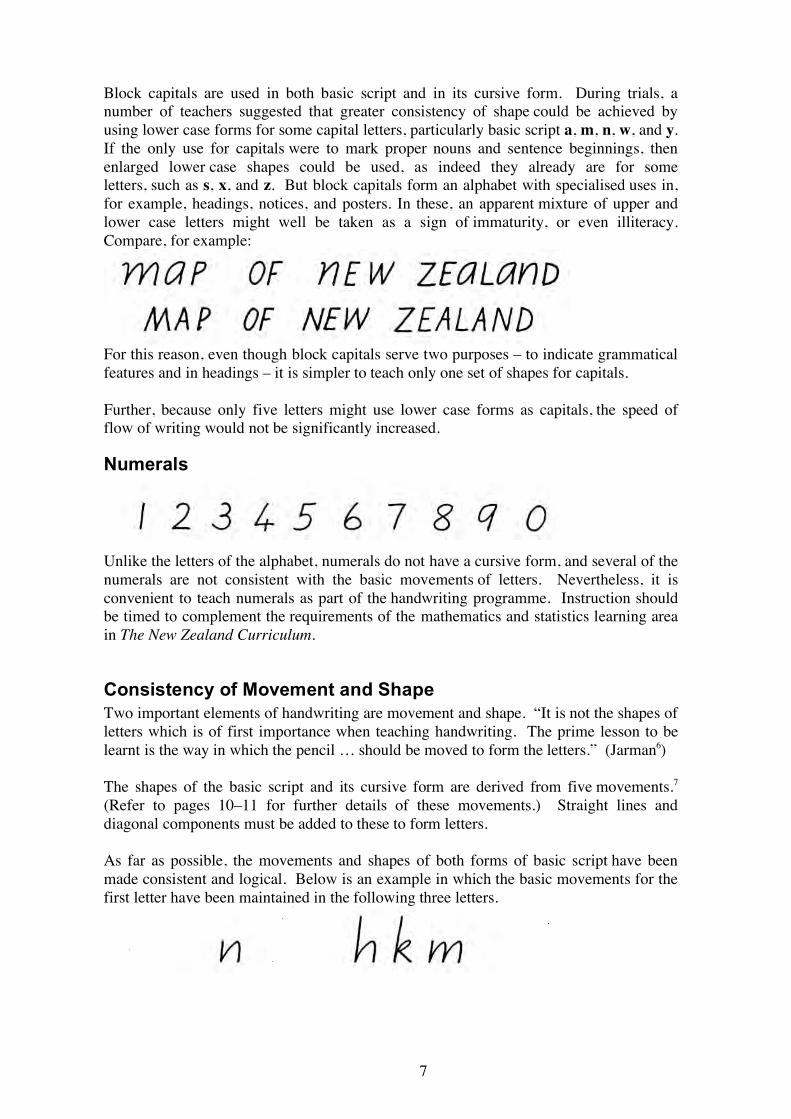
Block capitals are used in both basic script and in its cursive form. During trials, a number of teachers suggested that greater consistency of shape could be achieved by using lower case forms for some capital letters, particularly basic script a, m, n, w, and y. If the only use for capitals were to mark proper nouns and sentence beginnings, then enlarged lower case shapes could be used, as indeed they already are for some letters, such as s, x, and z. But block capitals form an alphabet with specialised uses in, for example, headings, notices, and posters. In these, an apparent mixture of upper and lower case letters might well be taken as a sign of immaturity, or even illiteracy. Compare, for example:
For this reason, even though block capitals serve two purposes – to indicate grammatical features and in headings – it is simpler to teach only one set of shapes for capitals. Further, because only five letters might use lower case forms as capitals, the speed of flow of writing would not be significantly increased.
Numerals
Unlike the letters of the alphabet, numerals do not have a cursive form, and several of the numerals are not consistent with the basic movements of letters. Nevertheless, it is convenient to teach numerals as part of the handwriting programme. Instruction should be timed to complement the requirements of the mathematics and statistics learning area in The New Zealand Curriculum.
Consistency of Movement and Shape Two important elements of handwriting are movement and shape. “It is not the shapes of letters which is of first importance when teaching handwriting. The prime lesson to be learnt is the way in which the pencil … should be moved to form the letters.” (Jarman6) The shapes of the basic script and its cursive form are derived from five movements.7 (Refer to pages 10–11 for further details of these movements.) Straight lines and diagonal components must be added to these to form letters. As far as possible, the movements and shapes of both forms of basic script have been made consistent and logical. Below is an example in which the basic movements for the first letter have been maintained in the following three letters.
8
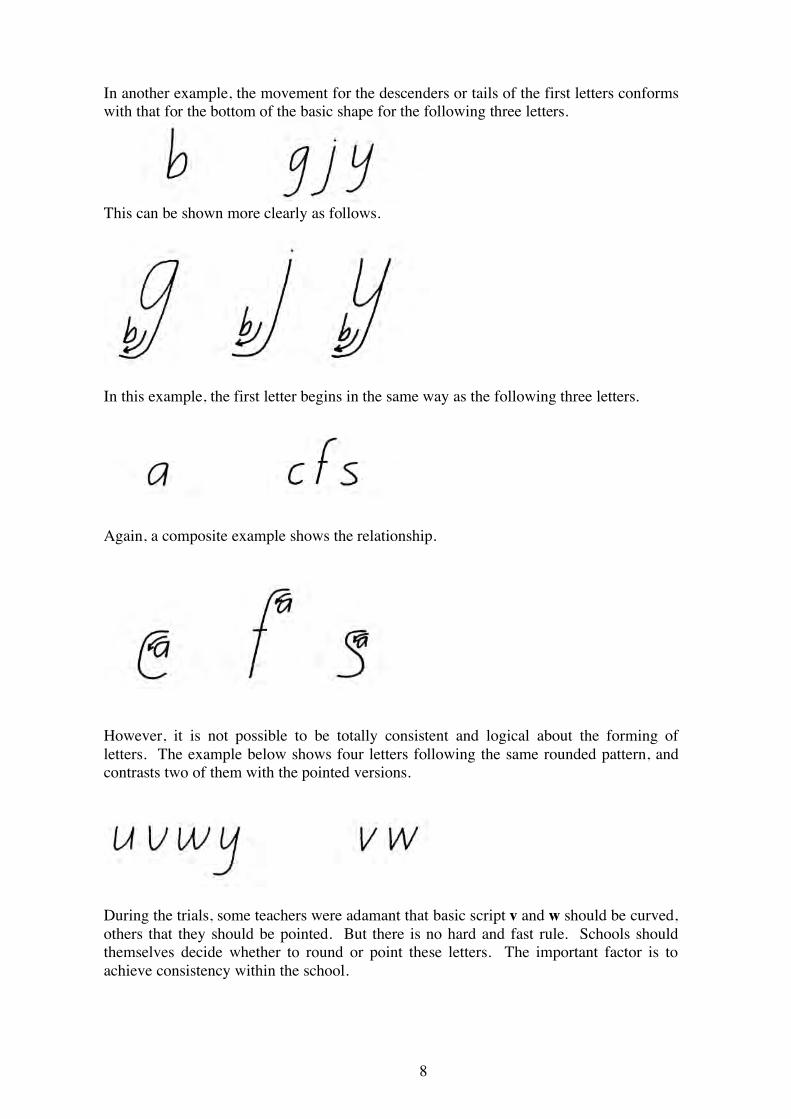
In another example, the movement for the descenders or tails of the first letters conforms with that for the bottom of the basic shape for the following three letters.
This can be shown more clearly as follows.
In this example, the first letter begins in the same way as the following three letters.
Again, a composite example shows the relationship.
However, it is not possible to be totally consistent and logical about the forming of letters. The example below shows four letters following the same rounded pattern, and contrasts two of them with the pointed versions.
During the trials, some teachers were adamant that basic script v and w should be curved, others that they should be pointed. But there is no hard and fast rule. Schools should themselves decide whether to round or point these letters. The important factor is to achieve consistency within the school.
9
2 Sequence of Instruction The main stages in teaching children handwriting at primary school generally are: • teaching grip, letter shapes and movements; • teaching ligatures; • increasing speed and endurance without loss of quality.
Young children continue to develop skill in handwriting whenever they use it, both in and out of school time. There is also an important link between learning to read and learning to write during children’s early years. However, the sequence of instruction outlined in this section refers only to the teaching and learning that takes place during the time set aside for special instruction in handwriting. The following section, under the headings “The First Two Years”, “Years 3 and 4”, “Years 5 and 6”, and “Years 7 and 8”, gives a guide to the sequence of instruction, but is not intended as a rigid requirement for each class level. Nor should it be regarded as a fixed sequence of learning through which every child must go. Children of similar ages will show a wide range of skill in handwriting. As a general guide, teachers should follow the well-known principle of beginning with what each child can do and proceeding to new aspects of learning in small manageable steps.
The First Two Years New entrants will include some children who can draw a recognisable picture, some who can draw objects other than houses and people, and a few who can copy or even write their own names. At the other extreme, some may appear seldom to have used a pencil. Those who are very immature, and lack preparation for school tasks such as writing, will need many opportunities to engage in manipulative activities to develop the co-ordination of hand and eye before handwriting instruction begins. Children show their readiness to be taught how to form letters correctly through their physical dexterity, their efforts to copy on their own, and by their requests for assistance. This is the best time to teach them. It is a mistake to try to teach children to write before they are ready. If the writing task is so demanding as to make a child tense, then it defeats the purpose. The first objectives should be to help children to establish the correct grip, to begin letters at the correct point, and to form letters and numerals correctly. (These points are elaborated below and on pages 17–18 and 29–30.) In the early stages, children can be grouped for instruction according to their level of development, but the smaller the group the better. They can then more readily be given individual help, and the possibility that children will practise errors can be avoided. It may help some children to establish the direction of their handwriting movements if they make their first efforts on large sheets of paper using crayons or paint brushes. This is not necessary for all children. Verbalisation In the context of handwriting, verbalisation means that the children watch and listen as the teacher models the letter and describes the movements, “Start at the top, down to the line, up, over, down, stop.”

10
The children then repeat the directions aloud as they practise the letter. As their confidence grows, they can assist in describing the sequence of movements. Research confirms that language has a vital place to play in focussing a young child’s attention on letter shapes and movements (Markoff8) and that learning is more effective if the children verbalise while they copy than if they do not verbalise. (Furner9) Verbalisation should include reference to the starting point, direction of stroke, and stopping point. Both teacher and pupils should verbalise to reinforce the important visual cues. Immediate feedback and correction is vital so that children do not fix incorrect forms in their minds by repeating them. This is particularly important when children are first learning to write. Examples: “Start at the top––down––up––over––in––out––stop.”
“Start at the top––round––down––lift––cross––stop.”
“Start at the top––down––lift––down––lift––across––stop.” The technique should not become an unthinking, ritual chant. Verbalisation should be discontinued when starting points and direction of movement become established. Lesson Format A typical handwriting lesson for junior children includes exercises to practise handwriting movements, instruction in and practice of specific letters, and application of the letters taught. Exercises Children’s ability to control pen or pencil develops gradually and can be assisted through simple exercises which practise the movements for letters, especially in the early stages. The four main purposes of exercises are to help children to: • develop manipulative skill and control; • learn to copy simple shapes; • practise movements on which letters are based; • develop visual discrimination. For examples of handwriting exercises, the books by Gourdie4 and Jarman5 are particularly useful. Basic Movements There are a variety of ways in which letters may be grouped for instruction; one method is to group letters based on similar movements. Teach letters with straight lines first because young children can make these more easily than those with curves.
11
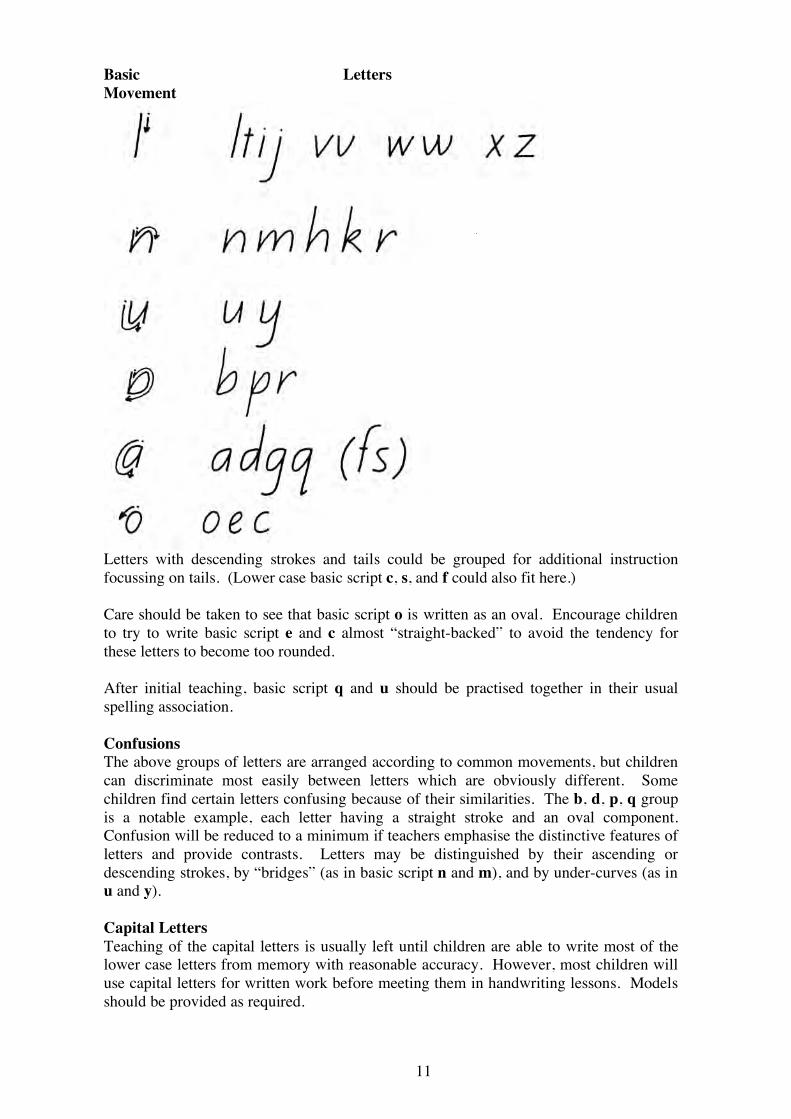
Basic Letters Movement
Letters with descending strokes and tails could be grouped for additional instruction focussing on tails. (Lower case basic script c, s, and f could also fit here.) Care should be taken to see that basic script o is written as an oval. Encourage children to try to write basic script e and c almost “straight-backed” to avoid the tendency for these letters to become too rounded. After initial teaching, basic script q and u should be practised together in their usual spelling association. Confusions The above groups of letters are arranged according to common movements, but children can discriminate most easily between letters which are obviously different. Some children find certain letters confusing because of their similarities. The b, d, p, q group is a notable example, each letter having a straight stroke and an oval component. Confusion will be reduced to a minimum if teachers emphasise the distinctive features of letters and provide contrasts. Letters may be distinguished by their ascending or descending strokes, by “bridges” (as in basic script n and m), and by under-curves (as in u and y). Capital Letters Teaching of the capital letters is usually left until children are able to write most of the lower case letters from memory with reasonable accuracy. However, most children will use capital letters for written work before meeting them in handwriting lessons. Models should be provided as required.
12
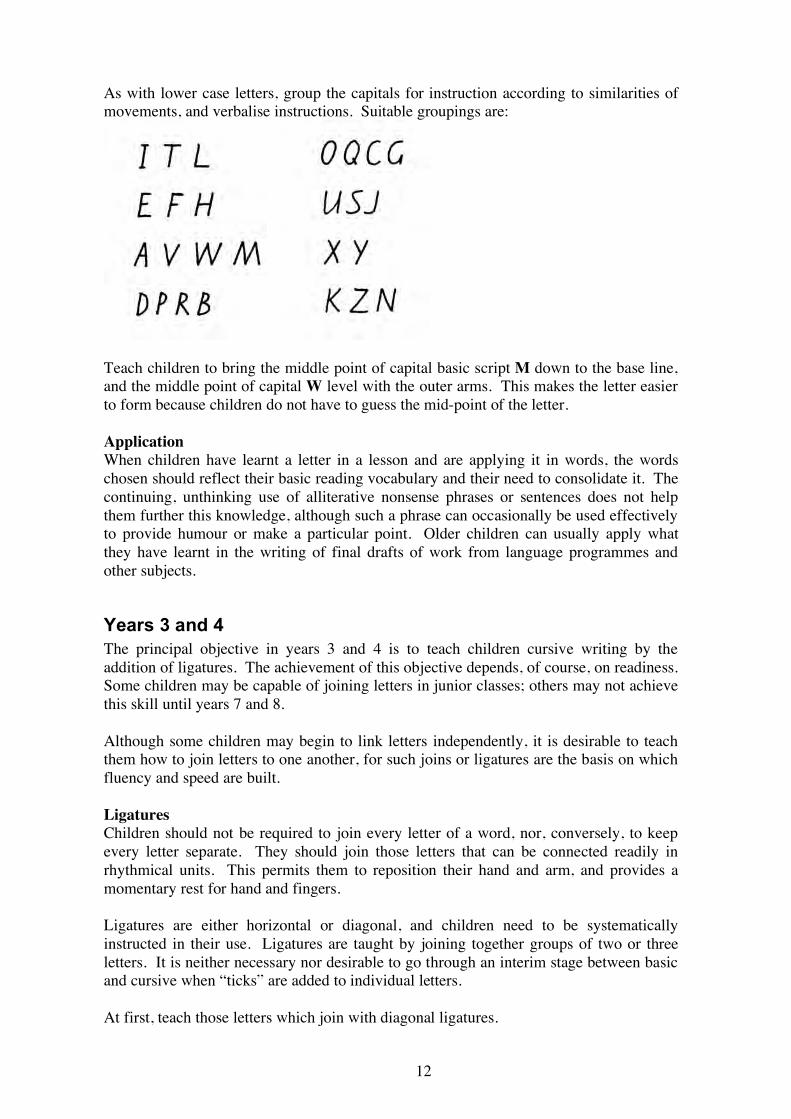
As with lower case letters, group the capitals for instruction according to similarities of movements, and verbalise instructions. Suitable groupings are:
Teach children to bring the middle point of capital basic script M down to the base line, and the middle point of capital W level with the outer arms. This makes the letter easier to form because children do not have to guess the mid-point of the letter. Application When children have learnt a letter in a lesson and are applying it in words, the words chosen should reflect their basic reading vocabulary and their need to consolidate it. The continuing, unthinking use of alliterative nonsense phrases or sentences does not help them further this knowledge, although such a phrase can occasionally be used effectively to provide humour or make a particular point. Older children can usually apply what they have learnt in the writing of final drafts of work from language programmes and other subjects.
Years 3 and 4 The principal objective in years 3 and 4 is to teach children cursive writing by the addition of ligatures. The achievement of this objective depends, of course, on readiness. Some children may be capable of joining letters in junior classes; others may not achieve this skill until years 7 and 8. Although some children may begin to link letters independently, it is desirable to teach them how to join letters to one another, for such joins or ligatures are the basis on which fluency and speed are built. Ligatures Children should not be required to join every letter of a word, nor, conversely, to keep every letter separate. They should join those letters that can be connected readily in rhythmical units. This permits them to reposition their hand and arm, and provides a momentary rest for hand and fingers. Ligatures are either horizontal or diagonal, and children need to be systematically instructed in their use. Ligatures are taught by joining together groups of two or three letters. It is neither necessary nor desirable to go through an interim stage between basic and cursive when “ticks” are added to individual letters. At first, teach those letters which join with diagonal ligatures.
13
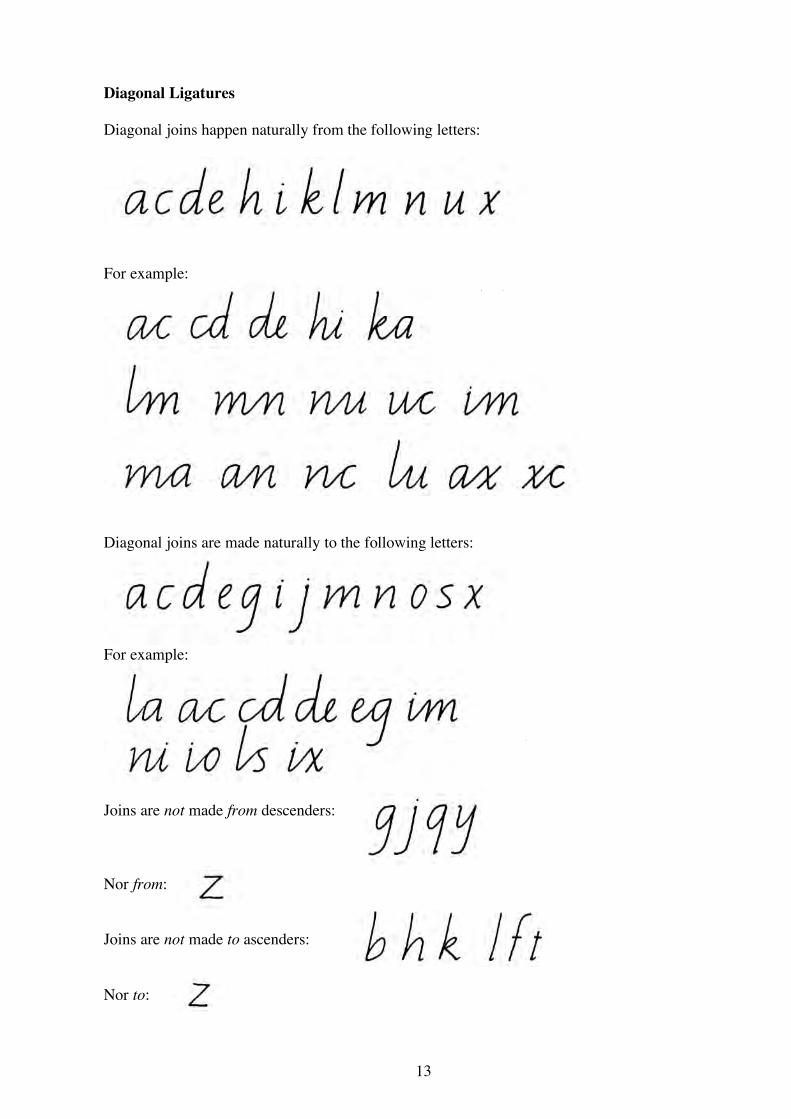
Diagonal Ligatures Diagonal joins happen naturally from the following letters:
For example:
Diagonal joins are made naturally to the following letters:
For example:
Joins are not made from descenders: Nor from: Joins are not made to ascenders: Nor to:
14
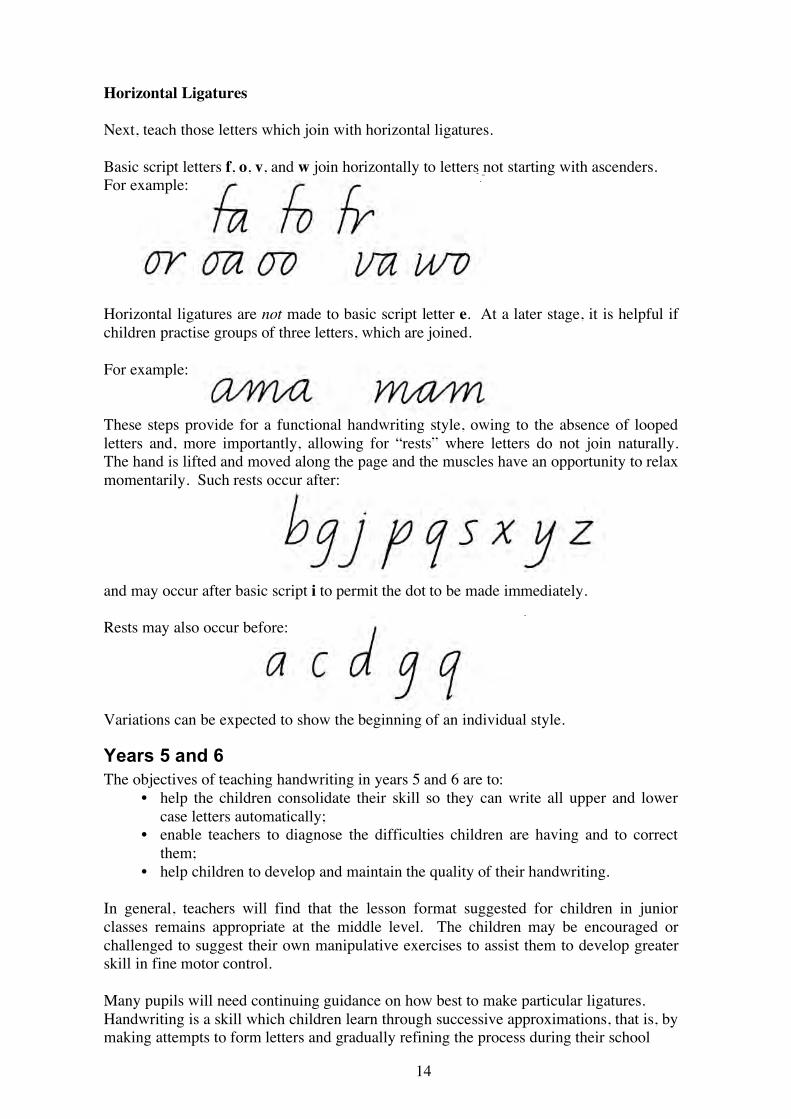
Horizontal Ligatures Next, teach those letters which join with horizontal ligatures. Basic script letters f, o, v, and w join horizontally to letters not starting with ascenders. For example: Horizontal ligatures are not made to basic script letter e. At a later stage, it is helpful if children practise groups of three letters, which are joined. For example: These steps provide for a functional handwriting style, owing to the absence of looped letters and, more importantly, allowing for “rests” where letters do not join naturally. The hand is lifted and moved along the page and the muscles have an opportunity to relax momentarily. Such rests occur after: and may occur after basic script i to permit the dot to be made immediately. Rests may also occur before: Variations can be expected to show the beginning of an individual style.
Years 5 and 6 The objectives of teaching handwriting in years 5 and 6 are to:
• help the children consolidate their skill so they can write all upper and lower case letters automatically;
• enable teachers to diagnose the difficulties children are having and to correct them;
• help children to develop and maintain the quality of their handwriting. In general, teachers will find that the lesson format suggested for children in junior classes remains appropriate at the middle level. The children may be encouraged or challenged to suggest their own manipulative exercises to assist them to develop greater skill in fine motor control. Many pupils will need continuing guidance on how best to make particular ligatures. Handwriting is a skill which children learn through successive approximations, that is, by making attempts to form letters and gradually refining the process during their school
15
years – and beyond. The teacher helps by encouraging and rewarding children in their attempts to form a fast, legible style.
Years 7 and 8 Most children can form letters accurately by the time they reach years 7 and 8. The objectives in teaching handwriting at this level are to:
• continue to help children develop an individual style; • help children to vary the quality and speed of their handwriting to suit the nature
of the task and its purpose; • help children write with increasing speed and endurance without significant loss
of legibility. These objectives relate to all writing, not merely to time spent in handwriting practice. Speed When children are working at speed, and under stress, the legibility of their writing can be significantly affected. It is inevitable that the quality will decline for a time when speed is first emphasised. During this stage, children should be frequently reminded to write at a speed to suit the task. Periodically, they can be given three-minute speed trials in which they write a well known sentence, such as “The quick brown fox … ”, which emphasises only speed. The average number of letters written per minute during a three-minute period can form the basis of records which children can keep themselves to show their increasing speed. At the year 8 level, monthly speed trials may be sufficient. Endurance Endurance is the key to both increasing speed and the maintenance of legibility. The quality of children’s writing tends to deteriorate after only a relatively brief period of continuous effort, and year 7 and 8 pupils will need help to acquire endurance. When they are writing their final copy during written expression or other assignments, children can be encouraged to pause periodically when the muscles in their hands feel strained. They should relax and flex their fingers briefly before continuing, and may also need to be reminded to hold their pens loosely. Purpose Children can be helped to recognise that the speed and quality of handwriting varies according to the task. A first draft can differ in quality from a final copy, and personal notes may differ from the writing that someone else will read. The time taken to compose the first draft may be much longer than the time taken to make a final copy. Regular quality trials in which the children copy a prose extract in their best writing help them to see their progress. These trials can be helpful for both the pupil and the teacher in the evaluation of handwriting.
16
3 General Considerations and Teaching Practices Individuality in Children’s Writing As a consequence of children’s differing abilities and development, it is inevitable that there will be variations in the letters they form. In the past, a rigid insistence on precise reproduction of model letter shapes caused problems in handwriting. On the other hand, children need models and specific instruction to develop legibility, fluency, absence of strain, and reasonable speed in handwriting. Teachers need to recognise and accept that in handwriting, as in any other physical skill, there is a wide range in the quality of performance by children of similar ages. Practice Physical skills can be fixed and refined through regular, brief periods of practice although “practice does not make perfect; it only makes permanent”. (Barbe10) Ideally, children should be individually supervised and given immediate feedback when practising handwriting to ensure that they are not practising errors, but this is seldom possible in the classroom unless the teacher is working with a small group. Alternatively, children can practise their handwriting in pairs, taking turns to observe each other’s efforts and to comment. It is not easy for children to see differences between their attempts and the model. Teachers can help by copying common errors on the blackboard or whiteboard for discussion by the group. The use of overlays on an overhead projector could be even more effective. The Teacher’s Style It is essential that teachers learn the basic script and the cursive style so that the samples of writing children see on blackboards, whiteboards, and wall charts will provide them with good models. Not all teachers will be able to demonstrate perfect models of letter shapes to their pupils, but they can demonstrate the correct movements for each letter, and can assist each child to learn and then master them. The teacher’s task is to demonstrate how the movements are made. Handwriting is a system of movements. A sample alphabet or copies of letters produced for pupils can only show shapes, not movements. Posture At times, children will write draft copies of their work while standing up, while they are lying or sitting on the floor, or when they are outside the classroom. However, good posture should be positively emphasised during handwriting instruction and when the children are writing final copies for others to read. There is no single correct posture for all children, but the following points give a guide to posture which encourages them to relax and helps them to write with ease. • The children should sit comfortably, facing a table of appropriate size. • They should rest their feet flat on the floor, although not necessarily together. • They should keep their body upright, but tilted slightly forward towards the desk. • They should keep their book or paper immediately in front of them to ensure that their
hand and eye movements are co-ordinated. (This may be disrupted if the paper is to one side.)
17
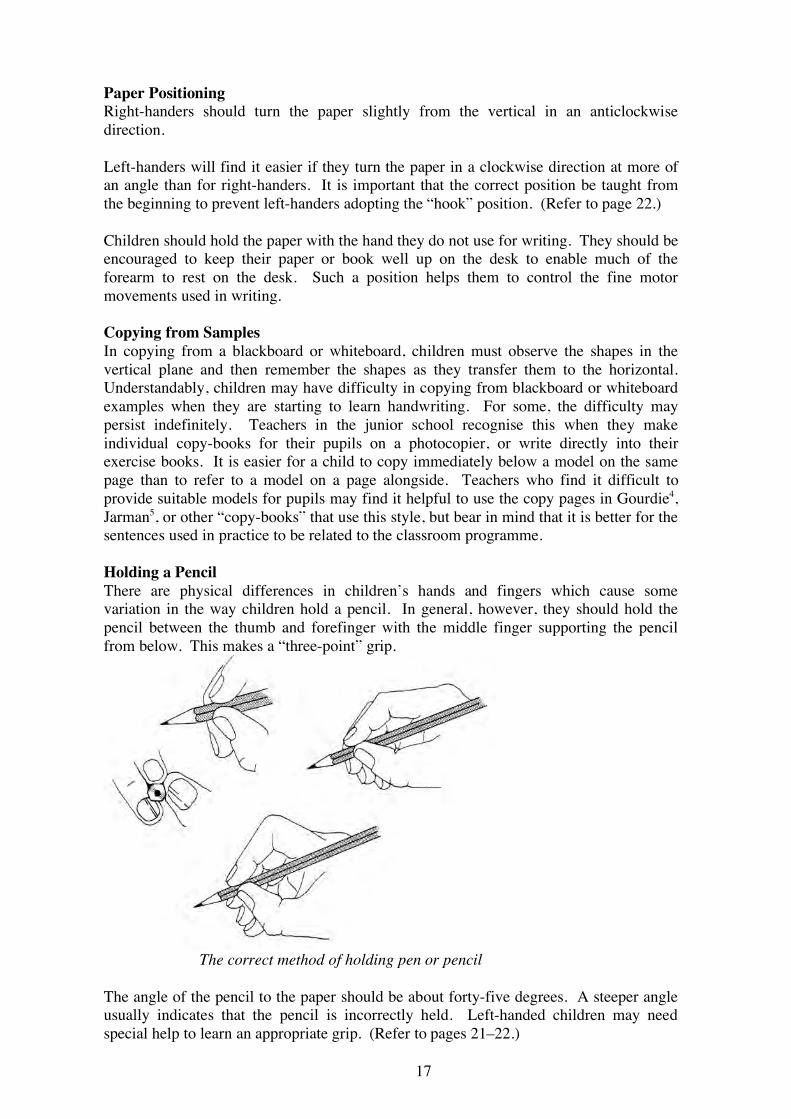
Paper Positioning Right-handers should turn the paper slightly from the vertical in an anticlockwise direction. Left-handers will find it easier if they turn the paper in a clockwise direction at more of an angle than for right-handers. It is important that the correct position be taught from the beginning to prevent left-handers adopting the “hook” position. (Refer to page 22.) Children should hold the paper with the hand they do not use for writing. They should be encouraged to keep their paper or book well up on the desk to enable much of the forearm to rest on the desk. Such a position helps them to control the fine motor movements used in writing. Copying from Samples In copying from a blackboard or whiteboard, children must observe the shapes in the vertical plane and then remember the shapes as they transfer them to the horizontal. Understandably, children may have difficulty in copying from blackboard or whiteboard examples when they are starting to learn handwriting. For some, the difficulty may persist indefinitely. Teachers in the junior school recognise this when they make individual copy-books for their pupils on a photocopier, or write directly into their exercise books. It is easier for a child to copy immediately below a model on the same page than to refer to a model on a page alongside. Teachers who find it difficult to provide suitable models for pupils may find it helpful to use the copy pages in Gourdie4, Jarman5, or other “copy-books” that use this style, but bear in mind that it is better for the sentences used in practice to be related to the classroom programme. Holding a Pencil There are physical differences in children’s hands and fingers which cause some variation in the way children hold a pencil. In general, however, they should hold the pencil between the thumb and forefinger with the middle finger supporting the pencil from below. This makes a “three-point” grip.
The correct method of holding pen or pencil
The angle of the pencil to the paper should be about forty-five degrees. A steeper angle usually indicates that the pencil is incorrectly held. Left-handed children may need special help to learn an appropriate grip. (Refer to pages 21–22.)

18
Faults in Holding a Pencil A faulty grip may be a factor that prevents a number of children from achieving the aims of handwriting. Common faults are outlined below. • The child grips the pencil too tightly. This is indicated by whitening of the knuckles
and heavy pressure on the paper. Ask such children to imagine they are holding a drinking straw or something they must not squeeze too tightly, or use a plastic sleeve (see below).
• The child grips the pencil too close to its point, obscuring what is being written. This is often combined with holding the pencil too tightly.
• The child crosses the thumb over the pencil to rest against the first joint of the forefinger.
Thumb crossed over pencil • Some children may hold both the forefinger and the middle finger on top of the pencil
with the ring finger as support underneath. Forefinger and middle finger held on top of pencil • Problems are also caused when children hold the ring and little fingers too tightly
curled into the palm of the hand. Correcting Faults When they are first learning to write, children who hold their pencil incorrectly should be constantly supervised and helped to hold it correctly. Triangular plastic sleeves can be obtained which slip over the pencil and are designed to help children learn the correct grip. These are most effective when used during the first two years at school since, like any habit, an incorrect grip is very difficult to change when it is well established. Plastic sleeve in use
19
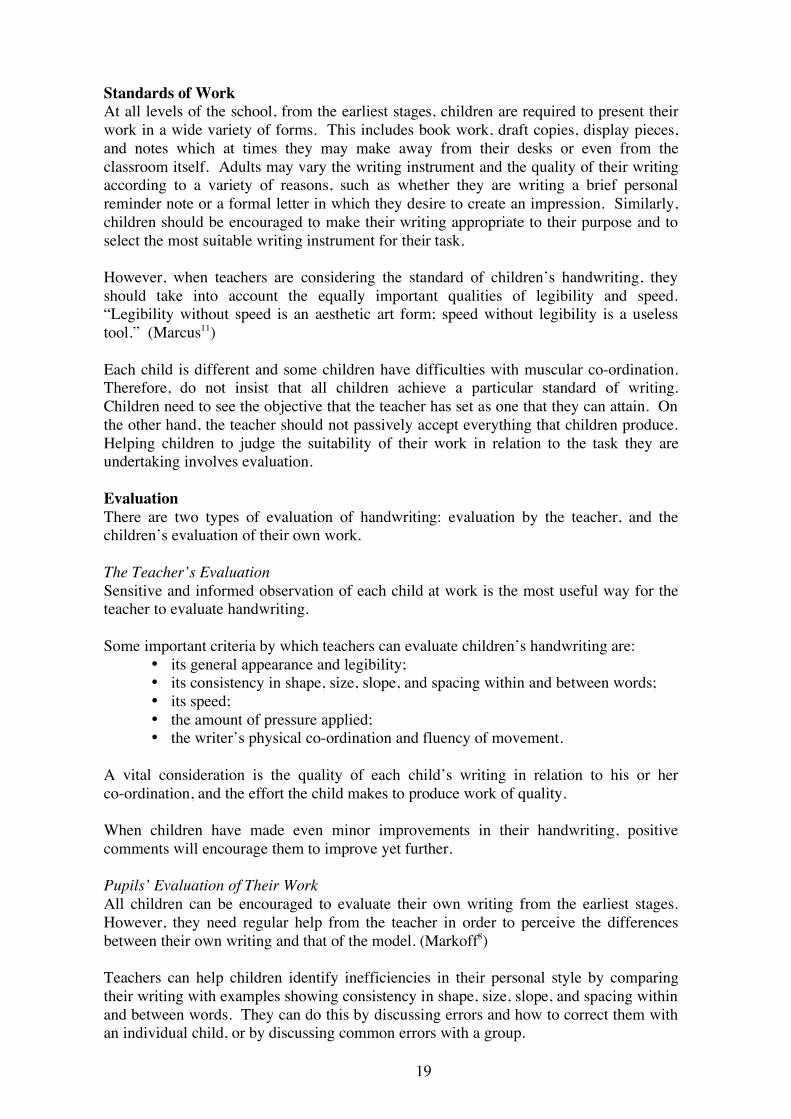
Standards of Work At all levels of the school, from the earliest stages, children are required to present their work in a wide variety of forms. This includes book work, draft copies, display pieces, and notes which at times they may make away from their desks or even from the classroom itself. Adults may vary the writing instrument and the quality of their writing according to a variety of reasons, such as whether they are writing a brief personal reminder note or a formal letter in which they desire to create an impression. Similarly, children should be encouraged to make their writing appropriate to their purpose and to select the most suitable writing instrument for their task. However, when teachers are considering the standard of children’s handwriting, they should take into account the equally important qualities of legibility and speed. “Legibility without speed is an aesthetic art form; speed without legibility is a useless tool.” (Marcus11) Each child is different and some children have difficulties with muscular co-ordination. Therefore, do not insist that all children achieve a particular standard of writing. Children need to see the objective that the teacher has set as one that they can attain. On the other hand, the teacher should not passively accept everything that children produce. Helping children to judge the suitability of their work in relation to the task they are undertaking involves evaluation. Evaluation There are two types of evaluation of handwriting: evaluation by the teacher, and the children’s evaluation of their own work. The Teacher’s Evaluation Sensitive and informed observation of each child at work is the most useful way for the teacher to evaluate handwriting. Some important criteria by which teachers can evaluate children’s handwriting are:
• its general appearance and legibility; • its consistency in shape, size, slope, and spacing within and between words; • its speed; • the amount of pressure applied; • the writer’s physical co-ordination and fluency of movement.
A vital consideration is the quality of each child’s writing in relation to his or her co-ordination, and the effort the child makes to produce work of quality. When children have made even minor improvements in their handwriting, positive comments will encourage them to improve yet further. Pupils’ Evaluation of Their Work All children can be encouraged to evaluate their own writing from the earliest stages. However, they need regular help from the teacher in order to perceive the differences between their own writing and that of the model. (Markoff8) Teachers can help children identify inefficiencies in their personal style by comparing their writing with examples showing consistency in shape, size, slope, and spacing within and between words. They can do this by discussing errors and how to correct them with an individual child, or by discussing common errors with a group.
20
Materials Pencils and Pens Children in primary schools can be encouraged to experiment with a variety of writing instruments and to learn to use them appropriately. However, it is recommended that in junior classes and years 3–4, children use a plain lead pencil for handwriting lessons and for their day-to-day bookwork. Once children know the basic letter forms, teachers may wish to encourage them to try ball-point and fine-tipped fibre pens, for example. These are inexpensive and produce a fine line of consistent quality with a minimum of pressure. The ubiquitous ball-point appears to be here to stay, and it is highly desirable to teach children how to use it. Ball-point pens are readily available and cheap, and are the most likely type of pen the children will use – now and in their adult life. Paper and Exercise Books There is little information available on whether writing paper should be lined or unlined. However, one preliminary study12 of a small number of children in their second year of school showed that there was a distinct improvement in the legibility of their writing when they used lined paper. The report goes on to note that initially children wrote between, rather than on, the lines. As a general guide, lines should be sufficiently spaced for the writer to avoid overlapping descending strokes in one line with ascending strokes in the following line. The lines are a guide on which the writing should sit, rather than a point to which ascending strokes of tall letters should reach. Similarly, upper case letters sit on the line, and do not need to reach the line above. Although the report (referred to above) of children in their second year at school emphasises the usefulness of lines, some experienced teachers consider that new entrant children, at the beginning stage of handwriting, often write most successfully on blank paper, where they can concentrate on the movement and shape of the letters rather than the size. But once children have passed the introductory stage, 25-millimetre ruling will assist legibility if the tall letters are not more than half the height of the spacing between the lines. Alternatively, 12-millimetre ruling may be appropriate through to year 3 and may be preferred in year 4. Very narrow ruling, although ensuring economy of paper, often causes children to intermingle descending “tails” and tall letters. Such ruling is unsuitable if legibility and general quality of appearance are desired. Instructional Errors Hofmeister describes five common errors in the teaching of handwriting.13 • Massed practice without supervision. There is no evidence to suggest that practice
alone will cause handwriting to improve. Just the opposite is a real possibility. • No immediate feedback given. The handwriting act involves motor movements. One
would not wait twenty minutes to correct a tennis player’s volley, and the same is true of handwriting. A delay in feedback often means allowing the child to practise inappropriate handwriting skills, making the remediation even more difficult.
• Emphasis on rote practice rather than discrimination. Perhaps the most important
skill children should acquire is the ability to compare their efforts with a model and determine for themselves the changes necessary.

21
• Failure to provide good models. Models and not verbal instruction will be the main
way many children learn best. But the teacher’s own blackboard or whiteboard work may be poor or, as the child reaches the bottom of a copy-book page, the model on the top line will be far away, and the child may be using his or her own efforts as a model.
• No differentiation between good and bad work. Too often the consequences of trying
to improve are the same as not trying, especially when teachers reward good work with more work, or give the same amount of practice to letters done well as they do to letters done poorly.
Left-handed Children Left-handed children must overcome two major difficulties. First, they must push the pen rather than pull it and, second, their left-hand tends to obscure their writing as it moves across the page. Right-handed adults can experience something of the left-handed child’s difficulties by trying mirror writing, beginning at the right-hand side of the page. Potential difficulties for both right-handers and left-handers in holding a pen can be avoided by early and regular teaching. Given this, left-handers are just as capable as right-handers of high achievement in handwriting, and should on no account be forced to use their right hands. Left-handed children may be helped in the following ways. • They should turn the paper from the vertical in a clockwise direction (the opposite
direction from the right-handed position). Diagrams A, B, and C show, in order, the three most efficient positions. (Enstrom14)
Note that the most efficient position (A) requires the paper to be turned in the opposite direction and at a more extreme
angle than is usual in a right-handed position.
22
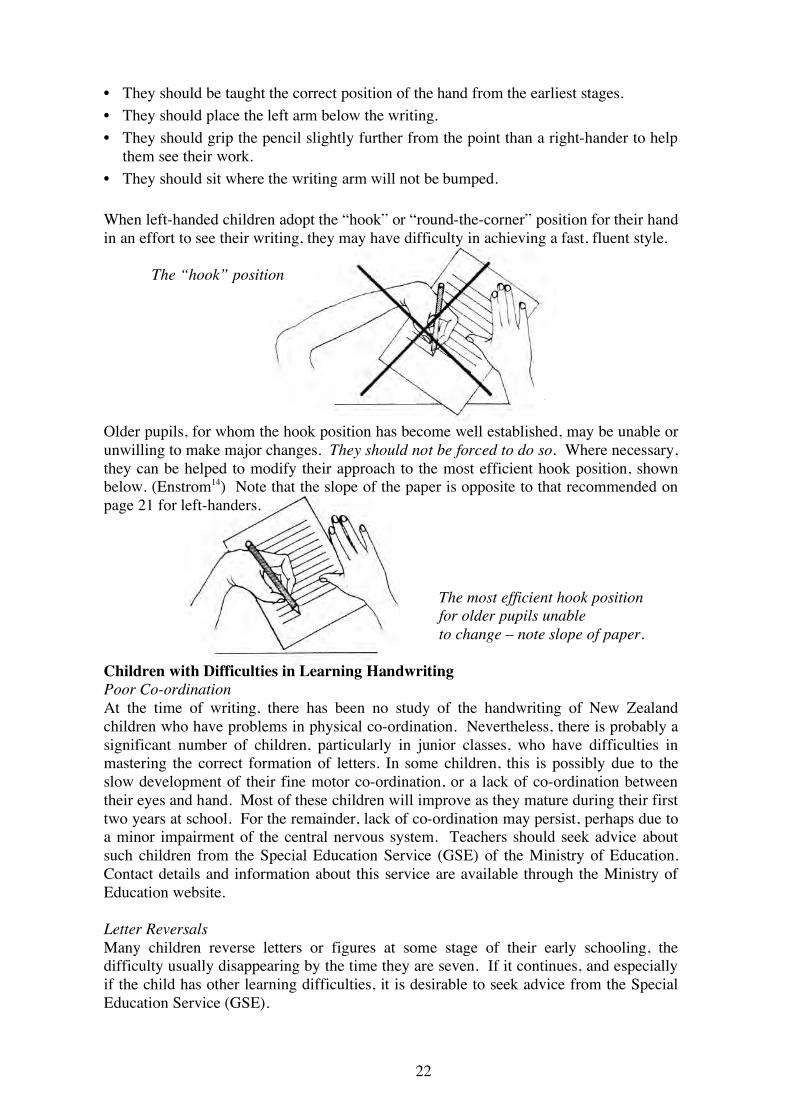
• They should be taught the correct position of the hand from the earliest stages. • They should place the left arm below the writing. • They should grip the pencil slightly further from the point than a right-hander to help
them see their work. • They should sit where the writing arm will not be bumped. When left-handed children adopt the “hook” or “round-the-corner” position for their hand in an effort to see their writing, they may have difficulty in achieving a fast, fluent style. The “hook” position Older pupils, for whom the hook position has become well established, may be unable or unwilling to make major changes. They should not be forced to do so. Where necessary, they can be helped to modify their approach to the most efficient hook position, shown below. (Enstrom14) Note that the slope of the paper is opposite to that recommended on page 21 for left-handers. The most efficient hook position for older pupils unable to change – note slope of paper. Children with Difficulties in Learning Handwriting Poor Co-ordination At the time of writing, there has been no study of the handwriting of New Zealand children who have problems in physical co-ordination. Nevertheless, there is probably a significant number of children, particularly in junior classes, who have difficulties in mastering the correct formation of letters. In some children, this is possibly due to the slow development of their fine motor co-ordination, or a lack of co-ordination between their eyes and hand. Most of these children will improve as they mature during their first two years at school. For the remainder, lack of co-ordination may persist, perhaps due to a minor impairment of the central nervous system. Teachers should seek advice about such children from the Special Education Service (GSE) of the Ministry of Education. Contact details and information about this service are available through the Ministry of Education website. Letter Reversals Many children reverse letters or figures at some stage of their early schooling, the difficulty usually disappearing by the time they are seven. If it continues, and especially if the child has other learning difficulties, it is desirable to seek advice from the Special Education Service (GSE).
23
References 1. New Zealand Department of Education. A study of the handwriting of form one
pupils in New Zealand intermediate schools. Unpublished report, 1982. 2. Burgoyne, P. A. Cursive handwriting. London: Dryad Press, 1955. 3. Gourdie, T. The simple modern hand. London: Collins, 1965. 4. Gourdie, T. The Puffin book of handwriting. London: Penguin, 1980. 5. Jarman, C. The development of handwriting skills: a book of resources for teachers.
Basil Blackwell, 1979. 6. Jarman, C. “A helping hand for slow learners”, in Special education: forward
trends, vol. 4, no. 4, 1977. 7. Glasgow teachers’ working party. “The teaching of handwriting,” in Scottish
education journal, no. 28, 1975. 8. Markoff, M. M. Teaching low-achieving children reading, spelling and
handwriting. Illinois: Charles C. Thomas, 1976. 9. Furner, B. A. “The perceptual motor nature of learning in handwriting,” in
Elementary English, vol. 47, 1970, pp. 61–9. 10. Barbe, W. B. “Instruction in handwriting: a new look,” in Childhood education, vol.
50, no. 4, 1974. 11. Marcus, M. Diagnostic teaching of the language arts. New York: John Wiley and
Sons, 1977. 12. Burnhill, P., Hartley J., Fraser, S. and Young, M. “Writing lines: an exploratory
study,” in Programme learning and educational technology, vol. 12, no. 2, March 1975, pp. 84–7.
13. Hofmeister, A. M. “Let’s get it write,” in Teaching exceptional children, vol. 6, no. 1, fall, 1973.
14. Enstrom, E. A. “The relative efficiency of various approaches to writing with the left hand,” in Journal of educational research, vol. 55, no. 10. 1962.
24
Appendices
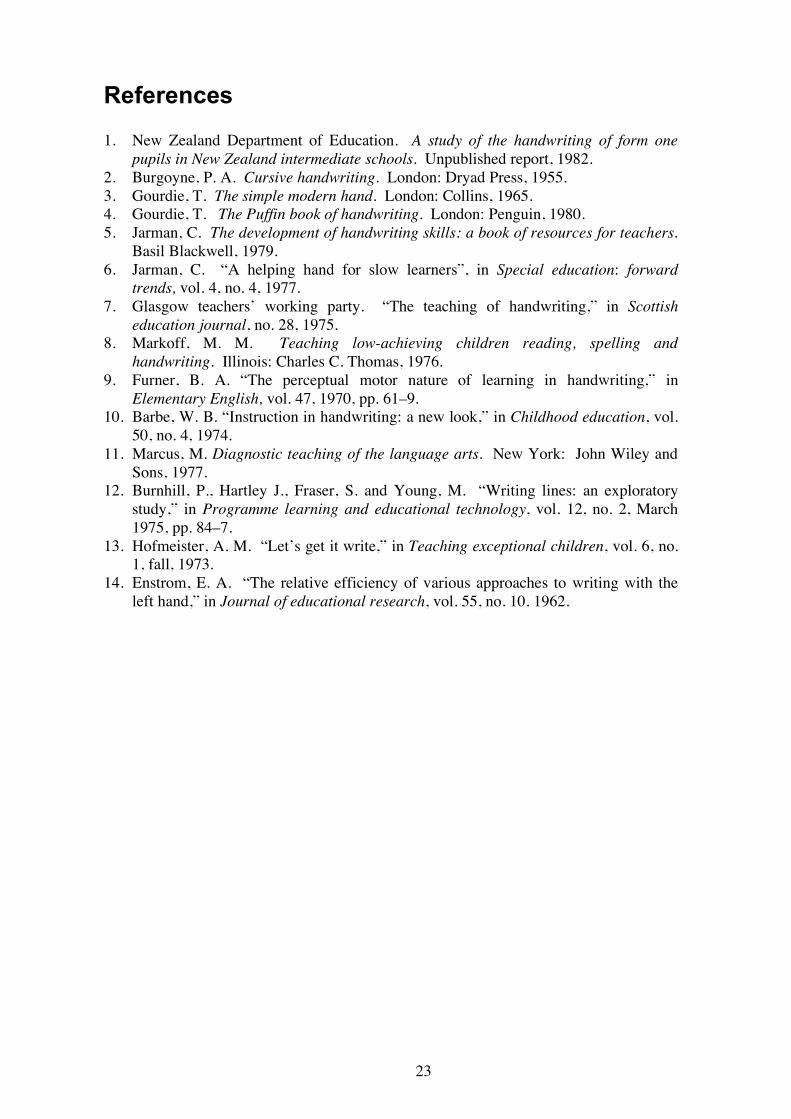
1 Samples of Developing Handwriting The following samples, the later ones chosen as representative work rather than perfect specimens, show how children’s handwriting had developed during the stated year. New Entrants
25
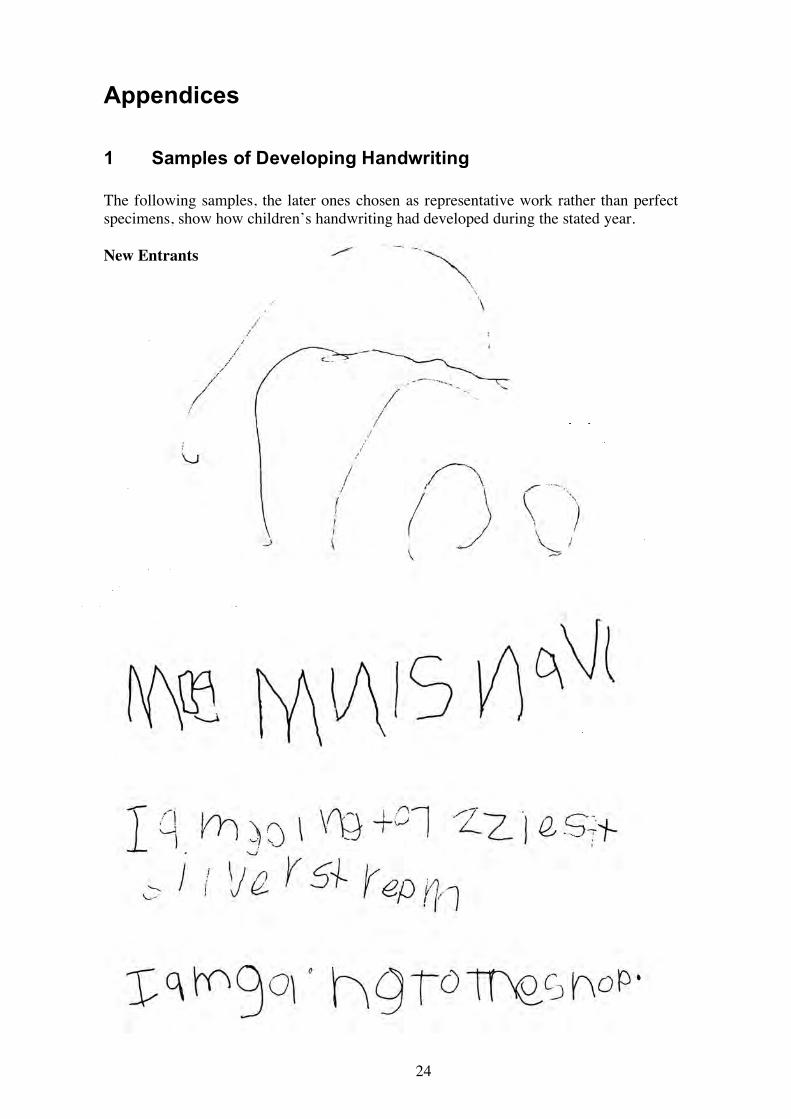
End of First Year at School
26
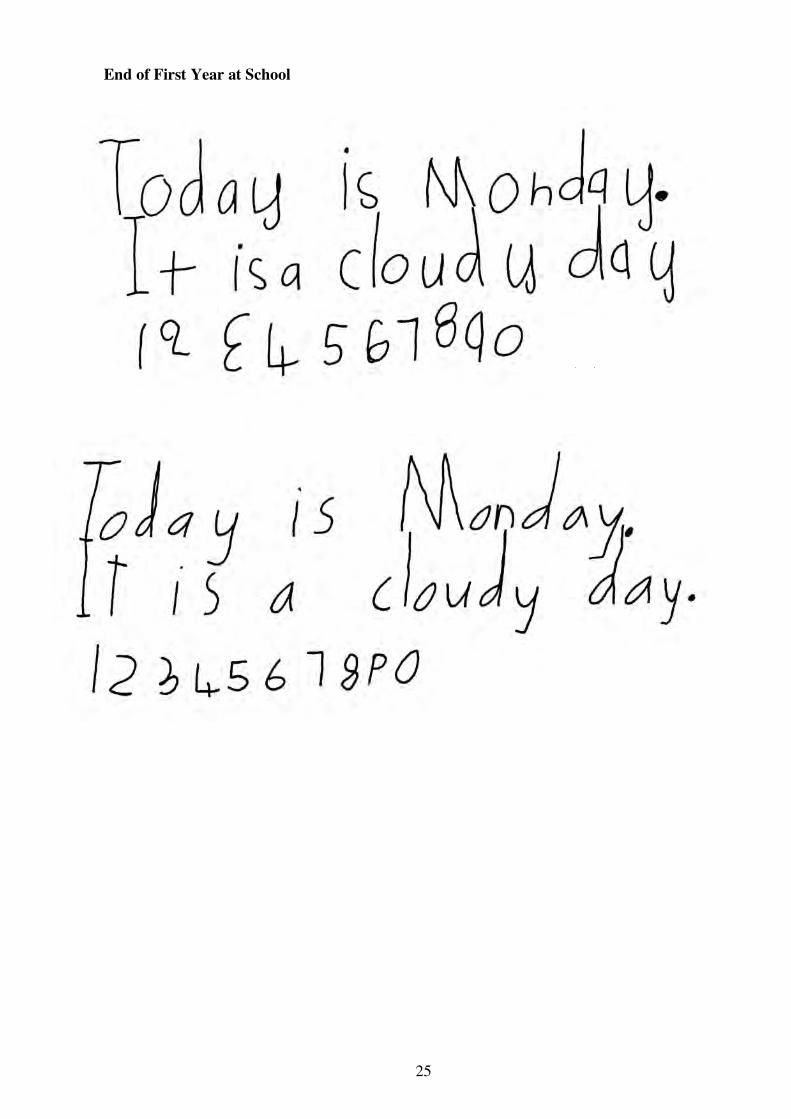
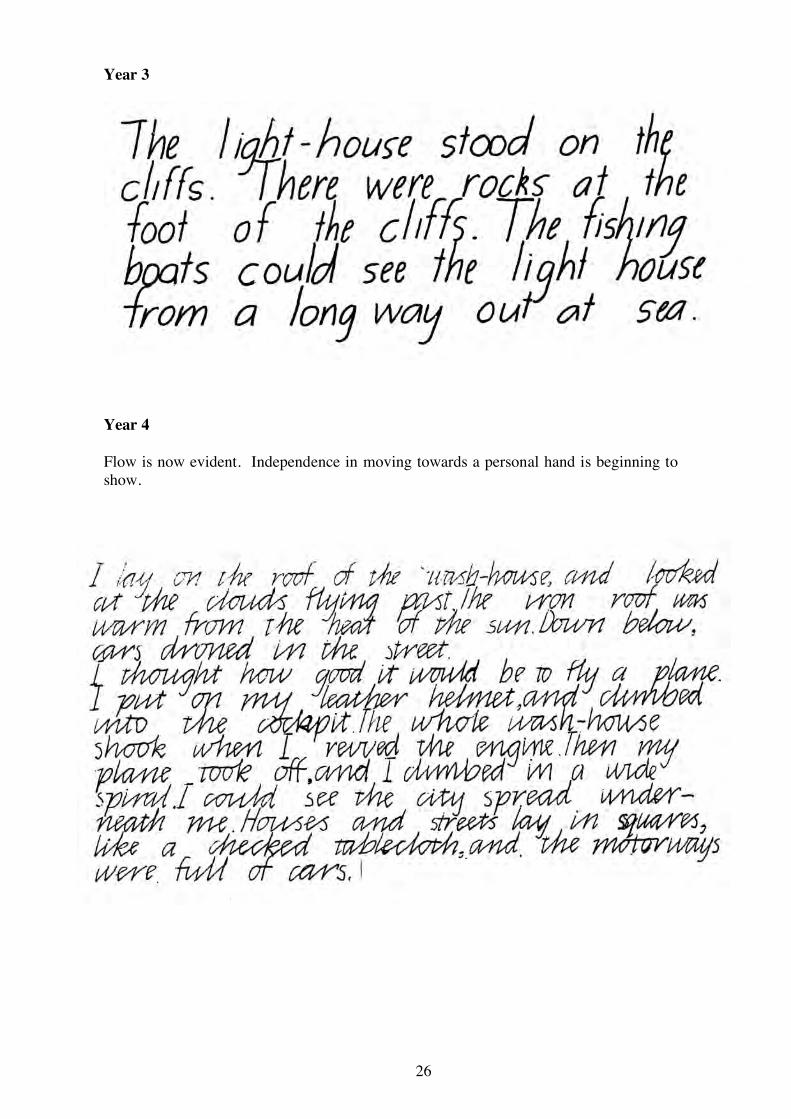
Year 3
Year 4 Flow is now evident. Independence in moving towards a personal hand is beginning to show.
27
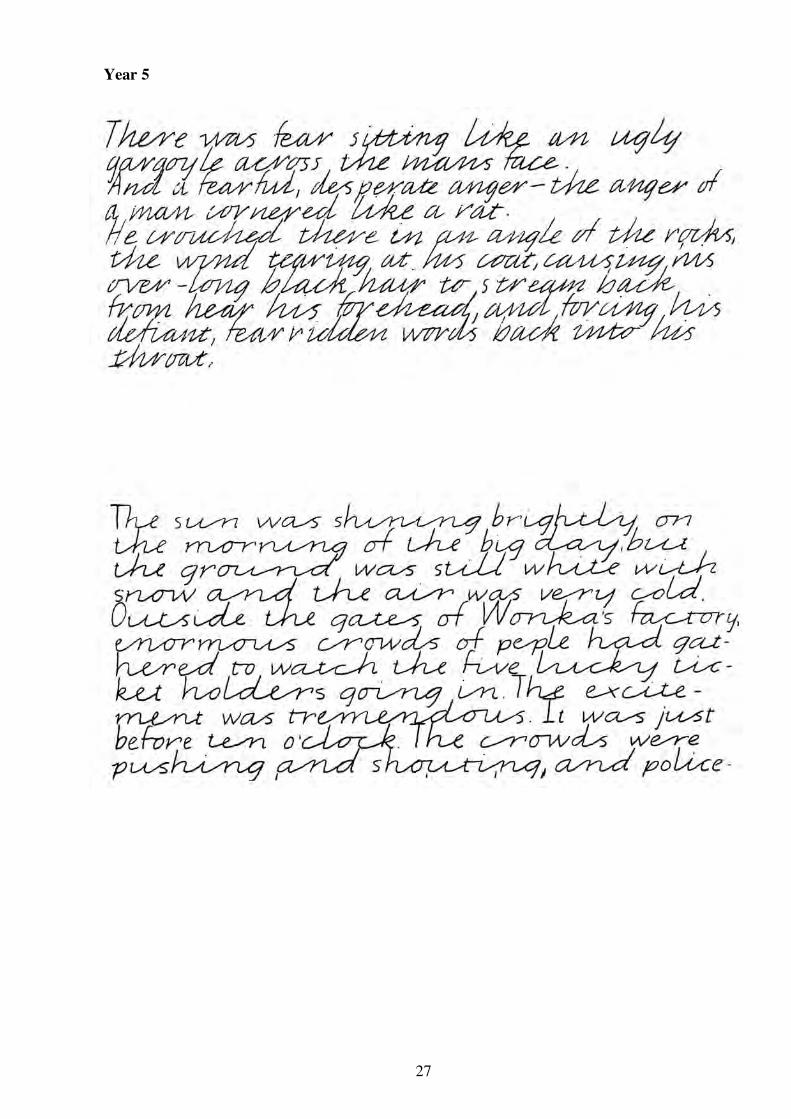
Year 5
28
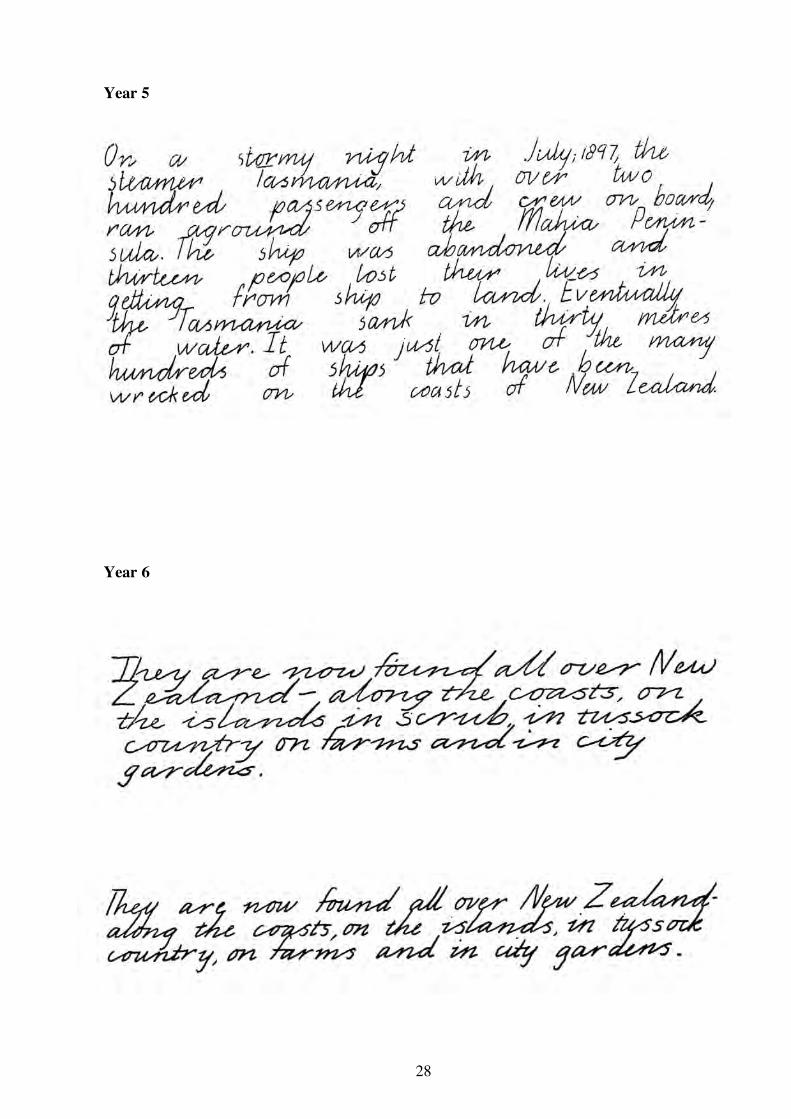
Year 5
Year 6
29
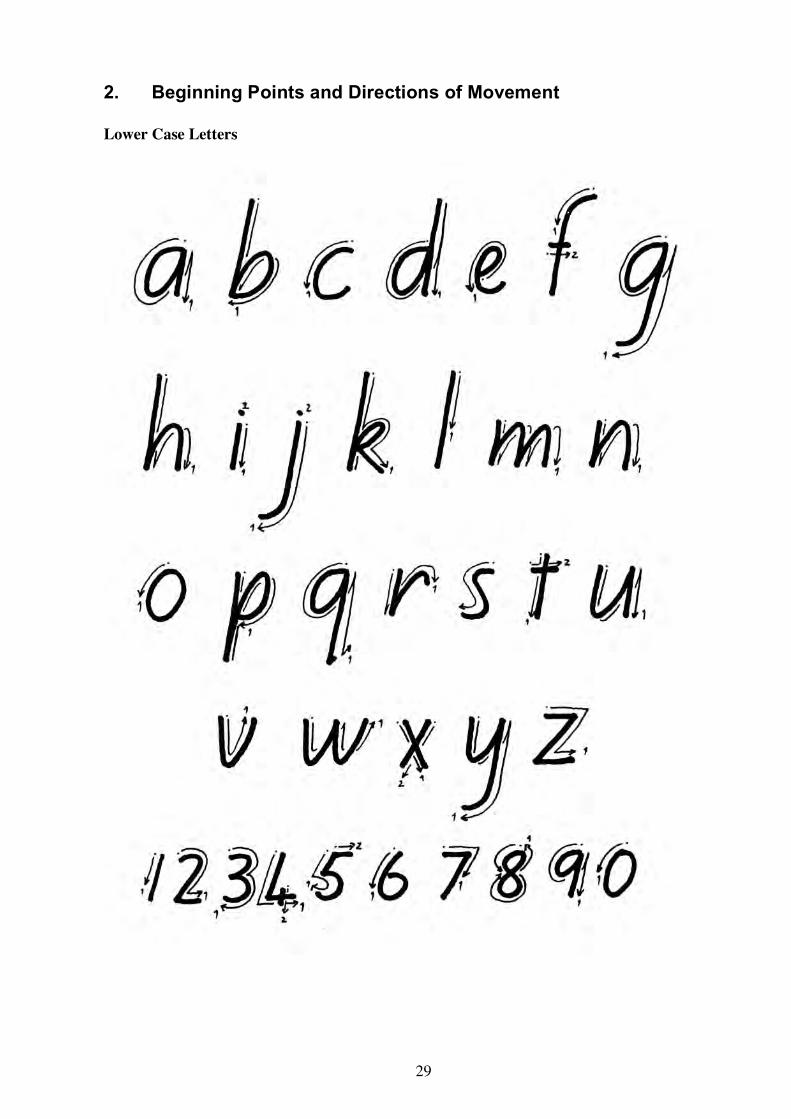
2. Beginning Points and Directions of Movement Lower Case Letters
30
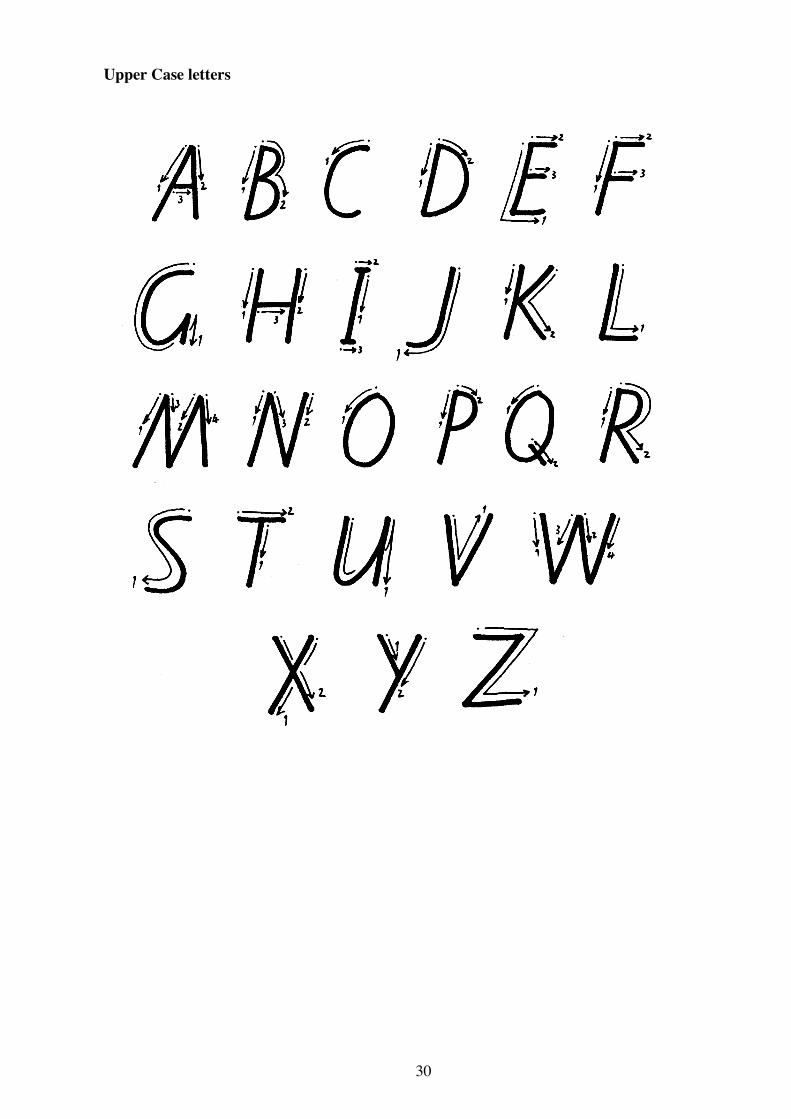
Upper Case letters
31
Index Aim of teaching handwriting 5 Left-handed children 17, 21 Application of handwriting 12 – hook position 22 Lesson format 10 Basic movements 7, 10 Letter reverses 22 Basic script 5 Ligatures 12 Lined paper 20 Capital letters 6, 11 Linking letters 12 Change to school scheme 5 Confusion of letters 11 Materials 20 Consistency of movement and shape 7 Models for handwriting (see also copying) 16, 21 Co-ordination (poor) 22 Copy-books 17 New entrants 9 Copying from blackboard or whiteboard 17 Numerals 7 Copying from samples 17 Correcting faults 18 Paper and exercise books 20 Cursive style 6 Paper positioning 17 – left-handers 21 Diagonal ligatures 13 Pencils and pens (types) 20 Poor co-ordination 22 Endurance 15 Positive comments 19 Evaluation – teacher 19 Posture 16 – criteria 19 – left-handers 22 – pupil 19 Practice 16, 20, 22 Exercises 10 Pupil’s evaluation 19 Exercise books 20 Purpose (related to speed and quality) 15 Faults – in holding a pencil 18 – correcting 18
Quality of writing (see also standards of work) 15, 19
Feedback 20 Quality trials 15 First two years at school 9 Readiness for writing 9 Grip – correct 17 Reversal of letters 22
– too tight 18 – too close to point 18 Sample alphabets 5, 6, 29, 30 – thumb crossed over 18 Sequence of instruction 9 – forefinger and middle finger on Speed 15 top 18 Standards of work (see also quality) 19
Grouping for instruction 9 Teacher’s style of handwriting 16 Holding a pencil 17 Horizontal ligatures 14 Verbalisation 9 Hook position (left-handers) 22 Years 3 and 4 12 Individuality of children’s writing 5, 16 Years 5 and 6 14 Instructional errors 20 Years 7 and 8 15