Teach Yourself - media.techtarget.com · 800 East 96th Street, Indianapolis, Indiana 46240 USA in...
28
800 East 96th Street, Indianapolis, Indiana 46240 USA in 24 Hours George Anderson Danielle Larocca SAP SECOND EDITION Teach Yourself Teach Yourself
-
Upload
hoangthuan -
Category
Documents
-
view
214 -
download
0
Transcript of Teach Yourself - media.techtarget.com · 800 East 96th Street, Indianapolis, Indiana 46240 USA in...

800 East 96th Street, Indianapolis, Indiana 46240 USA
in 24HoursGeorge AndersonDanielle Larocca
SAP
SECOND EDITION
TeachYourselfTeachYourself
00_0672328224_fm.qxd 10/13/05 2:34 PM Page i
Sams Teach Yourself SAP in 24 Hours,Second EditionCopyright © 2006 by Sams Publishing
All rights reserved. No part of this book shall be reproduced, stored in aretrieval system, or transmitted by any means, electronic, mechanical,photocopying, recording, or otherwise, without written permission fromthe publisher. No patent liability is assumed with respect to the use ofthe information contained herein. Although every precaution has beentaken in the preparation of this book, the publisher and author assumeno responsibility for errors or omissions. Nor is any liability assumed fordamages resulting from the use of the information contained herein.
International Standard Book Number: 0-672-32822-4
Library of Congress Catalog Card Number: 2005930224
Printed in the United States of America
First Printing: November 2005
08 07 06 05 4 3 2 1
TrademarksAll terms mentioned in this book that are known to be trademarks orservice marks have been appropriately capitalized. Sams Publishingcannot attest to the accuracy of this information. Use of a term in thisbook should not be regarded as affecting the validity of any trademarkor service mark.
Warning and DisclaimerEvery effort has been made to make this book as complete and as accu-rate as possible, but no warranty or fitness is implied. The informationprovided is on an “as is” basis. The authors and the publisher shallhave neither liability nor responsibility to any person or entity withrespect to any loss or damages arising from the information containedin this book or from the use of the CD or programs accompanying it.
Bulk SalesSams Publishing offers excellent discounts on this book when ordered inquantity for bulk purchases or special sales. For more information,please contact
U.S. Corporate and Government [email protected]
For sales outside of the U.S., please contact
International [email protected]
PublisherPaul Boger
Acquisitions EditorLoretta Yates
Development EditorSonglin Qiu
Managing EditorCharlotte Clapp
Senior Project EditorMatthew Purcell
Copy EditorKezia Endsley
IndexerChris Barrick
ProofreaderJessica McCarty
Technical EditorAJ Whalen
Publishing CoordinatorCindy Teeters
DesignerGary Adair
Page LayoutKelly Maish
00_0672328224_fm.qxd 10/13/05 2:34 PM Page ii
HOUR 20
Reporting Tools in SAP (SAPQuery, InfoSet Query, Ad HocQuery, and QuickViewer)
In the earliest versions of SAP, two tools were delivered for end-user reporting. The ABAP
Query was designed for all modules and the Ad Hoc Query was designed exclusively for
the Human Capital Management module. Beginning with version 4.6, things have
changed. The ABAP Query is now called the SAP Query and its features have been
enhanced. Additionally, the Ad Hoc Query tool can now be used with all modules in SAP
under the name the InfoSet Query (although in the Human Capital Management module
SAP still refers to it as the Ad Hoc Query). Both reporting tools enable you to create reports
within your SAP environment and neither requires any technical skills. Additionally, in
version 4.6, SAP introduced another tool called the QuickViewer. In this hour, you learn
how to create custom reports using these reporting tools, including the necessary configu-
ration and administrative decisions to get you on your way.
Highlights of this hour include
. Learning the quick and easy steps to configure the query reporting tools
. Using the SAP Query to create basic and advanced reports
. Using the InfoSet (Ad Hoc) Query to create reports
. Using the QuickViewer to create QuickViews
The Structure of the Query ReportingToolsThe query tools (SAP Query, InfoSet/Ad Hoc Query and QuickViewer) are built upon the
foundation of three main components:
. Query Groups (/nSQ03)
. InfoSets (/nSQ02)
. Administrative decisions (company specific)
26_0672328224_ch20.qxd 10/13/05 2:30 PM Page 273

274 HOUR 20: Reporting Tools in SAP
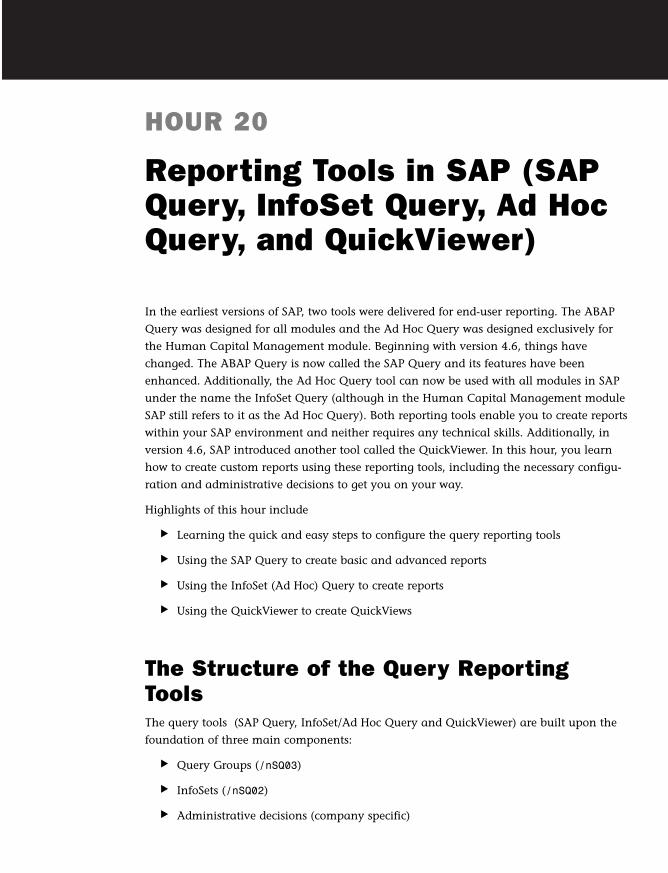
Each of these components permits a user with no technical programming skills
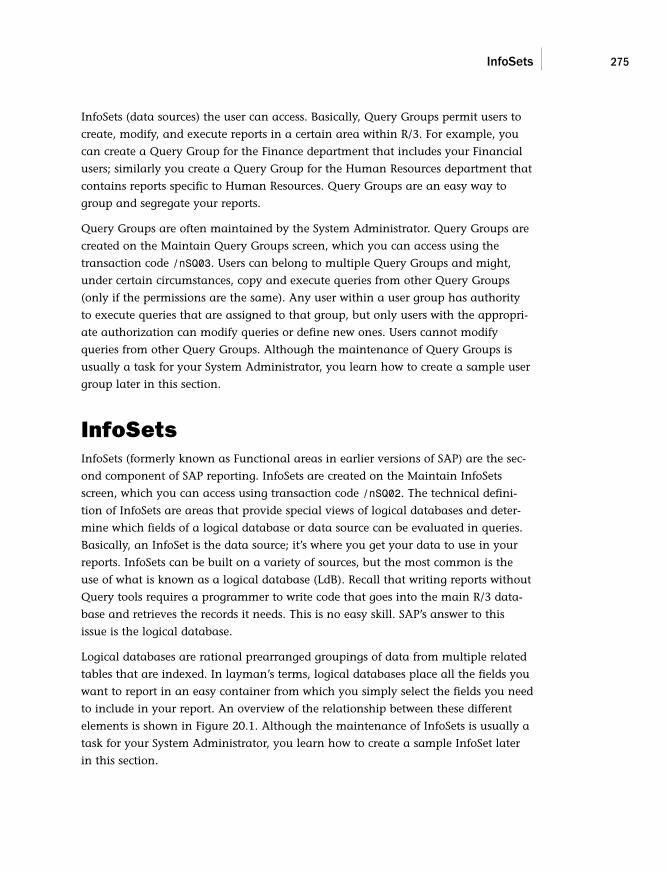
to create custom reports. The overview of the query tool structure is depicted in
Figure 20.1.
InfoSet
Query Group
R/3 User R/3 User R/3 User
Query Reporting Tools
SAP Query QuickViewerInfoSet Query (Ad Hoc Query)
A collection ofusers make upa Query Group
InfoSets are assignedto Query Groups
InfoSets are often based on a Logical Database (LdB)
A collection oftables make upa logical database
SAP R/3 Data Dictionary
Logical Database(LdB)
Table Table Table
CompanySpecific
AdministrativeDecisions
FIGURE 20.1The SAP familyof query report-ing tools givesusers easyaccess to thedatabase viaQuery Groupsand InfoSets.
If you think about custom reporting in SAP in layman terms, you picture a pro-
grammer sitting down at a terminal and typing lines and lines of ABAP code that
go to the core SAP database to collect the information needed for the report. The
programmer also has to code to account for security access, output, formatting, and
so on. The purpose of the SAP delivered query tools is that all the work is done for
you behind the scenes. The use of the three main components holds it all together.
Query GroupsLet’s start with the first component, Query Groups (formerly known as User Groups
in earlier versions of SAP). The technical definition of Query Groups is a collection of
SAP users who are grouped together. A user’s assignment to a user group determines
which queries he or she can execute or maintain. Additionally, it designates which
26_0672328224_ch20.qxd 10/13/05 2:30 PM Page 274
InfoSets 275
InfoSets (data sources) the user can access. Basically, Query Groups permit users to
create, modify, and execute reports in a certain area within R/3. For example, you
can create a Query Group for the Finance department that includes your Financial
users; similarly you create a Query Group for the Human Resources department that
contains reports specific to Human Resources. Query Groups are an easy way to
group and segregate your reports.
Query Groups are often maintained by the System Administrator. Query Groups are
created on the Maintain Query Groups screen, which you can access using the
transaction code /nSQ03. Users can belong to multiple Query Groups and might,
under certain circumstances, copy and execute queries from other Query Groups
(only if the permissions are the same). Any user within a user group has authority
to execute queries that are assigned to that group, but only users with the appropri-
ate authorization can modify queries or define new ones. Users cannot modify
queries from other Query Groups. Although the maintenance of Query Groups is
usually a task for your System Administrator, you learn how to create a sample user
group later in this section.
InfoSetsInfoSets (formerly known as Functional areas in earlier versions of SAP) are the sec-
ond component of SAP reporting. InfoSets are created on the Maintain InfoSets
screen, which you can access using transaction code /nSQ02. The technical defini-
tion of InfoSets are areas that provide special views of logical databases and deter-
mine which fields of a logical database or data source can be evaluated in queries.
Basically, an InfoSet is the data source; it’s where you get your data to use in your
reports. InfoSets can be built on a variety of sources, but the most common is the
use of what is known as a logical database (LdB). Recall that writing reports without
Query tools requires a programmer to write code that goes into the main R/3 data-
base and retrieves the records it needs. This is no easy skill. SAP’s answer to this
issue is the logical database.
Logical databases are rational prearranged groupings of data from multiple related
tables that are indexed. In layman’s terms, logical databases place all the fields you
want to report in an easy container from which you simply select the fields you need
to include in your report. An overview of the relationship between these different
elements is shown in Figure 20.1. Although the maintenance of InfoSets is usually a
task for your System Administrator, you learn how to create a sample InfoSet later
in this section.
26_0672328224_ch20.qxd 10/13/05 2:30 PM Page 275
276 HOUR 20: Reporting Tools in SAP
Depending on your SAP authorization privileges, you might need to request assis-tance from your System Administrator in creating a test Query Group, functionalarea, and query. It is also possible, if you are working with a newly installed SAPsystem, that you will receive a message saying you must convert objects first. Ifyou receive this message, contact your System Administrator. He or she will berequired to perform a standard administration function to convert the objectsbefore you can proceed.
Administrative DecisionsAs you see in just a moment, creating Query Groups and InfoSets is an easy task,
but before you do so, you must first review the following administrative decisions to
see which best applies to your organization.
. What is your client/transport strategy?
. Will you use the standard or global Query Area?
What Is Your Client/Transport Strategy?With custom-coded ABAP reports written by programmers, the traditional methodolo-
gy for report creation is as follows: A programmer accesses a development environ-
ment where the first draft of the custom report is coded. The report is then transported
to a testing client where it is tested. Assuming it passes testing, the report then moves
on to your production environment for use. This methodology differs from the strategy
often used with the query family of reporting tools. The addition of the query tools to
SAP enables end users to create reports in real-time with no technical skills. It is with
this in mind that your organization has to make a decision regarding your transport
strategy.
The creation of query objects can be performed in any client. However, there are
some best practices you should follow. For starters, end users who will be using the
query tools often only have user IDs in the live production environment. Therefore,
many companies maintain Query Groups live in the production client.
Similarly, InfoSets can be created in any client; however, best practice dictates that
InfoSets be treated inline with normal programming methodology. It’s best to create
InfoSets in a development environment and then transport them to a testing client,
where they are tested and then moved on to production for use. The reason why
InfoSets are treated differently is because a trained user has the capability to add
special coding or programs to InfoSets (outside the scope of this book) that can have
By theWay
26_0672328224_ch20.qxd 10/13/05 2:30 PM Page 276
Administrative Decisions 277
an impact on system resources or functioning and testing them is required in those
cases. That leaves the reports (queries) themselves. Unlike custom-coded ABAP
reports, query reports are designed to be made real-time in an ad hoc fashion, so the
best practice is to create your queries live in your production environment.
Using the Standard or Global Query AreaQuery Areas (formerly known as Application Areas in versions earlier than 4.6) con-
tain your ABAP Query elements, queries, functional areas, and Query Groups. There
are two distinct Query Areas in SAP: standard and global.
Standard Query AreasStandard Query Areas are client-specific, which means that they are available only
within the client in which they were created. For example, if you created a standard
query in the production client, it exists only in the production client. You can trans-
port query objects created in the standard area between multiple clients on the same
application server via the Transport Truck function on the main InfoSets screen
(SQ02). This bypasses the customary Workbench Organizer.
Global Query AreasQueries designed in the global area are used throughout the entire system and are
client independent. In Release 4.6, SAP delivers many of its standard reports in the
SAP global Query Area. These queries are also intended for transport into other sys-
tems and are connected to the ABAP Workbench.
A common best practice is to allow SAP to continue to deliver reports via the global
area and for end users to use the standard Query Area to create query-related
reports. With your administrative decisions completed, you are ready to begin the
configuration.
Creating a New User GroupTo create a new user group, perform the following steps:
1. Navigate to the Maintain User Group screen using transaction code /nSQ03.
2. Ensure that you are in the standard Query Area by following the menu path
Environment, Query Areas, and then selecting Standard area (client-specific).
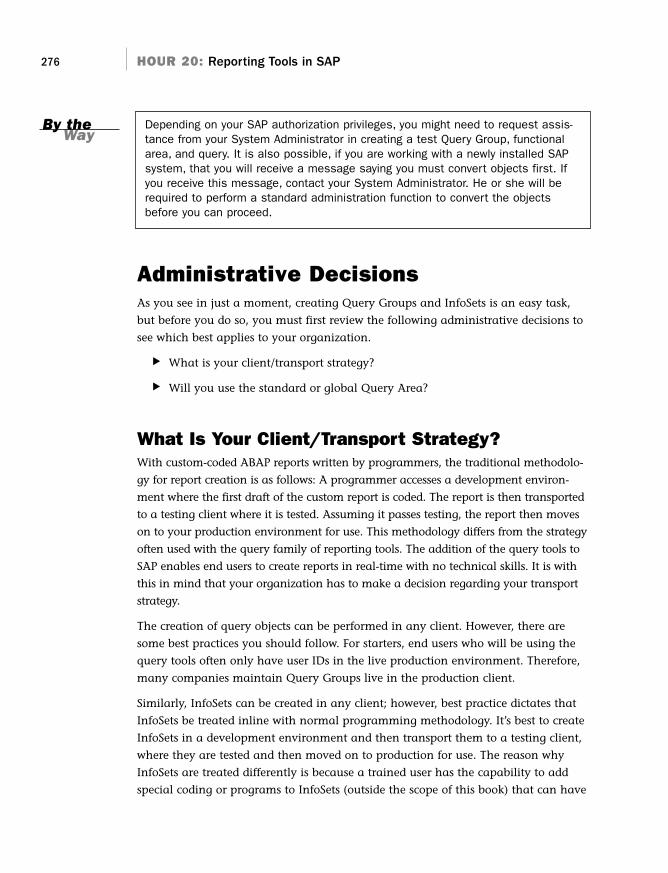
3. Type the user group name that you will be creating, ZTEST, and select the
Create button (see Figure 20.2).
26_0672328224_ch20.qxd 10/13/05 2:30 PM Page 277
278 HOUR 20: Reporting Tools in SAP
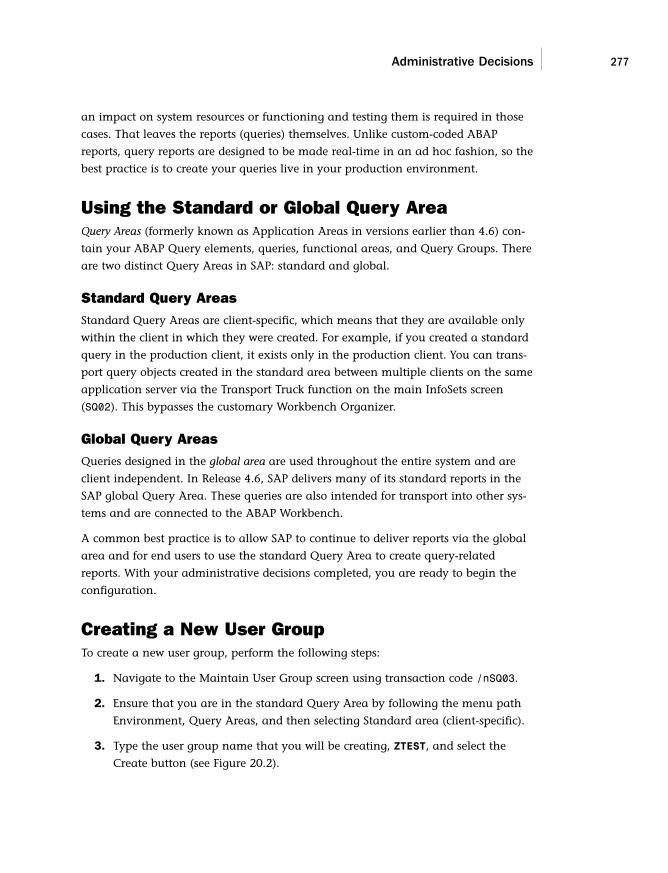
4. Type a name for your user group on the User Group ZTEST: Create or Change
screen, as shown in Figure 20.3 and select the Save button.
FIGURE 20.2SAP QueryGroups are cre-ated and modi-fied using UserGroups: InitialScreen.
FIGURE 20.3Enter the namefor your usergroup in theUser GroupZTEST: Createor Changescreen.
5. A message appears in your SAP GUI status bar stating that the User Group
ZTEST has been saved.
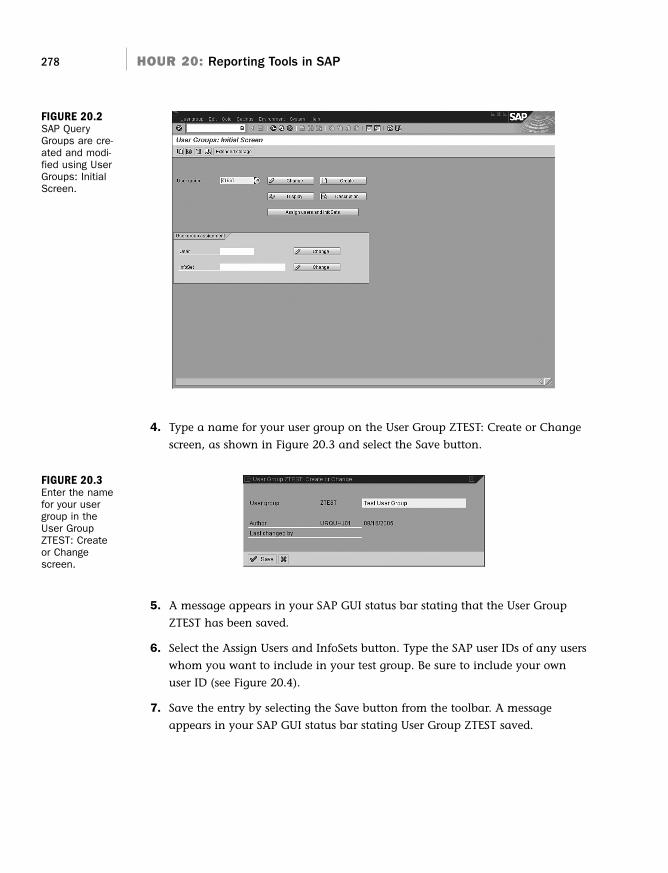
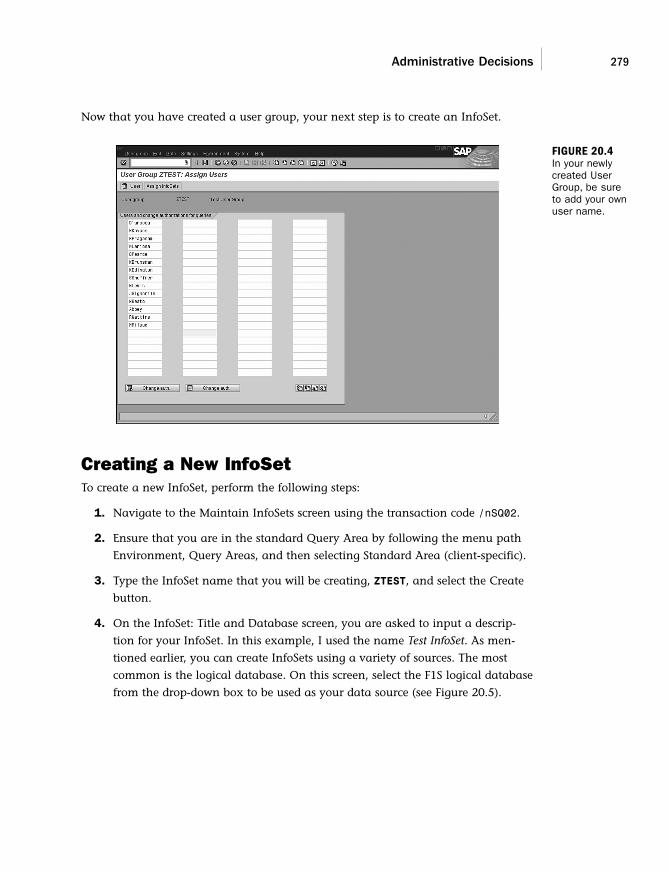
6. Select the Assign Users and InfoSets button. Type the SAP user IDs of any users
whom you want to include in your test group. Be sure to include your own
user ID (see Figure 20.4).
7. Save the entry by selecting the Save button from the toolbar. A message
appears in your SAP GUI status bar stating User Group ZTEST saved.
26_0672328224_ch20.qxd 10/13/05 2:30 PM Page 278
Administrative Decisions 279
Creating a New InfoSetTo create a new InfoSet, perform the following steps:
1. Navigate to the Maintain InfoSets screen using the transaction code /nSQ02.
2. Ensure that you are in the standard Query Area by following the menu path
Environment, Query Areas, and then selecting Standard Area (client-specific).
3. Type the InfoSet name that you will be creating, ZTEST, and select the Create
button.
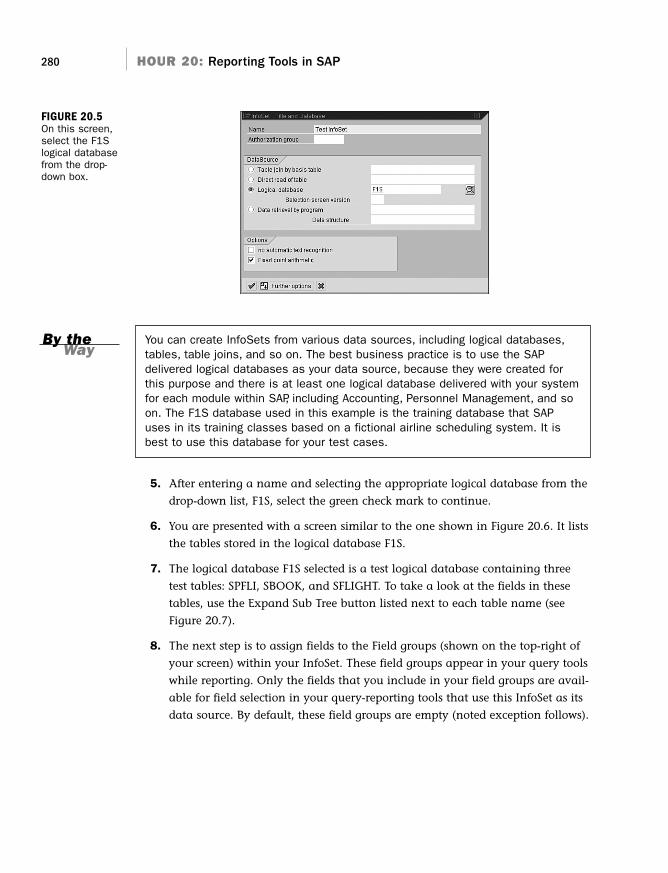
4. On the InfoSet: Title and Database screen, you are asked to input a descrip-
tion for your InfoSet. In this example, I used the name Test InfoSet. As men-
tioned earlier, you can create InfoSets using a variety of sources. The most
common is the logical database. On this screen, select the F1S logical database
from the drop-down box to be used as your data source (see Figure 20.5).
FIGURE 20.4In your newlycreated UserGroup, be sureto add your ownuser name.
Now that you have created a user group, your next step is to create an InfoSet.
26_0672328224_ch20.qxd 10/13/05 2:30 PM Page 279
280 HOUR 20: Reporting Tools in SAP
You can create InfoSets from various data sources, including logical databases,tables, table joins, and so on. The best business practice is to use the SAPdelivered logical databases as your data source, because they were created forthis purpose and there is at least one logical database delivered with your systemfor each module within SAP, including Accounting, Personnel Management, and soon. The F1S database used in this example is the training database that SAPuses in its training classes based on a fictional airline scheduling system. It isbest to use this database for your test cases.
5. After entering a name and selecting the appropriate logical database from the
drop-down list, F1S, select the green check mark to continue.
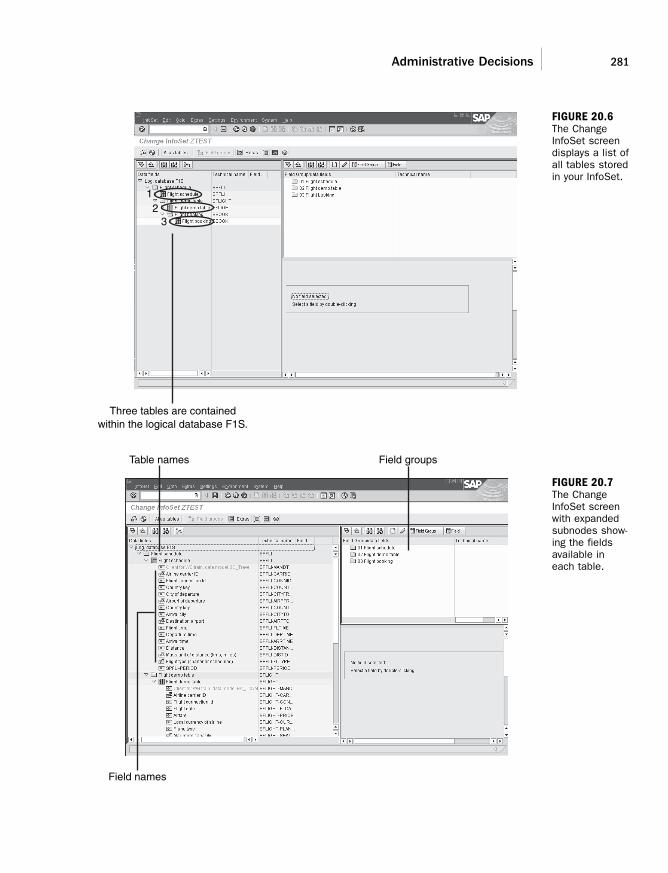
6. You are presented with a screen similar to the one shown in Figure 20.6. It lists
the tables stored in the logical database F1S.
7. The logical database F1S selected is a test logical database containing three
test tables: SPFLI, SBOOK, and SFLIGHT. To take a look at the fields in these
tables, use the Expand Sub Tree button listed next to each table name (see
Figure 20.7).
8. The next step is to assign fields to the Field groups (shown on the top-right of
your screen) within your InfoSet. These field groups appear in your query tools
while reporting. Only the fields that you include in your field groups are avail-
able for field selection in your query-reporting tools that use this InfoSet as its
data source. By default, these field groups are empty (noted exception follows).
FIGURE 20.5On this screen,select the F1Slogical databasefrom the drop-down box.
By theWay
26_0672328224_ch20.qxd 10/13/05 2:30 PM Page 280
Administrative Decisions 281
Three tables are containedwithin the logical database F1S.
12
3
FIGURE 20.6The ChangeInfoSet screendisplays a list ofall tables storedin your InfoSet.
Field names
Field groupsTable names
FIGURE 20.7The ChangeInfoSet screenwith expandedsubnodes show-ing the fieldsavailable ineach table.
26_0672328224_ch20.qxd 10/13/05 2:30 PM Page 281
282 HOUR 20: Reporting Tools in SAP
For nearly all modules in SAP, your field groups are empty and you need to manual-ly move fields to them. This is true for all modules with the exception of theHuman Capital Management module and the InfoSets that support it. The fieldgroups in this module are created for you with a default set of fields; you can addadditional information if required.
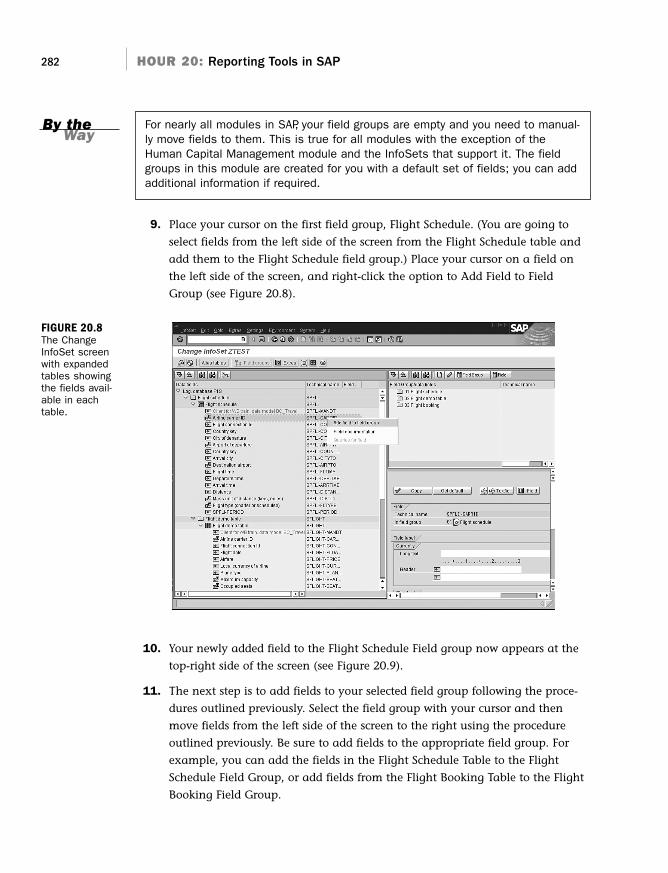
9. Place your cursor on the first field group, Flight Schedule. (You are going to
select fields from the left side of the screen from the Flight Schedule table and
add them to the Flight Schedule field group.) Place your cursor on a field on
the left side of the screen, and right-click the option to Add Field to Field
Group (see Figure 20.8).
By theWay
FIGURE 20.8The ChangeInfoSet screenwith expandedtables showingthe fields avail-able in eachtable.
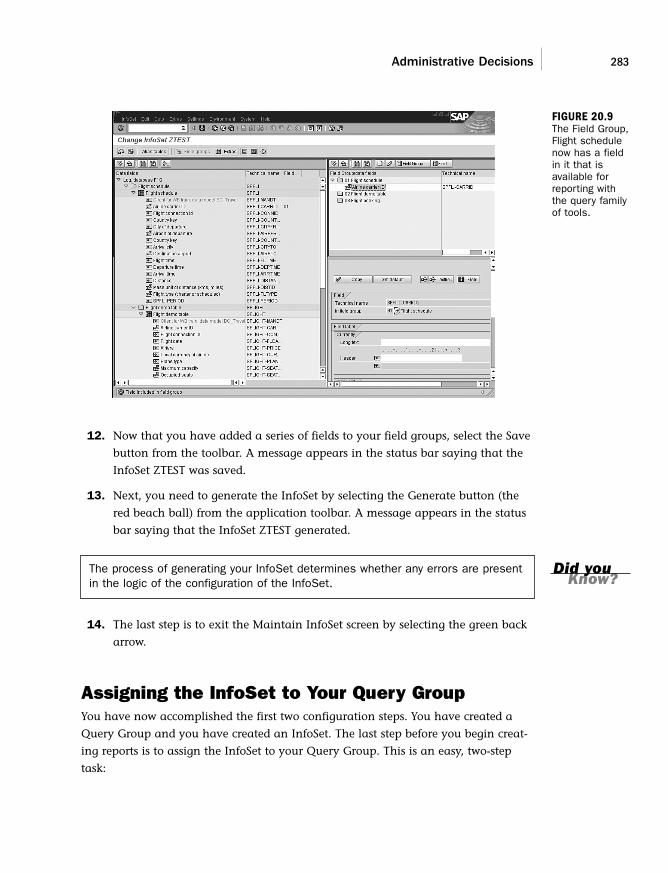
10. Your newly added field to the Flight Schedule Field group now appears at the
top-right side of the screen (see Figure 20.9).
11. The next step is to add fields to your selected field group following the proce-
dures outlined previously. Select the field group with your cursor and then
move fields from the left side of the screen to the right using the procedure
outlined previously. Be sure to add fields to the appropriate field group. For
example, you can add the fields in the Flight Schedule Table to the Flight
Schedule Field Group, or add fields from the Flight Booking Table to the Flight
Booking Field Group.
26_0672328224_ch20.qxd 10/13/05 2:30 PM Page 282
Administrative Decisions 283
12. Now that you have added a series of fields to your field groups, select the Save
button from the toolbar. A message appears in the status bar saying that the
InfoSet ZTEST was saved.
13. Next, you need to generate the InfoSet by selecting the Generate button (the
red beach ball) from the application toolbar. A message appears in the status
bar saying that the InfoSet ZTEST generated.
The process of generating your InfoSet determines whether any errors are presentin the logic of the configuration of the InfoSet.
14. The last step is to exit the Maintain InfoSet screen by selecting the green back
arrow.
Assigning the InfoSet to Your Query GroupYou have now accomplished the first two configuration steps. You have created a
Query Group and you have created an InfoSet. The last step before you begin creat-
ing reports is to assign the InfoSet to your Query Group. This is an easy, two-step
task:
FIGURE 20.9The Field Group,Flight schedulenow has a fieldin it that isavailable forreporting withthe query familyof tools.
Did youKnow?
26_0672328224_ch20.qxd 10/13/05 2:30 PM Page 283
284 HOUR 20: Reporting Tools in SAP
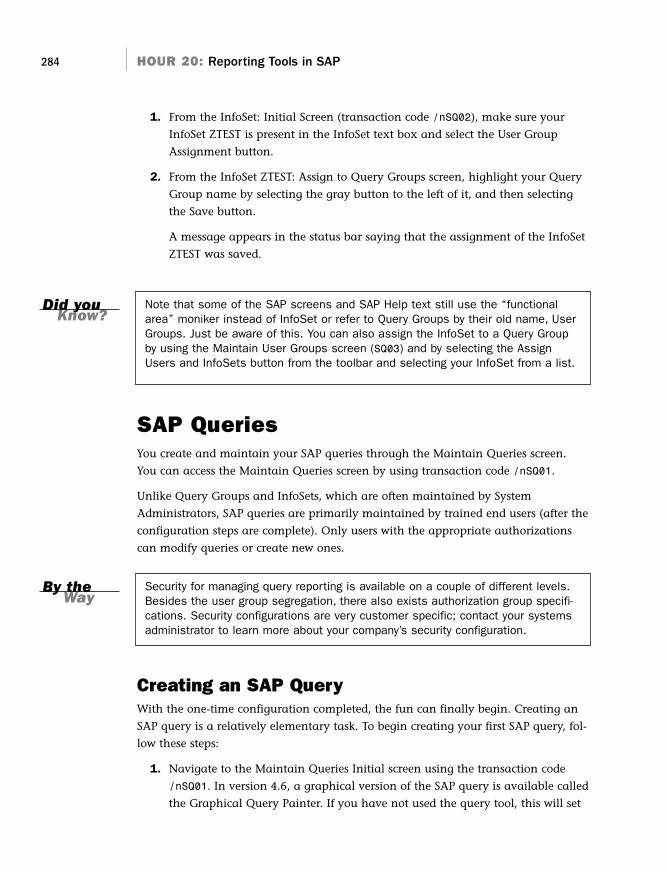
1. From the InfoSet: Initial Screen (transaction code /nSQ02), make sure your
InfoSet ZTEST is present in the InfoSet text box and select the User Group
Assignment button.
2. From the InfoSet ZTEST: Assign to Query Groups screen, highlight your Query
Group name by selecting the gray button to the left of it, and then selecting
the Save button.
A message appears in the status bar saying that the assignment of the InfoSet
ZTEST was saved.
Note that some of the SAP screens and SAP Help text still use the “functionalarea” moniker instead of InfoSet or refer to Query Groups by their old name, UserGroups. Just be aware of this. You can also assign the InfoSet to a Query Groupby using the Maintain User Groups screen (SQ03) and by selecting the AssignUsers and InfoSets button from the toolbar and selecting your InfoSet from a list.
SAP QueriesYou create and maintain your SAP queries through the Maintain Queries screen.
You can access the Maintain Queries screen by using transaction code /nSQ01.
Unlike Query Groups and InfoSets, which are often maintained by System
Administrators, SAP queries are primarily maintained by trained end users (after the
configuration steps are complete). Only users with the appropriate authorizations
can modify queries or create new ones.
Security for managing query reporting is available on a couple of different levels.Besides the user group segregation, there also exists authorization group specifi-cations. Security configurations are very customer specific; contact your systemsadministrator to learn more about your company’s security configuration.
Creating an SAP QueryWith the one-time configuration completed, the fun can finally begin. Creating an
SAP query is a relatively elementary task. To begin creating your first SAP query, fol-
low these steps:
1. Navigate to the Maintain Queries Initial screen using the transaction code
/nSQ01. In version 4.6, a graphical version of the SAP query is available called
the Graphical Query Painter. If you have not used the query tool, this will set
Did youKnow?
By theWay
26_0672328224_ch20.qxd 10/13/05 2:30 PM Page 284
SAP Queries 285
as your default. To turn it off and learn to create easy step-by-step reports, fol-
low the menu path Settings > Settings and deselect the Graphical Query
Painter check box.
2. The title bar will list the Query Group that you are currently in. For example,
your screen might read Query of User Group ZTEST: Initial Screen. (If you are
assigned to multiple user groups, you can see a list of the groups by selecting
the Shift + F7 key.)
3. It is always a good idea to ensure that you are in the standard Query Area by
following the menu path Environment, Query Areas and selecting Standard
area (client-specific).
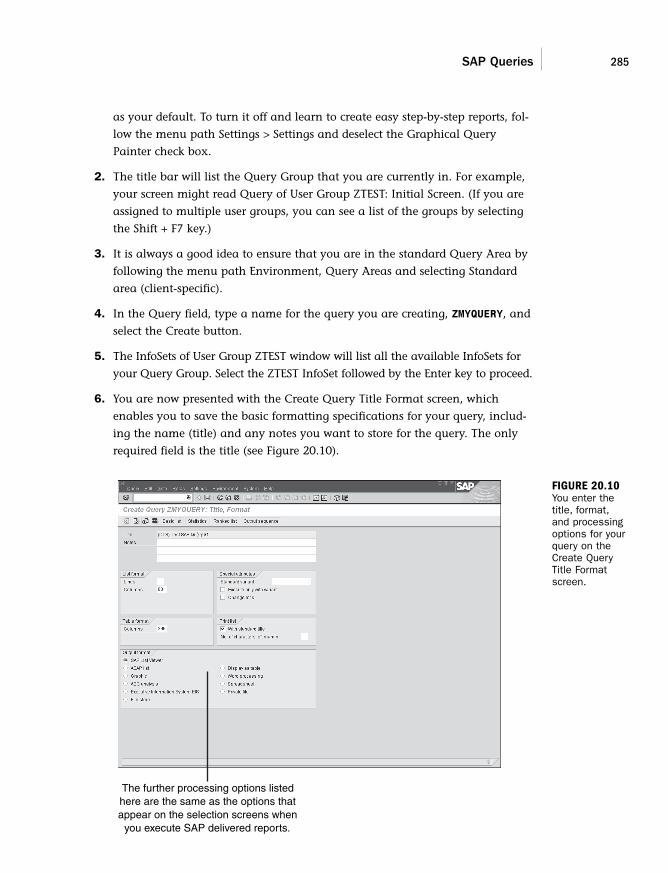
4. In the Query field, type a name for the query you are creating, ZMYQUERY, and
select the Create button.
5. The InfoSets of User Group ZTEST window will list all the available InfoSets for
your Query Group. Select the ZTEST InfoSet followed by the Enter key to proceed.
6. You are now presented with the Create Query Title Format screen, which
enables you to save the basic formatting specifications for your query, includ-
ing the name (title) and any notes you want to store for the query. The only
required field is the title (see Figure 20.10).
The further processing options listedhere are the same as the options thatappear on the selection screens when
you execute SAP delivered reports.
FIGURE 20.10You enter thetitle, format,and processingoptions for yourquery on theCreate QueryTitle Formatscreen.
26_0672328224_ch20.qxd 10/13/05 2:30 PM Page 285
286 HOUR 20: Reporting Tools in SAP
7. After entering a title, select the Save button on the toolbar. To navigate to the
next screen in the SAP query-creation process, select the next screen (white
navigational arrow) button from the application toolbar. You can use these
navigational arrows to navigate between the different screens of the SAP
Query.
8. A screen will appear listing all the field groups available within your InfoSet
(in this example, you can see Flight Schedule [SPFLI], Flight Demo Table
[SFLIGHT], and Flight Booking [SBOOK]). Place a check mark next to all field
groups that you want to include fields from in your report. Select the next
screen (white navigational arrow) button from the application toolbar.
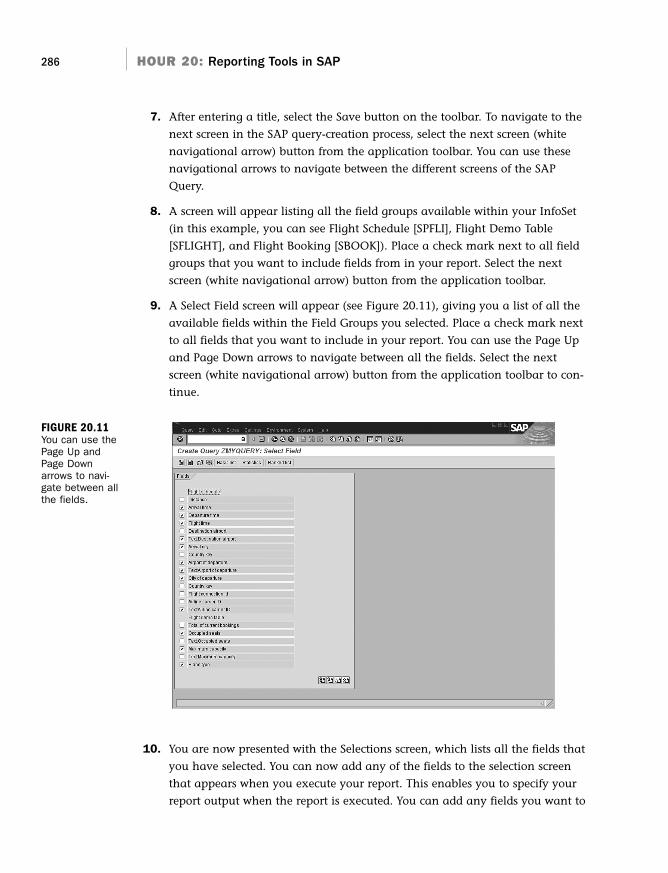
9. A Select Field screen will appear (see Figure 20.11), giving you a list of all the
available fields within the Field Groups you selected. Place a check mark next
to all fields that you want to include in your report. You can use the Page Up
and Page Down arrows to navigate between all the fields. Select the next
screen (white navigational arrow) button from the application toolbar to con-
tinue.
FIGURE 20.11You can use thePage Up andPage Downarrows to navi-gate between allthe fields.
10. You are now presented with the Selections screen, which lists all the fields that
you have selected. You can now add any of the fields to the selection screen
that appears when you execute your report. This enables you to specify your
report output when the report is executed. You can add any fields you want to
26_0672328224_ch20.qxd 10/13/05 2:30 PM Page 286
SAP Queries 287
the Selection screen by placing a check mark next to each field. This is the last
screen in the basic query sequence; to continue, select the Basic List button
from the application toolbar.
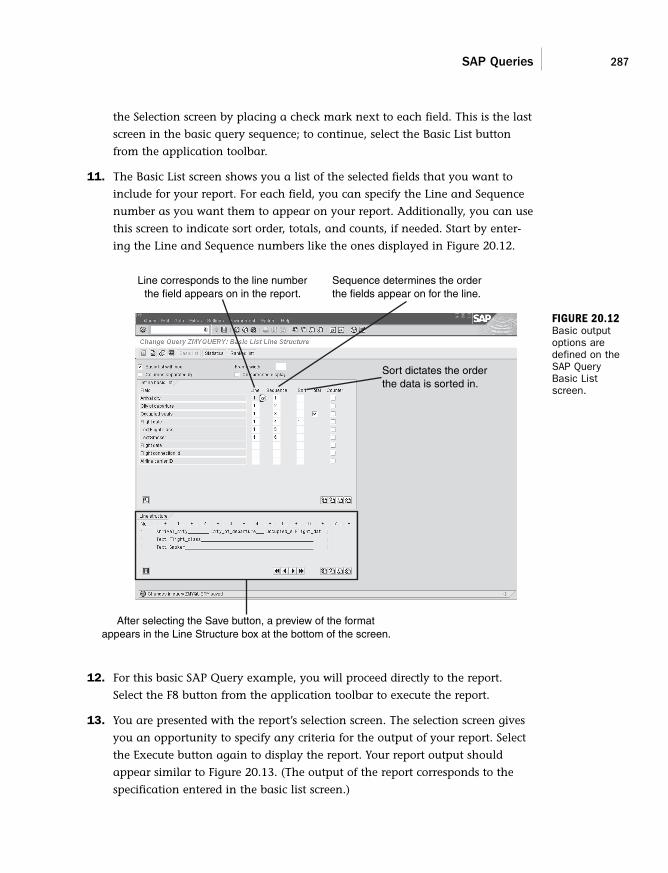
11. The Basic List screen shows you a list of the selected fields that you want to
include for your report. For each field, you can specify the Line and Sequence
number as you want them to appear on your report. Additionally, you can use
this screen to indicate sort order, totals, and counts, if needed. Start by enter-
ing the Line and Sequence numbers like the ones displayed in Figure 20.12.
Line corresponds to the line numberthe field appears on in the report.
Sort dictates the orderthe data is sorted in.
After selecting the Save button, a preview of the formatappears in the Line Structure box at the bottom of the screen.
Sequence determines the orderthe fields appear on for the line.
FIGURE 20.12Basic outputoptions aredefined on theSAP QueryBasic Listscreen.
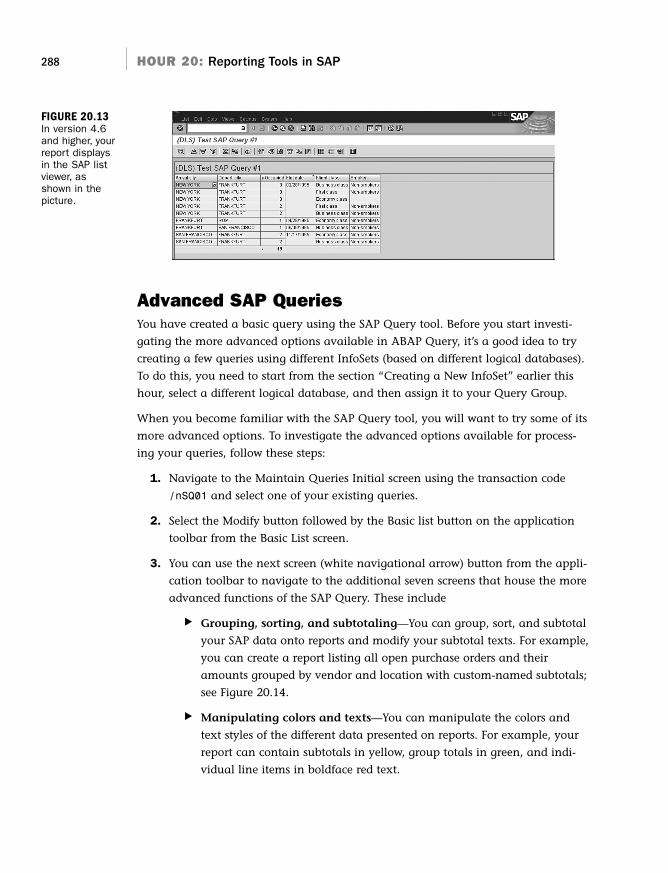
12. For this basic SAP Query example, you will proceed directly to the report.
Select the F8 button from the application toolbar to execute the report.
13. You are presented with the report’s selection screen. The selection screen gives
you an opportunity to specify any criteria for the output of your report. Select
the Execute button again to display the report. Your report output should
appear similar to Figure 20.13. (The output of the report corresponds to the
specification entered in the basic list screen.)
26_0672328224_ch20.qxd 10/13/05 2:30 PM Page 287
288 HOUR 20: Reporting Tools in SAP
Advanced SAP QueriesYou have created a basic query using the SAP Query tool. Before you start investi-
gating the more advanced options available in ABAP Query, it’s a good idea to try
creating a few queries using different InfoSets (based on different logical databases).
To do this, you need to start from the section “Creating a New InfoSet” earlier this
hour, select a different logical database, and then assign it to your Query Group.
When you become familiar with the SAP Query tool, you will want to try some of its
more advanced options. To investigate the advanced options available for process-
ing your queries, follow these steps:
1. Navigate to the Maintain Queries Initial screen using the transaction code
/nSQ01 and select one of your existing queries.
2. Select the Modify button followed by the Basic list button on the application
toolbar from the Basic List screen.
3. You can use the next screen (white navigational arrow) button from the appli-
cation toolbar to navigate to the additional seven screens that house the more
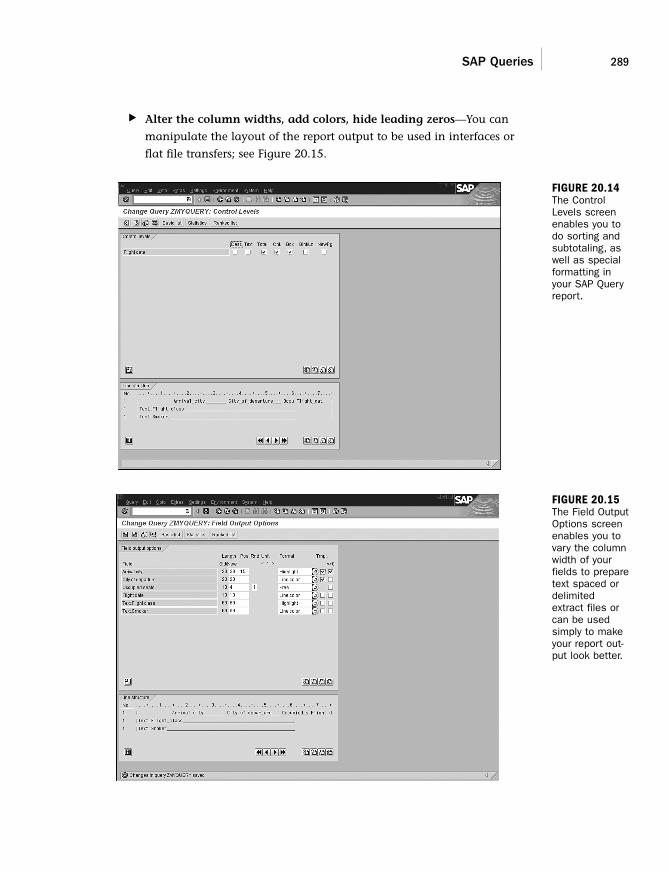
advanced functions of the SAP Query. These include
. Grouping, sorting, and subtotaling—You can group, sort, and subtotal
your SAP data onto reports and modify your subtotal texts. For example,
you can create a report listing all open purchase orders and their
amounts grouped by vendor and location with custom-named subtotals;
see Figure 20.14.
. Manipulating colors and texts—You can manipulate the colors and
text styles of the different data presented on reports. For example, your
report can contain subtotals in yellow, group totals in green, and indi-
vidual line items in boldface red text.
FIGURE 20.13In version 4.6and higher, yourreport displaysin the SAP listviewer, asshown in thepicture.
26_0672328224_ch20.qxd 10/13/05 2:30 PM Page 288
SAP Queries 289
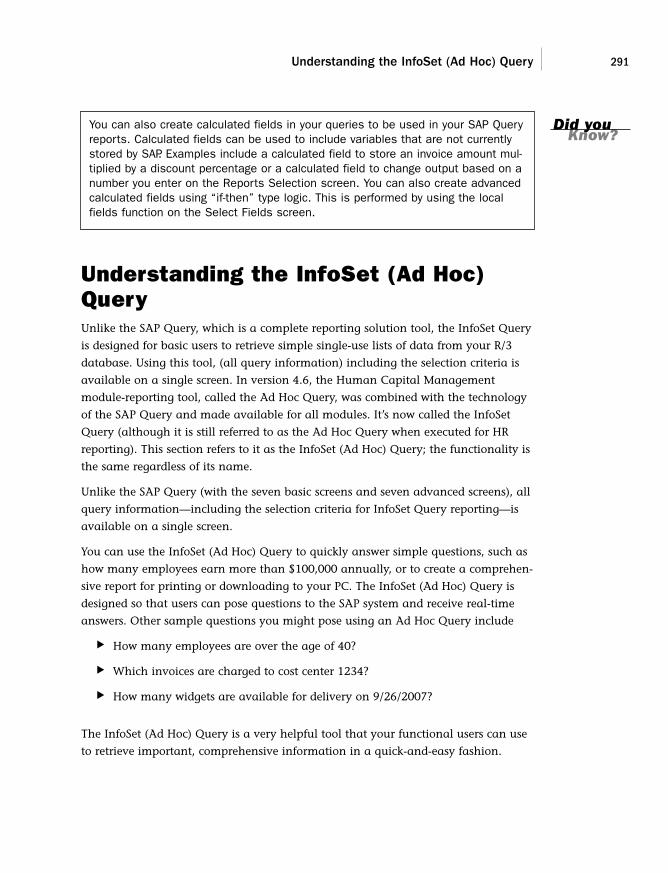
. Alter the column widths, add colors, hide leading zeros—You can
manipulate the layout of the report output to be used in interfaces or
flat file transfers; see Figure 20.15.
FIGURE 20.14The ControlLevels screenenables you todo sorting andsubtotaling, aswell as specialformatting inyour SAP Queryreport.
FIGURE 20.15The Field OutputOptions screenenables you tovary the columnwidth of yourfields to preparetext spaced ordelimitedextract files orcan be usedsimply to makeyour report out-put look better.
26_0672328224_ch20.qxd 10/13/05 2:30 PM Page 289

290 HOUR 20: Reporting Tools in SAP
. Custom headers and footers—You can create custom headers and footers to
be shown on each page of your printed reports. Your report can include the
name of the report and the date and time it was created at the top of each
printed page of the report; see Figure 20.16.
FIGURE 20.16You can usespecial symbolsto insert thecurrent date,time, and pagenumbers in yourcustom headersand footers.
. Charts and graphics—You can include graphics and create charts of your
SAP data on reports. You can create a bar graph displaying the open items
currently available in your warehouse in comparison to the items sold; see
Figure 20.17.
FIGURE 20.17Charts appearin full colorusing SAP busi-ness graphics.
26_0672328224_ch20.qxd 10/13/05 2:30 PM Page 290
Understanding the InfoSet (Ad Hoc) Query 291
You can also create calculated fields in your queries to be used in your SAP Queryreports. Calculated fields can be used to include variables that are not currentlystored by SAP. Examples include a calculated field to store an invoice amount mul-tiplied by a discount percentage or a calculated field to change output based on anumber you enter on the Reports Selection screen. You can also create advancedcalculated fields using “if-then” type logic. This is performed by using the localfields function on the Select Fields screen.
Understanding the InfoSet (Ad Hoc)QueryUnlike the SAP Query, which is a complete reporting solution tool, the InfoSet Query
is designed for basic users to retrieve simple single-use lists of data from your R/3
database. Using this tool, (all query information) including the selection criteria is
available on a single screen. In version 4.6, the Human Capital Management
module-reporting tool, called the Ad Hoc Query, was combined with the technology
of the SAP Query and made available for all modules. It’s now called the InfoSet
Query (although it is still referred to as the Ad Hoc Query when executed for HR
reporting). This section refers to it as the InfoSet (Ad Hoc) Query; the functionality is
the same regardless of its name.
Unlike the SAP Query (with the seven basic screens and seven advanced screens), all
query information—including the selection criteria for InfoSet Query reporting—is
available on a single screen.
You can use the InfoSet (Ad Hoc) Query to quickly answer simple questions, such as
how many employees earn more than $100,000 annually, or to create a comprehen-
sive report for printing or downloading to your PC. The InfoSet (Ad Hoc) Query is
designed so that users can pose questions to the SAP system and receive real-time
answers. Other sample questions you might pose using an Ad Hoc Query include
. How many employees are over the age of 40?
. Which invoices are charged to cost center 1234?
. How many widgets are available for delivery on 9/26/2007?
The InfoSet (Ad Hoc) Query is a very helpful tool that your functional users can use
to retrieve important, comprehensive information in a quick-and-easy fashion.
Did youKnow?
26_0672328224_ch20.qxd 10/13/05 2:30 PM Page 291
292 HOUR 20: Reporting Tools in SAP
Your System Administrator can control access rights to the InfoSet Query usingRoles or SAP Query User Groups. Exactly one SAP Query User Group must beassigned to a role (an InfoSet must be associated with the User Group), althoughthe user does not need to be listed in the User Group. If users want to save theirreports, they need authorization object S_QUERY, field ACTVT, value 2; otherwise,they can only create and execute reports.
Like SAP queries, InfoSet (Ad Hoc) queries are built on the foundation of Query
Areas, Query Groups, and InfoSets. Earlier in this hour, you created an InfoSet based
on the test logical database F1S, which corresponds to SAP’s test system. You can use
the same data source used in earlier examples for creating an InfoSet (Ad Hoc)
Query or you can create a new InfoSet using an HR logical database. The following
example uses the one created earlier in the chapter.
Creating an InfoSet (Ad Hoc) QueryWhen the one-time configuration is completed, Creating an InfoSet query is a rela-
tively elementary task. To begin creating your first InfoSet (Ad Hoc) query, follow
these steps:
1. You can access the InfoSet query in three ways: through an application-
specific role using the Easy Access menu, using the SAP Query (transaction
SQ01) and then selecting the InfoSet Query button, or by using transaction
code /nPQAH.
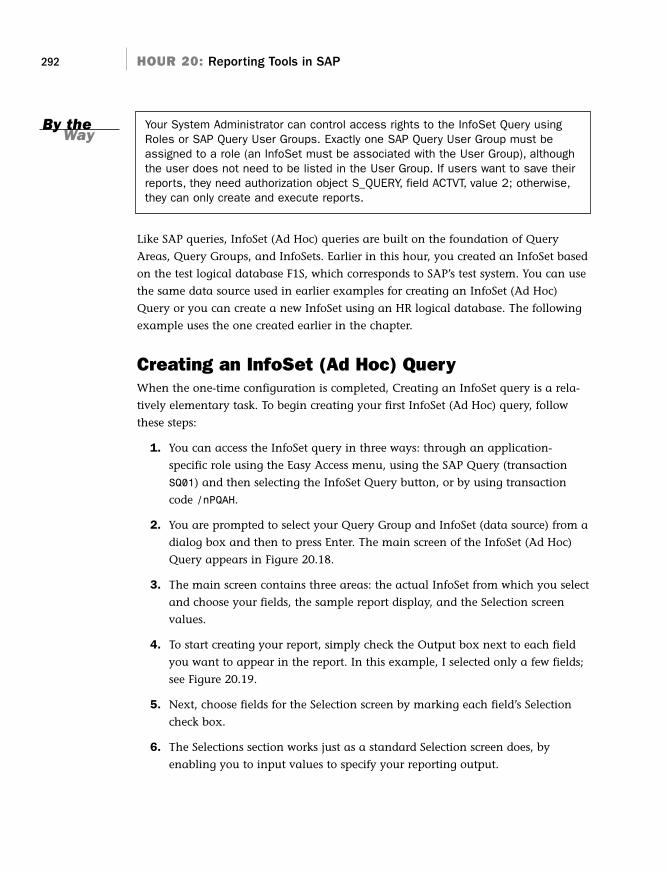
2. You are prompted to select your Query Group and InfoSet (data source) from a
dialog box and then to press Enter. The main screen of the InfoSet (Ad Hoc)
Query appears in Figure 20.18.
3. The main screen contains three areas: the actual InfoSet from which you select
and choose your fields, the sample report display, and the Selection screen
values.
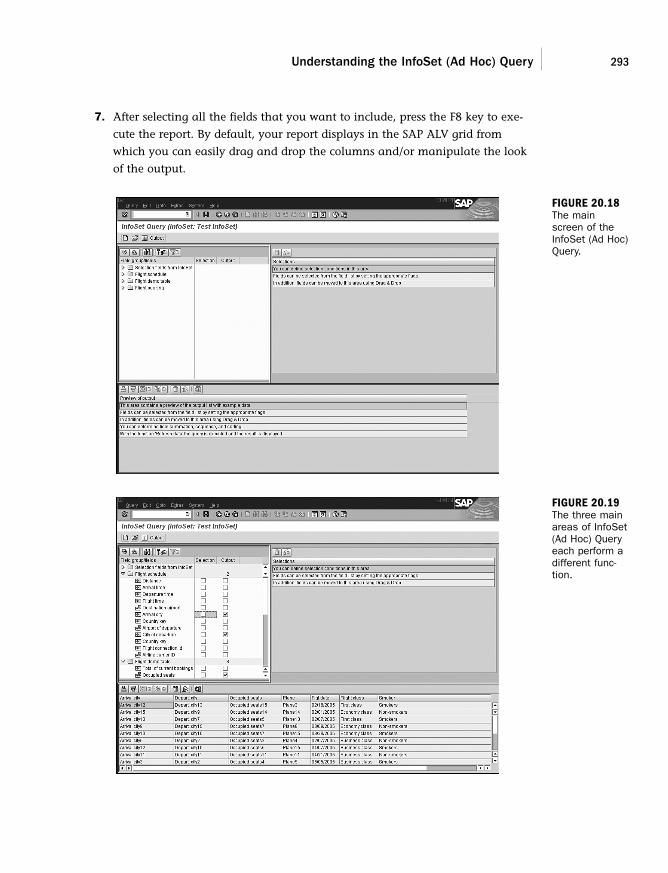
4. To start creating your report, simply check the Output box next to each field
you want to appear in the report. In this example, I selected only a few fields;
see Figure 20.19.
5. Next, choose fields for the Selection screen by marking each field’s Selection
check box.
6. The Selections section works just as a standard Selection screen does, by
enabling you to input values to specify your reporting output.
By theWay
26_0672328224_ch20.qxd 10/13/05 2:30 PM Page 292
Understanding the InfoSet (Ad Hoc) Query 293
7. After selecting all the fields that you want to include, press the F8 key to exe-
cute the report. By default, your report displays in the SAP ALV grid from
which you can easily drag and drop the columns and/or manipulate the look
of the output.
FIGURE 20.18The mainscreen of theInfoSet (Ad Hoc)Query.
FIGURE 20.19The three mainareas of InfoSet(Ad Hoc) Queryeach perform adifferent func-tion.
26_0672328224_ch20.qxd 10/13/05 2:30 PM Page 293
294 HOUR 20: Reporting Tools in SAP
The difference between reporting using the test logical database F1S and theHuman Capital Management (HCM) module is that data in the HCM module is dis-played by InfoType and not by table name. This makes it easier for the end users.
Understanding the QuickViewerUnlike the SAP Query, which is a complete reporting solution tool, the SAP
QuickViewer Tool delivered with a 4.6 system is a “what-you-see-is-what-you-get”
utility for quick collection of data from your R/3 system. To define a report with the
QuickViewer, you simply enter texts (titles) and select the fields and options that
define your QuickView. Unlike with SAP Query, whereby you create queries, you cre-
ate QuickViews. QuickViews are not queries and they cannot be exchanged among
users. The good news is that they can be converted to queries to be used with SAP
Query.
Like with the InfoSet (Ad Hoc) Query, you can use the QuickViewer to quickly
answer simple questions.
In contrast to using SAP Query and InfoSet (Ad Hoc) Query, you do not need toconfigure User Groups and InfoSets to use QuickViewer. However, if they havealready created, you can use them. Users simply select a data source (table, data-base view, table join, logical database, or InfoSet) when building their QuickView.
Like SAP queries, InfoSet (Ad Hoc) queries are built on the foundation of Query
Areas, Query Groups, and InfoSets. Earlier in this hour, you created an InfoSet based
on the test logical database F1S, which corresponds to SAP’s test system. You can use
the same data source used in earlier examples for creating a QuickView or you can
create a new InfoSet using an HR logical database. The following example uses the
one created earlier in the chapter.
Creating a QuickViewAfter the one-time configuration is completed, Creating a QuickView is also a rela-
tively elementary task. To begin creating your first QuickView, follow these steps:
1. Like the SAP Query explained earlier, QuickViews can be run in Basis or
Layout (Graphical) mode. In Basis mode, the system automatically renders the
report from parameters. In Graphical mode, a user can tweak the report’s
interface via a visual tool. Like the SAP Query, QuickViews are easier to work
with in Basis mode.
By theWay
Did youKnow?
26_0672328224_ch20.qxd 10/13/05 2:30 PM Page 294
Understanding the QuickViewer 295
2. You can access SAP R/3 QuickViewer in three ways: by using transaction SQVI,
by using the QuickViewer button on the main screen of the SAP Query (trans-
action SQ01), or by using an application-specific role from the Easy Access
menu.
3. On the main screen, enter a name for your QuickView followed by the Create
button. You will be prompted to select a data source. For this example, I use
the F1S data source.
4. There are three main tabs that you use to specify your QuickView. The
QuickViewer appears in Figure 20.20.
FIGURE 20.20The mainscreen of theQuickViewer.
5. The first tab is your list of output fields. Simply select fields listed in the
Available Fields column and select the arrow keys to move them to the output
column. The second tab enables you to dictate the sort sequence for your
selected fields. The third tab enables you to indicate selection fields for specify-
ing your final output.
6. Note in the middle of the screen that you have different Export options for
your QuickView. Select one from the drop-down box and then select the
Execute button to see the Reports Selection screen. You can further specify your
selections. Next, select the Execute button to see your completed QuickView.
26_0672328224_ch20.qxd 10/13/05 2:30 PM Page 295
296 HOUR 20: Reporting Tools in SAP
If you have created a QuickView and you want to convert it to an SAP Queryreport, simply follow these three quick steps:
1. Navigate to the main screen of the SAP Query (SQ01).
2. Follow the menu path Queries > Convert QuickViews.
3. Select your QuickView from the drop-down box and press the Enter button.You are prompted to type a name for the query; press Enter again to convertthe QuickView.
The Query family of tools contains a toolbar with functions to assist you in further
processing your data, including
Did youKnow?
. Currency conversions
. Sums and totals
. Sorting
. Graphics generation
. Easy download options
. Expert mode options (increased
report complexity)
SummaryIn this hour, you reviewed how to perform the configuration necessary for the query
tools and how to use each query tool. The skills learned in this hour might be the
most meaningful to you as an end user because they will empower you with the
skills to extract data from your own SAP system. Keep in mind that trial and error is
usually the best method for getting accustomed to working with queries in SAP. To
this end, seek to “test” your queries in nonproduction systems.
You have also read how to create Ad Hoc queries, truly valuable to those who other-
wise must rely on the system administration and programming staff to generate
reports from the system. Using the simple InfoSet tool, you can pose complex ques-
tions and enjoy the output you need in just minutes. You also have the capability to
perform further analysis of the data within the query or by saving or downloading
the report to a local spreadsheet.
Q&AQ Do users or System Administrators generally regulate the creation of Query
Groups, InfoSets, and queries?
A The use of different tools in SAP largely depends on the customer. In general,
Query Groups and InfoSets are maintained by your company’s technical users,
although the creation of queries varies. In some organizations, users see it as
a great means of creating their own reports without seeking the assistance of
26_0672328224_ch20.qxd 10/13/05 2:30 PM Page 296
Workshop 297
the technical users. On the other hand, depending on your company’s security
configuration, the creation of queries and QuickViews might be restricted to
technical or super functional users only.
Q What are the three main components of the Query family?
A Query Groups, InfoSets, and administrative decisions (which are company
specific) are the three main components of the Query family.
Q When creating InfoSets in the Human Capital Management module, what isdifferent about the configuration?
A Unlike all other modules, the Field groups that are automatically created in
your InfoSet contain fields based on InfoTypes automatically without the users
having to add them.
Q Out of the three query tools, which is the most robust reporting tool withthe most features?
A The SAP Query is the most robust.
Q Does security restrict access in Query reporting?
A There are several ways that security can influence the availability of data in
Query reporting. Security depends on your company’s security configuration,
but if you use logical databases, the security is built-in and uses your standard
security profile when determining what data you have access to.
WorkshopThe workshop is designed to help you anticipate possible questions, review what
you’ve learned, and begin thinking ahead to putting your knowledge into practice.
The answers to the quiz that follows can be found in Appendix A, “Quiz Answers.”
Quiz1. What is the transaction code to access the Create Users screen?
2. What is the transaction code to access the Create InfoSets screen?
3. What is the transaction code to access the Create SAP Queries screen?
4. Are global Query Areas client-dependent or independent?
5. Name three different components of SAP queries.
26_0672328224_ch20.qxd 10/13/05 2:30 PM Page 297
298 HOUR 20: Reporting Tools in SAP
6. What does a Query Area include?
7. What are the two different Query Areas?
8. What must you always do after creating or modifying an InfoSet?
9. What is the transaction code to access the QuickViewer?
10. In which R/3 application modules is the InfoSet (Ad Hoc) Query available?
Exercises1. Make a cheat sheet of the transaction codes for each of the query reporting
tools.
2. Create a new Query Group in the standard area called ZTEST2.
3. Create a new InfoSet in the standard area ZTEST2.
4. Open InfoSet ZTEST2 and peruse the different tables and fields available
within it.
5. Assign the InfoSet ZTEST2 to the Query Group ZTEST2.
6. Create a new SAP query in the standard area called ZMYQUERY2 using the
InfoSet ZTEST2.
7. Create a new InfoSet (Ad Hoc) Query called ZAHQUERY2.
8. Create a new QuickView called ZQVQUERY2.
26_0672328224_ch20.qxd 10/13/05 2:30 PM Page 298