TCP/IP MODULE CA-ETHR-A INSTALLATION MANUAL CD Centaur 5.1... · CA-ETHR-A: TCP/IP Module...
32
TCP/IP MODULE CA-ETHR-A INSTALLATION MANUAL www.cdvgroup.com
Transcript of TCP/IP MODULE CA-ETHR-A INSTALLATION MANUAL CD Centaur 5.1... · CA-ETHR-A: TCP/IP Module...

TCP/IP MODULE CA-ETHR-AINSTALLATION MANUAL
w w w . c d v g r o u p . c o m

CA-ETHR-A: TCP/IP Module Installation Manual Page �

CA-ETHR-A: TCP/IP Module Installation Manual Page �
Table of Contents
Introduction....................................................................................5Hardware Components ........................................................................... 6Technical Specifications .......................................................................... 6PCB Overview ......................................................................................... 7Problems? ............................................................................................... 7
Configuring the Module................................................................8Configuring Via Serial Port ...................................................................... 8Configuring Via Web ............................................................................. 14
Hardware Connections...............................................................18Connecting Between LAN and RS-��� Device ..................................... 18Connecting Between LAN and RS-485 Device ..................................... 19
Jumpers.......................................................................................21Direct Connection.................................................................................. �1Null Connection ..................................................................................... �1
Settings and Menus.....................................................................22Local IP Address ................................................................................... ��Local Port Number ................................................................................ ��Subnet Mask ......................................................................................... ��Gateway Address .................................................................................. ��Baud Rate ............................................................................................. ��Packets ................................................................................................. ��Acknowledgement Delay....................................................................... �4Serial Port ............................................................................................. �5Remote IP Address ............................................................................... �5Remote Port Number ............................................................................ �5Password .............................................................................................. �5Menus ................................................................................................... �6

CA-ETHR-A: TCP/IP Module Installation Manual Page 4

CA-ETHR-A: TCP/IP Module Installation Manual Page 5
Introduction
The CA-ETHR-A TCP/IP module serves as an interface between a device that uses serial communications (serial device) and a Local Area Network (LAN).
By connecting serial devices to the TCP/IP module, the serial devices can communicate with other devices over a LAN using the IP protocol through a TCP data channel.
Although optimized for use with CDV Group products, this module can be used with other serial devices. Below is a list of some types of serial devices that are supported:
• Centaur CT-V900-A controller• Time and Attendance Clocks and Terminals• Security and alarm systems• CCTV equipment
Figure 1: Example of a Typical Application
10BaseTEthernet
RS-232 or Serial (TTL)
TCP/IPModule
TCP/IPModule
FirstController
Site A
FirstController
Site B
To Next Controller
To Next Controller
CentaurAccess Control Server
LAN

CA-ETHR-A: TCP/IP Module Installation Manual Page 6
Hardware Components
The following is a list of hardware components included with the CA-ETHR-A TCP/IP module:
• Plastic cover• Ethernet board• DB9 to modular phone jack cable• 5- to 5-pin molex cable
Technical Specifications
Serial RS-��� Interface
Modular phone jack, requires a DB-9 to modular phone jack cable
Network Interface RJ-45 connector, requires a 10Base-T Ethernet cable
Protocols Supported TCP/IP, HTTP, ICMP and ARP
Baud Rates 9600, 19200 and 38400
Serial Line FormatCharacters: 8 data bitsStop bit: 1Parity: none
Compatibility Ethernet: Version 2.0/IEEE 802.3
Support 10 MBPS - Half duplex
Reset PCB mounted push button
Power 12Vdc
Current Consumption 80mA max.
PCB Dimensions 10cm X 6.4cm (4” X 2.5”)fits into controller’s metal box
Temperature 5°C to 55°C (41°F to 1�1°F)
Hardware Compatibility CT-V900-A controller
CA-ETHR-A: TCP/IP Module Installation Manual Page 7
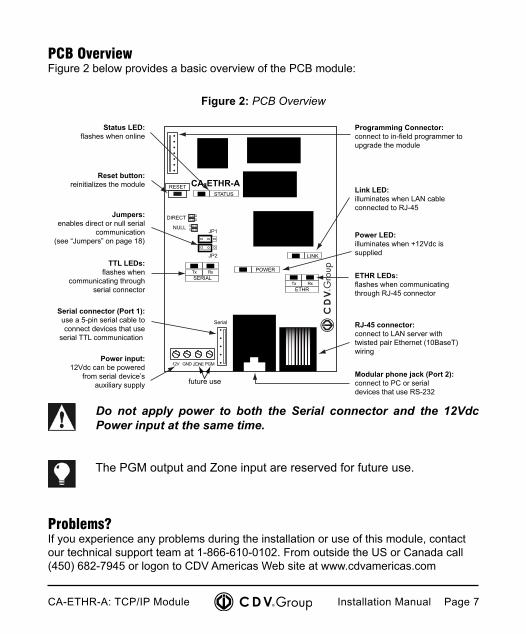
PCB OverviewFigure � below provides a basic overview of the PCB module:
Figure 2: PCB Overview
ZONE
Serial
PGMGND12V
SERIALTx Rx
ETHRTx Rx
POWER
STATUSRESET
JP1
DIRECT
NULL
JP2 LINK
CA-ETHR-A
Status LED:flashes when online
Reset button: reinitializes the module
Jumpers:enables direct or null serial
communication(see “Jumpers” on page 18)
TTL LEDs:flashes when
communicating through serial connector
Serial connector (Port 1):use a 5-pin serial cable to connect devices that use
serial TTL communication
Power input:12Vdc can be powered
from serial device’s auxiliary supply future use
Programming Connector:connect to in-field programmer to upgrade the module
Link LED:illuminates when LAN cable connected to RJ-45
Power LED:illuminates when +12Vdc is supplied
ETHR LEDs:flashes when communicating through RJ-45 connector
RJ-45 connector: connect to LAN server with twisted pair Ethernet (10BaseT) wiring
Modular phone jack (Port 2): connect to PC or serial devices that use RS-232
Do not apply power to both the Serial connector and the 12Vdc Power input at the same time.
The PGM output and Zone input are reserved for future use.
Problems?If you experience any problems during the installation or use of this module, contact our technical support team at 1-866-610-0102. From outside the US or Canada call (450) 682-7945 or logon to CDV Americas Web site at www.cdvamericas.com

CA-ETHR-A: TCP/IP Module Installation Manual Page 8
Configuring the Module
Before using the TCP/IP module, you must configure it to communicate on a LAN. The module can be configured by one of two methods:
• Using a commercial serial communication program, such as HyperTerminal, to access the module’s serial port (refer to “ Configuring Via Serial Port” below).
• Using a standard Web browser to access the module’s internal Web pages (refer to “ Configuring Via Web” on page11” on page ).
To configure the module through its internal Web pages, you must first set the module’s Local IP Address through its serial port.
Configuring Via Serial PortTo configure the module using a commercial serial communication program, such as HyperTerminal, follow the steps detailed below. The first time you configure the module, you must use this method. To configure the module using its internal Web pages, refer to “ Settings and Menus” on page19.
Although these steps refer to HyperTerminal, you can use any serial communication program that supports the same parameters.
Step A - “ `Hardware Connections`” (see below)Step B - “ `Set up HyperTerminal`” (page )Step C - “ `Start Communication`” (page )Step D - “ `Configure the Module`” (page )
Step A - Hardware ConnectionsTo configure the TCP/IP module via its serial port, you must connect the module to a computer’s COM port. Refer to Figure page6 on page and to the instructions that follow:

CA-ETHR-A: TCP/IP Module Installation Manual Page 9
Figure 3: Serial Communication
1) Apply 12Vdc to the terminals labeled 12V and GND on the TCP/IP module. Power can be supplied from the auxiliary output of the serial device (i.e. controller) or from a separate power supply.
�) Connect the DB-9 to modular phone jack cable between the modular phone jack on the TCP/IP module and an available COM port on your computer.
Step B - Set up HyperTerminalThe first time you connect using this method you must set up HyperTerminal. If you have already set up HyperTerminal, go to “ Start Communication” on page8”.
1) Click Start, point to Programs, point to Accessories, point to Communications and then click HyperTerminal.
12V GND PGMZONE
SERIAL
TCP/IP Module(CA-ETHR-A)
Modular phone jack
DB-9 to modular phone jack cable to desired
COM port
+ -12Vdc
12V GND PGMZONE
SERIAL
TCP/IP Module(CA-ETHR-A)
Modular phone jack
DB-9 to modular phone jack cable to desired
COM port
+ -12Vdc

CA-ETHR-A: TCP/IP Module Installation Manual Page 10
�) The Connection Description dialog box appears.
In the Name text box, type a descriptive name such as Configuring TCP_IP Module. Select the
desired icon and click OK.
�) The Connect To dialog box appears.
From the Connect using list, select the COM port that the TCP/IP module is connected to and click OK.
4) The COM Properties dialog box appears.
From the Bits per second list, select 19200. From the Data bits list, select 8. From the Parity list, select None. From the Stop bits list, select 1. From the Flow control list, select None. Click OK. All settings in the COM Properties dialog box must match the TCP/IP module’s settings. If you modify the module’s settings after performing these steps, make sure to edit HyperTerminal’s COM port settings.

CA-ETHR-A: TCP/IP Module Installation Manual Page 11
5) The HyperTerminal window appears. From the menu bar, click File and then click
Save.
Step C - Start CommunicationOnce HyperTerminal is set up, you must establish communication between the TCP/IP module and the computer.
1) Make sure the HyperTerminal window is open. If not, click Start, point to Programs, point to Accessories, point to Communications, point to the HyperTerminal folder and select the name created in Step B.
�) Press the Reset button on the TCP/IP module, wait two seconds and type the word postech using your computer’s keyboard. If you wait more than 5 seconds after pressing the Reset button, you will not be able to establish communication.
3) The TCP/IP module’s Main Menu appears.
Step D - Configure the ModuleAfter accessing the TCP/IP module’s Main Menu, use the number keys on your computer’s keyboard to access the different menus. If there is no activity for a period of 4 minutes, the module exits its serial port menu.
For more detailed explanations of the different settings and menus, refer to “ Settings and Menus” on page19”.

CA-ETHR-A: TCP/IP Module Installation Manual Page 1�
1) From the Main Menu, press 1 on your computer’s keyboard to access the Configuration Menu.
�) Press 2 on your computer’s keyboard to modify the module’s settings.
3) The module’s current values will appear one at a time. Type a new value and press [enter] on your computer’s keyboard. If you want to keep the current value, press [enter] without typing a value. Repeat these steps until all settings are programmed. When finished, press the [space] bar to exit this menu.
By default the serial port is 2. If you need to use the 5-pin serial connector (port 1) to connect the TCP/IP to the serial device (refer to “ Hardware Connections” on page15” on page ), do not change the value of the serial port now. You will be able to select port 1 later, after accessing the module’s Web page. This allows you to make sure that the module was configured properly and that you can access it through the Web.

CA-ETHR-A: TCP/IP Module Installation Manual Page 1�
4) Any modified settings must be saved. From the Configuration Menu, press 3 on your computer’s keyboard.
5) Press 1 on your computer’s keyboard to save.
6) The module will restart and stop communication with HyperTerminal. The TCP/IP module is now programmed and ready for use. To make sure that the module was configured properly, view the module’s Web page as explained in “ Configuring Via Web” on page11” on page .

CA-ETHR-A: TCP/IP Module Installation Manual Page 14
Configuring Via WebTo configure the TCP/IP module using a standard Web browser, such as Microsoft Internet Explorer, follow the steps detailed below. To configure the module through its serial port, refer to “ Configuring Via Serial Port” on page5”.
Although the following steps refer to Internet Explorer, you can use any standard Web browser that supports the same parameters.
Step A - “ `Set IP Address Via Serial Port`” (see below)Step B - “ `Hardware Connections`” (see below)Step C - “ `Access the Module’s Web Page`” (page )Step D - “ `Configure the Module`” (page )
Step A - Set IP Address Via Serial PortIn order to access the TCP/IP module’s internal Web pages, the module must have a Local IP Address. The first time you assign a Local IP Address, it must be done through the serial port menu as detailed in “ Configuring Via Serial Port” on page5”.
Step B - Hardware ConnectionsTo configure the TCP/IP module via Web, you must connect it to the LAN. If the module is already connected to the LAN as detailed in “ Hardware Connections” on page15” on page , you can proceed to the next step. Otherwise, refer to Figure page1� on page and follow these instructions:
1) Apply 12Vdc to the terminals labeled 12V and GND on the TCP/IP module. Power can be supplied from the auxiliary output of the serial device (i.e. controller) or from a separate power supply.
2) Connect a twisted pair Ethernet wire (10BaseT) between the TCP/IP module’s RJ-45 network connector and the LAN.

CA-ETHR-A: TCP/IP Module Installation Manual Page 15
Figure 4: Web Connections
12V GND PGMZONE
SERIAL
TCP/IP Module(CA-ETHR-A)
LAN+-
12Vdc
Step C - Access the Module’s Web PageOnce a Local IP Address is assigned to the TCP/IP module and the module is connected to the LAN, you must establish communication between the module and a computer on the LAN.
1) From a computer connected to the LAN, open Internet Explorer.
�) In the Address bar, type the TCP/IP module’s Local IP Address and press [enter] on your computer’s keyboard. A Login window appears. Do not type any of the zeros at the start of each set of � digits. For example, if the Local IP Address is 010.010.020.003, you would type 10.10.20.3.

CA-ETHR-A: TCP/IP Module Installation Manual Page 16
�) In the Password text box, type your password and click Login. The default password is admin. Refer to “ Password” on page22”.
Step D - Configure the ModuleOnce you have accessed the TCP/IP module’s internal Web pages, configure the module using the available menus. To save the changes, click Apply before selecting a different tab.
1) By default, the window displays the Network Settings tab. Make any necessary changes and click Apply. If you do not click Apply, changes will not be saved when you change tabs.

CA-ETHR-A: TCP/IP Module Installation Manual Page 17
For more detailed explanations of the different settings and menus, refer to “ Settings and Menus” on page19” on page . When you click Apply, the module automatically resets, the Login window appears and a list of what was changed appears.
�) Select the COM Settings tab and make any necessary changes. If you need to use the 5-pin serial connector (port 1) to connect the TCP/IP to the serial device (refer to “ Hardware Connections” on page15” on page ), you can now select port 1. Click Apply.
�) Select the Security tab, make any necessary changes, and click Apply.
4) Select the Admin tab. In the Password text box, type your password and click Apply.
5) When you are done, click Logout.
6) Close your Web browser.

CA-ETHR-A: TCP/IP Module Installation Manual Page 18
Hardware ConnectionsThe following sections provide an overview of the TCP/IP module and details on how to connect it between a serial device and a LAN.
A special connection method is required when configuring the module through its serial port. Refer to “ Configuring Via Serial Port” on page5”.
Connecting Between LAN and RS-232 DeviceThis connection method enables you to connect the TCP/IP module to a serial device’s DB-9 connector (RS-232 serial port). For example, you can connect to the serial port of a Centaur CT-V900-A controller. The standard connection requires the use of a DB-9 to modular phone jack cable. Refer to Figure below and to the instructions that follow:
Figure 5: Standard Connections
RXTXSERIAL
12V GND PGMZONE
SERIAL
NULLDIRECT
JP2
JP1
TCP/IP Module(CA-ETHR-A)
Modularphone jack
5-pinserial cable
10BaseTEthernetTo 9-pin RS-232
connector on serial device
(i.e. controller)
+ -12Vdc
LAN
RXTXSERIAL
12V GND PGMZONE
SERIAL
NULLDIRECT
JP2
JP1
TCP/IP Module(CA-ETHR-A)
Modularphone jack
5-pinserial cable
10BaseTEthernetTo 9-pin RS-232
connector on serial device
(i.e. controller)
+ -12Vdc
LAN

CA-ETHR-A: TCP/IP Module Installation Manual Page 19
1) Apply 12Vdc to the terminals labeled 12V and GND on the TCP/IP module.
�) Connect the DB-9 to modular phone jack cable between the modular phone jack on the TCP/IP module and the serial device’s DB-9 connector (refer to Table below).
3) Connect a twisted pair Ethernet wire (10BaseT) between the TCP/IP module’s RJ-45 network connector and the LAN.
Table 1: DB9 to Phone Jack Pin-Out Connections
Pin # DB9 Connector Phone Jack Connector
1 NC NC
� RX NC
� TX NC
4 NC GND
5 GND RX
6 NC TX
7 NC NA
8 NC NA
9 NC NA
Connecting Between LAN and RS-485 DeviceThis connection method enables you to connect the TCP/IP module to a device that uses the RS-485 standard. For example, you can connect to another CA-A360-A RS-��� to RS-485 Converter to expand the distance between the TCP/IP module and the serial device or to connect the TCP/IP module to a device using the RS-485 communication standard. Refer to Figure page17 on page and to the instructions that follow:

CA-ETHR-A: TCP/IP Module Installation Manual Page 20
Figure 6: RS-485 Connections
RXTXSERIAL
12V GND PGMZONE
SERIAL
NULLDIRECT
JP2
JP1
Position Technology
POW
ER+
12VA+
RX
TXRS-485
RS-232
B-G
ND
GN
DG
ND
PWR
ConvertorRS-232/RS-485
TX RX
JP3
JP2
JP1
+ -
LAN
TCP/IP Module(CA-ETHR-A)
Jumpersetting
RS485 to RS-232 ConverterCA-A360-A
4- to 5-pinconnector cable
(not supplied)To RS-485
device10BaseTEthernet
JP1
JP2
If you apply 12Vdc to the TCP/IP module, do not connect the +12V.and.GND terminals on the CA-A360-A.
1) Set the jumpers to “Direct” as shown in Figure . For more information on Direct Connections, see “ Jumpers” on page18” on page .
2) Apply 12Vdc to the terminals labeled 12V and GND on the TCP/IP module.
�) Connect a 4- to 5-pin connector cable (not supplied) from the RS-��� to RS-485 Converter (CA-A360-A) to the connector labelled SERIAL on the TCP/IP module.
4) Connect a twisted pair Ethernet wire (10BaseT) between the TCP/IP module’s RJ-45 network connector and the LAN.
5) Connect the RS-232 to RS-485 Converter (CA-A360-A) to any RS-485 device.

CA-ETHR-A: TCP/IP Module Installation Manual Page �1
Jumpers
The CA-ETHR-A TCP/IP Module has two on-board jumpers which allow you to select whether the communication between the TCP/IP module and a serial TTL device is null or direct. These jumpers only affect the serial TTL connector (port 1).
Direct ConnectionIf you need a direct connection between the TCP/IP module and a serial TTL device, set the jumpers as shown in Figure :
Figure 7: Direct Communication
Null ConnectionIf you need a null connection between the TCP/IP module and a serial TTL device, set the jumpers as shown in Figure :
Figure 8: Null CommunicationJP1
JP2
JP1
JP2
JP1
JP2

CA-ETHR-A: TCP/IP Module Installation Manual Page ��
Settings and MenusThe TCP/IP module settings listed in the following sections can be configured using one or both of these methods.
• “ Configuring Via Serial Port” on page5” on page • “ Configuring Via Serial Port” on page5“Configuring Via Web” on page11”
Local IP AddressThis is the Internet Protocol (IP) address of a device communicating on a LAN. Each TCP/IP module must have a unique Local IP Address. The address entered must be recognized by the LAN and must not be used by another device. A Local IP Address is entered as four sets of three digits (000-255) separated by periods (i.e. 206.104.032.006). Speak to your Network Administrator about obtaining an IP address.
Serial Port: Yes (Menu [1], [2]) Web Page: Yes (Network Settings tab)
The first time you set the module’s Local IP Address, you must do so using the serial port method as described in “ Configuring Via Serial Port” on page5”.
Local Port NumberThe Local Port Number is assigned to the data transfer application program that communicates through the TCP/IP module’s physical serial connector for initiating remote connections with the LAN. Enter a value between 0 and 65535. Do not use Well-Known Ports, which are port numbers used by everyone. For example, port 80 is used for HTTP traffic (Web traffic). Speak to your Network Administrator about obtaining a port number.
Serial Port: Yes (Menu [1], [2]) Web Page: Yes (Network Settings tab)
Subnet MaskWhenever the TCP/IP module wants to communicate with another device on the LAN, it will compare its Local IP Address with that of the device. The result is then matched with the assigned Subnet Mask number to determine

CA-ETHR-A: TCP/IP Module Installation Manual Page ��
whether the device’s IP Address belongs to the same subnet (LAN segment) as the module. If not, data will be directed towards the Gateway Address (see below) to redirect the data to the correct subnet via a router. A Subnet Mask is entered as four sets of three digits (000-255) separated by periods. A common Subnet Mask number is 255.255.000.000. Speak to your Network Administrator about obtaining a Subnet Mask number.
Serial Port: Yes (Menu [1], [2]) Web Page: Yes (Network Settings tab)
Gateway AddressThe Gateway Address enables the TCP/IP module to communicate with other LAN segments. Enter the Local IP Address of the router connected to the same LAN segment as the TCP/IP module. The Gateway Address must be within the local network. A Gateway Address is entered as four sets of three digits (000-255) separated by periods (i.e. 206.104.032.006). Speak to your Network Administrator for more information.
Serial Port: Yes (Menu [1], [2]) Web Page: Yes (Network Settings tab)
Baud RateThis value represents the signalling rate of a line, which is the number of transitions (voltage or frequency changes) that are made per second. It is important that you set the Baud Rate to the same value as the serial device connected to the module. By default the module is set to 19200. The TCP/IP module supports the following Baud Rates: 9600, 19200 and 38400.
Serial Port: Yes (Menu [1], [2]) Web Page: Yes (COM Settings tab)
PacketsA packet is a block of data received from the serial device connected to the TCP/IP module. These settings define when the packet is sent to the LAN.
Serial Port: Yes (Menu [1], [2]) Web Page: Yes (COM Settings tab)

CA-ETHR-A: TCP/IP Module Installation Manual Page �4
Packet DelayIf the idle period (no activity) between each character is equivalent to the programmed Packet Delay, then the module sends the serial data currently in the buffer to the LAN. Enter a value between 1 and 255ms. If you set the value to 0 this feature is disabled. The default value is 3ms. The Packet Delay is directly related to the baud rate. When used with CDV Group controllers, we recommend the following values: If Baud Rate = 9600, set Packet Delay to 6msIf Baud Rate = 19200, set Packet Delay to 3msIf Baud Rate = 38400, set Packet Delay to 2ms
Packet SizeWhen the data received is equivalent in bytes to the programmed Packet Size, the module sends the serial data in the buffer to the LAN. Enter a value between 1 and 458 bytes. If you set the value to 0, this feature is disabled. The default value is 0 (disabled).
Acknowledgement DelayWhen the TCP/IP module receives a packet from the LAN, it must acknowledge receipt, otherwise the LAN continues to send the same packet. In order to save bandwidth, the acknowledgement can be sent on the LAN with a packet received on its serial port. If, after receiving a packet from the network, no data is received on the serial port, the module sends the acknowledgment after the programmed Acknowledgment Delay. If data is received on the serial port within the Acknowledgment Delay, the module ignores the delay and waits until the entire packet is received. The acknowledgment will then be sent on the LAN with the packet received on its serial port. Enter a value between 1 and �55ms. To send the acknowledgement as soon as a packet is received from the network, set the value to 1ms. The default value is 100ms.
Serial Port: Yes (Menu [1], [2]) Web Page: Yes (COM Settings tab)

CA-ETHR-A: TCP/IP Module Installation Manual Page �5
Serial PortThe serial port is the port used to connect the TCP/IP module to the serial device. Serial port 1 refers to the 5-pin serial (TTL) connector while serial port � refers to the modular phone jack connector on the TCP/IP module (see Figure page4 on page ).
Serial Port: Yes (Menu [1], [2]) Web Page: Yes (COM Settings tab)
Remote IP AddressOnly a device on the LAN whose Local IP Address matches that of the TCP/IP module’s Remote IP Address will be able to communicate with the module. If the IP Addresses do not match, no data transfer will occur. To disable this feature, enter 0.0.0.0. For more information on IP Addresses, go to page .
Serial Port: Yes (Menu [1], [2]) Web Page: Yes (Security tab)
Remote Port NumberOnly a device on the LAN whose Local Port Number matches that of the TCP/ IP module will be able to communicate with the module. If the Port Numbers do not match, no data transfer will occur. To disable this feature, enter 0. For more information on Port Numbers, go to page .
Serial Port: Yes (Menu [1], [2]) Web Page: Yes (Security tab)
PasswordAllows you to password protect the TCP/IP module’s internal Web pages for configuring the module (refer to “ Access the Module’s Web Page” on page12” on page ). The password is case sensitive and can be up to eight characters. The default password is admin.
A password is not required when accessing the Serial Port Menu via the RS-��� serial port.
Serial Port: Yes (Menu [2], [1]) Web Page: Yes (Administration tab)

CA-ETHR-A: TCP/IP Module Installation Manual Page �6
MenusVarious other menus and options are available when configuring the TCP/IP module.
SaveWhen configuring the TCP/IP module through the serial port, you must access this menu to save any changes that were made, otherwise any changes you have made will not be applied.
Serial Port: Yes (Menu [1], [3]) Web Page: No
Restore Current SetupWhen configuring the TCP/IP module via serial port, you can restore the last saved settings of the module.
Serial Port: Yes (Menu [1], [4]) Web Page: No
Restore Default Setup Use this feature to restore the TCP/IP module’s default settings. Refer to Table for a list of the module’s default settings.
Serial Port: Yes (Menu [1], [5]) Web Page: Yes (Administration tab)
Table 2: TCP/IP Module’s Default SettingsLocal IP Address 000.000.000.000Local Port Number 00000Subnet Mask 000.000.000.000Gateway Address 000.000.000.000Baud Rate 19200Packet Delay �msPacket Size 000Acknowledgment Delay 100msRemote IP Address 000.000.000.000Remote Port Number 00000Password adminSerial Port Port �

CA-ETHR-A: TCP/IP Module Installation Manual Page �7
AdvancedThis menu enables you to update the module’s internal Web pages after the module has been upgraded through the Programming Connector (refer to Figure � on page 5 ). Contact your distributor or CDV Americas before using this menu.
Serial Port: Yes (Menu [2], [2]) Web Page: No


WARRANTyCDV Group (“Seller”) warrants its products to be free from defects in materials and workmanship under normal use for the period of one year. Except as specifically stated herein, all express or implied warranties whatsoever, statutory or otherwise, including without limitation, any implied warranty of merchantability and fitness for a particular purpose, are expressly excluded. Because Seller does not install or connect the products and because the products may be used in conjunction with products not manufactured by Seller, Seller cannot guarantee the performance of the security system and shall not be responsible for circumstances resulting from the product’s inability to operate. Seller obligation and liability under this warranty is expressly limited to repairing or replacing, at Seller’s option, any product not meeting the specifications. Returns must include proof of purchase and be within the warranty period. In no event shall the Seller be liable to the buyer or any other person for any loss or damages whether direct or indirect or consequential or incidental, including without limitation, any damages for lost profits, stolen goods or claims by any other party, caused by defective goods or otherwise arising from the improper, incorrect or otherwise faulty installation or use of the merchandise sold.
Notwithstanding the preceding paragraph, the Seller’s maximum liability will be strictly limited to the purchase price of the defective product. Your use of this product signifies your acceptance of this warranty.
BEWARE: Dealers, installers and/or others selling the product are not authorized to modify this warranty or make additional warranties that are binding on the Seller.


For technical support in Canada or the U.S., call 1-866-610-0102.For technical support outside Canada and the U.S., call 00-1-450-682-7945,
Monday to Friday from 8:00 a.m. to 8:00 p.m. EST.Please feel free to visit our website at
www.cdvamericas.com
1645A Autoroute Laval West (Quebec) H7L 3W3 CANADATel.: (450) 682-7945 • Fax: (450) 682-9590
CDV AmericasACCESS CONTROL SYSTEM MANUFACTURER