TC380 Work Instructions
6
Final Report – Instructions April 23 rd , 2013 DISASSEMBLY AND REASSEMBLY OF AN M1911 PISTOL INTRODUCTION Originally adopted by the United States Army in 1911, the M1911 is a single-action, semi- automatic pistol which was a standard issue sidearm for the United Stated Armed Forces. It was originally designed by John Browning, was manufactured b y Colt Firearms and later expanded to Springfield Armory. The M1911 is still used as a standard sidearm in the Armed Forces even though it was replaced by the M9 after 1985. General Infantry (more commonl y known as GI) during WWI, WWII, the Korean War, and Vietnam War would needed to disassemble – or “field strip” – their side-arm to clean their weapon. The purpose of these instructions is to give a thorough walkthrough of how to disassemble and reassemble the M1911. While there are man y different calibers and manufacturers of this weapon, these instructions are app licable to any military specification M1911. The pistol used in this documentation is a Taurus PT1911 9mm. Pictured below is an overview of the basic parts of the M1911. Figure 1: Fully Assembled M1911 DISASSEMBLY OF M1911 1) Inspection Remove magazine (if inserted) by depressing the magazine catch release button Pull slide back fully to ensure the ch amber is clear of any ammunition 2) Removal of Recoil Spring Depress recoil spring plug Slide/Barrel Assembly Trigger Catch Release Button Magazine Hammer
-
Upload
chris-sookhai -
Category
Documents
-
view
220 -
download
0
Transcript of TC380 Work Instructions

7/28/2019 TC380 Work Instructions
http://slidepdf.com/reader/full/tc380-work-instructions 1/6
Final Report – Instructions
April 23rd
, 2013
DISASSEMBLY AND REASSEMBLY OF AN M1911 PISTOL
INTRODUCTION
Originally adopted by the United States Army in 1911, the M1911 is a single-action, semi-
automatic pistol which was a standard issue sidearm for the United Stated Armed Forces. It was
originally designed by John Browning, was manufactured by Colt Firearms and later expanded to
Springfield Armory. The M1911 is still used as a standard sidearm in the Armed Forces even
though it was replaced by the M9 after 1985. General Infantry (more commonly known as GI)
during WWI, WWII, the Korean War, and Vietnam War would needed to disassemble – or “field
strip” – their side-arm to clean their weapon. The purpose of these instructions is to give a
thorough walkthrough of how to disassemble and reassemble the M1911. While there are manydifferent calibers and manufacturers of this weapon, these instructions are applicable to any
military specification M1911. The pistol used in this documentation is a Taurus PT1911 9mm.
Pictured below is an overview of the basic parts of the M1911.
Figure 1: Fully Assembled M1911
DISASSEMBLY OF M1911
1) Inspection
Remove magazine (if inserted) by depressing the magazine catch release button
Pull slide back fully to ensure the chamber is clear of any ammunition
2) Removal of Recoil Spring
Depress recoil spring plug
Slide/Barrel Assembly
Trigger
Catch Release Button
Magazine
Hammer

7/28/2019 TC380 Work Instructions
http://slidepdf.com/reader/full/tc380-work-instructions 2/6
With plug depressed, turn barrel bushing counter clockwise
Remove spring and bushing from the slide/barrel assembly
i. Note: Spring is under high tension and can fly out if not controlled
Figure 2: Front View of Pistol
3) Removal of Slide/Barrel Assembly
Push slide rearward until semi-circular tab on slide aligns with semi-circular
disassembly notch on slide stop
Push slide stop pin on right side of the pistol through the left side and remove
Figure 3: Recoil Spring and Bushing Removed and Alignment of Semi-Circles
Recoil Spring Plug
Barrel Bushing
Rotate CCW
Barrel
Recoil Spring Guide
Slide Stop Pin
Semi-Circular Notches

7/28/2019 TC380 Work Instructions
http://slidepdf.com/reader/full/tc380-work-instructions 3/6
Figure 4: Removal of Slide Stop Pin
4) Slide/Barrel Assembly Removal
After slide stop pin is removed, push the slide all the way forward to remove
Move slide completely off of lower frame
Figure 5: Slide/Barrel Assembly Removal
Slide Stop Pin
Slide/Barrel Assembly

7/28/2019 TC380 Work Instructions
http://slidepdf.com/reader/full/tc380-work-instructions 4/6
5) Removal of Barrel and Recoil Spring Guide
Rotate the recoil spring guide away from the barrel and remove towards the rear
of the slide
Remove the barrel through the front of the slide
Figure 6: Fully Field Stripped M1911
Now that the pistol is completely disassembled, cleaning of the gun can take place. After proper
cleaning with an appropriate solvent and oil, the pistol is ready to be reassembled.
REASSEMBLY OF M1911
1) Reassembly of Slide/Barrel Assembly
Insert barrel through the front of the slide until it is as far back as it can go
Insert the recoil spring guide from the back of the slide to the front
Figures 7 and 8 show how to insert the spring guide and barrel into the slide
Slide
Barrel
Frame
Recoil Spring Guide
Slide Stop Pin
7/28/2019 TC380 Work Instructions
http://slidepdf.com/reader/full/tc380-work-instructions 5/6
Figure 7: Insertion of Barrel into Slide
Figure 8: Insertion of Barrel into Slide
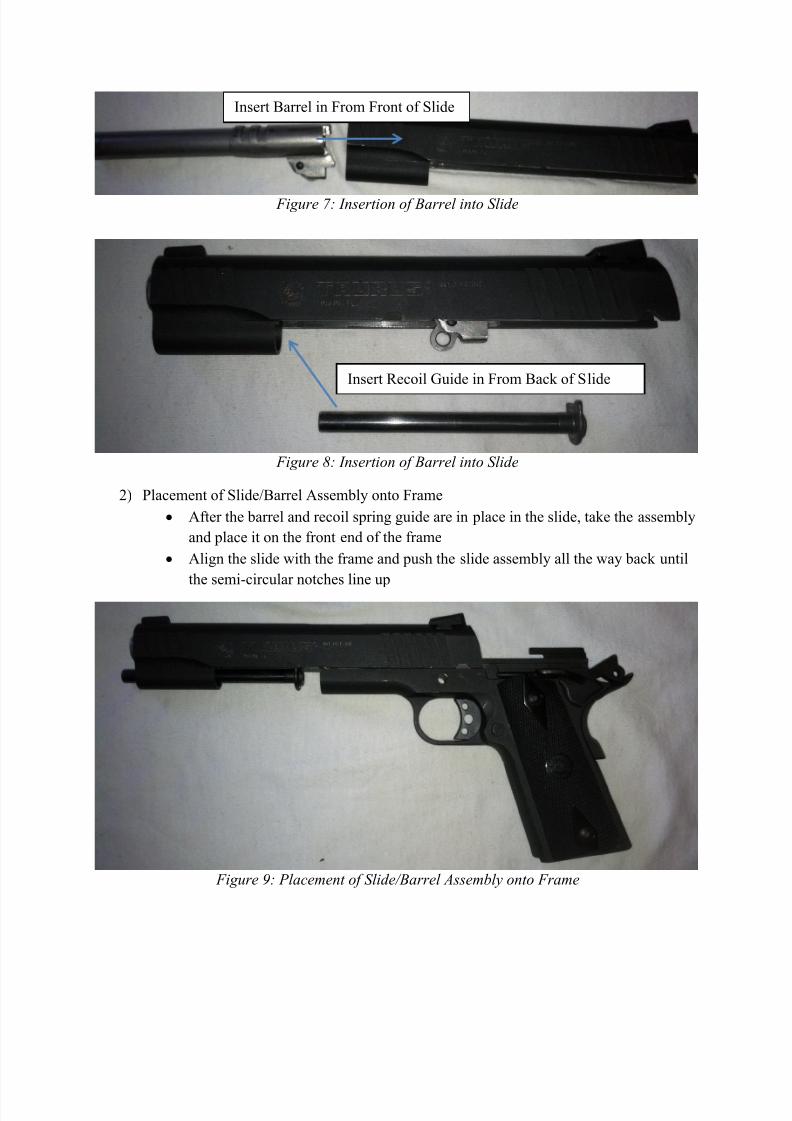
2) Placement of Slide/Barrel Assembly onto Frame
After the barrel and recoil spring guide are in place in the slide, take the assembly
and place it on the front end of the frame
Align the slide with the frame and push the slide assembly all the way back until
the semi-circular notches line up
Figure 9: Placement of Slide/Barrel Assembly onto Frame
Insert Barrel in From Front of Slide
Insert Recoil Guide in From Back of Slide

7/28/2019 TC380 Work Instructions
http://slidepdf.com/reader/full/tc380-work-instructions 6/6
Figure 10: Alignment of Semi-Circular Notches
3) Insertion of Slide Stop Pin
When notches are aligned, take slide stop pin and insert it into the slide stop pin
hole
Push the pin all the way through until it clicks into place
4) Insertion of Recoil Spring and Bushing
Return slide back to its original position and insert recoil spring over the recoil
spring guide Push the recoil spring and plug completely down until it is flush with the recoil
spring guide
Place the bushing over the barrel so the teeth are 90o
to the recoil spring
Push the bushing down into the slide assembly and rotate 90o
clockwise so the
teeth cover the recoil spring plug
5) Testing Assembly
Pull the slide as far back as it will go so the hammer is cocked
Release the slide so it returns to its original position
If the slide does not return to its original position, disassemble the pistol again and
reassemble to ensure each part is properly seated
Slide Stop Pin Hole