TC Dimension Manual - TCArms
44
Safety & Instruction Manual T/C ® Dimension ® Bolt Action Rifle Read the instructions and warnings in this manual CAREFULLY BEFORE using this firearm. This Manual is for both right-hand & left-hand models. The instructions are written for the right-hand version. The left-hand version is simply a mirror image and the instructions are basically the same. THOMPSON/CENTER ARMS 2100 Roosevelt Avenue • Springfield, MA 01104 Toll Free Phone (866) 730-1614 Web site: www.tcarms.com Customer Service Email: [email protected] Copyright © 2018 Thompson/Center Arms All rights reserved.
Transcript of TC Dimension Manual - TCArms

Safety & Instruction Manual
T/C® Dimension®
Bolt Action Rifle
Read the instructions andwarnings in this manual
CAREFULLY BEFORE using this firearm.
This Manual is for both right-hand & left-hand models.The instructions are written for the right-hand version.The left-hand version is simply a mirror image and theinstructions are basically the same.
THOMPSON/CENTER ARMS2100 Roosevelt Avenue • Springfield, MA 01104
Toll Free Phone (866) 730-1614Web site: www.tcarms.com
Customer Service Email:[email protected]
Copyright © 2018 Thompson/Center Arms
All rights reserved.
Dimension_Manual_080118_00084013.Qxp_TC Dimension Manual 8/20/18 9:52 A

2
WARNINGREAD THESE
INSTRUCTIONS AND WARNINGS CAREFULLY.
BE SURE YOU UNDERSTAND THESE INSTRUCTIONS AND WARN-
INGS BEFORE USING THIS FIREARM. FAILURE TO READ THESE INSTRUC-
TIONS AND TO FOLLOW THESE WARN-INGS MAY RESULT IN SERIOUS INJURY
OR DEATH TO YOU AND OTHERS AND DAMAGE TO PROPERTY
This SAFETY & INSTRUCTIONMANUAL should always accompany
this firearm and be transferred with itupon change of ownership or when thefirearm is presented to another person.
Always keep your firearm pointed in asafe direction. Never point a firearm atanything you do not intend to shoot.
If you don’t have a manual, printedcopies are available free upon request
by contacting the factory at the addressbelow. They are also available via
download from the company’s web siteshown below.
THOMPSON/CENTER ARMS
• CUSTOMER SUPPORT •2100 Roosevelt Avenue
Springfield, MA 01104
TEL. Toll Free (866) 730-1614
www.tcarms.com
Dimension_Manual_080118_00084013.Qxp_TC Dimension Manual 8/20/18 9:52 A

3
TABLE OF CONTENTS
YOUR SAFETY RESPONSIBILITIES ..............................3-6
SAFE STORAGE AND TRANSPORTATION ....................7-8
PREPARATION FOR FIRING ..............................................9
AMMUNITION .............................................................10-11
MODEL AND FEATURES IDENTIFICATION .....................12
INSPECTION AND INITIAL ASSEMBLY......................13-15
LOADING..........................................................................16
FIRING..............................................................................17
CLEARING MISFIRES ......................................................18
UNLOADING.....................................................................18
DISASSEMBLY / FIELD STRIPPING ................................19
SCOPE MOUNT..........................................................20-21
MAKING TRIGGER ADJUSTMENTS ..........................21-22
CLEANING AND MAINTENANCE...............................23-24
CONVERSION PARTS ................................................25-26
CHANGING A BARREL ..............................................27-32
CHANGING A STOCK ................................................32-33
STOCK LENGTH SPACERS .......................................33-34
ACCESSORY LOC™ SCOPE MOUNT APPENDIX ....34-38
LIMITED LIFETIME WARRANTY.................................39-40
CONTACT AND SHIPPING FOR SERVICE.................41-42
PATENT INFORMATION ...................................................43
CONTACTS.......................................................................44
YOUR SAFETY RESPONSIBILITIESSAFETY IS YOUR NUMBER ONE
RESPONSIBILITY!!!!
• At home, in the field, at the range, or anywhere, the first concernof every firearm owner should be safety. Apply the following safetyrules in every situation, with any kind of firearm. If you feel uncer-tain about any operational aspects of your firearm, please contactThompson/Center before proceeding with its operation.
• If you are unfamiliar with firearms you should seek formal trainingbefore using your rifle.
WARNING: YOU MUST FOLLOW ALL OF THESE SAFETYRULES TO ENSURE THE SAFE USE OF YOUR FIREARM.THE FAILURE TO FOLLOW THE INSTRUCTIONS AND
WARNINGS IN THIS MANUAL COULD CAUSE SERIOUS PER-SONAL INJURY OR DEATH TO YOU OR OTHERS AND DAMAGETO PROPERTY.
• As a firearm owner, you accept a demanding responsibility. How seriously you take this responsibility can be the differencebetween life and death. There is no excuse for careless or abusivehandling of your firearm. At all times handle your firearm withintense respect for its power and potential danger.
Dimension_Manual_080118_00084013.Qxp_TC Dimension Manual 8/20/18 9:52 A

4
YOUR SAFETY RESPONSIBILITIES CONTINUED
• ALWAYS KEEP YOUR FIREARM POINTED IN A SAFEDIRECTION. Never point a firearm at anyone or anything youdo not intend to shoot whether or not it is loaded. This is par-ticularly important when loading, unloading, or field strippingthe firearm. ALWAYS control the direction of the firearm.
• ALWAYS TREAT EVERY FIREARM AS IF IT IS LOADEDAND WILL FIRE. Do not take anyone’s word that the firearmis unloaded – always check for yourself. Never pass yourfirearm to another person until the action is open and youvisually check that it is unloaded. Keep your firearm unloadedand safely stored when not in use.
• NEVER PLACE YOUR FINGER INSIDE THE TRIGGERGUARD OR ON THE TRIGGER UNLESS YOU INTEND TOFIRE. Ensure that other objects do not touch the trigger.
• ALWAYS BE SURE OF YOUR TARGET AND WHAT ISBEYOND IT. Always be sure of where the bullet will strike andshoot only where there is a safe back stop free of obstruc-tions, water or other surfaces which can cause ricochets. Besure your bullet will stop behind your target. Bullets canglance off many surfaces like rocks or the surface of waterand travel in unpredictable directions with considerable veloci-ty. Do not fire randomly into the sky.
• NEVER CROSS OBSTACLES SUCH AS FENCES ORSTREAMS WITH A LOADED FIREARM. Always make certainyour firearm is unloaded before crossing a fence, climbing atree, jumping a ditch or negotiating other obstacles.
• SAFE FIREARM HANDLING IS YOUR PERSONAL RESPON-SIBILITY AT ALL TIMES. Firearms are dangerous and cancause serious injury or death if they are misused or used inap-propriately. Safety must be the prime consideration of anyonewho owns or handles firearms. Accidents are the result of vio-lating the rules of safe firearm handling and common sense.Firearm safety training is available. Contact your firearms deal-er, law enforcement agency, local sportsman’s club, etc. foravailability.
• YOU ARE RESPONSIBLE FOR THE FIREARM AT ALLTIMES. In owning a firearm, you must undertake full-timeresponsibility for your firearm’s safety and security. You mustprotect yourself and all others against injury or death frommisuse of the firearm 24 hours a day.
• FIREARM SECURITY IS YOUR RESPONSIBILITY. You mustsecure firearms safely from children and/or unauthorizedusers. Your firearm should always be kept unloaded andlocked when not in use. Never assume that the use of thislock is sufficient to safely secure your firearm. You mustalways evaluate your personal situation and employ the secu-rity systems that meet your needs and prevent children andunauthorized users from gaining access to your firearm.
Dimension_Manual_080118_00084013.Qxp_TC Dimension Manual 8/20/18 9:52 A
5
YOUR SAFETY RESPONSIBILITIES CONTINUED
• APPROPRIATE USE FOR YOUR FIREARM MEANS USINGYOUR FIREARM FOR LEGAL PURPOSES. For example -target shooting, hunting and lawful resistance of deadly crimi-nal force. It is your responsibility to ensure that you are incompliance with all applicable laws and ordinances regardingthe use of your firearm.
• NEVER RELY ON MECHANICAL FEATURES ALONE. Onlyyour safe firearm-handling habits will ensure the safe use ofyour firearm. This is your responsibility.
• ALWAYS SAFELY STORE AND SECURE YOUR FIREARM.Safe and secure storage of your firearm is one of your mostimportant responsibilities. It is a full-time responsibility. Youmust always secure your firearm and ammunition separatelyso that they are not accessible to children and/or other unau-thorized persons.
• NEVER KEEP AMMUNITION IN THE SAME LOCATION ASTHE FIREARM. Store each in a separate and secure place.
• ALWAYS WEAR EYE PROTECTION THAT IS SPECIFIEDFOR USE WITH FIREARMS every time you handle yourfirearm for cleaning and maintenance.
• ALWAYS WEAR EYE AND HEARING PROTECTION THATARE SPECIFIED FOR USE WITH FIREARMS every time youdischarge your firearm. Make sure others in the vicinity ofwhere you will be shooting do so as well.
• NEVER USE ALCOHOL OR DRUGS BEFORE OR WHILESHOOTING. Do not use your firearm if you are on any med-ication which impairs, even slightly, your mental or physicalability.
• ALWAYS HAVE ADEQUATE VENTILATION. Dischargingfirearms in poorly ventilated areas, cleaning firearms, or han-dling ammunition may result in exposure to lead and othersubstances known to cause birth defects, reproductive harm,and other serious physical injury. Review the warnings andlabels for all ammunition and cleaning products carefully.Wash hands thoroughly after exposure.
• BEFORE HANDLING ANY FIREARM, UNDERSTAND ITSOPERATION. Not all firearms are the same. Familiarize your-self with the mechanical features of any firearm you intend touse. If you feel uncertain about any operational aspects ofyour firearm, please contact Thompson/Center before pro-ceeding with its operation.
• NEVER ALLOW A FIREARM TO BE USED BY INDIVIDUALSWHO DO NOT UNDERSTAND ITS SAFE OPERATION ORHAVE NOT READ THESE FIREARM SAFETY RULES.
Dimension_Manual_080118_00084013.Qxp_TC Dimension Manual 8/20/18 9:52 A
6
YOUR SAFETY RESPONSIBILITIES CONTINUED
• ALWAYS USE THE CORRECT AMMUNITION FOR YOURPARTICULAR FIREARM as indicated by the marking on thefirearm. Never use non-standard, reloaded or “handloaded”ammunition which has not been subjected to internal ballisticpressure testing.
• BEWARE OF BARREL OBSTRUCTIONS Be sure the barrel isclear of obstructions before shooting. Mud, water, snow or otherobjects may inadvertently lodge in the barrel bore. A smallobstruction can cause a dangerous increase in pressure and maydamage your firearm and cause injury to yourself and others.
• BE SURE ALL ACCESSORIES, SUCH AS HOLSTERS,GRIPS, SLINGS, SCOPES AND OTHER ACCESSORIES ARECOMPATIBLE with the firearm and that the accessories donot interfere with safe operation. It is your responsibility tounderstand and follow all of the instructions in this manual,aswell as those which may be supplied with your ammunitionand any accessory.
• NEVER DISASSEMBLE YOUR FIREARM beyond the fieldstripping procedure outlined in this manual. Improper disas-sembly or reassembly of your firearm may be dangerous andcan lead to serious injury or death.
• NEVER MANIPULATE, ADJUST OR CHANGE ANY OF THEINTERNAL COMPONENTS OF YOUR FIREARM UNLESSSPECIFICALLY INSTRUCTED TO DO SO IN THIS MANUAL.Improper manipulation of any other internal component mayaffect the safety and reliability of your firearm and may causeserious injury or death.
• NEVER ALLOW ANY ALTERATION OR REPLACEMENT OFPARTS IN YOUR THOMPSON/CENTER FIREARM UNLESSPERFORMED BY A QUALIFIED GUNSMITH using genuineThompson/Center parts. If you do otherwise, improper func-tioning of your firearm may occur and serious injury or deathand damage to property may result.
WARNING: SAFE USE OF A FIREARM IS YOUR PERSON-AL RESPONSIBILITY AND THE FAILURE TO FOLLOWALL OF THESE BASIC SAFETY RULES MAY RESULT IN
SEVERE PERSONAL INJURY OR DEATH TO YOU OR OTHERS.YOU ARE THE MOST IMPORTANT SAFETY DEVICE WHEN ITCOMES TO THE USE OF YOUR FIREARM ANDTHOMPSON/CENTER AND ITS PARENT COMPANY WILL NOTBE RESPONSIBLE FOR ANY PERSONAL INJURY, DEATH ORPROPERTY DAMAGE THAT RESULTS FROM: (1) THE CRIMINAL OR NEGLIGENT USE OF THIS FIREARM; (2) A DISREGARD OF THESE SAFETY INSTRUCTIONS ANDWARNINGS; (3) IMPROPER OR CARELESS HANDLING OF THISFIREARM; (4) THE USE OF NON-STANDARD, DEFECTIVE,IMPROPER AMMUNITION; OR (5) IMPROPER OR NEGLIGENTMODIFICATIONS OR REPAIRS TO THE FIREARM.
Dimension_Manual_080118_00084013.Qxp_TC Dimension Manual 8/20/18 9:52 A

7
SAFE STORAGE ANDTRANSPORTATION
WARNING: ALWAYS POINT THE MUZZLE IN A SAFEDIRECTION.
WARNING: FIREARMS ARE DANGEROUS WHEN USEDAND STORED IMPROPERLY. THEY POSE A RISK OFSERIOUS OR FATAL INJURIES. FIREARMS CAN BE
ESPECIALLY DANGEROUS TO CHILDREN WHEN THEY ARESTORED IN AN IRRESPONSIBLE AND UNSAFE MANNER. FORYOUR SAFETY AND THE SAFETY OF OTHERS, IT IS IMPERA-TIVE THAT YOU KEEP YOUR FIREARM LOCKED ANDUNLOADED IN A SECURE PLACE. THE AMMUNITION SHOULDBE STORED IN A SEPARATE, SECURE LOCATION WHEN IT ISNOT IN USE. SAFE AND SECURE STORAGE OF YOUR FIREARMIS ONE OF THE MOST IMPORTANT RULES OF FIREARM SAFE-TY. YOUR FAILURE TO FOLLOW THESE RULES MAY RESULT INSERIOUS INJURY OR DEATH TO YOU OR OTHERS.
• ALWAYS SECURE YOUR FIREARM IN A MANNER THAT WILLPREVENT UNAUTHORIZED ACCESS. Whenever your firearm isnot in use, keep it unloaded and locked. Your safety and the safe-ty of others requires that you always secure and store your firearmin a manner that will prevent unauthorized access. Never leave afirearm unattended unless it is locked, unloaded and secured.
• ALWAYS USE THE LOCK PROVIDED BY THOMPSON/CENTERTO SECURE YOUR FIREARM. Please read and follow theinstructions packaged separately for the use of this lock. A lock,when properly used, can be an effective tool in preventing unau-thorized access to your firearm. There are other alternative locksand safe storage containers available in the marketplace whichmay also be appropriate for your particular needs. Consult yourlocal gun shop, hardware store, or local police department forguidance on the variety of other safe storage devices or practiceswhich may be appropriate for your particular needs. By purchasingthis firearm you have accepted the responsibility of safely securingthe firearm at all times and preventing its unauthorized use. Neverassume that the use of this lock alone is sufficient to safely secureyour firearm. It is your personal responsibility to select and usewhatever measures or practices that will enable you to beabsolutely certain that your firearm is secure at all times.
WARNING: NEVER LOCK A LOADED FIREARM ANDNEVER LOAD A LOCKED FIREARM!!
Dimension_Manual_080118_00084013.Qxp_TC Dimension Manual 8/20/18 9:52 A

8
SAFE STORAGE & TRANSPORTATION CONTINUED
• ALWAYS STORE YOUR FIREARM AND AMMUNITION SEP-ARATELY so that they are not accessible to children or otherunauthorized persons. Safe and secure storage of your firearmand ammunition are your responsibility. It is a full-time respon-sibility.
• NEVER ASSUME THAT A “HIDING” PLACE IS A SECURESTORAGE METHOD. Others may be aware of your storagelocation or come upon it by chance. It is your personal respon-sibility to use common sense when storing your firearm andammunition and to always make sure they are not accessibleto children or other unauthorized persons.
• NEVER TRANSPORT A LOADED FIREARM. When transport-ing your firearm, be sure it is unloaded and locked. Safe andsecure transportation of your firearm is your responsibility.
• ALWAYS FOLLOW THE LAW! Many jurisdictions have lawsthat make it a crime to keep a firearm unlocked and in an areaaccessible to children or others. Keeping a firearm locked andunloaded when not in use is not only common sense safetypractice... IT IS THE LAW. You must be familiar with all local,state, and federal laws regarding the safe storage and trans-portation of your firearm. Failure to know and follow the lawmay result in unauthorized access or use of your firearm byanother. Obey all laws relating to the storage and transporta-tion of firearms. Your local police department or gun shop canfurnish you with available information on storing and/or trans-porting a firearm safely and legally.
• YOUR FIREARM IS YOUR RESPONSIBILITY. You must pre-vent your firearm from being stolen or from being used byuntrained or unqualified individuals. Keep it locked, unloadedand secured when not in use.
• Use the lock provided to prevent unauthorized use, follow theinstructions supplied with the lock.
• Never leave the key with the stored firearm.
Dimension_Manual_080118_00084013.Qxp_TC Dimension Manual 8/20/18 9:52 A

9
PREPARATION FOR FIRINGWARNING: FAILURE TO FOLLOW THESE FIREARMSAFETY REQUIREMENTS WILL CAUSE SERIOUS PER-SONAL INJURY OR DEATH TO YOU OR OTHERS.
• ALWAYS TREAT ALL FIREARMS AS IF THEY ARE LOADEDAND WILL FIRE IF THE TRIGGER IS PULLED.
• ALWAYS BE SURE THAT THE ACTION OF THE DIMENSION® ISOPEN, THAT THE CHAMBER IS CLEAR OF A CARTRIDGE ANDTHAT THE DIMENSION® IS POINTING IN A SAFE DIRECTION.
• ALWAYS WEAR ADEQUATE AND PROPER HEARING PROTEC-TORS SPECIFIED FOR FIREARM USE to prevent permanentdamage to your hearing. Make sure others who are nearby arewearing hearing protection as well.
• ALWAYS WEAR SAFETY GLASSES SPECIFIED FOR FIREARMUSE, whether indoors or out. Safety glasses should protect youreyes from the firing flash and particles associated with the dis-charge of ammunition. Failure to do so creates a risk of personalinjury from particle or debris spitting or ricochets.
• ALWAYS BE ALERT AND ALWAYS FOLLOW THE SAFETYINSTRUCTIONS OF THE RANGE OFFICER. Never shoot if youare tired, cold or impaired in any way.
• ALWAYS BE AWARE OF OTHER PEOPLE so that persons do notaccidentally walk into the line of fire.
• THE SHOOTER (AND ALL OTHERS IN THE SHOOTING AREA)MUST ALWAYS BE IN A POSITION THAT IS OUT OF THE LINEOF FIRE and are not within an area where they may be struck bya ricochet or particles spitting from a firearm, or by ejected casesfrom some types of firearms.
• NEVER SHOOT AT SURFACES THAT MAY CAUSE A RICO-CHET. Always select a place to shoot that has a safe backstop, isfree from obstructions and has no surfaces which may cause aricochet.
• NEVER FIRE RANDOMLY INTO THE SKY. Always select a placeto shoot that has a safe backstop.
• NEVER USE ALCOHOL OR DRUGS BEFORE OR WHILESHOOTING OR HANDLING ANY FIREARM.
Dimension_Manual_080118_00084013.Qxp_TC Dimension Manual 8/20/18 9:52 A

10
AMMUNITIONWARNING: NEVER USE AMMUNITION NOT SPECIFICAL-LY DESIGNATED FOR USE IN YOUR FIREARM. FAILURETO USE THE CORRECT TYPE OR CALIBER OF AMMUNI-
TION MAY CAUSE THE FIREARM TO JAM, OR FAIL TO FIRE, ORMAY GENERATE EXCESSIVE PRESSURE WHICH CAN DAMAGEOR EVEN RUPTURE YOUR FIREARM, CAUSING PERSONALINJURY OR DEATH TO THE SHOOTER OR BYSTANDERS.
• Locate the cartridge desig-nation marked on the bar-rel. This information indi-cates the correct ammuni-tion that must be used inthis firearm (FIGURE 1).
• You are responsible forselecting ammunition thatmeets industry standardsand is appropriate in typeand caliber for this firearm.
• Never mix ammunition.
WARNING: IN SOME CASES, A ROUND OF AMMUNITIONNOT SPECIFIED ON YOUR FIREARM AND NOT LISTED ASALTERNATE AMMUNITION IN THIS MANUAL, MAY FIT
INTO THE CHAMBER. FIRING THIS AMMUNITION MAY CAUSE ARUPTURE RESULTING IN DAMAGE TO THE FIREARM AND PERSONAL INJURY OR DEATH TO THE SHOOTER ORBYSTANDERS. FOR MORE INFORMATION REGARDING UNSAFECALIBER COMBINATIONS, REFER TO THE FOLLOWING URL:HTTP://WWW.SAAMI.ORG/SPECIFICATIONS_AND_INFORMA-TION/PUBLICATIONS/DOWNLOAD/SAAMI_ITEM_211-UNSAFE_ARMS_AND_AMMUNITION_COMBINATIONS.PDF
WARNING: ALWAYS INSPECT YOUR AMMUNITIONBEFORE USING IT. NEVER USE DIRTY, CORRODED ORDAMAGED AMMUNITION. A BURST CARTRIDGE MAY
RESULT CAUSING DAMAGE TO THE FIREARM AND PERSONALINJURY OR DEATH TO THE SHOOTER OR BYSTANDERS.
• Use only commercially manufactured ammunition with internal bal-listic pressures which are in strict accordance with the specifica-tions of the Sporting Arms and Ammunition Manufacturers’Institute (SAAMI). If you are uncertain, contact your ammunitionsupplier for verification.
FIGURE 1
Cartridge/Caliber designation onthe barrel
Dimension_Manual_080118_00084013.Qxp_TC Dimension Manual 8/20/18 9:52 A

11
AMMUNITION CONTINUED
WARNING: NEVER USE NON-STANDARD, RELOADEDOR “HANDLOADED” AMMUNITION WHICH HAS NOTBEEN SUBJECTED TO INTERNAL BALLISTIC PRESSURE
TESTING. RELOADED OR HANDLOADED AMMUNITION, MAYHAVE MANY MANUFACTURING AND QUALITY VARIABLES(SUCH AS THE TYPE AND AMOUNT OF GUN POWDER). CAR-TRIDGE CASES THAT HAVE BEEN RELOADED AND FIRED MUL-TIPLE TIMES MAY SUFFER PHYSICAL DAMAGE WHICH COULDSIGNIFICANTLY IMPACT OR REDUCE THE INTEGRITY OF THECARTRIDGE, POSSIBLY RESULTING IN BULLET SETBACK ORUNSEATING. CASE FAILURE AND INJURY TO THE SHOOTEROR BYSTANDERS AND DAMAGE TO THE FIREARM MAYRESULT WHEN SUCH A ROUND IS FIRED. ANY AMMUNITIONTHAT IS IMPROPERLY MANUFACTURED OR RELOADED, EVENIN THE SLIGHTEST DEGREE, MAY FAIL TO FIRE OR MAY GEN-ERATE EXCESSIVE INTERNAL PRESSURES WHICH CAN DAM-AGE OR EVEN RUPTURE THE FIREARM, CAUSING PERSONALINJURY OR DEATH TO THE SHOOTER OR THOSE IN THEIMMEDIATE VICINITY.
• A firearm and ammunition are a system and must work together.There are different types of ammunition for different types offirearms. Your firearm has been designed for ammunition of a spe-cific type and a specific gauge or caliber. It is important to selectthe proper ammunition for your firearm.
• Different combinations of bullet velocity, bullet weight and firearmweight can have major impact on felt recoil; a high level of feltrecoil can be uncomfortable to some shooters.
WARNING: NEVER USE CARTRIDGES OR SHELLSOTHER THAN THOSE DESIGNATED BY THE MARKINGON THE BARREL. DOING SO CAN RESULT IN DANGER-
OUSLY HIGH PRESSURES THAT MAY DAMAGE THE FIREARMAND POSSIBLY CAUSE SERIOUS INJURY TO YOURSELF ANDOTHERS.
WARNING: DEATH, SERIOUS INJURY AND PROPER-TY DAMAGE CAN RESULT FROM THE USE OFINCORRECT AMMUNITION OR BORE OBSTRUC-
TIONS. NEVER USE RELOADED AMMUNITION THAT HASNOT BEEN SUBJECTED TO INTERNAL BALLISTIC PRES-SURE TESTING.
WARNING: DISCHARGING FIREARMS IN POORLY VENTI-LATED AREAS, CLEANING FIREARMS, OR HANDLINGAMMUNITION MAY RESULT IN EXPOSURE TO LEAD
AND OTHER SUBSTANCES KNOWN TO CAUSE BIRTHDEFECTS, REPRODUCTIVE HARM, AND OTHER SERIOUSPHYSICAL INJURY. HAVE ADEQUATE VENTILATION AT ALLTIMES. WASH HANDS THOROUGHLY AFTER EXPOSURE.
Dimension_Manual_080118_00084013.Qxp_TC Dimension Manual 8/20/18 9:52 A

MODEL AND FEATURESIDENTIFICATION
FIGURE 2a
Model name on the barrel
FIGURE 2c
Bolt-stop location
FIGURE 2d
Cockingindicator
Safetylever
BUTT PAD
SLINGSWIVELSTUD
BOLTHANDLE
MUZZLE
STOCK
SAFETY
COCKINGINDICATOR
BOLT
BARREL
FOREND
MAGAZINERELEASELATCH
MAGAZINE
TRIGGERGUARD
TRIGGER
Serial Number
FIGURE 2e
STOCKSPACERS
12
FIGURE 2b
FIGURE 2f
Magazine latch location
TORQUECOLLAR
Dimension_Manual_080118_00084013.Qxp_TC Dimension Manual 8/20/18 9:52 A

13
INSPECTION ANDINITIAL ASSEMBLY
WARNING: ALWAYS ENSURE THAT THE FIREARM ISUNLOADED BEFORE INSPECTING, DISASSEMBLING,ASSEMBLING OR CLEANING AND ALWAYS KEEP THE
MUZZLE POINTED IN A SAFE DIRECTION.
• Your Thompson/Center Dimension® rifle comes completelyassembled from the factory except for the bolt, which has beenremoved for transportation and storage. The bolt is packed sepa-rately in the shipping carton.
INSPECT
• Grasp the rifle, keeping yourfinger outside the trigger guardand off the trigger. Point themuzzle in a safe direction.
• If the bolt has not been installedyet, verify that the chamber isempty.
• If the bolt has been installed, liftthe bolt handle and pull the boltopen to check that the cham-ber is empty (FIGURE 3).
• Ensure that the magazine isempty (FIGURE 4).
• Press the magazine latch rear-ward to release the magazine(FIGURE 5).
• Orient the rifle as shown toallow the magazine to drop outof the rifle when the magazinelatch is released (FIGURE 6).Catch the magazine as it fallsclear of the rifle.
Magazine Empty
FIGURE 4
FIGURE 3
Chamber Empty
FIGURE 5
FIGURE 6
Press magazine latch rearward
Catch magazine as it falls out
Dimension_Manual_080118_00084013.Qxp_TC Dimension Manual 8/20/18 9:53 A

INSPECTION AND INITIAL ASSEMBLY CONTINUED
INSTALLING THE BOLT
• Grasp the bolt by its handleand slide the bolt forward intothe receiver as shown (FIGURE7). Note that the bolt handletouches the stock.
• While pressing the bolt stop in,continue to push the bolt for-ward into the receiver aboutone inch (FIGURE 8).
• FIGURE 9 shows the bolt stoptracking groove, to distinguishit from the bolt flutes.
• While continuing to press thebolt stop in (so it doesn’t getcaught in the bolt flutes) rotatethe bolt handle until the boltstop engages the bolt stoptrack (FIGURE 10).
14
FIGURE 10
Rotate bolt handle up until boltstop engages the tracking
groove
FIGURE 8
Push bolt into receiver about one inch while holding bolt stop in
Bolt stop tracking groove
FIGURE 9
Press and hold bolt stop
FIGURE 7
Depress bolt stop while installingbolt
Dimension_Manual_080118_00084013.Qxp_TC Dimension Manual 8/20/18 9:53 A
15
INSPECTION AND INITIAL ASSEMBLY CONTINUED
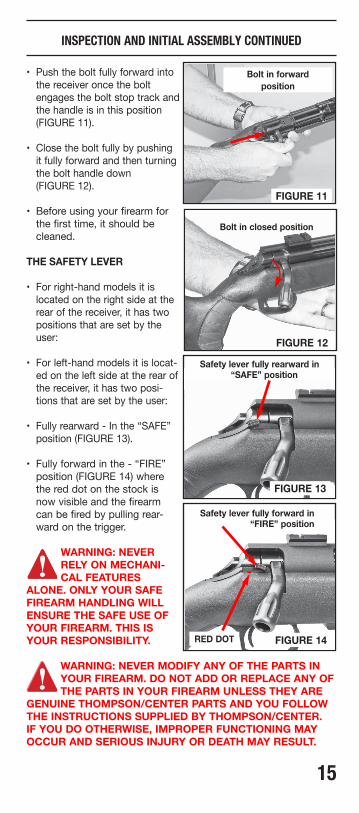
• Push the bolt fully forward intothe receiver once the boltengages the bolt stop track andthe handle is in this position(FIGURE 11).
• Close the bolt fully by pushingit fully forward and then turningthe bolt handle down (FIGURE 12).
• Before using your firearm forthe first time, it should becleaned.
THE SAFETY LEVER
• For right-hand models it islocated on the right side at therear of the receiver, it has twopositions that are set by theuser:
• For left-hand models it is locat-ed on the left side at the rear ofthe receiver, it has two posi-tions that are set by the user:
• Fully rearward - In the “SAFE”position (FIGURE 13).
• Fully forward in the - “FIRE”position (FIGURE 14) wherethe red dot on the stock isnow visible and the firearmcan be fired by pulling rear-ward on the trigger.
WARNING: NEVERRELY ON MECHANI-CAL FEATURES
ALONE. ONLY YOUR SAFEFIREARM HANDLING WILLENSURE THE SAFE USE OFYOUR FIREARM. THIS ISYOUR RESPONSIBILITY.
WARNING: NEVER MODIFY ANY OF THE PARTS INYOUR FIREARM. DO NOT ADD OR REPLACE ANY OFTHE PARTS IN YOUR FIREARM UNLESS THEY ARE
GENUINE THOMPSON/CENTER PARTS AND YOU FOLLOWTHE INSTRUCTIONS SUPPLIED BY THOMPSON/CENTER. IF YOU DO OTHERWISE, IMPROPER FUNCTIONING MAYOCCUR AND SERIOUS INJURY OR DEATH MAY RESULT.
FIGURE 13
Safety lever fully rearward in“SAFE” position
FIGURE 14
Safety lever fully forward in“FIRE” position
RED DOT
Bolt in closed position
FIGURE 12
Bolt in forward
position
FIGURE 11
Dimension_Manual_080118_00084013.Qxp_TC Dimension Manual 8/20/18 9:53 A
16
LOADINGWARNING: ALWAYS KEEP THE MUZZLE POINTED INA SAFE DIRECTION.
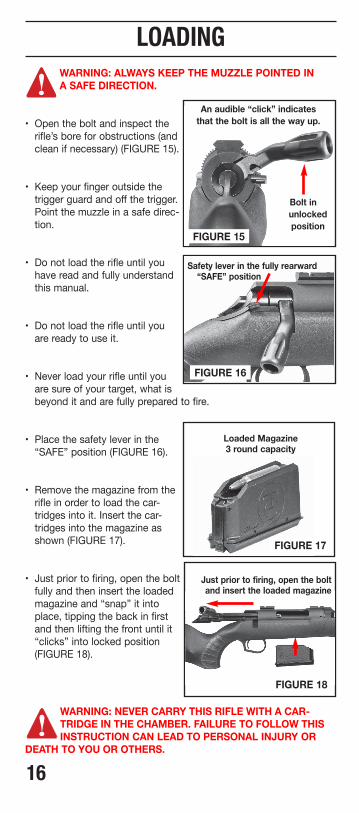
• Open the bolt and inspect therifle’s bore for obstructions (andclean if necessary) (FIGURE 15).
• Keep your finger outside thetrigger guard and off the trigger.Point the muzzle in a safe direc-tion.
• Do not load the rifle until youhave read and fully understandthis manual.
• Do not load the rifle until youare ready to use it.
• Never load your rifle until youare sure of your target, what isbeyond it and are fully prepared to fire.
• Place the safety lever in the“SAFE” position (FIGURE 16).
• Remove the magazine from therifle in order to load the car-tridges into it. Insert the car-tridges into the magazine asshown (FIGURE 17).
• Just prior to firing, open the boltfully and then insert the loadedmagazine and “snap” it intoplace, tipping the back in firstand then lifting the front until it“clicks” into locked position(FIGURE 18).
WARNING: NEVER CARRY THIS RIFLE WITH A CAR-TRIDGE IN THE CHAMBER. FAILURE TO FOLLOW THISINSTRUCTION CAN LEAD TO PERSONAL INJURY OR
DEATH TO YOU OR OTHERS.
Bolt in
unlocked
positionFIGURE 15
FIGURE 16
Safety lever in the fully rearward“SAFE” position
An audible “click” indicates
that the bolt is all the way up.
Loaded Magazine3 round capacity
FIGURE 17
Just prior to firing, open the boltand insert the loaded magazine
FIGURE 18
Dimension_Manual_080118_00084013.Qxp_TC Dimension Manual 8/20/18 9:53 A

17
FIRINGWARNING: ALWAYS KEEP THE MUZZLE POINTED INA SAFE DIRECTION.
WARNING: WEAR EYE AND HEARING PROTECTION SPEC-IFIED FOR FIREARM USE EVERY TIME YOU DISCHARGEYOUR FIREARM. MAKE SURE OTHERS IN THE VICINITY
OF WHERE YOU WILL BE SHOOTING DO SO AS WELL.
• Make certain that the safety is in the “SAFE” position (FIGURE 19).
• Close the bolt to strip a roundfrom the magazine and put itinto the chamber.
• Grasp firearm with one hand onthe fore-end and other hand onthe grip with the trigger fingerresting along and outside of thetrigger guard. Raise firearm andpull buttstock firmly into shoul-der. Aim at your target.
• Push the safety lever to the fullyforward “FIRE” position (FIG-URE 20).
• The rifle will now fire when pres-sure is applied to the trigger.
• Place your finger on trigger andsqueeze it until the rifle fires.
• You may continue to fire by fullycycling the bolt and squeezingthe trigger until the rifle is empty.
• To reload, see the Loading Section.
FIGURE 20
Safety lever fully forward in the“FIRE” position
FIGURE 19
Place the safety lever fully rearwardin the “SAFE” position,
then close the bolt
Red dot
Dimension_Manual_080118_00084013.Qxp_TC Dimension Manual 8/20/18 9:53 A

CLEARING MISFIRESWARNING: ALWAYS KEEP THE MUZZLE POINTED IN ASAFE DIRECTION.
WARNING: IF YOUR FIREARM GIVES ANY INDICATIONTHAT IT IS NOT PERFORMING PROPERLY OR THEOPERATION OF YOUR FIREARM HAS CHANGED “THE
WAY IT FEELS OR SOUNDS,” STOP FIRING. MAKE SURE THEFIREARM IS POINTED IN A SAFE DIRECTION, UNLOAD THEFIREARM AND HAVE IT INSPECTED BY A FACTORY TECHNI-CIAN. CALL THOMPSON/CENTER CUSTOMER SUPPORT.
• If a cartridge fails to fire, keep the muzzle pointed in a safe direc-tion and wait 10 seconds before opening the bolt and ejecting thesuspect cartridge. Then remove the magazine and make sure thatthe rifle is unloaded.
UNLOADINGWARNING: ALWAYS KEEP THE MUZZLE POINTED IN ASAFE DIRECTION.
• Open the bolt and ensure thatthe chamber is empty (FIGURE 21).
• Set safety lever to the “SAFE”position (FIGURE 22).
• Press the magazine latch rear-ward and remove the magazine(FIGURES 23 & 24).
18
FIGURE 22
Safety lever in fully rearward“SAFE” position
FIGURE 21
Make sure that the chamber is empty
FIGURE 24FIGURE 23
Magazine latch location
Press magazine latch rearward and catch magazine as it falls out
Dimension_Manual_080118_00084013.Qxp_TC Dimension Manual 8/20/18 9:53 A

19
DISASSEMBLY /FIELD STRIPPING
WARNING: ALWAYS KEEP THE MUZZLE POINTED INA SAFE DIRECTION.
WARNING: NEVER DO ANYTHING BEYOND WHATYOU ARE SPECIFICALLY INSTRUCTED TO DO INTHIS MANUAL. NEVER ALTER OR MODIFY THE
PARTS IN YOUR FIREARM.
WARNING: WEAR SAFETY GLASSES EVERY TIMEYOU ASSEMBLE OR DISASSEMBLE YOUR FIREARM.
WARNING: DO NOT ALTER, MODIFY OR REPLACEANY OF THE PARTS OF YOUR FIREARM UNLESSTHIS WORK IS PERFORMED BY A QUALIFIED GUN-
SMITH USING GENUINE THOMPSON/CENTER PARTS. IFYOU DO OTHERWISE, IMPROPER FUNCTIONING MAYOCCUR AND SERIOUS INJURY MAY RESULT.
FIELD STRIPPING FOR THE PURPOSE OF CLEANING
• Lift the bolt handle and draw the bolt fully to the rear.
• Place the safety lever in the “SAFE” position.
• Check through the ejection portto confirm that the chamberand magazine are both empty.
• Remove the magazine from therifle.
• At this point, press the boltstop in as shown (FIGURE 25).
• Continue to hold the bolt stopdepressed while you rotate thebolt as shown (FIGURE 26) andcontinue to pull the bolt fromthe receiver rearward (FIGURE27) taking care not to hit thestock, causing cosmetic dam-age.
• This is the extent to which therifle needs to be disassembledfor the purpose of cleaning andmaintenance. See the section inthis manual for cleaning instruc-tions.
FIGURE 27
FIGURE 25
Remove bolt completely
Hold bolt stop in
FIGURE 26
Rotate bolt handle down
Dimension_Manual_080118_00084013.Qxp_TC Dimension Manual 8/20/18 9:53 A
MOUNTING A SCOPEWARNING: ALWAYS ENSURE THAT THE FIREARM ISUNLOADED BEFORE INSTALLING A SCOPE OR ANYOTHER ACCESSORIES. FAILURE TO DO THIS CAN
CAUSE PERSONAL INJURY OR DEATH TO YOU OR OTHERS.
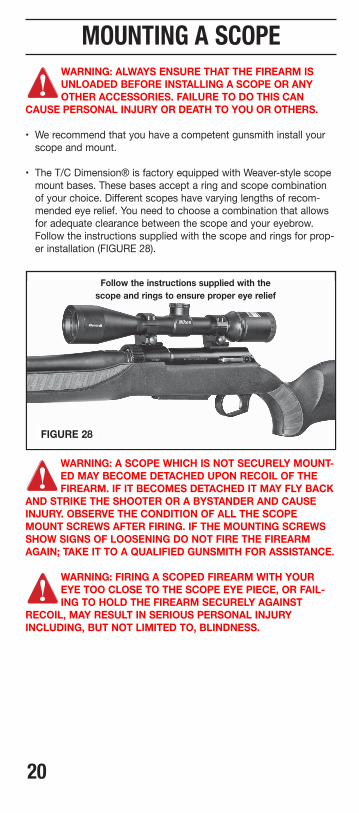
• We recommend that you have a competent gunsmith install yourscope and mount.
• The T/C Dimension® is factory equipped with Weaver-style scopemount bases. These bases accept a ring and scope combinationof your choice. Different scopes have varying lengths of recom-mended eye relief. You need to choose a combination that allowsfor adequate clearance between the scope and your eyebrow.Follow the instructions supplied with the scope and rings for prop-er installation (FIGURE 28).
WARNING: A SCOPE WHICH IS NOT SECURELY MOUNT-ED MAY BECOME DETACHED UPON RECOIL OF THEFIREARM. IF IT BECOMES DETACHED IT MAY FLY BACK
AND STRIKE THE SHOOTER OR A BYSTANDER AND CAUSEINJURY. OBSERVE THE CONDITION OF ALL THE SCOPEMOUNT SCREWS AFTER FIRING. IF THE MOUNTING SCREWSSHOW SIGNS OF LOOSENING DO NOT FIRE THE FIREARMAGAIN; TAKE IT TO A QUALIFIED GUNSMITH FOR ASSISTANCE.
WARNING: FIRING A SCOPED FIREARM WITH YOUREYE TOO CLOSE TO THE SCOPE EYE PIECE, OR FAIL-ING TO HOLD THE FIREARM SECURELY AGAINST
RECOIL, MAY RESULT IN SERIOUS PERSONAL INJURYINCLUDING, BUT NOT LIMITED TO, BLINDNESS.
20
FIGURE 28
Follow the instructions supplied with the
scope and rings to ensure proper eye relief
Dimension_Manual_080118_00084013.Qxp_TC Dimension Manual 8/20/18 9:53 A

21
SCOPE MOUNT CONTINUED
• A LOC™ bridge-type scope mount base is offered as an accessory(FIGURE 29). The advantage of the bridge-type system is that the“sighted-in” scope stays with the barrel when the barrel is changed outfor another barrel. The one rear cross-bolt ties the base rigidly to thereceiver. This one bolt needs to be removed to allow the barrel to beremoved from the receiver. See section in this manual for details on thebridge-type scope mount base system. T/C suggests using low ringswith the LOC™ bridge-type mount to provide proper eye relief.
MAKING TRIGGERADJUSTMENTS
WARNING: ALWAYS ENSURE THAT THE FIREARM ISUNLOADED BEFORE ADJUSTING THE TRIGGER OR DRYFIRING.
NOTE: The T/C Dimension® trigger pull is user adjustable for weightof pull. The trigger pull has beenset at the factory with properover-travel and sear engagement.
• After determining that thefirearm is unloaded proceed asfollows:
• Trigger “Weight of Pull” adjust-ment can be made by firstremoving the bolt from thereceiver to gain access to the adjustment screw (FIGURE 30). The appropriatetool is included in the box fromthe factory (FIGURE 31).
FIGURE 30
Weight of pull adjustment screw
Trigger adjustment tool
FIGURE 29
Follow the instructions supplied with the
scope and rings to ensure proper eye relief
The socket that fits the torque wrench can be
used to tighten T/C sporter rings to the base
FIGURE 31
Dimension_Manual_080118_00084013.Qxp_TC Dimension Manual 8/20/18 9:53 A

22
MAKING TRIGGER ADJUSTMENTS CONTINUED
• Turn the screw clockwise (as viewed from the top of the rifle) toincrease the trigger pull force required. A trigger adjustment tool isprovided with the T/C Dimension® rifle (FIGURE 29).
• Turn the adjustment screw counter-clockwise to decrease the trig-ger pull force required.
• After each adjustment, with the chamber empty and the rifle point-ed in a safe direction, dry fire the rifle until the desired pull isachieved.
• Do not attempt any other trigger adjustments. When turning theadjustment screw, once resistance is met, do not force the screwto turn further in either direction.
DRY FIRING NOTE
• Be certain that the chamber is unloaded and the magazine isremoved from the rifle. Keep the firearm pointed in a safe direc-tion. The Thompson/Center Dimension® rifle can be dry fired with-out damage to the firing pin or other components. To dry fire, cockthe rifle by lifting the bolt handle fully and returning it to theclosed position and then pulling the trigger.
NOTE REGARDING DIMENSION® STOCK FINISH ANDCLEANING:
To help preserve the ARMORSOFT® coating on yourThompson/Center Arms Dimension® rifle stock, remove thestock from the barreled receiver when using solvents to cleanthe bore.
CAUTION: Do not allow the following chemicals to come incontact with the ARMORSOFT® coating: Gun Scrubber®,T17® Foaming Bore Cleaner, acetone or any DEET-basedinsecticide or repellent. Damage to the finish will result.
If you have further questions, please call our CustomerService Department at 1-866-730-1614.
Dimension_Manual_080118_00084013.Qxp_TC Dimension Manual 8/20/18 9:53 A
23
CLEANING AND MAINTENANCEWARNING: ENSURE THAT YOUR FIREARM ISUNLOADED BEFORE BEGINNING TO CLEAN IT. (SEE“INSPECTING YOUR FIREARM” SECTION). ALWAYS
FOLLOW THE FUNDAMENTAL NRA RULES OF SAFEFIREARM HANDLING.
WARNING: WEAR EYE PROTECTION SPECIFIED FORFIREARM USE EVERY TIME YOU CLEAN OR MAINTAINYOUR FIREARM.
• Before using your firearm for the first time, it should be cleaned.
• Your firearm was treated at the factory with either a preservative oroil to protect it against corrosion during shipping and storage.
• Preservative and oil should be wiped from the bore, chamber andexposed areas using a clean swab or patch before using thefirearm.
CAUTION: Never disassemble your firearm beyond the instructionsin the Field Stripping and Inspection sections of this manual.
• Purchase cleaning supplies from your firearms dealer that arespecifically designated for your type and caliber of firearm. Manysuppliers offer these in kit form for your convenience.
• Follow the instructions provided with your cleaning supplies.
NOTE: A basic firearm cleaning kit should include: a brass borebrush and a cleaning jag of appropriate size for the bore beingcleaned, high-quality gun cleaning solvent and gun oil/lubricant, cot-ton cleaning patches and a cleaning rod that is long enough to push the brush and jag completely through the barrel.
• Remove excessive firing residue from the bore and chamber usinga properly fitted brush.
• Clean the exterior of the firearm using a non-abrasive cleaningcloth.
• After cleaning, lightly coat the metal parts, internal and externalwith a firearm oil.
• Whenever your firearm has been exposed to sand, dust, extremehumidity, water or other adverse conditions, it must be cleanedand lubricated.
WARNING: ALWAYS HAVE ADEQUATE VENTILATION.CLEANING FIREARMS IN POORLY VENTILATED AREAS,DISCHARGING FIREARMS, OR HANDLING AMMUNITION
MAY RESULT IN EXPOSURE TO LEAD AND OTHER SUB-STANCES KNOWN TO CAUSE BIRTH DEFECTS, REPRODUC-TIVE HARM AND OTHER SERIOUS PHYSICAL INJURY. WASHHANDS THOROUGHLY AFTER EXPOSURE.
Dimension_Manual_080118_00084013.Qxp_TC Dimension Manual 8/20/18 9:53 A
24
CLEANING AND MAINTENANCE CONTINUED
• Run a few patches saturated with good quality firearm cleaningsolvent through the bore, preferably from the chamber end toavoid damage to the rifling at the muzzle. Use of a bronze borebrush may be required periodically. More extensive cleaning,especially after the T/C Dimension® has been subjected to rain orsnow, would include wiping all of the external metal surfaces witha dry cloth, followed by a light coating of oil. If the internal compo-nents require cleaning, it is recommended that you return thefirearm to Thompson/Center’s Service Department.
CAUTION: Always follow the instructions provided with your firearmcleaner and firearm lubricant.
CAUTION: Some cleaners can cause damage to your firearms. Youshould avoid prolonged solvent immersion and prolonged ultrasoniccleaning of your firearm. Choice of solvent should be restricted tothose products specifically developed for firearms maintenance.Damage to a firearm’s finish may occur if these cautions are ignored.Ammoniated solvents or other strong alkaline solvents, should notbe used on any Thompson/Center firearm.
WARNING: NEVER MANIPULATE, ADJUST OR CHANGEANY OF THE INTERNAL COMPONENTS OF YOURFIREARM UNLESS SPECIFICALLY DIRECTED TO DO SO
IN THIS MANUAL. IMPROPER MANIPULATION OF ANY INTER-NAL COMPONENT MAY AFFECT THE SAFETY AND RELIABILITYOF YOUR FIREARM AND MAY CAUSE SERIOUS INJURY ORDEATH. IT ALSO VOIDS YOUR WARRANTY.
WARNING: ANY MAINTENANCE, ADJUSTMENT OR SER-VICE NOT SPECIFIED IN THIS MANUAL MAY AFFECTTHE SAFETY AND RELIABILITY OF YOUR FIREARM AND
MUST BE PERFORMED BY A QUALIFIED GUNSMITH USINGGENUINE THOMPSON/CENTER PARTS. IF YOU DO OTHER-WISE, IMPROPER FUNCTIONING OF YOUR FIREARM MAYOCCUR AND SERIOUS INJURY OR DEATH MAY RESULT.
• If your firearm will be used in a cold climate, be sure to use an oilof an appropriate weight so that it will not congeal in cold temper-atures, causing the interaction of important parts to be slowed orhalted.
MAINTENANCE BEFORE STORAGE• When storing, do not encase your firearm in anything that will
attract or hold moisture, for example, leather or heavy cloth. Also,do not store guns with a plug inserted in the barrel for this can bea contributing factor to moisture accumulation. If your firearm is tobe stored for an extended period, the bore, chamber and internalsurfaces should be oiled with a high-quality lubricating oil orpreservative intended for firearms. The external parts; receiver,bolt and barrel should be coated with an anti-rust oil. Before usingyour firearm again, be sure to clean it. Every time you clean yourfirearm, check it for signs of wear. If wear is noted, do not use thefirearm. Return it to Thompson/Center for service or have itchecked by a qualified gunsmith.
Dimension_Manual_080118_00084013.Qxp_TC Dimension Manual 8/20/18 9:53 A

25
CONVERSION PARTS• The T/C Dimension® is a modular design. Each of the four (4)
interchangeable parts will have a letter marking that indicates thatit is to be used with similarly marked parts (FIGURES 32-35).
WARNING: ALWAYSENSURE THAT THEFIREARM IS ASSEM-
BLED USING PARTS WITH THESAME LETTER CODE MARK-INGS ON THE INTERCHANGE-ABLE PARTS. A MIX OF LETTERCODES COULD RESULT IN ADANGEROUS COMBINATION,POSSIBLY RESULTING ININJURY AND/OR DEATH TOTHE SHOOTER ORBYSTANDERS AND DAMAGETO PROPERTY.
• The stock and receiver are thesame for all calibers. The lettercodes designate “families” ofcartridges that share commonlengths and case dimensions.These common sizes allowthem to function correctly in therifle with appropriately markedparts.
WARNING: NEVER USEAMMUNITION NOTSPECIFICALLY DESIGNATED FOR USE IN YOUR
FIREARM. FAILURE TO USE THE CORRECT TYPE OR CALIBEROF AMMUNITION MAY CAUSE THE FIREARM TO JAM, FAIL TOFIRE OR EVEN GENERATE EXCESSIVE PRESSURE WHICH CANDAMAGE OR EVEN RUPTURE YOUR FIREARM, CAUSING PER-SONAL INJURY, DEATH OR PROPERTY DAMAGE.
• The cartridge/caliber marking on the barrel must be strictlyadhered to. The marking on the barrel is specific to one cartridgeand that is the only one that should be used in that barrel.
FIGURE 32 Each of the four interchangeable parts has a letter code on it. All parts of a
correctly assembled rifle will have this same letter code .
FIGURE 33
Magazine Letter Code
FIGURE 34
Barrel Letter Code
FIGURE 35
Magazine HousingLetter Code
Bolt Letter Code
Dimension_Manual_080118_00084013.Qxp_TC Dimension Manual 8/20/18 9:53 A
CONVERSION PARTS CONTINUED
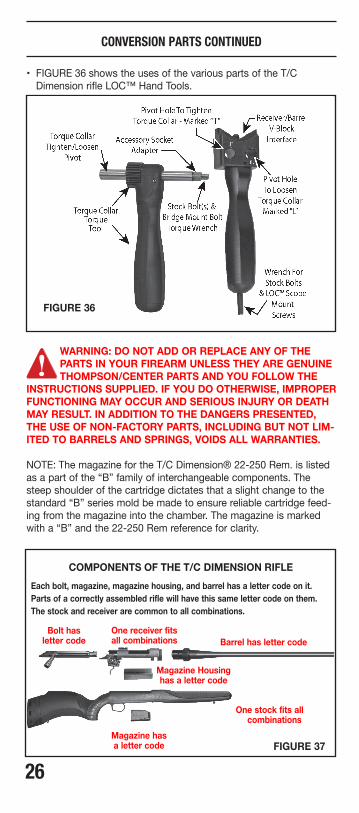
• FIGURE 36 shows the uses of the various parts of the T/CDimension rifle LOC™ Hand Tools.
WARNING: DO NOT ADD OR REPLACE ANY OF THEPARTS IN YOUR FIREARM UNLESS THEY ARE GENUINETHOMPSON/CENTER PARTS AND YOU FOLLOW THE
INSTRUCTIONS SUPPLIED. IF YOU DO OTHERWISE, IMPROPERFUNCTIONING MAY OCCUR AND SERIOUS INJURY OR DEATHMAY RESULT. IN ADDITION TO THE DANGERS PRESENTED,THE USE OF NON-FACTORY PARTS, INCLUDING BUT NOT LIM-ITED TO BARRELS AND SPRINGS, VOIDS ALL WARRANTIES.
NOTE: The magazine for the T/C Dimension® 22-250 Rem. is listedas a part of the “B” family of interchangeable components. Thesteep shoulder of the cartridge dictates that a slight change to thestandard “B” series mold be made to ensure reliable cartridge feed-ing from the magazine into the chamber. The magazine is markedwith a “B” and the 22-250 Rem reference for clarity.
26
FIGURE 36
FIGURE 37
Each bolt, magazine, magazine housing, and barrel has a letter code on it.
Parts of a correctly assembled rifle will have this same letter code on them.
The stock and receiver are common to all combinations.
One receiver fits all combinations
One stock fits allcombinations
Barrel has letter code
Bolt has letter code
Magazine Housinghas a letter code
Magazine has a letter code
COMPONENTS OF THE T/C DIMENSION RIFLE
Dimension_Manual_080118_00084013.Qxp_TC Dimension Manual 8/20/18 9:53 A

CHANGING A BARRELWARNING: ALWAYS KEEP THE MUZZLE POINTED IN ASAFE DIRECTION.
WARNING: ALWAYS ENSURE THAT THE FIREARM ISUNLOADED BEFORE INSPECTING, PERFORMINGADJUSTMENTS OR MAINTENANCE, ASSEMBLING OR
DISASSEMBLING.
CAUTION: THE USE OF TOOLS TO CHANGE PARTS ON YOURT/C DIMENSION COMES WITH THE RISK OF BEING PINCHEDAS PARTS COME TOGETHER. BE CAREFUL WHEN USINGTOOLS TO PREVENT THIS POTENTIAL PROBLEM.
NOTE: The modular nature of the T/C Dimension® design allowseasy interchanging of barrels, bolts, stocks and scope mounts. Eachpiece of the correct combination of four (4) interchangeable parts willhave a letter marking (A,B,C,D, etc.) that indicates that it is to beused with components with the same mark.
TO REMOVE A BARREL
NOTE: The high comb of thestock prevents the bolt from com-ing straight out rearward. The bolthandle must be tipped down toprovide clearance in disassembly.
Step 1: Open the bolt and draw itfully rearward. Depress andhold the bolt stop inand remove the boltfrom the receiver.(FIGS. 38 & 39).
NOTE: The bolt handlemust be rotated downuntil the bolt handletouches the stock when withdraw-ing it. Cosmetic damage to thestock may result if the bolt isn’trotated before it is withdrawn.
Step 2: Unlatch and remove themagazine from the rifle (FIGURES40 & 41).
27
FIGURE 40
FIGURE 39
FIGURE 41
FIGURE 38
Dimension_Manual_080118_00084013.Qxp_TC Dimension Manual 8/20/18 9:53 A

28
CHANGING A BARREL CONTINUED
Step 3: Remove the stock from thebarreled receiver. The take-down/assembly torque tool has acorrectly sized Allen wrench forthis task. There are two boltsthat need to be removed, one infront of the magazine well andone behind the trigger guard(FIGURES 42 & 43). The stockassembly bolts are designed notto be completely removed fromthe stock. Loosen the bolts untilthe receiver comes free of thestock. Break these bolts freeusing the leverage provided bythe torque wrench - then spinthem out with the hex end of theLeverage Handle.
Step 4: Remove the magazinehousing from the stock if you areswitching to a different letterseries of magazine (FIGURE 44).Install the replacement housinginto the stock at this point asshown - making certain that theletter code matches that of theother parts being changed to.
Step 5: Align and thread theLeverage handle into the receiveras shown (FIGURE 45) until thewrench is snug
• Insert the shaft of the gear driveon the torque wrench as showninto the hole marked “L” in theleverage handle (FIGURE 46)making sure that the gear teethmesh fully before applyingleverage.
FIGURE 42
FIGURE 43
FIGURE 44
FIGURE 46
Loosen Stock Bolts With TheTorque Tool
Spin bolts free withLeverage Handle
Note LetterMarking
FIGURE 45
Install Leverage Tool into thread-ed hole of receiver
Use HoleMarked “L” toloosen
TorqueCollar
Dimension_Manual_080118_00084013.Qxp_TC Dimension Manual 8/20/18 9:53 A
29
CHANGING A BARREL CONTINUED
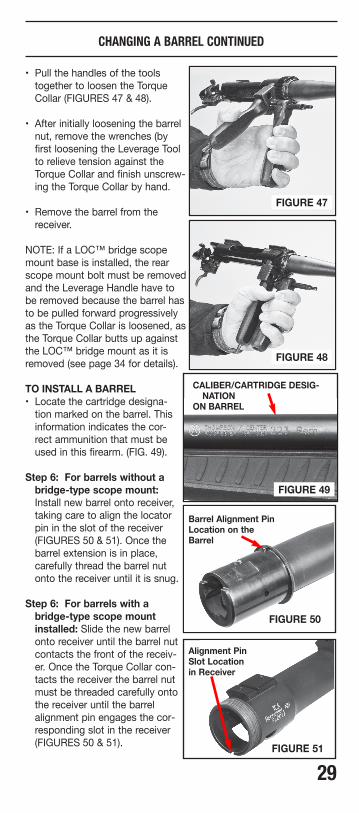
• Pull the handles of the toolstogether to loosen the TorqueCollar (FIGURES 47 & 48).
• After initially loosening the barrelnut, remove the wrenches (byfirst loosening the Leverage Toolto relieve tension against theTorque Collar and finish unscrew-ing the Torque Collar by hand.
• Remove the barrel from thereceiver.
NOTE: If a LOC™ bridge scopemount base is installed, the rearscope mount bolt must be removedand the Leverage Handle have tobe removed because the barrel hasto be pulled forward progressivelyas the Torque Collar is loosened, asthe Torque Collar butts up againstthe LOC™ bridge mount as it isremoved (see page 34 for details).
TO INSTALL A BARREL• Locate the cartridge designa-
tion marked on the barrel. Thisinformation indicates the cor-rect ammunition that must beused in this firearm. (FIG. 49).
Step 6: For barrels without abridge-type scope mount:Install new barrel onto receiver,taking care to align the locatorpin in the slot of the receiver(FIGURES 50 & 51). Once thebarrel extension is in place,carefully thread the barrel nutonto the receiver until it is snug.
Step 6: For barrels with abridge-type scope mountinstalled: Slide the new barrelonto receiver until the barrel nutcontacts the front of the receiv-er. Once the Torque Collar con-tacts the receiver the barrel nutmust be threaded carefully ontothe receiver until the barrelalignment pin engages the cor-responding slot in the receiver(FIGURES 50 & 51).
FIGURE 51
Alignment Pin Slot Location in Receiver
FIGURE 50
Barrel Alignment PinLocation on theBarrel
FIGURE 47
FIGURE 48
FIGURE 49
CALIBER/CARTRIDGE DESIG-NATION
ON BARREL
Dimension_Manual_080118_00084013.Qxp_TC Dimension Manual 8/20/18 9:53 A

CHANGING A BARREL CONTINUED
• Once the barrel is in the receiv-er with the locator pin alignedand the Torque Collar snuggeddown hand-tight, screw theLeverage Handle into place asshown (FIGURE 52).
• Once the Leverage Tool isscrewed into position, insert theleverage handle into theLeverage Tool pivot hole marked“T” (FIGURE 53).
CAUTION: THE USE OF TOOLSTO CHANGE PARTS ON YOURT/C DIMENSION COMES WITHTHE RISK OF BEING PINCHEDAS PARTS COME TOGETHER. BECAREFUL WHEN USING TOOLSTO PREVENT THIS POTENTIALPROBLEM.
• Pull the handles of the toolstogether until an audible “click”is heard. When the Torque Tool“clicks” the Torque Collar istightened to the correct specifi-cation (FIGURE 54).
• Avoid getting pinched whenbringing the handles together(FIGURE 55).
• After tightening the torque collar,remove the torque wrench (byfirst loosening the leverage han-dle to relieve tension against thetorque collar).
Step 7: Be sure that you haveinstalled the correct magazinehousing into the stock for theletter series of caliber that youintend to use (FIGURE 56).
30
FIGURE 54
FIGURE 53
Starting Position
Ending Position
FIGURE 55
Avoid Pinching
Use HoleMarked “T” totighten
TorqueCollar
Pull handlestogether
until TorqueTool “clicks”
FIGURE 52
Install the Leverage Tool intothreaded hole of receiver
FIGURE 56
Note LetterMarking
Dimension_Manual_080118_00084013.Qxp_TC Dimension Manual 8/20/18 9:53 A
31
CHANGING A BARREL CONTINUED
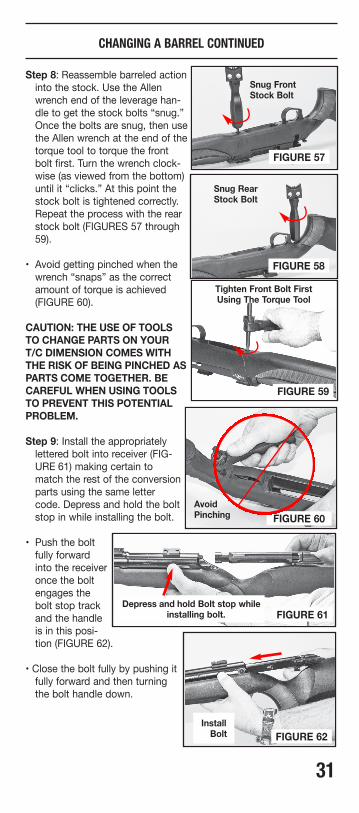
Step 8: Reassemble barreled actioninto the stock. Use the Allenwrench end of the leverage han-dle to get the stock bolts “snug.”Once the bolts are snug, then usethe Allen wrench at the end of thetorque tool to torque the frontbolt first. Turn the wrench clock-wise (as viewed from the bottom)until it “clicks.” At this point thestock bolt is tightened correctly.Repeat the process with the rearstock bolt (FIGURES 57 through59).
• Avoid getting pinched when thewrench “snaps” as the correctamount of torque is achieved(FIGURE 60).
CAUTION: THE USE OF TOOLSTO CHANGE PARTS ON YOURT/C DIMENSION COMES WITHTHE RISK OF BEING PINCHED ASPARTS COME TOGETHER. BECAREFUL WHEN USING TOOLSTO PREVENT THIS POTENTIALPROBLEM.
Step 9: Install the appropriatelylettered bolt into receiver (FIG-URE 61) making certain tomatch the rest of the conversionparts using the same lettercode. Depress and hold the boltstop in while installing the bolt.
• Push the boltfully forwardinto the receiveronce the boltengages thebolt stop trackand the handleis in this posi-tion (FIGURE 62).
• Close the bolt fully by pushing itfully forward and then turningthe bolt handle down.
FIGURE 57
FIGURE 58
Snug Front Stock Bolt
Snug Rear Stock Bolt
FIGURE 59
Tighten Front Bolt First Using The Torque Tool
FIGURE 61
FIGURE 62
Depress and hold Bolt stop whileinstalling bolt.
InstallBolt
FIGURE 60
Avoid Pinching
Dimension_Manual_080118_00084013.Qxp_TC Dimension Manual 8/20/18 9:53 A

32
CHANGING A BARREL CONTINUED
Step 10: Insert the appropriatelylettered magazine into position(FIGURE 63).
CHANGING A STOCKWARNING: ALWAYSKEEP THE MUZZLEPOINTED IN A SAFE
DIRECTION.
WARNING: ALWAYSENSURE THAT THEFIREARM IS UNLOADED
BEFORE INSPECTING, PER-FORMING ADJUSTMENTS ORMAINTENANCE, ASSEMBLINGOR DISASSEMBLING.
NOTE: The modular nature of theT/C Dimension® design allowseasy interchangeability of barrels,bolts, stocks and scope mounts.Each interchangeable piece of thecorrect combination of parts willhave a letter marking that indi-cates that it is to be used withsimilarly marked components. Thestock and the receiver are thesame for all calibers.
• Open the bolt and ensure thatthe chamber is empty (FIGURE 64).
• Set safety lever to the “SAFE”position (FIGURE 65).
• Remove the magazine from therifle (FIGURES 66 & 67).
• Loosen the two stock bolts (onebehind the trigger guard and onein front of the magazine well)using the hex wrench end of thetorque wrench tool (FIGURE 68).
FIGURE 66
FIGURE 67
FIGURE 64
Make sure that the chamber is empty.
FIGURE 65
Place safety lever In the “SAFE” position - then close bolt.
FIGURE 63
Dimension_Manual_080118_00084013.Qxp_TC Dimension Manual 8/20/18 9:53 A
33
CHANGING A STOCK CONTINUED
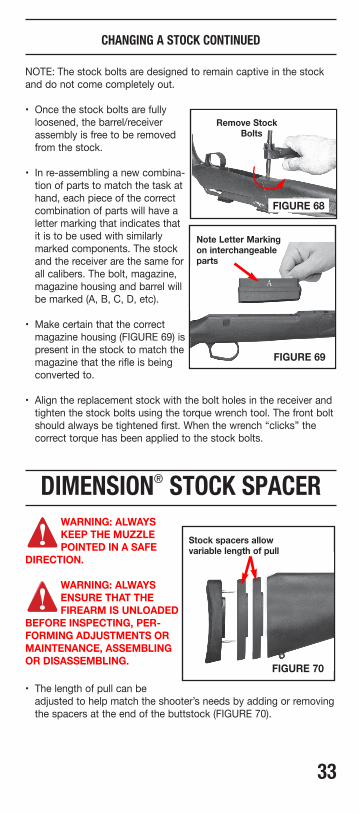
NOTE: The stock bolts are designed to remain captive in the stockand do not come completely out.
• Once the stock bolts are fullyloosened, the barrel/receiverassembly is free to be removedfrom the stock.
• In re-assembling a new combina-tion of parts to match the task athand, each piece of the correctcombination of parts will have aletter marking that indicates thatit is to be used with similarlymarked components. The stockand the receiver are the same forall calibers. The bolt, magazine,magazine housing and barrel willbe marked (A, B, C, D, etc).
• Make certain that the correctmagazine housing (FIGURE 69) ispresent in the stock to match themagazine that the rifle is beingconverted to.
• Align the replacement stock with the bolt holes in the receiver andtighten the stock bolts using the torque wrench tool. The front boltshould always be tightened first. When the wrench “clicks” thecorrect torque has been applied to the stock bolts.
DIMENSION® STOCK SPACERWARNING: ALWAYSKEEP THE MUZZLEPOINTED IN A SAFE
DIRECTION.
WARNING: ALWAYSENSURE THAT THEFIREARM IS UNLOADED
BEFORE INSPECTING, PER-FORMING ADJUSTMENTS ORMAINTENANCE, ASSEMBLINGOR DISASSEMBLING.
• The length of pull can beadjusted to help match the shooter’s needs by adding or removingthe spacers at the end of the buttstock (FIGURE 70).
FIGURE 70
Stock spacers allow variable length of pull
FIGURE 68
Remove StockBolts
Note Letter Marking on interchangeable parts
FIGURE 69
Dimension_Manual_080118_00084013.Qxp_TC Dimension Manual 8/20/18 9:53 A
34
DIMENSION® STOCK SPACER CONTINUED
• The recoil pad is held in place with two phillips head screws. Byremoving these screws from the stock and adding or removingspacers, the length of the stock can be matched to the shooter’sneeds.
• The spacers are held in place by the same screws that hold therecoil pad onto the buttstock.
INSTALLING A LOC™ BRIDGESCOPE MOUNT APPENDIX
(Mount is Sold Separately)
WARNING: ALWAYS KEEP YOUR FIREARM POINTED INA SAFE DIRECTION. NEVER POINT A FIREARM AT ANY-THING YOU DO NOT INTEND TO SHOOT.
WE RECOMMEND THAT YOU HAVE A COMPETENTGUNSMITH INSTALL YOUR SCOPE & MOUNT.
NEVER ATTEMPT TO INSTALL A SCOPE MOUNT ON ALOADED FIREARM. ALWAYS ENSURE THAT THEFIREARM IS NOT LOADED.
A SCOPE WHICH IS NOT SECURELY MOUNTED MAYBECOME DETACHED UPON RECOIL OF THE FIREARM.IF IT BECOMES DETACHED IT MAY FLY BACK AND
STRIKE THE SHOOTER OR A BYSTANDER AND CAUSE INJURY.OBSERVE THE CONDITION OF THE MOUNTING SCREWSAFTER FIRING. IF THE MOUNTING SCREWS SHOW SIGNS OFLOOSENING DO NOT FIRE THE GUN AGAIN; CALL THECUSTOMER SERVICE DEPARTMENT FOR ASSISTANCE, TOLLFREE AT 866-730-1614.
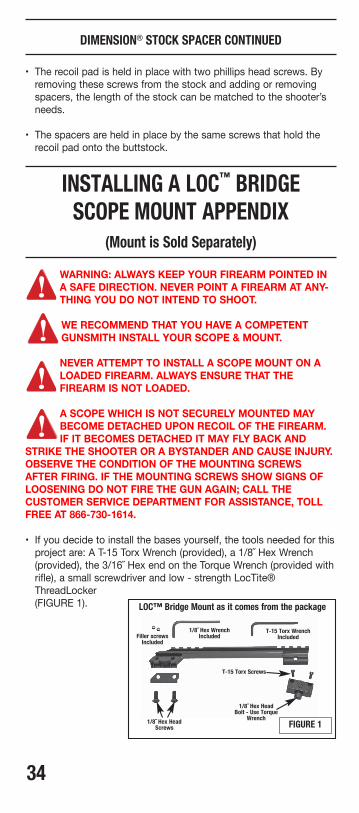
• If you decide to install the bases yourself, the tools needed for thisproject are: A T-15 Torx Wrench (provided), a 1/8˝ Hex Wrench(provided), the 3/16˝ Hex end on the Torque Wrench (provided withrifle), a small screwdriver and low - strength LocTite®ThreadLocker (FIGURE 1).
FIGURE 1
LOC™ Bridge Mount as it comes from the package
1/8˝ Hex WrenchIncluded
1/8˝ Hex HeadScrews
1/8˝ Hex HeadBolt - Use Torque
Wrench
T-15 Torx Screws
T-15 Torx WrenchIncludedFiller screws
Included
Dimension_Manual_080118_00084013.Qxp_TC Dimension Manual 8/20/18 9:53 A

35
INSTALLING A BRIDGE SCOPE MOUNT CONTINUED
• This scope mountbase is designed toprovide maximumaccuracy from theDimension® riflewhen it is installedcorrectly and thenstay sighted-inwhen the barrel ischanged out withanother barrel (FIG-URES 2 and 3).
• As received fromthe factory, theDimension® riflehas Weaver-stylebases installed (FIGURE 4). Thesebases need to beremoved to allowthe LOC™ BridgeMount to beinstalled.
• Remove theWeaver-style basesfrom the receiverusing the T-15 Torxwrench (see FIG-URES 5 and 6).
• Set the bases andscrews aside forpossible later use.Note that the rearbase is taller thanthe front base -should you wish toreinstall them atsome later date.
FIGURE 2
FIGURE 3
LOC™ Bridge Mount on T/C Dimension® Rifle
Once installed, The LOC™ Bridge Mount stays sighted-in on the T/C Dimension® barrel when it is
changed out for a different caliber barrel.
Only the rear screw needs to be removed whenchanging out a barrel.
The Dimension® rifle as it comes from the factory,with Weaver-style bases installed
Remove the Weaver-style baseswith the Torx wrench provided
Note that the rear base istaller - if you re-install the
Weaver-style bases
FIGURE 4
FIGURE 5
FIGURE 6
Dimension_Manual_080118_00084013.Qxp_TC Dimension Manual 8/20/18 9:54 A
36
INSTALLING A BRIDGE SCOPE MOUNT CONTINUED
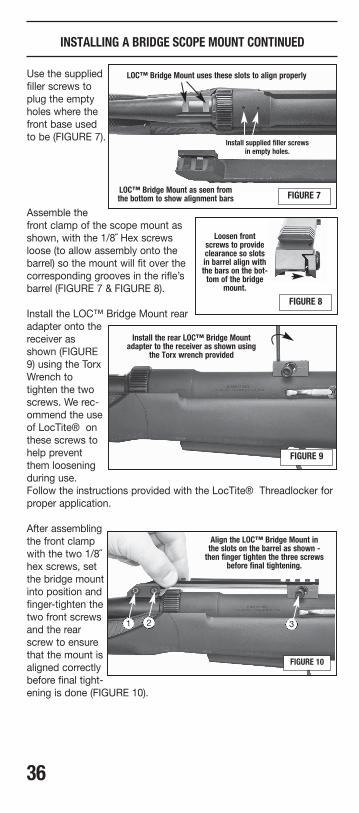
Use the suppliedfiller screws toplug the emptyholes where thefront base usedto be (FIGURE 7).
Assemble thefront clamp of the scope mount asshown, with the 1/8˝ Hex screwsloose (to allow assembly onto thebarrel) so the mount will fit over thecorresponding grooves in the rifle’sbarrel (FIGURE 7 & FIGURE 8).
Install the LOC™ Bridge Mount rearadapter onto thereceiver asshown (FIGURE9) using the TorxWrench to tighten the twoscrews. We rec-ommend the useof LocTite® onthese screws tohelp preventthem looseningduring use.Follow the instructions provided with the LocTite® Threadlocker forproper application.
After assemblingthe front clampwith the two 1/8˝hex screws, setthe bridge mountinto position andfinger-tighten thetwo front screwsand the rearscrew to ensurethat the mount isaligned correctlybefore final tight-ening is done (FIGURE 10).
Loosen frontscrews to provideclearance so slotsin barrel align withthe bars on the bot-tom of the bridge
mount.
FIGURE 10
Install the rear LOC™ Bridge Mountadapter to the receiver as shown using
the Torx wrench provided
LOC™ Bridge Mount uses these slots to align properly
LOC™ Bridge Mount as seen fromthe bottom to show alignment bars
Align the LOC™ Bridge Mount inthe slots on the barrel as shown -then finger tighten the three screws
before final tightening.
Install supplied filler screwsin empty holes.
1 2 3
FIGURE 7
FIGURE 8
FIGURE 9
Dimension_Manual_080118_00084013.Qxp_TC Dimension Manual 8/20/18 9:54 A
37
INSTALLING A BRIDGE SCOPE MOUNT CONTINUED
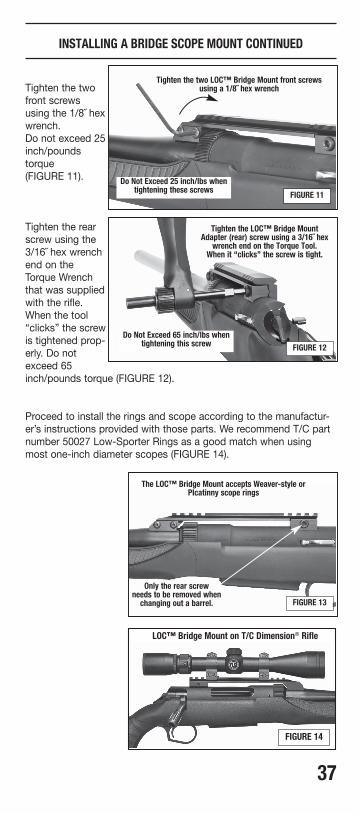
Tighten the twofront screwsusing the 1/8˝ hexwrench. Do not exceed 25inch/poundstorque (FIGURE 11).
Tighten the rearscrew using the3/16˝ hex wrenchend on theTorque Wrenchthat was suppliedwith the rifle.When the tool“clicks” the screwis tightened prop-erly. Do notexceed 65inch/pounds torque (FIGURE 12).
Proceed to install the rings and scope according to the manufactur-er’s instructions provided with those parts. We recommend T/C partnumber 50027 Low-Sporter Rings as a good match when usingmost one-inch diameter scopes (FIGURE 14).
FIGURE 11
FIGURE 12
FIGURE 13
Tighten the two LOC™ Bridge Mount front screws using a 1/8˝ hex wrench
Tighten the LOC™ Bridge MountAdapter (rear) screw using a 3/16˝ hex
wrench end on the Torque Tool.When it “clicks” the screw is tight.
The LOC™ Bridge Mount accepts Weaver-style orPIcatinny scope rings
Only the rear screw needs to be removed whenchanging out a barrel.
Do Not Exceed 65 inch/lbs whentightening this screw
Do Not Exceed 25 inch/lbs whentightening these screws
FIGURE 14
LOC™ Bridge Mount on T/C Dimension® Rifle
Dimension_Manual_080118_00084013.Qxp_TC Dimension Manual 8/20/18 9:54 A

38
INSTALLING A BRIDGE SCOPE MOUNT CONTINUED
NOTE: The LOC™ Bridge Scope Mount Base is made to accepteither Weaver-style rings or scope rings with Picatinny dimensions.
WHEN CHANGING OUT BARRELS
• When the user isready to changebarrels on theDimension® rifle,follow the direc-tions in this manualstarting on page 27after first fully loos-ening the rear 3/16˝Hex screw (FIG-URE 15). Thisscrew is held cap-tive in the baseadapter - once fully loosened, the screw stays with the adapteron the rifle - ready to thread into the LOC™ Bridge Mount beingused with the new barrel.
WARNING: FIRING A SCOPED FIREARM WITH YOUR EYETOO CLOSE TO THE SCOPE EYE PIECE, OR FAILING TOHOLD THE FIREARM SECURELY AGAINST RECOIL, MAY
RESULT IN SERIOUS PERSONAL INJURY INCLUDING, BUT NOTLIMITED TO, BLINDNESS.
FIGURE 15
Once installed, The LOC™ Bridge Mount stays sighted-in on the T/C Dimension® barrel when it is
changed out for a different caliber barrel.
Only the rear screw needs to be removed whenchanging out a barrel.
Dimension_Manual_080118_00084013.Qxp_TC Dimension Manual 8/20/18 9:54 A

39
LIMITED LIFETIME WARRANTYThis warranty is granted by Smith & Wesson Corp. doing businessas Thompson/Center Arms. This warranty is effective from the dateof purchase for the lifetime of the original retail purchaser of any fac-tory finished firearm. In order to be eligible for service under this war-ranty, the original retail purchaser must return a completed autho-rized warranty card or register online at http://www.tcarms.com/war-ranty-details/registration within thirty (30) days of purchase of suchfirearm. With respect to such firearm, this warranty supersedes anyand all other warranties.
Thompson/Center Arms brand firearms are warranted to be free fromdefects in material and workmanship. Any such defects of whichSmith & Wesson receives written notice by the original retail pur-chaser will be remedied without charge within a reasonable timeafter such notification and delivery of the firearm as provided below.
Warranty claims (in writing) and the firearm or part thereof concernedshould be delivered, postage prepaid, to the factory at Smith &Wesson, 2100 Roosevelt Ave., Springfield, MA 01104, Attn: ServiceDepartment. In addition, a copy of the bill of sale in the original retailpurchaser’s name, or, where applicable, a copy of ATF Form 4473indicating date of purchase must be included. Please include yourphysical address and phone number. You must comply with allapplicable federal, state and local laws and regulations in the ship-ment of firearms to Smith & Wesson.
NOTE: See the Contact & Shipping section of this manual for further details regarding returns.
Warranty claims should state the model and, where applicable, theserial number of the firearm concerned and the description of thedifficulty experienced. It is recommended that shipments be insuredby the owner, since Smith & Wesson will accept no responsibility forloss or damage in transit. Transportation and insurance charges forreturn to the owner will be paid by Smith & Wesson if the claim iscovered by this warranty.
If the work required is not covered by our “Limited LifetimeWarranty” you will receive a quotation which must be authorized byyou. No actual work will be done without your approval. Return ship-ments can be shipped via UPS, FedEx or mail at your cost. Repairedproduct will be shipped back to you via FedEx requiring an adult sig-nature upon receipt.
UNDER NO CIRCUMSTANCES SHALL SMITH & WESSON BERESPONSIBLE FOR INCIDENTAL OR CONSEQUENTIAL DAMAGESWITH RESPECT TO ECONOMIC LOSS, INJURY, DEATH OR PROP-ERTY DAMAGE, WHETHER AS A RESULT OF BREACH OF THISWARRANTY, NEGLIGENCE OR OTHERWISE.
Dimension_Manual_080118_00084013.Qxp_TC Dimension Manual 8/20/18 9:54 A
40
LIMITED LIFETIME WARRANTY CONTINUED
Some states do not allow the exclusion or limitation of incidental orconsequential damages, so the above limitation or exclusion maynot apply to you.
Smith & Wesson will not be responsible for:
• Defects or malfunctions resulting from careless handling, unautho-rized adjustments or modifications made or attempted by anyoneother than a qualified gunsmith following authorized procedures, orfailure to follow the instructions in Safety & Instruction manual thatwas provided with the firearm from the factory.
• Use of defective or improper ammunition and/or propellant, corro-sion, neglect, abuse, ordinary wear and tear, or unreasonable use.
• Use of replacement parts, including but not limited to barrels andsprings, other than factory or authorized parts.
• Criminal misuse, negligence, or use under the influence of drugs oralcohol.
Services that were performed by the Thompson/Center ArmsCustom Shop and/or that are performed by the Smith & WessonRepair Department do not void this warranty. This warranty gives youspecific legal rights, and you may also have other rights which varyfrom state to state.
NOTE: All liability is excluded in the event that the instructions pro-vided in the Safety and Instruction manual that was provided withthe firearm from the factory are not observed.
Dimension_Manual_080118_00084013.Qxp_TC Dimension Manual 8/20/18 9:54 A

41
CONTACT AND SHIPPINGFOR SERVICE
NOTE: A Return Merchandise Authorization (RMA) is the first step inthe process of returning a product in order to receive a repair,replacement or refund. Please contact Thompson/Center’s Customer Service Dept. (e-mail:[email protected] or by phone at 800-331-0852 ext.4125) to obtain authorization to return your firearm so we canprocess it quickly and efficiently. The RMA number that is suppliedby Thompson/Center Arms must be displayed on the outside of thereturned product's packaging; returns without an RMA number willbe routed differently which will result in delayed processing.
The issuance of an Return Merchandise Authorization (RMA) allowsThompson/Center Arms an opportunity to try to diagnose and cor-rect a customer's concerns with the product (such as ammunitionproblems) before it is returned. Accordingly, please contact us beforereturning your Thompson/Center firearm.
Shipping Address: Thompson/Center Arms 2100 Roosevelt Avenue Springfield, MA 01104
Should your Thompson/Center firearm require service, it shouldbe returned to the Thompson/Center factory.
• Call or e-mail the Customer Service Dept. for authorization andshipping instructions.
• Ensure that the magazine and chamber are unloaded.
• Do not attempt to ship a firearm via US Postal Service; onlyfederally licensed dealers may ship a firearm by US PostalService.
• DO NOT SHIP ANY AMMUNITION.
• Enclose a letter which includes your full name and address (noP.O. Boxes, please), daytime telephone number, e-mail address, theserial number of the firearm, and details of the problem experienced(stating the brand and type of ammunition used when the problemoccurred) or work desired.
• Record the serial number before shipping, in case you wish tocheck on the repair status of your firearm.
• Please remove all custom parts and accessories, such asstocks, special sights and scopes, or slings from your firearmbefore returning.
• Place the firearm in its original case or in a similarly secure contain-er and pack it securely.
Dimension_Manual_080118_00084013.Qxp_TC Dimension Manual 8/20/18 9:54 A

42
CONTACT AND SHIPPING CONTINUED
• The package must NOT bear any markings which indicate theidentity of the contents.
• It is most important that you comply with federal, state, and locallaws and regulations. The following guidelines are meant to help, butyou must seek assistance from the appropriate authorities if neces-sary.
• If your firearm must be replaced, it may be necessary to ship thereplacement to a dealer rather than directly to you. You may berequested to furnish a signed FFL (Federal Firearms License) fromyour dealer in such an instance.
• Warranty repair work will begin upon receipt and examination ofthe firearm. In the case of repairs or work not covered by the war-ranty, a quotation covering the cost of the work plus shippingcharges will be sent to you. Repairs or modification will be sched-uled upon receipt of payment.
WARNING: YOU MAY PURCHASE ACCESSORIES FORYOUR THOMPSON/CENTER FIREARM. YOU MUST HAVESOME OF THESE PARTS INSTALLED BY A GUNSMITH
QUALIFIED TO PERFORM SERVICE ON THOMPSON/CENTERFIREARMS. NEVER ATTEMPT TO MODIFY YOUR FIREARM ORINSTALL REPLACEMENT PARTS IN YOUR FIREARM. ALWAYSUSE A QUALIFIED THOMPSON/CENTER GUNSMITH EVEN IFTHE REPAIR SEEMS SIMPLE.
PATENT INFORMATION• This product may be covered by one or more patents.
Visit www.tcarms.com for virtual patent information.
Dimension_Manual_080118_00084013.Qxp_TC Dimension Manual 8/20/18 9:54 A

43
BATTERY WARNINGS WARNING: IF A BATTERY OPERATED ACCESSORY ORATTACHMENT (I.E. LASER, OPTICAL SIGHT OR FLASH-LIGHT, ETC.) IS SUPPLIED OR USED WITH THIS
FIREARM, THE FOLLOWING WARNINGS AND INSTRUCTIONSMUST BE ADHERED TO.
WARNING: KEEP BATTERIES AWAY FROM CHILDREN.THERE IS A CHEMICAL BURN HAZARD ASSOCIATEDWITH BATTERIES.
WARNING: IF A NEW OR USED LITHIUM BUTTON/COINCELL BATTERY IS SWALLOWED OR ENTERS THE BODY,IT CAN CAUSE SEVERE INTERNAL BURNS AND CAN
LEAD TO DEATH IN AS LITTLE AS 2 HOURS. ALWAYS COM-PLETELY SECURE THE BATTERY COMPARTMENT. IF THE BAT-TERY COMPARTMENT DOES NOT CLOSE SECURELY, STOPUSING THE PRODUCT, REMOVE THE BATTERIES, AND KEEP ITAWAY FROM CHILDREN. IF YOU THINK BATTERIES MIGHTHAVE BEEN SWALLOWED OR PLACED INSIDE ANY PART OFTHE BODY, SEEK IMMEDIATE MEDICAL ATTENTION.
• When used correctly, batteries provide a safe and dependablesource of portable power. However, misuse or abuse may result inleakage, fire, or explosion.
• Batteries can explode or leak and cause burns if installed back-wards, disassembled, charged, or exposed to water, fire or hightemperature.
• Always take care to install your batteries correctly observing the“+” and “-” marks on the battery and the device.
• Always replace the whole set of batteries at one time, taking carenot to mix old and new batteries, or batteries of different types.
• Store unused batteries in their original packaging and away frommetal objects that may short-circuit them.
• Remove discharged batteries from equipment promptly to avoidpossible damage from leakage.
• Never dispose of batteries in fire. (Failure to observe this precau-tion may result in an explosion.)
• The batteries are supplied in a charged state and are not designedfor recharging. Recharging may cause leakage, fire, or explosion.
• The batteries should be disposed of properly, including keepingthem away from children.
• Dispose of used batteries immediately. Even used batteries maycause injury.
Dimension_Manual_080118_00084013.Qxp_TC Dimension Manual 8/20/18 9:54 A
44
CONTACT INFORMATION
p/n 00084013 REV:T/C® DIMENSION®_080118
T/C Mailing Address:(for questions & comments)
Thompson/Center Arms
2100 Roosevelt Avenue • Springfield, MA 01104
T/C Shipping Address:(for repairs or warranty work)
Thompson/Center Arms
ATTN: Repair Department
2100 Roosevelt Avenue • Springfield, MA 01104
Web Address:www.tcarms.com
Customer Service Phone:Toll Free (866) 730-1614
Customer Service email:[email protected]
Dimension_Manual_080118_00084013.Qxp_TC Dimension Manual 8/20/18 9:54 A