Taping attachment traduction
6
1/6 This set includes: 1. Setscrew 2. Tape reel 3. Taping foot For your safety, turn off the power switch before changing any attachments. Machine setting: Set the machine for ordinary 2-needle 4-thread serging. (Refer to the machine instruction book.) Thread tensions Left needle Right needle Upper looper Lower looper 3 3 3 3 Stitch length : 3 - 4 Differential feed dia l: 1.0 Presser foot :: Taping foot Upper Knife : Activated Needle plate setting knob : S TAPING ATTACHMENT FOR OVERLOCK MACHINES PIED À RUBANS POUR SURJETEUSES PRÉNSATELAS PARA CINTAS
Transcript of Taping attachment traduction

1/6
This set includes:
1. Setscrew 2. Tape reel 3. Taping foot
For your safety, turn off the power switch before changing any attachments.
Machine setting: Set the machine for ordinary 2-needle 4-thread serging. (Refer to the machine instruction book.) Thread tensions
Left needle Right needle Upper looper Lower looper
3 3 3 3
Stitch length: 3 - 4 Differential feed dial: 1.0 Presser foot:: Taping foot Upper Knife: Activated Needle plate setting knob: S
TAPING ATTACHMENT FOR OVERLOCK MACHINES PIED À RUBANS POUR SURJETEUSES
PRÉNSATELAS PARA CINTAS

2/6
To attach the taping attachment: This attachment can be used for tape widths of 4 - 8 mm.
1. Remove the face plate setscrew. 2. Secure the tape reel on the face plate with the
setscrew included in the package. 3. Insert tape into the tape holding hole from inside
of the reel. Wind the tape (turn the knob while holding the end of the tape).
4. Replace the foot with the taping foot and raise it. 5. Deactivate the upper knife. 6. Insert the tape into the guiding hole in the reel
arm. Then insert the tape into the taping slit on the foot from the right side, and pull the tape behind the foot.
7. Activate the upper knife. 8. Place the fabric under the foot, and lower the foot. 9. Remove any slack in the tape by turning the knob
of the reel lightly. 10. Start sewing slowly.
* To deactivate and activate the upper knife, see the instruction book.
NOTE: To ensure even feeding, slacken the tape and guide lightly with your finger.
3/6
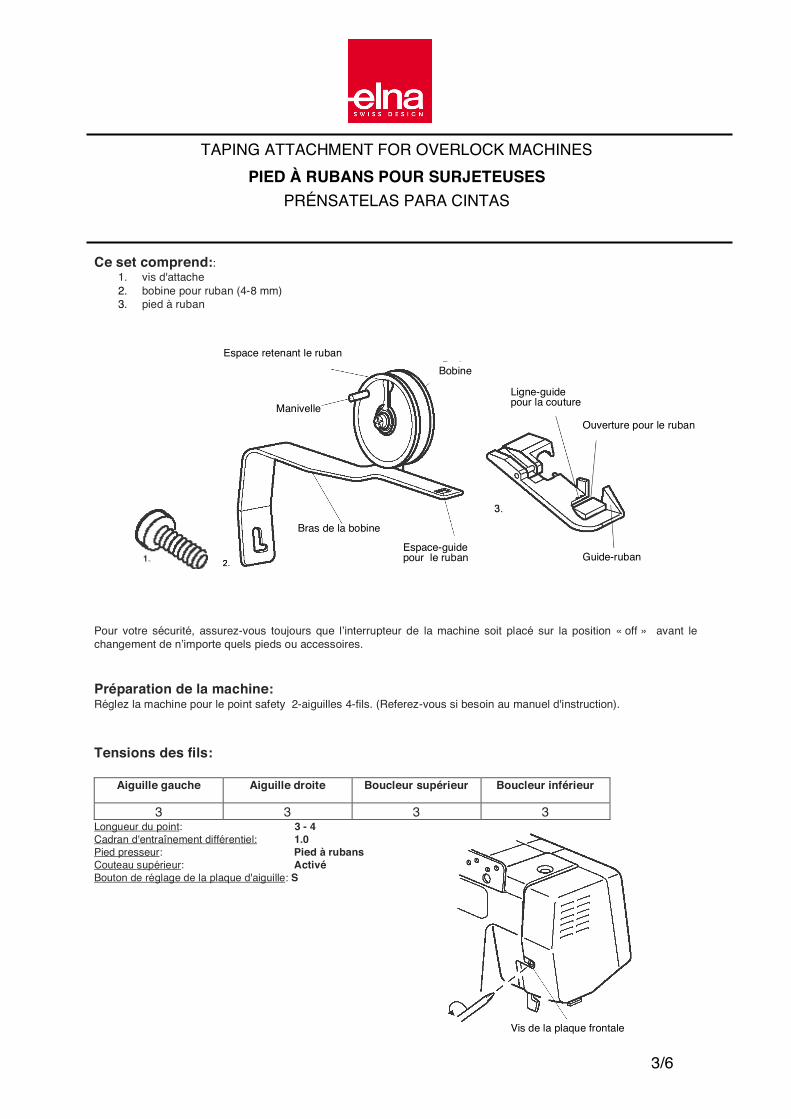
Vis de la plaque frontale
Ce set comprend::
1. vis d'attache 2. bobine pour ruban (4-8 mm) 3. pied à ruban
Pour votre sécurité, assurez-vous toujours que lʼinterrupteur de la machine soit placé sur la position « off » avant le changement de nʼimporte quels pieds ou accessoires.
Préparation de la machine: Réglez la machine pour le point safety 2-aiguilles 4-fils. (Referez-vous si besoin au manuel d'instruction). Tensions des fils:
Aiguille gauche Aiguille droite Boucleur supérieur Boucleur inférieur
3 3 3 3 Longueur du point: 3 - 4 Cadran d'entraînement différentiel: 1.0 Pied presseur: Pied à rubans Couteau supérieur: Activé Bouton de réglage de la plaque d'aiguille: S
Bobine Espace retenant le ruban
Manivelle
Espace-guide pour le ruban Guide-ruban
Ligne-guide pour la couture
Ouverture pour le ruban
Bras de la bobine
TAPING ATTACHMENT FOR OVERLOCK MACHINES PIED À RUBANS POUR SURJETEUSES
PRÉNSATELAS PARA CINTAS

4/6
Comment installer le pied à rubans: La largeur du ruban doit être comprise entre 4 - 8 millimètres.
1. Retirez la vis d'attache de la plaque frontale. 2. Fixez le bras de la bobine sur la plaque frontale à
l'aide de la vis d'attache comprise dans le set. 3. Insérez le début du ruban dans l'espace-guide
depuis l'intérieur de la bobine. Enroulez le ruban à l'aide de la manivelle tout en le maintenant avec l'autre main.
4. Remplacez le pied avec le pied à rubans et relevez ce dernier.
5. Désactivez le couteau supérieur. (Référez-vous au manuel d'instruction de la machine pour cette manœuvre).
6. Insérez le ruban dans l'espace-guide du bras de la bobine puis dans l'espace du pied prévu à cet effet depuis la droite. Passez finalement le ruban sous le pied, puis à l'arrière de celui-ci.
7. Activez le couteau supérieur. 8. Placez le tissu sous le pied et baissez le pied. 9. Retendez légèrement le ruban à l'aide de la
manivelle de la bobine. 10. Commencez à coudre lentement.
NOTEZ: Pour assurer un bon fonctionnement du système, tendez le ruban délicatement et guidez-le à la main.
Espace retenant le ruban
Espace-guide pour le ruban
Pied à rubans Tissu

5/6
El set incluye: 1. Tornillo de ajuste 2. Rollo de cinta 3. Pie de cinta
Para su seguridad, desconecte el enchufe de la corriente antes de cambiar cualquier accesorio. Ajuste de la máquina : Posicione la máquina para 2-aguja 4- hilos normal sobrehilado. (Consultar el libro de instrucciones de la máquina.) Tensiones del hilo :
Aguja Izquierda Aguja derecha Áncora Superior Áncora Inferior
3 3 3 3 Longitud de puntada: 3-4 Cuadrante diferencial del alimentador: 1.0 Prensatela: Prensatelas para cinta Cuchilla superior: Activada Ajuste la uña del placa agujas: S
TAPING ATTACHMENT FOR OVERLOCK MACHINES PIED À RUBANS POUR SURJETEUSES
PRÉNSATELAS PARA CINTAS

6/6
Montaje del prensatelas para cintas: Este accesorio puede ser usado para cintas de ancho 4-8mm.
1. Quite los tornillos de la tapa posterior. 2. Ajuste el rollo de cinta en la tapa posterior con los tornillos incluidos en el paquete. 3. Inserte la cinta en el agujero del soporte de la cinta dentro del rollo y enróllela (gire el tirador mientras sujeta el final de la cinta). 4. Reemplace el prénsatelas por el prénsatelas de cinta y levántelo. 5. Desactive la cuchilla superior. 6. Inserte la cinta en el agujero de la guía en el brazo
del rollo. Después inserte la cinta en la hendidura del lado derecho del prénsatelas y tire de la cinta por detrás del prénsatelas.
7. Active la cuchilla superior. 8. Coloque la tela debajo del prénsatelas, y bájelo.
Si la cinta se destensa gire el rodillo para tensarla. 9. Comience a coser lentamente.
*Para desactivar y activar la cuchilla superior, consulte el manual de instrucciones.
Nota: Para asegurar un desplazamiento plano, guíe ligeramente la cinta con el dedo.