
tapi 120 en - TAPICall. CTI/CRM/UC für Outlook, Office ... · Siemens Enterprise Communications...
33
Communication for the open minded Siemens Enterprise Communications www.siemens.com/open Documentation HiPath TAPI 120 V2.0 Installation and Configuration Administrator Documentation P31003-H3540-T120-7-76A9, 09/2010
Transcript of tapi 120 en - TAPICall. CTI/CRM/UC für Outlook, Office ... · Siemens Enterprise Communications...
Communication for the open minded
Siemens Enterprise Communicationswww.siemens.com/open
DocumentationHiPath TAPI 120 V2.0Installation and Configuration
Administrator Documentation
P31003-H3540-T120-7-76A9, 09/2010
Our Quality and Environmental Management Sys-tems are implemented according to the require-ments of the ISO9001 and ISO14001 standard cer-tified by an external certification company.
Copyright © Siemens Enterprise Communications GmbH & Co. KG 2010Hofmannstr. 51, 80200 München
Siemens Enterprise Communications GmbH & Co. KG is a Trademark Licensee of Siemens AG
Reference No.: A31003-H3540-T120-7-76A9
The information provided in this document contains merely general descriptions or characteristics of performance which in case of actual use do not always apply as described or which may change as a result of further development of the products. An obligation to provide the respective characteristics shall only exist if expressly agreed in the terms of contract. Availability and technical specifications are subject to change without notice. OpenScape, OpenStage and HiPath are registered trademarks of Siemens Enterprise Communications GmbH & Co. KG. All other company, brand, product and service names are trademarks or registered trademarks of their respective holders.
Siemens Enterprise Communicationswww.siemens.com/open
Communication for the open minded
tapi_120_enTOC.fm
A31003-H3540-T120-7-76A9, 09/2010HiPath TAPI 120 V2.0 Installation and Configuration, Administrator Documentation 0-1
Nur für den internen Gebrauch Content
Content 0
1 Introduction. . . . . . . . . . . . . . . . . . . . . . . . . . . . . . . . . . . . . . . . . . . . . . . . . . . . . . . . . . 1-11.1 General . . . . . . . . . . . . . . . . . . . . . . . . . . . . . . . . . . . . . . . . . . . . . . . . . . . . . . . . . . . . 1-11.2 Requirements . . . . . . . . . . . . . . . . . . . . . . . . . . . . . . . . . . . . . . . . . . . . . . . . . . . . . . . 1-5
2 Installation of TAPI 120 . . . . . . . . . . . . . . . . . . . . . . . . . . . . . . . . . . . . . . . . . . . . . . . . 2-12.1 General . . . . . . . . . . . . . . . . . . . . . . . . . . . . . . . . . . . . . . . . . . . . . . . . . . . . . . . . . . . . 2-12.2 Starting installation . . . . . . . . . . . . . . . . . . . . . . . . . . . . . . . . . . . . . . . . . . . . . . . . . . . 2-1
2.2.1 Installing the CMD component . . . . . . . . . . . . . . . . . . . . . . . . . . . . . . . . . . . . . . . 2-32.2.2 Installing the TSP component . . . . . . . . . . . . . . . . . . . . . . . . . . . . . . . . . . . . . . . . 2-4
2.3 Uninstall TSP and/or CMD. . . . . . . . . . . . . . . . . . . . . . . . . . . . . . . . . . . . . . . . . . . . . . 2-5
3 Configuring components . . . . . . . . . . . . . . . . . . . . . . . . . . . . . . . . . . . . . . . . . . . . . . . 3-13.1 General . . . . . . . . . . . . . . . . . . . . . . . . . . . . . . . . . . . . . . . . . . . . . . . . . . . . . . . . . . . . 3-13.2 Configuring the CMD component. . . . . . . . . . . . . . . . . . . . . . . . . . . . . . . . . . . . . . . . . 3-1
3.2.1 Starting the configuration dialog . . . . . . . . . . . . . . . . . . . . . . . . . . . . . . . . . . . . . . 3-13.2.2 General CMD parameters . . . . . . . . . . . . . . . . . . . . . . . . . . . . . . . . . . . . . . . . . . . 3-23.2.3 Advanced CMD parameters . . . . . . . . . . . . . . . . . . . . . . . . . . . . . . . . . . . . . . . . . 3-43.2.4 CMD assignment parameters . . . . . . . . . . . . . . . . . . . . . . . . . . . . . . . . . . . . . . . . 3-6
3.2.4.1 Adding nodes . . . . . . . . . . . . . . . . . . . . . . . . . . . . . . . . . . . . . . . . . . . . . . . . . 3-73.2.4.2 Editing / deleting an entry . . . . . . . . . . . . . . . . . . . . . . . . . . . . . . . . . . . . . . . . 3-83.2.4.3 Exporting / importing parameters (nodes) . . . . . . . . . . . . . . . . . . . . . . . . . . . 3-8
3.2.5 CMD parameters for CTI firewall. . . . . . . . . . . . . . . . . . . . . . . . . . . . . . . . . . . . . . 3-93.2.5.1 Editing/deleting an entry . . . . . . . . . . . . . . . . . . . . . . . . . . . . . . . . . . . . . . . . 3-103.2.5.2 Adding a TAPI 120 client . . . . . . . . . . . . . . . . . . . . . . . . . . . . . . . . . . . . . . . 3-10
3.2.6 CMD license parameters . . . . . . . . . . . . . . . . . . . . . . . . . . . . . . . . . . . . . . . . . . 3-113.2.7 CMD version information. . . . . . . . . . . . . . . . . . . . . . . . . . . . . . . . . . . . . . . . . . . 3-12
3.3 Configuration the TSP component. . . . . . . . . . . . . . . . . . . . . . . . . . . . . . . . . . . . . . . 3-133.3.1 Manual activation of configuration dialogs . . . . . . . . . . . . . . . . . . . . . . . . . . . . . 3-133.3.2 Configuration of TSP 120 parameters. . . . . . . . . . . . . . . . . . . . . . . . . . . . . . . . . 3-14
Introduction Nur für den internen Gebrauch
tapi_120_en_c01.fm
General
1 Introduction
1.1 General
The product HiPath TAPI 120 V2.0 consists of the following software components:
● HiPath TAPI 120 TAPI Service Provider (TSP)HiPath TAPI 120 TSP is a first party telephony provider software based on MS Windows TAPI functionality and is always deployed on client PCs.HiPath TAPI 120 TSP enables TAPI-based applications to have the control and status / presence display of telephones connected to a communication system. To enable this, Hi-Path TAPI 120 communicates with the communication system directly via LAN and CSTA III protocols.
● CSTA Message Dispatcher CMDPer client, HiPath TAPI 120 occupies one CSTA link on the communication system. If there are insufficient CSTA links on a communication system to connect all clients, you can use CSTA Message Dispatcher (CMD) component. The CMD SW-component merges the CSTA links of multiple TAPI 120 TSP applications on one CSTA link on the communication system.
Documentation
● To improve readability, "telecommunications system(s)" has been abbreviated to "commu-nication system(s)" or "system(s)" in this document.
● The product name HiPath TAPI 120 V2.0 has also been abbreviated to TAPI 120 for the same reason.
● All described operation sequences and dialogs refer to older Windows versions, e.g. Win-dows XP. With using newer Windows versions you have to activate the functions accord-ingly.
Solutions
TAPI 120 can be used as standalone software with a system / server or can be purchased and used in conjunction with several systems / servers. Basic operation is identical:
● HiPath 500
● HiPath OpenOffice EE
● HiPath 2000
● HiPath 3000
● OpenScape Office
A31003-H3540-T120-7-76A9, 09/20101-1 HiPath TAPI 120 V2.0 Installation and Configuration, Administrator Documentation
tapi_120_en_c01.fm
Nur für den internen Gebrauch IntroductionGeneral
Alternatively the system connection can be established using CMD
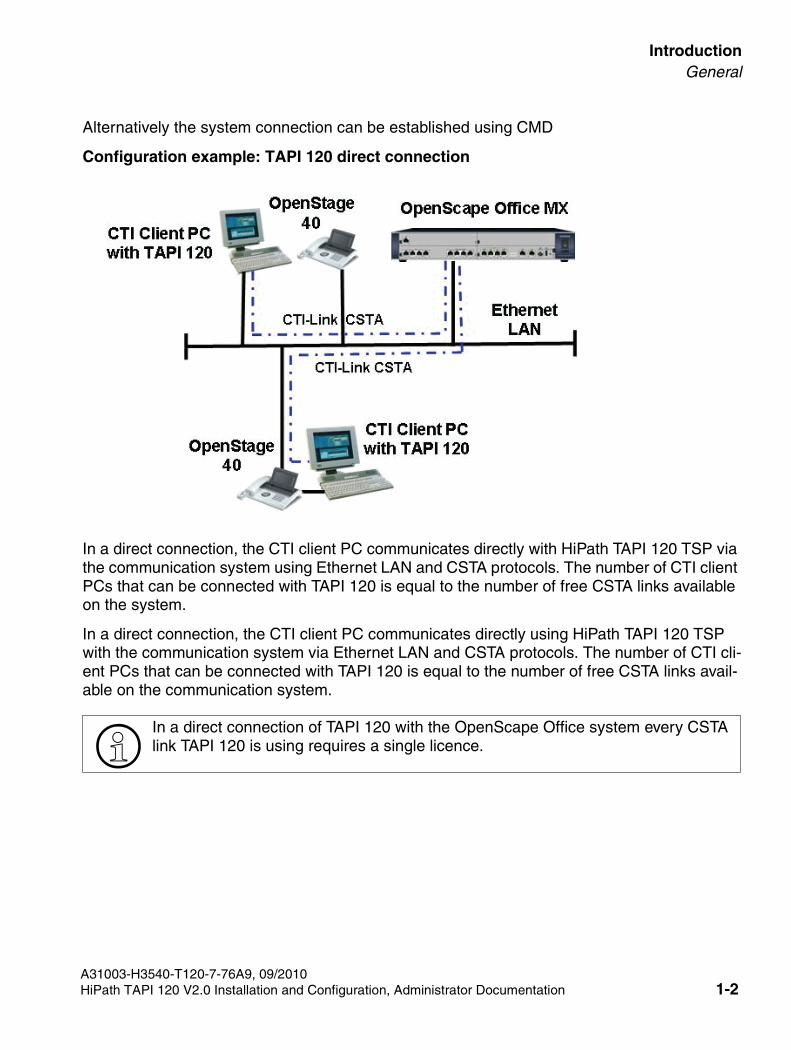
Configuration example: TAPI 120 direct connection
In a direct connection, the CTI client PC communicates directly with HiPath TAPI 120 TSP via the communication system using Ethernet LAN and CSTA protocols. The number of CTI client PCs that can be connected with TAPI 120 is equal to the number of free CSTA links available on the system.
In a direct connection, the CTI client PC communicates directly using HiPath TAPI 120 TSP with the communication system via Ethernet LAN and CSTA protocols. The number of CTI cli-ent PCs that can be connected with TAPI 120 is equal to the number of free CSTA links avail-able on the communication system.
>In a direct connection of TAPI 120 with the OpenScape Office system every CSTA link TAPI 120 is using requires a single licence.
A31003-H3540-T120-7-76A9, 09/2010HiPath TAPI 120 V2.0 Installation and Configuration, Administrator Documentation 1-2
Introduction Nur für den internen Gebrauch
tapi_120_en_c01.fm
General
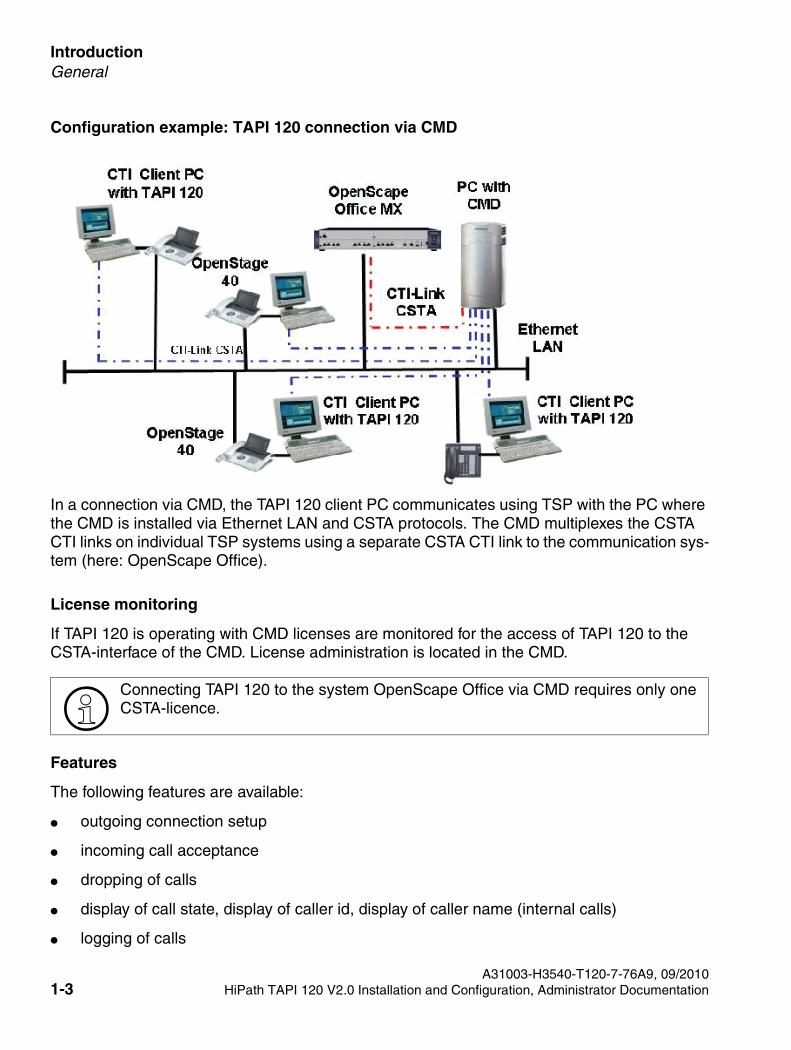
Configuration example: TAPI 120 connection via CMD
In a connection via CMD, the TAPI 120 client PC communicates using TSP with the PC where the CMD is installed via Ethernet LAN and CSTA protocols. The CMD multiplexes the CSTA CTI links on individual TSP systems using a separate CSTA CTI link to the communication sys-tem (here: OpenScape Office).
License monitoring
If TAPI 120 is operating with CMD licenses are monitored for the access of TAPI 120 to the CSTA-interface of the CMD. License administration is located in the CMD.
Features
The following features are available:
● outgoing connection setup
● incoming call acceptance
● dropping of calls
● display of call state, display of caller id, display of caller name (internal calls)
● logging of calls
>Connecting TAPI 120 to the system OpenScape Office via CMD requires only one CSTA-licence.
A31003-H3540-T120-7-76A9, 09/20101-3 HiPath TAPI 120 V2.0 Installation and Configuration, Administrator Documentation
tapi_120_en_c01.fm
Nur für den internen Gebrauch IntroductionGeneral
● call pickup (group)
● consultation hold
● toggling between calls
● call transfer, speed extend, call park / hold
● conference
● call forwarding, do not disturb
● additional information for redirected calls
● data exchange between TAPI applications
TAPI application: Example
The easiest way to work with TAPI is to use the default Windows application Dialer. It is possi-ble to start outgoing calls with this application.
A31003-H3540-T120-7-76A9, 09/2010HiPath TAPI 120 V2.0 Installation and Configuration, Administrator Documentation 1-4
Introduction Nur für den internen Gebrauch
tapi_120_en_c01.fm
Requirements
1.2 Requirements
Requirements for server connection
Connection to the communication systems or connection to CMD is realized via TCP/IP.
Software requirements for TAPI 120 PCs
● 32-bit operation system versions:
– Windows XP Professional
– or Windows 2003 Server / 2003 Server R2
– or Windows Vista (except Home Edition)
– or Windows 7 (except Starter / Home Basic / Home Premium Edition)
– or Windows 2008
● 64-bit operation system versions:
– Windows 7 (except Starter / Home Basic / Home Premium Edition)
– or Windows 2008
– or Windows 2008 R2
>The listed operation systems above are not released in virtual environments.
>When using Microsoft Vista, Microsoft Windows 7 or Windows 2008 / 2008 R2 diffe-rent confirmation prompts might appear during TAPI 120 configuration.
>For more information about appropriate operating system variants please consider the file readme.txt on the TAPI 120 installation CD.
A31003-H3540-T120-7-76A9, 09/20101-5 HiPath TAPI 120 V2.0 Installation and Configuration, Administrator Documentation

tapi_120_en_c01.fm
Nur für den internen Gebrauch IntroductionRequirements
TAPI 120 configurations with 64-bit operation system versions
Possible configurations for TAPI 120 on 64-bit operation system versions are:
● TAPI 120 with direct connection:
– PC with 64-bit operation system versionwith the 64-bit version of TAPI 120and 32-bit or 64-bit TAPI applications
● TAPI 120 with connection via CMD
– PC with 64-bit operation system versionwith the 64-bit version of CMD
– Client-PC with 64-bit operation system versionwith the 64-bit version of TAPI 120and 32-bit or 64-bit TAPI applications
Other requirements
● Network protocol: TCP/IP must be installed and configured.
● Installation of TAPI 120 must be executed by an user with administration rights.
Overview of used TAPI 120 ports (default)
Limitations
Operating TAPI 120 and TAPI 170 on the same PC is not possible.
Port number Description
7001 CSTA-link th the system (HiPath 500 / OpenOffice EE / 2000 / 3000)
8001 CSTA-link to CMD
8800 CSTA-Link to OpenScape Office
A31003-H3540-T120-7-76A9, 09/2010HiPath TAPI 120 V2.0 Installation and Configuration, Administrator Documentation 1-6
tapi_120_en_c02.fm
Nur für den internen Gebrauch Installation of TAPI 120General
2 Installation of TAPI 120
2.1 General
Scope of installation
The components to be installed for TAPI 120 can be selected when during setup. The following components are available in principle:
● TSP
● CMD
Installation and configuration
If both components are selected for installation, the individual installation routines and dialogs for entering the configuration parameters may be automatically started one after the other. In the present document, installation procedures are described in section Starting installation and configurable parameters are described in section Configuring components.
2.2 Starting installation
Starting installation
1. Log on as an administrator and close all running applications.
2. Insert the TAPI 120 installation CD. Select Start - Run, enter the file\TAPI120\setup.exe on the installation drive and confirm with OK.
3. Select the language for the installation dialogs, the installation is prepared.
4. After installation preparation the welcome-Dialog appears. Confirm it with Next.
5. Continue installation with clicking Next.
>The setup determines the operation system version (32-bit or 64-bit) and auto-matically starts the installation of the correct TAPI 120 setup version.
>Under Windows Vista, Windows 2008 or Windows 7 please confirm the UAC (User Account Control) prompt, that appears now.
>Make sure, that the service-control dialog and all TAPI applications are inactive. Corresponding to this a red marked notice appears in the installation dialog.
A31003-H3540-T120-7-76A9, 09/2010HiPath TAPI 120 V2.0 Installation and Configuration, Administrator Documentation 2-1

tapi_120_en_c02.fm
Nur für den internen Gebrauch Installation of TAPI 120Starting installation
6. The installation setup type must then be specified:
Display
7. Select the components to be installed in the dialog displayed and confirm with Next.
8. Installation of the selected components is started after clicking Install.
– Installing the CMD component
– Installing the TSP component
9. To finish installation click on the Finish button displayed in the final dialog.
>The initial installation of TAPI 120 on a PC with Windows Vista or Windows 7 requires a reboot of the TAPI-PC. In that case the installation dialog displays an additional red marked notice.You then can cancel the installation. For continuing the installation you click on Install, the PC automatically reboots. After logging on you return to this point of the TAPI 120 installation procedure.
A31003-H3540-T120-7-76A9, 09/2010HiPath TAPI 120 V2.0 Installation and Configuration, Administrator Documentation 2-2
Installation of TAPI 120 Nur für den internen Gebrauch
tapi_120_en_c02.fm
Starting installation
2.2.1 Installing the CMD component
If required the CMD component can be installed on a central PC. This PC has to meet the fol-lowing requirements:
● Cover the operating time of all HiPath TAPI 120 clients.
● It is not allowed to use applications that might cause a resource supply shortfall (CPU load, network traffic, etc.).
1. A welcome dialog is not displayed when installing the CMD component. Progress is dis-played in a window.
2. For PCs with two network cards, a dialog appears prompting you to select the IP address to be used.
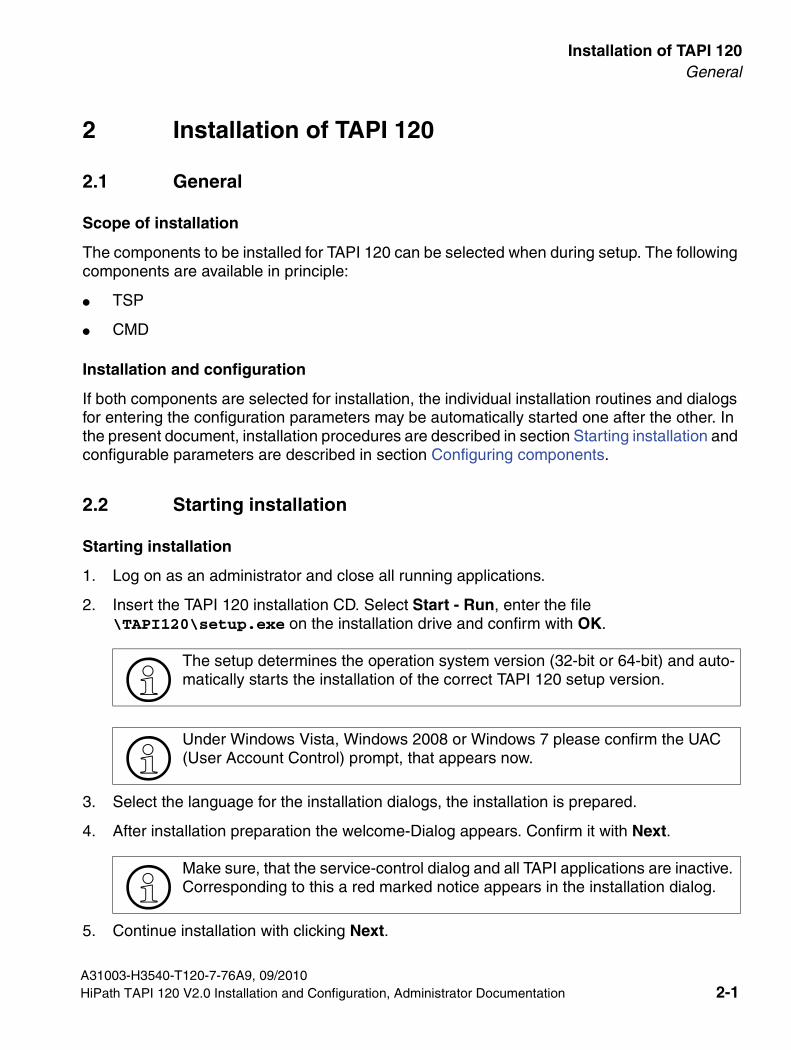
3. The CMD configuration dialog opens automatically following successful CMD installation. The required parameters can be entered in this dialog or configured at a later stage.
Display
The individual configuration parameters are described under Configuring the CMD compo-nent.
CMD installation is complete once you have exited the configuration dialog. The component TSP may now be installed automatically depending on the setup type selected.
>When using Microsoft Vista, Microsoft Windows 7 or Microsoft 2008 / 2008 R2 dif-ferent confirmation prompts might appear during TAPI 120 configuration.
A31003-H3540-T120-7-76A9, 09/20102-3 HiPath TAPI 120 V2.0 Installation and Configuration, Administrator Documentation
tapi_120_en_c02.fm
Nur für den internen Gebrauch Installation of TAPI 120Starting installation
2.2.2 Installing the TSP component
1. Click Next to confirm the install TSP welcome dialog.
TAPI 120 installation is then started and progress is displayed in a window.
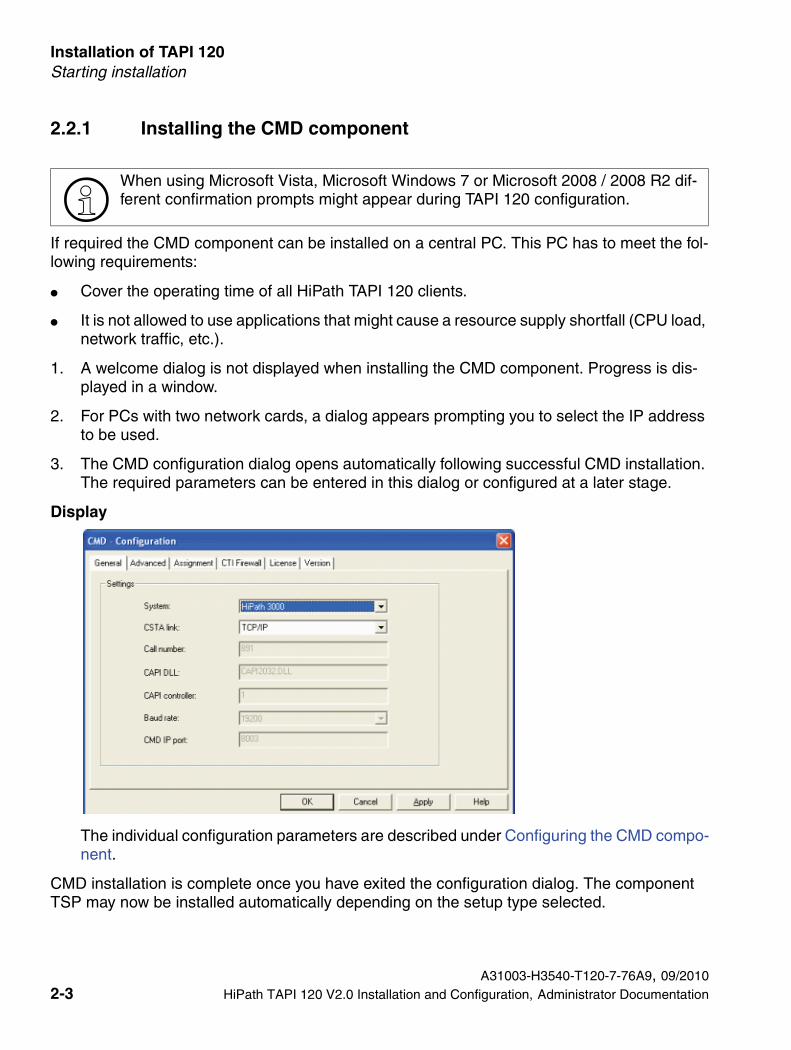
2. The TSP configuration dialog opens automatically following successful TSP installation. The required parameters can be entered in this dialog or configured at a later stage.
Display
The individual configuration parameters are described under Configuration the TSP com-ponent.
TSP 120 installation is complete once you have exited the configuration dialog.
>When using Microsoft Vista, Microsoft Windows 7 or Microsoft 2008 / 2008 R2 dif-ferent confirmation prompts might appear during TAPI 120 configuration.
A31003-H3540-T120-7-76A9, 09/2010HiPath TAPI 120 V2.0 Installation and Configuration, Administrator Documentation 2-4
Installation of TAPI 120 Nur für den internen Gebrauch
tapi_120_en_c02.fm
Uninstall TSP and/or CMD
2.3 Uninstall TSP and/or CMD
To uninstall TSP or CMD proceed as follows:
> Open Start - Settings - Control Panel and click on Software.
> Activate the entry HiPath TAPI 120 SP V2
– To uninstall one of both components click the Change button and follow the instruc-tions.
– To uninstall one of both components click the Remove button and follow the instruc-tions.
A31003-H3540-T120-7-76A9, 09/20102-5 HiPath TAPI 120 V2.0 Installation and Configuration, Administrator Documentation
tapi_120_en_c03.fm
Nur für den internen Gebrauch Configuring componentsGeneral
3 Configuring components
3.1 General
Manual activation of configuration dialogs
The individual component parameters can be configured during installation or at a later stage. You find the description of how to activate the components configuration after installation in these sections:
● Configuring the CMD component
● Configuration the TSP component
Effectiveness of modified configuration parameters
Modified configuration parameters are immediately effective once the data has been saved in the configuration dialog (Apply or OK buttons). Components do not have to be reassigned and the PC does not have to be rebooted.
3.2 Configuring the CMD component
3.2.1 Starting the configuration dialog
Activating the configuration dialog
To edit the CMD configuration parameters after installation, start the configuration dialog as fol-lows:
1. Open the Windows Control Panel via Start - Settings - Control Panel. Activate the CSTA Message Dispatcher by double-clicking the associated icon.
The CMD configuration dialog is then displayed.
2. Edit the following parameters as required:
– General CMD parameters
– Advanced CMD parameters
– CMD assignment parameters
– CMD parameters for CTI firewall
– CMD license parameters
Up-to-date CMD version information can be found in the configuration dialog.
A31003-H3540-T120-7-76A9, 09/2010HiPath TAPI 120 V2.0 Installation and Configuration, Administrator Documentation 3-1
Configuring components Nur für den internen Gebrauch
tapi_120_en_c03.fm
Configuring the CMD component
3.2.2 General CMD parameters
The type of system connected, the type of connection between the CMD and the system and the relevant connection parameters must be determined when configuring the general CMD parameters.
> Activate the General tab in the CMD configuration dialog.
Display
These parameters and information is displayed:
>When using Microsoft Vista, Microsoft Windows 7 or Microsoft 2008 / 2008 R2 dif-ferent confirmation prompts might appear during TAPI 120 configuration.
Parameter Description
System For selecting the connected system. The following systems can be se-lected:● HiPath 500● HiPath OpenOffice EE● HiPath 2000● HiPath 3000 (default)● OpenScape Office
CSTA link Connection type between CMD and the system. By default this is TCP/IP and cannot be changed.
A31003-H3540-T120-7-76A9, 09/20103-2 HiPath TAPI 120 V2.0 Installation and Configuration, Administrator Documentation
tapi_120_en_c03.fm
Nur für den internen Gebrauch Configuring componentsConfiguring the CMD component
Saving parameters
● To save entries, click Apply (to configure parameters in other tabs for example) or OK (to exit the configuration dialog and save changes).
● A confirmation message appears in both cases before the parameter values are saved in the database. Click Yes to confirm this message.
>Existing installations of TAPI 120 can be connected to the HiPath 3000 system via S0 (ISDN card) or V.24 (null modem cable) instead of TCP/IP. This connection type is supported for existing installations. With new installations of TAPI 120 or installa-tions with newer operating systems the connection to the HiPath 3000 system has to be realized via TCP/IP.
Parameter Description
Call number When using a system connection via S0 this is the access number for the system’s CSTA interface (default setting is 891).
CAPI-DLL When using a system connection via S0 this is the name of the DLL file including the CAPI driver for the S0 card (default setting is CAPI2032.DLL).
CAPI controller When using a system connection via S0 this is the S0 card controller number (default is 1).
CMD IP port When using a system connection to HiPath 3000 via S0 this is the CMD Listener Port port number to be configured for the system, e.g. 8001, 8002, etc. When connecting other communication systems this field is inactive. Then you configure this parameter in the Assignment tab.
>If the system is changed, a message may appear indicating that the licensing infor-mation may have been changed. If this occurs, the licensing information for the new system must be checked.
A31003-H3540-T120-7-76A9, 09/2010HiPath TAPI 120 V2.0 Installation and Configuration, Administrator Documentation 3-3

Configuring components Nur für den internen Gebrauch
tapi_120_en_c03.fm
Configuring the CMD component
3.2.3 Advanced CMD parameters
When configuring advanced CMD parameters, you are configuring parameters that are rele-vant to the connection between the connected system and the CMD. System-dependent pa-rameters are defined on the system and should be specified here accordingly.
> Activate the Advanced tab in the CMD configuration dialog.
Display
Enter the following parameters:
Parameter Description
CSTA3 user CSTA3 user name of the system.Entering a name opens an input dialog in which you can de-termine and confirm the new name, then return to the con-figuration dialog.
CSTA3 password CSTA3 system password.Entering a password opens an input dialog in which you can determine and confirm the new password, then return to the configuration dialog.
>CSTA-login on the system is not possible if the CSTA3 password entered here does not correspond to the system password.
A31003-H3540-T120-7-76A9, 09/20103-4 HiPath TAPI 120 V2.0 Installation and Configuration, Administrator Documentation
tapi_120_en_c03.fm
Nur für den internen Gebrauch Configuring componentsConfiguring the CMD component
Saving parameters
> To save entries, click Apply (to configure parameters in other tabs for example) or OK (to exit the configuration dialog and save changes).
> A confirmation message appears in both cases before the parameter values are saved in the database. Click Yes to confirm this message.
Parameter Description
Heartbeat period (s) Time interval (seconds) for checking CSTA interface activi-ty. The value 0 disables the check.The default value is 15 seconds and should not be changed.
Heartbeat timeout (s) Additional time in seconds until automatic re-establishment in the case of CSTA interface failure.The default value is 10 seconds and should not be changed.
Consistency check period (s) Time interval in seconds for cyclical plausibility checks. The value 0 disables the check.The default value 60 seconds should not be changed.
CSTA reestablish period (s) CMD waiting time in seconds until a connection is re-estab-lished following connection failure. The default value is 120 seconds.
CSTA invoke timeout (s) CMD timeout in seconds.The default value is 120 seconds.
Transmission interval (ms) Waiting time between two CMD messages.The default value is 50 ms.
Trace With TCP/IP connection of the CMD this parameter is not relevant. You must define the trace option for each of the connected systems when configuring the assignment pa-rameters.See also CMD assignment parameters.
A31003-H3540-T120-7-76A9, 09/2010HiPath TAPI 120 V2.0 Installation and Configuration, Administrator Documentation 3-5
Configuring components Nur für den internen Gebrauch
tapi_120_en_c03.fm
Configuring the CMD component
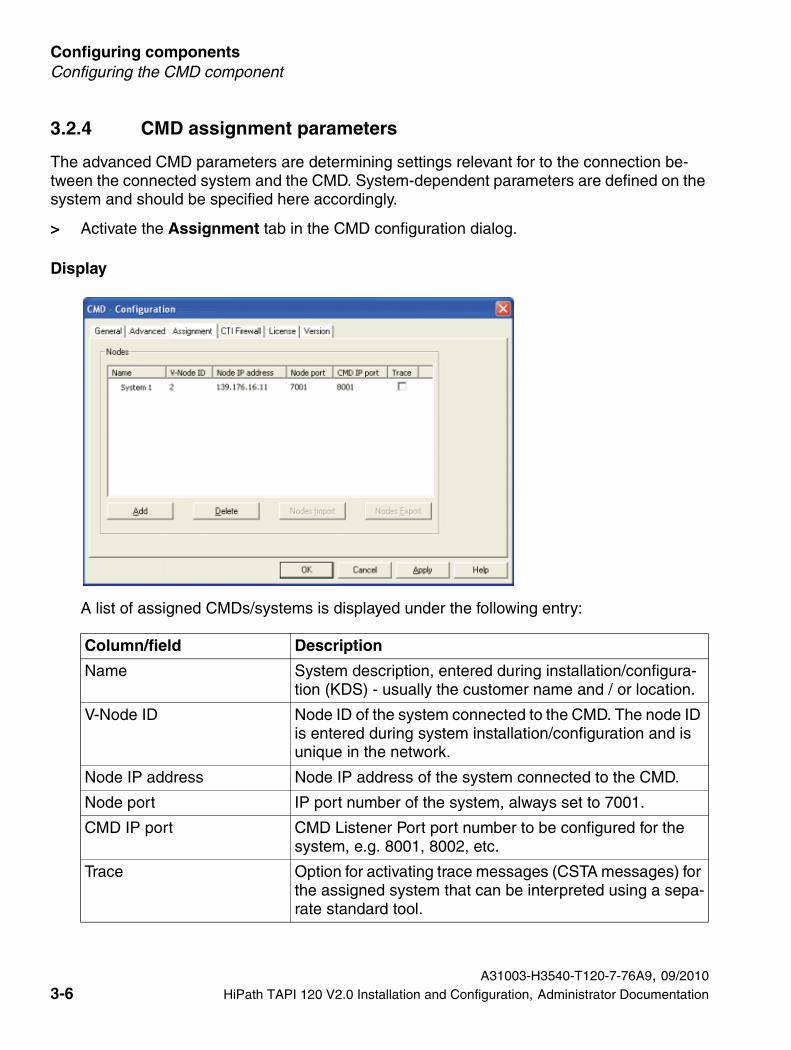
3.2.4 CMD assignment parameters
The advanced CMD parameters are determining settings relevant for to the connection be-tween the connected system and the CMD. System-dependent parameters are defined on the system and should be specified here accordingly.
> Activate the Assignment tab in the CMD configuration dialog.
Display
A list of assigned CMDs/systems is displayed under the following entry:
Column/field Description
Name System description, entered during installation/configura-tion (KDS) - usually the customer name and / or location.
V-Node ID Node ID of the system connected to the CMD. The node ID is entered during system installation/configuration and is unique in the network.
Node IP address Node IP address of the system connected to the CMD.
Node port IP port number of the system, always set to 7001.
CMD IP port CMD Listener Port port number to be configured for the system, e.g. 8001, 8002, etc.
Trace Option for activating trace messages (CSTA messages) for the assigned system that can be interpreted using a sepa-rate standard tool.
A31003-H3540-T120-7-76A9, 09/20103-6 HiPath TAPI 120 V2.0 Installation and Configuration, Administrator Documentation
tapi_120_en_c03.fm
Nur für den internen Gebrauch Configuring componentsConfiguring the CMD component
Sorting the list displayed
The list can be sorted in ascending/descending order according to column content by clicking the relevant column heading, e.g. Name.
Saving parameters
> To save entries, click Apply (to configure parameters in other tabs for example) or OK (to exit the configuration dialog and save changes).
> A confirmation message appears in both cases before the parameter values are saved in the registration database. Click Yes to confirm this message.
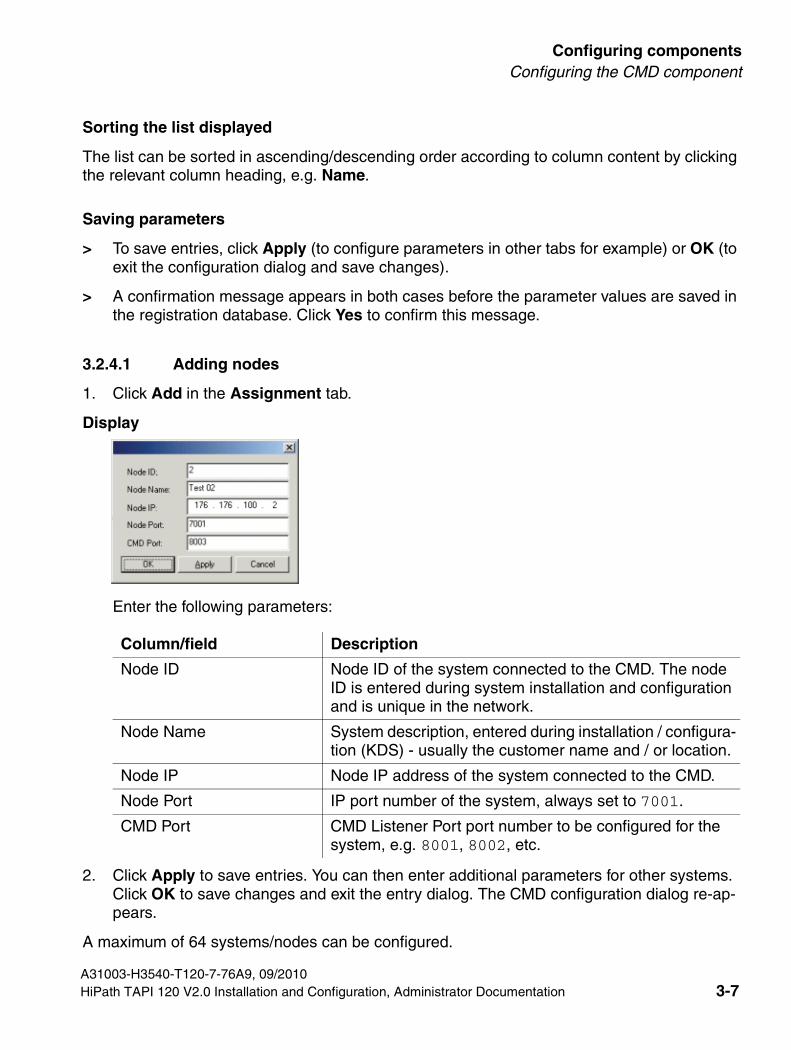
3.2.4.1 Adding nodes
1. Click Add in the Assignment tab.
Display
Enter the following parameters:
2. Click Apply to save entries. You can then enter additional parameters for other systems. Click OK to save changes and exit the entry dialog. The CMD configuration dialog re-ap-pears.
A maximum of 64 systems/nodes can be configured.
Column/field Description
Node ID Node ID of the system connected to the CMD. The node ID is entered during system installation and configuration and is unique in the network.
Node Name System description, entered during installation / configura-tion (KDS) - usually the customer name and / or location.
Node IP Node IP address of the system connected to the CMD.
Node Port IP port number of the system, always set to 7001.
CMD Port CMD Listener Port port number to be configured for the system, e.g. 8001, 8002, etc.
A31003-H3540-T120-7-76A9, 09/2010HiPath TAPI 120 V2.0 Installation and Configuration, Administrator Documentation 3-7
Configuring components Nur für den internen Gebrauch
tapi_120_en_c03.fm
Configuring the CMD component
3.2.4.2 Editing / deleting an entry
Editing an entry
> To edit the parameters of a configured system double-click the corresponding value. The value can then be changed in the entry field displayed.
Deleting an entry
> Highlight the entry to be deleted using the mouse and click Delete or press the * key. The entry is then deleted from the list.
3.2.4.3 Exporting / importing parameters (nodes)
Exporting
1. The configured node information can be exported to a file, e.g. to save a specific level. Click Nodes Export to start exporting.
2. Enter the name of the export file in the dialog displayed and confirm.
The entries are exported. The CMD configuration dialog re-appears.
Importing
1. Node parameters can also be imported from a file, e.g. containing exported parameter in-formation. Click Nodes Import to start importing.
2. Select the file to be imported.
The entries are imported and the CMD configuration dialog re-appears.
A31003-H3540-T120-7-76A9, 09/20103-8 HiPath TAPI 120 V2.0 Installation and Configuration, Administrator Documentation
tapi_120_en_c03.fm
Nur für den internen Gebrauch Configuring componentsConfiguring the CMD component
3.2.5 CMD parameters for CTI firewall
Every TAPI 120 client that is connected to the CMD and permitted to seize a line, must be en-tered in the CTI Firewall tab to enable this access.
> Activate the CTI Firewall tab in the CMD configuration dialog.
You will see a list of the TAPI 120 clients (IP addresses) already configured for access:
Display
Entries are displayed with the following information:
Sorting the list displayed
The list can be sorted in ascending/descending order according to column content by clicking the relevant column heading, e.g. Name.
Saving parameters
> To save entries, click Apply (to configure parameters in other tabs for example) or OK (to exit the configuration dialog and save changes).
Column Description
Name Freely chosen name for the TAPI 120 client, enabling a single entry in the firewall to be identified.
Call number Call number of the extension to be monitored
TAPI 120 IP addresses IP address of the TAPI 120 client
A31003-H3540-T120-7-76A9, 09/2010HiPath TAPI 120 V2.0 Installation and Configuration, Administrator Documentation 3-9
Configuring components Nur für den internen Gebrauch
tapi_120_en_c03.fm
Configuring the CMD component
> A confirmation message appears in both cases before the parameter values are saved in the database. Click Yes to confirm this message.
3.2.5.1 Editing/deleting an entry
Editing an entry
> To edit the parameters of an entered TAPI 120 client, double-click the corresponding value. The value can then be changed in the entry field displayed.
Deleting an entry
> Highlight the entry to be deleted using the mouse and click Delete or press the * key. The entry is then deleted from the list.
3.2.5.2 Adding a TAPI 120 client
1. Click Add in the CTI Firewall tab.
2. Enter the data of the TAPI 120 client in the input dialog and confirm with OK. You return to the CTI Firewall tab.
An unlimited number of clients can be entered on this tab. However, please note that the num-ber of clients permitted to seize lines at any one time is limited by the licensing agreement (see also CMD license parameters).
A31003-H3540-T120-7-76A9, 09/20103-10 HiPath TAPI 120 V2.0 Installation and Configuration, Administrator Documentation
tapi_120_en_c03.fm
Nur für den internen Gebrauch Configuring componentsConfiguring the CMD component
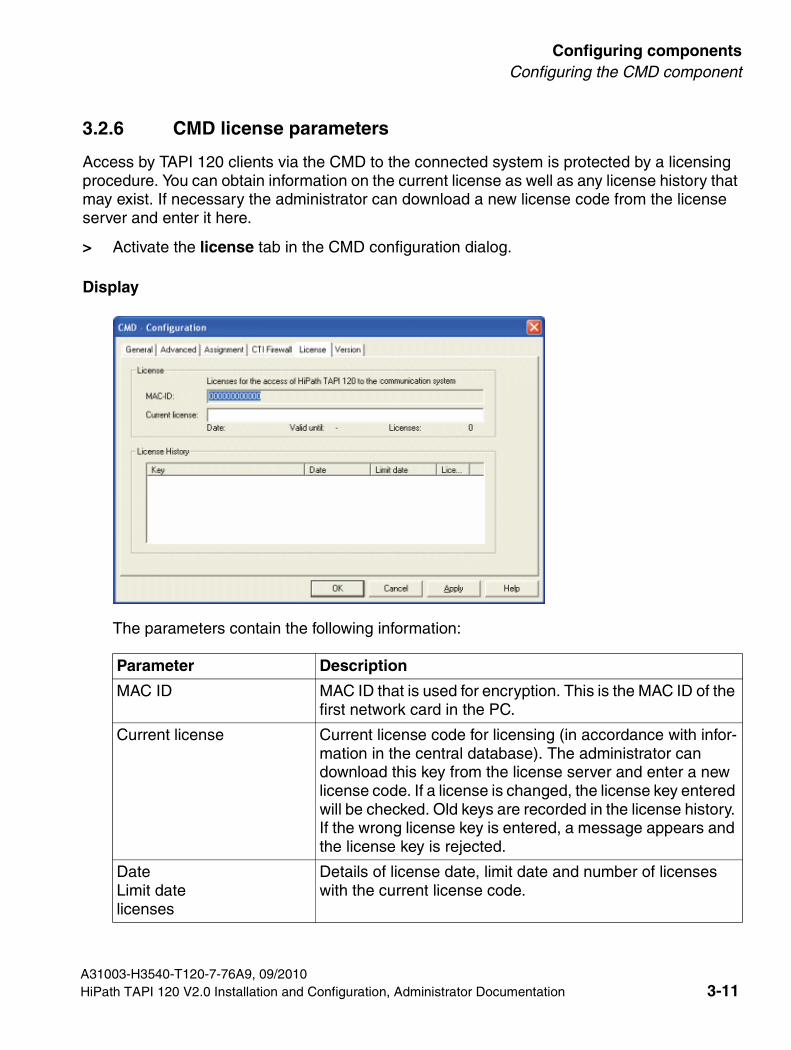
3.2.6 CMD license parameters
Access by TAPI 120 clients via the CMD to the connected system is protected by a licensing procedure. You can obtain information on the current license as well as any license history that may exist. If necessary the administrator can download a new license code from the license server and enter it here.
> Activate the license tab in the CMD configuration dialog.
Display
The parameters contain the following information:
Parameter Description
MAC ID MAC ID that is used for encryption. This is the MAC ID of the first network card in the PC.
Current license Current license code for licensing (in accordance with infor-mation in the central database). The administrator can download this key from the license server and enter a new license code. If a license is changed, the license key entered will be checked. Old keys are recorded in the license history. If the wrong license key is entered, a message appears and the license key is rejected.
DateLimit datelicenses
Details of license date, limit date and number of licenses with the current license code.
A31003-H3540-T120-7-76A9, 09/2010HiPath TAPI 120 V2.0 Installation and Configuration, Administrator Documentation 3-11
Configuring components Nur für den internen Gebrauch
tapi_120_en_c03.fm
Configuring the CMD component
Saving parameters
● To save entries, click Apply (to configure parameters in other tabs for example) or OK (to exit the configuration dialog and save changes).
● A confirmation message appears in both cases before the parameter values are saved in the database. Click Yes to confirm this message.
3.2.7 CMD version information
The version numbers of the components that are used and installed are listed in the Version tab.
License History Previous licenses are displayed here with the relevant infor-mation.
Parameter Description
A31003-H3540-T120-7-76A9, 09/20103-12 HiPath TAPI 120 V2.0 Installation and Configuration, Administrator Documentation
tapi_120_en_c03.fm
Nur für den internen Gebrauch Configuring componentsConfiguration the TSP component
3.3 Configuration the TSP component
3.3.1 Manual activation of configuration dialogs
1. The individual component parameters can be configured during installation or at a later stage. To edit TSP configuration parameters after installation, start the configuration dialog as follows:
Starting the configuration dialog
> Open the Windows Control Panel via Start - Settings - Control Panel. Activate the Telephone and Modem Options by double-clicking the associated icon.
The Phone and Modem Options dialog is displayed.
– Activate the Advanced Options tab
– select the entry HiPath TAPI 120/170 TAPI 2.0 SP from the list of providers displayed
– and click Configure.
The TSP configuration dialog appears.
A31003-H3540-T120-7-76A9, 09/2010HiPath TAPI 120 V2.0 Installation and Configuration, Administrator Documentation 3-13
Configuring components Nur für den internen Gebrauch
tapi_120_en_c03.fm
Configuration the TSP component
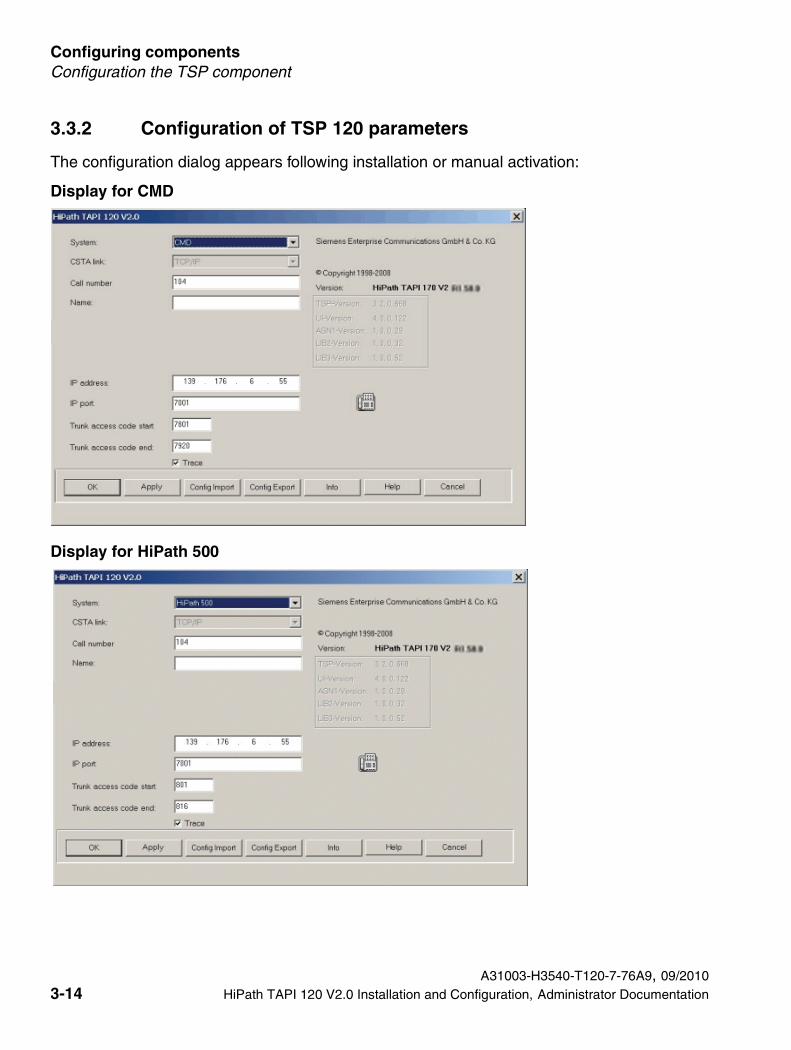
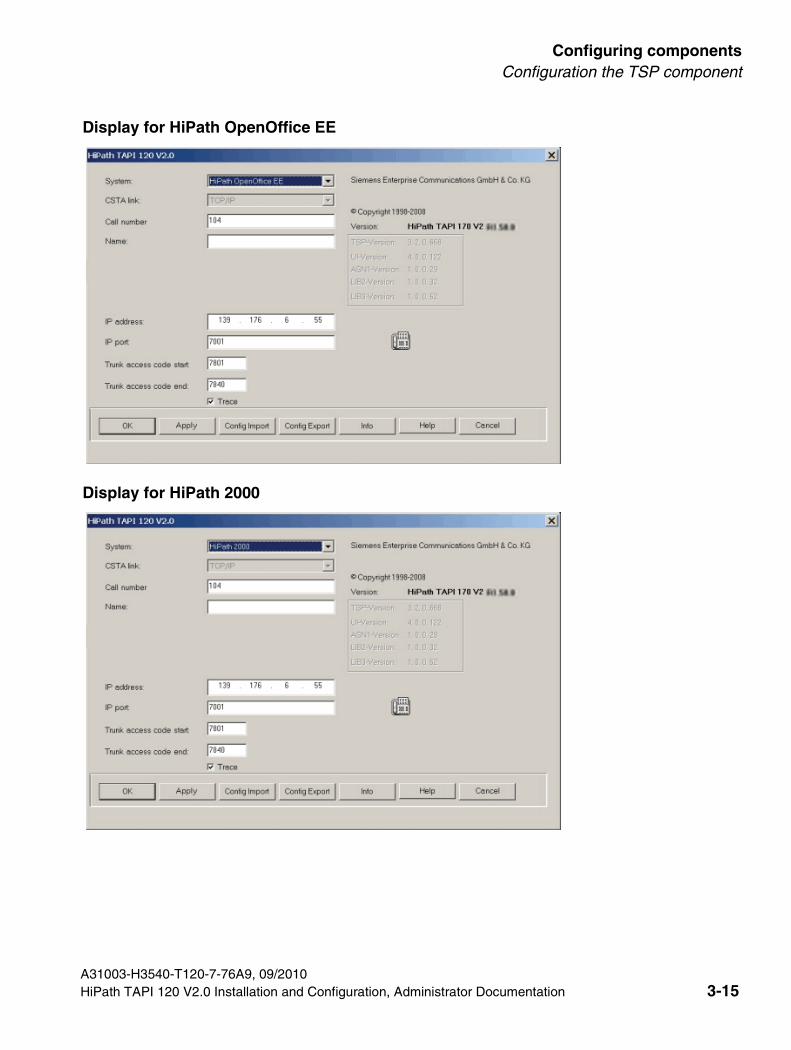
3.3.2 Configuration of TSP 120 parameters
The configuration dialog appears following installation or manual activation:
Display for CMD
Display for HiPath 500
A31003-H3540-T120-7-76A9, 09/20103-14 HiPath TAPI 120 V2.0 Installation and Configuration, Administrator Documentation
tapi_120_en_c03.fm
Nur für den internen Gebrauch Configuring componentsConfiguration the TSP component
Display for HiPath OpenOffice EE
Display for HiPath 2000
A31003-H3540-T120-7-76A9, 09/2010HiPath TAPI 120 V2.0 Installation and Configuration, Administrator Documentation 3-15

Configuring components Nur für den internen Gebrauch
tapi_120_en_c03.fm
Configuration the TSP component
Display for HiPath 3000
Display for OpenScape Office
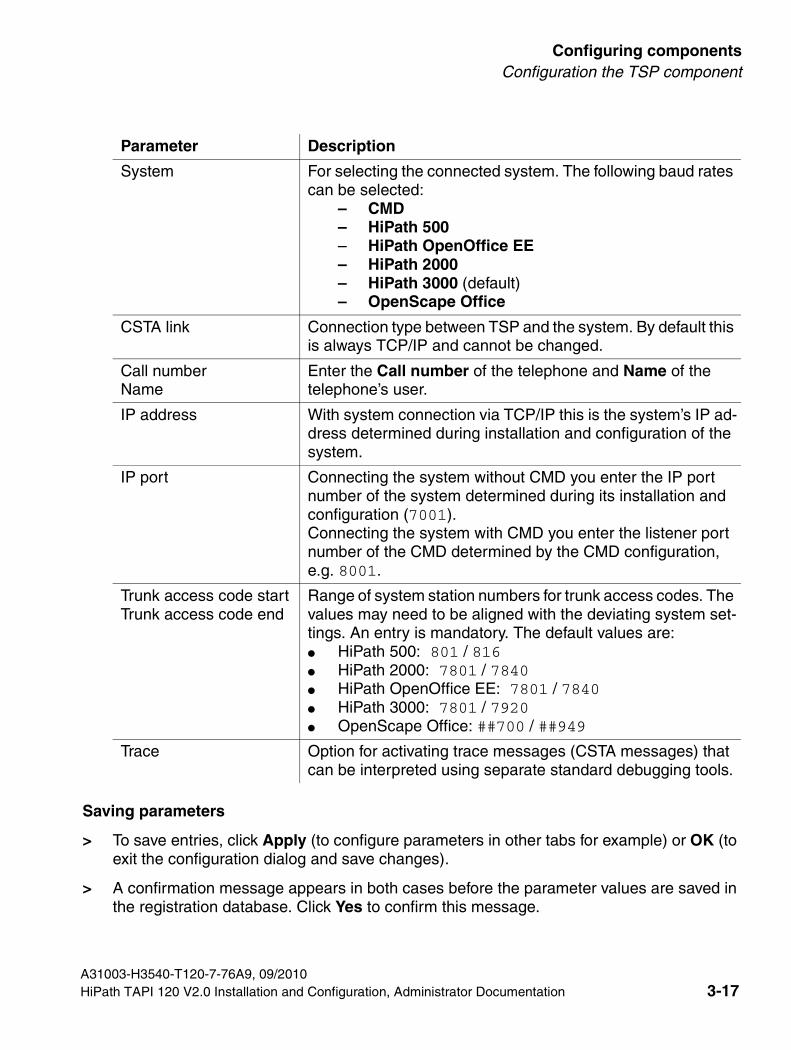
The parameters contain the following information:
A31003-H3540-T120-7-76A9, 09/20103-16 HiPath TAPI 120 V2.0 Installation and Configuration, Administrator Documentation
tapi_120_en_c03.fm
Nur für den internen Gebrauch Configuring componentsConfiguration the TSP component
Saving parameters
> To save entries, click Apply (to configure parameters in other tabs for example) or OK (to exit the configuration dialog and save changes).
> A confirmation message appears in both cases before the parameter values are saved in the registration database. Click Yes to confirm this message.
Parameter Description
System For selecting the connected system. The following baud rates can be selected:
– CMD– HiPath 500– HiPath OpenOffice EE– HiPath 2000– HiPath 3000 (default)– OpenScape Office
CSTA link Connection type between TSP and the system. By default this is always TCP/IP and cannot be changed.
Call numberName
Enter the Call number of the telephone and Name of thetelephone’s user.
IP address With system connection via TCP/IP this is the system’s IP ad-dress determined during installation and configuration of the system.
IP port Connecting the system without CMD you enter the IP port number of the system determined during its installation and configuration (7001).Connecting the system with CMD you enter the listener port number of the CMD determined by the CMD configuration, e.g. 8001.
Trunk access code startTrunk access code end
Range of system station numbers for trunk access codes. The values may need to be aligned with the deviating system set-tings. An entry is mandatory. The default values are:● HiPath 500: 801 / 816● HiPath 2000: 7801 / 7840● HiPath OpenOffice EE: 7801 / 7840● HiPath 3000: 7801 / 7920● OpenScape Office: ##700 / ##949
Trace Option for activating trace messages (CSTA messages) that can be interpreted using separate standard debugging tools.
A31003-H3540-T120-7-76A9, 09/2010HiPath TAPI 120 V2.0 Installation and Configuration, Administrator Documentation 3-17
Configuring components Nur für den internen Gebrauch
tapi_120_en_c03.fm
Configuration the TSP component
Importing / exporting of TSP configuration parameters
Exporting
1. The configured general configuration parameters can be exported to a file, e.g. to save a specific level. Click Config Export to start exporting.
2. Enter the name of the export file in the dialog displayed and confirm.
The entries are exported. The TSP configuration dialog re-appears.
Importing
1. General configuration parameters can also be imported from a file, e.g. containing export-ed parameter information. Click Config Import to start importing.
2. Select the file to be imported.
The entries are imported and the TSP configuration dialog re-appears.
>It is necessary to restart the TSP (net stop tapisrv), for instance after modifying the connection type (CSTA link).
A31003-H3540-T120-7-76A9, 09/20103-18 HiPath TAPI 120 V2.0 Installation and Configuration, Administrator Documentation
tapi_120_enSIX.fm
Nur für den internen Gebrauch Index
Index Z
CCMD 2-1, 2-3, 3-1CMD advanced parameters 3-4CMD assignment parameters 3-6CMD general parameters 3-2CMD license parameters 3-11CMD parameters for CTI firewall 3-9CMD version information 3-12Configuring the CMD component 3-1
FFeatures 1-3
IInstalling the CMD component 2-3Installing the TSP component 2-4
LLicense monitoring 1-3Limitations 1-6
OOther requirements 1-6
RRequirements 1-5
SScope of installation 2-1Software components 1-1Software requirements 1-5Solutions 1-1Starting installation 2-1
TTAPI 120 ports 1-6TSP 2-1, 2-4TSP 120 parameters 3-14
UUninstall CMD 2-5
A31003-H3540-T120-7-76A9, 09/2010HiPath TAPI 120 V2.0 Installation and Configuration, Adm
Uninstall HiPath TAPI 120 2-5Uninstall TSP 2-5
inistrator Documentation Z-1