Taleo 10 - SP1 Recruiting User Guide - oracle.com · Recruiting User Guide Taleo 10 - SP1 ii Table...
280
Taleo Enterprise Taleo 10 - SP1 Recruiting User Guide March 18, 2010
Transcript of Taleo 10 - SP1 Recruiting User Guide - oracle.com · Recruiting User Guide Taleo 10 - SP1 ii Table...

BP(A|S)
Taleo Enterprise
Taleo 10 - SP1Recruiting User Guide
March 18, 2010

Recruiting User Guide Taleo 10 - SP1 i
Confidential Information and Notices
Confidential InformationThe recipient of this document (hereafter referred to as "the recipient") agrees that the Confidential Information disclosed herein by Taleo shall be retained in confidence by the recipient, and its respective employees, affiliates and/or subsidiaries.
For the purpose herein, the term "Confidential Information" shall mean the following:
1. Any information, know-how, data, process, technique, design, drawing, program, formula or test data, work in process, business plan, sales, suppliers, customer, employee, investor or business information contained in a document, whether in written, graphic, or electronic form; or
2. Any document, diagram, or drawing which is either conspicuously marked as "Confidential", known or reasonably known by the other party to be confidential, or is of a proprietary nature, and is learned or disclosed in the course of discussions, demonstrations, or other collaboration undertaken between the parties.
Limited Rights Notice (Dec 2007)1. These data are submitted with limited rights under Subcontract No. 6896589. These data may
be reproduced and used by the Government with the express limitation that they will not, without written permission of the Contractor, be used for purposes of manufacture nor disclosed outside the Government; except that the Government may disclose these data outside the Government for the following purposes, if any; provided that the Government makes such disclosure subject to prohibition against further use and disclosure: None.
2. This notice shall be marked on any reproduction of these data, in whole or in part.
© 2010 Taleo Corporation. Do not reproduce without the written permission of Taleo Corporation.

Recruiting User Guide Taleo 10 - SP1 ii
Table of Contents
Confidential Information and Notices .................................................................. i
Technical RequirementsTechnical Requirements ..................................................................................1-1
Technical Requirements ..............................................................................1-1
Basic ConceptsLogin ............................................................................................................2-1
Login and Product Access ...........................................................................2-1Accessing an Application ............................................................................2-1Changing My Password ..............................................................................2-2Release Notes ............................................................................................2-2Deactivating the Release Notes Message .....................................................2-2
Getting Help .................................................................................................2-4Online Help ..............................................................................................2-4Online Tour ..............................................................................................2-4Tooltip ......................................................................................................2-5Web Support Link ......................................................................................2-5
Basic Concept ...............................................................................................2-6Application Timeout ...................................................................................2-6Concurrent Management ............................................................................2-6Setting ......................................................................................................2-7System Status .............................................................................................2-7Contextualization: Organization-Location-Job Field ......................................2-8Time Zone ...............................................................................................2-10Setting a Time Zone .................................................................................2-11
Recruiting User Guide Taleo 10 - SP1 iii
Print Function ..........................................................................................2-11Printing a File ..........................................................................................2-12Selector and Autosuggest .........................................................................2-13History Tab ..............................................................................................2-13Viewing a Comment .................................................................................2-14Modifying Event Categories ......................................................................2-14Modifying an Event Date ..........................................................................2-15
Language ....................................................................................................2-16Language Management ...........................................................................2-16Selecting Languages ................................................................................2-16Selecting the Base Language ....................................................................2-17Activating a Language ..............................................................................2-17Deactivating a Language ..........................................................................2-17Setting My Preferred Correspondence Language .........................................2-18Setting My Preferred Content Language .....................................................2-18
Layout .........................................................................................................2-19Page Structure .........................................................................................2-19Home Page and List Elements ...................................................................2-20Auxiliary Navigation Bar ...........................................................................2-21Core Navigation Bar ................................................................................2-22Search Widget .........................................................................................2-22Page Header ...........................................................................................2-23Page Footer ............................................................................................2-23Welcome Title .........................................................................................2-23Separator Line .........................................................................................2-23Center Stage ...........................................................................................2-24Color Theme ...........................................................................................2-25Communications Channel ........................................................................2-26Advanced Filter ........................................................................................2-27Quick Filter .............................................................................................2-27Requisition List Quick Filters ......................................................................2-29Candidate List Quick Filters ......................................................................2-29Show Filter ..............................................................................................2-30List Usage ...............................................................................................2-32Logo .......................................................................................................2-34Color Theme ...........................................................................................2-35Selected Item Color ..................................................................................2-35Setting Theme, Selected Item Color and Font Size .......................................2-36
List ..............................................................................................................2-37List Format ..............................................................................................2-37List Column .............................................................................................2-37Item Requiring Attention Icon ....................................................................2-38Locating the Name of a List Format ...........................................................2-40Selecting a List Format ..............................................................................2-40Creating a Personalized List Format ..........................................................2-40
Recruiting User Guide Taleo 10 - SP1 iv
Editing a Personalized List Format ..............................................................2-41Deleting a Personalized List Format ...........................................................2-41Displaying Information in a List .................................................................2-42Changing the Candidate List Sorting Key ...................................................2-42Candidate File Identifier ...........................................................................2-42Selecting the Information in the Candidate Record Identifier Column ............2-43
Folder Management .....................................................................................2-44Folder .....................................................................................................2-44Creating a Folder ....................................................................................2-44Deleting a Folder .....................................................................................2-44Renaming a Folder ..................................................................................2-45Moving a Folder ......................................................................................2-45Modifying the Properties of a Folder ..........................................................2-46Sharing a Folder ......................................................................................2-46Storing a File in a Folder ..........................................................................2-47
File Attachment ............................................................................................2-48Attachment ..............................................................................................2-48Adding an Attachment to a Candidate File .................................................2-48Removing an Attachment from a Candidate File .........................................2-49Viewing Attachments in a Candidate File ....................................................2-49Adding an Attachment to a Requisition File ................................................2-49Removing an Attachment from a Requisition File .........................................2-50Viewing Attachments in a Requisition File ...................................................2-50Adding an Attachment to an Offer .............................................................2-50Removing an Attachment from an Offer .....................................................2-51
Personal Preferences ....................................................................................2-52My Setup .................................................................................................2-52Personal Preferences ................................................................................2-52Changing Personal Preferences .................................................................2-53Adding Preferred Non-Electronic Media .....................................................2-54Modifying Preferred Non-Electronic Media .................................................2-54
Correspondence ..........................................................................................2-55Correspondence ......................................................................................2-55Sending a Customized Correspondence .....................................................2-55Sending a Standard Correspondence ........................................................2-56Resending a Correspondence ...................................................................2-56
Candidate FileCandidate File ...............................................................................................3-1
Candidate File ...........................................................................................3-1Candidate Card ........................................................................................3-2Candidate File Tabs ...................................................................................3-3Candidate Duplicate Check ........................................................................3-4Candidate File Event ..................................................................................3-4Candidate Screening Results .......................................................................3-5

Recruiting User Guide Taleo 10 - SP1 v
Creating a Candidate File ..........................................................................3-6Editing a Candidate File .............................................................................3-6Deleting a Candidate File ...........................................................................3-7Adding a Comment in a Candidate File .......................................................3-7Exporting a Candidate File to SAP ...............................................................3-8Entering a Grade in a Candidate File ..........................................................3-8Merge Form ..............................................................................................3-8Using the Fill Out Form ..............................................................................3-9
Candidate ...................................................................................................3-10Candidate ...............................................................................................3-10Candidate Creation .................................................................................3-11Candidate Progression Status ....................................................................3-12Deleting a Candidate Submission ..............................................................3-13Restoring a Deleted Candidate Submission ................................................3-14Rejecting a Candidate ..............................................................................3-14Hiring a Candidate ..................................................................................3-14Hiring a Candidate More than Once for the Same Requisition .....................3-15Recording that a Candidate was Hired .......................................................3-15Indicating a Candidate has Declined a Job Offer .......................................3-16Reverting to Step and Status Previously Reached .........................................3-16Unlocking a Candidate Account ................................................................3-16Generating a Password for a Candidate Account ........................................3-17Changing the Internal/External State of a Candidate ...................................3-17
Ace Candidate ............................................................................................3-18ACE Recruiting Guidelines ........................................................................3-18ACE Candidate Alert ................................................................................3-19ACE Candidate Filtering ...........................................................................3-20Configuring ACE Recruiting - Overview .....................................................3-21Setting the ACE Candidate Alert ................................................................3-21Adding a Recipient to an ACE Alert ...........................................................3-22Removing a Recipient from an ACE Alert ....................................................3-22
Candidate Comparison ................................................................................3-24Candidate Comparison ............................................................................3-24Comparing Candidate Files ......................................................................3-26
Candidate Sharing .......................................................................................3-27Candidate Sharing ...................................................................................3-27Sharing a Candidate File ..........................................................................3-27
Candidate File Merge ..................................................................................3-28Candidate File Merge ..............................................................................3-28Merging Candidate Files ..........................................................................3-29
Similar Candidates .......................................................................................3-31Similar Candidate Search .........................................................................3-31Finding Similar Candidates .......................................................................3-31
Candidate Matching ....................................................................................3-33

Recruiting User Guide Taleo 10 - SP1 vi
Candidate Matching to a Requisition .........................................................3-33Matching Requisition Criteria ....................................................................3-33Matching a Candidate to a Requisition ......................................................3-34Modifying Matching Requisition Criteria .....................................................3-35Emailing Candidates Matched to a Requisition ...........................................3-35
Candidate Interview .....................................................................................3-36Candidate Interview .................................................................................3-36File Attached to an Interview Invitation .......................................................3-37Candidate Interview and Candidate Selection Workflow ..............................3-38Scheduling an Interview ............................................................................3-38Changing Interview Attendees ...................................................................3-39Changing Interview Information ................................................................3-39Adding an Interview to MS Outlook ...........................................................3-40Cancelling an Interview ............................................................................3-40
Candidate Autopooling ................................................................................3-42Automatic Candidate Pooling ...................................................................3-42Defining Autopooling Criteria ...................................................................3-43Activating Autopooling Criteria .................................................................3-44Viewing Autopooling Criteria ....................................................................3-44Viewing the List of Automatically Pooled Candidates ...................................3-44Matching a Candidate to a Requisition via Autopooling ..............................3-45Rejecting a Candidate Selected via Autopooling .........................................3-45
Onboarding ................................................................................................3-47Candidate Onboarding ............................................................................3-47Starting an Onboarding Process ................................................................3-47Cancelling an Onboarding Process ...........................................................3-47Updating Onboarding Data .....................................................................3-48
Hourly Hiring ...............................................................................................3-49Evergreen Hiring ......................................................................................3-49
Contingent Hiring ........................................................................................3-52Contingent Hiring ....................................................................................3-52
Candidate Selection WorkflowCandidate Selection Workflow ........................................................................4-1
Candidate Selection Workflow ....................................................................4-1Candidate Selection Workflow Priority .........................................................4-1Candidate Selection Workflow Example .......................................................4-3Standard Candidate Selection Workflows .....................................................4-4Candidate Selection Workflow Step .............................................................4-5RSOffer Step ..............................................................................................4-6Candidate Selection Workflow Status ...........................................................4-6Candidate Selection Workflow Action ..........................................................4-8Bulk Move to the Hire Step/Status ...............................................................4-9Step/Status Change in One Click ................................................................4-9Moving a Candidate to the Next Step ........................................................4-10

Recruiting User Guide Taleo 10 - SP1 vii
Moving Several Candidates to the Next Step ..............................................4-10Moving a Candidate to Any Step ...............................................................4-11Moving Several Candidates to Any Step .....................................................4-11Changing the Status of a Candidate ..........................................................4-11Changing the Status of Several Candidates ................................................4-12Identifying the Requisition’s Candidate Selection Workflow .........................4-12Removing the Tracking Solution Feature ....................................................4-13
RequisitionRequisition ....................................................................................................5-1
Requisition File ..........................................................................................5-1Requisition Creation ...................................................................................5-2Diagnostic Tool and Show Required Fields ...................................................5-2Requisition Description ...............................................................................5-3Request More Information Alert ...................................................................5-3Daily Recruiting Report ...............................................................................5-4Creating a Requisition ................................................................................5-4Editing Requisition Fields ............................................................................5-5Editing the Organization-Location-Job Field of a Requisition ..........................5-5Selecting the Candidate Selection Workflow for a Requisition ........................5-6Selecting a Screening Service ......................................................................5-6Cancelling a Requisition .............................................................................5-7Duplicating a Requisition ............................................................................5-7Deleting a Requisition ................................................................................5-7Saving a Requisition as a Template .............................................................5-8Reopening a Requisition that Was Cancelled not Filled .................................5-8Reopening a Filled Requisition and Adding Openings ...................................5-8Reopening a Filled Requisition and Cancelling the Hiring ..............................5-9Filling a Requisition ....................................................................................5-9Cancelling the Hiring of a Candidate ........................................................5-10Putting a Requisition on Hold ....................................................................5-10Reactivating an On Hold Requisition .........................................................5-11Reopening a Requisition ...........................................................................5-11Requesting a Contribution ........................................................................5-11Returning my Contribution ........................................................................5-12Adding a Comment in a Requisition File ....................................................5-12Adding a Source to a Requisition ...............................................................5-12Removing a Source from a Requisition .......................................................5-13Using the Requisition Automatic Filling Option ...........................................5-13Modifying the Daily Recruiting Report ........................................................5-14Setting the Request More Information Alert .................................................5-14
Requisition Template ....................................................................................5-15Requisition Template ................................................................................5-15Creating a Requisition Template ................................................................5-15Duplicating a Requisition Template ............................................................5-16Editing a Requisition Template ..................................................................5-16
Recruiting User Guide Taleo 10 - SP1 viii
Activating a Requisition Template ..............................................................5-16Deactivating a Requisition Template ..........................................................5-17
Requisition Types .........................................................................................5-18Requisition/Staffing Type .........................................................................5-18Changing the Type of a Requisition Template .............................................5-18
Requisition Ownership ..................................................................................5-20Requisition Owner ...................................................................................5-20Changing the Ownership of Requisition .....................................................5-20
Requisition Collaboration .............................................................................5-22Collaborator ...........................................................................................5-22Adding a Collaborator in a Requisition ......................................................5-22Deleting a Collaborator in a Requisition ....................................................5-23Adding Frequent Collaborators in a Requisition ..........................................5-23Creating a List of Frequent Collaborators ...................................................5-23Adding a Collaborator to the Frequent Collaborators List ............................5-24Removing a Collaborator from the Frequent Collaborators List ....................5-24
Requisition Matching ....................................................................................5-26Preview of Candidates Matching a Requisition ............................................5-26Criteria for Matching Candidates ..............................................................5-26Filters for Matching Candidates .................................................................5-27Viewing Candidates Matching a Requisition ...............................................5-27Modifying Matching Candidate Criteria .....................................................5-28Modifying Matching Candidate Filters ........................................................5-28Sending an E-mail to Candidates Matched to a Requisition .........................5-29
Candidate Search for a Requisition ................................................................5-30Candidates Search for a Requisition ..........................................................5-30Finding Candidates for a Requisition .........................................................5-30Creating a Search Query Based on a Requisition ........................................5-30
Requisition Approval ....................................................................................5-32Requisition Approval Rerouting After Changes ............................................5-32Amending a Requisition Approval Path ......................................................5-32Approving a Requisition ............................................................................5-33Approving a Requisition via a BlackBerry ....................................................5-33Requesting an Approval Path Amendment ..................................................5-34Requesting the Approval of a Requisition ....................................................5-34Resending a Requisition Approval Request ..................................................5-35Self Approving a Requisition ......................................................................5-35Sending an Approval Request Reminder .....................................................5-36Terminating an Approval Path ...................................................................5-36
Requisition Prescreening ...............................................................................5-37Prescreening ............................................................................................5-37Required, Asset and Weight Criteria ..........................................................5-37Weight Criteria ........................................................................................5-40Adding a Competency to a Requisition ......................................................5-42

Recruiting User Guide Taleo 10 - SP1 ix
Removing a Competency from a Requisition ...............................................5-42Applying Competency and Question Model ...............................................5-43Ordering Competencies in a Requisition ....................................................5-43Defining Competency Criteria ...................................................................5-44Adding a Question to a Requisition File .....................................................5-44Removing a Question from a Requisition File .............................................5-44Ordering Questions in a Requisition File ....................................................5-45Defining Question Criteria ........................................................................5-45Creating a Question for a Requisition ........................................................5-45Duplicating a Question for a Requisition ....................................................5-46
Requisition Posting .......................................................................................5-47Requisition Posting ...................................................................................5-47Allowing the Posting of a Requisition ..........................................................5-47Preventing the Posting of a Requisition .......................................................5-48Posting a Requisition on a Career Section ..................................................5-48Unposting a Requisition from a Career Section ...........................................5-49Posting a Requisition on a Job Board .........................................................5-49Unposting a Requisition from a Job Board .................................................5-50Posting a Requisition on a Job Board with a Future Start Date ......................5-50Posting a Requisition to Non-Electronic Media ............................................5-50Unposting a Requisition from Non-Electronic Media ...................................5-51Requesting Resume Searching ...................................................................5-51Requesting Sourcing Strategy ....................................................................5-52Requisition Posting via a Staffing Agent ......................................................5-52Inviting an Agent to Refer Candidates ........................................................5-53Preventing an Agent from Referring Candidates ..........................................5-53
Source ........................................................................................................5-55Recruiting Source .....................................................................................5-55Source Tracking .......................................................................................5-56Adding a Source to a Requisition ...............................................................5-57Removing a Source from a Requisition .......................................................5-57
Event ..........................................................................................................5-58Recruiting Event .......................................................................................5-58
External Services ..........................................................................................5-59Screening Service .....................................................................................5-59Requesting a Screening Service .................................................................5-59
OfferOffer ............................................................................................................6-1
Offer ........................................................................................................6-1Offer Statuses ............................................................................................6-2Creating an Offer ......................................................................................6-3Making an Offer ........................................................................................6-3Editing an Offer .........................................................................................6-3Cancelling an Offer ...................................................................................6-4

Recruiting User Guide Taleo 10 - SP1 x
Extending an Offer in Writing ......................................................................6-4Extending an Offer Verbally ........................................................................6-5Sending an Offer .......................................................................................6-5Capturing the Candidate Response ............................................................6-6Capturing Candidate Expectations ..............................................................6-6Editing Candidate Expectations ...................................................................6-6Capturing Candidate Current Conditions .....................................................6-7Editing Candidate Current Conditions .........................................................6-7Capturing Competitive Offer Information .....................................................6-7Editing Competitive Offer Information ..........................................................6-8Cancelling an Accepted Offer .....................................................................6-8Indicating a Candidate has Declined an Accepted Offer ...............................6-8Updating the Offer Expiration Date .............................................................6-9Specifying if the Offer Start Date is Tentative ................................................6-9Updating the Offer Start Date .....................................................................6-9Using the Salary Calculator ......................................................................6-10
Offer Approval ............................................................................................6-11Requesting an Offer Approval ...................................................................6-11Modifying an Offer Approval Path Created by a User ..................................6-11Approving an Offer ..................................................................................6-12Approving an Offer via a BlackBerry ..........................................................6-12Approving an Offer on Behalf of Another Approver .....................................6-13Terminating the Offer Approval Process .....................................................6-13Requesting an Approval Path Amendment ..................................................6-13
ApprovalApproval .......................................................................................................7-1
Approval ..................................................................................................7-1Approval via a BlackBerry ...........................................................................7-2eShare Approval Acknowledgement .............................................................7-3
Approvers .....................................................................................................7-4Approver ...................................................................................................7-4Creating a List of Frequent Approvers ..........................................................7-4Adding an Approver to the Frequent Approvers List .......................................7-5Removing an Approver from the Frequent Approvers List ...............................7-5Modifying the List of Frequent Approvers ......................................................7-5
SearchQuick Search ................................................................................................8-1
Candidate Quick Search ............................................................................8-1Performing a Candidate Search ..................................................................8-2Specific Candidate Search ..........................................................................8-2Performing a Specific Candidate Search ......................................................8-3Requisition Quick Search ............................................................................8-3Performing a Requisition Search ..................................................................8-4Setting Default Search Criteria ....................................................................8-4

Recruiting User Guide Taleo 10 - SP1 xi
Advanced Search ...........................................................................................8-6Advanced Search with Keywords ..................................................................8-7Advanced Search and Multiple Occurrences of Information Blocks .................8-9Conceptual Search ..................................................................................8-11Boolean Operators ..................................................................................8-11Randomized Search Result ........................................................................8-12Performing an Advanced Search ...............................................................8-13Why Advanced Search is not Displaying Expected Results ............................8-13Search Result Archiving ............................................................................8-15Setting Default Search Criteria ..................................................................8-15General Profile Search .............................................................................8-16Exclusion of Agency Owned Candidates in Search Results ...........................8-16
Search Queries ............................................................................................8-17Search Query ..........................................................................................8-17Saving an Advanced Candidate Search Query ...........................................8-17Adding a Search Criterion to an Advanced Candidate Search Query ...........8-18Removing a Search Criterion from an Advanced Candidate Search Query ....8-18Duplicating a Saved Search Query ............................................................8-18Editing the Search Query Properties ...........................................................8-19Deleting an Advanced Candidate Search Query .........................................8-19
Question, Competency, Disqualification Question LibrairiesQuestion .......................................................................................................9-1
Question Library ........................................................................................9-1Question ...................................................................................................9-1Question Writing Tips .................................................................................9-4Creating a Question ..................................................................................9-5Activating a Question .................................................................................9-5Deactivating a Question .............................................................................9-5Editing a Question .....................................................................................9-6Duplicating a Question ..............................................................................9-6Associating a Question to a Location ...........................................................9-6Dissociating a Question from a Location ......................................................9-7Associating a Question to a Job Field ..........................................................9-7Dissociating a Question from a Job Field .....................................................9-8Adding a Question to the Job Field or Location Structure ..............................9-8Removing a Question from the Job Field or Location Structure .......................9-9Adding a Question to the Model .................................................................9-9Removing a Question from the Model .........................................................9-9Adding a Question to the Profile ...............................................................9-10Removing a Question from the Profile .......................................................9-10Viewing a Question in Another Language ..................................................9-10Changing the Visibility of a Question .........................................................9-11
Disqualification Question .............................................................................9-12Disqualification Question Library ...............................................................9-12Disqualification Question .........................................................................9-12
Recruiting User Guide Taleo 10 - SP1 xii
Explanations for Disqualification Questions ................................................9-13Creating a Disqualification Question .........................................................9-14Duplicating a Disqualification Question .....................................................9-14Editing a Disqualification Question ............................................................9-15Associating a Disqualification Question to a Location .................................9-15Dissociating a Disqualification Question from a Location ............................9-16Associating a Disqualification Question to a Job Field ................................9-16Dissociating a Disqualification Question from a Job Field ...........................9-16Adding a Disqualification Question to the Job Field or Location Structure .....9-17Removing a Disqualification Question from the Job Field or Location List .....9-17Activating a Disqualification Question .......................................................9-18Deactivating a Disqualification Question ...................................................9-18Viewing a Question in Another Language ..................................................9-18Changing the Visibility of a Disqualification Question ..................................9-19
Competency ................................................................................................9-20Competency Library .................................................................................9-20Competency ............................................................................................9-20Competency Assessment ...........................................................................9-21Competency Assessment Definitions ..........................................................9-23Creating a Competency ...........................................................................9-24Editing a Competency ..............................................................................9-24Associating a Competency to a Location ....................................................9-24Dissociating a Competency from a Location ...............................................9-25Associating a Competency to a Job Field ...................................................9-25Dissociating a Competency From a Job Field .............................................9-26Adding a Competency to the Job Field or Location Structure ........................9-26Removing a Competency from the Job Field or Location Structure ................9-26Adding a Competency to the Profile ..........................................................9-27Removing a Competency from the Profile ...................................................9-27Adding a Competency to the Model ..........................................................9-27Viewing a Competency in Another Language ..............................................9-28Changing the Visibility of a Competency ....................................................9-28
TaskTask Management .......................................................................................10-1
Task .......................................................................................................10-1Self-assigned Task ...................................................................................10-2Viewing Tasks ..........................................................................................10-3Executing a Task ......................................................................................10-3Creating a Self Assigned Task ...................................................................10-4Removing a Task .....................................................................................10-4Confirming Employee Presence at Work .....................................................10-4Work Item Delegation ..............................................................................10-5Delegating My Work Items ........................................................................10-5
Report

Recruiting User Guide Taleo 10 - SP1 xiii
Report .........................................................................................................11-1Report .....................................................................................................11-1
TroubleshootingProblem Solving ...........................................................................................12-1
Troubleshooting .......................................................................................12-1
BP(A|S)
Technical Requirements
• Technical Requirements . . . . . . . . . . . . . . . . . . . . . . . . . . . . . . . . . . . . . . . . 1-1

Recruiting User Guide Taleo 10 - SP1 1-1
Technical Requirements Technical Requirements
Technical Requirements
Technical RequirementsFor detailed information on technical requirements, refer to the latest version of the Taleo 10 Technical Requirements document for the applicable service pack.

BP(A|S)
Basic Concepts
• Login . . . . . . . . . . . . . . . . . . . . . . . . . . . . . . . . . . . . . . . . . . . . . . . . . . . . . 2-1
• Getting Help . . . . . . . . . . . . . . . . . . . . . . . . . . . . . . . . . . . . . . . . . . . . . . . 2-4
• Basic Concept . . . . . . . . . . . . . . . . . . . . . . . . . . . . . . . . . . . . . . . . . . . . . . 2-6
• Language. . . . . . . . . . . . . . . . . . . . . . . . . . . . . . . . . . . . . . . . . . . . . . . . . 2-16
• Layout . . . . . . . . . . . . . . . . . . . . . . . . . . . . . . . . . . . . . . . . . . . . . . . . . . . 2-19
• List. . . . . . . . . . . . . . . . . . . . . . . . . . . . . . . . . . . . . . . . . . . . . . . . . . . . . . 2-37
• Folder Management . . . . . . . . . . . . . . . . . . . . . . . . . . . . . . . . . . . . . . . . . 2-44
• File Attachment. . . . . . . . . . . . . . . . . . . . . . . . . . . . . . . . . . . . . . . . . . . . . 2-48
• Personal Preferences . . . . . . . . . . . . . . . . . . . . . . . . . . . . . . . . . . . . . . . . . 2-52
• Correspondence . . . . . . . . . . . . . . . . . . . . . . . . . . . . . . . . . . . . . . . . . . . . 2-55

Recruiting User Guide Taleo 10 - SP1 2-1
Basic Concepts Login
Login
Login and Product AccessAllows users to sign in the application to see the list of products to which they have access.
Detailed Description
When opening the Taleo Enterprise solution, the User Sign In page appears. Users must select the language in which they want to use the application. If a user changes the default language on the Sign In page, the page refreshes to the new language and subsequent Taleo pages are presented in the selected language. After selecting a language, users also have the possibility to tell the system to remember their selection so that the next time they sign in, the User Sign In page will be presented in the language selected.
In the User Sign In page, users must also provide a user name and password before being able to see the list of Taleo products to which they have access. The user name and password are provided by the system administrator. But the user has the ability to modify them.
Once a user’s credentials have been entered, the Table of Contents page appears and presents Taleo products purchased by the company and to which a user has access according to a user’s permissions and user type.
When accessing Taleo applications, the information displayed in the home page is specific to the user who signs into the application and is also dependent on the user type and configuration profile of the user.
Benefits
• Users are only presented with the products that they have access to based on their user type permissions.
Accessing an ApplicationPrerequisite
Users must know the Web address.
Users must have received a user name and password from the system administrator.
Steps
1. Select the language in which you want to use the application.
2. Enter your user name and password and click Sign In.
3. Click on the desired product.
Result
User is signed in and can select the product they wish to use.
Recruiting User Guide Taleo 10 - SP1 2-2
Basic Concepts Login
Changing My PasswordPrerequisite
A setting allows the activation of this feature.
A user type permission grants users access to this feature.
Steps
1. Click My Setup located in the top right-hand corner.
2. In the General tab, click Edit.
3. Modify the information contained in the Account section.
4. Click Save.
Release NotesThe release notes feature displays a pop-up message containing new release information or other important information when a user signs in the application.
Detailed Description
The release notes feature provides the option to present users with a pop-up message once they log into the system. No default release notes is provided by Taleo. A blank page is displayed unless the system administrator decides to customize the page to present important information to users.
Once they are logged in, users can turn off the Release Notes message by checking the Don’t display the message again option. The message will reappear when new release information or other important information is available and also when the user clears the browser cookies.
One release notes message is displayed to users, regardless of application.
Settings allow the activation and configuration of this feature.
Benefits
• Ensures users are informed of system improvements and other important information.
• Provides the ability to broadcast key messages to all users.
• Provides the same message to all users, regardless of the application.
Deactivating the Release Notes MessagePrerequisite
The system administrator must have activated the option to display the release note information pop-up message.
Steps
1. Log on to an application.
2. In the Release Notes page, check the ”Don’t display this message again” option.

Recruiting User Guide Taleo 10 - SP1 2-3
Basic Concepts Login
Result
The release notes message will no longer be displayed until new release information or other important information is available. If you want to see the release note information again, before new released information is available, delete the browser cookies.
Recruiting User Guide Taleo 10 - SP1 2-4
Basic Concepts Getting Help
Getting Help
Online HelpTaleo applications offer comprehensive help about concepts or tasks to perform.
Detailed Description
The online help provides information about a concept or a task to be performed. The online help, represented by this icon , is available in the supporting tools panel located in the top right-hand side of all pages. When clicking on the Help icon, a table of content of available help topics is displayed. It is also possible to search the help database to locate specific subjects. performed. The online help is available in the supporting tools panel located in the top right-hand side the all page. When clicking on Help, a table of contents of available help topics displays. It is also possible to search the help database to locate specific subjects.
Online TourTaleo Recruiting Center offers short clips describing essential user interface elements of Taleo 10.
Detailed Description
These online tours are short animations that present basic information about the design, navigation and certain features of the application. Each tour is no more than one minute in length to give users a quick way to get up to speed with how to use the product.
These tours, if activated by the system administrator, are available in the Clips tab in the right panel of the supporting tools, just beside the online help tab.
By default, key online tours designed by Taleo come with the product. Taleo reserves the right to add new online tours, modify existing tours or delete tours at any time without notice to customers.
The tab where these online tours are available is configurable. Customers can choose to disable the tab or replace the content with their own XML file linking to alternative learning materials for their end users.
All online tours have been built using Taleo Proficiency, Taleo’s custom online learning tool for an ever changing environment. For customers choosing to create custom content using Taleo Proficiency, the standard online tour content can be purchased as starting material. Contact Taleo Education Services or your Client Executive to learn more about Taleo Proficiency and/or purchasing the online tour content.
Benefits
• Makes the product more approachable.
• Facilitates first-encounter use of the product.
• Exposes basic, critical features clearly to users.
• Gives sense of accomplishment in user’s first hour of using the product.
• Encourages users to continue learning the product.

Recruiting User Guide Taleo 10 - SP1 2-5
Basic Concepts Getting Help
TooltipA tooltip is a short, explanatory text which appears when you “hover” your mouse over a button, a link, a table cell heading or icon without clicking it.
Detailed Description
Tooltips are available throughout the system and they give you additional information about an action before performing it.
Taleo provides tooltips for buttons, links, icons and table cell headings. These tooltips are not configurable. However, for screening services, the system administrator can create tooltips for some types of user-defined fields.
Web Support LinkThe Web Support link is displayed in the auxiliary navigation bar, located at the top right hand side of all pages of the application.
Detailed Description
The Web Support link is displayed to users if the system administrator has activated it. Furthermore, the Web Support optional feature must be activated by Taleo Support. If only the setting is turned on, users will not have access to Web Support even though the link will still be present.
Benefits
• Provides a level of control over which users will see the Web Support link.

Recruiting User Guide Taleo 10 - SP1 2-6
Basic Concepts Basic Concept
Basic Concept
Application TimeoutApplication timeout is a security feature that signs out the user when the application has been idled for more than thirty minutes.
Detailed Description
The application includes a security feature that warns the user when the application has not been used for more than thirty minutes even if a user is still signed in the application. When the timeout delay is reached, a message notifies the user that the timeout delay for the application is imminent.
Two scenarios are possible:
• User takes action: When the application has been idled for thirty minutes, a message notifies the user that the application requires attention. Clicking “Access the application” will direct the user to the application. When the user accesses the application, they can reset the application and a message indicates the remaining time before the session expires.
• User does not take action: If the user does not reset the application within the defined delay, a message will be displayed, indicating that the user has been signed out of the application and will need to sign in again to use the application.
The timeout delay is set by default to thirty minutes. The reminder displayed before timeout is set by default to ten minutes before timeout.
Private settings allow the configuration of the application timeout. Contact Taleo Support for details.
Benefits
• Ensures uniform experience to users across browsers.
• Allows users to save information before the application times out.
• Unattended application will automatically sign out the user avoiding any unwanted intruders.
Concurrent ManagementConcurrent management ensures that only one user can edit a given element at a time.
Detailed Description
Concurrent management applies by default to requisitions and requisition templates.
If you try to open a requisition that another user is editing, a message appears indicating that you have read-only access. You cannot edit the requisition until the other user closes it. Same thing with requisition templates. If a user applies a template to a requisition while the template is being edited, the last-saved version of the template in the database will be used.
Benefits
• Avoids the possibility of parallel edition of elements.
Recruiting User Guide Taleo 10 - SP1 2-7
Basic Concepts Basic Concept
SettingA setting is used to configure features and elements in Taleo products.
Detailed Description
There are two types of setting:
• Global settings: Settings related to multiple Taleo products.
• Product settings: Settings specific to each Taleo product, for example, Recruiting, Onboarding, Performance, etc.
Settings are configured by system administrators. A default value is set by Taleo prior to application delivery. The system administrator can decide to change the value that will be applied throughout the application. If for a given setting a user can change the value, the user’s value overrides the value set by the system administrator.
For a list of all Taleo 10 settings, refer to the Excel file entitled TEE Settings_External_Taleo 10.xls.
Benefits
• Allows a system administrator to activate and deactivate features in the application.
• Allows a system administrator to configure the application to the specific needs of a company.
• Allows a system administrator to see the actual configuration of the system.
System StatusA status indicates the current state of an element in the system.
Detailed Description
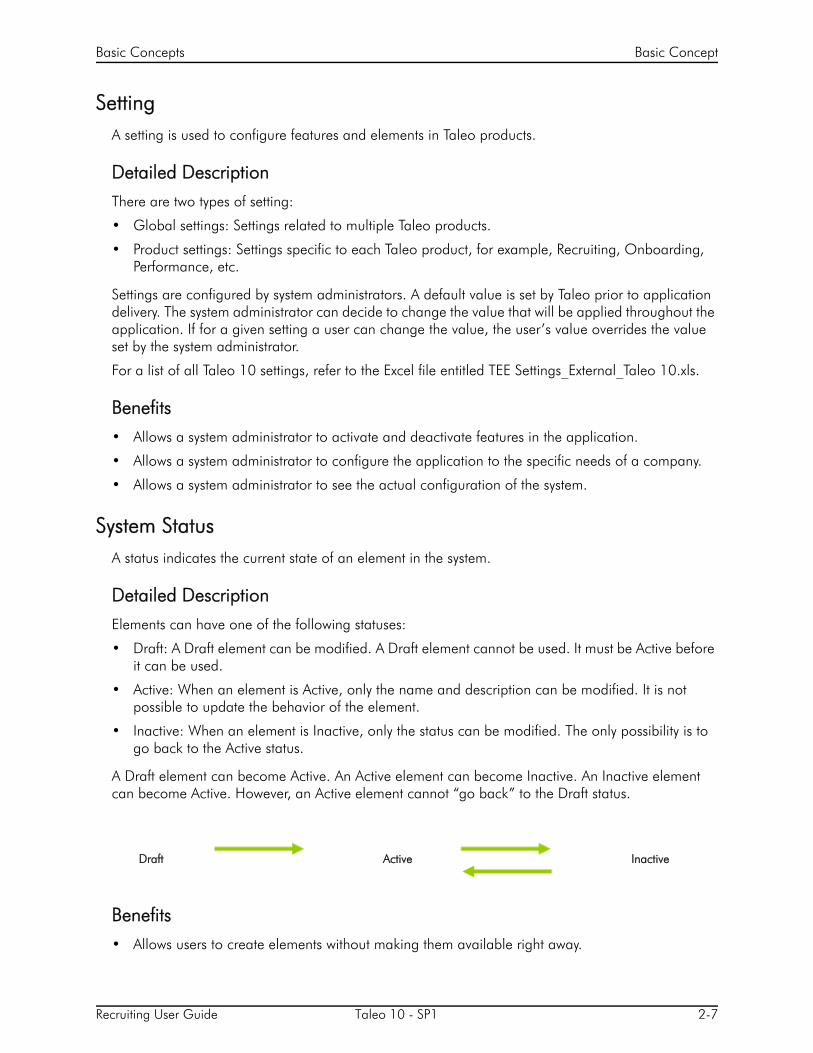
Elements can have one of the following statuses:
• Draft: A Draft element can be modified. A Draft element cannot be used. It must be Active before it can be used.
• Active: When an element is Active, only the name and description can be modified. It is not possible to update the behavior of the element.
• Inactive: When an element is Inactive, only the status can be modified. The only possibility is to go back to the Active status.
A Draft element can become Active. An Active element can become Inactive. An Inactive element can become Active. However, an Active element cannot “go back” to the Draft status.
Benefits
• Allows users to create elements without making them available right away.
Draft Active Inactive

Recruiting User Guide Taleo 10 - SP1 2-8
Basic Concepts Basic Concept
• Allows users to remove an existing element from use without removing it form the database.
Contextualization: Organization-Location-Job FieldOrganizations, locations and job fields represent the fundamental data structure by which information is organized in the application.
Detailed Description
Contextualization, i.e. Organization-Location-Job Field structure associated to an element, represents the framework the application uses to organize, classify, link, match or search for information in the application.
Organization describes the hierarchical structure of an organization. Up to 20 organization levels can be created. The system proposes the following organization structure, but other terms may be chosen to better reflect the hierarchical structure of a company:
Location represents a geographical area, such as a country or state. Locations are listed in a hierarchical order, from the broadest geographical area (often a country) to increasingly specific areas (work location). Up to 5 location levels can be created. Locations must be associated to Taleo network locations used for various purposes, mainly integration with external systems, using a common and standard universal structure. A common location structure is:
Job Field represents the employment sectors or domains. Up to 4 job field levels can be created. Job fields must also be mapped to the network job fields, again to have a common language with the external world, be for posting or integrations. This mapping also serves to inherit existing classification for competencies. The system proposes the following job field structure, but other terms may be chosen to better reflect the structure of a company:
Organization Structure
Company
Sector
Department
Division
Location Structure
Country
State/Province
Region
City
Work Location
Job Field Structure
Category
Function
Recruiting User Guide Taleo 10 - SP1 2-9
Basic Concepts Basic Concept
Although Organization-Location-Job Field structures are configured with the help of a Taleo representative during the implementation phase (implementation mode), modifications to structure elements can be done in maintenance mode at any time. It is possible to customize the application to reflect a company’s unique structure and make modifications to Organization-Location-Job field elements in real time so that the data accounts for any changes in the structure.
There are several key elements of Taleo solution that are tied to contextualization (Organization-Location-Job field structure), such as:
• Candidate experience (job field)
• Candidate selection workflow
• Requisitions and job templates
• Message templates
• Onboarding processes
• Reporting
• Integration
• User management
• Source tracking
• Prescreening competencies, questions and assessments
• Forms management
• Candidate matching
• Roles
• Approval paths
• Agencies
• Fields
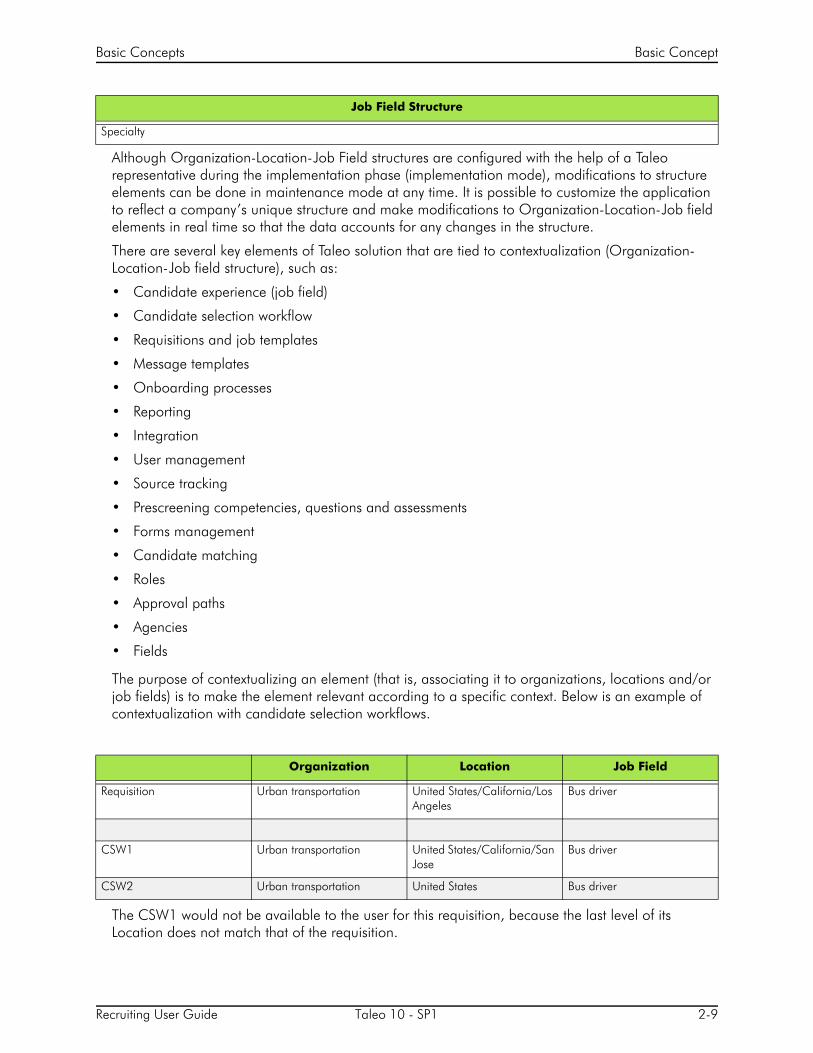
The purpose of contextualizing an element (that is, associating it to organizations, locations and/or job fields) is to make the element relevant according to a specific context. Below is an example of contextualization with candidate selection workflows.
The CSW1 would not be available to the user for this requisition, because the last level of its Location does not match that of the requisition.
Specialty
Organization Location Job Field
Requisition Urban transportation United States/California/Los Angeles
Bus driver
CSW1 Urban transportation United States/California/San Jose
Bus driver
CSW2 Urban transportation United States Bus driver
Job Field Structure
Recruiting User Guide Taleo 10 - SP1 2-10
Basic Concepts Basic Concept
The CSW2 could be available to the user for this requisition. The parent element of the lowest level of the requisition for each dimension (Organization, Location or Field) must be the same as the lowest level of the workflow for each dimension:
When using contextualization, the system applies the AND operator between Organizations, Locations and Job Fields entities. However, the OR operator is applied between elements of the same entity.
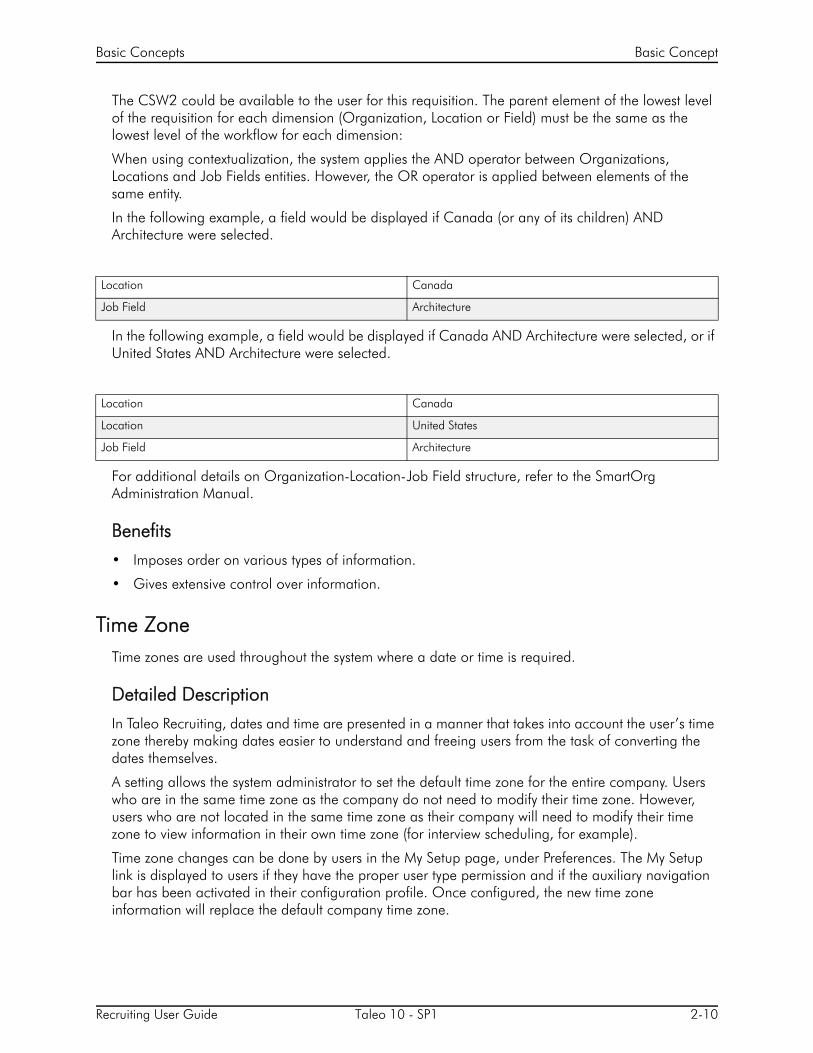
In the following example, a field would be displayed if Canada (or any of its children) AND Architecture were selected.
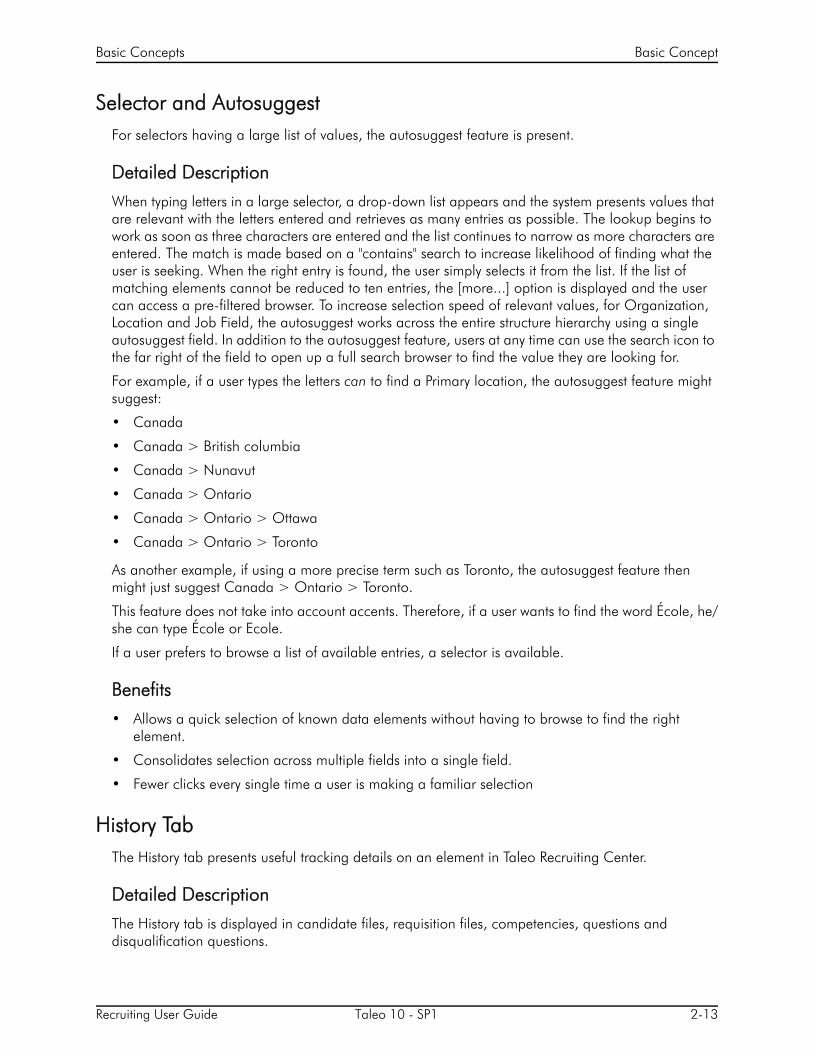
In the following example, a field would be displayed if Canada AND Architecture were selected, or if United States AND Architecture were selected.
For additional details on Organization-Location-Job Field structure, refer to the SmartOrg Administration Manual.
Benefits
• Imposes order on various types of information.
• Gives extensive control over information.
Time ZoneTime zones are used throughout the system where a date or time is required.
Detailed Description
In Taleo Recruiting, dates and time are presented in a manner that takes into account the user’s time zone thereby making dates easier to understand and freeing users from the task of converting the dates themselves.
A setting allows the system administrator to set the default time zone for the entire company. Users who are in the same time zone as the company do not need to modify their time zone. However, users who are not located in the same time zone as their company will need to modify their time zone to view information in their own time zone (for interview scheduling, for example).
Time zone changes can be done by users in the My Setup page, under Preferences. The My Setup link is displayed to users if they have the proper user type permission and if the auxiliary navigation bar has been activated in their configuration profile. Once configured, the new time zone information will replace the default company time zone.
Location Canada
Job Field Architecture
Location Canada
Location United States
Job Field Architecture

Recruiting User Guide Taleo 10 - SP1 2-11
Basic Concepts Basic Concept
An example where time zone is used is for scheduling interviews with candidates. When scheduling an interview, the time zone of the person scheduling the meeting is used as a reference value. This means that the time of the meeting in Taleo Recruiting is displayed according to the time zone selected by the person who scheduled the meeting, but the time of the meeting in Outlook or Lotus Notes is displayed according to the time zone set in the recipients’ Windows settings. For example, a user living in San Francisco schedules an interview from 2 p.m. to 3 p.m. Pacific Time. For an attendee living in New-York, the time of the meeting in Taleo Recruiting is from 2 p.m. to 3 p.m. Pacific Time, but the time of the meeting in Outlook is from 5 p.m. to 6 p.m. Eastern Time.
Benefits
• All dates and time are displayed according to the user’s time zone.
• When users share information or send e-mails, the time zone is explicit, avoiding ambiguity for the user receiving the information.
• The time zone feature makes Taleo Recruiting global system appear like a local system.
Setting a Time ZonePrerequisite
A setting allows the activation of this feature.
A user type permission grants users access to this feature.
Steps
1. Click the My Setup link located in the top right-hand corner.
2. In the Preferences tab, click Edit.
3. Click next to the Time Zone field.
4. Select a time zone.
5. Click Select.
6. Click Save.
Result
The selected time zone will replace the default time zone set for your company.
Print FunctionThe print function allows users to create a PDF version of a requisition file, a candidate file or a list of requisitions or candidate files that can then be printed.
Detailed Description
The print function is available in a candidate list, a requisition list as well as within a candidate file and requisition file. Users can print a list or the details of each file selected. Multiple files can be selected from a list to be printed (maximum of 50 files). The print function creates a PDF for users to save and/or print.
When using the print function, users can print:

Recruiting User Guide Taleo 10 - SP1 2-12
Basic Concepts Basic Concept
• a requisition file or candidate file containing all sections of the file or only specific sections. For example, a user can choose to print from a candidate file only prescreening and basic profile information. Sections selected by a user when using the print function are saved as defaults for the next print action, but blocks selected within the main submission file section are not. Also, sections available to a user are based on how the file is configured and on user permissions. This means, if a system administrator wanted to allow users to more precisely control what is printed, he/she can do this by increasing the sections in the file layout.
• a list of requisition files or candidate files. The content of the file is presented in different columns and the content of each file is displayed in a row. The format of the list (that is, the columns used to display the information) is identical to the requisition or candidate list format used.
When selecting one or several candidate files in a candidate list or requisition-specific candidate list in order to print them, the Submission file is printed. When printing from a General Profile list, the General Profile file will be printed.
When using the print function, only fields containing data are visible in the view/print mode; this means fields with no data will not be rendered when printing.
The PDF generated by the print function will be identical to the data presented to the user for the selected sections while looking at the information in view mode.
Note that attachments cannot be printed without first opening them.
Benefits
• Option for more granular sections of information for print selection based on the candidate and requisition file configurations.
• Ability to print what the user wants in a list or file.
• Cleaner print output.
Printing a FilePrerequisite
Your computer must be linked to a printer.
The printing icon must be displayed.
Steps
1. Select a file.
2. Click .
3. Specify the printing parameters.
4. Click Create PDF.
5. Click in the page displaying the PDF.
6. In the Windows File menu, select Print.
Result
A PDF version of the requisition of candidate file is creates and can be senty for printing.
Recruiting User Guide Taleo 10 - SP1 2-13
Basic Concepts Basic Concept
Selector and AutosuggestFor selectors having a large list of values, the autosuggest feature is present.
Detailed Description
When typing letters in a large selector, a drop-down list appears and the system presents values that are relevant with the letters entered and retrieves as many entries as possible. The lookup begins to work as soon as three characters are entered and the list continues to narrow as more characters are entered. The match is made based on a "contains" search to increase likelihood of finding what the user is seeking. When the right entry is found, the user simply selects it from the list. If the list of matching elements cannot be reduced to ten entries, the [more...] option is displayed and the user can access a pre-filtered browser. To increase selection speed of relevant values, for Organization, Location and Job Field, the autosuggest works across the entire structure hierarchy using a single autosuggest field. In addition to the autosuggest feature, users at any time can use the search icon to the far right of the field to open up a full search browser to find the value they are looking for.
For example, if a user types the letters can to find a Primary location, the autosuggest feature might suggest:
• Canada
• Canada > British columbia
• Canada > Nunavut
• Canada > Ontario
• Canada > Ontario > Ottawa
• Canada > Ontario > Toronto
As another example, if using a more precise term such as Toronto, the autosuggest feature then might just suggest Canada > Ontario > Toronto.
This feature does not take into account accents. Therefore, if a user wants to find the word École, he/she can type École or Ecole.
If a user prefers to browse a list of available entries, a selector is available.
Benefits
• Allows a quick selection of known data elements without having to browse to find the right element.
• Consolidates selection across multiple fields into a single field.
• Fewer clicks every single time a user is making a familiar selection
History TabThe History tab presents useful tracking details on an element in Taleo Recruiting Center.
Detailed Description
The History tab is displayed in candidate files, requisition files, competencies, questions and disqualification questions.

Recruiting User Guide Taleo 10 - SP1 2-14
Basic Concepts Basic Concept
The information displayed in the History tab is non editable except in the candidate file (user type permissions are required).
Depending on which part of the application the History tab is displayed, the information provided will vary:
In candidate files, the information displayed in the History tab can be filtered with the Show filter.
Benefits
• Allows users to track any modification applied to an element.
• Supplies customer support with valuable information for troubleshooting.
Viewing a CommentSteps
1. In a list or a file, browse your mouse over the icon or see the comment directly in the list.
Result
The comment is displayed for viewing.
Modifying Event CategoriesSteps
1. In the Candidates list, click on a candidate file.
2. Select the History tab.
3. Click Modify.
History tab in requisitions, competencies, questions and disqualification questions
Element Description
Date Date when an event occurred.
Type Event or action performed on an element.
Comments Comments entered by the user.
By The “actor” (person or system) who performed the event.
History tab in candidate files
Element Description
Date Date when an event occurred.
Events Event or action performed on an element.
Details Information regarding the event.
Comments Comments entered by the user.
By The “actor” (person or system) who performed the event.

Recruiting User Guide Taleo 10 - SP1 2-15
Basic Concepts Basic Concept
4. Select the desired event categories.
5. Click Done.
Result
Events related to the event categories selected will be displayed in the candidate file History tab.
Next Step
Filtering events using the Show history for filter.
Modifying an Event DatePrerequisite
A setting allows the activation of this feature.
A user type permission grants users access to this feature.
Steps
1. In the Candidates list, click on a candidate file.
2. Select the History tab.
3. Click next to the event.
4. Change the date.
Result
The date of an event is modified in order to specify when an action on a candidate's file really took place.

Recruiting User Guide Taleo 10 - SP1 2-16
Basic Concepts Language
Language
Language ManagementLanguage management refers to the use of languages in Taleo products.
Detailed Description
Each user has a language preference. This preferred language is used as the default content language in the system. The content language is the same across all Taleo products, but if a product does not support the same set of content languages, it will have its own preference configuration.
In Taleo applicationss, the languages in which an element is available are indicated in the Activated Languages drop-down list. A base language is the item’s reference language, usually used as a reference for other languages or fallback display in list mode. The user preference is used as the default base language when the user creates an element. Such base language can be changed at any time by the user. A language must be activated before designating it as the base language.
When creating or editing an element, the Configure option in the Activated Languages drop-down list becomes available and gives you access to the Language Configuration window where you can specify the base language as well as the languages in which an element will be available.
A language can be assigned one of the following statuses:
• Active: The element is available in that language.
• Draft: The element is planned to be used in that language, but not yet completely translated or validated. This status is meant to support phase out delivery of languages since a company does not need to deliver them all at once.
• Not Used: The element is not used in that language.
When multiple languages are used for an element (such as requisitions, templates or questions), this icon is displayed in lists: . Hovering your mouse over the icon displays the languages activated for the element. When only one language is used for an element, the name of the language is displayed. When only one language is used in your company, there is no special indicator.
Selecting LanguagesPrerequisite
Element must be in edit mode.
Steps
1. Edit an element.
2. In the Activated Languages drop-down list, select Configure.
3. Select the base language.
4. For each required language, select Active from the Status drop-down list.
5. Click Save.

Recruiting User Guide Taleo 10 - SP1 2-17
Basic Concepts Language
Result
Activated languages will be displayed in the Activated Languages drop-down list. The word Base will appear next to the base language.
Selecting the Base LanguagePrerequisite
Language must be active.
If only one language is activated, the base language option is not displayed.
Steps
1. Edit an element.
2. In the Activated Languages drop-down list, select Configure.
3. Select a language in the Base column.
4. Click Save.
Result
The word Base will appear next to the language in the Activated Languages drop-down list.
Activating a LanguagePrerequisite
Element must be in Edit mode.
Steps
1. Edit an element.
2. In the Activated Languages drop-down list, select Configure.
3. For each required language, select Active from the Status drop-down list.
4. Click Save.
Result
Activated languages will appear in the Activated Languages drop-down list.
Deactivating a LanguagePrerequisite
Element must be in Edit mode.
Steps
1. Edit an element.
2. In the Activated Languages drop-down list, select Configure.
3. For each required language, select Not Used from the Status drop-down list.
4. Click Save.
Recruiting User Guide Taleo 10 - SP1 2-18
Basic Concepts Language
Result
Selected languages will no longer appear in the Activated Languages drop-down list.
Setting My Preferred Correspondence LanguagePrerequisite
A setting allows the activation of this feature.
A user type permission grants users access to this feature.
Steps
1. Click the My Setup link located in the top right-hand corner.
2. In the Preferences tab, click Edit.
3. Select the desired language in the Correspondence Language drop-down list.
4. Click Save.
Setting My Preferred Content LanguagePrerequisite
A setting allows the activation of this feature.
A user type permission grants users access to this feature.
Steps
1. Click the My Setup link located in the top right-hand corner.
2. In the Preferences tab, click Edit.
3. Select the desired language in the Content Language drop-down list.
4. Click Save.
Result
When creating a requisition or candidate file, the file will be created in the selected preferred language regardless of the Recruiting Center language the user is logged with.

Recruiting User Guide Taleo 10 - SP1 2-19
Basic Concepts Layout
Layout
Page StructureThe same page structure is used in Taleo Recruiting Center and information is organized the same way throughout the application.
Detailed Description
Pages all have the same structure and can be displayed as a normal layout or as an expanded layout. The normal layout displays the following:
To hide or show the right or left pane, users simply have to click available in the corresponding pane.
In addition, the overall layout of the page can be expanded to take advantage of the screen real estate. To expand or collapse the page, users must click available in the auxiliary navigation bar.
The recommended screen resolution for the page layout is 1024 x 768.
Pane Description
Top Pane The top pane is the section of the screen above the core navigation bar. It contains the search widget, the Advanced Search link, the Search Queries link, the core navigation bar, the auxiliary navigation bar as well as a logo or header text the client wishes to display.
Central Pane The central pane is the middle and main section of the application. It is where the primary content is presented. For example, the candidate list, requisition list, candidate file, requisition file. Upon initial login, this area contains elements configured in the center stage. The center stage can be customized for specific needs or users. A center stage is selected for each configuration profile and a configuration profile is tied to each user. Consequently, depending on the user logging in to Taleo Recruiting Center, the information displayed in the central pane of the home page will differ.
Left Pane This is the section of the screen located on the left hand side. It is persistent throughout the application and it can be expanded and collapsed. It contains filters, folders and other key content for navigation.
Right Pane This is the section of the screen located on the right hand side which is called supporting tools. It is persistent throughout the application and it can be expanded and
collapsed. It can contain the Communications tab ( ), the
Clips tab ( ) and the Help tab ( ). Supporting tools such as the Communications channel, the online help, customer support content/custom instructions that Taleo or you have configured, tours (short clips) provided by Taleo to help end users understand essential skills and features
Lower Pane The lower pane is the section of the screen located at the bottom. It can contain a footer.
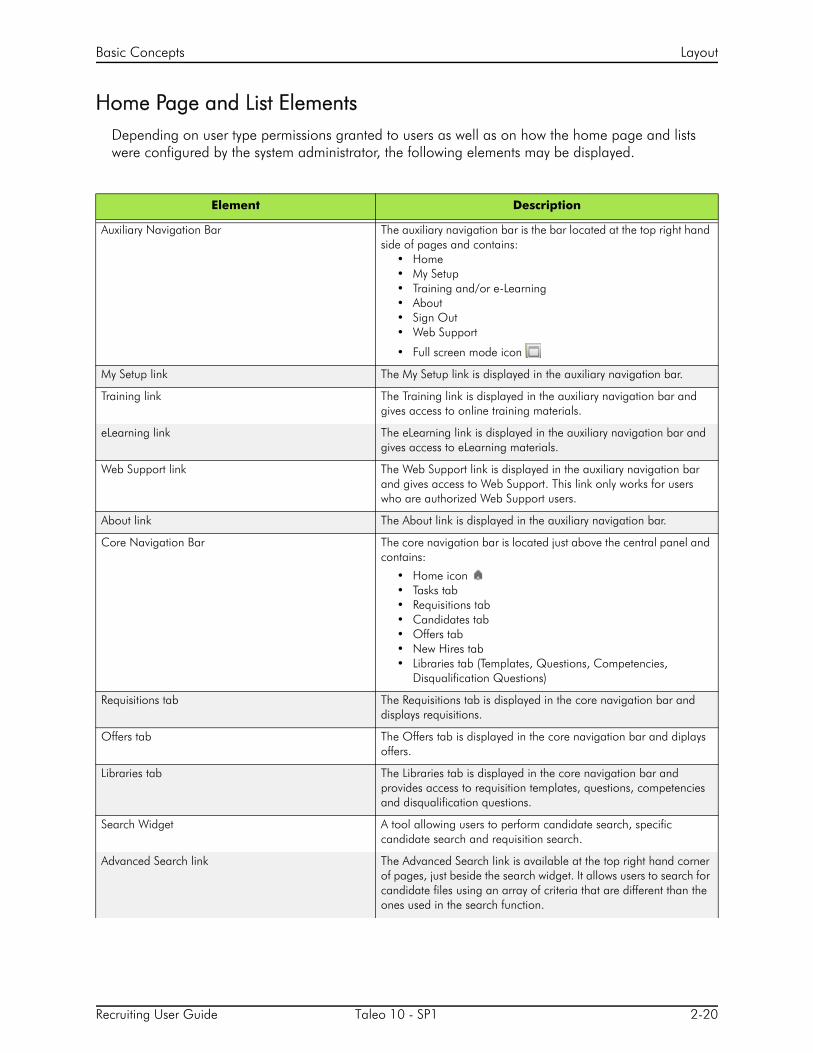
Recruiting User Guide Taleo 10 - SP1 2-20
Basic Concepts Layout
Home Page and List ElementsDepending on user type permissions granted to users as well as on how the home page and lists were configured by the system administrator, the following elements may be displayed.
Element Description
Auxiliary Navigation Bar The auxiliary navigation bar is the bar located at the top right hand side of pages and contains:
• Home• My Setup• Training and/or e-Learning• About• Sign Out• Web Support
• Full screen mode icon
My Setup link The My Setup link is displayed in the auxiliary navigation bar.
Training link The Training link is displayed in the auxiliary navigation bar and gives access to online training materials.
eLearning link The eLearning link is displayed in the auxiliary navigation bar and gives access to eLearning materials.
Web Support link The Web Support link is displayed in the auxiliary navigation bar and gives access to Web Support. This link only works for users who are authorized Web Support users.
About link The About link is displayed in the auxiliary navigation bar.
Core Navigation Bar The core navigation bar is located just above the central panel and contains:
• Home icon • Tasks tab• Requisitions tab• Candidates tab• Offers tab• New Hires tab• Libraries tab (Templates, Questions, Competencies,
Disqualification Questions)
Requisitions tab The Requisitions tab is displayed in the core navigation bar and displays requisitions.
Offers tab The Offers tab is displayed in the core navigation bar and diplays offers.
Libraries tab The Libraries tab is displayed in the core navigation bar and provides access to requisition templates, questions, competencies and disqualification questions.
Search Widget A tool allowing users to perform candidate search, specific candidate search and requisition search.
Advanced Search link The Advanced Search link is available at the top right hand corner of pages, just beside the search widget. It allows users to search for candidate files using an array of criteria that are different than the ones used in the search function.

Recruiting User Guide Taleo 10 - SP1 2-21
Basic Concepts Layout
Auxiliary Navigation BarThe auxiliary navigation bar is the bar located at the top right hand side of pages.
Detailed Description
A setting allows the display of the auxiliary navigation bar.
If the bar is displayed, it is available at all times for users to see and access. The auxiliary navigation bar contains the following links, some of which are also configurable for display by either user type permission or by settings:
• Home
• My Setup (available if a user type permission was granted)
• Training and/or e-Learning (available if the setting was activated)
• About (available if the setting was activated)
• Sign Out
• Full screen mode icon
Search Queries link The Search Queries link is available at the top right hand corner of pages, just beside the search widget. A search query is an advanced candidate search that has been saved in order to be used repetitively and potentially shared with other users.
Center Stage A center stage is what users see in their first panel when they first log into the application.
Communications Channel The Communications channel allows the display of useful information to users when they first log into Taleo Recruiting.
Online Tour Short clips describing essential user interface elements of Taleo 10.
Show Filter The Show filter allows users to filter information displayed in a list using ownership and collaboration criteria.
Quick FIlters Quick filters help users to quickly filter a list down to relevant information.
Advanved Filters Advanced filters are used to filter lists by a more expansive set of filtering criteria.
Page Header The header text is displayed on all pages of the application.
Page Footer The footer text is displayed on the home page of the application.
Welcome Title The welcome title is displayed on the home page of the application.
Separator Line The line separating the Welcome title from the main content of the center stage.
Logo A logo can be displayed in the upper left corner of Taleo Recruiting and Taleo Performance pages.
Color Theme A theme is a set of colors used for body text, headings, links within an application.
Selected Item Color This is the color displayed when selecting elements in the user interface
Element Description
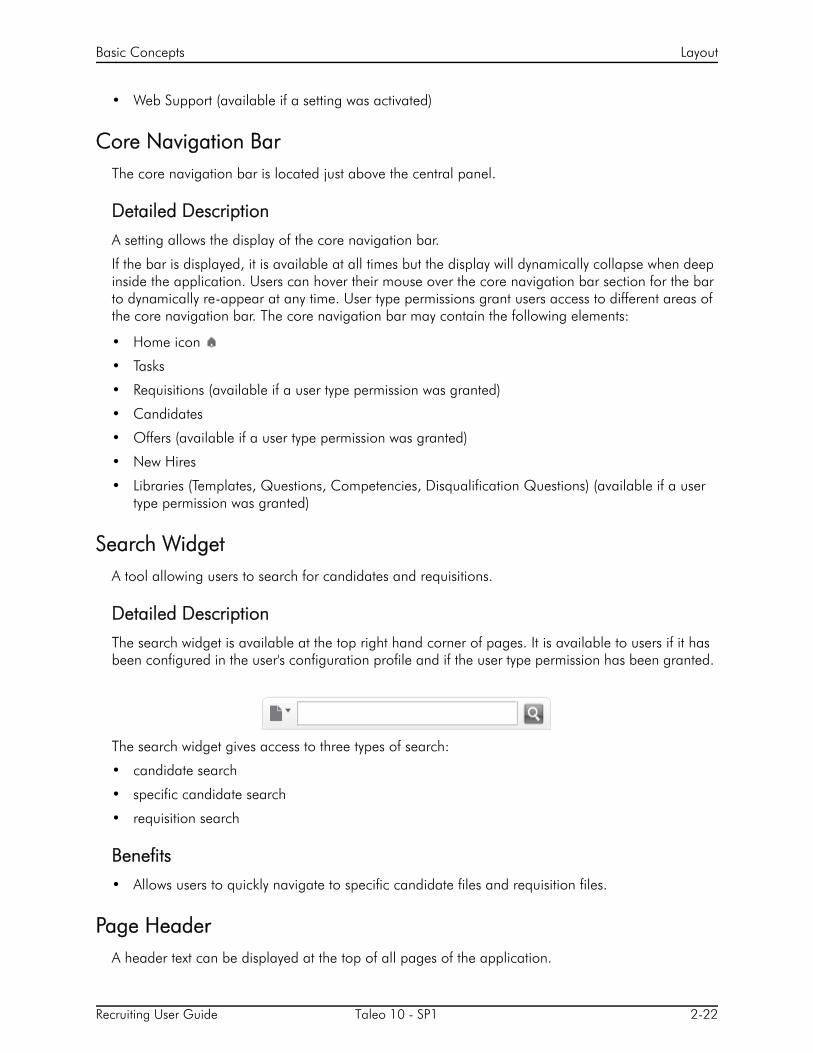
Recruiting User Guide Taleo 10 - SP1 2-22
Basic Concepts Layout
• Web Support (available if a setting was activated)
Core Navigation BarThe core navigation bar is located just above the central panel.
Detailed Description
A setting allows the display of the core navigation bar.
If the bar is displayed, it is available at all times but the display will dynamically collapse when deep inside the application. Users can hover their mouse over the core navigation bar section for the bar to dynamically re-appear at any time. User type permissions grant users access to different areas of the core navigation bar. The core navigation bar may contain the following elements:
• Home icon
• Tasks
• Requisitions (available if a user type permission was granted)
• Candidates
• Offers (available if a user type permission was granted)
• New Hires
• Libraries (Templates, Questions, Competencies, Disqualification Questions) (available if a user type permission was granted)
Search WidgetA tool allowing users to search for candidates and requisitions.
Detailed Description
The search widget is available at the top right hand corner of pages. It is available to users if it has been configured in the user's configuration profile and if the user type permission has been granted.
The search widget gives access to three types of search:
• candidate search
• specific candidate search
• requisition search
Benefits
• Allows users to quickly navigate to specific candidate files and requisition files.
Page HeaderA header text can be displayed at the top of all pages of the application.
Recruiting User Guide Taleo 10 - SP1 2-23
Basic Concepts Layout
Detailed Description
To display text in the header, the system administrator must first submit the desired text to Taleo Support. Text requirements are:
• The text area supports up to 50 characters.
• Text must be supplied for all active languages.
• Basic HTML formatting such as color, bold and italics are possible, but it is not possible to embed hyperlinks.
A Configuration Profle setting allows the activation of this feature.
Page FooterA footer text can be displayed on the home page of the application.
Detailed Description
To display text in the footer, the system administrator must first submit the desired text to Taleo Support. Text requirements are as follows:
• The text area supports up to 50 characters.
• Text must be supplied for all active languages.
• Basic HTML formatting such as color, bold and italics are possible, but it is not possible to embed hyperlinks.
A configuration Profile setting allows the activation of this feature.
Welcome TitleThe welcome title is displayed to users when they first log in into the application.
Detailed Description
A Configuration Profile setting allows the activation of this feature.
By default, the text displayed is Welcome followed by the name of the user signing in.
For example, Welcome John Smith. The text Welcome is configurable; contact Taleo Support for information.
Separator LineThis is the line separating the Welcome title from the main content of the center stage.
Detailed Description
By default, the separator line is not displayed.
A configuration Profile setting allows the activation of this feature.

Recruiting User Guide Taleo 10 - SP1 2-24
Basic Concepts Layout
Center StageA center stage is what users see in the center panel when they first log into the Recruiting Center.
Detailed Description
From the center stage, users can be presented with key information and/or jump into the underlying application to perform more complex actions. For example, a center stage may contain elements such as task list, links to create requisitions or view candidates, channels providing overview information on requisitions, candidates or offers.
A center stage can be customized for specific needs or users. Consequently, depending on the user logging into Taleo Recruiting Center, the information displayed in the central panel of the home page will differ. The center stage linked to a user is defined via the user’s configuration profile.
The Center Stage feature is available in Taleo Recruiting Administration, under Center Stage.
Three default center stages are supplied with the application:
• Recruiter
• Hiring Manager
• Hourly Manager
The system administrator can edit these default center stages and can also create new center stages either from scratch or by duplicating existing ones. Changes made to a center stage are applied the next time a user linked to any configuration profiles using that center stage logs in.
In addition to the center stage configuration, the system administrator can decide to display a welcome title in the center stage, to add a separator line between the welcome title and the widgets of the center stage, and also add a footer text on the center stage.
Information in the center stage may be displayed as follows:
• Single column: channels, links and lists are displayed in one single column.
• Two columns: channels, links and lists are displayed in two columns. The system administrator can choose which column and the order in which each widget will appear in that column.
• Two columns with header: channels, links and lists are displayed in either the header or one of the two columns, as specified by the system administrator when placing the widgets.
A center stage may contain channels, links and lists.
Channels contain overview counts of information about the area and links that can redirect the user to another part of the application. Channels are supplied by Taleo and cannot be created nor edited. The following channels are available:
• Candidates
• Offers
• Onboarding
• Requisitions
• Tasks

Recruiting User Guide Taleo 10 - SP1 2-25
Basic Concepts Layout
A channel always includes a list of elements as well as the number of items associated to each element. The elements on the list are clickable and bring users to a more detailed area of the application, for example the candidate list, requisition list, etc. The elements on the list are also dependent on the value selected in the Show filter.
The number in the following two columns work as follows:
• The number in the column is specific to you (not to your user groups). It represents the number of items that are new or have been updated by another user since you last viewed them. For example, if you approve your own requisition, a “new” task is added to your Ready for sourcing tasks, and the number in this column for Ready for sourcing element increases by one.
• The number in the Total column represents the total number of items including new, previously viewed, and updated. For example, if you choose your user name in the Show list and Ready for sourcing appears in the Tasks channel, the number in the Total column represents the total number of your requisitions that are ready for sourcing.
Links redirect the user to another part of the application. Links are supplied by Taleo and cannot be created nor edited. The following links are available:
• Create a Requisition
• Onboarding Process
• Reports
• Search for candidates
• View My Candidates
• View My Requisitions
There is one list format that is available in the center stage as well, known as the Mini Requisition list. This mini requisition list can be added in the center stage to allow users to access a candidate list directly from the home page without having to go through the standard requisition list page. This mini requisition list can contain up to four columns of summary information about each requisition, including the number of candidates. It can also display up to 30 requisitions (the ones with the most recent submission activity). This mini requisition list is used by default with the Hourly Manager center stage.
Benefits
• Displays only the necessary information to specific users.
• Provides a unified method for accessing and interacting with all Taleo applications.
• Provides the ability to customers to self-administer the working environment to provide a more compelling user experience.
Color ThemeA theme is a set of colors used for body text, headings, and links within Taleo applications.
Detailed Description
The following standard color themes are provided by Taleo.
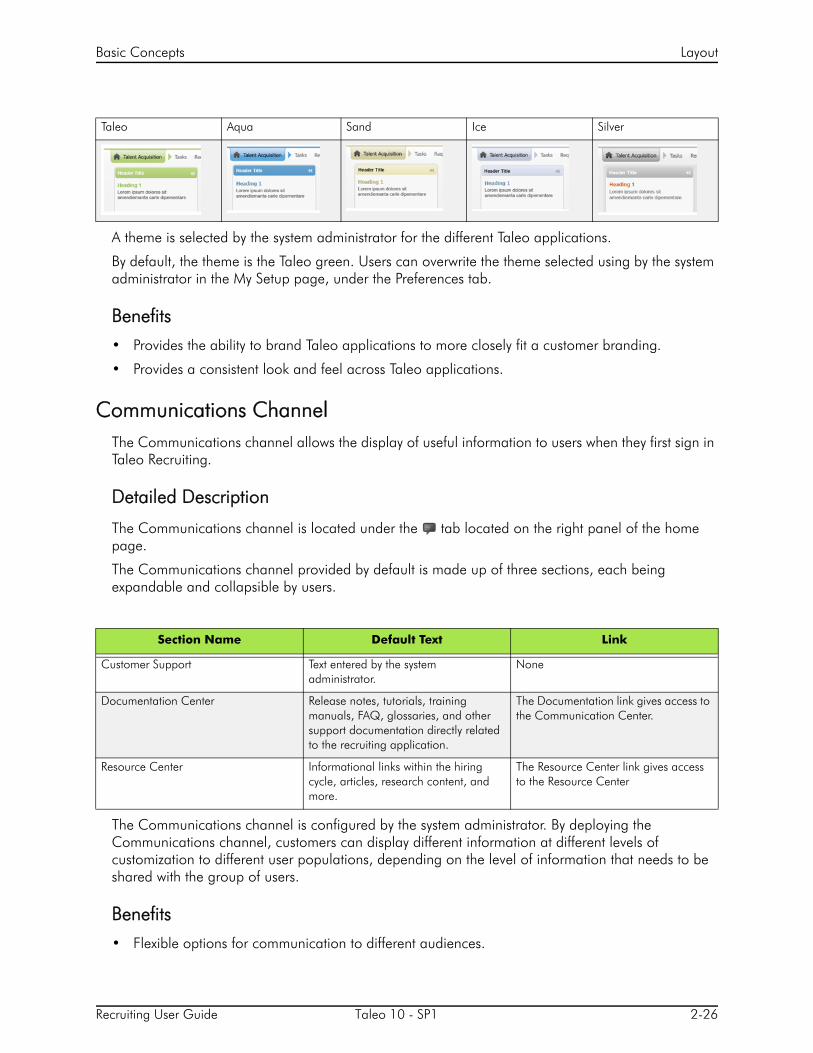
Recruiting User Guide Taleo 10 - SP1 2-26
Basic Concepts Layout
A theme is selected by the system administrator for the different Taleo applications.
By default, the theme is the Taleo green. Users can overwrite the theme selected using by the system administrator in the My Setup page, under the Preferences tab.
Benefits
• Provides the ability to brand Taleo applications to more closely fit a customer branding.
• Provides a consistent look and feel across Taleo applications.
Communications ChannelThe Communications channel allows the display of useful information to users when they first sign in Taleo Recruiting.
Detailed Description
The Communications channel is located under the tab located on the right panel of the home page.
The Communications channel provided by default is made up of three sections, each being expandable and collapsible by users.
The Communications channel is configured by the system administrator. By deploying the Communications channel, customers can display different information at different levels of customization to different user populations, depending on the level of information that needs to be shared with the group of users.
Benefits
• Flexible options for communication to different audiences.
Taleo Aqua Sand Ice Silver
Section Name Default Text Link
Customer Support Text entered by the system administrator.
None
Documentation Center Release notes, tutorials, training manuals, FAQ, glossaries, and other support documentation directly related to the recruiting application.
The Documentation link gives access to the Communication Center.
Resource Center Informational links within the hiring cycle, articles, research content, and more.
The Resource Center link gives access to the Resource Center

Recruiting User Guide Taleo 10 - SP1 2-27
Basic Concepts Layout
• Default option allows for distinct support instructions for different configuration profiles.
• Custom option allows for distinct messaging of text and supporting documents to different configuration profiles.
• Ability to disable section for configuration profiles where the information is not applicable.
Advanced FilterAdvanced filters are used to filter lists by a more expansive set of filtering criteria.
Detailed Description
Both requisition and candidate lists have “advanced” filtering tools at the very bottom of the left panel of the page. Users can select several advanced filter criteria to filter a list. Once executed, the criteria are presented to the user across the top of the screen with a small x adjacent to the filter criteria. By clicking the x, the criteria can be removed and the list will dynamically update according to the updated criteria set. User-defined fields can also be available as filtering criteria.
Advanced filters are filtering on an already filtered list, that is whatever advanced filter criteria is selected, the list will be filtered based on what is already displayed in the list. For example, a user filters a requisitions list using the Pending, Open and On Hold status quick filters (he does not select the Draft status filter). The user then applies the advanced filter “Status Details/Draft”. The list will display “No matches found”. In this example, the system first displays all requisitions except Draft ones. Then, from the results displayed by the quick filters, the system finds those requisitions that are draft.
When using advanced filters for which words must be entered, users have the ability to enter partial words. For example, a user could filter a candidate list with candidates whose first name starts with “cath”. The system would retrieve candidates whose first name is “cathy”, “catherine” or “cathia”.
Advanced filters are activated by the system administrator. The system administrator has the ability to specify if the Advanced Filters button will be displayed or not. Criteria available in advanced filters are pre-defined by the system based on the columns selected for the list format context. The system administrator cannot modify them.
Benefits
• Easy removal of filter criteria and dynamic list updating improves usability.
• System administrators can control if users have access to advanced filters by context.
Quick FilterQuick filters help users to quickly filter a list down to relevant information.
Detailed Description
Quick filters are displayed on the left panel of a page and are available in the following lists:
• Tasks
• Requisitions
• Candidates
• Offers
Recruiting User Guide Taleo 10 - SP1 2-28
Basic Concepts Layout
• Requisition Templates
• Questions
• Disqualification Questions
• Competencies
By default, quick filter categories are collasped and only display selected filtering criteria. When no quick filter is selected, the list displays all available entries. As soon as one filter is selected, it is automatically applied to the list and the list refreshes according to the selection made. Users do not need to refresh the list. For example, in the Requisitions list, if the Open quick filter is selected, only open requisitions will be displayed in the list.
Several quick filters can be applied at a time. Quick filters can be restored to their initial value.
The system administrator can configure quick filters available in the Requisitions and Candidates lists. For a list format context, the system administrator has the ability to select filters amongst a predefined list of filters that will be displayed.
The system administrator can define a default value for certain quick filters. These default values are automatically applied to the list.
• If a quick filter is displayed to users, users can choose to edit the default value for the filter.
• If a quick filter is not displayed to users, this means that the users will only see candidates according to this default value. As a result, the total number of candidates on a requisition can be different from what users see on their list.
For example: In the list format "All Candidates / By Requisition", the system administrator decides to not display the ACE filter but yet decides to set the ACE filter as a default value. As a result, when users review the candidates list of a specific requisition, they will see a certain number of candidates. However, if they click the "candidate" number, which will display the list format "All candidates / By Requisition" for that same requisition, the system will present them with only the ACE candidates, but will not display the ACE filter and therefore the number of candidates they see are reduced to only show ACE candidates.
The system administrator also has the ability to define the order in which quick filters are displayed. It is important to note that for candidate list filters, the configuration option appears repeatedly for every single list format, however, similar requisition formats such as requisition specific candidate list formats will share the same configuration. Changing it in one location, will change it in all others as well. (Important Note - you must click apply changes - which is about half way down the page prior to clicking Done for the changes to the filter format configuration to take place.)
Benefits
• Dynamic filtering on screen improves usability.
• Configuration by variation options gives flexibility in layout for different user audiences where necessary.
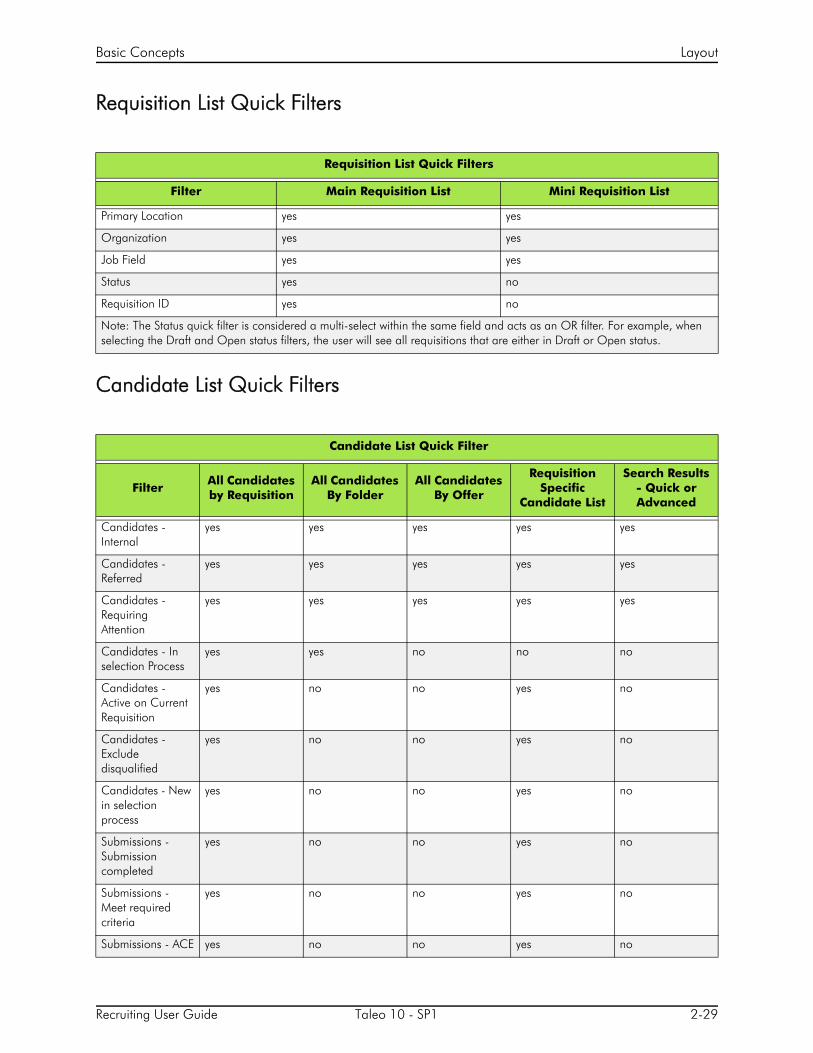
Recruiting User Guide Taleo 10 - SP1 2-29
Basic Concepts Layout
Requisition List Quick Filters
Candidate List Quick Filters
Requisition List Quick Filters
Filter Main Requisition List Mini Requisition List
Primary Location yes yes
Organization yes yes
Job Field yes yes
Status yes no
Requisition ID yes no
Note: The Status quick filter is considered a multi-select within the same field and acts as an OR filter. For example, when selecting the Draft and Open status filters, the user will see all requisitions that are either in Draft or Open status.
Candidate List Quick Filter
FilterAll Candidates by Requisition
All Candidates By Folder
All Candidates By Offer
Requisition Specific
Candidate List
Search Results - Quick or Advanced
Candidates - Internal
yes yes yes yes yes
Candidates - Referred
yes yes yes yes yes
Candidates - Requiring Attention
yes yes yes yes yes
Candidates - In selection Process
yes yes no no no
Candidates - Active on Current Requisition
yes no no yes no
Candidates - Exclude disqualified
yes no no yes no
Candidates - New in selection process
yes no no yes no
Submissions - Submission completed
yes no no yes no
Submissions - Meet required criteria
yes no no yes no
Submissions - ACE yes no no yes no
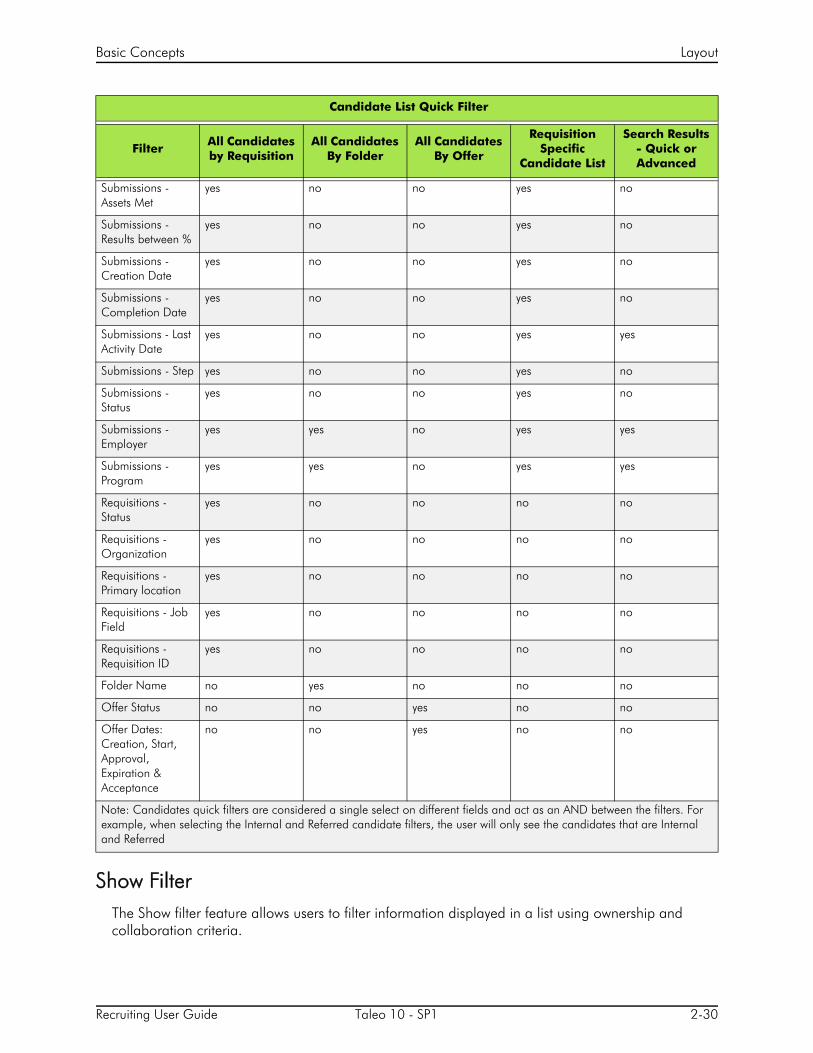
Recruiting User Guide Taleo 10 - SP1 2-30
Basic Concepts Layout
Show FilterThe Show filter feature allows users to filter information displayed in a list using ownership and collaboration criteria.
Submissions - Assets Met
yes no no yes no
Submissions - Results between %
yes no no yes no
Submissions -Creation Date
yes no no yes no
Submissions -Completion Date
yes no no yes no
Submissions - Last Activity Date
yes no no yes yes
Submissions - Step yes no no yes no
Submissions -Status
yes no no yes no
Submissions -Employer
yes yes no yes yes
Submissions -Program
yes yes no yes yes
Requisitions - Status
yes no no no no
Requisitions - Organization
yes no no no no
Requisitions -Primary location
yes no no no no
Requisitions - Job Field
yes no no no no
Requisitions - Requisition ID
yes no no no no
Folder Name no yes no no no
Offer Status no no yes no no
Offer Dates: Creation, Start, Approval, Expiration & Acceptance
no no yes no no
Note: Candidates quick filters are considered a single select on different fields and act as an AND between the filters. For example, when selecting the Internal and Referred candidate filters, the user will only see the candidates that are Internal and Referred
Candidate List Quick Filter
FilterAll Candidates by Requisition
All Candidates By Folder
All Candidates By Offer
Requisition Specific
Candidate List
Search Results - Quick or Advanced
Recruiting User Guide Taleo 10 - SP1 2-31
Basic Concepts Layout
Detailed Description
The Show filter can appear in:
• requisitions list
• candidates list
• home page
The Show filter is displayed to users if the Show information for Filter Visibility configuration profile setting has been configured in the user's configuration profile.
The Show filter:
• can be displayed everywhere except in the home page
• can be displayed everywhere including the home page
• cannot be displayed at all.
Values appearing in the Show filter depend on the permissions granted to the user and on the configuration of the application.
Possible values are:
• I own
• I collaborate on
• I own or collaborate on
• I own in My coverage area
• I own or collaborate on or in My coverage area
• Groups the user is part of
• All
For example:
• If a user’s permissions do not allow a user to see requisitions he/she does not own, the user will only see the “I own” value.
• If a user’s permissions allow a user to see requisitions he/she does not own BUT the collaborator feature is not available in the company, the user will not see the following values related to the collaborator feature: “I own or collaborate on”, “I collaborate on” and “I own or collaborate on or in My coverage area”.
• If a user’s permissions allow the user to see requisitions he/she does not own AND the collaborator feature is available in the company, the user will see the following values related to the collaborator feature: “I own or collaborate on”, “I collaborate on” and “I own or collaborate on or in My coverage area”.
Benefits
• The Show filter may be hidden to avoid users changing it and being distracted or confused by it.
• A default value may be set for the Show filter for users’ convenience and to ensure that they see the relevant requisitions without having to change this filter each time.
• Retail and hourly customers can use the configuration to default to My coverage area and to simplify the experience for their decentralized hourly managers.

Recruiting User Guide Taleo 10 - SP1 2-32
Basic Concepts Layout
List UsageSeveral tools are available to manage requisition and candidate lists.
Detailed Description
List Filtering: Several filters are available to filter information in a list:
• quick filters
• advanced filters
• show filter
Column Sorting: Columns in a list are sortable by clicking on the column header. Columns made of a user-defined field, including partner services result fields, are also sortable.
Column Manipulation: It is possible to drag columns and change the width of a given column on a list. Columns can also be moved on the page using a drag and drop action. Changes in columns are kept during the session.
Column Display and Interaction: Column headers and rows have different colors depending on their statuses:
An up or down arrow is displayed in the column header to indicate a descending or ascending sorting order.
Candidate Count Column: The Candidate Count column indicating the number of candidates who applied on a requisition is available on the left of the list to make it easier and faster for users to get to the list of candidates.
Actions Directly in the List: Several actions can be performed directly in a list using inline actions. For example, from the requisition file, users can select a drop-down just adjacent to the requisition and take an action on the file without having to load the file first.
Callouts: Candidate and requisition files display a callout containing relevant information about the file. The callout is displayed as a bubble beside the candidate or requisition name.
For the candidate file, the callout includes the following information:
• Candidate name with an hyperlink to the candidate file.
• Home, work and cellular numbers (primary phone is indicated).
• E-mail address.
For the requisition file, the information contained in the callout as well as the link to access the requisition file are different based on the context.
Header Color Status
White Indicates a normal status.
Light Blue Indicates that the cursor is passing over the column header or row.
Dark Blue Indicates that the row has been selected or that the column is used to sort elements.
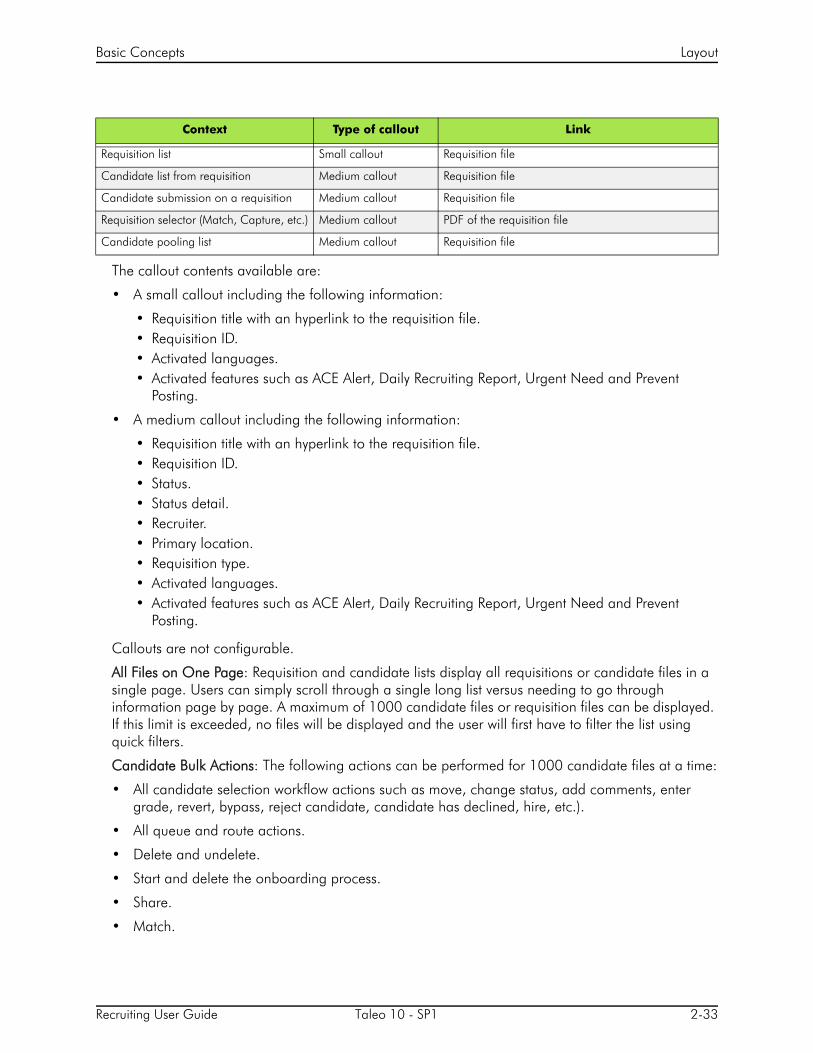
Recruiting User Guide Taleo 10 - SP1 2-33
Basic Concepts Layout
The callout contents available are:
• A small callout including the following information:
• Requisition title with an hyperlink to the requisition file.• Requisition ID.• Activated languages.• Activated features such as ACE Alert, Daily Recruiting Report, Urgent Need and Prevent
Posting.
• A medium callout including the following information:
• Requisition title with an hyperlink to the requisition file.• Requisition ID.• Status.• Status detail.• Recruiter.• Primary location.• Requisition type.• Activated languages.• Activated features such as ACE Alert, Daily Recruiting Report, Urgent Need and Prevent
Posting.
Callouts are not configurable.
All Files on One Page: Requisition and candidate lists display all requisitions or candidate files in a single page. Users can simply scroll through a single long list versus needing to go through information page by page. A maximum of 1000 candidate files or requisition files can be displayed. If this limit is exceeded, no files will be displayed and the user will first have to filter the list using quick filters.
Candidate Bulk Actions: The following actions can be performed for 1000 candidate files at a time:
• All candidate selection workflow actions such as move, change status, add comments, enter grade, revert, bypass, reject candidate, candidate has declined, hire, etc.).
• All queue and route actions.
• Delete and undelete.
• Start and delete the onboarding process.
• Share.
• Match.
Context Type of callout Link
Requisition list Small callout Requisition file
Candidate list from requisition Medium callout Requisition file
Candidate submission on a requisition Medium callout Requisition file
Requisition selector (Match, Capture, etc.) Medium callout PDF of the requisition file
Candidate pooling list Medium callout Requisition file

Recruiting User Guide Taleo 10 - SP1 2-34
Basic Concepts Layout
The share and match bulk actions are delayed scheduled actions if the following requirements are met:
• For the Share action if (number of candidates) * (number of recipients) >= 10.
• For the Match action if (number of candidates) * (number of requisitions) >= 10.
When the action is delayed, a new task is scheduled for immediate execution. The execution of the action depends on the scheduler’s load. As a general rule, the action is executed a few minutes after the task is created.
The processing of actions by the system is done in groups of 20 and is committed within that group of 20. For example, if a recruiter wants to hire 21candidates on a requisition and the requisition only has 20 positions available, the system will hire the first 20 candidates and commit the data. Once candidate 21 is processed, the system will fail and will display a message to the recruiter indicating that he/she cannot hire the last candidate because there is no longer any positions available. If the recruiter needs to undo the first 20 hired transactions, he/she will have to do it manually.
Note that the Send Correspondence and Print actions are limited to 50 candidates at a time.
Option to Reset the Item Requiring Attention Icon: There is a setting configurable by the system administrator to remove the Item Requiring Attention icon when an action has been performed against a candidate, even if the candidate’s file has not been physically viewed. The actions for which this feature is available are:
• Successful CSW move/change step and status
• Successful offer related actions
• Successful Start Onboarding action
• Successful delete submission
• Successful comparison of candidates
Benefits
• Users can quickly get to what they want on a list.
• Users see what they need to see when on a list.
• Users do what they need to do when on a list.
LogoA logo can be displayed in the upper left corner of Taleo applications pages.
Detailed Description
The system administrator has the ability to upload a logo that will appear in the upper left corner of Taleo applications pages. By default, the Taleo logo is displayed.
A limit of one logo can be defined by zone. The logo must have a JPEG format and dimensions of 185 x 60 pixels.
Benefits
• Provides the ability to brand Taleo applications to more closely fit a customer branding.
• Provides a consistent look and feel across Taleo applications.

Recruiting User Guide Taleo 10 - SP1 2-35
Basic Concepts Layout
By default, the Taleo logo is displayed. The system administrator can upload another logo if desired.
• Migration
• For Taleo Performance customers, the logo already implemented will be migrated. • The Taleo Performance setting to upload a logo was moved out of Taleo Performance
Administration and into the new Central Configuration menu.
Color ThemeA theme is a set of colors used for body text, headings, and links within Taleo applications.
Detailed Description
The following standard color themes are provided by Taleo.
A theme is selected by the system administrator for the different Taleo applications.
By default, the theme is the Taleo green. Users can overwrite the theme selected using by the system administrator in the My Setup page, under the Preferences tab.
Benefits
• Provides the ability to brand Taleo applications to more closely fit a customer branding.
• Provides a consistent look and feel across Taleo applications.
Selected Item ColorColor displayed when selecting elements in the user interface.
Detailed Description
The following standard colors are provided by Taleo:
• Green
• Soft blue
• Yellow
• Blue (inverted)
• Dark (inverted)
A default color is selected by the system administrator. However, users can override the default color by modifying the Selected Item Default Color in the My Setup page, under the Preferences tab (available via the Setup link located in the up right corner of pages).
Taleo Aqua Sand Ice Silver
Recruiting User Guide Taleo 10 - SP1 2-36
Basic Concepts Layout
A high contrast color scheme, Dark (inverted), is available to users to address the Section 508 compliance standard for visually impaired users.
Setting Theme, Selected Item Color and Font SizePrerequisite
A user type permission grants users access to this feature.
Steps
1. Click the My Setup link located in the top right-hand corner.
2. In the Preferences tab, click Edit.
3. Select the desired theme in the Default Theme drop-down list.
4. Select the desired selected item color in the Selected Item Default Color drop-down list.
5. Select the desired font size in the Default Text Size drop-down list.
6. Click Save.

Recruiting User Guide Taleo 10 - SP1 2-37
Basic Concepts List
List
List FormatA list format allows the display of candidate file or requisition file information in different columns.
Detailed Description
List formats are configured by the system administrator then used by users in Taleo Recruiting Center. List formats are available for candidate lists as well as requisition lists.
Users can select (among the list formats created by the system administrator) the list format they wish to use to display files in a list.
If they have been granted the permission, users can also create up to three list formats and select columns to display specific information. Columns available to choose from have been previously defined by the system administrator.
Benefits
• Facilitates the search and organization of information.
• Improves the organization of lists.
• Speeds up candidate evaluation and improves recruiting process.
• Displays only relevant information in columns.
List ColumnA list is composed of columns that display different types of information.
Detailed Description
For a column to be available for a list format, it must have been made available for this purpose. This is done via the field configuration feature. When defining the properties of a field, whether the field was provided by Taleo or is user-defined, the system administrator must specify if the field will be available in Taleo Recruiting. When this option is selected, the field becomes available when selecting a column for a context.
Example of a list format and its columns.
Context List Format Columns
All Candidates/By Requisition Education Item Requiring Attention Icon
Disqualification Question Result
Candidate Record Identifier
Requisition Number and Title
Selection Step and Status
Education Level (most relevant education)
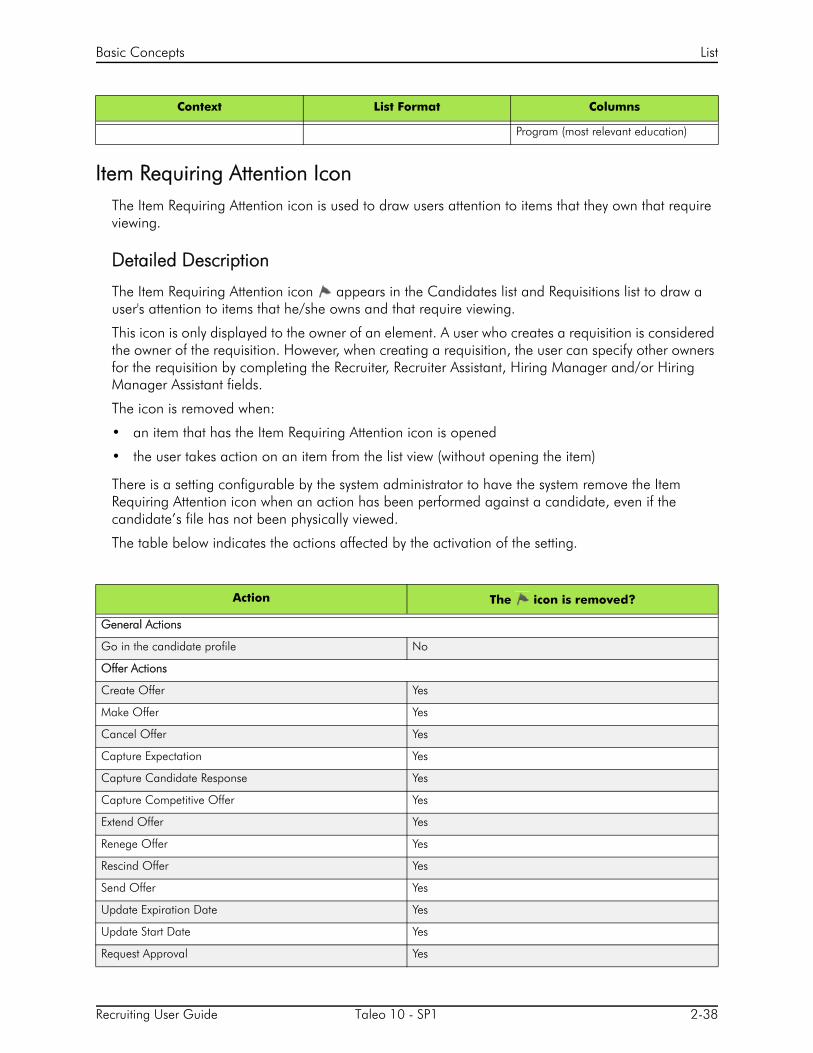
Recruiting User Guide Taleo 10 - SP1 2-38
Basic Concepts List
Item Requiring Attention IconThe Item Requiring Attention icon is used to draw users attention to items that they own that require viewing.
Detailed Description
The Item Requiring Attention icon appears in the Candidates list and Requisitions list to draw a user's attention to items that he/she owns and that require viewing.
This icon is only displayed to the owner of an element. A user who creates a requisition is considered the owner of the requisition. However, when creating a requisition, the user can specify other owners for the requisition by completing the Recruiter, Recruiter Assistant, Hiring Manager and/or Hiring Manager Assistant fields.
The icon is removed when:
• an item that has the Item Requiring Attention icon is opened
• the user takes action on an item from the list view (without opening the item)
There is a setting configurable by the system administrator to have the system remove the Item Requiring Attention icon when an action has been performed against a candidate, even if the candidate’s file has not been physically viewed.
The table below indicates the actions affected by the activation of the setting.
Program (most relevant education)
Action The icon is removed?
General Actions
Go in the candidate profile No
Offer Actions
Create Offer Yes
Make Offer Yes
Cancel Offer Yes
Capture Expectation Yes
Capture Candidate Response Yes
Capture Competitive Offer Yes
Extend Offer Yes
Renege Offer Yes
Rescind Offer Yes
Send Offer Yes
Update Expiration Date Yes
Update Start Date Yes
Request Approval Yes
Context List Format Columns

Recruiting User Guide Taleo 10 - SP1 2-39
Basic Concepts List
Amend Approval Path Yes
Decide on Approval Yes
Terminate Approval Yes
Candidate Selection Workflow Actions
Move/Change Status & Step Yes
Bypass Yes
Reject Yes
Has Declined Yes
Hire Yes
Schedule Interview Yes
Update Interview Yes
Cancel Interview Yes
Mark as Yes Yes
Mark as No Yes
Mark as Maybe Yes
Move all to next step Yes
Move to next step Yes
Revert Yes
Reset Selection Process Yes
Candidate File Actions
Match No
Merge No
Share No
Fill Out Form No
Print No
File in folder No
Compare Yes
Add Comment No
Add Grade No
Attach File No
Send Correspondence No
Find Similar Candidate No
Remove candidate No
Delete Submission Yes
Undelete Submission Yes
Create Screening Request No
Onboarding Actions
Start Onboarding Process Yes
Action The icon is removed?
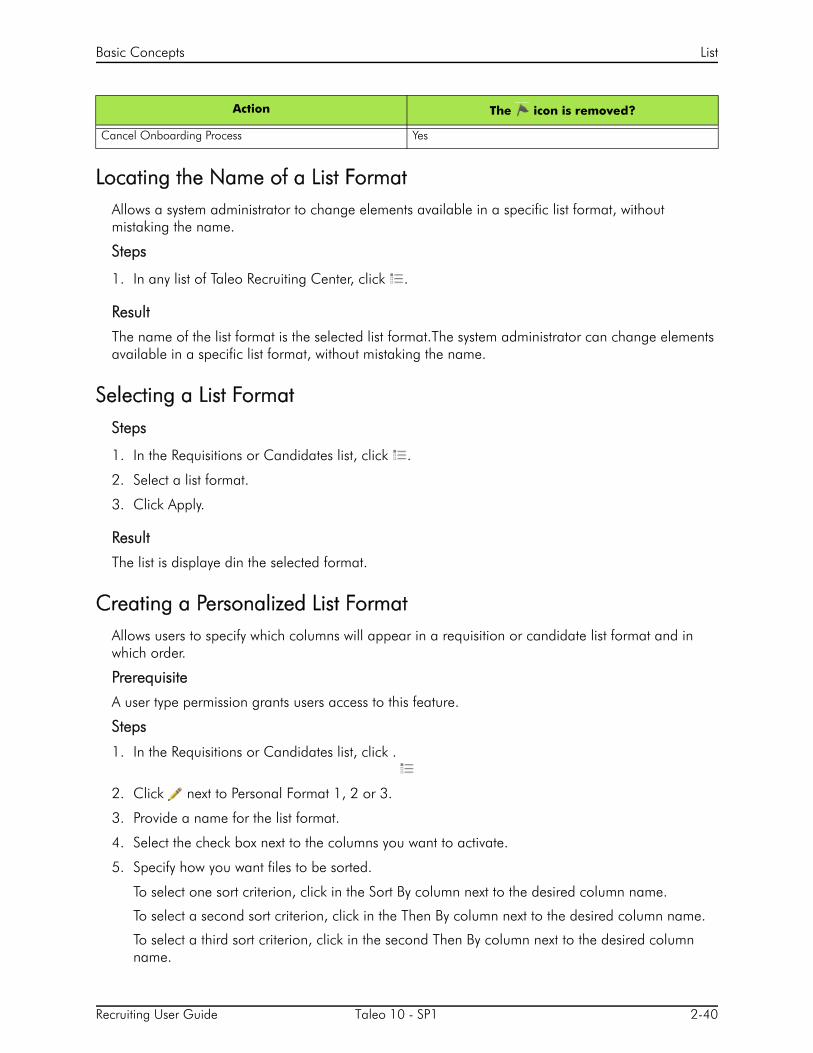
Recruiting User Guide Taleo 10 - SP1 2-40
Basic Concepts List
Locating the Name of a List FormatAllows a system administrator to change elements available in a specific list format, without mistaking the name.
Steps
1. In any list of Taleo Recruiting Center, click .
Result
The name of the list format is the selected list format.The system administrator can change elements available in a specific list format, without mistaking the name.
Selecting a List FormatSteps
1. In the Requisitions or Candidates list, click .
2. Select a list format.
3. Click Apply.
Result
The list is displaye din the selected format.
Creating a Personalized List Format Allows users to specify which columns will appear in a requisition or candidate list format and in which order.
Prerequisite
A user type permission grants users access to this feature.
Steps
1. In the Requisitions or Candidates list, click .
2. Click next to Personal Format 1, 2 or 3.
3. Provide a name for the list format.
4. Select the check box next to the columns you want to activate.
5. Specify how you want files to be sorted.
To select one sort criterion, click in the Sort By column next to the desired column name.
To select a second sort criterion, click in the Then By column next to the desired column name.
To select a third sort criterion, click in the second Then By column next to the desired column name.
Cancel Onboarding Process Yes
Action The icon is removed?

Recruiting User Guide Taleo 10 - SP1 2-41
Basic Concepts List
To select ascending or descending sorting order, click the triangle icon repeatedly.
To disable sorting for a specific column, click the triangle icon again. The triangle icon disappears.
6. To modify the order of the columns selected, use the arrows.
7. Click Save.
Result
The personalized list format is available in the List Formats window.
Editing a Personalized List FormatPrerequisite
A user type permission grants users access to this feature.
Steps
1. In the Requisitions or Candidates list, click .
2. Select a personal format then click .
3. Make necessary changes.
4. Click Save.
Result
The name of a requisition or candidate list format and the columns displayed in the list are modified as specified.
Deleting a Personalized List FormatPrerequisite
A user type permission grants users access to this feature.
Steps
1. In the Requisitions or Candidates list, click .
2. In the List Formats window, select a personal list format then click .
Result
The list format created is deleted.
Displaying Information in a ListPrerequisite
A user type permission grants users access to this feature.
Steps
1. In the Requisitions or Candidates list, click .

Recruiting User Guide Taleo 10 - SP1 2-42
Basic Concepts List
2. Select a list format (personal or system defined) that includes the column that will allow displaying the required information.
If no list format includes the required column, contact your system administrator.
3. Click Apply.
Result
The column is displayed in the list format.
Changing the Candidate List Sorting KeyPrerequisite
A setting allows the activation of this feature.
A user type permission grants users access to this feature.
Steps
1. Click the My Setup link located in the top right-hand corner.
2. In the Preferences tab, click Edit.
3. Select the desired value in the Sorting Key drop-down list.
4. Click Save.
Candidate File IdentifierA candidate file identifier contains candidate-specific information presented in the Candidate Record Identifier column of a candidate list.
Detailed Description
A candidate file identifier can provide the following information in the form of text or icon:
• Candidate name (first name, last name, middle initial)
• Identification number
• Ace candidate
• Internal candidate
• In at least one selection process
• Referred candidate
• Registered person
The Candidate Record Identifier column is always present in a candidate list. The system administrator is responsible of defining which information will appear by default in the column. However, users can modify the information set by the system administrator via the My Setup page.
Selecting the Information in the Candidate Record Identifier ColumnPrerequisite
A setting allows the activation of this feature.

Recruiting User Guide Taleo 10 - SP1 2-43
Basic Concepts List
A user type permission grants users access to this feature.
Steps
1. Click the Setup link located in the top right-hand corner.
2. In the Preferences tab, click Edit.
3. Select the desired elements in the Identifier Content section.
4. Click Save.
Result
The options selected appear in the Candidate Record Identifier column of a candidate lists.
Recruiting User Guide Taleo 10 - SP1 2-44
Basic Concepts Folder Management
Folder Management
FolderA folder is a storage area for organizing candidate files and search queries.
Detailed Description
Users, if they have been granted the proper permissions, have the ability to organize folders in ways that best suit their needs. They can store candidate files as well as candidate search queries in folders. They can create, delete and rename folders and they can also share folders with other users.
The folder feature is represented by this icon and is available in the left panel of the Candidates list and Search Queries page.
Benefits
• Allows users to organize files more efficiently.
Creating a FolderPrerequisite
A user type permission grants users access to this feature.
Steps
1. Click located in the left pane of the Candidates list and Search Queries page.
2. Select the Personal folder.
3. Click Manage.
4. Select Create.
5. Enter the folder name in the blank field that appears.
6. Press Enter.
Result
A new folder appears in your personal list of folders to organize candiate files and search queries.
Next Step
Sharing the folder.
Defining the folder properties.
Deleting a FolderPrerequisite
A user type permission grants users access to this feature.
Files included in the folder must not be opened by another user.
Steps

Recruiting User Guide Taleo 10 - SP1 2-45
Basic Concepts Folder Management
1. Click located in the left pane of the Candidates list and Search Queries page.
2. Select a folder.
3. Click Manage.
4. Select Delete.
Result
The folder is removed from your personal list of folders.
Renaming a FolderPrerequisite
A user type permission grants users access to this feature.
Steps
1. Click located in the left pane of the Candidates list and Search Queries page.
2. Select a folder.
3. Click Manage.
4. Click Rename.
5. Enter a new folder name.
6. Press Enter.
Next Step
Modifying the folder properties.
Moving a FolderPrerequisite
A user type permission grants users access to this feature.
Steps
1. Click located in the left pane of the Candidates list or Search Queries page.
2. Select a folder.
3. Click Manage.
4. Click File In...
5. Select the desired personal folder.
6. Drag the folder in the desired folder.
7. Click Yes in the message that appears.
Result
The personal folder is moved into another folder.

Recruiting User Guide Taleo 10 - SP1 2-46
Basic Concepts Folder Management
Next Step
Modifying the folder properties.
Modifying the Properties of a FolderPrerequisite
A user type permission grants users access to this feature.
Steps
1. Click located in the left pane of the Candidates list and Search Queries page.
2. Select a folder.
3. Click Manage.
4. Select Properties...
5. Enter information in the fields.
6. Click Done.
Result
A name, an pwner and comments are specified for the folder.
Next Step
Sharing a folder.
Sharing a FolderPrerequisite
A user type permission grants users access to this feature.
Steps
1. Click located in the left pane of the Candidates list and Search Queries page.
2. Select a folder.
3. Click Manage.
4. Click Sharing...
5. Specify the users and/or groups who can have access to the folder.
6. Click Done.
Result
The folder is available in the Shared folders section and a hand appears below the folder to show that it is shared. When a user shares a folder, this user will not see his/her own folder in the "shared" directory. Shared folders are only available to users who have been granted the permission to access shared folders.
Storing a File in a FolderAllows users to put a file in a folder in order to consult it later on.

Recruiting User Guide Taleo 10 - SP1 2-47
Basic Concepts Folder Management
Steps
1. Click located in the Candidates list and the Search Queries page.
2. Select an element to file in a folder.
3. Select a folder. You can also create a new folder if the ones available do not suit your needs.
4. Click Done.

Recruiting User Guide Taleo 10 - SP1 2-48
Basic Concepts File Attachment
File Attachment
AttachmentAn attachment is a file that can be tied to a requisition, a candidate file, an offer, etc.
Detailed Description
User type permissions allow users to attach and remove files in requisitions and candidate files.
Settings can be configured to specify the following:
• the maximum size of an attachment (by default, the allocated limit is 100 kb).
• the maximum size of all attachments (by default, the allocated limit is 500 Mb).
• the maximum number of attachments (by default, five files can be attached).
The following file formats are supported by the application. It is the responsibility of the system administrator to define which formats are available to users.
• Word Perfect (.wpd)
• MS Word (.doc)
• MS Word 2007 (.docx)
• Adobe (.pdf)
• Text (.txt)
• Rich Text Format (.rtf)
• Hypertext Markup Language (.htm)
• Portable Document Format (.html)
• Zip Format
Adding an Attachment to a Candidate FilePrerequisite
A user type permission grants users access to this feature.
Candidate must be in a step that includes the Attach File action.
A candidate file may contain up to five attached files, each limited to 100 KB.
File must be in the following format: *.doc (MS-Word), *.docx (MS Word 2007), *.wpd (Word Perfect), *.txt (text), *.rtf (rich text format), *.pdf (Adobe), *.html and *.htm.
McAfee scans files for viruses. If a virus is detected, the file is not attached. The system displays file information or suggests attaching a different file.
Steps
1. In the Candidates list, click on a candidate file.
2. Under the Attachments tab, click Add.
3. Click Browse to select a file.

Recruiting User Guide Taleo 10 - SP1 2-49
Basic Concepts File Attachment
4. Complete fields as required.
5. Click Done.
Result
The candidate file is supplemented with more information.
Removing an Attachment from a Candidate FilePrerequisite
A user type permission grants users access to this feature.
Steps
1. In the candidate file, click on the Attachments tab.
2. Move the mouse over the name of an attachment.
3. Click .
4. In the warning window, confirm your deletion.
Result
The attachment is no longer attached to the candidate file.
Viewing Attachments in a Candidate FileSteps
1. In the candidate file, click on the Attachments tab.
2. In the Attachments list, click on the name of an attachment.
Result
The content of the attatchment is displayed to the user.
Adding an Attachment to a Requisition FilePrerequisite
A user type permission grants users access to this feature.
A user can attach as many files as desired until the total zone capacity set by the system administrator has been reached.
McAfee scans files for viruses. If a virus is detected, the file is not attached. The system displays file information or suggests attaching a different file.
File must be in the following format: *.doc (MS-Word), *.docx (MS Word 2007), *.wpd (Word Perfect), *.txt (text), *.rtf (rich text format), *.pdf (Adobe), *.html and *.html.
Steps
1. Open a requisition file.

Recruiting User Guide Taleo 10 - SP1 2-50
Basic Concepts File Attachment
2. In the Attachments tab, click Browse to select a file.
3. Click Add.
Result
The attachment appears in the Attachments tab. The file is attached to the requisition file and can be shared with approvers and users having access to the requisition.
Removing an Attachment from a Requisition FilePrerequisite
A user type permission grants users access to this feature.
Steps
1. In a requisition file, click on the Attachments tab.
2. Move the mouse over the name of an attachment.
3. Click Delete.
4. In the warning window, confirm your deletion.
Result
The attachment is no longer attached to the requisition.
Viewing Attachments in a Requisition FileSteps
1. In the requisition file, click on the Attachments tab.
2. In the Attachments list, click on the name of an attachment.
Result
Content of the attachment is displayed to the user.
Adding an Attachment to an OfferPrerequisite
A user type permission grants users access to this feature.
Candidate file must include an offer.
A user can attach as many files as desired until the total zone capacity set by the system administrator has been reached.
McAfee scans files for viruses. If a virus is detected, the file is not attached. The system displays file information or suggests attaching a different file.
File must be in the following format: *.doc (MS-Word), *.docx (MS Word 2007), *.wpd (Word Perfect), *.txt (text), *.rtf (rich text format), *.pdf (Adobe), *.html and *.htm.
Steps
1. In the candidate file, click .

Recruiting User Guide Taleo 10 - SP1 2-51
Basic Concepts File Attachment
2. Select Offer in the Attach to option.
3. Browse to select a file.
4. Click Done.
Result
The name of the attached file is displayed in the Attachments list under the Attachments tab of the candidate file.
Removing an Attachment from an OfferPrerequisite
A user type permission grants users access to this feature.
Candidate file must have a file attached to an offer.
Steps
1. In the candidate file, select the Attachments tab.
2. Move your mouse over the name of the file to remove.
3. Click .
4. In the warning window, confirm deletion.
Result
The file no longer appears in the list of attachments.

Recruiting User Guide Taleo 10 - SP1 2-52
Basic Concepts Personal Preferences
Personal Preferences
My SetupThe My Setup feature allows users to set their personal preferences for certain features of the application.
Detailed Description
The My Setup link is displayed at the top right hand corner of pages. It is available to users if it has been configured in the user's configuration profile and if the user has been granted a user type permission.
Most settings appearing in the My Setup link have been previously configured by the system administrator, but users can override the value of these settings to fit their personal preferences.
For a list of all preferences that can be modified, refer to Personal Preferences.
Personal PreferencesThe table presents personal preferences that can be modified by a user in the My Setup page.
Element Description
Personal Information • First Name• Last Name• Prefix• Suffix• Initial• Employee ID• Title• Department Name
Contact • Email address• Fax Number • Work Phone Number • Cellular Phone Number • Pager Number • Home Phone Number
Address • Complete address
Account • User Name• Password • Work item delegation

Recruiting User Guide Taleo 10 - SP1 2-53
Basic Concepts Personal Preferences
Changing Personal PreferencesPrerequisite
A setting allows the activation of this feature.
A user type permission grants users access to this feature.
Steps
1. Click the My Setup link located in the top right-hand corner.
2. Click on a tab.
3. Click Edit.
4. Modify your preferences.
5. Click Save and Close.
Result
Personnal preferences are changed.
General User Preferences • Enable eShare Email for Response Center Access• Default Distance Unit • Correspondence Language• Content Language• Time Zone• Workflow Event Notification• Fax Notification• Default Theme• Default Text Size• Selected Item Default Color• Accessibility Features
Search • Last Update• Place of Residence
Candidates • Identifier Content• Sorting Key• Candidate List Content• Tab displayed when accessing a candidate file in navigation• Tab displayed when accessing a candidate file from a list• Sorting Key• Sorting Key• Sorting Key
Requisition • Default Hiring Manager• Default Recruiter• Requisition File Automatic Filling• Preferred Non-Electronic Media• Display Question Details in Libraries
Frequent Collaborators
Frequent Approvers • Requisition Approval• Offer Approval
Element Description
Recruiting User Guide Taleo 10 - SP1 2-54
Basic Concepts Personal Preferences
Adding Preferred Non-Electronic MediaPrerequisite
A setting allows the activation of this feature.
A user type permission grants users access to this feature.
Steps
1. Click the My Setup link located in the top right-hand corner.
2. In the Preferences tab, click Edit.
3. Click Add... located under Preferred Non-Electronic Media.
4. Locate and select the desired medium.
5. Click Done.
Result
The medium appears in the Source list of the Preferences tab. Users now have their own personalized list of preferred non-electronic media different than the one defined by the system administrator.
Next Step
Modifying the list of preferred non-electronic media.
Modifying Preferred Non-Electronic MediaPrerequisite
A setting allows the activation of this feature.
A user type permission grants users access to this feature.
Steps
1. Click the My Setup link located in the top right-hand corner.
2. In the Preferences tab, click Edit.
3. Click Modify... located under Preferred Non-Electronic Media.
4. Select one or several media.
5. Click Select.
6. Click Done.
Result
The media appear in the Source list of the Preferences tab.

Recruiting User Guide Taleo 10 - SP1 2-55
Basic Concepts Correspondence
Correspondence
CorrespondenceA correspondence is a message sent to a recipient or multiple recipients.
Detailed Description
A correspondence can be sent to one or several recipients at the same time.
Users can send a correspondence to up to 50 recipients, all selected on one page.
When sending a correspondence, a user can create a message from scratch or use a message template defined by the system administrator. The correspondence can be sent via email or it can be printed in order to fax it or send it by regular mail.
Attachments can be included in a correspondence.
The maximum file size of attachments is specified by the system administrator.
To send a correspondence, to create a message from scratch and to attach files to a correspondence, a user must have been granted the proper user type permissions.
Sending a Customized CorrespondencePrerequisite
A user type permission grants users access to this feature.
A user type permission is required to attach a file to a message.
Step must include the Send Correspondence action.
Steps
1. In the Candidates list, select one or several candidate files.
2. In the More Actions list, select Send Correspondence...
3. Select From scratch.
4. Complete required fields.
To send correspondence to more than one recipient, use a semi column to separate names.
5. Click Next.
6. Enter information in the fields.
7. To select a file to attach, click Browse...
8. Click Send.
Result
Depending on the option you selected, the message will be sent to the candidates selected or printed. No notification is sent for invalid e-mail addresses.
Next Step
If the message was printed, you can either fax the message to the candidates or send it via regular mail.
Recruiting User Guide Taleo 10 - SP1 2-56
Basic Concepts Correspondence
Sending a Standard CorrespondencePrerequisite
A user type permission grants users access to this feature.
A step of the candidate selection workflow must include the Send Correspondence action.
Corresponce can be sent to a maximum of 50 candidates at a time.
Steps
1. In the Candidates list, select one or several candidate files.
2. In the More Actions list, select Send Correspondence...
3. Select From template.
4. Click .
5. Select the paragraphs to include in the message.
6. Complete required fields.
7. Click Next.
8. If values are missing in the message, provide the required information.
9. Click Next.
10.In the Message Preview page, look at the message content.
If changes are required, click Edit.
11.Click Send to send the message via e-mail or Print to print it.
Result
Depending on the option you selected, the message will be printed or sent to the selected candidates.
Next Step
If the message was printed, you can either fax the message to the candidates or send it via regular mail.
Resending a CorrespondencePrerequisite
A user type permission grants users access to this feature.
Steps
1. In the candidate file, click on the History tab.
2. In the Details column, click on the link corresponding to the correspondence that was sent.
3. Click Resend.
4. Add a comment.
5. Click Next.
6. Click Send.

Recruiting User Guide Taleo 10 - SP1 2-57
Basic Concepts Correspondence
Result
The correspondence previously sent is sent again.
BP(A|S)
Candidate File
• Candidate File . . . . . . . . . . . . . . . . . . . . . . . . . . . . . . . . . . . . . . . . . . . . . . 3-1
• Candidate . . . . . . . . . . . . . . . . . . . . . . . . . . . . . . . . . . . . . . . . . . . . . . . . 3-10
• Ace Candidate . . . . . . . . . . . . . . . . . . . . . . . . . . . . . . . . . . . . . . . . . . . . . 3-18
• Candidate Comparison . . . . . . . . . . . . . . . . . . . . . . . . . . . . . . . . . . . . . . . 3-23
• Candidate Sharing . . . . . . . . . . . . . . . . . . . . . . . . . . . . . . . . . . . . . . . . . . 3-26
• Candidate File Merge . . . . . . . . . . . . . . . . . . . . . . . . . . . . . . . . . . . . . . . . 3-27
• Similar Candidates . . . . . . . . . . . . . . . . . . . . . . . . . . . . . . . . . . . . . . . . . . 3-30
• Candidate Matching . . . . . . . . . . . . . . . . . . . . . . . . . . . . . . . . . . . . . . . . . 3-32
• Candidate Interview . . . . . . . . . . . . . . . . . . . . . . . . . . . . . . . . . . . . . . . . . 3-35
• Candidate Autopooling . . . . . . . . . . . . . . . . . . . . . . . . . . . . . . . . . . . . . . . 3-41
• Onboarding . . . . . . . . . . . . . . . . . . . . . . . . . . . . . . . . . . . . . . . . . . . . . . . 3-45
• Hourly Hiring . . . . . . . . . . . . . . . . . . . . . . . . . . . . . . . . . . . . . . . . . . . . . . 3-47
• Contingent Hiring . . . . . . . . . . . . . . . . . . . . . . . . . . . . . . . . . . . . . . . . . . . 3-50

Recruiting User Guide Taleo 10 - SP1 3-1
Candidate File Candidate File
Candidate File
Candidate FileA candidate file is a form containing candidate information such as personal information, work experience, certifications, references, EEO information, screening information.
Detailed Description
When opening a candidate file, users are always in view mode and, if authorized, users can choose to go into edit mode. This provides a cleaner layout and eliminates the need to “close” the file (to exit out of it and reactivate other buttons on the screen) if only viewing the file. In view mode, only fields for which data is provided are displayed. However, in edit mode, fields that do not contain data are displayed according to user permissions.
When opening a candidate file, the screen is organized into three panes:
• Left pane containing the candidate card in the top section and supporting information in the bottom section. The pane can be expanded or collapsed.
• Right pane containing supporting tools such as the online help. The pane can be expanded or collapsed.
• Central pane containing a menu bar allowing users to perform actions on the candidate file. It also contains tabs that provide complete information about the candidate. Depending on which side the candidate card is, the information displayed will vary.
The candidate file contains several tabs:
• Job Submission/General Profile
• Attachments
• Tasks
• Offer
• Offer Approval
• Referral
• History
The content of the candidate file is presented as a long form. The main content of the candidate file is within the Job Submission/General Profile tab, which includes various sections. The other tabs contain peripheral information.
Note that the landing tab when opening a candidate file can be configured by users in My Setup, under the Preferences tab.
Whether in edit or view mode, on the Job Submission/General Profile tab, users always have access to a table of contents section that allows quick jumping to different portions of the file. To display this table of contents, users simply have to click located in the Job Submission/General Profile tab.
All fields displayed in the candidate file and the candidate card are linked to a security level. Depending on the user type permissions a user has been granted by the system administrator, the user may or may not be able to see or to edit fields of the candidate file or the candidate card.

Recruiting User Guide Taleo 10 - SP1 3-2
Candidate File Candidate File
Benefits
• Allows users to locate candidate information at a glance.
• Easy access to other submission status information.
• Centralized attachment management
• The candidate file is highly flexible and shows only what the user is allowed to see.
• The candidate file is easy to read as it does not display empty fields.
Candidate CardThe candidate card provides quick information about the candidate.
Detailed Description
Located on the left panel of the candidate file, the candidate card quickly provides information about the candidate. The candidate card can be “flipped” by clicking its top-right corner.
One side of the candidate card displays information on the general profile of the candidate such as:
• name
• address
• phone number
• e-mail address
• etc.
The other side of the candidate card displays information on the candidate's job submission(s) such as:
• Candidate Selection Workflow step/status
• prescreening results
• etc.
In addition, the candidate card displays links to other submissions of interest. This gives users a quick way of knowing which of the other submissions that have been created are still under “active” consideration. By hovering over the active or inactive link, users are presented with a callout with links to navigate to the relevant submissions. On this listing, there is also a column that indicates the step/status of the candidate for that specific submission. It is therefore easy to see at a glance without having to open and read through the actual submission, if the candidate is at the interview or at the offer stage on another position.
The content of the candidate file left panel (bottom part) is also dependent on the candidate card side selected. For example, the submission date, the source type, the recruiter and hiring manager names can be displayed. A link to any existing offers is also available. Users will only be able to see information on submissions and offers that they are authorized to access.
The content of the candidate file central panel is also dependent on the candidate card side selected. Depending on which side the candidate card is, the information displayed will vary:
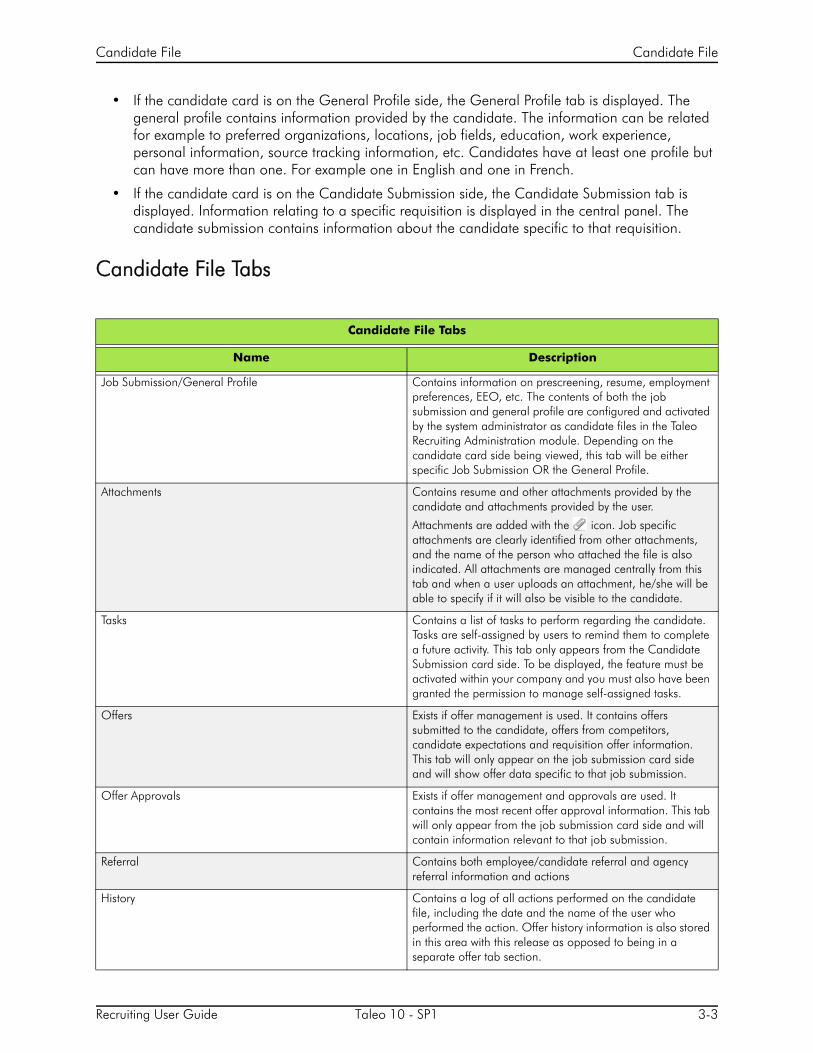
Recruiting User Guide Taleo 10 - SP1 3-3
Candidate File Candidate File
• If the candidate card is on the General Profile side, the General Profile tab is displayed. The general profile contains information provided by the candidate. The information can be related for example to preferred organizations, locations, job fields, education, work experience, personal information, source tracking information, etc. Candidates have at least one profile but can have more than one. For example one in English and one in French.
• If the candidate card is on the Candidate Submission side, the Candidate Submission tab is displayed. Information relating to a specific requisition is displayed in the central panel. The candidate submission contains information about the candidate specific to that requisition.
Candidate File Tabs
Candidate File Tabs
Name Description
Job Submission/General Profile Contains information on prescreening, resume, employment preferences, EEO, etc. The contents of both the job submission and general profile are configured and activated by the system administrator as candidate files in the Taleo Recruiting Administration module. Depending on the candidate card side being viewed, this tab will be either specific Job Submission OR the General Profile.
Attachments Contains resume and other attachments provided by the candidate and attachments provided by the user.
Attachments are added with the icon. Job specific attachments are clearly identified from other attachments, and the name of the person who attached the file is also indicated. All attachments are managed centrally from this tab and when a user uploads an attachment, he/she will be able to specify if it will also be visible to the candidate.
Tasks Contains a list of tasks to perform regarding the candidate. Tasks are self-assigned by users to remind them to complete a future activity. This tab only appears from the Candidate Submission card side. To be displayed, the feature must be activated within your company and you must also have been granted the permission to manage self-assigned tasks.
Offers Exists if offer management is used. It contains offers submitted to the candidate, offers from competitors, candidate expectations and requisition offer information. This tab will only appear on the job submission card side and will show offer data specific to that job submission.
Offer Approvals Exists if offer management and approvals are used. It contains the most recent offer approval information. This tab will only appear from the job submission card side and will contain information relevant to that job submission.
Referral Contains both employee/candidate referral and agency referral information and actions
History Contains a log of all actions performed on the candidate file, including the date and the name of the user who performed the action. Offer history information is also stored in this area with this release as opposed to being in a separate offer tab section.

Recruiting User Guide Taleo 10 - SP1 3-4
Candidate File Candidate File
Candidate Duplicate CheckAllows users to verify if a candidate already exists in the system.
Detailed Description
The candidate duplicate check is used when users capture candidate information or when they merge candidate files. The candidate duplicate check feature is also used by agents who refer candidates for a position.
To determine if candidate files are duplicates, the system performs a duplicate check against criteria specified by the system administrator. Duplicate check criteria are:
• First Name (default)
• Last Name (default)
• Street Address (default)
• City (default)
• Zip/Postal Code (default)
• Place of Residence
• Social Security Number
• Phone Numbers
• Date of Birth
Benefits
• Avoids increasing the size of the database with duplicated information.
Candidate File EventA candidate file event is any action performed on a candidate file.
Detailed Description
When a candidate file is modified, either by the candidate or the user, an event to track this action is generated and is displayed in the candidate file History tab. There are 103 distinct combinations (tracking event + event details) in the application and each combination belongs to one of the following eleven categories.
The system administrator selects the event categories used to track events but users can modify the event categories selected.
• Agent and referer
• Attachments
• Candidate file update
• Candidate information
• Candidate progression
• Comments
• Correspondence

Recruiting User Guide Taleo 10 - SP1 3-5
Candidate File Candidate File
• Questions and competencies
• Regulation
• Resume
• Screening services
• Offer
The Correspondence event category allows users to review previously sent correspondence. A user type permission allows users to resend the correspondence directly from the History tab.
Comments relating to an event can be added and edited in the History tab if the user has the proper user type permissions.
A user type permission allows users to modify the date of an event and specify when an action on a candidate's file really took place, provided the feature has been activated. The use of the actual date enables reports to more accurately reflect user activity in the selection process. There might be a number of reasons why users would want to change certain dates in a candidate's file. For example, if a candidate had an interview on September 15, but that user was only able to enter this information in the system on September 20, the event date would indicate September 20. The user could then change this date to September 15, which would be more accurate. If the date and time related to an event can be edited, they appear as a hyperlink. The event date can only be between the application’s creation date and the current date.
Candidate Screening ResultsScreening results such as background checks, tax credit eligibility, etc. are displayed in the candidate file.
Detailed Description
Screening results are available in the candidate file, in the Job Submission tab.
A Previous Requests link gives access to the previous transactions with the same provider. The information is displayed in the columns of a table as follows:
• Requester
• Request Date
• Provider Status
• Status
• Result Summary
A Details link provides details on the transaction selected. This view is configurable by the system administrator. Information on partner updates is also displayed.
The History tab in the candidate file provides detailed information on each transaction as well as updates sent by partners.
Results are automatically reused across the system, if applicable. If the results of a screening service are applicable on a different candidate submission, they will automatically be re-used on that new job submission. This means that as the candidate applies on a career section, he/she will NOT have to go through the screening service if there is already active information stored on the candidate for
Recruiting User Guide Taleo 10 - SP1 3-6
Candidate File Candidate File
that service. The screening results will show in the candidate file screening section of all the applications configured with that screening service automatically (no result synchronization necessary on the Partner screening service). In addition, auto-flow will automatically progress the candidate on ALL the applications that the candidate applied where the results are valid.
With the candidate General Profile, it is possible to view the results of any screening services the candidate has completed on any of its job submissions, provided that the results are reusable across all applications.
Creating a Candidate FilePrerequisite
A user type permission grants users access to this feature.
The information you will need to provide depends on the flow and options configured by the system administrator.
File used for resume parsing must be in a *.doc (MS-Word), *.txt (text), *. rtf (rich text format), *.pdf (Adobe PDF), *.html and *.htm.
The processing of resumes written in other languages than the submission language might not be supported.
If using *.PDF file for resume parsing, file must not contain an image of text.
Steps
1. In the Candidates list, select Create Candidate in the More Actions list.
2. Follow the on-screen instructions.
Instructions and fields to complete vary from one configuration to another.
3. A duplicate check is automatically performed by the system when a candidate file is created.
Result
Candidate information such as personal information, work experience, education, etc. is captrue in a candidate file appearing in the candidate list.
Editing a Candidate FilePrerequisite
User type permissions grants users access to this feature.
Candidate file must not be identified as registered i.e with the icon.
Steps
1. In the Candidates list, click on the name of a candidate.
2. Click Edit.
3. Modify information as needed.
4. Click Save.
Result
Information is updated in the candidate file.
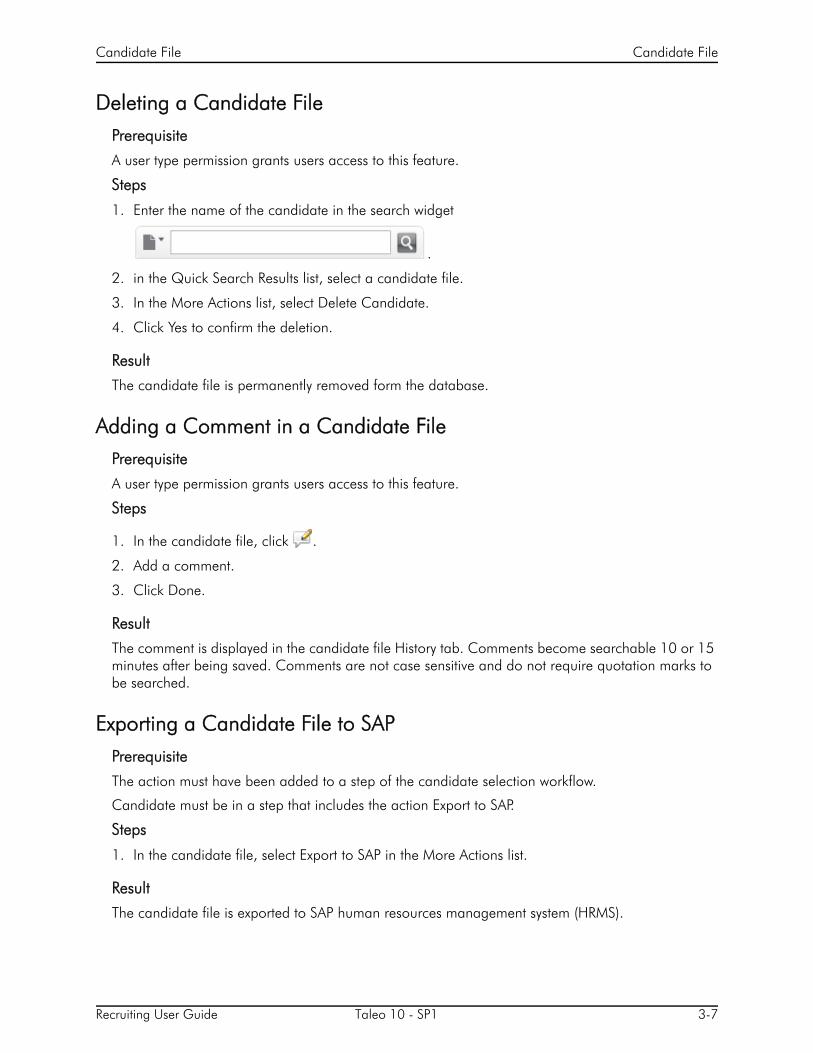
Recruiting User Guide Taleo 10 - SP1 3-7
Candidate File Candidate File
Deleting a Candidate FilePrerequisite
A user type permission grants users access to this feature.
Steps
1. Enter the name of the candidate in the search widget
.
2. in the Quick Search Results list, select a candidate file.
3. In the More Actions list, select Delete Candidate.
4. Click Yes to confirm the deletion.
Result
The candidate file is permanently removed form the database.
Adding a Comment in a Candidate FilePrerequisite
A user type permission grants users access to this feature.
Steps
1. In the candidate file, click .
2. Add a comment.
3. Click Done.
Result
The comment is displayed in the candidate file History tab. Comments become searchable 10 or 15 minutes after being saved. Comments are not case sensitive and do not require quotation marks to be searched.
Exporting a Candidate File to SAPPrerequisite
The action must have been added to a step of the candidate selection workflow.
Candidate must be in a step that includes the action Export to SAP.
Steps
1. In the candidate file, select Export to SAP in the More Actions list.
Result
The candidate file is exported to SAP human resources management system (HRMS).

Recruiting User Guide Taleo 10 - SP1 3-8
Candidate File Candidate File
Entering a Grade in a Candidate FilePrerequisite
A user type permission grants users access to this feature.
The action must have been added to a step of the candidate selection workflow.
Candidate must be in a step that includes the action Enter grade.
Steps
1. In the Candidates list, click on a candidate file.
2. In the candidate file, select Enter Grade... in the More Actions list.
3. Complete fields as required.
4. Click Done.
Result
The grade is displayed in the History tab.
Merge FormA merge form is a PDF document that can be tied to candidate selection workflows, steps and statuses or that can be generated/filled out at any point on demand by a user.
Detailed Description
Merge forms are used during the hiring process. For example, during interviews with candidates, a recruiter may use a PDF form as a template to complete a candidate’s “Do not disclose” information. PDF forms are most typically used for various new hire paperwork.
Merge forms are first built in Adobe Acrobat. System administrators then add them in Taleo Recruiting Administration and tie them to candidate selection workflows, steps and statuses to make them available to users in Taleo Recruiting Center. Merge forms can be printed by a user, then further completed if needed and signed by the candidate. (None of this is tracked in the system).
Merge forms can be pre-populated with variables retained in the system within the Message Template feature. These variables can be added using the Adobe Acrobat Professional Forms feature. For example, you could take a merge form (such as the I-9 form) and insert Taleo variables that will automatically pull information from the candidate file. Instead of typing the name of a candidate, the name would automatically appear in the form.
By default, the maximum file size of a merge form is 2 MB.
Benefits
• Merge forms may be available in any language. Merged data is available in English only. Most asian languages are not supported, based on PDF conversion issues with tokens. The merged data will pull what is in the candidates file, so it may not be in English.
• Merge forms provide consistency and the ability for corporate driven forms to be interchanged with basically no interruption to the end user.
• Pre-populating information in a merge form reduces the time necessary for a candidate to complete the form.
Recruiting User Guide Taleo 10 - SP1 3-9
Candidate File Candidate File
Using the Fill Out FormPrerequisite
The Fill Out Form action must be enabled in a candidate selection workflow.
Steps
1. In a candidate list, select a candidate.
2. In the More Actions list, select Fill Out Form.
3. In the Fill Out Form list, click on a form. Acrobat® Reader opens, displaying the form. The form is filled automatically using the corresponding fields of the candidate file or requisition.
4. Validate the information.
5. Click Print.
Result
A PDF form containing information automatically generated by the system is created.

Recruiting User Guide Taleo 10 - SP1 3-10
Candidate File Candidate
Candidate
CandidateA candidate is a person for which the system has information for.
Detailed Description
A candidate is a person:
• who has submitted a profile
• who has submitted a job application
• for which a user has created a profile
• who has been matched to a requisition by a user
• who has been referred by an agent for a job opening
• who has been referred by a friend for a job opening
• who's profile has been submitted by an agent
• who's profile has been submitted by a friend
In general, candidates applying on a job or submitting their profile from an internal career section are considered internal candidates. All other candidates are considered external candidates. Candidate’s internal/external state is tracked in the general profile and at the job submission level.
In the General Profile: Internal candidates are identified by the icon. This icon is displayed in the candidate card located on the left pane and in the candidate list.
Application flows can be configured to allow external candidates to indicate that they are actually internal candidates.
A user type permission grants users access to the Internal Candidate check box which is available in the Candidate Personal Information section of the candidate file General Profile tab. This check box allows users to change the internal/external state of a candidate directly in the candidate file.
A recruiting setting allows users to automatically identify a candidate as Internal so that candidates who reach the Hire/Hired status in a candidate selection workflow will automatically have their general profile updated to indicate Internal. The system will display the icon for those candidates in a candidate list. Candidates who have received the Internal designation at the general profile level are considered to be internal candidates on the general profile even if they applied via an external career section. Authorized system users or integrations are required to remove this designation from employees who leave the company. For integration and reporting purposes, this field is named “Candidate,InternalApplication”.
In the Submission: Internal/external submissions are identified in the candidate submission, in the Submission Type field located under the candidate card. The internal/external state value is used to improve metrics and analysis. Because all hired candidates can become “internal” candidates without an application level designation of Internal or External, all hires might appear in metrics as “internal hires”, which would be incorrect. Values for the Submission Type field are either External or Internal and this value is not currently editable. This field is derived strictly from the internal/external value on the candidates' profile at the time the job submission was completed. For integration and reporting purposes, this field is named “Application,IsInternal”.
Recruiting User Guide Taleo 10 - SP1 3-11
Candidate File Candidate
Registered Candidate: A registered person file is a candidate that was created as a result of two different actions:
• Someone who did not have a candidate file in the system referred a candidate and because they were asked to provide some information about themselves, a registered person file was created.
• A candidate logged in to the career section and instead of following the application process, the candidate clicked on the My Account link and provided the information on that page.
Candidate CreationUsers have the ability to create a candidate file to capture candidate information such as personal information, work experience, education, etc.
Detailed Description
The creation of candidates is done via the Create Candidate action which is available in the home page as well as in the Candidates list via the More Actions list. This action is available to users if they have been granted the proper user type permission; it also depends to which creation file the user’s configuration profile was granted access to.
When selecting the Create Candidate action, the Create a Candidate wizard is launched. Users have the ability to create a general profile or a job-specific submission if these two types of files have been activated by the system administrator. If selecting the job-specific submission option, users need to specify the requisition, which controls for which staffing types they want to capture a candidate.
After deciding on the type of file to create, users have to select a template to create the candidate. Templates are used to capture general profiles, job-specific submissions or referrals, be general profile or job specific. The templates provided are based on the selected requisitions and their staffing type. Note that all users do not have the same list of templates since the system administrator can activate a different set of templates for different configuration profiles.
Users then select the folder where they want to save the candidate file and the language in which they want to create the candidate file.
Users can also select the Resume Parsing option to extract key data elements from a candidate's resume and to use these data elements to automatically populate fields in the application. The candidate's resume cannot exceed 100 kilobytes or the size defined by the system administrator. It must also have the proper file format as defined by the system administrator. Resume Parsing has no impact on the formatting of a text (bold, italics, bullets). It can detect text in the header and footer. The following data elements are extracted from the candidate's resume:
• Personal information: first name, last name, initial, address, city, state/province, country, zip/postal code, phone number, e-mail address.
• Education: education level, evaluation date.
• Experience: start date, end date, achievement.
Then, a duplicate check has to be performed to find out if the candidate already exists in the database. If duplicates are found, the system displays them in a list. Users can select the candidate file and edit the file. If no duplicates are found or if duplicates are found and the candidate is not on the list, users can create a new candidate file OR modify the duplicate search criteria and perform a new duplicate check.

Recruiting User Guide Taleo 10 - SP1 3-12
Candidate File Candidate
When the candidate file template appears, users have to complete the required fields. The layout of the file is presented as a long form containing sections, blocks of information and fields selected by the system administrator. For details, see the Candidate File chapter.
Benefits
• Any users who have been granted the proper user type permission can create candidates.
• The creation of candidates can be done from any candidate lists.
• The capture form is tailored to the process, requisition type, Organization-Location-Job Field structure and user security.
Candidate Progression StatusThe candidate progression status indicates the most advanced progression status of a candidate on other requisitions across all positions where the candidate is being considered.
Detailed Description
To see the progression status of a candidate, your system administrator must add the Most Advanced Progression Status column in the candidate list format. When this column is added, an icon appears in the candidate list, in the Progression Status column, indicating the furthest active progression status of a candidate across all positions where he/she is being considered. When mousing over the icon, a tooltip appears. The tooltip indicates the active status and a date. For example, “Most advanced progression status: Offer (as of 09/19/2009)”. It is also possible to obtain more details on the status by clicking on the icon.
Statuses are based on the reference workflow and there is one icon for each of the possible job application status of the application workflow. Icons are displayed for active candidates on active requisitions.
In the scenario below, a candidate has applied to four jobs:
Icon Description
New
Reviewed
, , First, second and third interview
Testing
Offer
Hired
Job Job Status Candidate Status
1 Active for sourcing New > To be reviewed
2 Closed Interview 2 > To be scheduled
3 Active for sourcing Offer > Rejected

Recruiting User Guide Taleo 10 - SP1 3-13
Candidate File Candidate
The icon that would appear for this candidate across all contexts would be Interview 1 because it is the furthest active progression status on an active job. Note that both requisition status and candidate status must be active to be considered for the furthest active progression status.
In the Candidates list, the icon remains available and shows the parallel job applications of the candidate. In an application specific list, the progression status icon may be displayed while the staircase icon may not be displayed if there is only one job application. In the search result list, if the staircase icon is displayed, the progression status icon is also displayed. If no staircase icon is displayed, the progression status column is empty.
It is recommended to remove the tracking solution (staircase icon) and to replace it with the Progression Status feature in general lists (such as search result lists, folder lists) if you allow users to view the content of requisitions to which a candidate has applied and to which the user has access. In a job-specific candidate list, the staircase icon is visible only when there is at least one concurrent active job application, and the progression status icon is visible as soon as there is one active job application.
Benefits
• Reduces chances of having multiple users working on the same candidate simultaneously.
• Users are informed of candidates being considered on other requisitions and they can have additional details directly on the candidate list on the job where the candidate is active and has progressed furthest.
Deleting a Candidate SubmissionPrerequisite
A user type permission grants users access to this feature.
Steps
1. In the Candidates list, select a candidate file.
2. Select Delete Submission in the More Actions list.
3. Click Save and Close.
Result
The candidate submission is removed from the requisition. The status of the candidate for the requisition is Deleted.
Restoring a Deleted Candidate SubmissionPrerequisite
A user type permission grants users access to this feature.
Steps
1. In the Candidates list, select a candidate file.
4 Active for sourcing Interview 1 > To be scheduled
Job Job Status Candidate Status
Recruiting User Guide Taleo 10 - SP1 3-14
Candidate File Candidate
2. In the More Actions list, select Restore Submission.
3. Add a comment.
4. Click Save and Close.
Result
The candidate submission for the requisition is restored. The status of the candidate for the requisition is Restored.
Rejecting a CandidatePrerequisite
A user type permission grants user access to this feature.
Steps
1. In the Candidates list, select a candidate file.
2. In the More Actions list, select Change Status/Step.
3. Select Rejected from the New Status list.
4. Enter comments.
5. Click Save and Close.
Result
The candidate is rejected for the requisition. The status of the candidate is Rejected.
Hiring a CandidatePrerequisite
Candidate must be at the completion status of a step.
The candidate selection workflow must include the Hire step.
Steps
1. In the Candidates list, select a candidate.
2. From the More Actions list, select Bypass.
3. Select Hire in the New Step field.
4. Complete mandatory fields.
5. Click Save and Close.
Result
The user hired the candidate is hired without going through all the steps of the candidate selection workflow. The status of the candidate is Hired.

Recruiting User Guide Taleo 10 - SP1 3-15
Candidate File Candidate
Hiring a Candidate More than Once for the Same RequisitionPrerequisite
A setting allows the activation of this feature.
The action can only be performed for one candidate at a time.
The action can only be performed on hourly requisitions. This is the only type of requisitions for which the selection process can be restarted.
The requisition must be active (it cannot be canceled or filled).
The candidate must not be disqualified for the application or for his/her profile.
The action cannot be performed if the application is flagged as deleted.
The action cannot be performed if the Offer management step is part of the workflow (active or not active step).
The action cannot be performed if it brings the hiring manager to a restricted step.
The action can be performed on a candidate with the following status:
• Rejected
• Declined
• Offer
• Hired
Steps
1. In a candidate list, select a candidate file.
2. In the More Actions list, select Reset Selection Process.
3. Click Done.
Result
The candidate is now back into the selection process and can be rehired.
Recording that a Candidate was HiredSteps
1. In the Candidate file, select Move... from the More Actions list.
2. In the Move window, select the Hire step and Hired status.
3. Click done.
Result
The Hired status is displayed in the candidate list indicating that a candiate has completed a selection process and is ready to be hired.
Next Step
Onboarding process can be started.

Recruiting User Guide Taleo 10 - SP1 3-16
Candidate File Candidate
Indicating a Candidate has Declined a Job OfferSteps
1. In the candidate file, select Candidate has declined... in the More Actions list.
2. In the Change Status menu, enter a comment.
3. Click Done.
Result
Usrt was able to indicate that the candidate has removed his/her application on a specific requisition. Candidate is no longer in the candidate selection workflow for that requisition.
Reverting to Step and Status Previously ReachedPrerequisite
Step must include the Revert action.
Step must not be an RSOffer step.
Status of the requisition must not be filled or cancelled.
Steps
1. In the candidate file, select Revert in the More Actions list.
2. In the Revert window, add a comment.
3. Click Done.
Result
Candidate is moved back to the step and status previously reached.
Unlocking a Candidate AccountPrerequisite
A user type permission grants users access to this feature.
Steps
1. In the Candidates list, click on a candidate file.
2. In the candidate file, select the General Profile tab.
3. Confirm candidate identity.
4. Click Unlock Account under the Account information section.
Result
Candidate can noe access the application.

Recruiting User Guide Taleo 10 - SP1 3-17
Candidate File Candidate
Generating a Password for a Candidate AccountPrerequisite
A user type permission grants user access to this feature.
Steps
1. Confirm candidate identity.
2. In the candidate file, select the General Profile tab.
3. In the Account Information section, click Generate New Password.
4. Click Yes to confirm your choice.
5. Click OK.
Result
A new password is generated at the candidate’s request. The new system-generated password is temporary. The candidate will only be able to use this password once, at the next login. The system will then force the candidate to change his/her password.
Changing the Internal/External State of a CandidatePrerequisite
A user type permission grants users access to this feature.
Steps
1. In the candidate file, select the General Profile tab.
You may need to flip the candidate card on the left pane.
2. Click Edit.
3. In the Candidate Personal Information section, select or clear the Internal Candidate field.
4. Click Save and Close.
Result
The candidate profile indicates if thecandidate is an internal or external candidate.

Recruiting User Guide Taleo 10 - SP1 3-18
Candidate File Ace Candidate
Ace Candidate
ACE Recruiting GuidelinesACE Recruiting is the entire process of creating a requisition, complete with a good job description, questions and competencies, that enables the automated identification of top (ACE) candidates.
Detailed Description
At the basis of ACE Recruiting is the creation of an ACE requisition that contains a comprehensive job description listing all relevant Abilities, Certifications, and Experiences and that includes competencies and questions developed utilizing standardized formats.
The ACE Recruiting success formula contains the following steps:
Writing a Good Job Description: An effective job description must be compelling, intelligent and honest. It must attract, intrigue and persuade top talents. It should include specific information and be focused on the talent.
For details, see the Requisition Description chapter.
Identifying the Job Basic Requirements (ACE List): When writing the description of a requisition, the basic requirements for the job must be identified. Break up the qualifications into Abilities, Certifications and Experience that are required or strongly desired to obtain the ACE (Abilities-Certifications-Experience) list.
There are two kinds of abilities (skills):
• Hard Skills: measurable, clearly identifiable professional trade skills. For example: Java, Pediatrics.
• Soft Skills: personality and life experiences, which are more difficult to quantify. These skills are often better assessed in an interview. Express them in terms of proficiency in or years of experience in questions. For example: What is your level of proficiency managing software integration projects?.
There are two kinds of certifications:
• Academic Certifications: degrees, diplomas, or certificates obtained from a post-secondary institution. For example: Bachelor Science in Engineering.
• Professional Certifications: courses, seminars, or programs that offer a recognized standard in a specific industry. For example: PMI (Project Management).
There are two kinds of experiences:
• Role-Specific: knowledge and previous experience gained by working in a particular role with specific responsibilities. For example: Nurse, Web Developer.
• Industry-Specific: knowledge and previous experience gained by working within a specific discipline or marketplace. For example: Healthcare, Telecommunications.
Based on your ACE list, you create questions and add those questions to the requisition.

Recruiting User Guide Taleo 10 - SP1 3-19
Candidate File Ace Candidate
Creating Questions and Adding Questions to the Requisition: The requisition contains questions that candidates will answer to provide information you are looking for and not the information they feel is relevant. Questions should have prescreening value, clearly indicate whether the candidate meets a requirement or has an asset, contain all of the possible answers listed in a logical and standardized order.
For details, see the Question and Question Writing Tips chapters.
Adding Competencies to the Requisition: The requisition may also contain competencies. Competencies are supplied with the system. Competencies are not written as a question. Examples of competencies could be “Human resource planning”, “Develop, implement and evaluate human resources policies and procedures”.
For details, see the Competency chapter.
Assigning the Required, Asset and Weight criteria to Questions and Competencies: Once questions and competencies have been added to the requisition, you need to specify if the questions and competencies are required for the position or if they are an asset. You can then add a weighting to give more considerations to certain questions or competencies.
For details, see the Prescreening chapter.
Setting the ACE Alert: The ACE Alert is a threshold to identify the ideal candidates or ACE candidates. The ACE Alert is set in the requisition Alerts tab. Once the ACE Alert is set, the system identifies the candidates who achieves or exceeds the ACE Alert threshold for a job offer.
For details, see the ACE Candidate Alert chapter.
Sorting ACE Candidates: The ACE Candidate icon identifies top candidates in the Candidate list of a requisition. You can sort the Candidate list by ACE candidates. You can also use the “Requirements”, “Assets Met X/Y” and “Result” columns to sort candidates.
For details, see the ACE Candidate Filtering chapter.
Reviewing the ACE Recruiting Process: A best practice is to review and analyze your results on an ongoing basis until you find what works best for you and your positions. Ask yourself: “Did I hire an ACE candidate?” If yes, did the candidate align with the ACE criteria. If no, do I need to adjust questions, required and assets criteria, ACE Alert?
Benefits
• ACE Recruiting decreases time to hire and increases the quality of hires.
• ACE Recruiting helps users identify top candidates quickly without sorting through volumes of unqualified candidates.
ACE Candidate AlertThe ACE Candidate alert allows users to set a threshold to identify the ideal candidates and to send an e-mail to specific recipients to inform them that ACE candidates were found.
Detailed Description
The ACE alert allows the system to identify the candidate who achieves or exceeds the ACE Alert threshold for a job offer. The ACE alert identifies top candidates based on their responses to the competencies and questions in the Prescreening section of the requisition file.
The ACE Candidate icon identifies top candidates in the Candidate list of a requisition.
Recruiting User Guide Taleo 10 - SP1 3-20
Candidate File Ace Candidate
The ACE alert is based on Required and Asset criteria. The ACE alert divides candidates into three groups that assist you in determining which candidate files to review first:
• ACE candidates: Consider these candidates first because they meet all Required criteria and some Asset criteria.
• Minimally qualified candidates: Consider these candidates after the ACE candidates because they meet all Required criteria but no Asset criterion.
• Other candidates: Do not consider these candidates because they do not meet any Required criteria.
A best practice is to always have the ACE alert activated.
When setting the ACE Candidate alert:
• Select the option “A candidate meeting all the required criteria achieves a result of at least x%” to set the minimum result. Select a percentage from the list. At the right of the percentage, the system displays the number of points the candidate must have to match the selected percentage. When changing the percentage, the value to the right is recalculated. Candidates who meet all the required criteria and the result value will be considered ACE candidates. Do not use the percentage weighting option if you do not use the Weight criterion in the Prescreening section of the requisition file. If you utilized weighting on some of the questions you could, if you wish, incorporate into the ACE Alert setting as well. For a simple approach, you can start by using 75% weight result and then eventually align that % with your own approach and utilization of weighting that works best for you.
• Select the option “A candidate meeting all the required criteria has at least x assets out of y” to set the minimum number of assets. Select a value from the list. Candidates who meet all the required criteria and the minimum number of assets will be considered ACE candidates.
• Select the option “Identify a candidate as an ACE when either condition is met” to identify ACE candidates using the result or asset condition.
• Select the option “Identify a candidate as an ACE when both conditions are met” to identify ACE candidates using the result and asset conditions.
When setting the ACE Alert, you have the option to send an e-mail to notify specific recipients that an ACE candidate was found.
ACE Candidate FilteringACE candidate filtering allows users to use different methods to filter ACE candidates, that is those candidates who have met the Required, Asset and Weight criteria included in the Prescreening section of the requisition file.
Detailed Description
Different methods can be used to filter ACE candidates.
Viewing the Candidate List: The Candidate list of a specific requisition contains the ACE column represented by this icon: . Candidates with this icon are ACE candidates. You can sort the candidate list by ACE candidates.
You can also use the “Requirements”, “Assets Met X/Y” and “Result” columns to sort candidates.
Using Quick Filters: The “ACE” filter available on the left hand side of the page can help you to only display ACE candidates for a requisition.
Recruiting User Guide Taleo 10 - SP1 3-21
Candidate File Ace Candidate
The “Meets required criteria” is another way to quickly filter your Candidate list to show active candidates who meet all the required criteria of the Prescreening section of the requisition file.
You can also use the “Assets Met” and “Results between (%)” features to filter your list.
Adjusting Required and Asset Criteria: If your Candidate list shows too many or too few ACE candidates, you can go back to the requisition Prescreening section and adjust the Required and Asset criteria. You may realize that a response you marked as an asset should have been marked as a requirement.
Updating the ACE Alert: If you do adjust the Required and Asset criteria, then you need to review the ACE Alert. You may need to adjust the selections of assets or adjust overall settings based on the modifications you made in the requisition Prescreening section.
Configuring ACE Recruiting - OverviewPrerequisite
A user type permission grants users access to this feature.
Steps
1. Create a requisition.
2. Define basic job requirements.
a. Abilities
b. Certifications
c. Experience
3. Create questions.
4. Add questions to the requisition.
5. Assign the Required, Asset and Weight criteria to Questions and Competencies.
6. Set the ACE alert.
Setting the ACE Candidate AlertAllows users to set criteria to identify the ideal candidates and to select recipients who will be informed that ACE candidates were found.
Prerequisite
A user type permission grants users access to this feature.
A best practice is to always activate the ACE candidate alert.
When setting the ACE candidate alert, answer the prescreening competencies and questions as your ideal candidate would. Then calculate the total assets and weight to determine the ACE threshold.
Steps
1. In the requisition file, click the Alerts tab.
2. In the ACE Candidate Alert section, click Modify Alert.
3. In the ACE Candidate Alert page, select the desired criteria.
4. Click Next.

Recruiting User Guide Taleo 10 - SP1 3-22
Candidate File Ace Candidate
5. In the Ace Candidate Alert window, select the desired recipients.
6. Click Done.
Result
In the requisition Alerts tab, the criteria and recipients are displayed in the ACE Candidate Alert section.
Next Step
Setting the Request More Information alert.
Adding a Recipient to an ACE AlertAllows users to select a person who will be receiving alerts for ACE candidates.
Prerequisite
A user type permission grants users access to this feature.
Steps
1. In the requisition file, click the Alerts tab.
2. In the ACE Candidate Alert section, click Modify Alert.
3. Click Next.
4. In the Ace Candidate Alert window, select the desired recipients.
5. Click Done.
Result
The selected recipient will appear in the list of recipients that will receive an ACE alert.
Removing a Recipient from an ACE AlertAllows users to remove a person previously selected to receive alerts of ACE candidates.
Prerequisite
A user type permission grants users access to this feature.
Steps
1. In the requisition file, click the Alerts tab.
2. In the ACE Candidate Alert section, click Modify Alert.
3. In the ACE Candidate Alert window, click Next.
4. In the Ace Candidate Alert window, browse mouse over the name of a recipient.
5. Click .
6. Click Done.
Result
The recipient no longer appears in the list of recipients of the ACE alert.

Recruiting User Guide Taleo 10 - SP1 3-23
Candidate File Candidate Comparison
Candidate Comparison
Candidate ComparisonAllows users to display candidate files side by side for comparison purposes.
Detailed Description
From a requisition-specific candidate list, a user can select two or more candidate files and invoke the Compare action in the More Actions list.
Up to four candidate files can be displayed simultaneously side by side. However, more than four candidate files can be compared. After expanding or collapsing sections of information to focus on the most interesting criteria for a given comparison of four candidate files, the user can click on the icon to lock a candidate file as being the reference against which the other candidate files will be compared. The user can scroll through the other candidates selected earlier, continue the comparison and remove unwanted candidates from the comparison view as needed using the using the small x in the top right corner of the column for the candidate.
The sections of information displayed when comparing candidate files match the sections and sub-sections configured for the candidate file. The following fields are included in the compare process if they are present in the candidate file. Note that UDFs (other than screening results) are not included among the fields being compared.
Section Field
Basic Profile • Education Level• Job Level• Job Type• Schedule• Shift• Employee Status• Minimum Annual Salary• Currency• Travel• Advance Notice• Date of Availability
Work Experience • Achievements• Current Job• Employer• Start Date • End Date• Job Function• Other Employer• Other Function
Work Conditions • Currency• Expected Hourly Pay Rate• Hours per week willing to work• Hours per week, preferred• Willing to work on holidays• Willing to work on weekends
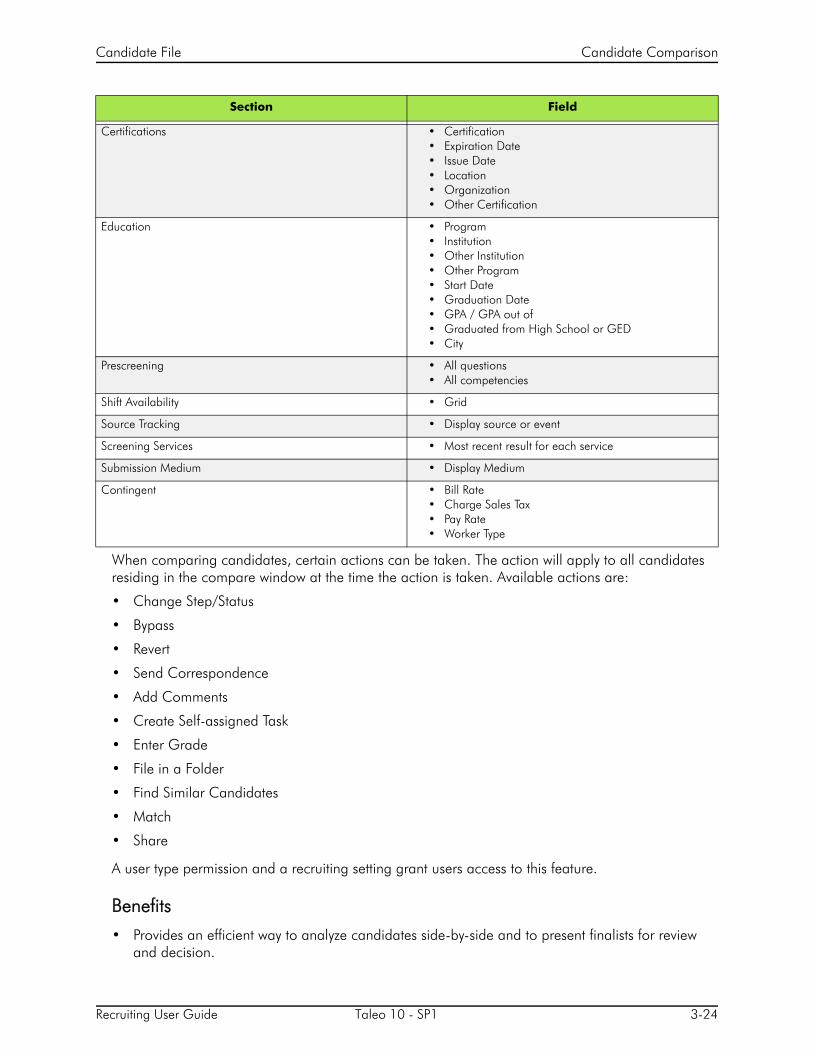
Recruiting User Guide Taleo 10 - SP1 3-24
Candidate File Candidate Comparison
When comparing candidates, certain actions can be taken. The action will apply to all candidates residing in the compare window at the time the action is taken. Available actions are:
• Change Step/Status
• Bypass
• Revert
• Send Correspondence
• Add Comments
• Create Self-assigned Task
• Enter Grade
• File in a Folder
• Find Similar Candidates
• Match
• Share
A user type permission and a recruiting setting grant users access to this feature.
Benefits
• Provides an efficient way to analyze candidates side-by-side and to present finalists for review and decision.
Certifications • Certification• Expiration Date• Issue Date• Location• Organization• Other Certification
Education • Program• Institution• Other Institution• Other Program• Start Date• Graduation Date • GPA / GPA out of• Graduated from High School or GED• City
Prescreening • All questions• All competencies
Shift Availability • Grid
Source Tracking • Display source or event
Screening Services • Most recent result for each service
Submission Medium • Display Medium
Contingent • Bill Rate• Charge Sales Tax • Pay Rate• Worker Type
Section Field

Recruiting User Guide Taleo 10 - SP1 3-25
Candidate File Candidate Comparison
• Displays comparable information for a subset of candidates in a clear, side-by-side format.
• Can take certain actions on individual candidates or on all candidates.
Comparing Candidate FilesPrerequisite
A setting activates this feature.
A user type permission grants users access to this feature.
Candidate files must be linked to the same requisition
Steps
1. In the Requisitions list, for the desired requisition, click on the number located in the column.
2. In the candidate list of the selected requisition, select candidates to compare.
3. In the More Actions list, select Compare...
4. Compare candidate as desired.
Result
User can compare candidate files linked to the same requisition
Recruiting User Guide Taleo 10 - SP1 3-26
Candidate File Candidate Sharing
Candidate Sharing
Candidate SharingThis feature allows users to share candidate files with people via e-mail.
Detailed Description
The share action is represented by the icon and is available in the candidate list and the candidate file.
The file generated when sharing a candidate file is a PDF file similar in look to what would be generated using the Print function. In addition, the sections available for selection by a user are based on how the file is configured and on user type permissions. This means, if a system administrator wanted to allow users to more precisely control what is printed, he/she can do this by increasing the sections in the file layout.
When using the share function, only fields containing data are visible in the view/print mode; this means fields with no data will not be rendered when sharing.
The PDF generated by the share function will be identical to the data presented to the user for the selected sections while looking at the information in view mode.
A user type permission grants users access to this feature.
Benefits
• More granular sections of information based on the candidate file configurations.
• Ability to share what the user wants in a list or file.
Sharing a Candidate FilePrerequisite
A user type permission grants users access to this feature.
Steps
1. In the Candidates list, select a candidate file.
2. Click .
3. Select a recipient.
4. Click Next.
5. Select Content to share.
6. Click Share.
Result
An e-mail is sent to the recipient with all or part of the selected content of the candidate file.

Recruiting User Guide Taleo 10 - SP1 3-27
Candidate File Candidate File Merge
Candidate File Merge
Candidate File MergeA candidate file merge allows users to combine two candidate files into one file.
Detailed Description
A candidate file merge can be done in the following contexts:
• Candidate search
• Candidate advanced search
• Candidate folders
During a candidate file merge, a candidate file is enhanced with the content of another candidate file (i.e., the master file). The system suggests a master file as follows:
• If both candidates were not referred, the system suggests the most recent candidate file.
• If the most recent candidate was referred, the system suggests the oldest candidate file.
• If both candidates were referred, the system suggests the first referral.
To determine if the two candidate files are duplicate files, the system performs a duplicate check against fields specified by the system administrator. The following rules apply:
• If there is no match between the fields, a message is displayed but the merge can still be done.
• If there is a match between the fields, the system merges the two candidate files. The master candidate file is enhanced with the content of the duplicate file, and the duplicate file is then deleted.
When a merge occurs, the content of the duplicate file is added to the content of the master candidate file. For the Education block, field content is copied over if Institution, Program or Education Level are different. For the Work Experience block, field content is copied over if Employer or Job Function are different. Note that the content of custom fields is also merged.
Note that the candidate file that is not selected is soft deleted (that is data can later be restored). All new candidate applications are considered for the merge action. However, existing candidate applications of the master candidate file are not overwritten.
If the e-mail option was selected when merging two candidate files, an e-mail message is sent to the candidate to inform him/her that two candidate files corresponding to his/her profile were merged and to invite him/her to review the new candidate file. If the candidate file is owned by an agent, the e-mail message is sent to the agent rather than to the candidate.
A user type permission is required to be able to merge candidate files. Also, users who do not have the permission to view sensitive information for internal applications are able to merge candidate files. However, the name of the candidate is not displayed; “Confidential Information” appears instead.
It is not possible to merge candidate files for the following reasons:
• The duplicate candidate file is already in an onboarding process.
• The duplicate candidate file contains an offer.
• The duplicate candidate file contains an interview request.

Recruiting User Guide Taleo 10 - SP1 3-28
Candidate File Candidate File Merge
• The duplicate candidate file contains an incomplete external service request (i.e., an open Passport transaction) such as a background check, a tax credit check, an assessment.
It is not possible to merge more than two candidate files at a time. However, here’s a possible workaround. If three duplicate files are found, first merge two candidate files. Then use the merged candidate file and merge it with the third candidate file. When doing the first merge, do not send a message to the candidate or the agent. Send it when doing the merge with the third file.
It is not possible to automatically restore the master candidate file in its original state. You have to restore it manually by removing information that was added. However, the deleted duplicate candidate file can be restored by your system administrator.
It is possible to “unmerge” candidate files. You can undelete the duplicate candidate file, since this file was soft deleted. Regarding the master candidate file, users have to delete the newly created file manually to restore the state. The tracking history is not modifiable, but a comment can be added to explain what was done.
Files attached to the duplicate file are also merged. If the maximum number of attachments allowed is exceeded or the attachments exceed the allocated disk space, the attachments will be merged. However, you will not be able to add additional files, since the maximum number is reached or exceeded.
Merging can create multilingual candidate files. When merging two candidate files with different languages, the master candidate file will have two languages instead of one. However, the language of the master candidate file will be used for the general correspondence. Application specific correspondence will continue to be in the language of the application, thus the candidate might start receiving correspondences in both languages.
Benefits
• Provides a cleaner database.
• Recruiters do not work on the same candidate files without knowing it.
• Agents are informed if two duplicate candidate files exist in the database, thus resolving conflicting situations. When a duplicate candidate file is merged, agents who are owners of the master candidate file are informed immediately.
Merging Candidate FilesPrerequisite
A user type permission grants users access to this feature.
Candidate file must not be in an onboarding process.
Candidate file must not contain an interview request.
Candidate file must not contain an incomplete external service request (i.e., an open Passport transaction) such as a background check, a tax credit check, an assessment.
Candidate file must not contain an offer.
Candidate file must not be identified as registered i.e with the icon.
Steps
Recruiting User Guide Taleo 10 - SP1 3-29
Candidate File Candidate File Merge
1. Enter the name of a candidate in the search widget.
.
2. In the Quick Search Results list, select candidate files.
3. Click .
4. Click Yes to confirm merging.
Result
If there is no match between the fields, a message is displayed but you can still perform the merge.
If there is a match between the fields, the system merges the two candidate files. The master candidate file is enhanced with the content of the duplicate file, and the duplicate file is then deleted. When a merge occurs, the content of the duplicate file is added to the content of the master candidate file. For the Education block, field content is copied over if Institution, Program or Education Level are different. For the Work Experience block, field content is copied over if Employer or Job Function are different. Note that the content of custom fields is also merged. Note that the candidate file that is not selected is soft deleted (that is data can later be restored). All new candidate applications are considered for the merge action. However, existing candidate applications of the master candidate file are not overwritten.
Next Step
If the e-mail option was selected in the Merging Candidate Files window, an e-mail message is sent to the candidate to inform him/her that two candidate files corresponding to his/her profile were merged and to invite him/her to review the new candidate file. If the candidate file is owned by an agent, the e-mail message is sent to the agent rather than to the candidate.
Recruiting User Guide Taleo 10 - SP1 3-30
Candidate File Similar Candidates
Similar Candidates
Similar Candidate SearchUsers have the ability to look for similar candidates based on information of an existing candidate.
Detailed Description
This type of search can be performed from a candidate list or from within a candidate file by using the icon .
Basically, a “find similar candidate” search uses the following fields of the candidate file to find similar candidates:
• Pasted resume from the general profile
• Career objectives from the general profile
• Additional information from the general profile
• Education (Institution, Program, Education Level (Achieved), and text-based user-defined fields) from the general profile
• Work Experience (Employer, Job Function, Achievements, and text-based user-defined fields) from the general profile
• Text-based answers to questions from library
• Text-based user-defined fields answers
• The last three attachments per candidate provided the attachments use one of the following supported file formats:
• .doc (MS Word). Warning: the docx Word 2007 format is not supported, only the standard Word format.
• .txt (standard text file)• .rtf (Rich Text Format)• .pdf (Adobe Portable Document Format)• .htm or .html (hypertext documents)• .wpd (WordPerfect)
In addition to the fields mentioned above, the system uses the default value for the Last Update field. The Last Update value is a user preference and can be defined in the Setup window.
Note that performing a “find similar candidate” search using a candidate file that contains no information in any of the fields listed above retrieves no candidates. You increase your chance of retrieving similar candidates by using a candidate file that contains a valid attachment or a pasted resume.
Finding similar candidates can be performed for one candidate file at a time.
Finding Similar CandidatesSteps

Recruiting User Guide Taleo 10 - SP1 3-31
Candidate File Similar Candidates
1. In the candidate list, select a candidate.
2. Click .
Result
A list of candidates similar to an existing candidate is displayed.
Recruiting User Guide Taleo 10 - SP1 3-32
Candidate File Candidate Matching
Candidate Matching
Candidate Matching to a RequisitionThis feature allows users to select one or several candidate files and to match them to one or several requisition files.
Detailed Description
The matching action is available via this icon and can be performed from a candidate list or from within a candidate file.
Basically, a user selects a candidate file, clicks and the system presents a list of requisitions. Requisitions are displayed by the system if they match the default matching requisition criteria set by the system administrator. However, these default criteria can be modified by the user to find more relevant requisitions for a particular candidate. This is done by selecting the Matching Requisitions option and clicking this icon both available in the Match Candidates to Requisitions window. Once a candidate has been matched to a requisition, the user can decide to send an e-mail to the candidate to inform him/her that a match has been done and to obtain more information on his/her application. E-mails are sent only for posted requisitions, to avoid inviting candidates to requisitions they cannot see on the career section.
Users can match a candidate file to requisitions based on their user type permissions.
Benefits
• This feature is useful if, for example, a recruiter has found an interesting candidate who is not the best fit for the position they applied to. However, the recruiter believes there may be other openings that would be a better fit for this candidate's experience and skills.
Matching Requisition CriteriaMatching requisition criteria are used to find a match between a candidate file and requisition file.
Detailed Description
Default matching requisition criteria are set by the system administrator. However, these default criteria can be modified by the user to find more relevant requisitions for a particular candidate. Matching criteria are:
• Preferred Jobs and Job
• Preferred Locations and Locations
• Preferred Organizations and Organization
• Place of residence and Location
• Competencies
• Questions
• Job Level
• Job Type
Recruiting User Guide Taleo 10 - SP1 3-33
Candidate File Candidate Matching
• Schedule
• Shift
• Employee Status
• Education Level
• Travel
• Minimum Annual Salary
Matching criteria (except for competencies and questions) can be set as desired or required:
• Required: The criterion is mandatory. A match must exist between the content of the candidate file and of the requisition file. If a requisition file meets the criterion, it will appear in the list of requisitions presented to the user.
• Desired: The criterion is an asset. A match is not required between the content of the candidate file and of the requisition file. Desired criteria are considered as a plus. A requisition file that does not match a desired criterion is not rejected.
Requisition files that meet all the required criteria and that also meet some desired criteria will appear at the top of the requisitions list presented to the user.
Competencies and questions criteria are considered as wildcards. If these criteria are not selected as required in the requisition, or if a candidate does not enter answers for these criteria, the answers will still be considered.
Matching a Candidate to a RequisitionAllows users to select a candidate file and to match it to a specific requisition.
Prerequisite
A user type permission grants users access to this feature.
A candidate can only be matched to a requisition that has the Approved status.
Candidate file must not be identified as registered i.e with the icon.
Steps
1. Select a candidate file.
2. Click .
3. Click Select next to the desired requisition. If no requisitions are displayed, select different values in the quick filters.
4. Click Done.
Result
Users selected a candidate file and matched it to a specific requisition. Selected candidate will be considered for the requisition.
Modifying Matching Requisition CriteriaSteps
1. Select a candidate file.
Recruiting User Guide Taleo 10 - SP1 3-34
Candidate File Candidate Matching
2. Click .
3. In the Quick Filters pane, select the option Matching Requisitions and click .
4. In the Matching Criteria window, modify criteria available in the tabs.
5. Click Done.
Result
Criteria to find requisitions are modified to find a better fit for a candidate. The list of requisitions is modified according to the criteria selected.
Emailing Candidates Matched to a RequisitionPrerequisite
A user type permission grants users access to this feature.
Steps
1. In the requisition file, select the Posting and Sourcing tab.
2. In the Careers Section, select Preview Matching Candidate.
3. In the Postings Requisitions- Filter Matching candidates window, select candidates to email to.
4. Click Done.
Result
An e-mail is sent to selected candidates to invite them to apply on a job.

Recruiting User Guide Taleo 10 - SP1 3-35
Candidate File Candidate Interview
Candidate Interview
Candidate InterviewA candidate interview is a formal meeting to evaluate the qualifications and work experience of a candidate.
Detailed Description
Users can schedule, update and cancel interviews directly in Taleo Recruiting. Attendees invited to a meeting receive an interview notification by e-mail and they add the meeting to their calendars. Each time and interview is scheduled, updated or cancelled in Taleo Recruiting, an e-mail message is sent to selected attendees
Here is how the candidate interview scheduling feature basically works.
A recruiter wants to interview a candidate for a job. The recruiter opens the candidate file and schedules an interview. The recruiter invites the candidate and can also invite other attendees to the interview meeting. The hiring manager of the requisition is invited by default. However, if the meeting organizer is the hiring manager, the recruiter is invited instead. Non-Taleo Recruiting users can also be invited to the meeting via their e-mail address.
A default interview invitation message is proposed by the system. The most appropriate message template is pre-selected based on the requisition’s Organization-Location-Job Field structure and the application language. However, it is possible to select another message.
If the recruiter has the appropriate user type permission, he/she can attach the candidate file and requisition file to the interview being scheduled and the message being sent.
When all the interview details are entered, the recruiter sends the interview meeting invitation.
The candidate, the meeting organizer and the attendees receive the interview meeting invitation by e-mail and they can add the invitation directly into their calendars. If the candidate has no e-mail address, the interview organizer can print the invitation and send it to the candidate by fax or regular mail.
After the interview meeting has been scheduled, the recruiter can view interview scheduling information in the candidate list Interview column and in the candidate file History tab. Note that to the Interview column must have been activated and added to the candidate list by the system administrator.
The recruiter also has the ability to update the interview meeting by changing the attendees, the schedule or other information, and also cancel the interview.
The candidate interview feature integrates with Microsoft® Outlook® calendar or any iCalendar system (for example, Lotus Notes®). Note that events occurring in MS Outlook calendar or any iCalendar system are not managed by Taleo Recruiting. For example, if an interview meeting is modified in Outlook, the new information will not appear in Taleo Recruiting.
MS Outlook 2000 and higher are supported. The iCalendar plug-in has been tested with LotusNotes version 5.5 and higher. Other calendar products may be functional but are not officially supported.
When the candidate file and requisition file (or other candidate attachments) are included in the interview meeting invitation, these do not follow in the Calendar meeting.

Recruiting User Guide Taleo 10 - SP1 3-36
Candidate File Candidate Interview
A candidate can only have one interview scheduled per application at a time.If a candidate has no email address, users can still schedule an interview; they simply need to print the interview invitation and send it to the candidate by fax or regular mail.
Benefits
• Interviews are scheduled directly in Taleo Recruiting.
• By importing the interview schedule information directly into Outlook or Lotus Notes calendars, candidate interview schedules can be tracked directly in Taleo Recruiting without the necessity for an external product.
• The ability to add scheduling information into a calendar minimizes the risk for forgotten meetings or conflicting agendas.
• Efficient communication and tracking of interview information at the users fingertips.
File Attached to an Interview InvitationUsers can attach the candidate file and requisition file to the interview being scheduled and the message being sent.
Detailed Description
The candidate file attached to the e-mail message only contains information included in the sections:
• Preescreening
• Screening
• Resume
• Profile
The attached file never contains confidential candidate information included in the sections:
• Offers
• Tracking
• Regulations
Files attached to the candidate file (for example, a resume) are not included in the interview invitation.
The requisition file attached to the e-mail message only contains information included in the sections:
• Logistics
• Description
User type permissions grants users access to the content of the candidate and requisition files. Depending on the user type permissions granted to the user scheduling the interview, some attendees may not have access to information they normally would have. Note that the candidate will not receive the candidate file nor requisition file.
When the candidate file and requisition file (or other candidate attachments) are included in the interview meeting invitation, these do not follow in the Calendar meeting.

Recruiting User Guide Taleo 10 - SP1 3-37
Candidate File Candidate Interview
Candidate Interview and Candidate Selection WorkflowThe candidate interview feature can be configured in the candidate selection workflow for proper candidate selection tracking.
Detailed Description
Candidate selection workflows can be configured by the system administrator so that when users schedule an interview, the candidate’s status automatically changes to a preset value. To automatically change the candidate’s status, the system administrator must activate the Interview Scheduling Behavior option for the statuses in question, that is 1st, 2nd and 3rd interview statuses (available in the Statuses Usage tab of a step).
Example:
A recruiter uses a candidate selection workflow containing the 1st, 2nd and 3rd Interview steps. All three steps have the following statuses:
• To be scheduled
• Scheduled
• Passed
The Interview Scheduling Behavior option is activated for the Scheduled status. The candidate is currently at the 1st Interview step and the To be Scheduled status.
The recruiter schedules an interview for the candidate. When the recruiter sends the interview invitation to the attendees, the status of the candidate automatically changes from To be Scheduled to Scheduled.
The candidate attends the interview as scheduled. The recruiter wants to invite the candidate to a second interview. The recruiter has to perform the following steps:
• Change the status of the 1st Interview step to Passed.
• Move the candidate to the 2nd Interview step and set the status to To be scheduled.
• Schedule a new interview.
Since the Scheduled status is also configured for the 2nd Interview step, the candidate’s 2nd Interview status automatically changes to Scheduled once the interview is sent to the attendees.
When using this functionality, a best practice is to configure the Interview steps with a completion status that indicates the successful completion of the interview (for example, Passed, Successful). This helps to ensure that an interview that is past due is not simply forgotten.
Scheduling an InterviewPrerequisite
A setting allows the activation of this feature.
A user type permission grants users access to this feature.
A candidate can only have one interview scheduled per requisition at a time.
The candidate must be at an interview step.
The language icon in the Schedule an Interview page indicates the language in which the candidate application was submitted; ensure that the interview information is in the candidate’s language.

Recruiting User Guide Taleo 10 - SP1 3-38
Candidate File Candidate Interview
Validate e-mail addresses of internal attendees before sending the interview request.
Steps
1. In the candidate file, select Schedule an Interview... in the More Actions list.
2. Follow the on-screen instructions.
3. Click Done.
4. Change the status of the candidate to Scheduled.
5. Enter comments.
6. Click Done.
Result
A formal meeting is organized with a candidate to obtain more information regarding his/her qualifications and work experience. An e-mail message containing the interview details is sent to all attendees. Attendees can add the interview meeting in their calendar. Scheduling information is available in the candidate list Interview column as well as in the candidate file History tab.
Changing Interview AttendeesPrerequisite
A setting allows the activation of this feature.
A user type permission grants users access to this feature.
An interview must have been scheduled.
Only one user at a time can modify interview information.
The candidate must have the scheduled status.
Steps
1. In the candidate file, select Update the Interview... in the More Actions list.
2. Add or remove attendees.
3. Click Done.
Result
An e-mail message containing the interview details is sent to existing and new attendees. The e-mail message is identical to the original message except that (Updated) appears in the subject of the e-mail. Attendees that have been removed receive a cancellation message. The ics file attachment is now named “Update my calendar.ics”. In the candidate file, the Tracking tab indicates that the interview has been updated.
Changing Interview InformationPrerequisite
A setting allows the activation of this feature.
A user type permission grants users access to this feature.
An interview must have been scheduled.
Recruiting User Guide Taleo 10 - SP1 3-39
Candidate File Candidate Interview
Only one user at a time can modify interview information.
The candidate must have the scheduled status.
Steps
1. In the candidate file, select Update the Interview... in the More Actions list.
2. Follow on-screen instructions.
3. Click Done.
Result
An e-mail message containing the interview details is sent to the attendees. The e-mail message is identical to the original message except that (Updated) appears in the subject of the e-mail. The ics file attachment is now named “Update my calendar.ics”. In the candidate file, the Tracking tab indicates that the interview has been updated.
Adding an Interview to MS OutlookPrerequisite
For MS Outlook 2000 and higher.
The iCalendar plug-in has been tested with Lotus Notes version 5.5 and higher.
Other calendar products may be functional but are not officially supported.
Steps
1. In MS Outlook, open the e-mail containing the interview message.
2. Double-click the Add to my calendar.ics attachment.
3. Click Accept
4. If desired, send a response to the meeting organizer.
Result
The candidate interview invitation is added to the MS Outlook calendar.The subject, location, date and time of the meeting are recorded.
Cancelling an InterviewPrerequisite
A setting allows the activation of this feature.
A user type permission grants users access to this feature.
An interview must have been scheduled.
A user cannot cancel an interview that is being updated by another user.
Steps
1. In the candidate file, select Cancel the Interview... in the More Actions list.
2. Select to send or not a cancellation message to the candidate.
3. Select a new status for the candidate.

Recruiting User Guide Taleo 10 - SP1 3-40
Candidate File Candidate Interview
4. Enter comments.
5. Click Done.
Next Step
An e-mail message is sent to the attendees. The e-mail message is identical to the original message except that (Canceled) appears in the subject of the e-mail. The ics file attachment is now named “Remove from my calendar.ics”. In the candidate file, the Tracking tab indicates that the interview has been canceled.

Recruiting User Guide Taleo 10 - SP1 3-41
Candidate File Candidate Autopooling
Candidate Autopooling
Automatic Candidate PoolingThe Automatic Candidate Pooling feature allows customers to add autopooling criteria to a requisition or requisition template to find candidates in the database who are available and qualified for a job. Managers can then access the autopool results with a single click.
Detailed Description
The Automatic Candidate Pooling feature is typically used in decentralized hiring environments, for example in high volume retail and hourly hiring where managers may have to quickly identify candidates on their own without the assistance of recruiters.
For the Automatic Candidate Pooling feature to be available, the feature must be activated by the system administrator. Users creating or defining autopooling criteria must be granted the required user type permissions, but no permission is required to access the autopool results.
Autopooling criteria can be added to a requisition via the Autopooling Criteria tab (if autopooling criteria were added to a requisition template, they will be inherited by the requisition). This is like a saved search that managers can use to find candidates who are both available and qualified. The following autopooling criteria may include any criteria from the Advanced Search, plus an additional set of basic criteria. For example:
• Exclude candidates in selection process
• Candidate’s general profile language must match the requisition language
• Exclude expired job submissions (selected by default)
• Exclude rejected candidates - Within the last x days
• Exclude hired candidates - Within the last x days (selected by default)
• Candidate’s place of residence - Within a radius of x kilometers/miles from the primary location of the job opening
• Submissions must match the following organization-location-job field structure
As a best practice, when defining autopooling criteria:
• Define autopooling criteria in requisition templates so criteria are inherited as requisitions are created.
• Define the widest possible set of candidates from the database that would be both qualified and available. This way, no time is wasted on unqualified or unavailable candidates. For example:
• Set Organizations, Locations and Job Fields to only include candidates from other jobs with overlapping skills and/or who applied to nearby locations. Filter by Organization and Location if appropriate (specific country, specific division, etc.).
• Exclude candidates being considered in another requisition, who were recently hired, whose submissions have expired.
• Use the parameter to limit results to candidates who live within X kilometers/miles of the primary location of the requisition.

Recruiting User Guide Taleo 10 - SP1 3-42
Candidate File Candidate Autopooling
Once autopooling criteria have been defined and enabled, the system will automatically generate a list of candidates matching the criteria anytime on demand. This list of candidates is accessible in the
requisition-specific candidate list or in the requisition file via the icon. candidate list or in the
requisition file via the icon. A maximum of 300 candidates can be displayed. The user then has the ability to:
• View candidate files.
• Match candidates to the current job opening (candidates are moved from the autopool results list to the requisition-specific candidate list, and they can then be moved along the workflow like any other candidate).
• Match candidates to the current job opening and reject them in a single action (which will remove undesired candidates from continuing to appear in the candidate pool for this requisition; note that by default this option is disabled).
• Filter the list of candidates using quick filters defined by the system administrator.
• Sort the list of candidates by clicking a column heading.
When viewing a candidate file, the user may be able to view the other job applications that the candidate has submitted, depending on the permissions he/she was granted.
The user is able to match a candidate to the requisition via the autopooling feature even if he/she was not granted the permission to match candidates to a requisition in general.
The user may also be able to match and reject candidates in one action if he/she was granted the proper permission. When rejecting a candidate, the manager must specify the qualifiers (motives) and provide comments as required by the workflow.
If configured by the system administrator, the Automatic Candidate Pooling feature may also provide the ability to create optional repooling rules which automatically set a candidate's submission to an Inactive status after X days of inactivity. If the autopooling criteria for other jobs include the criteria to exclude candidates who are in a selection process, candidates who are automatically set to an inactive status will no longer be excluded and thus will be included in pool results.
Benefits
• Allows employers to maximize the value of their candidate database and the sharing of candidates across locations and jobs.
• Allows employers to predefine a sophisticated search that meets regulations and company policies.
• Provides one-click access to candidates for any job according to pre-defined criteria.
• Managers and recruiters no longer waste their time on candidates who are not available nor qualified, who are already under consideration for other jobs or locations, or who have already been hired.
Defining Autopooling CriteriaPrerequisite
The automatic candidate pooling feature must be activated.
A user type permission grants users access to this feature.
Recruiting User Guide Taleo 10 - SP1 3-43
Candidate File Candidate Autopooling
Steps
1. Click on a requisition or requisition template.
2. Click the Autopooling Criteria tab.
3. Click Edit.
4. Select autopooling criteria.
5. Select if desired advanced search criteria by clicking the Customize... button.
6. Click Save.
Next Step
Activating autopooling criteria.
Activating Autopooling CriteriaPrerequisite
The automatic candidate pooling feature must be activated.
A user type permission grants users access to this feature.
Steps
1. Click on a requisition or requisition template.
2. Click the Autopooling Criteria tab.
3. Click Edit.
4. Select the Enabled status.
5. Click Save.
Viewing Autopooling CriteriaPrerequisite
The automatic candidate pooling feature must be activated.
Steps
1. Click on a requisition or requisition template.
2. Click the Autopooling Criteria tab.
Viewing the List of Automatically Pooled CandidatesPrerequisite
The automatic candidate pooling feature must be activated.
Autopooling criteria must have been defined.
Steps
1. Click on a requisition file or a requisition-specific candidate list.
2. Click .

Recruiting User Guide Taleo 10 - SP1 3-44
Candidate File Candidate Autopooling
Next Step
Viewing candidate files.
Matching candidates to the current job opening.
Rejecting candidates.
Matching a Candidate to a Requisition via AutopoolingPrerequisite
The automatic candidate pooling feature must be activated.
A user type permission grants users access to this feature.
Steps
1. Click on a requisition file or a requisition-specific candidate list.
2. Click .
3. Select a candidate file.
4. Click .
5. Specify if you wish to send an e-mail to the candidate to request more information.
Result
The candidate is matched to the current job opening. The candidate is moved from the autopool results list to the requisition-specific candidate list, and he/she can then be moved along the workflow like any other candidate.
Rejecting a Candidate Selected via AutopoolingPrerequisite
The automatic candidate pooling feature must be activated.
A user type permission grants users access to this feature.
Steps
1. Click on a requisition file or a requisition-specific candidate list.
2. Click .
3. Select a candidate file.
4. Click .
5. Specify the reason why the candidate was rejected.
6. Enter comments.
7. Click Done.
Result
The candidate will no longer in the candidate pool for this requisition.

Recruiting User Guide Taleo 10 - SP1 3-45
Candidate File Onboarding
Onboarding
Candidate OnboardingCandidate onboarding is the process of integrating a new employee into an organization.
Detailed Description
Onboarding begins when a person accepts a position; it can include orientation, communication, filling out forms, getting equipment such as a laptop.
A user type permission grants users access to this feature.
Benefits
• Improves time to productivity.
• Reduces time and effort for Human Resources.
Starting an Onboarding ProcessPrerequisite
Candidate must be hired.
A user type permission grants users access to this feature.
Steps
1. In the Candidates list, select a candidate.
2. In the More Actions list, select Start Onboarding Process.
3. Complete the fields.
4. Click Done.
Cancelling an Onboarding ProcessPrerequisite
Candidate must be involved in an onboarding process.
A user type permission grants users access to this feature.
Steps
1. In the Candidates list, select a candidate.
2. In the More Actions list, select Cancel Onboarding Process.
3. Enter a comment.
4. Click Done.
Result
Onboarding process is cancelled. Action is tracked under the candidate file History tab.
Recruiting User Guide Taleo 10 - SP1 3-46
Candidate File Onboarding
Updating Onboarding Data Prerequisite
A user type permission grants users access to this feature.
The step/status of the candidate must be Hire/Hired.
An onboarding process must be started for the candidate.
Steps
1. In a candidate file, select Cancel Onboarding Process from the More Actions list.
2. In a candidate file, select Start Onboarding Process from the More Actions list.
3. Select the option Update onboarding data with current recruiting data.
If you do not select the option, the system does not overwrite data and only updates the Assignment, Job Position and Application data. Also, all data entered previously on all Onboarding forms are kept intact, enabling you to review each step or simply submit them as they are.
4. Complete fields as required.
5. Click Done.
Result
The system overwrites Candidate, Experience and Education data and updates Assignment, Position and Application data. Also, all data entered on Onboarding forms prior to running this process is removed.
Recruiting User Guide Taleo 10 - SP1 3-47
Candidate File Hourly Hiring
Hourly Hiring
Evergreen HiringEvergreen hiring is used in continuous hiring situations such as retail stores where employers want to enable candidates to apply at all times, and also want a ready supply of candidates available to move quickly when a need is identified.
Detailed Description
Often such employers will want to implement a definite validity period and expiration for the candidate's submission, with the easy ability for the candidate to re-apply after his/her submission expires. It is not uncommon for workers in the hourly retail world to have held several different jobs within the span of a year. Employers need to ensure they are collecting all of the most recent information regarding a candidate's relevant history. This may also help to limit legal exposures in addition to confirming candidate's continued interest in employment with the employer.
A submission validity period may be enabled for any requisition, before that requisition reaches the Sourcing status. The number of days for the validity period is inherited from a default setting (initially 90 days), but may be changed for specific requisitions by users with sufficient permissions. The Validity Period and Validity Period Enabled fields may also be inherited from a requisition template. The submission validity period must be between 1 and 730 days (2 years).
The validity period starts when a candidate submits his/her completed submission. The candidate submission remains valid for the number of days defined in the requisition. For submissions created when matching or referring a candidate, the period starts on the date that the candidate was matched or referred. If a submission is incomplete and the candidate later completes it, the validity period is restarted.
The Evergreen Hiring feature basically works as follows:
For the Evergreen Hiring feature to be available, the system administrator must make the following two requisition fields available in the Recruiting application:
• Validity Period Enabled
• Validity Period
If desired, the security level can be set for those fields to hide them from some users. Once these fields are activated, the system administrator can add them to the requisition and/or requisition template, in the Identification block. It is necessary to have the Validity Period Enabled field in either the requisition template and/or the requisition file in order to enable submission expiration.
Best Practice: If the expiration for all requisitions is the same (following the default setting), consider to either not display the Validity Period field in the requisition file, or to set the field to read-only. If different validity periods are needed for different jobs, consider adding the Validity Period field in the requisition template where authorized users can set it, but not in the requisition file itself.
In the Recruiting application, when creating a requisition or requisition template, users can use the default validity period set by the system administrator or set a different validity period for the requisition or requisition template being created. The validity period must be set before the requisition is posted. The submission validity period is displayed in the requisition card (located on the left hand side of the requisition), when hovering the mouse over the icon.

Recruiting User Guide Taleo 10 - SP1 3-48
Candidate File Hourly Hiring
Once the requisition is posted, candidates applying on the requisition will be informed of the expiration date of their submission on the Thank You page. Within Taleo Recruiting, the submission validity period is displayed in the candidate submission card, when hovering the mouse over the icon.
If the candidate's submission has expired and the requisition is still posted, the Modify link is replaced with the Reapply link on the candidate's My Jobs page. When candidates re-apply for a job:
• The submission’s validity period and expiration date are reset.
• A summary of the candidate's current information will be displayed to allow him/her to make any necessary changes.
• Depending on how the zone was configured, the candidate selection workflow of the submission may be reset back to the beginning.
• A tracking history is automatically added in candidate file History tab. If during the reapply process, the system forces the candidate selection workflow to be reset, a second tracking history is added in the History tab stating that.
Once candidates have applied on the requisition, the column in the Requisitions list indicating the candidate count considers if the submission validity period is enabled or not for the requisition. If the validity period is enabled, the count only includes candidate submissions that are not expired.
The system administrator also has the ability to add the following columns in the candidate lists and requisition lists. When these columns are made available in list formats, users can select them to display the desired information:
The quick filter “Hide expired submissions” can be added to Candidates list to let users show or hide expired candidate submissions. Expired submissions are hidden by default. This filter is only available for requisition-specific candidate list formats.
The system administrator can also enable a setting to determine under which conditions the Candidate Selection Workflow (CSW) is reset to the initial step/status after a candidate re-applies for the same requisition (after submission expiration). Note that the CSW will never change if the submission has reached the "Offer" step or if an interview has been scheduled.
Candidate List Columns Description
Submission Expired This column is represented by the icon. When a
submission is expired, the icon is displayed.
Latest Submission Date Date when the candidate has submitted his/her submission or has reapplied.
Submission Expiration Date Date when the candidate submission expires/expired.
Days before Submission Expiration Displays as a countdown the number of days left before the expiration of the submission.
Requisition List Columns Description
Submission Validity Period Enabled This column is represented by the icon.
Submission Validity Period Number of days of the validity period.

Recruiting User Guide Taleo 10 - SP1 3-49
Candidate File Hourly Hiring
Benefits
• Companies can define and enforce submission validity periods with expirations for candidate submissions.
• Companies can configure whether the Candidates list shall display expired submissions or not.
• Candidates can easily re-apply for an open job even if their submission is expired.
• Candidates can reconfirm that they are still in the job market, allowing recruiters to focus on truly active candidates.
• Candidate’s information is current with the most recent submission, including for example work history, education, and contact information.
• Candidates may be hired more than once on the same requisition, for example in cases of seasonal rehiring.
• In some cases, expired submissions may offer an enhanced degree of legal protection against certain kinds of lawsuits (please reply on your attorney for legal questions).
Recruiting User Guide Taleo 10 - SP1 3-50
Candidate File Contingent Hiring
Contingent Hiring
Contingent HiringContingent hiring is used to hire people when needed and for a limited period of time. Contingent hiring may include part-time, temporary and contractor work.
Detailed Description
Once the contingent hiring feature has been purchased, the feature must be activated by Taleo.
Contingent hiring is not configured by default i.e it must be configured from scratch by the system administrator.
When the feature is activated and configured, users can start acquiring contingent workers. When creating a requisition, users can choose a contingent requisition type which offers more functionalities than other requisition types as it has its own set of candidate selection workflow, a contingent information block, supplier invitation to submit candidates using the agency portal, confirmation of availability and specific candidate ownership rules.
BP(A|S)
Candidate SelectionWorkflow
• Candidate Selection Workflow . . . . . . . . . . . . . . . . . . . . . . . . . . . . . . . . . . . 4-1

Recruiting User Guide Taleo 10 - SP1 4-1
Candidate Selection Workflow Candidate Selection Workflow
Candidate Selection Workflow
Candidate Selection WorkflowA candidate selection workflow (CSW) provides the framework to move a candidate through the hiring process.
Detailed Description
A candidate selection workflow (CSW) includes steps, phases, statuses and actions a user must go through before hiring a candidate. An analogy can be drawn between the candidate selection workflow and moving candidate resumes from one pile to another as the selection progresses and the number of resumes retained is reduced.
The CSW is created by the system administrator then selected by the user when creating a requisition. When candidates apply on the requisition, the selected CSW is used to track and manage candidates from the time they are new to the system to the time that they are hired. Candidate files in each step of the CSW can have a status. Specific actions can be performed on these candidate files depending on the steps and statuses. A set of user type permissions grant users access to the actions that can be performed in a candidate selection workflow.
CSW can be displayed to the user on a priority basis. The system will sort workflows according to the level of compatibility and ensure that the most appropriate workflow is displayed when a user is creating a requisition.
A CSW can be contextualized, that is organizations, locations and job fields can be associated by the system administrator to the candidate selection workflow. As a result, when creating a requisition, the user will only see the CSW with an Organization-Location-Job Field structure matching the one of the requisition. If a CSW is not associated to any Organization-Location-Job Field element, this means that the CSW will be available for all requisitions.
When associating an Organization-Location-Job Field structure to a CSW, the more specific the level of the structure is, the more compatible the workflow will be with a requisition. Moreover, the system will automatically select the workflow which provides the highest degree of compatibility with the requisition.
Standard candidate selection workflows are supplied with the application which can be used as templates to create customized workflows.
A candidate selection workflow can be associated to a requisition type (professional, hourly, etc.). As a result, when creating a requisition, the user will only see the CSW matching the selected requisition type. If a CSW is not associated to any requisition type, this means that the CSW will be available for all requisition types.
Candidate Selection Workflow PriorityThe candidate selection workflow priority ensures that the most appropriate workflow is displayed to the user when creating a requisition.
Detailed Description
The system can sort candidate selection workflows (CSW) according to the level of compatibility and ensure that the most appropriate workflow is displayed when a user is creating a requisition.
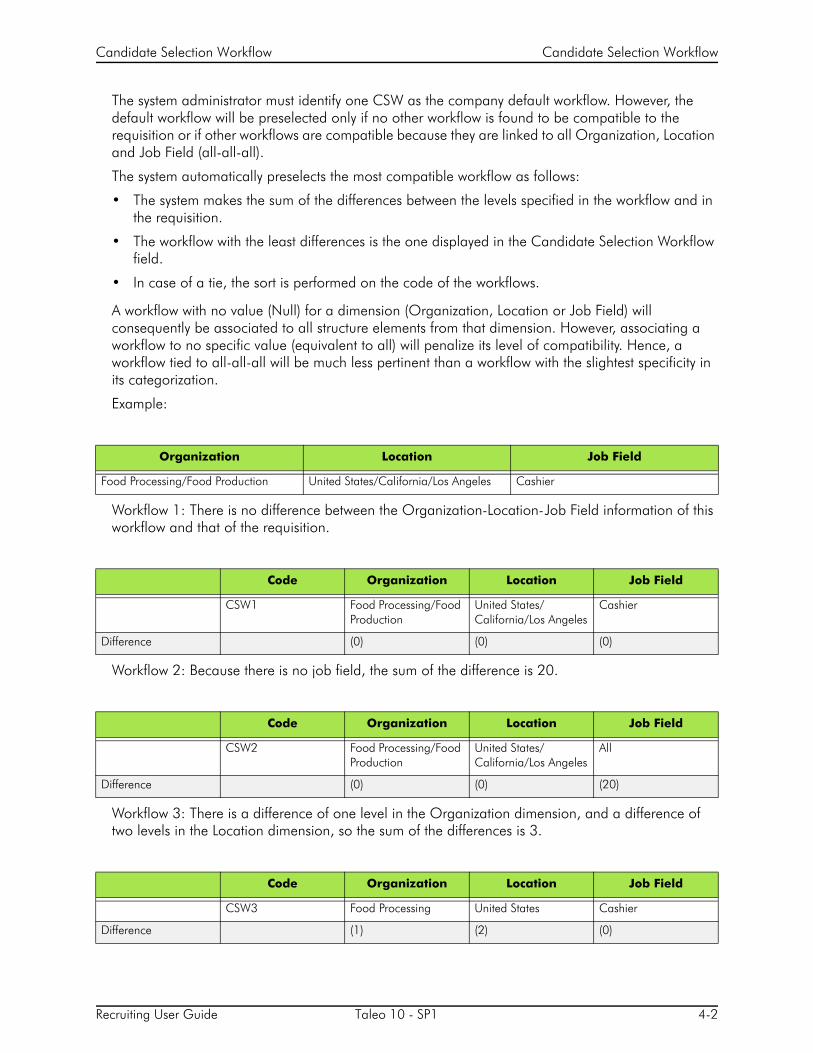
Recruiting User Guide Taleo 10 - SP1 4-2
Candidate Selection Workflow Candidate Selection Workflow
The system administrator must identify one CSW as the company default workflow. However, the default workflow will be preselected only if no other workflow is found to be compatible to the requisition or if other workflows are compatible because they are linked to all Organization, Location and Job Field (all-all-all).
The system automatically preselects the most compatible workflow as follows:
• The system makes the sum of the differences between the levels specified in the workflow and in the requisition.
• The workflow with the least differences is the one displayed in the Candidate Selection Workflow field.
• In case of a tie, the sort is performed on the code of the workflows.
A workflow with no value (Null) for a dimension (Organization, Location or Job Field) will consequently be associated to all structure elements from that dimension. However, associating a workflow to no specific value (equivalent to all) will penalize its level of compatibility. Hence, a workflow tied to all-all-all will be much less pertinent than a workflow with the slightest specificity in its categorization.
Example:
Workflow 1: There is no difference between the Organization-Location-Job Field information of this workflow and that of the requisition.
Workflow 2: Because there is no job field, the sum of the difference is 20.
Workflow 3: There is a difference of one level in the Organization dimension, and a difference of two levels in the Location dimension, so the sum of the differences is 3.
Organization Location Job Field
Food Processing/Food Production United States/California/Los Angeles Cashier
Code Organization Location Job Field
CSW1 Food Processing/Food Production
United States/California/Los Angeles
Cashier
Difference (0) (0) (0)
Code Organization Location Job Field
CSW2 Food Processing/Food Production
United States/California/Los Angeles
All
Difference (0) (0) (20)
Code Organization Location Job Field
CSW3 Food Processing United States Cashier
Difference (1) (2) (0)
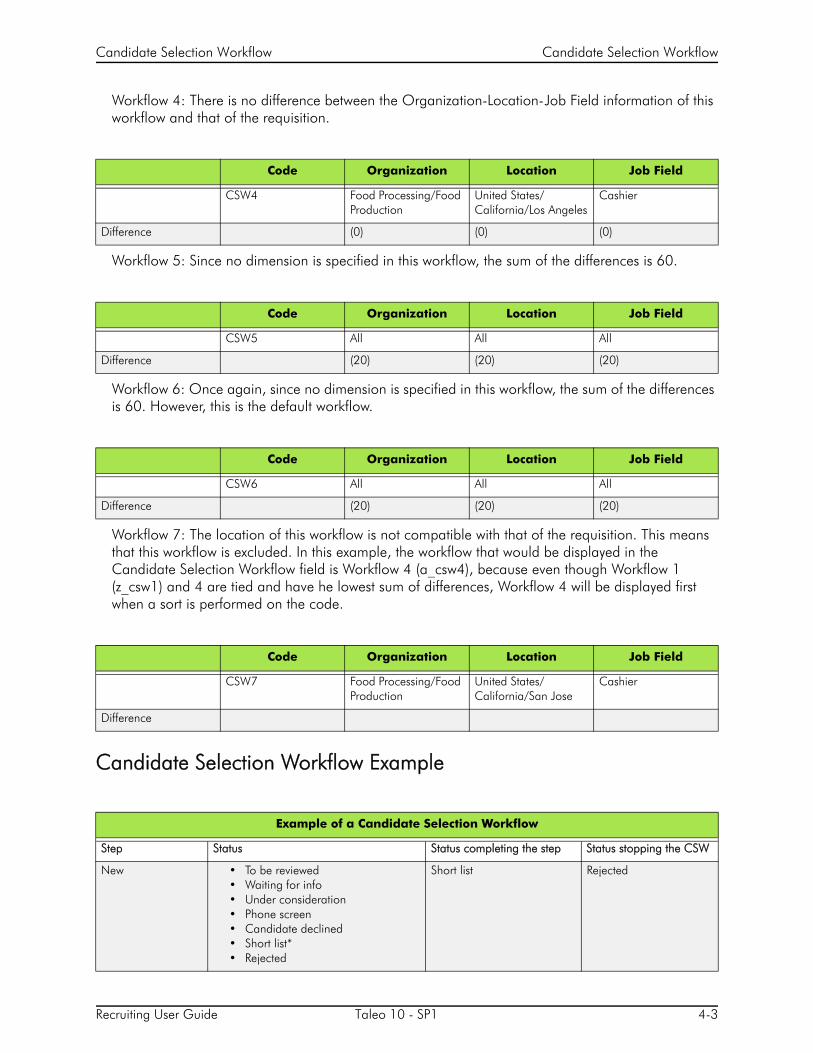
Recruiting User Guide Taleo 10 - SP1 4-3
Candidate Selection Workflow Candidate Selection Workflow
Workflow 4: There is no difference between the Organization-Location-Job Field information of this workflow and that of the requisition.
Workflow 5: Since no dimension is specified in this workflow, the sum of the differences is 60.
Workflow 6: Once again, since no dimension is specified in this workflow, the sum of the differences is 60. However, this is the default workflow.
Workflow 7: The location of this workflow is not compatible with that of the requisition. This means that this workflow is excluded. In this example, the workflow that would be displayed in the Candidate Selection Workflow field is Workflow 4 (a_csw4), because even though Workflow 1 (z_csw1) and 4 are tied and have he lowest sum of differences, Workflow 4 will be displayed first when a sort is performed on the code.
Candidate Selection Workflow Example
Code Organization Location Job Field
CSW4 Food Processing/Food Production
United States/California/Los Angeles
Cashier
Difference (0) (0) (0)
Code Organization Location Job Field
CSW5 All All All
Difference (20) (20) (20)
Code Organization Location Job Field
CSW6 All All All
Difference (20) (20) (20)
Code Organization Location Job Field
CSW7 Food Processing/Food Production
United States/California/San Jose
Cashier
Difference
Example of a Candidate Selection Workflow
Step Status Status completing the step Status stopping the CSW
New • To be reviewed• Waiting for info• Under consideration• Phone screen• Candidate declined• Short list*• Rejected
Short list Rejected
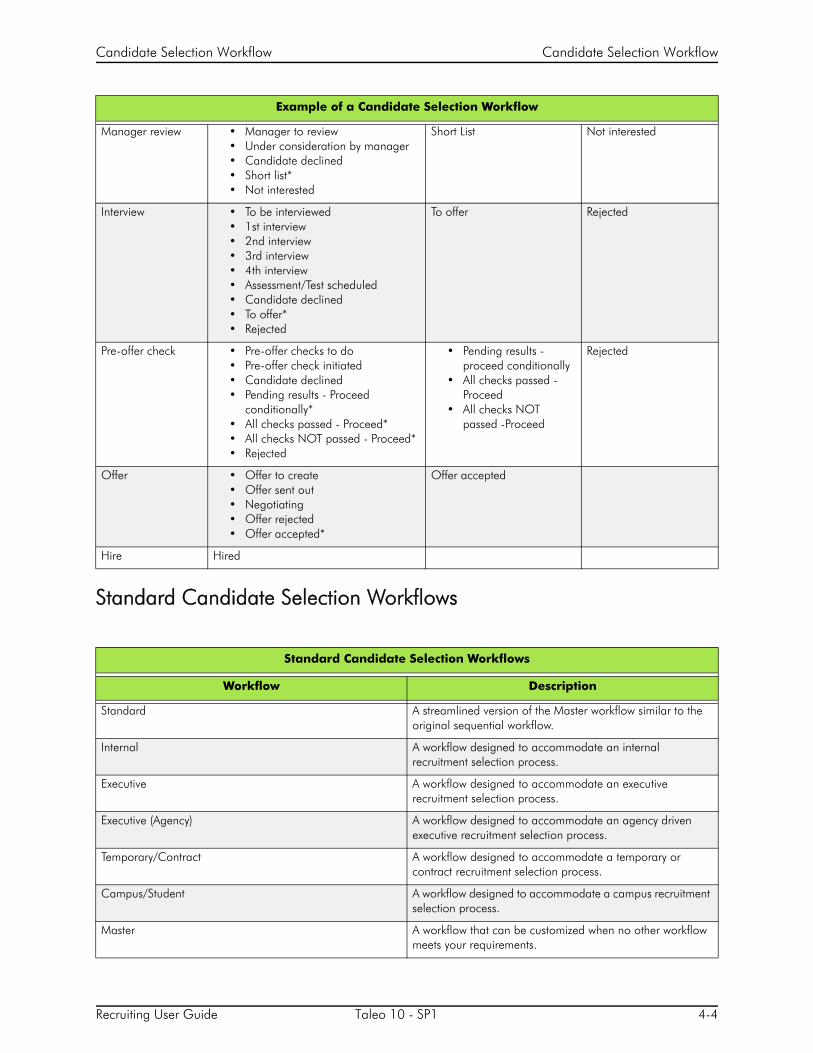
Recruiting User Guide Taleo 10 - SP1 4-4
Candidate Selection Workflow Candidate Selection Workflow
Standard Candidate Selection Workflows
Manager review • Manager to review• Under consideration by manager• Candidate declined• Short list*• Not interested
Short List Not interested
Interview • To be interviewed• 1st interview • 2nd interview • 3rd interview • 4th interview • Assessment/Test scheduled• Candidate declined• To offer*• Rejected
To offer Rejected
Pre-offer check • Pre-offer checks to do• Pre-offer check initiated• Candidate declined• Pending results - Proceed
conditionally*• All checks passed - Proceed*• All checks NOT passed - Proceed*• Rejected
• Pending results -proceed conditionally
• All checks passed -Proceed
• All checks NOT passed -Proceed
Rejected
Offer • Offer to create• Offer sent out • Negotiating • Offer rejected• Offer accepted*
Offer accepted
Hire Hired
Standard Candidate Selection Workflows
Workflow Description
Standard A streamlined version of the Master workflow similar to the original sequential workflow.
Internal A workflow designed to accommodate an internal recruitment selection process.
Executive A workflow designed to accommodate an executive recruitment selection process.
Executive (Agency) A workflow designed to accommodate an agency driven executive recruitment selection process.
Temporary/Contract A workflow designed to accommodate a temporary or contract recruitment selection process.
Campus/Student A workflow designed to accommodate a campus recruitment selection process.
Master A workflow that can be customized when no other workflow meets your requirements.
Example of a Candidate Selection Workflow

Recruiting User Guide Taleo 10 - SP1 4-5
Candidate Selection Workflow Candidate Selection Workflow
Candidate Selection Workflow StepA step represents a major stage or event in a candidate selection workflow.
Detailed Description
A step in a candidate selection workflow can be mandatory or optional.
• Mandatory: If a step is mandatory, the user must take the candidate through the step before moving on to any subsequent steps. The user will not have access to the subsequent list of steps until the step is completed.
• Optional: If a step is optional, the user can skip the step entirely and move the candidate on to the next step. Or, the user can move a candidate conditionally through a step without completing the step in order to move to a subsequent step, and return to the conditional completion step later to complete it.
Most steps are mandatory and sequential, meaning that they must be completed in the prescribed order. In some scenarios, a user may be able to move a candidate to a step without completing the current one, but the system will require that all mandatory steps be completed before a hire can be completed.
Each step must be finished with a completion status, indicated by an asterisk (*), before a candidate can move to another step in the hiring process. A completion status completes the step.
Notifications can be added to steps, This allows sending a message to users to let them know when a step is reached by candidates.
There is no limit on the number of steps that can be used in a CSW. However, a best practice is to only add necessary steps.
Example of a step versus possible statuses:
Reference Workflow 4.1
Sequential Workflow 4.1
Staffing Station A workflow for applications received via Staffing Stations.
Union A workflow for unionized candidates.
Step Status
New • To be reviewed• Waiting for info• Under consideration• Phone screen• Candidate declined• Phone screen
Standard Candidate Selection Workflows
Workflow Description

Recruiting User Guide Taleo 10 - SP1 4-6
Candidate Selection Workflow Candidate Selection Workflow
RSOffer StepThe RSOffer step is a step that can be included in a candidate selection workflow to allow users to use the offer management module.
Detailed Description
The system administrator is responsible of adding the RSOffer step in the candidate selection workflow. The RSOffer step must be placed before the Hire step.
The RSOffer step cannot be customized or edited (except for qualifier groups and qualifiers that can be added to specific statuses).
The RSOffer step has the following statuses:
Candidate Selection Workflow StatusA status indicates the position or state a candidate has reached in the step of a candidate selection workflow.
RSOffer step
Status Description
Offer to be made Initial status of the Offer step.
Draft Offer terms have been started and saved, but not approved.
Cancelled A draft offer has been created and then cancelled prior to routing for approval or extending to the candidate.
Approval in progress Offer has been routed for approval.
Approval rejected Offer has been rejected.
Approved Offer has been approved.
Extended Offer has been extended to the candidate.
Rescinded fter the offer has been extended or the candidate has accepted the offer, the user (company) rescinds/revokes the offer.
In negotiation Offer was extended to the candidate. The user marked the candidate as wanting to negotiate the offer. If a new offer should be created, the user will need to rescind the offer in order to create a new offer. If a new offer is not required, then either recapture the candidate response (accept or refused) or status them as Rejected or Has Declined.
Refused Offer was extended to the candidate. The user marked the candidate as refusing the offer. A new offer can be created at this point.
Accepted Offer was accepted by the candidate.
Reneged After the candidate has accepted the offer, the candidate refuses the offer (goes back on his or her word).
Rejected After the offer has been rescinded to a candidate, the user should status the candidate as Rejected in the Offer step. This will allow another offer to be created and extended.
Has declined After the offer has been refused or reneged by the candidate, the user should status the candidate as Has Declined in the Offer step. This will allow another offer to be created and extended

Recruiting User Guide Taleo 10 - SP1 4-7
Candidate Selection Workflow Candidate Selection Workflow
Detailed Description
A candidate can change status during a step but the candidate can only have one status at a time in each step. Statuses are more flexible than steps as most are optional and do not need to be followed in a certain order. Statuses can be temporary therefore requiring an additional action from the user or they can complete a step (indicated by *) because they complete the step by either moving the candidate to the next step or terminating the candidate selection process.
Available statuses will depend on the candidate selection workflow being used. For example:
• Approved
• In Process
• Negotiating
• Waiting for results
Example of a step versus possible statuses:
Statuses also have different progression levels.
A status can be linked to a button that will be used as a shortcut to change the status of a candidate directly in a candidate file.
Step Status
New • To be reviewed• Waiting for info• Under consideration• Phone screen• Candidate declined• Phone screen
Progression Level Description
Initial Indicates the first status that will apply to a candidate accessing a new step. Example: For the 1st Interview step, the initial status would be To Be Scheduled.
Not Started Indicates that the step has not started yet. Example: For the 1st Interview step, “To be Scheduled” is a Not Started status because the interview has not been scheduled and the step has not officially started.
In Progress Indicates that a candidate needs to be moved to other statuses before moving to the next step. The option “move” is not available to the user at this point. Example: For the 1st Interview step, “Scheduled” is an In Progress status.
Completed Indicates that a candidate can move to the next step. The option “move” is available to the user at this point.
Conditionally Completed Indicates that a candidate can move from one step to another even if some activities are not completed in the step (missing information, waiting for an approval, waiting to confirm an interview date, waiting for test results, etch.). When a status is conditionally completed, the user is able to return to the step and eventually complete unfinished activities. The step is not completed until all activities are finished. More than one status in a step can be conditionally completed.
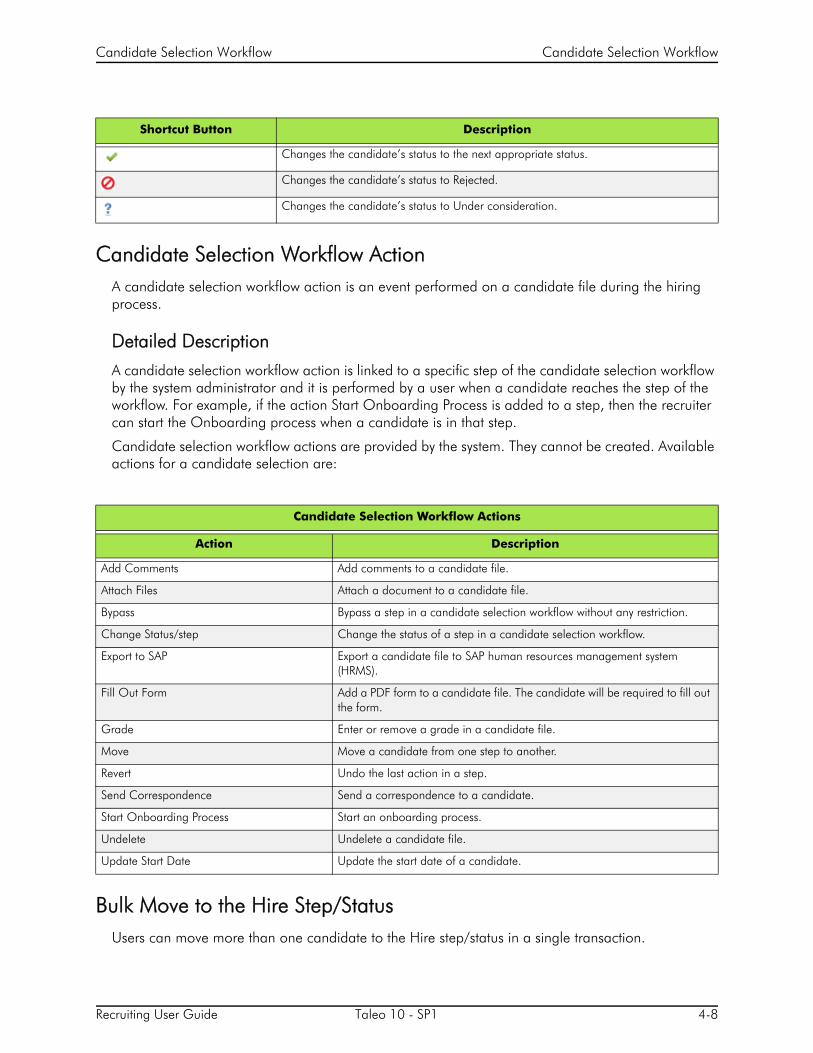
Recruiting User Guide Taleo 10 - SP1 4-8
Candidate Selection Workflow Candidate Selection Workflow
Candidate Selection Workflow ActionA candidate selection workflow action is an event performed on a candidate file during the hiring process.
Detailed Description
A candidate selection workflow action is linked to a specific step of the candidate selection workflow by the system administrator and it is performed by a user when a candidate reaches the step of the workflow. For example, if the action Start Onboarding Process is added to a step, then the recruiter can start the Onboarding process when a candidate is in that step.
Candidate selection workflow actions are provided by the system. They cannot be created. Available actions for a candidate selection are:
Bulk Move to the Hire Step/StatusUsers can move more than one candidate to the Hire step/status in a single transaction.
Shortcut Button Description
Changes the candidate’s status to the next appropriate status.
Changes the candidate’s status to Rejected.
Changes the candidate’s status to Under consideration.
Candidate Selection Workflow Actions
Action Description
Add Comments Add comments to a candidate file.
Attach Files Attach a document to a candidate file.
Bypass Bypass a step in a candidate selection workflow without any restriction.
Change Status/step Change the status of a step in a candidate selection workflow.
Export to SAP Export a candidate file to SAP human resources management system (HRMS).
Fill Out Form Add a PDF form to a candidate file. The candidate will be required to fill out the form.
Grade Enter or remove a grade in a candidate file.
Move Move a candidate from one step to another.
Revert Undo the last action in a step.
Send Correspondence Send a correspondence to a candidate.
Start Onboarding Process Start an onboarding process.
Undelete Undelete a candidate file.
Update Start Date Update the start date of a candidate.

Recruiting User Guide Taleo 10 - SP1 4-9
Candidate Selection Workflow Candidate Selection Workflow
Detailed Description
When this feature is activated, users are able to select more than one candidate to move to the Hire step/status. The system performs a verification to see if the number of candidates selected is equal to or less than the number of positions still open.
If additional information is required during the hire action, for example the start date, all the information entered will apply to all candidates hired in that action.
This feature supports candidate selection workflows with or without the RSOffer step.
The setting is a global setting that affects all requisition types (professional, executive, hourly, etc.). It cannot be activated for a specific requisition type.
As a recommended practice, customers should activate this feature to perform mass-hiring.
Benefits
• Improved usability for users by allowing them to move more than one candidate to the Hire step/status.
Step/Status Change in One ClickAllows users to access steps and statuses directly in the Candidates list without having to select an action in the More Actions list.
Detailed Description
To be able to change the step/status of a candidate with one click, the Next Action column must be added in a candidate list format. In order to do that, the user type permission allowing the personalization of list formats must be granted to the user.
The Next Action column contains actions that will give access to the next status or step related to a candidate. Actions available in the new column will allow users to:
• Change the status of a candidate to the next completion status (if the step is not already completed).
• Move the candidate to the initial status of the next step if the current step is completed.
Actions available in the Next Action column are Candidate Selection Workflow (CSW) movements only, either a
• Move to the next step in the CSW
• Change to the completion status within the current step
If the current status is not a completion status, the action displayed will be a move (change status) to the first completion status of the current step.
If the current status is a completion status, then the action will be a move to the next step at the initial status. In a one-step CSW (reference workflow), only statuses configured as a “completion status” will show up as next steps.
Benefits
• This feature eases the movement of candidates in a Candidate Selection Workflow (CSW).

Recruiting User Guide Taleo 10 - SP1 4-10
Candidate Selection Workflow Candidate Selection Workflow
Moving a Candidate to the Next StepPrerequisite
A user type permission grants users access to this feature.
Candidate must be in a step that includes the Move action.
Candidate must be at a completion status.
Candidate must not be in a RSOffer step.
Steps
1. In the candidate list, select a candidate.
2. Select Change Status/Step in the More Actions list.
3. Click Done.
Result
User can move a candidate to a subsequent step regardless of the status of the step the candidate is currently at.
Moving Several Candidates to the Next StepPrerequisite
A user type permission grants users access to this feature.
Candidates must all be related to the same requisition.
Candidates must be at the same step and status.
Candidates must be at a completion status.
Step must include the Move action.
Candidate must not be in a RSOffer step.
Steps
1. In the candidate list, select several candidates.
2. Select Change Status/Step in the More Actions list.
3. Click Done.
Result
User can move several candidates to a subsequent step regardless of the status of the step the candidate is currently at.
Moving a Candidate to Any StepPrerequisite
A user type permission grants users access to this action.
Candidate must be at a completion status.
Step must include the Bypass action.

Recruiting User Guide Taleo 10 - SP1 4-11
Candidate Selection Workflow Candidate Selection Workflow
Candidate must not be in a RSOffer step.
Steps
1. In a Candidate file, select a candidate.
2. Select Bypass from the More Actions drop down list
3. Click Done.
Result
User can move a candidate to a subsequent step regardless of the status of the step the candidate is currently at.
Moving Several Candidates to Any StepPrerequisite
A user type permission grants users access to this action.
Candidates must all be related to the same requisition.
Candidates must be at the same step and status.
Candidates must be at a completion status.
Step must include the Bypass action.
Candidate must not be in a RSOffer step.
Steps
1. In the Candidate list, select several candidates.
2. Select Bypass in the More Actions list.
3. Click Done.
Result
User can move several candidates to any step of the candidate selection workflow regardless of the status of the step the candidates are currently at.
Changing the Status of a CandidatePrerequisite
A user type permission grants users access to this action.
Step in which the candidate is must include the Change Status action.
Candidate must not be in a RSOffer step.
Steps
1. Select a candidate file.
2. In the More Actions list, select Change Status/Step.
3. Select a new status.
4. Click done.
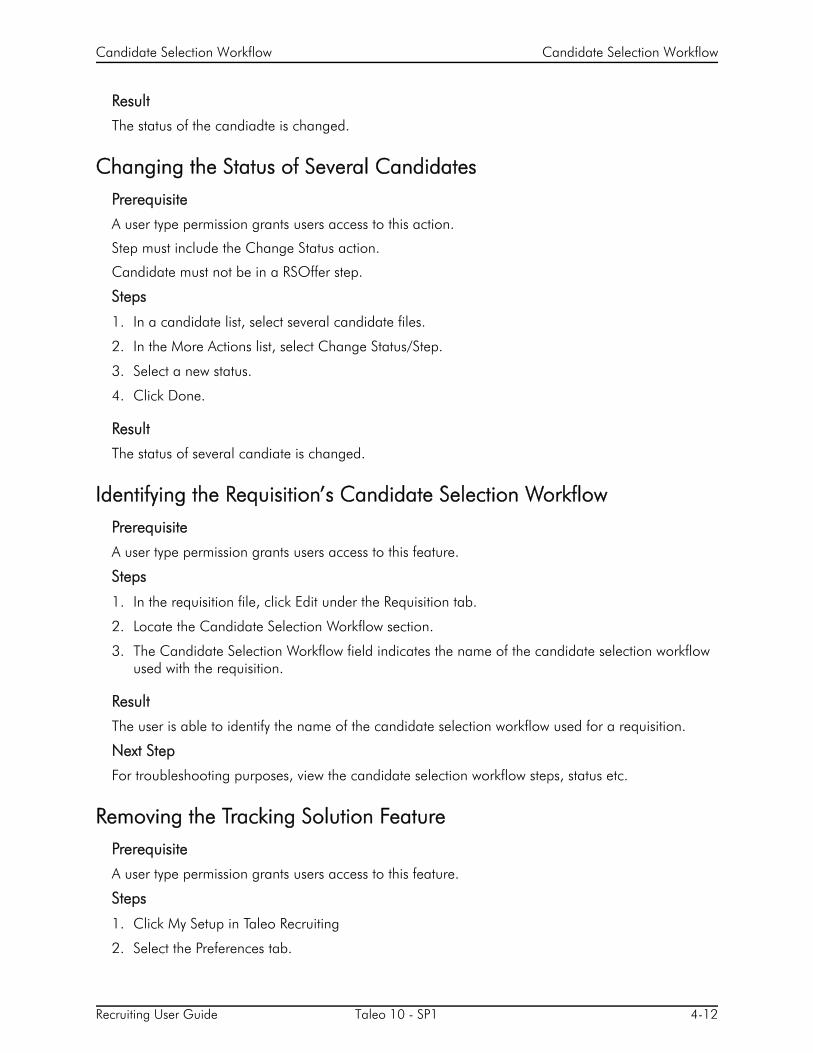
Recruiting User Guide Taleo 10 - SP1 4-12
Candidate Selection Workflow Candidate Selection Workflow
Result
The status of the candiadte is changed.
Changing the Status of Several CandidatesPrerequisite
A user type permission grants users access to this action.
Step must include the Change Status action.
Candidate must not be in a RSOffer step.
Steps
1. In a candidate list, select several candidate files.
2. In the More Actions list, select Change Status/Step.
3. Select a new status.
4. Click Done.
Result
The status of several candiate is changed.
Identifying the Requisition’s Candidate Selection Workflow Prerequisite
A user type permission grants users access to this feature.
Steps
1. In the requisition file, click Edit under the Requisition tab.
2. Locate the Candidate Selection Workflow section.
3. The Candidate Selection Workflow field indicates the name of the candidate selection workflow used with the requisition.
Result
The user is able to identify the name of the candidate selection workflow used for a requisition.
Next Step
For troubleshooting purposes, view the candidate selection workflow steps, status etc.
Removing the Tracking Solution FeaturePrerequisite
A user type permission grants users access to this feature.
Steps
1. Click My Setup in Taleo Recruiting
2. Select the Preferences tab.

Recruiting User Guide Taleo 10 - SP1 4-13
Candidate Selection Workflow Candidate Selection Workflow
3. Clear the In at least one selection process option.
4. Click Save and Close.
Result
The staircase icon will no longer appear in the candidate list.
Next Step
Activating automatic progression of a candidate.

BP(A|S)
Requisition
• Requisition . . . . . . . . . . . . . . . . . . . . . . . . . . . . . . . . . . . . . . . . . . . . . . . . . 5-1
• Requisition Template . . . . . . . . . . . . . . . . . . . . . . . . . . . . . . . . . . . . . . . . . 5-15
• Requisition Types. . . . . . . . . . . . . . . . . . . . . . . . . . . . . . . . . . . . . . . . . . . . 5-18
• Requisition Ownership. . . . . . . . . . . . . . . . . . . . . . . . . . . . . . . . . . . . . . . . 5-20
• Requisition Collaboration . . . . . . . . . . . . . . . . . . . . . . . . . . . . . . . . . . . . . 5-22
• Requisition Matching . . . . . . . . . . . . . . . . . . . . . . . . . . . . . . . . . . . . . . . . . 5-25
• Candidate Search for a Requisition. . . . . . . . . . . . . . . . . . . . . . . . . . . . . . . 5-29
• Requisition Approval . . . . . . . . . . . . . . . . . . . . . . . . . . . . . . . . . . . . . . . . . 5-30
• Requisition Prescreening . . . . . . . . . . . . . . . . . . . . . . . . . . . . . . . . . . . . . . 5-35
• Requisition Posting . . . . . . . . . . . . . . . . . . . . . . . . . . . . . . . . . . . . . . . . . . 5-45
• Source . . . . . . . . . . . . . . . . . . . . . . . . . . . . . . . . . . . . . . . . . . . . . . . . . . . 5-53
• Event . . . . . . . . . . . . . . . . . . . . . . . . . . . . . . . . . . . . . . . . . . . . . . . . . . . . 5-56
• External Services . . . . . . . . . . . . . . . . . . . . . . . . . . . . . . . . . . . . . . . . . . . . 5-57

Recruiting User Guide Taleo 10 - SP1 5-1
Requisition Requisition
Requisition
Requisition FileA requisition file details the specific requirements for a job position.
Detailed Description
When opening a requisition file, users are always in view mode and they can from there choose to go into edit mode. This provides a cleaner layout and eliminates the need to “close” the file (to exit out of it and reactivate other buttons on the screen) if only viewing the file. In view mode, only fields for which data is provided are displayed. However, in edit mode, fields that do not contain data are displayed according to user permissions.
When opening a requisition file, the screen is organized into three panes:
• Left pane containing the requisition card in the top section and supporting information in the bottom section. The pane can be expanded or collapsed.
• Right pane containing supporting tools such as the online help and the diagnostic tool. The pane can be expanded or collapsed.
• Central pane containing a menu bar allowing users to perform actions on the requisition file. It also contains tabs that provide complete information about the candidate. Depending on which side the candidate card is, the information displayed will vary.
The requisition file contains several tabs:
• Requisition
• Alerts
• Attachments
• Approvals
• Posting and Sourcing
• History
• Reports
The content of the requisition file is presented as a long form. The main content of the requisition file is within the Requisition tab, which includes various sections. The other tabs contain peripheral information.
From the main requisition tab, whether in edit or view mode, users always have access to a table of contents section that allows quick jumping to different portions of the file. To display this table of contents, users simply have to click located in the Requisition tab.
The fields and layout of the requisition are configured by the system administrator. It is also the system administrator who grants users access to requisition files. Fields in a requisition are completed by a user to create a requisition. The requisition contains many details and fields such as the title of the job, the number of openings, the requisition owners and collaborators, the organization, location and job field associated to it, compensation information, job description, questions and competencies, etc. Once the requisition is created and approved, the user can post it on internal and/or external career sections, on job boards via eQuest, or via agency offering staffing services. Once the requisition is posted, candidates can apply for the job and fill the required fields.

Recruiting User Guide Taleo 10 - SP1 5-2
Requisition Requisition
Benefits
• Easy to navigate requisition files.
• Diagnostic tool making it easy to understand what fields are required and when
• The requisition file is highly flexible and only displays what the user is allowed to see.
• The system administrator has the ability to define the layout of the requisition file based on requisition types.
Requisition CreationRecruiters and managers have the ability to create requisitions to detail the specific requirements for a job position.
Detailed Description
The creation of requisitions is done via the Create Requisition button which is available in the home page Requisitions channel as well as in the Requisitions page. This button is available to users if they have been granted the proper user type permission.
When creating a requisition, the Create a Requisition wizard is launched. One of the first step when creating a requisition is to select a requisition type. The system administrator is responsible of activating requisition types and of granting the user type permissions that allow users access to specific requisition types. If more than one requisition type has been activated, the user is asked to select the desired requisition type.
Depending on the company’s configuration, users may be able to specify specific elements such as the position, the department, the Organization- Location-Job Field structure. When this information is provided, the system fills certain fields in the requisition form.
When all of the above have been specified, users complete the various fields of the requisition. When saving the requisition, a message appears if information is missing in certain fields. Users can also use the diagnostic tool to know which fields must be filled to be able to save the requisition. If information is missing for certain fields, the diagnostic tool provides links to jump quickly to these fields to enter the missing information. The diagnostic tool is located in the right-hand pane.
Once the requisition is completed, the requisition goes through an approval process before being posted on career sections or job boards.
Diagnostic Tool and Show Required FieldsThese two features allow you to know which requisition fields must be completed for certain actions to take place.
Detailed Description
In the requisition file, in edit mode, the “Show fields required to” feature allows you to know which fields must be filled for certain actions to take place, that is, saving, posting and approval request. For example, when selecting the Save action, an asterisk would appear beside the fields that must be completed in order to perform the save action.

Recruiting User Guide Taleo 10 - SP1 5-3
Requisition Requisition
Also, a diagnostic tool is available in the requisition file, in view and edit modes. This tool, located in the right hand side of the page, is accessible by clicking this icon . The diagnostic tool allows you to see all the fields that are missing information and to jump quickly to those fields to enter the missing information.
Requisition DescriptionThe description of a requisition is the information provided to candidates who apply for a job.
Detailed Description
The requisition description provides information about the job as well as the qualifications required.
A requisition can have two descriptions:
• internal description for current employees applying for a job
• external description for external candidates
The requisition description also contains the opening date and closing date of the requisition, that is the period provided to apply for the job.
An effective job description must be compelling, intelligent and honest. It must attract, intrigue and persuade top talents. It should include specific information and be focused on the talent.
When writing the description of a requisition, consider the following elements:
• Job Title: Make sure applicants outside the organization will know what it means.
• Headline: Start with a brief marketing statement, “grabber”.
• Structure: Explain where and how the position fits into the organization.
• Type of Environment: Explain what it is like to work for the organization (fast-paced, small/large team, multiple projects, etc.).
• Description of the Role: Concentrate on important, positive aspects of the position.
• Description of the Person Required: List qualifications, important competencies, relevant experience, personal qualities; Be specific and keep it short.
• Salary/Benefits/Training/Opportunities: Highlight key benefits offered by the organization.
Request More Information AlertThe Request More Information alert allows users to send an e-mail to candidates who meet certain conditions but whose application information is incomplete.
Detailed Description
The message invites the candidates to return to their applications and provide the missing information. The system determines automatically which information is missing by reviewing fields identified by your company at the time of implementation.
When setting the Request More Information alert:
Recruiting User Guide Taleo 10 - SP1 5-4
Requisition Requisition
• Select the option “A candidate meeting all the required criteria achieves a result of at least x%” to set the minimum result. Select a percentage from the list. At the right of the percentage, the system displays the number of points the candidate must have to match the selected percentage. When changing the percentage, the value to the right is recalculated. Candidates who meet all the required criteria and the result value will be considered ACE candidates.
• Select the option “A candidate meeting all the required criteria has at least x assets out of y” to set the minimum number of assets. Select a value from the list. Candidates who meet all the required criteria and the minimum number of assets will be considered ACE candidates.
• Select the option “Request information when candidate meets either condition” to notify candidates who meet the result or asset condition.
• Select the option “Request information when candidate meets both conditions” to notify candidates who meet the result and asset condition.
Daily Recruiting ReportThe daily recruiting report is an e-mail message sent to users and that contains statistics on one or more requisitions.
Detailed Description
The statistics available in the daily recruiting report are:
• Global statistics: new applications, candidates in the database and the number of requisitions in the various stages of the hiring cycle.
• Statistics on requisitions assigned to you (as the recruiter or owner): number of new candidates and number of posted requisitions.
• Details on requisitions for which you are a recipient or interested team member: requisition title and status, number of candidates by status, and opening and closing posting dates.
The daily recruiting report option is available in the requisition Reports tab. When selecting this option, a user can then select the recipients to whom the report will be sent.
Benefits
• Keeps collaborators informed of different statistics on candidate applications and requisitions.
Creating a RequisitionPrerequisite
A user type permission grants users access to this feature.
Steps
1. In the Requisition list, click Create Requisition.
2. Follow on-screen instructions.
The information you will need to provide depends on the flow and options configured by your system administrator.
Budget fields support currency symbols, commas and decimals. Bonus and Salary fields support only commas and decimals.

Recruiting User Guide Taleo 10 - SP1 5-5
Requisition Requisition
The opening and closing dates refer to when the company offers the position.These dates may differ from the posting (sourcing) dates.
3. Click Save.
Result
The requisition appears in the Requisition list and the status is Draft.
Next Step
Requesting an approval for the requisition.
Editing Requisition FieldsPrerequisite
Settings allow the activation of this feature.
A user type permission grants users access to this feature.
Status must be On Hold.
You cannot edit the fields:
• Title by manager
• Justification
• All fields in the profile
• Candidate Selection Workflow
• Included in the sections Budget, Compensation and Other
• Contact name
• Contact e-mail
Steps
1. In the requisition file, click Edit.
2. Make changes to the editable fields.
3. Click Save and Close.
Editing the Organization-Location-Job Field of a RequisitionPrerequisite
A user type permission grants users access to this feature.
The system administrator must have contextualized the requisition fields (i.e. associate fields to Organizations, Locations and Job Fields) in order to make them relevant according to the requisition context.
Steps
1. In the requisition file, click Edit.
2. Click Edit in the Structure section.
Recruiting User Guide Taleo 10 - SP1 5-6
Requisition Requisition
Depending on the status of the requisition and user type permissions granted to the user, available editing functionalities will vary.
3. Click Save and Close.
Result
The Organization-Location-Job Field structure of the requisition modified.
Selecting the Candidate Selection Workflow for a RequisitionPrerequisite
A user type permission grants users access to this feature.
The requisition must be draft.
The candidate selection workflow in a requisition can never be edited; you will always need to cancel the requisition and duplicate it to be able to make changes.
Steps
1. In the requisition file, under the Requisition tab, click Edit.
2. Click Edit in the Candidate Selection Workflow section.
Depending on the status of the requisition and user type permissions granted to the user, available editing functionalities will vary.
3. Click Save and Close.
Selecting a Screening ServicePrerequisite
Screening service must be activated by support.
A user type permission grants users access to this feature.
Steps
1. In the requisition file, under the requisition tab, click Edit.
2. In the Screening section, select the desired service in the requisition.
3. Click Save and Close.
Result
A screening service is added to the requisition.
Cancelling a RequisitionPrerequisite
A user type permission grants users access to this feature.
The status must NOT indicate Canceled or Filled.
Steps
1. In the requisition file, click Cancel Requisition... in the More Actions list.

Recruiting User Guide Taleo 10 - SP1 5-7
Requisition Requisition
2. Enter comments.
3. Click Done.
Result
The status of the requisition becomes Cancel. If you cancelled the requisition by mistake, reopen the requisition via the More Actions list.
Duplicating a RequisitionPrerequisite
A user type permission grants users access to this feature.
Any requisition can be duplicated regardless of its status.
Steps
1. Open a requisition.
2. Click .
3. Modify the information as necessary.
When duplicating a requisition, all of the information is duplicated except the Alerts tab information and the Target Start Date field content. The information on the Alerts tab defaults to your organization's ACE settings.
4. Click Save.
Result
The requisition appears in the Requisitions list and the status is Draft.
Next Step
Requesting an approval for the requisition.
Deleting a RequisitionPrerequisite
A user type permission grants users access to this feature.
Requisition must be draft.
Steps
1. In the requisition file, click Delete... in the More Actions list.
2. Enter comments.
3. Click Done.
Result
The requisition no longer appears in the requisition list.

Recruiting User Guide Taleo 10 - SP1 5-8
Requisition Requisition
Saving a Requisition as a TemplateSteps
1. In the requisition file, click .
Result
The requisition is now a requisition template that is available in the Libraries menu, under Templates.
Reopening a Requisition that Was Cancelled not FilledAllows users to reopen a requisition that had not been filled when it was cancelled.
Prerequisite
A setting activates this feature.
A user type permission grants users access to this feature.
The requisition status must be Canceled.
Steps
1. In the requisition file, select Reopen Requisition... in the More Actions list.
2. In the Reopen Requisition window, indicate a specific number of job openings or indicate Unlimited.
3. Enter comments.
4. Click Done.
Result
The requisition that was cancelled without being filled is reopend. The system displays a window in which you indicate whether you want to post the requisition immediately or at a later time. If you click Yes, a new series of steps is displayed that enable you to post the reopened requisition.
Reopening a Filled Requisition and Adding OpeningsPrerequisite
A setting activates this feature.
A user type permission grants users access to this feature.
The requisition status must be Filled.
Steps
1. In the requisition file, select Reopen Requisition... in the More Actions list.
2. In the Reopen Requisition window, click the radio button next to Add Openings and then indicate a specific number of openings or click the radio button next to Unlimited.
3. Enter comments.
4. Click Done.

Recruiting User Guide Taleo 10 - SP1 5-9
Requisition Requisition
Result
The system displays a window in which you indicate whether you want to post the requisition immediately or at a later time. If you click Yes, a new series of steps is displayed that enable you to post the reopened requisition. A candidate who was hired prior to reopening of the requisition remains on the requisition and retains the Hired step and status.The requisition that was filled is reopened and new openings are added while retaining candidates hired to fill the original opening.
Reopening a Filled Requisition and Cancelling the HiringPrerequisite
A setting activates this feature.
A user type permission grants users access to this feature.
The requisition status must be Filled.
Steps
1. In the requisition file, select Reopen Requisition... in the More Actions list.
2. Click the radio button next to Cancel the hiring of the candidates.
3. Enter comments.
4. The system displays a reminder that you have to revert the hired candidate's step and status using the Revert action. Click Yes.
Clicking No is not a best practice: if you forget to change the candidate's step and status later, the reopened requisition will contain a candidate whose step and status is Hired.
5. The system displays the candidate list corresponding to the requisition.
6. Click the check box next to the candidate's name and click Revert... in the More Actions list.
7. Enter comments.
8. Click Done.
Result
Allows users to reopen The filled requisition is reopened and the candidates who had been hired on the requisition are cancelled. If you click the Requisitions tab, the requisition now has Open status in the Requisitions window. If you click the corresponding number in the Candidates column, the candidate who was originally hired is still displayed in the requisition's Candidates list but the person has the step and status he/she had prior to reaching the Hired step.
Filling a RequisitionAllows users to indicate that a position has been filled.
Prerequisite
A user type permission grants users access to this feature.
The Status must NOT indicate Filled, Draft or On Hold.
The Status must not indicate Pending with a Status Details displaying to To Be Approved.
Steps
Recruiting User Guide Taleo 10 - SP1 5-10
Requisition Requisition
1. Open a requisition.
2. In the More Actions list, select Fill...
3. Enter comments.
4. Click Done.
Result
When a requisition is filled, the step of the remaining candidates changes to Rejected and the requisition no longer appears in the requisition list.
Cancelling the Hiring of a CandidatePrerequisite
A user type permission grants users access to this feature.
The status must be Filled.
Steps
1. In the requisition file, select Reopen Requisition in the More Actions list.
2. Select the option Cancel the hiring of candidates.
3. Click done.
Result
Candidates previously hired for the requisition will no longer be hired.
Putting a Requisition on HoldAllows users to restrict or postpone activities related to a requisition.
Prerequisite
A user type permission grants users access to this feature.
The status must indicate Unposted, Open or Expired.
The status must NOT indicate Deleted, Cancelled, Filled, Posted, or Scheduled for posting.
The offers under the OFfers tab must NOT have the status Accepted with Final Start Date, Accepted with Tentative Start Date, Negotiating, or Extended (waiting for candidate response).
Steps
1. In the requisition file, select Put on Hold....in the More Actions list.
2. Enter comments.
3. Click Done.
Result
The status of the requisition is changed to On Hold.

Recruiting User Guide Taleo 10 - SP1 5-11
Requisition Requisition
Reactivating an On Hold RequisitionPrerequisite
The Status of the requisition must be On Hold.
Steps
1. In the requisition file, select Reactivate... in the More Actions list.
2. Enter comments.
3. Click Done.
Result
The status of the requisition becomes Draft.
Reopening a RequisitionPrerequisite
A user type permission grants users access to this feature.
The status of the requisition must be Filled.
Steps
1. In the requisition file, select Reopen Requisition in the More Actions list.
2. In the Reopen Requisition page, complete the required information.
3. Click Done.
Result
The status of the requisition becomes Draft.
The requisition that was no longer active is reopened. For example when additional positions are offered for a requisition that has been filled, or if canceling the hiring of a candidate.
Requesting a ContributionPrerequisite
A user type permission grants users access to this feature.
Steps
1. In the requisition file, select Request Contribution.... in the More Actions list.
2. Select a contributor.
3. Complete desired fields.
4. Click Done.
Result
The selected colleague will receive an e-mail requesting to contribute to the task.

Recruiting User Guide Taleo 10 - SP1 5-12
Requisition Requisition
Returning my ContributionPrerequisite
A user type permission grants users access to this feature.
A contribution must have been requested.
User must have completed the contribution.
Steps
1. In the requisitions file, select Return my contribution in the More Actions list.
2. Select the contribution.
3. Enter comments.
4. Click Done.
Result
User that has requested a contribution is notifed that the contribution is completed
Adding a Comment in a Requisition FilePrerequisite
A user type permission grants users access to this feature.
Steps
1. In the requisition file, click .
2. Enter a comment.
3. Click Done.
Result
The comment is displayed in the requisition file History tab. The comment cannot be modified once entered.
Adding a Source to a RequisitionPrerequisite
A user type permission grants users access to this feature.
The organization, location and job field of the source and of the requisition must match or the source must not be associated to any organization, location and job field.
Source must be active.
Steps
1. Open a requisition.
2. Click the Posting and Sourcing tab.
3. In the Modify Source List section, click Modify.

Recruiting User Guide Taleo 10 - SP1 5-13
Requisition Requisition
4. Click Select next to the desired source.
5. Click Done.
Result
The selected source appears in the Modify Source List section of the requisition. Users can add sources to a requisition to know how candidates have heard about a position.
Removing a Source from a RequisitionPrerequisite
A user type permission grants users access to this feature.
Steps
1. Open a requisition.
2. Click the Posting and Sourcing tab.
3. In the Modify Source List section, click Modify.
4. In the Posting Requisitions window, click next to a selected source.
5. Click Done.
Result
The selected source no longer appears in the Modify Source List section of the requisition.
Using the Requisition Automatic Filling OptionPrerequisite
A setting allows the activation of this feature.
A user type permission grants users access to this feature.
Steps
1. Click the My Setup link located in the top right-hand corner.
2. In the Preferences tab, click Edit.
3. Select the option I want to use the automatic filling option of the requisition file.
4. Click Save.
Result
When a user will create a requisition, certain fields will be automatically filled.
Modifying the Daily Recruiting ReportPrerequisite
A user type permission grants users access to this feature.
Steps
1. In the requisition file, click the Reports tab.

Recruiting User Guide Taleo 10 - SP1 5-14
Requisition Requisition
2. Click Modify Report.
3. Select the option allowing you to include the requisition in the report.
4. Select the recipients of the report.
5. Click Done.
Result
In the requisition Reports tab, there is an indication that the requisition will be included in the report. The name of the recipients is also displayed.
Setting the Request More Information AlertPrerequisite
A user type permission grants users access to this feature.
Use totals that are equal to or slightly lower than those you used in the ACE candidate alert section.
Steps
1. In the requisition file, click the Alerts tab.
2. In the Request More Information section, click Set Alert.
3. Select the desired criteria.
4. Click Done.
Result
In the requisition Alerts tab, the criteria are displayed in the Request More Information section. An e-mail is sent to candidates meeting certain conditions but whose application information is incomplete.
Next Step
Setting the ACE Candidate alert.

Recruiting User Guide Taleo 10 - SP1 5-15
Requisition Requisition Template
Requisition Template
Requisition TemplateA requisition template is a requisition file containing information that will likely be reused for a similar job position.
Detailed Description
Requisition templates are available to users in the Libraries menu.
A requisition template can be created for each position or job category. Depending on your organization's policies, the requisition template may be very detailed or may include only basic information.
When creating a new requisition, it is a best practice to select a requisition template first; this will auto-populate many of the requisition fields based on the selected template.
The creation of requisition templates is similar to the creation of requisitions. It is done via the Create Template button which is available in the Requisition Templates page, via the Libraries menu. This button is available to users if they have been granted the proper user type permission.
When creating a requisition template, the Create Requisition Template wizard is launched. One of the first step when creating a requisition template is to select a requisition type. The system administrator is responsible of activating requisition types and of granting the user type permissions that allow users access to specific requisition types. If more than one requisition type has been activated, the user is asked to select the desired requisition type.
Depending on the company’s configuration, users may be able to specify specific elements such as the Organization, Location and Job Field (Organization-Location-Job Field structure). When this information is provided, the system fills certain fields in the requisition form.
A status is defined for a requisition template. A template can be draft, inactive, active or active for a specific period of time.
When all of the above have been specified, users complete the various fields of the requisition template. When saving the requisition template, a message appears if information is missing in certain fields. Users can also use the diagnostic tool to know which fields must be filled to be able to save the requisition template. If information is missing for certain fields, the diagnostic tool provides links to jump quickly to these fields to enter the missing information. The diagnostic tool is located in the right-hand pane.
Once the requisition template is completed, it is available in the Requisition Templates page.
Benefits
• Allows the creation of a requisition file without having to start from scratch.
Creating a Requisition TemplatePrerequisite
A user type permission grants users access to this feature.
Steps

Recruiting User Guide Taleo 10 - SP1 5-16
Requisition Requisition Template
1. In the Libraries menu, select Templates.
2. Click Create Template.
3. Follow on screen instructions.
4. Click Save.
Result
The requisition template containing information likely to be reused for a similar job position is available in the Requisition Templates page.
Duplicating a Requisition TemplatePrerequisite
A user type permission grants users access to this feature.
Steps
1. In the Libraries menu, select Templates.
2. Click on a template.
3. Click .
4. Modify information.
5. Click Save and Close.
Result
The new requisition template appears in the Requisition Templates page.
Editing a Requisition TemplatePrerequisite
A user type permission grants users access to this feature.
Steps
1. In the Libraries menu, select Templates.
2. Click on a template.
3. Click Edit.
4. Modify fields as required.
5. Click Save and Close.
Activating a Requisition TemplatePrerequisite
A user type permission grants users access to this feature.
The requisition template must be inactive.
All requisition templates must be displayed in the Requisition template list.

Recruiting User Guide Taleo 10 - SP1 5-17
Requisition Requisition Template
Steps
1. In the Libraries menu, select Templates.
2. In the Requisition Templates page, click on a template.
3. Click Edit.
4. Select Active.
5. Click Save and Close.
Result
The requisition template is available to users creating a requisition.
Deactivating a Requisition TemplatePrerequisite
A user type permission grants users access to this feature.
The requisition template must be active.
Steps
1. In the Libraries menu, select Templates.
2. Click on a template.
3. Click Edit.
4. Select Inactive.
5. Click Save and Close.
Result
The requisition template is no longer available for use.
Recruiting User Guide Taleo 10 - SP1 5-18
Requisition Requisition Types
Requisition Types
Requisition/Staffing Type A requisition (or staffing) type allows a user to determine the type of candidates that he/she wants to hire.
Detailed Description
Six requisition types are available:
• Professional: Requisitions for most professional employees.
• Executive: Requisitions for executives. This type of requisition allows you to secure and protect private executive candidates in the system.
• Hourly: Requisitions for hourly employees.
• Campus: Requisitions for students or campus job fairs.
• Contingent: Requisitions for contractual employees submitted by agencies.
• Universal: Requisitions that can be used for all types of requisition templates.
The system administrator is responsible of activating requisition types. Also, user type permissions grant users access to the different requisition types and indirectly, different pools of candidates.
When creating a requisition, if more than one requisition type is activated, the user is asked to select the desired requisition type. When a requisition type is no longer available, it cannot be selected, but requisitions created with that type keep their original requisition type.
For Integration purposes: Campus requisitions and Hourly requisitions must be identified by your Taleo representative in order for the integration team to change requisition type with a manual script. This will be allowed only once by customer. If more than one requisition type is active, import files must be modified.
Benefits
• Allows users to create requisitions for a specific type of hiring.
Changing the Type of a Requisition TemplatePrerequisite
A user type permission grants users access to this feature.
Steps
1. In the Libraries menu, select Templates.
2. Click on a template.
3. Click .
4. Select a requisition type.
5. Click Done.

Recruiting User Guide Taleo 10 - SP1 5-19
Requisition Requisition Types
Result
The requisition template can now be used to create requisitions for the specified requisition type.

Recruiting User Guide Taleo 10 - SP1 5-20
Requisition Requisition Ownership
Requisition Ownership
Requisition OwnerRequisition ownership refers to the individuals chosen as the recruiter, the hiring manager, the recruiter assistant or the hiring manager for a specific requisition.
Detailed Description
The individuals chosen as the recruiter, the hiring manager, the recruiter assistant or the hiring manager for a specific requisition are considered owners of the requisition.
To be available for a requisition, the recruiter assistant and the hiring manager assistant roles must be activated by your system administrator. These two assistant roles can carry out requisition-related activities to help out the recruiter or hiring manager while, from a reports perspective, the requisition is attributed to the recruiter and hiring manager.
When creating a requisition, you can choose a recruiter assistant and/or a hiring manager assistant. To modify the recruiter, the hiring manager, the recruiter assistant and the hiring manager assistant, you must be the owner of the requisition or have the Reassign requisitions to owners and collaborators even if the user is not a owner user type permission.
When viewing the Requisition list, you can use the “I own” quick filter located on the left-hand side of the page to gain quick access to your requisitions. You can also use the advanced filters Recruiter, Hiring Manager, Recruiter Assistant, Hiring Manager Assistant to view requisitions owned by a specific user.
When notifications (such as attention indicator flags, workflow event notifications) are sent, the recruiter, the hiring manager as well as the assistants will receive them.
System-assigned tasks (such as To be completed, Ready for sourcing, Extend posting and To be filled) are assigned to the assistant (if an assistant was identified) instead of the recruiter. However, the recruiter also has access to these tasks even though they were assigned to the assistant.
The recruiter, recruiter assistant, hiring manager, hiring manager assistant chosen for the requisition as well as the creator of the approval path can terminate the approval path.
Benefits
• Assistant roles can carry out activities to help out the hiring manager and recruiter.
Changing the Ownership of RequisitionPrerequisite
A user type permission grants users access to this feature.
User must be the owner of the requisition or have the appropriate user type permission.
Steps
1. In the requisition file, click Edit.
2. In the Owners section, select new individuals as recruiter, hiring manager, recruiter assistant and hiring manager assistant for the requisition.
3. Click Save and Close.

Recruiting User Guide Taleo 10 - SP1 5-21
Requisition Requisition Ownership
Result
Notifications will be sent to the new owners of the requisition.

Recruiting User Guide Taleo 10 - SP1 5-22
Requisition Requisition Collaboration
Requisition Collaboration
CollaboratorA collaborator is a person chosen by the owner of a requisition who helps out or takes responsibility for certain parts of the requisition process.
Detailed Description
To provide special access to a number of users throughout the requisition’s life cycle, a Collaborator role is available. To be available, the Collaborator field must be activated by the system administrator.
Requisition owners (for example the recruiter, hiring manager, recruiter assistant and hiring manager assistant) can grant privileges and access to one or multiple users they identify as collaborators on their requisitions. The recruiter, the hiring manager and the assistants, if any, are the principal actors throughout the requisition’s life cycle. Collaborators will help out or take responsibility for certain parts of the process.
Any user (not deleted) can be a collaborator, even non-Taleo Recruiting users (these users can be involved in the approval process with the use of the Taleo e-share Center).
When creating a requisition, a user can specify collaborators who would be responsible for selected steps within the requisition or recruitment process. If using the same individuals as collaborators, a user can create a list of frequent collaborators in the My Setup page. Once a list of frequent collaborators is created, these collaborators can quickly be added to requisitions by clicking the Add Frequent Collaborators button.
If a user wants to modify the collaborators added in a requisition, the user must be the owner of the requisition and have the Edit requisitions user type permission or, have the Reassign requisitions to owners and collaborators event if user is not an owner user type permission.
When viewing the Requisition list, a user can use the “I collaborate on” quick filter located on the left-hand side of the page to gain quick access to requisitions he/she collaborates on.
Benefits
• Collaborator role has functional privileges and can quickly access requisitions.
• There is no limit to the number of collaborators, and collaborators do not have to be part of the user group.
• More effective recruitment process thanks to greater collaboration capabilities.
Adding a Collaborator in a RequisitionPrerequisite
A user type permission grants users access to this feature.
The Owners section must be included in the requisition.
Steps
1. In the Requisition tab of the requisition file, click Edit.
2. Click Add in the Collaborators section.
Recruiting User Guide Taleo 10 - SP1 5-23
Requisition Requisition Collaboration
3. Select a user.
4. Click Done.
Result
The name of the collaborator appears in the Collaborators section of the requisition.
Deleting a Collaborator in a RequisitionPrerequisite
A user type permission grants users access to this feature.
The Owners section must be included in the requisition.
Collaborators must have been included in the requisition.
Steps
1. In the Requisition tab of the requisition file, click Edit.
2. Select a collaborator in the Collaborators section.
3. Click Delete.
Result
The collaborator no longer appears in the Collaborators section of the requisition.
Adding Frequent Collaborators in a RequisitionPrerequisite
The list of frequent collaborators must be defined in the My Setup page.
A user type permission grants users access to this feature.
The Owners section must be included in the requisition.
Steps
1. In the Requisition tab of the requisition file, click Edit.
2. Click Add Frequent Collaborators in the Collaborators section.
Result
The list of frequent collaborators defined under My Setup appears in the Collaborators section.
Creating a List of Frequent CollaboratorsPrerequisite
A setting allows the activation of this feature.
A user type permission grants users access to this feature.
The Collaborators field must be activated by the system administrator.
Steps
1. Click My Setup link located in the top right-hand corner.
Recruiting User Guide Taleo 10 - SP1 5-24
Requisition Requisition Collaboration
2. In the Frequent Collaborators tab, click Add...
3. Select one or several collaborators.
4. Click Done.
Result
Individuals with whom users will work on a regular basis regarding requisitions, i.e. collaborators, will appear in the Collaborators list. These collaborators will be available via the Add Frequent Collaborators button when creating a requisition.
Adding a Collaborator to the Frequent Collaborators ListPrerequisite
A setting allows the activation of this feature.
A user type permission grants users access to this feature.
The Collaborator field must be activated by the system administrator.
Steps
1. Click My Setup link located in the top right-hand corner.
2. In the Frequent Collaborators tab, click Modify...
3. Select a collaborator.
4. Click Done.
Result
The collaborator appears in the Collaborators list. The collaborator will be available via the Add Frequent Collaborators button when creating a requisition.
Removing a Collaborator from the Frequent Collaborators ListPrerequisite
A setting allows the activation of this feature.
A user type permission grants users access to this feature.
The Collaborator field must be activated by the system administrator.
Steps
1. Click My Setup link located in the top right-hand corner.
2. In the Frequent Collaborators tab, click Modify...
3. Hover your mouse on the name of a collaborator.
4. Click on the that appears.
5. Click Done.
Result
The collaborator no longer appears in the Collaborators list. It will no longer be available via the Add Frequent Collaborators button when creating a requisition.

Recruiting User Guide Taleo 10 - SP1 5-25
Requisition Requisition Matching
Requisition Matching
Preview of Candidates Matching a RequisitionThis feature allows users to select a requisition and to preview candidates who would be a fit for the requisition based on the Job, Location and Organization structure fields as well as additional matching criteria and filters.
Detailed Description
When a user posts a requisition to a career section, the Preview Matching Candidates button in the Posting and Sourcing tab allows him/her to preview a list of candidates whose profiles match default matching criteria and filters.
For the Preview Matching Candidates button to appear in a requisition file, the country specified in the requisition must correspond to the country specified by the system administrator. For example, if a user posts a requisition for a job available in the United States, the Preview Matching Candidates button will be displayed if the system administrator selected United States among the countries for which users can view matching candidates. This is useful if a company may not feel comfortable in showing to users a list of matching candidates for job posted in some countries because of regulation reasons (EEO regulations for example).
Default matching criteria are set by the system administrator. However, these default criteria can be modified by the user to find more relevant candidates for a particular requisition.
Default matching filters are also set by the system administrator. However, these default filters can be modified by the user.
Once the user feels that he/she has found the right candidates, an e-mail is sent to these candidates to invite them to apply for the job.
Criteria for Matching CandidatesCriteria for matching candidates are used to find a match between a requisition file and candidate file.
Detailed Description
Default matching candidate criteria are set by the system administrator. However, these default criteria can be modified by the user to find more relevant candidates for a particular requisition. Matching criteria are:
• Preferred Jobs and Job
• Preferred Locations and Locations
• Preferred Organizations and Organization
• Place of residence and Location
• Competencies
• Questions
• Job Level
• Job Type

Recruiting User Guide Taleo 10 - SP1 5-26
Requisition Requisition Matching
• Schedule
• Shift
• Employee Status
• Education Level
• Willing to Travel
• Salary
Matching criteria (except for competencies and questions) can be set as desired or required:
• Required: The criterion is mandatory. The candidate has to meet this specific criterion to appear in the list of candidates displayed to the users.
• Desired: The criterion is not mandatory, it is considered an asset. A candidate who does not have an asset will be matched as long as he or she meets all the required criteria. Candidates who do not match a Desired criterion are not rejected. Candidates who meet all the Required criteria and who also meet some of the Desired criteria will appear at the top of the list of candidate displayed to the user.
Competencies and questions criteria are considered as wildcards. If these criteria are not set to Required in the requisition, or if a candidate does not enter answers for these criteria, the answers will still be considered. The candidate will be matched if he or she matches all the other required criteria. Answering these criteria will help determine the position of the candidate on the candidate list.
Filters for Matching CandidatesFilters for matching candidate are used to control the number of candidates displayed to users when viewing a list of candidates matching a requisition.
Detailed Description
Default matching candidate filters are set by the system administrator. However, users have the ability to modify default filters for a specific requisition. Matching candidate filters are:
• A filter to invite or not candidates who have at least one job application with a specific status.
• A filter to invite or not candidates who have applied for a job through any type of source or through a specific source.
• A filter to invite candidates living in all countries, the requisition country, the requisition state/province or the requisition region.
• A filter to invite candidates whose information has been modified during the last x months.
• A filter to invite or not internal candidates.
Viewing Candidates Matching a RequisitionAllows users to view a list of candidates who meet default candidate matching criteria.
Prerequisite
A user type permission grants users access to this feature.
The requisition must be posted on a career section.

Recruiting User Guide Taleo 10 - SP1 5-27
Requisition Requisition Matching
Steps
1. In the requisition file, select the Posting and Sourcing tab.
2. In the Career Sections section, click Preview Matching Candidates.
Result
The Posting Requisitions - Filter Matching Candidates window displays candidates matching the requisition.
Next Step
Modify default matching candidate criteria.
Modify default matching candidate filters.
Modifying Matching Candidate CriteriaAllows users to modify default matching criteria to find more relevant candidates for a particular requisition.
Prerequisite
A user type permission grants users access to this feature.
The requisition must be posted on a career section.
Steps
1. In the requisition file, select the Posting and Sourcing tab.
2. In the Career Sections section, click Preview Matching Candidates.
3. In the Posting Requisitions - Filter Matching Candidates window, click available in the Filters section on the left pane.
4. Modify criteria available in each tab.
5. Click Done.
Result
In the Posting Requisitions - Filter Matching Candidates window, the list of candidates matching the requisition is updated according to the selected criteria.
Next Step
Modify matching candidate filters.
Modifying Matching Candidate FiltersAllows users to modify default filters to control candidates who will be invited to apply for a specific job.
Prerequisite
A user type permission grants users access to this feature.
The requisition must be posted on a career section.
Steps

Recruiting User Guide Taleo 10 - SP1 5-28
Requisition Requisition Matching
1. In the requisition file, select the Posting and Sourcing tab.
2. In the Career Sections section, click Preview Matching Candidates.
3. In the Posting Requisitions - Filter Matching Candidates window, selected the desired filters in the Filters section on the left pane.
Result
In the Posting Requisitions - Filter Matching Candidates window, the list of candidates matching the requisition is updated according to the selected filters.
Next Step
Modify matching candidate criteria.
Sending an E-mail to Candidates Matched to a RequisitionAllows users to send an e-mail to candidates to invite them to apply for a job.
Prerequisite
The requisition must be posted on a career section.
A setting allows the activation of this feature.
A user type permission grants users access to this feature.
Steps
1. In the requisition file, select the Posting and Sourcing tab.
2. In the Career Sections section, click Modify.
3. In the Posting Requisitions window, select the option Email this job posting to matching candidates.
4. Click Done.
Result
Candidates matched to the requisition will receive an e-mail inviting them to apply for the job.

Recruiting User Guide Taleo 10 - SP1 5-29
Requisition Candidate Search for a Requisition
Candidate Search for a Requisition
Candidates Search for a RequisitionAllows users to look for candidates who match specific criteria of the requisition.
Detailed Description
This type of search can be performed from within a requisition file by using the icon .
The External Job Description and Qualifications fields are used as search criteria. In addition to these two fields, the system uses the default value for the Last Update field. The Last Update value is a user preference and can be defined in the My Setup page. Candidate files matching these search criteria are displayed in a search results list.
This type of search can be performed for one requisition file at a time.
Finding Candidates for a RequisitionPrerequisite
A user type permission grants users access to this feature.
Steps
1. Open a requisition file.
2. Click .
Result
Candidate files that best match the external job description and qualifications contained in a requisition are displayed. The search results can include candidates who have already been matched to the requisition.
Creating a Search Query Based on a RequisitionPrerequisite
A user type permission grants users access to this feature.
Steps
1. Open a requisition.
2. Click .
3. Click Save Query.
4. Complete the required information.
5. Click Done.
Result
The search query created based on the content of a requisition is now available in the Search Queries page.
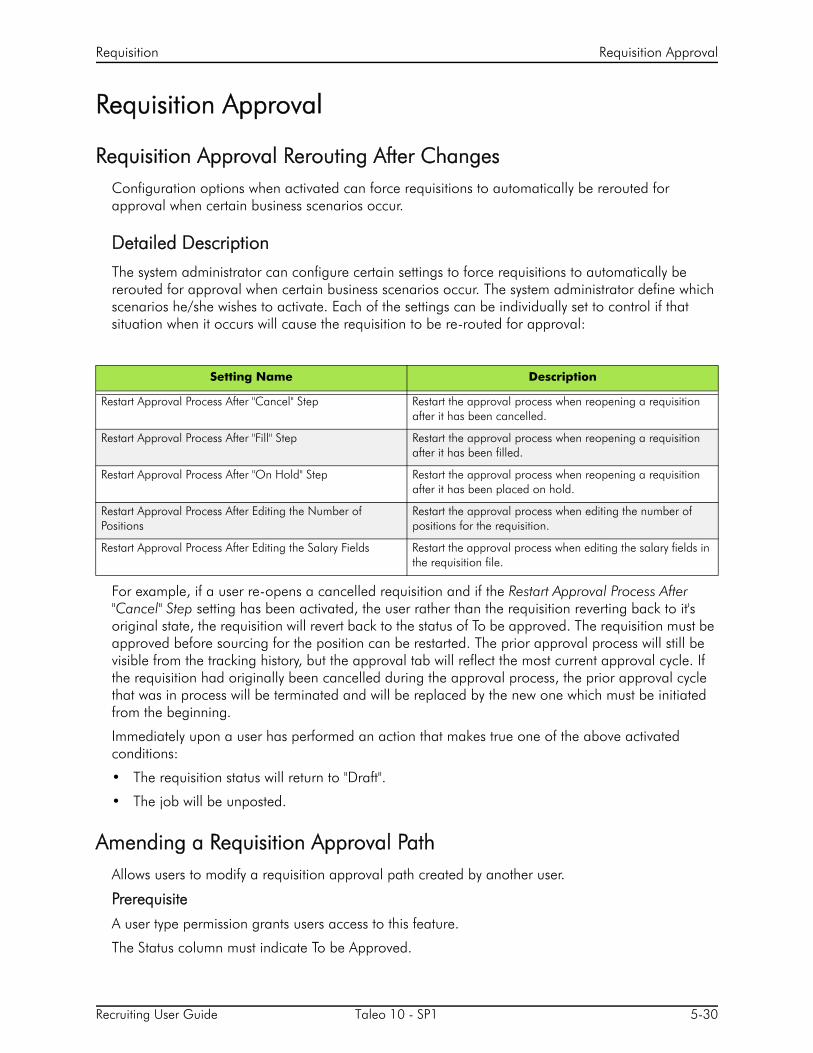
Recruiting User Guide Taleo 10 - SP1 5-30
Requisition Requisition Approval
Requisition Approval
Requisition Approval Rerouting After ChangesConfiguration options when activated can force requisitions to automatically be rerouted for approval when certain business scenarios occur.
Detailed Description
The system administrator can configure certain settings to force requisitions to automatically be rerouted for approval when certain business scenarios occur. The system administrator define which scenarios he/she wishes to activate. Each of the settings can be individually set to control if that situation when it occurs will cause the requisition to be re-routed for approval:
For example, if a user re-opens a cancelled requisition and if the Restart Approval Process After "Cancel" Step setting has been activated, the user rather than the requisition reverting back to it's original state, the requisition will revert back to the status of To be approved. The requisition must be approved before sourcing for the position can be restarted. The prior approval process will still be visible from the tracking history, but the approval tab will reflect the most current approval cycle. If the requisition had originally been cancelled during the approval process, the prior approval cycle that was in process will be terminated and will be replaced by the new one which must be initiated from the beginning.
Immediately upon a user has performed an action that makes true one of the above activated conditions:
• The requisition status will return to "Draft".
• The job will be unposted.
Amending a Requisition Approval PathAllows users to modify a requisition approval path created by another user.
Prerequisite
A user type permission grants users access to this feature.
The Status column must indicate To be Approved.
Setting Name Description
Restart Approval Process After "Cancel" Step Restart the approval process when reopening a requisition after it has been cancelled.
Restart Approval Process After "Fill" Step Restart the approval process when reopening a requisition after it has been filled.
Restart Approval Process After "On Hold" Step Restart the approval process when reopening a requisition after it has been placed on hold.
Restart Approval Process After Editing the Number of Positions
Restart the approval process when editing the number of positions for the requisition.
Restart Approval Process After Editing the Salary Fields Restart the approval process when editing the salary fields in the requisition file.

Recruiting User Guide Taleo 10 - SP1 5-31
Requisition Requisition Approval
Steps
1. In the requisition file, select Amend Approval Path... in the More Actions list.
2. In the Amend Approval page, select the approvers. If desired, change the order of the approvers.
3. Enter comments.
4. Complete other necessary fields.
5. Click Done.
Result
The system assigns the requisition to the first approver in the sequence.
• If the approver is a Taleo Recruiting user, an Approve Requisition task will be assigned to the us
• If the approver is not a Taleo Recruiting user, the approver will receive an e-share approver message
Next Step
• If the approver is a Taleo Recruiting user, he/she can select the following actions: Approve, Reject, Pass, Pending.
• If the approver is not a Taleo Recruiting user, he/she can select the following actions: Approve, Refuse to Approve.
Approving a RequisitionPrerequisite
A user type permission grants users access to this feature
To approve a requisition, a collaborator must be in the same group as the requisition owner.
Steps
1. In your Tasks list, click Approve Requisition.
Users can access the tasks list either by clicking the Respond link in the email received requesting the approval of the requisition, or by directly accessing Taleo Recruiting.
2. In the Decide on Approval window, indicate your decision.
3. Enter comments if mandatory.
4. Click Done.
Approving a Requisition via a BlackBerryAllows users who are not Taleo Recruiting users to approve a requisition via a BlackBerry.
Prerequisite
BlackBerry must:
• Support HTML tables
• Use foreground and background colors
• Use background images

Recruiting User Guide Taleo 10 - SP1 5-32
Requisition Requisition Approval
• Support style sheets
• Java Script is required on the login page if login authentication was activated via eShare.
A user type permission grants users access to this feature.
User must have received an e-mail on his/her BlackBerry.
Steps
1. In the e-mail requesting approval, click Respond.
2. Provide a comment.
3. Click Done.
Result
Approved is indicated in the Decision column of the Approvals tab of the requisition.
Requesting an Approval Path AmendmentAllows a user to ask a colleague who has the proper permissions to amend an approval path.
Prerequisite
A user type permission grants users access to this feature.
The requisition must have the status To be approved.
Steps
1. In a requisition file, select Request Approval Path Amendment... in the More Actions list.
2. Click to select a contributor.
3. Click Done.
Result
The colleague will receive a task to amend an approval path.
Requesting the Approval of a RequisitionAllows users to request the approval of a requisition to one or several colleagues before being able to post a requisition.
Prerequisite
A user type permission grants users access to this feature.
To approve a requisition, a collaborator must be in the same group as the requisition owner.
Steps
1. In the requisition file, select Request Approval... in the More Actions list.
2. In the Request Approval page, select the approvers. If desired, change the order of the approvers.
3. Select a user in the Assign the next task to field.
4. Enter comments.

Recruiting User Guide Taleo 10 - SP1 5-33
Requisition Requisition Approval
5. Complete other necessary fields.
6. Click Done.
Result
The system assigns the requisition to the first approver in the sequence.
• If the approver is a Taleo Recruiting user, an Approve Requisition task will be assigned to the user.
• If the approver is not a Taleo Recruiting user, the approver will receive an e-share approver message
Next Step
• If the approver is a Taleo Recruiting user, he/she can select the following actions: Approve, Reject, Pass, Pending.
• If the approver is not a Taleo Recruiting user, he/she can select the following actions: Approve, Refuse to Approve.
Resending a Requisition Approval RequestAllows users to send a requisition approval request reminder to the currently assigned eShare approver. This feature is useful in the case where an approver may have lost or accidently deleted the original message.
Prerequisite
This feature is only relevant to use if approvers are eShare users and are therefore receiving e-mail based task requests.
A user type permission grants users access to this feature.
Steps
1. In a requisition file, click on the Approvals tab.
2. Click the Send Reminder option.
Result
Another approval request notification is sent to the active approver only.
Self Approving a RequisitionAllows a user to approve his/her own requisition.
Prerequisite
A user type permission grants users access to this feature.
A requisition can be approved only if mandatory fields have been filled, unless the system has been configured to accept partially filled requisitions.
Steps
1. In the requisition file, select Save As Open... in the More Actions list.
Recruiting User Guide Taleo 10 - SP1 5-34
Requisition Requisition Approval
2. Enter comments.
3. Click Done.
Result
The status of the requisition is Approved.
Next Step
Posting the requisition.
Sending an Approval Request ReminderAllows users to send a reminder to the approver of a requisition.
Prerequisite
A user type permission grants users access to this feature.
The requisition status must be To be Approved.
Steps
1. In the Requisition list, click on a requisition.
2. In the More Actions list, select Send an approval request reminder...
3. Enter comments.
4. Click Done.
Result
Another approval request notification is sent to the active approver only. The approver receives the message and must click Respond to respond to the approval request.
Terminating an Approval PathAllows users to stop an approval path if the position has been cancelled or if the requisition is no longer required.
Prerequisite
A user type permission grants users access to this feature.
User must be the owner of the requisition or the creator of the approval path.
The Status Details must indicate To be Approved.
Steps
1. In the requisition file, select Terminate Approval Path... in the More Actions list.
2. Enter comments.
3. Complete other necessary fields.
4. Click Done.
Recruiting User Guide Taleo 10 - SP1 5-35
Requisition Requisition Prescreening
Requisition Prescreening
PrescreeningThe Prescreening section of the requisition file contains disqualification questions, competencies and questions used to find the ideal candidates.
Detailed Description
The Prescreening section contains questions and competencies and can also contain disqualification questions if this feature was activated. The Prescreening section is available to users who have been granted the proper user type permission. A set of user type permissions also grants users access to actions that can be performed in the Prescreening section.
Disqualification questions are displayed in the Prescreening section if the locations and job fields of the question matches the locations and job fields of the requisition.
When defining competencies and questions for a requisition, users have the ability to apply the pre-defined model of competencies and questions associated with the requisition. When clicking Apply Model, questions and competencies that match one location or one job field of the requisition are added to the requisition.
For each question and competency contained in a requisition, users can define if the question or competency is required or an asset, the weight (optional), the minimum proficiency (competencies only) and the minimum experience (competencies only).
Competencies and questions contained in a requisition are answered by candidates. The candidates' responses to the questions and competencies are filtered by the system and presented on the Candidate list of the requisition. An ACE Candidate icon identifies top candidates, and the amount of requirements and assets that the candidate has achieved with his/her responses is also displayed. Users can then review the Candidate list and have the option to reset the Required, Asset and Weight indicators as well as the ACE alert to modify the threshold if necessary to obtain a viable pool of top candidates.
Best practices:
• Identify Required criteria first and then identify and select any Asset criteria.
• When some assets are “Strongly Preferred” and others are “Nice-to-Have”, use weight to differentiate them.
• When starting out, use Required and Asset only and NOT Weight.
• Use weight when they are many assets and you want to indicate some are more important then others.
Required, Asset and Weight CriteriaWhen adding questions and competencies to a requisition, users need to specify if the question or competency is required for the position or if it is an asset. Weight can also be added to a competency, an asset or a question to give it more consideration when prescreening candidates.

Recruiting User Guide Taleo 10 - SP1 5-36
Requisition Requisition Prescreening
Detailed Description
When adding questions and competencies to a requisition, users need to specify if the question or competency is required for the position or if it is an asset.
A required criterion means that the competency or answer to a question absolutely has to be selected for the candidate to be considered for the job. Think “Minimum Requirements”. Are there any circumstances where this qualification could be waived? Goal: All hires have all Required qualifications.
An asset criterion means that the competency or answer to a question does not have to be selected for the candidate to be considered for the job, but would distinguish this candidate compared to others. Think “Strongly Preferred” and “Nice-to-Have” qualifications. Goal: Identify enough Assets to separate “minimally qualified” candidates from “ideal” candidates (ACE Candidates). A best practice is to identify Required criteria first and then identify and select any Asset criteria. When some assets are “Strongly Preferred” and others are “Nice-to-Have”, use weight to differentiate.
Example 1: Question 1 is a single answer question, the candidate will only check one answer. If a Bachelor's Degree is required, we must mark that answer and all answers greater than that answer as required. If we do not do this, a candidate that answers Master's degree will not be recorded by the system as having met the requirement, even though candidates with a Master's degree do meet the minimum requirement.
Example 2: Question 2 is a single answer question, the candidate will only check one answer. If a minimum of 2 years of experience is required, we must mark “1 to 3 years” and all answers greater than that answer as required. If we do not do this, a candidate that answers “3 to 6 years” will not be recorded by the system as having met the requirement, even though those candidates have at least 3 years of experience and thus do meet the minimum requirement.
Required Asset
Question 1: Indicate the highest level of education you have completed.
High School
Associate’s Degree
Bachelor’s Degree x
Master’s Degree x
PhD x
None of the above
Required Asset
Question 2: How many years of experience do you have in Java programming.
No experience
Less than 1 year
1 to 3 years x
3 to 6 years x
6 to 10 years x
More than 10 years

Recruiting User Guide Taleo 10 - SP1 5-37
Requisition Requisition Prescreening
Weight is a numerical value added to a required or asset competency or answer to a question to give it more consideration when prescreening candidates. The weight criterion is an optional third level filter. To use weighting, users assign a certain number of “points” to the answer they want to weight. Goal: Keep it simple! Weighting is used to refine requirements and assets, so it should be used selectively.
Weighting can be helpful with a high volume requisition as there will be more questions and users will need to have extensive filtering of the Candidate list.
Weight can be assigned to a question having a single answer or a question having multiple answers.
There is no limit to the number of points that can be awarded or the number of answers that can have points. Once the points are assigned, the system automatically calculates a percentage. This percentage is the amount that question earns relative to the entire questionnaire. Since these percentages add up to 100%, we can assume these were the only points assigned on this entire questionnaire. All point percentages will be normalized and add up to 100% at the bottom of the prescreening questionnaire.
If users decide to use weighting either because they have a high volume requisition or wish to utilize the third level of filtering, there are some basic usage tips to keep in mind to know what to weight:
• First determine what answers need points. Not all questions or answers need weighting.
• Only weight assets not requirements, and only those assets that really need to stand out from the others in order to sort your ideal candidates to the top of the list.
• One exception to the asset rule is you can put weighting on single answer requirements if the questions are minimum or greater like we saw earlier.
• Another exception is if the Prescreening requirement column is strictly used for OFCCP compliance, then typically assets are not used, and some organizations may want to use weighting in that case to help sort the list.
Example 1: Question 1 is a multiple answer question where you may have several assets. Weighting helps you identify preferred, or super, assets over other assets listed. Here we see MS Project is the most important asset out of the 4 assets. 3 out of the 4 assets are weighted with extra points. When utilizing a list that includes requirements and assets, never assign weighting to requirements. The candidate will either meet the requirement or not, adding weight to a requirement listed here does not assist in providing further differentiation from other candidates. The total weighting for this question is 100%, so you can assume in this example, that this is the only question weighted on the whole questionnaire. If a candidate selected all the assets with weighting they would receive 6 asset points or a 100% result.
Required Asset Weight
Question 1: Indicate which computer applications you have used to perform your job duties in the past. Select all that apply.
MS Access
MS Word x
MS Excel x
MS Publisher x 1 (17%)
MS Project x 3 (50%)
Adobe Acrobat x 2 (33%)
Adobe Pagemaker x
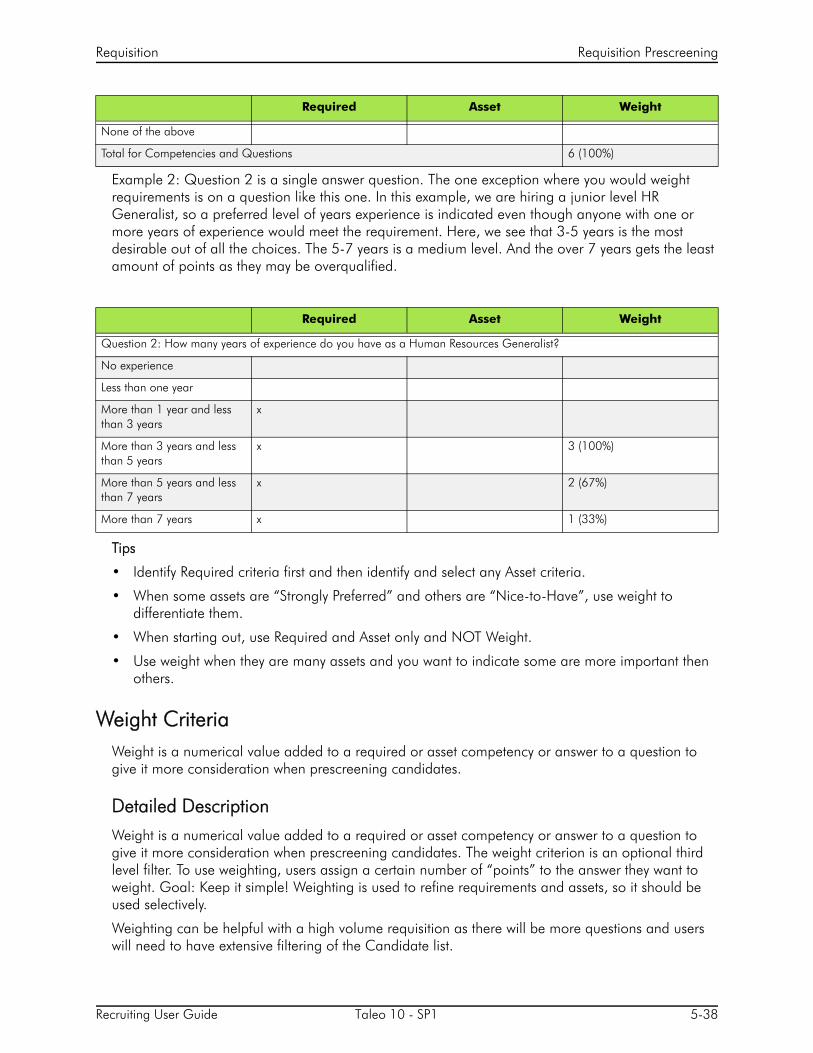
Recruiting User Guide Taleo 10 - SP1 5-38
Requisition Requisition Prescreening
Example 2: Question 2 is a single answer question. The one exception where you would weight requirements is on a question like this one. In this example, we are hiring a junior level HR Generalist, so a preferred level of years experience is indicated even though anyone with one or more years of experience would meet the requirement. Here, we see that 3-5 years is the most desirable out of all the choices. The 5-7 years is a medium level. And the over 7 years gets the least amount of points as they may be overqualified.
Tips
• Identify Required criteria first and then identify and select any Asset criteria.
• When some assets are “Strongly Preferred” and others are “Nice-to-Have”, use weight to differentiate them.
• When starting out, use Required and Asset only and NOT Weight.
• Use weight when they are many assets and you want to indicate some are more important then others.
Weight CriteriaWeight is a numerical value added to a required or asset competency or answer to a question to give it more consideration when prescreening candidates.
Detailed Description
Weight is a numerical value added to a required or asset competency or answer to a question to give it more consideration when prescreening candidates. The weight criterion is an optional third level filter. To use weighting, users assign a certain number of “points” to the answer they want to weight. Goal: Keep it simple! Weighting is used to refine requirements and assets, so it should be used selectively.
Weighting can be helpful with a high volume requisition as there will be more questions and users will need to have extensive filtering of the Candidate list.
None of the above
Total for Competencies and Questions 6 (100%)
Required Asset Weight
Question 2: How many years of experience do you have as a Human Resources Generalist?
No experience
Less than one year
More than 1 year and less than 3 years
x
More than 3 years and less than 5 years
x 3 (100%)
More than 5 years and less than 7 years
x 2 (67%)
More than 7 years x 1 (33%)
Required Asset Weight

Recruiting User Guide Taleo 10 - SP1 5-39
Requisition Requisition Prescreening
Weight can be assigned to a question having a single answer or a question having multiple answers.
There is no limit to the number of points that can be awarded or the number of answers that can have points. Once the points are assigned, the system automatically calculates a percentage. This percentage is the amount that question earns relative to the entire questionnaire. Since these percentages add up to 100%, we can assume these were the only points assigned on this entire questionnaire. All point percentages will be normalized and add up to 100% at the bottom of the prescreening questionnaire.
If users decide to use weighting either because they have a high volume requisition or wish to utilize the third level of filtering, there are some basic usage tips to keep in mind to know what to weight:
• First determine what answers need points. Not all questions or answers need weighting.
• Only weight assets not requirements, and only those assets that really need to stand out from the others in order to sort your ideal candidates to the top of the list.
• One exception to the asset rule is you can put weighting on single answer requirements if the questions are minimum or greater like we saw earlier.
• Another exception is if the Prescreening requirement column is strictly used for OFCCP compliance, then typically assets are not used, and some organizations may want to use weighting in that case to help sort the list.
Example 1: Question 1 is a multiple answer question where you may have several assets. Weighting helps you identify preferred, or super, assets over other assets listed. Here we see MS Project is the most important asset out of the 4 assets. 3 out of the 4 assets are weighted with extra points. When utilizing a list that includes requirements and assets, never assign weighting to requirements. The candidate will either meet the requirement or not, adding weight to a requirement listed here does not assist in providing further differentiation from other candidates. The total weighting for this question is 100%, so you can assume in this example, that this is the only question weighted on the whole questionnaire. If a candidate selected all the assets with weighting they would receive 6 asset points or a 100% result.
Required Asset Weight
Question 1: Indicate which computer applications you have used to perform your job duties in the past. Select all that apply.
MS Access
MS Word x
MS Excel x
MS Publisher x 1 (17%)
MS Project x 3 (50%)
Adobe Acrobat x 2 (33%)
Adobe Pagemaker x
None of the above
Total for Competencies and Questions 6 (100%)

Recruiting User Guide Taleo 10 - SP1 5-40
Requisition Requisition Prescreening
Example 2: Question 2 is a single answer question. The one exception where you would weight requirements is on a question like this one. In this example, we are hiring a junior level HR Generalist, so a preferred level of years experience is indicated even though anyone with one or more years of experience would meet the requirement. Here, we see that 3-5 years is the most desirable out of all the choices. The 5-7 years is a medium level. And the over 7 years gets the least amount of points as they may be overqualified.
Adding a Competency to a RequisitionPrerequisite
A user type permission grants users access to this feature.
Requisition must not be posted.
Steps
1. In a requisition file, click Edit.
2. In the Competencies section, click Add.
3. Select a competency.
4. Click Done.
5. Click Save and Close.
Result
The competency appears in the Competencies section of the requisition file.
Removing a Competency from a RequisitionPrerequisite
A user type permission grants users access to this feature.
Requisition must not be posted.
Steps
1. In a requisition file, click Edit.
Required Asset Weight
Question 2: How many years of experience do you have as a Human Resources Generalist?
No experience
Less than one year
More than 1 year and less than 3 years
x
More than 3 years and less than 5 years
x 3 (100%)
More than 5 years and less than 7 years
x 2 (67%)
More than 7 years x 1 (33%)
Recruiting User Guide Taleo 10 - SP1 5-41
Requisition Requisition Prescreening
2. In the Competencies section, select a competency.
3. Click Remove.
4. Click Save and Close.
Result
The selected competency no longer appears in the Competencies section of the requisition.
Applying Competency and Question ModelPrerequisite
A user type permission grants users access to this feature.
Requisition must not be posted.
Steps
1. In the requisition file, click the Requisition tab.
2. Click Edit.
3. In the Prescreening section, locate the Competencies section.
4. Click Apply Model.
5. Click Save and Close.
Result
Questions and competencies associated to the model of the position appear in the requisition.
Next Step
Defining competency criteria.
Ordering Competencies in a RequisitionPrerequisite
A user type permission grants users access to this feature.
Requisition must not be posted.
Steps
1. In a requisition file, click Edit.
2. In the Competencies section, for each competency, select an order number from the list.
3. Click Reorder.
4. Click Save and Close.
Result
Competencies will be displayed in the requisition in the selected order.

Recruiting User Guide Taleo 10 - SP1 5-42
Requisition Requisition Prescreening
Defining Competency CriteriaPrerequisite
A user type permission grants users access to this feature.
Requisition must not be posted.
Steps
1. In the requisition file, click the Requisition tab.
2. Click Edit.
3. In the Competencies section, select the criteria for a competency.
4. Click Save and Close.
Result
The required/asset criteria, the minimum proficiency and experience required, the weight are set for the competenc.
Adding a Question to a Requisition FilePrerequisite
A user type permission grants users access to this feature.
Requisition must not be posted.
Steps
1. In a requisition file, click Edit.
2. In the Questions section, click Add.
3. Select a question.
4. Click Done.
5. Click Save and Close.
Result
The question appears in the Questions section of the requisition file.
Removing a Question from a Requisition FilePrerequisite
A user type permission grants users access to this feature.
Requisition must not be posted.
Steps
1. In a requisition file, click Edit.
2. In the Questions section, select a question.
3. Click Remove.
4. Click Save and Close.
Recruiting User Guide Taleo 10 - SP1 5-43
Requisition Requisition Prescreening
Result
The selected question no longer appears in the Questions section of the requisition.
Ordering Questions in a Requisition FilePrerequisite
A user type permission grants users access to this feature.
Requisition must not be posted.
Steps
1. In a requisition file, click Edit.
2. In the Questions section, for each question select an order number from the drop down list.
3. Click Reorder.
4. Click Save and Close.
Result
Questions will be displayed in the requisition in the selected order.
Defining Question CriteriaPrerequisite
A user type permission grants users access to this feature.
The requisition must not be posted.
Steps
1. In the requisition file, select the Requisition tab.
2. Click Edit.
3. In the Questions section, select values for the criteria of the question.
4. Click Save and Close.
Result
Users has specified if a question is required or an asset and to set the weight of a question
Creating a Question for a RequisitionPrerequisite
A user type permission grants users access to this feature.
Requisition must not be posted.
Steps
1. In the requisition file, click the Requisition tab.
2. Click Edit.
3. In the Questions section, click .

Recruiting User Guide Taleo 10 - SP1 5-44
Requisition Requisition Prescreening
4. Complete the fields.
5. Click Save and Close.
Result
The question is added to the requisition. The question is not added to the Question Library therefore not available for other requisitions.
Duplicating a Question for a RequisitionPrerequisite
A user type permission grants users access to this feature.
The requisition must not be posted.
Steps
1. In the requisition file, select the Requisition tab.
2. Click Edit.
3. In the Questions section, click .
4. Complete the fields.
5. Click Save and Close.
Result
The question is added to the requisition. The question is not added to the Question Library therefore not available for other requisitions.

Recruiting User Guide Taleo 10 - SP1 5-45
Requisition Requisition Posting
Requisition Posting
Requisition PostingRequisition posting allows a user to publish a requisition in order to have candidates applying on the job.
Detailed Description
A requisition can be posted on:
• Internal or external career sections.
• eQuest: this is the doorway to post a requisition on any job board. A requisition must be posted on a career section before being posted on eQuest.
• Staffing agents: a user can ask an advertising agency to post an ad.
• Non-electronic media such as newspapers, magazines and trade publications, billboards and broadcasting. A list of preferred non-electronic media can be created in the Setup page, under Preferences.
Depending on how settings are configured by the system administrator, a requisition may need approval before being posted. When an approval is required, the approval requirements will be displayed in the requisition file Approval Path tab.
When the last position of a requisition is filled, the requisition is automatically unposted from the company’s career sections and intranet, and the requisition is no longer displayed in the requisition list. Users might have to remove the requisition manually from other sites. Also, the step for remaining candidates is changed to Rejected.
Users must have the required user type permission to be able to post requisitions. Also, different permissions are also required to perform certain posting actions.
Benefits
• Allows a user to target where a requisition will be posted.
Allowing the Posting of a RequisitionPrerequisite
A user type permission grants users access to this feature.
A requisition must have been prevented from being posted in order to allow the posting.
Steps
1. In the requisition file, select Allow Posting... in the More Actions list.
2. Enter a comment.
3. Click Done.

Recruiting User Guide Taleo 10 - SP1 5-46
Requisition Requisition Posting
Result
The icon is no longer displayed in the requisition file left panel as well as in the Requisitions list. The requisition that has been prevented from being posted can now be posted.
Preventing the Posting of a RequisitionPrerequisite
A user type permission grants users access to this feature.
The requisition must not be posted.
A requisition must be approved and ready.
Steps
1. In the requisition file, select Prevent Posting... in the More Actions list.
2. Enter a comment.
3. Click Done.
Result
The icon is displayed in the requisition file left panel as well as in the Requisitions list. Also, the Posting and Sourcing action is deactivated so that it becomes impossible to post the requisition even if it is ready for posting.
Posting a Requisition on a Career SectionPrerequisite
A user type permission grants users access to this feature.
The Status must indicate Open.
The Status Details must indicate Approved (Ready), Unposted or Expired.
There must be no Organization, Location and Job Field associated to the Career Section or, the Organization, Location and Job Field of the requisition and the Career Section must match.
Career section must be active.
Steps
1. In the requisition file, select the Posting and Sourcing tab.
2. In the Career Sections section, click Modify.
3. Select the posting start date and end date for the desired career section.
4. Click Post.
Result
The status of the requisition is Posted. Information regarding the posting is displayed in the requisition Career Sections section. Once a requisition has been posted, candidates can start applying.
Recruiting User Guide Taleo 10 - SP1 5-47
Requisition Requisition Posting
Unposting a Requisition from a Career SectionPrerequisite
A user type permission grants users access to this feature.
The requisition must be Approved.
Steps
1. In the requisition file, select the Posting and Sourcing tab.
2. In the Career Sections section, click Modify.
3. In the Posting Requisitions page, click Unpost.
Result
The status of the requisition is Unposted. Candidates can no longer apply via this career section.
Posting a Requisition on a Job BoardPrerequisite
A user type permission grants users access to this feature.
The Status must indicate Open.
The Status Details must indicate Posted.
A requisition must be posted on a career section before being posted on eQuest. A requisition must be posted on an external company career section for at least the same time as on eQuest job boards.
Steps
1. In the requisition file, select the Posting and Sourcing tab.
2. In the Job Boards (eQuest) section, click Modify.
3. Verify and complete requisition and company information as necessary.
See eQuest help if necessary.
4. Click Post Job.
5. Review information in the Final Confirmation window.
6. Click Post Job.
Result
The status of the requisition is Posted. Information regarding the posting is displayed in the requisition Job Boards (eQuest) section. Once a requisition has been posted, candidates can start applying.
The eQuest feature brings the user to another service which is not the responsibility of Taleo Corporation. Posting requisitions on certain job boards through eQuest may imply additional costs and fees independent of the services offered by Taleo Corporation. The selections you make will be effective once you quit the eQuest portal and return to Taleo Recruiting. Once postings have been made, information on dates and status will be available in the requisition Posting and Sourcing tab.
Recruiting User Guide Taleo 10 - SP1 5-48
Requisition Requisition Posting
Unposting a Requisition from a Job BoardPrerequisite
A user type permission grants users access to this feature.
Steps
1. In the requisition file, select the Posting and Sourcing tab.
2. In the Job Boards (eQuest) section, click Modify.
3. In the Posting Requisitions page, click Unpost.
Result
The status of the posting for the job board is Unposted. Candidates can no longer apply via this job board.
Posting a Requisition on a Job Board with a Future Start DatePrerequisite
A user type permission grants users access to this feature.
The requisition must be active. Status must indicate Open and the Status Details must indicate Posted.
A requisition must be posted on a career section before being posted on eQuest. A requisition must be posted on an external company career section for at least the same time as on eQuest job boards.
Steps
1. In the requisition file, enter a date later than the current day’s date in the Opening Date field.
2. Select the Posting and Sourcing tab.
3. Post the requisition on an internal career section that is unavailable to both internal and external candidates, specifying today’s date in the Start Date field.
4. Post the job to eQuest, specifying the future date on which you want the job to be displayed on USAJOBS.
Result
The requisition is displayed on USAJOBS on the correct future date automatically because USAJOBS allows the queuing of jobs.
Posting a Requisition to Non-Electronic MediaPrerequisite
A user type permission grants users access to this feature.
The requisition must be posted on a career section.
A requisition must be Approved to be posted.
Steps
1. In the requisition file, select the Posting and Sourcing tab.
Recruiting User Guide Taleo 10 - SP1 5-49
Requisition Requisition Posting
2. In the Non-Electronic Media section, click Request Service.
3. Select a medium.
If you want to select a medium amongst your preferred non-electronic media, select the option Preferred non-electronic media located on the left pane.
4. Specify the start date and end date of the posting.
5. Click Next.
6. In the Posting Requisitions page, select the agency that will post the job ad.
7. Click Done.
Result
The agency will receive a request to post the requisition to the selected non-electronic media such as newspapers, magazines, billboards, etc.
Unposting a Requisition from Non-Electronic MediaAllows users to remove the posting of a requisition on a non-electronic media.
Prerequisite
A user type permission grants users access to this feature.
The requisition must be posted on a career section.
The requisition must be approved.
Posting must not be overdue.
Steps
1. In the requisition file, select the Posting and Sourcing tab.
2. In the Non-Electronic Media section, click Request Service.
3. Browse mouse over the name of a non-electronic media.
4. Click .
Requesting Resume SearchingAllows users to ask an agency to search for resumes over the internet.
Prerequisite
A user type permission grants users access to this feature.
A requisition must be Approved to be posted.
Steps
1. In the requisition file, select the Posting and Sourcing tab.
2. In the Internet Mining section, click Request Service.
3. In the Posting Requisitions page, select an agency.
4. Click Done.
Recruiting User Guide Taleo 10 - SP1 5-50
Requisition Requisition Posting
Result
The agency will receive a request to search for resumes over the internet.
Requesting Sourcing StrategyAllows users to ask an agency to find relevant media before preparing an ad request.
Prerequisite
A user type permission grants users access to this feature.
A requisition must be Approved to be posted.
Steps
1. In the requisition file, select the Posting and Sourcing tab.
2. In the Sourcing Strategy Request section, click Request Service.
3. In the Posting Requisitions page, select an agency.
4. Click Done.
Result
The agency will receive a request to find relevant media.
Requisition Posting via a Staffing AgentPosting a requisition via staffing agents involves many actions such as the creation of the agency portal, application flows, agencies and agents, as well as many actors such as the system administrator, the user, the agent and the candidate.
Detailed Description
Agency portals (or agency career sections) provide a fully integrated solution that enables organizations to deal directly with staffing agencies. This feature helps ensure the privacy of the organization's candidates and jobs by providing an agency-dedicated application flow within one or multiple agency portals.
The posting of a requisition via posting agents involves the following.
After creating a requisition, a user can decide to use staffing agents to help him/her find candidates for the job. The list of agents available is dependent on the organization, location and job field selected for the requisition. The user can select one or several staffing agents who will post the requisition on their job list, then determine the start and end time when candidate referrals will be allowed. Note that this process can take place after the requisition is opened but before it is posted to internal or external career sections as agents will be accessing the requisition through their own career section (agency portal).
An email is sent to staffing agents inviting them to refer candidates for the job. The staffing agent signs in to the Taleo agency portal, locates the requisition associated to him/her and refers a candidate. When referring a candidate, the agent must first verify if the candidate already exists in the database by entering the candidate’s email address and performing a duplicate check. If the candidate does not exist in the database, the agent is able to refer the candidate.
Recruiting User Guide Taleo 10 - SP1 5-51
Requisition Requisition Posting
Candidates being referred receive an email informing them that they were referred by an agent for a job and inviting them to review the profile information submitted by the agent.
Later, when searching through the candidate database, the user can easily identify candidates referred by an agent with this icon . The tracking tab of the candidate file also displays the name of the agency and that of the agent who referred the candidate. Candidates referred by an agent are considered agent-owned candidates. However, the user can remove the agent-ownership. The user has the possibility to perform a duplicate check to see if the candidate already exist in the database.
As per the configuration aspect of the feature, the system administrator is responsible for creating the agency portal as well as the application flows used by agents and agencies to refer candidates. For more information, see the Career Section Administration Manual. Once the agency portal and flows are created, the system administrator creates agencies and agents. It is necessary to create an agency because every agent is linked to an agency to be functional. An agency is not linked to a portal; only an agent at an agency is linked to a portal.
Inviting an Agent to Refer CandidatesPrerequisite
A user type permission grants users access to this feature.
The requisition must be Approved.
Steps
1. In the requisition file, select the Posting and Sourcing tab.
2. In the Staffing Agents section, click Modify.
3. Select an agent.
If no agents appear in the Agent Selector window, check with your system administrator to ensure the proper career section and agents have been created.
4. Select start and end dates, for the agent.
5. Click Post.
6. Click Done.
Result
The agent has been invited to refer candidates for the requisition available in an organization.
Preventing an Agent from Referring CandidatesPrerequisite
A user type permission grants users access to this feature.
Steps
1. In the requisition file, select the Posting and Sourcing tab.
2. In the Staffing Agents section, click Modify.
3. Click Unpost.
4. Click Done.

Recruiting User Guide Taleo 10 - SP1 5-52
Requisition Requisition Posting
Result
The agent is no longer invited to refer candidates for the requisition for a position available in an organization..

Recruiting User Guide Taleo 10 - SP1 5-53
Requisition Source
Source
Recruiting SourceA recruiting source is a medium or event through which a candidate has heard about the job posted or about a company.
Detailed Description
Sources are used for source tracking purposes. Sources may be as diverse as Internet job boards, job fairs, magazines, specialized trade publications, newspapers, professional associations, mailing lists, recruiting agencies, etc.
Two types of sources exist:
• System-defined sources: These sources are provided by Taleo and cannot be deleted from the database. However, they can be removed by the system administrator. A source that has been removed from the sources list can be added again as it remains available in the database. If a source is removed form the sources list, it no longer appears to users in Taleo Recruiting Center, unless users can access Taleo sources directly because they have been granted the Select Taleo system sources in selector window user type permission. The use of a system-defined source can be modified by the system administrator, that is if the source is used in the profiler, in a requisition, in both, or in none.
• User-defined sources: These sources are created by the system administrator. A user-defined source can be permanently deleted from the sources list, provided it is not in use. If a user-defined source is in use, deleting it will only inactivate it. The properties of a user-defined source as well as the Organization-Location-Job Field structure associated to it can be modified by the system administrator even if the source is in use.
The system administrator can configure the use, the visibility and the Organization-Location-Job Field structure of a source.
• Use: a source is required by users when creating a requisition (use = in requisition). A source can also be used by candidates when entering their profile in a career section (use = in profiler). A source can be used in a requisition source list (in requisition) and/or in a general profile source list (in profiler). If the use of a source is not defined, then the source will not automatically default into the source list for the requisitions or the general profiles. However, via Taleo Recruiting Center, a user can still add the source to a specific source list. The use of a source can be modified after it has been created
• Visibility: The visibility of a source can be set to internal or public. An internal source can be viewed only by users. A public source can be viewed by candidates in career sections and by users in Taleo Recruiting Center.
• Organization-Location-Job Field structure: a source can be associated to organizations, locations and/or job fields. If a source is to be available to all requisitions, no Organization-Location-Job Field structure needs to be associated to the source. However:
• When creating a requisition, only the sources that have the same Organization-Location-Job Field structure as the requisition are displayed in the Sources list.
• When a candidate applies on a job (requisition), only the sources that have the same Organization-Location-Job Field structure as the requisition on which the candidate is applying on, are displayed in the Sources list.

Recruiting User Guide Taleo 10 - SP1 5-54
Requisition Source
• When candidates complete their profile without actually applying on a job, all sources that are active and set to “In Profiler” will display, no matter what the Organization-Location-Job Field structure is set for on the source. The reason for this is that the source tracking block can be placed before or after the Organization-Location-Job Field block and therefore the system is just set to not look at the Organization-Location-Job Field when defining what sources to display.
Benefits
• Allows your organization to know how many candidates applied through each source.
• Provides data on the performance of each source allowing your organization to better decide where to post jobs.
• When posting a job, only the sources relevant to the context are included and available for candidates to choose from.
• Provides the ability to efficiently manage large numbers of sources.
• Does not require any settings activation.
Source TrackingSource tracking allows users to know how the candidate has heard about a position.
Detailed Description
Users have the option to embed the ID of an event or of a source into the URL that sends the candidate to a Career Section. By using the ID of a source or an event in the URL of a Career Section, it is possible to track the event or the source from which the candidate has heard about a position.
If a source code is the same as the event code, the source code will win over the event code. Therefore, the same code should not be used for a source and an event.
There are technically three levels of source tracking:
The system administrator can determine at what level the tracking will take place:
• Source: Sourcing performance is measured in terms of the source only.
• Event: Sourcing performance is measured in terms of a specific event related to a source.
To collect sourcing data, the application can be configured to ask candidates where they heard about the job they are applying for. The choice of answers for each job posted can be specified by the administrator in Recruiting Configuration. Recruiting Center users can then view data in various layouts of the Source Tracking Report.
Note: Agencies and agents appearing under the Corporate Sources List are created under the Agencies section of Recruiting Configuration.
Level Item Description Example
1 Source Type General source Newspaper
2 Source Specific source Boston globe
3 Event Timely event for a source An add in the Boston Globe on Sunday

Recruiting User Guide Taleo 10 - SP1 5-55
Requisition Source
Adding a Source to a RequisitionPrerequisite
A user type permission grants users access to this feature.
The organization, location and job field of the source and of the requisition must match or the source must not be associated to any organization, location and job field.
Source must be active.
Steps
1. Open a requisition.
2. Click the Posting and Sourcing tab.
3. In the Modify Source List section, click Modify.
4. Click Select next to the desired source.
5. Click Done.
Result
The selected source appears in the Modify Source List section of the requisition. Users can add sources to a requisition to know how candidates have heard about a position.
Removing a Source from a RequisitionPrerequisite
A user type permission grants users access to this feature.
Steps
1. Open a requisition.
2. Click the Posting and Sourcing tab.
3. In the Modify Source List section, click Modify.
4. In the Posting Requisitions window, click next to a selected source.
5. Click Done.
Result
The selected source no longer appears in the Modify Source List section of the requisition.

Recruiting User Guide Taleo 10 - SP1 5-56
Requisition Event
Event
Recruiting EventAn event is a specific advertisement in a trade magazine, a recruiting event on a university campus (job fair), or a special recruiting event at an organization.
Detailed Description
Events allow users to track down which event/banner/campaign are attracting the most candidates to their career sections. Events are created by the system administrator and are linked to a specific source. When a source is used in a source list of a requisition (in requisition) or a general profile (in profiler), any event created for that source is also populated in the list.
For events to be made available in requisitions or in general profiles, the system administrator must set the Tracking Mode setting value to Event. This will display the Events column in the Corporate Sources List and from there, the system administrator will be able to configure events.
For tracking purposes, the event ID which is unique, can be embedded into the URL that sends the candidate to a career section. Therefore, when a candidate logs to a career section, the URL will include the event from which the candidate has heard about the job posting or the company. For details, refer to the Career Section Administration Manual.
The properties of an event can be modified even if the event is used in a requisition or in a general profile.
Benefits
• Provides data on the performance of each event allowing an organization to better decide where to post jobs.
Recruiting User Guide Taleo 10 - SP1 5-57
Requisition External Services
External Services
Screening ServiceAn organization can choose to have external partners provide specialized screening services.
Detailed Description
An organization can choose to have some services executed by a third party. A screening services partner can supply services such as:
• candidate assessment
• background check
• tax credit eligibility
• interview guides
• interview scheduling
• validated tests to identify and measure a candidate’s qualifications, motivations, abilities and eligibility
Screening services must be activated by the support service before they can be used in a requisition flow. Services are sourced to the application using an external tool, and enabled by default if the service does not require any additional configuration.
Once a service is made available by the support service, the service can be activated or deactivated by the system administrator and made available or not to users when creating a requisition.
All screening services have the same properties, however, the settings of these properties will vary according to the service. The system administrator can configure the screening service i.e. modify input fields, phases, etc.
The languages in which an external service is available depend on the languages used by the service providers and vendors.
Screening services are available to users provided they have been granted the user type permission. User type permissions are granted by an administrators through the SmartOrg product.
Benefits
• Allows an organization to delegate specialized services to third party providers.
• Allows an organization to concentrate resources on recruiting services.
Requesting a Screening ServicePrerequisite
A screening service must be available in the application.
A user type permissions grants users access to this feature.
Candidate must be in a selection process.
Steps

Recruiting User Guide Taleo 10 - SP1 5-58
Requisition External Services
1. In the Candidate list, click on the name of a candidate.
2. In the More Actions list, select Request Screening Service.
3. Select a service from the Available Service drop-down list.
4. Comment is necessary.
5. Click Done.
Result
Candidate will receive a request from a screening service.

BP(A|S)
Offer
• Offer . . . . . . . . . . . . . . . . . . . . . . . . . . . . . . . . . . . . . . . . . . . . . . . . . . . . . 6-1
• Offer Approval . . . . . . . . . . . . . . . . . . . . . . . . . . . . . . . . . . . . . . . . . . . . . 6-11

Recruiting User Guide Taleo 10 - SP1 6-1
Offer Offer
Offer
OfferAn offer contains the terms and conditions of a job.
Detailed Description
The offer process can be started once a candidate has been moved to the Offer step. All offer-related actions are available in the candidate list or from anywhere in the candidate submission via the More Actions list.
The offer form, available in the candidate file Offers tab, is where all the information is gathered to create an offer. It contains not only the information about the current offer to be made to a candidate but it can also be used to collect and maintain information on previous offers, competitive offers, and offer expectations.
To create an offer, a user clicks Create Offer in the More Actions list. This action is available from the candidate list and from any tab in the candidate file. Note that to create an offer, a user must have been granted the proper user type permission.
In the offer form, each offer appears in a specific column. When a new offer is created, it automatically appears in the first column to the left and is labeled Offer (New). It is possible to view up to four columns at a time and users can use the arrows in the top right corner of the center panel to navigate through more offers as desired. Users can also use the drop-down option at the top of each column to change or remove the context being viewed.
When creating an offer for a candidate, it is possible to use information from another offer column,
such as the terms of a previous offer, by using the icon . This icon appears when hovering the mouse at the top of a column or beside rows or sections of the offer form. By clicking this icon, a user can move fields to the new offer all at once or individually. Note that previous offers are for reference only and cannot be modified. When choosing to carry over an entire offer column or section, the only field that will not carry over automatically is the actual offer correspondence. To carry over an offer correspondence, the user must select this row individually and explicitly choose to move it across.
When in the offer form, if the user has been given appropriate permissions, it is possible to look at offers presented to the candidate for other requisitions by clicking the Other Offers link located in the left panel.
There can only be one current offer per candidate application at a time. The current offer can be modified until it is approved or extended to a candidate, after which only the start date and expiration date can be modified. Changes made to the start date and expiration date are tracked by the system.
Once all required offer fields have been completed, the user can submit the offer for approval. The user can review the current offer approval details at any time by going to the candidate file Offer Approvals tab. Approval information is available in the candidate file Offer Approvals tab.
If a user has been granted the proper permissions, the Amend Approval Path and Terminate Approval buttons can be available.

Recruiting User Guide Taleo 10 - SP1 6-2
Offer Offer
Benefits
• Improved usability: fewer clicks to take offer-related actions.
• Ability to create new offers by leveraging data from prior offers (including the offer correspondence).
• Easy access to offer approval information.
• Easy access to offers on other job submissions.
• All offer-related actions available in the More Actions list via the candidate list and via any tab with the candidate submission file.
Offer StatusesAn offer can go through different statuses.
Detailed Description
An offer can go through different statuses:
Status Description
Offer to be made Initial status of the Offer step.
Draft Offer terms have been started and saved, but not approved.
Cancelled A draft offer has been created and then cancelled prior to routing for approval or extending to the candidate.
Approval in progress Offer has been routed for approval.
Approval rejected Offer has been rejected.
Approved Offer has been approved.
Extended Offer has been extended to the candidate.
Rescinded fter the offer has been extended or the candidate has accepted the offer, the user (company) rescinds/revokes the offer.
In negotiation Offer was extended to the candidate. The user marked the candidate as wanting to negotiate the offer. If a new offer should be created, the user will need to rescind the offer in order to create a new offer. If a new offer is not required, then either recapture the candidate response (accept or refused) or status them as Rejected or Has Declined.
Refused Offer was extended to the candidate. The user marked the candidate as refusing the offer. A new offer can be created at this point.
Accepted Offer was accepted by the candidate.
Reneged After the candidate has accepted the offer, the candidate refuses the offer (goes back on his or her word).
Rejected After the offer has been rescinded to a candidate, the user should status the candidate as Rejected in the Offer step. This will allow another offer to be created and extended.
Has declined After the offer has been refused or reneged by the candidate, the user should status the candidate as Has Declined in the Offer step. This will allow another offer to be created and extended
Recruiting User Guide Taleo 10 - SP1 6-3
Offer Offer
Creating an OfferPrerequisite
A user type permission grants users access to this feature.
Candidate must have reached the offer step.
The candidate selection workflow must contain the RSOffer step.
Steps
1. In the candidate list, select a candidate file.
2. Select Create Offer... in the More Actions list.
3. Complete mandatory information.
4. Select required information.
5. Click Save and Close.
Next Step
Requesting an approval.
Making an OfferPrerequisite
A user type permission grants users access to this feature.
Candidate must have reached the offer step.
Candidate selection workflow must not contain the RSOffer step.
Steps
1. Select a candidate file..
2. Select Make Offer... in the More Actions list.
3. Complete mandatory information.
4. Select required information.
5. Click Save and Close.
Result
The status is changed to “Offer” in a workflow that does not include offer management but does include a simple offer step.
Editing an OfferPrerequisite
A user type permission grants users access to this feature.
Candidate must have reached the offer step.
Offer must be created but not approved.
Steps

Recruiting User Guide Taleo 10 - SP1 6-4
Offer Offer
1. In the candidate list, select a candidate file.
2. Select the Offers tab.
3. Click Edit under an offer.
4. Edit information.
5. Click Save and Close.
Result
Offer is modified before being approved.
Next Step
Requesting an approval.
Cancelling an OfferPrerequisite
A user type permission grants users access to this feature.
Candidate must have reached an Offer step.
An offer must be created but not extended to candidate.
Steps
1. In the candidate list, select a candidate file.
2. Select Cancel Offer... in the More Actions list.
3. Add a comment.
4. Click Done.
Result
The offer is no longer approved, and no request to approve the offer is in process. The offer approval process is stopped and reset.
Extending an Offer in WritingPrerequisite
A user type permission grants users access to this feature.
A setting allows the configuration of the feature.
Candidate must be at an offer step.
Offer must be approved.
Steps
1. In the candidate list, select a candidate file.
2. Select Extend Offer... in the More Actions list.
3. Select the option Extend by letter, email, or fax via the correspondence.
4. Click Done.

Recruiting User Guide Taleo 10 - SP1 6-5
Offer Offer
Result
Offer is communicated to the candidate either by mail, email or fax.
Extending an Offer VerballyPrerequisite
A user type permission grants users access to this feature.
Candidate must be at an offer step.
Offer must be approved.
Steps
1. In the candidate list, select a candidate file.
2. Select Extend Offer... in the More Actions list.
3. Select the Extend Verbally option.
4. Click .
5. Select the current date in the calendar.
6. Select the capture candidate response, if necessary.
7. Click Done.
Result
Offer is communicated verbally to the candidate.
Next Step
Sending an offer
Sending an OfferPrerequisite
A user type permission grants users access to this feature.
Offer must have been extended to candidate verbally.
Steps
1. In the candidate list, click on a candidate file.
2. Select Send Offer... from the More Actions list.
3. Complete mandatory fields.
4. Select required information.
5. Click Next.
6. Click Send.
Result
The offer previously communicated verbally is sent to the candidate with the selected medium.

Recruiting User Guide Taleo 10 - SP1 6-6
Offer Offer
Capturing the Candidate Response Prerequisite
A user type permission grants users access to this feature.
Offer must be approved.
Offer must have been extended to candidate verbally.
Steps
1. In the candidate list, select a candidate file.
2. Select Capture Response... in the More Actions list.
3. Select the response the candidate has made to the offer.
4. Click Next.
5. Complete required information according to the response given by candidate.
6. Click Done.
Result
The response to an offer made verbally to a candidate is entered in the candidate file.
Next Step
Sending the offer.
Capturing Candidate ExpectationsUsers can capture candidate expectations before a formal offer is made. Candidate expectations can be captured throughout the selection process, but most likely during an interview.
Prerequisite
A user type permission grants users access to this feature.
Steps
1. In the candidate list, select a candidate file.
2. Select Capture Expectations... in the More Actions list.
3. Select the type of expectation.
4. Click Create.
5. In the Desires (New) column, complete information.
6. Click Save and Close.
Editing Candidate ExpectationsPrerequisite
A user type permission grants users access to this feature.
Candidate expectations must be included in file.
Steps

Recruiting User Guide Taleo 10 - SP1 6-7
Offer Offer
1. In the candidate file, select the Offers tab.
2. Click Edit in the expectations column.
3. Change information.
4. Click Save and Close.
Capturing Candidate Current ConditionsUsers can capture candidate current work conditions for comparison purposes before a formal offer is made. Candidate current work conditions can be captured throughout the selection process, but most likely during an interview.
Prerequisite
A user type permission grants users access to this feature.
Steps
1. In the candidate file, select Capture Expectations... from the More Actions list.
2. Select Current Job.
3. Click Create.
4. In the current Job (New) column, complete information.
5. Click Save and Close.
Editing Candidate Current ConditionsPrerequisite
A user type permission grants users access to this feature.
Steps
1. In the candidate file, select the Offers tab.
2. Click Edit next to Current Job column.
3. Make changes.
4. Click Save and Close.
Capturing Competitive Offer InformationUsers can gather information on offers made by other companies. Competitive offer information can be entered in the offer form throughout the selection process, during interviews or telephone conversations.
Prerequisite
A user type permission grants users access to this feature.
Steps
1. In the candidate list, click on a candidate file.
2. Select Capture Competitive... in the More Actions list.

Recruiting User Guide Taleo 10 - SP1 6-8
Offer Offer
3. In the Competitive Offer (New) column, complete information.
4. Click Save and Close.
Editing Competitive Offer InformationPrerequisite
A user type permission grants user access to this feature.
Competitive offer must be captured.
Steps
1. In the candidate file, select Capture Competitive...from the More Actions list.
2. Click Edit under the Competitive Offer column.
3. Complete the information.
4. Click Save and Close.
Cancelling an Accepted OfferPrerequisite
A user type permission grants users access to this feature.
The offer must have been extended to the candidate.
Steps
1. In the candidate list, select a candidate file.
2. Select Rescind Offer... in the More Actions list.
3. Add a comment.
4. Click Done.
Result
The offer is canceled although it was sent to the candidate.
Indicating a Candidate has Declined an Accepted OfferPrerequisite
A user type permission grants users access to this feature.
The offer must have been extended to the candidate.
Steps
1. In the candidate list, select a candidate file.
2. Select Renege Offer... in the More Actions list.
3. Add a comment.
4. Click Done.

Recruiting User Guide Taleo 10 - SP1 6-9
Offer Offer
Result
The candidate file indicates that the candidat has declined an offer previously accepted.
Updating the Offer Expiration DatePrerequisite
A user type permission grants users access to this feature.
An offer must be created.
Steps
1. In the candidate list, select a candidate file.
2. Select Update Expiration Date... in the More Actions list.
3. Select a new expiration date.
4. Click Done.
Result
The date before which the candidate must respond to an offer is changed.
Specifying if the Offer Start Date is TentativePrerequisite
A setting allows the activation of this feature.
The candidate must be at the Offer step.
Steps
1. In the candidate file, click on the Offer tab.
2. In the More Actions list, select Create Offer.
3. Under the start date section, select or not the Tentative option.
4. Click Save.
Result
The offer form now indicates if the start date is tentative or not.
Updating the Offer Start DatePrerequisite
A user type permission grants users access to this feature.
An offer must be created.
Steps
1. In the candidate list, select a candidate file.
2. Select Update Start Date... in the More Actions list.

Recruiting User Guide Taleo 10 - SP1 6-10
Offer Offer
3. Select a new starting date.
4. Click Done.
Result
The starting date on which the candidate is required to start working is changed in the offer.
Using the Salary CalculatorPrerequisite
A user type permission grants users access to this feature.
Steps
1. In the candidate file, select the Offers tab.
2. Click Edit in a column.
3. Click .
4. Complete fields as required.
5. Click Done.
Result
Salary related values generated by the calculator are automatically included in the file.

Recruiting User Guide Taleo 10 - SP1 6-11
Offer Offer Approval
Offer Approval
Requesting an Offer ApprovalPrerequisite
A user type permission grants users access to this feature.
Candidate must have reached the offer step.
Offer must be created.
Steps
1. In the candidate list, select a candidate file.
2. Select Request Approval....in the More Actions list.
3. Select the approvers. If desired, change the order of the approvers.
4. Select a user in the Assign the next task to field.
5. Enter comments.
6. Complete other necessary fields.
7. Click Done.
Result
The system assigns the task to the first approver in the sequence.
• If the approver is a Taleo Recruiting user, an Approve Offer task will be assigned to the user
• If the approver is not a Taleo Recruiting user, the approver will receive an e-share approver message.
Next Step
• If the approver is a Taleo Recruiting user, he/she can select the following actions: Approve, Reject, Pass, Pending.
• If the approver is not a Taleo Recruiting user, he/she can select the following actions: Approve, Refuse to Approve.
Modifying an Offer Approval Path Created by a UserPrerequisite
A user type permission grants users access to this feature.
Decision of approver must be pending.
An offer must be created for the candidate.
Steps
1. In the candidate list, click on a candidate file.
2. In the Candidate file, select Amend Approval Path in the More Actions list.
3. Add or remove approvers. If desired, change the order of the approvers.
4. Enter comments.

Recruiting User Guide Taleo 10 - SP1 6-12
Offer Offer Approval
5. Complete other necessary fields.
6. Click Done.
Result
The system assigns the approval to the first approver in the sequence.
• If the approver is a Taleo Recruiting user, an Approve Offer task will be assigned to the user.
• If the approver is not a Taleo Recruiting user, the approver will receive an e-share approver message.
Next Step
• If the approver is a Taleo Recruiting user, he/she can select the following actions: Approve, Reject, Pass, Pending.
• If the approver is not a Taleo Recruiting user, he/she can select the following actions: Approve, Refuse to Approve.
Approving an OfferPrerequisite
A user type permission grants users access to this feature
Steps
1. In your Tasks list, click Approve Offer.
2. Indicate your decision.
3. Enter comments if mandatory.
4. Click Done.
Approving an Offer via a BlackBerryPrerequisite
BlackBerry must:
• Support HTML Tables
• Use Foreground and Background Colors
• Use Background Images
• Support Style Sheets
• Java Script is required on the login page if login authentication was activated via eShare.
A user type permission grants users access to this feature.
User must have received an e-mail on his/her BlackBerry.
Steps
1. In the email requesting approval, click Respond.
2. Provide a comment.
3. Click Done.

Recruiting User Guide Taleo 10 - SP1 6-13
Offer Offer Approval
Result
User approved an offer without using Taleo Recruiting Center. Approved is indicated in the Decision column of the Approvals tab of the offer.
Approving an Offer on Behalf of Another ApproverPrerequisite
A user type permission grants users access to this feature.
Candidate must have reached the offer step.
Approval for offer must have been requested.
Steps
1. In the candidate list, click on a candidate file.
2. Select Amend Approval Path in the More Actions list.
3. Select Approve from the Decision drop-down menu.
4. Complete mandatory fields.
5. Click Done.
Terminating the Offer Approval ProcessPrerequisite
A user type permission grants users access to this feature.
Approval must have been requested for the offer.
Offer must not have been extended to the candidate.
Steps
1. In the candidate list, click on a candidate file.
2. Select Terminate Approval Process... in the More Actions list.
3. Enter comments.
4. Click Done.
Requesting an Approval Path AmendmentPrerequisite
A user type permission grants users access to this feature.
Offer must have a the status To be approved.
Steps
1. In a candidate file, select Request Approval Path Amendment... in the More Actions list.
2. Click to select a contributor.
3. Click Done.

Recruiting User Guide Taleo 10 - SP1 6-14
Offer Offer Approval
Result
The colleague who has the proper user typ epermission will receive a task to amend an approval path.

BP(A|S)
Approval
• Approval . . . . . . . . . . . . . . . . . . . . . . . . . . . . . . . . . . . . . . . . . . . . . . . . . . 7-1
• Approvers . . . . . . . . . . . . . . . . . . . . . . . . . . . . . . . . . . . . . . . . . . . . . . . . . 7-4
Recruiting User Guide Taleo 10 - SP1 7-1
Approval Approval
Approval
Approval An approval is the act of a user approving an element or asking others to approve an element.
Detailed Description
An approval can be requested for:
• requisitions
• offers
When an approval is requested, the user must choose from a list the name of the users who will be required to approve the requisition or the offer. The list of approvers can be configured or not by the system administrator depending on the type of approval chosen by an organization.
• If the standard approval process is used within an organization, the user will select approvers from a list containing all the users of the database. The user will also be able to create a list of preferred approvers via the Setup feature.
• If the dynamic approval routing is used within an organization, the user will select approvers from a short list of approvers configured within the Dynamic Approval Routing feature. The system administrator creates an approval path, linked to roles for which assignees are preselected. These assignees are displayed as approvers when requesting an approval, based on rules and conditions.
The approval path can be carried out in two ways:
• Sequential: When the first approver receives an approval request, he/she approves the element. Once approved, the approval request goes to the next approver, and so on.
• Parallel: All approvers receive an approval request at the same time and they can all approve the element at the same time.
If the standard approval process is used within an organization, the system administrator must activate settings to enable sequential or parallel approval. If the dynamic approval routing is used within an organization, approval will be sequential unless there are more than one approver for the same role, then approval will be parallel.
Users have the ability to approve requisitions and offers either via the Tasks feature and/or eShare. System administrators can choose the method(s) of approval for different users:
• eShare e-mail: available to users when the Access response center user type permission is granted (Configuration > [SmartOrg] Administration > User Types > Recruiting > General) and when the user's preference for Enable eShare Center E-mail is set to True (Recruiting Center > My Setup > Preferences).
• Tasks channel: Tasks will be available to the user if the system administrator has configured the Tasks channel into the user's center stage and/or the system administrator has granted access to the Core Navigation Bar in the user's configuration profile. Also, an approval task will only appear to the user if the user is “authorized to view” the requisition – that means the user would need to either be a collaborator on the requisition or authorized to view requisitions within his/her group.

Recruiting User Guide Taleo 10 - SP1 7-2
Approval Approval
• Either by eShare or the Tasks channel: if eShare and the Tasks channel are both configured for the user, the user can receive both eShare approval requests and also track them in the Tasks channel. Users can decide on approval from either location. Tasks executed from the eShare response center will be automatically updated in the user's Tasks channel as well. If an approval is executed from the Tasks channel, the eShare request will indicate that the decision has already been made and the eShare is no longer active.
User type permissions grant users access to the approval feature and approval-related actions.
Benefits
• Allows users to select approvers based on their role.
• Allows the system administrator to choose default approvers.
Approval via a BlackBerryUsers may have the ability to approve or decline requisitions and offers via a BlackBerry.
Detailed Description
Users who have the required user type permissions can approve and decline requisitions and offers using any BlackBerry model regardless of whether Java script is enabled. The only exception is if login authentication has been activated via eShare; in this case, Java script is still required on the login page.
When creating a requisition or offer and then requesting its approval (via the Request Approval action), the user must select an approver. If the approver selected is an eShare user (as defined by the system administrator), an e-mail is sent and the user will receive an approval request via his/her BlackBerry. To approve the requisition or offer, the user must click Respond included in the e-mail. Once the requisition or offer is approved, the History tab indicates that the requisition or offer was approved.
To use a BlackBerry to approve or decline requisitions and offers, the BlackBerry browser must have the following configuration options activated:
• Support Java script
• Allow Java script Popups
• Support HTML Tables
• Use Foreground and Background Colors
• Use Background Images
• Support Style Sheets
To receive approvals via a BlackBerry, users must also have a valid e-mail address (set by the system administrator in the SmartOrg User Account Personal Information section). If the e-mail address entered is the same as the one configured on the user’s BlackBerry, the user will receive approvals directly on his/her BlackBerry.
Benefits
• Speeds up the hiring process, from requisition creation to hiring, as requisitions can be posted faster and offers approved sooner.
Recruiting User Guide Taleo 10 - SP1 7-3
Approval Approval
eShare Approval AcknowledgementeShare users have the ability to receive a confirmation of their requisition or offer approvals.
Detailed Description
eShare users have the ability to receive a confirmation of their requisition or offer approvals. This feature is automatically active on all eShares sent from the system. When a user receives an eShare approval request, there is an available check box to trigger the receiving of an approval acknowledgement. If the user chooses to receive the acknowledgement, upon completing his/her decision on the request, the user will receive an e-mail message confirming his/her action.
Six system message templates have been created for this purpose. There is a standard message available and if desired, system administrators can modify the text of the message sent. The acknowledgement sent will depend on the decision of the approver:
• Requisition Approved Acknowledgement
• Requisition Rejected Acknowledgement
• Requisition Passed Acknowledgement
• Offer Approved Acknowledgement
• Offer Rejected Acknowledgement
• Offer Passed Acknowledgement
Note that approvals decided via the Tasks channel do not have an acknowledgement option; users can view their completed tasks in the Tasks channel by clearing the Hide completed tasks option.

Recruiting User Guide Taleo 10 - SP1 7-4
Approval Approvers
Approvers
ApproverAn approver is a Taleo Recruiting user who will approve requisitions and/or offers.
Detailed Description
A list of default approvers can be defined by the system administrator at the department level. A list of personal default approvers can also be defined by the user in the My Setup feature. When a requisition and/or offer is ready to be approved (by selecting the Request Approval action), the approval path is selected by default as follows:
• If approvers are selected under My Setup, these approvers will be automatically selected.
• If approvers are not selected under My Setup, the approvers set for the department by the system administrator will be selected automatically.
When a user selects approvers, the selector only displays users who can be potential approvers. It is possible that no approvers are displayed if none of them are allowed to do the approval. An approver must be an active user and have the user type permission to approve requisitions and/or offers.
Benefits
• Simplifies requisition and offer creation for users.
• Prevents re-typing the same list of approvers for each requisition or offer.
• Prevents approval path errors.
Creating a List of Frequent ApproversPrerequisite
A setting allows the activation of this feature.
A user type permission grants users access to this feature.
Steps
1. Click My Setup link located in the top right-hand corner.
2. In the Frequent Approvers tab, click Add...
3. Select one or several approvers.
4. Click Done.
Result
The approvers appear in the Approvers list. These approvers will be automatically selected when requesting the approval of a requisition and/or offer overwriting the default approvers set by the system administrator.
Recruiting User Guide Taleo 10 - SP1 7-5
Approval Approvers
Adding an Approver to the Frequent Approvers ListPrerequisite
A setting allows the activation of this feature.
A user type permission grants users access to this feature.
Steps
1. Click My Setup link located in the top right-hand corner.
2. In the Frequent Approvers tab, click Add...
3. Select one or several approvers.
4. Click Done.
Result
The approvers appear in the Approvers list. These approvers will be automatically selected when requesting the approval of a requisition and/or offer. The system cannot modify the approver list a user has set under My Setup.
Removing an Approver from the Frequent Approvers ListPrerequisite
A setting allows the activation of this feature.
A user type permission grants users access to this feature.
Steps
1. Click My Setup link located in the top right-hand corner.
2. In the Frequent Approvers tab, click Modify...
3. Hover your mouse on the name of an approver.
4. Click on the that appears.
5. Click Done.
Result
The approver no longer appears in the Approvers list under My Setup.
Modifying the List of Frequent ApproversPrerequisite
A setting allows the activation of this feature.
A user type permission grants users access to this feature.
Steps
1. Click the My Setup link located in the top right-hand corner.
2. In the Frequent Approvers tab, click Modify...
3. Select one or several approvers.

Recruiting User Guide Taleo 10 - SP1 7-6
Approval Approvers
4. Click Select.
5. Click Done.
Result
The approvers appear in the Approvers list. These approvers will be automatically selected when requesting the approval of a requisition or offer overwriting the default approvers set by the system administrator. The system cannot modify the approver list a user has set under My Setup.

BP(A|S)
Search
• Quick Search . . . . . . . . . . . . . . . . . . . . . . . . . . . . . . . . . . . . . . . . . . . . . . . 8-1
• Advanced Search . . . . . . . . . . . . . . . . . . . . . . . . . . . . . . . . . . . . . . . . . . . . 8-5
• Search Queries. . . . . . . . . . . . . . . . . . . . . . . . . . . . . . . . . . . . . . . . . . . . . 8-16

Recruiting User Guide Taleo 10 - SP1 8-1
Search Quick Search
Quick Search
Candidate Quick SearchThe candidate quick search allows users to quickly find specific candidates.
Detailed Description
The candidate quick search is available at the top right hand corner of pages. It is available to users if it has been configured in the user's configuration profile and if the user type permission has been granted.
When performing a candidate quick search, the search engine will search for candidates who applied on a job, submitted a profile or are registered but did not apply on a job (that is a person who referred a friend for a job and who had to register himself/herself as a new user).
When performing a candidate search, users can enter partial (either the first or family name) or complete names in the field. However, a best practice is to enter complete names to obtain more exact results.
Users can also perform a search with a middle initial if they know the person's full name (example: Sam P Jones). If searching for someone who's first name contains initials, we recommend entering just the initials (example: Jr. will give you the following results: Jr., j.r., or JR). If looking for someone who hyphenate's his/her last name, it is not required to enter both names. Let’s say Smith-Jones is the name you are looking for; entering smith will only bring you candidates whose last name, fisrt name, username or first part of the email address is smith. Entering smith jones (smith space jones) will bring you back Smith-Jones.
If users have been granted permissions to access candidate identification information, the candidate search will allow users to search by:
• candidate identification number only (you must use at least three numbers of the total identification number or more, otherwise the search will not work)
• candidate first name
• candidate last name
• candidate first and last names
• e-mail address
• user name
The candidate quick search searches for all the search terms in all five fields. For this reason, the specific candidate search often produces search results that are more relevant than those generated by the candidate quick search.
Benefits
• Users can quickly locate candidate files.
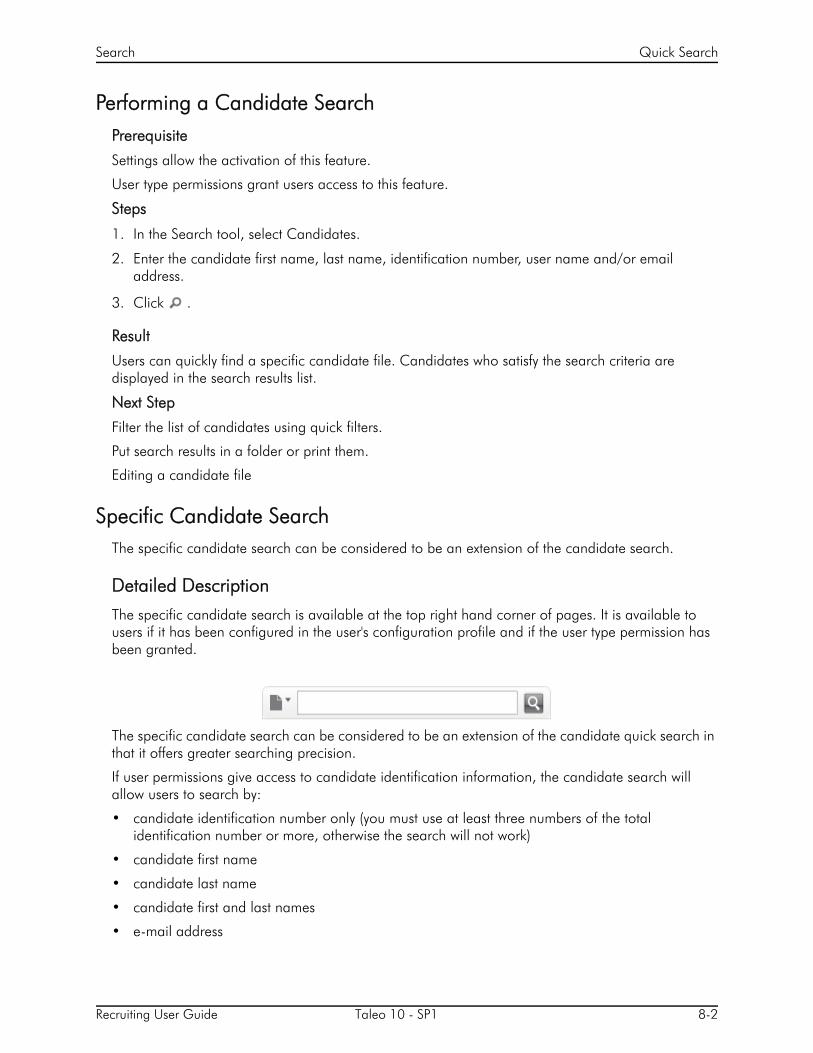
Recruiting User Guide Taleo 10 - SP1 8-2
Search Quick Search
Performing a Candidate SearchPrerequisite
Settings allow the activation of this feature.
User type permissions grant users access to this feature.
Steps
1. In the Search tool, select Candidates.
2. Enter the candidate first name, last name, identification number, user name and/or email address.
3. Click .
Result
Users can quickly find a specific candidate file. Candidates who satisfy the search criteria are displayed in the search results list.
Next Step
Filter the list of candidates using quick filters.
Put search results in a folder or print them.
Editing a candidate file
Specific Candidate SearchThe specific candidate search can be considered to be an extension of the candidate search.
Detailed Description
The specific candidate search is available at the top right hand corner of pages. It is available to users if it has been configured in the user's configuration profile and if the user type permission has been granted.
The specific candidate search can be considered to be an extension of the candidate quick search in that it offers greater searching precision.
If user permissions give access to candidate identification information, the candidate search will allow users to search by:
• candidate identification number only (you must use at least three numbers of the total identification number or more, otherwise the search will not work)
• candidate first name
• candidate last name
• candidate first and last names
• e-mail address

Recruiting User Guide Taleo 10 - SP1 8-3
Search Quick Search
Using the specific candidate search, users can enter the same or different search terms in any of the four fields. For this reason, the specific candidate search often produces search results that are more relevant than those generated by the candidate search.
Wild card can be used with 1 or 2 characters in the specific candidate search, to support searching for combined words. For example, d* in first name and magnan in last name will return all magnan with first name starting by d, while d* magnan in quick search is not supported, because searching for d* in all 5 fields typically returns too much entries for the search result to display in a performant manner.
Performing a Specific Candidate SearchPrerequisite
A setting allows the activation of this feature.
A user type permission grants users access to this feature.
Steps
1. In the Search tool, select Specific Candidate.
2. Enter information in the fields.
3. Click Search.
Result
Userscan search for candidates using the First Name, Last Name, Initial, Email Address and/or Candidate ID fields. Candidates who satisfy the search criteria are displayed in the search results list.
Next Step
Edit a candidate file.
Print search results.
Match candidate to requisition.
Requisition Quick SearchThe requisition search allows users to quickly find specific requisitions.
Detailed Description
The requisition quick search is available at the top right hand corner of pages. It is available to users if it has been configured in the user's configuration profile and if the user type permission has been granted.
The requisition quick search allow users to enter the title, the number or a keyword to find the desired requisition. A wildcard search may also be used.
The search engine only returns results appropriate to the user's permissions and group association. When performing a requisition search, the search engine looks through all the content of the requisition file.

Recruiting User Guide Taleo 10 - SP1 8-4
Search Quick Search
For the requisition search, the system automatically applies the boolean operator AND. The AND, OR, and NOT operators can be entered manually.
The search is not case sensitive.
For performance and management reasons, only up to 300 matching files are displayed.
Benefits
• Users can quickly locate requisitions.
Performing a Requisition SearchPrerequisite
Settings allow the activation of this feature.
A user type permission grants users access to this feature.
Steps
1. In the Search tool, select Requisitions.
2. Enter a keyword in the field.
3. Click .
Result
Users can quickly find a specific requisition file using a keyword. Requisitions that satisfy the search criteria are displayed in the search results list.
Next Step
Filter the list of requisitions using quick filters.
Print Search results.
Setting Default Search CriteriaPrerequisite
A user type permission grants users access to this feature.
Steps
1. Click the My Setup link located in the top right-hand corner.
2. In the Preferences tab, click Edit.
3. Select the desired value in the Last Update and Place of Residence fields.
4. Click Save.
Result
The value selected for the Last Update and Place of Residence search criteria will be used in all types of candidate search. Note that the "Within x Miles of ZIP/Postal Code" or "Within x km of ZIP/Postal Code" search results could include candidates living outside the specified area or exclude candidates living within the specified area. If candidates do not specify their ZIP code or postal code, the place of residence will be used.
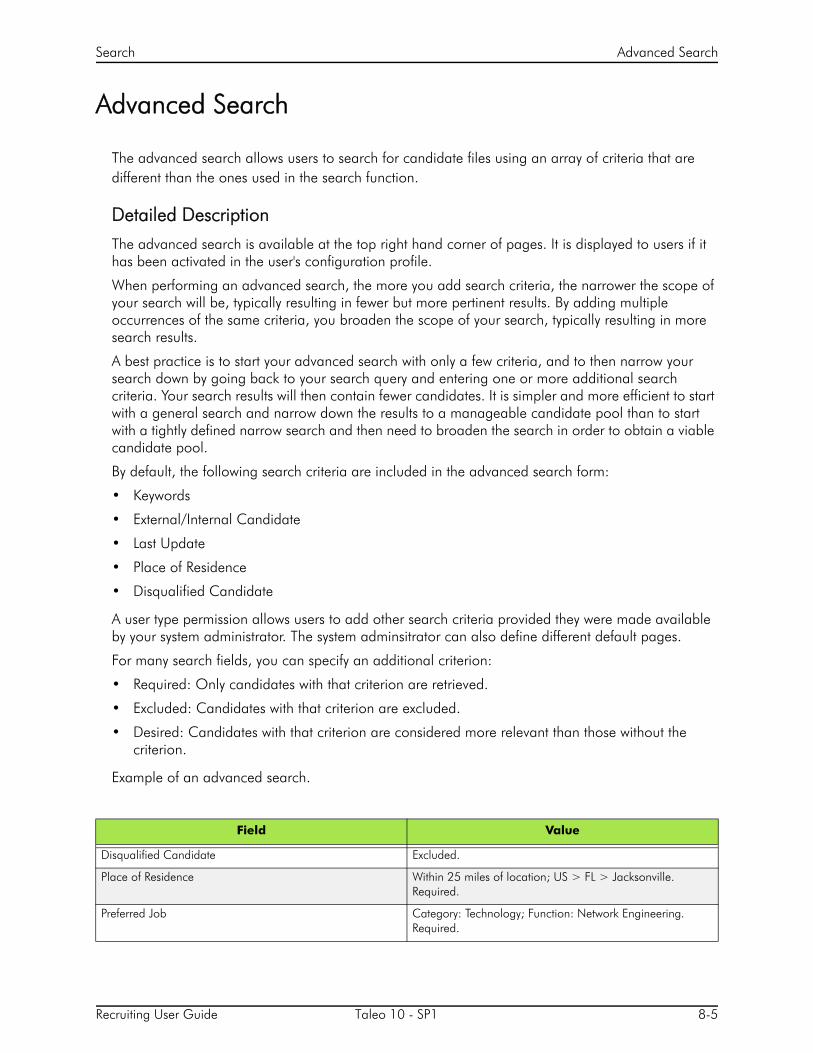
Recruiting User Guide Taleo 10 - SP1 8-5
Search Advanced Search
Advanced Search
The advanced search allows users to search for candidate files using an array of criteria that are different than the ones used in the search function.
Detailed Description
The advanced search is available at the top right hand corner of pages. It is displayed to users if it has been activated in the user's configuration profile.
When performing an advanced search, the more you add search criteria, the narrower the scope of your search will be, typically resulting in fewer but more pertinent results. By adding multiple occurrences of the same criteria, you broaden the scope of your search, typically resulting in more search results.
A best practice is to start your advanced search with only a few criteria, and to then narrow your search down by going back to your search query and entering one or more additional search criteria. Your search results will then contain fewer candidates. It is simpler and more efficient to start with a general search and narrow down the results to a manageable candidate pool than to start with a tightly defined narrow search and then need to broaden the search in order to obtain a viable candidate pool.
By default, the following search criteria are included in the advanced search form:
• Keywords
• External/Internal Candidate
• Last Update
• Place of Residence
• Disqualified Candidate
A user type permission allows users to add other search criteria provided they were made available by your system administrator. The system adminsitrator can also define different default pages.
For many search fields, you can specify an additional criterion:
• Required: Only candidates with that criterion are retrieved.
• Excluded: Candidates with that criterion are excluded.
• Desired: Candidates with that criterion are considered more relevant than those without the criterion.
Example of an advanced search.
Field Value
Disqualified Candidate Excluded.
Place of Residence Within 25 miles of location; US > FL > Jacksonville. Required.
Preferred Job Category: Technology; Function: Network Engineering. Required.

Recruiting User Guide Taleo 10 - SP1 8-6
Search Advanced Search
After running the above search, the search engine would return the following candidates:
• Candidates who had not been disqualified, AND
• Candidates who lived within 25 miles of Jacksonville, Florida, AND
• Candidates who had indicated a preference for work in network engineering or system administration, AND
• Candidates without any job field, AND
• Candidates who had a Bachelor's degree in computer engineering.
The search engine can retrieve any number of candidate files although, for performance and management reasons, only 300 are displayed. By default, we suggest to display the top 300 by relevancy.
Advanced Search with KeywordsKeywords can be used when performing an advanced candidate search.
Detailed Description
The Advanced Search looks for keywords in the Candidate Profile and in up to five most recently attached files: three attached by candidates and two attached by users. The attached files must be in a supported file format.
An entire word or 3 characters with a wildcard (*) can be used as a keyword. When performing an advanced search using the Keywords field, the search engine looks through the following content of the candidate file:
• candidate name
• candidate address
• candidate phone number
• pasted resume of the profile
• cover letter of the profile
• additional information of the profile
• text answers to prescreening questions from the library
• program descriptions of the profile
• institution descriptions of the profile
• employers' names of the profile
• job function descriptions of the profile
• user comments
• source descriptions
Preferred Job Category: Technology; Function: System Administration. Required.
Education Program: Computer Engineering; Education Level: Bachelor’s Degree
Field Value

Recruiting User Guide Taleo 10 - SP1 8-7
Search Advanced Search
• event descriptions
• all text-based custom fields
• the last two files attached by any user
• the last three files attached by the candidate provided they use one of the following supported file formats:
• .doc, Word. Warning: the docx Word 2007 format is not supported, only the standard Word format.
• .txt, standard text file• .rtf, Rich Text Format• .pdf, Adobe Portable Document Format• .htm or .html, hypertext documents• .wpd, WordPerfect
Conjunctions, prepositions, articles and other words that are not key to searches are ignored by the search engine. Such words are often called "stop words". Also, words entered in the Keywords field are highlighted in the candidate files returned by the search engine.
When performing an advanced search using the Keywords field, the following options are available:
• Exact Term
• Related Terms
• Conceptual
Keywords and Exact Term: When you perform a Keywords search with Exact Term selected, words that match exactly the terms you entered are returned and highlighted. You can use the wildcard character *, quotation marks, parentheses, and Boolean operators (AND, OR, NOT) to construct sophisticated candidate search queries. The system applies the AND operator between words.
Keywords and Related Terms: When you perform a Keywords search with Related Terms selected, words that match exactly the terms you entered and words with the same root, or of the same family are returned, and entered words are highlighted. Selecting Related Terms generally broadens the scope of your search. Wildcards, Boolean operators and parentheses cannot be used with Related Terms selected. The system applies the OR operator between words.
Example: If you enter "secretary" with Related Terms selected, the system would retrieve candidate files that contain "secretary" and typically words such as "receptionist," "stenographer," or "bookkeeper". It is usually best to use relatively "generic" search criteria rather than specific ones. For example, by specifying "banking," related banking terms and the names of specific banks may be among the results.
Keywords and Conceptual: The conceptual option for the advanced search is available if your system administrator has activated the proper setting.
The conceptual search is an extension of the related term search, where instead of finding variations of entered words, the system automatically finds the right concepts to search for based on the text provided and then broaden its search.

Recruiting User Guide Taleo 10 - SP1 8-8
Search Advanced Search
The conceptual search allows you to use large blocks of text (typically from a candidate's resume or a job description) to search for candidates. Conceptual search is typically the best tool to use when searching for candidates with attached files. This tool can be used when you are viewing a relatively large amount of text regarding particular sections of a candidate's resume such as experience and education, or a job description and you want to know if there are other candidates whose records contain similar information.
Keyword Highlighting: Keyword highlighting is activated by your system administrator and is limited to Advanced Search results. Each occurrence of the keyword is highlighted in yellow on all tabs in the candidate file and in the attached files. Up to fifty different terms can be highlighted. A setting allows your system administrator can limit the number of highlighted words. The Search will highlight words together when the search keyword includes double quotes, to better match what is really retrieved by the search engine. For example, searching for "product manager" displays only candidates with "product manager" in their file. Note that words are highlighted throughout the entire candidate file, even the labels, so some of the highlighted words are not used to retrieve the candidates.
Advanced Search and Multiple Occurrences of Information BlocksWhen performing an advanced search, it is possible to use multiple occurrences of the Education and Work Experience blocks.
Detailed Description
When using multiple blocks, the OR operator is used.
If you use multiple occurrences of blocks, care should be taken in choosing fields and in making selections from the Required, Desired and Excluded options.
The following examples demonstrate how multiple Education blocks can be used to perform highly precise searches. The same principles apply to multiple Work Experience blocks.
Example 1: In this example, the search results would contain either candidates with a Bachelor's degree in computer information systems and a GPA between 3 and 4, or candidates with a college diploma in computer information systems and a GPA between 3.5 and 4. Note that both Education blocks are Required.
Education Block 1 - Search Field Education Block 1 - Search Value
Education Block 1 Required
Program Computer Information System
Education Level Achieved Bachelor's Degree
GPA is at least 3 out of 4
Education Block 2 - Search Field Education Block 2 - Search Value
Education Block 2 Required
Program Computer Information System
Education Level Achieved Associate’s Degree/College Diploma
GPA is at least 3.5 out of 4
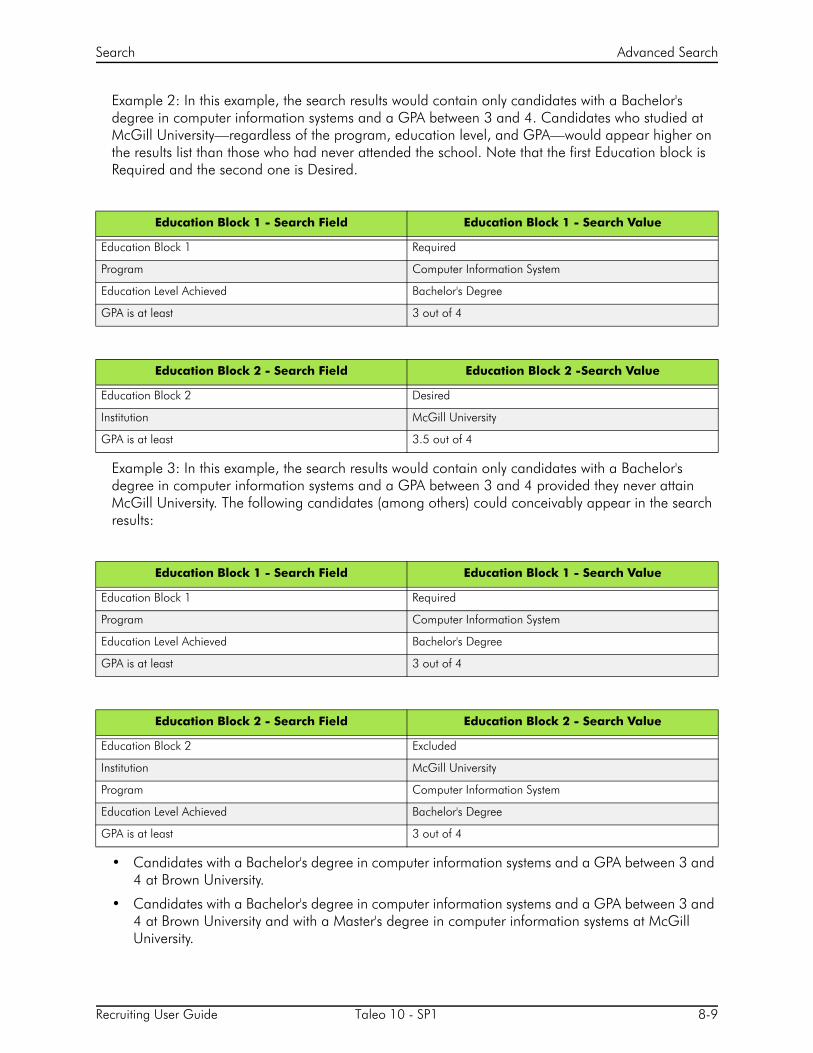
Recruiting User Guide Taleo 10 - SP1 8-9
Search Advanced Search
Example 2: In this example, the search results would contain only candidates with a Bachelor's degree in computer information systems and a GPA between 3 and 4. Candidates who studied at McGill University—regardless of the program, education level, and GPA—would appear higher on the results list than those who had never attended the school. Note that the first Education block is Required and the second one is Desired.
Example 3: In this example, the search results would contain only candidates with a Bachelor's degree in computer information systems and a GPA between 3 and 4 provided they never attain McGill University. The following candidates (among others) could conceivably appear in the search results:
• Candidates with a Bachelor's degree in computer information systems and a GPA between 3 and 4 at Brown University.
• Candidates with a Bachelor's degree in computer information systems and a GPA between 3 and 4 at Brown University and with a Master's degree in computer information systems at McGill University.
Education Block 1 - Search Field Education Block 1 - Search Value
Education Block 1 Required
Program Computer Information System
Education Level Achieved Bachelor's Degree
GPA is at least 3 out of 4
Education Block 2 - Search Field Education Block 2 -Search Value
Education Block 2 Desired
Institution McGill University
GPA is at least 3.5 out of 4
Education Block 1 - Search Field Education Block 1 - Search Value
Education Block 1 Required
Program Computer Information System
Education Level Achieved Bachelor's Degree
GPA is at least 3 out of 4
Education Block 2 - Search Field Education Block 2 - Search Value
Education Block 2 Excluded
Institution McGill University
Program Computer Information System
Education Level Achieved Bachelor's Degree
GPA is at least 3 out of 4
Recruiting User Guide Taleo 10 - SP1 8-10
Search Advanced Search
• Candidates with a Bachelor's degree in computer information systems and a GPA between 3 and 4 at Brown University and with a second Bachelor's degree in computer information systems at McGill University and a GPA of only 2.
Note that the first Education block is Required and the second one is Excluded.
Conceptual SearchConceptual search is an alternative way to search candidate files that broadens the search result by including documents that are similar based on concepts and proximities. The retrieved documents do not need to contain everything entered as search criteria, only related concepts.
Detailed Description
Once the conceptual search is activated, the system administrator can control which users will have access to conceptual search by granting them a user type permission. Please note: even if customers have not activated the conceptual search, they will have the user type permission available in their list of permissions but the permission has no function until the module is activated by Taleo.
The conceptual search is available via the advanced search. When selecting the Conceptual option, users must enter significant text in the Keywords text box like a job description or a paragraph describing the ideal candidate. On top of that, users can increase the conceptual search with any specific fielded search criteria made available to them. This provides the possibility to mine the database on various concepts to find interesting candidates, but also restricts the result with more precise criteria, which was not available before.
The conceptual search is an extension of the related term search, where instead of finding variations of entered words, the system automatically finds the right concepts to search for based on the text provided and then broaden its search.
The conceptual search allows users to use large blocks of text (typically from a candidate's resume or a job description) to search for candidates. Conceptual search is typically the best tool to use when searching for candidates with a minimum amount of structured fields. This tool can be used when viewing a relatively large amount of text regarding particular sections of a candidate's resume such as experience and education, or a job description and a user wants to know if there are other candidates whose records contain similar information.
The conceptual search uses mathematical algorithms to assign a weight to each word in a block of data with the exception of stop words—conjunctions, prepositions, articles and other words that are not key to searches—taking into account the other words in the text and their relationships with each other. It then searches for candidate files that contain similar text-based information.
The conceptual search looks for patterns in text with a special algorithm and figures out the subject of the text while the advanced search is looking for exact matches with exact field values. The conceptual search is designed to recognize themes and concepts based on your input. For example, searching with an interesting candidate's academic background generally gives better results than searching with the candidate's academic background and personal information such as address.
The conceptual search cannot retrieve disqualified candidates because they are not indexed in the database.
Boolean OperatorsBoolean operators are used when performing an advanced search using a keyword.

Recruiting User Guide Taleo 10 - SP1 8-11
Search Advanced Search
Detailed Description
Boolean operators that can be used with keywords in the advanced search are:
• AND: Place AND between search terms to search for candidate files that contain all of the terms. For example, a search for university AND librarian will retrieve candidate files that contained both the words university and librarian.
• OR: Place OR between search terms to search for candidate files that contain at least one of the terms. For example, a search for university OR college will retrieve candidate files that contained either word or both words.
• NOT: Place NOT before search term to exclude candidate files that contain the terms you specify. For example, a search for computer NOT technician will retrieve files that contained the word computer but only if they did not contain the word technician.
• * (wildcard): You can place a wildcard character within or at the end of a word but not at the beginning of a word. A minimum of 3 characters must be used with the * (wildcard). For example, a search for comput* will retrieve all words that begin with comput such as computer, computing, computers, computation. Note that the wildcard character ? is not supported.
• Quotation marks: Use quotation marks to search for occurrences of an exact expression. For example, a search for "database administrator " will retrieve candidate files that contain the exact term database administrator with no terms or punctuation separating the two words.
• Parenthesis: Operations enclosed in parentheses are performed before other operations. For example, a search query for candidates who worked as marketing or advertising consultants could look like the following: (market* or advertis*) and (consult* or agent or representative). The search engine would retrieve candidate files that satisfy the two conditions:
• Candidate files containing a word that begins with market or advertis such as market, markets, marketing, advertise, advertising, advertisement AND,
• Candidate files containing agent, representative, or a word beginning with consult such as agent, representative, consult, consults, consulting, consulted, consultant.
Neither search terms, nor operators are case-sensitive.
If you do not use Boolean syntax and simply enter a number of words in the Keywords field, those candidate files that contain all of the terms will be retrieved.
If the words AND, OR, or NOT are present in the Keywords field, the search engine assumes they are Boolean operators.Users cannot search the words OR, AND, or NOT as they are not recognized as words but as booelan operators. Boolean operators are not recognized as a string in the search field or in the text being searched. If boolean operators are used in double quotes, they are ignored.
Randomized Search ResultThe randomized search result feature allows users to specify that the information contained in the advanced search result list be returned in random order.
Detailed Description
Randomized search means that candidates displayed in the advanced search result list are picked randomly in the overall list of candidates matching search criteria.

Recruiting User Guide Taleo 10 - SP1 8-12
Search Advanced Search
An advanced candidate search done with randomization will return a list of 300 candidates or less, but instead of displaying the first 300 candidates, it will display any 300 of the matching candidates, with no predetermined priority, and will sort them based according to the sorting criterion set for the list. Any candidate matching the search criteria can be returned. It could be candidate number 1, 2, 13, 57, 423, 789, etc. As soon as a candidate matches the search criteria, the candidate is displayed, even the least matching candidate, as long as this candidate meets the mandatory criteria. No pattern is used; therefore, if you run the same exact search again, the list of candidates returned will be completely different.
An advanced candidate search done without randomization will return all candidates matching search criteria and display the first 300 candidates or less, based on the number of returned candidates in the candidate list. The first 300 candidates will be displayed based on relevancy but sorted on the list definition. Thus it is always the same set of candidates, but sorted differently. If required criteria are used instead of relevancy then the 300 returned candidates to work with are all valid candidates and are not displayed in a particular order.
Performing an Advanced SearchPrerequisite
A setting allows the activation of this feature.
A user type permission grants users access to this feature.
Steps
1. In the top right-hand corner, click Advanced Search.
2. Enter information in the fields.
3. Click Search.
Result
Candidates who satisfy the search criteria are displayed in the search results list.
Next Step
Filter the list of requisitions using quick filters.
Put search results in a folder or print them.
Why Advanced Search is not Displaying Expected ResultsCertain elements could have an impact on advanced search results.
Detailed Description
Segmentation: In a global environment, data segmentation, if activated, might exclude a lot of candidates from the search results. Make sure to verify if your company has introduced such restrictions and if this is the case, verify the impact and what, as a user, you are entitled to view. There are two dimensions to data segmentation: a permission per user type whereby what users can view is determined by their respective staffing type; and a recruiting setting allows users to indicate if candidate search results are restricted based on the search domains of each user's groups and

Recruiting User Guide Taleo 10 - SP1 8-13
Search Advanced Search
personal coverage areas. A user This is probably the most complex case to validate. While it might be easy to manage only a few groups around specific organizations, segmentation can be difficult to clearly understand if users are associated with multiple groups incorporating various organizations, locations and job fields
Incomplete applications: There are a significant number of candidates who never complete their applications for various reasons. An incomplete general application might not be retrieved in a search result if the system configuration excludes their applications. Note that up to 30% of candidates might not have completed their application. An interesting alternative to not displaying such candidates is to display them but to use the “incomplete application” column (to do so, activate the Complete Application Indicator column in the List Format Configuration window and look at the candidate files that have no checkmark in this column). Remember that the “incomplete application” flag refers to the online application process, not to the completeness of the candidate file. You might have detailed candidate files with a lot of information not displayed because the candidates didn’t complete the application process online. On the other hand, you might have partial candidate files, that were captured or imported and whose basic information has the “complete” flag, even if only few fields were captured.
The incomplete application setting is an internal one, which can be activated only through a service request. It is important that you know if your organization has them displayed or not because thousands of candidates might remain in an incomplete state and never be retrieved by the search engine.
Identification missing: ”Identification missing” candidates are candidate files without first and last name and without the official “anonymous” flag. The name of the candidate does not appear; instead ”Identification missing” is displayed. Ask your system administrator if he/she has activated the Display Identification Missing Candidates setting.
Excluding candidates in selection process: Candidates who are in a selection process associated with an open requisition can be excluded from search results. Ask your system administrator if he/she has activated the Candidate Search Mask Processed setting.
Excluding candidates in selection process who have attained or proceeded beyond a specific status: The Search Most Advanced Submission Status setting works in tandem with the Allow users to recruit candidates being considered in other active requisitions user type permission to prevent competitive recruiting. This setting sets the status from which the system is to stop showing candidates. If the candidate has attained or proceeded beyond the selected status in one of its submissions, the candidate will no longer be displayed in the search results. This prevents users from matching these candidates to additional requisitions and inviting them to apply for multiple positions. Ask your system administrator if he/she has activated that setting and user permission.
Matching the place of residence: By default, when a user searches for candidates associated with a specific place of residence, the system retrieves candidates associated with a “higher” location in addition to the specific location (place of residence). When the Search Place of Residence Match Activation setting is turned on, only exact matches are retrieved. It is recommended that you include “higher” levels (country and state/province) because even if in theory candidates do have all levels (down to region), some might not. Exceptions are:
• If the place of residence field is not mandatory (usually only optional in capture candidate or through import).
Recruiting User Guide Taleo 10 - SP1 8-14
Search Advanced Search
• If it is a new country. Taleo place of residence locations, which are centrally managed, increase in number as customers request that specific new countries be included. Taleo had numerous countries without states or regions in the past and started to add into the database such countries’ regions on a customer-by-customer basis. Some candidates never had the opportunity to select a 2nd or 3rd level so it is important that they are not excluded by default when a search is performed.
The number of exceptions should be less than the number of candidates with an exact match and Taleo feels it is fair to retrieve those candidates who never had the opportunity to indicate their structured place of residence. Some Taleo clients might want to change this setting however.
Search Result ArchivingThe search result archiving feature allows users to select the requisition for which they want to archive search criteria and results.
Detailed Description
The search result archiving feature was introduced for U.S. clients in order to comply with a regulation of the Office of Federal Contract Compliance Programs (OFCCP) regarding the collection of gender, race and ethnicity data for each candidate. When performing an advanced search, search criteria and/or results are archived in the database. The information is kept in the database for two years for audit purposes and prevents candidates from hard deletion.
When the feature is activated, all search results, even those done for requisitions outside the US will be archived.
Settings allow the activation of this feature.
Setting Default Search CriteriaPrerequisite
A user type permission grants users access to this feature.
Steps
1. Click the My Setup link located in the top right-hand corner.
2. In the Preferences tab, click Edit.
3. Select the desired value in the Last Update and Place of Residence fields.
4. Click Save.
Result
The value selected for the Last Update and Place of Residence search criteria will be used in all types of candidate search. Note that the "Within x Miles of ZIP/Postal Code" or "Within x km of ZIP/Postal Code" search results could include candidates living outside the specified area or exclude candidates living within the specified area. If candidates do not specify their ZIP code or postal code, the place of residence will be used.
Recruiting User Guide Taleo 10 - SP1 8-15
Search Advanced Search
General Profile SearchIt is possible to return search results of candidates who have only submitted a general profile but have not yet applied on any specific requisition.
Detailed Description
When this feature is enabled, users may add the “Exclude candidates who applied on requisitions” search criteria in the advanced search form and decide to search only for candidates who have submitted a general profile but have not yet applied for a specific position.
A user type permission and settings grant users access to this feature.
Benefits
• Helps to ensure candidates who do not apply for a specific job are also considered.
• Enhances the advanced search functionality.
Exclusion of Agency Owned Candidates in Search ResultsAgency owned candidates can be excluded from candidate search results.
Detailed Description
When this feature is enabled, users may add the “Exclude candidates owned by agencies” search criteria in the advanced search form and decide to include or not agency owned candidates in search results.
A user type permission grants user access to this feature.
Benefits
• Provides the option to exclude agency owned candidates from search results. Recruiters and hiring managers have a much more efficient experience as they no longer need to manually go through candidate files to make sure they are not off limits based on agency ownership agreements.
• Clients can more confidently manage agency agreements and expenses.
• Provides extended configurability when using agencies for candidate referrals.
• Provides reduced risk of unknowingly incurring agency costs.
Recruiting User Guide Taleo 10 - SP1 8-16
Search Search Queries
Search Queries
Search QueryA search query is an advanced candidate search that has been saved in order to be used repetitively and potentially shared with other users.
Detailed Description
A search query is a set of search criteria selected by the user to perform an advanced candidate search. Each time an advanced search is performed, a search query can be created. A search query can be used as a basis for future searches and can be changed to narrow or broaden search results when needed.
The search query feature is available at the top right hand corner of pages. It is displayed to users if it has been activated in the user's configuration profile. Users can save a Query if the feature is activated in the user’s configuration profile and if the user type permission has been granted.
Two types of queries can be created:
• Personnal search queries will remain available only to the user that created the query.
• Shared search queries are queries that are made available to selected users.
Benefits
• Saves time.
• Allows users to repeat the same search.
Saving an Advanced Candidate Search QueryPrerequisite
A setting allows the activation of this feature.
A user type permission grants users access to this feature.
Steps
1. In the top right-hand corner, click Advanced Search.
2. Enter information in the fields.
3. Click Save Query...
4. Enter information in the fields.
5. Click Done.
Result
The search query is available in the Search Queries window. User wil be able to repeat the same search in the future using the same fields and their respective values.

Recruiting User Guide Taleo 10 - SP1 8-17
Search Search Queries
Adding a Search Criterion to an Advanced Candidate Search QueryPrerequisite
A setting allows the activation of this feature.
A user type permission grants users access to this feature.
Steps
1. In the top right-hand corner, click Search Queries.
2. Click on a search query.
3. Click Customize...
4. Click Select next to the criterion you want to add.
5. Click Done.
Removing a Search Criterion from an Advanced Candidate Search Query
Prerequisite
A setting allows the activation of this feature.
A user type permission grants users access to this feature.
Steps
1. In the top right-hand corner, click Search Queries.
2. Click on a search query.
3. Click Customize...
4. Click next to the criterion you want to remove.
5. Click Done.
Duplicating a Saved Search QueryPrerequisite
A user type permission grants users access to this feature.
A setting allows the activation of this feature.
Steps
1. Click Search Queries.
2. Open an existing query.
3. Click .
4. Complete fields.
5. Click Done.

Recruiting User Guide Taleo 10 - SP1 8-18
Search Search Queries
Result
The query created from the duplication of another query is saved in the selected folder.
Editing the Search Query PropertiesPrerequisite
A user type permission grants users access to this feature.
A setting allows the activation of this feature.
Steps
1. Click Search Query.
2. Open a search query, click Properties.
3. Click Properties.
4. In the Search Query Properties window, make changes.
5. Click Done.
Deleting an Advanced Candidate Search QueryPrerequisite
A setting allows the activation of this feature.
A user type permission grants users access to this feature.
Steps
1. In the top right-hand corner, click Search Queries.
2. Select a search query.
3. Click .
Result
The search query is no longer available in the Seach Queries window.

BP(A|S)
Question, Competency,Disqualification Question
Librairies
• Question . . . . . . . . . . . . . . . . . . . . . . . . . . . . . . . . . . . . . . . . . . . . . . . . . . 9-1
• Disqualification Question . . . . . . . . . . . . . . . . . . . . . . . . . . . . . . . . . . . . . 9-12
• Competency. . . . . . . . . . . . . . . . . . . . . . . . . . . . . . . . . . . . . . . . . . . . . . . 9-20
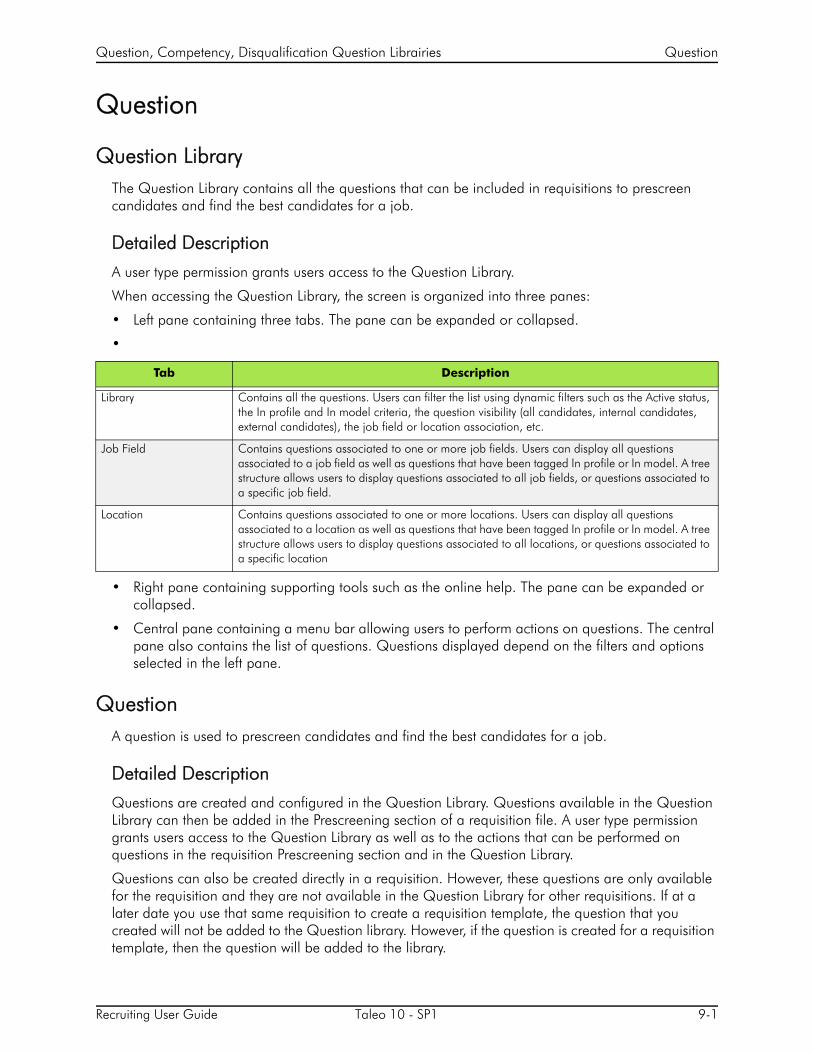
Recruiting User Guide Taleo 10 - SP1 9-1
Question, Competency, Disqualification Question Librairies Question
Question
Question LibraryThe Question Library contains all the questions that can be included in requisitions to prescreen candidates and find the best candidates for a job.
Detailed Description
A user type permission grants users access to the Question Library.
When accessing the Question Library, the screen is organized into three panes:
• Left pane containing three tabs. The pane can be expanded or collapsed.
•
• Right pane containing supporting tools such as the online help. The pane can be expanded or collapsed.
• Central pane containing a menu bar allowing users to perform actions on questions. The central pane also contains the list of questions. Questions displayed depend on the filters and options selected in the left pane.
QuestionA question is used to prescreen candidates and find the best candidates for a job.
Detailed Description
Questions are created and configured in the Question Library. Questions available in the Question Library can then be added in the Prescreening section of a requisition file. A user type permission grants users access to the Question Library as well as to the actions that can be performed on questions in the requisition Prescreening section and in the Question Library.
Questions can also be created directly in a requisition. However, these questions are only available for the requisition and they are not available in the Question Library for other requisitions. If at a later date you use that same requisition to create a requisition template, the question that you created will not be added to the Question library. However, if the question is created for a requisition template, then the question will be added to the library.
Tab Description
Library Contains all the questions. Users can filter the list using dynamic filters such as the Active status, the In profile and In model criteria, the question visibility (all candidates, internal candidates, external candidates), the job field or location association, etc.
Job Field Contains questions associated to one or more job fields. Users can display all questions associated to a job field as well as questions that have been tagged In profile or In model. A tree structure allows users to display questions associated to all job fields, or questions associated to a specific job field.
Location Contains questions associated to one or more locations. Users can display all questions associated to a location as well as questions that have been tagged In profile or In model. A tree structure allows users to display questions associated to all locations, or questions associated to a specific location
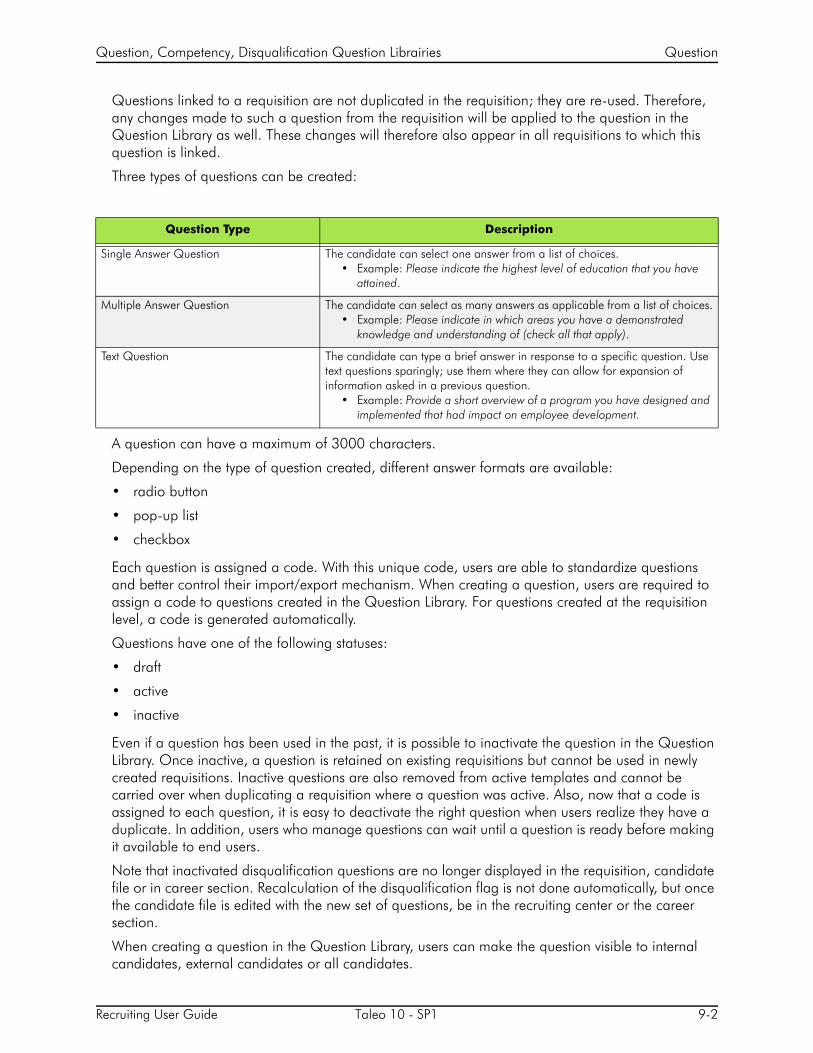
Recruiting User Guide Taleo 10 - SP1 9-2
Question, Competency, Disqualification Question Librairies Question
Questions linked to a requisition are not duplicated in the requisition; they are re-used. Therefore, any changes made to such a question from the requisition will be applied to the question in the Question Library as well. These changes will therefore also appear in all requisitions to which this question is linked.
Three types of questions can be created:
A question can have a maximum of 3000 characters.
Depending on the type of question created, different answer formats are available:
• radio button
• pop-up list
• checkbox
Each question is assigned a code. With this unique code, users are able to standardize questions and better control their import/export mechanism. When creating a question, users are required to assign a code to questions created in the Question Library. For questions created at the requisition level, a code is generated automatically.
Questions have one of the following statuses:
• draft
• active
• inactive
Even if a question has been used in the past, it is possible to inactivate the question in the Question Library. Once inactive, a question is retained on existing requisitions but cannot be used in newly created requisitions. Inactive questions are also removed from active templates and cannot be carried over when duplicating a requisition where a question was active. Also, now that a code is assigned to each question, it is easy to deactivate the right question when users realize they have a duplicate. In addition, users who manage questions can wait until a question is ready before making it available to end users.
Note that inactivated disqualification questions are no longer displayed in the requisition, candidate file or in career section. Recalculation of the disqualification flag is not done automatically, but once the candidate file is edited with the new set of questions, be in the recruiting center or the career section.
When creating a question in the Question Library, users can make the question visible to internal candidates, external candidates or all candidates.
Question Type Description
Single Answer Question The candidate can select one answer from a list of choices.• Example: Please indicate the highest level of education that you have
attained.
Multiple Answer Question The candidate can select as many answers as applicable from a list of choices.• Example: Please indicate in which areas you have a demonstrated
knowledge and understanding of (check all that apply).
Text Question The candidate can type a brief answer in response to a specific question. Use text questions sparingly; use them where they can allow for expansion of information asked in a previous question.
• Example: Provide a short overview of a program you have designed and implemented that had impact on employee development.

Recruiting User Guide Taleo 10 - SP1 9-3
Question, Competency, Disqualification Question Librairies Question
When creating a question in the Question Library, the question can be associated to locations and job fields.
• If a question is not associated to any location or job field, the question will be available to users when adding questions to a requisition.
• If a question is associated to all locations and/or to all job fields, the question will be available to users when adding questions to a requisition only if the In Model option is selected.
• If a question is associated to specific locations and/or job fields, the question will be available to users when adding questions to a requisition if the In Model option is selected and if the question matches the locations or job fields of the requisition.
When associating a question to locations or job fields, the question can be made available in a profile or in a model:
• If a question is tagged “In profile”, the question will be available to users who create a candidate file, and to candidates who are entering their profile in a career section. Questions made available will be sorted to match the location and job field preferences defined by the candidate.
• If a question is tagged “In model”, the question will be available to users who complete the Prescreening section of a requisition. Questions will be grouped in a model based on the location and job field of the requisition.
Once a question is created in the Question Library, users can add it to the Prescreening section of a requisition file. When adding questions to a requisition file, users should consider balancing the number of questions with the expected candidate volume and job complexity.
The following table outlines the recommended number of questions as per the number of candidates expected and the job complexity.
The difficult to fill position expects few candidates. Less questions should be used. As a rule of thumb, do not exceed 8 questions (job specific and skills together).
The average to fill position should keep candidates engaged, but not lose them due to too many questions. As a rule of thumb, do not exceed 12 to 15 questions (job specific and skills together).
The easy to fill position expects a large number of candidates. You can use as many questions as necessary (job specific and skills together).
Difficult to Fill Position Average to Fill Position Easy to Fill Position
Number of Candidates Expected
Low - Less than 30 Medium - 30 to 100 High - 100 +
Recommended Number of Questions
8 or less 12 or less As many as required
ACE Indicators Use RequiredUse Asset optionallyDo not use Weight
Use Required,Use AssetUse Weight optionally
Use RequiredUse Asset,Use Weight
% of Candidates Identified as ACE Candidates
15% and higher 10% to 15% 5% to 10%

Recruiting User Guide Taleo 10 - SP1 9-4
Question, Competency, Disqualification Question Librairies Question
Question Writing TipsQuestions must be written to obtain useful data from candidates and to facilitate the hiring process. When creating questions to prescreen candidates, these simple rules will help you achieve these goals.
Tip Description
Using the right amount of questions Balance the number of questions with the job complexity and expected candidate volume.
Writing effective questions The question should contain Required and Asset criteria.The question should help you sort candidates who apply for the position.The response to the question should provide value in determining the caliber of the candidate for the position.
Using Yes/No questions Use Yes/No questions for straight-forward requirements. For other questions, consider answer ranges that make it less obvious what the correct answer is.Do not use a Yes/No question for question of type Do you have a Bachelor's degree?
Including an “Out” answer Always include an “out” answer to the question such as None of the above, None or Not applicable. Otherwise you force the candidate to be untruthful. For example: With which of the following software do you have experience? Microsoft Word, Microsoft Excel, Microsoft PowerPoint, None.
Standardizing questions and answers Standardize answer ranges to questions to give the candidate a positive experience. For example, always put “None of the above” at the top or bottom of the answer list. Also, all years of experience questions should have the same ranges in the same order. For example: Indicate the highest level of education you have attained. High School Diploma, Associates Degree, Bachelor’s Degree, Master’s Degree, Doctorate Degree, None of the above.
Reviewing grammar and spelling A best practice is to review the questions and answers for grammar and spelling
Using strong verbs Use strong verbs in questions such as “write a program” or “operate”. Avoid phrases containing words like “work with” or “involved in”.
Using known acronyms Use only highly recognized acronyms such as IT.
Using examples in the question Use examples if necessary and reveal more about the position within the question. For example: In this position, you will be required to drive within a 200 mile radius to various merchandise outlets. Do you have a valid driver's license?.
Adhering to legal guidelines Adhere to legal guidelines by checking with your Employment Law and Diversity officers, keeping questions directly job-related (no personal questions). Also, do not create questions that may lead to discrimination.
Asking one question per question Do not ask too many different questions within one question. For example, avoid questions such as this one: Please indicate the number of years you have hands-on experience in marketing, accounting and/or manufacturing. It would be more valuable to restructure the question completely or to simply have three different questions if it is important to know the number of years the candidates have worked within those three areas.
Separating questions for years of experience and proficiency
Many times, candidates are asked about the number of years they have performed certain tasks or worked within a certain industry. However, it can be more helpful to know the candidate's proficiency or how well he/she performs a certain task. Ask yourself if it is more important to know the number of years of experience or the level of proficiency to evaluate a candidate

Recruiting User Guide Taleo 10 - SP1 9-5
Question, Competency, Disqualification Question Librairies Question
Creating a QuestionPrerequisite
A user type permission grants users access to this feature.
The question can have a maximum of 3000 characters.
Recruiting > Libraries > Questions
Steps
1. Click Create Question.
2. Select the type of answer.
3. Complete mandatory fields.
4. Select necessary information.
5. Click Save and Close.
Result
The question is available in the Question Library.
Next Step
Activating a question.
Activating a QuestionPrerequisite
A user type permission grants users access to this feature.
The question must be draft or inactive.
Recruiting > Libraries > Questions
Steps
1. Select a question.
2. In the More Actions list, select Activate Question.
Result
The status of the question is Active. The question is available for selection in a requisition
Deactivating a QuestionPrerequisite
A user type permission grants users access to this feature.
The question must be active.
Recruiting > Libraries > Questions
Steps
1. Select a question.
2. In the More Actions list, select Deactivate Question.

Recruiting User Guide Taleo 10 - SP1 9-6
Question, Competency, Disqualification Question Librairies Question
Result
The question remains in the Question Library with the Inactive status.
Editing a QuestionPrerequisite
A user type permission grants users access to this feature.
If the question is active, only grammatical and typographical corrections are allowed.
If the question is draft, any corrections are allowed.
An inactive question cannot be edited.
Recruiting > Libraries > Questions
Steps
1. Click on a question.
2. Click Edit.
3. Make modifications.
4. Click Save and Close.
Result
Changes will be applied to questions that will eventually be added to a requisition. Changes are not applied in a requisition that already contains a question.
Duplicating a QuestionPrerequisite
A user type permission grants users access to this feature.
Recruiting > Libraries > Questions
Steps
1. Select a question.
2. Click Duplicate.
3. Modify the information in the fields.
4. Translate the question if necessary.
5. Click Save and Close.
Result
The question created based on an existing one is available in the Question Library.
Associating a Question to a LocationPrerequisite
A user type permission grants users access to this feature.

Recruiting User Guide Taleo 10 - SP1 9-7
Question, Competency, Disqualification Question Librairies Question
Question should have the draft or active status.
Recruiting > Libraries > Questions
Steps
1. Click on a question.
2. In the question page, click Edit.
3. In the Locations section, specify if you want to associate the question to all locations or to specific locations.
If you associate the question to specific locations, click Modify, select a location in the Location selector, then click Save.
4. Click Save and Close.
Result
Users are able to add the question in a requisition if the question matches the location of the requisition.
Dissociating a Question from a LocationPrerequisite
A user type permission grants users access to this feature.
Question should have the draft or active status.
Recruiting > Libraries > Questions
Steps
1. Click on a question.
2. Click Edit.
3. In the Associated Structure section, clear the Locations check boxes.
4. Click Save and Close.
Result
A question which is not associated to any location remains in the Question Library but can only be added manually to a requisition.
Associating a Question to a Job FieldPrerequisite
A user type permission grants users access to this feature.
Question should have the draft or active status.
Recruiting > Libraries > Questions
Steps
1. Click on a question.
2. In the question page, click Edit.

Recruiting User Guide Taleo 10 - SP1 9-8
Question, Competency, Disqualification Question Librairies Question
3. In the Job Fields section, specify if you want to associate the question to all job fields or to specific job fields.
If you associate the question to specific job fields, click Modify, select a job field in the Job Field selector, then click Save.
4. Click Save and Close.
Result
Users are able to add the question in the requisition if the question matches the job field of the requisition.
Dissociating a Question from a Job FieldPrerequisite
A user type permission grants users access to this feature.
Question should have the draft or active status.
Recruiting > Libraries > Questions
Steps
1. Click on a question.
2. Click Edit.
3. In the Associated Structure section, clear the Job Fields check boxes.
4. Click Save and Close.
Result
A question which is not associated to any job field remains in the Question Library but can only be added manually to a requisition
Adding a Question to the Job Field or Location StructurePrerequisite
A user type permission grants users access to this feature.
Recruiting > Libraries > Questions
Steps
1. Click on the Job Field or Location tab in the left pane.
2. Click Add Question...
3. Click Select next to the desired question.
4. Click Done.
Result
The user adding a question to a requisition will be presented with a selector window containing questions matching the Organization-Location-Job Field structure of the requisition.
Recruiting User Guide Taleo 10 - SP1 9-9
Question, Competency, Disqualification Question Librairies Question
Removing a Question from the Job Field or Location StructurePrerequisite
A user type permission grants users access to this feature.
Recruiting > Libraries > Questions
Steps
1. Click on the Job Field or Location tab in the left pane.
2. Select a question.
3. Click Remove Question.
Result
By removing a question from the Location and/or Job Field structure, the user adding a question to a requisition will be presented with a selector window containing this question regardless of the requisition Organization-Location-Job Field structure. Note that the selector window presents questions matching the Organization-Location-Job Field structure of the requisition or any questions that is not associated to any Organization-Location-Job Field
Adding a Question to the ModelPrerequisite
A user type permission grants users access to this feature.
Recruiting > Libraries > Questions
Steps
1. Click on the Job Field or Location tab in the left pane.
2. Select a question.
3. In the More Actions list, click Add to Prescreening Model.
Result
In the Question Library list, a check mark appears in the In Model column, next to the question. The question is available to another user completing the Prescreening section of a requisition.
Removing a Question from the ModelPrerequisite
A user type permission grants users access to this feature.
Recruiting > Libraries > Questions
Steps
1. Click on the Job Field or Location tab in the left pane.
2. Select a question.
3. In the More Actions list, click Remove from Prescreening Model.

Recruiting User Guide Taleo 10 - SP1 9-10
Question, Competency, Disqualification Question Librairies Question
Result
In the Question Library list, a check mark no longer appears in the In Model column, next to the question. The question is no longer available to another user completing the Prescreening section of a requisition.
Adding a Question to the ProfilePrerequisite
A user type permission grants users access to this feature.
Recruiting > Libraries > Questions
Steps
1. Click on the Job Field or Location tab in the left pane.
2. Select a question.
3. In the More Actions list, click Add to Profile.
Result
In the Question Library list, a checkmark appears in the In Profile column, next to the question. The question is available to another user creating a candidate file and to a candidate completing a profile in a career section.
Removing a Question from the ProfilePrerequisite
A user type permission grants users access to this feature.
Recruiting > Libraries > Competencies
Steps
1. In the Question Library page, click on the Job Field or Location tab in the left pane.
2. Select a question.
3. In the More Actions list, click Remove from Profile.
Result
A check mark no longer appears in the In Profile column, next to the question. The questionis no longer available to another user creating a candidate file and to a candidate entering a profile in a career section.
Viewing a Question in Another LanguagePrerequisite
A user type permission grants users access to this feature.
The icon must be displayed next to the question in the Question list.
Recruiting > Libraries > Questions
Steps
Recruiting User Guide Taleo 10 - SP1 9-11
Question, Competency, Disqualification Question Librairies Question
1. Click on a question.
2. Select a language from the Activated Languages list.
Result
The question is displayed in the selected language.
Changing the Visibility of a QuestionPrerequisite
A user type permission grants users access to this feature.
Recruiting > Libraries > Questions
Steps
1. Click on a question.
2. Click Edit.
3. In the Question Properties section, select the visibility from the Visible by drop down list.
4. Click Save.
Result
The selected question will be visible to internal, external or all candidates according to the selected visibility.

Recruiting User Guide Taleo 10 - SP1 9-12
Question, Competency, Disqualification Question Librairies Disqualification Question
Disqualification Question
Disqualification Question LibraryThe Disqualification Question Library contains all the disqualification questions that can be included in requisitions to prescreen candidates and find the best candidates for a job.
Detailed Description
To have access to disqualification questions, this feature must be activated within your company. A user type permission grants users access to this feature.
When accessing the Disqualification Question Library, the screen is organized into three panes:
• Left pane containing three tabs. The pane can be expanded or collapsed.
•
• Right pane containing supporting tools such as the online help. The pane can be expanded or collapsed.
• Central pane containing a menu bar allowing users to perform actions on disqualification questions. The central pane also contains the list of disqualification questions. Questions displayed depend on the filters and options selected in the left pane.
Disqualification QuestionA disqualification question is a single-answer question that contains the minimum requirements for a candidate to be eligible for a job. A candidate not meeting the required response can be instantly exited from the application process.
Detailed Description
To have access to disqualification questions, this feature must be activated within your company.
Disqualification questions are created and configured in the Disqualification Question Library. Questions available in the Disqualification Question Library can appear in the Prescreening section of a requisition file if the locations and job fields of the disqualification question matches the locations and job fields of the requisition.A user type permission grants users access to this feature.
Tab Description
Library Contains all the questions. Users can filter the list using dynamic filters such as the Active status, the In profile and In model criteria, the question visibility (all candidates, internal candidates, external candidates), the job field or location association, etc.
Job Field Contains questions associated to one or more job fields. Users can display all questions associated to a job field as well as questions that have been tagged In profile or In model. A tree structure allows users to display questions associated to all job fields, or questions associated to a specific job field.
Location Contains questions associated to one or more locations. Users can display all questions associated to a location as well as questions that have been tagged In profile or In model. A tree structure allows users to display questions associated to all locations, or questions associated to a specific location
Recruiting User Guide Taleo 10 - SP1 9-13
Question, Competency, Disqualification Question Librairies Disqualification Question
A disqualification question requires one answer from the candidate, that is the candidate is limited to one answer from a list of choices. When creating a disqualification question, at least two answers must be provided, one of which must indicate that the candidate passes. There are three results for each answer:
• The candidate passes: the candidate is not disqualified.
• The candidate is disqualified: the candidate is automatically disqualified.
• To be verified: the candidate file must be reviewed.
If configured by your system administrator, you can have the ability to configure disqualification questions so that candidates are prompted for explanations for specific responses. This feature provides candidates a greater opportunity to accurately explain their qualifications and it also reduces the need for users to make follow-up contact with candidates to obtain details regarding their responses.
A disqualification question can be viewed by internal candidates, external candidates or all candidates.
A disqualification question can be associated to locations and job fields.
• If a question is not associated to any location or job field, the question will be displayed in the requisition.
• If a question is associated to all locations and/or to all job fields, the question will be displayed in the requisition.
• If a question is associated to specific locations and/or job fields, the question will be displayed in the requisition if it matches the location or job field of the requisition.
Unanswered disqualification questions are considered as being passed and will not affect the disqualification status of the candidate.
Explanations for Disqualification QuestionsThis feature provides users the ability to configure disqualification questions so that candidates are prompted for explanations for specific answers.
Detailed Description
When creating a disqualification question, when this feature is activated, the system administrator may specify that an explanation is required for certain answers. Note that it is not currently possible to change whether the explanation is required for certain answers once the question is active.
If an explanation is required for an answer, the user must enter an introduction sentence for the explanation. For example, if the question is “Have you ever been convicted of a crime?”, the introduction sentence could “Please specify the crimes you were convicted for as well as any details”. A maximum of 256 characters can be entered.
When applying, if the candidate selects a response to a disqualification question requiring an explanation, the candidate must provide it. A maximum of 1000 characters can be entered for the explanation. Authorized recruiters and managers can also enter an explanation on behalf of the candidate either by capturing or editing the candidate submission.
When an explanation is provided for an answer, the explanation is displayed just below the question answer in the candidate file Prescreening section.
Recruiting User Guide Taleo 10 - SP1 9-14
Question, Competency, Disqualification Question Librairies Disqualification Question
Benefits
• Provides users the ability to collect relevant additional details from candidates for Disqualification Questions.
• Provides candidates the ability to explain their responses to disqualification questions as well as greater opportunity to accurately explain their qualifications.
• Requiring candidates to provide explanations during initial submission reduces the need for users to make follow-up contact with candidates to obtain details regarding their responses.
Creating a Disqualification QuestionPrerequisite
A setting allows the activation of this feature.
The question can have a maximum of 3000 characters.
Recruiting > Libraries > Disqualification Questions
Steps
1. Click Create Question.
2. Complete mandatory fields.
3. Specify required information.
4. Click Save and Close.
Result
The disqualification question is available in the disqualification question library. New disqualification questions added to existing requisitions will not affect candidates who have already applied until they update their candidate profiler or their application.
Next Step
Activate the disqualification question so it appears in the Prescreening section of a requisition file.
Duplicating a Disqualification QuestionPrerequisite
A setting allows the activation of this feature.
Recruiting > Libraries > Disqualification Questions
Steps
1. Select a question.
2. Click Duplicate.
3. Modify the information in the fields.
4. Translate the question if necessary.
5. Click Save and Close.
Recruiting User Guide Taleo 10 - SP1 9-15
Question, Competency, Disqualification Question Librairies Disqualification Question
Result
The disqualification question created based on an existing one is available in the Disqualification Questions library.
Editing a Disqualification QuestionPrerequisite
A setting allows the activation of this feature.
If a question is active, only grammatical and typographical corrections are allowed.
If a question is draft, any corrections are allowed.
Inactive questions cannot be edited.
Taleo Recruiting > Libraries > Disqualification Questions
Steps
1. Click on a disqualification question.
2. Click Edit.
3. Make modifications.
4. Click Save and Close.
Result
Modifications to a disqualification question do not affect already answered questions. Candidates who had passed will still pass. Candidates who had been disqualified will remain disqualified.
Associating a Disqualification Question to a LocationPrerequisite
A setting allows the activation of this feature.
Recruiting > Libraries > Disqualification Questions
Steps
1. Click on a question.
2. Click Edit.
3. In the Locations section, specify if you want to associate the question to all locations or to specific locations.
If you associate the question to specific locations, click Modify, select a location in the Location selector, then click Save.
4. Click Save and Close.
Result
The disqualification question will be added to a requisition if the location of the disqualification question matches the location of the requisition.
Recruiting User Guide Taleo 10 - SP1 9-16
Question, Competency, Disqualification Question Librairies Disqualification Question
Dissociating a Disqualification Question from a LocationPrerequisite
A user type permission grants users access to this feature.
Disqualification Questions should have the draft status.
Inactive disqualification questions cannot be dissociated from a job field.
Taleo Recruiting > Libraries > Disqualification Questions
Steps
1. Click on a question.
2. Click Edit.
3. In the Associated Structure section, clear the Job Fields check boxes.
4. Click Save and Close.
Result
By dissociating a disqualification question from a location, the question will be available to be added to all requisitions regardless of the location specification of a requisition.
Associating a Disqualification Question to a Job FieldPrerequisite
A setting allows the activation of this feature.
Recruiting > Libraries > Disqualification Questions
Steps
1. Click on a question.
2. Click Edit.
3. In the Job Fields section, specify if you want to associate the question to all job fields or to specific job fields.
If you associate the question to specific job fields, click Modify, select a job field in the Job Field selector, then click Save.
4. Click Save and Close.
Result
The disqualification question will be added in a requisition if the question matches the job field of the requisition.
Dissociating a Disqualification Question from a Job FieldPrerequisite
A user type permission grants users access to this feature.
Disqualification Question should have the draft status.
Disqualification Question must not be used by a posted requisition.

Recruiting User Guide Taleo 10 - SP1 9-17
Question, Competency, Disqualification Question Librairies Disqualification Question
Inactive disqualification questions cannot be dissociated from a job field.
Taleo Recruiting > Libraries > Disqualification Questions
Steps
1. Click on a question.
2. Click Edit.
3. In the Associated Structure section, clear the Job Fields check boxes.
4. Click Save and Close.
Result
The question will not appear in a new requisition related to the previously selected job field. By dissociating a disqualification question from a job field, the question will be available to be added to all requisitions regardless of the job field specification of a requisition
Adding a Disqualification Question to the Job Field or Location Structure
Prerequisite
A setting allows the activation of this feature
A user type permission grants users access to this feature.
Recruiting > Libraries > Disqualification Questions
Steps
1. Click on the Job Field or Location tab in the left pane.
2. Click Add Question...
3. Click Select next to the desired question.
4. Click Done.
Result
The user adding a disqualification question to a requisition will be presented with a selector window containing questions matching the Organization-Location-Job Field structure of the requisition
Removing a Disqualification Question from the Job Field or Location List
Prerequisite
A setting allows the activation of this feature.
Recruiting > Libraries > Disqualification Questions
Steps
1. Click on the Job Field or Location tab in the left pane.
2. Select a question.
3. Click Remove Question.

Recruiting User Guide Taleo 10 - SP1 9-18
Question, Competency, Disqualification Question Librairies Disqualification Question
Result
By removing a disqualification question from the location or job field list, users will be able to add the question to all requisitions regardless of the location or job field of a requisition
Activating a Disqualification QuestionPrerequisite
A setting allows the activation of this feature.
The question must have a draft or inactive status.
Recruiting > Libraries > Disqualification Questions
Steps
1. Select a question.
2. In the More Actions list, select Activate Question.
Result
The status of the disqualification question is Active. The disqualification question is displayed in the requisition.
Deactivating a Disqualification QuestionPrerequisite
A setting allows the activation of this feature.
The question must be active in order to be deactivated.
Recruiting > Libraries > Disqualification Questions
Steps
1. Select a question.
2. In the More Actions list, select Deactivate Question.
Result
The disqualification question no longer appears in the Disqualification question Library.
Viewing a Question in Another LanguagePrerequisite
A user type permission grants users access to this feature.
The icon must be displayed next to the question in the Question list.
Recruiting > Libraries > Questions
Steps
1. Click on a question.
2. Select a language from the Activated Languages list.

Recruiting User Guide Taleo 10 - SP1 9-19
Question, Competency, Disqualification Question Librairies Disqualification Question
Result
The question is displayed in the selected language.
Changing the Visibility of a Disqualification QuestionPrerequisite
A user type permission grants users access to this feature
Recruiting > Libraries > Disqualification Questions
Steps
1. Click on a disqualification question.
2. Click Edit.
3. In the Question Properties section, select the visibility from the Visible by drop down list.
4. Click Save.
Result
The selected disqualification question will be visible to internal, external or all candidates according to the selected visibility.
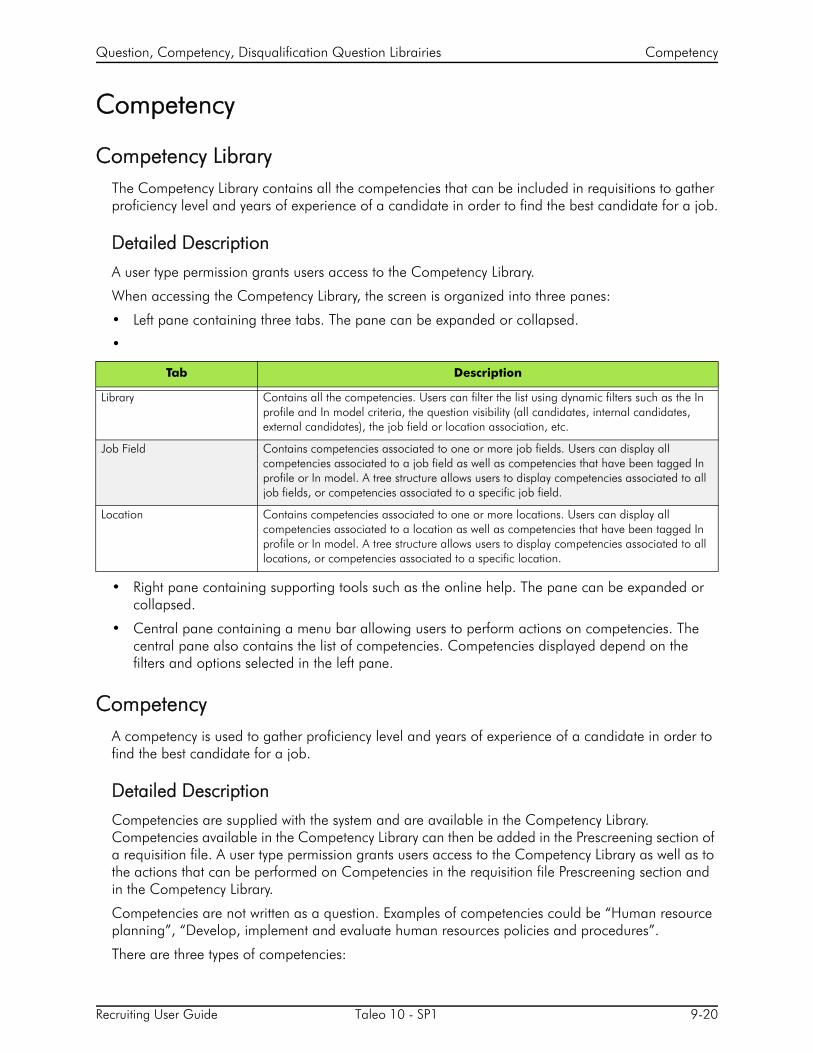
Recruiting User Guide Taleo 10 - SP1 9-20
Question, Competency, Disqualification Question Librairies Competency
Competency
Competency LibraryThe Competency Library contains all the competencies that can be included in requisitions to gather proficiency level and years of experience of a candidate in order to find the best candidate for a job.
Detailed Description
A user type permission grants users access to the Competency Library.
When accessing the Competency Library, the screen is organized into three panes:
• Left pane containing three tabs. The pane can be expanded or collapsed.
•
• Right pane containing supporting tools such as the online help. The pane can be expanded or collapsed.
• Central pane containing a menu bar allowing users to perform actions on competencies. The central pane also contains the list of competencies. Competencies displayed depend on the filters and options selected in the left pane.
CompetencyA competency is used to gather proficiency level and years of experience of a candidate in order to find the best candidate for a job.
Detailed Description
Competencies are supplied with the system and are available in the Competency Library. Competencies available in the Competency Library can then be added in the Prescreening section of a requisition file. A user type permission grants users access to the Competency Library as well as to the actions that can be performed on Competencies in the requisition file Prescreening section and in the Competency Library.
Competencies are not written as a question. Examples of competencies could be “Human resource planning”, “Develop, implement and evaluate human resources policies and procedures”.
There are three types of competencies:
Tab Description
Library Contains all the competencies. Users can filter the list using dynamic filters such as the In profile and In model criteria, the question visibility (all candidates, internal candidates, external candidates), the job field or location association, etc.
Job Field Contains competencies associated to one or more job fields. Users can display all competencies associated to a job field as well as competencies that have been tagged In profile or In model. A tree structure allows users to display competencies associated to all job fields, or competencies associated to a specific job field.
Location Contains competencies associated to one or more locations. Users can display all competencies associated to a location as well as competencies that have been tagged In profile or In model. A tree structure allows users to display competencies associated to all locations, or competencies associated to a specific location.

Recruiting User Guide Taleo 10 - SP1 9-21
Question, Competency, Disqualification Question Librairies Competency
• Simple competency: A simple competency allows you to identify if the competency is required or an asset and to specify the weight of the competency. In career sections, when candidates assess their competencies in a prescribing questionnaire, they are presented with a question and a choice of competencies to select (check boxes).
• Detailed competency: A detailed competency allows you to identify if the competency is required or an asset, to specify the weight of the competency and to indicate the proficiency and experience level. In career sections, when candidates assess their competencies in a prescreening questionnaire, they are presented with lists for each competency they have to assess.
• Simple and detailed competency: In career sections, candidates will have the choice of using the simple competency or to use the lists to provide more information on specific competencies.
A competency can be visible to internal candidates, external candidates or all candidates.
A competency can be associated to locations and job fields.
• If a competency is not associated to any location or job field, the competency will be available to users when adding competencies to a requisition.
• If a competency is associated to all locations and/or to all job fields, the competency will be available to users when adding competencies to a requisition only if the In Model option is selected.
• If a competency is associated to specific locations and/or job fields, the competency will be available to users when adding competencies to a requisition if the In Model option is selected and if the competency matches the locations or job fields of the requisition.
When associating a competency to locations or job fields, the competency can be made available in a profile or in a model:
• If a competency is tagged “In profile”, the competency will be available to users who create a candidate file, and to candidates who are entering their profile in a career section. Competencies made available will be sorted to match the location and job field preferences defined by the candidate.
• If a competency is tagged “In model”, the competency will be available to users who complete the Prescreening section of a requisition. Competencies will be grouped in a model based on the location and job field of the requisition.
Competency AssessmentThe competency assessment score consists of three parts: Proficiency/Last Used basic score, Proficiency/ Experience Rectifier and Interest Weight. The competency score is the sum of the basic score and rectification value, multiplied by the interest weight. The maximum result is 100.
Detailed Description
Three formats of competencies assessment are available:
• Detailed competencies Assessment (DSA): allows candidates to assess their competencies by selecting—from lists—the appropriate level of experience, proficiency, last used, and interest. The process is repeated for each competency.
• Simple competencies Assessment (SSA): is a simplified DSA format. It allows candidates to assess their competencies by selecting—using check boxes—the competencies for which they possess a certain level of proficiency and experience.
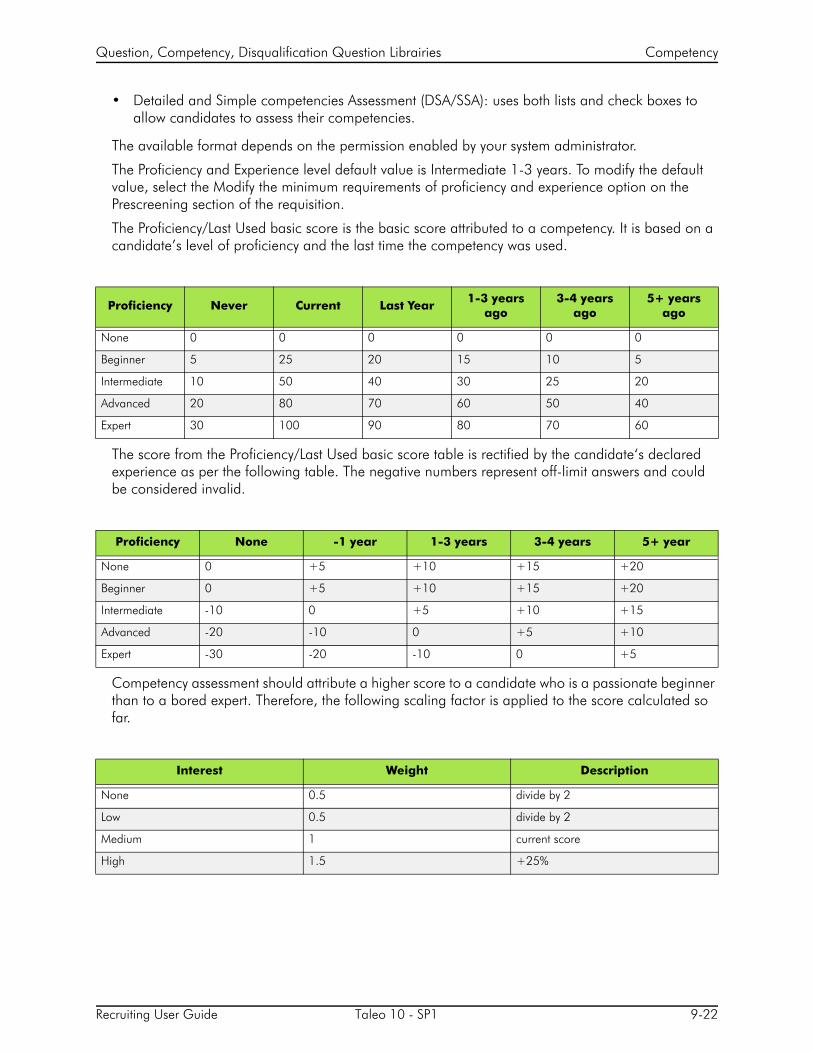
Recruiting User Guide Taleo 10 - SP1 9-22
Question, Competency, Disqualification Question Librairies Competency
• Detailed and Simple competencies Assessment (DSA/SSA): uses both lists and check boxes to allow candidates to assess their competencies.
The available format depends on the permission enabled by your system administrator.
The Proficiency and Experience level default value is Intermediate 1-3 years. To modify the default value, select the Modify the minimum requirements of proficiency and experience option on the Prescreening section of the requisition.
The Proficiency/Last Used basic score is the basic score attributed to a competency. It is based on a candidate’s level of proficiency and the last time the competency was used.
The score from the Proficiency/Last Used basic score table is rectified by the candidate‘s declared experience as per the following table. The negative numbers represent off-limit answers and could be considered invalid.
Competency assessment should attribute a higher score to a candidate who is a passionate beginner than to a bored expert. Therefore, the following scaling factor is applied to the score calculated so far.
Proficiency Never Current Last Year1-3 years
ago3-4 years
ago5+ years
ago
None 0 0 0 0 0 0
Beginner 5 25 20 15 10 5
Intermediate 10 50 40 30 25 20
Advanced 20 80 70 60 50 40
Expert 30 100 90 80 70 60
Proficiency None -1 year 1-3 years 3-4 years 5+ year
None 0 +5 +10 +15 +20
Beginner 0 +5 +10 +15 +20
Intermediate -10 0 +5 +10 +15
Advanced -20 -10 0 +5 +10
Expert -30 -20 -10 0 +5
Interest Weight Description
None 0.5 divide by 2
Low 0.5 divide by 2
Medium 1 current score
High 1.5 +25%

Recruiting User Guide Taleo 10 - SP1 9-23
Question, Competency, Disqualification Question Librairies Competency
Competency Assessment Definitions
Proficiency Level
Experience Level
Last Used Level
None Candidates have no experience or training regarding the competency.
Beginner Candidates have received basic training and can perform the competency with some assistance. They received classroom or field training, either as an apprentice or through an internship.
Intermediate Candidates have completed at least one successful experience. Help from an expert may be required occasionally, but candidates can usually perform the competency themselves.
Advanced Candidates can perform the competency without any assistance. They are recognized within their company as “the people to ask” regarding the competency. They might be known in the industry as a specialist. They have extensive experience and could teach the subject if they had teaching competencies.
Expert Candidates can answer all questions about the competency and industry-related questions. They have contributed to developing, defining, or improving the competency. They have published a paper on the subject and advanced people actively seek their advice. They are often offered jobs.
None Candidates have no experience or training regarding the competency.
Less than 1 year Candidates possess between 1 and 11 months of work experience during which they had to perform the competency.
1 to 3 years Candidates possess between 12 and 35 months of work experience during which they had to perform the competency.
3 to 5 years Candidates possess between 36 and 59 months of work experience during which they had to perform the competency.
5 years + Candidates possess 60 months or more of work experience during which they had to perform the competency.
None Candidates have never performed the competency.
Current Candidates perform the competency as part of their current employment.
Last Year Candidates successfully performed the competency within the last 11 months.
1 to 3 years ago Candidates successfully performed the competency between 12 and 35 months ago.
3 to 5 years ago Candidates successfully performed the competency between 36 and 59 months ago.

Recruiting User Guide Taleo 10 - SP1 9-24
Question, Competency, Disqualification Question Librairies Competency
Interest Level
Creating a CompetencyCompetencies are supplied with the system, they cannot be created by a user or a system administrator. Contact Taleo Support for more information.
Editing a CompetencyPrerequisite
A user type permission grants users access to this feature.
Recruiting > Libraries > Competencies
Steps
1. Click on a competency.
2. Click Edit.
3. Make modifications.
4. Click Save and Close.
Result
The visibility of the competency as well as the locations and job fields associated to the competency reflect changes.
Associating a Competency to a LocationPrerequisite
A user type permission grants users access to this feature.
Recruiting > Libraries > Competencies
Steps
1. Click on a competency.
2. Click Edit.
3. In the Locations section, specify if you want to associate the competency to all locations or to specific locations.
None Candidates have absolutely no interest in performing or learning the competency.
Low Candidates have a lot of experience and key knowledge regarding the competency but have little interest in performing the competency often.
Medium Candidates would be willing to perform the competency daily in their job.
High Candidates have a high interest in jobs that require them to perform the competency. Performing the competency is a high source of motivation. They are willing to participate in improving how the competency is performed at the company.

Recruiting User Guide Taleo 10 - SP1 9-25
Question, Competency, Disqualification Question Librairies Competency
If you associate the competency to specific locations, click Modify, select a location in the Location selector, then click Save.
4. Click Save and Close.
Result
The competency can be added in a requisition if the competency matches the location of the requisition
Dissociating a Competency from a LocationPrerequisite
A user type permission grants users access to this feature.
Recruiting > Libraries > Competencies
Steps
1. Click on a competency.
2. Click Edit.
3. In the Associated Structure section, clear the Location check boxes.
4. Click Save and Close.
Result
A competency which is not associated to any location remains in the Competency Library but can only be added manually to a requisition.
Associating a Competency to a Job FieldPrerequisite
A user type permission grants users access to this feature.
Recruiting > Libraries > Competencies
Steps
1. Click on a competency.
2. Click Edit.
3. In the Job Fields section, specify if you want to associate the competency to all job fields or to specific job fields.
If you associate the competency to specific job fields, click Modify, select a job field in the Job Field selector, then click Save.
4. Click Save and Close.
Result
The competency can be added in the requisition if the competency matches the job field of the requisition
Recruiting User Guide Taleo 10 - SP1 9-26
Question, Competency, Disqualification Question Librairies Competency
Dissociating a Competency From a Job FieldPrerequisite
A user type permission grants users access to this feature.
Recruiting > Libraries > Competencies
Steps
1. Click on a competency.
2. Click Edit.
3. In the Associated Structure section, clear the Job Fields check boxes.
4. Click Save and Close.
Result
A competency which is not associated to any location remains in the Competency Library but can only be added manually to a requisition.
Adding a Competency to the Job Field or Location StructurePrerequisite
A user type permission grants users access to this feature.
Recruiting > Libraries > Competencies
Steps
1. Click on the Job Field or Location tab in the left pane.
2. Click Add Competency...
3. Click Select next to the desired competency.
4. Click Done.
Result
The user adding a competency to a requisition will be presented with a selector window containing competencies matching the Organization-Location-Job Field structure of the requisition.
Removing a Competency from the Job Field or Location StructurePrerequisite
A user type permission grants users access to this feature.
Recruiting > Libraries > Competencies
Steps
1. Click on the Job Field or Location tab in the left pane.
2. Select a competency.
3. Click Remove Competency.

Recruiting User Guide Taleo 10 - SP1 9-27
Question, Competency, Disqualification Question Librairies Competency
Result
By removing a competency from the Location and/or Job Field structure, the user adding a competency to a requisition will be presented with a selector window containing this competency regardless of the requisition Organization-Location-Job Field structure. Note that the selector window presents competencies matching the Organization-Location-Job Field structure of the requisition or any competencies that is not associated to any Organization-Location-Job Field.
Adding a Competency to the ProfilePrerequisite
A user type permission grants users access to this feature.
Taleo Recruiting > Libraries > Competencies
Steps
1. Click on the Job Field or Location tab in the left pane.
2. Select a competency.
3. In the More Actions list, click Add to Profile.
Result
In the Competency Library list, a checkmark appears in the In Profile column, next to the competency. The competency is available to another user creating a candidate file and to a candidate entering a profile in a career section.
Removing a Competency from the ProfilePrerequisite
A user type permission grants users access to this feature.
Recruiting > Libraries > Competencies
Steps
1. Click on the Job Field or Location tab in the left pane.
2. Select a competency.
3. In the More Actions list, click Remove from Profile.
Result
In the Competency Library list, a check mark no longer appears in the In Profile column, next to the competency. The competency is no longer available to another user creating a candidate file and to a candidate completing a profile in a career section.
Adding a Competency to the ModelPrerequisite
A user type permission grants users access to this feature.
Recruiting > Libraries > Competencies

Recruiting User Guide Taleo 10 - SP1 9-28
Question, Competency, Disqualification Question Librairies Competency
Steps
1. Click on the Job Field or Location tab in the left pane.
2. Select a competency.
3. In the More Actions list, click Add to Prescreening Model.
Result
In the Competency Library list, a check mark appears in the In Model column, next to the competency. The competency is available to another user completing the Prescreening section of a requisition.
Viewing a Competency in Another LanguagePrerequisite
A user type permission grants users access to this feature.
The icon must be displayed next to the competency in the competencies list.
Recruiting > Libraries > Competencies
Steps
1. Click on a competency.
2. Select a language from the Activated Languages list.
Result
The competency is displayed in the selected language.
Changing the Visibility of a CompetencyPrerequisite
A user type permission grants users access to this feature
Recruiting > Libraries > Competencies
Steps
1. Click on a competency.
2. Click Edit.
3. In the Competency Properties section, select the visibility from the Visible by drop down list.
4. Click Save.
Result
The selected competency will be visible to internal, external or all candidates according to the selected visibility.

BP(A|S)
Task
• Task Management. . . . . . . . . . . . . . . . . . . . . . . . . . . . . . . . . . . . . . . . . . . 10-1

Recruiting User Guide Taleo 10 - SP1 10-1
Task Task Management
Task Management
TaskA task is an action a user needs to perform regarding requisitions, candidate files and offers.
Detailed Description
For the task feature to be available to the user in the center stage, the system administrator must have configured the center stage to include the Tasks channel and activated the proper settings.
Tasks are generated by the system and displayed in the Tasks channel of the center stage. Hyperlinks in the Tasks channel give access to the Tasks list where users can see all tasks in one list view and use quick filters to filter the list. Users who are assigned a task but dot not have access to the product (or who desire it) can receive e-mails (eShare) for approval related tasks. In the Tasks list, a task can only be executed by the owner of the task or his/her delegate. All system-generated tasks show the due date as “blank” and the priority as “normal”. These fields are present to support any candidate self-assigned tasks which do have due dates and priority set.
Tasks are assigned to a user or to the user’s assistant according to these rules:
• When a system-generated task is created, the assignee is always the “user’s assistant” (if a user assistant is identified). Otherwise, the assignee is always the user. However, the user also has access to these tasks even though they were assigned to the assistant.
• Both the user and the user’s assistant can access the linked task regardless to whom (user or assistant) the task was assigned to.
• If a user assistant is identified after a system-generated task was created, the task will remain assigned to the user, but the linked task will be available to both the user and user’s assistant.
• If a user assistant was assigned a task and the user assistant was later removed, the task will automatically be re-assigned to the user.
In the Tasks list, when selecting the “I own” filter, tasks related to requisitions the user owns (as a user and user assistant) are displayed. If a system-generated task is assigned to the user, both the user and user’s assistant will be able to perform the task. If a system-generated task is assigned to the user assistant, both the user assistant and user will be able to perform the task. In both cases the task will be displayed as a link.
The Tasks list provides quick filters and presents information in different columns. Quick filters and columns are not configurable.
Available quick filters are:
• task ownership (for example, I own, I collaborate on, etc.)
• tasks requiring attention
• completed tasks (by default, the Hide Completed Tasks option is selected)
• tasks due date (with the ability to exclude tasks with no due date)
• task type (for example, tasks to be completed, tasks ready for sourcing, self-assigned tasks, etc.)
• tasks related to a specific candidate or requisition
• tasks related to a specific owner
Available columns are:
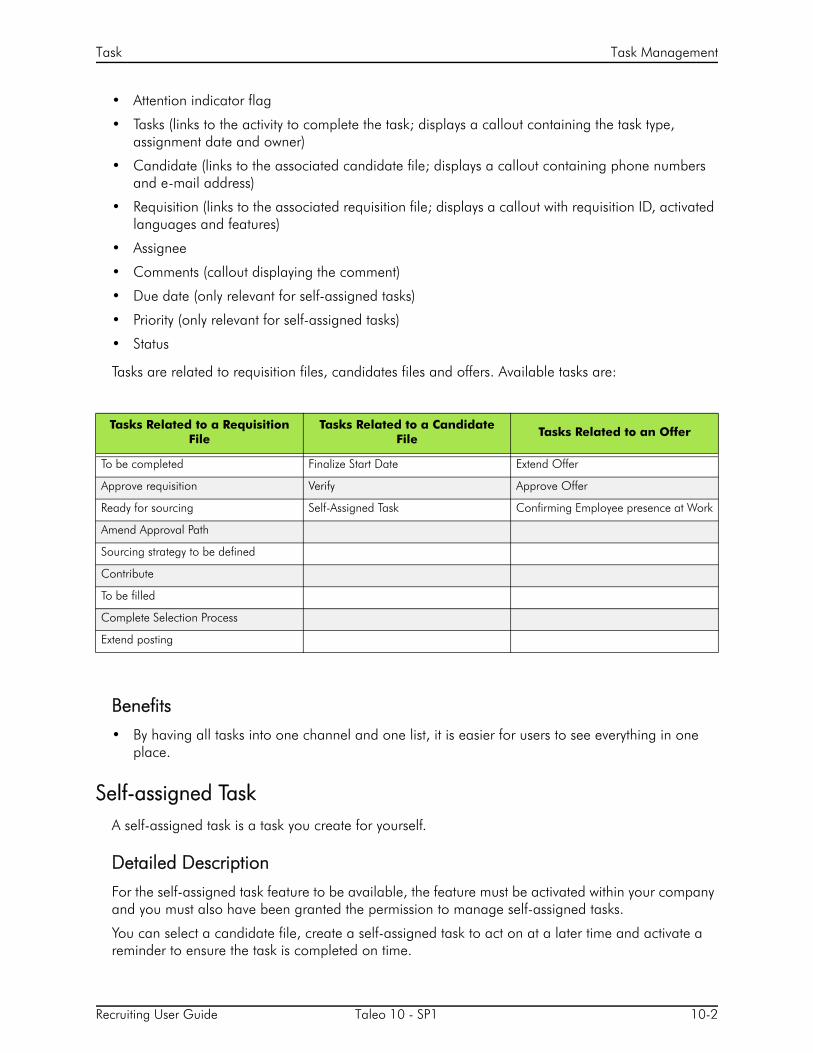
Recruiting User Guide Taleo 10 - SP1 10-2
Task Task Management
• Attention indicator flag
• Tasks (links to the activity to complete the task; displays a callout containing the task type, assignment date and owner)
• Candidate (links to the associated candidate file; displays a callout containing phone numbers and e-mail address)
• Requisition (links to the associated requisition file; displays a callout with requisition ID, activated languages and features)
• Assignee
• Comments (callout displaying the comment)
• Due date (only relevant for self-assigned tasks)
• Priority (only relevant for self-assigned tasks)
• Status
Tasks are related to requisition files, candidates files and offers. Available tasks are:
Benefits
• By having all tasks into one channel and one list, it is easier for users to see everything in one place.
Self-assigned TaskA self-assigned task is a task you create for yourself.
Detailed Description
For the self-assigned task feature to be available, the feature must be activated within your company and you must also have been granted the permission to manage self-assigned tasks.
You can select a candidate file, create a self-assigned task to act on at a later time and activate a reminder to ensure the task is completed on time.
Tasks Related to a Requisition File
Tasks Related to a Candidate File
Tasks Related to an Offer
To be completed Finalize Start Date Extend Offer
Approve requisition Verify Approve Offer
Ready for sourcing Self-Assigned Task Confirming Employee presence at Work
Amend Approval Path
Sourcing strategy to be defined
Contribute
To be filled
Complete Selection Process
Extend posting

Recruiting User Guide Taleo 10 - SP1 10-3
Task Task Management
For example, let say that you want to call the candidate John Doyle by the end of the week to invite him for an interview the following Monday. You need to open John Doyle candidate file, create a self-assigned task (for example “Confirm Monday’s Interview”) and set a reminder for Friday. On Friday morning, you will receive an e-mail message reminding you to call John to see if he is available for an interview the following Monday. The e-mail message contains a link that you can click in order to access all the information regarding this task. Then, in your list of tasks, click on the task regarding John Doyle to obtain details regarding this task as well as information regarding the candidate and the requisition he applied to. Look at John’s phone number in his candidate file and can call him to invite him for the interview. When the task is completed (i.e., you phoned John), you simply need to indicate that the task is completed by selecting the Completed status. The Confirm Monday’s Interview task is no longer displayed in the Tasks list.
A self-assigned task can also be created for several candidate files. For example, you could have a pre-filtered lists of candidates that are to be phone screened and create a single self-assigned task to perform an initial phone screen. The system automatically creates a separate self-assigned task for each candidate that was selected.
Self-assigned tasks can only be viewed by their creator. They cannot be redirected to delegates or transferred to a new user taking over.
Reminders are sent daily and users receive them in the morning (according to the appropriate time zone).
Self-assigned tasks are not reportable; reports showing self-assigned tasks cannot be created.
Benefits
• By having all tasks into one channel and one list, it is easier for users to see everything in one place.
Viewing TasksPrerequisite
A user type permission grants users access to this feature.
A setting allows the activation of this feature.
Steps
1. In the Recruiting Center, click on the Tasks link.
Result
The task list of the user is displayed.
Executing a TaskPrerequisite
A user type permission grants users access to this feature.
A setting allows the activation of this feature.
Steps
1. In the Tasks list, locate the task to perform.

Recruiting User Guide Taleo 10 - SP1 10-4
Task Task Management
2. Click the link.
The user is redirected to the page of the application where the task is performed.
3. Complete the task indicated in the Task column of the Tasks list.
Result
Once the task is completed, it is removed from the Tasks list.
Creating a Self Assigned TaskSelf assigned tasks can be created as personal reminders.
Prerequisite
A user type permission grants users access to this feature.
A setting allows the activation of this feature.
Steps
1. In the candidate file, select Create Self Assigned Task in the More Actions list.
2. In the Task window, complete the information as required.
3. Click Save and Close.
Result
An email message is sent to the user. The message contains a link that redirects the user to the information of the task. The task is listed in the Tasks list.
Removing a TaskPrerequisite
A user type permission grants users acces to this feature.
Only self assigned tasks can be removed.
Steps
1. In the Tasks list, hover your mouse over a task of the Tasks column.
2. Click .
Result
The self assigned task is removed from the Tasks list.
Confirming Employee Presence at WorkTo complete a hiring process, it may be necessary to confirm the employee’s presence at work.
Prerequisite
Only the owner of the requisition or a delegate can confirm an employee’s presence.
Candidate must be hired.
Current date must be the same or near the start date indicated in the offer.

Recruiting User Guide Taleo 10 - SP1 10-5
Task Task Management
Steps
1. In the Tasks list, click the link Confirm Employee Presence.
2. In the Confirm Employee Presence window, select an answer to the question: Is the candidate present for work.
3. Click Done.
Work Item DelegationWork item delegation allows a user to delegate work items to another user for a short preset period of time.
Detailed Description
A user delegates work items to another user for a preset period of time. This can be useful during the time a user is on vacation or on a sick leave. When selecting a user (new owner) to whom work items will be delegated, the following rules apply:
• The new owner must have the same user type permissions (constraints not included) as the current owner.
• The new owner must be at least in all the same groups as the current owner.
• If the current owner is an eShare user (not a Taleo application user), the new owner must also be an eShare user.
Delegating My Work ItemsPrerequisite
A setting allows the activation of this feature.
A user type permission grants users access to this feature.
The new owner must be different from the current owner.
The new owner must have the same user type permissions as the current owner.
The new owner must be in all the same groups of the current owner.
If the current owner is an eShare user, the new owner must also be an eShare user.
Steps
1. Click the My Setup link located in the top right-hand corner.
2. In the General tab, click Delegate.
3. Click Search to select the user to whom you wish to delegate your work items.
4. Click to open the calendar and select a starting date and an end date.
5. Click Done.
Result
Work items such as requisitions and tasks are delegated to another user for a specific period of time.

BP(A|S)
Report
• Report . . . . . . . . . . . . . . . . . . . . . . . . . . . . . . . . . . . . . . . . . . . . . . . . . . . 11-1

Recruiting User Guide Taleo 10 - SP1 11-1
Report Report
Report
ReportA wide range of custom and standard reports are available via Taleo Recruiting.
Detailed Description
Reports are available within the Taleo Reporting and Analytics solution. If your company has acquired this solution, users will be able to access a wide range of reports by selecting “Reporting and Analytics” in the Taleo Recruiting Table of Content page. For more details on the Taleo reporting solution, refer to the Reporting and Analytics User Guide.
Custom fields can be added to reports. In Taleo Recruiting Administration, the system administrator can create custom fields and tag them to appear in reports.

BP(A|S)
Troubleshooting
• Problem Solving . . . . . . . . . . . . . . . . . . . . . . . . . . . . . . . . . . . . . . . . . . . . 12-1
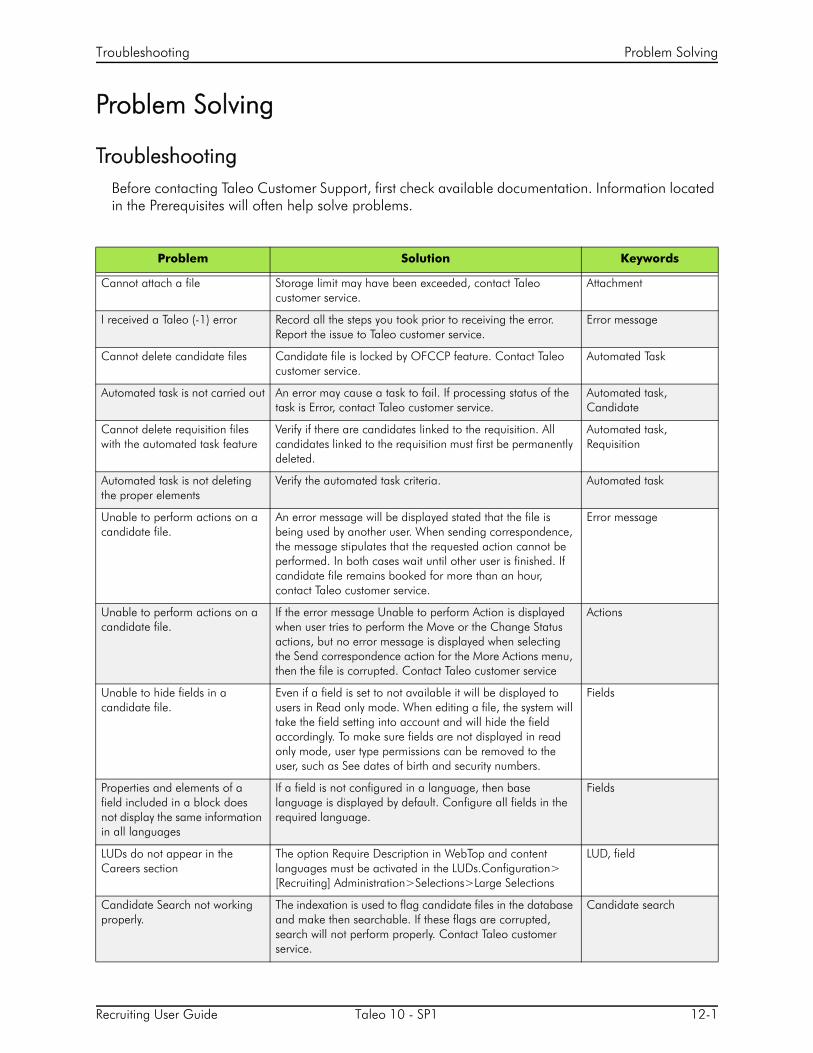
Recruiting User Guide Taleo 10 - SP1 12-1
Troubleshooting Problem Solving
Problem Solving
TroubleshootingBefore contacting Taleo Customer Support, first check available documentation. Information located in the Prerequisites will often help solve problems.
Problem Solution Keywords
Cannot attach a file Storage limit may have been exceeded, contact Taleo customer service.
Attachment
I received a Taleo (-1) error Record all the steps you took prior to receiving the error. Report the issue to Taleo customer service.
Error message
Cannot delete candidate files Candidate file is locked by OFCCP feature. Contact Taleo customer service.
Automated Task
Automated task is not carried out An error may cause a task to fail. If processing status of the task is Error, contact Taleo customer service.
Automated task, Candidate
Cannot delete requisition files with the automated task feature
Verify if there are candidates linked to the requisition. All candidates linked to the requisition must first be permanently deleted.
Automated task, Requisition
Automated task is not deleting the proper elements
Verify the automated task criteria. Automated task
Unable to perform actions on a candidate file.
An error message will be displayed stated that the file is being used by another user. When sending correspondence, the message stipulates that the requested action cannot be performed. In both cases wait until other user is finished. If candidate file remains booked for more than an hour, contact Taleo customer service.
Error message
Unable to perform actions on a candidate file.
If the error message Unable to perform Action is displayed when user tries to perform the Move or the Change Status actions, but no error message is displayed when selecting the Send correspondence action for the More Actions menu, then the file is corrupted. Contact Taleo customer service
Actions
Unable to hide fields in a candidate file.
Even if a field is set to not available it will be displayed to users in Read only mode. When editing a file, the system will take the field setting into account and will hide the field accordingly. To make sure fields are not displayed in read only mode, user type permissions can be removed to the user, such as See dates of birth and security numbers.
Fields
Properties and elements of a field included in a block does not display the same information in all languages
If a field is not configured in a language, then base language is displayed by default. Configure all fields in the required language.
Fields
LUDs do not appear in the Careers section
The option Require Description in WebTop and content languages must be activated in the LUDs.Configuration> [Recruiting] Administration>Selections>Large Selections
LUD, field
Candidate Search not working properly.
The indexation is used to flag candidate files in the database and make then searchable. If these flags are corrupted, search will not perform properly. Contact Taleo customer service.
Candidate search
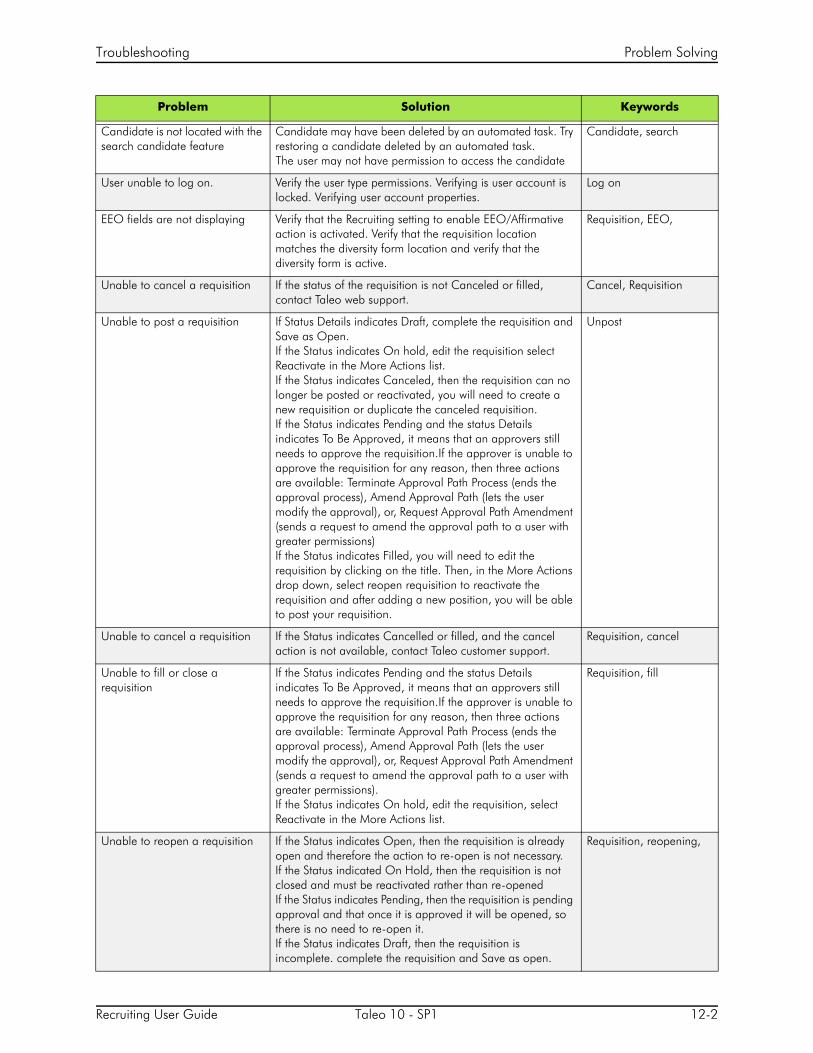
Recruiting User Guide Taleo 10 - SP1 12-2
Troubleshooting Problem Solving
Candidate is not located with the search candidate feature
Candidate may have been deleted by an automated task. Try restoring a candidate deleted by an automated task.The user may not have permission to access the candidate
Candidate, search
User unable to log on. Verify the user type permissions. Verifying is user account is locked. Verifying user account properties.
Log on
EEO fields are not displaying Verify that the Recruiting setting to enable EEO/Affirmative action is activated. Verify that the requisition location matches the diversity form location and verify that the diversity form is active.
Requisition, EEO,
Unable to cancel a requisition If the status of the requisition is not Canceled or filled, contact Taleo web support.
Cancel, Requisition
Unable to post a requisition If Status Details indicates Draft, complete the requisition and Save as Open.If the Status indicates On hold, edit the requisition select Reactivate in the More Actions list.If the Status indicates Canceled, then the requisition can no longer be posted or reactivated, you will need to create a new requisition or duplicate the canceled requisition.If the Status indicates Pending and the status Details indicates To Be Approved, it means that an approvers still needs to approve the requisition.If the approver is unable to approve the requisition for any reason, then three actions are available: Terminate Approval Path Process (ends the approval process), Amend Approval Path (lets the user modify the approval), or, Request Approval Path Amendment (sends a request to amend the approval path to a user with greater permissions)If the Status indicates Filled, you will need to edit the requisition by clicking on the title. Then, in the More Actions drop down, select reopen requisition to reactivate the requisition and after adding a new position, you will be able to post your requisition.
Unpost
Unable to cancel a requisition If the Status indicates Cancelled or filled, and the cancel action is not available, contact Taleo customer support.
Requisition, cancel
Unable to fill or close a requisition
If the Status indicates Pending and the status Details indicates To Be Approved, it means that an approvers still needs to approve the requisition.If the approver is unable to approve the requisition for any reason, then three actions are available: Terminate Approval Path Process (ends the approval process), Amend Approval Path (lets the user modify the approval), or, Request Approval Path Amendment (sends a request to amend the approval path to a user with greater permissions).If the Status indicates On hold, edit the requisition, select Reactivate in the More Actions list.
Requisition, fill
Unable to reopen a requisition If the Status indicates Open, then the requisition is already open and therefore the action to re-open is not necessary.If the Status indicated On Hold, then the requisition is not closed and must be reactivated rather than re-openedIf the Status indicates Pending, then the requisition is pending approval and that once it is approved it will be opened, so there is no need to re-open it.If the Status indicates Draft, then the requisition is incomplete. complete the requisition and Save as open.
Requisition, reopening,
Problem Solution Keywords

Recruiting User Guide Taleo 10 - SP1 12-3
Troubleshooting Problem Solving
Unable to post a requisition Requisition location must match the Location of the diversity form
Requisition, posting
Unable to create a candidate with the resume parsing option.
If the file used for resume parsing is a *.pdf , open the file and try highlighting text. If you cannot highlight text in the PDF, then the file includes an image of text and you will not be able to use the resume parsing feature.
Candidate, resume parsing.
Cancelled a requisition by mistake.
If you cancelled a requisition by accident or selected Request Approval instead of Save as Open, you will not see the requisition.If it was cancelled, you can select the Show Requisitions for All option. If you requested approval on it, you will need to wait until the approver(s) complete their action.
Cancel, requisition
Cannot find my requisitions Check the view in the left pane. Is the Show requisitions for field set to your requisitions? You may need to change it to All (depending on how you created the requisition
Requisition
Unable to edit fields in a requisition
Check if a selection is made for the settings Use this flow for requisition creation without posting” and “Use this flow for requisition creation with posting”.
Field, edit
Candidate is unable to log in Candidate file may be corrupted. Open the candidate file in Recruiting Center, and select Move from the More Actions menu. If the action is not performed try the send Correspondence action. If the send correspondence action works but not the Move action, then the candidate file is corrupted.
Log in
Candidate is not auto-progressing in the CSW
Candidate file may in use by another user.Make sure the steps in the CSW are properly ordered A candidate cannot progress from a status 4 to a status.
Auto progression
Candidate did not receive email notification
Check if the template used to send the notification is configured properly. email address, contents field etc.
Notification
When matching a candidate to a requisition, the automatic email is not sent.
If the template used to send the email includes a field to redirect the candidate to a career site, then the requisition must be posted.
Match
Problem Solution Keywords