Table of Contents - Volleyball Ireland
36
1
Transcript of Table of Contents - Volleyball Ireland

1

2
Table of Contents Introduction ............................................................................................................................... 3
Differences between Volleyball and Sitting Volleyball .............................................................. 4
Common Misconceptions about Sitting Volleyball ............................................................... 5
Court Set-Up .............................................................................................................................. 6
Sitting, Sliding and Moving ........................................................................................................ 8
Sitting, Sliding and Moving and Ball Control ........................................................................... 10
Beginner Games ...................................................................................................................... 13
The Forearm Pass/Dig ............................................................................................................. 15
The Volley ................................................................................................................................ 17
Serving ..................................................................................................................................... 19
The Hit/Spike ........................................................................................................................... 20
The Block ................................................................................................................................. 21
Jousting .................................................................................................................................... 22
Additional Drills Using Multiple Skills ...................................................................................... 23
Adapting Games ...................................................................................................................... 26
Running a Tournament/Blitz ................................................................................................... 28
Refereeing ............................................................................................................................... 31
Refereeing Hand signals ...................................................................................................... 32
Basic Score Sheet ................................................................................................................. 33
Blank Results Chart .............................................................................................................. 34

3
Introduction Sitting Volleyball is one of the most entertaining Paralympic sports and it is getting
increasing attention for being an exciting fast game, and for its potential to be a tool
for positive change. It is a fantastic sport that enables able bodied players and
disabled bodied players to play and compete together
• Invented in 1956 in the Netherlands
• International Federation World Para Volley (formerly known as: W.O.V.D.)
http://www.wovd.info/history.htm
• It is played in 60+ countries.
• First entered the Olympic games for Men in Arnhem,
the Netherlands and Women in Athens, Greece in 2004.
• 2016 Olympic Gold Medallists Females- United States
• 2016 Olympic Gold Medallists Males- Iran

4
Differences between Volleyball and Sitting Volleyball
The Game (Any differences are shown in red) Volleyball Sitting Volleyball
Court Size 18 m X 9 m 10 m X 6 m
Net Height Men 2.43m Women 2.24m Mixed 2.35m Men 1.15m Women 1.05m Mixed 1.10m
Players on Court
6 players (1 of which can be a libero player)
6 players (1 of which can be a libero player)
Players off Court
Up to 6 substituted on the team bench. Up to 6 substituted on the team bench.
Touching the Ball
Each team is allowed a maximum of 3 touches each. The block does not count as a touch and a player can only touch the ball twice consecutively when the first touch is a block.
Each team is allowed a maximum of 3 touches each. The block does not count as a touch and a player can only touch the ball twice consecutively when the first touch is a block.
Ball (Size and Weight)
Circumference 650-670mm/Weight 260g-280g
Circumference 650-670mm/Weight 260g-280g
Officials 1st Referee, 2nd Referee, 4 Line Judges and 2 Scorers
1st Referee, 2nd Referee, 4 Line Judges and 2 Scorers
Who Can Play?
Recreational Level: Anyone Club Level: Anyone International Level: Anyone
Recreational Level: Anyone Club Level: Anyone International Level: Those who meet the WOVD Disability Classification.

5
The Rules (Any differences are shown in red)
Volleyball Sitting Volleyball
To Win a Point
The team who is first to ground the ball on their opponent’s half of the court or who plays the ball in such a way that their opposition cannot legally return it, wins 1 point.
The team who is first to ground the ball on their opponent’s half of the court or who plays the ball in such a way that their opposition cannot legally return it, wins 1 point.
When to Rotate
The whole team rotates one position clockwise when they win a point that the opposition served.
The whole team rotates one position clockwise when they win a point that the opposition served.
The Court Lines
If the ball touches the court lines the ball is IN. If the ball touches the court lines the ball is IN.
The Net Players cannot touch the net. Players cannot touch the net.
The Players Body
Players can use any part of their boy to play the ball.
Players can use any part of their boy to play the ball.
Leaving the Floor
Players can jump freely to retrieve the ball One part of the players core (buttocks to shoulder) must be in contact with the ground when playing the ball.
The Service Is a one-handed shot played with both feet behind the back line of their half of the court.
Is a one-handed shot played with buttocks sat behind the back line of their half of the court.
Blocking the Service
Players are not permitted to block the service. Players are permitted to block the service.
Common Misconceptions about Sitting Volleyball
False True Sitting Volleyball is played in a wheelchair.
In fact, players sit directly on the floor and move or slide around using their limbs.
Sitting Volleyball is a sport only for “disabled” people.
In fact, only when competing internationally are players required to be classified as having a physical impairment.
People living with an arm impairment, even amputation, struggle to play Sitting Volleyball
In fact, lots of people with a wide range of different arm impairments play the sport across all levels.
Beginning players struggle with Sitting Volleyball. In fact, it is a sport which is easy for anyone to start and all can play at their own level.
Sitting Volleyball is slow as the Players are “disabled”.
In fact, as the net is lower, and the court is smaller the game is faster and more energetic than regular Volleyball.
Sitting Volleyball players just sit still on the floor and only play the ball when it comes to them
In fact, players, do not remain static and develop good movement skills to reach the ball.
All Players have the same physical impairments and limitations when playing sitting volleyball.
In fact, each player is unique both physically and emotionally, so coaches are required to fully understand their qualities to develop a successful team.

6
Court Set-Up When looking for a suitable space to play there are two particularly important points
to remember:
1. Sitting Volleyball is played on a smooth surface that is free from anything
sharp or anything that is likely to cause iritation to the skin. Players need to
be able to sit, slide, dive and fall around without
causing any issues to their bodies.
2. Make sure there are no breakable objects in the
nearby vicinity e.g. lights as the ball can go
anywhere.
• A Sitting Volleyball court is 10 m Long and 6 m wide in
total. The attack lines are 2 m away from the net and are indicated in the picture
by the red arrows.
• When marking out courts try to use lines which may
already be on the floor. Other options for court
markings are cones, tape, rope etc.
• The Net: You don’t always need an actual net. You can use rope, or ribbon or any
other suitable divider you can find. (Net heights: Men 1.15 m, Mixed 1.10 m
Women 1.05 m, Junior 1.00 m)
o Remember don’t have the net too low. A lower net makes it easier for
attackers to play fast hard balls over the net and make it very difficult for
defenders to keep the rally going. A higher net will encourage ball controle
and team work and provide better ralleys.
• The environment (court and net) should be suitable for the activities and the
participants. There are lots of miniature versions of the sport used to aid
development on the player pathway. These are just some of the options:

7
• The more space on the court, the shorter the rallies will be. So decide if you are
looking to teach either collaborative (ball control based play) or competitive
(winning focused) play?
• The ball: The ball used for Sitting Volleyball in is identical to that
used in Volleyball, the Mikasa MVA200.
• The full size and weight ball may move through the air too
quickly for beginners who may struggle to move to play it.
• Alter the ball in line with the level and ability of the group. Using
different ball options you can slow down and make the games
easier.
• Balloons, beach balls and soft touch balls can all be used when starting with
beginners. You can also allow the ball to bounce once when starting off. Then,
over time gradually progress towards the correct weight and size ball and rules.
• As players/groups develop, another option is to attempt some specific activity
with variations of a volleyball.
o A smaller ball helps to develop ball control
techniques
o A heavier ball helps to develop strength in the
wrists
o A bigger/lighter ball helps to develop movement
o A tiny ball helps to develop reactions

8
Sitting, Sliding and Moving
The most important element to most sports is movement. Sitting Volleyball is no
different, yet doing that movement is much harder. Players move using their arms
and legs, they can even lift their buttocks off the floor to move if one is on the floor
when they touch the ball. Players should have their hands on the floor when the ball
is on the other side of the net. You never know when it is going to come over!
Here are a couple of warm up games to get players used to sliding and moving on
the court before any skills have been introduced.
Sitting Tag
x x
x x x x
• One person is on. Players move around the floor while sliding on their buttocks, all the while trying to avoid becoming ‘IT’. Any number of players. All ages.
• Start with one person ‘IT’, and each player whom he/she touches becomes ‘IT’ as well, until everyone is caught.
• This game helps players get use to moving around on their bottoms. They can figure out what is the quickest way of moving around and what works best for them.
Follow the Leader
L
X X X X X X X
• Players (X) spread out on one side of the court facing “The Leader” (L).
• They must copy the leader’s movements. The leader moves left, right, forwards, backwards etc. at different speeds.
• The game gives players better understanding of their special awareness.

9
Clean Your Room
x x x x
x x x x
• Gather players into two even teams. The teams are on the opposite side of the court to each other. Each team is given 5 balls. Teams must aim to get all the balls from their side to the other side of the court.
• Time the game e.g. 2 mins. The team with the least amount of balls on their court after the time is up wins.
• This game will help players get used to moving around on the court and will be introduced to throwing, catching, and hitting a ball from a seated position.
Rotation Game
4 3 2
5 6 1
• This is a fun game that teaches the players about the positions on the court and the rotation rules and direction. (Players rotate in a clockwise direction when they win their serve back).
• Have two teams of 6 either side of the court set up in the six positions.
• Coach says GO and the two teams must rotate around all the positions.
• Whichever team makes it back to the start first is the winner.
The Harvest
• Have two teams set up, one either side of the net.
• Place different objects over both sides of the court e.g. balls, cones, beanbags (Anything that can be picked up easily)
• Make sure to place the same number of objects on each side.
• Place a hoola hoop (If you do not have one use something that will act as a basket) in the centre of either side of the courts.
• The coach blows the whistle/signals the start of the game. Each team begins moving around their side of the court on their bums collecting the different objects. They can only pick up one object at a time.
• Once collected they must place the object in the basket (hoola hoop)
• When all the items have been collected the team must all move back to their basket and shout their name.

10
Sitting, Sliding and Moving and Ball Control The following are some examples of drills that can be used when playing sitting
volleyball. When players first start playing the game, the two areas that need to be
addressed are the ability to move quickly and efficiently and then to be able to
quickly move their hands up tp play the ball. The below example drills drills work on
developing movement patterns and ball control before progressing to modified
game-play.
Ball Control Shuffle
X X X X Y Y Y Y
• This drill is a movement focused drill and is used to train the players to move and respond to playing the ball. The focus is on quick movement line to line and then training to get in position before lifting hands off the floor to play the ball.
• Get players into groups of four.
• Players line up in two lines facing each other about 2m apart (X and Y)
• The first player in line X tosses the ball to line Y. That player then slides/moves over to the Y line to join the back of it.
• This drill can be varied by using underarm and overhead tossing. They can also toss the ball laterally so their teammate must move side to side to catch the ball.
• Progressions: If the players know how to dig and volley the ball the same drill can be used with the skills.
• Coaching Tips: Encourage players to use the proper movement patterns when transitioning from line to line. They should also keep their hands on the ground for as long as possible to help them make final movement adjustments before playing the ball back.
Ball Handling Drills Here are a couple of simple drills that can be used to get players moving and used to the feel of the ball.
• Bounce ball on floor with two hands.
• Bounce ball with one hand, then the other.
• Bounce ball as above while looking at coach.
• Bounce ball as above with eyes closed.
• Bounce ball around body.
• Throw and catch the ball.
• Throw and catch as above while clapping in between.
• Throw and catch as above while turning in between.
• Now lessen the time which ball is held until the release is automatic.
• With partner – long throwing and catching.
• With partner – bounce ball of floor from overhead.
• In pairs, underarm throw with two hands. The throw must be high enough for the partner to catch the ball above their head.

11
W- Passing
Coach (C) is highlighted in red. The
black arrows indicate the way the
player moves, and the red arrows are
to represent the ball being passed
back to the coach.
P P C
• This drill is to train Players’ movement patterns in multiple directions and to play the ball after making those preparatory movements. The speed and angle of the ball can be varied to simulate game situations, but the emphasis needs to be on the Players controlling the height and speed of their contact.
• Players in groups of 3 of 4.
• Players starts on side-line and catches tossed ball and passes back to coach (C).
• Player then moves back to the second point, catches, and toss back to coach and then does the same for all five
• points of the W.
• Progressions: You can add in two balls at each point. After the player catches and passes back the 1st ball toss a second to them straight away. Once the player has caught and passed back the two balls, they move to the next target point. If players know the volley and the dig the same drill can be used with these skills.
• Coaching Tip: Be aware of the speed and height that the ball is being introduced at. In the game of sitting volleyball, the ball comes to Players at a low angle and very quickly.
Triangle Drill
B A
• This drill is to train Players’ movement patterns in multiple directions and to play the ball after making those preparatory movements. The speed and angle of the ball can be varied to simulate game situations, but the emphasis needs to be on the Players controlling the height and speed of their contact.
• Players work in pairs.
• Player A starts in the centre of the triangle. Player B tosses the ball to player A.
• Player A moves to one corner of the triangle around 1.5m away catches the ball and tosses it back to player B.
• Player A then returns to the centre, Player B tosses the ball again player A catches it and throws it back to B.
• Player A then moves to the other corner and repeats.
• Progressions: If the players know how to dig and volley the ball the same drill can be used with the skills.
• Coaching Tips: Encourage Players to use the proper movement patterns when transitioning from line to line. They should also keep their hands on the ground for as long as possible to help them make final movement adjustments before playing the ball back.

12
Partner Passing with Lateral Movement
A B
• This drill will work on lateral movement of the Players, which requires large involvement of the hands for movement.
• Players are in pairs (A and B).
• In pairs facing each other the players pass the ball continuously back and forth.
• When passing the ball, the players focus on putting it on one side or another of their partner.
• Progressions: Have partner play first ball to self and then hit down- ball to partner on each side.
• Coaching Tip: Players need to be able to move laterally with speed and efficiency and be able to play the ball high into the middle of the court
out of a defensive situation.
• Black arrows indicate the ball being passed back and forward between the partners. The red arrows indicate that the players must move laterally/side to side to catch the ball and pass it back.
Return to Sender
F
A B
• Players are in groups of 3. With one player assigned as the designated standing feeder who throws a ball to the group one at a time.
• Before playing the ball, each player should call ‘mine’ or their name, so everyone knows who is taking that ball and return it to the sender.
• Vary the feeds as you progress moving through the list below:
• Start with a catch just before it lands on their head (for volley) or lap (for dig)
• Feeding the ball 1m either side, left or right or long and short. Starting with alternating and then changing it random.
• Each time the players must return the ball high to the feeder.
• Once the players are calling mine each time and have mastered catching and returning the ball, they can then progress this game by using a volley or a dig to receive the ball and to return it to the sender.
Star Drill
V T
C
P
• This is a high movement drill designed to force the Players to efficiently move longer distances to play the ball.
• Players are in groups of 3 or 4.
• Player starts in the middle of the court and then moves to the side-line to catch the ball. The then pass the ball back to the target (T)
• After passing the ball back the player then goes deep to play the ball.
• Players move to all side-lines and corners to play the ball.
• Progressions: Have Players play two balls at each spot on the court. Or have players play the ball back using a dig or a volley.
• Coaching Tips: Simulate the speed of the ball when introducing to the Players Ensure that Players use both the legs and hands efficiency to propel themselves to each position and are stopped and balance when preparing to play the ball.
13
Beginner Games
There are a variety of ways the game can be adapted for starting of with beginners
or younger players. There are a couple of ideas listed below.
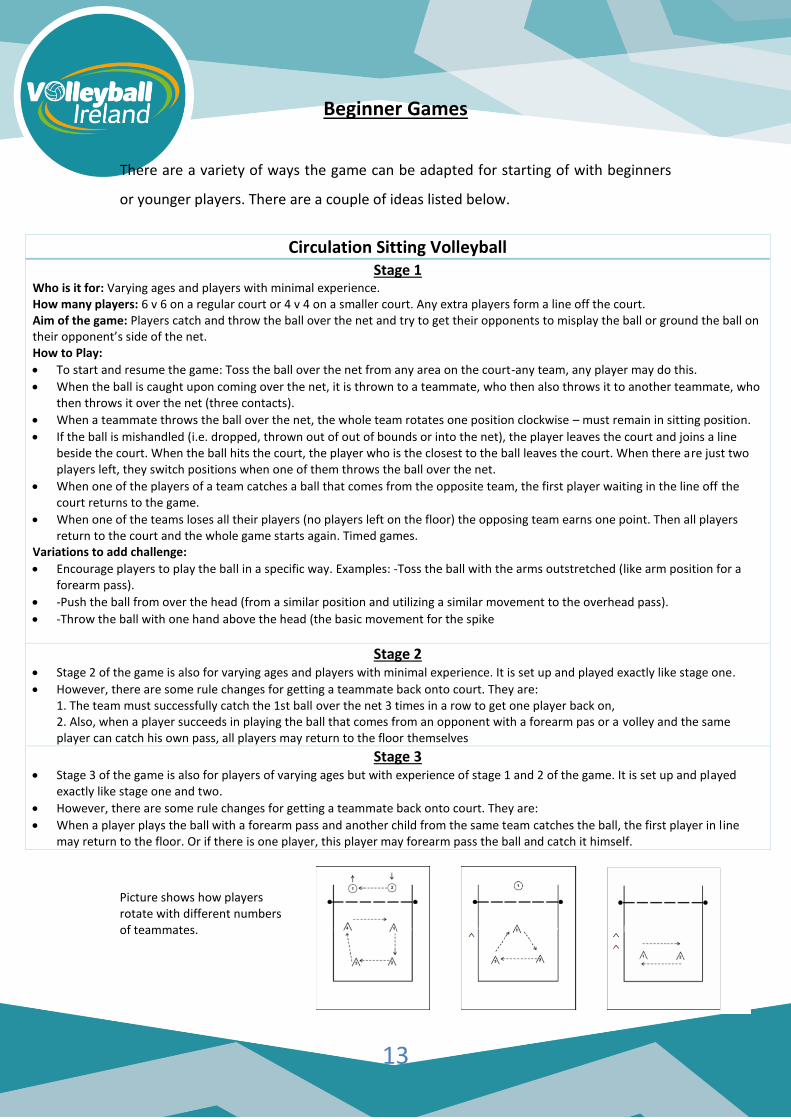
Circulation Sitting Volleyball Stage 1
Who is it for: Varying ages and players with minimal experience. How many players: 6 v 6 on a regular court or 4 v 4 on a smaller court. Any extra players form a line off the court. Aim of the game: Players catch and throw the ball over the net and try to get their opponents to misplay the ball or ground the ball on their opponent’s side of the net. How to Play:
• To start and resume the game: Toss the ball over the net from any area on the court-any team, any player may do this.
• When the ball is caught upon coming over the net, it is thrown to a teammate, who then also throws it to another teammate, who then throws it over the net (three contacts).
• When a teammate throws the ball over the net, the whole team rotates one position clockwise – must remain in sitting position.
• If the ball is mishandled (i.e. dropped, thrown out of out of bounds or into the net), the player leaves the court and joins a line beside the court. When the ball hits the court, the player who is the closest to the ball leaves the court. When there are just two players left, they switch positions when one of them throws the ball over the net.
• When one of the players of a team catches a ball that comes from the opposite team, the first player waiting in the line off the court returns to the game.
• When one of the teams loses all their players (no players left on the floor) the opposing team earns one point. Then all players return to the court and the whole game starts again. Timed games.
Variations to add challenge:
• Encourage players to play the ball in a specific way. Examples: -Toss the ball with the arms outstretched (like arm position for a forearm pass).
• -Push the ball from over the head (from a similar position and utilizing a similar movement to the overhead pass).
• -Throw the ball with one hand above the head (the basic movement for the spike
Stage 2 • Stage 2 of the game is also for varying ages and players with minimal experience. It is set up and played exactly like stage one.
• However, there are some rule changes for getting a teammate back onto court. They are: 1. The team must successfully catch the 1st ball over the net 3 times in a row to get one player back on, 2. Also, when a player succeeds in playing the ball that comes from an opponent with a forearm pas or a volley and the same player can catch his own pass, all players may return to the floor themselves
Stage 3 • Stage 3 of the game is also for players of varying ages but with experience of stage 1 and 2 of the game. It is set up and played
exactly like stage one and two.
• However, there are some rule changes for getting a teammate back onto court. They are:
• When a player plays the ball with a forearm pass and another child from the same team catches the ball, the first player in line may return to the floor. Or if there is one player, this player may forearm pass the ball and catch it himself.
Picture shows how players rotate with different numbers of teammates.
14
Atomic Sitting Volleyball Stage 1:
Who is it for: Beginners or younger players. How many players: 4v4 on a smaller court with the net height at 1m. How to Play:
• Underhand serve or toss from player in the right back position
• Three (3) compulsory passes before directing the ball over the net. The second contact must be a smooth catch-throw movement. This movement can be done in three (3) ways.
o With extended arms tossing in a forward direction o With extended arms tossing in a backward direction o Catch the ball with extended arms above the head (setting position) and pushing upwards.
• Encourage players to play the second ball parallel to the net (along the net). Second contact may NOT be thrown over the net. All other contacts are sitting volleyball skills.
• No rotating after the ball is thrown over the net. Normal sitting volleyball rotation procedure.
• Team winning the rally earns one point and initiates the next play by underhand serving from the right back position.
• Maximum of three (3) serves before rotating to the next server.
• Rally point scoring: every mistake is a point to the opponent. Timed games of ten (10) minutes.
Stage 2: Who is it for: Beginners or younger players. How many players: 4v4 on a smaller court with the net height at 1m. How to Play:
• Underhand serve or toss from player in the right back position (position 1).
• No number of compulsory passes before directing the ball over the net required, but three (3) passes are encouraged.
• No rotating after the ball is thrown over the net. Normal sitting volleyball rotation procedure.
• Rally point scoring: team winning the rally earns one point and initiates the next play by underhand serving from the right back position. Maximum of three (3) serves before rotating to the next server.
• Timed games (10-15 minutes)

15
Hand Position 2 Hand Position 1
The Forearm Pass/Dig The ‘Forearm Pass’ is also called the ‘Dig’ and is used mainly to play the 1st touch
when the ball comes low over the net from a service or attack. The aim of this skill is
to control the ball on the 1st touch and direct it towards the front of the court to
enable another player to set up the attack. This skill can also be used to play the ball
over the net on the 2nd or 3rd touch.
The key teaching points for the forearm pass/dig are:
• Ensure both thumbs are level.
• Two options for hand positions
• 1. Make a fist with writing hand and wrap the other
hand around.
• 2. One hand on top of the other and cross fingers
diagonally.
• Ball rebounds on lower arms not hands or wrists.
• Use minimal shoulder and elbow movement to guide the ball to the target.
• The higher you pass the ball the better as it gives your teammates time to get
to it.
Here are a few forearm pass/dig drills. Note: Some of the previous movement and
ball control drills can also be used incorporating the forearm pass/ dig.

16
Forearm Pass/Dig Drills
A A A A A A
B B B B B B
Passing in Pairs
• In pairs (A & B) A is standing and B is sitting.
• A throws ball (underarm throw) to B.
• B Forearm Pass’s the ball to A.
• A catch the ball.
• Repeat 5 times and then B stands up throws the Ball to A who is now sitting down.
• A & B now both sit down and try to complete as many consecutive touches as they can, using only the forearm pass.
• They must aim to get 10 in a row, when they do, they lie down.
• First pair to lie down wins.
• If 10 are too easy encourage the pairs to try 15 and then 20.
• A & B pass to themselves and then pass to their partner:
• A throw’s the ball to B, B forearm passes to themselves then passes the ball back to A.
• A then forearm passes to themselves and then passes the ball back to B.
• Repeat for x no. of times
A A A A A A
B B B B B B
Rocking and Rolling
• Sitting Volleyball is an extremely fast game sometimes players must stretch out and play the ball with one arm.
• Players must often rock to their right or left side to play the ball.
• In Pairs A stands up and throws the ball to B’s right side. B must play the ball back using only their right forearm.
• A throw’s the ball to B’s right 5 times, then left 5 times.
• A and B then switch places with B standing and A sitting
• Challenge: This time the partner who is sitting down turns around so that their back is to their partner. The partner who is standing up must call their partners name and then throw them the ball they must decide to throw it left, right, centre, high or low. The partner who turns around must play the ball back as fast as possible and then turn back around to start again. After 10 shots partners switch positions.

17
The Volley
The ‘Volley’ is a skill that can be used to play the ball when the ball is high. The skill
can be used for the 1st touch to control the ball and direct it towards the front of the
court to enable another player to set up the attack. The skill can also be used as the
2nd and 3rd touch to play the ball into space on opponents’ court. The volley is
dominant shot in Sitting Volleyball.
The key teaching points for the volley are:
• Two handed simultaneous finger contact
• Rebounds off the fingertips and thumbs
• Create a window (triangle) above the forehead
• Bring the ball in using predominantly the thumb, index and middle fingers
and release quickly to a peak
• Key to getting this right is being in the right position. (if you remove your
hands it should hit your forehead)
• The higher you pass the ball the better as it gives your teammates time to get
to it.
Here are a few volley drills. Note: Some of the previous movement and ball control
drills can also be used incorporating the volley.
18
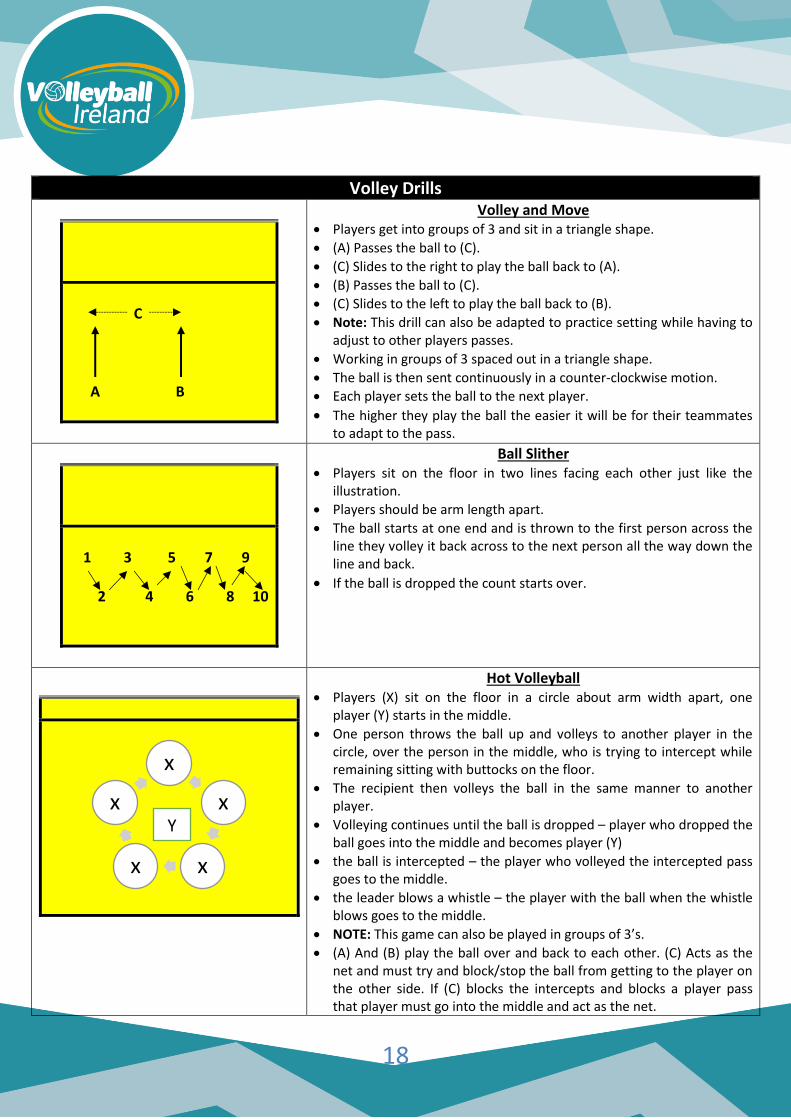
Volley Drills
C A B
Volley and Move • Players get into groups of 3 and sit in a triangle shape.
• (A) Passes the ball to (C).
• (C) Slides to the right to play the ball back to (A).
• (B) Passes the ball to (C).
• (C) Slides to the left to play the ball back to (B).
• Note: This drill can also be adapted to practice setting while having to adjust to other players passes.
• Working in groups of 3 spaced out in a triangle shape.
• The ball is then sent continuously in a counter-clockwise motion.
• Each player sets the ball to the next player.
• The higher they play the ball the easier it will be for their teammates to adapt to the pass.
1 3 5 7 9 2 4 6 8 10
Ball Slither • Players sit on the floor in two lines facing each other just like the
illustration.
• Players should be arm length apart.
• The ball starts at one end and is thrown to the first person across the line they volley it back across to the next person all the way down the line and back.
• If the ball is dropped the count starts over.
Hot Volleyball • Players (X) sit on the floor in a circle about arm width apart, one
player (Y) starts in the middle.
• One person throws the ball up and volleys to another player in the circle, over the person in the middle, who is trying to intercept while remaining sitting with buttocks on the floor.
• The recipient then volleys the ball in the same manner to another player.
• Volleying continues until the ball is dropped – player who dropped the ball goes into the middle and becomes player (Y)
• the ball is intercepted – the player who volleyed the intercepted pass goes to the middle.
• the leader blows a whistle – the player with the ball when the whistle blows goes to the middle.
• NOTE: This game can also be played in groups of 3’s.
• (A) And (B) play the ball over and back to each other. (C) Acts as the net and must try and block/stop the ball from getting to the player on the other side. If (C) blocks the intercepts and blocks a player pass that player must go into the middle and act as the net.
x
x
xx
xY
19
Serving
The serve is used to start the game. In sitting volleyball, the serve CAN be blocked.
The key teaching points for the serve are:
• Strike the ball with one open hand
• Use a high fast arm.
• Every part of the player’s buttocks must be behind the baseline.
• Release the ball before striking it (it must be tossed)
• Every serve count, there are no second serves
Serving Drill
B
B B
B B B
A
Gone Fishing
• Two teams Team A and Team B.
• The server for each team must sit behind the baseline on the opposite side of the court.
• They must serve the ball over to their teammates and their teammates must catch the ball.
• Round 1: Players are allowed move to catch the ball.
• Round 2: Players are NOT allowed move to catch the ball.
• Round 3: Players are NOT allowed move to catch the ball and can only catch
A A
A A A

20
The Hit/Spike
The ‘Hit’ is also called the ‘Spike’ and is used as an attacking shot to play the ball
over the net. The aim of the ‘Hit’ is to win the rally by playing the ball with power
into space on opponents’ court.
The key teaching points for the hit/spike are:
• Make sure you move off the net to make space in front of you.
• Hit the ball as high as possible without lifting.
• Use an open hand.
• Try directing the ball into space.
• Fast arm with full extension.
Hitting Drill
F F X Y X Y
X Y X Y X Y
o There are two feeders at the net (F).
o Players make two lines (X) and (Y)
o Each player has a ball. Players pass their ball to the
feeder who underarm throws the ball up for the
player to attack it over the net.
o Players then move to the back of their line.
o Have half the players on the far side of the court
collecting the balls and giving them to the players
in the lines.
o Everyone should have minimum 3 attempts at
attacking the ball.
o Then swap out the players, feeders and collectors
so that they all have a go at attacking.
21
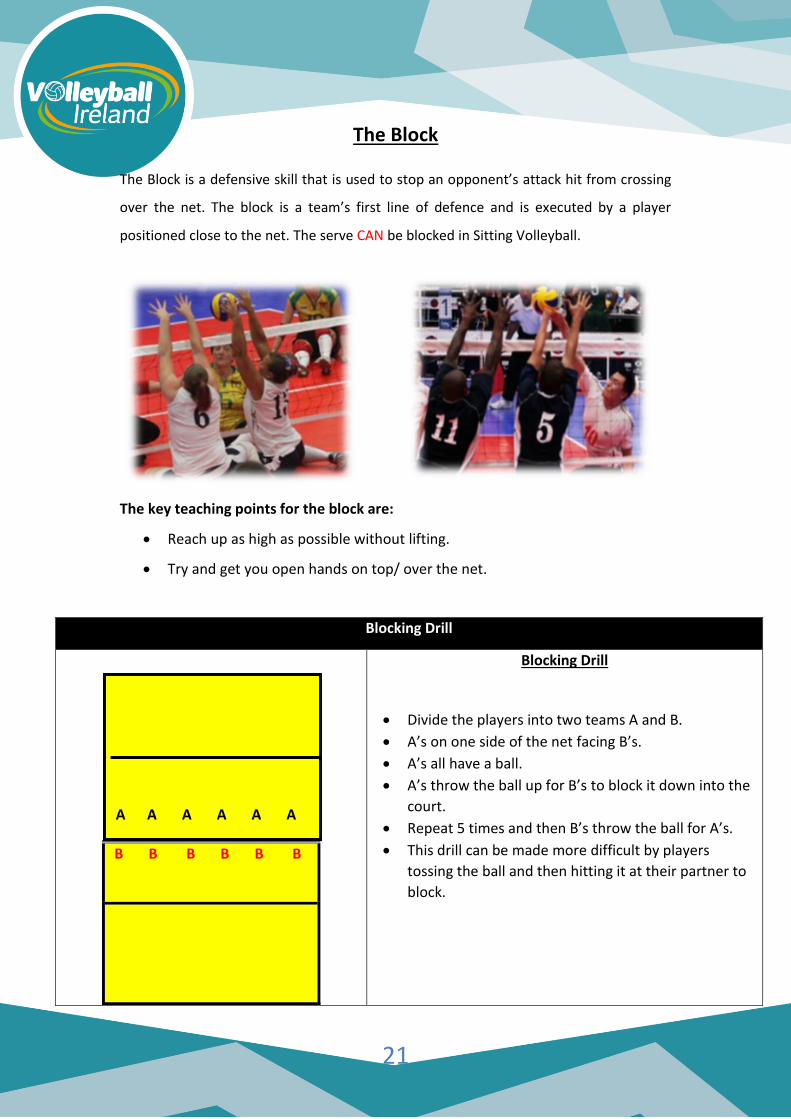
The Block
The Block is a defensive skill that is used to stop an opponent’s attack hit from crossing
over the net. The block is a team’s first line of defence and is executed by a player
positioned close to the net. The serve CAN be blocked in Sitting Volleyball.
The key teaching points for the block are:
• Reach up as high as possible without lifting.
• Try and get you open hands on top/ over the net.
Blocking Drill
B B B B B B
Blocking Drill
• Divide the players into two teams A and B.
• A’s on one side of the net facing B’s.
• A’s all have a ball.
• A’s throw the ball up for B’s to block it down into the
court.
• Repeat 5 times and then B’s throw the ball for A’s.
• This drill can be made more difficult by players
tossing the ball and then hitting it at their partner to
block.
A A A A A A
22
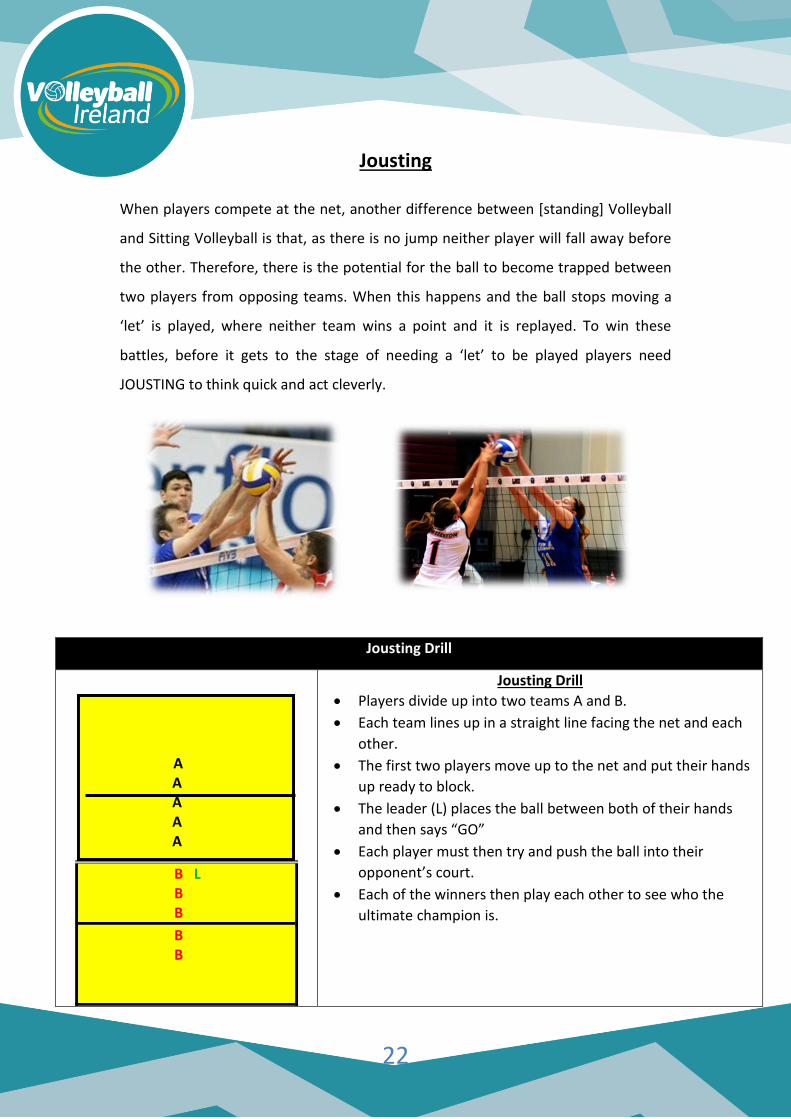
Jousting When players compete at the net, another difference between [standing] Volleyball
and Sitting Volleyball is that, as there is no jump neither player will fall away before
the other. Therefore, there is the potential for the ball to become trapped between
two players from opposing teams. When this happens and the ball stops moving a
‘let’ is played, where neither team wins a point and it is replayed. To win these
battles, before it gets to the stage of needing a ‘let’ to be played players need
JOUSTING to think quick and act cleverly.
Jousting Drill
B L B B
B B
Jousting Drill
• Players divide up into two teams A and B.
• Each team lines up in a straight line facing the net and each
other.
• The first two players move up to the net and put their hands
up ready to block.
• The leader (L) places the ball between both of their hands
and then says “GO”
• Each player must then try and push the ball into their
opponent’s court.
• Each of the winners then play each other to see who the
ultimate champion is.
A A A A A

23
Additional Drills Using Multiple Skills
Dig and Volley Feeder and Target Drill
F&T F T F T F T
P P P P T P F
1 2 3 4 5
• Players working in groups of 3. There is one Feeder (F) and one Target (T).
• The above diagram shows the same drill except it starts quite easy at stage 1 and progresses to a more
complicated stage (Stage 5)
• Sitting down in groups of 3 players set themselves up and try each of the stages.
• The feeder can choose to send a high or low ball encouraging the player to decide to either play a dig or volley.
• After they have tried each of the stages, players rotate positions and repeat the drill.
Pepper Option 1
A A A B B B
Option 2
B
A C
Option 1: Dig it to yourself pepper.
• Working in pairs (A and B)
• (A) tosses the ball to (B).
• (B) passes to self (self-sets) and then hits the ball at (A).
• (A) digs to self and then hits the ball back to (B).
• Tip To make the drill slightly easier do not have the players
hitting the ball too hard at each other.
Option 2: Triple Pepper
• This is a warmup drill that replicates actual game shots.
• Working in groups of 3 (A, B and C) spread out in a triangle
shape.
• (A) passes the ball to (B)
• (B) sets the ball back to (A)
• (A) attacks the ball at (C)
• (C) defends the ball and passes it back to (B)
• (B) sets (C)
• (C) attacks the ball at (A)
• Continue for several passes and then swap positions.
• Blue arrows represent a pass, Green arrows represent a
set, Red arrows represent an attack.
Four Corner Defence

24
Four Corner Defense
• Player in the middle sets to the player in
the bottom right corner (green arrow).
Player attacks the ball directly cross court
at the player in the top left corner (Red
Arrow). The two players in the other
corners move in to help defend the
attack (Blue Arrows)
• This is a high movement, high paced drill, which overemphasizes
the speed that the transition from offense to defence needs to
happen, and reiterates the importance of the high first contact
• You will need 5 players.
• One player in each of the four corners and another player in the
centre of the court.
• Player in the middle sets athlete on one corner who will attack
directly cross court
• All players attacking converge cross court and prepare to defend
attack
• After digging attacked ball to player in the middle, corner players
must reset to respective corner and
• Player in the middle sets another corner
• Player in the middle (setter) can set to themselves before setting
corner to slow the drill down in the beginning
SOLO
D D D
B B B
A S A
C
• Set up the court like the diagram to the left. One Coach (C), one
Setter (S) two Attackers (A), 3 Blockers (B) and three Defenders
(D).
• The coach feeds the ball into the setter. The setter then sets up
one of the attackers. They alternate it throughout the drill.
• If the attacker has a successful attack and wins the point they
continue hitting. If the attacker gets blocked the attacker and
blocker switch positions.
• If a Defender plays the ball up (using a volleyball
shot) to a target [whatever you define as the target] they replace
the Attacker who attacked.
• If the Attacker makes 2 consecutive errors, then they are
replaced by the next spare person.
• Ways to progress this are: Instead of throwing the ball straight
to the Setter you can throw it to a nominated Passer who sends
the ball to the Setter. Have a Server send the ball to a Passer (or
number of Passers), who then send the ball to the Setter.

25
Wozzaball
• Wozzaball’ is a game that is set up in an identical way to a traditional game. However, the
service is removed, and it is initiated by a randomly introduced ball.
• This is best done at pace, challenging the players to think quickly, as well as reset and prepare so
that they are always ready, whatever happens.
• A ball gets thrown into the team who won the previous point, making it as difficult or as easy as
possible for the Passers/Defenders.
• Look to involve a scoring system where a team must achieve something before, they rotate or
switch positions. This can be as simple or as complicated as you wish, however make sure the
players are aware how it works if you want to create a competitive environment. You can
nominate Setters, systems and tactics yourself or
allow the teams to problem solve themselves.
• You can simulate structured play by feeding balls that are commonly received in a match, or just
throw the
ball in randomly with different types of spin, speed and trajectory to encourage the teams to
work to
create stability from random situations. No two Sitting Volleyball rallies are the same.
• Some ways to progress this are:
o Remove the players at position 3 to allow more space at the net if you want to focus
on defending.
o Only allow teams 2 touches on the first attack, to simulate a bad first contact and the
need to create stability.
o Have ‘punishment’ should a ball fall to the floor without any effort being made by any
member of the team. The mentality needs to be to go for it… even if only 1 in 10 comes
up!

26
Adapting Games
Here are some scenarios where you may have to adapt your sessions and some ideas
to help.
1. Number of People
a. Large Group:
• Half the courts make two sitting volleyball courts out of one.
• Timed games to ensure everyone gets equal play time.
• Have a rotation system e.g. everyone moves one place to the right.
• Have a fun drill for the teams that are off court e.g. A game of keepy uppies in a
circle.
• Identify potential junior coaches to assist with the running of the session.
b. Small Group:
• Reduce the size of the court.
• Games can be adapted to 3v3 or 2v2.
• Focus on improving individual skills.
2. Different Levels of Ability
If there is mixed ability, ensure there are conditions set for stronger players so
everyone is still challenged. Examples in game situation:
• Stronger player is not allowed hit.
• Stronger team compulsory 3 touches.
• Serves can be modified for weaker players receiving the ball e.g. an underarm
throw.
• Beginners who score a point is worth two.
• Include conditions in drills to challenge or make it easier. E.g. in a passing drill
the person acting as a target if they are a beginner, they just catch the ball
whereas the stronger player must set it.
27
3. Extremely nervous players who are afraid of the ball
• Work with the players on individual ball skills getting them used to the feel and
the weight of the ball.
• Then work in pairs on the ball drills.
• Starting off in games the serve must be an underarm throw. This gives nervous
players time to get to the ball and it is less intimidating. As they become more
confident the serve can progress to underarm and finally overarm.
• Equipment can also be adapted e.g. use a softer ball.
4. Men/Women dominating the game
• If the men on the team are dominating the game leaving minimal touches of
the ball for the women change the rules so that the team can only score a point
when a woman hits the last shot.
• This situation can be switched around if the women are dominating the game.
• Power Plays: Girl Power and Guy Power teams can use power play cards. When
a power play is called if that specific gender scores the next point it is worth 2
points.
5. Players not communicating or calling for the ball:
• Each player must call for the ball in a game. If team scores a point and one
player has not called for the ball the point is not awarded.
6. Scoring Options
• Teams must win a certain number of points in a row
• Teams win a double point in achieving a certain type of point (e.g. block)
• Teams must win a rally then win an additional ‘free’ ball point – where another
ball is thrown to the winning team
• One player needs to do a certain action for the team to rotate.

28
Running a Tournament/Blitz
There are a few ways to run a Tournament or Blitz Competition which include:
1. Round Robin: Each team plays each other once. This can determine final
placings or teams can then be seeded for a knockout round.
2. Pools: Teams are divided into pools (the number of pools will depend on the
number of teams). After the 1st round pool matches teams are seeded in
their pool, and pools are crossed in a knockout round.
Recommendations
• Timed sets are recommended to ensure all matches are played within the
allocated tournament time.
• All schedules, score sheets and results charts should be prepared in advance of
the competition days.
Tournament/Blitz Examples
Using a round robin format with 6 teams entered Tournament/Blitz
• All teams play each other once, total of 15 matches.
• Teams are placed 1 to 6 based on the results of these matches.
• Teams can play an additional knockout round to lead to a final.
Knockout Round Examples Round Robin Format
Example 1 Example 2
M1 1st v 6th Winner to Final
M2 2nd v 5th Winner to SF1
M3 3rd v 4th Winner to SF1
M4 SF1 Winner M2 v Winner M3
M5 Final Winner M1 v Winner M4
M1 3rd v 6th Winner to SF2
M2 4th v 5th Winner to SF1
M3 SF1 1st v Winner M2
M4 SF 2nd v Winner M1
M5 Final Winner M3 v Winner M4

29
Using a pool format:
• Teams are divided into two pools of 3 teams. Pools can be seeded if using a
club format and club can enter an ‘A’ and ‘B’ team. Teams in each pool play
each other once, total of 3 matches per pool.
• Teams are placed 1st to 3rd in their pools based on pool match results.
• Pools are crossed for knockout round, (in examples below Pool A and Pool B
are crossed).
Knockout Round Examples Pools Format
Example 1 Example 2
M1 2nd A v 3rd B Winner to SF2
M2 2nd B v 3rd A Winner to SF1
M3 SF1 1st A v Winner M2
M4 SF2 1st B v Winner M1
M5 Final Winner M3 v Winner
M1 1st A v 3rd B Winner to Pl X Loser to Pl Y
M2 1st B v 3rd A Winner to Pl X Loser to Pl Y
M3 2nd A v 2nd B Winner to Pl X Loser to Pl Y
Pool X 3 matches for 1st – 3rd place
Pool Y 3 matches for 4th – 6th place
Sample Competition Schedule
Round Robin Tournament with 6 teams
Time
Court 1
Referee
Court 2
Referee
10.00
Team A
v
Team B
Team E
Team C
v
Team D
Team F
10.10
Team E
v
Team F
Team A
Team B
v
Team C
Team D
10.20
Team A
v
Team E
Team C
Team D
v
Team F
Team B
10.30
Team A
v
Team C
Team E
Team B
v
Team F
Team D
10.40
Team D
v
Team E
Team A
Team C
v
Team F
Team B
10.50
Team A
v
Team D
Team F
Team B
v
Team E
Team C
11.00
Team A
v
Team F
Team D
Team C
v
Team E
Team B
11.10
Team B
v
Team D
Team E

30
• Matches can consist of 1 set, 2 sets or 3 sets, depending on time available.
• Recommended minimum match time of 1 x 8-minute set.
• Time required to play off the above example with 6 teams using 2 courts, each
match consisting of 1 x 8 min set, allowing 2 minutes changeover time to the next
match, is 1 hour 20 minutes.
• Referees and score keepers are assigned in advance. Teams when not scheduled
to play are scheduled to officiate.
Sample Results Chart
• 2 points awarded for a match win, 1 point for a match draw, 0 for a match loss.
• + or – figure written in brackets is the points difference in that match.
• In the case of a tie-on match points, the points difference amount will decide
position.
Resources needed for each court for Competitions
• 1 x Volleyball
• 1 x Whistle
• Court Schedule of matches
• Score sheet for each match
• 1 referee and 1 scorekeeper
Team A
Team B
Team C
Team D
Team E
Team F
Total
Place
Team A
2 (+4)
0 (-2)
2 (+7)
1 (-)
2 (+5)
7 (+14)
2nd
Team B
0 (-4)
0 (-8)
1 (-)
0 (-3)
2 (+2)
3 (-13)
5th
Team C
2 (+2)
2 (+8)
2 (+6)
2 (+3)
0 (-1)
9 (+18)
1st
Team D
0 (-7)
1(-)
0 (-6)
0 (- 5)
1 (-)
2 (-18)
6th
Team E
1 (-)
2 (+3)
0 (-3)
2 (+5)
2 (+4)
7 (+9)
3rd
Team F
0 (-5)
0 (-2)
2 (+1)
1 (-)
0 (-4)
3 (-10)
4th

31
Match Protocol
• Team captains meet referee before start of match for coin toss to determine
which side will serve first.
• Teams line up on court in starting positions before the start of the match.
• At the end of the match teams line up along the net on their own side and shake
hands with opponents and referees.
• Referee and Team Captains sign the score sheet.
Refereeing • The role of the referee is to ensure the matches are played in a fair manner and
apply the rules of the game.
• When a rule is broken the referee must:
o Blow the whistle to stop play.
o Indicate which side has next serve.
o Use correct hand signals to show what the fault was. (Diagrams
illustrating hand signals available on next page)
• The score keeper records on a score sheet the score during the match. Rally
scoring is used in Volleyball, so regardless of which team served to start the rally
the team that wins the rally is awarded one point.
Officiating team responsibilities during competition days
During a competition, when a team is scheduled to be the officiating team, they
must provide 1 Referee and 1 Scorekeeper for that match. In addition to refereeing
the match the referee is responsible for:
• Conducting the coin toss before the start of the match to determine which team
will serve first.
• Ensuring teams line up along the net and shake hands at the end of the match.
• Signing the score sheet, along with the team captains, at the end of the match.

32
Refereeing Hand signals
All the referee signals that are used in Sitting Volleyball are the same as the
ones used in regular volleyball except for one. The picture on the right
illustrates the signal that is used when a player lifts their bottom off the
court. This is not allowed. One part of the players core (buttocks to shoulder)
must be in contact with the ground when playing the ball.
1. Authorisation to
serve
2. Team to serve
3. Time - out 4. Change of courts
5. Substitutions &
indication of illegal substitutions
6. End of match or set
7. Ball in 8. Ball out
9. Lift 10. Four touches –
show 4 fingers
11. Net touched by
a player or a service
going into the net
12. Penetration into
the opponents court or ball crossing over the lower space
13. Double fault or
replay
14. Ball touched
33
Basic Score Sheet
Court:
Time:
Date:
Referee:
Scorekeeper:
Team ____________________ V Team _____________________
1 1 2 2 3 3 4 4 5 5 6 6 7 7 8 8 9 9 10 10 11 11 12 12 13 13 14 14 15 15 16 16 17 17 18 18 19 19 20 20 21 21 22 22 23 23 24 24 25 25 26 26 27 27 28 28 29 29 30 30
Winner __________________ Score ____________
Referee Signature:
Team Captain Signature:
Team Captain Signature:
34
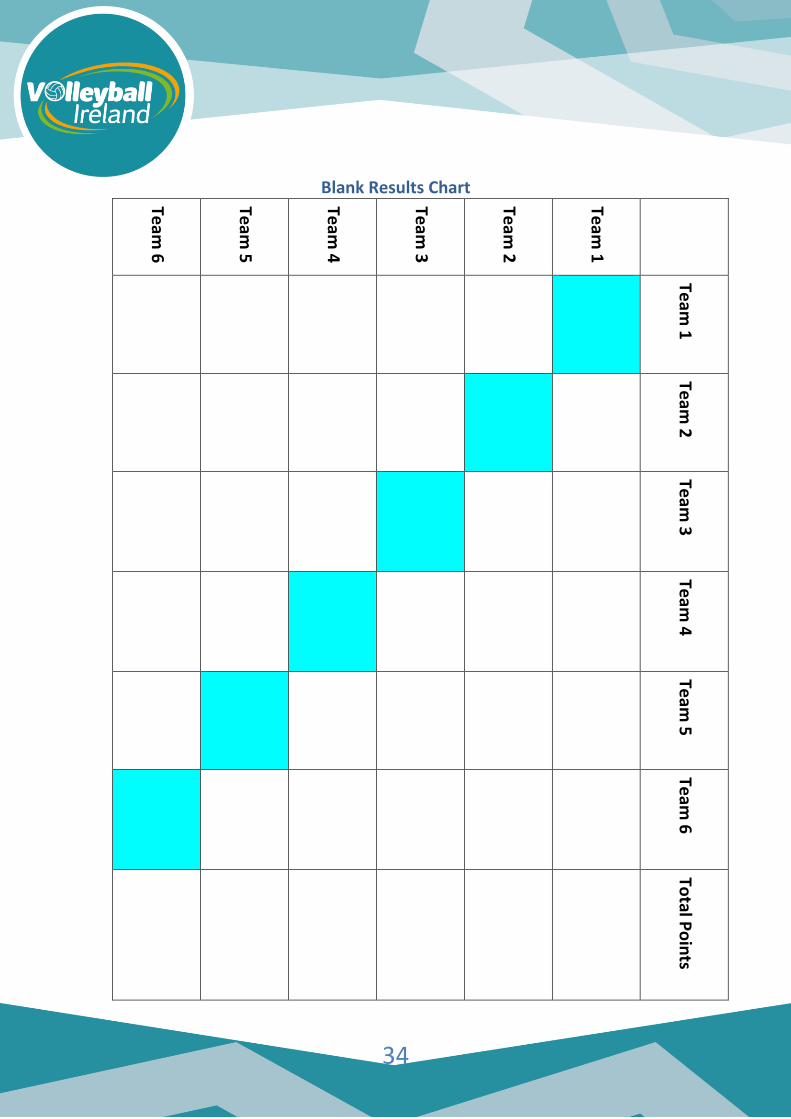
Blank Results Chart
Team
6
Team
5
Team
4
Team
3
Team
2
Team
1
Team
1
Team
2
Team
3
Team
4
Team
5
Team
6
Total P
oin
ts

35
Do not forget to add festivity to competitions
• Teams can select an anthem/song that is played before the start of the
competition.
• Invite spectators to the end of tournament/blitz.
• Use a PA system and appoint a team announcer that presents the team players
before the start of a match.
• Include Fun awards that can be presented at the end of the day’s competition e.g.
longest rally, most impressive play or defence etc.
• Video the matches to be available for the players to watch later.
• Include a fun competition if possible, e.g. players v coaches/parents.

36