ML-Resume-September · Title: ML-Resume-September Created Date: 9/6/2017 8:54:52 PM
Upload
truongtuongCategory
view
219download
0
1
TABLE OF CONTENTS
Introduction 2 Records 2-6 Handling 6 Feet 6 Dental Basics 7-15
Chewing Cycle 7
Anatomy and Confirmation 7-8
Triadan Classification 9
Aging Basics 9-10
Common Malocclusions 10-11 Equipment 12 Performing Dental Work 11-15 Oral (and Peri-Oral) Exam 11-13 Power Float 14-15 Physical Exam/ Body Condition Scoring 15-16 Vaccines, Anthelmintics… 16 Administration of Drugs 17-22 IV Injection 17-20 IM injection 20-22 Injectable anesthesia 22-25 The Process 22 When to Give More, reading anesthetic depth 22-23 Dosing Chart, Needle and Syringe Size chart 24 Variations in Ax Protocols 25 Surgical Field Work-Preparations 26 Castration, the Process 27-30 Splitting the Cord, Removing the Median Raphe Recovery 31 Review Of Important Surgical Points 32 Equine Surgical Equipment 33-34
Processing the Emasculators 33 Equine Packs & Cold Sterile Instruments 34

2
EQUINE INFORMATION/PROTOCOLS
Each animal we treat deserves our patience and respect. We must refrain from using derogatory terms to refer to our patients. They are not crazy, or nuts, they only act like horses.
Keep in mind that horses are by nature, flight animals. Many of the animals we work with have very limited experience with humans. Others have only been manhandled and labeled “broncs.” Time spent finessing a patient rather than bullying it is an investment. Everywhere we work people are watching. Teach by example. When we demonstrate how easily a vaccine or wormer can be administered to a “bronc” when it is done quietly, we can affect the animal handling skills of a community. Each time you approach a patient this way, you make your next interaction with that patient easier.
Pay attention. A lot of what there is to be learned on an equine trip comes from watching others work with horses. Don’t miss out on these opportunities to learn from those around you.
Ask questions. As with any part of the RAVS clinic, we are here to teach. If we cannot answer you immediately, remind us later when there is less going on.
RECORDS
Records are very important and are reviewed by a staff member at the end of the season. They must be clear and complete. Be specific. If no history is available, write “no history available.” If we are unable to perform a PE, write “unable to perform due to patient temperament.”
The records are divided into sections by color coding. They contain color coded sections for; Yellow--Patient description—patient number, weight, age, markings, name, BCS White—presented for, treatment notes, recommendations to owners, also used for overflow information
that does not fit into color coded sections.
Grey—medications provided, vaccine, wormer, Banamine, PPG, prescriptions Blue—treatment provided, all treatments are rated as a I, II, or III
o I = A procedure that would take a skilled veterinarian 0-15 minutes o II = A procedure that would take a skilled veterinarian 15-30 minutes o III = A procedure that would take a skilled veterinarian longer than 30 minutes
Grey/Green—operator information—surgeon/care provider, anesthetist, scribe
Green--Surgical information—
o castration, hernia, wound, (any other surgery should be described in the section provided) o castration-open, closed, cord split, routine, standing, cryptorchid, o blocked-carbocaine, spermatic cord, intratesticular, skin o ligated(with________), no ligature,
Patient#
Name BCS Age Male Female Gelding weight _________ Color/Markings Tally
# Tallied
Presented for TPR/PE findings
Treatment notes/recommendations to client
Surgeon/Care provider
Anesthetist Scribe IvermectIn Tetanus
Anti Toxin
Tetanus Toxoid
Rabies Flunixin P P G
Rx Castrate Other I,II,III
Hoof I,II,III
Dental 0, I,II,II
Lame I,II,III
Surgery I,II,III
SURGERY PERFORMED:
Hernia repair ___cm Wound Castration Routine Cord Split Closed Open Standing Abdominal Crypt
Carbocaine 1% 2% Lidocaine No block Testi Cord _________ ml each, Skin ________ml No Ligature Ligated with

3
Purple—Dental: The dental record is split into two sections, a dental chart and a check the box/fill in the blank section. o An “X” over a tooth on the chart
represents a missing tooth. o A “D” on the chart represents a
diastema ( a space between teeth). o An “E” over a tooth would represent an extraction o The mark out of the upper incisors represent that they have been worn to the gum line, and all that
remains is even with or below the gums
Pink & White—Anesthesia
Do not leave spaces blank. If a box on the form does not apply to the patient, when the procedure is complete, write a line or a dash through it so that someone looking at the form at a later date does not wonder if you forgot to write in that space.
Specifics of the procedure performed must be written in the notes section of the form. The initial note will reflect what the patient presented for. There must be subsequent notes reflecting what, if anything, we did or did not do for the patient, what recommendations were made to the client, etc...
For castrations it must me be noted if the cord, testes, or skin were blocked, if the cord was split, if ligatures were applied, as well as if any bleeding or other complications occurred.
Any patient listed as a cryptorchid or suspected cryptorchid must have clarification on the record as to what was found after the patient was anesthetized. Were both testes descended? Was this an high flanker, or was this a true abdominal cryptorchid? Was the castration completed or aborted? Any cryptorchid previously hemi-castrated by another party must be listed as such. It should be noted if a scar was located
The size of all hernias must be noted on the record.
If a patient undergoes farrier work under anesthesia, there must be notes identifying the work performed. Was trimming the feet under anesthesia simply a matter of convenience for the owner? Was anesthesia required due to a behavioral issue, or did the condition of the feet (severely overgrown) require that the patient be anesthetized in order to address the condition. Was the work performed by us or by the owner? Were the feet simply chipped, was work done on all four feet or only on the front or hind feet. Was the work due to a prior injury or significant llaminitic episode? Was the work done a basic trim, or had the patients feet been allowed to grow for an entire year without any farrier work?
Our records contain ample room for making notes. On the back of each page there is room for additional notes for those patients whose procedures/condition or recomaendations to the owner require more space, as well as prescriptions sent home, or additional information given to the client.
If you have written a complete record, anyone looking at the record will be able to tell you what the patient presented for, what we found on physical exam, and what treatment options we provided to the patient or discussed with the owner. If you have not included all of this information on your record, it is not complete.
Detomidine (ml)
Xylazine (ml) Butorphanol
(ml) Additional sedation
Additional sedation
Ketamine (ml)
Valium (ml) Ket/Val
Waste (ml)
Top Off (ml)
Top Off (ml)
Top Off (ml)
Top Off (ml)
Top Off (ml)
Top Off (ml)
Top Off
Waste (ml)
time time time time time time time time time time time time time

4
At the end of the day you will be referring to the records to complete the daily tally, trading the records you wrote with another equine student. This will afford you the opportunity to review other records and point out where they are lacking, which should help you to write more complete records.
Please pay particular attention to the following points
The client must sign the form
If a client has multiple forms they must sign each form
Notes are a very important part of the records, please be thorough Fill the form out as you complete the work (record surgical and anesthetic information, as well as n-saids and antibiotics as they are given There is space for 2 patients on the front and back of the equine record, as well as space for additional notes and prescriptions on the second page; the different sections of the form are shown below.
The client will receive the equine patient care record. It is more efficient to complete this
as you work, (one person in your team will be the scribe, and will complete the records)

5
If dental work beyond a routine float has been performed, turn the patient care record over , and
complete the dental chart for that patient.
EQUINE CHECK IN SHEET
If the clinic will be high volume one person will be assigned to act as an intake coordinator. This person will be responsible for completing a client check in sheet.
The services which the client requires should be circled on the intake sheet when the client signs in.
6
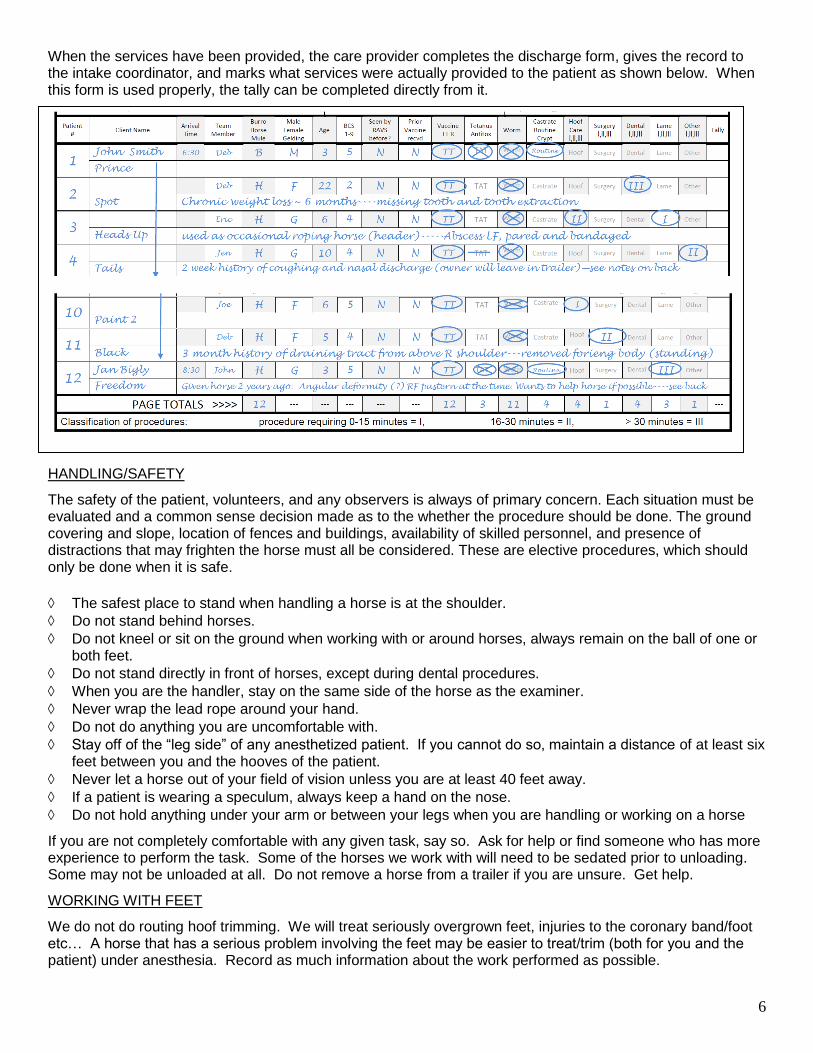
When the services have been provided, the care provider completes the discharge form, gives the record to the intake coordinator, and marks what services were actually provided to the patient as shown below. When this form is used properly, the tally can be completed directly from it.
HANDLING/SAFETY
The safety of the patient, volunteers, and any observers is always of primary concern. Each situation must be evaluated and a common sense decision made as to the whether the procedure should be done. The ground covering and slope, location of fences and buildings, availability of skilled personnel, and presence of distractions that may frighten the horse must all be considered. These are elective procedures, which should only be done when it is safe.
The safest place to stand when handling a horse is at the shoulder.
Do not stand behind horses.
Do not kneel or sit on the ground when working with or around horses, always remain on the ball of one or both feet.
Do not stand directly in front of horses, except during dental procedures.
When you are the handler, stay on the same side of the horse as the examiner.
Never wrap the lead rope around your hand.
Do not do anything you are uncomfortable with.
Stay off of the “leg side” of any anesthetized patient. If you cannot do so, maintain a distance of at least six feet between you and the hooves of the patient.
Never let a horse out of your field of vision unless you are at least 40 feet away.
If a patient is wearing a speculum, always keep a hand on the nose.
Do not hold anything under your arm or between your legs when you are handling or working on a horse
If you are not completely comfortable with any given task, say so. Ask for help or find someone who has more experience to perform the task. Some of the horses we work with will need to be sedated prior to unloading. Some may not be unloaded at all. Do not remove a horse from a trailer if you are unsure. Get help.
WORKING WITH FEET
We do not do routing hoof trimming. We will treat seriously overgrown feet, injuries to the coronary band/foot etc… A horse that has a serious problem involving the feet may be easier to treat/trim (both for you and the patient) under anesthesia. Record as much information about the work performed as possible.

7
A B C D A
DENTISTRY BASICS
A significant portion of the work we do involves the horse’s teeth. In order to understand the dental needs of our patients, we must first have a basic understanding of the development, form and function of the equine masticatory system
The Horse is designed to spend the majority of its day eating very low quality feed. The grinding of food for extended periods of time causes more wear on the teeth than you might see in an animal who eats one or two meals a day. To compensate for this the horses teeth are very long. A large portion of each tooth lies below the gum line early in life, and erupts at a constant rate over the life of the horse. This process continues until late in life, when there is no tooth left to erupt
The horse loses about 2-3 mm of tooth a year to these grinding forces. This process is known as attrition. Attrition is affected by factors such as:
1. Type of feed
Affects tooth formation
Affects attrition by affecting the length of time spent
chewing,
2. The chewing cycle,(a complex cycle which varies slightly
from horse to horse).
3. Confirmation of the dental arcades
The 3 stages of chewing shown in these diagrams are
Opening Stoke (A-B)
Closing Stroke (B-C)
Power Stroke (C-D)
It has been suggested that some horses are one sided chewers, a condition that could have a marked effect on tooth wear
The upper arcades consist of wider teeth that are set further apart than the lower arcades. In addition, the upper arcades may be set slightly forward of the lower arcades. This can have a significant effect on dental attrition.

8
4. Anatomy of the tooth; the layers
Pulp
infundibulum
Cementum
Enamel
Dentin
Cementum
A little about the layers Cementum
o Living tissue
o Most adaptable tissue
o Covers the entire crown (worn from occlusal surface upon
eruption)
o Fills the infundibulum
o Deposited to the root and crown below the gum line
throughout the life of the tooth.
o Function- adds to size, strength and protects enamel.
o Deciduous incisors appear whiter due to the relative lack of cementum compared to permanent
incisors.
Enamel
o Hardest component of the tooth, but brittle
o 98 % mineral
o essentially dead
o no ability to repair itself
o 3 types (1, 2, & 3)
Type 1 inside edge of enamel folds
Type 2 present at the enamel to cement border
Type 3 present in a very thin layer at the enamel to cement and enamel to dentin borders
o Upper cheek teeth more type 1 than type 2
o Lower cheek teeth type 1 and type 2 about equal
o Incisors almost solely type 2
Dentin
o Makes up the majority of the tooth
o 70% minerals
o Types
Primary
Secondary
Regular
Irregular
o Produced by
Odontoblasts
Pulp (this process occurs as the tooth erupts, preventing the pulp from becoming exposed)
Pulp
o Maintains a relatively large blood supply
o Lays down dentin (secondary) to close the pulp cavity as the tooth erupts. As the tooth ages and
dentin is laid down, the cavity narrows and the tooth becomes stronger.

9
o This process aids in strengthening the teeth
o The blood supply and ability to lay down secondary dentin allow younger horses to fight pulp
infections and repair themselves.
o Teeth of horses younger than 7 or 8 years are more brittle due to lower ratio of secondary dentin
o Older horses teeth are much stronger due to the higher ratio of dentin
o Root formation is completed by the age of 2 years; however separate pulp channels may not be
completely formed in the mandibular cheek teeth until the age of 5-6 years.
Students should be familiar with the Triadan system of classification, the eruption table and the basics of aging a horse utilizing the teeth.
Triadan Classification System
This Triadan system’s utility stems from its simplicity and lack of ambiguity.
Eruption Table Incisors Premolars Molars
Canine Wolf Age 01’s 02’s 03’s 04’s 05’s 06’s 07’s 08’s 09’s 10’s 11’s
Birth – 7 days Erupt Birth – 2 weeks Erupt Erupt Erupt
4-8 weeks Erupt 6-9 months Erupt Erupt
9-15 months Erupt 1
2 Erupt 2 ½ Erupt Erupt
3 Erupt 3 ½ Erupt
Erupt Erupt
4 Erupt In
Males *
4 ½ Erupt
5
6
Deciduous Permanent *canine teeth form in both males and females; however they are generally smaller in females and only erupt in about 30 %.
Note that the first molars (the 09’s) are the oldest teeth in the horse’s mouth

10
Common Malocclusions
306 307 309 310 311
206 207
308
209 210 211 208
306 307 309 310 311
206 207
308
209 210 211
Estimating Age Using the Teeth
Incisors
Middle -01’s Intermediate -- 02’s Outer -- 03’s
Eruption 2 ½ 3 ½ 4 ½ In Wear 3 4 5
Level 5 6 7 Cup Gone* 6* 7* 8*
Dental Star 8 9 10-11 Round 9 10 11-12
Appearance of Galvayne’ Groove* 9 Disappearance of Galvayne’ Groove* 30
No Enamel Spot 13-16 Oval to round 5-9
Round to Triangular 10-15 Triangular-to Rectangular 16-20
*disappearance of the cup as well as appearance/disappearance of Galvayne’ groove (May be absent in as much as 50% of equids) are considered unreliable by some practitioners
Profile of the Upper Corner Incisor (103 & 203)
Wider than Height 5-9
Square 9-10 Taller than Width 10 +
Dental wear (and its utility for aging) is affected by many factors including breed, conformation and diet (affects both tooth formation and tooth wear)
Step Mouth
The loss of tooth 208 has caused an overgrowth of the opposing 308. Corrective treatment will involve power equipment. Care must be taken not to remove too much of crown, thus exposing the pulp.
Wave Mouth
Develops over an extended period of time. May originate from dental pathology i.e. the presence of a softer tooth, impactions, maleruptions…

11
Rostral and Caudal Hooks
Front view PERFORMING DENTAL WORK
The majority of the routine dental work can be done without a speculum in place, using hand floats. It is impossible however, to thoroughly evaluate your patient’s dental needs without a full mouth speculum, and many dental abnormalities require power equipment. When your patient is wearing a mouth speculum, allow them to periodically rest their jaw. Speculums should not be left open for more than 15 minutes at a time. (If you have ever had a mouth speculum in your mouth, you may feel that half this time is more than enough for an upper limit)
Equipment
Bucket of water with small amount of nolvasan
400 ml dose syringe to rinse mouth
Light source
100
400
200
300
306 307
207
308
208 206 209 210
309 311 310
211
306 307 309 310
207
308
209 210 211 208 206
311
306 307 309 310 311
206 207
308
209 210 211 208
Over time rostral & caudal hooks form secondary to incomplete occlusal contact during mastication
Ramps Form at the back of the mouth on the lower arcades
Shear Mouth
The lingual surface of the upper arcades and the buccal surface of the lower arcades have been worn away. This condition will not be corrected in one visit, and may never be completely corrected. It will require both dental and dietary management.

12
Wedge speculum
Full mouth speculum (We carry Huassmann or MacPherson type)
Hand floats
o Jupiter blades
o Carbide blades
o Carbide chip blades
Power float
Note: never set the equipment down on the ground. Always place floats and syringe back into the bucket and power float into the case on top of a table or box.
Performing an oral exam will be a regular part of your job as an equine practitioner. Now is as good a time as any to develop a system for doing so. A thorough “oral” exam involves more than looking into the patient’s mouth. You may be able to perform a very thorough exam with little or no sedation, however not all patients will allow you to even touch their mouths without chemical assistance.
Examine your patient from the outside
look for signs of quidding (dropped incompletely chewed feed)
look at the feces for signs of poorly masticated food
smell the patient’s breath
feel for even air movement in both nostrils
Ask the owner if the patient has exhibited any problems eating or changes in weight, appetite, or feed
preferences. If the owner reports a change, you may want to watch the patient eat prior to sedating.
Watch for
o difficulty chewing
o difficulty swallowing
o dropped feed
Examine the patients head from the outside, both visually and by palpation
o Look for asymmetry of the jaw, sinuses, and the sides of the face (from the corner of the mouth
to the masetter muscle)
o Palpate the joint (Temporomandibular joint or TMJ)
o Run your hand along the line of the upper molars and premolars. Feel for:
Wads of packed feed-(horses sometimes pack feed to move sharp buccal points off of their
cheeks while eating)
Sharp buccal points
You may be able to feel the points
Your patient may tell you they exist through protest (pushing sharp points into the buccal
tissue will hurt)
Missing or dramatically uneven teeth
Knock on the patients sinuses and listen for differences in tone from one to another
o They should sound hollow.
o Thudding indicates a problem in the sinuses (frequently related to oral health issues
Look at the patients lips inside and out
Asses your patients lateral excursion (ability to move the arcades side to side against one another)
Asses your patients caudal roastral excursion (raise and lower the head and see how far the incisors
move front to back in relation to one another

13
If you have already identified sharp buccal points, you may want reduce these using hand floats prior to
completing your oral exam, as opening the patients mouth will push the points into its check, causing the
patient discomfort.
Examine your patient’s oral cavity
Note: always use care when examining mouths (of any species) Do not get bitten.
remove watches or other jewelry prior to placing your hand into the patient’s mouth
Turn your patient so that it faces the sun
Thoroughly rinse the patients mouth on both sides by sliding the tip of the syringe between the cheek and
the teeth and emptying the syringe
Place your thumb into the interdental space and push up on the roof of the mouth
Grasp your patient’s tongue
Note: Always use care when holding the patient’s tongue. The tendency in inexperienced handlers when a patient pulls back is to grasp the tongue tightly. If you do this and fail to move with the patient the hyiod apparatus may be damage. This can cause permanent neurologic symptoms. To avoid this potential complication always brace your hand against your patient. If you cannot maintain this contact with the patients jaw release the tongue.
Pull the patients tongue between his upper and lower arcades. This will encourage her to maintain an
open jaw
Look for
o ulcerations
o signs of feed packing
o obvious sharp points on the buccal side of the upper arcade
o obvious sharp points on the lingual side of the lower arcade
o missing teeth
o retained caps
o malocclusions
o hooks on front of the first tooth in the upper arcade or the last tooth on the lower arcade
Remove your hand and release the patients tongue
Smell your hand for signs of dental disease
Repeat the process on the opposite side of the mouth
Address dental disease/perform prophylactic procedure (Not all patients will require dental care) Dental floating should be performed using a routine system
o Start with the upper arcade
The upper arcade can be floated using hand tools, without the use of a speculum.
This reduces the amount of time that your patient must wear a speculum,
This exercise will help teach you the proper blade angle for reducing buccal points (if you are at
the wrong angle, your patient will be able to bite your blade)
Start with the central cheek teeth on whichever side you have chosen to work.
Choose a straight head float buccal surface
Hold the blade at a 45° angle to buccal points blade
Start with short light strokes.
Increase the length and strength of the stroke as you grind points and the movement becomes
easier
Tooth 207

14
Listen for a change in tone from a higher tone to a low hollow sound. This indicates that you
have removed the points and achieved a smooth surface
Remove the blade from the patients mouth and examine it for tooth particles and rinse
If the tooth particles are evenly distributed on the blade your angle is correct in relation to
the length of the arcade
If the tooth particles are only present on the tip or distal portion of the blade, you need to
move the handle of the float medially
If the tooth particles are concentrated on the base or proximal end of the blade, you need
to move your handle laterally.
If your patient is able to take hold of the blade with his teeth, you are not at a 45°
Complete both upper arcades prior to proceeding to the lower arcades
A very thin blade will be needed to reach to the upper 11’s, and a slightly closed angle will help
reach the most caudal hooks. If available, power equipment is less traumatic to the cheeks
than hand floating this area of the mouth
o To utilize power equipment you will need to sedate your patient, and place a mouth speculum.
o
NOTE: If you are involved in a dental procedure and are using a mouth speculum maintain a hand on the horses head. Speculums can cause serious injury if the horse moves unexpectedly.
While you have the power equipment in the back of the mouth address any hooks on the lower
11’s
Move to the front of the mouth and address hooks on the 6’s as well as lingual points on the
lower arcades
Floats for Basic Prophylactic Treatment
Area to be Floated/Rasped Triadan Classification Hand Float Power Float
Buccal surface of upper molars and caudal premolars (may miss caudal surface of upper 3’s)
108, 109, 110, 111 208, 209, 210, 211
Long handle straight
Can be used if available
Points on upper 2nd
premolars 106, 206, Power
particularly useful
Hooks on lower third molars 311, 411 Long handle closed angle
Power particularly useful
Points on medial lower premolars & molars 306 to 311 406 to 411
Short/medium handle
open angle
Can be used if available
THE POWER FLOAT-just the basics/Important use and storage notes
For complete information pertaining to operation and techniques for floating teeth refer to the printed copy of the manuals in the back of the equine binder or visit the power float website
Never submerge the grinding wheel/float head into water
Lube the power float after each use (daily when used)
BATTERY POWERED CORDLESS MODEL OPERATION
Only operate the adjustable clutch on setting 13 or 14.
Only operate the rpm range selector at setting number 2.

15
TOOTH COOLING Do not float on a single tooth or group of teeth for longer than 10 seconds without cooling the tooth (teeth)
with cold water. Repeat floating and cooling procedure as needed until procedure is completed.
ROTATING GRINDING HEAD Pull the shaft while holding onto the metal collar with the other hand.
While pulling the shaft rotate it through 180° clockwise or counter-clockwise.
Release the shaft and the head will lock securely into position.
CHARGERS 15 minute wall plug battery charger
1 hour cigarette lighter/electrical accessory charger
CLEANING
To clean or replace grinding wheel
Rotate black metal ring (C) to expose the opening in the shaft .
Insert shaft lock pin, finishing nail or Allen key, into hole to lock the shaft.
Using small sized vise-grip pliers grip the edges of the grinding wheel and rotate counter-clockwise to loosen.
Unscrew and remove used grinding wheel.
Put the new grinding wheel into place.
Using fingers, thread the new grinding wheel into place clockwise until finger-tight.
Remove shaft lock pin and replace metal cover (C).
Scrub the grinding wheel with a brass brush until clean
Spray with alcohol to remove any residual moisture
LUBING-refer to the power float manual for a complete description.
CHUTE WORK
Working with horses in a chute presents a set of unique, inherent risks. It also presents learning opportunities that you may not be routinely exposed to. Noise and activity around the chute stimulate the patient and counteract our sedation. Minimize all unnecessary noise and movement around the chute.
If you have not been assigned to be at the chute, STAY AWAY.
PHYSICAL EXAMS
At times we are unable to perform a physical exam on our patients. They often lack the training necessary to facilitate examination. As a patient becomes excited, sedatives become less effective, making it more difficult to achieve sedation in the patient. Then if the patient is a surgical case, anesthesia and recovery are compromised. Normal physical exam parameters: (these parameters are relatively unchanged by anesthesia)
Temperature: 99.0 to 101.8 Heart beat: 32 to 44 Respirations: 12 to 24
The heart beat should be regular. An irregular beat should be evaluated prior to anesthesia or sedation. A regularly irregular beat (i.e., 3 beats, a dropped beat, 3 beats, a dropped beat) usually indicates a 2nd degree AV block. This is a relatively common arrhythmia in the horse. In most cases this will not affect anesthesia. An irregularly irregular heart beat may be indicative of atrial fibrillation. This is a more uncommon arrhythmia, and requires further evaluation. All patients will have a Body Condition Score Recorded. The chart below will help you to determine each
patient’s BCS

16
VACCINES, ANTHELMINTIC AND OTHER MEDICATIONS
In the USA we deworm and vaccinate horses who are presented for a dental procedure, a lameness workup, or a surgical procedure such as castration, hernia repair, or exploration of a wound or draining tract. While we will train residents to give anthelmintics and vaccinations to their horses we do not do “vaccination only” appointments for equine patients.
We carry ivermectin for our equine patients. It is dosed at 200 mcg/kg or 1 ml/100 lbs of body weight.
All vaccines require refrigeration. We carry tetanus toxoid, tetanus antitoxin and rabies vaccines on domestic trips.
Equine Body Condition Score Table IDEAL BCS
BCS 1 2 3 4 5 6 7 8 9 Point of
Evaluation Emaciated Very Thin Thin
Moderately Thin
Moderate Moderately
Fleshy Fleshy Fat
Extremely Fat
Neck Bones
Prominent
Bones Faintly
Prominent
Accentuated Not
Obviously Thin
Not Obviously Thin
Rounded, Smooth
Slight Fat Deposit
Fat Deposit Thickened Bulging
Withers Bones
Prominent
Bones Faintly
Prominent
Accentuated Not
Obviously Thin
Not Obviously Thin
Rounded, Smooth
Slight Fat Deposit
Fat Deposit Fat
Deposit Bulging
Area Behind
Shoulder
Bones Prominent
Bones Faintly
Prominent
Accentuated Not
Obviously Thin
Not Obviously Thin
Rounded, Smooth
Slight Fat Deposit
Fat Deposit Filled In Bulging
Area Below Elbow
Bones Prominent
Bones Prominent
Accentuated Not
Obviously Thin
Not Obviously Thin
----- ----- ----- ----- -----
Top line Bones
Prominent Bones
Prominent Ridge Slight Ridge Flat
Possible Slight
Crease
Possible Slight
Crease
Crease Present
Obvious Crease
Ribs Bones
Prominent Bones
Prominent
Slight Fat Covering,
Easily Discernable
Faintly Discernable
Not Seen Easily Felt
Slightly Spongy, Not Easy To Feel
Palpable, But With
Fat Filling Between
Difficult To
Palpate Patchy Fat
Tail Head Bones
Prominent Bones
Prominent
Prominent, But Can Not
See Individual Vertebrae
Fat Palpable, Prominence
Conformation Dependant
Slightly Spongy
Soft Soft Very Soft Bulging
Point Of Hip
Bones Prominent
Bones Prominent
Rounded But Easily
Discernable
Not Visually Discernable
----- ----- ----- ----- -----
Point Of Buttocks
Bones Prominent
Bones Prominent
Rounded But Easily
Discernable
Not Visually Discernable
----- ----- ----- ----- -----
Spinous Processes
Bones Prominent
Thin Layer Fat
Covering
Rounded But Easily
Discernable ----- ----- ----- ----- ----- -----
Inner Thighs
----- ----- ----- ----- ----- ----- ----- Fat
Deposits Fat Deposits
May Rub
Flank ----- ----- ----- ----- ----- ----- ----- ----- Fat Filled

17
One ml of tetanus toxoid is administered IM to patients over the age of 8 weeks. Tetanus toxoid should be administered annually, as well as when a patient is injured or is undergoing a surgical procedure. Tetanus toxoid must be boosted 3-4 weeks after the initial vaccine. Until this booster is given, each tetanus toxoid vaccine is considered to be the patient’s first.
Tetanus antitoxin is administered only to surgical or injured patients who have not been previously or consistently vaccinated for tetanus. Tetanus antitoxin is administered IM at a dose of 1500 units. Packaging must be consulted to determine what volume is necessary to administer 1500 units. The antitoxin contains an antibody that affords the patient an immediate protection against tetanus toxins. There is a risk of acute liver failure in patients who receive a tetanus antitoxin. There is a higher risk of tetanus infection without the antitoxin. We feel that the risk is outweighed by the benefits.
Rabies vaccines should be administered annually to equine patients. The dose is 2 ml given IM.
Injectable flunixin meglumine (Banamine) is administered IV and is dosed at 1.1 mg/kg. This is a Non Steroidal Anti Inflammatory Drug (NSAID). All NSAIDs are nephrotoxic and ulcerogenic to varying degrees. Flunixin meglumine is administered to provide post-op analgesia.
Procaine Penicillin G (PPG, 300,000 U/ml) is administered IM and may be administered at doses ranging from 20,000 to 40,000 IU/kg. We use PPG to protect against clostridial growth while the wound or surgical site is healing. When discussing penicillin with the client we must be clear. Many of our clients use the slow release, long acting penicillin Benzathine (150,000 U/ml) in their horses. This drug is not effective in the horse as it is not possible to administer it in high enough volume.
The pharmacy includes trimethoprimsulfamethoxazole tablets, phenylbutazone tablets, metronidazole tablets, flunixin meglumine, carbocaine, and lidocaine Injectable, and assorted topical and eye ointments.
Adverse reactions to vaccines may include high fever in the day or days following the injection, swelling at the injection site, abscess formation, and anaphylaxis.
STORAGE OF INJECTABLE DRUGS
Vaccines and Procaine Penicillin G must be stored in the refrigerator (PPG does not require refrigeration until after the bottle is used for the first time).
Procaine Penicillin G must be thoroughly mixed prior to use. Depending on the brand of PPG and the length of storage, this can require vigorous shaking of the bottle for several minutes. Prior to drawing PPG from the bottle, hold the bottle upside down and check the bottom for a solid white lump. If the lump persists you must continue shaking the bottle until all contents are homogenous. The thinner portion of the product is the procaine. Failure to mix the contents of the bottle properly may result in administration of procaine with little or no antibiotic. Procaine Penicillin should be warmed prior to administration. This can be accomplished by placing the syringe under your armpit.
ADMINISTRATION OF INJECTABLE DRUGS: INTRAVENOUS (IV) INJECTIONS
Most injections given to horses will be Intravenous (IV) or Intramuscular (IM) injections. Students will generally not be asked to give IV injections to patients who are conscious, and will only give IV injections under direct supervision. Mistakenly injecting any drug into the artery will cause your patient to seizure and fall down or flip over backwards. This places the patient, yourself and the client at risk of serious injury and reduces the client’s faith in your ability and in the clinic.
Syringes must be clearly labeled. Unlabelled syringes are garbage.
Syringes of carbocaine, vaccine and PPG may be used for more than one patient as long as they have not been contaminated. The needle must be changed after each injection. Do not remove a dirty needle and set the syringe down prior to needle replacement as this results in contamination. All syringes used for IV injections are discarded after a single use.
To find the horses jugular vein; 1. Locate the jugular furrow
2. Depress/occlude the vein 3 to 6 inches below where you plan to puncture the vein and watch for the
rise or filling of the vein. Once you are proficient at venipuncture, you will hold the vein off just below
your puncture site, which will reduce the time needed to obtain adequate fill of the vein, when learning

18
venipuncture it can be helpful during needle alignment to hold off well below the planned venipuncture
site, this will allow you to visualize more of the vein, improving your alignment .
3. To aid in visualization:
a. Raise the head. A taught vein will not roll or push away from the needles as easily, and is more
easily visualized.
b. Push the patients head slightly away from you while holding it up.
c. Wet the hair with alcohol.
Ponies, donkies, and very muscular or thick necked horses, can be more challenging. When learning, start with an animal with a slighter build. The most common errors made when giving an IV injection are: (many of these same points also apply to placement of the venous catheter)
1. The location chosen for the injection.
2. Incorrect bevel orientation during needle placement.
3. Use of the blind stick, or stick and fish technique.
4. Assuming that aspiration of blood into the syringe is evidence of correct needle placement.
5. Misalignment to the vein or too great an angle of the needle during venipuncture and drug
administration.
6. Failure to complete needle placement once venipuncture has occurred
7. Choosing a needle of inappropriate length.
8. Placing the needle subcutaneously or partially subcutaneously prior venipuncture.
9. Lack of commitment to the act of needle placement.
10. The use of a dulled needle for an injection.
1. IV injections should be given in the upper third to one half of the neck (closer to the head). Closer to the
body of the horse the artery is more superficial and closer to the vein. Venipuncture in this part of the neck
increases the chance of an arterial puncture and injection. Until you have given thousands of jugular
injections using sound technique, you may lack the skill required to avoid arterial injection.
2. Placement of the needle into the vein should always be done with the bevel facing toward you.
Venipuncture with the bevel incorrectly oriented increases the level of resistance to skin puncture, and may
cause the bevel to rest flat against the back wall of the vein once venipuncture has occurred, thus
occluding your needle. If you feel that you have placed the needle in the vein and yet there is no “flash” or
drop of blood in the hub of the needle, occlude the vein and rotate the needle within the vein by twisting the
hub. Utilizing the stick and fish technique increases the likelihood that you will hit the artery. Take the time
to find the vein before attempting venipuncture in your patient. If you believe you have found the vein, yet
are unable to obtain a flash, rotate the hub of the needle as directed above. Do not pull the needle out or
fish blindly for the vein. Take a few moments to think about where your needle is. Watch the needle while
occluding and releasing the vein. The movement in the needle will help to identify where the vein lies
relative to it. This is a learning exercise that will help you to become more accurate when placing your
needle.
3. Placement of the needle and syringe as a single unit is common. It is, however, impossible to differentiate
vein from artery by aspiration of blood into your syringe, and overestimating the depth of the vein is
common. Until you have given thousands of IV injections utilizing sound technique, it is a good idea to
disconnect the needle from the syringe during placement. Once the needle is placed, continue occlusion of
the vein and watch for blood dripping from the needle. An arterial puncture will pulse.
4. Placement of the needle into the vein at too great an angle increases the risk of running the needle through
the vein and into the artery. The Jugular vein is quite shallow.
5. Failure to completely advance the needle into the vein increases the risk of two common errors. First, you
are more likely to lose the vein during your injection, causing perivascular drug administration. Second, if

19
the horse swings into you during injection, the needle may be pushed deeper, causing an arterial injection.
To avoid these problems, once the tip of the needle is within the lumen of the vein, advance the needle
until all that is visible is the hub.
6. Choosing a needle that is too short increases the risk of losing the vein during the injection. If your patient
moves after needle placement you are less likely to lose the vein when using a 1 ½” needle for the
injection.
7. A needle placed using sound technique will pierce the skin and immediately enter the vein. It will not run
subcutaneously before it enters the vein.
8. Once you decide to place the needle, find the vein and do it. Lack of commitment to the act of needle
placement tends to result in repeatedly jabbing the patient.
9. Each time a needle punctures anything it becomes dulled. Dulled needles cause significantly more pain.
For this reason a new needle should always be placed on your syringe prior to administration of an
injection to an un-anesthetized patient.
EQUINE IV INJECTION TECHNIQUE
Occlude the jugular Correct angle and needle orientation
Angle too steep Needle position not parallel to vein

20
ADMINISTRATION OF INJECTABLE DRUGS: INTRAMUSCULAR (IM) INJECTIONS
Intramuscular injections may be given in the neck, semimembrinosus, semitendinosus, or pectoral muscles. Some clinicians also use the muscles of the forearms as well as the gluteal muscles. Use of the pectoral muscles is associated with a short lived edema. Use of the gluteal muscles is generally limited, as drainage of an abscess is difficult to achieve. The neck and Semis are the two most common sites for IM injections in the horse.
Intramuscular injections in the adult horse should be given using a 1 ½” needle. Less viscous products such as vaccines, or gentamicin should be administered with a 19 ga or 20 ga needle while more viscous solutions, such as procaine penicillin should be given through an 18 ga or 19 ga needle (a 20 ga needle can be used in foals).
The area of the neck used for injections is bordered by the scapula, the nuchal ligament, and the spine. Avoid use of the neck for IM injections in foals. They lack neck muscles and it is possible to inject into the spine. Avoid the use of the neck for viscous solutions such as procaine penicillin if the patient is very thin and lacks adequate muscle.
EQUINE INJECTION SITES
Incorrect bevel orientation Correct bevel orientation
Avoid the points of the tuber Ischia
Note the change in orientation when the patient shifts weight
Correct site for injection of the semimembrinosus, and
semitendinosus

21
INJECTABLE ANESTHESIA PROTOCOL
Xylazine (0.5 mg/lb) + butorphanol (0.01 mg/lb) given intravenously, mixed in the same syringe: The horse should be kept quiet during this procedure. Restraint techniques such as twitches should be avoided unless absolutely necessary. It is better to spend the time to “finesse” a needle into the vein. An adult stallion will receive 5ml of xylazine (100 mg/ml) and 1ml of butorphanol (10 mg/ml).
Evaluate the degree of sedation achieved by this combination: Within 2 -5 minutes the horse’s head should drop below the level of the withers. If this does not occur, another dose of xylazine (0.1-0.2 mg/lb) may be necessary. Adequate sedation is critical for smooth induction, adequate anesthesia, and safe recovery.
After sedation is achieved give ketamine (1 mg/lb) and diazepam (0.02 mg/lb) slowly, intravenously, and mixed in the same syringe. The horse will become recumbent in less than a minute. For most right-handed surgeons the horse should be positioned in left lateral recumbancy. To achieve this, the horse’s head may be elevated and turned slightly to the right. Some anesthetists will lower the horse’s head and pull it slightly to the left. Regardless of the technique used it is more important that the horse goes down quietly than that he rests on one side or the other. The horse can be rolled over if he lands in the wrong way.
Once the horse has become recumbent, the eyes should be covered with a towel. With ketamine/diazepam horses may be stiff and move their legs for a few seconds immediately after laying down.
Catheters: IV catheters will be placed in selected cases (cryptorchids and other longer procedures) The ease of jugular venipuncture in the horse makes then unnecessary for routine cases
Triple drip: We (RAVS) occasionally use a combination of xylazine (500 mg), ketamine (1000 mg or 1 g), in a liter of 5% guaifenesin (50mg/ml) given at 1ml/lb/hr. Alternatively 5% guaifenesin can be given in boluses (not exceeding 1ml/lb/hr) with intermittent injections of xylazine and ketamine as described above. This combination requires a jugular catheter and provides more muscle relaxation. It is used for cryptorchid surgery, exploration of draining tracts and other extended procedures.
NOTE WORTHY INFORMATION REGARDING THE ANESTHESIA PLAN
Injectable equine anesthesia on RAVS trips is frequently performed on patients who lack any handling or training and may have never been touched. These horses may require higher drug doses than a well handled horse, and present a degree of challenge that might not be present in the average equine patient.
The best anesthetic plan for any patient is to administer a dose just high enough to adequately anesthetize the patient for the procedure being performed.
Administering a higher dose than needed for a short procedure such as a standard castration will cause the patient to sleep for extended periods after the procedure is completed.
Administering too small a dose may only be apparent after the patient has been let out of a chute. One of two things will happen.
Neck injections should be given in the muscles located between the nuccal ligament and the cervical vertebra.

22
o the patient will not drop, and will be run back through the chute requiring that the process be repeated. (You must treat this patient as if it has had no drugs prior to its second trip through the chute), or
o the patient will go down without being adequately anesthetized to complete the procedure. At this point all you can do is administer more drugs.
o Inadequately anesthetized patients: require multiple “top offs” Never become deeply anesthetized until after all stimulation ceases Require significantly more drugs than if they had been started with an adequate dose Sleep for extended periods once all stimulation has ceased and the drugs reach the target receptors Have difficult recoveries
THE ANESTHESIA PROCESS
Examine your patient. Whenever possible do a brief physical exam on your patient prior to anesthesia.
Fractious patients may not be examined prior to anesthesia. Pushing the issue of physical exam in a fractious patient can increase the risk to your safety, the safety of your patient, and may compromise the anesthesia and recovery process.
Form an anesthetic plan based on o The size and temperament of your patient o The experience level of your surgeon and support team o Your surroundings and available equipment
ADMINISTER XYLAZINE AND BUTORPHANOL o Wait for adequate sedation (head below withers) A horse that is given Ketamine prior to being adequately sedated will tend to drop in a manner that is
more stiff and may paddle or swim in place after falling to the ground.
ADMINISTER KETAMINE AND VALIUM o Open gate if working in bucking chute o Wait for patient to drop in chute if working in squeeze chute with side door. o If working with a manageable patient, drop patient on left side (if possible) and do not make any
attempt to knock the patient off of its feet as this; o Horse becomes recumbent The team must wait until the horse is fully relaxed to proceed, this is the anesthetists call. The upper
leg should be resting on the ground. Do not rush the patient. Once the patient is recumbent and adequately anesthetized the rest of the team should move to
complete their assigned tasks as efficiently as possible. Everyone must remain on the back side of the patient, that is away from the legs of the horse. If the patient remains sternal or attempts to stand a staff member will administer more drugs. May have nystagmus or tearing (lacrimation), muscle tone or palpebral reflex. Place a towel over the patients eye and a pillow under the head.
DETERMINING IF THE PATIENT IS ADEQUATELY ANESTHETIZED FOR SURGERY o During surgery an anesthetist will be at the horse’s head at all times. Prior to anesthesia, two doses of
xylazine/ketamine to “top off” the patient are drawn up. The drugs are mixed in the same syringe and administered at less than the initial anesthetic dose (xylazine at 0.125 mg/ lb and ketamine at 0.25 mgs/lb), to maintain an adequate level of anesthesia. If the patient has been properly anesthetized and the surgery is done expeditiously, this extra anesthetic is rarely necessary, but it must be available.
o Wait 2 minutes and administer a top off If horse does not relax or continues to move or vocalize If nystagmus slows watch for another 2 minutes If nystagmus remains-top
23
READING ANESTHETIC DEPTH
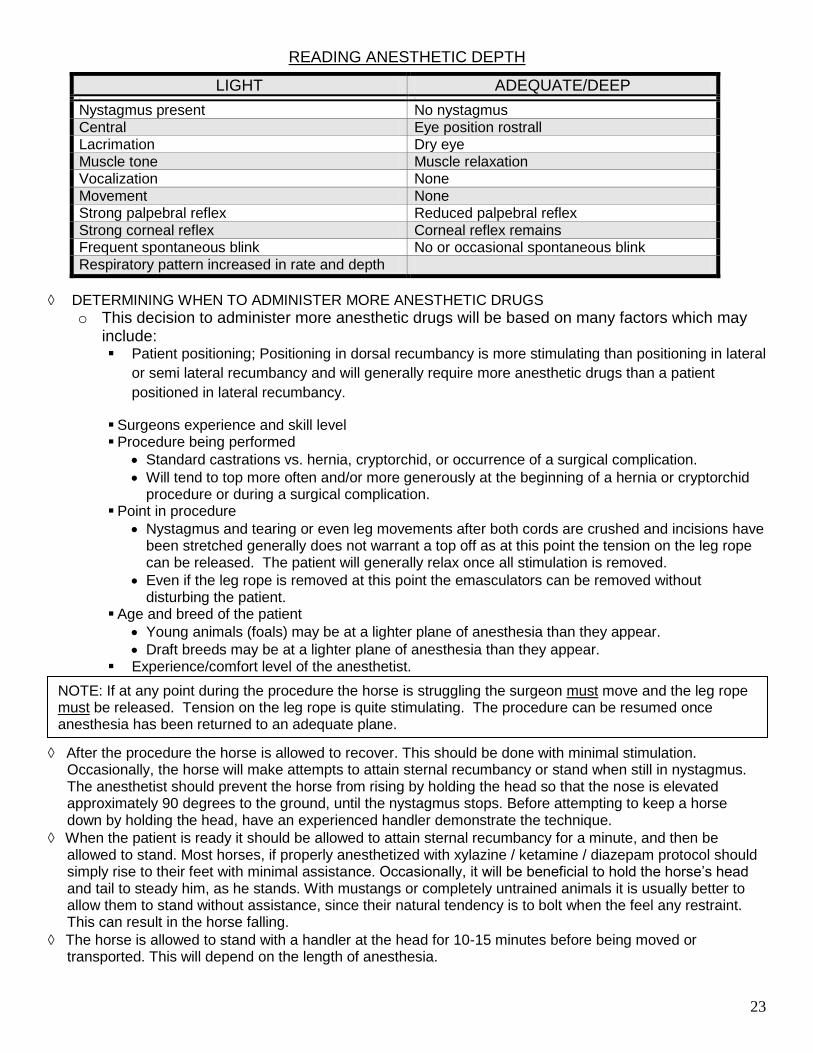
LIGHT ADEQUATE/DEEP o o
Nystagmus present No nystagmus Central Eye position rostrall Lacrimation Dry eye Muscle tone Muscle relaxation Vocalization None Movement None Strong palpebral reflex Reduced palpebral reflex Strong corneal reflex Corneal reflex remains Frequent spontaneous blink No or occasional spontaneous blink Respiratory pattern increased in rate and depth
DETERMINING WHEN TO ADMINISTER MORE ANESTHETIC DRUGS
o This decision to administer more anesthetic drugs will be based on many factors which may include: Patient positioning; Positioning in dorsal recumbancy is more stimulating than positioning in lateral
or semi lateral recumbancy and will generally require more anesthetic drugs than a patient
positioned in lateral recumbancy.
Surgeons experience and skill level Procedure being performed
Standard castrations vs. hernia, cryptorchid, or occurrence of a surgical complication.
Will tend to top more often and/or more generously at the beginning of a hernia or cryptorchid procedure or during a surgical complication.
Point in procedure
Nystagmus and tearing or even leg movements after both cords are crushed and incisions have been stretched generally does not warrant a top off as at this point the tension on the leg rope can be released. The patient will generally relax once all stimulation is removed.
Even if the leg rope is removed at this point the emasculators can be removed without disturbing the patient.
Age and breed of the patient
Young animals (foals) may be at a lighter plane of anesthesia than they appear.
Draft breeds may be at a lighter plane of anesthesia than they appear. Experience/comfort level of the anesthetist.
After the procedure the horse is allowed to recover. This should be done with minimal stimulation. Occasionally, the horse will make attempts to attain sternal recumbancy or stand when still in nystagmus. The anesthetist should prevent the horse from rising by holding the head so that the nose is elevated approximately 90 degrees to the ground, until the nystagmus stops. Before attempting to keep a horse down by holding the head, have an experienced handler demonstrate the technique.
When the patient is ready it should be allowed to attain sternal recumbancy for a minute, and then be allowed to stand. Most horses, if properly anesthetized with xylazine / ketamine / diazepam protocol should simply rise to their feet with minimal assistance. Occasionally, it will be beneficial to hold the horse’s head and tail to steady him, as he stands. With mustangs or completely untrained animals it is usually better to allow them to stand without assistance, since their natural tendency is to bolt when the feel any restraint. This can result in the horse falling.
The horse is allowed to stand with a handler at the head for 10-15 minutes before being moved or transported. This will depend on the length of anesthesia.
NOTE: If at any point during the procedure the horse is struggling the surgeon must move and the leg rope must be released. Tension on the leg rope is quite stimulating. The procedure can be resumed once anesthesia has been returned to an adequate plane.

24
EQUINE DOSING CHART
Injectable Anesthesia (IV), Flunixin Meglumine (IV), Penicillin (IM), Ivermectin (PO)
Weight
(lbs) Xylazine
rompum
(ml)
1mg/kg 0.5 mg/lb
Butorphanol Torbagesic
(ml)
0.02-0.04 mg/kg 0.01-0.02 mg/lb
Diazepam Valium
(ml)
0.03 mg/kg 0.02 mg/lb
Ketamine
(ml)
2 mg/kg 1 mg/lb
Procaine Penicillin G
(PPG) (ml)
20,000 units/kg 10,000 units/lb
Banamine Flunixin
meglumine
(ml)
1 mg/kg 0.5 mg/lb
Ivermectin
1.0 ml/100 lb
110 0.5 0.2 0.3 1.0 4.0 1.0 2 ml 220 1.0 0.2 0.4 2.0 7.0 2.0 3 ml 330 1.5 0.3 0.5 3.0 11.0 3.0 4 ml 440 2.0 0.4 1.0 4.0 14.0 4.0 5 ml 550 2.5 0.5-1.0 1.5 5.0 18.0 5.0 6 ml 660 3.0 0.5-1.0 2.0 6.0 21.0 6.0 7 ml 770 3.5 0.5-1.0 2.5 7.0 25.0 7.0 8 ml 880 4.0 0.5-1.0 3.0 8.0 28.0 8.0 9 ml 990 4.5 0.5-1.0 3.5 9.0 32.0 9.0 10 ml
1100 5.0 0.5-1.0 4.0 10.0 35.0 10.0 11 ml 1210 5.5 0.5-1.0 4.5 11.0 39.0 11.0 12 ml 1320 6.0 0.5-1.0 5.0 12.0 42.0 12.0 13 ml
NOTE: The doses of both Xylazine and Butorphanol are behavior dependant. For very quiet horses the xylazine dose may be dropped by up to one half. For fractious horses the xylazine and butorphanol doses may be increased. We have found that increasing the dose of Butorphanol beyond 1.5 ml does not provide any additional benefit and may cause the patient to twitch during the procedure.
STANDARD SYRINGE AND NEEDLE SIZES
DRUG SYRINGE SIZE NEEDLE SIZE
PPG 35 cc 18 ga, 1 ½” BANAMINE 3 cc to 12 cc (dose dependant) 20 ga 1 ½” CARBOCAINE 35 cc or 60 cc 18 ga 1 ½” IVERMECTIN 12 cc or 20 cc N/A (oral) VACCINES 3 cc 20 ga 1 ½” or 22 ga 1” or 1 ½” TETANUS ANTITOXIN 3 cc or 5 cc, (volume dependant) 20 ga 1 ½” or 22 ga 1” or 1 ½” ANESTHESIA TOPPER 3 cc or 6 cc 18 ga 1 ½”
NOTE: All anesthesia “toppers” must have an 18 gauge 1 ½” needle on them. If you are doing equine work you must check the needle on all toppers and ensure that they are appropriate.

25
EXAMPLE VARIATIONS ON STANDARD DRUG PROTOCOLS
Equine field anesthesia is an art that takes experience and horsemanship. The following chart is meant as a series of examples. It is not meant as a “cook book” that will substitute for practice and observation. The effect of level of training/handling, personality, variations in equipment and surroundings on the anesthetic protocol choices for a 400 kg (880 lb) 3 year old patient All drugs administered IV except the detomidine in patient 7. Administration of IM sedation may compromise the recovery process.
Patient # 1 2 3 4 5 6 7 8 Prior exposure to people level of training
in use, under saddle, shod regularly
In use, under saddle, shod regularly
Halter broke, started under saddle
Has exposure to people with minimal direct handling
Never touched, has been minimally exposed to people
Never touched, has been exposed to people
Never touched, has been exposed to people
Never touched, no or minimal prior exposure to people,
Disposition Quiet, able to firmly palpate both testicles
Poorly mannered
Average handling
Haltered once or twice
Gentle nature
fight response initiated
Belligerent, fight response initiated, un-able to get vein
Belligerent, fight response initiated
Equipment/ location of choice
No special requirement, standing castration candidate, using a lip chain or a twitch for restraint
Can anesthetize in or out of chute
No special requirement
In or out of chute, sedation in trailer, prior to exposure to noise and other potential stimulation
In bucking chute, possibly with neck rope
Bucking chute, neck rope, blindfold
try for vein with second horse in chute, use protocol 6 if successful, if not administer IM detomidine
Hydraulic squeeze chute
Detomidine (ml)
--------- ---------- ---------- --------- ------------- ------------ 3.0 IM ------------
Wait 15-20 minutes. DO NOT RUSH THIS STEP
sta
ndin
g
anesth
etized
Xylazine (ml) 1.5 4.0 4.0 4.0 4.0-5.0 4.0-5.0 7.0 5.0 8.0-9.0 Butorphanol (ml)
0.5 0.5 1.0 1.0 1.0 1.0 1.0 1.0 1.0
Diazepam ----- 3.0 3.0 3.0 3.0 3.0 3.0 3.0 3.0 Ketamine ----- 8.0 8.0 8.0 8.0 8.0 8.0 9.0 11.0 End procedure with xylazine (ml) IV To allow patient to metabolize some of the extra drugs the patient required
N/A N/A N/A N/A N/A N/A 2.0 2.0