Table of Contents - VMwaredocs.hol.vmware.com/HOL-2013/hol-sdc-1320_pdf_en.pdfOpenStack on VMware...
107
Table of Contents Lab Overview - HOL-SDC-1320 ......................................................................................... 2 HOL-1320 OpenStack with vSphere + NSX ............................................................. 3 Module 1 - OpenStack Compute & Storage ....................................................................... 4 OpenStack Compute and Storage with vSphere ..................................................... 5 Module 2 - OpenStack Network Management with VMware NSX .................................... 62 OpenStack Network Management with VMware NSX ............................................ 63 HOL-SDC-1320 Page 1 HOL-SDC-1320
Transcript of Table of Contents - VMwaredocs.hol.vmware.com/HOL-2013/hol-sdc-1320_pdf_en.pdfOpenStack on VMware...
Table of ContentsLab Overview - HOL-SDC-1320 ......................................................................................... 2
HOL-1320 OpenStack with vSphere + NSX ............................................................. 3Module 1 - OpenStack Compute & Storage....................................................................... 4
OpenStack Compute and Storage with vSphere ..................................................... 5Module 2 - OpenStack Network Management with VMware NSX ....................................62
OpenStack Network Management with VMware NSX ............................................63
HOL-SDC-1320
Page 1HOL-SDC-1320
Lab Overview - HOL-SDC-1320
HOL-SDC-1320
Page 2HOL-SDC-1320
HOL-1320 OpenStack with vSphere +NSXPlease continue to the lab overview.
Lab Overview
This hands on lab consists of one module:
• Module #1: Basic overview of OpenStack + vSphere integration, using thevCenter Web Client and the Openstack Horizon Dashboard (60 minutes)
There is a file copy-paste.txt on your windows desktop that includes any strings youneed to enter. This can be useful if you are using an international keyboard and the labrequires you to enter text that you cannot easily type.
• Module #2: Basic overview of OpenStack + VMware NSX integration, using theOpenStack Horizon Dashboard (60 minutes)
Lab Captains:
• Gary Kotton• Sabari Murugesan• Dan Wendlandt• Arvind Soni
HOL-SDC-1320
Page 3HOL-SDC-1320
Module 1 - OpenStackCompute & Storage
HOL-SDC-1320
Page 4HOL-SDC-1320

OpenStack Compute and Storage withvSphereIn the next step, we will begin with an overview of OpenStack.
What is OpenStack?
OpenStack is open source software enabling the creation of clouds on top of a diverseset of hardware and software infrastructure technologies.
HOL-SDC-1320
Page 5HOL-SDC-1320
Cloud API Layer in a Cloud Technology Stack
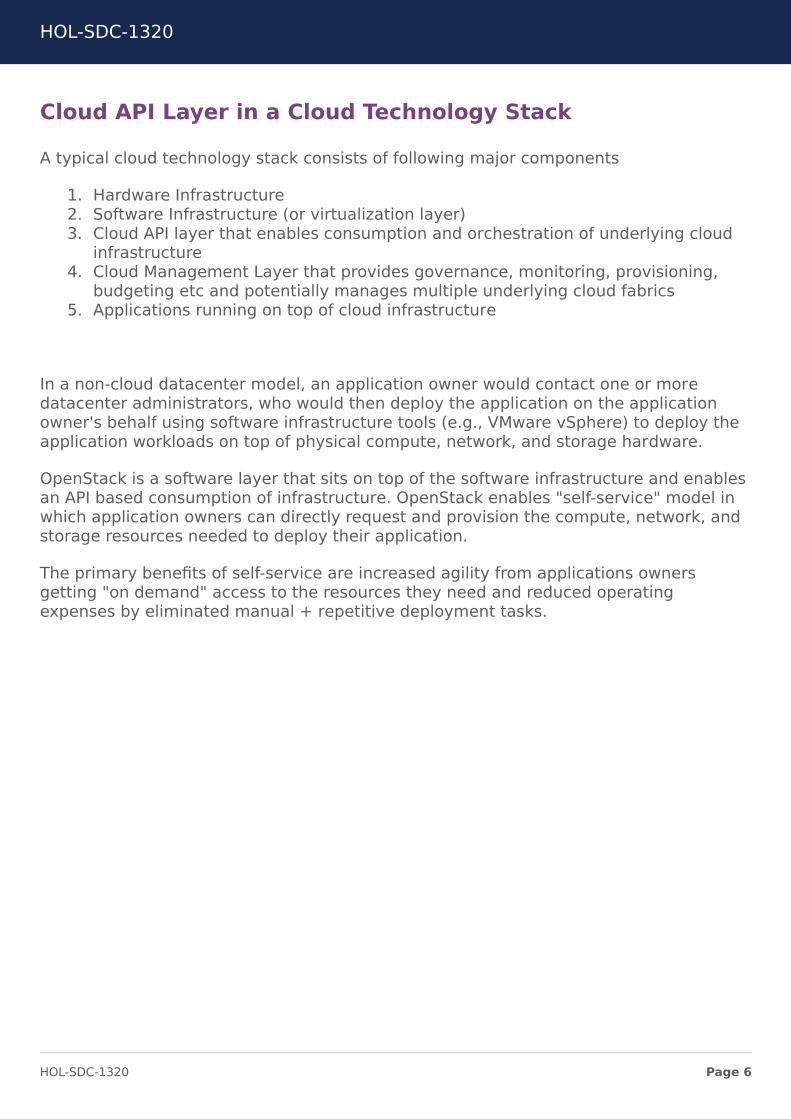
A typical cloud technology stack consists of following major components
1. Hardware Infrastructure2. Software Infrastructure (or virtualization layer)3. Cloud API layer that enables consumption and orchestration of underlying cloud
infrastructure4. Cloud Management Layer that provides governance, monitoring, provisioning,
budgeting etc and potentially manages multiple underlying cloud fabrics5. Applications running on top of cloud infrastructure
In a non-cloud datacenter model, an application owner would contact one or moredatacenter administrators, who would then deploy the application on the applicationowner's behalf using software infrastructure tools (e.g., VMware vSphere) to deploy theapplication workloads on top of physical compute, network, and storage hardware.
OpenStack is a software layer that sits on top of the software infrastructure and enablesan API based consumption of infrastructure. OpenStack enables "self-service" model inwhich application owners can directly request and provision the compute, network, andstorage resources needed to deploy their application.
The primary benefits of self-service are increased agility from applications ownersgetting "on demand" access to the resources they need and reduced operatingexpenses by eliminated manual + repetitive deployment tasks.
HOL-SDC-1320
Page 6HOL-SDC-1320
HOL-SDC-1320
Page 7HOL-SDC-1320
Anatomy of a Cloud Technology Stack
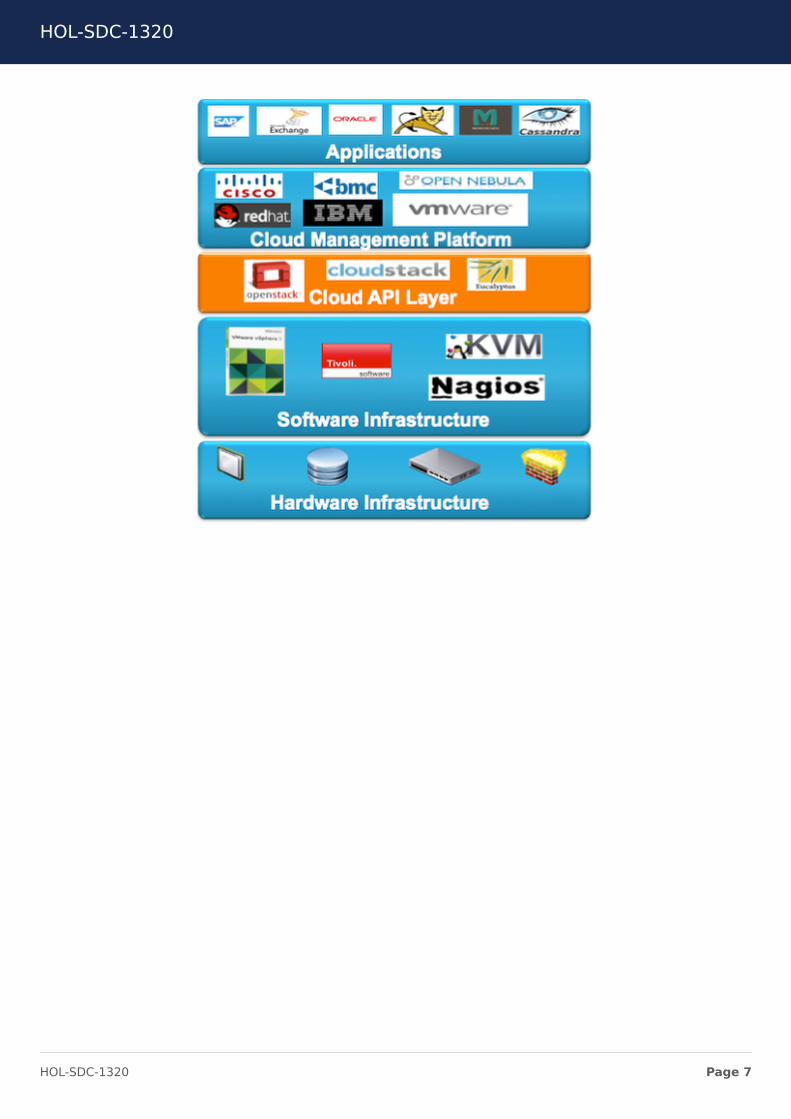
OpenStack Cloud API Layer adds following services in the cloud technology stack.
• An API layer presents abstracted compute/network/storage resources, completelydecoupled from any datacenter hardware, for user by self-service tools.
• Enables self-service to compute/network/storage resources, there is a Web GUI,CLI tools, and programmatic SDK
• Provides an identity service that provides authentication and basic control overresource consumption by managing quotas on infrastructure resources.
• The core logic of OpenStack takes requests from the API layer, determines if therequest is permitted, and routes the request to the proper portion of the softwareinfrastructure.
• Based on the type of software infrastructure in use, OpenStack uses a "driver"layer to translate abstract resource requests into a call to a particular underlyingtechnology (e.g., create a VM on VMware vSphere).
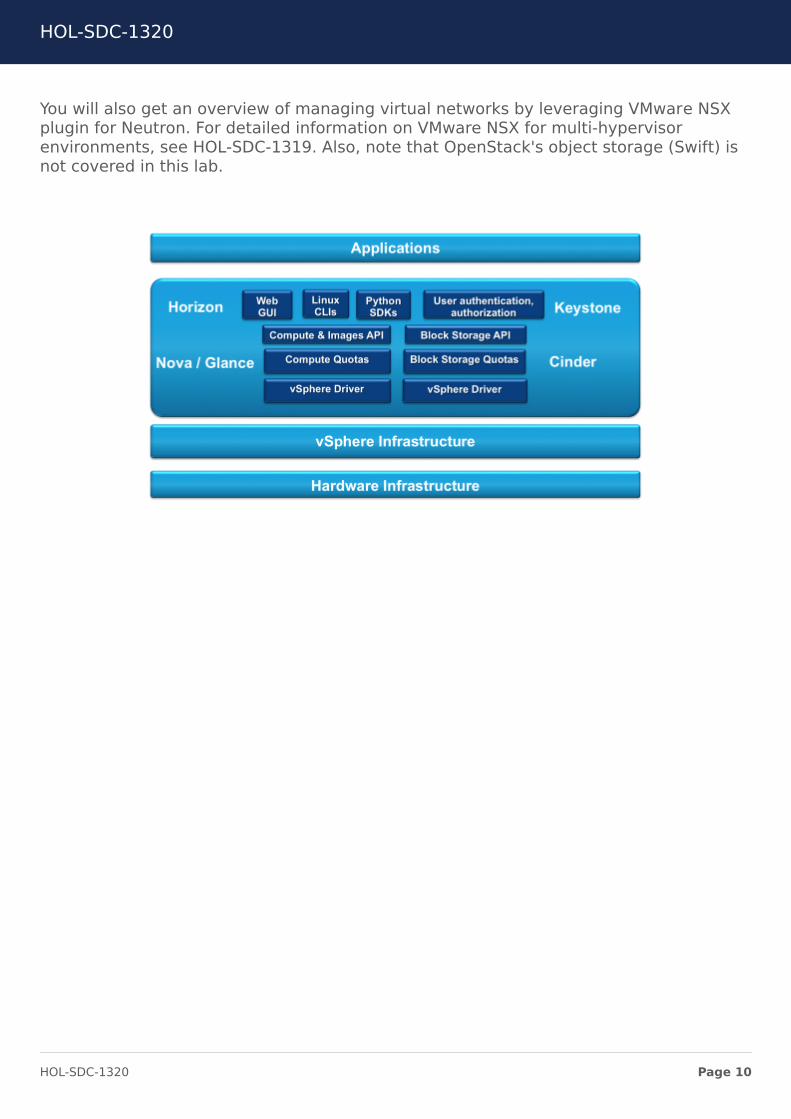
Anatomy of OpenStack
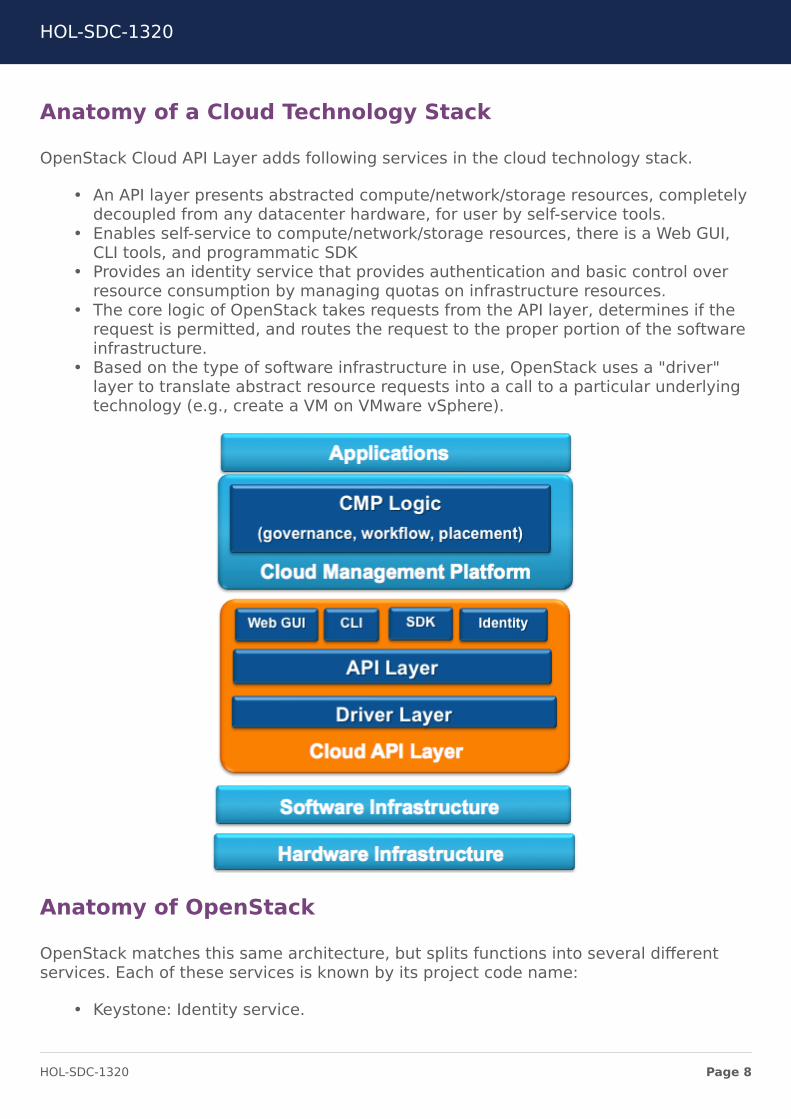
OpenStack matches this same architecture, but splits functions into several differentservices. Each of these services is known by its project code name:
• Keystone: Identity service.
HOL-SDC-1320
Page 8HOL-SDC-1320
• Horizon: Web GUI.• Nova: Compute service.• Glance: Image service.• Neutron: Network services (formerly called "Quantum").• Cinder: Block Storage service.
OpenStack services orchestrate and manage the underlying infrastructure and exposeAPIs for end users to consume the resources. OpenStack's strength is that it is a highlycustomizable framework, allowing those deploying it to choose from a number ofdifferent technology components, and even customize the code themselves.
OpenStack on VMware Infrastructure
In this step, we will review the VMware vSphere infrastructure for the lab and howOpenStack has been deployed within this infrastructure.
Lab Scope
This lab focuses on how the compute, image, and storage portions of OpenStackinteract with VMware vSphere. You will provision virtual servers and virtual disk volumesvia OpenStack and learn how these capabilities are implemented on the back-end byusing vCenter APIs.
HOL-SDC-1320
Page 9HOL-SDC-1320
You will also get an overview of managing virtual networks by leveraging VMware NSXplugin for Neutron. For detailed information on VMware NSX for multi-hypervisorenvironments, see HOL-SDC-1319. Also, note that OpenStack's object storage (Swift) isnot covered in this lab.
HOL-SDC-1320
Page 10HOL-SDC-1320
Understanding Administrators vs. Users
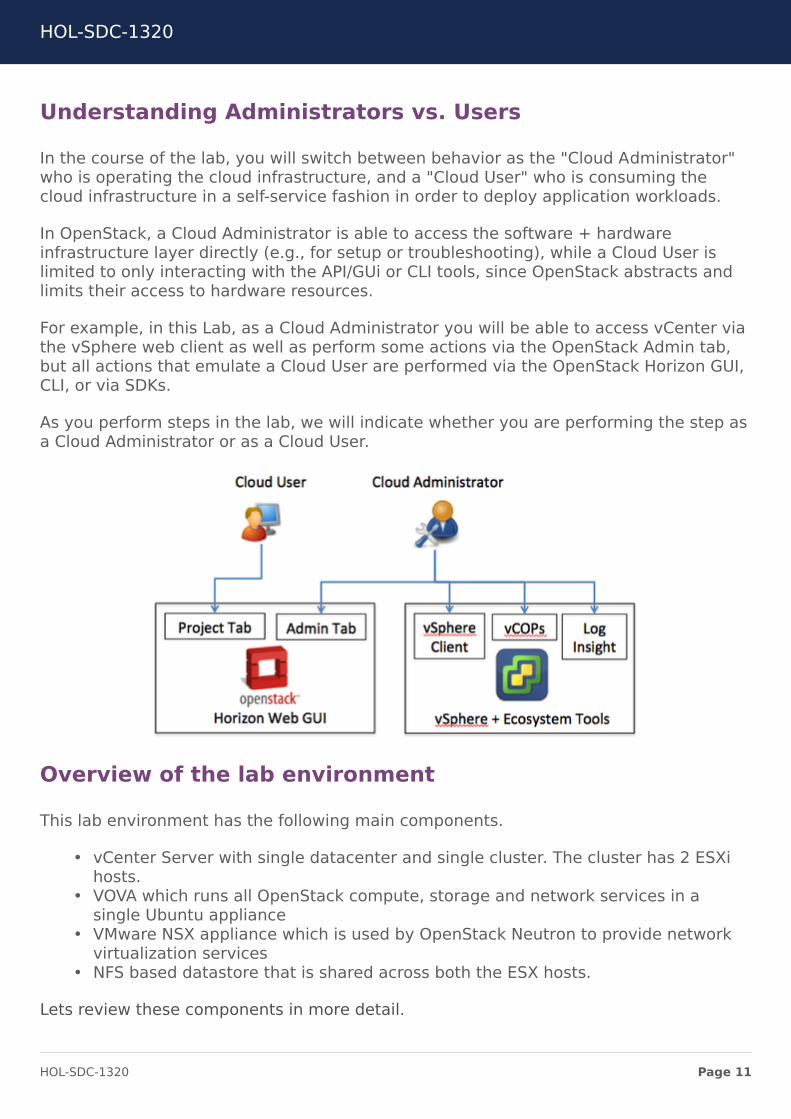
In the course of the lab, you will switch between behavior as the "Cloud Administrator"who is operating the cloud infrastructure, and a "Cloud User" who is consuming thecloud infrastructure in a self-service fashion in order to deploy application workloads.
In OpenStack, a Cloud Administrator is able to access the software + hardwareinfrastructure layer directly (e.g., for setup or troubleshooting), while a Cloud User islimited to only interacting with the API/GUi or CLI tools, since OpenStack abstracts andlimits their access to hardware resources.
For example, in this Lab, as a Cloud Administrator you will be able to access vCenter viathe vSphere web client as well as perform some actions via the OpenStack Admin tab,but all actions that emulate a Cloud User are performed via the OpenStack Horizon GUI,CLI, or via SDKs.
As you perform steps in the lab, we will indicate whether you are performing the step asa Cloud Administrator or as a Cloud User.
Overview of the lab environment
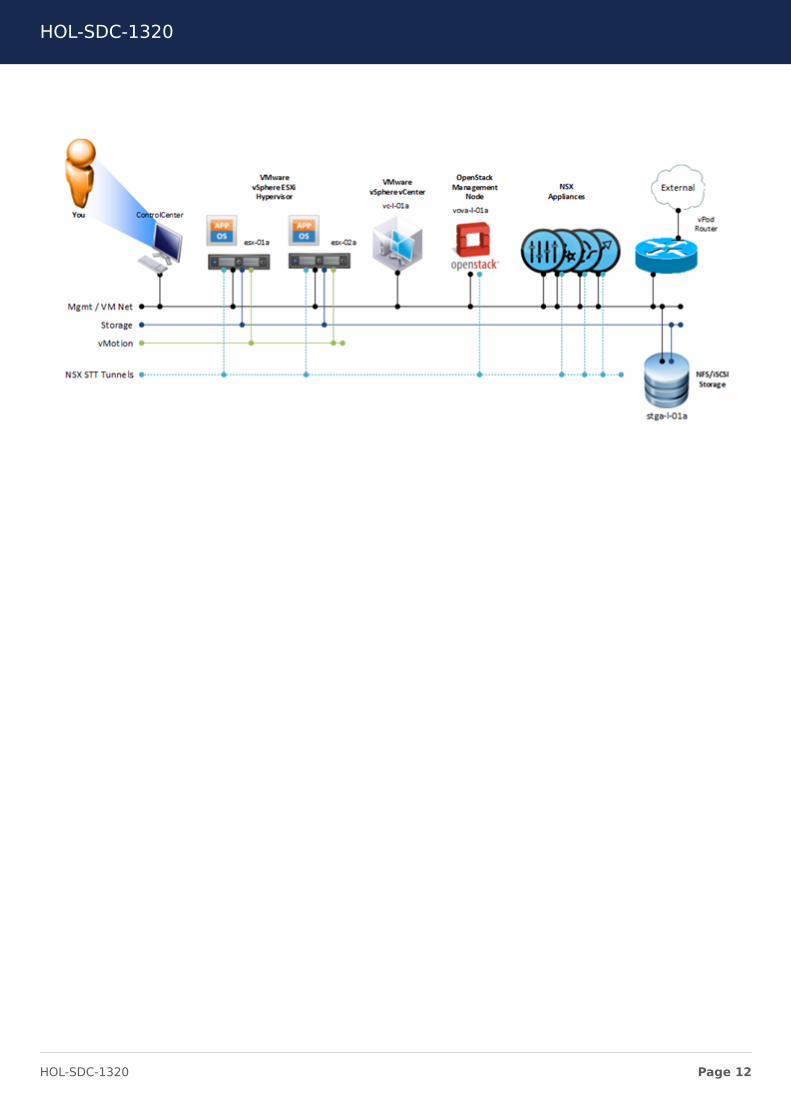
This lab environment has the following main components.
• vCenter Server with single datacenter and single cluster. The cluster has 2 ESXihosts.
• VOVA which runs all OpenStack compute, storage and network services in asingle Ubuntu appliance
• VMware NSX appliance which is used by OpenStack Neutron to provide networkvirtualization services
• NFS based datastore that is shared across both the ESX hosts.
Lets review these components in more detail.
HOL-SDC-1320
Page 11HOL-SDC-1320
HOL-SDC-1320
Page 12HOL-SDC-1320
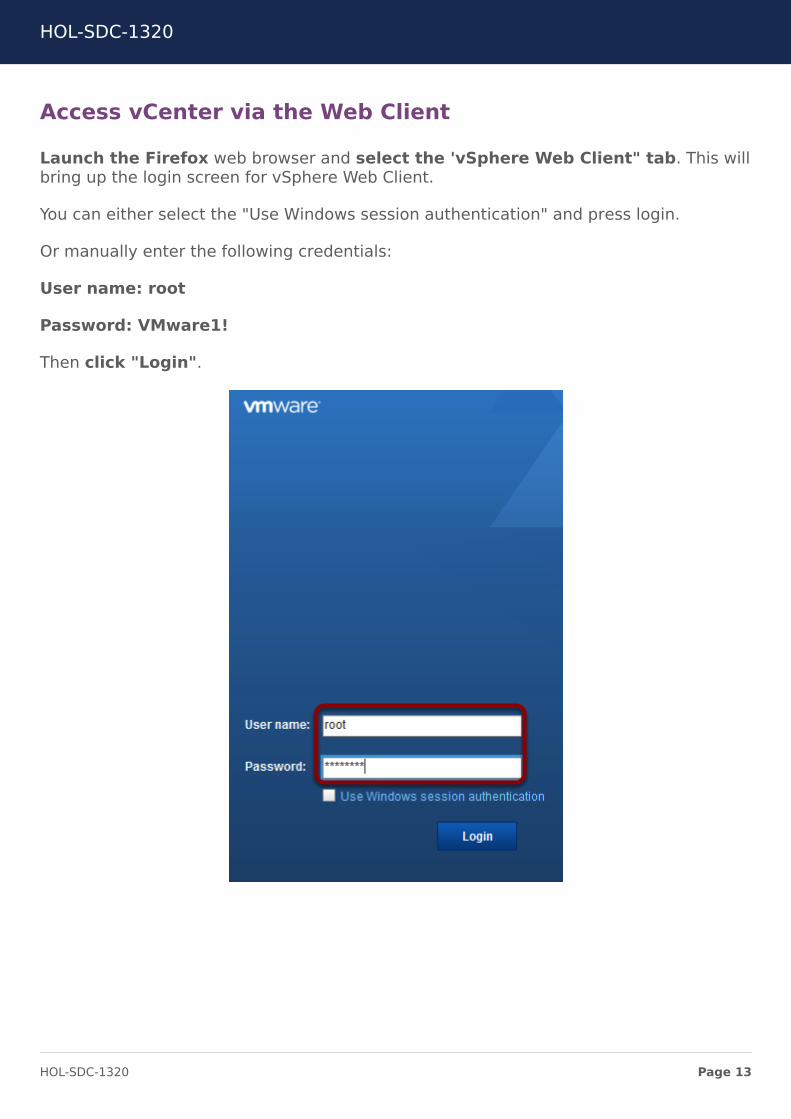
Access vCenter via the Web Client
Launch the Firefox web browser and select the 'vSphere Web Client" tab. This willbring up the login screen for vSphere Web Client.
You can either select the "Use Windows session authentication" and press login.
Or manually enter the following credentials:
User name: root
Password: VMware1!
Then click "Login".
HOL-SDC-1320
Page 13HOL-SDC-1320
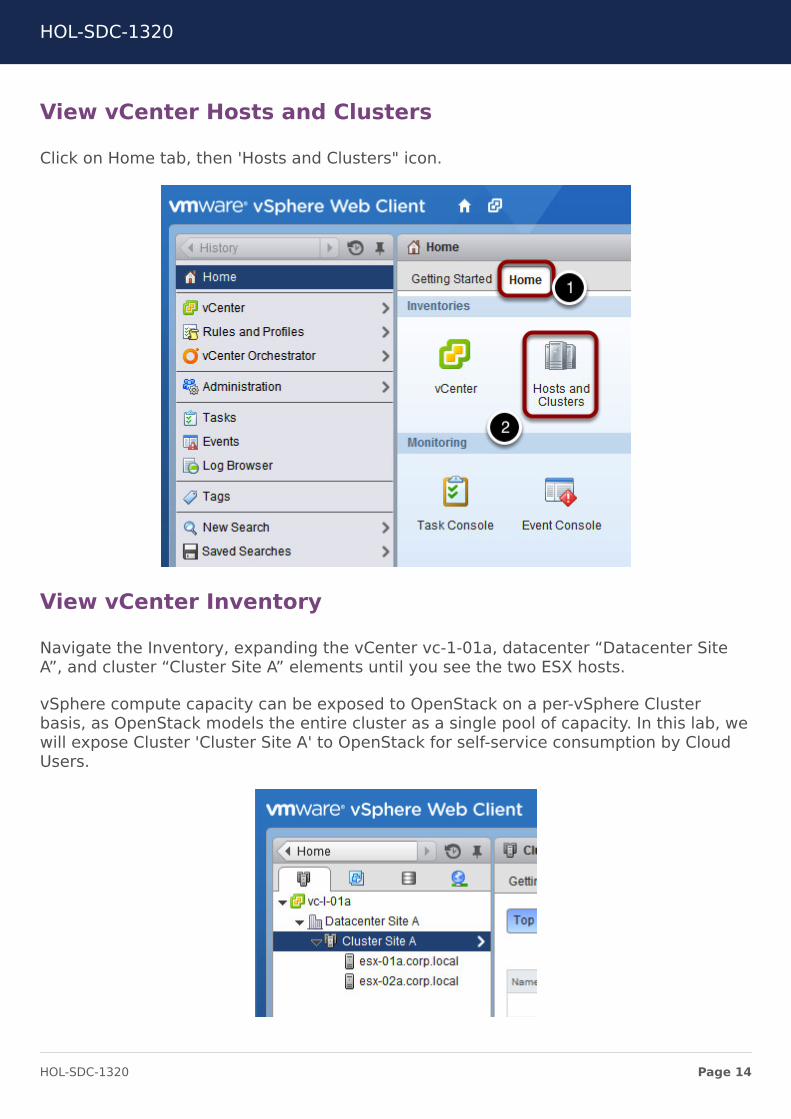
View vCenter Hosts and Clusters
Click on Home tab, then 'Hosts and Clusters" icon.
View vCenter Inventory
Navigate the Inventory, expanding the vCenter vc-1-01a, datacenter “Datacenter SiteA”, and cluster “Cluster Site A” elements until you see the two ESX hosts.
vSphere compute capacity can be exposed to OpenStack on a per-vSphere Clusterbasis, as OpenStack models the entire cluster as a single pool of capacity. In this lab, wewill expose Cluster 'Cluster Site A' to OpenStack for self-service consumption by CloudUsers.
HOL-SDC-1320
Page 14HOL-SDC-1320

View Cluster Properties
Click on 'Cluster Site A' in the Inventory, and then click on the 'Summary' tab of theCluster. This is the cluster we will expose as OpenStack capacity.
This is a small cluster, with 7.99 GHZ of CPU and 8 GBs of RAM. But OpenStack canhandle any cluster size up to vSphere limits and can provision workloads to multipleclusters for larger deployments.
Notice that as the Cloud Administrator, you can still take advantage of key vSpherefeatures like DRS and HA by enabling them on a cluster added to OpenStack.
Currently, DRS with auto-placement must be enabled for any cluster used byOpenStack, as OpenStack relies on DRS to spread VMs across all capacity available inthe cluster.
HOL-SDC-1320
Page 15HOL-SDC-1320
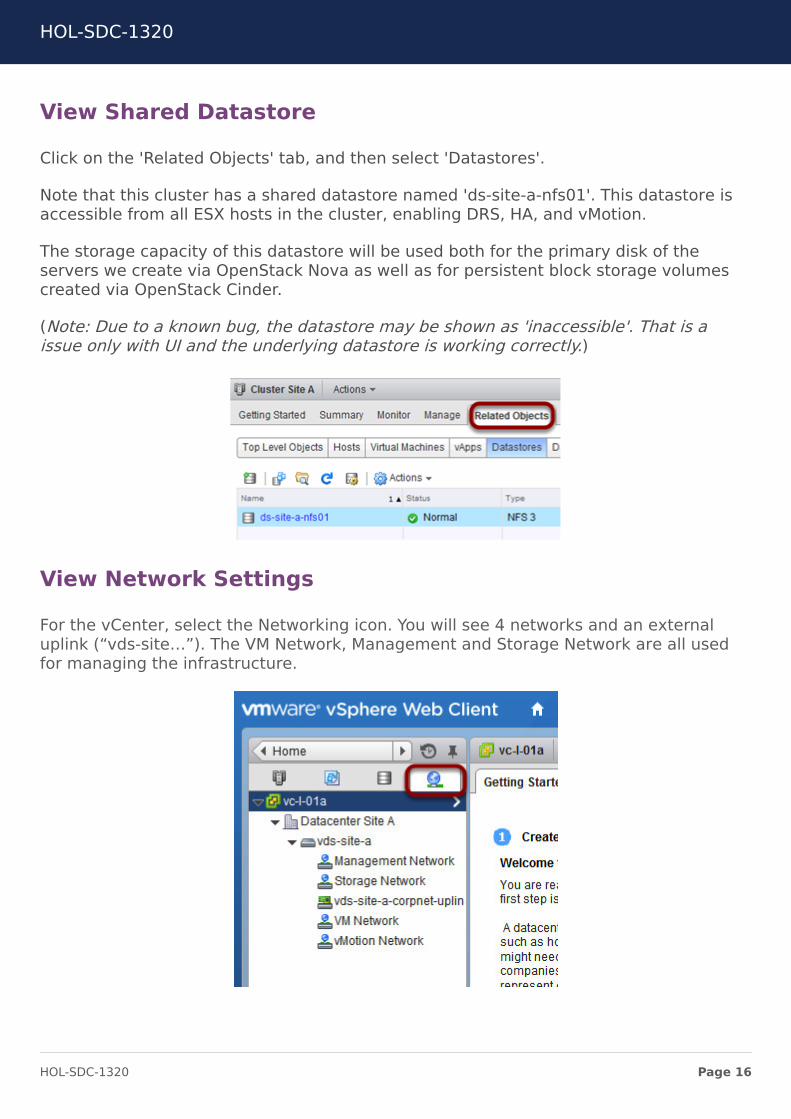
View Shared Datastore
Click on the 'Related Objects' tab, and then select 'Datastores'.
Note that this cluster has a shared datastore named 'ds-site-a-nfs01'. This datastore isaccessible from all ESX hosts in the cluster, enabling DRS, HA, and vMotion.
The storage capacity of this datastore will be used both for the primary disk of theservers we create via OpenStack Nova as well as for persistent block storage volumescreated via OpenStack Cinder.
(Note: Due to a known bug, the datastore may be shown as 'inaccessible'. That is aissue only with UI and the underlying datastore is working correctly.)
View Network Settings
For the vCenter, select the Networking icon. You will see 4 networks and an externaluplink (“vds-site…”). The VM Network, Management and Storage Network are all usedfor managing the infrastructure.
HOL-SDC-1320
Page 16HOL-SDC-1320
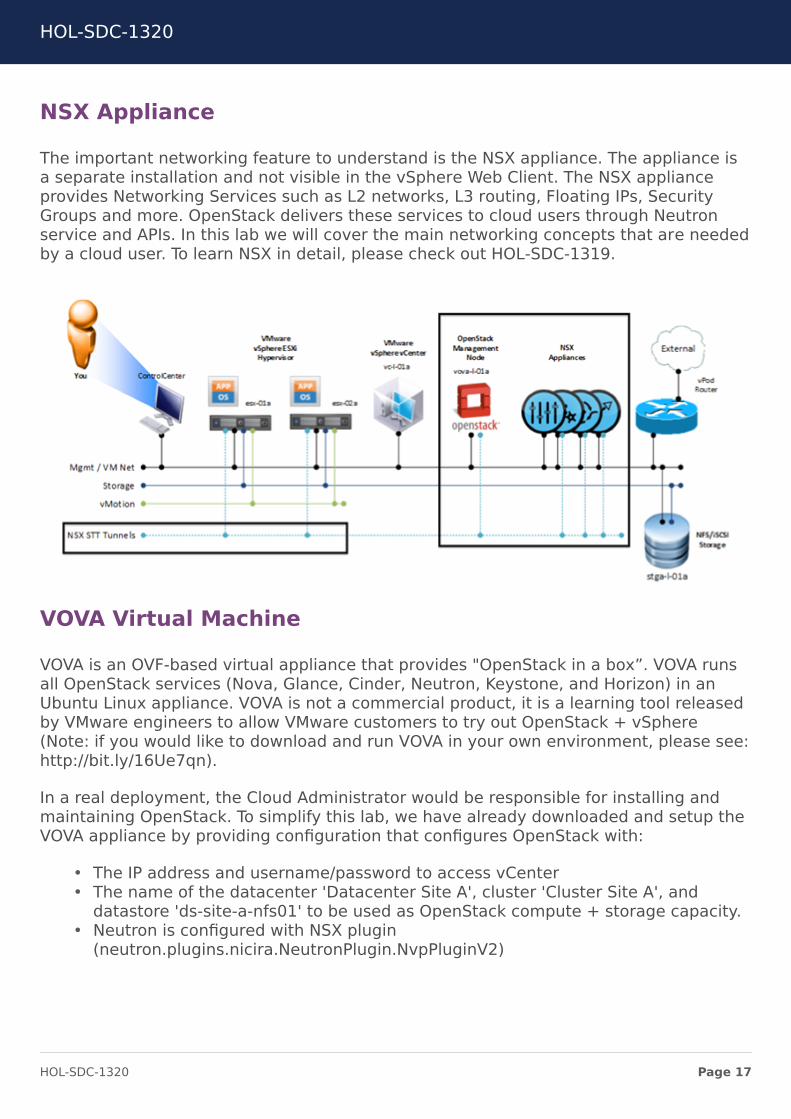
NSX Appliance
The important networking feature to understand is the NSX appliance. The appliance isa separate installation and not visible in the vSphere Web Client. The NSX applianceprovides Networking Services such as L2 networks, L3 routing, Floating IPs, SecurityGroups and more. OpenStack delivers these services to cloud users through Neutronservice and APIs. In this lab we will cover the main networking concepts that are neededby a cloud user. To learn NSX in detail, please check out HOL-SDC-1319.
VOVA Virtual Machine
VOVA is an OVF-based virtual appliance that provides "OpenStack in a box”. VOVA runsall OpenStack services (Nova, Glance, Cinder, Neutron, Keystone, and Horizon) in anUbuntu Linux appliance. VOVA is not a commercial product, it is a learning tool releasedby VMware engineers to allow VMware customers to try out OpenStack + vSphere(Note: if you would like to download and run VOVA in your own environment, please see:http://bit.ly/16Ue7qn).
In a real deployment, the Cloud Administrator would be responsible for installing andmaintaining OpenStack. To simplify this lab, we have already downloaded and setup theVOVA appliance by providing configuration that configures OpenStack with:
• The IP address and username/password to access vCenter• The name of the datacenter 'Datacenter Site A', cluster 'Cluster Site A', and
datastore 'ds-site-a-nfs01' to be used as OpenStack compute + storage capacity.• Neutron is configured with NSX plugin
(neutron.plugins.nicira.NeutronPlugin.NvpPluginV2)
HOL-SDC-1320
Page 17HOL-SDC-1320
Summary of Infrastructure Setup
We have now completed reviewing the underlying infrastructure for a simple OpenStackon vSphere deployment.
This is a single vSphere cluster with 2 ESXi hosts. DRS is enabled and all ESXi hostshave access to a shared datastore.
We have vCenter for managing ESX hosts and datastores. And NSX appliance providesnetworking services.
We are running the VOVA appliance that provides a full OpenStack install running as avirtual appliance.
Remember that this infrastructure view is something that is only visible to the CloudAdministrator and is not at all visible to Cloud Users.
HOL-SDC-1320
Page 18HOL-SDC-1320
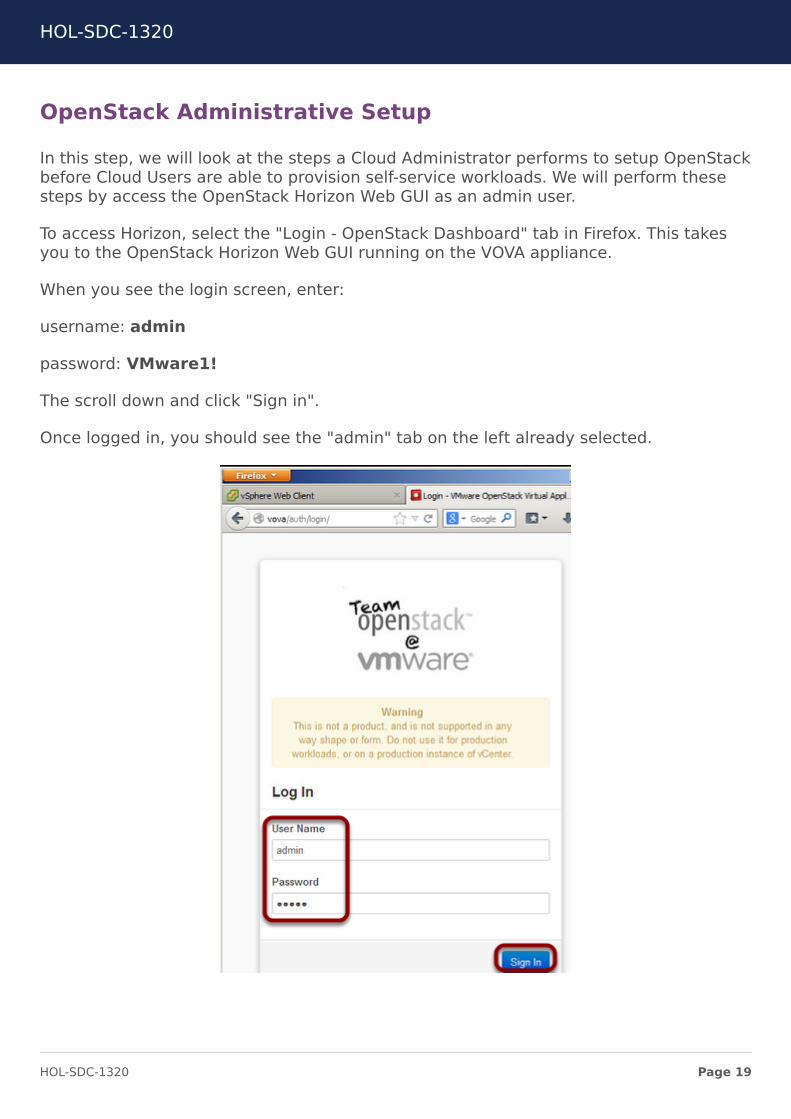
OpenStack Administrative Setup
In this step, we will look at the steps a Cloud Administrator performs to setup OpenStackbefore Cloud Users are able to provision self-service workloads. We will perform thesesteps by access the OpenStack Horizon Web GUI as an admin user.
To access Horizon, select the "Login - OpenStack Dashboard" tab in Firefox. This takesyou to the OpenStack Horizon Web GUI running on the VOVA appliance.
When you see the login screen, enter:
username: admin
password: VMware1!
The scroll down and click "Sign in".
Once logged in, you should see the "admin" tab on the left already selected.
HOL-SDC-1320
Page 19HOL-SDC-1320
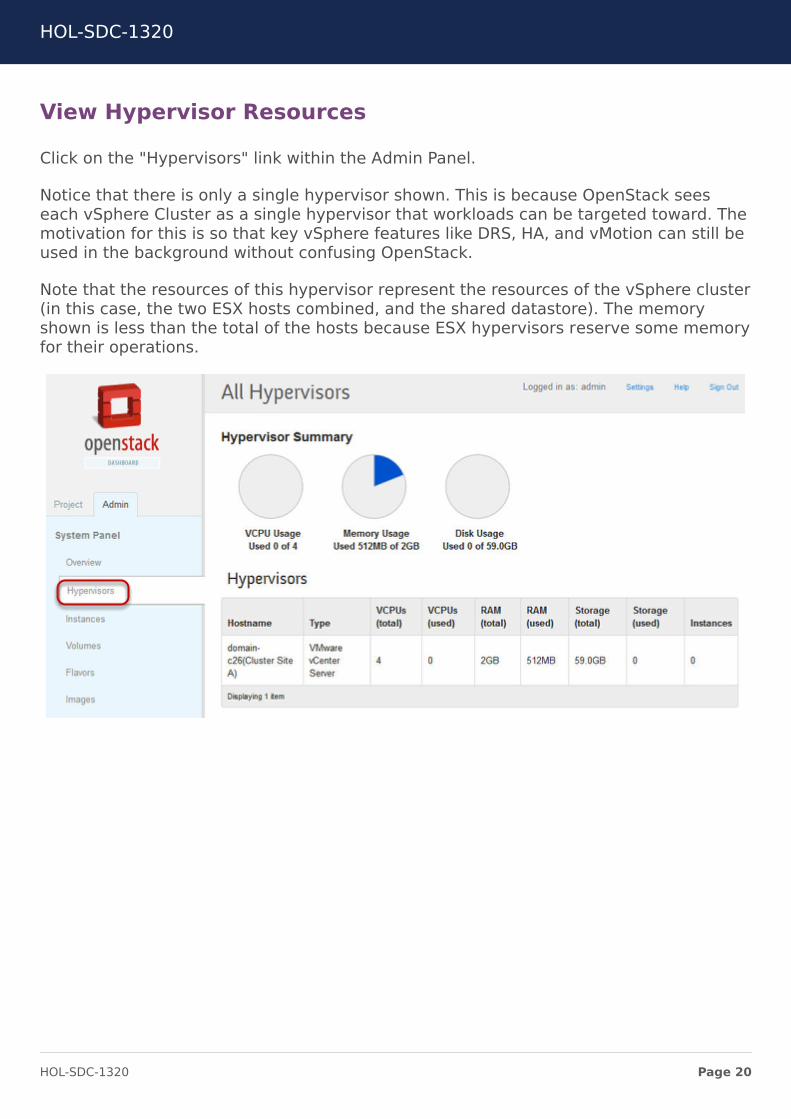
View Hypervisor Resources
Click on the "Hypervisors" link within the Admin Panel.
Notice that there is only a single hypervisor shown. This is because OpenStack seeseach vSphere Cluster as a single hypervisor that workloads can be targeted toward. Themotivation for this is so that key vSphere features like DRS, HA, and vMotion can still beused in the background without confusing OpenStack.
Note that the resources of this hypervisor represent the resources of the vSphere cluster(in this case, the two ESX hosts combined, and the shared datastore). The memoryshown is less than the total of the hosts because ESX hypervisors reserve some memoryfor their operations.
HOL-SDC-1320
Page 20HOL-SDC-1320
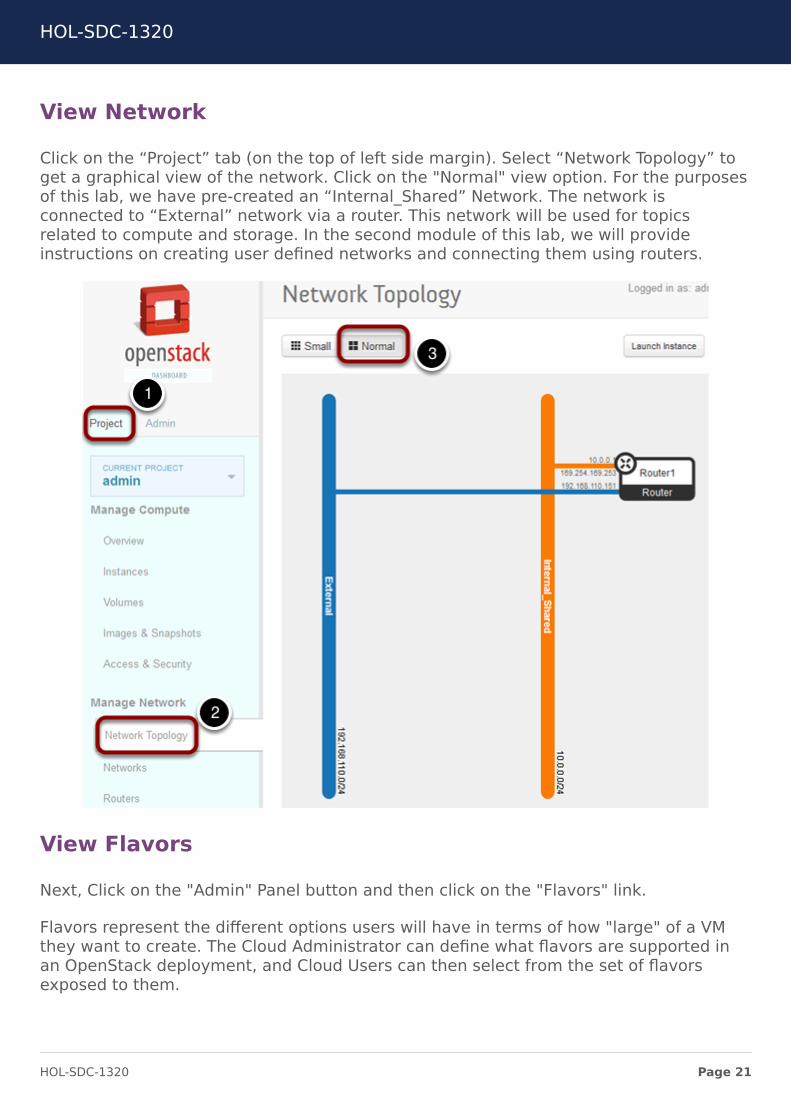
View Network
Click on the “Project” tab (on the top of left side margin). Select “Network Topology” toget a graphical view of the network. Click on the "Normal" view option. For the purposesof this lab, we have pre-created an “Internal_Shared” Network. The network isconnected to “External” network via a router. This network will be used for topicsrelated to compute and storage. In the second module of this lab, we will provideinstructions on creating user defined networks and connecting them using routers.
View Flavors
Next, Click on the "Admin" Panel button and then click on the "Flavors" link.
Flavors represent the different options users will have in terms of how "large" of a VMthey want to create. The Cloud Administrator can define what flavors are supported inan OpenStack deployment, and Cloud Users can then select from the set of flavorsexposed to them.
HOL-SDC-1320
Page 21HOL-SDC-1320
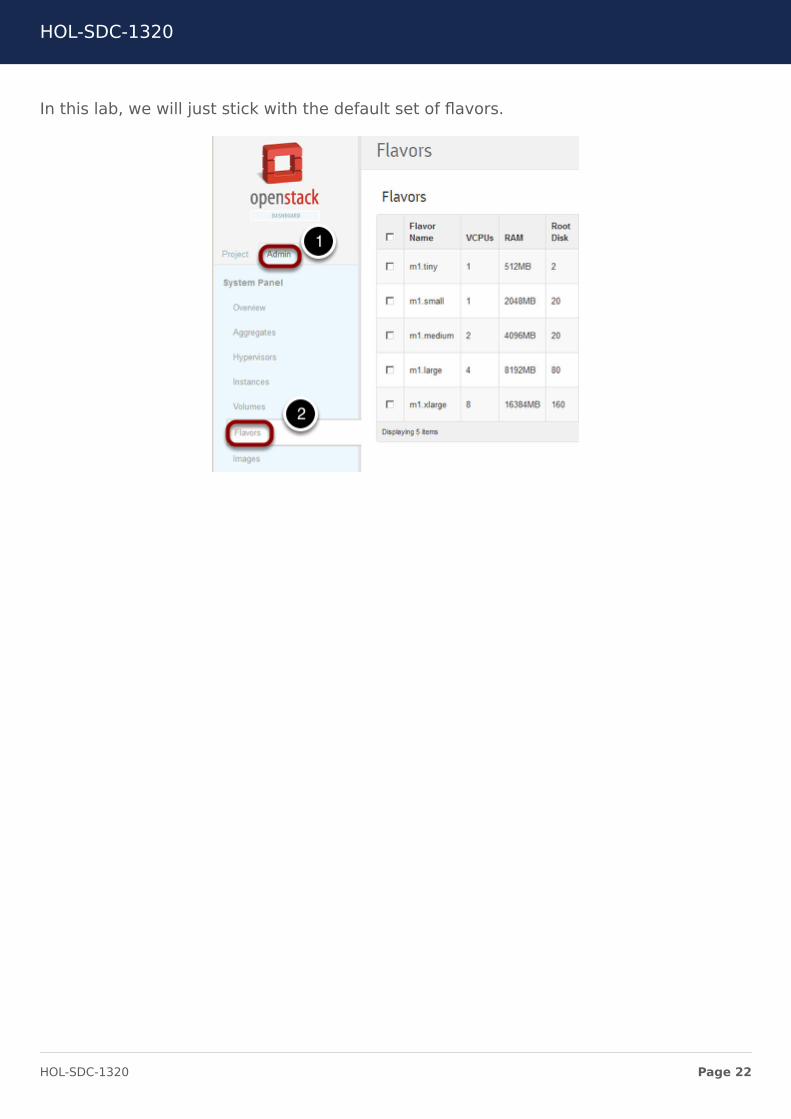
In this lab, we will just stick with the default set of flavors.
HOL-SDC-1320
Page 22HOL-SDC-1320

View Images
Click on the "Images" link within the Admin Panel.
This shows a list of all images that will be available to tenants to choose from when theylook to create a virtual machine. Cloud Administrators will typically upload a variety of"public" images to be made available to their users, and Cloud Users are able to extendthis set of images with their own custom images.
For simplicity, we have already uploaded a single Debian Linux image for use with thelab. Note that the disk format of VMDK indicates that it can be used with vSphere.
Managing Users and Projects
Next, scroll down and click on the "Projects" link within the Admin Panel.
To enable self-service, we must create one or more projects, and then place one or moreusers in each of those projects.
In this lab, we will have two self-service users, and simply create a project for each user.
HOL-SDC-1320
Page 23HOL-SDC-1320

To get started, click on the "Create Project" button in the upper right hand corner of thescreen.
HOL-SDC-1320
Page 24HOL-SDC-1320
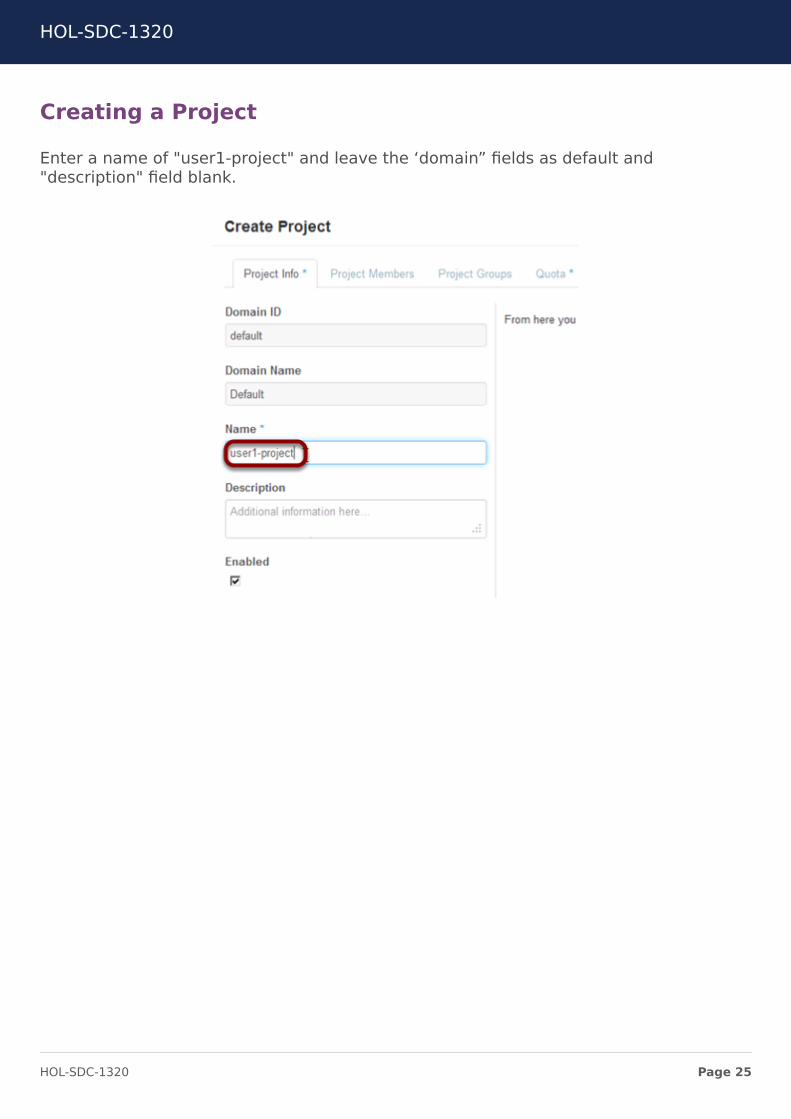
Creating a Project
Enter a name of "user1-project" and leave the ‘domain” fields as default and"description" field blank.
HOL-SDC-1320
Page 25HOL-SDC-1320
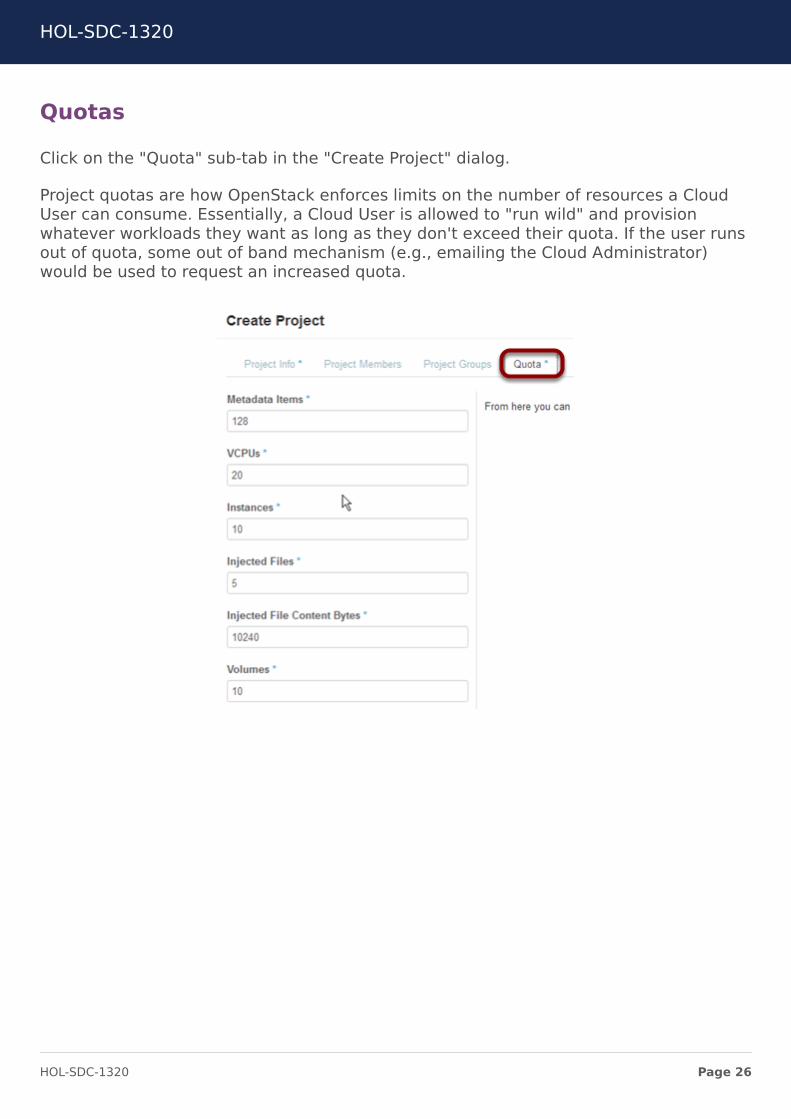
Quotas
Click on the "Quota" sub-tab in the "Create Project" dialog.
Project quotas are how OpenStack enforces limits on the number of resources a CloudUser can consume. Essentially, a Cloud User is allowed to "run wild" and provisionwhatever workloads they want as long as they don't exceed their quota. If the user runsout of quota, some out of band mechanism (e.g., emailing the Cloud Administrator)would be used to request an increased quota.
HOL-SDC-1320
Page 26HOL-SDC-1320
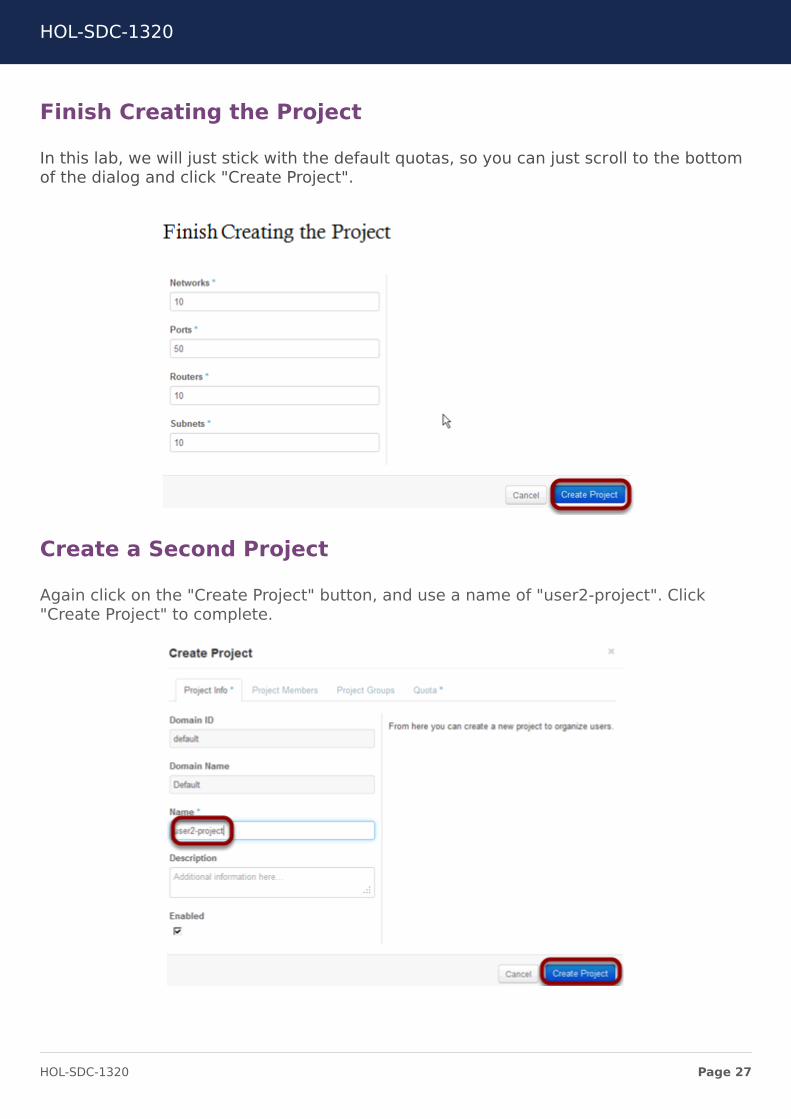
Finish Creating the Project
In this lab, we will just stick with the default quotas, so you can just scroll to the bottomof the dialog and click "Create Project".
Create a Second Project
Again click on the "Create Project" button, and use a name of "user2-project". Click"Create Project" to complete.
HOL-SDC-1320
Page 27HOL-SDC-1320
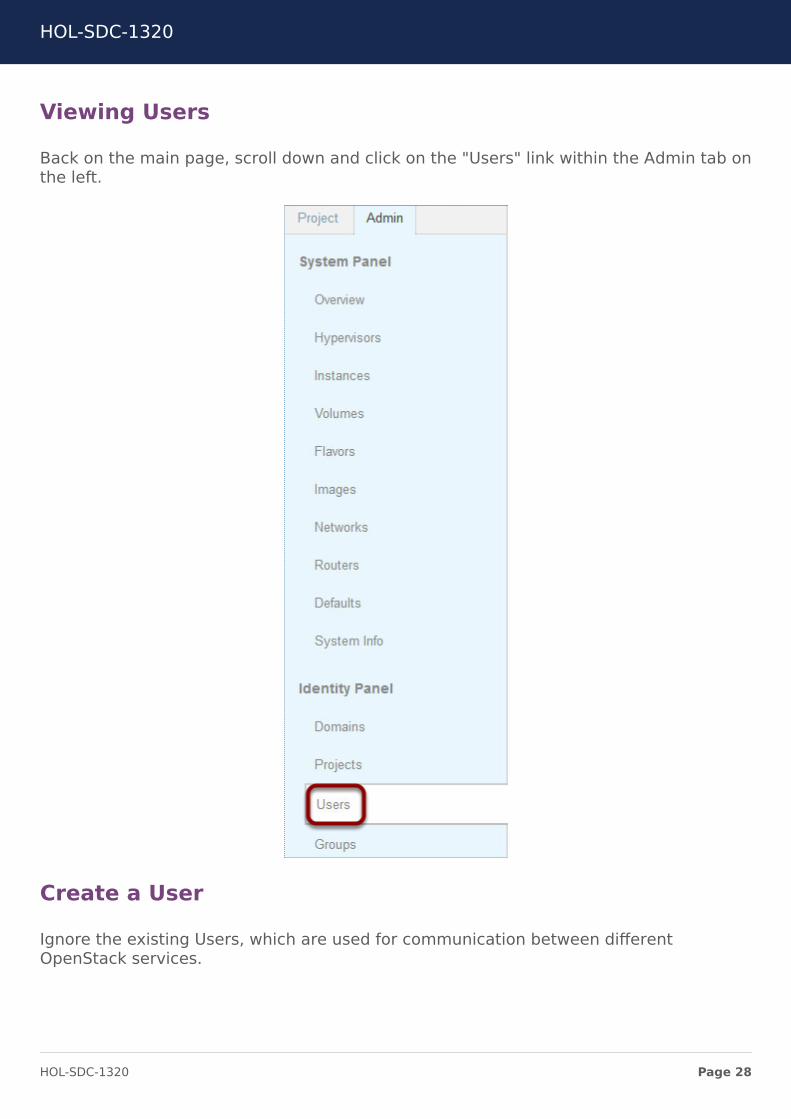
Viewing Users
Back on the main page, scroll down and click on the "Users" link within the Admin tab onthe left.
Create a User
Ignore the existing Users, which are used for communication between differentOpenStack services.
HOL-SDC-1320
Page 28HOL-SDC-1320
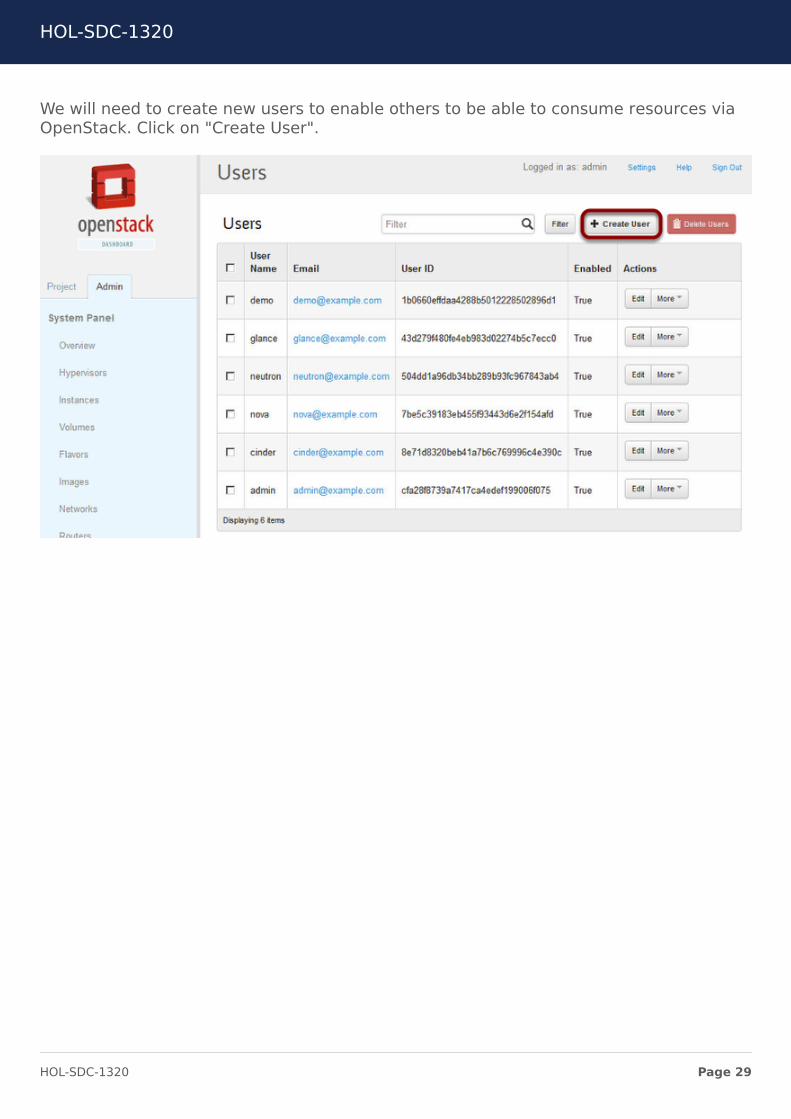
We will need to create new users to enable others to be able to consume resources viaOpenStack. Click on "Create User".
HOL-SDC-1320
Page 29HOL-SDC-1320

Create a User - perimeters
Click the "Create User" button, and create a user with the following settings:
• User Name: user1• Email: [email protected]• Password: user1• Confirm Password: user1• Primary Project: user1-project• Role: Member
Leave the “domain” fiels as default and Click on "Create User"
HOL-SDC-1320
Page 30HOL-SDC-1320
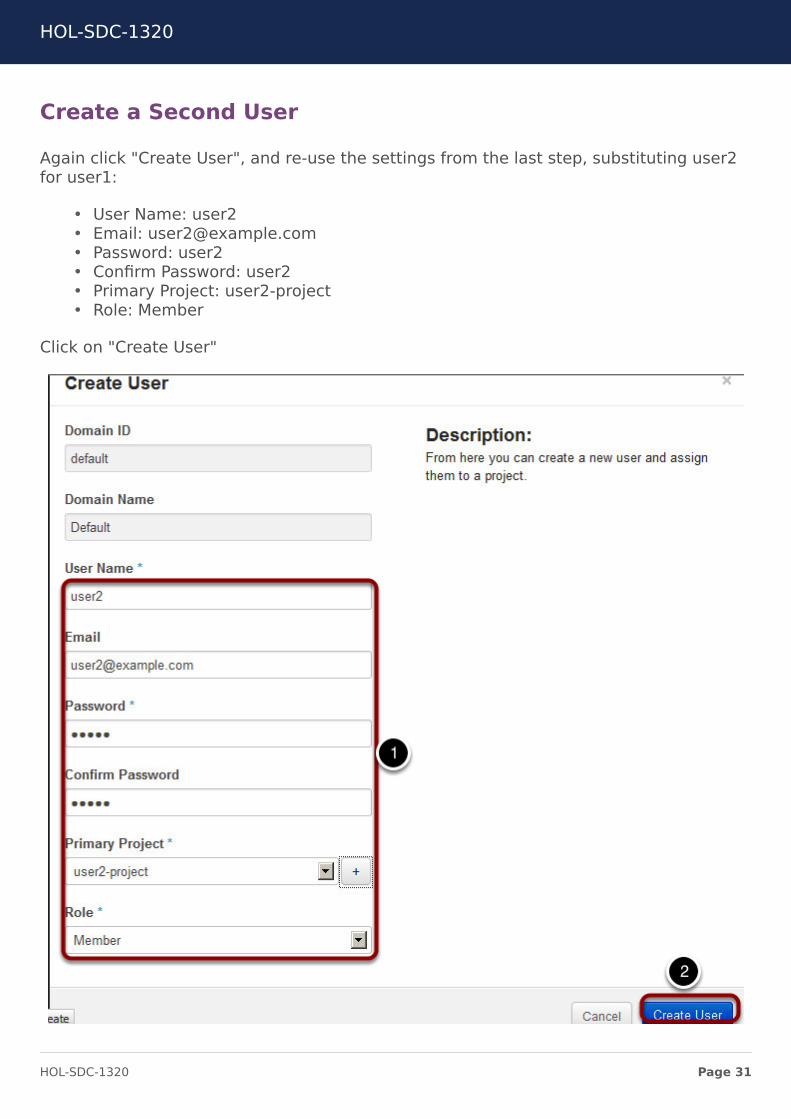
Create a Second User
Again click "Create User", and re-use the settings from the last step, substituting user2for user1:
• User Name: user2• Email: [email protected]• Password: user2• Confirm Password: user2• Primary Project: user2-project• Role: Member
Click on "Create User"
HOL-SDC-1320
Page 31HOL-SDC-1320

Logout Admin User
We are now complete with the OpenStack infrastructure setup, as we have two self-service users created, each with their own project + resource quota.
Click the "Sign Out" link in the top right corner of the browser page. This will take youback to the login page.
Provisioning VM Instances via the OpenStack GUI
Now we will shift our vantage point and take on the role of a Cloud User (user1) whowants to provision a VM via the self-service OpenStack Horizon web GUI. In this lab, wewill use the OpenStack term "instance", which simply is another term to describe a VM.
Log into the Horizon Web GUI, this time using:
• User Name: user1• Password: user1
HOL-SDC-1320
Page 32HOL-SDC-1320
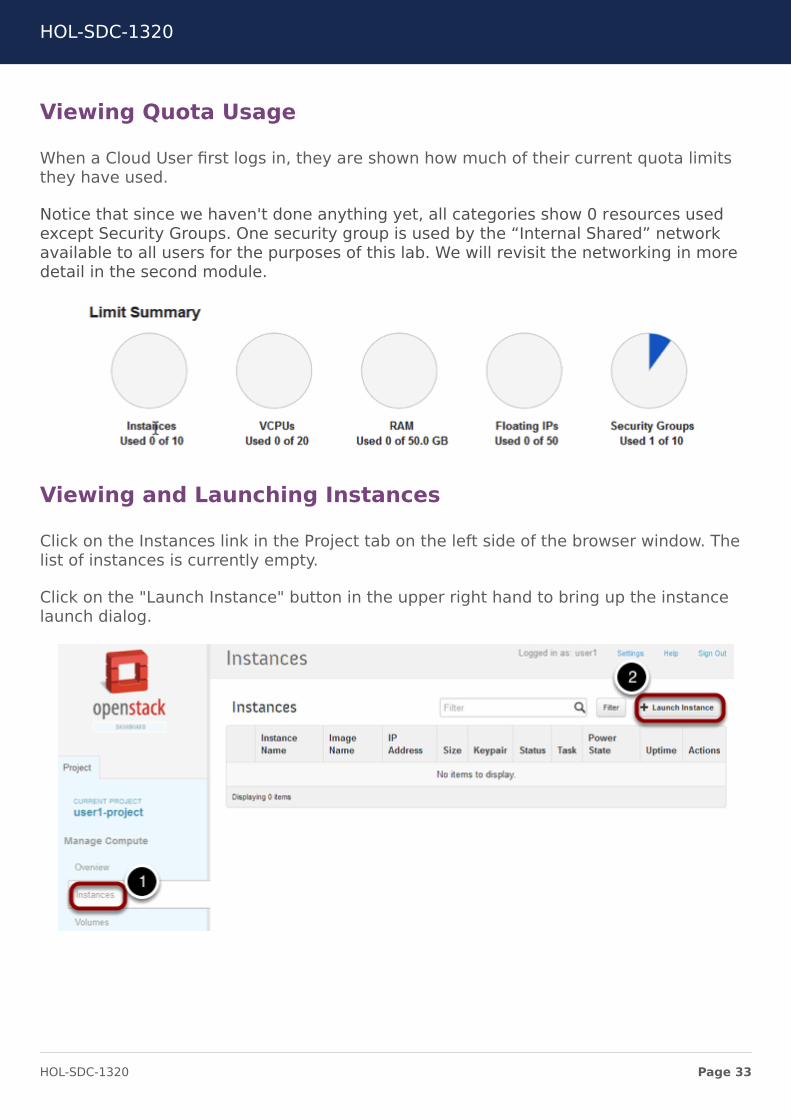
Viewing Quota Usage
When a Cloud User first logs in, they are shown how much of their current quota limitsthey have used.
Notice that since we haven't done anything yet, all categories show 0 resources usedexcept Security Groups. One security group is used by the “Internal Shared” networkavailable to all users for the purposes of this lab. We will revisit the networking in moredetail in the second module.
Viewing and Launching Instances
Click on the Instances link in the Project tab on the left side of the browser window. Thelist of instances is currently empty.
Click on the "Launch Instance" button in the upper right hand to bring up the instancelaunch dialog.
HOL-SDC-1320
Page 33HOL-SDC-1320
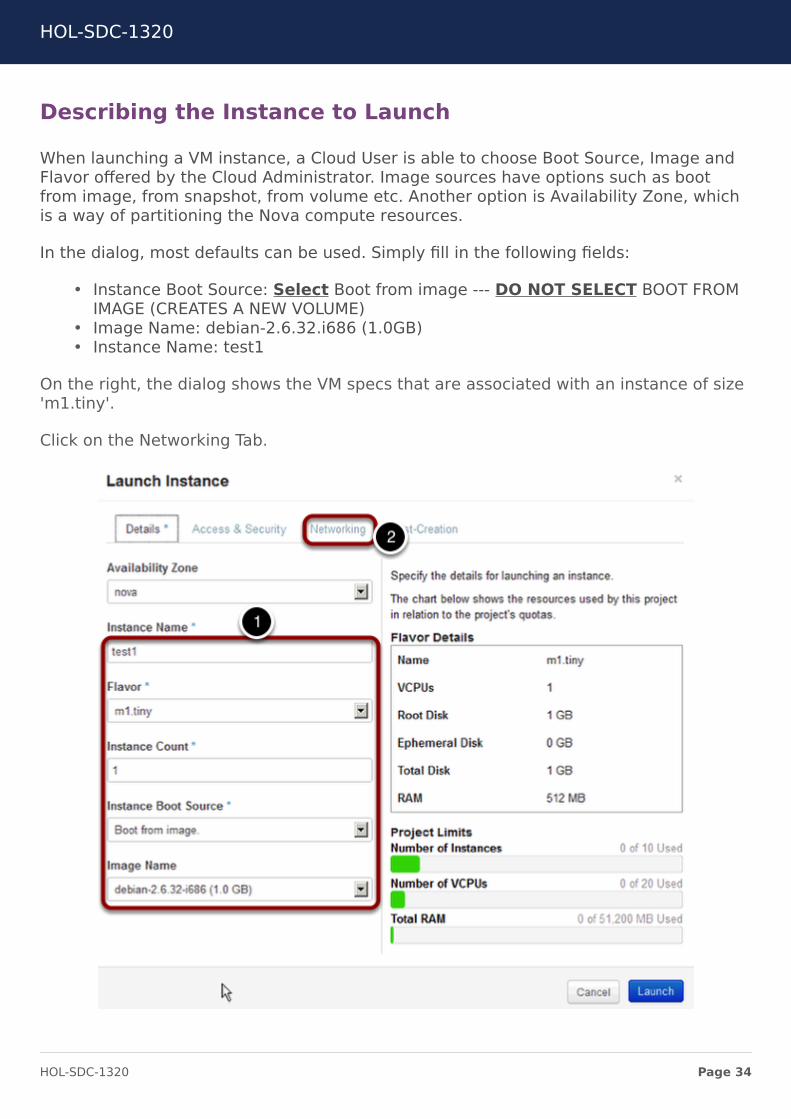
Describing the Instance to Launch
When launching a VM instance, a Cloud User is able to choose Boot Source, Image andFlavor offered by the Cloud Administrator. Image sources have options such as bootfrom image, from snapshot, from volume etc. Another option is Availability Zone, whichis a way of partitioning the Nova compute resources.
In the dialog, most defaults can be used. Simply fill in the following fields:
• Instance Boot Source: Select Boot from image --- DO NOT SELECT BOOT FROMIMAGE (CREATES A NEW VOLUME)
• Image Name: debian-2.6.32.i686 (1.0GB)• Instance Name: test1
On the right, the dialog shows the VM specs that are associated with an instance of size'm1.tiny'.
Click on the Networking Tab.
HOL-SDC-1320
Page 34HOL-SDC-1320
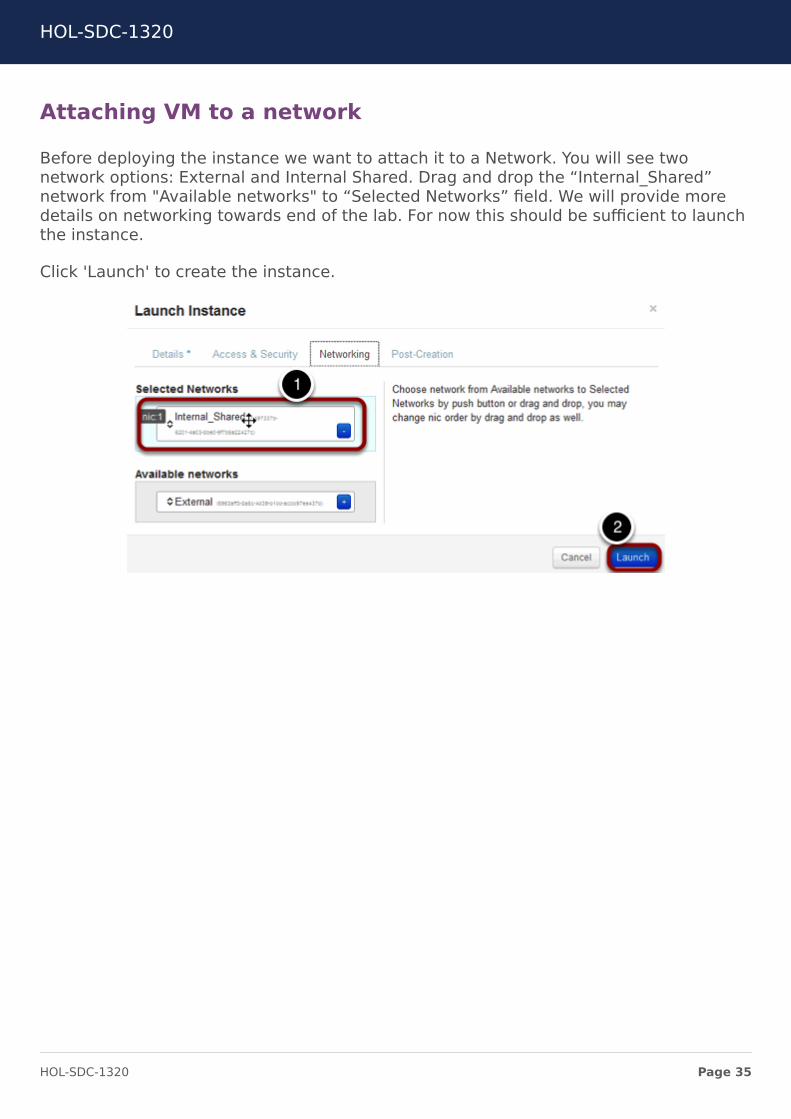
Attaching VM to a network
Before deploying the instance we want to attach it to a Network. You will see twonetwork options: External and Internal Shared. Drag and drop the “Internal_Shared”network from "Available networks" to “Selected Networks” field. We will provide moredetails on networking towards end of the lab. For now this should be sufficient to launchthe instance.
Click 'Launch' to create the instance.
HOL-SDC-1320
Page 35HOL-SDC-1320

Viewing Instance Status
This will take you back to the list of instances, where we now see our test1 in the list ofInstances.
In the list, you will initially see the 'Status' field of the instance as 'Build', and after lessthan a minute it will transition to 'Active'.
This means the VM instance has been booted on the back-end vSphere infrastructure.
Remember that as a Cloud User, you do not have access to the vCenter GUI, so all ofthe information you get about a VM is shown via the Horizon GUI.
Click on the 'test1' link in the Instance Name column to view the details of the instance.
HOL-SDC-1320
Page 36HOL-SDC-1320
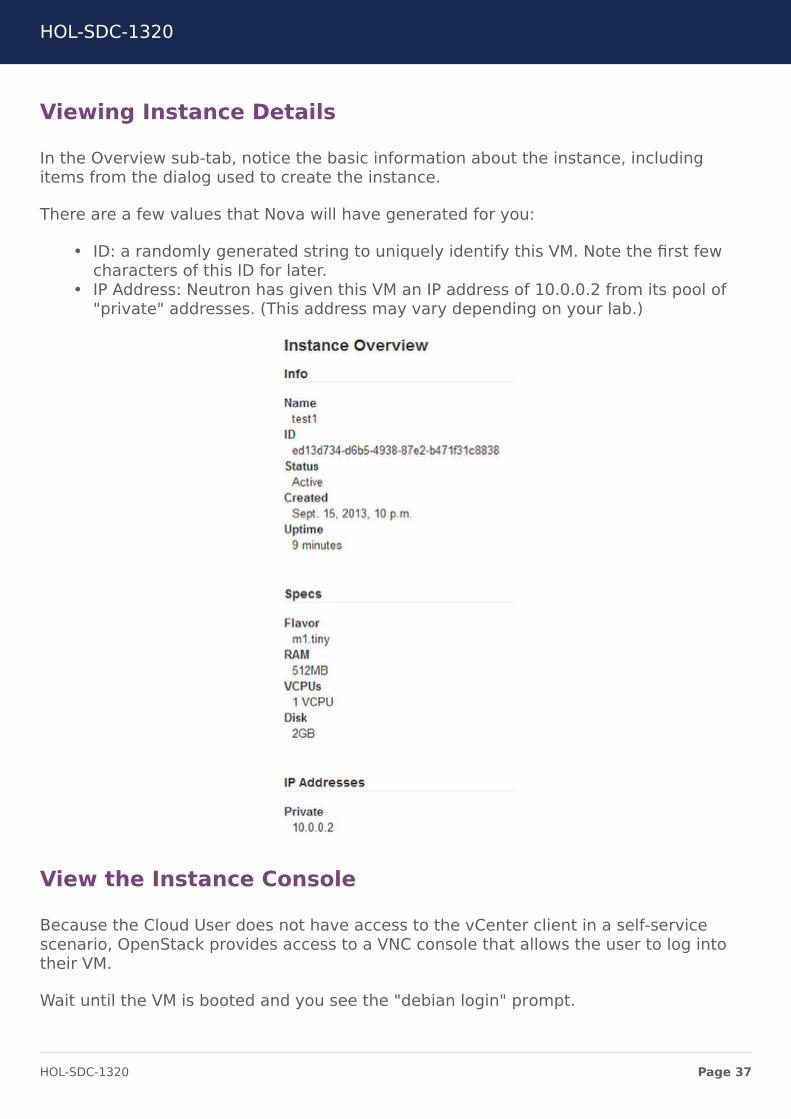
Viewing Instance Details
In the Overview sub-tab, notice the basic information about the instance, includingitems from the dialog used to create the instance.
There are a few values that Nova will have generated for you:
• ID: a randomly generated string to uniquely identify this VM. Note the first fewcharacters of this ID for later.
• IP Address: Neutron has given this VM an IP address of 10.0.0.2 from its pool of"private" addresses. (This address may vary depending on your lab.)
View the Instance Console
Because the Cloud User does not have access to the vCenter client in a self-servicescenario, OpenStack provides access to a VNC console that allows the user to log intotheir VM.
Wait until the VM is booted and you see the "debian login" prompt.
HOL-SDC-1320
Page 37HOL-SDC-1320
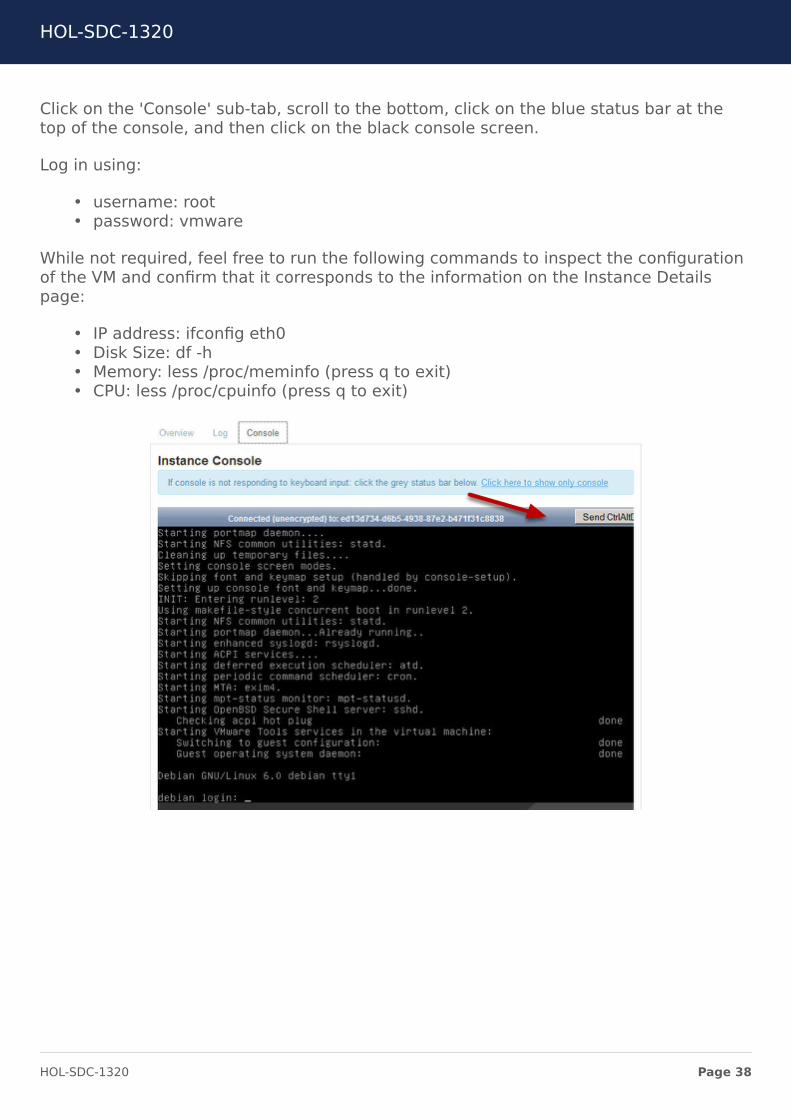
Click on the 'Console' sub-tab, scroll to the bottom, click on the blue status bar at thetop of the console, and then click on the black console screen.
Log in using:
• username: root• password: vmware
While not required, feel free to run the following commands to inspect the configurationof the VM and confirm that it corresponds to the information on the Instance Detailspage:
• IP address: ifconfig eth0• Disk Size: df -h• Memory: less /proc/meminfo (press q to exit)• CPU: less /proc/cpuinfo (press q to exit)
HOL-SDC-1320
Page 38HOL-SDC-1320
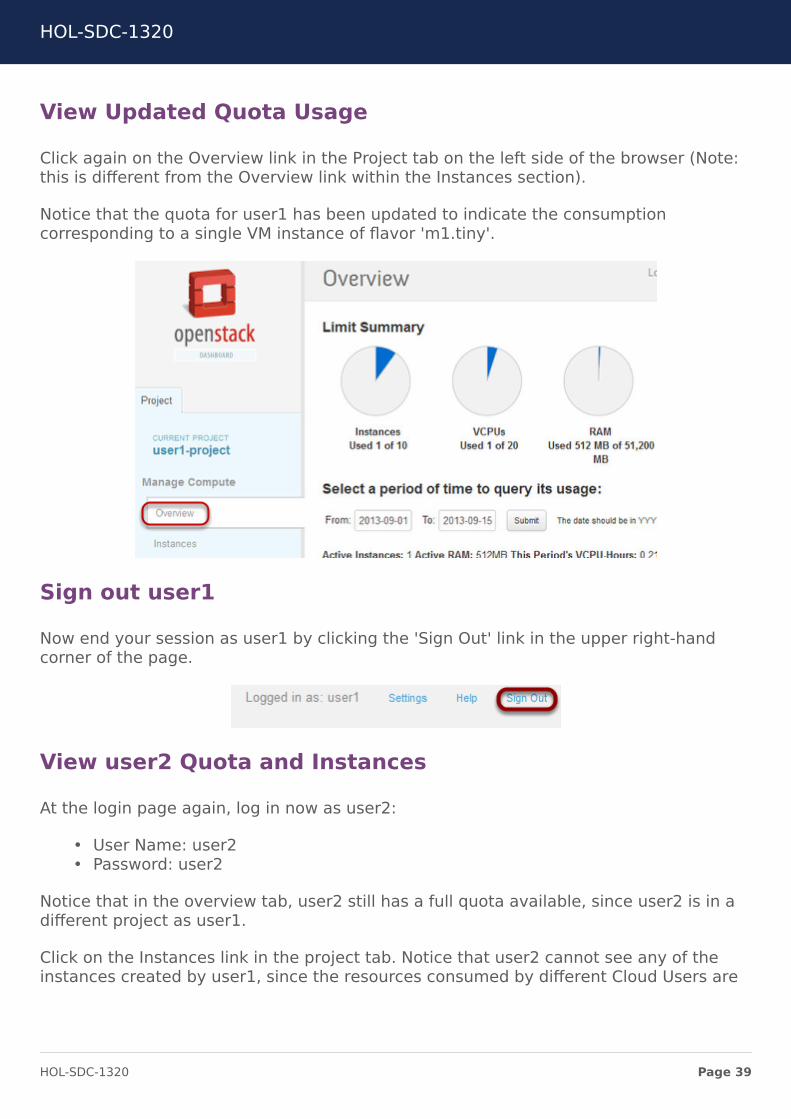
View Updated Quota Usage
Click again on the Overview link in the Project tab on the left side of the browser (Note:this is different from the Overview link within the Instances section).
Notice that the quota for user1 has been updated to indicate the consumptioncorresponding to a single VM instance of flavor 'm1.tiny'.
Sign out user1
Now end your session as user1 by clicking the 'Sign Out' link in the upper right-handcorner of the page.
View user2 Quota and Instances
At the login page again, log in now as user2:
• User Name: user2• Password: user2
Notice that in the overview tab, user2 still has a full quota available, since user2 is in adifferent project as user1.
Click on the Instances link in the project tab. Notice that user2 cannot see any of theinstances created by user1, since the resources consumed by different Cloud Users are
HOL-SDC-1320
Page 39HOL-SDC-1320
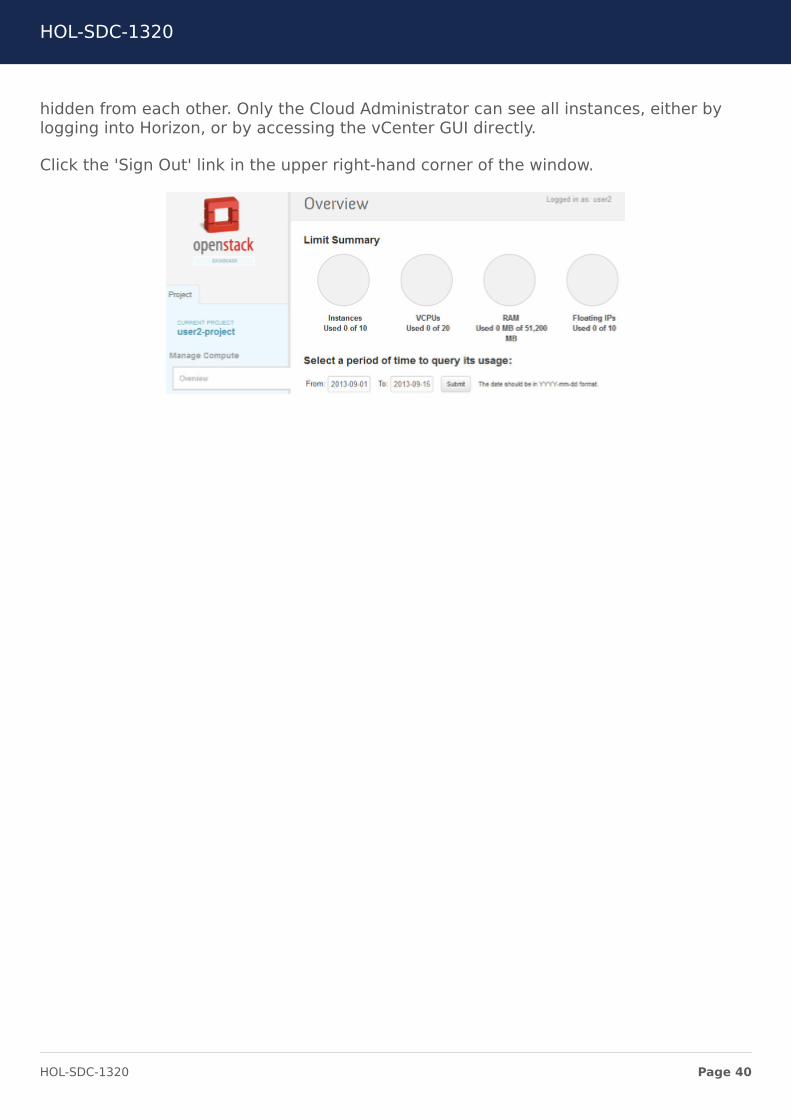
hidden from each other. Only the Cloud Administrator can see all instances, either bylogging into Horizon, or by accessing the vCenter GUI directly.
Click the 'Sign Out' link in the upper right-hand corner of the window.
HOL-SDC-1320
Page 40HOL-SDC-1320
Viewing the Provisioned VM Instance via the vSphere WebClient
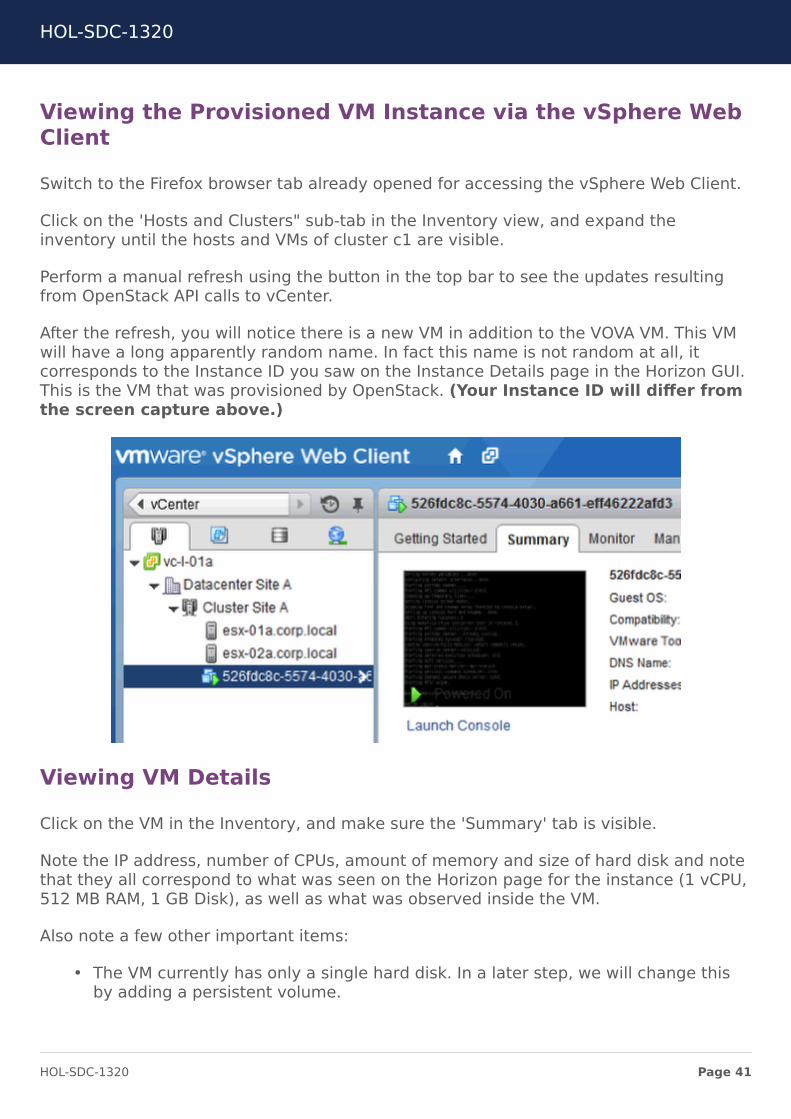
Switch to the Firefox browser tab already opened for accessing the vSphere Web Client.
Click on the 'Hosts and Clusters" sub-tab in the Inventory view, and expand theinventory until the hosts and VMs of cluster c1 are visible.
Perform a manual refresh using the button in the top bar to see the updates resultingfrom OpenStack API calls to vCenter.
After the refresh, you will notice there is a new VM in addition to the VOVA VM. This VMwill have a long apparently random name. In fact this name is not random at all, itcorresponds to the Instance ID you saw on the Instance Details page in the Horizon GUI.This is the VM that was provisioned by OpenStack. (Your Instance ID will differ fromthe screen capture above.)
Viewing VM Details
Click on the VM in the Inventory, and make sure the 'Summary' tab is visible.
Note the IP address, number of CPUs, amount of memory and size of hard disk and notethat they all correspond to what was seen on the Horizon page for the instance (1 vCPU,512 MB RAM, 1 GB Disk), as well as what was observed inside the VM.
Also note a few other important items:
• The VM currently has only a single hard disk. In a later step, we will change thisby adding a persistent volume.
HOL-SDC-1320
Page 41HOL-SDC-1320
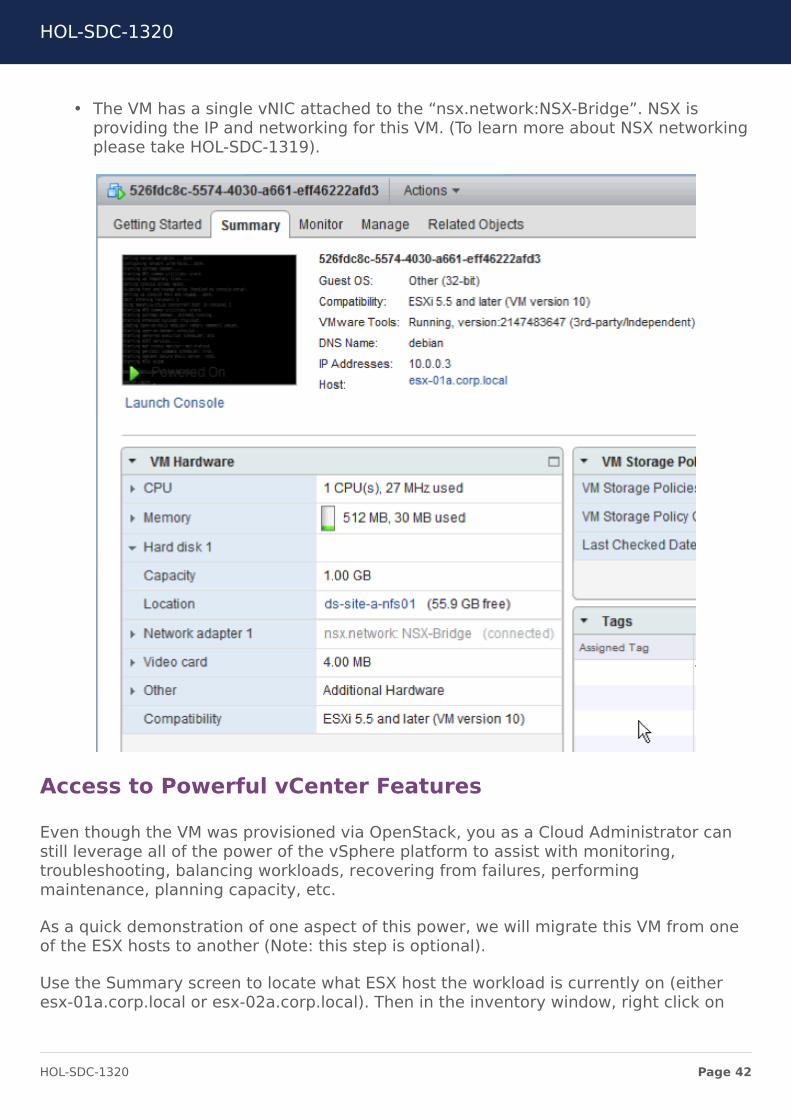
• The VM has a single vNIC attached to the “nsx.network:NSX-Bridge”. NSX isproviding the IP and networking for this VM. (To learn more about NSX networkingplease take HOL-SDC-1319).
Access to Powerful vCenter Features
Even though the VM was provisioned via OpenStack, you as a Cloud Administrator canstill leverage all of the power of the vSphere platform to assist with monitoring,troubleshooting, balancing workloads, recovering from failures, performingmaintenance, planning capacity, etc.
As a quick demonstration of one aspect of this power, we will migrate this VM from oneof the ESX hosts to another (Note: this step is optional).
Use the Summary screen to locate what ESX host the workload is currently on (eitheresx-01a.corp.local or esx-02a.corp.local). Then in the inventory window, right click on
HOL-SDC-1320
Page 42HOL-SDC-1320
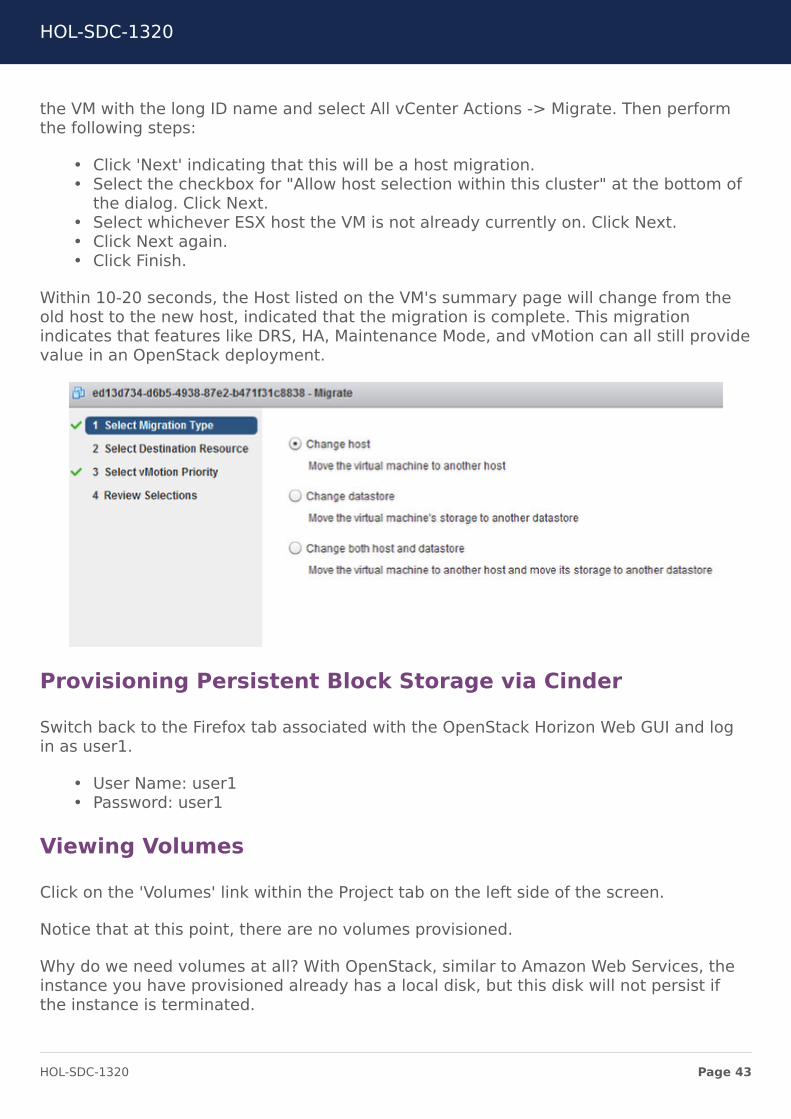
the VM with the long ID name and select All vCenter Actions -> Migrate. Then performthe following steps:
• Click 'Next' indicating that this will be a host migration.• Select the checkbox for "Allow host selection within this cluster" at the bottom of
the dialog. Click Next.• Select whichever ESX host the VM is not already currently on. Click Next.• Click Next again.• Click Finish.
Within 10-20 seconds, the Host listed on the VM's summary page will change from theold host to the new host, indicated that the migration is complete. This migrationindicates that features like DRS, HA, Maintenance Mode, and vMotion can all still providevalue in an OpenStack deployment.
Provisioning Persistent Block Storage via Cinder
Switch back to the Firefox tab associated with the OpenStack Horizon Web GUI and login as user1.
• User Name: user1• Password: user1
Viewing Volumes
Click on the 'Volumes' link within the Project tab on the left side of the screen.
Notice that at this point, there are no volumes provisioned.
Why do we need volumes at all? With OpenStack, similar to Amazon Web Services, theinstance you have provisioned already has a local disk, but this disk will not persist ifthe instance is terminated.
HOL-SDC-1320
Page 43HOL-SDC-1320
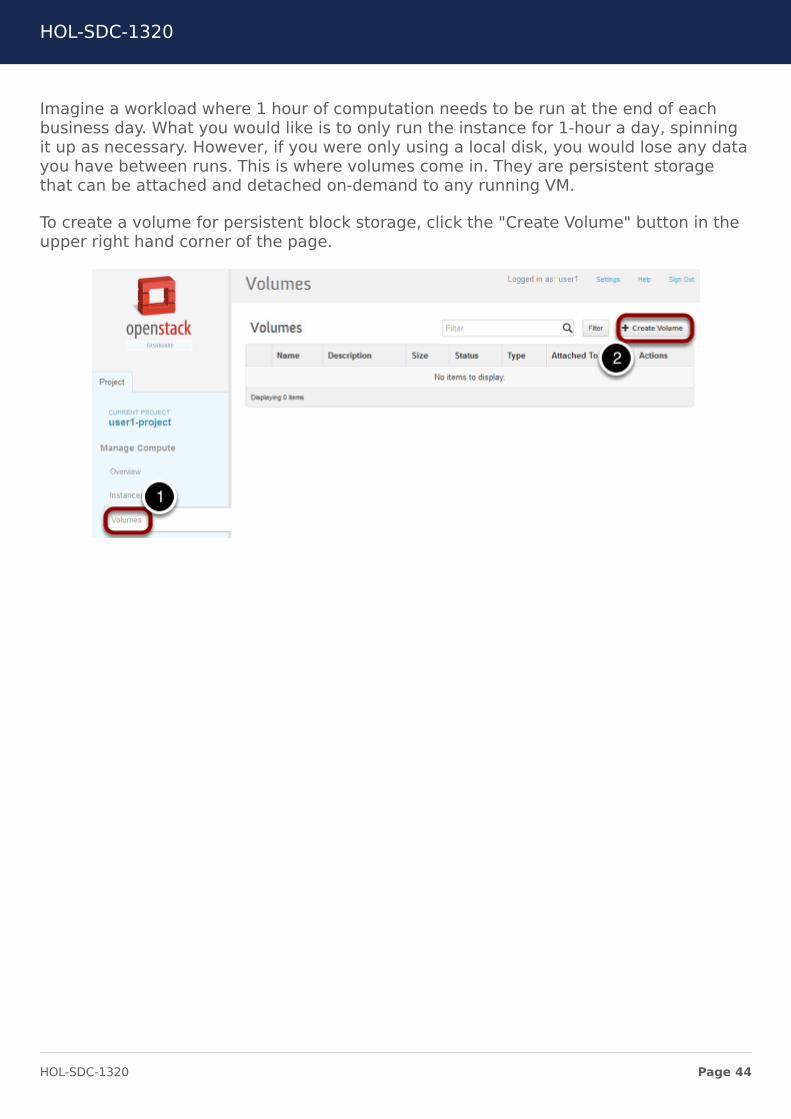
Imagine a workload where 1 hour of computation needs to be run at the end of eachbusiness day. What you would like is to only run the instance for 1-hour a day, spinningit up as necessary. However, if you were only using a local disk, you would lose any datayou have between runs. This is where volumes come in. They are persistent storagethat can be attached and detached on-demand to any running VM.
To create a volume for persistent block storage, click the "Create Volume" button in theupper right hand corner of the page.
HOL-SDC-1320
Page 44HOL-SDC-1320
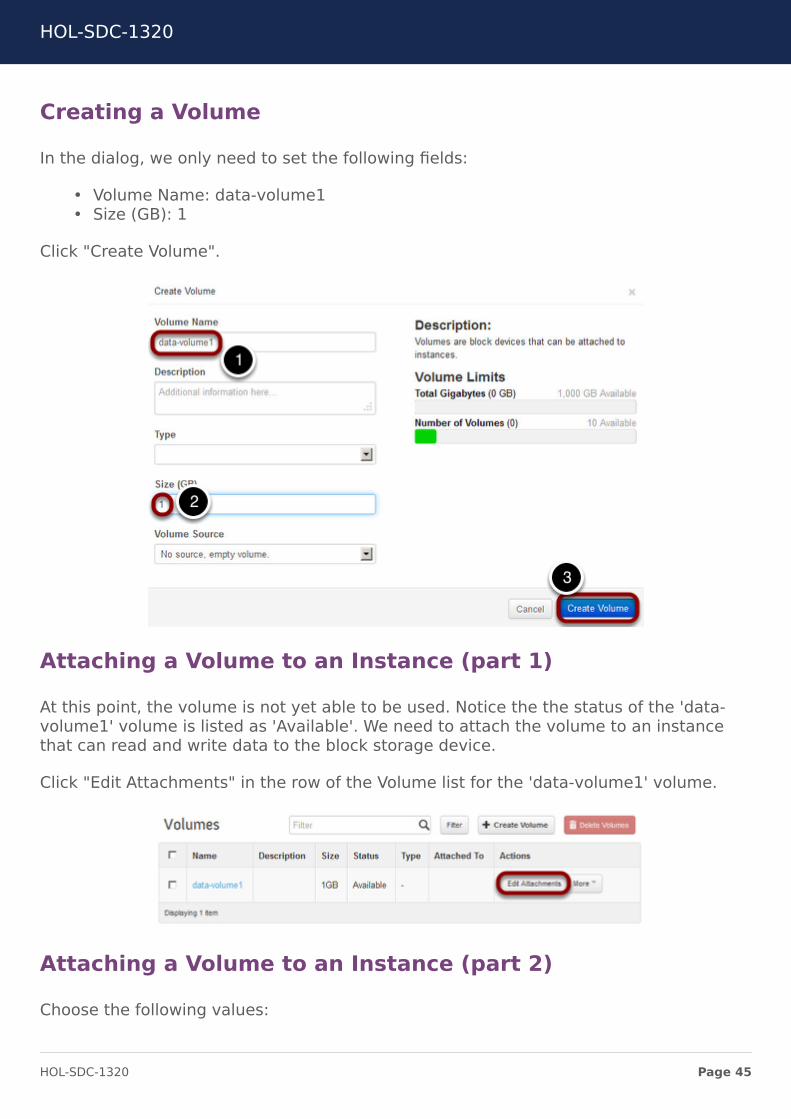
Creating a Volume
In the dialog, we only need to set the following fields:
• Volume Name: data-volume1• Size (GB): 1
Click "Create Volume".
Attaching a Volume to an Instance (part 1)
At this point, the volume is not yet able to be used. Notice the the status of the 'data-volume1' volume is listed as 'Available'. We need to attach the volume to an instancethat can read and write data to the block storage device.
Click "Edit Attachments" in the row of the Volume list for the 'data-volume1' volume.
Attaching a Volume to an Instance (part 2)
Choose the following values:
HOL-SDC-1320
Page 45HOL-SDC-1320
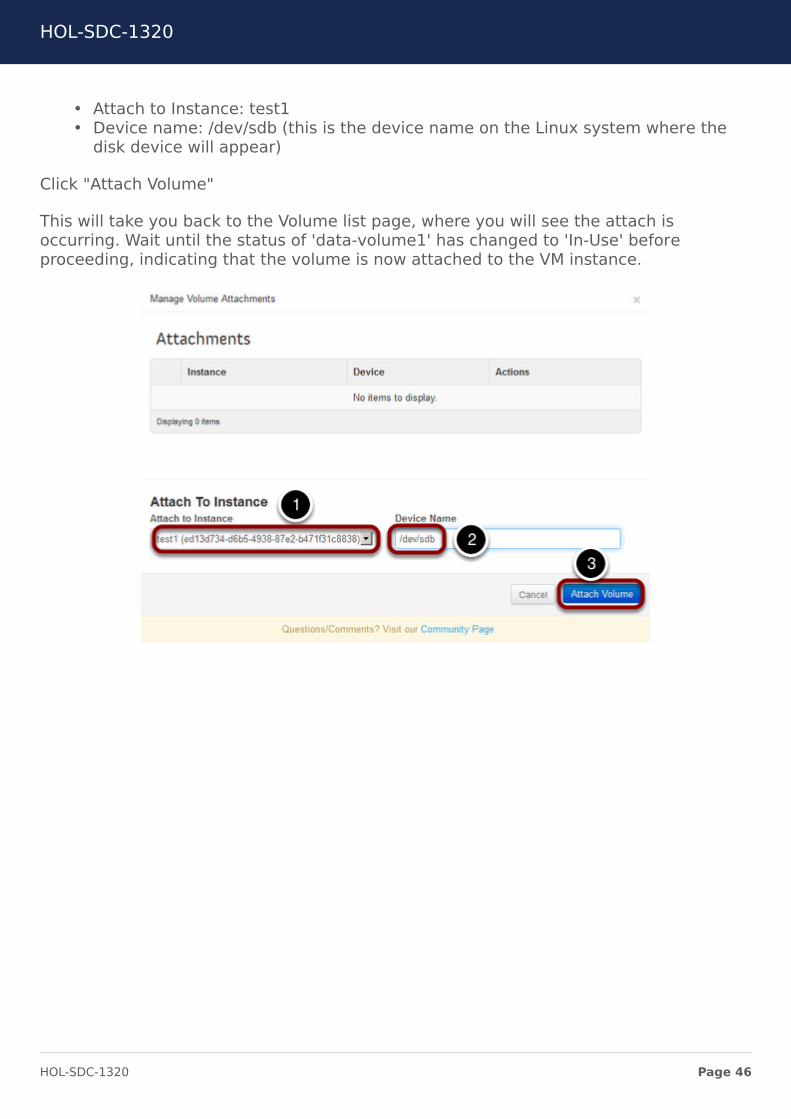
• Attach to Instance: test1• Device name: /dev/sdb (this is the device name on the Linux system where the
disk device will appear)
Click "Attach Volume"
This will take you back to the Volume list page, where you will see the attach isoccurring. Wait until the status of 'data-volume1' has changed to 'In-Use' beforeproceeding, indicating that the volume is now attached to the VM instance.
HOL-SDC-1320
Page 46HOL-SDC-1320
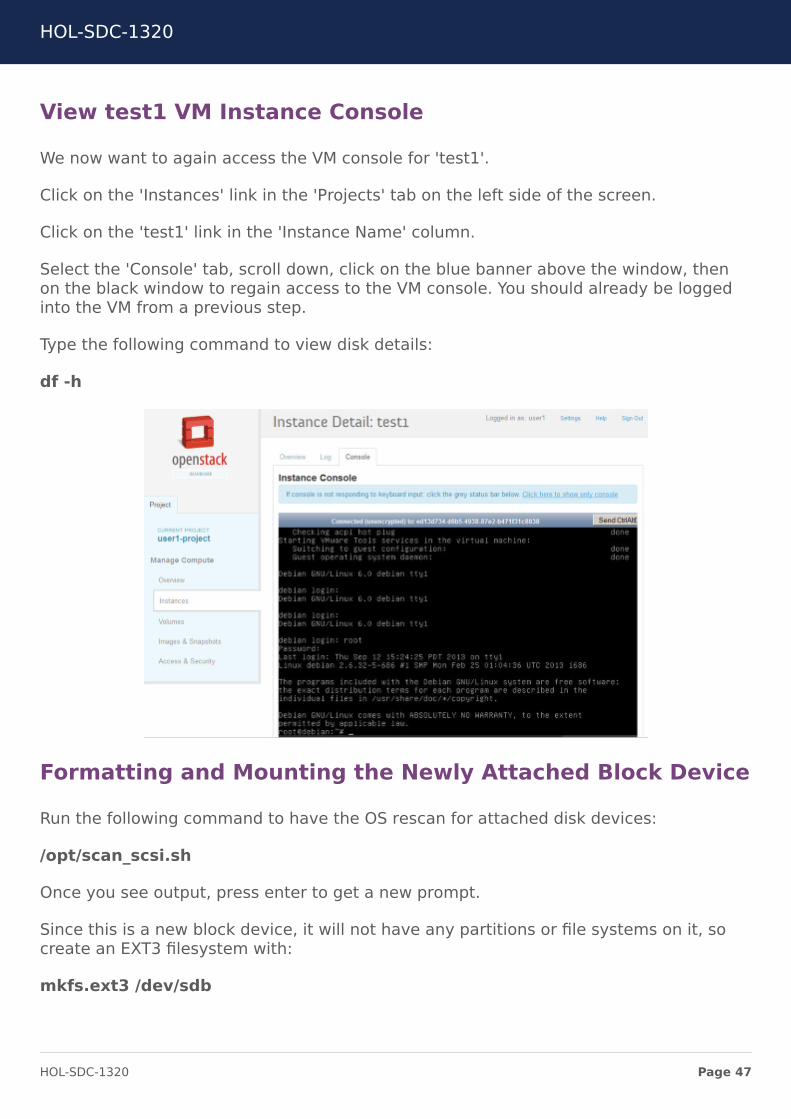
View test1 VM Instance Console
We now want to again access the VM console for 'test1'.
Click on the 'Instances' link in the 'Projects' tab on the left side of the screen.
Click on the 'test1' link in the 'Instance Name' column.
Select the 'Console' tab, scroll down, click on the blue banner above the window, thenon the black window to regain access to the VM console. You should already be loggedinto the VM from a previous step.
Type the following command to view disk details:
df -h
Formatting and Mounting the Newly Attached Block Device
Run the following command to have the OS rescan for attached disk devices:
/opt/scan_scsi.sh
Once you see output, press enter to get a new prompt.
Since this is a new block device, it will not have any partitions or file systems on it, socreate an EXT3 filesystem with:
mkfs.ext3 /dev/sdb
HOL-SDC-1320
Page 47HOL-SDC-1320
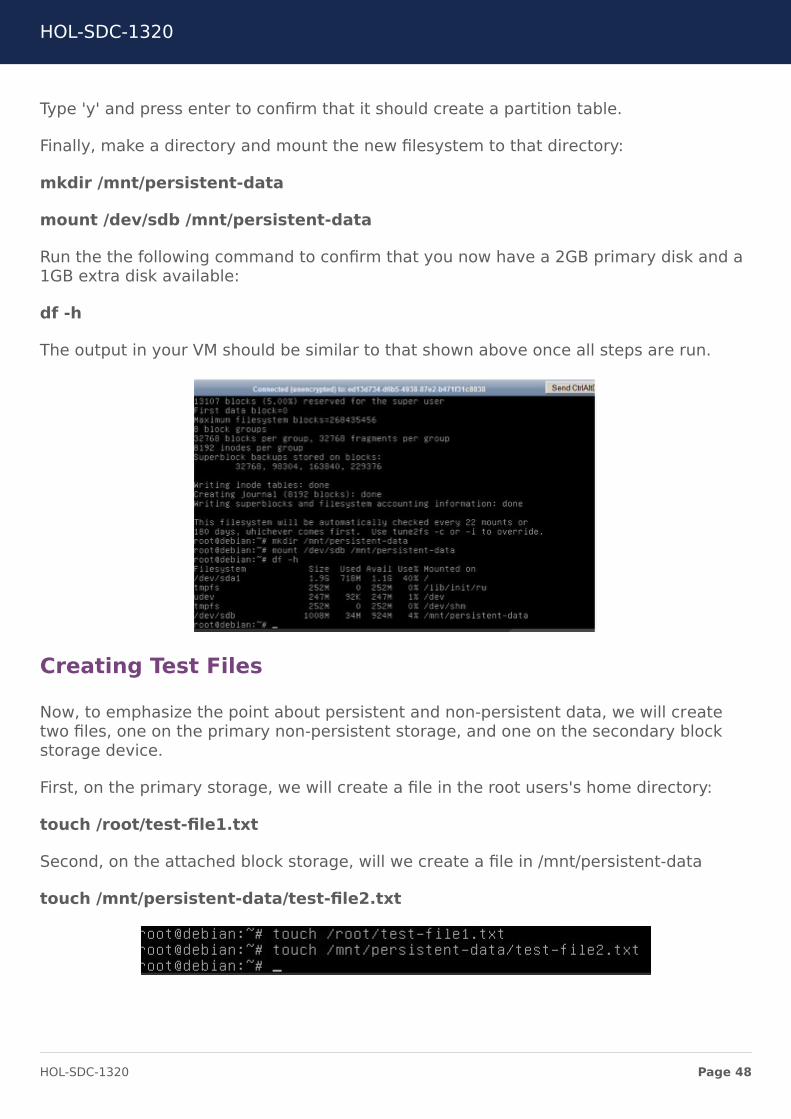
Type 'y' and press enter to confirm that it should create a partition table.
Finally, make a directory and mount the new filesystem to that directory:
mkdir /mnt/persistent-data
mount /dev/sdb /mnt/persistent-data
Run the the following command to confirm that you now have a 2GB primary disk and a1GB extra disk available:
df -h
The output in your VM should be similar to that shown above once all steps are run.
Creating Test Files
Now, to emphasize the point about persistent and non-persistent data, we will createtwo files, one on the primary non-persistent storage, and one on the secondary blockstorage device.
First, on the primary storage, we will create a file in the root users's home directory:
touch /root/test-file1.txt
Second, on the attached block storage, will we create a file in /mnt/persistent-data
touch /mnt/persistent-data/test-file2.txt
HOL-SDC-1320
Page 48HOL-SDC-1320
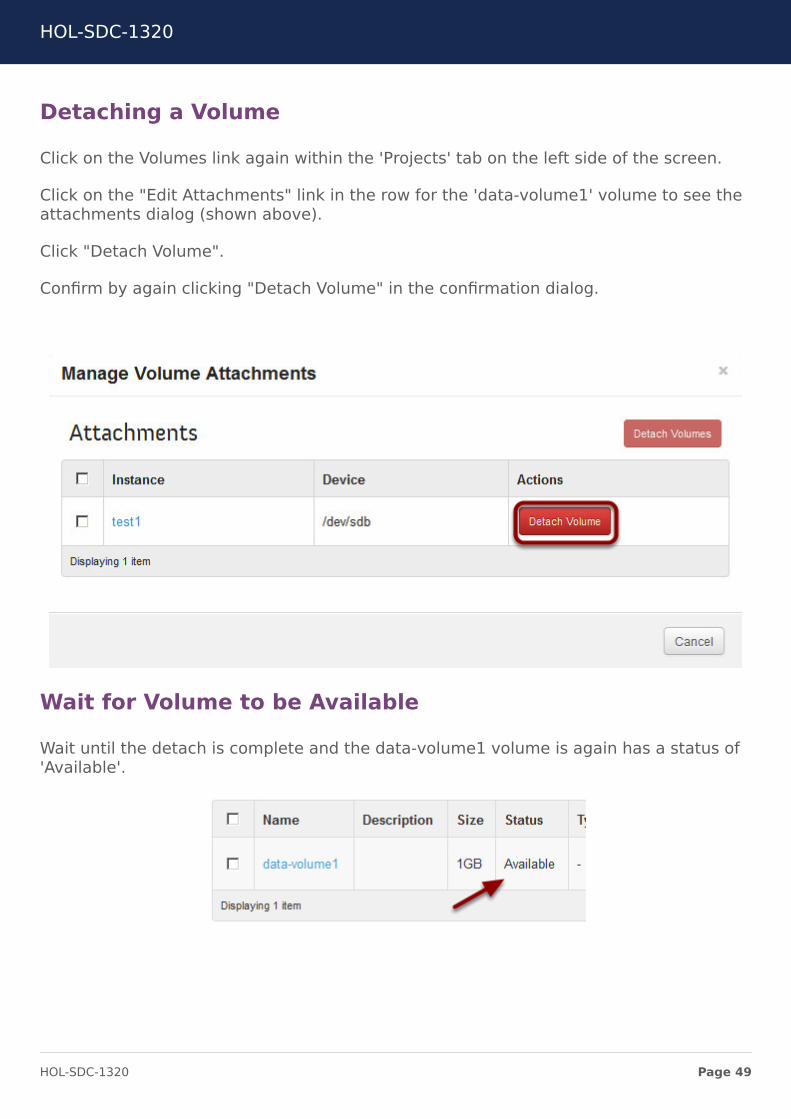
Detaching a Volume
Click on the Volumes link again within the 'Projects' tab on the left side of the screen.
Click on the "Edit Attachments" link in the row for the 'data-volume1' volume to see theattachments dialog (shown above).
Click "Detach Volume".
Confirm by again clicking "Detach Volume" in the confirmation dialog.
Wait for Volume to be Available
Wait until the detach is complete and the data-volume1 volume is again has a status of'Available'.
HOL-SDC-1320
Page 49HOL-SDC-1320
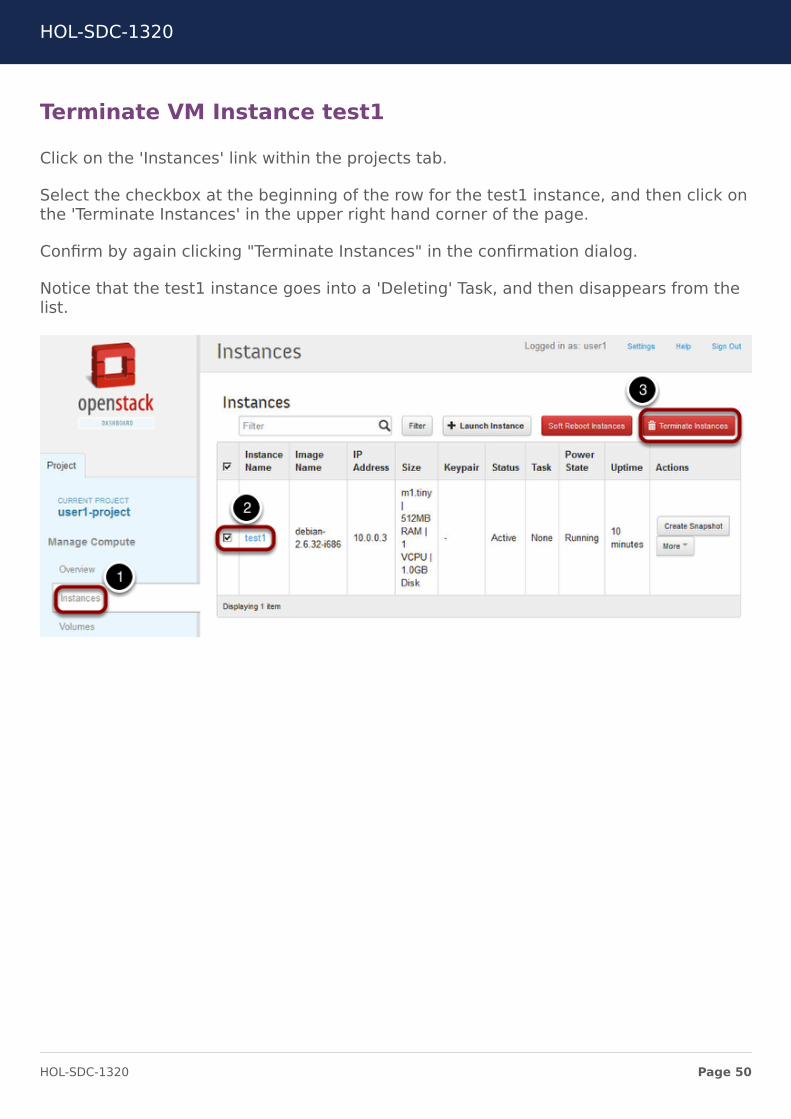
Terminate VM Instance test1
Click on the 'Instances' link within the projects tab.
Select the checkbox at the beginning of the row for the test1 instance, and then click onthe 'Terminate Instances' in the upper right hand corner of the page.
Confirm by again clicking "Terminate Instances" in the confirmation dialog.
Notice that the test1 instance goes into a 'Deleting' Task, and then disappears from thelist.
HOL-SDC-1320
Page 50HOL-SDC-1320
Create VM Instance test2
Click the 'Launch Instance' button and fill in the following values:
• Instance Boot Source: Boot from image• Image Name: debian-2.6.32.i686 (1.0GB)• Instance Name: test2
In the “Networking” tab,
• drag and drop “Internal_Shared” network
Click Launch at the bottom of the dialog.
Wait on the Instance list page until the VM status shows as 'Active'.
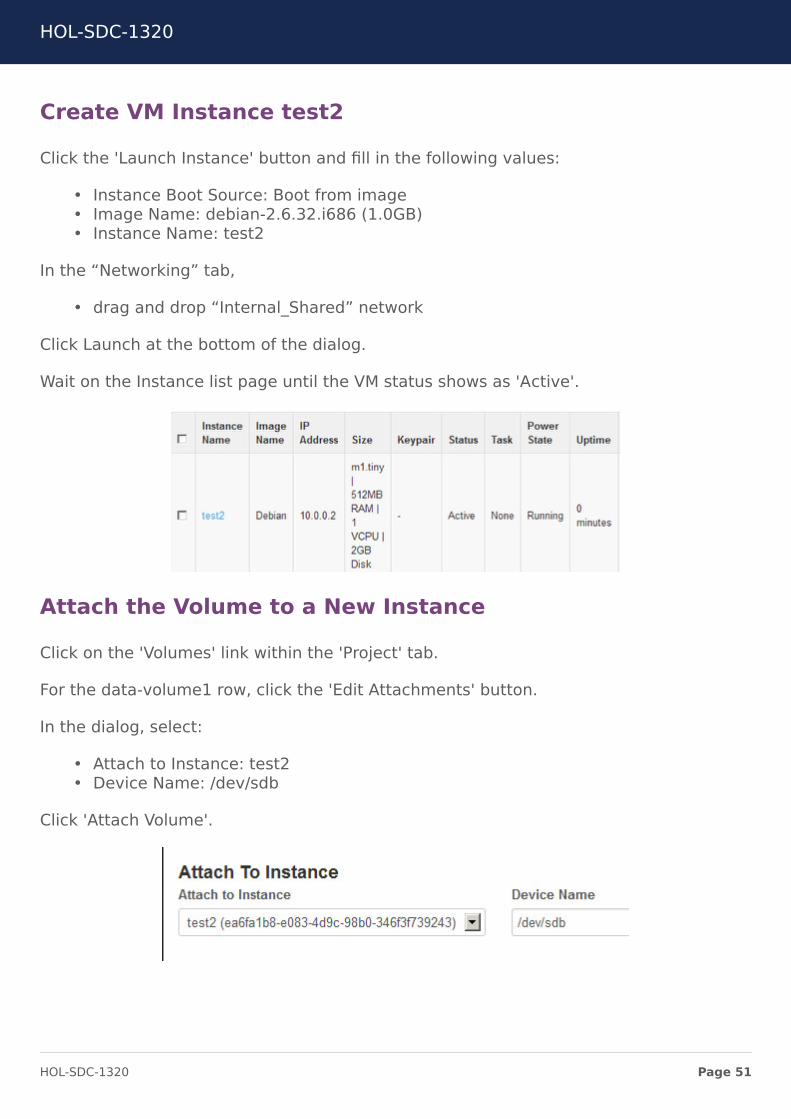
Attach the Volume to a New Instance
Click on the 'Volumes' link within the 'Project' tab.
For the data-volume1 row, click the 'Edit Attachments' button.
In the dialog, select:
• Attach to Instance: test2• Device Name: /dev/sdb
Click 'Attach Volume'.
HOL-SDC-1320
Page 51HOL-SDC-1320
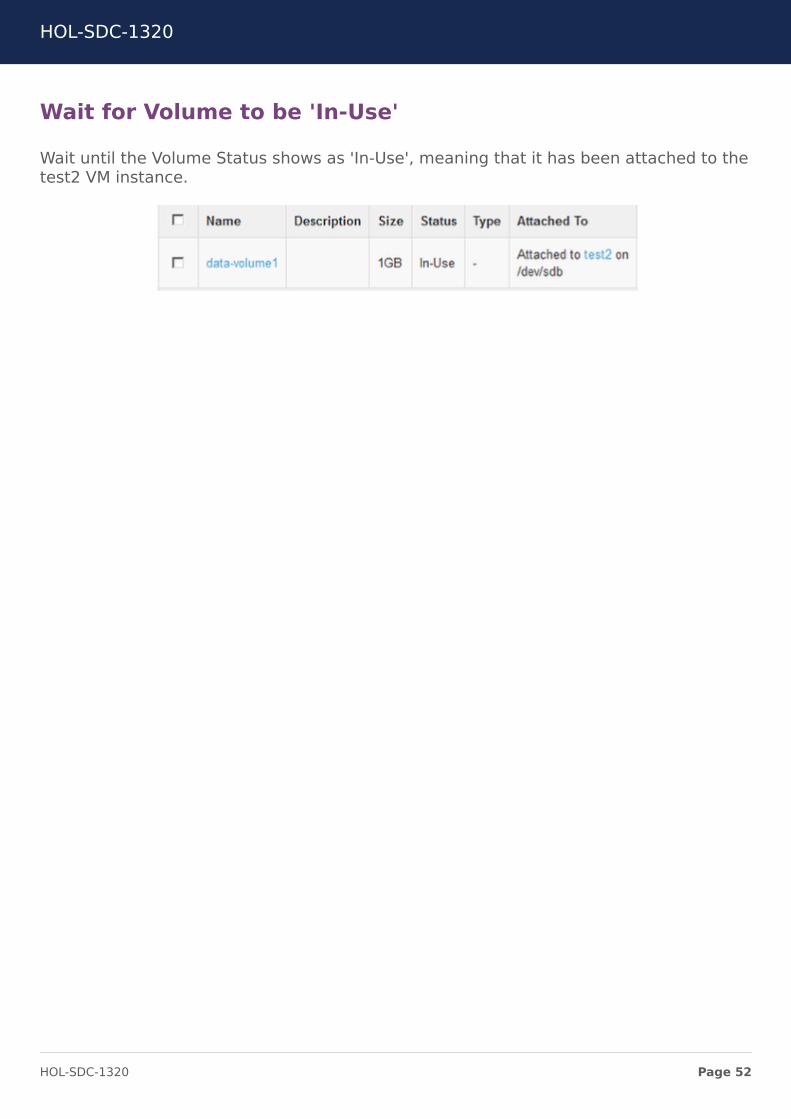
Wait for Volume to be 'In-Use'
Wait until the Volume Status shows as 'In-Use', meaning that it has been attached to thetest2 VM instance.
HOL-SDC-1320
Page 52HOL-SDC-1320
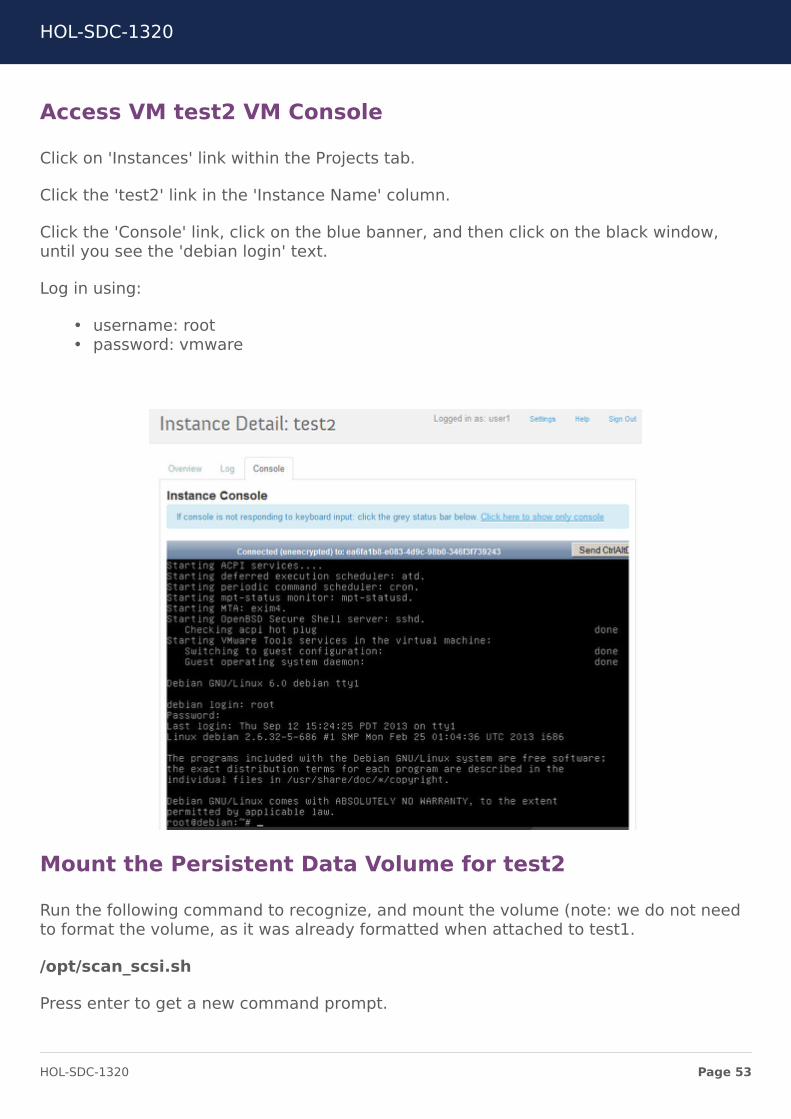
Access VM test2 VM Console
Click on 'Instances' link within the Projects tab.
Click the 'test2' link in the 'Instance Name' column.
Click the 'Console' link, click on the blue banner, and then click on the black window,until you see the 'debian login' text.
Log in using:
• username: root• password: vmware
Mount the Persistent Data Volume for test2
Run the following command to recognize, and mount the volume (note: we do not needto format the volume, as it was already formatted when attached to test1.
/opt/scan_scsi.sh
Press enter to get a new command prompt.
HOL-SDC-1320
Page 53HOL-SDC-1320
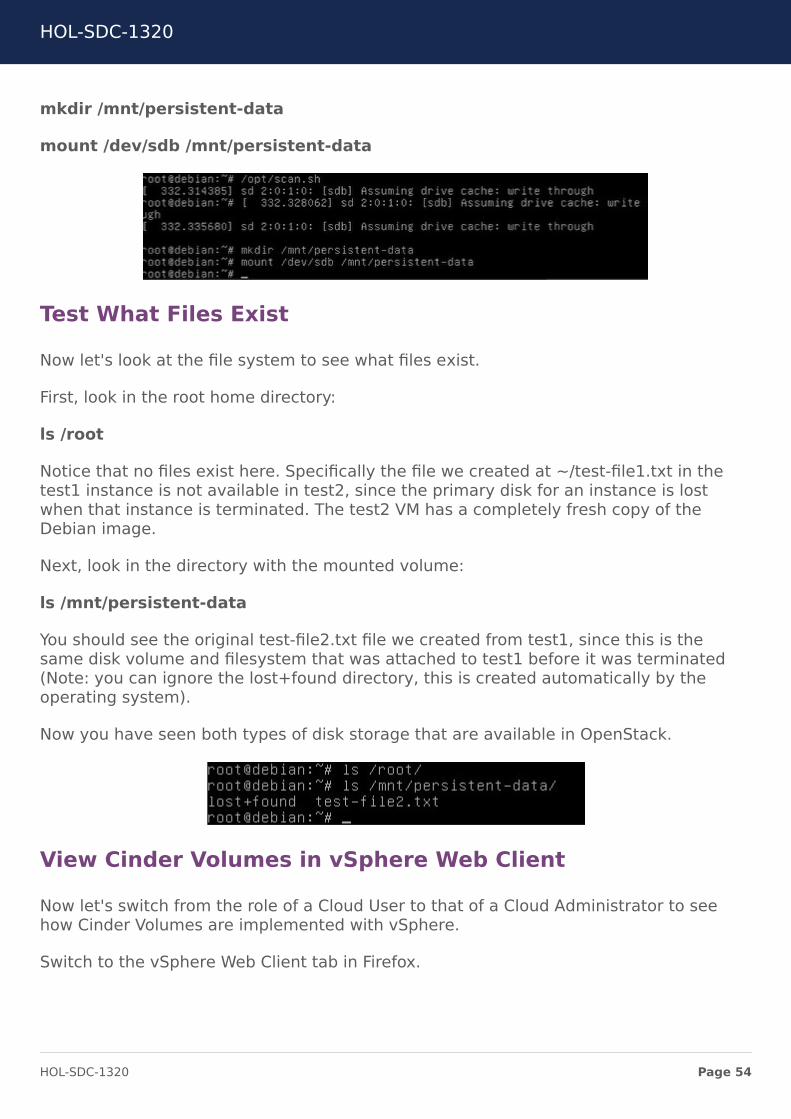
mkdir /mnt/persistent-data
mount /dev/sdb /mnt/persistent-data
Test What Files Exist
Now let's look at the file system to see what files exist.
First, look in the root home directory:
ls /root
Notice that no files exist here. Specifically the file we created at ~/test-file1.txt in thetest1 instance is not available in test2, since the primary disk for an instance is lostwhen that instance is terminated. The test2 VM has a completely fresh copy of theDebian image.
Next, look in the directory with the mounted volume:
ls /mnt/persistent-data
You should see the original test-file2.txt file we created from test1, since this is thesame disk volume and filesystem that was attached to test1 before it was terminated(Note: you can ignore the lost+found directory, this is created automatically by theoperating system).
Now you have seen both types of disk storage that are available in OpenStack.
View Cinder Volumes in vSphere Web Client
Now let's switch from the role of a Cloud User to that of a Cloud Administrator to seehow Cinder Volumes are implemented with vSphere.
Switch to the vSphere Web Client tab in Firefox.
HOL-SDC-1320
Page 54HOL-SDC-1320
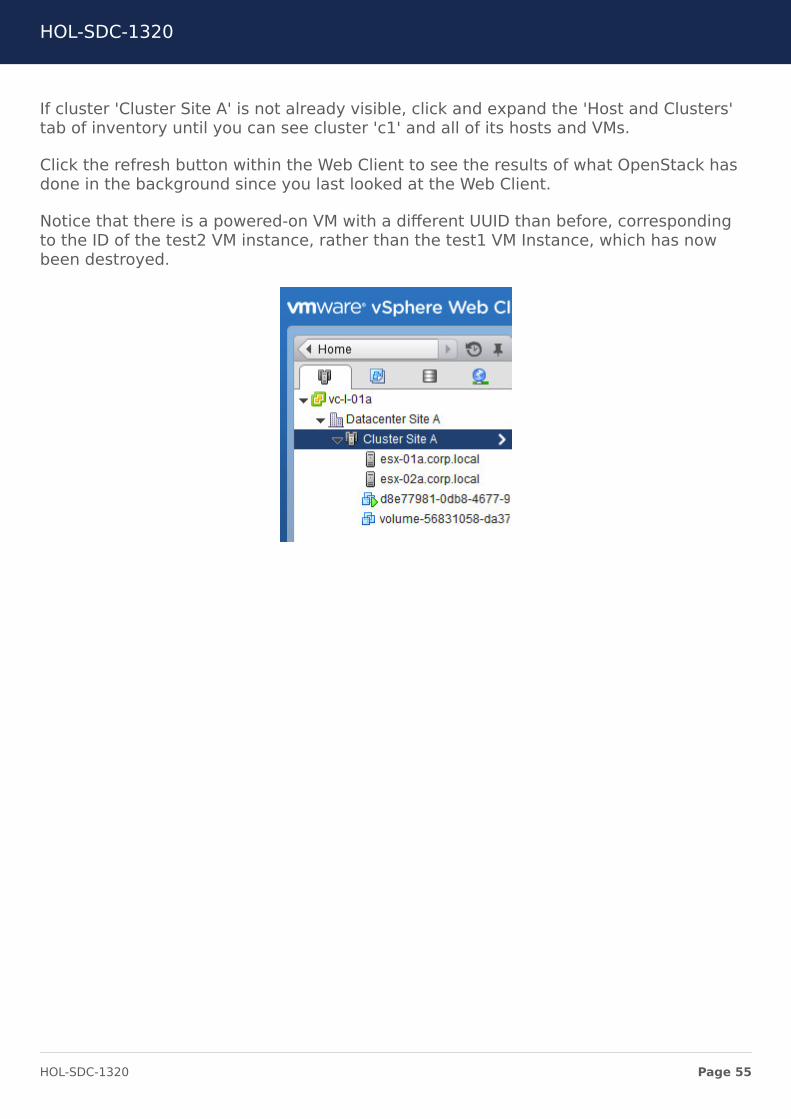
If cluster 'Cluster Site A' is not already visible, click and expand the 'Host and Clusters'tab of inventory until you can see cluster 'c1' and all of its hosts and VMs.
Click the refresh button within the Web Client to see the results of what OpenStack hasdone in the background since you last looked at the Web Client.
Notice that there is a powered-on VM with a different UUID than before, correspondingto the ID of the test2 VM instance, rather than the test1 VM Instance, which has nowbeen destroyed.
HOL-SDC-1320
Page 55HOL-SDC-1320
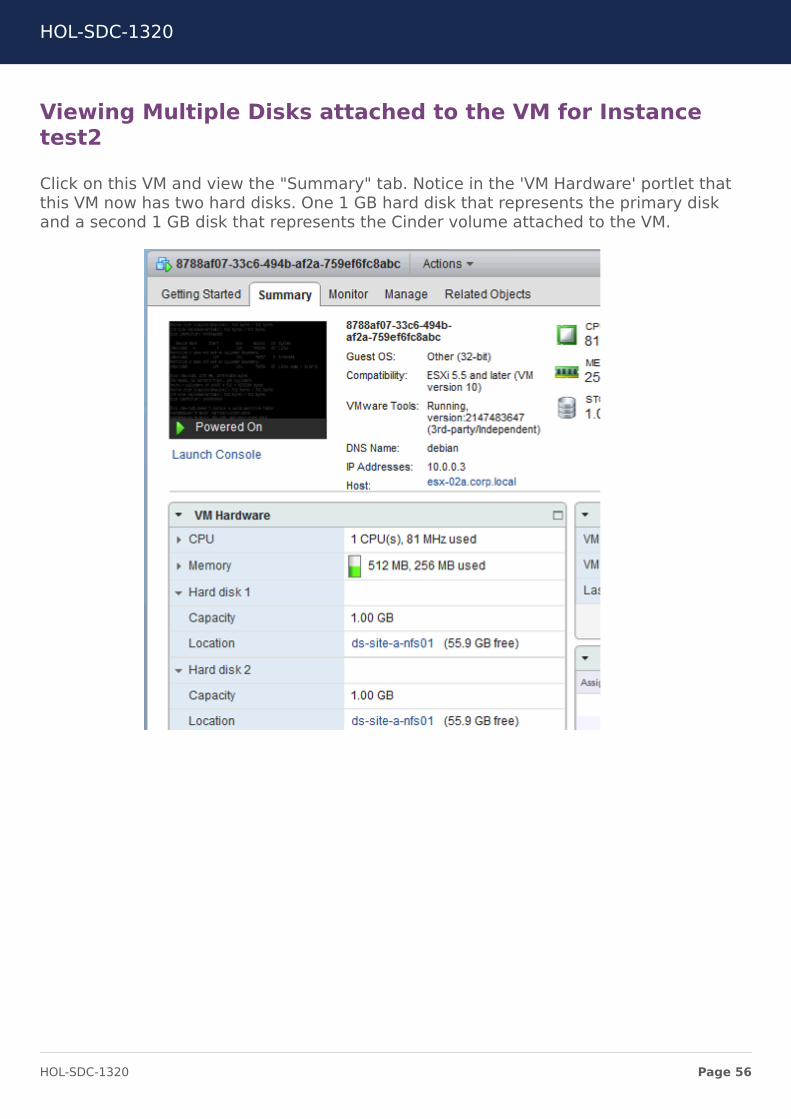
Viewing Multiple Disks attached to the VM for Instancetest2
Click on this VM and view the "Summary" tab. Notice in the 'VM Hardware' portlet thatthis VM now has two hard disks. One 1 GB hard disk that represents the primary diskand a second 1 GB disk that represents the Cinder volume attached to the VM.
HOL-SDC-1320
Page 56HOL-SDC-1320
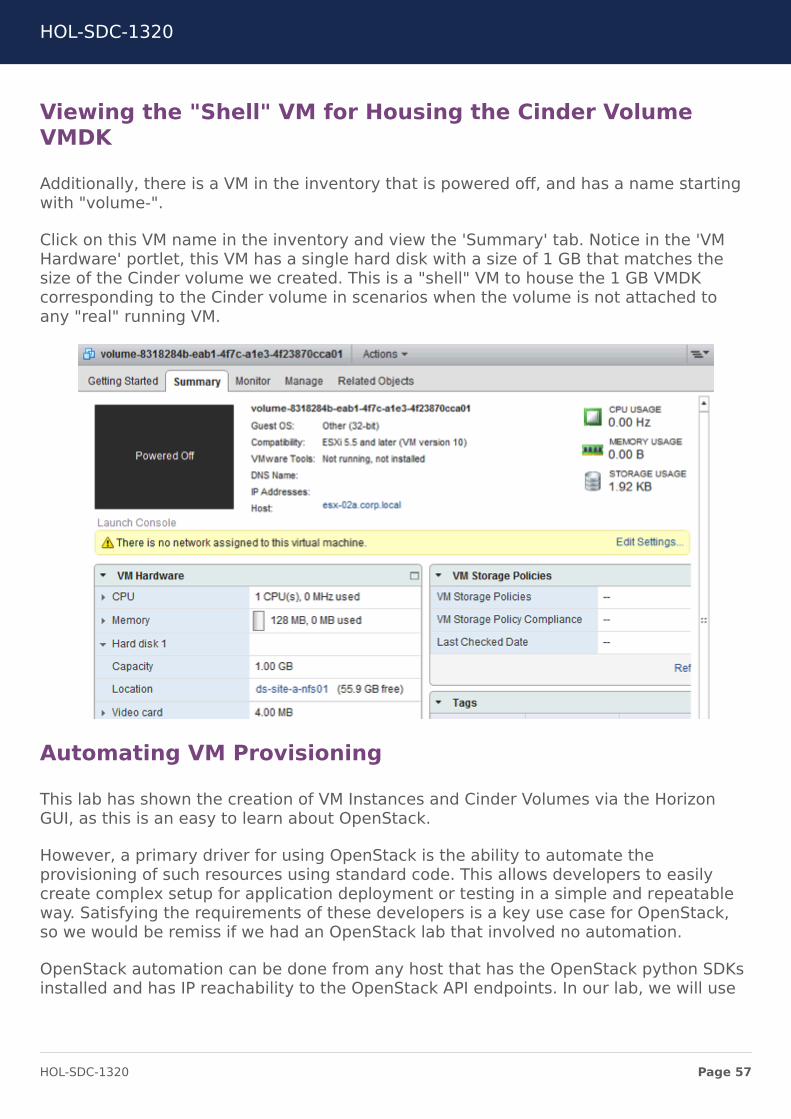
Viewing the "Shell" VM for Housing the Cinder VolumeVMDK
Additionally, there is a VM in the inventory that is powered off, and has a name startingwith "volume-".
Click on this VM name in the inventory and view the 'Summary' tab. Notice in the 'VMHardware' portlet, this VM has a single hard disk with a size of 1 GB that matches thesize of the Cinder volume we created. This is a "shell" VM to house the 1 GB VMDKcorresponding to the Cinder volume in scenarios when the volume is not attached toany "real" running VM.
Automating VM Provisioning
This lab has shown the creation of VM Instances and Cinder Volumes via the HorizonGUI, as this is an easy to learn about OpenStack.
However, a primary driver for using OpenStack is the ability to automate theprovisioning of such resources using standard code. This allows developers to easilycreate complex setup for application deployment or testing in a simple and repeatableway. Satisfying the requirements of these developers is a key use case for OpenStack,so we would be remiss if we had an OpenStack lab that involved no automation.
OpenStack automation can be done from any host that has the OpenStack python SDKsinstalled and has IP reachability to the OpenStack API endpoints. In our lab, we will use
HOL-SDC-1320
Page 57HOL-SDC-1320

the VOVA host for this, as it already has the SDK installed and is running the endpointslocally.
Use Putty to Access the VOVA CLI
Double-click on the putty.exe icon on your Windows lab desktop. The icon shortcut isalready configured to connect to VOVA.
Use the following credentials.
username: root
password: VMware1!
Viewing and Running the Automation Script
Type:
ls
HOL-SDC-1320
Page 58HOL-SDC-1320
This shows a single file in the root directory, named boot_vm.py
Optionally, if you want to view the contents of this file, type:
cat boot_vm.py
While the details of the code may not make sense if you are not familiar with python,essentially automates the steps that we previously performed manually via the GUI:
• logs in as user1 by providing a username/password, and a URL where the APIscan be accessed.
• Boots a VM using the image 'Debian' and flavor 'm1.tiny', naming that VM"created-from-python".
• The script then waits until the VM is booted and ready for use.
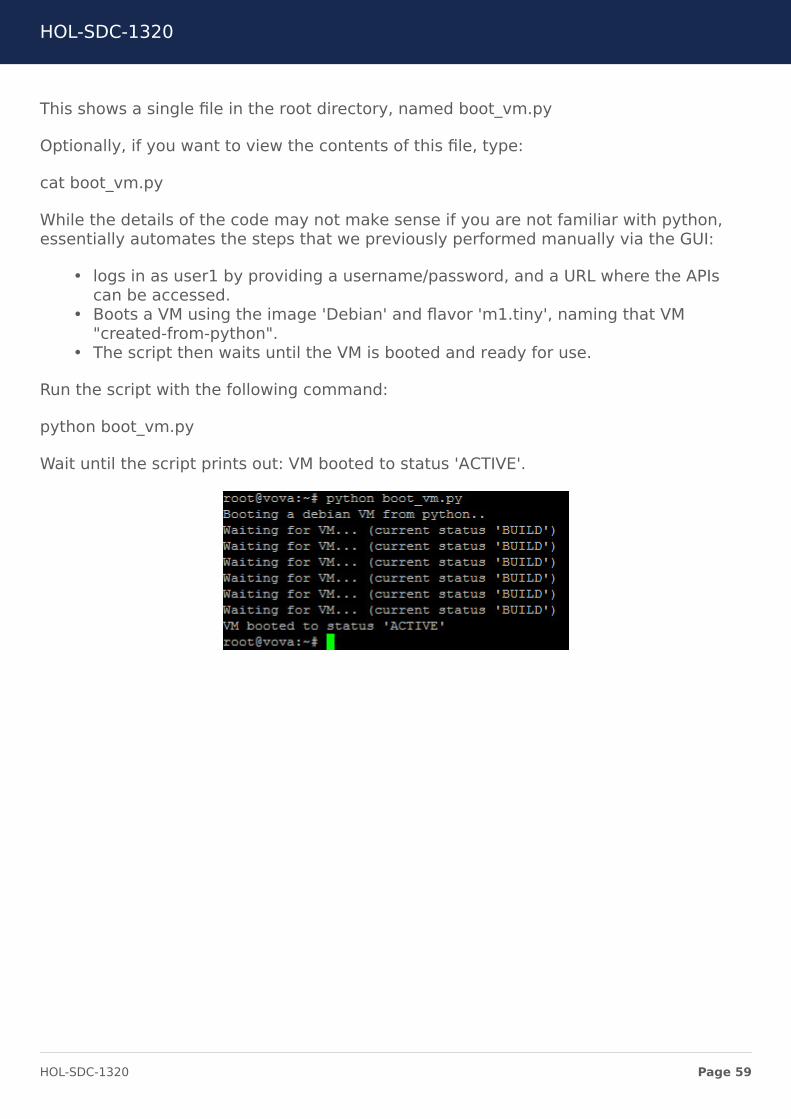
Run the script with the following command:
python boot_vm.py
Wait until the script prints out: VM booted to status 'ACTIVE'.
HOL-SDC-1320
Page 59HOL-SDC-1320
View the Results of Automation in the Horizon GUI
Return to the Horizon tab in your firefox browser, and switch to the OpenStack Horizontab.
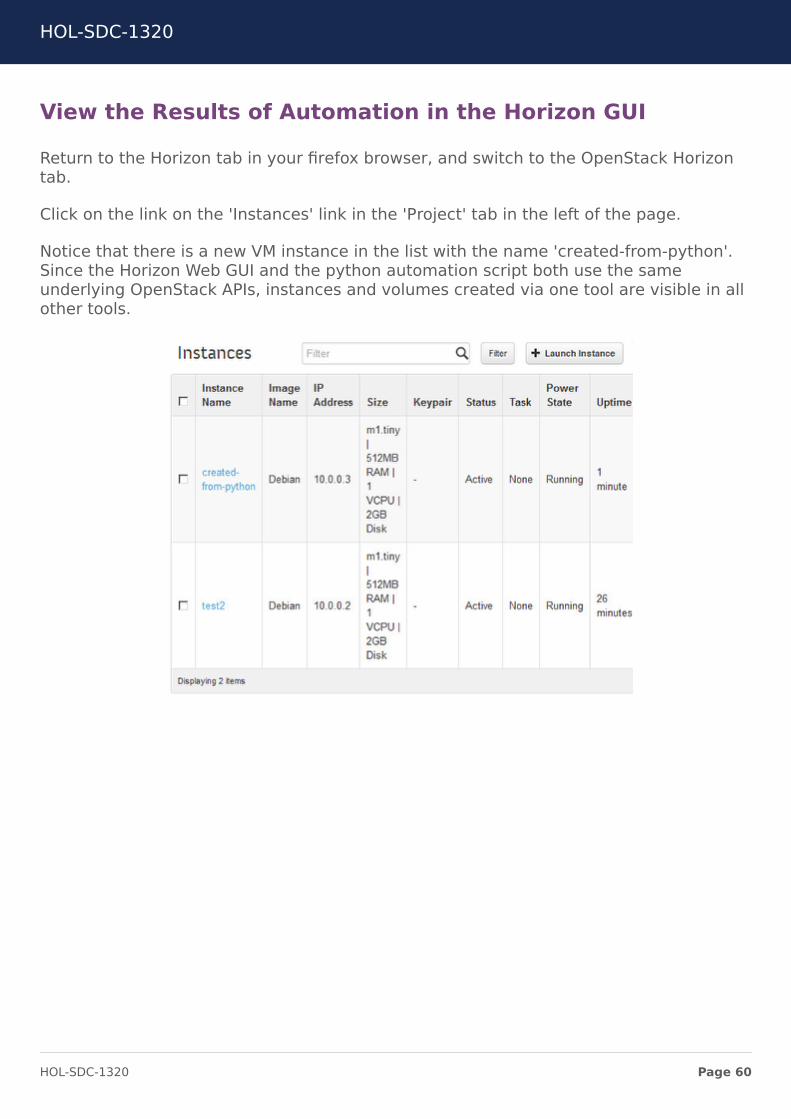
Click on the link on the 'Instances' link in the 'Project' tab in the left of the page.
Notice that there is a new VM instance in the list with the name 'created-from-python'.Since the Horizon Web GUI and the python automation script both use the sameunderlying OpenStack APIs, instances and volumes created via one tool are visible in allother tools.
HOL-SDC-1320
Page 60HOL-SDC-1320
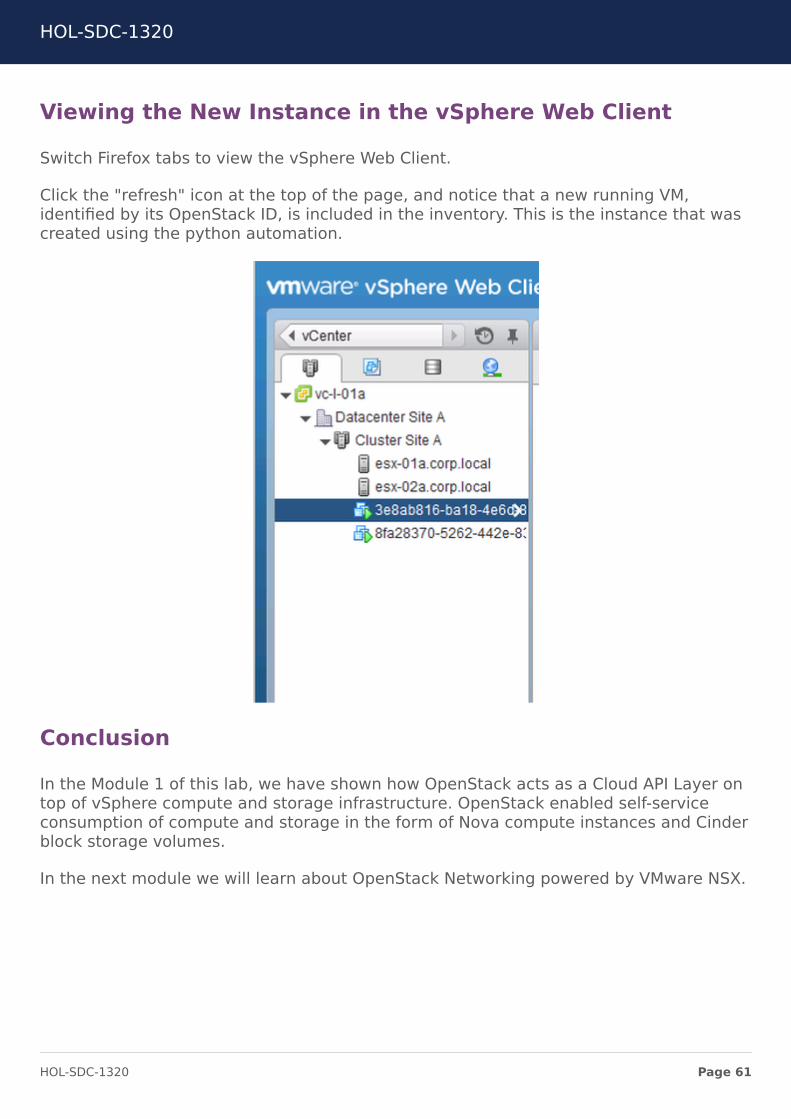
Viewing the New Instance in the vSphere Web Client
Switch Firefox tabs to view the vSphere Web Client.
Click the "refresh" icon at the top of the page, and notice that a new running VM,identified by its OpenStack ID, is included in the inventory. This is the instance that wascreated using the python automation.
Conclusion
In the Module 1 of this lab, we have shown how OpenStack acts as a Cloud API Layer ontop of vSphere compute and storage infrastructure. OpenStack enabled self-serviceconsumption of compute and storage in the form of Nova compute instances and Cinderblock storage volumes.
In the next module we will learn about OpenStack Networking powered by VMware NSX.
HOL-SDC-1320
Page 61HOL-SDC-1320
Module 2 - OpenStackNetwork Management
with VMware NSX
HOL-SDC-1320
Page 62HOL-SDC-1320
OpenStack Network Management withVMware NSXIn the traditional model of networking, users attach VMs to existing networks which aremostly hardware defined. However, relying on hardware defined, pre-existing networksmakes a private cloud inflexible, hinders scalability and doesn't support cloud use cases.Cloud users need the flexibility to create network topologies and modify network accesspolicies to suit their applications. For example, in most SaaS services ApplicationServers, Database Servers and Web Servers are all required to run on differentnetworks. Additionally while Web Servers need to be accessible from internet, theapplication and database VMs need to block internet access. Such customized networktopologies and network access controls are provided by VMware NSX throughOpenStack Neutron networking service
In this module we will provide an overview of key features that enable cloud users torealize custom network topologies and control various aspects of network access.
Note: While you can take this module independently, it is strongly advised that you take"Module 1: OpenStack Compute and Storage with vSphere" prior to this module. A basicfamiliarity with OpenStack Horizon GUI and ability to create OpenStack VM instances isassumed for this module.
HOL-SDC-1320
Page 63HOL-SDC-1320
Cleaning Up Instances from Module 1
If you are taking this Module independently and have not taken Module 1 ("OpenStackCompute and Storage"), then you should skip this section.
Login to the OpenStack Horizon GUI
• username: user1• passwd: user1
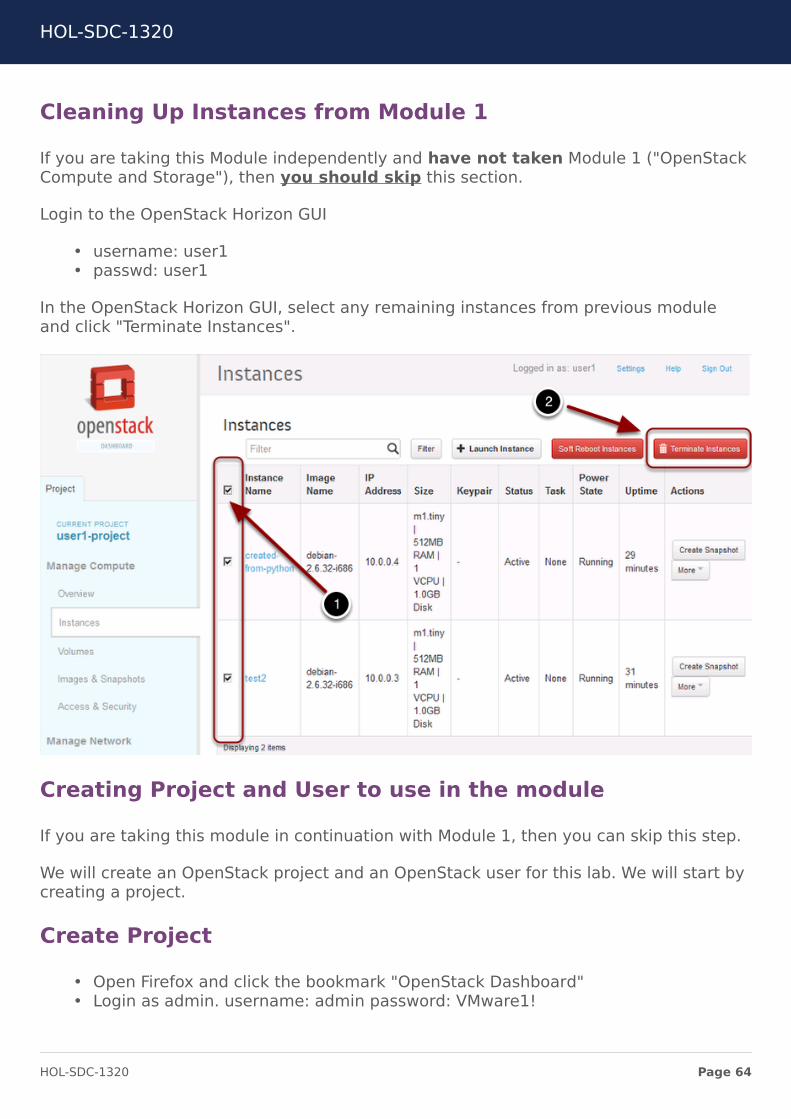
In the OpenStack Horizon GUI, select any remaining instances from previous moduleand click "Terminate Instances".
Creating Project and User to use in the module
If you are taking this module in continuation with Module 1, then you can skip this step.
We will create an OpenStack project and an OpenStack user for this lab. We will start bycreating a project.
Create Project
• Open Firefox and click the bookmark "OpenStack Dashboard"• Login as admin. username: admin password: VMware1!
HOL-SDC-1320
Page 64HOL-SDC-1320
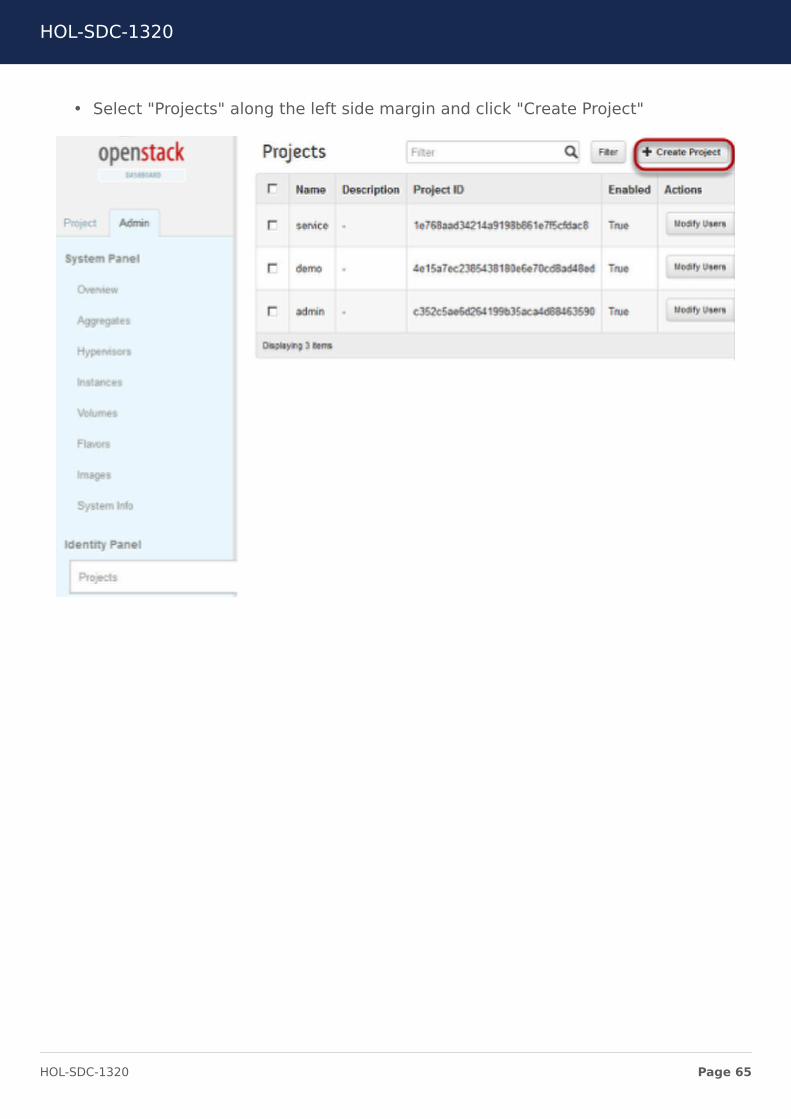
• Select "Projects" along the left side margin and click "Create Project"
HOL-SDC-1320
Page 65HOL-SDC-1320
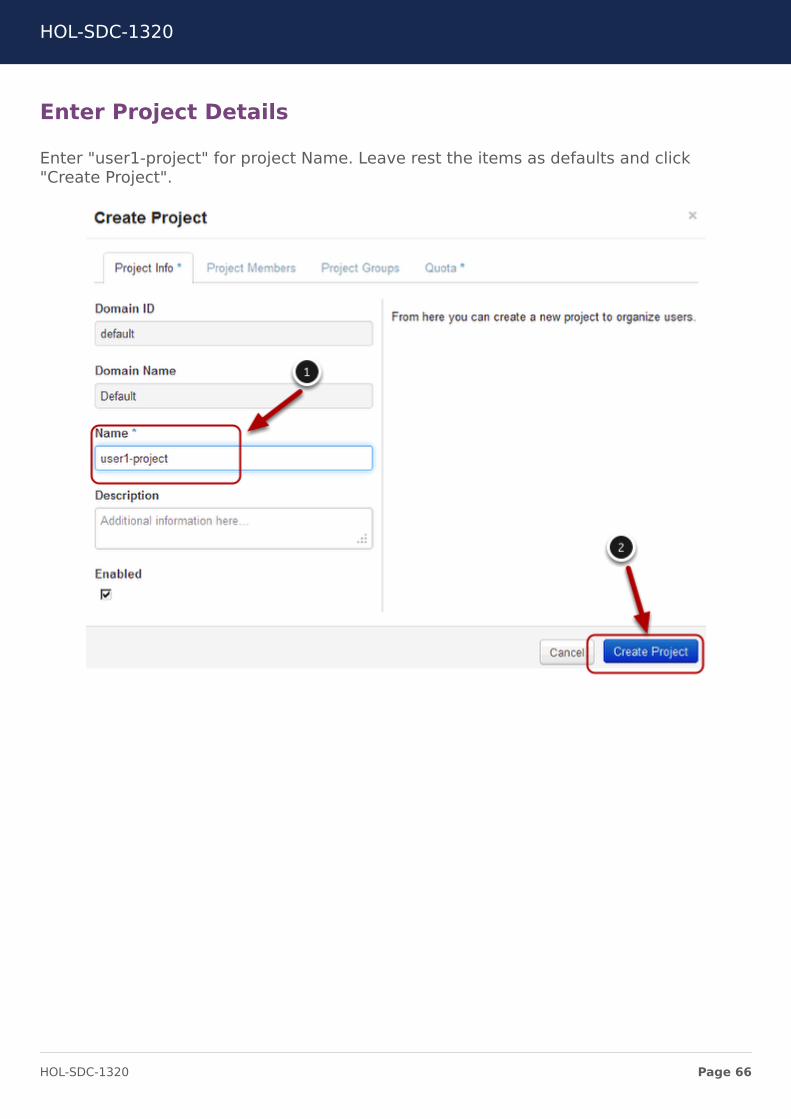
Enter Project Details
Enter "user1-project" for project Name. Leave rest the items as defaults and click"Create Project".
HOL-SDC-1320
Page 66HOL-SDC-1320
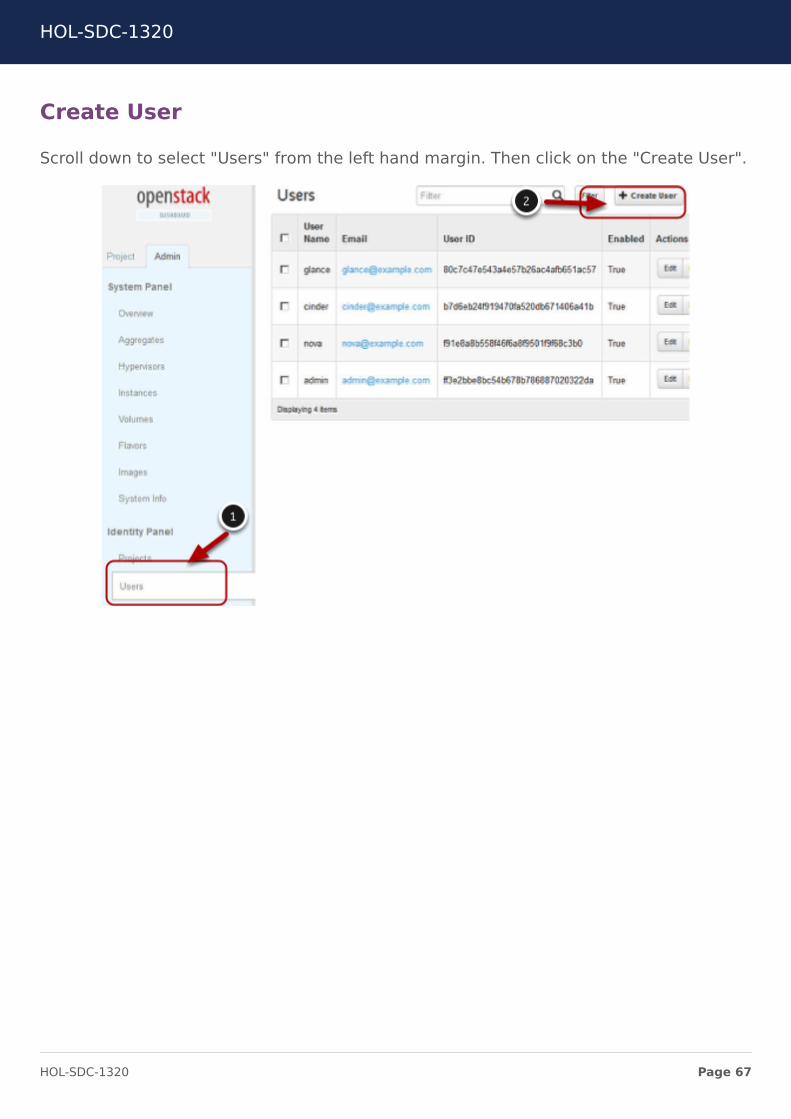
Create User
Scroll down to select "Users" from the left hand margin. Then click on the "Create User".
HOL-SDC-1320
Page 67HOL-SDC-1320
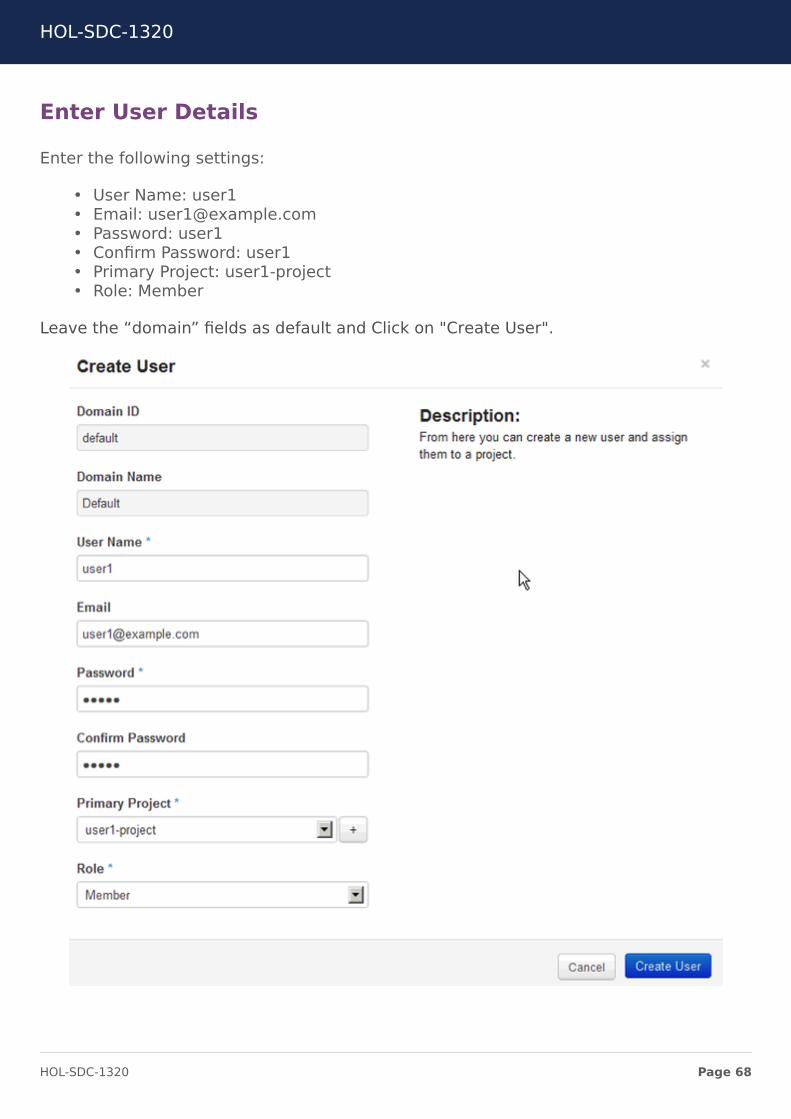
Enter User Details
Enter the following settings:
• User Name: user1• Email: [email protected]• Password: user1• Confirm Password: user1• Primary Project: user1-project• Role: Member
Leave the “domain” fields as default and Click on "Create User".
HOL-SDC-1320
Page 68HOL-SDC-1320
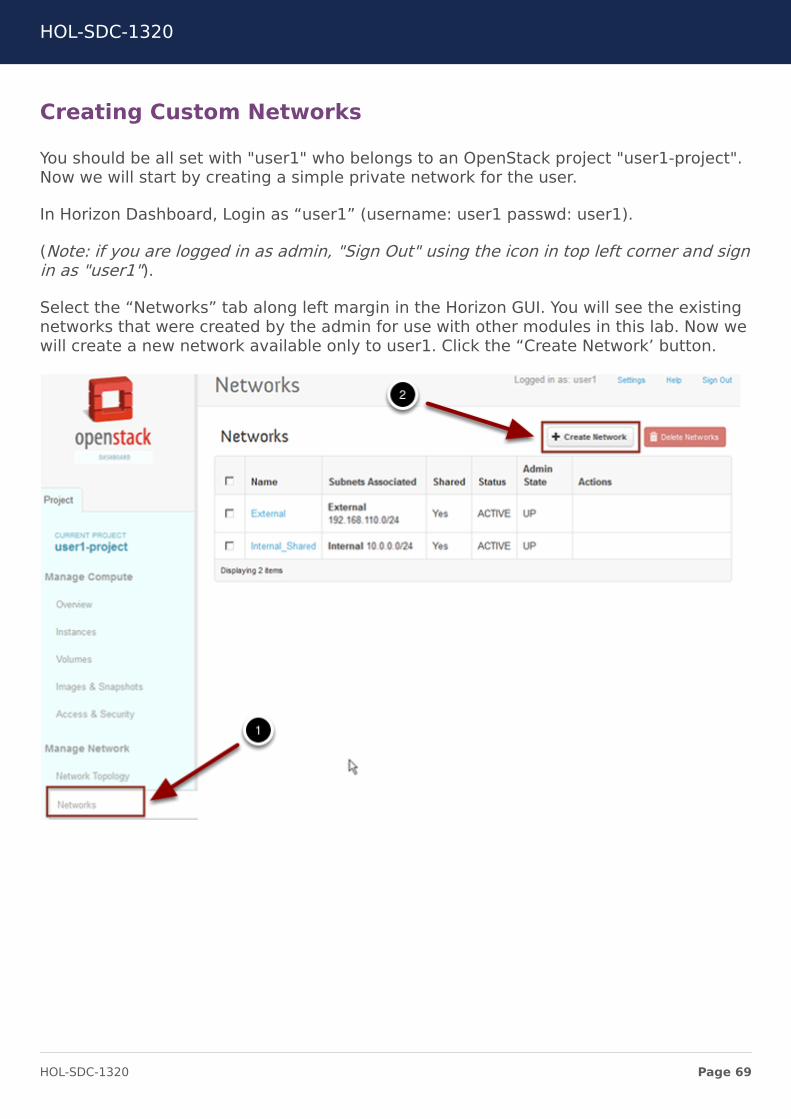
Creating Custom Networks
You should be all set with "user1" who belongs to an OpenStack project "user1-project".Now we will start by creating a simple private network for the user.
In Horizon Dashboard, Login as “user1” (username: user1 passwd: user1).
(Note: if you are logged in as admin, "Sign Out" using the icon in top left corner and signin as "user1").
Select the “Networks” tab along left margin in the Horizon GUI. You will see the existingnetworks that were created by the admin for use with other modules in this lab. Now wewill create a new network available only to user1. Click the “Create Network’ button.
HOL-SDC-1320
Page 69HOL-SDC-1320
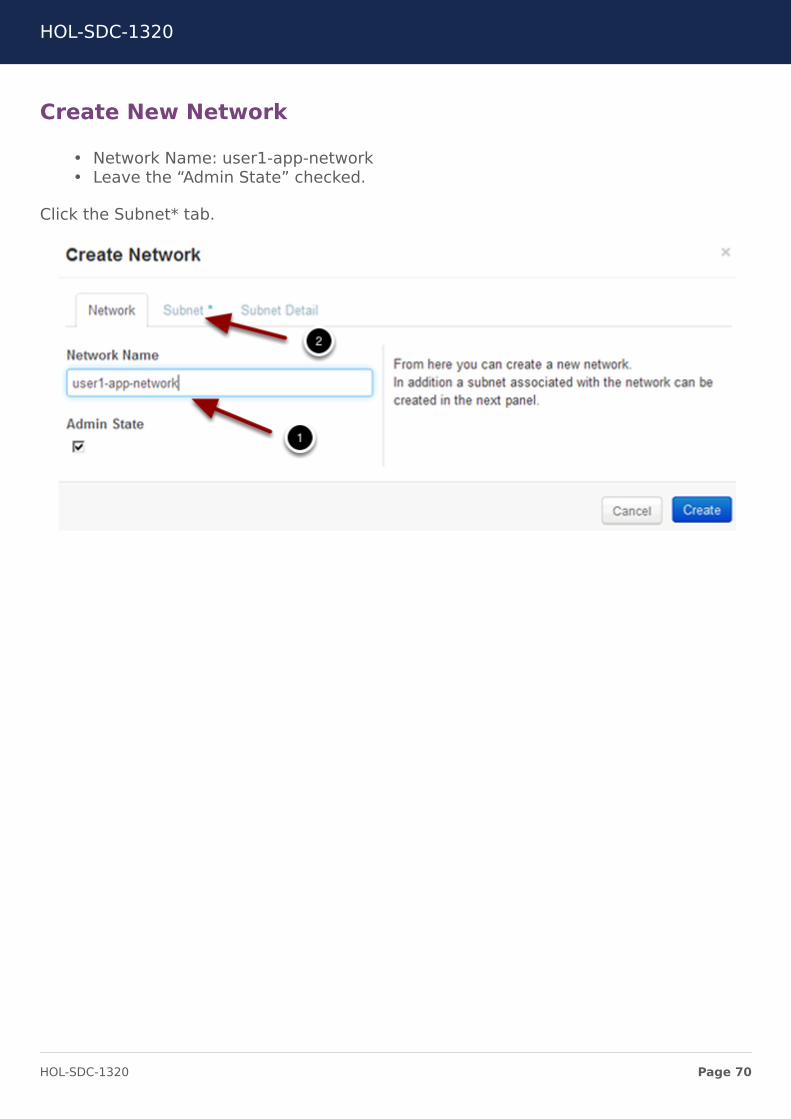
Create New Network
• Network Name: user1-app-network• Leave the “Admin State” checked.
Click the Subnet* tab.
HOL-SDC-1320
Page 70HOL-SDC-1320
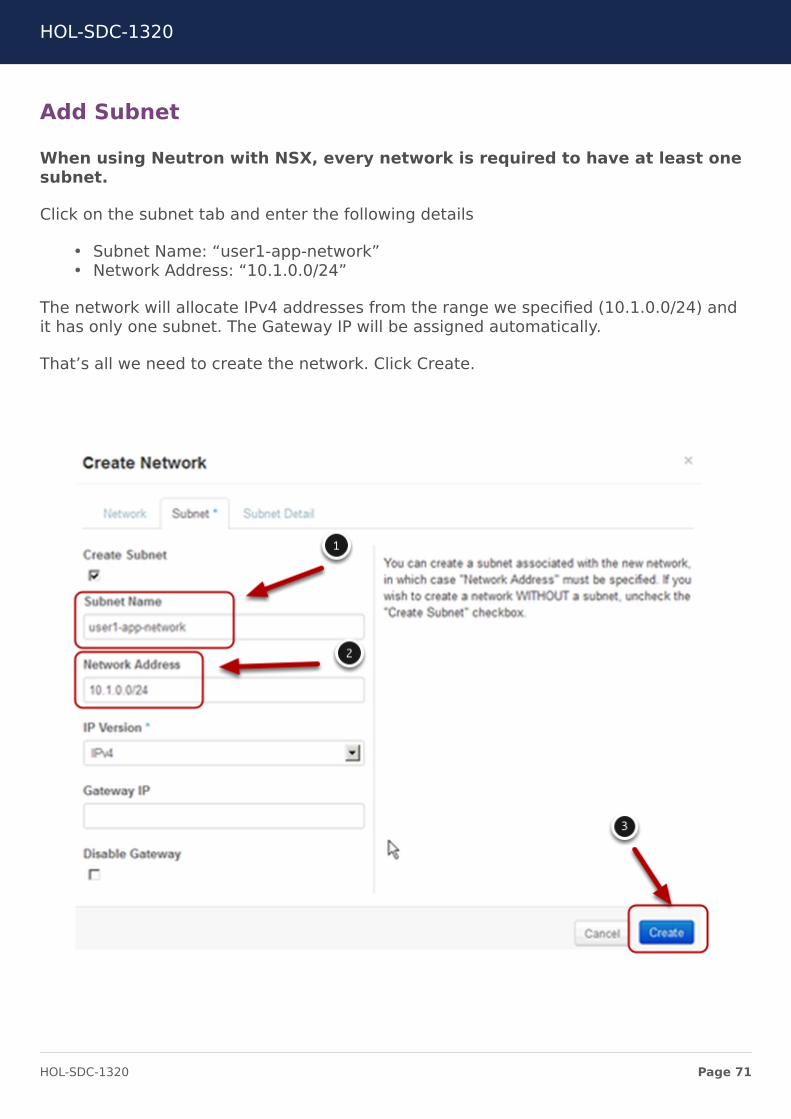
Add Subnet
When using Neutron with NSX, every network is required to have at least onesubnet.
Click on the subnet tab and enter the following details
• Subnet Name: “user1-app-network”• Network Address: “10.1.0.0/24”
The network will allocate IPv4 addresses from the range we specified (10.1.0.0/24) andit has only one subnet. The Gateway IP will be assigned automatically.
That’s all we need to create the network. Click Create.
HOL-SDC-1320
Page 71HOL-SDC-1320
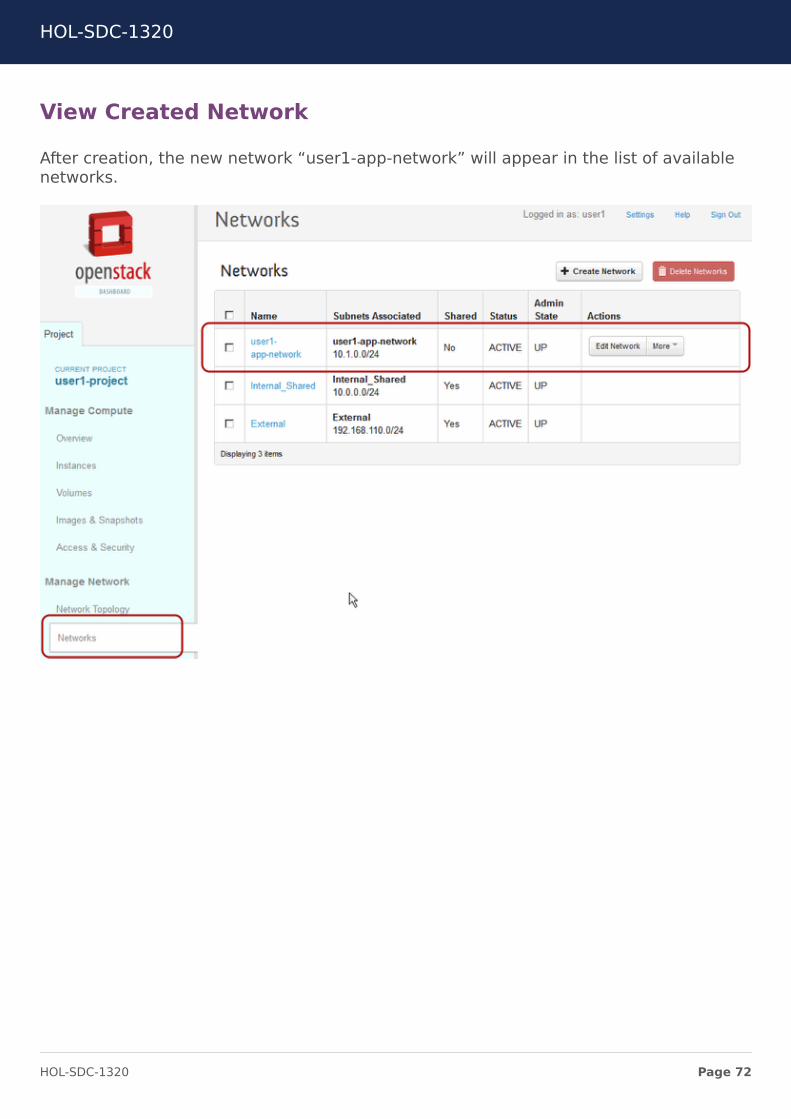
View Created Network
After creation, the new network “user1-app-network” will appear in the list of availablenetworks.
HOL-SDC-1320
Page 72HOL-SDC-1320
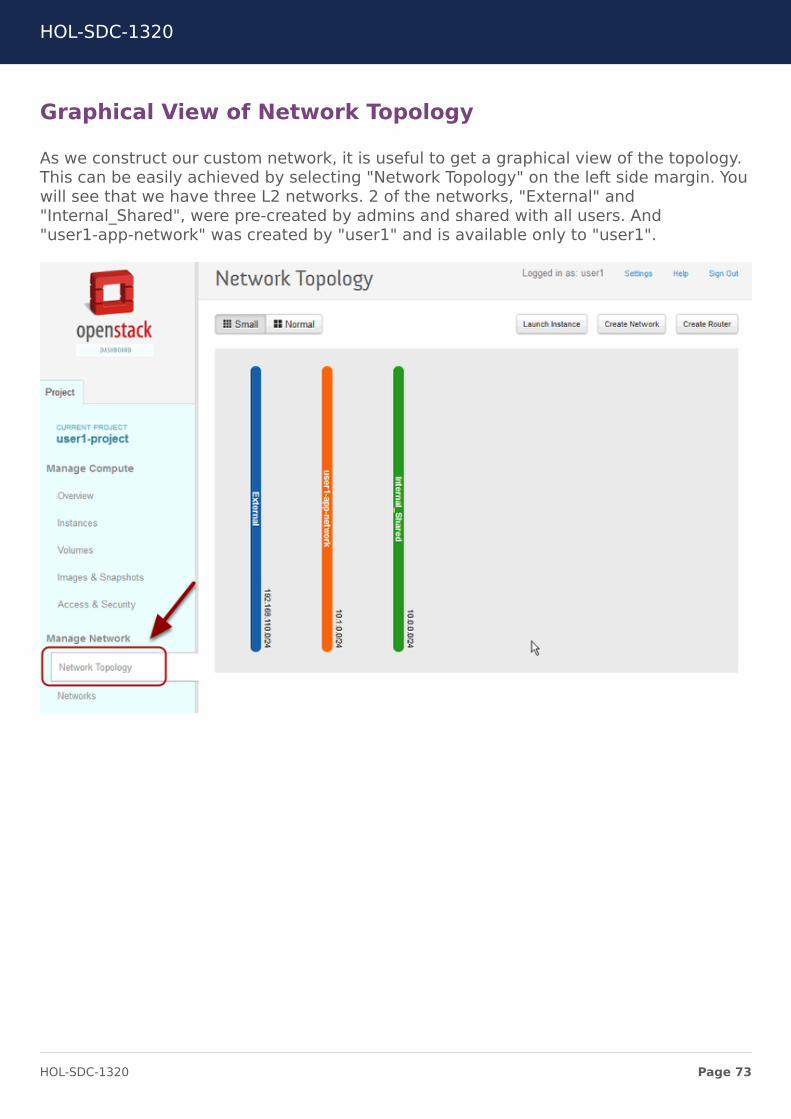
Graphical View of Network Topology
As we construct our custom network, it is useful to get a graphical view of the topology.This can be easily achieved by selecting "Network Topology" on the left side margin. Youwill see that we have three L2 networks. 2 of the networks, "External" and"Internal_Shared", were pre-created by admins and shared with all users. And"user1-app-network" was created by "user1" and is available only to "user1".
HOL-SDC-1320
Page 73HOL-SDC-1320
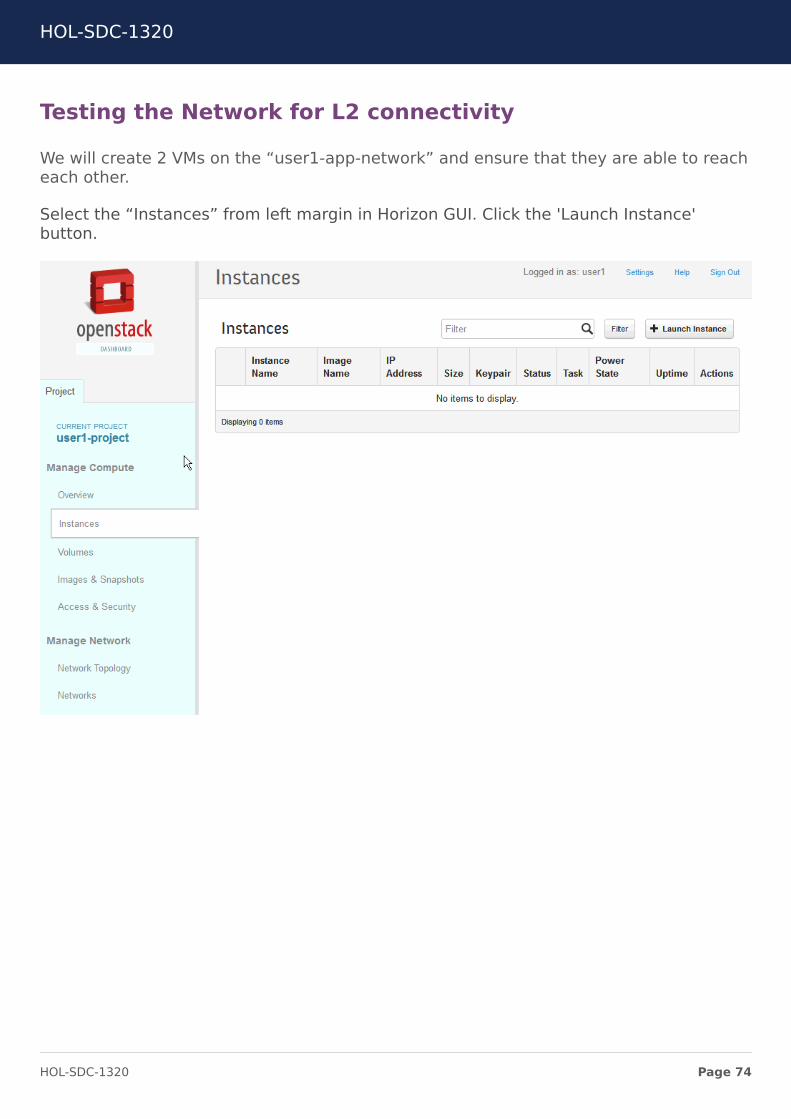
Testing the Network for L2 connectivity
We will create 2 VMs on the “user1-app-network” and ensure that they are able to reacheach other.
Select the “Instances” from left margin in Horizon GUI. Click the 'Launch Instance'button.
HOL-SDC-1320
Page 74HOL-SDC-1320
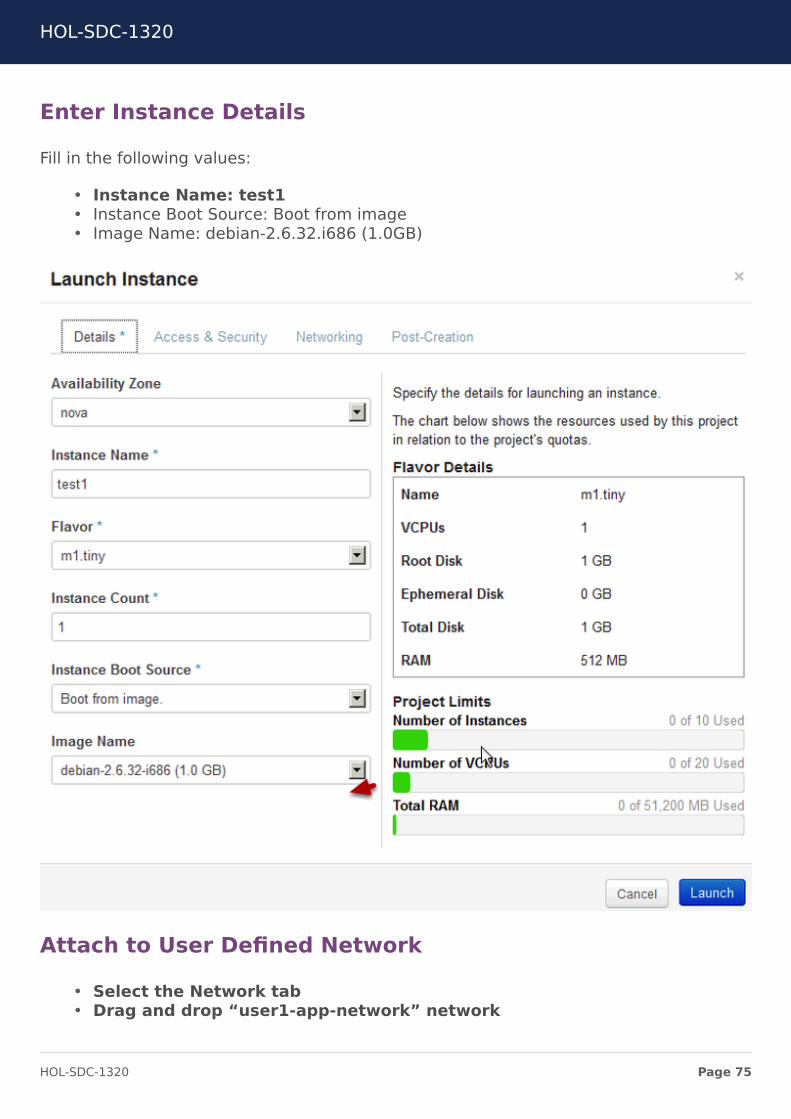
Enter Instance Details
Fill in the following values:
• Instance Name: test1• Instance Boot Source: Boot from image• Image Name: debian-2.6.32.i686 (1.0GB)
Attach to User Defined Network
• Select the Network tab• Drag and drop “user1-app-network” network
HOL-SDC-1320
Page 75HOL-SDC-1320
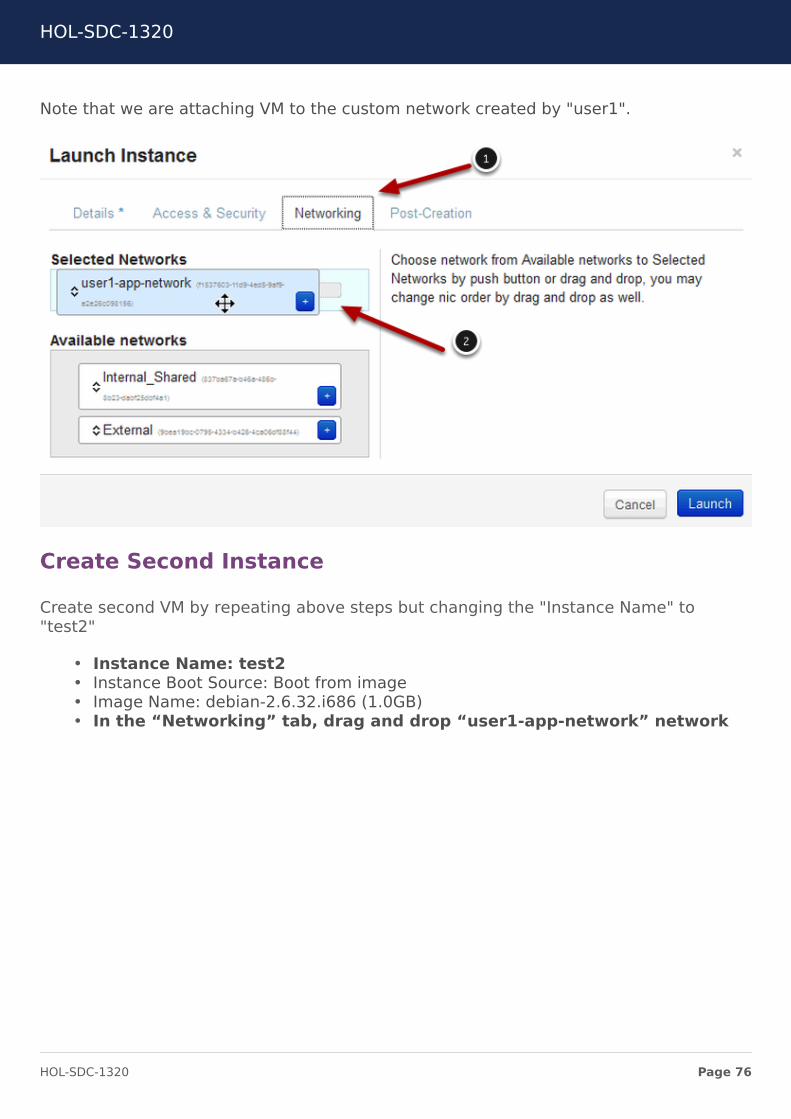
Note that we are attaching VM to the custom network created by "user1".
Create Second Instance
Create second VM by repeating above steps but changing the "Instance Name" to"test2"
• Instance Name: test2• Instance Boot Source: Boot from image• Image Name: debian-2.6.32.i686 (1.0GB)• In the “Networking” tab, drag and drop “user1-app-network” network
HOL-SDC-1320
Page 76HOL-SDC-1320
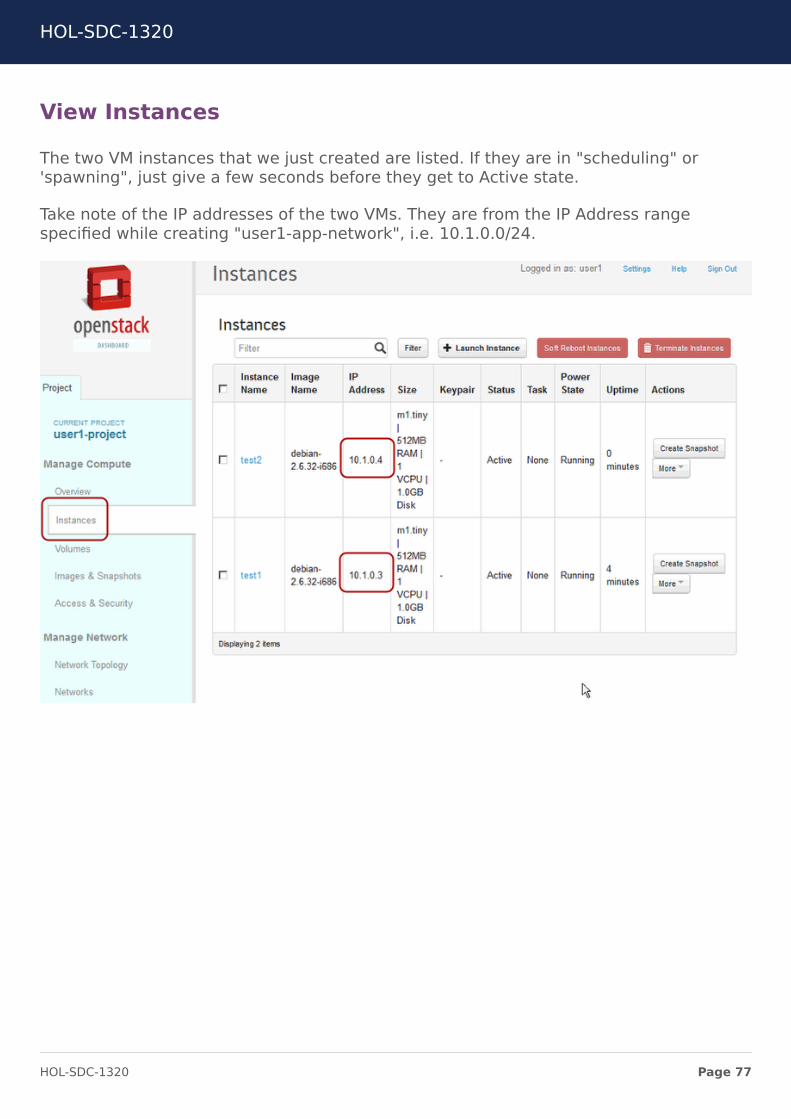
View Instances
The two VM instances that we just created are listed. If they are in "scheduling" or'spawning", just give a few seconds before they get to Active state.
Take note of the IP addresses of the two VMs. They are from the IP Address rangespecified while creating "user1-app-network", i.e. 10.1.0.0/24.
HOL-SDC-1320
Page 77HOL-SDC-1320
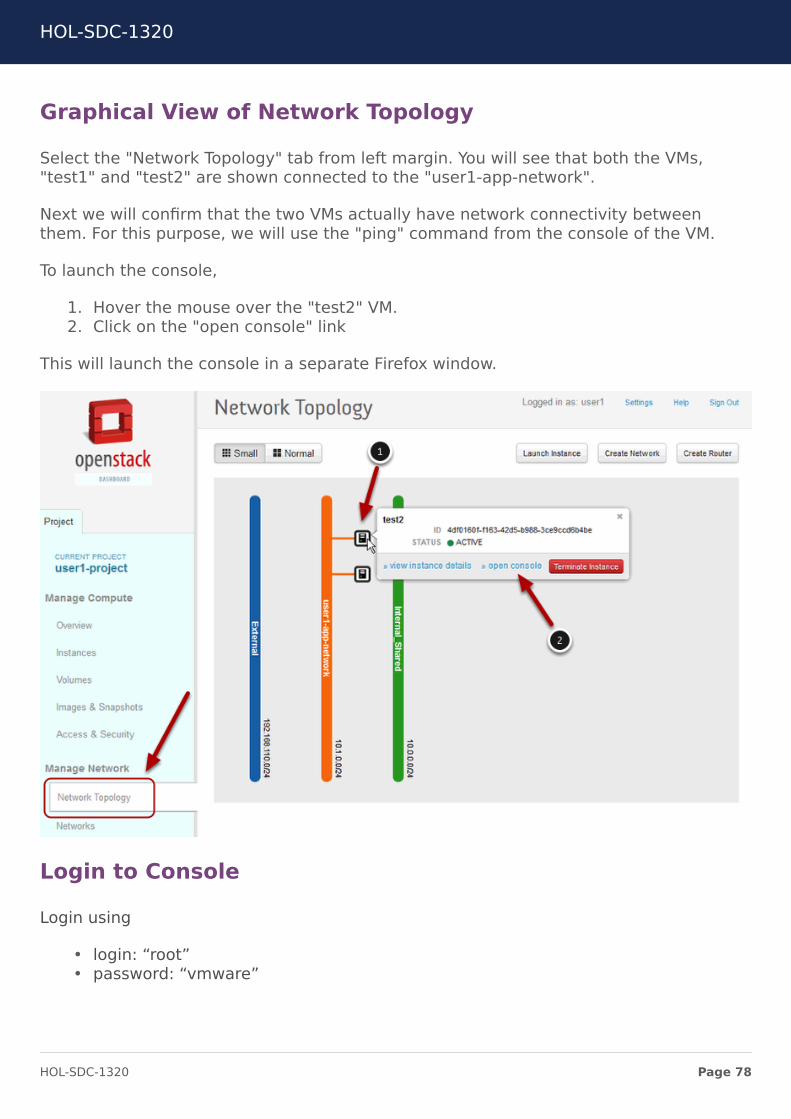
Graphical View of Network Topology
Select the "Network Topology" tab from left margin. You will see that both the VMs,"test1" and "test2" are shown connected to the "user1-app-network".
Next we will confirm that the two VMs actually have network connectivity betweenthem. For this purpose, we will use the "ping" command from the console of the VM.
To launch the console,
1. Hover the mouse over the "test2" VM.2. Click on the "open console" link
This will launch the console in a separate Firefox window.
Login to Console
Login using
• login: “root”• password: “vmware”
HOL-SDC-1320
Page 78HOL-SDC-1320
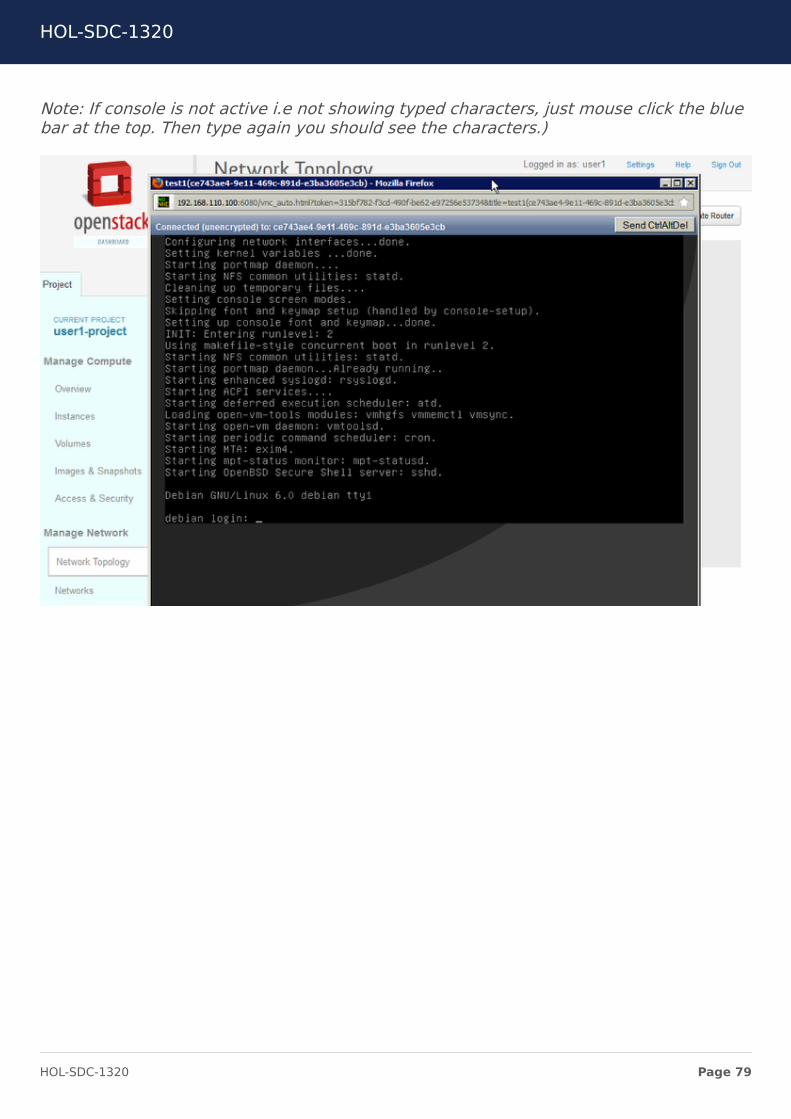
Note: If console is not active i.e not showing typed characters, just mouse click the bluebar at the top. Then type again you should see the characters.)
HOL-SDC-1320
Page 79HOL-SDC-1320
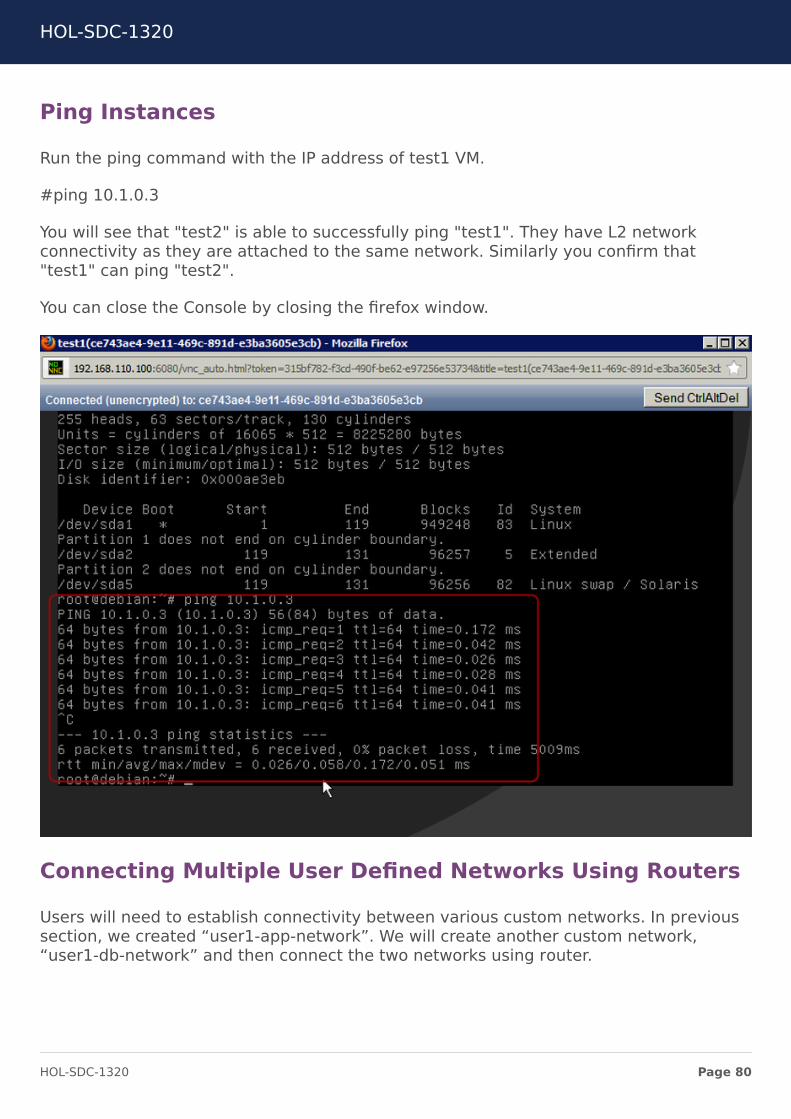
Ping Instances
Run the ping command with the IP address of test1 VM.
#ping 10.1.0.3
You will see that "test2" is able to successfully ping "test1". They have L2 networkconnectivity as they are attached to the same network. Similarly you confirm that"test1" can ping "test2".
You can close the Console by closing the firefox window.
Connecting Multiple User Defined Networks Using Routers
Users will need to establish connectivity between various custom networks. In previoussection, we created “user1-app-network”. We will create another custom network,“user1-db-network” and then connect the two networks using router.
HOL-SDC-1320
Page 80HOL-SDC-1320
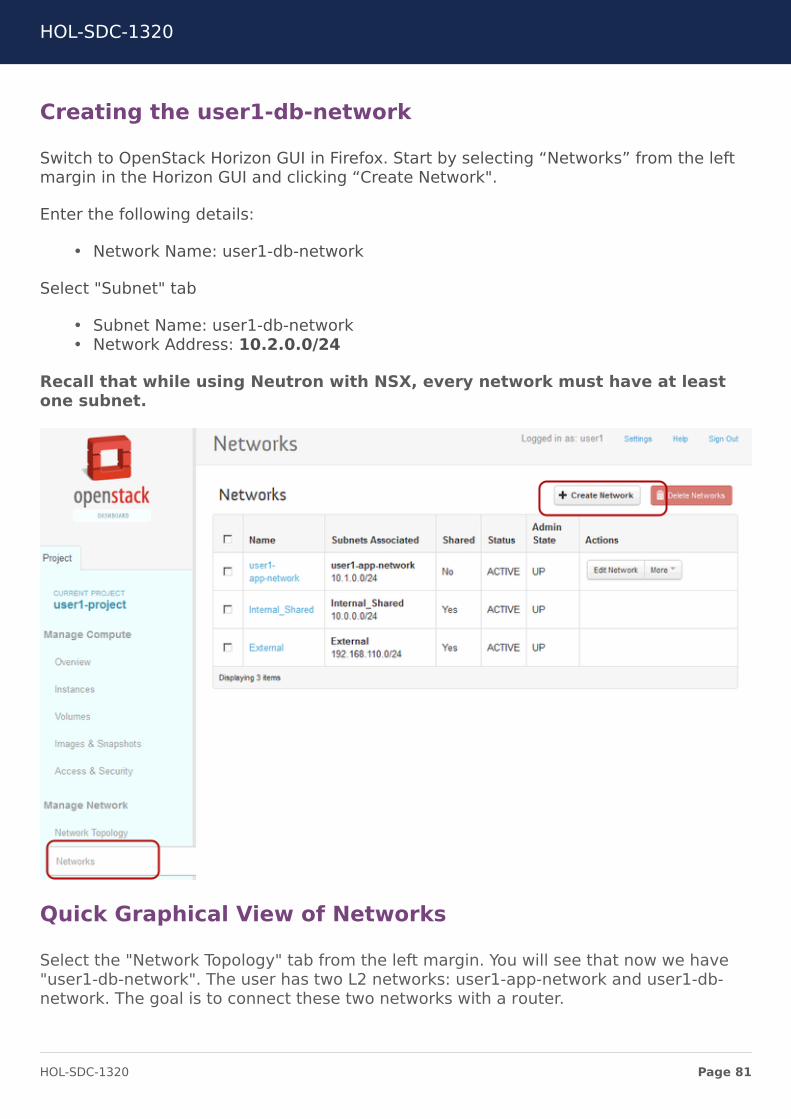
Creating the user1-db-network
Switch to OpenStack Horizon GUI in Firefox. Start by selecting “Networks” from the leftmargin in the Horizon GUI and clicking “Create Network".
Enter the following details:
• Network Name: user1-db-network
Select "Subnet" tab
• Subnet Name: user1-db-network• Network Address: 10.2.0.0/24
Recall that while using Neutron with NSX, every network must have at leastone subnet.
Quick Graphical View of Networks
Select the "Network Topology" tab from the left margin. You will see that now we have"user1-db-network". The user has two L2 networks: user1-app-network and user1-db-network. The goal is to connect these two networks with a router.
HOL-SDC-1320
Page 81HOL-SDC-1320
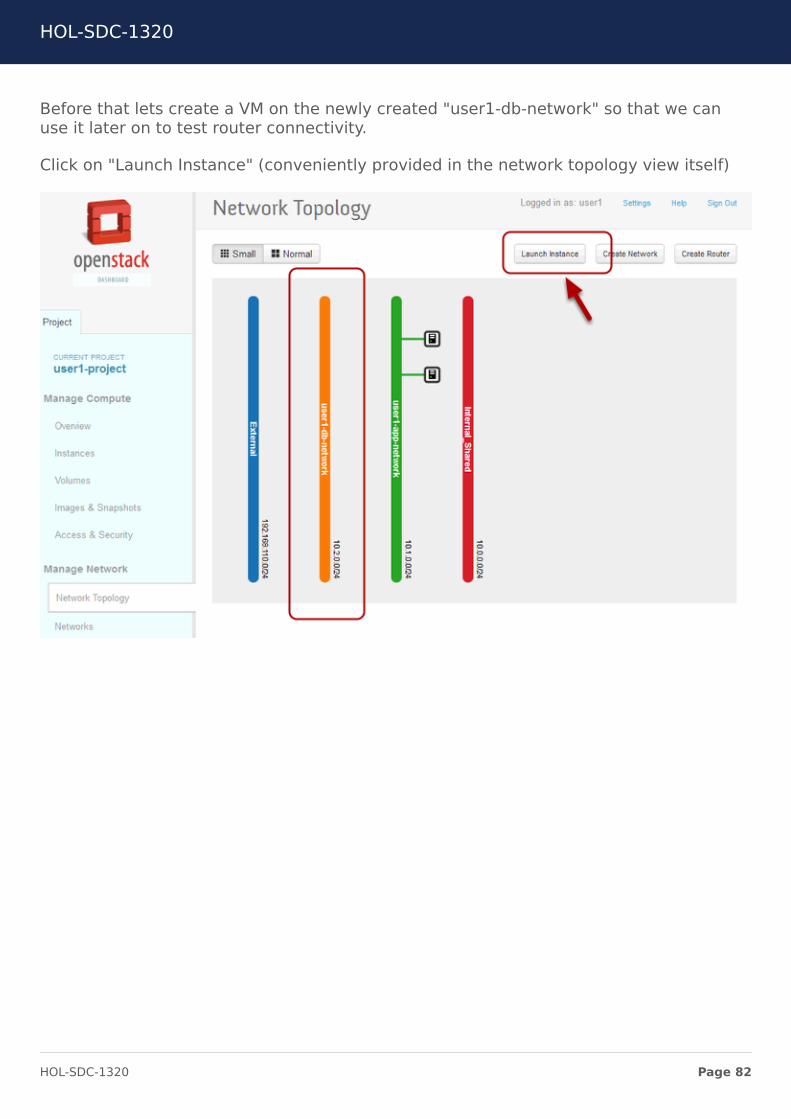
Before that lets create a VM on the newly created "user1-db-network" so that we canuse it later on to test router connectivity.
Click on "Launch Instance" (conveniently provided in the network topology view itself)
HOL-SDC-1320
Page 82HOL-SDC-1320
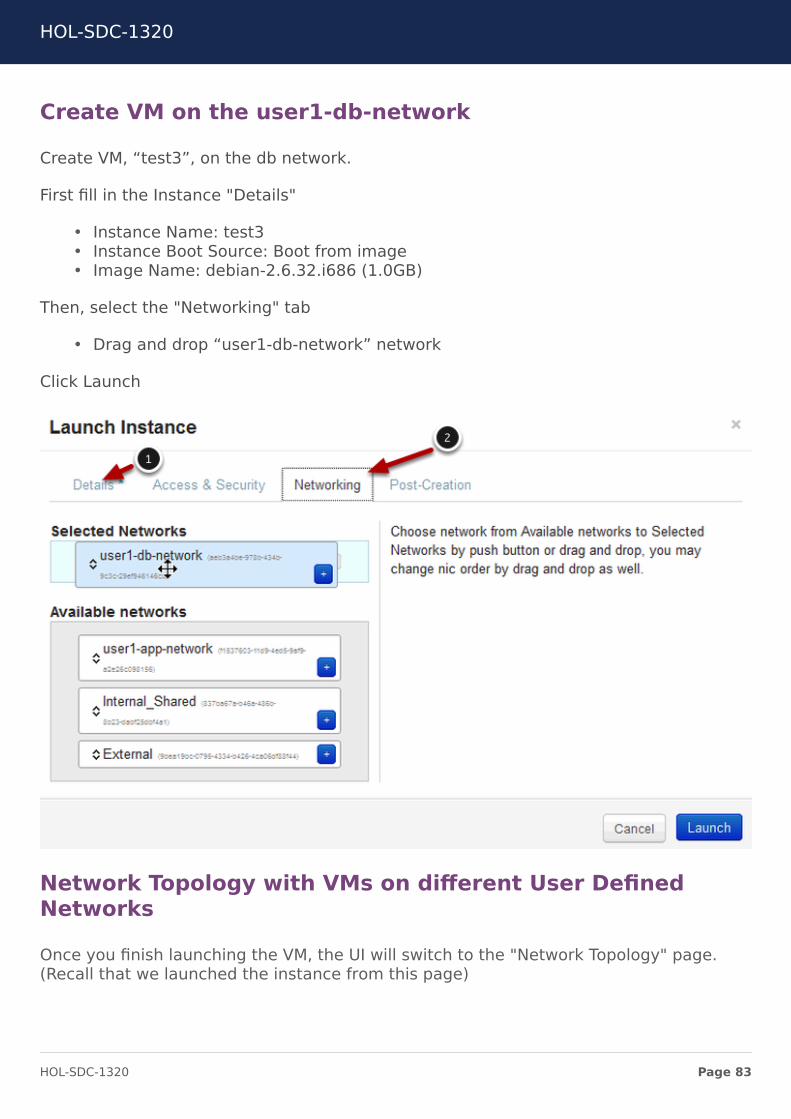
Create VM on the user1-db-network
Create VM, “test3”, on the db network.
First fill in the Instance "Details"
• Instance Name: test3• Instance Boot Source: Boot from image• Image Name: debian-2.6.32.i686 (1.0GB)
Then, select the "Networking" tab
• Drag and drop “user1-db-network” network
Click Launch
Network Topology with VMs on different User DefinedNetworks
Once you finish launching the VM, the UI will switch to the "Network Topology" page.(Recall that we launched the instance from this page)
HOL-SDC-1320
Page 83HOL-SDC-1320
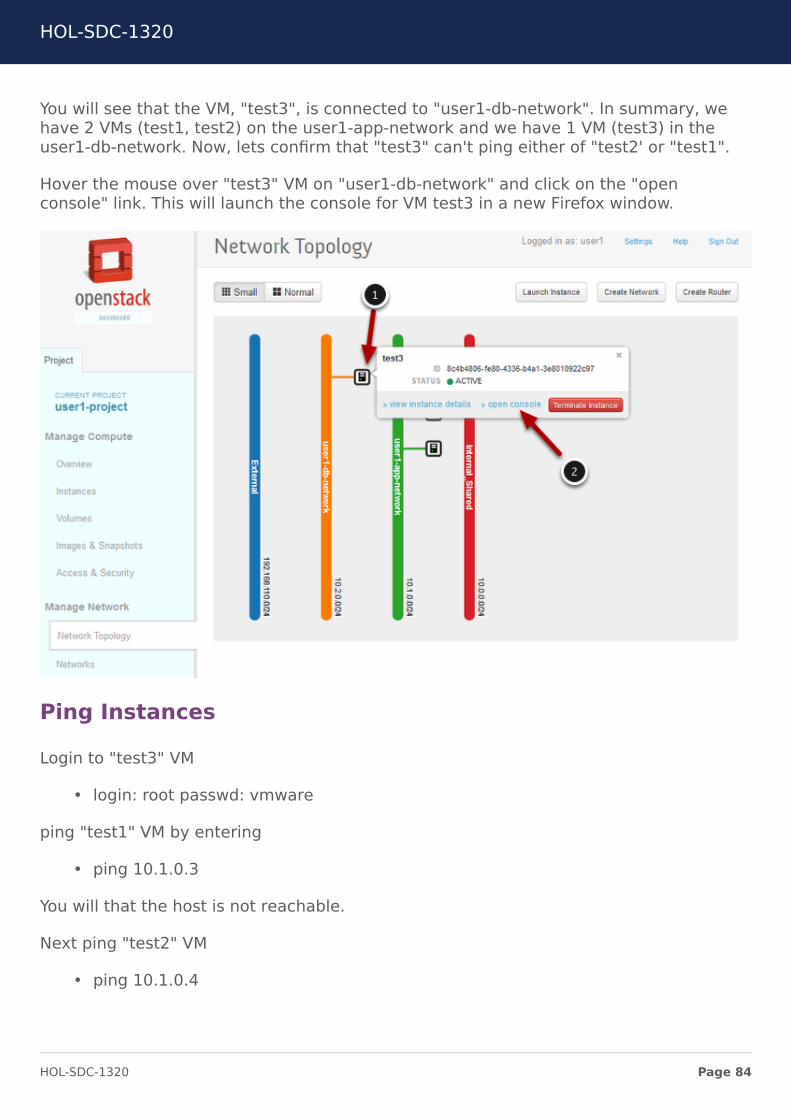
You will see that the VM, "test3", is connected to "user1-db-network". In summary, wehave 2 VMs (test1, test2) on the user1-app-network and we have 1 VM (test3) in theuser1-db-network. Now, lets confirm that "test3" can't ping either of "test2' or "test1".
Hover the mouse over "test3" VM on "user1-db-network" and click on the "openconsole" link. This will launch the console for VM test3 in a new Firefox window.
Ping Instances
Login to "test3" VM
• login: root passwd: vmware
ping "test1" VM by entering
• ping 10.1.0.3
You will that the host is not reachable.
Next ping "test2" VM
• ping 10.1.0.4
HOL-SDC-1320
Page 84HOL-SDC-1320
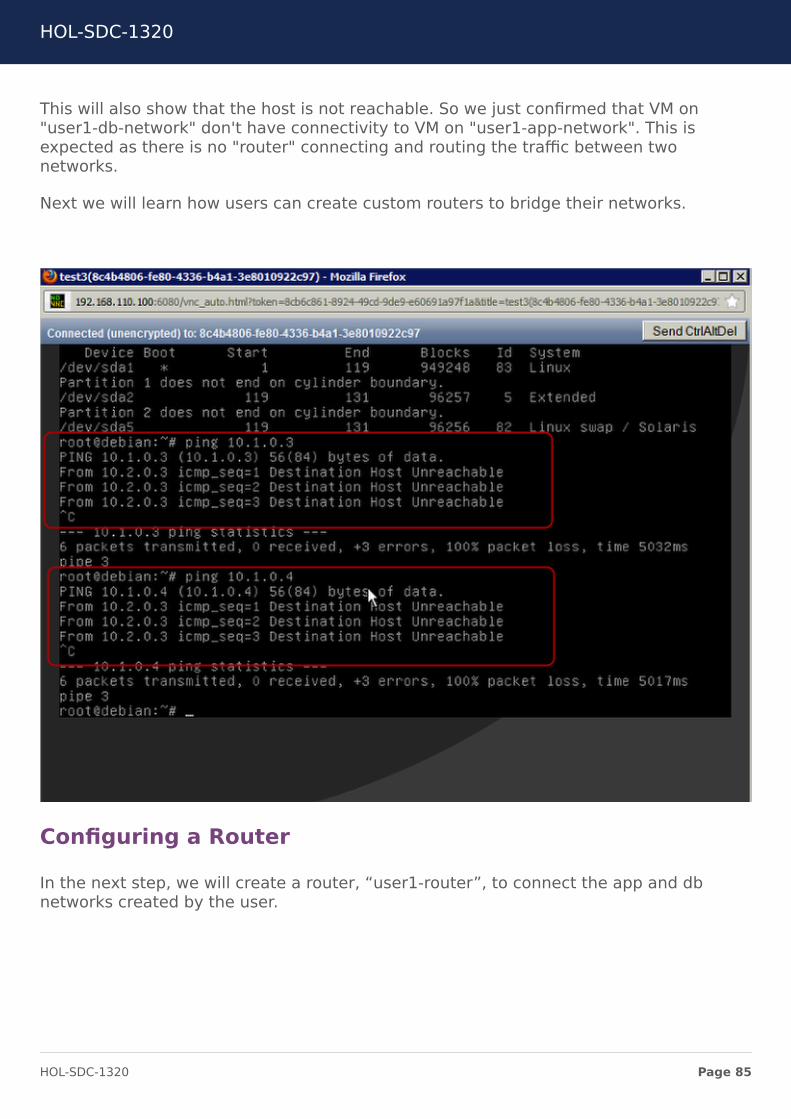
This will also show that the host is not reachable. So we just confirmed that VM on"user1-db-network" don't have connectivity to VM on "user1-app-network". This isexpected as there is no "router" connecting and routing the traffic between twonetworks.
Next we will learn how users can create custom routers to bridge their networks.
Configuring a Router
In the next step, we will create a router, “user1-router”, to connect the app and dbnetworks created by the user.
HOL-SDC-1320
Page 85HOL-SDC-1320
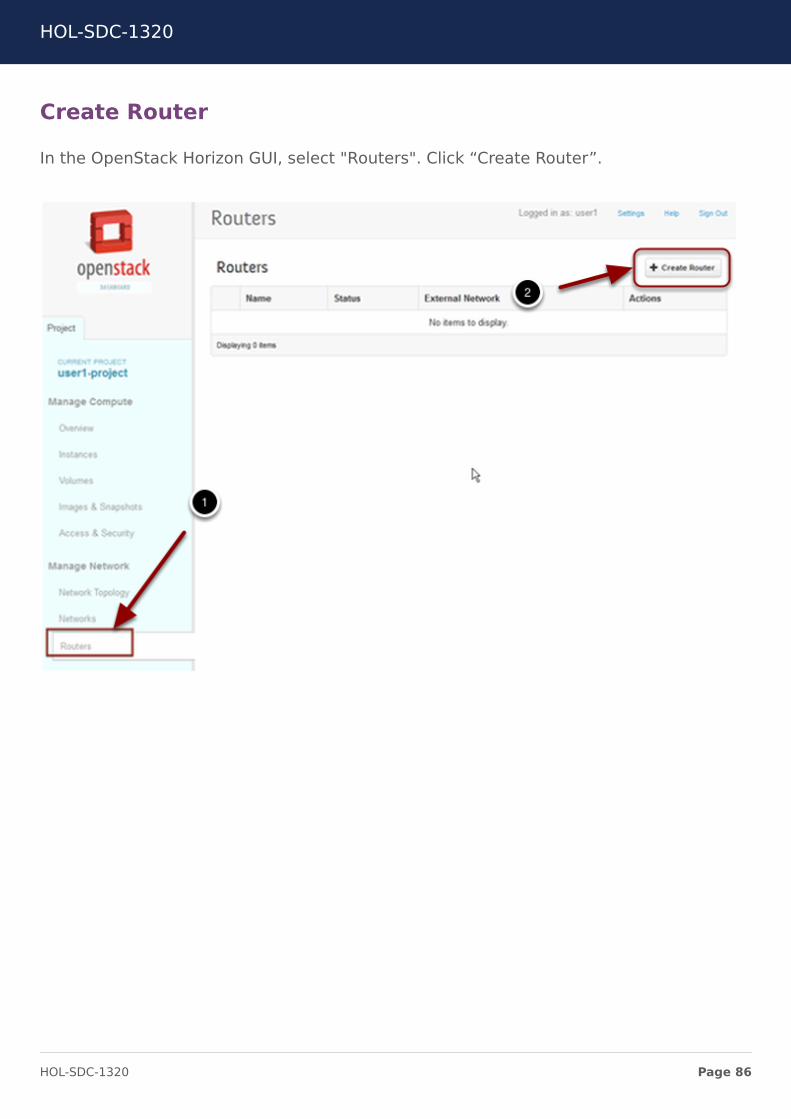
Create Router
In the OpenStack Horizon GUI, select "Routers". Click “Create Router”.
HOL-SDC-1320
Page 86HOL-SDC-1320
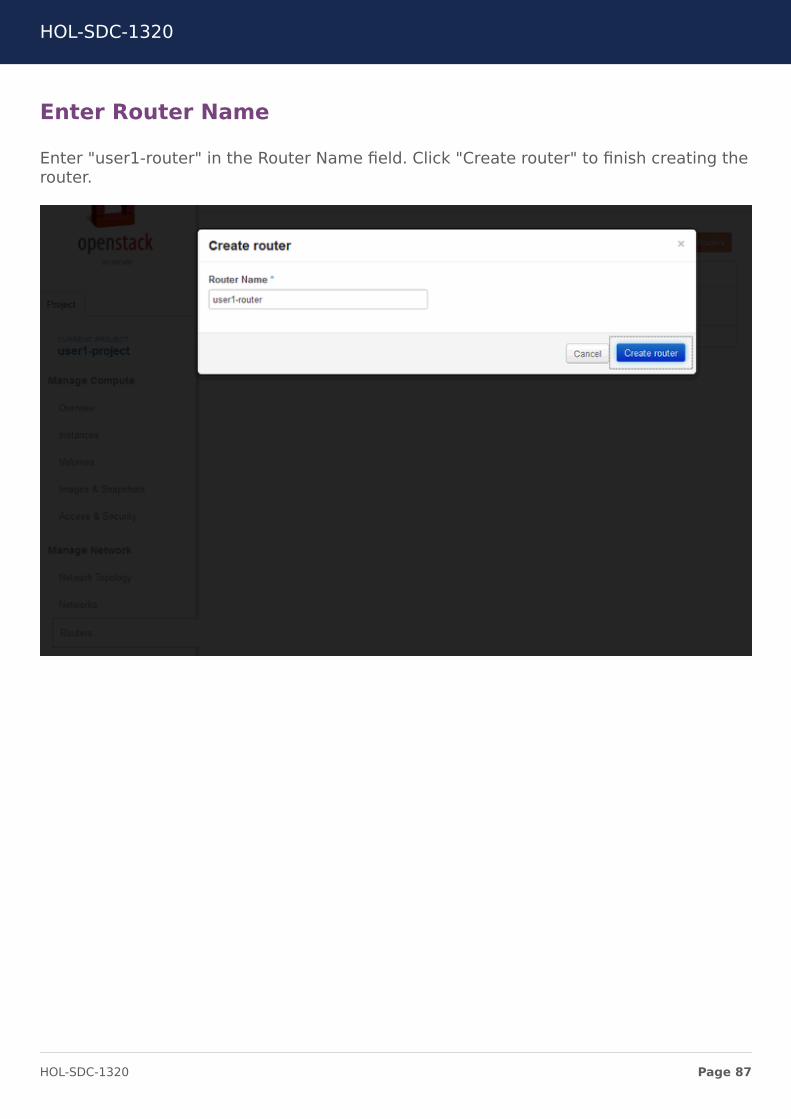
Enter Router Name
Enter "user1-router" in the Router Name field. Click "Create router" to finish creating therouter.
HOL-SDC-1320
Page 87HOL-SDC-1320
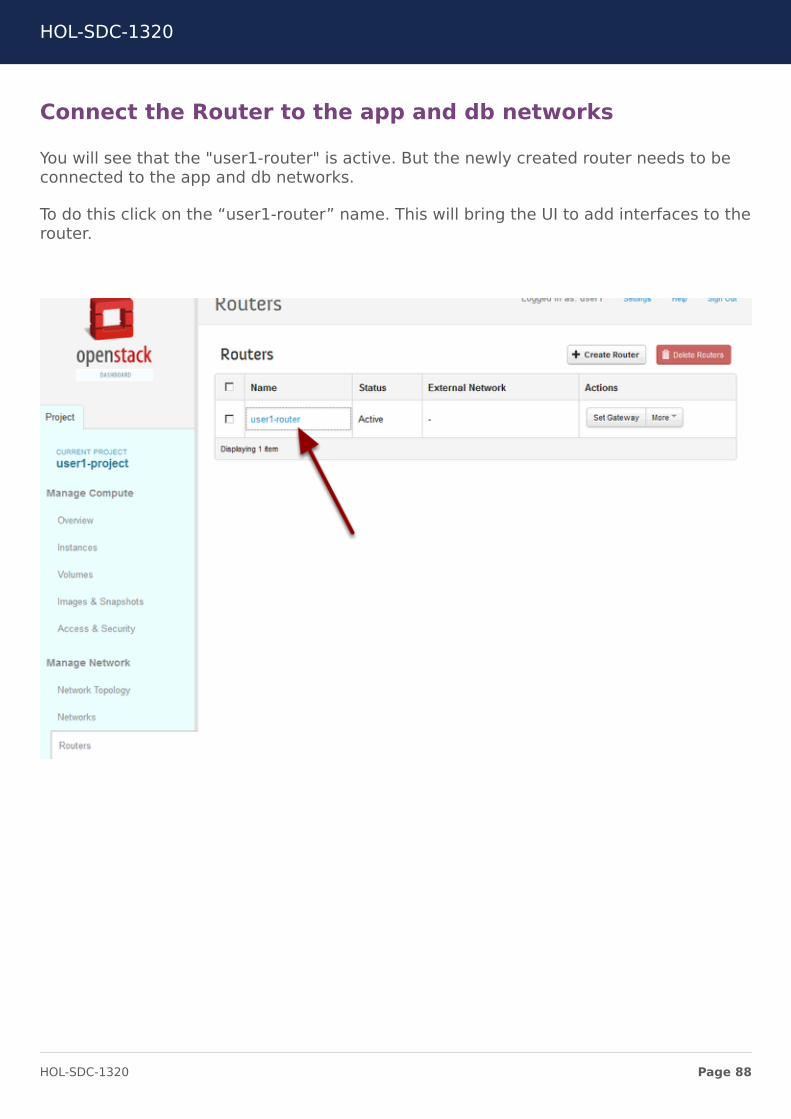
Connect the Router to the app and db networks
You will see that the "user1-router" is active. But the newly created router needs to beconnected to the app and db networks.
To do this click on the “user1-router” name. This will bring the UI to add interfaces to therouter.
HOL-SDC-1320
Page 88HOL-SDC-1320
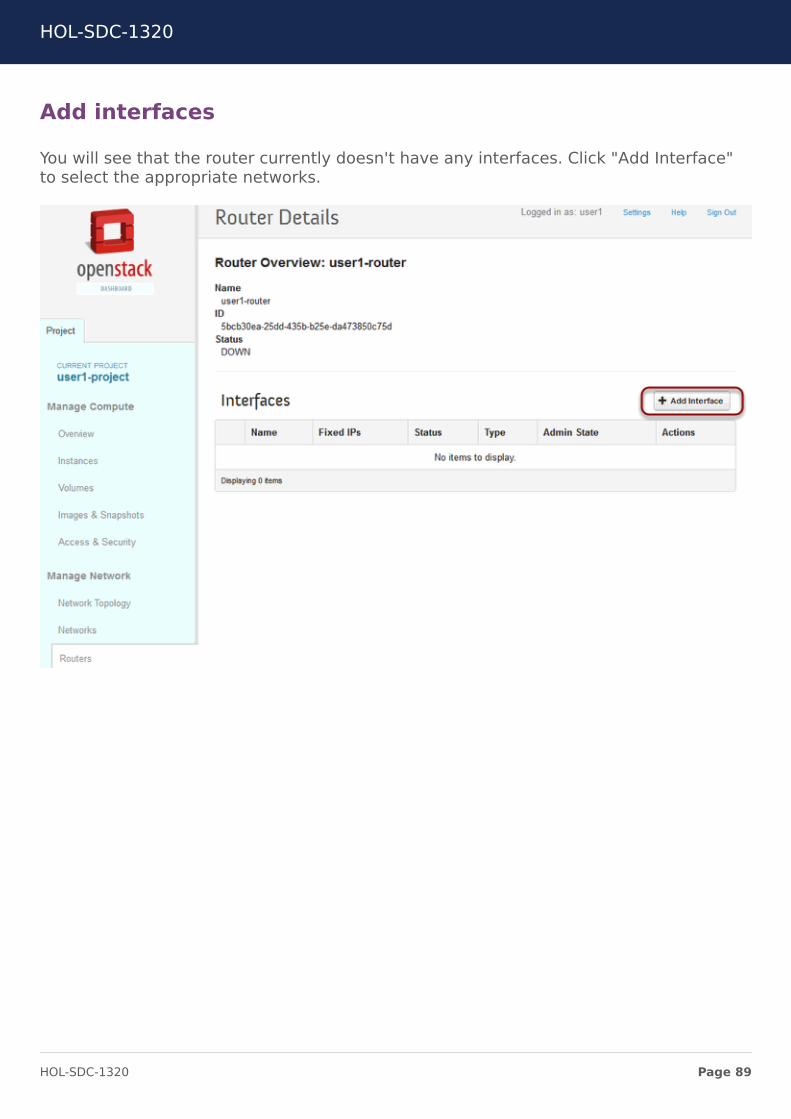
Add interfaces
You will see that the router currently doesn't have any interfaces. Click "Add Interface"to select the appropriate networks.
HOL-SDC-1320
Page 89HOL-SDC-1320
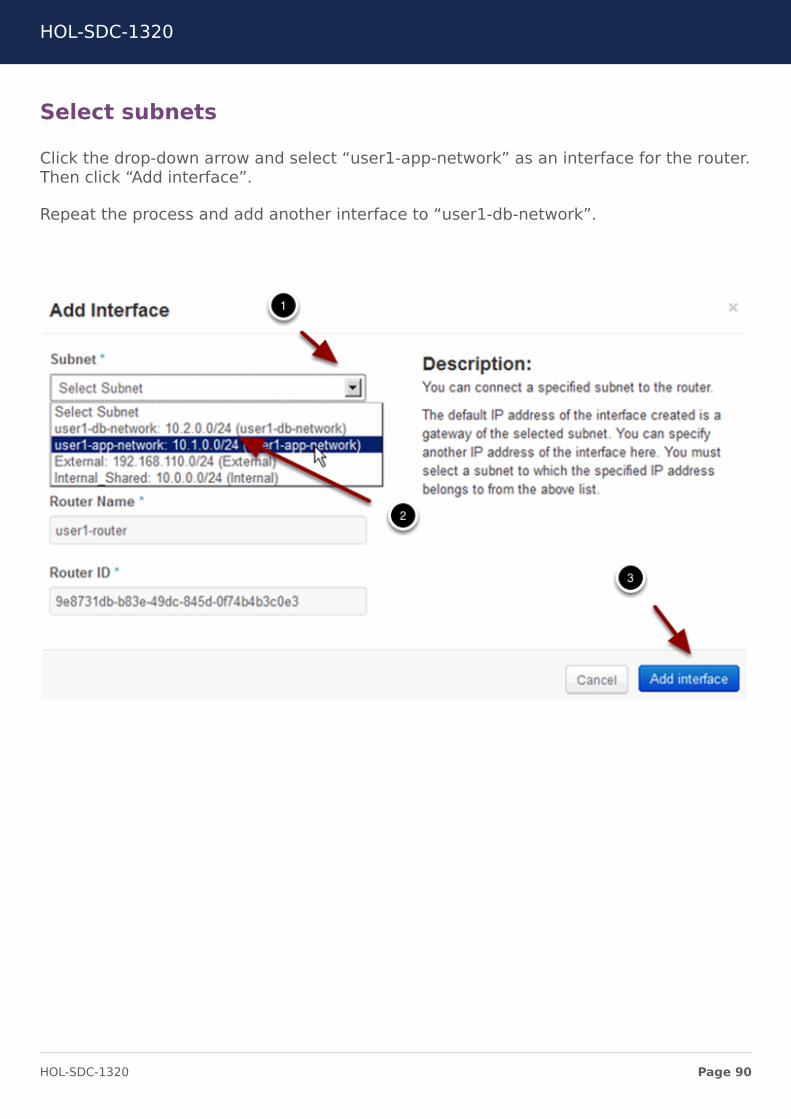
Select subnets
Click the drop-down arrow and select “user1-app-network” as an interface for the router.Then click “Add interface”.
Repeat the process and add another interface to “user1-db-network”.
HOL-SDC-1320
Page 90HOL-SDC-1320
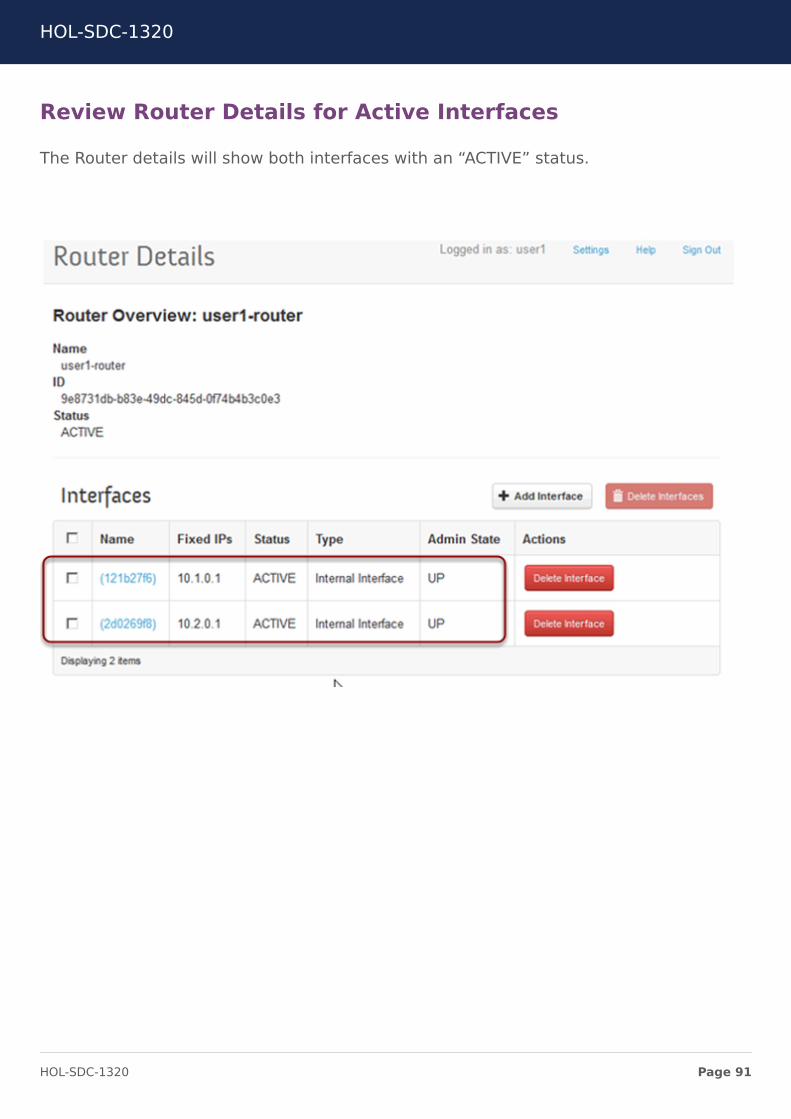
Review Router Details for Active Interfaces
The Router details will show both interfaces with an “ACTIVE” status.
HOL-SDC-1320
Page 91HOL-SDC-1320
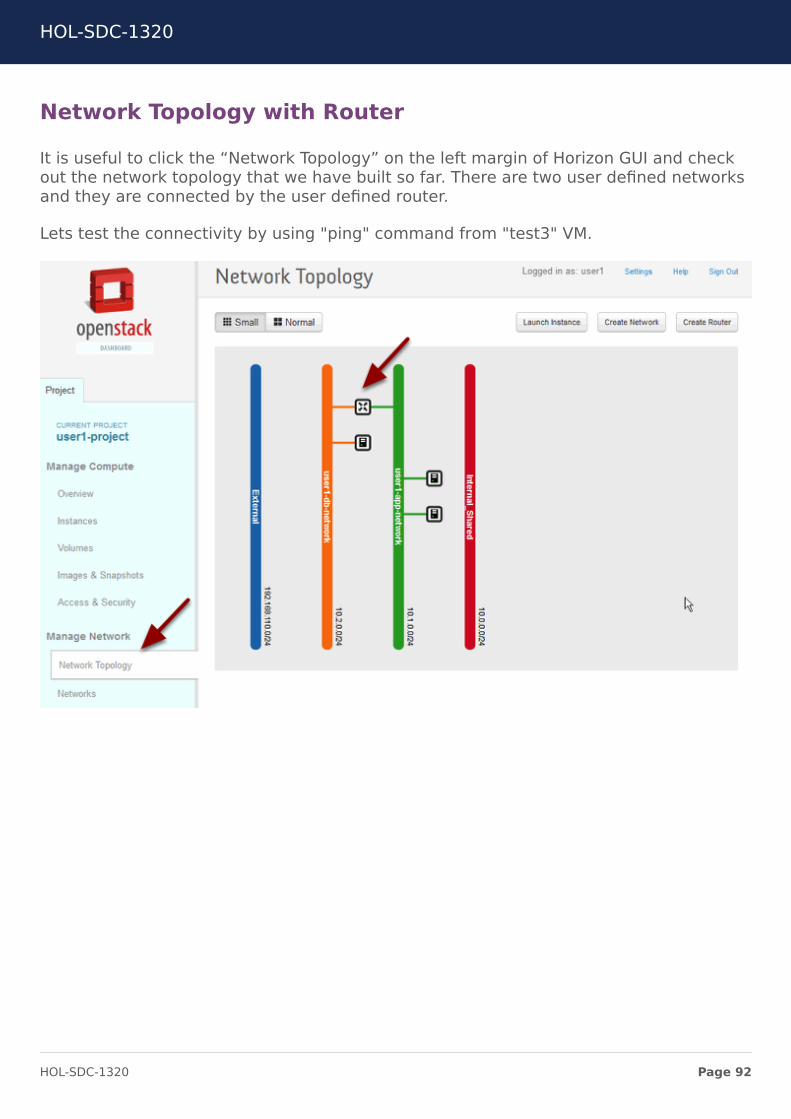
Network Topology with Router
It is useful to click the “Network Topology” on the left margin of Horizon GUI and checkout the network topology that we have built so far. There are two user defined networksand they are connected by the user defined router.
Lets test the connectivity by using "ping" command from "test3" VM.
HOL-SDC-1320
Page 92HOL-SDC-1320
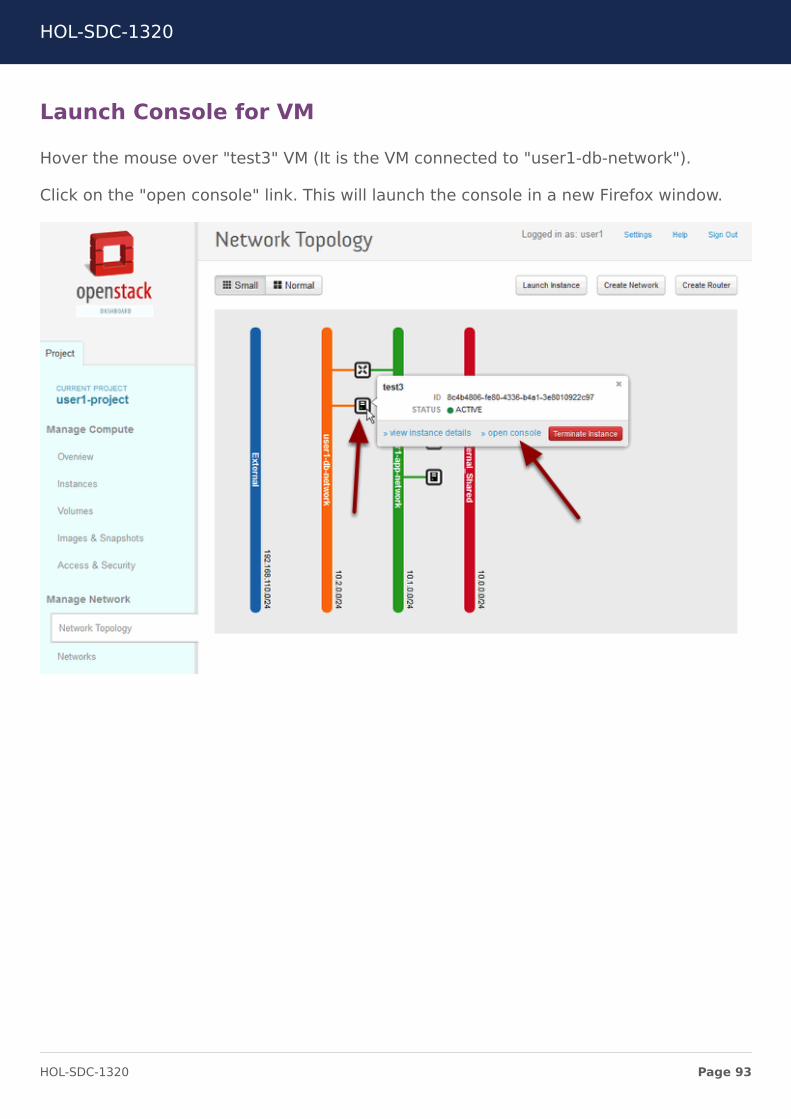
Launch Console for VM
Hover the mouse over "test3" VM (It is the VM connected to "user1-db-network").
Click on the "open console" link. This will launch the console in a new Firefox window.
HOL-SDC-1320
Page 93HOL-SDC-1320
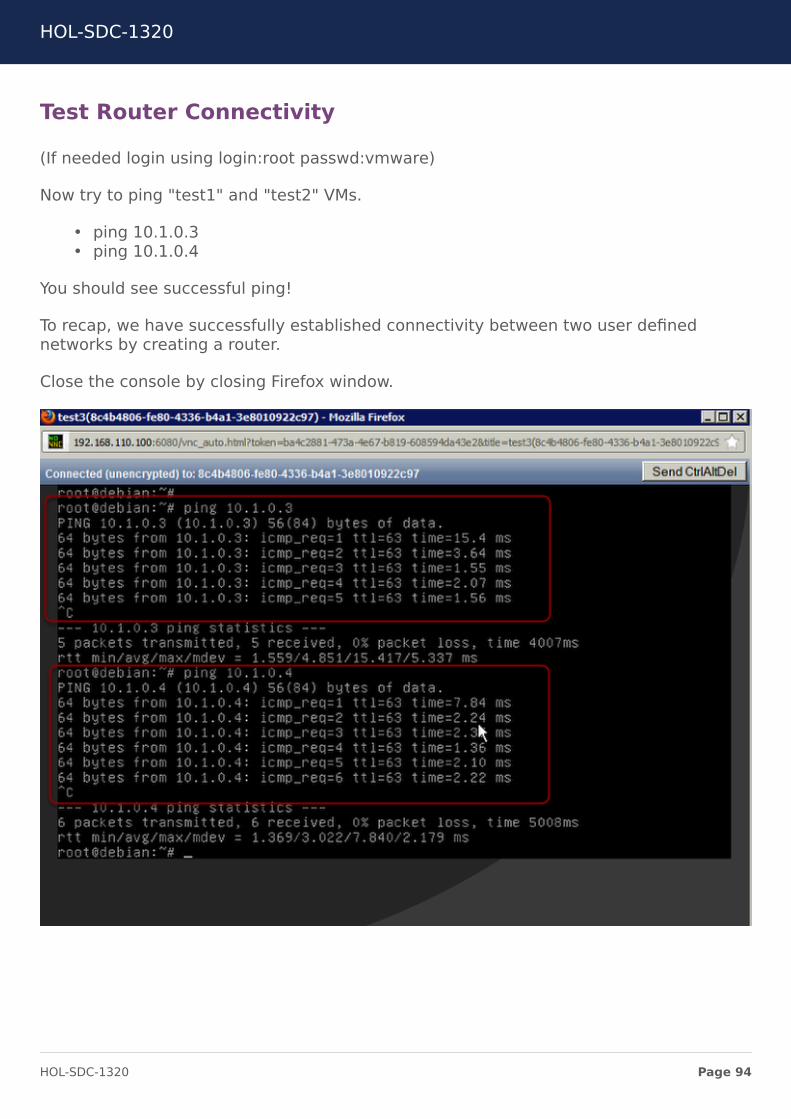
Test Router Connectivity
(If needed login using login:root passwd:vmware)
Now try to ping "test1" and "test2" VMs.
• ping 10.1.0.3• ping 10.1.0.4
You should see successful ping!
To recap, we have successfully established connectivity between two user definednetworks by creating a router.
Close the console by closing Firefox window.
HOL-SDC-1320
Page 94HOL-SDC-1320
External Connectivity Using Floating IPs
VMs often need connectivity from external end points. For example, a common use caseis to SSH into the VMs.
In this section, we will learn how to establish external connectivity to a VM.
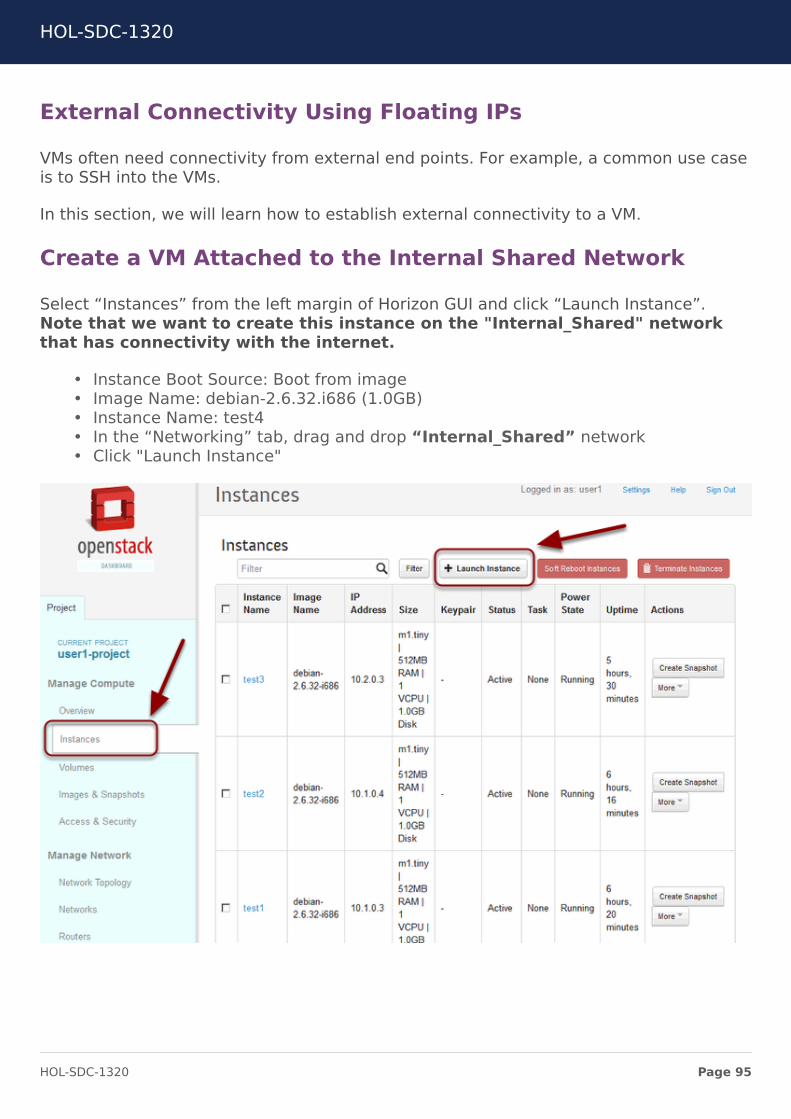
Create a VM Attached to the Internal Shared Network
Select “Instances” from the left margin of Horizon GUI and click “Launch Instance”.Note that we want to create this instance on the "Internal_Shared" networkthat has connectivity with the internet.
• Instance Boot Source: Boot from image• Image Name: debian-2.6.32.i686 (1.0GB)• Instance Name: test4• In the “Networking” tab, drag and drop “Internal_Shared” network• Click "Launch Instance"
HOL-SDC-1320
Page 95HOL-SDC-1320
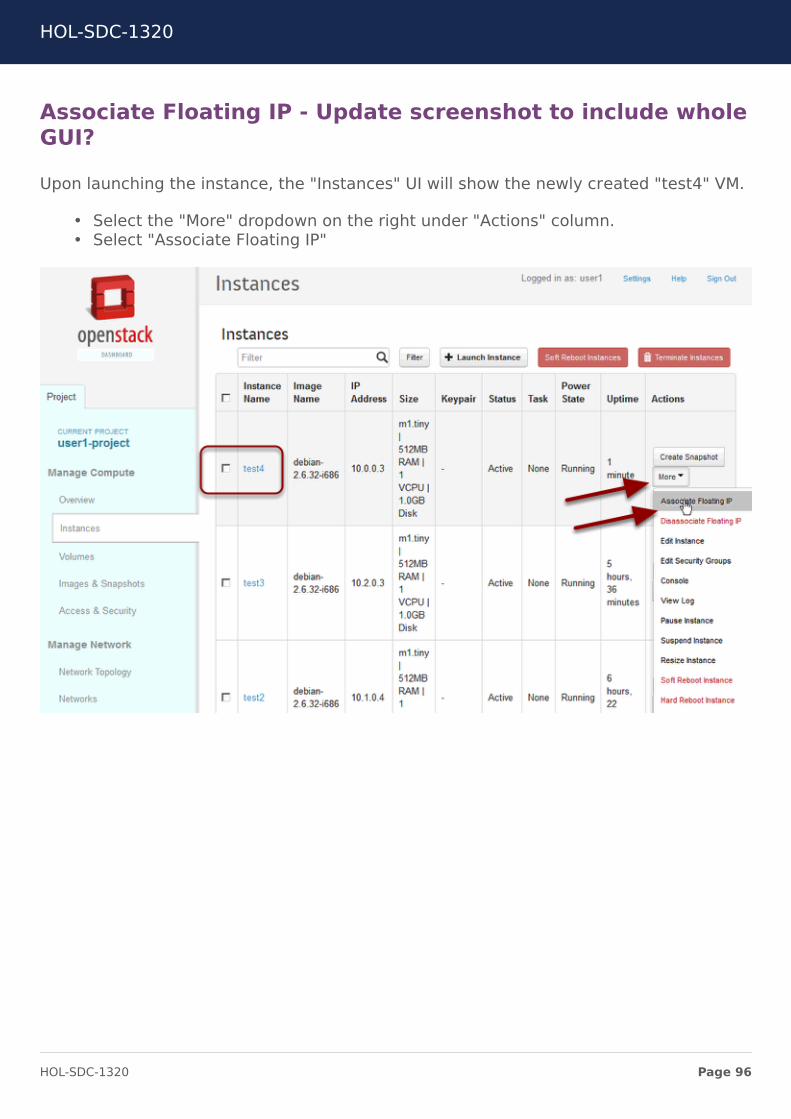
Associate Floating IP - Update screenshot to include wholeGUI?
Upon launching the instance, the "Instances" UI will show the newly created "test4" VM.
• Select the "More" dropdown on the right under "Actions" column.• Select "Associate Floating IP"
HOL-SDC-1320
Page 96HOL-SDC-1320
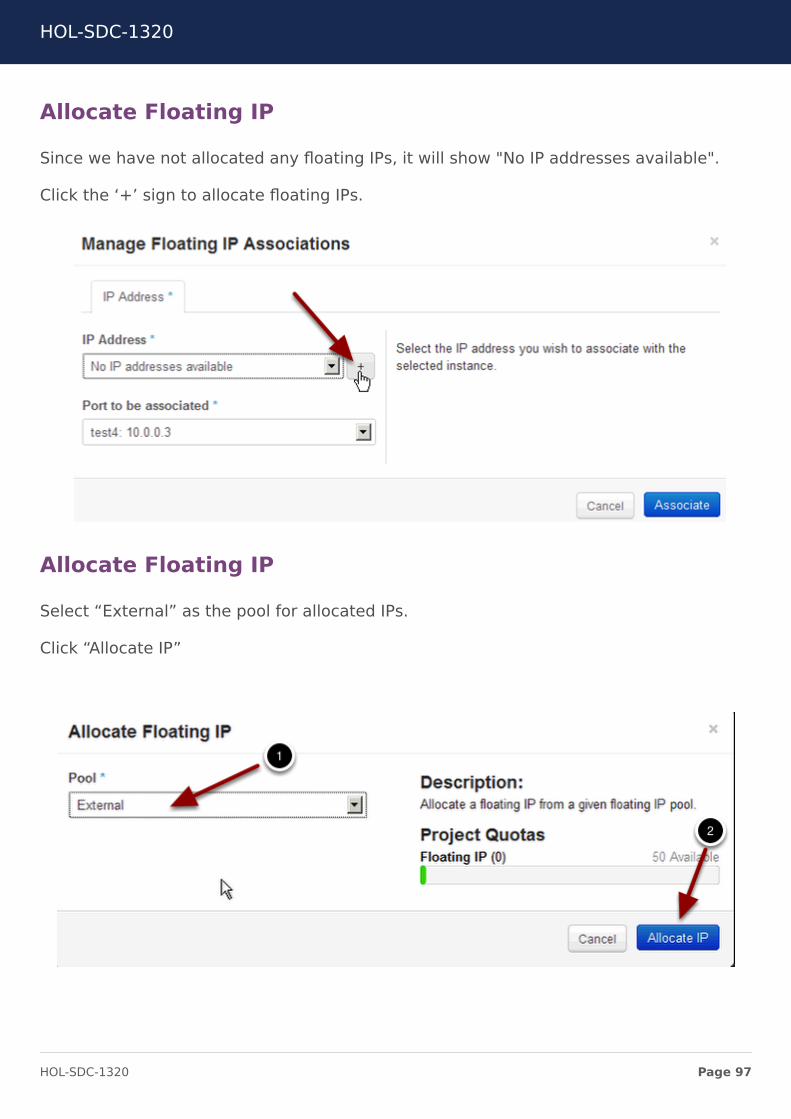
Allocate Floating IP
Since we have not allocated any floating IPs, it will show "No IP addresses available".
Click the ‘+’ sign to allocate floating IPs.
Allocate Floating IP
Select “External” as the pool for allocated IPs.
Click “Allocate IP”
HOL-SDC-1320
Page 97HOL-SDC-1320
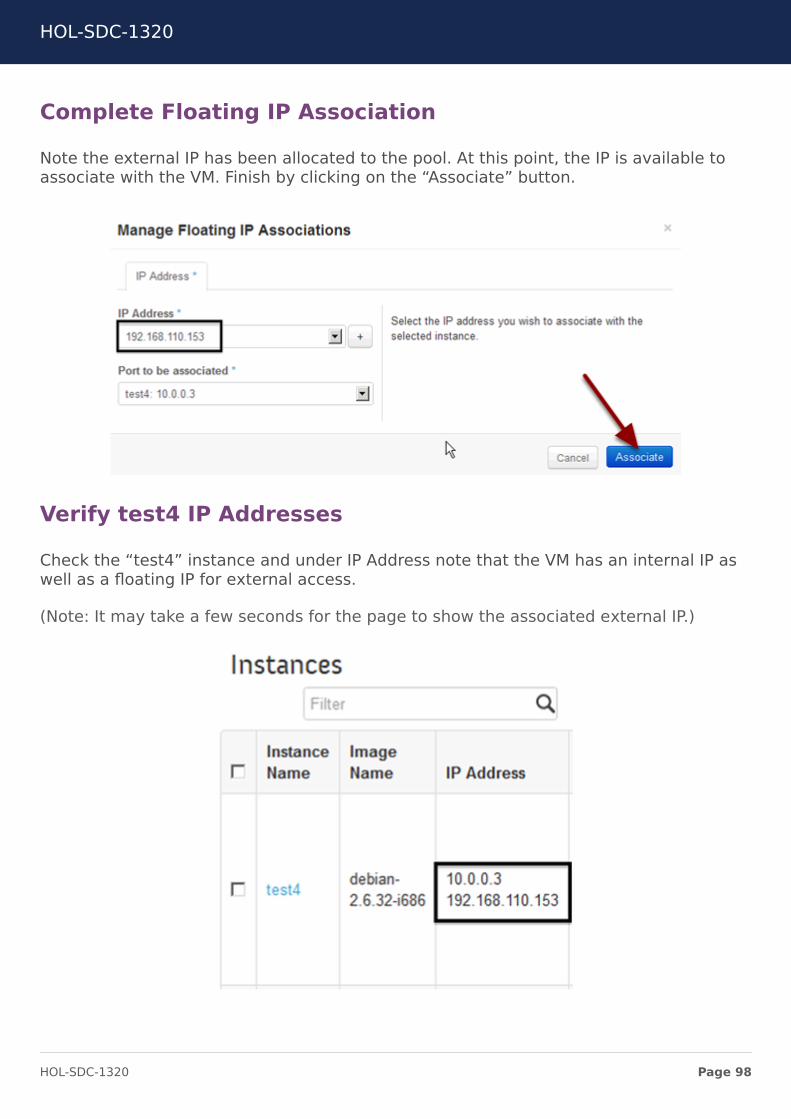
Complete Floating IP Association
Note the external IP has been allocated to the pool. At this point, the IP is available toassociate with the VM. Finish by clicking on the “Associate” button.
Verify test4 IP Addresses
Check the “test4” instance and under IP Address note that the VM has an internal IP aswell as a floating IP for external access.
(Note: It may take a few seconds for the page to show the associated external IP.)
HOL-SDC-1320
Page 98HOL-SDC-1320
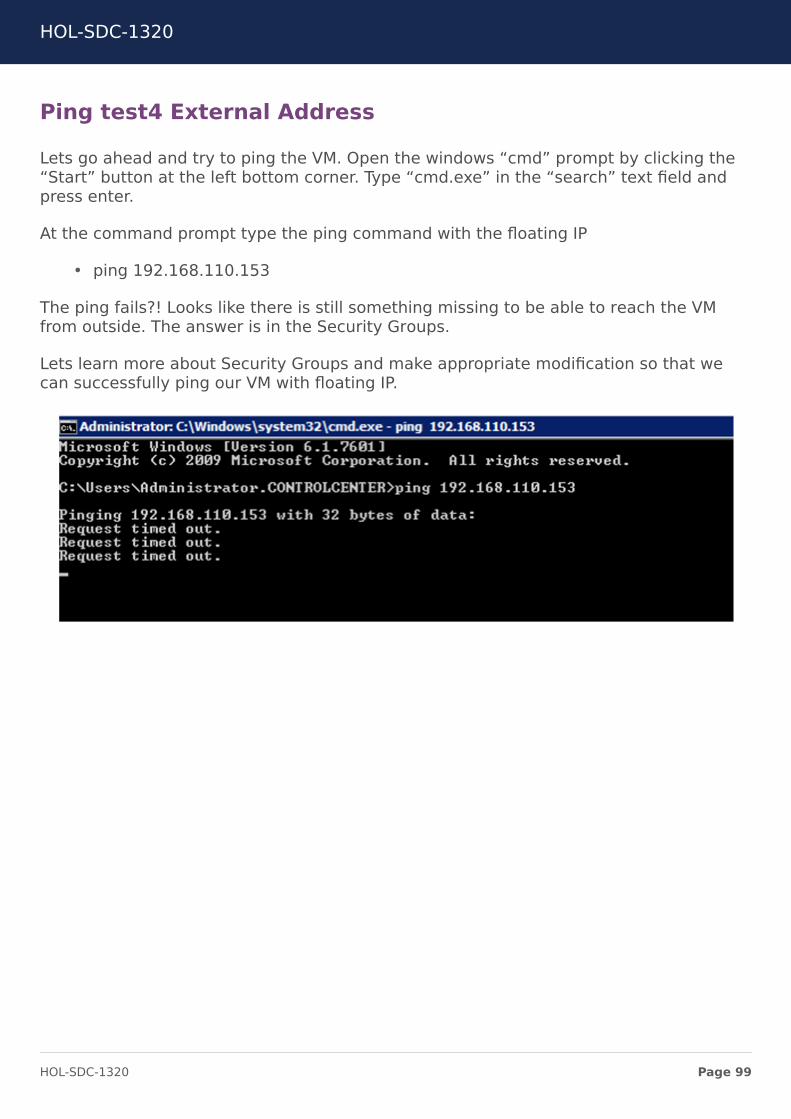
Ping test4 External Address
Lets go ahead and try to ping the VM. Open the windows “cmd” prompt by clicking the“Start” button at the left bottom corner. Type “cmd.exe” in the “search” text field andpress enter.
At the command prompt type the ping command with the floating IP
• ping 192.168.110.153
The ping fails?! Looks like there is still something missing to be able to reach the VMfrom outside. The answer is in the Security Groups.
Lets learn more about Security Groups and make appropriate modification so that wecan successfully ping our VM with floating IP.
HOL-SDC-1320
Page 99HOL-SDC-1320
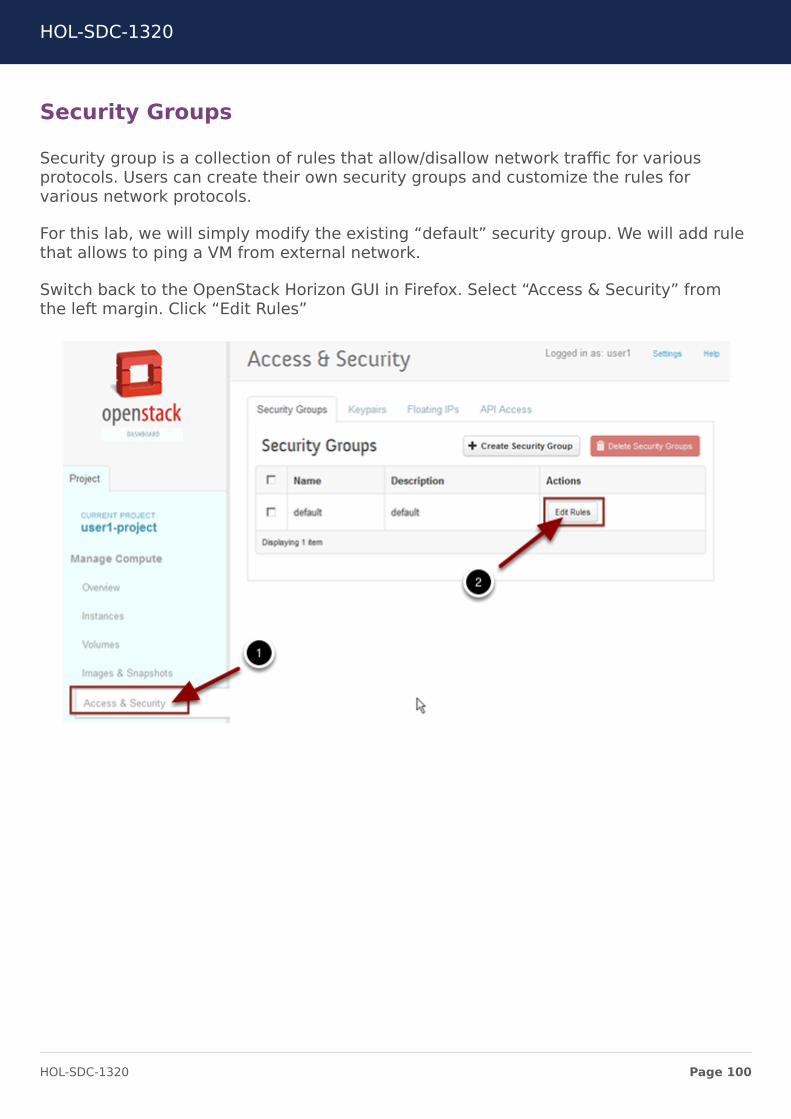
Security Groups
Security group is a collection of rules that allow/disallow network traffic for variousprotocols. Users can create their own security groups and customize the rules forvarious network protocols.
For this lab, we will simply modify the existing “default” security group. We will add rulethat allows to ping a VM from external network.
Switch back to the OpenStack Horizon GUI in Firefox. Select “Access & Security” fromthe left margin. Click “Edit Rules”
HOL-SDC-1320
Page 100HOL-SDC-1320
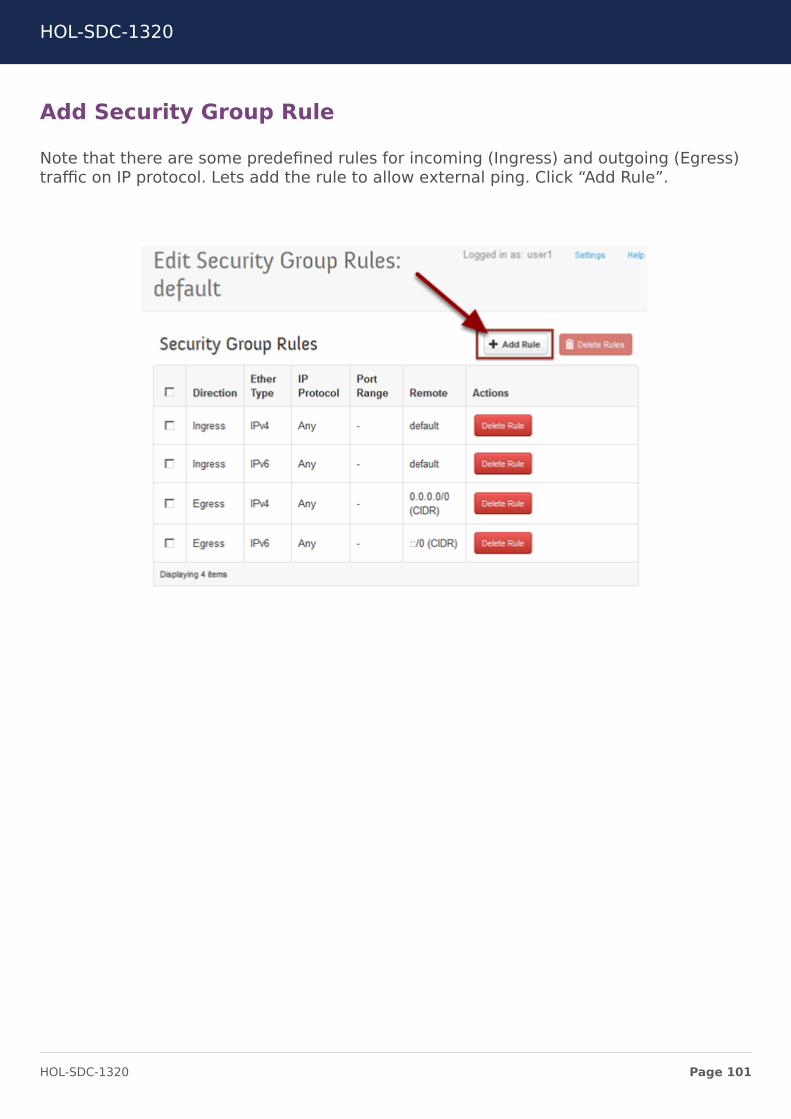
Add Security Group Rule
Note that there are some predefined rules for incoming (Ingress) and outgoing (Egress)traffic on IP protocol. Lets add the rule to allow external ping. Click “Add Rule”.
HOL-SDC-1320
Page 101HOL-SDC-1320
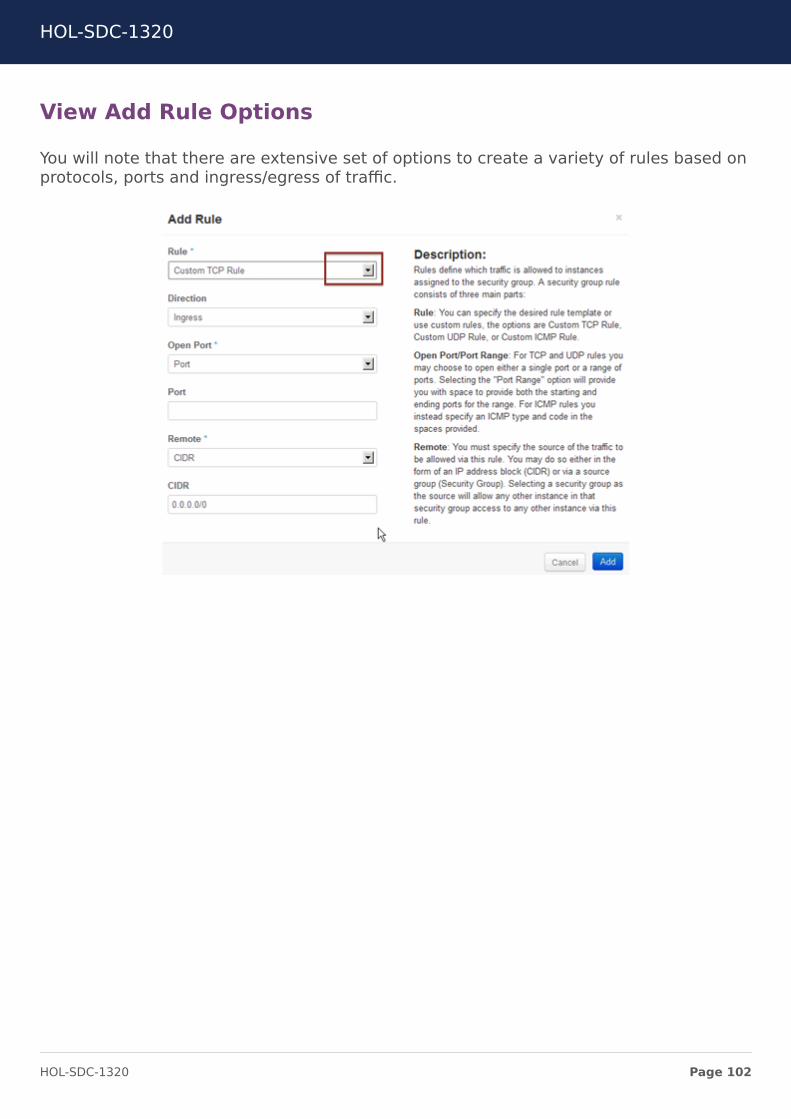
View Add Rule Options
You will note that there are extensive set of options to create a variety of rules based onprotocols, ports and ingress/egress of traffic.
HOL-SDC-1320
Page 102HOL-SDC-1320
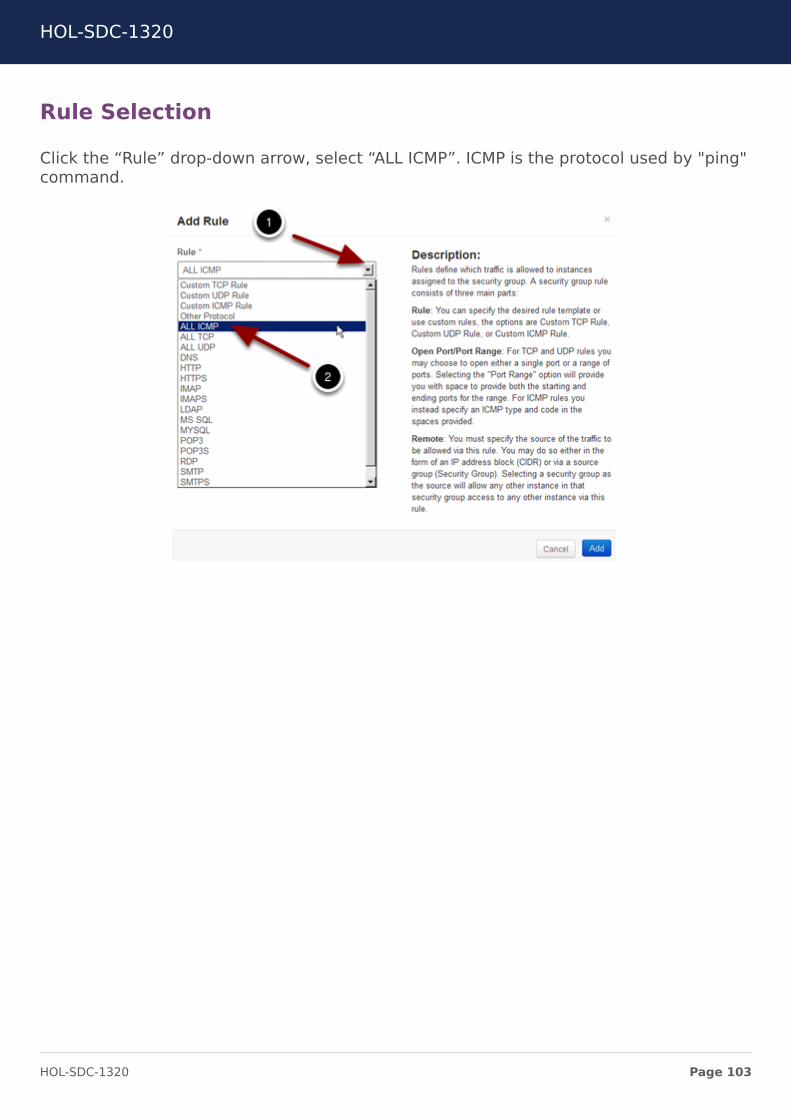
Rule Selection
Click the “Rule” drop-down arrow, select “ALL ICMP”. ICMP is the protocol used by "ping"command.
HOL-SDC-1320
Page 103HOL-SDC-1320
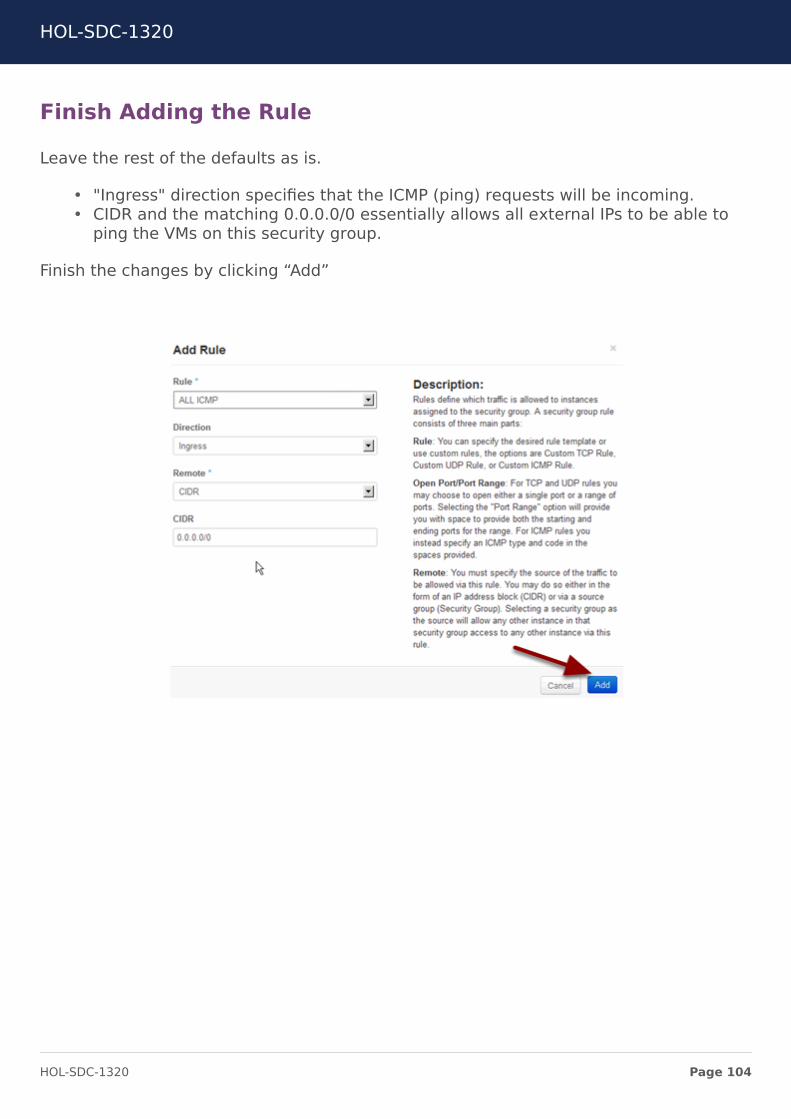
Finish Adding the Rule
Leave the rest of the defaults as is.
• "Ingress" direction specifies that the ICMP (ping) requests will be incoming.• CIDR and the matching 0.0.0.0/0 essentially allows all external IPs to be able to
ping the VMs on this security group.
Finish the changes by clicking “Add”
HOL-SDC-1320
Page 104HOL-SDC-1320
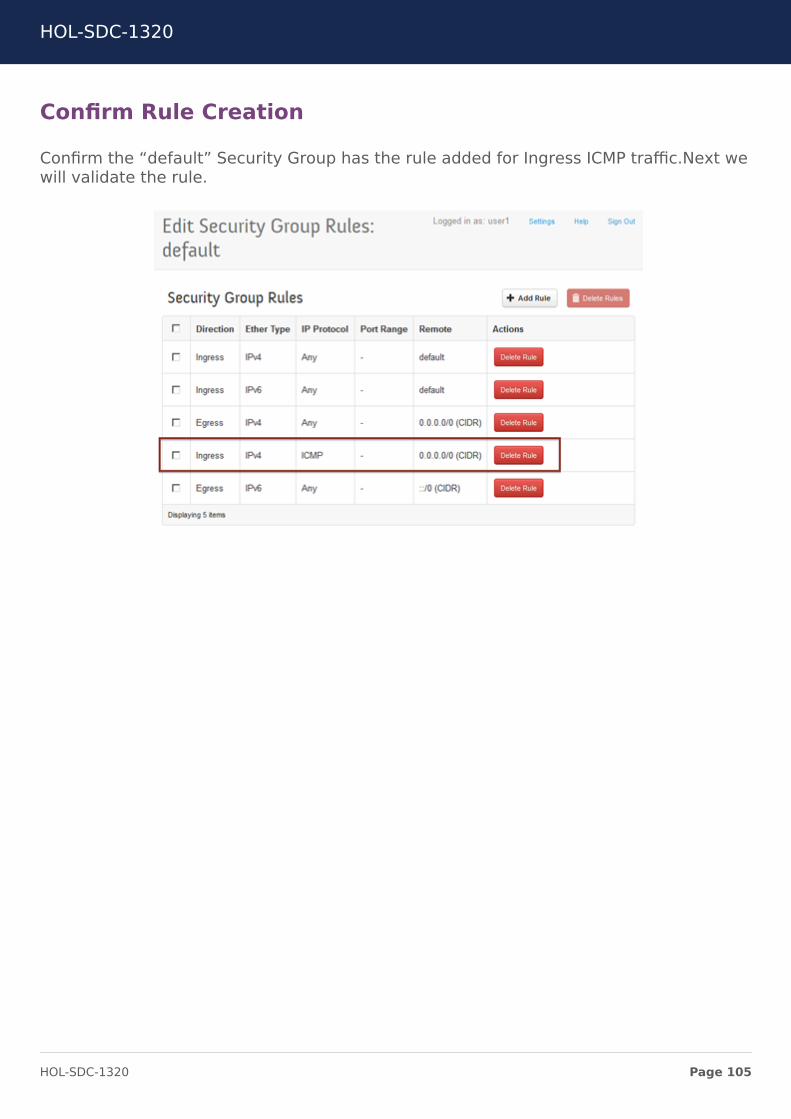
Confirm Rule Creation
Confirm the “default” Security Group has the rule added for Ingress ICMP traffic.Next wewill validate the rule.
HOL-SDC-1320
Page 105HOL-SDC-1320
Ping the External IP Address
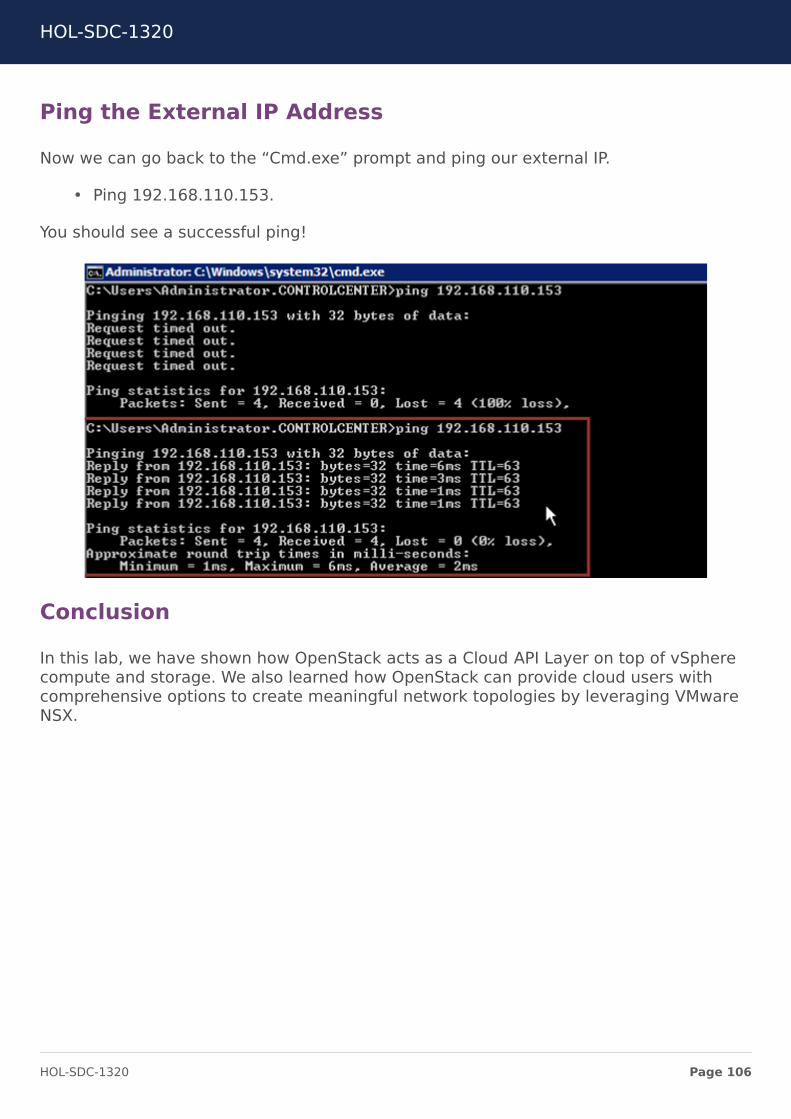
Now we can go back to the “Cmd.exe” prompt and ping our external IP.
• Ping 192.168.110.153.
You should see a successful ping!
Conclusion
In this lab, we have shown how OpenStack acts as a Cloud API Layer on top of vSpherecompute and storage. We also learned how OpenStack can provide cloud users withcomprehensive options to create meaningful network topologies by leveraging VMwareNSX.
HOL-SDC-1320
Page 106HOL-SDC-1320

ConclusionThank you for participating in the VMware Hands-on Labs. Be sure to visithttp://hol.vmware.com/ to continue your lab experience online.
Lab SKU: HOL-SDC-1320
Version: 20141126-112254
HOL-SDC-1320
Page 107HOL-SDC-1320