Table of Contents - Carls's Grill...
79
Transcript of Table of Contents - Carls's Grill...


- 1 -
Table of Contents
Disclaimer 2Acknowledgements 3Caveat Emptor 4Chapters1. Introduction 52. Basic Safety, Lighting and Grease Fires 73. Before Buying a Gas Grill 94. Finding Repair Parts 105. Basic Grill Maintenance, Diagnostics and Trouble Shooting 11
Trouble Shooting 12 Images 15
6 LP Parts and Gas Fittings 197. Care and Replacement of Cooking Grids 21
Images 228. Rock Grates and Flame Tamers (Heat Plates 24
Images 259. Burners, Side Burners, Infrared Burners and Burner Air Shutters 27
Side Burners 28 Infrared Burners 28 Burner Air Shutters 30 Images 31
10. Igniters and Electrodes 35 Push Button and Rotary Igniters 35 Battery Igniters 36 Flame Thrower Igniters 37 Images 39
11. Problems that can occur with Gas Grill Valves 44 Valve Orifice Inspection and Cleaning 45 Replacing a Valve 46 Old Style Gas Grill Valve Assemblies 47 Images 48
12. Table Top Grills, Post Mounted Grills, Knobs, Handles & Other Parts 5313. LP to Natural Gas Conversion 55
Images 5714. Natural Gas to LP Conversion 60
Images 62Glossary of Terms 68Index of Manufacturers’ Phone Numbers & Websites 71Anderson/Forrester Chart of Orifice Capacities 78

- 2 -DISCLAIMER
EQUIPMENT AND PARTS VARY BY MODEL AND MANUFACTURER. NEVER USE,MAINTAIN OR REPAIR EQUIPMENT UNTIL YOU HAVE READ AND UNDERSTOOD THEDOCUMENTATION PROVIDED BY YOUR SELLER AND MANUFACTURER.
IF THE INFORMATION CONTAINED HEREIN CONFLICTS WITH THE MANUAL PROVIDEDFOR YOUR PARTICULAR EQUIPMENT, YOU SHOULD FOLLOW THE INSTRUCTIONSPROVIDED BY YOUR SELLER/MANUFACTURER OR CONSULT WITH A QUALIFIEDTECHNICIAN.
IMPROPER INSTALLATION, MAINTENANCE OR REPAIR MAY RESULT IN INJURY ORDAMAGE FOR WHICH THE AUTHOR WILL NOT BE RESPONSIBLE. IF YOU DO NOT HAVETHE PROPER TOOLS, KNOWLEDGE OR ABILITY TO USE OR MAINTAIN YOUREQUIPMENT, ALWAYS CONSULT WITH QUALIFIED PROFESSIONALS.

- 3 -Acknowledgements
I want to thank my family and partners for our successes in business together.
Thanks to my children, Zach and Erin, for their love and encouragement.
My dear friend and life companion Antje has always been there for me over the last13 years.
For my teacher Red Hawk, and guide Ralph, my deep appreciation.
My other friends are too many to list but have encouraged me so much.
My special thanks to Jeanie Whitelaw for editing and web work.

- 4 -The Star-Driller's Attention(For Little Moose)
In a dark and narrow tunnel they kneelone behind the otherlit only by lamps on their hats,drilling holes for dynamite.
The front man holds the 5-foot drillwith its star-shaped, tapered point.One hand is inches from the butt.His beam is focused on the point.He never looks back.
The rear man swings the 12 pound hammerwith all his might.His beam is focused on the butt.He never looks away.
The rhythmic noise of the blows is deafeningin that small tight place sotheir ears are plugged and they never speak.Sometimes the front man will tireand wish to rest.
He cannot yell,he cannot turn,so just after the hammer strikeshe places his thumb
directly over the buttwhere the hammer lands.The rear man's beamis focused on the butt.
He never looks away.
(Reprinted with permission, Red Hawk, The Sioux Dog Dance, 13)
- 5 -Chapter 1 – Grill Manual Introduction
I am Carl Hunter (I publish under my full name Romero Carl Hunter) to avoid confusionwith the many other Carl Hunter’s out there and I currently work in my family business sellingmostly “aftermarket” and “OEM” (see the Glossary of Terms for definitions) gas grill parts. Wehave been selling online since 2005. If you’ve seen the home page www.clagrills.com, there is apicture of my dad at a gas grill sales event in 1963. I have been around gas grills since then.
Lark Hunter (Dad)
For the past 25 years we have had a small business, Clagrills & Service, in the LittleRock area selling and fixing gas grills. My dad, Lark, and I have been licensed as Gas Fittersfor most of that time. He worked in plumbing, heating and air, and gas products since 1958. Ihave worked full time on gas grills, including running gas lines, since 1985. You can contact meat [email protected] with questions. I get very busy during our season, which is from Aprilthrough July. But I still always try to respond within 24 hours.
You might want to repair your grill to save money and keep from sending more USDollars out of the country. Some aftermarket repair parts are US Made. I hope this manual willhelp you decide if you can safely repair your gas grill, and if it is worth it to you.
In this manual I have tried to emphasize, and constantly address, safety issues requiredwhile trying to repair your grill. If you have little or no experience with gas appliances, you’ll haveto decide if you can safely do the work. The failure to do so can (and probably will) result in firein the wrong places, with possible destruction and injury to people and property.
When I use my grill I am always aware of any gas smell (which reveals a leak). I usuallygrab the tank to get an idea of how much gas it has and sometimes I will even weigh it. I lightthe grill, and leave it on high for 10 or 15 minutes. This will burn off any grease from theprevious cooking, as well as see how the burners are lit.
As I cook, I like to check the grill every ten minutes or so. And since I’ve done this for solong, I know what to do in case there are grease fires or leaks (including a leak that may be inthe gas line that runs to the tank that’s burning). It’s good to be ready and to be aware thatthese grills, when in use, should not be left unattended for more than a few minutes. Withcombustibles around I also like to have the water hose handy. My warnings in this manual on

- 6 -safety are there to alert you and avoid the dangers that happen thousands of times a yearto users of these grills. See Chapter 2 - Basic Safety, Lighting and Grease Fires. I admit to a lotof redundant warnings in this area. SAFETY ALWAYS!!!
Since the early 1960's gas grills have been a favorite appliance for Americans to cookwith outside. The early gas grills were more expensive than the charcoal grills. And, consumerswere slow to buy them because of the additional expense as well as the "fear" of usingsomething different.
In the past 6 years, the introduction of the cheaper box type (and Asian made) gas grillshas made them common in peoples’ backyards. They have many more parts than the oldcharcoal grills (which are also still common today) and these parts wear out or fail. Theconsumer will often try to fix their own grill, and that is the main reason I have written this book.
BEFORE YOU BEGIN trying to fix the old grill BEWARE! These are gas appliances andyour failure to understand safety procedures will result in fires where you don't expect them! Ifyou haven't hooked up a gas dryer or stove before or worked on a gas appliance, you need tobe certain of what you're doing! If you're not certain get a trained appliance technician to helpyou. IF YOU CONTINUE you must check, recheck and test your work!! Before using your grillagain go through these steps.
1. Check to be certain that the burners are mounted correctly with the burner-venturiopening (which is where the burner tube slides over the valve orifice-jet) and placed overthe gas valve orifice (jet). FAILURE to do this WILL result in a "back-up flame" aroundthe valves. Damage and POSSIBLE INJURY could result.
2. Check all gas connections for leaks. Failure could result in a flame where it shouldn’t be.3. Test the grill with the grids and heat plates out and look for problems.4. If you smell gas (a "rotten egg" scent put in the gas by the gas industry since Natural
Gas and LP gas are odorless), find the source of the leak and repair it before using thegrill. Soapy water is a great way to find a gas leak and will bubble when a leak isdetected.
Turn off the gas supply before working on the grill as you might have your face in tooclose to the grill when working on it. Turn off the LP tank or the Natural Gas shut off valve. Ifchildren are around you must be able to keep them from using the controls (which you probablydo anyway). If you cannot FOLLOW THE DIRECTIONS or UNDERSTAND the dangers, GIVEUP and call a trained technician!

- 7 -Chapter 2 – Basic Safety, Lighting and Grease Fires
“We argue rashly and unadvisedly because in our reasoning, as in ourselves, a great partis played by chance.” Plato, “Timaeus” 34-C
Whenever you are using gas grills, you must be aware of the dangers that might occurwhen you grill. Using a gas stove in the house has more potential for danger and house fires dooccur with improper use. Some injuries on the decks and patios of houses happen because ofnegligence and equipment failure with gas grills every year.
I always like to check the gas supply, LP or Natural Gas before lighting as well aschecking the operation of the grill before leaving it to go back in the house. And I always like tocheck on it every ten minutes. I usually take a lighter and check for back up flame around thevalves. I like to check for combustibles around the grill and I have a heavy old towel or gloves incase of a grease fire or a leak that ignites. YOU MUST PRACTICE SAFETY!!
Basic Safety & Lighting
When you first get your grill, go through the owner’s manual to see the particularprocedures they recommend for lighting the grill. It’s a good idea to check the gas connections(LP or Natural Gas) for leaks every time you use the grill. Failure to detect a leak, or beingunaware of a backup flame caused by a blocked or loose burner, could be dangerous. Followthese steps:
1. Always read the owners manual lighting instructions first to understand the factories’instructions for the model you have. There might be an important clue there.
2. Turn on the gas supply to the grill valve assembly and check for leaks. Also, check tomake sure that the burners are properly mounted against the valve orifices.
3. Open the grill lid and open one valve to the high or light position and push the igniterbutton. Some grills have a "flame thrower" type igniter and will try to light as you turn theknob to the high or light position. You may have to turn the knob several times to getignition of the burners. As the grill gets older the efficiency of the igniter systems tend tolessen. You may have to resort to manual lighting to get the grill cooking.
4. KEEP YOUR FACE AWAY from the grill as you try to light it. Failure in lighting the grillcan result in a gas buildup which may then suddenly ignite. You will not want your facein the grill when that happens!
5. If you cannot light the grill with the ignition system, you can use a long stemmed lighterto manually light the grill.
6. Open the grill lid and turn the knob to high.7. Turn one knob to the “high” position and insert the lighter stem into the grill next to the
burner. Many grills have a hole in the front or side to do this. If you can't find a hole, youmight look under the grill for a vent opening that would allow the lighter stem to be closeto the burner. You may find this between the grease tray and the burners from the back.Again, KEEP YOUR FACE AWAY from the grill surface or a back up flame could occur
as you try and light the grill.8. If you cannot get the burner lit you might have a gas flow problem. You will then want to
remove the grids and heat plates to get a lighter flame beside the burner. Check thediagnostic and maintenance chapter for that. Check your gas supply if you are notgetting gas through the burner. You'll usually hear the gas flow when you turn on thecontrol knob.

- 8 -Grease Fires
Grease fires can occur when you have left any excess and unburned grease on the heatplates or on the grease trays. Hamburgers and slowed cooked, sloppy sauced BBQ canleave behind enough grease for a nice big (and alarming) grease fire. Hamburgers cancause extra flames in a clean grill since they are often grilled with high burner settings. If youhave a grease fire, follow these steps:
1. Turn off the gas control knobs and the gas supply valve (I like to have a heavy old towelor leather gloves just in case). Open the grill lid and remove the food. Don’t leave thegrill until you are sure the grease has burned off. Be ready to call the fire department ifyou feel the situation is becoming dangerous. The way to avoid big grease fires is to beaware of grease accumulation and burn it off before each use. If the grease on thebottom is considerable, go through Chapter 5 - Basic Grill Maintenance, Diagnostics andTrouble Shooting to clean out the excess grease before using again.
2. Allow the grease to burn off and keep the lid open as that allows more heat to escape.DON’T WATER THE GREASE FIRE IN THE GRILL! IT MAKES IT MUCH WORSE.
3. Have a hose ready, just to be safe, in case the fire spreads away from the grill. Andcertainly be ready to call the Fire Department.
4. When the fire burns out you can recheck the gas connections and relight the grill withthe top up. Check for problems before cleaning the grids and putting the food back on.

- 9 -Chapter 3 – Before Buying a Gas Grill
“Anerriphtho kibos-Let the die be cast “ Plutarch- Life of Caesar
For most of you who have this book, it is likely too late for this chapter to help. But,before you buy another gas grill, you should research the brand and model in which you areinterested. Consumer guides often rate the grills for performance. However, they usually do notrate for the ease a person might have with warranty and repair parts (especially after thewarranty expires). Get the model number and factory information before buying the grill,and check it out following these steps:
1. Research grills on the web by searching with different search phrases (like the modelnumber, name of the manufacturer, or the store that sells that type grill). Otherconsumers often post complaints on companies and particular models.
2. Take the time to call the customer service numbers and ask about warranty and repairparts. Many will phase out parts in just a few years. By the way, Weber, Broilmaster,Modern Home Products, OMC (Broil King, Broil Mate and Grill Pro) keep parts aroundfor years.
3. Ask the store you might be buying from what help they offer with warranty and repairparts.
4. Go ahead and look for "aftermarket" websites in your search. They are not connected tothe factory and offer parts made by other suppliers. The greater number of models sold,the more likely it is to find "aftermarket parts". Usually, but not always, the factory offersthe cheapest prices for repair parts. At first, the "aftermarket" dealers were there to fill inthe void that was left when the factories discontinued certain parts. Nowadays the“aftermarket" dealers like to offer as many parts as possible. www.clagrills.com offersmany “aftermarket” parts and some OEM (original equipment manufactured) parts.
5. Sometimes you will find the best deals for gas grills offered on the Internet. Howeverthose deals will primarily be on the more expensive models, since the chain storesusually control the lower priced models
6. If buying “USA Made” means anything to you, look for deals on those brands.Broilmaster, Weber, MHP (Modern Home Products) are mostly “USA Made”, but willhave some parts that are foreign made. Some models are made in Asia. OMC (BroilKing, BroilMate and Grill Pro) are primarily made in Canada. All grill brands have USAdistribution centers, so don't be fooled by that. The USA grills usually (but not always)cost more. Those grills haven't changed much over 40 years and have better warrantycoverage. Charbroil offers short warranty periods on most models.
7. BE SURE to keep all the receipts and manuals that come with the grill. Send in theregistration. The manufacturers will always honor the purchase receipt. You will needthe serial number with any warranty complaints. So, write down the model number andserial number from the grill on the owners’ manual. You may still have to buy someparts before the warranty expires. Usually you can make the manufacturers supply newparts that are under warranty.
For my own choice (I have been around grills daily for the last 25 years), I use an oldFalcon that is on a steel cart that I made a long time ago. This model is no longer made. Itdoesn’t even have knobs on the valves; I just turn the valve stems by hand. (I know better thanto use pliers or vice grips) I would be wary of makers that haven’t been around very long or withlittle or no manufacturers’ information. I would prefer a grill with common parts, a company stillin business and a price I can afford. Do YOUR HOMEWORK FIRST!!

- 10 -Chapter 4 – Finding Repair Parts
“age quod agis” - do what you do carefully, concentrate on the business at hand”
You’ve taken the grill apart, cleaned everything and looked over the whole grill to decideif it’s worth fixing. The sum of the parts, in this case, might be greater than the price of the grill,so BEWARE! If you haven’t done this, GO BACK and take it apart and make sure you want toreplace the parts. Check the condition of the whole grill. Of course, you’ll need to know whatyou need and how much will it cost before you can make a final decision. Chapter 5 - Basic GrillMaintenance, Diagnostics and Trouble Shooting is next, so you might want to read over thatpart right away. Most of the returns we get at www.clagrills.com are from people who orderedthe parts but did not take a close look at the grill and then decided it wasn’t worth it to fix. And,they had to pay all the shipping costs, both ways. So, be sure to look at the parts you need aswell as the condition of the grill. You even need to check out the casters and the post that holdsthe grill. It’s been my experience that when working in people’s back yards with their grills, thegrill usually looked worse as I took the grill apart.
If you buy your grill from a small dealer they might have the parts or can get parts fromthe factory. Most of the grills bought today in the big stores do not offer parts or help withwarranty issues. I have found some exact parts in Home Depot and Lowe's but mostly theyhave universal parts, which might work in some cases. The biggest shopping center out there isthe Internet. My company, www.clagrills.com, is one of many that show up regularly on pageone of an Internet search for gas grill parts.
Get use to buying over the Internet. If you haven't tried to buy on-line, or don't have acomputer… get one or go to the library (they usually have some that can access the Internet).You might have a friend or family member who can help. When you find a computer to use, trythese steps:
1. Try a search for the factory’s web page. Try www.broilmaster.com, if you have aBroilmaster. The factory usually has a site with their name and a .com address.Sometimes the address will be a .net address like www.nexgrill.net andwww.brinkmann.net. Try different phrases. Some factories don't have easy access whileothers offer the best prices and have started accepting web orders.
2. You always want to try several sites to be certain you get the best deals. Page one of anInternet search will show 10 or so sites. Some sites on that page will show competitivepricing. SHOP AROUND! Look at their return policy. Be aware that, during the springand summer, they get behind in shipping. Check the shipping cost too.
3. Before you confirm and place your order, review the part numbers and your modelnumbers. Do all of your research before ordering. It’s easy to make mistakes, so proofread the order before you hit "submit". My company and most of the others, only pay forour own mistakes. We don't have a cross referencing system to keep people frombuying the wrong parts.

- 11 -Chapter 5 - Basic Grill Maintenance, Diagnostics and Trouble Shooting
"The man (or woman) of action is the debtor to suffering and pain"Achilles (the Iliad) motto
Members Mark
Basic Grill Maintenance & Diagnostics
I know I've harped on SAFETY but, as you go through the grill, understand that the grids,warming rack and heat plates come out and go back in without much chance of changing thegrill's performance or causing bodily harm(other than, maybe, dropping them on yourfoot. When you get to the burners, remember that the burner must go back in allowing theventuri opening to slide over the valve orifice and for the burner to set properly as it wasinstalled by the factory. Failure to do this will result in flame around the valves and DANGER! Ifyou get to the valves, remember that the orificescan be removed and MUST BE PUT BACK. They only need to be snug. The rest of the valvesystem must pass a leak test before use AND TESTED before cooking. You might change thevalves but again TEST for leaks and test the grill. DON’T TAKE THE VALVES APART AS THEYARE EASY TO SCREW UP. IF YOU'RE NOT SURE, GET HELP!!
Taking care of your grill requires a clear understanding of the DANGER of what willhappen if you fail to close all the gas connections that you open, as well as the failure to findand close off a gas leak that you've detected. IF YOU"RE NOT COMFORTABLE working withthe parts out of the grill OR NOT SURE OF WHAT YOU'RE DOING, GET AN APPLIANCETECHNICIAN TO HELP YOU.
You’ll need basic tools like screwdrivers, pliers, open-end wrenches, vise grips andchannel locks. You will commonly find rusted screws and bolts that cannot be loosened withoutcutting, grinding, twisting, or drilling them out with a drill. You might want a pair of garden glovesto pull the parts out as it is usually quite greasy and rusty under the cooking grids. I've workedon gas grills for the past 25 years and am prepared to take the parts out, try a fix and then startover if it doesn't work.
Try the following steps. Work step-by-step and recheck your work to be sure that youhave no gas leaks. And, check that the parts, especially the burners, are installed correctlybefore you relight and test the grill. FAILURE TO BE SAFE could result in FIRE, DAMAGE andINJURY!!!
1. Have a few tools and gloves ready. Shut off the gas supply, LP tank or Natural Gasoutlet valve. It’s better to disconnect the gas line to reinforce safety in your mind as youwork.

- 12 -2. Open the lid and remove the warming rack, cooking grids and heat plate (rock and
grate). These parts are usually sitting inside, not bolted or pinned down. I can’t think ofany brands that require a bolted or pinned heat plate-rock grate.
3. You will now see the burner and the igniter-electrode system. Take a good look at theburner and the igniter system as you may have to disconnect the electrode wire from theigniter before you can get the burner out.
4. Now look to see if the burner has any pins, screws or bolts securing it to the grill. Manygrill models have a straight tube burner that's secured to the back wall of the grill.
5. Remove the bolt and don't be surprised if it’s rusted and won't unscrew. I try to unscrewthem first then go to the channel locks and vise grips to try and twist them off. You canalso try one of the sprays like “Rust Free” and let the rusted bolt soak 30 minutes or so.Then retry loosening them before going to the vise grips or grinder.
6. I've used files, hack saw blades, drills and hand held electric grinders to get the bolthead off. A small Dremel electric multi-rotary tool would probably work well.
7. Since the burners always slide over the valve orifice (jet) you have to pull the burners upand away from the valve. The Ducane grills sold at Home Depot several years agorequire that the control panel be loosened and pulled away slightly from the grill toremove the burners. You'll have to look and study the grill until you figure it out. So beready to spend time getting the burners out.
8. If the burner is out, it’s always best to clean it out and brush it down. Look at the gasports and swab the inside with a venturi brush or hanger wire. Compressed air is usefulto clean it as well.
9. If your original complaint was "not enough gas", reconnect the gas and open each valveto high. See if you can feel the gas flow through the valve orifice-jets. If they are all verylow, you probably have a gas flow problem through the LP or Natural Gas regulator. SeeChapter 6 - LP Parts and Gas Fittings for instructions on testing and replacing it.
10. If you have good flow through the orifice and have cleaned the burner you're ready toreinstall it. First clean out the rust and burnt food on the grill bottom. I use a whiskbroom with an old T-shirt under the grill to clean it. I brush everything into the grease trayor out the air openings to get it all out. If the grill is not too big I’ll lay it down on its side tosweep every thing out.
11. Check and clean the electrode and the igniter. See the Chapter 10 - Igniters andElectrodes for more detail.
12. Reinstall the burners and be certain the burner opening goes over the valve orifice (jet).You may have to bend over the grill or look under the control panel to check this.
13. Relight each burner as you replace it and check the flame on high, medium & low.Compare with the other burners and with your recollection of the burners on high.
14. If the flame is inconsistent or low you have to repeat the all of the above steps. Thereasons for low flame are:
a. Dirty, clogged or burned out burner.b. Clogged orifice-see the Chapter on Valves.c. Clogged gas line or faulty LP - Natural Gas regulator
15. If the flame is good and consistent on all burners then replace the heat plates, gridsand warming rack. Test once more before using. BE SURE to check all remade gasconnections before using the grill. IF YOU SMELL gas when you are not trying to lightthe grill YOU HAVE A LEAK!!! FIND IT AND CORRECT IT!
16. When you're satisfied the grill is working correctly you're ready to cook on it.
Trouble Shooting
You should get use to checking over the grill once a year, especially before the warrantyexpires at the first year from the purchase date. Check the warranty information. You will needto know what information the factory will want if you make a claim. Sometimes burnerscan burn through before a year is up. You'll want to make sure that crud, rust and grease aren’t

- 13 -an issue. Some warranties (on most grill brands) start to expire in the first year. Do yourhomework and make the factories pay for warranty issues.
If you haven't studied safety issues, YOU NEED TO. Do it before you use the grill again.See Chapter 2 - Basic Safety, Lighting and Grease Fires. You are responsible for knowing andpracticing safety.
1. If you have hot spots on the cooking surface, they are caused by excess grease on theheat plates or a burner with holes wearing out. see Chapter 2 - Basic Safety, Lightingand Grease Fires
2. If one burner lights well, or just a little, but fades as you light the others, check the tank(LP grills with regular tanks) to be sure you've got a good gas supply. As the 20 poundregular tanks get low, the gas supply will start to fade. You can weigh the tank to seehow much gas is left. Note the empty weight of the tank on the side of the handle,usually 18 pounds. Some bath scales are easy to move outside, but they are not alwaysaccurate. If you have less than 1 pound of gas, you could start seeing the pressure fade.
3. While the above problem is probably due to gas supply, it is a good idea to clean theburners and check the orifices (jets) before replacing the LP hose regulator. I like to pullthe grids and heat plates and then light the burners one at a time, leaving them on as Igo. If you have one burner lighting well, and then it starts going down as you light themall, usually means that it is a LP regulator problem. With Natural Gas issues you mighthave an old regulator problem or even a blocked or kinked gas line. See Chapter 6 - LPParts and Gas Fittings for removal and replacement of LP hoses.
4. You may smell gas. It’s not unusual to smell gas as you light the grill. You don't want tohave the valves open more than 10 seconds while you try to light, as you could get ahigh flame into the cooking area. You don't need to have your head in the grill at thetime! If you smell gas with the valves off, you have a leak. You will need to find it. Use aspray bottle with soapy water to check the valves, gas fittings and hoses. IF YOU HAVENO EXPERIENCE WITH THESE GAS PROBLEMS, CALL A TECHNICIAN. Valves canleak over time as the grease in them dries out and causes the seal to break. YOU MUSTFIND THE LEAK BEFORE USING THE GRILL AGAIN!
5. You could have flame behind the knobs after turning the valves on and lighting the grill.This is always caused by a blocked or improperly mounted burner. Burners can comeloose, especially when the grill is moved. See Chapter 9 - Burners, Side Burners,Infrared Burners and Burner Air Shutters. IF YOU ARE NOT SURE, CALL ATECHNICIAN. Valve stems can leak, usually over time, but the leak can then occur inthe off or on position. Go through Chapter 5 - Basic Grill Maintenance, Diagnostics andTrouble Shooting.
6. The valve knob won't turn. This is a frozen valve stem. You might be able to spray withlubricant and heat the valve with a hair dryer to get it freed up. It’s sometimes possible toopen the valve; clean it and re lube it. But this is best left to the techs. IT IS EASY tobreak the valve for good if you open it up. The screws holding them are usually rusted in.Even replacing the valve can become difficult. So, don't try unless you know what you'redoing. THIS IS NOT A TASK FOR ANYONE THAT IS TECHNICALLY CHALLENGED!Also, see Chapter 11 - Valves.
7. If the grill won't get hot enough, or the flame is too low, it could be a rusted burner (youwill probably have a back up flame around the valves). You may have a blocked venturi.You could have blocked orifices, or a gas supply problem. See Chapter 5 - Basic GrillMaintenance, Diagnostics and Trouble Shooting, as a guide, to find the problem. It israrely a valve issue. I've had maybe 2 blocked valves, in over twenty five years, fromfactory grease and a blocked Natural Gas line. Natural Gas grills some times havecopper gas lines going to the grill. Over time, as a result of impurities in the gas reactingwith the copper could clog the line with copper sulfate. Most of you have LP gas grillswith 20 pound LP tanks. Like I said, go through the Chapter 5 - Basic Grill Maintenance,Diagnostics and Trouble Shooting steps to get to the problem. Or, call a technician. DO

- 14 -NOT take the valves apart, as you'll likely break them and they are often impossibleto replace!!
8. If the grill is hard to light, go through Chapter 5 - Basic Grill Maintenance, Diagnosticsand Trouble Shooting step by step, or call a technician.

- 15 -Basic Grill Maintenance, Diagnostics and Trouble Shooting Images
Remove Grids and clean with wire brush
Remove and clean Heat Plates
Remove Burners
You may have a cotter pin holding down the burner to the bracket. Some burners have screwsor bolts holding them, which might require grinding off.

- 16 -
Brush with wire brush
Use 1/16 drill bit to ream gas port
Use air hose to blow out burner-inside and outside. Canned air, used for dusting keyboards,works but not as well.
Side burner orifice

- 17 -
Infrared burner orifice
Check igniter and electrodes
Check and clean 3 main burner orifices, one side burner orifice and the infrared burner orifice.
Clean and blow out each orifice with compressed air

- 18 -
Turn off gas supply, disconnect gas line to gas valve manifold and check gas flow to grill valves.BE SURE to check for leaks and TEST!! before using grill.

- 19 -Chapter 6 - LP Parts and Gas Fittings
“Know thy Plumbing Terms”
LP Hose Regulator
Remember that plumbing terms rarely fit what you measure on the fittings. They areusually based on the ID of the pipe for which they were originally made. I have, many times, notfound any direct connection between the name (or the measurement stated) and the actualfitting. These terms are what they are called. Go to the plumbing section of the hardware storewith the old fittings and compare to what they have. Then you will know the correct names.Generally you have NPT (national pipe thread, also called standard pipe thread), flared fittingsand compression fittings. An occasional metric fitting might show up, but I haven’t found them.You are required to know your plumbing terms. YOU WILL BE TESTED IN THE GRILL!!
Dealing with a faulty LP regulator on your gas grill could require replacing the entire LPregulator hose. It is usually easier and faster to try and replace the hose regulator assemblythan to order a new regulator. Many local hardware stores and Home Depot - Lowe's storeshave replacement regulator hose in the gas grill section. These will easily change out with theold one on your grill. These hose regulators are often priced in the $25-35 range. It is possibleto change the assembly out in a few hours and be on your way to cooking dinner. There arethree things to know and compare in order to do this… assuming you have determined that theregulator is the problem.
1. The regulator connection to the LP tank is usually a QCC connector with a black plasticknob that is meant to be tightened by hand. The older style POL connectors required awrench and were tightened in a counter-clockwise motion.
2. The hose connection to the grill is, in most cases, a 3/8 female flared fitting.Occasionally a smaller flared fitting is found. Some older grills, like the old style Ducane,use a NPT-National Pipe Thread female hose connector. Since most hoses found atHome Depot - Lowe's are 3/8 flared; you will have to find a flared to NPT fitting to makethis connection. You can also try calling the factory customer service. Another way thehoses are attached to the grill is with a "crimped" on clamp.
3. The length of the hose is hopefully the last issue. If you cannot find a long enough hoseyou can probably find a union and a gas appliance connector in the plumbing section ofthe hardware store. A union is a gas fitting that is used to connect the ends of 2 gaslines. You may have a grill with a side burner and a two hose connection to the grill.These may be found at local stores, too. Our LP hose-regulators are found at:www.clagrill.com/allgrillparts/all-hoses-regulators.htm.
All of our hose-regulators have 3/8 female flared connectors.

- 20 -
Replacing the LP Hose Regulator
Buying an "aftermarket" LP hose-regulator can sometimes end up in failure if the grillconnection side is not a match for the gas connection on the hose. Another problem may occurif the replacement hose is too short to connect the LP tank and the grill.
With most of the "aftermarket" LP hose-regulators, the gas connection to the grill is a3/8" OD (outside diameter) female flared connector. It is possible to purchase a gas applianceconnector in most hardware stores. These can be found in the gas fitting section of the storewith plumbing parts. You will need a 3/8 flared union to connect the 2 hoses. There are 2different 3/8 flared fittings so be sure to try the LP hose, the union and the gas applianceconnector together before purchasing.
You will need some open end wrenches or 2 pairs of Channel Locks to secure theconnection. Since they are flared fittings you don't need to use Teflon tape or pipe dope. Besure to start the threads without crossing and then tighten. After securing the hose to the grill,connect to the tank and open the gas valve. Use soapy water to check all the fittings for leaksbefore lighting the grill. FAILURE TO SECURE GAS CONNECTIONS COULD RESULT IN AFIRE AND INJURY. IF YOU'RE NOT CERTAIN ABOUT WHAT YOU'RE DOING, CONTACT AQUALIFIED TECHNICIAN.

- 21 -Chapter 7 - Cooking Grids - Care and Replacement
“Cleanliness is next to Godliness” Old Hebrew proverb
Cleanliness may be as close as I get. But, working with the grids is the safest part ofmaintenance. You can only hurt yourself with the grids if you were to drop them or handle themwhile they are hot. This is a good section for the mechanically challenged person to work with.You should not need a technician with the grids. Keep them clean and oiled between uses.
Cooking grids are made of cast iron, stainless steel and carbon steel. Cast iron andcarbon steel are usually porcelain coated. The cheapest grids are chrome plated carbon steel.
Stainless steel grids are the most expensive and last the longest. I use a cheap painter’swire brush from the hardware store to clean grids. You should brush the stainlessgrids vigorously down to the metal. Then brush with vegetable oil before each use.
Cast iron grids are usually porcelain coated or "matted". Using a wire brush to cleanthem will wear down the porcelain. However, they must be kept clean. I still use the painter’swire brush on mine, but I get a good deal when buying them. So, to conserve wear and tear,some customers use a brass wire brush or even hand wash them in the sink. If you keep thegrids well oiled after each use, you can reduce the rusting of the parts where the porcelain hasworn or chipped away. I like to be sure any loose burnt food or chipped porcelain is cleanedaway before cooking.
You'll have the same problems with porcelain coated carbon steel wire grids. However,the carbon steel doesn't rust away as fast as cast iron. Keep both porcelain coated cast ironand porcelain coated carbon steel wire grids clean and oiled with vegetable oil between uses.You will slow down the rust. They will still rust but the proper care will help them last as long as
possible. Try to clean the rust and crud down to the metal. Even bare cast iron, oiled beforeuse, makes a great cooking surface.
When you are ready to replace the cooking grid, the internet is the fastest and mostcommon way to get replacements. Look at the warranty statement to see if the factory might stillreplace them. Sometimes they can be replaced without charge. I hope you kept the manual andreceipts. Otherwise, try a search phrase like "gas grill parts" and check out the sites on the firsttwo pages listed for parts. Our website, www.clagrills.com, offers a large variety of grids.Consider how much you paid for the grill, as well as how much you've spent already to repair it,before buying more.
Look through the websites and compare prices before ordering. Make sure you lookclosely at the measurements as well as the part description before ordering. BE SURE to look atthe dealers return policy before ordering. DO A FINAL EDIT of the order before submitting!!

- 22 -Care and Replacement of Cooking Grids Images
Members Mark rolled steel tube stainless steel grids
Ducane stainless, stamped steel grids showing rust which is possible even with the best(304 grade) stainless steel.
Cast iron grids (from Great Outdoors DG450) - wire brush and wipe with vegetable oil. Oil thegrids on both sides between uses to reduce rusting.

- 23 -
Great Outdoors DG450 - Cast Iron grid with an area that has been brushed and oiled withvegetable oil.
DG450 Cast Iron grid next to a new stainless grid (available from www.clagrills.com).
Porcelain coated grids (steel rod) showing brushed down area which was oiled with vegetableoil.

- 24 -Chapter 8 - Rock Grates and Flame Tamers (Heat Plates)
“Ignoranria legis neminem excusat” - Ignorance of the law excuses no one.
Rock grates and flame tamers are hard to screw up. Sometimes, however, they go backin several ways when only one way is intended. They need only to sit in the grill, and can workOK even with small holes in them. You might want to use some garden gloves to protect yourhands.
Gas grills usually have a plate or grate over the burners. The older grills used a rockgrate with lava rock or a ceramic tile sitting on the burners. The purpose of this grate or plate isto diffuse the heat evenly over the cooking grids and hold the meat juices (which will smoke andprovide some flavor to the cooked meat).
The original "lava" rock grates were meant to look like charcoal, as the first people tomarket the gas grills thought consumers might hesitate to buy them without a connection to thecharcoal cooking they were use to. Certainly, the price of the early gas grills made them hard tosell compared to the charcoal grills of the time.
The grates and heat plates also provide some protection for the burners as the meatjuices falling on the burners tend to increase the heat and combustion and increase the speedthat the burners wear out. Ducane grills used burners with the gas ports on the top of theburner and the "lava-grates" they used kept the meat juices almost entirely on the grates andthe ceramic tiles that sat on the "lava-grate" surface.
The grates and heat plates (sometimes called flame tamers) work effectively as long asthey can sit without collapsing on the burners. They should be cleaned of rust and burnt meatjuices, but they work just as well when they are rusted and burnt. They can even be patched fortemporary use with heavy aluminum foil. The heat plate or rock grate needs only to sit over theburners to work. If you find a close fit, but not a duplicate replacement part, it will work just thesame.
Some Charbroil and Thermos grills use a burner with a pointed top that is meant toserve as a heat plate as well. The addition of an extra heat plate over these burners wouldspread the heat more evenly. You can also use a rock grate, ceramic plates or tiles instead ofheat plates which might save some money. To do that, you have to see if the grill has somebrackets or ledges on the front and back that might support the grate. Then try to find a grate onone of the "aftermarket" grill parts websites, such as www.clagrills.com to find a possible fit.

- 25 -Rock Grates and Flame Tamers (Heat Plates) Images
Great Outdoors 1000 Rock Grate with Rock (ceramic), while used, is still in “usable”condition.
New Ducane Lav-a-Grate
Great Outdoors DG450 -This is used, but still has plenty of use left

- 26 -
Members Mark Y0101XC Stainless Steel (400 grade) half brushed - good condition.
My old, caved in, Falcon rock grate. Note where it has caved in. It needs replacement.

- 27 -Chapter 9 – Burners, Side Burners, Infrared Burners and Burner Air Shutters
“Badly conceived projects rewarded; foresight fails, for Fortune does not examinecauses nor follows merit but meanders through everything without distinction. Clearly
something is greater which drives and controls us and subjects the concerns of men tolaws of its own.” Manilus, “Astronomics” IV, 95-9
You’re getting to a part of maintenance and repair that requires sharp attention as wellas the ability to know if you’ve gone too far and need help. The burners must be clean ANDreinstalled correctly with the burner venturi opening placed over the valve orifice. You mightwant to take pictures showing the correct position or leave one burner installed to have a“pattern” to reinstall the new or cleaned one. Start this section carefully if you haven’t done itbefore. Check your work carefully before using the grill and be certain to run down any leaksbefore using the grill and leaving it unattended when lit. SAFETY ALWAYS!!
I always like to light each burner as I reinstall to check its function and even use a longstemmed lighter to put a flame around the venturi where it meets the orifice. BEWARE THAT ABACKUP FLAME COULD BURN YOU IF YOUR FACE IS CLOSE TO THE BURNER AREA.YOU’LL GET A BACK UP FLAME IF THE BURNER IS NOT MOUNTED CORRECTLY OVERTHE ORIFICE.
Grill burners are the central part of the grill. They come in many shapes but are mostlystraight tubes that mount from front to back. The opening is usually referred to as the venturi orventuri opening. If the venturi opening is clogged from an insect or rust from inside the grill, itwill cause a backup flame between the openings and the valve orifice. You need to get use toremoving the burner to check it and keep it clean.
1. To get to the burner, first turn off the control knobs (the gas supply) and disconnect thegas supply.
2. Remove the grids, rock grate or flame tamers.3. The burner is usually secured by a cotter pin or bolt holding it to the grill body which will
likely have to be twisted, ground, drilled or cut away.4. The burner may have an electrode attached and you'll have to disconnect the wire from
the igniter (the part with the button you push} to get the burner out. It might help to lookunder the control panel to see how the burner comes out.
5. If the burner gets stuck, you have to look from below the grill, the sides or the back tosee what is keeping it from coming out.
6. Check the burner inside out. Brush the outside, try to swab the inside and make sure theburner is clean. That is critical to get a clean burn. Use compressed air to blow theburner out as well as from outside through the gas ports.
7. If you have holes burned through the burner they will cause "hot spots”. You can usuallystill use the burner but will have to cook around the hot spots.
8. You might be able to plug any holes, in a pinch, with wadded up aluminum foil if youcan't get a replacement in time.
9. If the burner is rusted through, it is time to replace it. Check the warranty in the manualto see if the factory might replace it (them). Be prepared to go through some hoops withthem. If they won't replace the burner(s) under warranty, they will usually sell you newones… sometimes quite cheaply. Aftermarket burners can also be found through dealersonline, like www.clagrills.com, who I work for.
10. Reinstall the burner, being careful to place the venturi openings over the valve orifices.Try looking from under the control panel or even from the back of the grill to see thevalve orifices just to be certain that they meet the burner venturi opening correctly. Hookup the gas and check for leaks under pressure with soapy water.
11. ATTENTION!! Failure to mount the venturi opening of the burner over the valve orificewill result in a fire around the valves!!!

- 28 -12. Hopefully you remembered to hook up the electrode and igniter. You should have
checked them out. You may have to go through Chapter 10 - Igniters and Electrodes tomake it all work.
13. Light each burner to check the flames on high, medium and low (without the heat platesor grids in the grill).
14. If it everything works, replace the heat plates or grates, along with the back in the grill.
Your grill should be ready to use.
Side Burners
Side burners are found on many grills and, while a nice complement, are usually nomore than 12500 BTU, the same as your average stove burner in the house. They can be useto simmer a sauce but not for serious wok or frying. Since they are not used regularly, theburner venturi can easily be clogged by insects or even rust that occurs naturally in the burner.It’s a good idea to pull the burner, brush it and swab out the venturi. At least check it by lightingit when using the main part of the grill. With all gas burners it is necessary for the venturi andburner to be clean to get the best performance. To clean the burners follow these steps:
1. Lift the grids and heat plates out.2. Find the bolt holding the burner down to the grill (usually from underneath the side
burner shelf) and take it out. Be careful not to lose the bolt as those side burners usuallyrequire the bolt to be secured to the grill. They won't sit in place.
3. You'll have to disconnect the electrode wire to clear the burner from the shelf.4. Use a wire brush or steel wool to clean the outside of the burner and check the gas ports
to be sure they are clean. A safety pin will usually work to clean rust or dirt. For the castiron side burners, a sharp ice pick or 1/16 drill bit will help clear the rust out but it is easyto break these off in the gas port.
5. Use a coat hanger wire to clear out insects, spider webs or dirt daubers’ nests that mightbe in the venturi. Try to get any rust that is loose inside the burner out by shaking it withthe venturi down.
6. Compressed air might help to clear the burner.7. Before installing the burner back in the side shelf bracket, remove the gas orifice (or jet
at the end of the valve that goes into the burner) and check the inside by holding it up tothe light. You can usually blow it manually. BE CAREFUL!! You don't want to lose theorifice as they can be impossible to replace.
8. If the orifice (jet) is clear, screw it carefully back into the valve. It only needs to be handtightened.
9. Reinstall the burner and hook up the electrode wire.10. Light the burner, trying the igniter as well. Look for the spark. You may have to review
Chapter 10 - Igniters and Electrodes in order to get that to work. They are usually easyto light with a long stemmed lighter.
11. If you're convinced the burner is working well, put the grate and cover back. It should beready to use.
12. If it's not performing well, go through the steps from the start looking for what might havebeen missed on the first try.
Infrared Burners
Many of the Box type, stainless steel grills sold in the last 10 years have an infraredburner mounted on the back of the grill. It's used for roasting meats, usually on a rotisserie spit.Some grills, like TEC and some Charbroil, have an infrared burner mounted under the maincooking grid. These burners have a honeycomb ceramic plate. Sometimes the burners areunder a stainless steel screen which is mounted in a sheet metal box with an orifice attached tothe box. It may have a venturi tube coming from the box. Since the valve is on the front of the

- 29 -grill, a copper tube goes from the orifice to the valve. Attached to the burner is usually athermocouple. A thermocouple is a small metal probe next to the rotisserie burner connectedby heavy wire to the rotisserie valve and is used to close the burner if it’s not properly lit. Afterregular use, and in as little as one year, the infrared burner can become clogged or start tobreak apart. It will then stop working properly. The thermocouple can also fail, which will closethe control valve and you won't be able to use the burner.
To clean the infrared burner you will need an air compressor to blow out the burner fromoutside and from the venturi opening where the gas goes in. You will likely have to remove theorifice to get the air nozzle lined up to blow it out from there. Of course remember to TURN OFFthe gas supply and check any gas connections for leaks before using the grill again.
If you have an infrared control valve that requires you to hold down the knob for a minutebefore being able to release the knob (with the burner still lit) you might have a safety valveproblem. You either have a bad thermocouple or the burner has deteriorated to the point that itcan't generate enough heat to keep the safety valve open. Because these burners can fail tostay lit when they wear out, the factories usually put in the thermocouple as a safety effort. Trythese steps to clean and check the infrared burner:
1. Turn off the gas supply2. Find the venturi opening of the burner behind the grill and see if you need to remove the
orifice in order to put the compressed air nozzle into the burner to blow it out.3. Go ahead and blow it out from that side and BEWARE that a cloud of burner dust could
blow from the burner surface. You may want to keep your face away from the burnerface or wear a dust filter.
4. Blow the burner surface with the air compressor.5. Try lighting the burner and see how the flame looks. As the burner gets older they
usually won't be the same color when lit.6. If, after cleaning, the burner will not stay lit, you have either a burner needing
replacement or a bad thermocouple. The only way, at this point, to find out if the problemis the burner or thermocouple is to replace each, one at a time.
7. Infrared burners and thermocouples are usually only available from the factory or afactory dealer, although the thermocouple might be found at a local appliance repairparts store. You would need to have the grill model number as well as the oldthermocouple when you go into the store. These appliance repair parts stores usuallycarry some grill parts and they might be a dealer for your brand.
8. After safely hooking up the gas and checking for leaks, relight the burner and check theflame and heat.
To change the infrared burner you should follow these steps:
1. Turn off the gas supply and check to remove any covers on the back of the grill wherethe orifice is mounted.
2. You'll need to disconnect the copper gas line from the orifice or the orifice from the sheetmetal bracket that is part of the burner.
3. The infrared burner is probably attached by sheet metal screws to the back of the grill.Often the screws are rusted in and will have to be loosened by vise grips or even drilledoff with an electric drill.
4. You should be able to pull it out from inside the grill. You may have to pull one end outfirst and then the end with the venturi next.
5. If the new burner doesn't have new screws, you'll want to get some new ones from ahardware store. Put in the new burner and secure the sheet metal screws.
6. Install the orifice and reconnect the gas supply. Since that line goes to the orifice whichhas the hole in it, the line cannot leak and it doesn’t need to be more than snug.
7. Reattach the thermocouple and try relighting the burner.

- 30 -To replace the thermocouple follow these steps.
1. Turn off the gas supply and remove the main valve cover that is over the rotisseriecontrol valve.
2. Disconnect the end of the thermocouple at the burner and unscrew the end that’sattached to the valve. It is a long, thin copper line with a hex head attached to the valve.You may need a small open end wrench or adjustable wrench to get it off.
3. Watch where the line goes through the grill as you will need to rethread the line so thatthe end with the hex head goes into the valve and the other ends up at the burner heldby a bracket.
4. Reconnect the gas supply and try lighting the rotisserie burner.
Burner Air Shutters
All burners have an opening next to the venturi opening that slides over the orifice (jet) ofthe valve. The air shutter is there to allow some air to mix with the gas before leaving theburner for ignition. It's not uncommon for LP grills to have one opening without any adjustmentsince the factory design is intended only one type of gas to be use with that model.
If the air shutter has an adjustment, it should be about half closed for LP and full openfor Natural Gas. Natural Gas needs more air for a blue flame and LP Gas needs a smalleropening for the blue flame. If you get a jet sound with the flame and the flame is igniting awayfrom the burner, your air shutter is too open and needs to be slightly closed. The original burnermay have a screen over the air shutter. If so, it is there only in an attempt to keep bugs out.You should try to check the flame of a new or cleaned burner without the heat plates and gridsin the grill.
Try the burner with air shutter as it arrived and note the flame. If it is yellow try to openthe air shutter. You might have to improvise a bigger opening if the air shutter doesn't have anadjustment. Some of the cast iron burners have a hole without an adjustment. Some have abolt that screw into the neck of the venturi. This bolt should be screwed in more for LP and lessfor Natural Gas.

- 31 -Burners, Side Burners, Infrared Burners and Burner Air Shutters Images
This is a Ducane S Burner, from a 15 year-old model, which shows the rusted part. Theelectrode needs replacing, but the burner still has a year or so of life left.
This is a Ducane burner with a portion brushed off. It needs a total brush down and to be blownout.
This is from a Great Outdoors DG450. This burner hasn’t had much use. Note the two boltsholding it to the grill bottom. You will probably have to grind off the bolt heads to get the burner
out when it needs replacing.

- 32 -
DG450 Burner.
This Kenmore grill (made by Charbroil) is showing a rusted out burner that is in need ofreplacement. Also, the heat shield and a few other items should be replaced. The grill, though,
can be fixed.
Members Mark burner showing rusted gas ports partially closed.
- 33 -
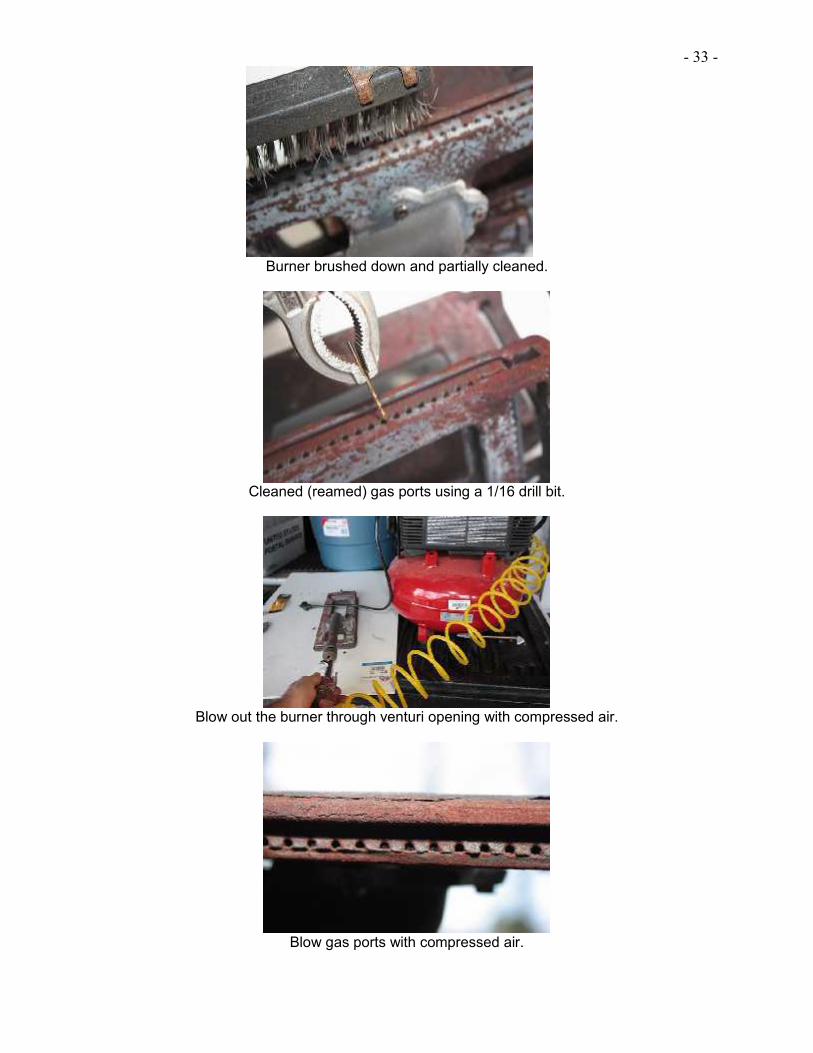
Burner brushed down and partially cleaned.
Cleaned (reamed) gas ports using a 1/16 drill bit.
Blow out the burner through venturi opening with compressed air.
Blow gas ports with compressed air.

- 34 -
Swab venturi with venturi brush or wire coat hanger.
Great Outdoors 1000 cast iron burners. The right one needs the gas ports cleaned and blownout there as well as through the venturi openings.
My Falcon burner could be brushed down and the gas ports reamed with drill bit. Then it shouldbe blown out with compressed air. It isn’t worth it to me.

- 35 -Chapter 10 – Igniters and Electrodes
“What seest thou else in the dark backward and abysm of time?” The Tempest, Act I
Igniter-electrode systems are the worst performing feature of gas grills. While there islittle danger in working on them, you will probably have to take the burners out to adjust andclean the electrodes. The burners need to be clean to get the best performance from theigniters. FAILURE to reinstall the burners correctly will cause a backup flame between theburner opening and the valve orifice. So BEWARE!
When you begin your task of fixing a grill problem you should accept the idea that it ismore than likely to be a tedious inquiry. You may have to make several trips to the tool shed orthe hardware store just to get the old parts off. Many "normal" people will throw the grill outafter a few hours of looking at a problem. Getting the old rusty screws and bolts loose, andavoiding flame ups (in your face), is the most difficult part of the work. My results with this part ofthe grill are not perfect. I’ve spent time on many grills getting marginal results that end up havingto manually light the grill with a long stemmed lighter.
Push Button & Rotary Igniters
Push Button type ignition systems for gas grills have the old push button type (piezo-igniter) where you would push the button once and get one "click". Rotary type igniters arewhere you turn and get one, two or even three "clicks" with each turn of the knob. Both of thesetype igniters can have just one outlet or as many as 3 outlets. With all of them you need to haveall the outlets hooked up to the electrodes or grounded by wire to the grill.
The simplest way to check the electrode is to pull out the cooking grids and the heatplates (or rock grates) and see if the spark jumps at the electrode end when you push the redbutton or turn the knob. You may have to bend into the grill to see the spark and can sometimessee it through the hole that is used for lighting the grill manually.
If the electrode is badly corroded, it will not likely allow the spark to occur. Check thewire to be sure the plastic insulation has not burned off which may allow a "short" to the grillbody. If the igniter "clicks" I usually assume that it is still working. If the electrode-collector boxis badly corroded, it is possible for the rotary and push button type igniters to “click" but not begenerating a spark. You may have to replace both the igniter and the electrode collector boxto get any ignition of the burner.
To check a one outlet push button igniter, it's often easier to have the igniter hooked upto the electrode-box and give it a push. Look for the spark. You might need to have theelectrode lying against the grill body to get a ground. If you have a simple voltmeter you couldconnect the end of the electrode to the grill then push the button to see if the spark occurs onthe electrode. Finding a way to connect all and then push or turn the knob with two hands will bethe hardest part of this.
Correcting an ignition problem with manual push button or rotary igniters requires:
1. Exposing the burner with the electrode-collector box for inspection.2. Testing the igniter to see if the collector shows a spark.3. If the electrode sparks you have to pull the burner and clean the gas ports, as well as the
venturi inside the burner. Then reinstall and check again for ignition BE VERYCAREFUL AS YOU CAN GET IGNITION AND A FLAME UP IN YOUR FACE.
4. You may have to pull the igniter and the electrode collector boxes for more testing orcleaning.

- 36 -5. And, you may have to replace the igniter-electrode system and possibly the burner
if it is badly corroded.
Battery Igniters
Maintaining and servicing the ignition system of your grill requires being able to: check theigniter, the wires to the electrode, the electrode and the burner gas portals. There are 3 basictypes of ignition systems for grills:
1. Mechanical types which require you to turn or push the igniter button or knob.2. Electrical-battery types that you push a button and usually get multiple sparks.3. A "flamethrower" type that gives you one click and a pilot to the burner that ignites the
burner.
Many of the grills today have a battery powered igniter with wires going to eachelectrode. They sometimes have an extra ground wire as well. I usually start with the igniter tosee if it’s "clicking". If it doesn't spark or click, I check the battery to see if it's in theproper position or to see if it is dead. The battery must be installed with the positive side in theproper place. If you have tried a new battery in all possible positions and it still doesn’t ”click",you probably have a bad unit. You can sometimes remove the battery and clean the terminalsthat are at the top and bottom with a pencil eraser. Then use a dry cloth to see if that might bethe problem.
If the igniter is sparking but the burner is not lighting, you need to determine if you'regetting a spark to the electrode. You can remove the grids and the heat plates to try and viewthe electrode. If you see a spark there but still get no ignition, then the burner gas portals (wherethe gas comes from) that are close to the electrode may need cleaning. You may want to checkthe whole burner to see if it’s clean and if the gas portals are clogged or rusted. Use a wirebrush, ice pick and air hose to clean the burner well. You need a good flow of gas over theelectrode collector box to get good ignition over the burner and you need "cross over" to theother burners in order to light all of the main burners.
Checking the ignition system of a battery powered igniter-electrode grill requires thesesteps:
1. Check the igniter by replacing the battery and be sure the polarity is correct. Do that byreversing the battery. If you get no "clicks", the igniter is probably not operational andneeds replacement. Some of the more persistent individuals may be able to extend thelife on the igniter by cleaning the terminals really well.
If the igniter needs replacement, the first choice is to find a factory part. You will need toknow the factory customer service website or the factory service phone number. Youwill also need the model number and sometimes the serial number when you reach thefactory. The model number and serial number can be found on the grill "spec plate"which is usually a decal somewhere out of the way on the grill. You may need aflashlight and reading glasses for that. It may also be helpful to remove one of theelectrodes to compare with what you see in your search. Don't be surprised if removingthe electrode requires twisting off, breaking apart, drilling or grinding off rusted parts thatwon't unscrew.
If you're unable to find the factory, or they don't have the part, you'll have to check"aftermarket” sources. Try an Internet search for "gas grill parts" or check our websitewww.clagrills.com. Try looking on the brand and model number page. If that doesn'twork, see if the aftermarket site has a page with the different igniter parts. CLA's igniterpage shows all igniters as well as electrode parts. Go to: www.clagrills.com, click on any

- 37 -model listed on the home page and check the small links on the left side under“everything we have”.
At that point you will have to compare the old part with drawings/descriptions found onwebsites. You should try to match the wire connections and, if you can't match the exactnumber of outlets, you can either eliminate one of the electrodes or grind off extras to agrill part close to one of the burners (or even the grill body). Igniter outlets in multiplesusually have pairs with one positive and one negative. When you have just oneelectrode, it’s best to hook up one of the ground or negative outlets. If you have severalelectrodes they will provide a spark to all electrodes if all the outlets are connected, withany extra's being grounded (connected by wire) to the grill body. In the case of a Bakersand Chef Grill, I happen to have an aftermarket igniter that was a match. That doesn'tusually happen with "aftermarket" parts.
2. Examine the wires to be sure that they are all connected and that the plastic insulation isnot burned off nor is it cut (which might cause a "short").
3. Examine the electrode-collector box. Be sure there's enough metal for the "arc" ofelectricity to pass in front of the burner gas port. The electrode/collector box may needreplacement.
4. If the electrode is rusted badly, or the igniter is working but the electrode is not producinga "spark" next to the burner, then the electrode probably needs to be replaced. It is rarethat anything but a factory part or a duplicate "aftermarket" part will work as areplacement. Do a search for grill part sites and check under your brand and modelnumber.
5. Check and clean the burners to be certain the gas portals are clean. This may require awire brush, ice pick and air pressure hose. If the burners have burned through holes, orthe portals are rusted beyond cleaning, the burner may need replacement. Canned aircan be used but it is not as effective.
6. The”cross-over" tubes may also be burned out and in need of replacement. Examinethem to be sure they are complete. I always like to try lighting the burners with the flametamers-heat plates and the grids out of the grill. It’s much easier to see how the flameignites. ALWAYS BE CERTAIN YOU KEEP YOUR FACE WELL AWAY FROM THEIGNITION, as they can sometimes ignite when some gas has accumulated. This couldcause a small flame that could burn you.
7. If you've managed to repair or replace the igniter-electrode system reinstall the burnersand try lighting them with the igniter. Look for the spark and BE CAREFUL trying to lightthe grill as the gas can build up if the igniter is not working and you could have a flareup. The spark needs to be 3/8 to 1/2 inch from the gas portals. There may be a way toadjust the electrode or the burner to move them away or closer to get the best ignition.
Flame Thrower Igniters
The third type of igniters; “Flame Throwers” are found in many brand name grills like theHome Depot Ducane grills and many Nexgrill made gas grills. “Flame Thrower” igniters consistof the valve, igniter and electrode all in one assembly. You will, more than likely, have to replacethe whole valve-igniter which is attached to a valve manifold. See the Glossary of Terms for adefinition of manifold.
Sometimes the factory will sell the valves and sometimes they will sell only the entirevalve assembly with all the valves.
After removing the grids and flame tamers, you will see the burner and either theelectrode attached to the burner (not a Flame Thrower type) or the end of the tube from thevalve coming through the front grill wall next to the burner. That is the tip of the “Flame Thrower"igniter-part of the valve assembly. If you're not getting consistent ignition off that burner youshould check the burner to see if it’s clean. You may want to remove it to check the gas ports

- 38 -and its general condition. Use a wire brush to clean the outside and either turn the burnerup with the open end down or blow out with compressed air to clean any rust that might haveaccumulated inside the burner. If the burner has rusted through with holes in the burner (not thegas ports) it is time to replace the burner.
Inspect the igniter assembly attached to the burner. You may have to remove the valveassembly to see the valve-igniter well enough to clean and inspect. If the tube is rusted orcomes off you will likely have to replace the valve assembly-igniter. Otherwise make sure thetube is clean and try turning on the valve to see if the electrode clicks. BE CAREFUL!! If thegas is on you can get a flame from the electrode tube as well as the valve orifice. If the valve isintact with the igniter tube and the unit sparks when the valve is opened to the light or highposition, the igniter-valve is probably working.
Replace the valve assembly back into the grill and then replace the burner(s) back intothe proper position. Be certain that the burner openings are over the valve orifice (jet). Withoutreplacing the flame tamers or grids, try each burner to see if the ignition is improved. You shouldhear the click of the igniter as you turn the valve. Then the flame will come through the tubebeside the burner and finally ignite the burner.
- 39 -Igniters and Electrodes Images
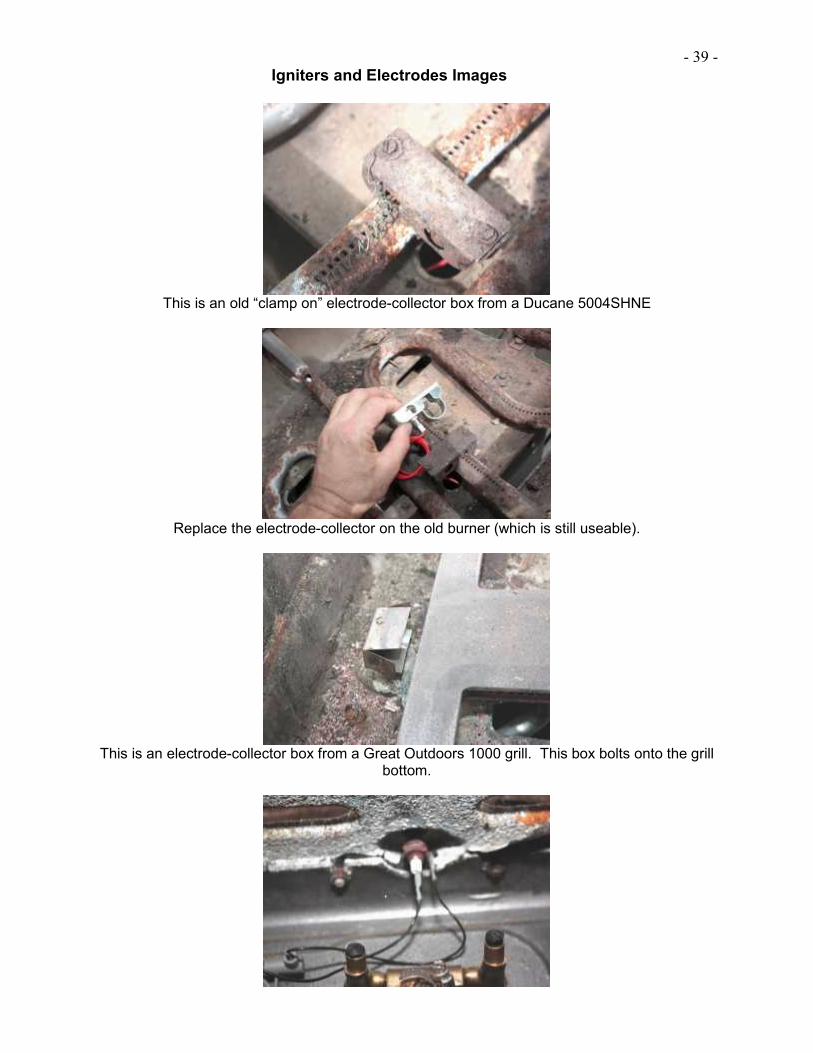
This is an old “clamp on” electrode-collector box from a Ducane 5004SHNE
Replace the electrode-collector on the old burner (which is still useable).
This is an electrode-collector box from a Great Outdoors 1000 grill. This box bolts onto the grillbottom.

- 40 -This is a GO 1000 electrode-collector which is bolted to the grill bottom. By the time this
needs to be replaced you will probably have to grind it off.
Bakers and Chef Y0656
Here are various manual igniters
This shows various battery igniters.
These are various electrode-collector boxes.

- 41 -
Check igniter. New battery should “click” if it is good.
To remove igniter, unscrew the nut on the control. HANG ON TO THE NUT!!!
It’s easier to hook up the wires before you put the igniter back in.
Remove the grids, heat plates and burners to get to the electrode.

- 42 -
Here is a new electrode along with the old one. See Chapter 4 - Basic Grill Maintenance,Diagnostics and Trouble Shooting.
This is an old electrode. It isn’t rusted so bad that it needs grinding to get it off. It can beunscrewed.
Here is an electrode seen from under the front of the grill, below the valve.

- 43 -Unscrew the nut from the electrode shaft. Be sure to set the new one like the old one.
Always keep one of the old ones in to be sure. Or, take a picture to remind yourself of how it isconnected.
These are “Flame Thrower” type assemblies. You can try cleaning but will more than likelyhave to replace it if you want to use the igniter.

- 44 -Chapter 11 - Problems that can occur with Gas Grill Valves
“But since such provisions as we can make are full of uncertainty and anguish, it isbetter to be ready to face with fair assurance anything that can happen, while drawing
some consolation from not being sure that it will.” Montaigne, Essays, I -24
Members Mark Y0101XC
Problems that Can occur with Gas Grills Valves
The valves are the part of the grill that controls the flow of gas into the burners. Since thevalves are closed (I hope) when you removed the orifices, you can remove the orifice, clean itand put it back without having to open the gas system. There isn’t any DANGER at this point. Ifyou decide to remove or open the valve, you must be sure you can safely put it back with thegas system sealed as it was originally. If you can’t be certain of the gas system being CLOSED,AND WITH NO LEAKS, then its time TO GET HELP and call a technician. When you removeand unscrew parts of the valve it is EASY TO CROSS THREAD the screws when putting it backtogether. Grill valves are always attached to the manifold.
I have been doing this for the last 25 years and I’m always wary of cross threading myvalve screws. The valve screws are usually brass or aluminum and easy to bend or cut across. IALWAYS reverse them when screwing together. I do this first to be sure they are seatedproperly together before turning (usually clockwise) to come together. I ALWAYS check forleaks when I’ve put it back together. I do this with the gas supply on, the control valves closedand check with soapy water. I’ve taken apart many valves to re-lube, but don’t recommend thisfor anyone but a pro. IF YOU FAIL to close the gas system properly THE CHANCES OF FIREEXIST!! This section is to be used ONLY for those that are experienced. Otherwise, it can beused as a reference for those who would like to understand while the tech is working on yourgrill. OK?
1. If the knob breaks off, replace the knob immediately! Many will use pliers or vise grips toturn the stem which usually results in the stem breaking off. Use the pliers carefully. Youcan get a generic knob replacement at Home Depot until you can find a match for the oldknob. If the grill is older, a match may not be available so you have to find a close“aftermarket" replacement from websites like www.clagrills.com.
2. If the stem is broken you will have to replace the valve. The valve is usually part of anassembly attached to a manifold (a pipe or cast brass piece to which all valves and thegas are attached). There are some "aftermarket" replacements, but you usually have toget one from the factory. Usually the factory will only sell the entire valve assembly.Weber sells only assemblies but Ducane (owned by Weber) will sell the valvereplacements. Nexgrill sells only the valves but doesn't like to keep them long. Charbroilusually just sells the assemblies.

- 45 -3. If the valve stems freezes (gets stuck) it might be able to be rebuilt but usually the
whole valve has to be replaced. Rebuilding a valve stem requires opening the valve up,cleaning the insides, re-lubing with heavy gas valve grease and putting the valve backtogether. You will likely have to replace the valve. No one sells just the stems, so forgetthat.
4. If the orifice is clogged with a bug or debris from the gas line, you can get the orifice offwithout removing the valve assembly. However, the burners, flame tamers andvalve cover always have to be removed to get to the orifice.
5. Valves will sometimes start to leak through the stems even when in the off position. It ispossible to open the valve, clean and lubricate the chamber. I don’t recommend this asit is easy to scratch it on the inside and cause a leak, or fail to correctly put it backtogether correctly. It will be difficult (but slightly easier than a lawnmower carburetor).BE CAREFUL - It is easy to scratch the inside of the chamber which may cause a
permanent leak. And, it is difficult to put it back together correctly. There are usually 6 orso ways to put it back together but only one correct way. IF YOU HAVE A LEAKYVALVE, replace it! Call the factory and get a new one.
6. If you have a "flame thrower" valve assembly with igniter problems, you will have toreplace the valve assembly most of the time. If the igniter portion isn’t working, trycleaning the tube to the electrode. If the stem is broken or frozen it will be very difficultto open, clean and lube the inside chamber. Also see Chapter 9 - Igniters andElectrodes.
Valve Orifice Inspection and Cleaning
Before you start trying to fix your grill, REMEMBER: If you're not sure of working with agas appliance like a gas grill, GIVE UP and call an appliance technician as FAILURE to be safecould result in unintended fire, damage or SEVERE INJURY!!!
You might suspect a blocked orifice if a burner is very low with the valve in the highposition. Or, if one burner starts out with a low flame and gets lower as you light the otherburners, you probably have a faulty regulator. See Chapter 6 - LP Parts and Gas Fittings.
The valve orifice is a small hex headed screw (with a tiny hole drilled to a precise size forBTU's and LP or Natural Gas) that goes into the end of the valve. That is where the gas exitsinto the burner. The orifice end of the valve goes into the venturi (open) end of the burner. It isopposite the end of the valve with the stem. Even though the hole is small, bugs can still get into nest. I have found spiders, ants and even small dirt daubers inside the orifice.
Occasionally, in Natural Gas copper lines, copper sulfide can coat the copper lining. Itcan then dry and flake off into the line going through the valve and clog the orifice. This can cutthe flow of gas into the burner. In LP hoses, which have been left open (not hooked up to the LPbottle), bugs or water can clog the line or regulator and stop the gas flow. Clogged gas lines area major source of gas grill breakdowns.
To remove the valve orifices in order to inspect and clean, follow these steps:
1. Remove the cooking grids, rock and grate or heat plates and then the burners. It iscommon for burners to be bolted or pinned down to the grill body. This can be a realproblem since you may have to grind, drill, saw or twist the rusted bolt to get the burnerout.
2. Now you can inspect the orifice and decide how to unscrew it. In the sheet metal boxtype grills common today, sometimes you can use a socket to unscrew it. NOWBEFORE removing the screw-orifice, be sure that you can hold or catch the orifice. IFYOU DROP THE ORIFICE you will lose it! Before unscrewing the orifice, open thecabinet door of the cart (if you have one) and look under the control panel to see if the

- 46 -valve and orifice are visible. You might be able to loosen the orifice with pliers orchannel locks. Either way you may want to hold your left hand under the valve to catchthe orifice if it drops. Use the socket from inside the grill or the pliers to loosen the orificeand try to remove with your fingers.
3. Assuming you've removed the orifice and are now holding it, take it inside the house orto a place where you have a flat surface that is safe from dropping (and maybe fromlosing) it.
4. Hold the orifice up against some light to see if it’s clogged. Take a small safety pin ortoothpick to clean out the inside. Be sure that it’s clean. Put the orifice in a baggie orenvelope to make it hard to lose.
5. Return to the grill and try to look into the open end of the valve. Try turning on the gas tothat valve to see if the gas pressure is good. You should feel it on high with your finger.
6. If you're convinced you have a good gas flow, reinstall the orifice. Be careful not to crossthread as it should screw in easily. If it does not screw in easily, it might be crossthreading. Unscrew and retry, then finger tighten only as there is little pressure when thevalve is open against the orifice.
7. Reinstall the burner and be sure the open-venturi end of the burner is over the orificeand the burner is sitting properly.
8. BE SURE YOUR GAS CONNECTIONS ARE SECURE! Test with soapy water. Theleak will bubble. If you smell gas with the valves in the off position then, with the burnerexposed, open the valve to high and light. BE CAREFUL! BE CERTAIN TO KEEPYOUR FACE AWAY FROM THE GRILL AS YOU LIGHT. Use a long stemmed lighter tomake it easier. Inspect the flame of the burner on high against the other burners. If itlooks like a good flame to you then the problem should be solved. If the flame is still low,you likely have another blockage somewhere in the gas line before the orifice.
Replacing a Valve
DANGER!! REMEMBER!! If you have little personal experience with gas appliancerepair and CANNOT be sure of safety precautions (like no flames or hot surfaces around whenyou're testing for leaks or testing the burners) then CALL AN APPLIANCE TECHNICIAN!
If you have determined that the valve needs replacing you might want to review thedecision. Use these points to see if that’s still the best bet:
1. If your initial reason for looking at the valve (as a possible problem) is that you had aflame under the control panel or where the burner meets the valve orifice, then youprobably have a clogged or totally rusted through burner. See Chapter 9 - Burners, SideBurners, Infrared Burners and Burner Air Shutters. A clogged or rusted through burnerwill cause the gas to back up and ignite around the valve. You might see the flamearound the valves or even the knobs. If you have cleaned the burner, and determinedthat the valve is leaking or won't turn, check the next point.
2. If not enough gas is coming through the orifice when the knob is in the high position, andyou have cleaned the orifice, and if all the valves still have too little gas going throughthe orifice, you probably have a faulty gas regulator. It is unlikely (but can happen) thatall the burners have clogged orifices. Otherwise go to the next point.
3. If the valve stem is frozen or broken (twisted off); you’ll have to replace it. Find themodel number and the serial number of your grill and call the factory. Sometimes theyput the customer service number on the grill spec plate found somewhere out of the wayon the grill. It should also be in the manual. If you don't have the manual you’ll have todo a search online for the customer service number or homepage Also see Page 67 ofthis manual “Index of Manufacturers’ Phone Numbers & Websites”. Try different searchphrases and check the sites shown.
Finally, you have the replacement valve and are ready to change it.

- 47 -1. Turn off the gas and disconnect the gas supply to the valve assembly.2. Pull the grids, heat plates and burners.3. Pull the knobs.4. Loosen the valve cover. Usually the valve assembly is attached to the valve cover and
to the grill. Hopefully the valve assembly and cover will come off easily. You may haveto remove a gas connection to the side burner.
5. You should be able to see the entire valve assembly. Most grills today have the valvesclamped onto a long pipe manifold. Remove the screws, holding the valve to the valvecover.
6. Remove a screw holding the clamp to the valve and remove the valve from the manifold7. Compare the old valve and the replacement. Be certain that the new valve came with an
orifice. If not, use the old one. Install the new valve and make sure its positionmatches other valves on the manifold.
8. At this point it is much easier to tighten the screws on the clamp a little to secure the gassupply. So, hook up the gas supply, open the gas supply and check for leaks. Reinstallthe valve assembly and check for leaks again.
9. Install a burner on the replaced valve and check the flame on high.10. Install the other burners and test before putting the heat plates and grids in place.11. Recheck connections for leaks with soapy water.
You should be ready to use the grill.
Old Style Gas Grill Valve Assemblies
The early gas grills were simple. The grill sat on a round post and the gas valve was inthe post with the stem sticking out with a knob. Later versions had two knobs and a burner thatusually had two venturi going down into the post and into the valve orifices.
The valve was screwed into a manifold that attached the valve to the post and had theincoming gas line attached as well. Sometimes the valve was screwed into the gas regulatorwhich was mounted to the post. Later, the valve assembly was moved to the lower front of thegrill and attached with a bracket, and a valve cover was added. Many people still have the 40year old grills from the old days.
When you have a problem with these valves you might find yourself at a dead end. Afew of these are still sold "aftermarket" through different dealers like www.clagrills.com. You willlikely have to use the old manifold and even the old orifices.
These older valves are much simpler and can still be found today. Broilmaster, ModernHome Products, Broil King, and Broil Mate still sell grills very much the same as they weretwenty years ago. To correct a valve problem in the older type gas valve assemblies, you wouldfollow the same procedures as stated in the previous section. AGAIN! If you're not sure aboutsafety when working with gas appliances GET A TECH'S help. It could be DANGEROUS!

- 48 -Problems that can occur with Gas Grill Valves Images
Pull the knobs - you may need to use your fingertips from both hands. Pliers might break theknobs.
I had to remove the right shelf tray to get to the two screws holding the control panel. I left thetop screw to keep the panel secure and to simply rotate up.
Remove the two bottom screws holding the control panel on the right side

- 49 -
I had to loosen a clip behind the gas fitting (0n the left side of the control panel) to get to thescrew holding the left side of the valve cover. The other screw was exposed.
With the top screw holding the valve cover on each side, you can rotate the valve cover toexpose the valves. The rotisserie valve is on the right side. It’s easier to see the valves and theorifices from the side of the valve that goes into the burner. The valves are attached to the wall
between the grill and the control panel. It is also attached to the black manifold pipe (if youneed to change the valves).
You’ll have to remove the orifice and a net holding the valve to a plate next to the grill. You willalso need to have a clamp holding the valve to the manifold, if you need to replace the valve.
BE CAREFUL NOT TO STRIP THE SCREW THREADS!!!
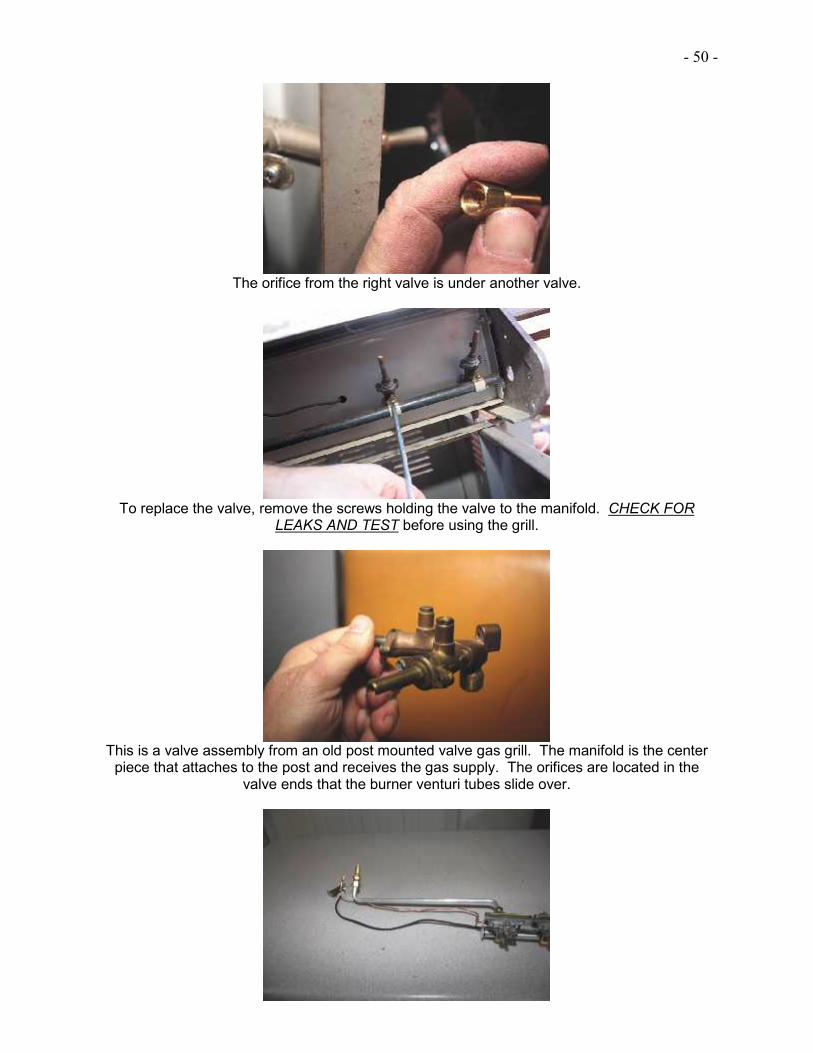
- 50 -
The orifice from the right valve is under another valve.
To replace the valve, remove the screws holding the valve to the manifold. CHECK FORLEAKS AND TEST before using the grill.
This is a valve assembly from an old post mounted valve gas grill. The manifold is the centerpiece that attaches to the post and receives the gas supply. The orifices are located in the
valve ends that the burner venturi tubes slide over.

- 51 -This is a valve assembly from a Turbo, which is a lot more complicated. This shows theextensions for gas to burners, electrode wire and a gas pilot type feed to the electrode. The
valves are attached by a clamp to the pipe manifold.
This is an orifice removed from a valve extension fitting.
This is a valve assembly from Capt’n Cook with “flame thrower” igniters. These igniters areclamped to a pipe manifold.
This is showing a Phoenix Grill valve assembly with a brass manifold in the center and the LPhose and regulator attached to the manifold.

- 52 -
This is a used valve assembly from Great Outdoors 1000. Remove the screws holding thecover plate. DON’T LOSE THE SCREWS!!!

- 53 -
Chapter 12 - Table Top Grills, Knobs, Handles, Warming Racks, Post MountedGrills, Old Grills and Other Attachments
“Those who persevere are sometimes rewarded but woe the prat falls! Advance withcare!” -Unknown author
Table Top Grills
Table top grills are the cheapest grills out there. I still see some for less than $25. Youwon't get many repair parts for less than $25, so always include that fact in your thinking.
The burners and valves are the two issues that stop these grills from working. Alwayscheck the warranty first as you might get the factory to replace the broken part. There are few"aftermarket" parts for table top grills, and I don't recommend trying.
Many customers order our one table top valve-regulator for disposable LP tanks. Thatpart fits old Sunbeam table top grills and our supplier only sells them because he still has themin his warehouse. Making an "aftermarket" valve fit your table top will likely result in failureunless you are a great technician and have some machine skills as well as the right tools.
If you have a higher quality, expensive table top grill (they are out there), start with thefactory customer service for replacements parts. You can use the procedures for diagnosis andrepair, but be forewarned that factories have a tendency to drop these parts from theirinventories quickly. The valves are usually part of the LP regulator which usually accepts onlythe 2 pound disposable LP bottles. The orifice in the valve is made to attach to the burner andthe grill in a particular way. There are hundreds of different table tops and they rarely usecommon valve regulators. Be prepared to either adapt the grill to charcoal or scrap it.
Knobs
Knobs (universal type) can usually be found locally (at Home Depot, Lowe’s or otherhardware stores) in the grill section with various parts. It might be just a temporary fix. But withthis replacement for the cheaper grills, the universal is as good as the factory part. The valvestems that the knobs sit on can be in several sizes. And the orientation of the OFF-ON settingsis important. My first choice is to get the OEM factory knobs, but if the factory doesn’t havethem, do an Internet search through the aftermarket dealers like www.clagrills.com. Just try thesearch phrase “gas grill parts” and look through the sites. See Chapter 3 - Before Buying a GasGrill.
Handles
Handles are a part of the grill I really prefer to keep original. The lid, usually, has formedmolded pieces to hold the handle and they are usually only available from the factory or anOEM dealer. Otherwise, you’ll have to adapt a universal handle to the grill lid requiring a drilland it will not look very good.
Warming Racks
Warming racks are almost always only available from the factory and among the firstparts discontinued. I wouldn’t try using other warming racks thinking you can somehow makethem work. They won’t work. Especially with the “hide-away” type that folds back as you raisethe lid. You might find some universal racks that will work or a factory warming rack that just sits

- 54 -on the main grids that will fit under the hood. Keep the original rack clean and well oiled, orput it in the garage where you can find it as the chrome plated carbon steels will simply rustaway over a few years. People don’t use warming racks much anyway.
Post Mounted Grills
Post mounted grills are still being sold and are usually hooked up to the house NaturalGas supply or a house LP system. It is simple to replace the burners, grates and grids. But thevalves are harder to work on, as they are rarely found anywhere except OEM-factory dealers.Changing a rusted post is a tedious, labor intensive struggle. You have to turn off the gassupply, dig up the old post, break the old gas line and install the new post making sure toreconnect the gas line securely. I’ve done several hundred of those and it’s not fun. It reallyneeds to be a solid old grill. Do a total worst case estimate on time, parts and prices. This is notfor anyone except the experienced, trained technician (as far as I know). You might want toabandon the entire grill and have it dug up (gas line capped at the source) and thrown out.
Pedestal Grills
There are still many old grills on patio pedestals out there. And they are much like theground post grills, except no digging. Again, these are not for those untrained or mechanicallychallenged. Be ready to replace almost everything, even the valve. If the grill is hooked up tothe house gas supply, you might be able to find a new Natural Gas grill to replace it. Somehomes have a LP house supply. Of course you need to know which one before you try. Youneed knowledge and lots of time. Study well, work carefully and recheck all work for leaks andfunction.
Casters, Leg Pads and Big Wheels
Big wheels can sometimes be found at local lawn mower shops or old hardware stores.Of course try the factory. They always mounted over an axle. Casters are usually just made fora particular model and you’ll have to get the factory’s help or improvise with something from thehardware store. Occasionally a heavy caster might match a standard one from Lowe’s, but don’tcount on it. Be sure to take the old one with you to avoid wasting time. I have used angle L typesteel pieces and either bolted or welded them on the legs. Be sure to check the level on the grillbefore bolting

- 55 -Chapter 13 - LP to Natural Gas Conversion
“Animis opibusque parati”- prepared in spirit and resources- Roman proverb
Converting a grill to Natural Gas from LP is much easier that LP to Natural Gas. You stillhave to change the gas connection and drill out, or change the LP orifices to Natural Gasorifices. Since you have to change the LP to a Natural Gas hose and open the gas line, youmust secure the gas lines and test the grill before using it. There is an immediate DANGER ifyou fail to check for leaks and test the burners (you have to remove them to get to the orifices)before putting the heat plates and grids back in. CHECK FOR LEAKS and TEST the grill!! Donot cross thread the orifices or gas connections either.
Many people buy LP gas grills and wish to convert them to Natural Gas. The market issaturated with LP grills which are usually cheaper, while Natural Gas grills are fewer and usuallymore expensive.
Sometimes the manufacturer will provide a conversion kit or have one available to order.Converting the grill to Natural Gas without a factory kit could violate the warranty. FAILURE TOCARRY OUT THE PROCEDURE IN A SAFE WAY COULD RESULT IN A FIRE AND INJURY.
If you haven’t done this before you must research the procedure and be certain of thesafety before beginning. If you search for “gas grill conversion” on the web, you’ll find numeroussites with kits. You will also find websites by individuals who have successfully converted theirgrill from LP to Natural Gas.
Converting your grill from LP to Natural Gas requires changing the orifices (jets) on eachvalve. Most valves will work with LP or Natural Gas but some are made only for one or theother. The old Ducane grills will likely require changing the valves.
All of the holes in the valves are larger for Natural Gas than for LP, which is why it’sharder to convert from LP to Natural. You might also find that, in converting from LP to NaturalGas, the low flame setting results in little or no flame. You can adjust for that by simply settingyour low flame slightly closer to the medium setting.
Converting to Natural Gas usually doesn’t require a regulator. However sometimes,when the pressure is more than 7 inches, a regulator might be needed. The LP regulator won’twork for this and you’ll have to get one from a heating supply store.
Since the orifices and other openings in the valves are smaller for LP you might be ableto drill out the orifices without further adjustment.
The steps for converting a Home Depot Ducane Stainless steel grill from LP to NaturalGas are as follows:
1. Purchase or borrow numbered drill bits (you can use the conversion chart to buy just thedrill bits you need-see the Anderson/Forrester Chart of Orifice Capacities in the back ofthis manual). You’ll need a handheld bit driver or you could use a pair of vise grips tohand drill the orifice. An electric drill could easily break the small bits or damage theorifice.
2. Use the LP-Natural Gas BTU to numbered drill conversion chart to determine which drillbits you’ll need for each orifice. If the grill spec plate doesn’t show the individual BTUoutput per burner, you will have to do more research or guess using the total output ofthe grill. The spec plate for the Home Depot Ducane grill shows each burner rating.You’ll have to use the drill bit that gets closest to the BTU output listed.

- 56 -3. Starting with the front control panel, remove the two screws on each side and pull
the panel carefully away from the front of the grill. Remove the burners from the maincooking area of the grill. You can actually drill out each orifice by placing the handhelddrill bit holder with the correct bit from the inside of the grill through the burner hole. DONOT USE AN ELECTRIC DRILL!
4. It is possible to drill the orifices without detaching the control panel but you can’t easilysee the orifice and you can’t remove the burners in the Ducane without loosening thecontrol panel. Drill out each orifice using the numbered drill bit with the handheld bitholder.
Side Burner Orifice
5. The orifice for the side burner is under the side burner shelf in front of the burner venturi.It will have to be removed carefully with wrenches to allow drilling.
Get to the Rotisserie burner
6. To get to the rotisserie burner you’ll have to remove screws on the back of the grill andinside the grill that hold the rotisserie burner in place. You will have to remove the orificefrom the burner in order to get the drill bit in place.
Reattach all orifices
7. Reattach all orifices and any gas lines disconnected during this process. Be sure tocheck all fittings for leaks with the grill valves off but leaving the pressure on from thegas line. Also, check that the connections in the gas lines are opened with the grillvalves on and burners lit.
8. Before putting the flame tamers back in, check your main burners for the correct flame(which should be blue) and that it is lit as soon as the gas exits the burner. Use the airshutter if the flame is yellow by opening. Closing the shutter will make the flame yellowand slower.
9. When you’re sure you have no leaks and the flames are consistent, you can put the grillback together and you’re ready for use.
10. REMEMBER! Converting your LP Gas grill to Natural Gas requires opening gas linesand safely reconnecting them. FAILURE TO SAFELY DO YOUR WORK COULDRESULT IN FIRE AND INJURY! If in doubt, get an appliance technician to do the work.

- 57 -LP to Natural Gas Conversion Images
You can access the control panel by loosening the screws on each side. By pulling the panelaway slightly you can pull the main burners out in order to access the main valve orifices. TheseDucane-Home Depot grills are the only models that require control panel loosening to remove
the main burner.
After loosening the front panel and removing the main burners you can drill the valve orificeswith a drill in a manual holder through the front burner opening in the grill. DO NOT USE an
electric drill. The drill bit will break.

- 58 -
The orifice for the side burner is under the side burner shelf in front of the burner venturi. It willhave to be removed carefully with wrenches to allow drilling.
You’ll need 2 wrenches to loosen the side burner orifices after removing the burner (which Ididn’t do here).
To get to the rotisserie burner you’ll have to remove screws on the back of the grill and insidethe grill that hold the rotisserie burner in place. You will have to remove the orifice from the
burner in order to get the drill bit in place.

- 59 -
Use some wrenches to loosen and remove the rotisserie burner orifice to drill out with a10000BTU #54 drill bit for Natural Gas.
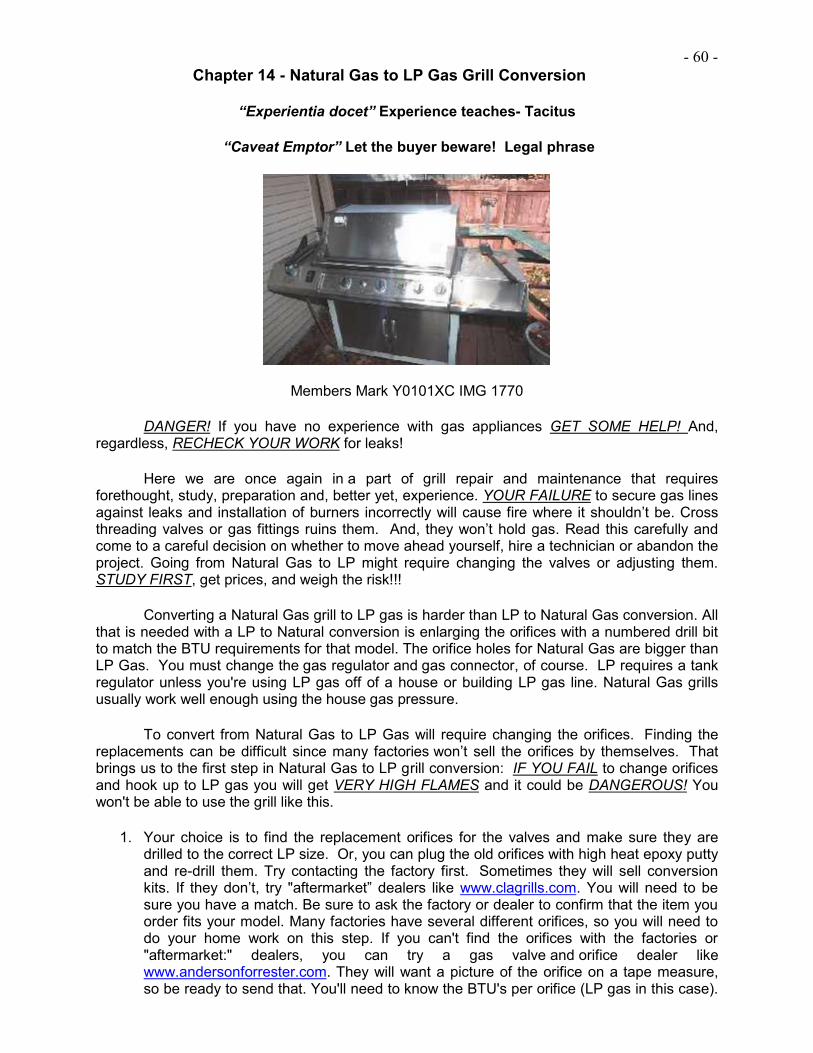
- 60 -Chapter 14 - Natural Gas to LP Gas Grill Conversion
“Experientia docet” Experience teaches- Tacitus
“Caveat Emptor” Let the buyer beware! Legal phrase
Members Mark Y0101XC IMG 1770
DANGER! If you have no experience with gas appliances GET SOME HELP! And,regardless, RECHECK YOUR WORK for leaks!
Here we are once again in a part of grill repair and maintenance that requiresforethought, study, preparation and, better yet, experience. YOUR FAILURE to secure gas linesagainst leaks and installation of burners incorrectly will cause fire where it shouldn’t be. Crossthreading valves or gas fittings ruins them. And, they won’t hold gas. Read this carefully andcome to a careful decision on whether to move ahead yourself, hire a technician or abandon theproject. Going from Natural Gas to LP might require changing the valves or adjusting them.STUDY FIRST, get prices, and weigh the risk!!!
Converting a Natural Gas grill to LP gas is harder than LP to Natural Gas conversion. Allthat is needed with a LP to Natural conversion is enlarging the orifices with a numbered drill bitto match the BTU requirements for that model. The orifice holes for Natural Gas are bigger thanLP Gas. You must change the gas regulator and gas connector, of course. LP requires a tankregulator unless you're using LP gas off of a house or building LP gas line. Natural Gas grillsusually work well enough using the house gas pressure.
To convert from Natural Gas to LP Gas will require changing the orifices. Finding thereplacements can be difficult since many factories won’t sell the orifices by themselves. Thatbrings us to the first step in Natural Gas to LP grill conversion: IF YOU FAIL to change orificesand hook up to LP gas you will get VERY HIGH FLAMES and it could be DANGEROUS! Youwon't be able to use the grill like this.
1. Your choice is to find the replacement orifices for the valves and make sure they aredrilled to the correct LP size. Or, you can plug the old orifices with high heat epoxy puttyand re-drill them. Try contacting the factory first. Sometimes they will sell conversionkits. If they don’t, try "aftermarket” dealers like www.clagrills.com. You will need to besure you have a match. Be sure to ask the factory or dealer to confirm that the item youorder fits your model. Many factories have several different orifices, so you will need todo your home work on this step. If you can't find the orifices with the factories or"aftermarket:" dealers, you can try a gas valve and orifice dealer likewww.andersonforrester.com. They will want a picture of the orifice on a tape measure,so be ready to send that. You'll need to know the BTU's per orifice (LP gas in this case).

- 61 -Ask them to drill the orifices. Or, you can check on-line for a drill chart. They usenumbered drill bits which can also be found at local hardware stores and auto partstores. You can find more information by doing a web search for "gas grill conversion". Ihave used high heat epoxy putty to plug the orifice and re-drill. But, this requires moretime and you need your own drill bits.
2. By now you've probably removed all the grill parts that are in the way; the grids, racks,heat plates and burners. If not, do so to get to the valve where the orifice is screwed in(the end where the gas comes from). Later, when you put it back you on, you will needto finger tighten. This is the only place tightening against pressure leaks is notimportant. ALWAYS CHECK FOR GAS LEAKS. There is no gas in the valve in front ofthe orifice unless the valve is open. And, if it’s open, the gas is going out of the valvethrough the orifice.
3. Check the valves to see if you can remove the orifices. If so, replace them with the newones for LP Gas. The side burner and the rotisserie burner usually have different orificesand you may have a harder time replacing them. You might have to remove the valveassembly to get to the valves. Broilmaster and MHP grills have a valve stem with anadjustable screw that can be adjusted for LP or Natural Gas. You'll have to make thoseadjustments with a tiny screw driver on the low flame setting when everything else isdone.
4. The old Ducane and most Weber grill models require changing the valve as well. Theinternal holes that are drilled in the valve setting are too high going from LP to NaturalGas. You would notice, after the conversion is made, that there is too much heat whenthe valves are in the low position. You can compensate for this without changing thevalve by using the Off-High setting to adjust the flames. But it requires a little practiceand closely watching the flame.
5. Remove the old gas connector and the Natural Gas regulator (if there is one) and hookup the LP hose-regulator. Connect to the LP tank and open the tank valve. Check withsoapy water on the fittings for leaks.
6. Once you have connected the LP hose and regulator you can install the burners andcheck the flame. LP burners require that the air shutter on the burner venturi to be abouthalf closed to get the best blue flame. They need to be open all the way to get a rich blueflame using Natural Gas. Experiment by trying different positions on the air shutter andchecking the flame. Some burners have no adjustments and you may have to improvisea bigger opening to get a blue flame. Some cast iron burners have a bolt in the neck ofthe venturi close to the air shutter opening which would be screwed in slightly for LP andadjusted out for Natural Gas. Too much air in the air shutter can result in a ’jet effect"and the flame may pop out, and then relight.
7. Assuming you've made "no leak" gas connections and checked your burner flames; ANDyou've been lucky enough to have the valves work in their High-Medium-Low positions;you should now recheck your work. Look for leaks and recheck your flames. I hope youremembered to hook up the electrodes to the igniters. Reinstall the heat plates andgrids. You are ready to cook.
8. If your flame is too high when the knob is in the low position, get a flashlight, pull theknob and look down the stem shaft. Broilmaster and MHP have a screw that when it isscrewed in all the way, that is the setting for LP. When the screw is out about 3revolutions, that is the setting for Natural Gas. I like to have the grids and plates out thenlight the burners and turn to low. Then I'll use a tiny screw driver to either screw in or out(for Natural Gas) and watch the flame. NATURALLY, BE CAREFUL about where yourface is in this procedure. Be careful NOT TO unscrew the stem shaft screw (inside thevalve stem)!
9. IF YOU'RE NOT CERTAIN OF YOUR WORK, RECHECK IT OR CALL A TECHNICIAN.

- 62 -Natural Gas to LP Gas Grill Conversion Images
Remove grids (assuming you’ve turned off and disconnected the gas supply!!)
Remove heat plates
Remove burners

- 63 -
I had to remove some side shelf and side burner screws to get to the control panel screws. Butafter removing the bottom two screws on each panel, I could rotate the panel up to reveal the
valves. It’s easier to see the orifices on the ends of the valve opposite the knob ends.
Remove the 3 main orifices and replace with the correctly drilled LP orifices. Be careful not tocross thread and be sure that the snug is tight enough, as that fitting has no real pressure when
valve is open.
Side burner - remove grate
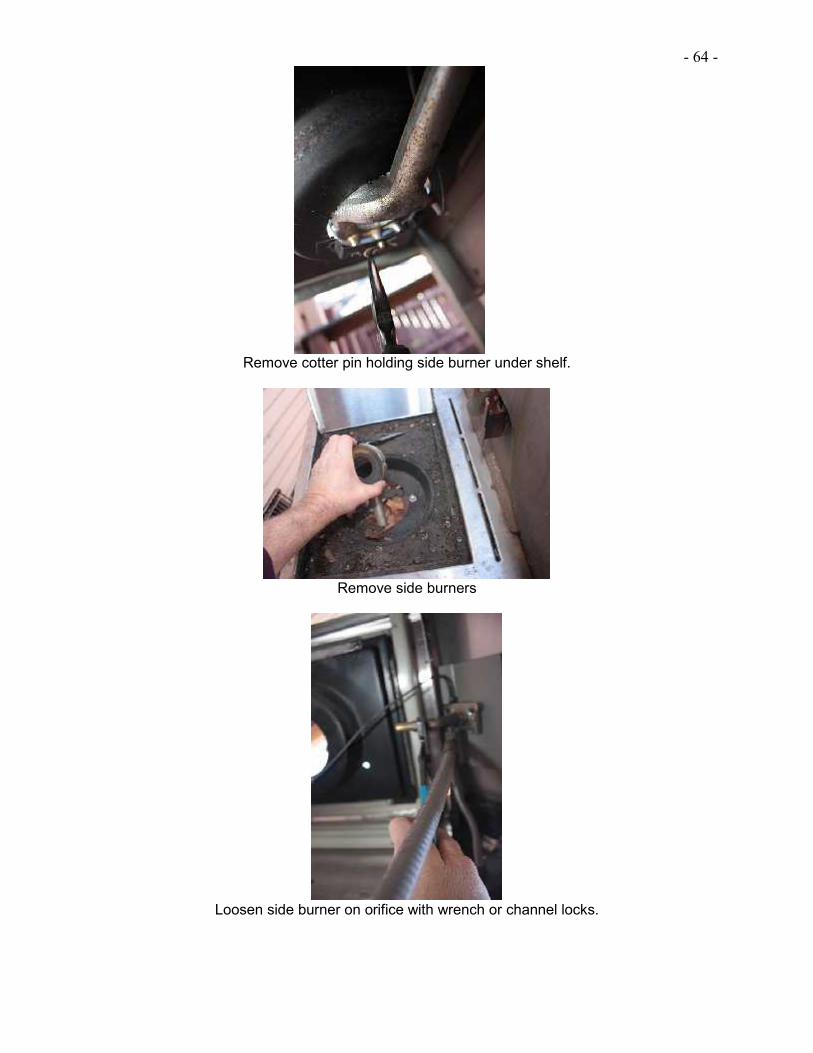
- 64 -
Remove cotter pin holding side burner under shelf.
Remove side burners
Loosen side burner on orifice with wrench or channel locks.
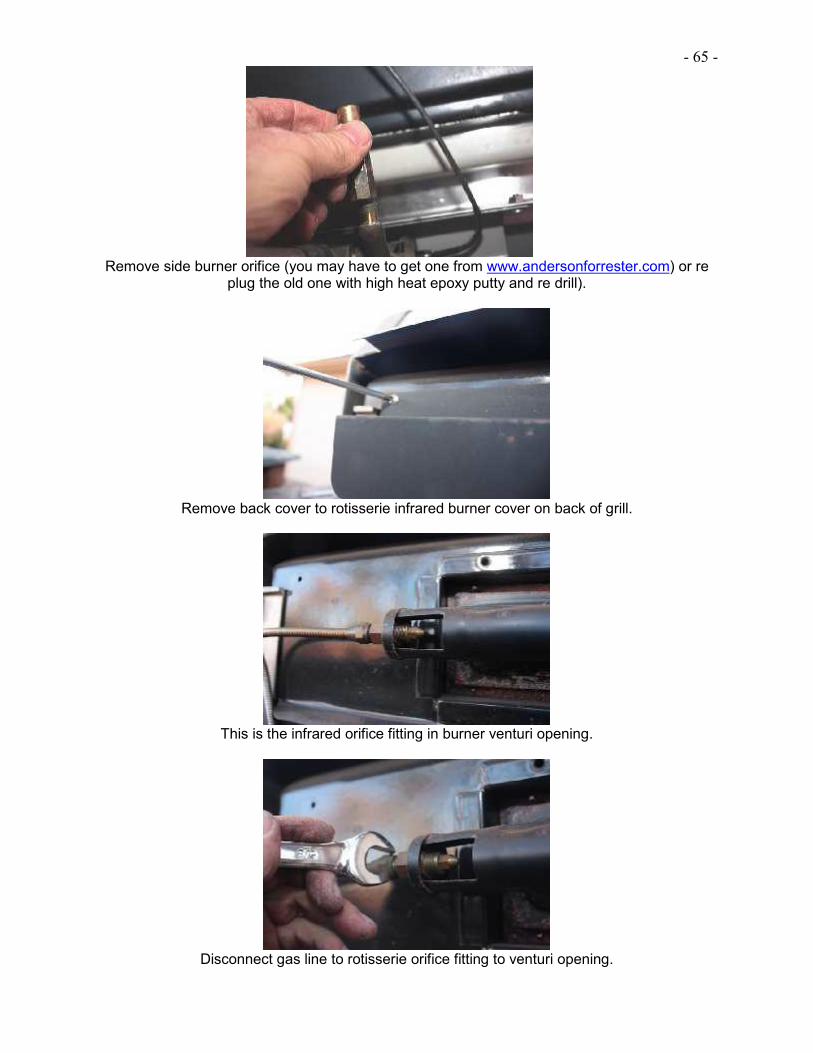
- 65 -
Remove side burner orifice (you may have to get one from www.andersonforrester.com) or replug the old one with high heat epoxy putty and re drill).
Remove back cover to rotisserie infrared burner cover on back of grill.
This is the infrared orifice fitting in burner venturi opening.
Disconnect gas line to rotisserie orifice fitting to venturi opening.

- 66 -
Loosen nut holding orifice fitting to venturi opening.
Remove nut holding the fitting - DO NOT DROP!!! Or LOSE!!!
DON’T DROP IT!!!
Orifice fitting and orifice

- 67 -
You’ll have to find a new orifice to re-drill (maybe www.andersonforrester.com), or plug with highheat epoxy and redrill. CLA does not have this orifice. Install the re-drilled orifice and reinstall
the orifice fitting and the gas line to rotisserie burner.
Reconnect the gas line to grill. Check for leaks, install burnersand test each one as you to be sure the burner is connected right.
Install the heat plates and grids. Re-test the grill thoroughlybefore reusing and chase down any hint of gas leaks.

- 68 -Glossary of Terms
Air shutter -This is an opening in the burner venturi tube that connects the burner to the valveorifice. It is usually, but not always, adjustable. It should be partially closed for LP and mostlyopen for Natural Gas. Some cast iron burners have a bolt that screw into the neck of the venturitube close to the opening in the air shutter. The bolt should be “in” more for LP and “out” morefor Natural Gas. If your flame is blue and ignites as the gas leaves the burner, your air mix isgood. A lazy yellow flame means not enough air, and the shutter needs to be opened more (orthe bolt screwed out some). If the flame is "jetting" and ignites away from the burner (and mayalso "pop" out) you have too much air. Close the shutter some or screw in the bolt. Someburners have no adjustment and you would have to improvise a way to change the air mix. Thecheaper grills made for LP might have this feature, which cost the factory less to make.
Cooking grid -These are made of porcelain coated cast iron, porcelain coated carbon steelrods, stainless rods (which can be in several grades) or chrome plated carbon steel. Seestainless steel below.
Cross thread -If you do not screw a fitting together correctly, you will have cross threaded thepieces and probably ruined them. Take your time when starting the threads. I like to reversethem to get a feel for the fittings or bolts. And then slowly start turning usually clockwise to start.It will go in easily if it is threaded correctly. And, within a half turn, get hard to turn if it is crossthreaded. YOU DON”T WANT TO CROSS THREAD!!
Drill bits (numbered) -These are used for drilling the gas valve orifices to a specific size.Which bit will depend on the BTU's required and the type of gas (LP or Natural Gas).Numbered drill bits are actually machine shop spec bits. These can sometimes be found inhardware stores and auto parts stores. You can easily find them on-line by typing in "numbereddrill bits" from the search engine.
Electrode (collector box) -The electrode is the part that places the spark next to the burner. Itis usually attached to a collector box. "Flame Thrower" type igniters (see below) have theelectrode next to a tube which is close to the burner in order to ignite the burner.
"Flame Thrower" igniter - This is, mostly, a part of a "flame thrower" valve for a gas grill.Usually it is one piece and can't be replaced without changing the valve itself. Very few have
the flame thrower detached from the valve and it is fed with an extra gas tube (for example:some Turbo grills).
Flare fitting - This is a type of gas connector with a noticeable concave end which is slanted“male” and goes into a "female" flared fitting. There are two other types of gas connectors: NPT(National Pipe Thread) and standard pipe thread with compression fittings. Hoses arecommonly "crimped" on with a clamp that is squeezed by a machine. These cannot be removedwithout using a hose clamp and that may not be authorized by local gas codes (THE LAW).
Heat plate, flame tamer, flare guard, Lav-A-Grate - These are pieces of sheet metal which,sometimes, are very simple. Other times they can be waffled or bent funny. They are placedover the burners to disperse the heat and protect the burners (somewhat) from the meat fat thatfalls as you cook. They also help as a platform for the grease to burn and smoke flavor themeat.
Igniter (or Ignitor) - This is the part of the ignition system that you push or twist to light the grill.It can be a push button, twist knob, battery or "flame thrower" type that activates when you turnthe control knob to light the grill.

- 69 -LP Gas - Liquefied Petroleum - LP Gas is primarily propane but as with other fuels likebutane which are under pressure, it is kept in bottles. This is so that we can have bottles thatcan be filled (steel) or small bottles that are disposable. The orifice holes are smaller thanrequired for Natural Gas.
Manifold - A central pipe or brass piece that connects the grill valves.
Natural Gas - Natural Gas is Methane (CH4), which is piped to homes and businesses. In gasgrills, Natural Gas requires different drill size holes than LP Gas.
OEM Parts - Original equipment manufactured parts.
Orifice - This is a nut that screws into the end of the valve that goes into the burner. It issometimes called a spud or hood orifice. It always has a tiny hole for the gas to go through thatis sized according to charts that are easy to find on line with a search phrase like (BTU drillcharts). There are no common types of orifice except some use a common 1/8 NPT thread. Theothers are usually special threads. There are no adapters that will connect them to othervalves.
Piezo - This is a type of igniter that is used to light grills. They require a twist of the knob orpushing the button. It is manual and doesn't require a battery.
Pipe thread - This term usually pertains to a NPT (national pipe thread) but could be used inrelation to flared or compression fittings. Always be careful not to CROSS-THREAD, which canruin a fitting (especially valves) I always start a thread by turning counter-clockwise first to besure the male thread is seated right before starting.
POL LP gas connector - The older style connection is used to connect the LP regulator to theLP gas tank (usually a 20 pound tank). This was replaced by the QCC-1 fittings for safetyreasons about 10 years ago. POL connectors are outlawed in many states.
Porcelain coated or porcelain matted - These are two types of porcelain coating for steel andcast iron. The enameled one is glossed and the matted one has a flat finish and might seem tobe uncoated.
QCC-1 LP tank connector - This newer type of fitting is used to connect the LP regulator-hoses to a LP refillable tank. This was brought into use as an extra safety measure ten yearsago and in response to an increasing danger form LP tank fires. As gas grills were becomingcommon, the danger of tank fires increased.
Regulator - A regulator is an aluminum gas fitting about the size of a small fist. It is used tocontrol the gas pressure into the grill valves.
Rock grate - These are grids or grates that use to be universal for gas grills. These grids orgrates sit over the burner with lava rock or ceramic rock. They spread the heat, catch thegrease, provide smoke and protect the burner.
Round and spade connector- These are terms used to describe the wire connectors betweenthe igniter and the electrode. They have a "male" and "female" piece. The spade is flat.
Stainless Steel - This is a type of metal alloy that comes in many grades. People often assumeit means "no stain" but it is only “stain less”. Some grades are magnetic and some are "nonmagnetic", depending on how much nickel or other non ferrous metal is used. The best is the

- 70 -304 grade, but that grade can be more expensive. Stainless Steel will rust and stain, butnot nearly as much as steel or iron.
Thermocouple - A thermocouple is a small metal probe attached to a burner and is connectedby heavy wire to a safety valve. It is used in rotisserie burners.
Venturi - The venturi is a 'tube" that connects the burner to the valve. It is always secured tothe burner. And, with cast iron burners, is sometimes cast with the burner in one piece. Theopen end slides over the valve orifice. It should not go in so far as to cut off the air shutter.

- 71 -Index of Grill Manufacturers
This is the most complete list I have of the grill makers and their website/customer serviceinformation.
-A-
Alfresco Grills - Website: www.alfrescogrills.com
Altima Gas Grills - Manufacturers Tuscany and Sonoma Grills. Website: www.sureheat.com
Amana Gas Grills - Manufactured by Sureheat. Website: www.sureheat.com
American Outdoor - Websites include: www.rhpeterson.com and "aftermarket" sites such aswww.clagrills.com
Aussie Gas Grills - Manufactured by: www.aussiegrills.com (to click on left side index.)"Aftermarket" sites like www.clagrills.com carry parts for Aussie.
-B-
Bakers and Chef - The only website I'm aware of is: www.grandhall.com. Also try"aftermarket" sites like www.clagrills.com.
BBQ Grillware (sold at Lowe's) - Lowe's customer service for grills is 1-800-643-0067. Ibelieve these grills are made by www.bondmfg.com. BBQ Grillware does answer 1-866-869-5300 (as of 11/22/10) and a website shows up in a search engine as www.bbqtek.com(11/22/10) Also try also "aftermarket" sites like www.clagrills.com.
BBQPro Gas Grills - are available through www.nexgrill.net (for model numbers 720-0267 and720-0268) and through www.omahagrills.com (for models starting with BQ-0423-1 as well asothers starting with BQ) Omaha’s phone number is 1-800-933-0527.
Blue Ember Grills – are made by Fiesta which is now owned by www.omcbbq.com Trywww.blueembergrills.com and www.fiestagasgrills.com
Bond Grills - are available at: www.bbqtek.com 1-877-885-8227. They have merged with theLucas Company, who makes the BBQ Grillware.
Brinkmann Grills - Website: www.brinkmann.net. Brinkman makes some Charmglow Grills(model numbers beginning in 810- ) for Home Depot. "Aftermarket" sites, likewww.clagrills.com, have parts as well
Broil King Grills - Website: www.omcbbq.com, or in Canada: www.clagrills.com (available asdealer).Broilmaster grills - Websites: www.broilmaster.com and www.clagrills.com (available asdealer).
Broil Mate Grills - Website: www.omcbbq.com, in Canada. www.clagrills.com (available asdealer).
Bull Grills, Brahma, Steel Bull and Texan Grills - Website: www.bullbbq.com
BBQTEK Grills - Website: www.bbqtek.com or call 1-877-885-8225

- 72 --C-
Cal Flame Grills - Based in California. Website: www.calspa.com or phone 1- 800-225-7727
Calphalon Cooking Essentials - AMG, Greenville, TN.1-800-251-7558 phone number forwww.meco.net (also handles Aussie Grills).
Capital Cooking Equipment - Website: www.capital-cooking.com
Capt'n Cook Grills - was owned by Grills Galore. They were bought out of bankruptcy bywww.grandhall.com. Grandhall also seems to be having problems. Also try "aftermarket" siteslike www.clagrills.com.
Centro -Trileaf Distribution -Toronto, Canada 1-800-251-5463
CFM Corp - Now owned by www.omcbbq.com. They may have some parts for CFM Grills
Char-Broil Grills - Is owned by WC Bradley. Website: www.charbroil.com. Also check"aftermarket” sites like www.clagrills.com.
Chargriller - Website: www.chargriller.com
Charmglow Grills - First made in the 60's by the MHP's Koziol family. They sold it and theCharmglow name went through many owners including Sunbeam. The name is now used (orrented) by Home Depot. You can try Home Depot customer service at www.homedepot.com.You should try finding the model number of your grill first. Model numbers starting with 720(or730) are handled by: www.nexgrill.net. Numbers starting with 810 are handled throughwww.brinkmann.net. Also try "aftermarket" sites like www.clagrills.com.
City Grill - Website: www.outdoorchef.com
Coleman - Website: www.coleman.com and "aftermarket" sites like www.clagrills.com
-D-
DCS - www.dcsappliances.com -888-936-7872 as well as "aftermarket" dealers such aswww.clagrills.com.
Devilbliss - by Sunbeam. Call 1-800-641-2100. Sunbeam has many websites and you'llprobably end up having to call them.
Ducane Grills - Ducane is the company bought out of bankruptcy by Weber. Try the website:www.ducane.com. You will probably have to use "aftermarket" sites like www.clagrills.com forolder parts.
-E-
Easy Chef - I found a manual online showing Empire Products in Montclair, CA 1-800-527-4790. The phone number was answered as “Sierra Products (11/25/10). They might now beEmpire Comfort Systems in Belleville, IL. Also try: www.broilmaster.com
Electrolux - Website: www.fridgidaire.com or phone number 1-800-527-4790. Also try some"aftermarket" dealers like www.clagrills.com.
-F-
- 73 -
Falcon Gas Grills - These grills originated in Texas and were purchased by Arkla Industries inthe 60's and then later sold to Preway. Finally they were owned by Sunbeam who closed theirgrill production 12 years ago. You will have to look at "aftermarket" parts dealers likewww.clagrills.com.
Fiesta Grills - are now owned by www.omcbbq.com. However, they still show the website:www.fiestagasgrills.com. "Aftermarket" dealers like www.clagrills.com also sell some parts.
Fire Magic - Website: www.rhpeterson.com. "Aftermarket" parts are available.
Fisher & Paykel - This company may be the current owner of DCS grills. They show thewebsite: www.dcsappliance.com. The phone number is: 1-888-936-7872.
Four Seasons - Website: www.sureheat.com. Phone number: 1-800-229-5647
Frigidaire - Website: www.fridgidare.com. Phone number: 1-800-320-0859
Fuego - Website: www.fuegoliving.com. Phone number: 1-888-88FUEGO
-G-
GE-Monogram -General Electric. Website: www.gemonogram.com. Phone number: 1-800-444-1845
George Foreman - These grills are primarily electric. But I found a gas grill with this namelocally at a Kroger store that was made by www.omcbbq.com. George mostly shows thewebsite www.salton-maxim.com (this may not be a current site) on the manuals I found. If youhave the OMC made “George Foreman”, those parts have "aftermarket" coverage. And,www.clagrills.com is an OEM dealer.
Glenn Canyon Grills - are all made by: www.nexgrill.com. This company has a habit ofclosing out parts, sometimes in just a few years. Try the "aftermarket" dealers, likewww.clagrills.com, as well.
Grand Hall - Website: www.grandhall.com. Also try the "aftermarket" dealers.
Grand Turbo - was made by BBQ Galore who was purchased by Grand Hall. Also, see"aftermarket" dealers, like www.clagrills.com, who has a small collection of Turbo and CaptCook valves.
Great Outdoors - started as a small grill maker in Missouri about 10 years ago. They werethen sold to CFM Corp in Canada. CFM went bankrupt and was then purchased bywww.omcbbq.com. You can find a collection of the parts at the OMC site. Additionally,"aftermarket" parts are available through www.clagrills.com, which specializes in the older,heavy Great Outdoors original series.
Grill King - The 810-XXX model numbers are made by www.brinkmann.net
Grill Master Grills - were made by Sunbeam for years. Those grills only have "aftermarket"parts available through websites like www.clagrills.com. The name has shown up on stainlesssteel “box" grills (seen everywhere). But those grills are not connected to Sunbeam. You canfind those grills at: www.grillmastergrills.com. 1-478-808-0710.

- 74 -Grill Mate - These grills are made by SR Potten, LTD in Canada. Phone number: 1-514-631-4995. They do answer the phone and still make Grill Mate parts and grills.
GrillPro Grills - are made by www.omcbbq.com. You can find "aftermarket" parts atwww.clagrills.com, who is an OEM dealer.
-H-
Hearthland Grills - These grills are (as far as I can find) wood fired (and offer grills that arefired with pellets). Website: http://hearthlandproducts.com. The company is known asHearthland Products and they are located in Bloomington, MN.
Holland Grills - Website: www.hollandgrill.com
-I-
Igloo - These grills show the company North American Outdoors, Ontario, Canada, The phonenumber is 1-866-626-4745. Additionally they show a support site:www.americancustomerservice.com. Igloo parts are also available through "aftermarket" siteslike www.clagrills.com.
-J-
Jenn Air Grills - These grills were made by 2 companies. CFM made the models starting withJA, and Nexgrill made all the models starting with 720, 730 or 750. CFM is now owned bywww.omcbbq.com. Website for Nexgrill is: www.nexgrill.net . Since Jenn Air is no longercarried by Lowe's, you may have to try an 'aftermarket' site like www.clagrills.com.
-K-
Kalamazoo - Website: www.KalamazooGourmet.com. Phone number: 1-800-868-1699. Alsotry "aftermarket" parts.
Kenmore - Website: www.kenmore.com (which is still Sears). Also try "aftermarket" parts suchas www.clagrills.com. Many companies have made grills for Kenmore.
Kirkland - All the 720-XXX numbers are through the Website: www.nexgrill.com . TheCG107ALP is a www.grandhall.com made grill and the PCA-2600L shows phone number 1-800-305-2557 support number. "Aftermarket" parts are available as well throughwww.clagrills.com.
Kitchen Aid - Website: www.KitchenAid.ca. Phone number: 1-800-807-6777. These grills aremostly sold in Canada.
KMART - Phone number: 1-888-317-7612. Also, try website: www.sears.com and“aftermarket" sites such as: www.clagrills.com.
-L-
Life@home - Loblaw Companies, Canada. Phone number: 1-877-885-8227
Lynx - Website: www.lynxgrills.com. Phone number: 1-888-879-2322. Also available through"aftermarket" dealers like www.clagrills.com.
-M-

- 75 -
Magicater - Website: www.magikitchn.com. Phone number: 1-800-258-3708 and 1-603-225-6684.
Magikitch’n - Same as above
Margaritaville - Website: www.margaritavillecargo.com. Phone number: 1-877-689-2737
Master Chef - This is a Canadian company. Website: www.masterchefbbqs.com. Phonenumber: 1-877-707-5463. Also, "aftermarket" sites like www.clagrills.com.
MasterForge - sold by Lowe's. I found a support phone number: 1-800-643-0067. Some"aftermarket" suppliers show a few parts.
Masterbuilt - Website: www.masterbuilt.com. Phone number: 1-800-489-1581. Located inGeorgia
Members Mark - Several companies make these grills. The model numbers starting with 720-XXX and 730-XXX are made by www.nexgrill.net. The grills starting with B and BQ are made byDongguan Xing Cheng and have a customer service number at 1-800-933-0527. I believe therest of the grills are from www.grandhall.com. Sam’s Club shows a phone number: 1-888-746-7726. Also, check www.clagrills.com.
MHP Grills - are made by Modern Home Products. Website: www.mhpgrills.com. Also,www.clagrills.com is an OEM dealer for these grills.
Minden Grill Company - Website: www.mindengrill.com
-N-
Napoleon - Website: www.napoleongrills.com. This company is in Canada.
NEX - Website: www.nexgrill.com
-O-
Orion - Website: www.orioncooker.com (this may not be a current site). Phone number: 1-866-891-3663
Outdoor Gourmet - Dongguam Xing Cheng Hardware, Phone number: 1-800-933-0527
Outdoors Unlimited - 888-226-9850, www.flemingsalesoem.com
-P-
PGS Grills - Pacific Gas Specialties Corp. Website: www.pgscorp.com
Patio Chef - SR Potten Ltd, Quebec, Canada. Phone number: 1-800-667-7313.
Perfect Flame - Made by several companies. The 720-XXX and the 730-XXX are throughwww.nexgrill.com. I believe all the models starting with G or S are throughwww.suregroup.com. Phone number: 1-866-578-6569. One table top model TT-1001 had aphone number of 1-877-447-4768 and that is for the GHP GROUP. These grills are made forLowe's and a phone number (last checked 6/10) is 1-800-648-0067 Of course, "aftermarket"parts are available through sites like www.clagrills.com.

- 76 -
Perfect Glo - Chino, CA. Phone number: 1-888-287-0735.
Permasteel - is made by: www.charbroil.com
Prochef - I do not believe that these grills are still being made. Parts will have to be boughtfrom "aftermarket" sites like www.clagrills.com.
Profire - Website: www.profiregrills.com, which is owned by www.mhpgrills.com.www.clagrills.com is an OEM parts dealer as well
-R-
Roma - Website: www.outdoorchef.com
-S-
Sears - Of course, try www.sears.com. But you may have to try "aftermarket" dealers likewww.clagrills.com.
Solaire - Website: www.rasmussen.biz. Phone number: 1-800-782-1365
Sonoma - Website: www.sureheat.com. Phone number: 1-800-229-5647
Sterling/Shepard - Website: www.omcbbq.com in Canada. Also, www.clagrills.com is anOEM parts dealer.
Sunbeam - Sunbeam no longer makes grills. You will have to try the "aftermarket" dealerssuch as www.clagrills.com.
Sunjoy - Phone number: 1-866 578 6569 is for Sunjoy Industries. You may end up going to an"aftermarket" dealer.
Sureheat - makes many Lowe's grills (and others). Website: www.sureheat.com
-T-
TEC-Grills - These grills are infrared specialty grills. Website: www.tecinfrared.com. Phonenumber: 1-800-331-0097
Thermador - Website: www.thermador.com. Phone number: 1-800-735-4328
Thermos - Website: www.charbroil.com and "aftermarket" dealers like www.clagrills.com.
Tuscany Grills - Website: www.sureheat.com and "aftermarket" dealers.
Twin Eagles - Website: www.twineaglesbbq.com. Phone number: 1-562-802-3488
-U-
Uniflame - Website:www.uniflame.com and "aftermarket' dealers like www.clagrills.com.
-V-
Veranda - Website: www.masterbuilt.com. Phone number: 1-800-489-1581

- 77 -
Vermont Castings - Website: www.vermontcastings.com. This company was owned by CFMin Canada and they sold it as a result of bankruptcy. "Aftermarket" dealers likewww.clagrills.com carry many parts
Vidalia - Website: www.vidaliagrill.com
Viking - Website: www.vikingrange.com.And "aftermarket" dealers like www.clagrills.com
Vintage - Website: www.excellappliances.com. Phone number: 1-866-357-6420
Virco - Website: www.nexgrill.net
-W-
Weber - Weber is an old American company. Website: www.weber.com. "Aftermarket" partsare also available from sites like www.clagrills.com.
Wolf - Website: www.wolfappliance.com. Phone number: 1-800-332-9513

- 78 -Orifice Capacity Cross Reference
Reprinted with Permission by: www.andersonforrester.com/orifice_capacities/default.html1-800-745-4466