Tab l e o f Co n ten ts - firebasestorage.googleapis.com
49
Transcript of Tab l e o f Co n ten ts - firebasestorage.googleapis.com


Table of Contents
INTROKNEE ABILITY ZERO
STEP 1: THE TIBIALIS RAISEHOWWHY
STEP 2: THE FHL (FLEXOR HALLUCIS LONGUS) CALF RAISEHOWWHY
BUT FIRST: STEP 2B: THE TIBIALIS RAISE... AGAIN!
STEP 3: THE KOT (KNEES OVER TOES) CALF RAISE:HOWWHY
STEP 4: THE PATRICK STEPHOWWHY
STEP 5: THE ATG (ASS TO GRASS) SPLIT SQUATHOWWHY
STEP 6: ELEPHANT WALKHOWWHY
STEP 7: L-SITHOWWHY
STEP 8: COUCH STRETCHHOWWHY
RECAP

INTRO
I can still remember being 4 years old and telling my best friend I wasgoing to save up for a Michael Jordan rookie card. I worked odd jobs,saved every penny, and at age 6 I did it: I bought a Michael Jordanrookie card for one thousand dollars. I had no interest in toys: justJordan.
First thing after waking up each day, I raced to the couch to turn on theTV, but not to watch cartoons...
(From the 1990 video "NBA Superstars")
An F-16 Fighting Falcon appears on the screen.
Michael Jordan enters the tunnel into the arena.
The F-16 approaches the runway, then Jordan steps onto the court.
The F-16 begins accelerating for takeoff, and Jordan begins dribblingdown the court.
The F-16 gets faster. Jordan gets faster! F-16 - Jordan! Back and forththey go, ‘til the F-16 lifts off and Jordan soars into the air for a dunk!
Berlin's "Take My Breath Away" begins to play, and slow motionhighlights of Michael Jordan ensue.
Many hours a day I practiced these dunks on my Little Tike hoop in thegarage. By age 9 I was waking up at 5 a.m. to do vertical jump programsbefore school. Thousands of nights I dreamed of dunking like MichaelJordan. Not once did I dream of lying half-naked on an operating table asdoctors used markers to draw where they were going to cut me open.
Chronic knee pain secretly dominated my life starting at age 12. Iremember during a fire drill at school being worried that if a real firebroke out, I'd be the last one out. Unless I was warmed up, I couldn'teven run, and I had to go up and down stairs very slowly to avoid thepain.
By 14 it was not so secret: My teammates and coaches nicknamed me"Old Man" because my knees were so stiff. I finished high school withscars on my knee, not even close to dunking a basketball, and with nocollege coaches interested in giving me a scholarship.
I recall the moment it hit home that my dream of being a basketballplayer had not succeeded. I had a real decision to make: What would Ido with my life now? Would I choose a logical career and forgetbasketball, or would I devote my existence to figuring out how tobulletproof my knees?
I chose the latter. I began painting walls during the day to make moneywhile I studied and experimented with how to fix my knees.

A year went by with no results. In fact, I was certain I needed anothersurgery when a spark of truth finally presented itself...
"The athlete whose knees can go farthest and strongest over his or hertoes is the most protected."
Everything I had been taught up to this point by dozens of trainers andphysical therapists was very clear: NO KNEES OVER TOES - but when Iread this statement, I immediately knew it was true.
I scrambled on the internet looking for examples of this, and the firstvideo footage I found was from Australian Strength Coach KeeganSmith, a student of Charles Poliquin. I became a student of Charlesmyself, and learned enough to get my knees to the point where I couldplay basketball with manageable pain.
At age 21, I beat the odds and signed a college basketball scholarshipwith an up-and-coming coach named Jeremy Shulman. He was the onlycoach who gave me a shot, and I repaid him by becoming the startingpoint guard for his team and helping him win two straight conferencechampionships in one of the strongest community college divisions in thenation.
At age 23, I received a full-ride scholarship offer from Boston University.From unrecruited in high school to Division 1 scholarship, local kids backhome were reaching out to have me train them whenever I was in town.No one had ever heard of such a story, and people wanted to know how Ihad pulled it off.
Little did I know, an NCAA rule allowed only 5 years of eligibility to playsports after graduating high school, and my time was up. I assembled allmy medical records, and Boston University appealed the ruling, but onceagain I was denied. It was suggested that I get a lawyer and fight thedecision in time for the start of the season, but I knew it was meant to be:My purpose was to follow the clues I learned from Charles Poliquin, andsee what I could achieve with knees over toes.
Fast forward to today. At 30 years old I have the abilities I alwaysdreamed of: I can DUNK, and not just a little bit. I've now trained manyNBA players and it is still surreal for me, as a 6'1 guy who grew upunable to grab the rim, to teach 6'6"+ NBA players how to improve theirdunks, and physically demonstrating the precise next dunk which wouldimprove their game but which they cannot do yet, thanks to the system ofknee training you are about to learn.
More importantly, the following formula puts the longevity of my knees inmy hands, so now I’m looking forward to a very different future than mygenetics and injury history indicated. My son turned 1 year old inSeptember, and I’ve got a new dream: To still be able to dunk when hecan dunk, too. Knee Ability gives me the tools to preserve my knees so Ican be dunking in my 40s and help my son dunk despite genetics that

wouldn’t naturally get him there. The ultimate thrill is no longer dunkingwith studs, but having my son dunk with me.
And here’s how that’s going to happen.
KNEE ABILITY ZERO
Knee Ability Zero is a program which requires zero weights, zeroequipment, and zero special abilities to start. You can read, study thepictures, and follow right along! I will teach you how to perform eachexercise with written explanations and visual demonstrations. You will dothe exercise, then come back to your book and read the "Why" behindthe exercise.
STEP 1: THE TIBIALIS RAISE
Tutorial VideoTroubleshooting Video
Your tibialis anterior muscle is on the front of your lower leg. It acts bothto flex your toes up, and to decelerate your foot when you walk, stoprunning, jump, etc., which you will see examples of when you get to the"Why" section for this exercise:
HOW
Find a wall and make sure you have safe footing (no socks or slipperyfloor).
Put your butt against the wall, and stand out a comfortable distance, withyour legs straight:

Now, without letting your knees bend, flex your toes up and hold the topposition for 2 seconds before lowering back down:
To make the exercise easier, simply stand closer to the wall:

To make the exercise harder, stand farther from the wall:
Perform 25 consecutive reps, pausing 2 seconds at the top of each rep,and 2 seconds at the bottom of each rep, monitoring difficulty as you go.You may need to stand closer to the wall as your muscles burn out, orfarther from the wall if you are feeling no challenge.
If you feel a significant burn by the end of the 25 reps, and no knee pain:
YOU JUST PUT MONEY IN THE BANK FOR YOUR BODY!
This is the beauty of Knee Ability: it is a program of pain-free ability,where our goal is never a win/lose situation, but rather degrees ofwinning only. Let's look at why that is...

WHY
You use your tibialis with every step you take:
When you play sports and decelerate or jump, you may put thousands ofpounds of force into this muscle, and whatever force is not handled bythe tibialis goes directly up to your knee:
Look familiar? Yet no study has ever been done on strengthening thismuscle.
The tibialis is the decelerator of your foot, and your foot is your first pointof contact, thus:
YOUR TIBIALIS IS YOUR FIRST LINE OF DEFENSE AGAINST BOTHCHRONIC AND ACUTE LOWER BODY INJURIES.

No matter how great I got at the direct knee exercises you will learn asyou continue reading, I still suffered from foot pain, Achilles pain, nastyshin splints, and "mystery" lower knee pains.
I recall that at my worst, my foot and lower leg pains were so bad, Iwould wake up in the morning and wonder, "Will today be awalking-to-the-bathroom morning, or a crawl-to-the-bathroom morning?"Sometimes the pain was too great to bear the load on my feet.
You see, coming from such weak knees, and then jacking up my kneestrength so dramatically, I was capable of producing far more force thanmy lower leg muscles had handled throughout my life. By reverseengineering this situation, I soon realized the tibialis was the missing linkin my regimen, and I was overjoyed when I found that transforming thismuscle took my knees to the next level of ability!
For example, prior to the Tibialis Raise, I had achieved the ability todunk, but only when I jumped off two feet. When I did a one-foot jump, Igot nowhere near as high, and was prone to debilitating foot, shin, andknee pains, which prevented me from trying. Not long after making theTibialis Raise a standard part of Knee Ability, I was dunking off one footwith ease. All these lower extremity pains disappeared - and never cameback.
If you look at your body logically, the Tibialis Raise would be the firstplace to start, regardless of what physical issues you may be having.
Last tip: Make sure you realize your shoes' heel height affects thedifficulty of the exercise: the higher the heel, the harder it is, and thelower the heel, the easier it is.
STEP 2: THE FHL (FLEXOR HALLUCIS LONGUS) CALF RAISE
Tutorial VideoTroubleshooting Video

The flexor hallucis longus is a powerful muscle which runs all the wayfrom your big toe to your mid-calf. It helps stabilize your ankle whenweight is on the ball of your foot, and it is particularly important whenforce goes through your big toe. Hallucis is a Latin word meaning "of thebig toe," so flexor hallucis longus simply means "a long muscle thatflexes your big toe."
HOW
As soon as you finish your 25 Tibialis Raises, turn around, put yourhands against the wall, and back up until your ankles are under enoughstretch that your heels come slightly off the ground:
Without bending your knees or hips, raise up until your weight is on yourbig toes:

If this is too difficult, you can stand closer to the wall, or even useassistance:
Perform 25 reps to the best of your ability, adjusting closer as necessary.
While the Tibialis Raise is likely to be very tough at first, the FHL CalfRaise is more likely to be easy, since the muscles involved are not quiteas neglected as the tibialis. To perform one leg at a time, simply wrap theother leg around, which puts even more stretch into the ankle, and moredifficulty into the flexor hallucis longus:

If 25 reps with two legs is easy, but with one leg is too difficult to performwithout a break, simply stop at a number that challenges you, then matchthat number with your other leg, and return to your original leg, goingback and forth until all 25 reps are complete. For example: 10 left leg, 10right leg, 7 more left leg (total is at 17 now), 7 right leg, 5 left leg (total isat 22), 5 right leg, and finally 3 more each leg for a total of 25 each side.
WHY
In doing Knee Ability, you’re going to be putting stimulus into your legswhich may allow you to withstand more force at your knee joint. This is agreat thing! However, this means you may unwittingly be putting moreforce into your feet as a result. For example, let's say you can jump 20inches high, and after a year of Knee Ability, you can jump 30 incheshigh. That’s awesome, of course, but I do not want you to end up withfoot pain, ankle pain, Achilles pain, or shin splints as a byproduct.
Also, your foot itself is the first line of defense for your knees whendecelerating, as we saw with the Tibialis Raise, and in the case of theflexor hallucis longus, the same is true when landing:

We know from research that whatever force is not absorbed by the ankle,goes into the knee:
Of course we’re seeking to improve your KNEE ability, but it makes mostsense to also improve the areas which prevent excess knee strain in thefirst place, and the tibialis and flexor hallucis longus are the first of theseareas.
In a traditional calf raise - which I am a fan of, by the way - it is simply notpractical to ensure the pressure goes through the big toe, and that’s why

I gravitated to this FHL Calf Raise. I’m sure many coaches throughouthistory have used similar exercises, but I was never taught anything likeit, and I wanted to use a name that would help you understand itspurpose.
Also (and this is quite important relative to your knees): the FHL CalfRaise locks in more ankle stretch than a traditional calf raise. For yourknees' sake, it is your ankle mobility itself that’s a major player, and theFHL Calf Raise is the better tool than a regular calf raise for this job. Justahead, you'll see how the FHL Calf Raise smoothly progresses you intoStep 3:
BUT FIRST: STEP 2B: THE TIBIALIS RAISE... AGAIN!
The Tibialis Raise is so important, you are going to immediately switchback around from the FHL Calf Raise and perform another 25 reps, withthe same protocol you did in Step 1.
STEP 3: THE KOT (KNEES OVER TOES) CALF RAISE:
Tutorial VideoTroubleshooting Video
The knees over toes calf raise is the first exercise in Knee Ability Zerowhich directly improves the ability of your knees when they are over yourtoes. However, it’s not actually your knees that will be creating themotion: it is still your ankles that will be lifting you up and down, whileyour knees will simply hold your pain-free level.
By measurably addressing the ability of your ankles to handle whateverload your knees can, we complete a perfect foundation so that your kneegains not only result in improved knee function, but also in improved foot,ankle, Achilles, and lower leg function! While Knee Ability has the mostknown success stories for knees, it also has a multitude of successstories for what lies below!
Let's look at this final progression before directly addressing your kneemovements themselves:
HOW
Stand about an arm’s length from the wall:

Now gradually reach your knees over your toes to a comfortable level.Ideally, this will be far enough that your heels actually lift slightly off theground:
It is totally fine if you can’t bend your knees much at first, and you are stillon the route to success no matter what level you start at, becausestrength "radiates" 15 degrees, meaning: If you get strong at one angle,you can recover back stronger not only at that angle, but also at another15 degrees of bend! For example, a minimal bend such as this (below),would still be productive:

Do not criticize your current level, and realize that wherever you fall shortnow only means you could feel that much better by patiently progressing!
From your pain-free level of knee bend, simply flex your ankles up,without any motion other than your ankles. Your knees, hips, andshoulders should be as still as a statue, while your ankles lift you up anddown:
Just like Tibialis and FHL Calf Raises, once it’s easy to perform 25consecutive reps with full ankle bend (to the point your heels comeslightly off the ground at the bottom), you can begin rebuilding one leg ata time! This puts even more load into your ankle mobility, and into thestrength of your knee to hold the position:

Like the Tibialis and FHL Calf Raises, if 25 in a row with two legs is easy,but with one leg is too difficult, simply count your reps on one leg untilburnout, then match on the other leg, then switch back to the original leg,and so on, until you reach 25 on each side. 25 perfect single-leg reps isyour long-term goal.
WHY
I got lucky on this exercise, and unwittingly solved two problems at once:
Problem 1 was the need for a no-equipment solution for your Achilles.You have two calf muscles: a gastroc (think "belly" of the calf) and asoleus, which is lower and deeper:
Your Achilles tendon looks pretty big, huh? Yep: It's the biggest tendon inyour body! It is a very interesting phenomenon when you realize that asyour muscles get smaller, your tendons get bigger. For example, yourglutes are huge compared to your calves, but your gluteal tendons aresmall compared to your Achilles!

Thus: Your hips are your biggest source of power, while your ankles areyour biggest source of springs. The knees are left in the middle - aperfect balance of both springs and power (or PAIN, as they are subjectto ramifications from both your ankles and your hips - ouch!).
Your soleus is more directly related to your Achilles health than yourgastroc is, but your soleus is not worked as much as your gastroc in atraditional standing calf raise. Fortunately, a bent-knee calf raiseprioritizes your soleus and handles this issue.
For this reason, my gym used to be full of seated calf machines. Yourgym has a row of bench presses; mine had a row of seated calfmachines!
Before long my gym was overrun. I was working from 4 a.m. to midnight,seven days a week, with no days off for multiple years in a row. Morepeople needed my help than I was capable of helping in person, so Idecided to become an online coach and take more responsibility.
I quickly ran into the problem of what to do if your gym does not have aseated calf machine, and through much trial and error, the KOT CalfRaise was born. Little did I know at the time, I had also solved the bridgebetween ankle exercises and knee exercises!
In Step 4, you will directly address your knees, and in most cases thisworks just fine. However, the KOT Calf Raise already starts puttingmoney in the bank toward your knee ability, so your progress will besmoother. In very sensitive cases, we have an option that strengthensthe knees without even risking any painful movement, since you canmonitor exactly how far you reach your toes.
Before we go on, you should know that your body relies particularlyheavily on your ability in the KOT Calf Raise when putting all your weighton your leg to push off in a sprint, as well as in the rear leg just beforejump takeoff, and again upon landing:
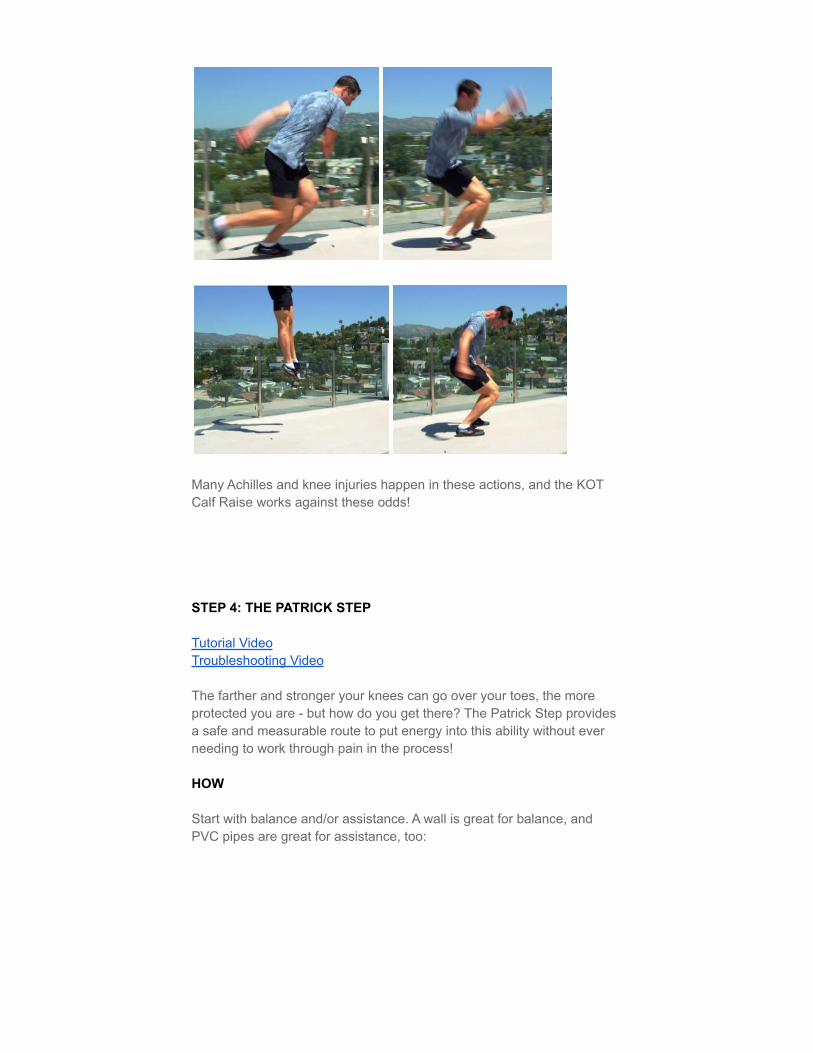
Many Achilles and knee injuries happen in these actions, and the KOTCalf Raise works against these odds!
STEP 4: THE PATRICK STEP
Tutorial VideoTroubleshooting Video
The farther and stronger your knees can go over your toes, the moreprotected you are - but how do you get there? The Patrick Step providesa safe and measurable route to put energy into this ability without everneeding to work through pain in the process!
HOW
Start with balance and/or assistance. A wall is great for balance, andPVC pipes are great for assistance, too:

Now reach the inside foot forward, and slowly lower the heel to the floor:
Pause fully to ensure you don't bounce in order to get momentum, andraise back up:

Understand you are fully in control of how much you work your knee overyour toes, by how far you reach the inside heel:
Notice how the farther you reach, the more your knee has to bend! Yourend goal is actually to go until your ankle cannot bend anymore withoutletting your inside heel touch the floor, thus requiring your knee tosupport your full weight, to full ankle bend:

Being able to perform 25 consecutive reps to full ankle bend helpsprepare for the fifth movement of Knee Ability Zero, but there is no rushto get to this level, and it is very important to never, ever work throughpain. Use the following rule:
PAIN = DESTRUCTION
Your body uses pain to communicate to you, and by acknowledging thistwo-way communication, you can actually handle the source of your painrather than just trying to "shut up" what your body is saying to you. Wewill go into more detail on this in a later section of the book whichaddresses the following things, but realize that ice, painkillers, etc., areexamples of your knee trying to talk to you, and you saying, "Shut up,Knee!" If someone in real life has a problem with you and you tell them toshut up, it may handle the problem temporarily, but has a higherlikelihood of coming back to be an even bigger problem. Your knees areno different!
On the other hand, if you feel burning in your muscles on this exercise,rather than pain inside the joint, you’re stimulating greater protection foryour knee, giving us the following counter-rule:
PAIN-FREE MUSCULAR BURN = CONSTRUCTION
WHY
While long-term strengthening of a reverse stepping motion itself hasnever been tested, we do know that there is pressure on your knee jointwhen your knee goes over your toes, and whatever your muscles cannothandle, must go somewhere - your knee joint itself!
So with the Patrick Step, we have a scalable way for you to put energyon this ability without ever working through pain.
My final usage tips are:
1. Always start on the non-dominant side, if you have one. Over time youmay become balanced to the point that each side feels the same, but ifyou’re aware of one side being more difficult, it’s important to start on thisside, paying careful attention to its ability, and then only matching thisability on the dominant side. If you started on the dominant side, youmight go farther than you can with the non-dominant side, resulting in theimbalance continuing, or perhaps working through pain in an effort tokeep up.
2. While not mandatory, you may even perform an additional set of 25reps on the weaker side, giving your body a 2:1 ratio of weaker tostronger. However, do not continue this long-term, as we don’t want tocreate an imbalance the other way around. Keep in mind that thestronger side will only be going as far as the weaker side could, so whileit will be stimulated compared to not training at all, it won’t be stimulatedas hard as the weaker side, so the weaker side will be able to catch up.

This weaker-stronger-weaker approach may simply accelerate theprocess.
Don’t worry, though, if you have an imbalance. Rather, look at thissituation optimistically. Whatever you feel like now, you’ll feel that muchbetter once you’re balanced, and you will be even more athletic as aresult!
STEP 5: THE ATG (ASS TO GRASS) SPLIT SQUAT
Tutorial VideoTroubleshooting Video
This is my personal favorite exercise, because I know if I did only thisone exercise for the rest of my life, I would still live in the upper 1% ofknee quality life.
Everything you have done to this point helps prepare your ankles andknees for the ATG Split Squat, but an added factor of hip flexor lengthenters the equation, so first understand that while I want you toeventually be able to perform this exercise on flat ground, you may haveto initially use a step. Notice the difference in hip flexibility:
(more hip flexor length)
(less hip flexor length)
(the hip flexors are in bright red)

With continued Patrick Step to be able to handle your full weight, plusfront foot elevation to compensate for flexibility limitation, the majority ofpeople I have coached have successfully gotten into this exercise withoutpain. However, there’s still one final option for regression, which is usingsomething for assistance:

If front foot elevation plus assistance still doesn't allow you to get into thisexercise pain-free, it is simply too much, too soon. Continued work onthe previous four exercises, plus the exercises after this step, havegotten such trainees there in relatively short time.
HOW
The first step - no pun intended - is establishing how long your step is.People have varying leg lengths and varying degrees of flexibility -fortunately, this is not something I have ever found the need to measure.You simply play with your foot distance until you have perfect form, andeventually it won't take any thinking about.
Too close of a step does not allow enough depth, and thus prevents fullcoverage:
While too long of a step does not allow enough knee over toes, and thusprevents full coverage:

The right step distance allows the front hamstring to fully cover the calf,with perfectly upright torso,

with back toes still pressed - NOT rolling over,
and with back knee NOT touching the floor.
Lower down slowly, fully pause in the bottom position, rise back upwithout altering posture, and repeat!
Perform 5 sets of 5 reps per side, back and forth, taking up to 30seconds between sides if you feel you need a break.

WHY
Full knee bend is a desired quality, but no studies have been done ontraining this ability one side at a time.
In the real world, the overwhelming majority of us have imbalanced legsand knees, and thus receive negative ramifications from bilateral (twolegs) squats: any difference between sides manifests when you squatwith two legs, leaving the weaker knee vulnerable, or worse: causing youto favor the stronger knee, and thus making the imbalance even worse!Enter: the ATG Split Squat.
The tighter the hip flexors, the more pulled forward we get. The modernlifestyle of excessive sitting doesn’t help, and bilateral squats don’t fixthis, whereas ATG Split Squats do:

In fact, I maintain my splits from this exercise alone for the hip flexors,plus one stretch for the hamstrings (The Elephant Walk: Step 6 ahead):

Once you can get into good, flat ground ATG Split Squats, you’re aheadof the game and have a chance to stay out of the trap forever! I advisegetting this ability and never losing it! My mother is 67 years young andshe has patiently worked her way to flat ground ATG Split Squats. Sherecently ran a half marathon and I was waiting there at the finish line,hoping she would be okay... "That was easy!" were the first words out ofher mouth!
(Even Momma better have perfect form)
I've personally done over 10,000 ATG Split Squats, and I've nowcoached over 10,000 ATG Split Squats in-person and online. It is the giftthat keeps on giving.
At this point, we have paved a route for amazing ability in our knees…

...and with pain-free knees, anti-gravity and bulletproofing goals becomeso much easier to achieve...

...but our training session doesn’t end there!
STEP 6: ELEPHANT WALK
Tutorial VideoTroubleshooting Video
This is the first of the "accessory" exercises in the Knee Ability Zeroformula. Everything we have done to this point directly contributes to youbeing able to handle more force through your leg muscles, but you canonly use the muscles that extend your knee (the quads) to the degreethat the muscles which flex the knee (the hamstrings) can stretch:

HOW
The test of adequately flexible hamstrings is the ability to have yourpalms on the floor without bending your knees:
If this position looks tough, remember that my nickname used to be "OldMan," and at the worst of my knee problems, even my toes looked likethey were a mile away from me!
By starting with your hands farther out (you can even lift up on yourfingertips, or use a box or step to elevate), with knees bent, and thenextending one leg at a time, you can get twice the load of a regularhamstring stretch:
(Farther out, on fingertips)

(You could even lift up with a box, step, etc.)
(Extend one leg)
(Bend again)

(Extend the other leg)
When you can comfortably extend each leg, you can back up farther.Over time, this will continue all the way until your palms are on the floor,in front of your toes:

Perform 30 reps per side, being sure to keep breathing throughout theset.
WHY
Once a foundation of Knee Ability Zero is laid, I then gradually addequipment and load in my “Dense Strength” program. This includestraining your hamstring strength multiple times per week. A palms-to-floorElephant Walk, or moving your way closer to it, helps me ensure thatyour hamstrings will have a nice balance of flexibility when we startaddressing their strength.
STEP 7: L-SIT
Tutorial VideoTroubleshooting Video
With greater leg power comes greater responsibility! No matter howstrong your legs are, you still have to pick them back up when you walk,run, etc:

Your hip flexors aren't prominent "mirror-muscles," so have lost much ofthe attention to the "6-pack:"
As you can see, the hip flexors are made up of a number of smallermuscles, attached from the spine itself (your hip flexors are linked closelyto lower back pain!) and extending all the way down your mid-thigh.
Interestingly, the hip flexors have more strength potential than your abs,and since they work along with your abs, they might just be the weak linkthat’s holding back your core potential! I don’t do any traditional "core"exercises, and my abs are getting by alright. I’m a pale guy, but a goodphotographer, my 6-pack ain’t half bad...

In my style of training, the goal is not to "neglect" your abs, but rather totrain them from the feet, ensuring your hip flexors never lag behind!
HOW
The measure of your hip flexors being up to par is simple: Can you holdyour body off the ground?
There are three levels of progression to this point:
Level 1 is just holding one leg off the ground at a time, for a two-count:

Leaning back reduces difficulty:
Leaning forward increases difficulty:

Set a timer and go back and forth for 60 seconds.
Level 2 is the same drill, but holding your butt off the floor as well! Alsofor 60 seconds:
When you go back and forth for 60 seconds with your butt off the floor,you can probably do Level 3: a full L-Sit!
At this point you are in the upper 1% of humans, but you could go evenfurther by setting a timer and seeing how long you can hold. Holding for30 seconds straight is getting closer to world-class, but I would not stopyou from holding even longer!
Like most exercises of Knee Ability Zero, I suggest doing one set everyother day, to ensure fullest recovery.

WHY
Let us break this down into 3 reasons, since each is quite different:
1. In relation to your knees, we know there is success waiting for us byaddressing the muscles which function to withstand force at your ankleand knee joints, but we also know that in doing so, we may experiencesome degree of muscle growth in these areas. I have never observedthis to be excessively heavy, but this is weight that must be accountedfor. If I’m going to make your ankles and knees stronger, I must makeyour hip flexors stronger so that your legs feel just as light, if not lighter,and are not subject to hip flexor strains due to imbalance. This brings usto point number 2:
2. The hip flexors are the biggest difference between regular humansand elite sprinters, and there is no doubt that many of my clients want torun faster: from competitive distance runners to NFL players with millionsof dollars on the line based on their speed, to dads who just want to beable to enjoy sports with their kids without tweaking something. For mepersonally, even after I had the leg power to dunk, I still lacked top-endspeed, meaning: I had powerful explosion, but once I built up to myfastest, I couldn’t hold onto it for very long, and I lacked the last gearneeded to be as fast as the pro basketball and football players I wastraining.
Fast-forward a couple years of hip flexor training, and my speed is nowon par with the average NFL defensive back! In high school I famouslyran a 6-second 40-yard dash. My coach thought his stopwatch wasmalfunctioning, and he made me run it again. After a second 6-secondtime, he made me take off my shoes to prove I didn't have weights inthem. For the record, I really like this coach, but I think he was in shockand didn’t know how to handle a 6-second 40. My speed tormented mefor years, and one of my worst fears in life was a footrace, but notanymore! Now, my speed on the basketball court is one of my greateststrengths, and I look back just amazed that out of the dozens of trainers Iwent to, no one ever made me confront my weak hip flexors.
Here’s me at age 16…
Start of a fastbreak, right?

Think again!
I was simply slower than everyone else on the court. Now when I play,my speed is my greatest weapon! And thanks to Knee Ability, I can runand jump as hard as I want without thinking about my knees.
3. Lastly, I think of stronger hip flexors as long-term knee bulletproofers,because they lead to less wear and tear over the course of seasons,years, and life. When your hip flexors are weak, you have to thud harderalong the ground to get from point A to B than your body was naturallydesigned to do. Squats, deadlifts, etc., train the ability of your hips toextend, but the fastest guys I’ve trained also have elite hip flexorstrength. Since hip-flexor strength isn’t a commonly taught andmeasurable thing, like squats and deadlifts are, I’ve encounteredcountless athletes who are still slow despite getting as “strong” as thefast guys. Fortunately, as the hip-flexors and other key speed areascome up, I have seen over and over again that these slow athletes canbe fast, because: If you can get strong in one area, you can get strong inanother!
Conclusion: Hip extensors are sexy and powerful, but hip flexors areoften the reason that hard-working athletes remain slow, and you’readding unnecessary long-term pain and injury to your feet, ankles,

Achilles, shins, and knees to the degree that your hip flexor-to-extensorratio is busted.
This ain't rocket science, but it IS science. You must confront the biologyof your knees and the rest of your body if you want to maximize not onlyyour genetic potential for anti-gravity and bulletproofing, but also yourquality of life for the long haul.
If you rely on where exercise science has put its money, you are subjectto its errors. It doesn’t matter what the findings are if it’s not looking fairlyand accurately to begin with!
We are still humans. We are still fragile. Every day, though, we’re seeinglife-changing wins become the norm just by training according to physicsand biology through the methods in this book. Something can be doneabout soaring pain and injury statistics, and they can and will come backdown to more manageable levels.
STEP 8: COUCH STRETCH
Tutorial VideoTroubleshooting Video
For knee tendon freedom, I highly advise achieving and maintaining theability to have your shin and shoulders against a wall:
HOW
For some, the ankle itself may be too tight to start against a wall, but achair’s lower seat allows you to begin. This appears to be the reason forthe name "Couch" Stretch:

Always use thick padding under the knee. You may be more comfortablewith even more than I’m using in the picture.
When this gets easy, you can gradually work against the wall as follows:
1) Start sideways in order to easily have your knee close to the wall:
2) Then spin around and lean forward so that you can easily slide yourback foot up the wall:

3) From here, you can work your hands up your front thigh and then toyour hips, thus increasing the stretch (as you are able to comfortably):
4) Your long-term goal is shoulders to wall, and from there, I want you toget comfortable actually contracting the glute on that side:

Perform 60 seconds per side, being sure to work only at a level you canrelax and breathe without pain.
WHY
When the quads and hip flexors are tight, they pull the kneecap upward,making you more likely to experience pain in the patellar tendon below:

Also, your quads and hip-flexors are the direct opposing muscles to yourhamstrings and glutes, which you rely on heavily when you sprint andjump…

It’s also worth reminding you that your ATG Split Squats a) improve yourhip flexor length, and b) improve your quad strength - so the better youget at the ATG Split Squat, the more comfortable and fruitful your CouchStretch efforts will be.
Strength and flexibility adaptation take time, so acknowledge yourself forevery 1% you get better, and you will soon find yourself waking up to adifferent reality, without ever working through pain in the process.
That marks the end of the Knee Ability Zero formula!

RECAP
3 times per week:
Step 1: Tibialis Raise: 25 reps
Step 2: FHL Calf Raise: 25 reps
Step 2B: Tibialis Raise (again): 25 reps
Step 3: KOT Calf Raise: 25 reps
Step 4: Patrick Step: 25 reps, but you can perform an extra set if youhave a weaker side, until balanced
Step 5: ATG Split Squat: 5 sets of 5 reps per side with 30 second breaksbetween each
Step 6: Elephant Walk: 30 reps per side
Step 7: L-Sit: 60 seconds
Step 8: Couch Stretch: 60 seconds per side
Yours in Bulletproofing,Ben