TAA Moses Training Manual for Career Center Staff | Mass.gov
195
Trade Adjustment Assistance MOSES Training Manual For Career Center Staff 2018 Charles Baker, Governor Karyn Polito, Lieutenant Governor Rosalin Acosta, Secretary EOLWD Alice Sweeney, Director DCS
Transcript of TAA Moses Training Manual for Career Center Staff | Mass.gov

Trade Adjustment Assistance
MOSES Training Manual For
Career Center Staff
2018
Charles Baker, Governor
Karyn Polito, Lieutenant Governor
Rosalin Acosta, Secretary EOLWD
Alice Sweeney, Director
DCS

Trade Career Center Staff Training Guide
Trade Career Center Staff Training Guide
Table of Contents
CHAPTER 1: TRADE PETITION RECORD ................................................................... 4
Search for a Trade Petition Record ...................................................................................................... 4 Search for a Closing / Layoff Record ................................................................................................... 9
CHAPTER 2: VIEW A TRADE PETITION RECORD .................................................... 14
View Petition and Petitioner Information ............................................................................................ 14
CHAPTER 3: SEARCH FOR JOB SEEKER TRADE RECORD .................................. 18
Search for Job Seeker Trade Record................................................................................................. 18
CHAPTER 4: JOB SEEKER TRADE RECORD ........................................................... 23
TAA Eligibility Application (1666) ....................................................................................................... 23 Trade Readjustment Alloances (TRA) Records ................................................................................. 34 Waiver from Training Record ............................................................................................................. 35 Deadline Extension Record ................................................................................................................ 41 Training Record .................................................................................................................................. 52 Benchmark Record ............................................................................................................................. 83 Reemployment Trade Adjustment Assistance (RTAA) and Alternative Trade Adjustment Assistance (ATAA) Record ................................................................................................................................... 87 Job Search Allowance Record ......................................................................................................... 105 Create a Relocation Allowance Record............................................................................................ 132 View a Hearing Record .................................................................................................................... 153 View Data for Health Coverage Tax Credit (HCTC) ......................................................................... 157
CHAPTER 5: EMAIL NOTIFICATIONS ...................................................................... 160
TAA Eligibility Application (1666) Determination Status Email Notification...................................... 160 RTAA / ATAA Determination Status Email Notification .................................................................... 162 Job Search Allowance Determination Status Email Notification ...................................................... 163 Relocation Allowance Determination Status Email Notification ....................................................... 164 Course Determination Status Email Notification .............................................................................. 165 Training Waiver Determination Status Email Notification ................................................................. 166 TRA Determination Status Email ...................................................................................................... 167 Petition Status Email Notification ..................................................................................................... 168
CHAPTER 6: TRADE REPORTS ............................................................................... 169
Trade Reports ................................................................................................................................... 169
CHAPTER 7: ICONS .................................................................................................. 180
Trade Icons ....................................................................................................................................... 180
CHAPTER 8: WORD TEMPLATES ............................................................................ 184
View Trade Forms ............................................................................................................................ 184

Course: Trade
Trade Career Center Staff Training Guide 4
Chapter 1: Trade Petition Record
Search for a Trade Petition Record
Overview To view data related to a Trade petition. Users access the Trade Petition Search screen by selecting Program from the MOSES Main Menu, selecting TAA, then selecting TAA Petitions.
The Trade Petition Search screen lets you search the MOSES database directly for Trade Petition records by selecting the Petition ID, Federal Petition No., FEIN, Employer Name, Employer ID, or LWIB.
Security Users with Trade Admin, Trade Staff, and Trade View Only permission can access this screen. Only Trade Admin users can add or edit data for trade petitions. Key Process Points to Remember Trade Petitions are submitted to the state Trade Unit at the Department of Career Services (DCS). The DCS Trade Unit would receive Trade Petition applications via email, mail or fax and enter the Trade Petition application via MOSES. The original form will be filed with the DCS Trade Unit. DOL conducts an investigation and issues a decision. The determination will be tracked via MOSES, notification letters sent to each affected worker are tracked via MOSES. Notifications like the legal notice will also be tracked via MOSES. Each Trade Petition
Course: Trade
Trade Career Center Staff Training Guide 5
has a related Federal Petition Status (Petition Filed, Pending, Certified, Denied, or Withdrawn). A daily email notification will be sent to the Career Center Managers / Staff Users summarizing petitions that are submitted, certified, denied, or withdrawn. After completing this lesson, you should be able to:
Locate a Trade Petition record by employer name
View closing / layoff record via Trade Petition Module

Course: Trade
Trade Career Center Staff Training Guide 6
Locate a Trade Petition record by employer name
1. Click Program on the MOSES Main Menu, select TAA, then select TAA Petitions to open the Trade Petition Search window.
2. Select the employer name radio button and enter an employer name in the
Search Criteria text box.
3. Click the Search button. MOSES locates the trade petition records by the employer name and displays the results in the Search Results window.

Course: Trade
Trade Career Center Staff Training Guide 7
4. Select the Trade Petition record from the list. Click Edit, hit the Enter key, or double click on the trade petition record. The Trade Petition Details window for that trade petition record appears. The first tab, Petition Info, is displayed.
The Send to UI box should be checked off in order to create the TAA Petition certification in UI Online at the Department of Unemployment Assistance (DUA). The DCS TAA Unit would be the ones to check this off.
5. Review data for the existing trade petition record.
6. Petitioner Information Tab may contain information that is to be held confidential.
View closing / layoff record via Trade Petition Module
1. (Continued from above) Highlight the record in the Closing / Layoff Information group box. Click the Go To button.

Course: Trade
Trade Career Center Staff Training Guide 8
2. You are taken to the Rapid Response module with the Closing / Layoff tab selected.
3. View the information for the closing / layoff record.
4. Click the Cancel button to close the window and to view the Petition module again.

Course: Trade
Trade Career Center Staff Training Guide 9
Chapter 1: Search for Trade Petition Record
Search for a Closing / Layoff Record
Overview After you have located your trade petition record in MOSES, you may also want to review the closing / layoff records that are associated with the Trade Petition record. The closing / layoff records are located in the Rapid Response module of MOSES. Users access Rapid Response by selecting Program from the MOSES Main Menu, then selecting RR.
The Closing / Layoff Search window lets you search the MOSES database directly for closing / layoff records. Security Users with the appropriate security privileges may access this screen. The security permissions that are needed to access Rapid Response are RR Admin, RR Staff, or RR View Only. In order to be able to add new closing / layoff records, users will need to have at least the RR Staff security permission. Key Process Points to Remember Trade Petition users should review closing / layoff data in the Rapid Response module to understand the closing / layoff record that is associated to the trade petition record. Trade Petition users can access the Rapid Response module that displays the closing / layoff record via the Petition Info tab. Users can click the Go To button in the Closing / Layoff Info group box. After completing this lesson, you should be able to:
Search for a closing / layoff record to review Rapid Response data
Course: Trade
Trade Career Center Staff Training Guide 10
Search for a closing / layoff record to review closing / layoff data
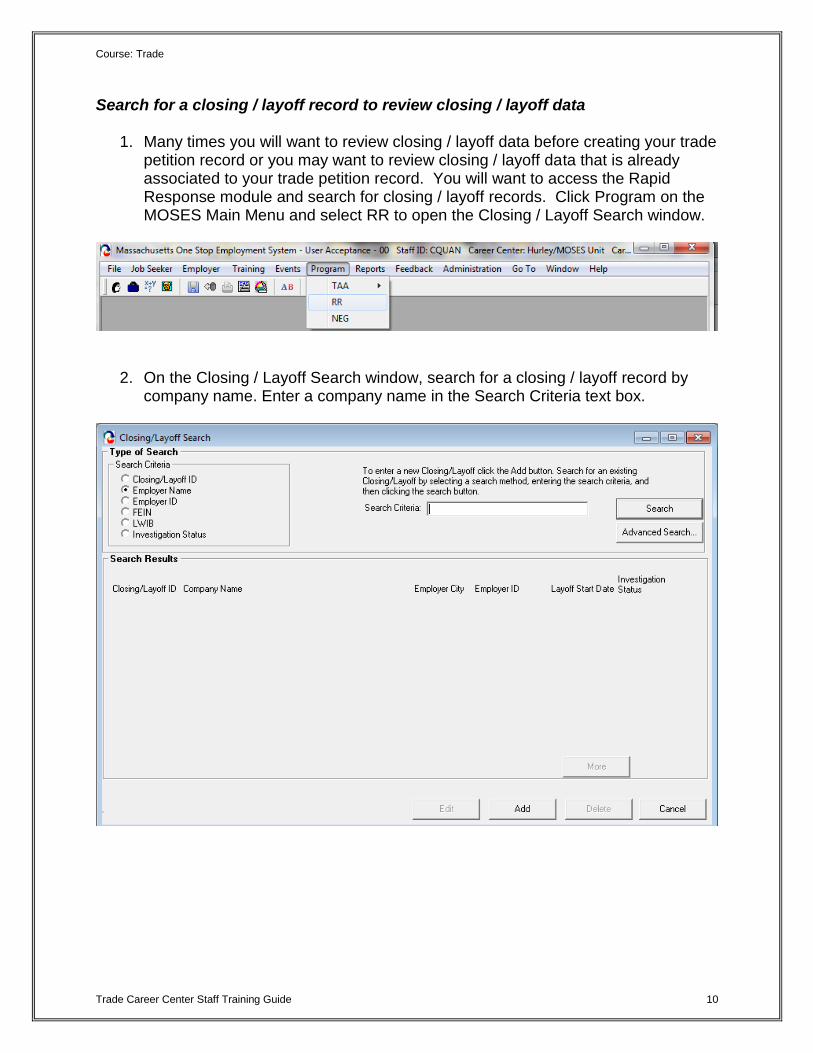
1. Many times you will want to review closing / layoff data before creating your trade petition record or you may want to review closing / layoff data that is already associated to your trade petition record. You will want to access the Rapid Response module and search for closing / layoff records. Click Program on the MOSES Main Menu and select RR to open the Closing / Layoff Search window.
2. On the Closing / Layoff Search window, search for a closing / layoff record by company name. Enter a company name in the Search Criteria text box.

Course: Trade
Trade Career Center Staff Training Guide 11
3. Click the Search button. MOSES locates the closing / layoff record by the company name and displays the result in the Search Results window.

Course: Trade
Trade Career Center Staff Training Guide 12
4. Select the closing / layoff record from the list. Click Edit, hit the Enter key, or double click on the closing / layoff record. The Closing / Layoff window for that closing / layoff record appears. The first tab, Closing / Layoff, is displayed.
The fields on this tab are disabled for all users who do not have the appropriate security privileges.
5. The question displayed at the top of the tab identifies whether or not the closing / layoff record was entered by Rapid Response staff. If the closing / layoff record was entered by Rapid Response staff, the answer to the question is Yes. If the closing / layoff record was not entered by Rapid Response staff, the answer to the question is No.
If Trade Users need to modify a record created by Rapid Response staff (the question already has the Yes radio button selected), leave the questioned answered as Yes.
6. Review the Employer Location group box. This group box displays the employer
location that is associated to the closing / layoff record. Only one employer location can exist in the group box.

Course: Trade
Trade Career Center Staff Training Guide 13
The Add button becomes disabled when one record exists, since only one employer location can be related to the closing / layoff record.
7. Select the record and click the Go To button. The first tab of the Employer
module is displayed. Close the window to view the Closing / Layoff tab.
8. The Delete button located in the Employer Location group box deletes the association of the employer location to the closing / layoff record.
Clicking the Delete button, with the record highlighted, does not delete the employer location from MOSES. Clicking the Delete button removes the association of the employer location with the closing / layoff record.
9. The data located in the Closing / Details group box lists information specific to
the closing / layoff record in focus. 10. Review data located in the Rapid Response group box.
This is data pertinent to Rapid Response staff. The Rapid Response group box becomes enabled when you answer Yes to the question located at the top of the tab.
11. Click the Cancel button to close the Closing / Layoff window.

Course: Trade
Trade Career Center Staff Training Guide 14
Chapter 2: View a Trade Petition Record
View Petition and Petitioner Information
Overview Trade petitions are accessed via the Trade Petition Search screen. Users access the Trade Petition Search screen by selecting Program from the MOSES Main Menu, selecting TAA, then selecting TAA Petitions. Security Trade Admin, Trade Staff, and Trade View Only users can access this screen. Only Trade Admin users can add a trade petition record.
Key Process Points to Remember Trade Petition applications should be mailed to the state Trade Office. The Trade Office will receive Trade Petition applications via email, mail or fax and enter the Trade Petition application into MOSES. The Trade Office will submit the trade petition application to DOL. The original form will be filed with the Trade Office. DOL’s decision concerning the trade petition will be tracked via MOSES. After completing this lesson, you should be able to:
View information on the Petition Info tab
View information on the Petition Info continued tab
View information on the Petitioner Info tab View Information on the Petition Info tab
1. From the Program menu item, select TAA, then TAA Petitions. The Trade Petition Search screen opens.
2. Search for a trade petition by entering search criteria. Click the Search button.
3. MOSES displays the results set. Highlight a record and click the Edit button.

Course: Trade
Trade Career Center Staff Training Guide 15
4. MOSES displays the Trade Petition Details window with the Petition Info tab selected. This screen captures information required for the trade petition such as important dates and the closing / layoff record that is associated to the trade petition.
5. Review the status fields on the tab. Fields:
Field Name Comments
Federal Status The following options are available: Filed, Pending, Certified, Denied, Withdrawn
6. A closing / layoff record must be tied to a trade petition record. The closing /
layoff record is displayed in the Closing / Layoff Information group box. Only one closing / layoff record can be associated to the trade petition.
When the Federal Petition status is updated to Certified, an email notification is sent to Career Center Managers / Staff Users of Filed, Denied or Withdrawn petitions.
Course: Trade
Trade Career Center Staff Training Guide 16
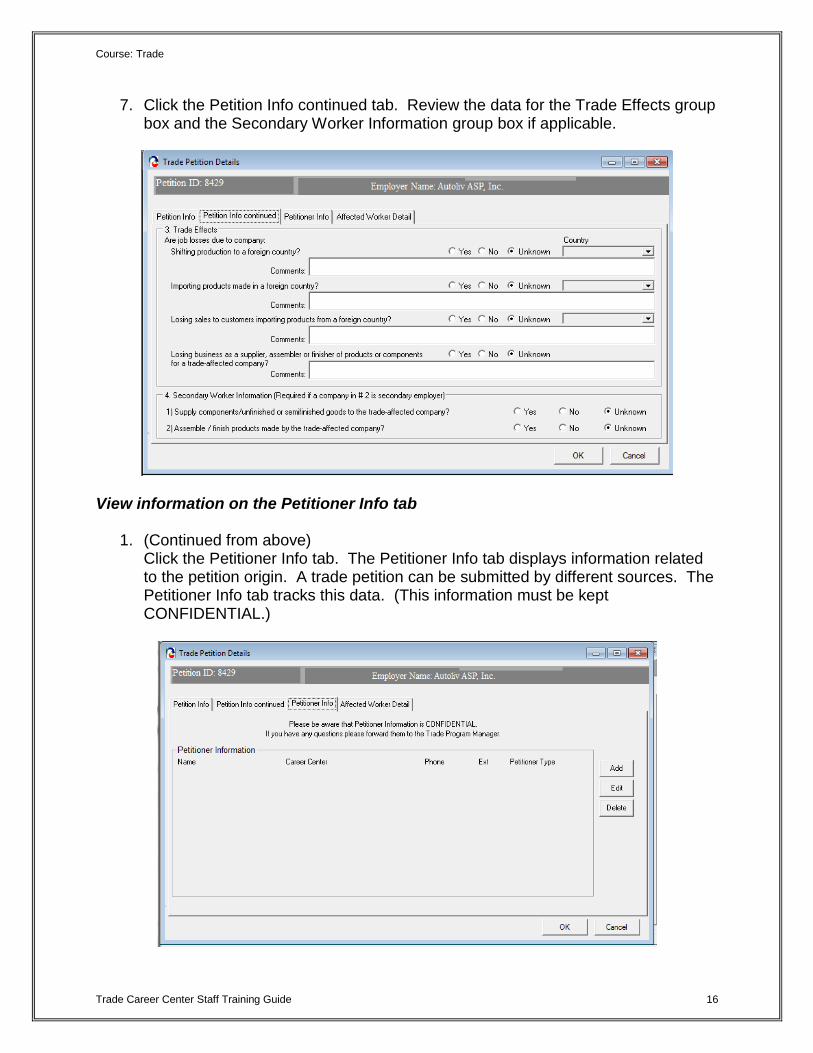
7. Click the Petition Info continued tab. Review the data for the Trade Effects group box and the Secondary Worker Information group box if applicable.
View information on the Petitioner Info tab
1. (Continued from above) Click the Petitioner Info tab. The Petitioner Info tab displays information related to the petition origin. A trade petition can be submitted by different sources. The Petitioner Info tab tracks this data. (This information must be kept CONFIDENTIAL.)

Course: Trade
Trade Career Center Staff Training Guide 17
2. The Petitioner Info tab lists the Petitioner Information based on the Petition Origin drop down list box. The Petition Origin drop down list box is a required field with the following options: Three Individuals, One Authorized Representative, One Company Representative, a Career Center, the State Workforce Agency , or Other. (This information is kept CONFIDENTIAL)
3. The Petitioner Information group box is a read only summary table that displays
petitioner information associated with the petition. One row is always required. Three rows are required if the Petition Origin drop down list box is equal to Three Individuals. (This information is CONFIDENTIAL)
4. Select the record in the group box and click the Edit button.
5. MOSES displays the Petitioner Details window.
6. Review information for the fields.
7. Click the Cancel button to close the window. MOSES displays the Petitioner Info tab.
8. Click the Cancel button to close the Trade Petition Details window.
The Affected Worker Detail Tab will not be accessible by everyone.

Course: Trade
Trade Career Center Staff Training Guide 18
Chapter 3: Search for Job Seeker Trade Record
Search for Job Seeker Trade Record
Overview You may wish to search for a job seeker trade record to view trade data for the job s eeker. There are two ways to access the job seeker’s trade data in MOSES. Users access the Job Seeker Trade Record Search screen by selecting Program from the MOSES Top menu, selecting TAA, then selecting TAA Participant. A second way is via the Job Seeker Search screen. Search for a job seeker, when the job seeker is displayed in the search results, highlight the record and click the Trade button at the bottom of the screen.
The Job Seeker Trade Search window lets you search the MOSES database directly for job seeker trade records by selecting the Last Name, SSN, Employer Name, Federal Petition Number, and 1666 Eligibility Status. Security Trade Admin, Trade Staff, and Trade View Only users can access this screen. Key Process Points to Remember After a worker group at the company is certified for trade, workers may then apply for individual reemployment services and benefits under TAA that will help them obtain suitable employment. A trade record is created for the affected worker in MOSES to track the worker’s trade data. After completing this lesson, you should be able to:
Locate a job seeker trade record by employer name
Delete a job seeker trade record
Access a job seeker trade record from the Job Seeker Search Screen

Course: Trade
Trade Career Center Staff Training Guide 19
Locate a job seeker trade record by employer name
1. From the Program menu, select TAA, and then select TAA Participant. MOSES displays the Job Seeker Trade Search screen.
2. Select a Search by criteria and enter data in the Search Criteria text box.
If you select to search by the 1666 Eligibility Status, the Search Criteria text box changes to a drop down list box.
3. Click the Search button to display the search results.
Each job seeker trade record associated with the entered search criteria will be displayed in the search results. If an individual is associated with multiple job seeker trade records, each record will be displayed in the search results.
4. Highlight a record in the search results. Click the Edit button.

Course: Trade
Trade Career Center Staff Training Guide 20
5. MOSES displays the Trade Application Details window. The Application Info tab is selected. The Trade Application Details window contains tabs which summarize a job seeker’s trade information. If relevant, information related to the Application for TAA Eligibility (Form 1666) ,, R/ATAA, job search allowances, relocation allowances, TAA training package details, waivers and Trade Readjustment Allowance (TRA) deadline extensions, TRA information and TAA-related hearings are displayed on appropriate tabs.
6. Click the Cancel button to close the Trade Application Details window.
Delete a job seeker trade record
1. From the Job Seeker Trade Search screen, enter new search criteria. 2. Select a Search by criteria and enter data in the Search Criteria text box. Click
the Search button to display the search results.
3. Select a record in the search results. Click the Delete button. Confirm the deletion for the job seeker trade record.
Only users with Trade Admin permission can delete job seeker trade records.

Course: Trade
Trade Career Center Staff Training Guide 21
Also, the Determination Status must be Pending. If Approved status, deletion will be denied, and the record can not be deleted.
Access a job seeker trade record from the basic Job Seeker Search screen
1. Go to the basic Job Seeker Search screen by clicking the Job Seeker icon. 2. Search for the job seeker whose trade record was viewed in the previous
exercise. After entering search criteria, click the Search button. 3. MOSES displays the search results.
4. Select the job seeker record. Click the Trade button.
5. MOSES displays the Job Seeker Trade Records window for the job seeker you
selected.
Trade users may initiate a new Trade application for job seekers from this screen or edit an existing application. Clicking the Go To Job Seeker button takes you to the Basic tab of the Job Seeker Membership module.
6. Review the data in the Trade Determinations group box.

Course: Trade
Trade Career Center Staff Training Guide 22
7. Notice the buttons located to the right of the Trade Determinations group box. The Add button will take you to the Trade Application Details window to add a new job seeker trade record.
8. The Edit button will take you to the Trade Application Details window to modify
the existing job seeker trade record.
Only Trade Admin users can delete job seeker trade records, provided the Job Seekers Determination Status is still Pending.
9. Click the Cancel button to close the Job Seeker Trade Records window.
Course: Trade
Trade Career Center Staff Training Guide 23
Chapter 4: Job Seeker Trade Record
TAA Eligibility Application (MA Form 1666)
Overview The first step of a job seeker trade record is capturing information required for the Trade Adjustment Assistance Eligibility Application Form (aka MA Form 1666). This information is entered through the Application Info tab located on the Trade Application Details window for the job seeker. This window is accessed either from the Job Seeker Trade Search screen or from the Job Seeker Trade Records screen. Security Trade Admin, Trade Staff, and Trade View Only users can access this screen. Key Process Points to Remember After a worker group at the company is certified for trade, workers may then apply for individual reemployment services and benefits under TAA that will help them obtain suitable employment. A trade record is created for the affected worker in MOSES to track the worker’s trade data. The first part of the trade record is entering information for the MA Form 1666. 1666 forms are entered by Career Center (CC) staff. The CC Staff must print the completed application, have the client sign as of the day the application was submitted and file the original form at the Career Center.
A nightly interface will send the pending applications from MOSES to UI Online.
An email notification is sent to TRA staff regarding 1666s pending a determination decision. The DUA TRA Unit will make a determination regarding the 1666 application.
A nightly interface will send the determinations from UI Online back to MOSES and update the MOSES database.
An email notification is also sent to the submitter when a determination is made.

Course: Trade
Trade Career Center Staff Training Guide 24
After completing this lesson, you should be able to:
Create a job seeker trade record
Enter information for the 1666
Submit the 1666 Job seeker trade record
1. Go to the Job Seeker Search Screen. Search for a job seeker record and click the Search button.
2. MOSES displays results based on the search criteria entered.
3. Select a record in the search results.
4. Click the Trade button.
5. MOSES displays the Job Seeker Trade Records window for the job seeker you
selected.
6. Click the Add button to add a new job seeker trade record.
Course: Trade
Trade Career Center Staff Training Guide 25
Enter information for the 1666
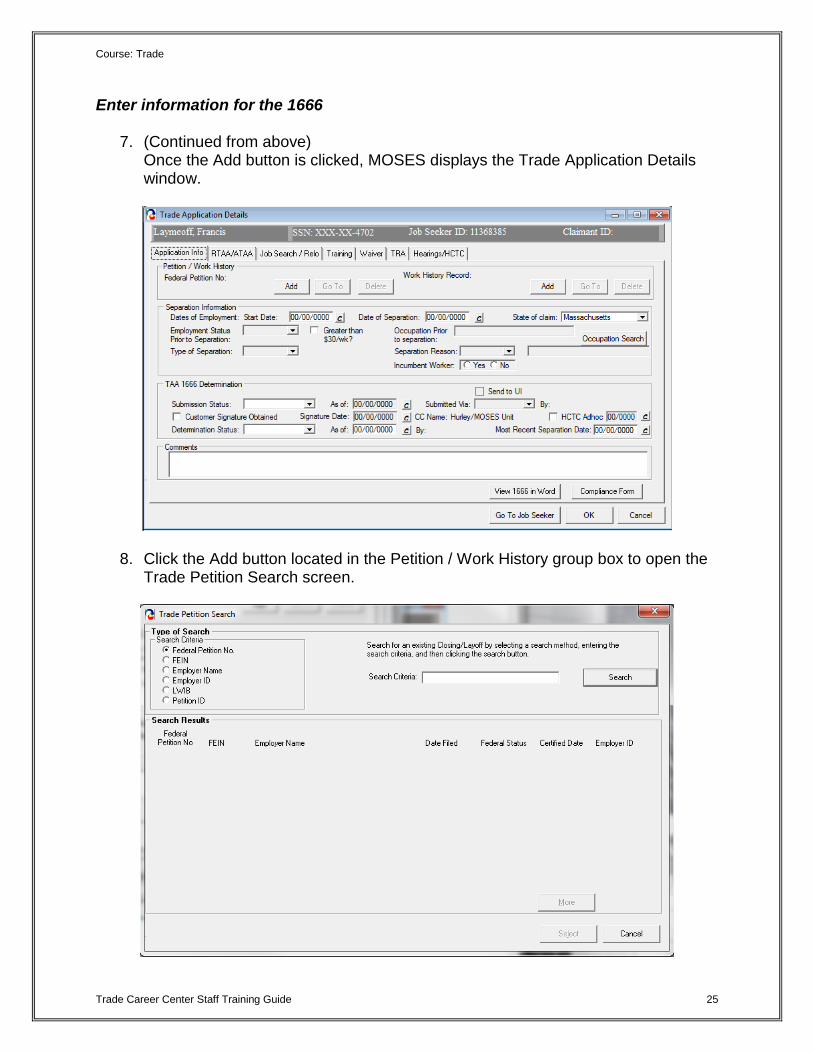
7. (Continued from above) Once the Add button is clicked, MOSES displays the Trade Application Details window.
8. Click the Add button located in the Petition / Work History group box to open the
Trade Petition Search screen.

Course: Trade
Trade Career Center Staff Training Guide 26
9. Search for the desired petition. MOSES displays the search results based on the criteria entered for the search.
10. Select a trade petition record in the search results. Click the Select button.
11. The Trade Petition Search screen is closed and the Federal Petition Number is
added to the Federal Petition Number field. The petition is now associated with the job seeker’s trade application.
The Add button becomes disabled once a trade petition is associated with the job seeker trade record, since only one trade petition can be associated to a job seeker trade record. The Go To button takes you to the trade petition associated with this job seeker’s trade application. The Delete button deletes the association of the trade petition to the job seeker’s trade application. Clicking the Delete button does not delete the trade petition from MOSES.
12. Click the Add button next to the Work History Record field. 13. MOSES displays the Work Experience tab of the Job Seeker Membership
module.
14. Review the list for the desired work history record and select the desired record. Click the Select button.
If the desired work history record is not in the Employment History group box, add a new work history record.
15. MOSES closes the Job Seeker Membership window and the Employer Name is
displayed in the Work History Record field.
When the work history record is added, fields in the Separation Information group box are populated. The fields that are populated include the Start Date, Date of Separation, Employment Status Prior to Separation, Occupation prior to Separation, and Greater than $30 week.
The Employer ID that belongs to the Work History record must match the Employer ID of the Trade Petition record that you already associated.

Course: Trade
Trade Career Center Staff Training Guide 27
The Add button becomes disabled once a work history record is associated with the job seeker trade record.
The Go To button takes you to the Work Experience Details tab which displays a list of work history records, if applicable.
The Delete button deletes the association of the work history record with the job seeker’s trade application. Clicking the Delete button does not delete the work history from MOSES.
16. Enter data for the fields in the Separation Information group box. 17. Fields:
Some fields in the table below are required if data for other fields was entered. Refer to the Comments column.
Field Name Required Comments
Start Date This field is populated with the job seeker’s work history record start date
Separation Date This field is populated with the job seeker’s
work history record end date. Please ensure last physical day of work and estimate if necessary.
Employment Status Prior to Separation
The following options are available: Full time or Part time
If the job seeker’s work history record has 35 hours or more, populate the drop down list box with the option of Full time.
Greater than $30/wk?
Check this box if user made more than $30 per week
This field is pre-populated if the worker earned more than $30 / week as indicated in the client’s work history record
Type of Separation This field is required if the Date of Separation field is entered
The following options exist: Full or Partial
Occupation Prior to Separation
The selected occupation code description is displayed
Use the Search button to go to the Occupation Code Search screen and search for a occupation
This field is pre-populated from the work history record if an Occupational Code exists in the client’s work experience

Course: Trade
Trade Career Center Staff Training Guide 28
Separation Reason
The following options are available: Lack of Work , Voluntary Separation, Other
Other This field is required if the Separation Reason is Other
Incumbent Worker Is a member of a group of workers that has been certified as eligible to apply for TAA benefits
Has not been totally or partially separated from employment, but has a layoff date verified by the company and is determined to be individually threatened with total or partial separation (will be monitored via case management).
Employer – Authorized Leave Prior to Separation?
Mouse-over text is displayed over the field: Has applicant received employer-authorized leave during last 52 weeks prior to separation lasting longer than 1 week? If yes, select type and enter number of weeks in corresponding text box.
If a box is checked, the corresponding text box is required
The following check boxes exist: Vacation, Sickness/Injury, Family Leave, Military, Disability
18. Select the Submission status of Work In Progress, since data is still being
entered for the 1666. Submit the 1666
19. (Continued from above) After all data is reviewed for the Application to Participate in the Trade Adjustment Assistance Program (1666), you are ready to submit the application.
20. On the Application Info tab, review the fields in the TAA 1666 Determination group box.
Fields:
Field Name Required Comments
Submission Status Once you change the Submission Status to
Submitted (or Withdrawn) and the record is saved, all fields on the Application Info tab become disabled, except for Trade Admin users.
If you select the Submitted status, the

Course: Trade
Trade Career Center Staff Training Guide 29
Determination status is set to Pending automatically.
The following options are available in the list: Work In Progress, Submitted, Withdrawn
As of This field is required if the Submission Status = Submitted
This field is pre-filled with the date the Submission Status was set to Submitted
Submitted Via This field is required if the Submission status = Submitted
Select from the following options: In Person, Phone, Mail, Rapid Response, Other
The Submitted Via field is defaulted to In Person
By Displays the User ID of user logged into system when the Submission Status field is updated
Customer Signature Obtained
Select this check box to indicate that the customer’s signature was obtained
This field is grayed out until Submission Status = Submitted
This field is required when Submission Status = Submitted
Signature Date This field is required if the Customer Signature Obtained Check box is selected
Enter the date that you obtained the customer’s signature
This field is grayed out until the Customer Signature Obtained check box is selected
21. Select a Submission Status of Submitted. The As of date field is pre-filled with today’s date. The Submitted Via field is defaulted to In Person.
22. Select the Customer Signature Obtained Check box and enter a date in the
Signature Date field.
23. Click the OK button to save the record.

Course: Trade
Trade Career Center Staff Training Guide 30
You have now submitted the 1666 for review. The interfaces as described above will run and TRA Staff are notified via email regarding pending 1666 record that needs a determination decision entered. TRA will make a determination decision regarding the 1666. The interfaces will run as described above and the Career Center Staff submitter will receive an email notifying of the determination decision once the Determination Status is updated by TRA Staff.
The 1666 application and the Trade Notification of Rights and Compliance Form must
be kept on file with signatures

Course: Trade
Trade Career Center Staff Training Guide 31
MUST BE KEPT ON FILE WITH SIGNATURES

Course: Trade
Trade Career Center Staff Training Guide 32
MUST BE KEPT ON FILE WITH SIGNATURES

Course: Trade
Trade Career Center Staff Training Guide 33

Course: Trade
Trade Career Center Staff Training Guide 34
Chapter 4: Job Seeker Trade Record
Trade Readjustment Allowance (TRA) Records
Overview Career Center Counselors must inform applicants that they may be eligible for TRA Cash Benefits while they are participating in full-time training, completed training that can be TAA approved (i.e. training funded by Title I, etc.) or if waived from training. The Counselor works with applicants to assist them in meeting their deadlines for TRA weekly cash benefits. The deadlines are listed below are the later of:
Trade Act 2002 Trade Act 2009 – 2011 – 2015
8 weeks from certification or 16 weeks from separation
26 weeks from certification or 26 weeks from separation
Key Process Changes Career Center Staff no longer data enter 1667 information via MOSES. TRA is now solely done through UI Online. Certain dates, including the actual date for the deadline above will be updated on the TRA tab.
Remember, deadlines are very important and need to be met. Make sure your customer understand that they need to have an approved training or an approved waiver from training prior to the deadline in order to be eligible for TRA benefits.
Course: Trade
Trade Career Center Staff Training Guide 35
Chapter 4: Job Seeker Trade Record
Waiver from Training Record
Overview Under certain circumstances, eligible workers can be waived from participating in training. The Career Center Counselor informs the worker that waivers are approved for an initial 90 days and then reviewed every 30 days thereafter. The Career Center Counselor works with the client to determine if any of the criteria for a waiver are applicable. Security Trade Admin, Trade Staff, and Trade View Only users can access this screen. Key Process Changes The Training Waiver is tracked in MOSES and entered by a Career Center Counselor. The Trade Admin user reviews the training waiver/extension via MOSES. The Trade Admin user decides if the training waiver is granted and can be extended to the following month. The submitter of the training waiver record will receive an email notification of the determination decision. After completing this lesson, you should be able to:
Add a training waiver record
Submit a training waiver for review
Print forms

Course: Trade
Trade Career Center Staff Training Guide 36
W AIVE RS AV AI L ABLE UNDE R 20 11 ACT AND 201 5 ACT
WAIVERS
HEALTH Waiver
The worker is unable to participate in training due to the health of the worker, except that a waiver under this subparagraph shall not be construed to exempt a worker from requirements relating to the availability for work, active search for work, or refusal to accept work under Federal or State unemployment compensation laws.
ENROLLMENT UNAVAILABLE
Waiver
The first available enrollment date for the approved training of the worker is within 60 days after the date of the determination made under this paragraph, or, if later, there are extenuating circumstances for the delay in enrollment, as determined pursuant to guidelines issued by the Secretary.
TRAINING NOT AVAILABLE
Waiver
Training approved by the Secretary is not reasonably available to the worker from either governmental agencies or private sources (which may include area vocational education schools, as defined in Section 3 of the Carl D. Perkins Vocational and Technical Education Act of 1 998 (20 U.S.C. 2302), and employers), no training that is suitable for the worker is available at a reasonable cost, or no training finds are available.

Course: Trade
Trade Career Center Staff Training Guide 37
Add a training waiver record
1. Go to the Job Seeker Search Screen. Search for a job seeker record and click the Search button.
2. MOSES displays results based on the search criteria entered.
3. Select a record in the search results.
4. Click the Trade button.
5. MOSES displays the Job Seeker Trade Records window for the job seeker you
selected.
6. Click the Edit button to open the job seeker trade record.
7. MOSES displays the Trade Application Details window with the Application Info tab selected.
8. Click the Waiver tab.
9. Click the Add button.
Course: Trade
Trade Career Center Staff Training Guide 38
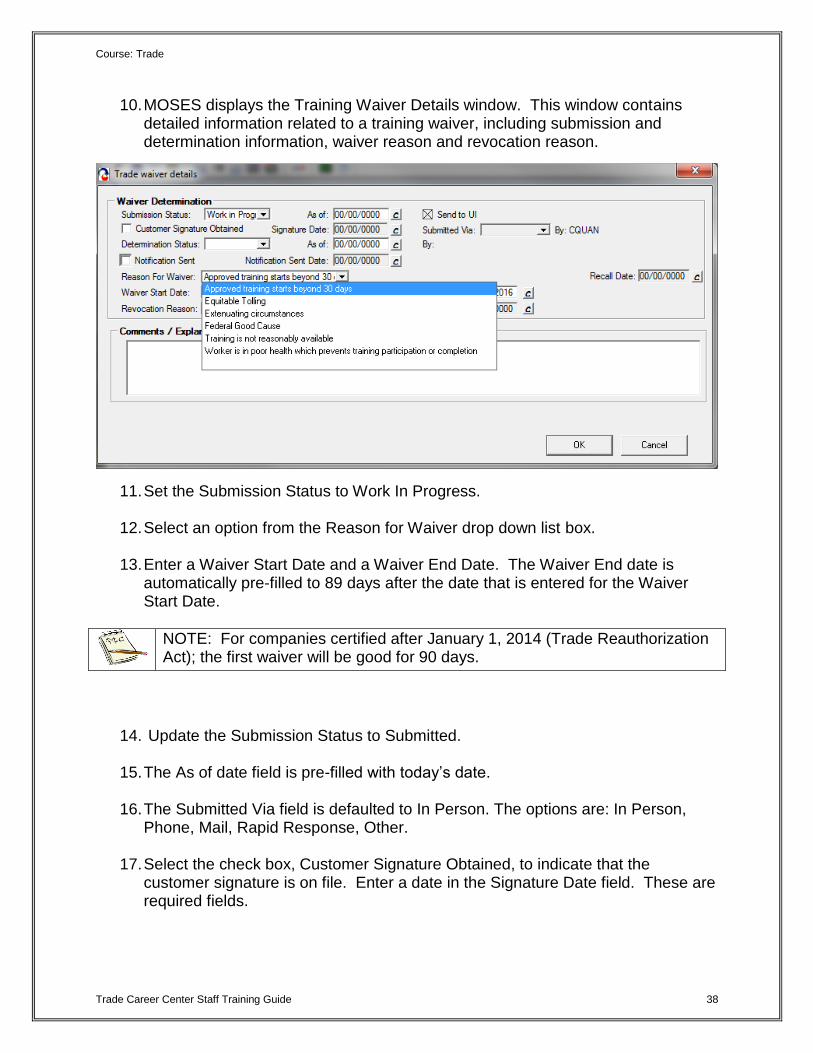
10. MOSES displays the Training Waiver Details window. This window contains detailed information related to a training waiver, including submission and determination information, waiver reason and revocation reason.
11. Set the Submission Status to Work In Progress. 12. Select an option from the Reason for Waiver drop down list box.
13. Enter a Waiver Start Date and a Waiver End Date. The Waiver End date is
automatically pre-filled to 89 days after the date that is entered for the Waiver Start Date.
NOTE: For companies certified after January 1, 2014 (Trade Reauthorization Act); the first waiver will be good for 90 days.
14. Update the Submission Status to Submitted.
15. The As of date field is pre-filled with today’s date.
16. The Submitted Via field is defaulted to In Person. The options are: In Person,
Phone, Mail, Rapid Response, Other.
17. Select the check box, Customer Signature Obtained, to indicate that the customer signature is on file. Enter a date in the Signature Date field. These are required fields.
Course: Trade
Trade Career Center Staff Training Guide 39
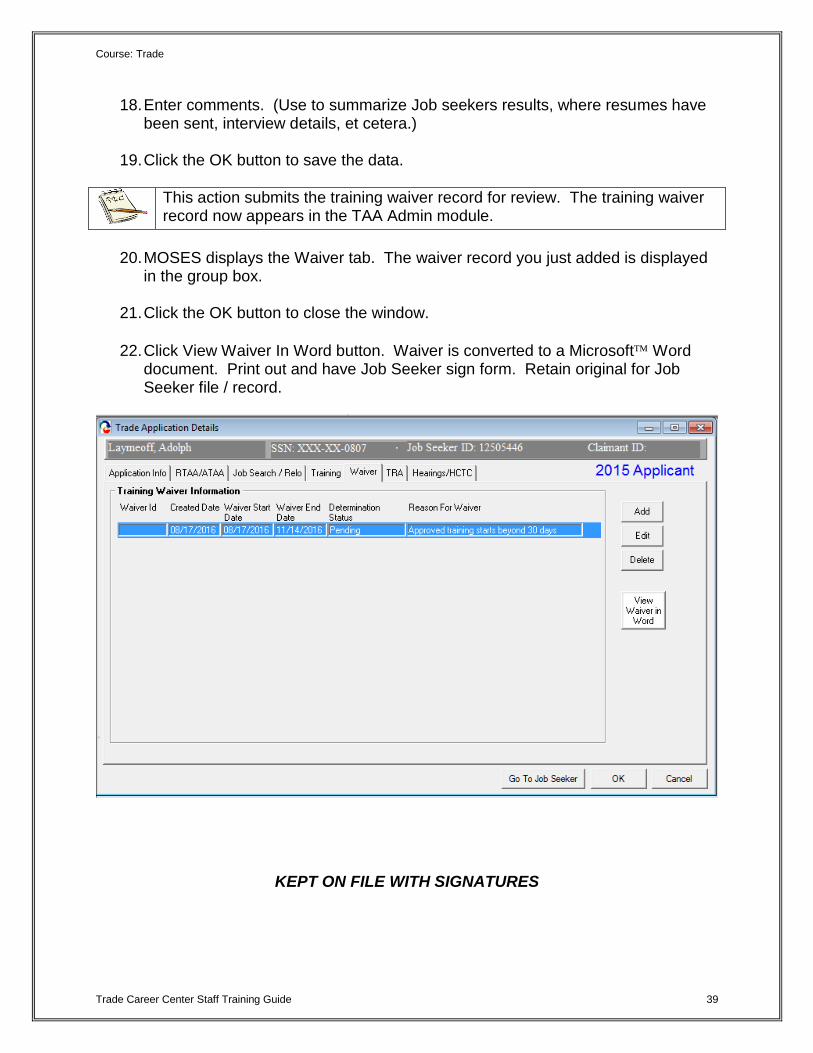
18. Enter comments. (Use to summarize Job seekers results, where resumes have been sent, interview details, et cetera.)
19. Click the OK button to save the data.
This action submits the training waiver record for review. The training waiver record now appears in the TAA Admin module.
20. MOSES displays the Waiver tab. The waiver record you just added is displayed
in the group box.
21. Click the OK button to close the window.
22. Click View Waiver In Word button. Waiver is converted to a Microsoft Word document. Print out and have Job Seeker sign form. Retain original for Job Seeker file / record.
KEPT ON FILE WITH SIGNATURES

Course: Trade
Trade Career Center Staff Training Guide 40
Course: Trade
Trade Career Center Staff Training Guide 41
Chapter 4: Job Seeker Trade Record
Deadline Extension Record
Overview Under certain extenuating circumstances, eligible workers can request to extend their deadline for potential continued TRA benefits eligibility. The Career Center Counselor informs the worker that extensions can be requested under circumstances demonstrated to be beyond their control. Security Trade Admin, Trade Staff, and Trade View Only users can access this screen. Key Process Changes The TRA deadline extension is tracked in MOSES and submitted by a Career Center Counselor. The Trade Admin user reviews the training waiver/extension via MOSES. The Trade Admin user makes the determination on the submittal of the TRA deadline extension. The submitter of the TRA deadline extension record will receive an email notification of the determination decision. After completing this lesson, you should be able to:
Add a deadline extension record for review
Print forms
NOTE: For Extenuating Circumstances, enter a Start Date. The Waiver End date is automatically pre-filled to 45 days after the date that is entered for the Extenuating Circumstances Waiver Start Date.

Course: Trade
Trade Career Center Staff Training Guide 42
EXTENSIO NS AV AI L ABLE UNDER 2011 ACT AND 2015 ACT
WAIVERS
EXTENUATING CIRCUSTANCES
Extenuating Circumstances extends the TRA deadline by an additional 45 days. There is no single, universally endorsed definition of “extenuating”. In general, the situation must be beyond the individual’s immediate control and must be unusual and/or infrequent, unexpected, and significantly disruptive.
FEDERAL GOOD CAUSE
If the customer still missed their deadline with the addition of the Extenuating Circumstance extension, and show good cause, they can get an additional extension through Federal Good Cause.
EQUITABLE TOLLING
Equitable Tolling of a deadline may only apply in egregious circumstances where an individual acted with due diligence to meet the deadline. Equitable Tolling should be applied in situations where it would be manifestly unfair to deny a worker TRA based on the worker’s failure to meet a deadline or to deny other TAA benefits due to missed deadlines.

Course: Trade
Trade Career Center Staff Training Guide 43
Add a Deadline Extension Record Record a Extenuating Circumstances extension
1. From the Waiver tab, click the Add button. 2. MOSES displays the Training Waiver window.
3. Select a Reason for Waiver: Extenuating circumstances.
4. Enter a date in the Waiver Start Date and Waiver End Date fields. The start date must be the day of the 26 week deadline. Click the tab key and the Waiver End Date field is automatically pre-filled to 44 days after the date entered for the Waiver Start Date field.
5. Set the Submission Status to Submitted. The As of date field is populated with
today’s date. The Determination Status is set to Pending automatically and the related “As of date” field should display the date the application was submitted.
6. The Submitted Via field is defaulted to “In Person”. If the submittal method is
different, the appropriate mode should be recorded. The By field should display the User ID of the person who submitted the record.
7. Select the check box, Customer Signature Obtained, to indicate that the
customer signature is on file. Enter a date in the Signature Date field. These fields are required.
8. Enter comments to justify the Extenuating Circumstances option. There must be
Extenuating Circumstances for not meeting the 26 week deadline.

Course: Trade
Trade Career Center Staff Training Guide 44
9. Click the OK button to save the record.
10. MOSES displays the Waiver tab with the new record displayed in the group box.
11. Click the View Waiver in Word button. This converts the Extenuating
Circumstances waiver into a Microsoft Word document. Print out document and have Job Seeker sign it. Retain original for Job Seeker file / record.
12. Click the OK button to close the window.
You have now submitted the Extenuating Circumstances Extension. Determinations are issued by the TAA Unit. The extension record now appears in the TAA Admin module. The submitter of the record will receive an email of the determination decision once a determination is made. The client will receive their determination via mail.

Course: Trade
Trade Career Center Staff Training Guide 45
MUST BE KEPT ON FILE WITH SIGNATURES

Course: Trade
Trade Career Center Staff Training Guide 46
Record a Federal Good Cause extension
1. From the Waiver tab, click the Add button. 2. MOSES displays the Training Waiver window.
3. Select a Reason for Waiver: Federal Good Cause
4. Select a Reason for Good Cause.
The reasons a worker may be approved for a Federal Good Cause provision:
Worker acted reasonably prudent
Determination/Notice not received
Factors outside of the control of the worker
Worker sought extension in timely manner
Worker physically unable to take timely action
Intimidation, coercion, or harassment by employer
Worker misinformed by career center or state staff
Reasonable advice not provided to worker
Compelling reasons or circumstances o Neglect by the state o Illness or injury to worker or immediate family o Delay in mail o Natural catastrophe o Delay in employer providing information o Compelling personal affairs or problems o Communication not in worker’s native language o Loss or unavailability of records

Course: Trade
Trade Career Center Staff Training Guide 47
5. Enter a date in the Waiver Start Date. click the tab button. The start date must
be the last day of the 45 Extenuating Circumstance Waiver deadline. Click the tab key and the Waiver End Date field is automatically pre-filled to 60 days after the date entered for the Waiver Start Date field.
6. Set the Submission Status to “Submitted”. The “As of:” date field is populated
with today’s date. The Determination Status is set to Pending automatically (change if appropriate) and the related “As of:” date field should display the date the application was submitted.
7. The Submitted Via field is defaulted to In Person. The “By” field should display
the User ID of the person who submitted the record.
8. Select the check box, Customer Signature Obtained, to indicate that the customer signature is on file. Enter a date in the Signature Date field. These fields are required.
9. Enter comments to justify the Federal Good Cause option.
10. Click the OK button to save the record.
11. MOSES displays the Waiver tab with the new record displayed in the group box.

Course: Trade
Trade Career Center Staff Training Guide 48
12. Click the View Waiver in Word button. This converts the Federal Good Cause
extension into a Microsoft Word document. Print out document and have Job Seeker sign it. Retain original for Job Seeker file / record.
13. Click the OK button to close the window.
You have now submitted the Federal Good Cause Extension. Determinations are issued by the TAA unit. The extension record now appears in the TAA Admin module. The submitter of the record will receive an email of the determination decision once a determination is made. The client will receive their determination via mail.
MUST BE KEPT ON FILE WITH SIGNATURES

Course: Trade
Trade Career Center Staff Training Guide 49

Course: Trade
Trade Career Center Staff Training Guide 50
Record an Equitable Tolling extension
1. From the Waiver tab, click the Add button. 2. MOSES displays the Training Waiver window.
3. Select a Reason for Waiver: Equitable Tolling.
4. Select the benefit the Equitable Tolling will apply to.
Equitable Tolling may apply to the following deadlines:
Training (TRA deadline extension)
Job Search Allowances
Relocation Allowances
Additional TRA (applies only to 2002 participants)
5. Enter a date in the Waiver Start Date and Waiver End Date fields. The start date
must be the a date person knew or should have known about TAA eligibility
6. Set the Submission Status to Submitted. The As of date field is populated with today’s date. The Determination Status is set to Pending automatically and the related As of date field should display the date the application was submitted.
7. The Submitted Via field is defaulted to In Person. The By field should display the
User ID of the person who submitted the record.

Course: Trade
Trade Career Center Staff Training Guide 51
8. Select the check box, Customer Signature Obtained, to indicate that the customer signature is on file. Enter a date in the Signature Date field. These fields are required.
9. Enter comments to justify the Good Cause Beyond 30 Days option.
10. Click the OK button to save the record.
11. MOSES displays the Waiver tab with the new record displayed in the group box.
12. Click the View Waiver in Word button. This converts the Good Cause Beyond 30
Days waiver into a Microsoft Word document. Print out document and have Job Seeker sign it. Retain original for Job Seeker file / record.
13. Click the OK button to close the window.
You have now submitted Equitable Tolling Extension. Determinations are issued by the TAA unit. The extension record now appears in the TAA Admin module. The submitter of the record will receive an email of the determination decision once a determination is made. The client will receive their determination via mail.
Course: Trade
Trade Career Center Staff Training Guide 52
Chapter 4: Job Seeker Trade Record
Training Record
Overview Once an applicant is TAA eligible, the Career Center Counselor informs the applicant of services that will help in determining the appropriate training programs and obtain reemployment at the conclusion of the training program. The CC Counselor helps the applicant complete the Vendor Selection sheet which includes two or three courses. Of these three courses, a recommended course must be selected and a budget is submitted only for the recommended course. The Career Center counselor must also submit verification that the applicant satisfies the six training criteria. The State Trade Office makes the determination regarding the recommended course. If training is approved, the budget is reviewed. Security Trade Admin, Trade Staff, and Trade View Only users can access this screen. Key Process Changes The Training Package is now tracked via MOSES; this includes data such as the Vendor Selection Sheet, the training budget, and criteria for training approval. All original forms are filed at the applicant’s Career Center. Training determinations are given via MOSES. A course in the Training record has a related status (Submitted, Approved, or Denied) and a Budget status (Pending, Approved, or History). Each cost item for the budget has a requested and approved amount. The submitter of the training record is sent an email of the determination decision once a determination is made by the Trade Admin user. If applicable, hearings are tracked in MOSES. After completing this lesson, you should be able to:
Submit verification that applicant satisfies six training criteria
Complete vendor selection
Submit vendor selection for review
Complete and submit training budget

Course: Trade
Trade Career Center Staff Training Guide 53
Submit verification that applicant satisfies six training criteria
This is done and verified throughout regular MOSES in case management, etc…
1. Go to the Job Seeker Search Screen. Search for a job seeker record and click the Search button.
2. MOSES displays results based on the search criteria entered.
3. Select a record in the search results.
4. Click the Trade button.
5. MOSES displays the Job Seeker Trade Records window for the job seeker you
selected.
6. Click the Edit button to open the job seeker trade record.
7. MOSES displays the Trade Application Details window with the Application Info tab selected.
8. Click the Training tab. 9. Once the Career Center Counselor has deemed that the client meets all six
criteria for training and a signed copy of the training criteria form is on file, the check box should be selected.
10. Hover text is displayed over the check box.
Hover text:
There is no suitable employment available to adversely affected worker
The worker would benefit from appropriate training
There is reasonable expectation of employment following completion of such training
Training approved by secretary is reasonably available to the worker from either government agencies or private sources
The worker is qualified to undertake and complete such training
Such training is suitable for the worker and available at a reasonable cost
The Add Course button cannot be clicked until the check box is selected.

Course: Trade
Trade Career Center Staff Training Guide 54
Complete Vendor Selection
1. Go to the Job Seeker Search Screen. Search for a job seeker record and click the Search button.
2. MOSES displays results based on the search criteria entered.
3. Select a record in the search results.
4. Click the Trade button.
5. MOSES displays the Job Seeker Trade Records window for the job seeker you selected.
6. Click the Edit button to open the job seeker trade record.
7. MOSES displays the Trade Application Details window with the Application Info tab selected.
8. Click the Training tab. This tab allows you to enter vendor selection records for training. Each record represents a vendor selection sheet, with multiple courses attached. The Course Enrollment Information group box displays the submitted recommended training course.

Course: Trade
Trade Career Center Staff Training Guide 55
9. Click the Add button. MOSES displays the Vendor Selection window. The Vendor Selection window displays the courses associated with a particular vendor selection record. You may add courses to this list.
10. Click the Add Course button. When the Add Course button is clicked, the Course Search screen is displayed.
11. Search for a Trade approved course. Select a course and click the Select
button.
12. Once the course is selected, you are navigated to the Course Details tab.
If cost and break information already exists for the selected course, this information is brought over to the TAA Participant module and defaulted for the Course selected.
The Career Center counselor must examine the defaulted values, change those values if necessary, and provide comments for such changes.
Information that is updated for the defaulted cost items and the defaulted schedule break items are saved to related job seeker trade record only and not updated in the Training course module.

Course: Trade
Trade Career Center Staff Training Guide 56
13. The Course Details tab displays information specific to one course on the vendor selection window. Determination, break information, and justification information is entered and displayed on this screen.
14. The course that you selected during your course search is displayed in the Course Information group box. The Course ID, Course Name, Provider ID and Provider Name, are displayed.
15. Select an option from the Recommendation drop down list. Select either
Recommended Course or Alternative Course.
16. Set the Submission Status to Work In Progress since data is still being entered.
17. Select an option for Apprenticeship. (If this program is an Apprenticeship.)
18. Select an option for Full-time. (Is this program Full-time?)
19. Select an option for Pre-Requisite(s). (Does the person have Pre-requisites for the program?)
Pre-Requisites should only be selected for customers taking pre-requisite courses in Degree programs.

Course: Trade
Trade Career Center Staff Training Guide 57
20. Enter dates for the Training Start Date and Training End Date fields. These are required fields.
21. If applicable, review the information in the Break Information group box. Data will
be populated in this group box if the break information exists in the MOSES Training Course module. Otherwise, this group box will be blank and you will have to enter the break information for the course.
The Break Type drop down list is not populated from the Training Course module. You must select an option. The Individual Verification Received is not defaulted. Check this checkbox if the client has signed off on the form.
22. After the break information is reviewed or entered, answer the questions in the
Best Option group box. Select Yes or No for each question.
If you select the No radio button for any question, the Comments field is required. You must justify based on the selected criteria, if you select a higher cost training.
23. Click the OK button to save the record and to close the window.

Course: Trade
Trade Career Center Staff Training Guide 58
24. MOSES displays the Vendor Selection window. The record you just saved is displayed in the Vendor Selection group box.
25. Click the Add Course button to add another course to the Vendor Selection. Search for a Trade Approved course, select the course, and click the Select button to be taken to the Course Details tab. Set this Recommendation status to Alternative Course.
26. Click the OK button to save the record and to view the Vendor Selection window.
27. If necessary, add another course. Once complete, you should now view the
Vendor Selection window.
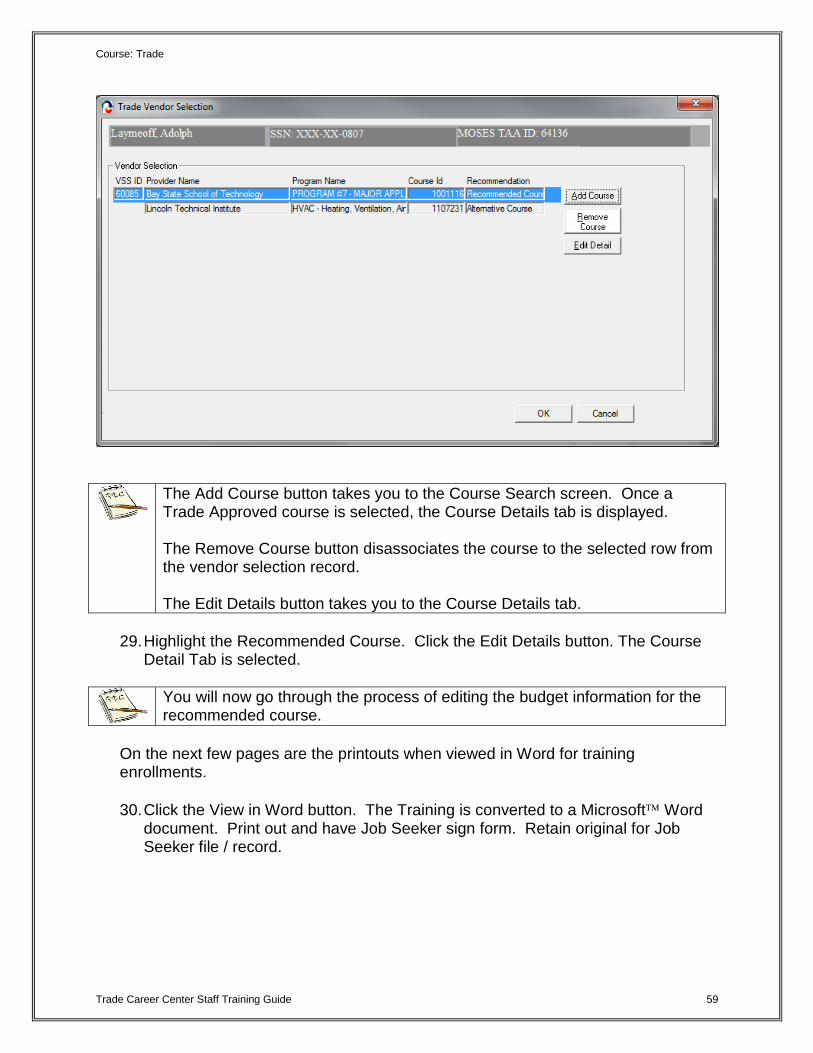
28. Review the buttons located inside the Vendor Selection group box.
Course: Trade
Trade Career Center Staff Training Guide 59
The Add Course button takes you to the Course Search screen. Once a Trade Approved course is selected, the Course Details tab is displayed. The Remove Course button disassociates the course to the selected row from the vendor selection record. The Edit Details button takes you to the Course Details tab.
29. Highlight the Recommended Course. Click the Edit Details button. The Course
Detail Tab is selected.
You will now go through the process of editing the budget information for the recommended course.
On the next few pages are the printouts when viewed in Word for training enrollments.
30. Click the View in Word button. The Training is converted to a Microsoft Word document. Print out and have Job Seeker sign form. Retain original for Job Seeker file / record.

Course: Trade
Trade Career Center Staff Training Guide 60
MUST BE KEPT ON FILE WITH SIGNATURES

Course: Trade
Trade Career Center Staff Training Guide 61

Course: Trade
Trade Career Center Staff Training Guide 62

Course: Trade
Trade Career Center Staff Training Guide 63
Complete and submit the training budget 1. Click the Training Package tab. This tab displays budget information specific to
one course on the vendor selection window (the recommended course).
If the selected Trade Approved course already has cost items entered by the vendor, a summary of the cost items is already displayed on the Training Package tab in the Pending Budget section.
2. A row in the Pending Budget section signifies that the Career Center Counselor
has submitted the budget to the Trade Office for review. If the budget is approved, the budget will appear in the Approved Budget section. If the budget is denied, the budget will appear in the Budget History section.
If a modification needs to be submitted for review, select an approved record and click the Modify button. Update the information and save the modified amounts and / or dates. This record will be displayed as pending and the existing record will remain in the Approved Budget section until the new pending record is reviewed. Once the updated budget record is reviewed and if it is approved, the budget record will become the approved record and the formerly approved record will move to the Budget History section. The updated record will move to the Approved Budget section.

Course: Trade
Trade Career Center Staff Training Guide 64
If the revision is denied, the budget record will move to the Budget History section and the existing approved record will remain in the Approved Budget section. Keep track of the most recent budget based upon “Date Created” field.
3. Review the buttons in the Budget group box.
The Add button is disabled if there is a record in the Pending Budget section or if there is a record in the Approved Budget section. The Modify button is disabled if a Pending budget record is selected. To edit a pending budget, click the Edit button. The Modify button functionality is designed to allow Career Center staff the ability to submit a modified budget request, while keeping the existing, approved budget available for financial reporting purposes. When the Modify button is clicked, a copy of the selected budget (which is the last approved budget) will open in the Budget Detail window, only the requested amounts should be pre-filled. When the modified budget is saved, the existing budget record is not updated and the record remains in the Approved Budget section.

Course: Trade
Trade Career Center Staff Training Guide 65
The Edit button is enabled if any budget row is selected. This functionality is designed to allow Career Center Counselors the ability to update a pending budget, which has not yet been reviewed by Trade Admin user. The Edit button allows Trade Administrators the ability to edit the amount of an approved budget. If the Trade Administrator wishes to zero-out the budget, the Trade Admin user will change approved amounts to $0.00. When the Edit button is clicked, the selected budget will open in the budget detail window. The existing budget amounts may be updated; however, the budget status will not change. The Delete button is disabled if the budget is in the Approved Budget section. When the button is clicked, the budget record is deleted.
4. If no budget exists, click the Add button, which is located on the Budget tab, to
add a new budget record on the Training Budget Summary window. If a pending budget already exists, click the Edit button to make changes to the Pending budget record.
5. MOSES displays the Training Budget window. The Training Budget window
displays a list of cost line items if cost items already existed in the Training Course module. The Cost Information group box allows you to view trade cost information associated with a particular course. You may add an infinite number of cost line items. The Total Cost will automatically calculate and appear at the bottom of the last row.
Course: Trade
Trade Career Center Staff Training Guide 66
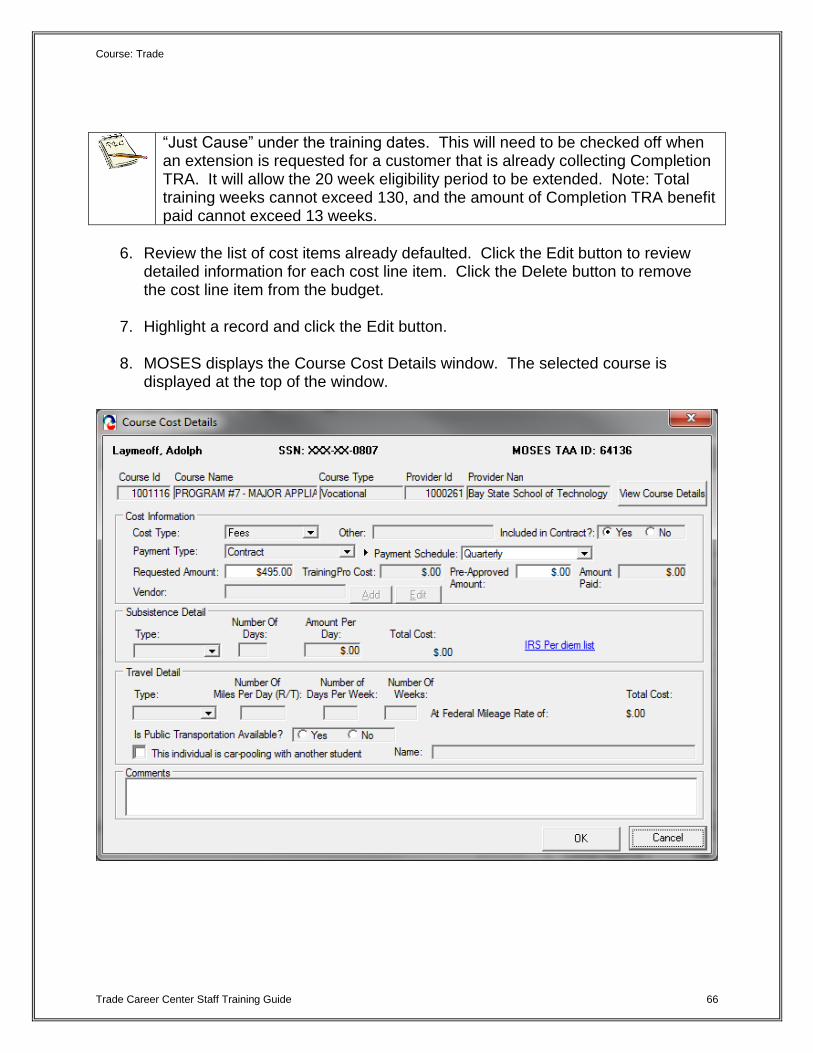
“Just Cause” under the training dates. This will need to be checked off when an extension is requested for a customer that is already collecting Completion TRA. It will allow the 20 week eligibility period to be extended. Note: Total training weeks cannot exceed 130, and the amount of Completion TRA benefit paid cannot exceed 13 weeks.
6. Review the list of cost items already defaulted. Click the Edit button to review
detailed information for each cost line item. Click the Delete button to remove the cost line item from the budget.
7. Highlight a record and click the Edit button. 8. MOSES displays the Course Cost Details window. The selected course is
displayed at the top of the window.

Course: Trade
Trade Career Center Staff Training Guide 67
9. Review data for the Cost Information group box. Fields:
Field Name Required Comments
Cost Type The following cost types are available:
Tuition, Fees, Health Insurance, Books, Supplies, Uniforms, Tools, Travel Expenses, Subsistence, or Other
This field is defaulted to the cost type if a budget existed for the training course selected
Cost Other This field is enabled and is required when the Cost Type = Other
Included in Contract Select Yes or No
Requested Amount Enter the amount requested that relates to the cost type
This field is defaulted to the cost type if a budget existed for the training course selected
Approved Amount This field is only enabled for Trade Administrators.
Payment Type Select from the options: Purchase Order,
Contract, or Reimbursement
This field is defaulted to the cost type if a budget existed for the training course selected
Vendor This is a disabled field that displays the Vendor ID of the associated Vendor selected via the Vendor search screen
This field is required if the Payment Type is Purchase order

Course: Trade
Trade Career Center Staff Training Guide 68
10. If Cost Type = Subsistence, the Subsistence Detail group box is enabled.
Subsistence Fields:
Field Name Required Comments
Subsistence Type The following options are available: Meals,
Travel, Lodging
Number of Days Enter a number
Amount per Day Enter currency
Total Cost This is a calculated field that multiplies the number of days times the amount per day
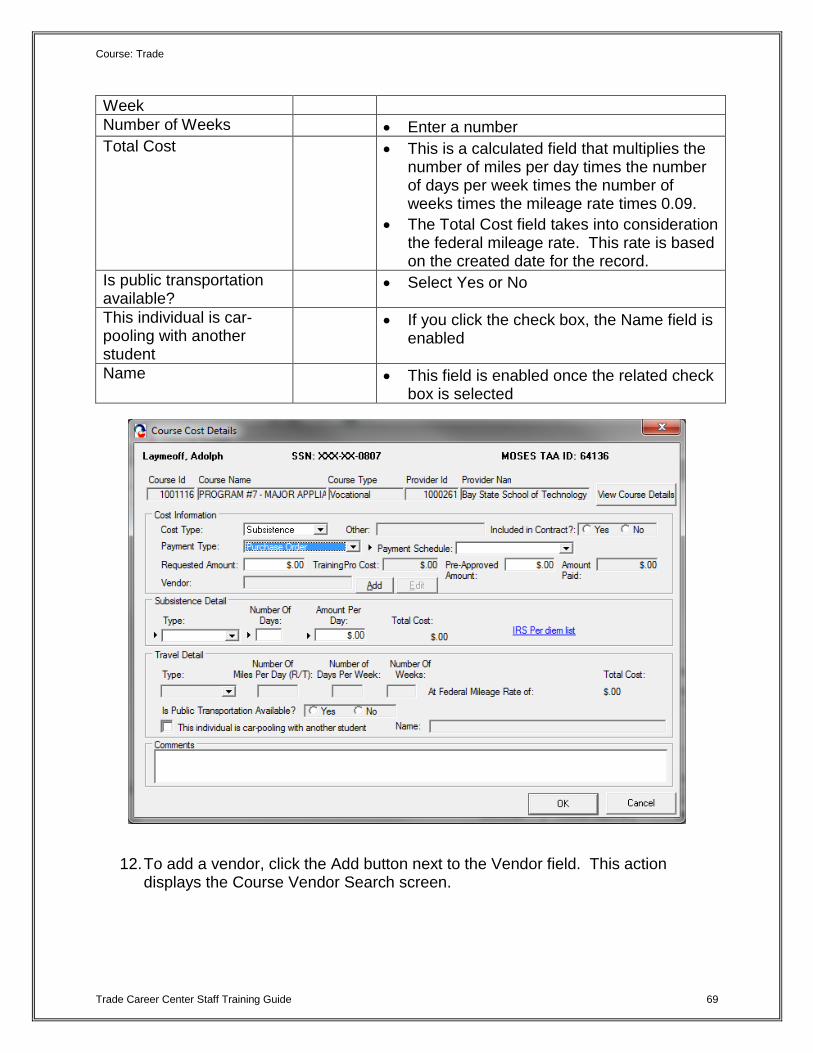
11. If Cost Type = Travel, the Travel Details group box is enabled. Travel Fields:
Field Name Required Comments
Type The following options are available: auto,
train, bus
Number of Miles Per Day Enter a number
Number of Days Per Enter a number
Course: Trade
Trade Career Center Staff Training Guide 69
Week
Number of Weeks Enter a number
Total Cost This is a calculated field that multiplies the number of miles per day times the number of days per week times the number of weeks times the mileage rate times 0.09.
The Total Cost field takes into consideration the federal mileage rate. This rate is based on the created date for the record.
Is public transportation available?
Select Yes or No
This individual is car-pooling with another student
If you click the check box, the Name field is enabled
Name This field is enabled once the related check box is selected
12. To add a vendor, click the Add button next to the Vendor field. This action displays the Course Vendor Search screen.

Course: Trade
Trade Career Center Staff Training Guide 70

Course: Trade
Trade Career Center Staff Training Guide 71
13. Once the vendor search is successful, highlight the record and click Select to add the vendor from the search. The Vendor ID appears in the Vendor field.

Course: Trade
Trade Career Center Staff Training Guide 72
14. Click the Edit button located next to the Add button for the Vendor field. 15. MOSES displays the Vendor Information window, which lists details for the
Vendor.
16. Click the OK button to close the Vendor Information window. 17. MOSES displays the Course Cost Details window. Click the OK button to close
the Course Cost Details window.
Course: Trade
Trade Career Center Staff Training Guide 73
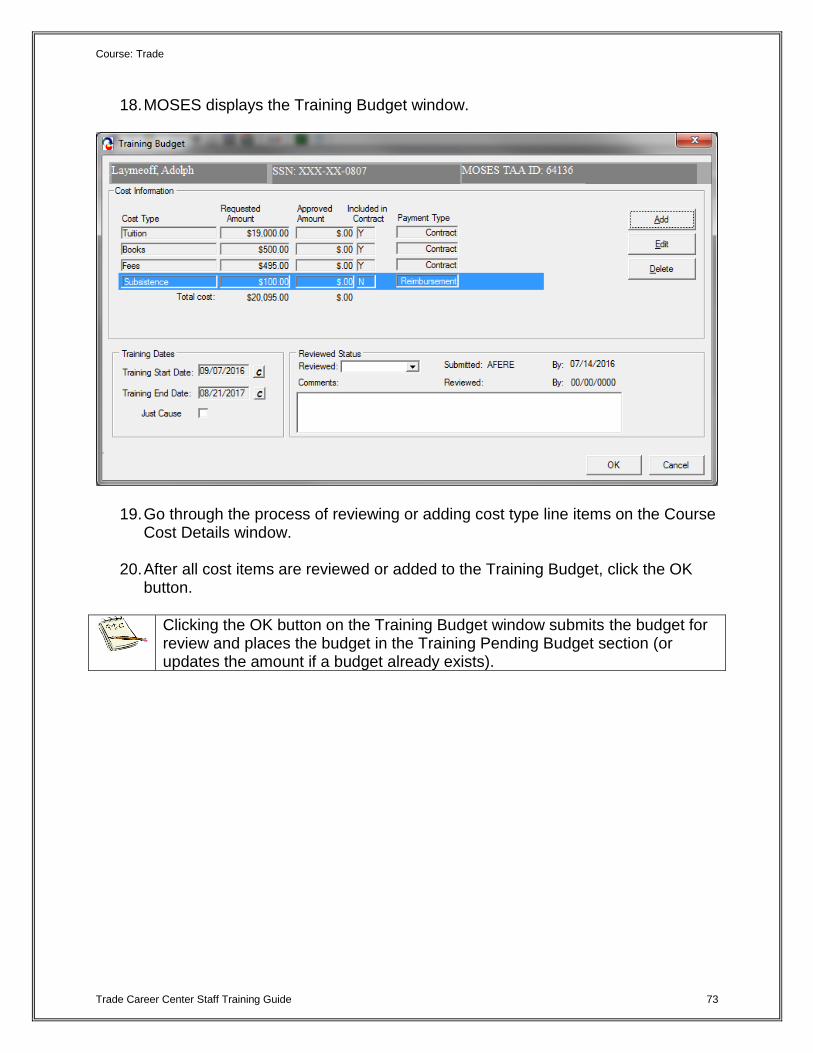
18. MOSES displays the Training Budget window.
19. Go through the process of reviewing or adding cost type line items on the Course Cost Details window.
20. After all cost items are reviewed or added to the Training Budget, click the OK
button.
Clicking the OK button on the Training Budget window submits the budget for review and places the budget in the Training Pending Budget section (or updates the amount if a budget already exists).

Course: Trade
Trade Career Center Staff Training Guide 74
21. MOSES displays the Training Details window with the Training Package tab selected.
22. The budget data you entered is displayed in the Pending Budget section.
23. If you want to edit the budget, click the Edit button.
24. Click the Course Detail tab.

Course: Trade
Trade Career Center Staff Training Guide 75
Submit Vendor Selection for review (Continued from above) 25. Update the Submission Status to Submitted. The Determination Status should
now be set to Pending.
MOSES automatically sets the Determination Status to Pending when the Submission Status is set to Submitted.
26. The As of date field is pre-filled with today’s date. 27. Select an option for the Submitted Via field. The options available are: In Person,
Phone, Mail, Rapid Response, or Other. The Submitted Via field is defaulted to In Person when the Submission status is set to Submitted.
28. The By field displays the User ID of the person who submitted the budget.

Course: Trade
Trade Career Center Staff Training Guide 76
The As of and the Submitted Via field are required if the Submission Status is equal to Submitted. The By field displays the User ID of the user logged into the system when an option is selected from the Submitted Via field.
29. Select the check box, Customer Signature Obtained, to indicate that the
customer signature is on file. Enter a date in the Signature Date field. These fields are required.
30. Click the save icon.
The save icon is located in below the top menu.
31. Click the Training Package tab.
You are performing these steps to verify that the data on the Submission status is now disabled since the Submission status is now Submitted and the record was saved.
32. Click the Course Details tab. Since the data was saved and the Submission
Status is equal to Submitted, all fields on the Course Details tab are disabled.
The training record is now displayed in the TAA Admin module and is ready to be reviewed by the Trade Admin user. The training record appears in the TAA Admin module because the budget status and determination status are equal to pending. You have now submitted the training record for review. TAA will make a determination regarding the training record and budget. The submitter will receive an email notification of the determination decision.
A nightly interface will send the determination from MOSES to UI Online.
33. Note the changes to the training package fields once approved:

Course: Trade
Trade Career Center Staff Training Guide 77
Upon Approval of a Course enrollment, an automatic enrollment in Services – Course/Activity will be generated. You must “enroll” the client upon their actual commencement in training.
These Services help to track the DOL standard for Common Measures

Course: Trade
Trade Career Center Staff Training Guide 78
An approved budget will also display on the Training Package tab.

Course: Trade
Trade Career Center Staff Training Guide 79
Complete and submit a Modified Training budget
1. Click the Training Package tab. This tab displays budget information specific to the course (the recommended course).
2. To submit a modification, select the approved Training Package record and click the Modify button.

Course: Trade
Trade Career Center Staff Training Guide 80
3. Highlight the Cost Type and Click Edit.
4. In the Requested Amount box insert the new requested amount. It should be the original amount plus the new requested amount. Click Ok to submit.
Course: Trade
Trade Career Center Staff Training Guide 81
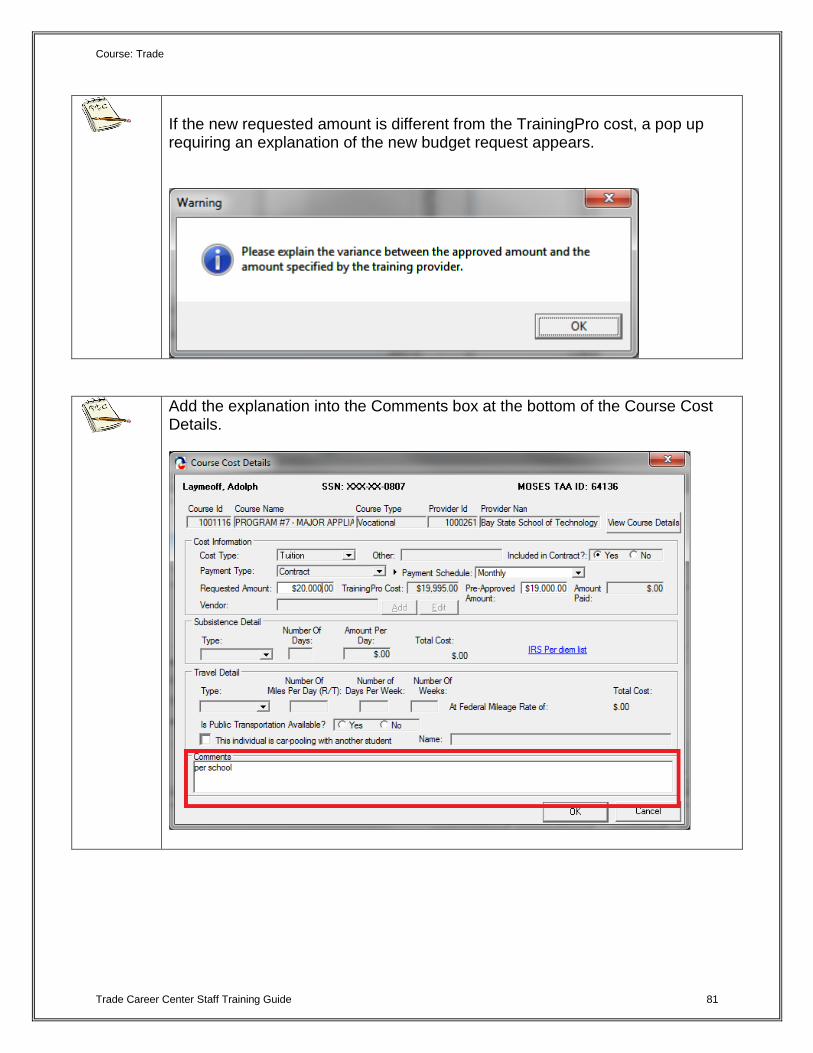
If the new requested amount is different from the TrainingPro cost, a pop up requiring an explanation of the new budget request appears.
Add the explanation into the Comments box at the bottom of the Course Cost Details.

Course: Trade
Trade Career Center Staff Training Guide 82
5. Note the new Requested Amount now appears on the Training Budget.
6. Click Ok to submit the new modified contract. Note it now is a Pending Training Package.

Course: Trade
Trade Career Center Staff Training Guide 83
Chapter 4: Job Seeker Trade Record
Benchmark Record
Overview Training benchmarks encourage early intervention and modification of unsuccessful training plans. Modifications can increase training completion and credential attainment. Benchmarks will be documented in an individual employment plan and signed by the participants. Benchmarks are required for trainings longer than 3 months for participants under the 2011 and 2015 Trade acts.
Benchmarks must be established at training package submission. They are required for Completion TRA eligibility, review will be conducted every 60 days from start of training.
Security Trade Admin, Trade Staff, and Trade View Only users can access this screen Key Proccess Career Centers will data enter Benchmark data via MOSES. All related Benchmark forms with original signatures of the applicant are filed at the Career Center. If the applicants training will be longer than 90 days; Benchmarks will need to be entered every 60 days from the beginning of training. Two benchmarks will need to be created;
Maintain Satisfactory Academic Standing
Complete training within Approved Timeframe After completing this lesson, you should be able to:
Enter data for Benchmarks

Course: Trade
Trade Career Center Staff Training Guide 84
Enter Data for Benchmarks
1. Go to the Case Plan Tab; “Goals”
2. Click Add Goal and Select ‘Maintain Satisfactory Academic Standing’ in the ‘Type’ dropdown menu. Please note the associated auto populated Goal Narrative.

Course: Trade
Trade Career Center Staff Training Guide 85
3. Add a Due Date. The due dates is 60 days from the Start Date of Training. 4. Click OK.
1. Click Add Goal and Select ‘Complete Training within Approved Timeframe’ in the ‘Type’ dropdown menu. Please note the associated auto populated Goal Narrative.
2. Add a Due Date (the due date is 60 days from the Start Date of Training).

Course: Trade
Trade Career Center Staff Training Guide 86
3. Repeat adding these two (2) goals every sixty (60) days.
4. Continue setting these two (2) goals up to but not beyond the approved TAA end date of the training.
Example of a completed case (please note the scroll bar for more)

Course: Trade
Trade Career Center Staff Training Guide 87
Chapter 4: Job Seeker Trade Record
Reemployment Trade Adjustment Assistance (RTAA) and Alternative Trade Adjustment Assistance (ATAA) Record
Overview The R/ATAA tab captures information related to the Reemployment Trade Adjustment Assistance (RTAA) program and the Alternative Trade Adjustment Assistance (ATAA) program. Once the worker is determined eligible for TAA (approved 1666), the worker can apply for RTAA or ATAA as appropriate. Workers applying for R/ATAA must file the application through a Career Counselor at the Career Center. Determinations for R/ATAA are performed by TAA staff. Security Trade Admin, Trade Staff, and Trade View Only users can access this screen. Key Process Changes Career Centers will data enter R/ATAA data via MOSES. All related R/ATAA forms with original signatures of applicant are filed at Career Center. Each R/ATAA record has a Submission Status (Submitted and Work In Progress) and a Determination Status (Approved, Denied, Pending and Withdrawn). R/ATAA determinations are tracked via MOSES. TAA informs applicants regarding their eligibility for R/ATAA. An email is sent to the submitter concerning the determination once the determination status is updated. After completing this lesson, you should be able to:
Enter data for RTAA / ATAA application
Submit an RTAA / ATAA application
Submit Monthly Certifications
Print forms
See General Requirements on next pages for more details.

Course: Trade
Trade Career Center Staff Training Guide 88
Enter data for an R/ATAA application
1. Go to the Job Seeker Search Screen. Type of Search By: Job Seeker ID, Last Name, SS Number, Claimant ID: Search for a job seeker record and click the Search button.
2. MOSES will display Search Results based on the search criteria entered.
3. Select a record in the search results.
4. Click the Trade button at the bottom of the screen.
5. Under Trade Determination: MOSES displays the Job Seeker Trade Records
window for the job seeker you selected.
6. To Add an R/ATAA application, double-click on the record you are submitting the application under to open the job seeker trade record.
7. MOSES displays the Trade Application Details window with the Application
Information.
8. Click on the RTAA/ATAA Tab.

Course: Trade
Trade Career Center Staff Training Guide 89
9. Enter the data for the fields in the R/ATAA Basic Information and Former Salary Information group box.
10. Trade Application Details window is display with the following Fields:
Basic Information, Certified Former salary Information, Applications
Field Name Required Comments
Basic Information:
Applicant DOB Applicant’s date of birth is displayed, verify age
Separation Date The date is pre-filled from the Application Info tab
26 Week Deadline MOSES displays a date that is 26 weeks after the Separation Date (only applies if ATAA eligible)
Certified Former salary Information:
Former Salary This field is pre-filled with the salary information tied to the WORK EXPERIENCErecord added on the Application Info tab
Per This field is required if the former salary is entered
The following options are available: Hour, Week, Month, and Year
Average Hr/Wk This field is required if the Former Salary (per) field is equal to hour
Annualized Former Salary MOSES calculates the annual salary based on Hour, Week, Month or Year
Salary Verification Method This field is required; former salary verification is requiredThe following options are available: Pay Stub, Letter from Employer, Other
Other This field is required if the Salary Verification Method is equal to Other
Former Number of hours Worked During Last Week of Full Employment
Enter Hours
11. Click OK to save information.
Course: Trade
Trade Career Center Staff Training Guide 90
Submit an R/ATAA application
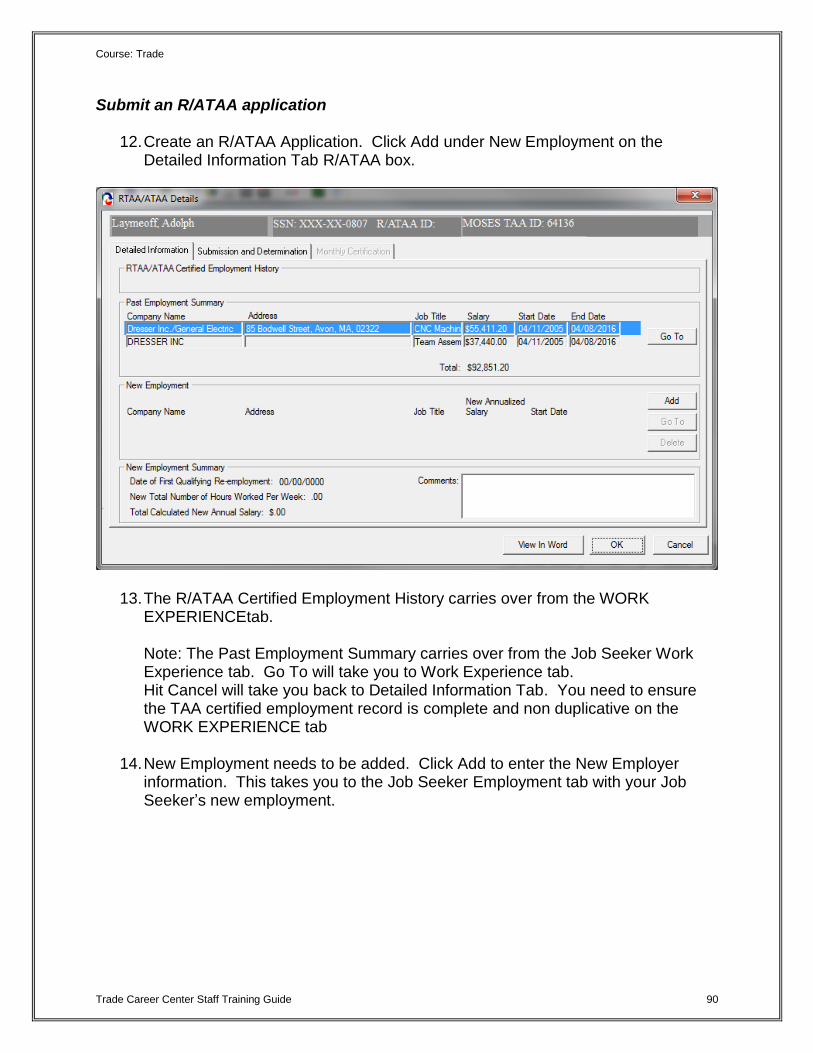
12. Create an R/ATAA Application. Click Add under New Employment on the Detailed Information Tab R/ATAA box.
13. The R/ATAA Certified Employment History carries over from the WORK EXPERIENCEtab. Note: The Past Employment Summary carries over from the Job Seeker Work Experience tab. Go To will take you to Work Experience tab. Hit Cancel will take you back to Detailed Information Tab. You need to ensure the TAA certified employment record is complete and non duplicative on the WORK EXPERIENCE tab
14. New Employment needs to be added. Click Add to enter the New Employer
information. This takes you to the Job Seeker Employment tab with your Job Seeker’s new employment.
Course: Trade
Trade Career Center Staff Training Guide 91
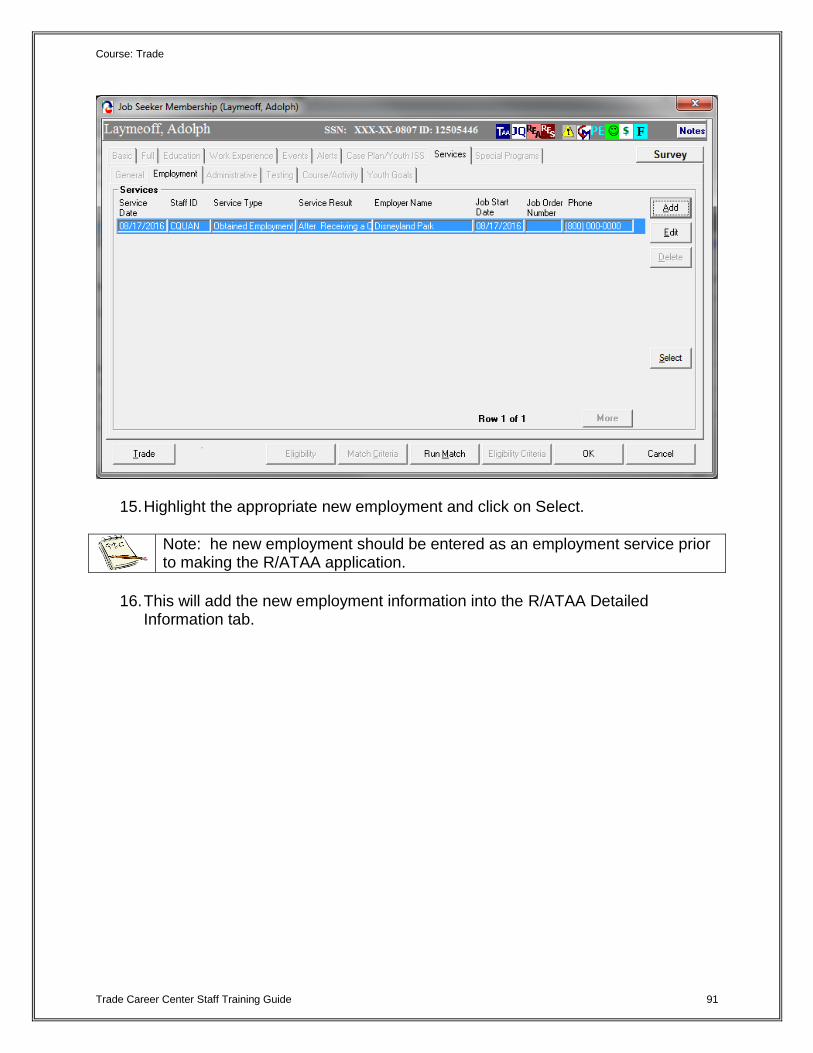
15. Highlight the appropriate new employment and click on Select.
Note: he new employment should be entered as an employment service prior to making the R/ATAA application.
16. This will add the new employment information into the R/ATAA Detailed
Information tab.

Course: Trade
Trade Career Center Staff Training Guide 92
NOTE: The New Employment section is now filled out.
17. After you have reviewed the data in the R/ATAA Detail Information tab, the application is ready to be submitted to the central office.
18. Click on the Submission and Determination Tab. – Under Initial Determination
Select Submitted for the Submission Status. This sets the Determination status to Pending automatically. Check box for Signature Obtained, to indicate that the signature of the customer is on file. While doing this a date is populated automatically into Signature Obtain Date: Enter a related date that the signature was obtained in the Signature Date field. Also Submitted Via: select one; these are required fields if the Submission Status is set to Submitted. Now click OK to submit the application for the R/ATAA to the Central office.
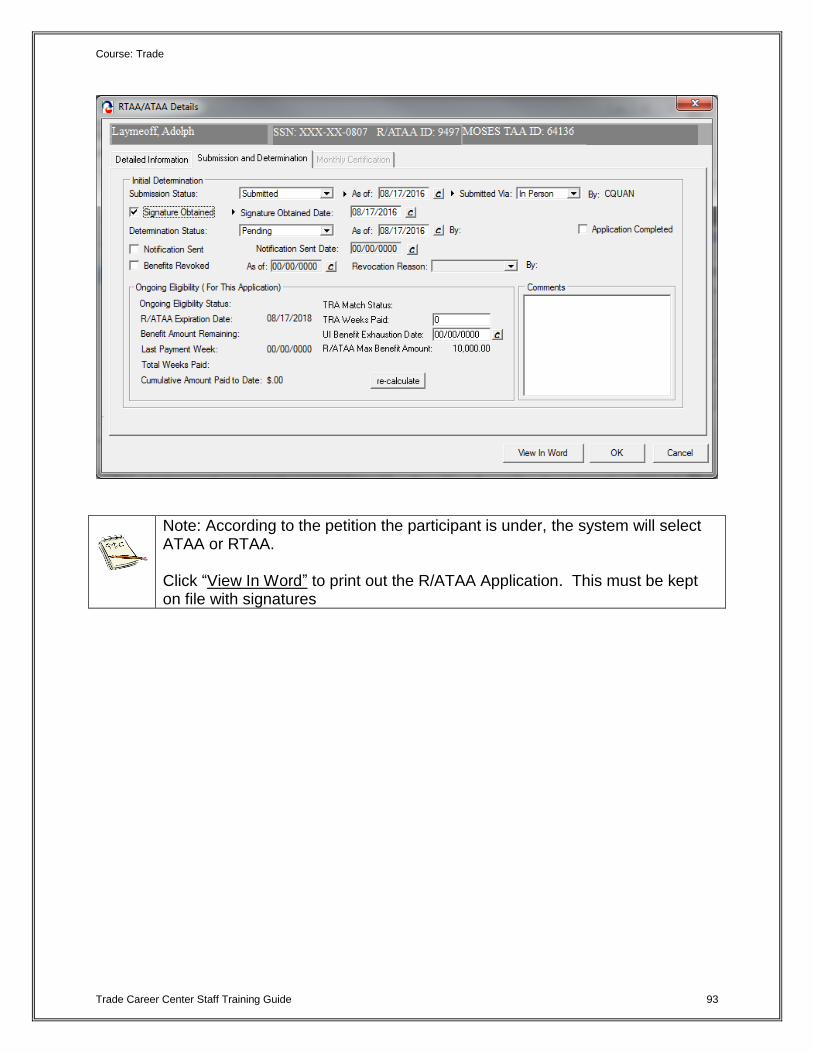
Course: Trade
Trade Career Center Staff Training Guide 93
Note: According to the petition the participant is under, the system will select ATAA or RTAA. Click “View In Word” to print out the R/ATAA Application. This must be kept on file with signatures

Course: Trade
Trade Career Center Staff Training Guide 94
MUST BE KEPT ON FILE WITH SIGNATURES

Course: Trade
Trade Career Center Staff Training Guide 95
19. Once the R/ATAA application has had a determination issued you can click Edit to review and/or add weekly certifications.
20. In the R/ATAA Details screen click on the Monthly Certification tab.

Course: Trade
Trade Career Center Staff Training Guide 96
21. Now that the R/ATAA has been approved you may submit requests for R/ATAA
payments to your client. Click Add to bring up the R/ATAA Details Tab.
22. Enter the first day of the month for the month being submitted. Under Monthly
Submission: Set the Submission Status to Work In Progress until you are ready to submit the completed month. Now click Add.
23. This brings up the R/ATAA Weekly Details screen. Enter the appropriate information.
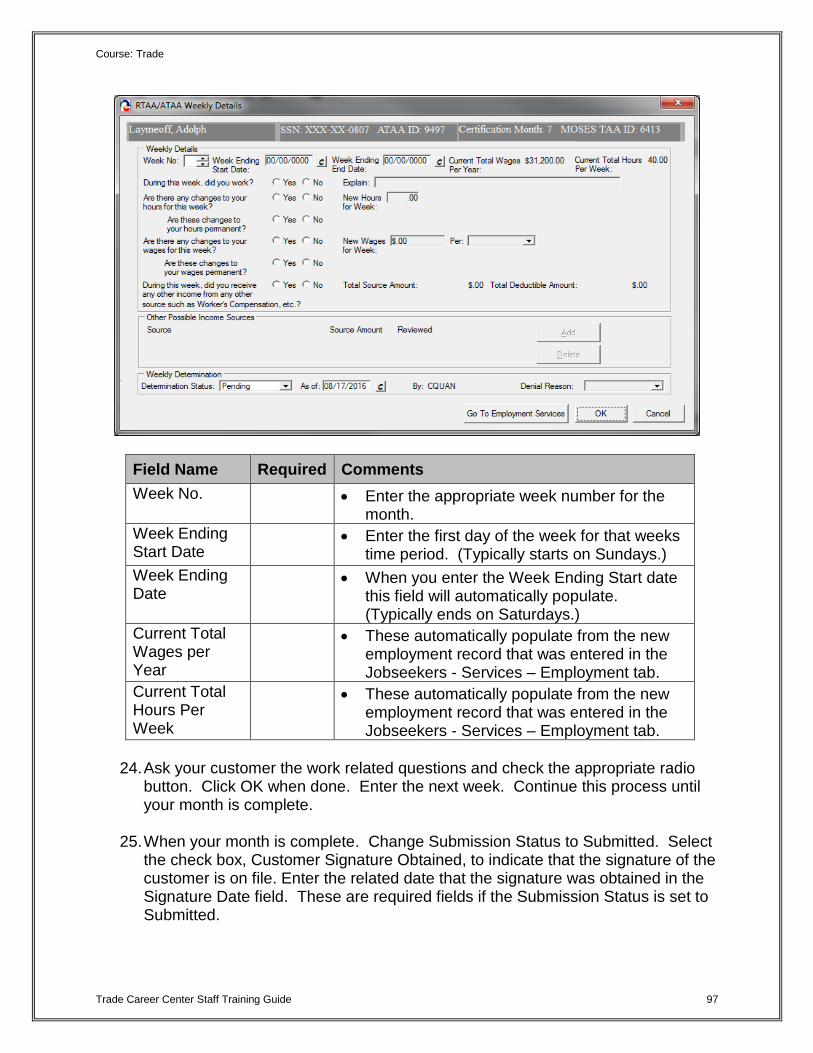
Course: Trade
Trade Career Center Staff Training Guide 97
Field Name Required Comments
Week No. Enter the appropriate week number for the month.
Week Ending Start Date
Enter the first day of the week for that weeks time period. (Typically starts on Sundays.)
Week Ending Date
When you enter the Week Ending Start date this field will automatically populate. (Typically ends on Saturdays.)
Current Total Wages per Year
These automatically populate from the new employment record that was entered in the Jobseekers - Services – Employment tab.
Current Total Hours Per Week
These automatically populate from the new employment record that was entered in the Jobseekers - Services – Employment tab.
24. Ask your customer the work related questions and check the appropriate radio
button. Click OK when done. Enter the next week. Continue this process until your month is complete.
25. When your month is complete. Change Submission Status to Submitted. Select the check box, Customer Signature Obtained, to indicate that the signature of the customer is on file. Enter the related date that the signature was obtained in the Signature Date field. These are required fields if the Submission Status is set to Submitted.

Course: Trade
Trade Career Center Staff Training Guide 98
26. Obtain and check verification of employment for the certification period from the client. Select the appropriate Salary Verification Method. Options are:
Pay Stub
Letter from Employer or
Other- If Other is selected, Other field becomes active and appropriate documentation must be entered. Now click OK to submit the R/ATAA to the Central office.
Note: The same weekly pay period must be used throughout the entire RTAA application. (ex. Sunday through Saturday or Monday through Sunday pay periods)

Course: Trade
Trade Career Center Staff Training Guide 99
27. Your Monthly Certification tab should reflect the monthly information.
Click on Print Monthly Request Form to print out the Monthly Certification Application.
Note: The original Monthly certification documentation must be sent in with verification documentation and must be kept on file with signatures.

Course: Trade
Trade Career Center Staff Training Guide 100
MUST BE KEPT ON FILE WITH SIGNATURES

Course: Trade
Trade Career Center Staff Training Guide 101
28. Once the Monthly Certification is determined the R/ATAA payments that were
approved will show on the screen.
29. The payments made with R/ATAA funds will be reflected in the “Benefit Amount Remaining”.

Course: Trade
Trade Career Center Staff Training Guide 102
30. The payments to date will show on the main R/ATAA tab.

Course: Trade
Trade Career Center Staff Training Guide 103
Note: If the client’s employment information has changed use the “Go To Employment Services” button to update employment history in Job Seekers record. This would be used for a change in hours or earnings only.

Course: Trade
Trade Career Center Staff Training Guide 104
Note: Do not enter another “obtained employment” record. You should be entering a FOLLOWUP to the job already documented and making the proper changes to that follow-up record.
Note: If new employment is obtained the existing application must be closed by central office and a new application must be submitted.

Course: Trade
Trade Career Center Staff Training Guide 105
Chapter 4: Job Seeker Trade Record
Job Search Allowance Record
Overview It is the responsibility of a Career Center Counselor to inform an applicant of benefits provided under the Trade program. Career Center Counselors should inform applicants that job search allowances may be payable to cover expenses incurred in seeking employment outside the certified worker's normal commuting area, if a suitable job is not available in the area. Career Center Counselors will work with the applicant to complete the Job Search Allowance. To access Job Search Allowance information, you must go to the Job Search/Relocation Tab within the Trade Application Details window. Security Trade Admin, Trade Staff, and Trade View Only users can access this screen. Key Process Changes After the Career Center (CC) Counselor works with the applicant to complete the Job Search Allowance, the Career Center Counselor will enter the Job Search Allowance data into MOSES. The CC Counselor will submit the Job Search Allowance and budget information via MOSES. The original form is filed at the applicant’s Career Center. An email notification is sent to the submitter of the job search allowance record in regards to the determination decision. If applicable, hearings are tracked in MOSES. After completing this lesson, you should be able to:
Add a job search allowance record
Add budget information necessary for the job search allowance
Submit the job search allowance for review
Add a modification to the job search allowance budget
Print forms

Course: Trade
Trade Career Center Staff Training Guide 106
Add a job search allowance record
1. Go to the Job Seeker Search Screen. Select the type of Search By for a job seeker record and click the Search button.
2. MOSES displays results based on the search criteria entered.
3. Select a record in the search results.
4. Click the Trade button, at the bottom of the Search Results.
5. MOSES displays the Job Seeker Trade Records window for the job seeker you
selected.
6. Click the Edit button to open the job seeker trade record.
7. MOSES displays the Trade Application Details window with the Application Info tab selected.
8. Click the Job Search/Relo Tab.
9. Inside the Job Search Allowance group box, click the Add button.

Course: Trade
Trade Career Center Staff Training Guide 107
10. A Warning window will pop up it will show if the Certification of Non-Suitable is not filled in, Enter text and click OK to save.
11. Click Add
12. MOSES displays the Job Search Details window. The Job Search Details
window contains two tabs. These tabs have information that is necessary for a job search allowance record. The Job Search Details window is displayed with the Interview Details and Budget Tabs.
13. The Interview Details tab captures information related to a job search interview.
A summary of the data entered on the Interview Details tab is displayed on the Job Seeker’s trade record Job Search tab. Click Add.
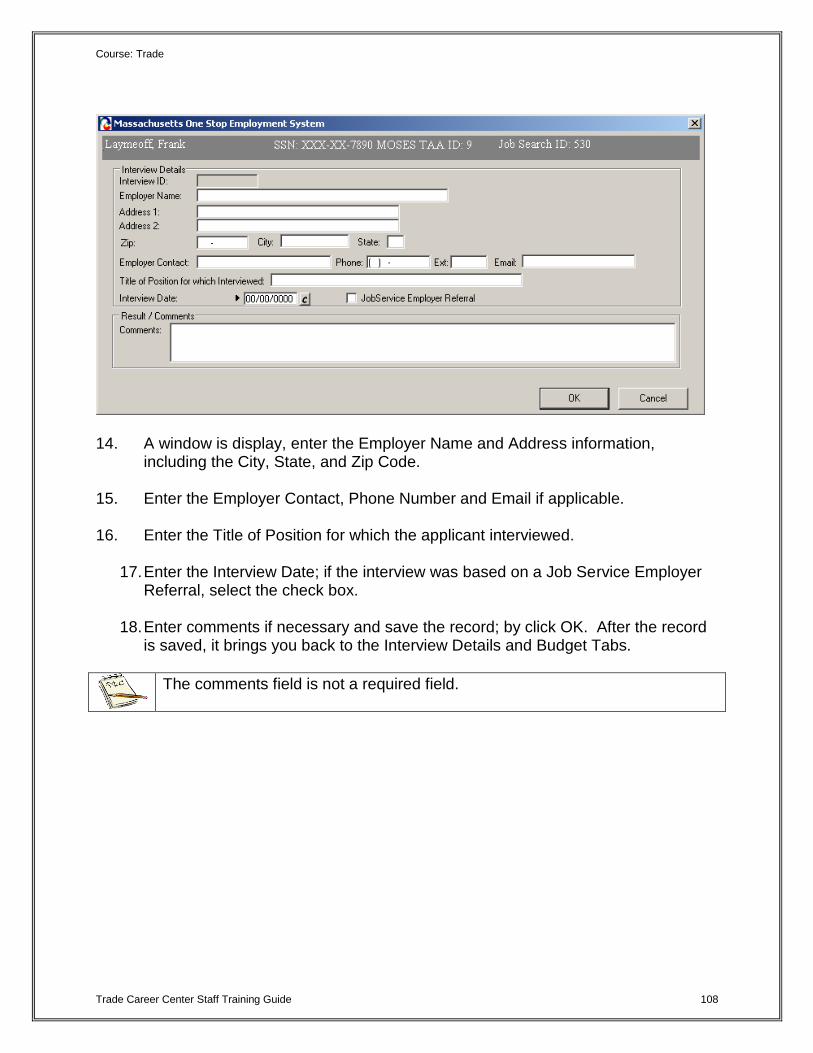
Course: Trade
Trade Career Center Staff Training Guide 108
14. A window is display, enter the Employer Name and Address information, including the City, State, and Zip Code.
15. Enter the Employer Contact, Phone Number and Email if applicable.
16. Enter the Title of Position for which the applicant interviewed.
17. Enter the Interview Date; if the interview was based on a Job Service Employer Referral, select the check box.
18. Enter comments if necessary and save the record; by click OK. After the record
is saved, it brings you back to the Interview Details and Budget Tabs.
The comments field is not a required field.

Course: Trade
Trade Career Center Staff Training Guide 109
Add budget information necessary for the job search allowance
1. Click on the Budget tab. This tab displays: Pending Budget, Approved Budget, and Budget History. Budget modifications can be made from this tab once a row exists in the Approved Budget section.
2. Click the Add button located inside the Budget tab.
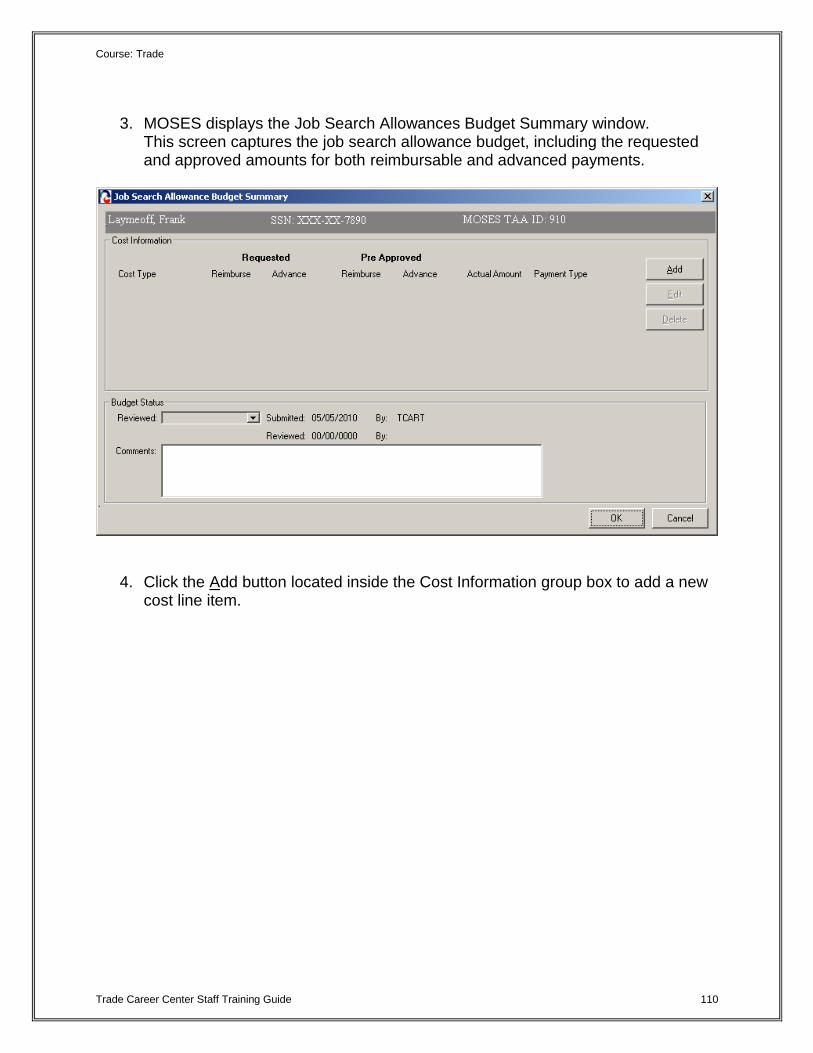
Course: Trade
Trade Career Center Staff Training Guide 110
3. MOSES displays the Job Search Allowances Budget Summary window.
This screen captures the job search allowance budget, including the requested and approved amounts for both reimbursable and advanced payments.
4. Click the Add button located inside the Cost Information group box to add a new
cost line item.

Course: Trade
Trade Career Center Staff Training Guide 111
5. The Cost Information group box contains a list of Cost Type line items.

Course: Trade
Trade Career Center Staff Training Guide 112
6. MOSES displays the Job Search Cost Details window. This window captures detailed cost information related to a specific job search cost line item. Data that appears on the Job Search Cost Details window is associated with the cost package listed on the Job Search Allowance Budget Summary window.
7. Enter data inside the Cost Information group box.

Course: Trade
Trade Career Center Staff Training Guide 113
Fields:
Field Name Required Comments
Cost Type The following options are available: Travel
Expense, Meals, Lodging, and Other
Selecting the Travel cost type will enable the Travel Details group box
Travel Type The following options are available: Air, Auto, Bus, Other, Train
Number of Miles (if travel by auto)
This field is enabled when cost type equals travel
This field is required only when travel type = auto
When the number of miles is entered, MOSES multiplies the number of miles * the federal mileage rate * 0.9 and populates the result in the Requested Reimbursed Amount field
MOSES multiplies the miles by 0.9 because the Trade Office only reimburses 90% of expenses
At a federal mileage rate of:
MOSES verifies the cost item created date and determines which federal mileage rate should be displayed based on valid federal mileage rates
Request Reimburse Amount
Career Center staff will enter the requested reimbursement amount
Requested Advance Amount
Career Center staff will enter the requested advance amount
Pre-Approved Reimburse Amount
The Trade Admin user will enter the pre-approved reimbursement amount
This field is only enabled for Trade Admin users
Pre-Approved Advanced Amount
The Trade Admin user will enter the pre-approved advance amount
This field is only enabled for Trade Admin users
Actual Amount This amount is entered after the Career Center sends in the receipts associated with the cost type line item
Payment Type The default is Reimbursement
The options that are available are: Contract,

Course: Trade
Trade Career Center Staff Training Guide 114
Purchase Order, Reimbursement
Vendor The vendor ID associated to the Vendor that you selected from the Vendor Search screen will be displayed
This field is required if the Payment Type equals Purchase Order
8. Select a Cost Type of Travel.
The Travel Details group box is now enabled.
9. Enter the Requested Amounts. 10. Enter data inside the Travel Details group box.
Fields:
Field Name Required Comments
Travel Type The following travel types are available:
Auto, Plane, Train, Bus, Other
Travel From Enter the Travel From Date
Travel To Enter the Travel To Date
11. Click the OK button to save the data.
12. MOSES displays the Job Search Allowance Budget Summary window.
13. The information you just added is now displayed as a row in the Cost Information
group box.

Course: Trade
Trade Career Center Staff Training Guide 115
14. Click the Edit button.
15. MOSES displays the Job Search Cost Details window.
16. Click Cancel to view the Job Search Allowance Budget Summary window.
17. Click the Add button to add another Cost Type. Complete all relevant fields.
Click the OK button to save changes.

Course: Trade
Trade Career Center Staff Training Guide 116
18. Another row is added to the Cost Information group box. The rows you added are
summed and a total is displayed underneath each column.
No amounts appear in the Pre-Approved section. Once the Trade Admin user reviews the budget, the amounts entered by the Trade Admin user will appear in the Pre-Approved section once the data is saved.
19. Click the OK button to save the information and to close the Job Search
Allowance Budget Summary window.
20. MOSES displays the Budget tab. The cost information you just added is displayed and summarized in the Pending Budget section of the Budget group box.
21. Click the Edit button for the row in the Pending Budget section. MOSES displays
the Job Search Allowance Budget Summary window. 22. The Submitted field should display today’s date. The By field should display the
User ID of the person who submitted the budget.

Course: Trade
Trade Career Center Staff Training Guide 117
You have now submitted the job search allowance budget for review. TAA will make a determination on the budget. If your budget is approved, it appears in the Approved Budget section. If you budget is denied, it appears in the Budget History section. An email will be sent to you regarding the determination decision of the job search allowance. The budget will not appear in the TAA Admin module for review until the Determination status is set to Pending.
Submit the job search allowance for review
1. Click the Interview Details tab. The Interview Details tab captures submission and determination information for the job search allowance.
2. Set the Submission Status to Submitted. The Determination Status is
automatically set to Pending.
The options available for the Submission Status are Work In Progress, Submitted, or Withdrawn.

Course: Trade
Trade Career Center Staff Training Guide 118
Once you select the Submitted status from the Submission Status drop down list box and you save the record, the Allowance Determination tab becomes disabled for all users except Trade Admin users. The tab is also disabled if you select the Withdrawn status as the Submission Status.
3. Review the fields that become populated when Submission Status is set to
Submitted.
4. The As of date field is pre-filled with today’s date. This field is required if
Submission Status is equal to Submitted.
5. The Submitted Via drop down list box is defaulted to In Person. This field is required if Submission Status is equal to Submitted. The options for the Submitted Via field are In Person, Phone, Mail, Rapid Response.
The By field is updated when you select set the Submission status equal to Submitted (or Withdrawn).
6. Select the check box, Customer Signature Obtained, to indicate that the
signature of the customer is on file. Enter the date that the signature was obtained in the Signature Date field. These are required fields when the Submission Status is set to Submitted.

Course: Trade
Trade Career Center Staff Training Guide 119
7. Choose the Yes or No radio button for each question listed inside the Job Search Travel Determination group box.
8. Now click View JS Allowance form button. This will convert the Job Seeker Job
Search Allowance details into a Microsoft Word document. Print this out and have the customer sign the form. Give the Job Seeker a copy and put original in Job Seekers folder / records.

Course: Trade
Trade Career Center Staff Training Guide 120
MUST BE KEPT ON FILE WITH SIGNATURES

Course: Trade
Trade Career Center Staff Training Guide 121
MUST BE KEPT ON FILE WITH SIGNATURES

Course: Trade
Trade Career Center Staff Training Guide 122
9. In addition, View Interview form button must be clicked to print out in Microsoft Word, the Job Interview details Form. The Job Seeker must take this form to the interviewing employer and have that employer sign off on it for verification of their interview. Once signed by the potential employer, the original should be placed in the Job seekers file / record.

Course: Trade
Trade Career Center Staff Training Guide 123
MUST BE KEPT ON FILE WITH SIGNATURES

Course: Trade
Trade Career Center Staff Training Guide 124
Fields:
Question Required Comments
Worker was last totally separated from adversely affected employment within the past year
Select Yes or No
Career Center counselor certification of non-suitable employment completed
Select Yes or No
Application for job search allowance made not later than 365th day after date of certification
Select Yes or No
Application for job search allowance made not later than 182nd day after conclusion of training
Select Yes or No
Job Search within the appropriate dates of <<Date>> and <<Date>>
Select Yes or No
The Job Search dates will be displayed if entered on the Job Search tab
Did the applicant accept a referral made by a job service employer?
Select Yes or No
Verification of interview complete
Select Yes or No
10. Click the OK button to save the record and to close the window.
These fields on the Allowance Determination tab are disabled for Trade Staff users once the Submission status is set to Submitted.
You have now submitted the job search allowance for review. Your record now appears in the TAA Admin module since a budget exists with a status of Pending and a Determination status exists with a status of Pending (the Determination status was set to Pending when the Submission status was set to Submitted). TAA will make a determination regarding the job search allowance record and budget. You will receive an email notifying you of the determination decision once the Determination status field is updated.

Course: Trade
Trade Career Center Staff Training Guide 125
11. MOSES displays the Job Search tab. The record you added appears in the Job Search Allowance group box with a status of Pending.
12. Click the OK button to close the Trade Application Details window.

Course: Trade
Trade Career Center Staff Training Guide 126
Add a modification to the job search allowance record
A Career Center counselor can modify an approved budget. A user can only modify an approved budget when a record exists in the Approved Budget section. A user cannot modify an approved budget when a record exists in the Pending budget section.
1. Go to the Job Seeker Search Screen. Search for your job seeker record and
click the Search button. 2. MOSES displays results based on the search criteria entered.
3. Select a record in the search results.
4. Click the Trade button.
5. MOSES displays the Job Seeker Trade Records window for the job seeker you
selected.
6. Click the Edit button to open the job seeker trade record.
7. MOSES displays the Trade Application Details window with the Application Info tab selected.
8. Click the Job Search tab.

Course: Trade
Trade Career Center Staff Training Guide 127
9. Highlight the record in the Job Search Allowance group box and click the Edit
button. 10. The Interview Details tab is selected.
11. Click the Budget tab. You can modify an approved budget from the Budget tab.
12. Highlight the record in the Approved Budget section. Click the Modify button.
The Modify button is disabled if a row in the Pending Budget section is selected. When the Modify button is clicked, a copy of the selected budget will open in the budget detail window. Only the requested amounts are pre-populated. Once the modified budget record is saved, it will be saved with a budget status of Pending. The existing budget record (already approved) will not be updated. It will continue to be displayed in the Approved Budget section.
Once you submit a budget for review, the status of the budget displays as Pending in the TAA Admin module. If you submit a modification to the budget, the associated status displays as Pending Mod in the TAA Admin module.

Course: Trade
Trade Career Center Staff Training Guide 128
13. MOSES displays the Job Search Allowance Budget Summary window.
14. The Cost Information group box contains a list of Cost Type line items. 15. Highlight a row and click the Edit button.

Course: Trade
Trade Career Center Staff Training Guide 129
16. MOSES displays the Job Search Cost Details window. This window captures detailed cost information related to a specific job search cost line item. Data entered about the cost type line item will be associated with the cost package listed on the Job Search Allowance Budget Summary window.
17. Modify the cost item as needed. Click the OK button to save the record. MOSES displays the Job Search Allowance Budget Summary window.
18. Select other records in the group box and modify the amounts as needed.
19. Once all modifications are entered, click the OK button to save the record.

Course: Trade
Trade Career Center Staff Training Guide 130
20. Click the OK button on the Job Search Allowance Budget Summary window.
21. MOSES displays the Budget tab.

Course: Trade
Trade Career Center Staff Training Guide 131
22. The budget you just modified is now displayed in the Pending Budget section. The amount that was originally approved by the Trade Office is displayed in the Total Approved field.
The approved budget is still displayed in the Approved Budget section.
23. Click the OK button.
24. MOSES displays the Job Search tab.
You have now submitted a modification to an existing approved budget for review. TAA will either approve or deny your modified budget. If your modified budget is approved, it appears in the Approved Budget section. If your modified budget is denied, it appears in the Budget History section. No records should appear in the Pending Budget section after the Trade Admin user has made his or her decision. The originally approved budget will move to the Budget History section.

Course: Trade
Trade Career Center Staff Training Guide 132
Chapter 4: Create a Job Seeker Trade Record
Create a Relocation Allowance Record
Overview It is the responsibility of a Career Center Counselor to inform an applicant of benefits provided under the Trade program. A Career Center Counselor informs the applicant that Relocation Allowances may reimburse approved expenses when the certified applicant has to move to a new area of employment outside their normal commuting area due to lack of marketable skills within their commuting area. Security Trade Admin, Trade Staff, and Trade View Only users can access this screen. Key Process Changes Career Center Counselors will data enter the Employment Verification Form for Relocation Allowances. This form is kept on file at the worker’s Career Center. All related Relocation Allowance forms with original signature of applicant are filed at Career Center. The submitter of the relocation allowance record will receive an email notification in regards to the determination decision. If applicable, hearings are tracked in MOSES. After completing this lesson, you should be able to:
Add a relocation allowance record
Add budget information necessary for the relocation allowance
Submit the relocation allowance for review
Print forms

Course: Trade
Trade Career Center Staff Training Guide 133
Highlights:
TRADE PROGRAMS RELOCATION ALLOWANCES
RELOCATION ALLOWANCES
2009 Only 2002, 2011, 2015
A worker will be reimbursed 100% of
their relocation expenses, and increases
the additional lump sum payment for
relocation to a maximum of $1,500.
A worker may be reimbursed for 90% of their
relocation costs, plus a lump sum payment of three
times the worker’s weekly wage
up to $1,250

Course: Trade
Trade Career Center Staff Training Guide 134
Add a relocation allowance record
1. Go to the Job Seeker Search Screen. Search for a job seeker record and click the Search button.
2. MOSES displays results based on the search criteria entered.
3. Select a record in the search results.
4. Click the Trade button.
5. MOSES displays the Job Seeker Trade Records window for the job seeker you
selected.
6. Click the Edit button to open the job seeker trade record.
7. MOSES displays the Trade Application Details window with the Application Info tab selected.
8. Click the Job Search / Relocation tab.
9. Click the Add button located inside the Relocation Allowance group box.

Course: Trade
Trade Career Center Staff Training Guide 135
10. MOSES displays the Relocation Details window. The Relocation Details window contains three tabs. These three tabs have information that is necessary for a relocation allowance record. The Relocation Details window is displayed with the New Employment tab selected.
11. The New Employment tab captures information about the new employment related to the relocation allowance, including a link to the entered employment record, employer contact information and employer relocation assistance.
12. In the New Employment Details group box, click the Add button to add the new employment information.
13. MOSES displays the Employment tab of the Services module within the Job Seeker Membership module.
A. If the correct employment already exists in the Employment Services module, you can highlight the record and click the Select button. This action associates the selected employment with this relocation allowance record.
B. If the correct employment is not already in the employment services
module, click the Add button to navigate to the Employment Services Detail screen and enter new employment information.
Only one employer can be added to the New Employment Details group box.

Course: Trade
Trade Career Center Staff Training Guide 136
The new employment for the relocation record is linked to the employment service.
14. Enter a first name and last name in the Employer Contact field. 15. If applicable, enter the phone number, phone extension, and email address for
the employer contact.
16. Enter a date in the Expected Move Date field.
17. When the employment is verified, click the Employment Verified check box and enter a date in the Employment Verification date.
18. The Verified By field is based on the current MOSES user who checks the
“Employment Verified” box and saves the record.
19. Review the fields in the Relocation Assistance group box.
20. Select the Yes or No radio button for the question: Worker Entitled to Relocation Assistance from Employer. Select the Yes radio button.
21. The Travel, Moving, Meals and Lodging, and Lump Sum fields become enabled.
Enter the amount of money that the client will receive from the new employer for Relocation Assistance.
22. If applicable, enter comments.
23. Click the OK button to save the data.
Add budget information necessary for the relocation allowance
1. From the Job Search tab, click the Edit button for the new relocation allowance you added.
2. The New Employment tab is selected.

Course: Trade
Trade Career Center Staff Training Guide 137
3. Click the Budget tab. The Relocation Details window is displayed. This tab displays the Relocation Budget, including the pending budget, approved budget and budget history. Budget modifications can be made from this tab when a record appears in the Approved Budget section.
4. Click the Add button located inside the Budget tab.
5. MOSES displays the Relocation Allowance Budget window. This screen captures the relocation allowance budget, including the Estimated Amount, the Pre-Approved Amount and the Actual Paid Amount.

Course: Trade
Trade Career Center Staff Training Guide 138
6. The Cost Information group box contains a list of Cost Type line items. In order
for cost type line items to be displayed in the Cost Information group box, you must add cost type line items by clicking the Add button.
7. Click the Add button located inside the Cost Information group box.
8. MOSES displays the Relocation Cost Details window. This window captures
detailed cost information related to a specific relocation cost line item. Data entered about the cost type line item will be associated with the cost package listed on the Relocation Allowance Budget window.
9. Enter data inside the Cost Information group box.
Fields:
Field Name Required Comments
Cost Type The following options are available: Travel
Allowance, Meals and Lodging, Transportation of Household Goods, Lump Sum
Selecting the Travel Allowance cost type

Course: Trade
Trade Career Center Staff Training Guide 139
will enable the Travel Details group box
Number of Miles (if travel by auto)
This field is enabled when cost type equals travel allowance
This field is required only when travel type = auto
When the number of miles is entered, MOSES multiplies the number of miles * the federal mileage rate * 0.9 and populates the result in the Estimated Amount field
MOSES multiplies the miles by 0.9 because the Trade Office only reimburses 90% of expenses
At Federal Mileage Rate of:
MOSES verifies the cost item created date and determines which federal mileage rate should be displayed based on valid federal mileage rates
Estimated Amount Career Center staff will enter the requested reimbursement amount
Approved Amount The Trade Admin user will enter the pre-approved amount
This field is only enabled for Trade Admin users
Actual Amount This amount is entered after the Career Center sends in the receipts
Payment Type The options that are available are: Contract,
Purchase Order, Reimbursement, Advance
The field is defaulted to Reimbursement
Vendor The vendor ID associated to the Vendor that you selected from the Vendor Search screen will be displayed
This field is required if the Payment Type is Purchase Order
10. Select a Cost Type of Travel Allowance.
The Travel Details group box is now enabled.
11. Enter the Estimated Amount. 12. Enter data inside the Travel Details group box.

Course: Trade
Trade Career Center Staff Training Guide 140
Fields:
Field Name Required Comments
Travel Type The following travel types are available:
Auto, Plane, Train, Bus, Other
Travel Identification
The following options are available: Worker, Spouse, Children, Other Family Members
Traveler Name Enter first name and last name of Travel Identification option selected
Traveler Age Enter age of person selected of Travel Identification option selected
Travel From Enter the Travel From Date
Travel To Enter the Travel To Date
13. Enter data in the comments box, if applicable 14. Click the OK button to save the data.
15. MOSES displays the Relocation Allowance Budget window.

Course: Trade
Trade Career Center Staff Training Guide 141
16. The information you just added is now displayed as a row in the Cost Information group box.
17. Click the Edit button.
18. MOSES displays the Relocation Cost Details window.
19. Click Cancel to view the Relocation Allowance Budget window.
20. Click the Add button to add another Cost Type. Complete all relevant fields.
21. Another row is added to the Cost Information group box. The rows you added are
summed and a total is displayed underneath each column.

Course: Trade
Trade Career Center Staff Training Guide 142
No amounts appear in the Approved or Actual section. Once the Trade Admin user reviews the budget, the amounts entered by the Trade Admin user will appear in the Approved section once the data is saved.
22. Click the OK button to save the information and to close the Relocation
Allowance Budget window.
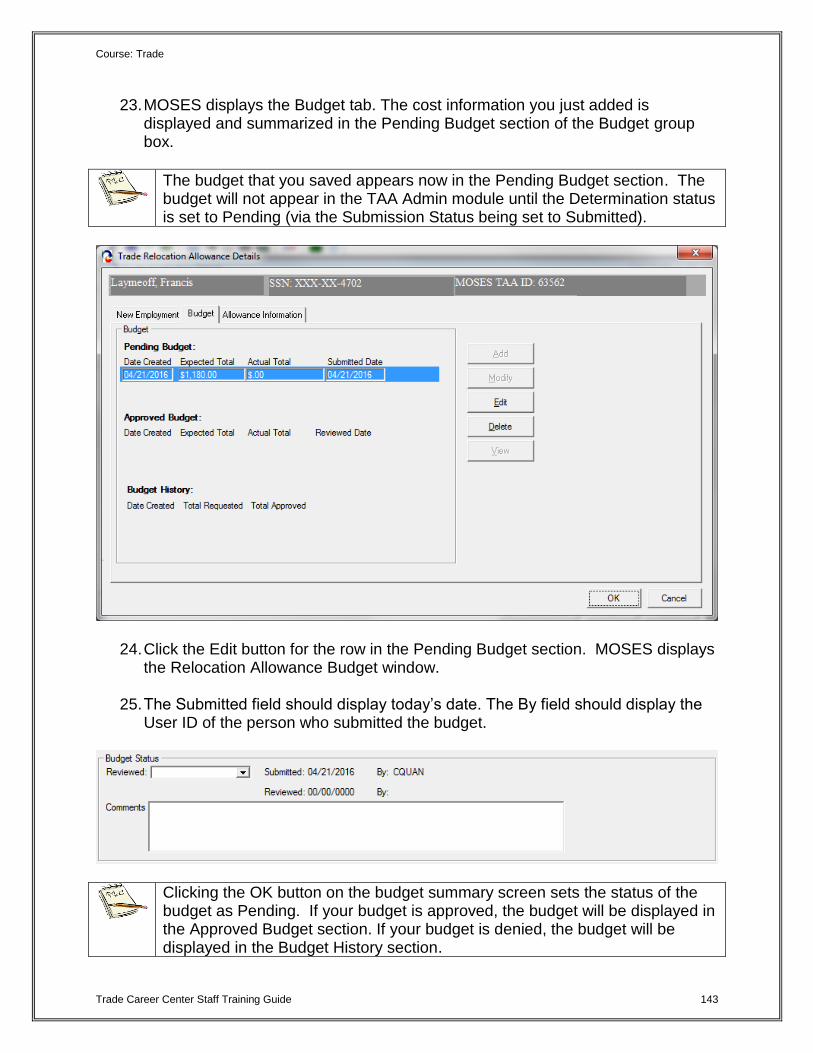
Course: Trade
Trade Career Center Staff Training Guide 143
23. MOSES displays the Budget tab. The cost information you just added is displayed and summarized in the Pending Budget section of the Budget group box.
The budget that you saved appears now in the Pending Budget section. The budget will not appear in the TAA Admin module until the Determination status is set to Pending (via the Submission Status being set to Submitted).
24. Click the Edit button for the row in the Pending Budget section. MOSES displays the Relocation Allowance Budget window.
25. The Submitted field should display today’s date. The By field should display the
User ID of the person who submitted the budget.
Clicking the OK button on the budget summary screen sets the status of the budget as Pending. If your budget is approved, the budget will be displayed in the Approved Budget section. If your budget is denied, the budget will be displayed in the Budget History section.

Course: Trade
Trade Career Center Staff Training Guide 144
Submit the relocation allowance for review
26. (Continued from above) Click the Allowance Information tab. The Allowance Information tab captures submission and determination information for the relocation allowance.
27. Set the Submission Status to Submitted. The Determination Status is
automatically set to Pending.

Course: Trade
Trade Career Center Staff Training Guide 145
The other option available for the Submission Status is Work In Progress.
Once you select the Submitted status from the Submission Status drop down list box and you save the record, the Allowance Determination tab becomes disabled for all users except Trade Admin users. The tab is also disabled if you select the Withdrawn status as the Submission Status.
28. The As of date field is pre-filled with today’s date. This field is required if
Submission Status is equal to Submitted.
29. The Submitted Via drop down list box is set to In Person when the Submission status is set to Submitted. This field is required if Submission Status is equal to Submitted. The options for the Submitted Via field are In Person, Phone, Mail, Rapid Response.
The By field is updated when you set the Submission status to Submitted or Withdrawn.
30. Select the check box, Customer Signature Obtained, to indicate that the
customer signature is on file. Enter a date in the Signature Date field. These fields are required.
31. Click the OK button to save the record and to close the window.

Course: Trade
Trade Career Center Staff Training Guide 146
These fields on the Allowance Determination tab are disabled for Trade Staff users when the Submission status is set to Submitted.
You have now submitted the relocation allowance for review. Your record now appears in the TAA Admin module since the budget status and Determination status are set to Pending. TAA will make a determination regarding the relocation allowance record and budget. You will receive an email notifying you of the determination decision when the Determination status is updated.

Course: Trade
Trade Career Center Staff Training Guide 147
32. Click on the View Employment Verification form button. This converts the new
Employment information into a Microsoft Word document. The Job Seeker should take this form to their new employer and have it signed by a Company Contact person verifying employment. Maintain the original in the Job Seeker’s folder / record.

Course: Trade
Trade Career Center Staff Training Guide 148
MUST BE KEPT ON FILE WITH SIGNATURES

Course: Trade
Trade Career Center Staff Training Guide 149
33. Click on View Relocation Application button. This converts the Relocation
information into a Microsoft Word document. The Job Seeker should sign off on this document to authenticate the relocation expenses and information. The original should be kept in the Job Seekers file / record.

Course: Trade
Trade Career Center Staff Training Guide 150
MUST BE KEPT ON FILE WITH SIGNATURES

Course: Trade
Trade Career Center Staff Training Guide 151
MUST BE KEPT ON FILE WITH SIGNATURES

Course: Trade
Trade Career Center Staff Training Guide 152
34. MOSES displays the Job Search tab. The record you added appears in the
Relocation Allowance group box.
35. Click the OK button to close the Trade Application Details window.

Course: Trade
Trade Career Center Staff Training Guide 153
Chapter 4: Create a Job Seeker Trade Record
View a Hearing Record
Overview Every determination decision can be appealed. As a result, each job seeker trade record has an associated Hearings window to track appeals, hearing dates, and related information. Hearings can only be accessed from the job seeker trade record via the TAA Participant module. Security Trade Admin, Trade Staff, and Trade View Only users can view this screen. Key Process Changes Hearings will be tracked via MOSES. After completing this lesson, you should be able to:
View a Hearing record The Hearing record
1. Go to the Job Seeker Search Screen. Search for a job seeker record and click the Search button.
2. MOSES displays results based on the search criteria entered.
3. Select a record in the search results.
4. Click the Trade button.
5. MOSES displays the Job Seeker Trade Records window for the job seeker you
selected.
6. Click the Edit button to open the job seeker trade record.
7. MOSES displays the Trade Application Details window with the Application Info tab selected.

Course: Trade
Trade Career Center Staff Training Guide 154
8. Click the Hearings tab.
9. Click the edit button to view a hearing record. 10. MOSES displays the Hearings Details window.

Course: Trade
Trade Career Center Staff Training Guide 155
11. View the Hearing Type. The options are: TAA Eligibility, ATAA/RTAA, HCTC, TRA Cash Benefits, Job Search Allowances, Relocation Allowances, Travel Allowances, Subsistence Allowances, Training, or Waiver from Training.
12. This is the information for all fields if applicable.
Fields:
Field Name Required Comments
Docket No. Docket number
Related Program This is a static field that displays the program type associated with the hearing
Date Appeal Received
Date appeal received at DCS
Date Sent to Hearing
Date sent to regional Hearings office (for scheduling).
Hearing Date Hearing date
Hearing Time Hearing time
Hearing Location The options available are: Boston, Dudley, Greenfield, Hyannis, Lawrence, Leominster, Lowell, Milford, Pittsfield, Salem, Taunton, Springfield, Worcester, Via Telephone, or Other
Other This text box is shown when the Other option for Hearing Location is selected
Hearing Decision The options available are: Affirmed, Overturned, Pending, Withdrew, or Other
Board of Review If applicable, select the check box
Hearing Comments
If applicable, view text
13. Click the OK button to close the record and to close the window.

Course: Trade
Trade Career Center Staff Training Guide 156
14. MOSES displays the Hearings tab. The record you just viewed appears in the
group box. 15. Click the OK button on the Hearings Information window to close the window.

Course: Trade
Trade Career Center Staff Training Guide 157
Chapter 4: Create a Job Seeker Trade Record
View Data for Health Coverage Tax Credit (HCTC)
Overview The Hearings / HCTC tab captures information related to the Health Coverage Tax Credit (HCTC) program when enacted. On a nightly basis, MOSES will produce a file of all eligible TAA participants for HCTC. This list of eligible participants is sent to DUA-UI Online (UIO) and run for a match with a UI or TRA payment. Matches are then sent to the IRS. The file is also returned to MOSES and the customers name is displayed on the Hearings / HCTC tab of the Trade Application Details window. Names are resent to UIO each night for a match for the month. WHAT IS IT?
o A tax credit covering 72.5% of an eligible participant’s monthly qualifying health insurance premium
o The HCTC is claimed at the end of the year as part of a customer’s filing his/her taxes
o For more information, go to www.irs.gov/HCTC

Course: Trade
Trade Career Center Staff Training Guide 158
Security Trade Admin, Trade Staff, and Trade View Only users can access this screen. After completing this lesson, you should be able to:
View HCTC Information View HCTC Information
1. Go to the Job Seeker Search Screen. Search for a job seeker record and click the Search button.
2. MOSES displays results based on the search criteria entered.
3. Select a record in the search results.
4. Click the Trade button.
5. MOSES displays the Job Seeker Trade Records window for the job seeker you
selected.
6. Click the Edit button to open the job seeker trade record.
7. MOSES displays the Trade Application Details window with the Application Info tab selected.
8. Click the Hearings/HCTC tab.

Course: Trade
Trade Career Center Staff Training Guide 159
9. Review the information in the HCTC Information group box. This group box will display each month and year that the determined individual was chosen for HCTC eligibility (see box below) . This individual was on the list that DCS submitted for review.
In order for an applicant to be eligible for HCTC, the worker must be receiving TRA or would be but has not yet exhausted UI (as of the first day of the month or any day within that month. To be eligible for TRA cash benefits you must be approved for Trade approved training (per the 8/16 or 26 week deadlines reviewed earlier in this document or have a Waiver approved by those same deadlines. RTAA / ATAA participants receiving RTAA / ATAA subsidy payments are also eligible for each month they collect. An interface exists between MOSES and the UI System to determine eligible candidates. If a candidate is potentially eligible, the eligible month will be displayed on the Hearings / HCTC tab for the job seeker trade record.
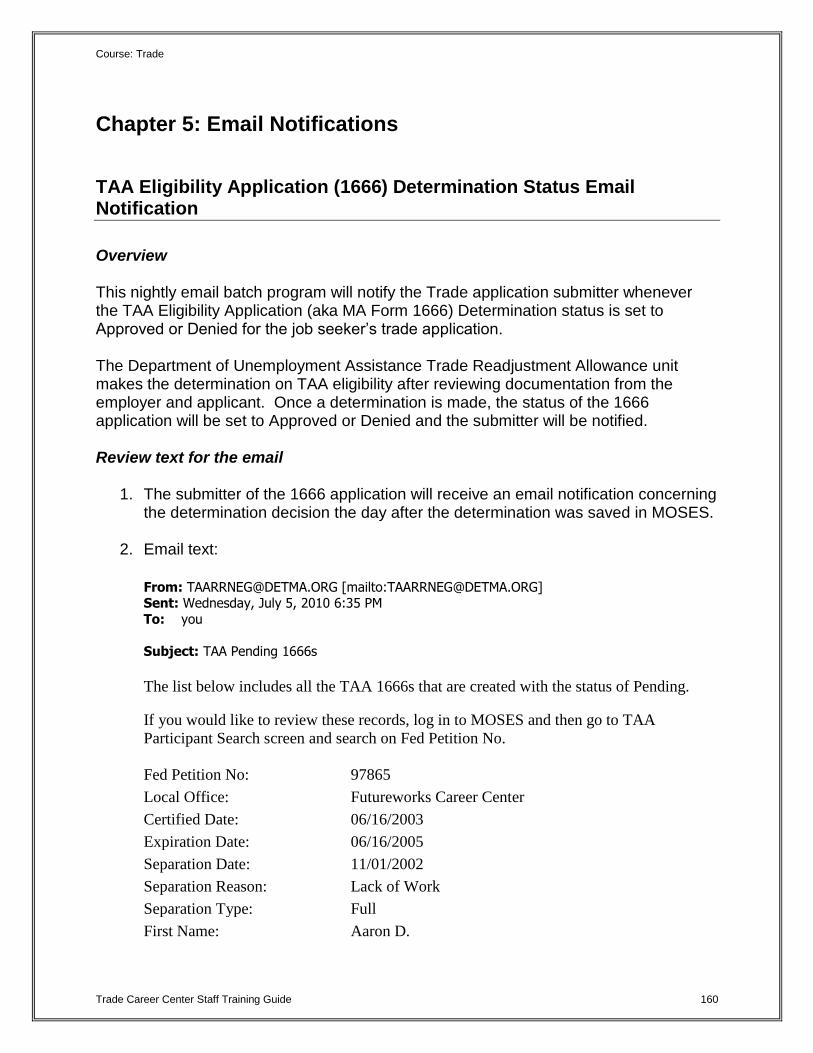
Course: Trade
Trade Career Center Staff Training Guide 160
Chapter 5: Email Notifications
TAA Eligibility Application (1666) Determination Status Email Notification
Overview
This nightly email batch program will notify the Trade application submitter whenever the TAA Eligibility Application (aka MA Form 1666) Determination status is set to Approved or Denied for the job seeker’s trade application. The Department of Unemployment Assistance Trade Readjustment Allowance unit makes the determination on TAA eligibility after reviewing documentation from the employer and applicant. Once a determination is made, the status of the 1666 application will be set to Approved or Denied and the submitter will be notified. Review text for the email
1. The submitter of the 1666 application will receive an email notification concerning the determination decision the day after the determination was saved in MOSES.
2. Email text:
From: [email protected] [mailto:[email protected]] Sent: Wednesday, July 5, 2010 6:35 PM
To: you
Subject: TAA Pending 1666s
The list below includes all the TAA 1666s that are created with the status of Pending.
If you would like to review these records, log in to MOSES and then go to TAA
Participant Search screen and search on Fed Petition No.
Fed Petition No: 97865
Local Office: Futureworks Career Center
Certified Date: 06/16/2003
Expiration Date: 06/16/2005
Separation Date: 11/01/2002
Separation Reason: Lack of Work
Separation Type: Full
First Name: Aaron D.

Course: Trade
Trade Career Center Staff Training Guide 161
Last Name: Tires
Address: 86 Flat Street
City: Springfield
State: MA
Zip Code: 01109
Phone: 413-456-4582
Employer Name: MeadWestvaco
Employment Start Date: 06/01/1998
Occupation Title: Bindery Workers
Submission Date: 05/05/2010
Fed Petition No: 83417
Local Office: Career Works
Certified Date: 11/19/2009
Expiration Date: 11/19/2011
Separation Date: 04/05/2010
Separation Reason: Lack of Work
Separation Type: Full
First Name: BUD
Last Name: LIGHT
Address: 365 CAN CIRCLE
City: HANSON BROTHERS
State: MA
Zip Code: 02341-1912
Phone: 781-293-6152
Employer Name: Gillette Corporation
Employment Start Date: 01/08/1996
Occupation Title: Office Clerks, General
Submission Date: 05/04/2010

Course: Trade
Trade Career Center Staff Training Guide 162
Chapter 5: Email Notifications
RTAA / ATAA Determination Status Email Notification
Overview
This nightly email batch program will notify the application submitter whenever the RTAA / ATAA Determination status is set to Approved or Denied for the job seeker’s RTAA / ATAA application. TAA staff will review the weekly certification submissions. Once a determination is made, the certification will be set to Approved or Denied and the submitter will be notified. Review text for the email
1. The submitter of the RTAA / ATAA application will receive an email notification concerning the determination decision the day after the determination was saved in MOSES.
2. Email text:
From: [email protected] [mailto:[email protected]]
Sent: Monday, June 28, 2010 6:39 PM Subject: RTAA/ATAA Determination Status Change: Approved/Denied/Withdrawn
The following Trade Application RTAA/ATAA Determination status has been changed.
Please log in to MOSES to find more details about this application.
Application ID : 1234
Job Seeker ID : 987563211
First Name : BUD
Last Name : LIGHT
Determination Status : Approved
Eligibility Period : 08/03/2011
Max R/ATAA allowance amount : 5636.80

Course: Trade
Trade Career Center Staff Training Guide 163
Chapter 5: Email Notifications
Job Search Allowance Determination Status Email Notification
Overview
This nightly email batch program will notify the application submitter whenever the job search allowance Determination status is set to Approved or Denied for the job seeker’s job search allowance application. TAA staff will review the Job Search Allowance request submissions. Once a determination is made, the allowance will be set to Approved or Denied and the submitter will be notified. Review text for the email
1. The submitter of the job search allowance will receive an email notification concerning the determination decision the day after the determination was saved in MOSES.
2. Email text:
From: MOSES – Trade Program
RE: Job Search Allowance Determination Status Change:
Approved/Denied
The following Trade Application Job Search Allowance
Determination status has been changed. Please log in to
MOSES to find more details about this application.
Application Id : 10000003
Applicant ID : 13456781
First Name : Michael
Last Name : Jones

Course: Trade
Trade Career Center Staff Training Guide 164
Chapter 5: Email Notifications
Relocation Allowance Determination Status Email Notification
Overview
This nightly email batch program will notify the application submitter whenever the relocation allowance Determination status is set to Approved or Denied for the job seeker’s relocation allowance application. TAA staff will review the Relocation Allowance request submissions. Once a determination is made, the allowance will be set to Approved or Denied and the submitter will be notified. Review text for the email
1. The submitter of the relocation allowance will receive an email notification concerning the determination decision the day after the determination was saved in MOSES.
2. Email text:
From: MOSES – Trade Program
RE: Relocation Allowance Determination Status Change:
Approved/Denied
The following Trade Application Relocation Allowance
Determination status has been changed. Please log in to
MOSES to find more details about this application.
Application Id : 10000004
Applicant ID : 13456782
First Name : Michelle
Last Name : Jones

Course: Trade
Trade Career Center Staff Training Guide 165
Chapter 5: Email Notifications
Course Determination Status Email Notification
Overview
This nightly email batch program will notify the application submitter whenever the course Determination status is set to Approved or Denied for the job seeker’s training application. TAA staff will review the training package submissions. Once a determination is made, the training package will be set to Approved or Denied and the submitter will be notified. Review text for the email
1. The submitter of the training record will receive an email notification concerning the determination decision the day after the determination was saved in MOSES.
2. Email text:
From: [email protected] [mailto:[email protected]]
Sent: None To: you (DWD)
Cc:
Subject: TAA Course Determination Status Change: Approved/Denied
The following Trade Application Course Determination status has been changed. Please
log in to MOSES to find more details about this application.
Application ID : 52843
Job Seeker ID : 66666666
First Name : POLLY
Last Name : ESTER

Course: Trade
Trade Career Center Staff Training Guide 166
Chapter 5: Email Notifications
Training Waiver Determination Status Email Notification
Overview
This nightly email batch program will notify the application submitter whenever the training waiver Determination status is set to Approved or Denied for a job seeker trade record. TAA staff will review the waiver application submissions. Once a determination is made, the waiver will be Approved or Denied and the submitter will be notified Review text for the email
1. The submitter of the training waiver will receive an email notification concerning the determination decision the day after the determination was saved in MOSES.
2. Email text:
From: [email protected] [mailto:[email protected]] Sent: Wednesday, October 05, 2010 6:35 PM
To: Goguen, Beth (DWD) Cc:
Subject: TAA Training Waiver Determination Status Change: Approved/Denied
The following Trade Application Training Waiver Determination status has changed.
Please log in to MOSES to find more details about this application.
Application ID : 98765
Job Seeker ID : 53489631
First Name : June
Last Name : Bugg

Course: Trade
Trade Career Center Staff Training Guide 167
Chapter 5: Email Notifications
TRA Determination Status Email
NOTICE: The launch of UI Online has set all TRA notifications to come from the UI Online system. MOSES no longer sends out notifications regarding TRA.

Course: Trade
Trade Career Center Staff Training Manual 168
Chapter 5: Email Notifications
Petition Status Email Notification
Overview
The Petition Status Email Notification notifies Trade Staff users (Career Center Managers) about Petition activities. A daily email notification is sent to Career Center Managers of newly submitted petitions, newly certified petitions, denied petitions, and petitions that have been withdrawn. Review text for the email
1. Career Center Managers (Trade Staff Users) will receive a weekly email notification detailing petition activities.
2. Email text:
From: MOSES – Trade Program
RE: TAA Petitions Summary
The list below includes a summary of all the petition
activities for the previous week. If you would like to
review these records, log in to MOSES and then go to Trade
Petition search screen and search on Petition ID.
Newly submitted or filed petitions:
1000000 – Fleet
1000001 - Kmart
Newly certified petitions:
1000002 – American
Newly denied petitions:
1000003 – Mercantile USA
Newly withdrawn petitions:
1000004 – Goodyear

Course: Trade
Trade Career Center Staff Training Manual 169
Chapter 6: Trade Reports
Trade Reports
Overview
Seven trade reports were created to summarize petition, job search allowance, relocation allowance, and training data. These trade reports are accessed from the Reports module in MOSES and are generated in Crystal. Security Users who have the Trade Admin and Trade Staff permissions can generate trade reports. After completing this lesson, you should be able to:
Generate a trade report
Review the Client Training Report
Review the Detailed Petition Report
Review the Job Search Allowance Report
Review the Quarterly Filed Petition Report
Review the Relocation Allowance Report
Review the Target Group Analysis Report
Review the Trade Entered Employment Report
Review the Waiver Report

Course: Trade
Trade Career Center Staff Training Manual 170
Generate a trade report
1. Click Reports from the MOSES top menu. Select TAARRNEG. The MOSES Reports selection window is displayed.
2. Select a trade report you wish to generate from the Report Names group box. 3. Choose a date criteria if applicable
4. Click the Criteria… button if applicable.
5. Select filter criteria and click the Preview button. 6. MOSES displays the Trade report.

Course: Trade
Trade Career Center Staff Training Manual 171
Review the Client Training Report
1. Go to the Reports module and select the Client Training Report, then click “Criteria”. The Client Training Report displays the client’s related training information.
2. The report can be filtered by the Client MOSES applicant ID, Completion Status,
LWIB, Petition #, Provider Name. The report is grouped by the Provider Name.
3. MOSES displays the report after all criteria is selected:

Course: Trade
Trade Career Center Staff Training Manual 172
Review the Detailed Trade Petition Report
1. Go to the Reports module and select the Detailed Petition Report, then click “Criteria”. The Detailed Trade Petition Report identifies, tracks, and displays trade petitions.
2. The report can be filtered by, Certified Date, File Date, Federal Status, City, or
LWIB.
3. MOSES displays the report after all criteria is selected:

Course: Trade
Trade Career Center Staff Training Manual 173
Review the Job Search Allowance Report
1. Go to the Reports module and select The Job Search Allowance Report, then click “Preview”. The Job Search Allowance Report displays job search allowance records and associated costs.

Course: Trade
Trade Career Center Staff Training Manual 174
Review the Quarterly Filed Petition Report
1. Go to the Reports module and select the Quarterly Filed Petition Report, then click “Preview”. The Quarterly Filed Petition Report shows the filed petitions and total cost given for assistance with mailings.
2. The report is sorted by company name.

Course: Trade
Trade Career Center Staff Training Manual 175
Review the Relocation Allowance Report
1. Go to the Reports module and select the Relocation Allowance Report, then click “Preview”. The Relocation Allowance Report displays relocation allowance records and associated costs. The report is sorted by MOSES ID.
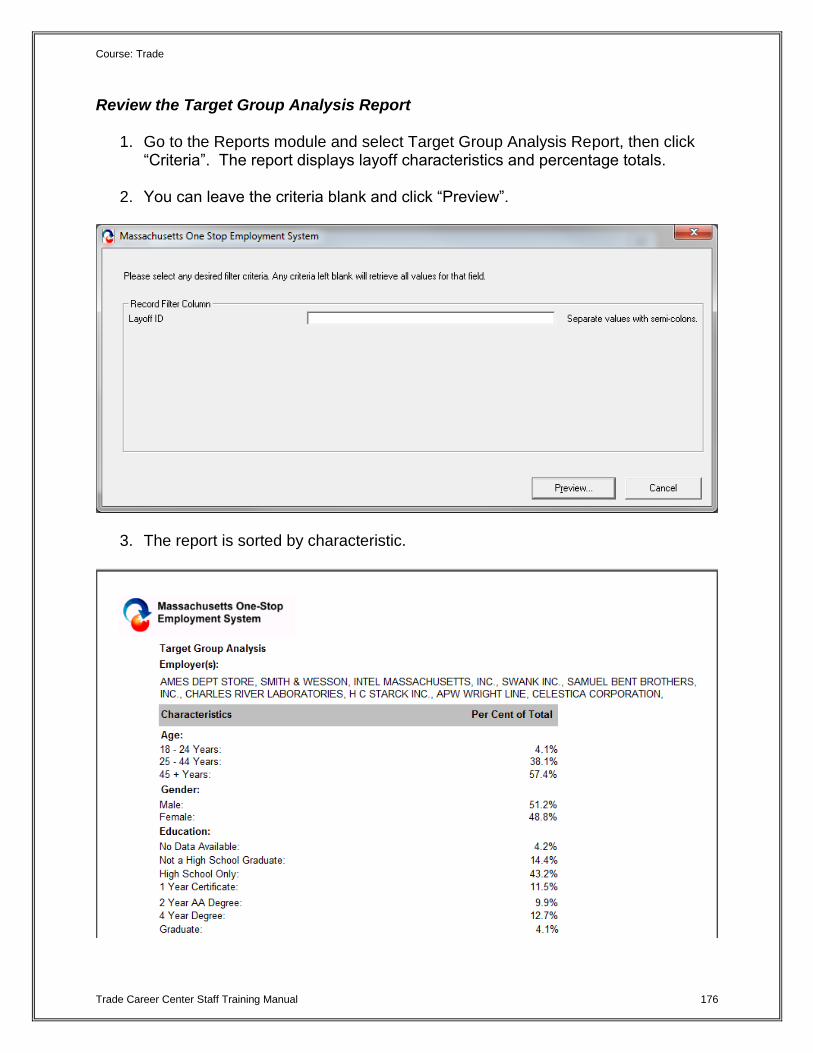
Course: Trade
Trade Career Center Staff Training Manual 176
Review the Target Group Analysis Report
1. Go to the Reports module and select Target Group Analysis Report, then click “Criteria”. The report displays layoff characteristics and percentage totals.
2. You can leave the criteria blank and click “Preview”.
3. The report is sorted by characteristic.

Course: Trade
Trade Career Center Staff Training Manual 177
Review the Trade Entered Employment Report
1. Go to the Reports module and select the Trade Entered Employment Report, then click “Criteria”. The Trade Entered Employment Report will show employment information for Trade customers. It displays training relation, employer name, occupation, salary difference, and etc.
2. The report can be filtered by Dates, Client MOSES ID, LWIB, Training Related,
Employer Name, or Petition Number.
3. When the information is selected, MOSES will display the report.

Course: Trade
Trade Career Center Staff Training Manual 178
Review the Waiver Report
1. Go to the Reports module and select the Waiver Report, then click “Criteria”. The Waiver Report displays waiver data such as waiver status, start date, end date, and waiver reason.
2. The report can be filtered by Waiver Start Date, End Date, LWIB, Waiver Status,
or Petition Number.
3. When the information is selected, MOSES will display the report.

Course: Trade
Trade Career Center Staff Training Manual 179
Generate a Trade Report
1. Go to http://www.mass.gov/massworkforce/ and Click Crystals Report Project.
To use these reports you must have Crystal Reports.
To run the reports:
Select Crystal Reports Project
Select Rapid Response/NEG/Trade
You will now see a list of reports that can be printed

Course: Trade
Trade Career Center Staff Training Manual 180
Chapter 7: Icons
Trade Icons
Overview Two Trade (TAA) icons now exist to identify a job seeker or employer’s association to the Trade program. After completing this lesson, you should be able to:
Identify a TAA icon for a job seeker
Identify a TAA icon for an employer Identify a TAA icon for a job seeker
A blue TAA icon is displayed for a job seeker on the Job Seeker Search screen when the job seeker is designated as TAA approved.
A gray TAA icon is displayed for a job seeker on the Job Seeker Search screen when the job seeker is designated as pending TAA determination.
If you mouse over the blue TAA icon, in the status bar it says TAA Approved
If you mouse over the gray TAA icon, in the status bar it says TAA Pending
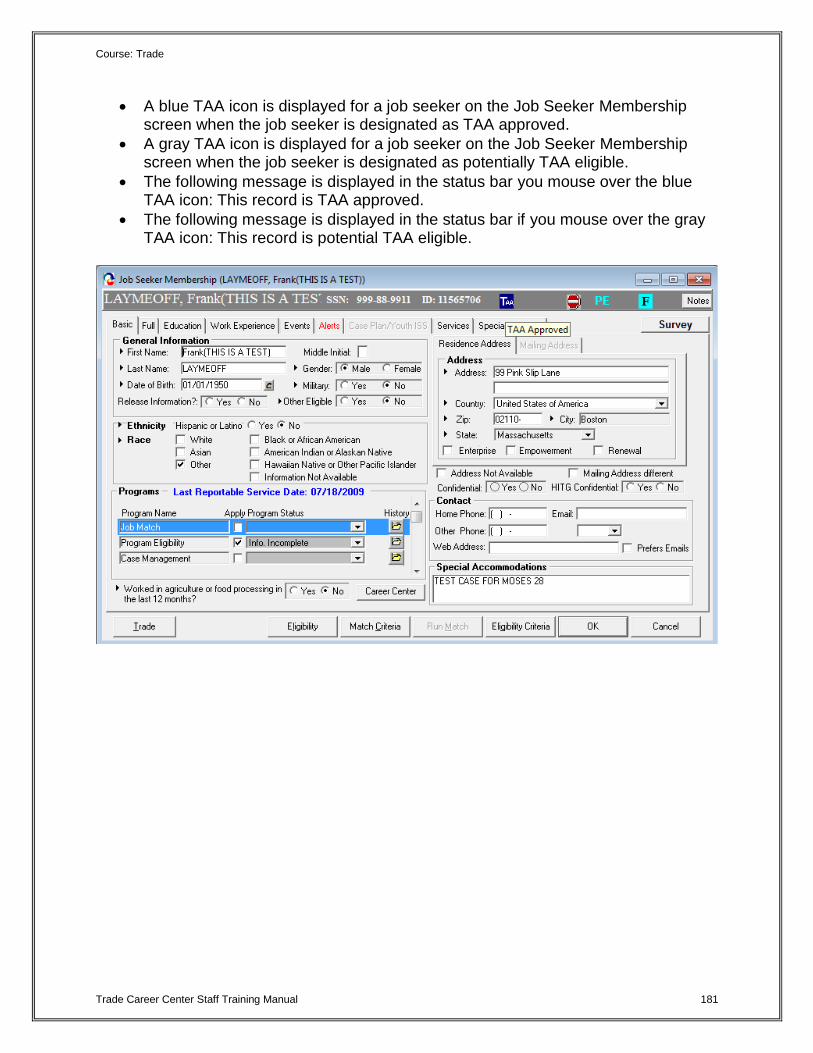
Course: Trade
Trade Career Center Staff Training Manual 181
A blue TAA icon is displayed for a job seeker on the Job Seeker Membership screen when the job seeker is designated as TAA approved.
A gray TAA icon is displayed for a job seeker on the Job Seeker Membership screen when the job seeker is designated as potentially TAA eligible.
The following message is displayed in the status bar you mouse over the blue TAA icon: This record is TAA approved.
The following message is displayed in the status bar if you mouse over the gray TAA icon: This record is potential TAA eligible.

Course: Trade
Trade Career Center Staff Training Manual 182
Identify a TAA icon for an employer
A blue TAA icon is displayed for an employer on the Employer Search screen when the employer has a trade petition on record whose status is Certified.
A gray TAA icon is displayed for an employer on the Employer Search screen when the employer has trade petition with a status of Pending or Filed.

Course: Trade
Trade Career Center Staff Training Manual 183
A blue TAA icon is displayed for an employer on the Employer header in the Employer module when the employer has a trade petition on record whose status is Certified.
A gray TAA icon is displayed for an employer on the Employer header in the Employer module when the employer has trade petition with a status of Pending or Filed.
The following message is displayed in the status bar if you mouse over the blue TAA icon: The employer is trade certified for this location.
The following message is displayed in the status bar if you mouse over the gray TAA icon: A record has been filed for TAA certification and / or is pending approval.

Course: Trade
Trade Career Center Staff Training Manual 184
Chapter 8: Word Templates
View Trade Forms
Overview MOSES generates Trade forms in Microsoft Word or PDF via the Trade Participant modules. Once information for a particular client is entered, you can click a button and generate the form in Word or PDF to print out. When MOSES generates the form, all fields on the form are populated. Security Trade Admin, Trade Staff, and Trade View Only users can click the View In Word buttons to generate the documents.
Key Process Points to Remember You should always have a signed copy of any form on file for job seekers who are part of the Trade program. Keep a hard copy of the form in the Career Center files that includes a signature of the applicant in case a Hearing takes place. After completing this lesson, you should be able to:
Generate Word Templates via the Trade Participant module
The example Templates shown in this lesson are samples of what you will see when you generate the forms in MOSES. Please note that some templates may not have data and are for demonstration purposes only.

Course: Trade
Trade Career Center Staff Training Manual 185
Generate Word Templates via the TAA Participant Module
1. Search for a job seeker
2. Click on the Trade button to bring up the Job Seeker Trade Records window. 3. Select the 1666 record and then click the Edit button to view the Application Info
tab.
4. Click the View 1666 In Word button.
5. MOSES displays the Application to Participate in the Trade Adjustment Assistance Program.
6. Close the document.

Course: Trade
Trade Career Center Staff Training Manual 186
1. After selecting the pertaining 1666 record.
2. Click the RTAA / ATAA tab.
3. Select the application you wish to view then click edit. 4. Click the View in Word button.
5. MOSES displays the Reemployment Trade Adjustment Assistance or Alternative
Trade Adjustment Assistance Individual Application (as appropriate).
6. Close the document.

Course: Trade
Trade Career Center Staff Training Manual 187
1. After selecting the pertaining 1666 record.
2. Click the Job Search/Relocation tab. 3. Select a job search record and click the Edit button. The Job Search Details
window is displayed. Click the Allowance Determination tab.
4. Click the View In Word button to generate the Job Search word document.
5. MOSES displays the Request for Job Search Allowances form.
6. Close the document.

Course: Trade
Trade Career Center Staff Training Manual 188
1. Click the View Interview Form.
2. MOSES displays the Interview Verification Form.
3. Close the document.

Course: Trade
Trade Career Center Staff Training Manual 189
1. After selecting the pertaining 1666 record.
2. Click the Job Search/Relocation tab.
3. Select a Relocation Allowance record and click the Edit button. The New
Employment Details window is displayed. Click the Allowance Determination tab.
4. Click the View Employment Verification button to generate the Relocation Allowances Employment Verification word document.
5. MOSES displays the Relocation Allowances Employment form.
6. When finished, close the document.
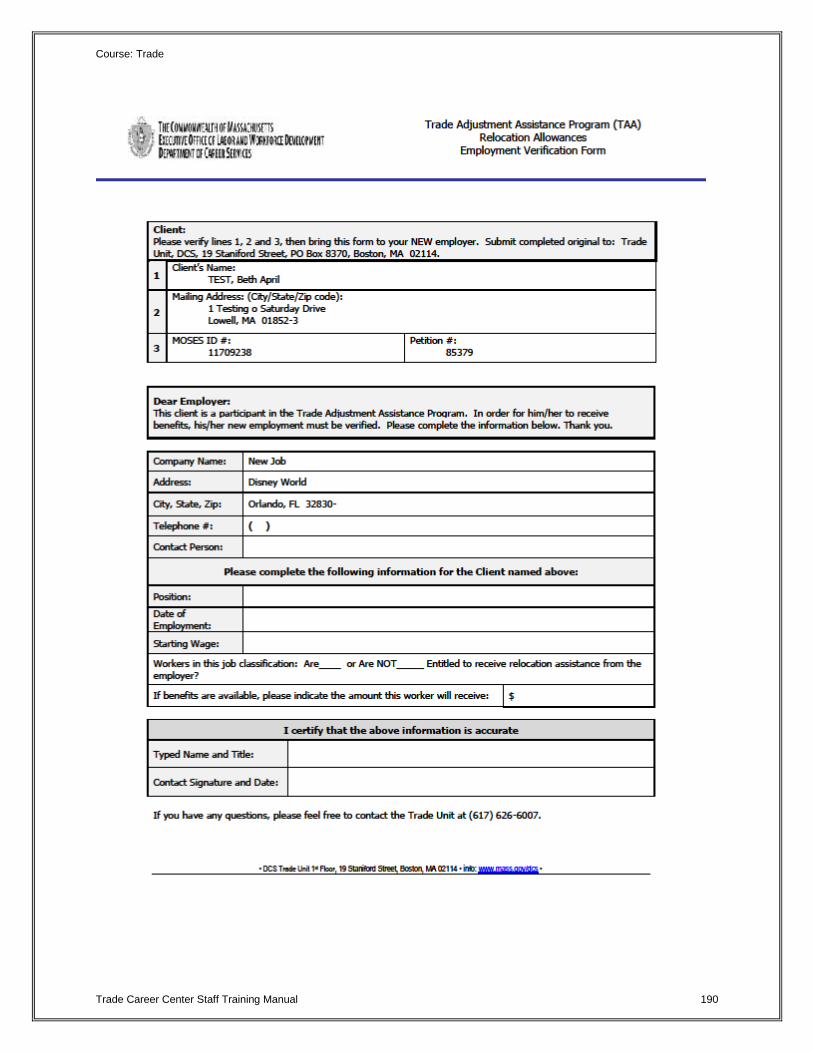
Course: Trade
Trade Career Center Staff Training Manual 190

Course: Trade
Trade Career Center Staff Training Manual 191
1. After selecting the pertaining 1666 record.
2. Click the Job Search/Relocation tab.
3. Select a Relocation Allowance record and click the Edit button. The New Employment Details window is displayed. Click the Allowance Determination tab.
4. Click the View Relocation Application button to generate the Relocation Allowances Application Request word document.
5. MOSES displays the Relocation Allowances Application Request form.
6. When finished, close the document.

Course: Trade
Trade Career Center Staff Training Manual 192

Course: Trade
Trade Career Center Staff Training Manual 193
1. After selecting the pertaining 1666 record.
2. Click the Training tab. 3. Select a VSS ID. On the Vendor Selection window, select the recommended
course.
4. Click the Edit Detail button.
5. On the Course Detail tab, click the Contract Approval button.
6. MOSES displays the Training Contract Pre-Approval form.
7. Close the document

Course: Trade
Trade Career Center Staff Training Manual 194
1. After selecting the pertaining 1666 record
2. Click the Waiver Tab. 3. Select a waiver or extension record from the list.
4. Click the View Waiver in Word button.
5. MOSES generates the Waiver Determination form.
6. Close the document.
Course: Trade
Trade Career Center Staff Training Manual 195
THAT IS ALL FOLKS. 2017 TC and the Trade Staff