T42437-UT Starcam EF Cvr - Compare...
18
® the future is friendly ® guide to getting started UTStarcom TM 6700
Transcript of T42437-UT Starcam EF Cvr - Compare...

®
the future is friendly®
guide to getting started
UTStarcomTM 6700
T42437-UT Starcam_EF_Cvr 11/9/05 2:56 PM Page 2

T42437-UT Starcom_EN 11/9/05 2:59 PM Page 1

table of contentsactivate 3
self service 3
full service 3
setting up your email 4
corporate email accounts 4
internet service provider email (POP3/IMAP4) 11
laptop internet access through your device 13
other useful settings 13
customizing the Today screen 13
synchronizing larger files / attachments
and additional email folders 13
moving email attachments to the storage card 15
support 16
T42437-UT Starcom_EN 11/9/05 2:59 PM Page 2

Thanks for choosing the UTStarcomTM 6700 wireless
PDA from TELUS Mobility.
Let’s get started!
T42437-UT Starcom_EN 11/9/05 2:59 PM Page 3

activateYou have two options to activate your handheld:
self serviceYou can activate your new device online and on your
own, at telusmobility.com/activate. Self service
activation is fast, convenient and available 24 hours
a day and 7 days a week.
full serviceFull service activation support is available by calling
1-888-552-3333 from any device other than your
UTStarcom 6700. An Activations Representative will
take you through the steps to create a 4-digit PIN
number, set up your account and guide you through the
programming of your new phone. They can also answer
basic questions about your rate plans and features.
Before you call, make sure you have your phone turned
on and handy. Service is available 8 am to 8 pm
Monday through Friday and 12 pm to 8 pm Saturday
and Sunday EST.
3
T42437-UT Starcom_EN 11/9/05 2:59 PM Page 4

setting up your emailYou can configure your handheld email with: your company’s Microsoft
Exchange Server, or your own personal POP3/IMAP
email account.
(a) Corporate email accounts (Microsoft Exchange 2003 required):
Please contact your email administrator to obtain the following
information before proceeding with configuration of Exchange
ActiveSync client:
User name (network account):
Password (network account):
Server name:
Domain:
SMS address (your 10 digit phone number):
SSL (Secure Sockets Layer) connection (if applicable) Yes or No:
4
T42437-UT Starcom_EN 11/9/05 2:59 PM Page 5

1. Tap the clock icon to modify the time zone, time and date.
Tap OK and then Yes to Save Changes to Clock Settings.
2. On the Today screen, tap Start, tap Programs, tap ActiveSync, tap on
Menu select Add Server Source (or Configure Server).
5
T42437-UT Starcom_EN 11/9/05 2:59 PM Page 6
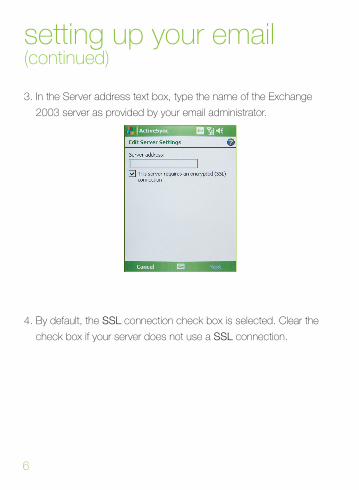
setting up your email(continued)
3. In the Server address text box, type the name of the Exchange
2003 server as provided by your email administrator.
4. By default, the SSL connection check box is selected. Clear the
check box if your server does not use a SSL connection.
6
T42437-UT Starcom_EN 11/9/05 2:59 PM Page 7

5. Tap Next and enter the following information:
� In the User name box, enter the user name for the account to
be synchronized.
� In the Password box, enter the password for the account to
be synchronized.
� In the Domain box, enter the domain provided by your email
administrator.
� By default, the Save password check box is not selected. Please
select it so that you do not have to type your password each
time you synchronize with the server and to enable notification-
activated (“always up-to-date”) synchronization with the server.
� Tap Next.
7
T42437-UT Starcom_EN 11/9/05 2:59 PM Page 8

setting up your email(continued)
6. By default, Contacts, Calendar, E-mail & Tasks are selected for
synchronization. De-select each type of data you do not wish
to synchronize.
7. Tap Finish and then tap Sync to start synchronization.
� After your first synchronization an ActiveSync message will appear
prompting you to use the “Always up to date feature” to receive
8
T42437-UT Starcom_EN 11/9/05 2:59 PM Page 9

your calendar updates/emails as and when they arrive. Select Yes.
� You will then be taken to the Schedule screen, where you can set
your synchronization preferences. This is the time between
network synchronizations. The default is set to 10 minutes but you
can adjust the schedule to suit your needs. If you select As Items
Arrive (same as “Always up to date feature”) and tap OK, then
you will be prompted to enter the device address. Tap OK.
9
T42437-UT Starcom_EN 11/9/05 2:59 PM Page 10

setting up your email(continued)
� Select TELUS from under the Service Provider field.
� Ensure your 10 digit mobile phone number is in the Phone
number for this device field. Note: Generally your mobile phone
will self-populate but you will need to validate.
� Tap OK to return to the ActiveSync screen.
10
T42437-UT Starcom_EN 11/9/05 2:59 PM Page 11
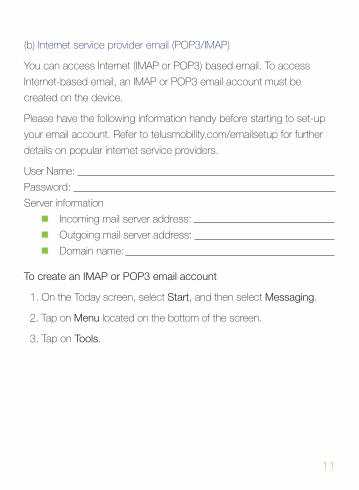
(b) Internet service provider email (POP3/IMAP)
You can access Internet (IMAP or POP3) based email. To access
Internet-based email, an IMAP or POP3 email account must be
created on the device.
Please have the following information handy before starting to set-up
your email account. Refer to telusmobility.com/emailsetup for further
details on popular internet service providers.
User Name:
Password:
Server information
� Incoming mail server address:
� Outgoing mail server address:
� Domain name:
To create an IMAP or POP3 email account
1. On the Today screen, select Start, and then select Messaging.
2. Tap on Menu located on the bottom of the screen.
3. Tap on Tools.
11
T42437-UT Starcom_EN 11/9/05 2:59 PM Page 12

setting up your email(continued)4. Select New Account.
5. Enter your email address and select Next.
6. Your device may perform an auto configuration. This will only
take a few seconds.
7. Enter Your Name, User Name and Password.
8. Check the Save password. Tap Next.
9. Select the Account type - IMAP4 or POP3. If your ISP is
recognized, the Name field will auto populate. Tap Next.
10. Enter the Incoming and Outgoing mail server address. If your ISP is
recognized this may auto-populate. Enter a Domain if applicable.
11. When you have completed the steps, click Finish. You have
successfully set up your POP3/IMAP4 email account.
12
T42437-UT Starcom_EN 11/9/05 2:59 PM Page 13

laptop internet accessthrough your deviceFor set up instructions please refer to the UTStarcom 6700 user
manual Using Wireless Modem, page 76. Refer to
telusmobility.com/ppc6700 for details on our email & web rate plans.
other useful settingscustomizing the Today screenTo customize the information you want displayed:
� On the Today screen tap Start > Settings > Personal tab >
Today > Items tab.
� Select the information you want displayed on the Today screen.
� To customize the information further, select an information type,
and then tap Options (not available for all information types).
synchronizing larger files / attachmentsand additional email foldersYou can specify the number of messages you want copied to the
device, the maximum size of the messages to be copied and the size
attachments to be downloaded. You must load and launch the
13
T42437-UT Starcom_EN 11/9/05 2:59 PM Page 14

other useful settings(continued)
ActiveSync Software on your Personal computer to do this.
� Place your UTStarcom in the cradle attached to your PC.
� On the ActiveSync of your computer screen tap Tools > Options >
under Exchange Server, highlight E-mail and tap on Settings. You
can now specify the number of days you want synchronized with
the device, the size of the messages to be copied and whether
attachments should be downloaded if they are below a certain size.
By default only messages from the Outlook® Inbox folder are
copied to your device. Messages in other email folders in Outlook®
are synchronized only if the folders have been selected for
synchronization on your device. If you would like to synchronize
sub-folders follow these steps:
� On the ActiveSync screen tap Tools > Options > under Exchange
Server, highlight E-mail and tap Settings then click on Folders.
� Select the folders you want to synchronize and tap OK.
The folders selected will be updated at the next scheduled
synchronization.
14
T42437-UT Starcom_EN 11/9/05 2:59 PM Page 15

moving email attachments to the storage card
� Insert a mini SD Storage Card in the accessories slot located at
the top of your device.
� Tap Start > Messaging > Menu > Tools > Options
� Select the Storage tab, tap Store attachments on storage card
then tap OK. All existing attachments will be moved to the storage
card and new attachments will automatically be stored on the
storage card. Click OK.
15
T42437-UT Starcom_EN 11/9/05 2:59 PM Page 16

16
supportIf you have any questions about the set-up of your handheld, rate
plans, or billing please visit us at telusmobility.com/PPC6700 or
contact us at 1-866-771-7292.
© 2005 TELUS Mobility. © 2005 UTStarcom Personal Communications LLC.All rights reserved. UTStarcom is a registered trademark of UTStarcom, Inc.and its subsidiaries.
T42437-UT Starcom_EN 11/9/05 2:59 PM Page 17